
UX-S77 - Audio System JVC - Free user manual and instructions
Find the device manual for free UX-S77 JVC in PDF.

| Product type | Audio system |
| Brand | JVC |
| Model | UX-S77 |
| Color | Black |
| Player type | DVD, CD, VCD |
| Supported audio formats | CD-DA, MP3, WMA |
| Supported video formats | DVD-Video, VCD, JPEG |
| Additional functions | Image adjustments (gamma, brightness, contrast, saturation, hue, sharpness) |
| Output power | 2x 15 W RMS |
| Number of speakers | 2 (stereo) |
| Dimensions (W x H x D) | 280 x 360 x 300 mm |
| Weight | 4.5 kg |
| Power supply | 220-240 V, 50/60 Hz |
| Power consumption | 30 W |
| Connectivity | Auxiliary input (3.5 mm jack) |
| Antenna type | Wired FM antenna |
| Care and cleaning | Clean with a soft, dry cloth. Do not use solvents. |
| Safety | Do not expose to moisture, shocks, or extreme temperatures. |
| Spare parts and repairability | Contact an authorized JVC service center for spare parts. |
| General information | User manual and instructions available in PDF format. |
Frequently Asked Questions - UX-S77 JVC
User questions about UX-S77 JVC
0 question about this device. Answer the ones you know or ask your own.
Ask a new question about this device
Download the instructions for your Audio System in PDF format for free! Find your manual UX-S77 - JVC and take your electronic device back in hand. On this page are published all the documents necessary for the use of your device. UX-S77 by JVC.
USER MANUAL UX-S77 JVC
—Consists of CA-UXS77 and SP-UXS77
SP-UXS77 CA-UXS77
SP-UXS77, CA-UXS77


INSTRUCTIONS
JaaJI JaaJIaI JaaJIaI
Warnings, Cautions and Others
s
Sds
CAUTION-STANDBY/ON O/I button!
Disconnect the mains plug to shut the power off completely (all lamps and indications go off). The STANDBY/ON /1 button in any position does not disconnect the mains line.
- When the unit is on standby, the STANDBY/ON lamp lights in red.
- When the unit is turned on, the STANDBY/ON lamp lights in green.
The power can be remote controlled.
CAUTION
To reduce the risk of electrical shocks, fire, etc.:
1. Do not remove screws, covers or cabinet.
2. Do not expose this appliance to rain or moisture.
CAUTION
- Do not block the ventilation openings or holes. (If the ventilation openings or holes are blocked by a newspaper or cloth, etc., the heat may not be able to get out.)
- Do not place any naked flame sources, such as lighted candles, on the apparatus.
- When discarding batteries, environmental problems must be considered and local rules or laws governing the disposal of these batteries must be followed strictly.
- Do not expose this apparatus to rain, moisture, dripping or splashing and that no objects filled with liquids, such as vases, shall be placed on the apparatus.
!STANDBY/ON OI/
Lk jll jc a lyg Sll lal ll Jl jn jn a lyg Sll alll sll gjil
Jai/1jaiill jaiiyj Jia.(olilullg alall J5e
JGLJIe JcIaIyIeIyIeIyIeIySTANDBY/ON 11
Jauuill Jauuuiuai juii. Jauuill Jauuuiuuiuui uuiuuiuuiuuiuuiuuiuuiuuiuuiuuiuuiuuiuuiuuiuuiuuiuuiuuiuuiuuiuuiuuiuuiuuiuuiuuiuuiuuiuuiuuiuuiuuiuuiuuiuuiuuiuuiuuiuuiuuiuuiuuiuuiuuiuuiuuiuuiuuiuuiuuiuuiuuuuuuuuuuuuuuuuuuuuuuuuuuuuuuuuuuuuuuuuuuuuuuuuuuuuuuuuuuuuuuuuuuuuuuuuuuuuuuuuuuuuuuuuuuuuuuuuuuuuuuuuuuuuuuuuuuuuuuuuuuuuuuuuuuuuuuuuuuuuuuuuuuuuuuuuuuuuuuuuuuuuuuuuuuuuuuuuuuuuuuuuuuuuuuuuuuuuuuUU
Jusill Jusuyl A. 1, Jusuull Jusll Jusll JusuL oie
STANDBY/ON
a a a a a a a a a a a a a a a a a a a
1
a1jai jia bixi jie 2
a a a a a a a a a a a a a a a a a a a
aJyI JyI JyI JyI JyI JyI JyI JyI JyI JyI
(二)二次函数
aill jia aigka yjua
14.11 1c
Jie 1
aal llll allll lalalalalalalalal
a a
11 11 11 11 11 11 11 11 11 11
Jb jIgssy 1 Uy Jgssy 1 g
jLl 1
!STANDBY/ON 0/1 a.s--b.
()
STANDBY/ON 01 .
15
STANDBY/ON
STANDBY/ON 1
.251 100010001000
blicl
0g jSjSjSjSjSjSj
S_ OBC = 12 · CO · BC = 12 × CD × 5
1
bolo
S OBC = S ABC + S_ BOC
2gduo 1000
(.)
jol (s) jn jn jn jn jn jn jn jn
.
a 5
2.5 1000
()
S_ OBC = 12 · CO · BC = 12 × CD × 5
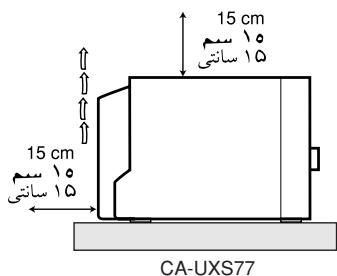
Caution: Proper Ventilation
To avoid risk of electric shock and fire, and to prevent damage, locate the apparatus as follows:
- Front:No obstructions and open spacing.
- Sides/ Top/ Back:No obstructions should be placed in the areas shown by the dimensions below.
- Bottom: Place on the level surface. Maintain an adequate air path for ventilation by placing on a stand with a height of 10 cm or more.


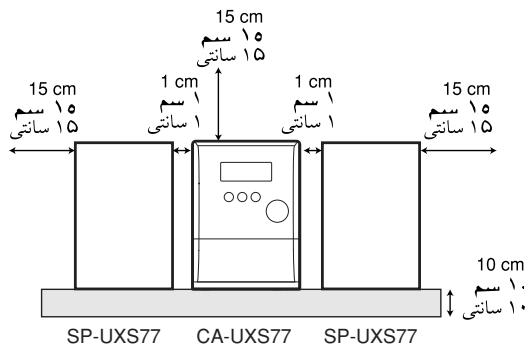
Front view
aolol aol
Side view
1
IMPORTANT FOR LASER PRODUCTS
- CLASS 1 LASER PRODUCT
- CAUTION: Do not open the top cover. There are no user serviceable parts inside the Unit; leave all servicing to qualified service personnel.
- CAUTION: Visible and invisible laser radiation when open and interlock failed or defeated. Avoid direct exposure to beam.
- REPRODUCTION OF LABEL: CAUTION LABEL, PLACED INSIDE THE UNIT.
auii iiaai 10
(20 1
e 1
yoluLcI Lgao yll Jlae gue jil:glu
ailllll llll lal
jJyI yIyIyIyIyIyIyIyIyIyIyIyIyIyIyIyIyIy
a
gblw jj gdi aaiu 10000000000000000000000000000000000000000000000000
1.25
1 435
CAUTION:Visible and invisible laser radiation when open and interlock failed or defeated. AVOID DIRECT EXPOSURE TO BEAM. (e)
How to Read This Manual 2
Getting Started 3
Step 1: Unpack 3
Step 2: Prepare the Remote Control. 3
Step 3: Hook Up. 4
Changing the Scanning Mode 7
Before Operating the System 8
Playable Disc Types. 8
Parts Index 9
Display Indicators 10
Daily Operations—Playback 12
Listening to the Radio 13
Playing Back a Disc 14
Playing Back a Tape. 16
Daily Operations—Sound&Other Adjustments .... 17
Adjusting the Volume 17
Adjusting the Sound. 17
Presetting Automatic DVD Sound Increase Level. 18
Adjusting the Audio Input Level. 18
Changing the Display Brightness 18
Changing the Picture Tone. 18
Setting the Clock 19
Turning Off the Power Automatically 20
Unique DVD/VCD Operations 21
Selecting the Sound Track. 21
Selecting the Subtitle Language 22
Selecting the View Angle 22
Playing Back a Bonus Group 22
Selecting Browsing Still Pictures 23
Special Effect Playback. 23
Advanced Disc Operations 24
Programming the Playing Order—Program Play 24
Playing at Random—Random Play 25
Playing Repeatedly 26
Prohibiting Disc Ejection—Child Lock 26
On-Screen Disc Operations 27
On-screen Bar Information. 27
Operations Using the On-screen Bar. 28
Operations on the CONTROL Screen 30
Advanced Tape Operations 32
Recording on a Tape 32
Synchronized Disc Recording 33
Timer Operations 35
Setting the Timer. 35
Setup Menu Operations 37
Operating Procedure 37
■ LANGUAGE Setup Menu 38
■ PICTURE Setup Menu 38
■ AUDIO Setup Menu 39
OTHERS Setup Menu 40
Restricting the Review—Parental Lock. 41
Additional Information 43
Learning More about This System 43
Maintenance 45
Troubleshooting 46
Language Code List 47
Country/Area Codes List. 48
DVD OPTICAL DIGITAL OUT Signals 49
Specifications 50
Introduction
Precautions
Installation
- Install in a place which is level, dry and neither too hot nor too cold—between 5^ and 35^ .
- Install the System in a location with adequate ventilation to prevent internal heat buildup in the System.

DO NOT install the System in a location near heat sources, or in a place subject to direct sunlight, excessive dust or vibration.
- Leave sufficient distance between the System and the TV.
- Keep the speakers away from the TV to avoid interference with TV.
Power sources
- When unplugging the System from the wall outlet, always pull on the plug, not the AC power cord.

DO NOT handle the AC power cord with wet hands.
Moisture condensation
Moisture may condense on the lenses inside the System in the following cases:
After starting to heat the room
- In a damp room
- If the System is brought directly from a cold to a warm place.
Should this occur, the System may malfunction. In this case, leave the System turned on for a few hours until the moisture evaporates, unplug the AC power cord, then plug it in again.
Internal heat
- A cooling fan is mounted on the rear panel to prevent heat buildup inside the unit.

For safety, observe the following carefully:
- Make sure there is good ventilation around the unit. Poor ventilation could overheat and damage the unit.
- DO NOT block the cooling fan and the ventilation openings or holes. If they are blocked by a newspaper or cloth, etc., the heat may not be able to get out.
Others
- Should any metallic object or liquid fall into the System, unplug the AC power cord and consult your dealer before operating any further.

DO NOT disassemble the System since there are no user serviceable parts inside.
- If you are not going to operate the System for an extended period of time, unplug the AC power cord from the wall outlet.
If anything goes wrong, unplug the AC power cord and consult your dealer.
How to Read This Manual
To make the explanations in this manual as simple and easy-to-understand as possible, we have adapted the following methods:
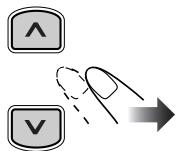
- Button and control operations are explained as listed in the table below. In this manual, the operations using the remote control is mainly explained; however, you can use the buttons and controls on the main unit if they have the same (or similar) name and marks.
- Some related tips and notes are explained later in the sections "Learning More about This System" and "Troubleshooting," but not in the same section explaining the operations. If you want to know more about the functions, or if you have a doubt about the function, go to these sections and you will find your answer there.
| Indicates that you press the button briefly. | |
| Indicates that you press the button briefly and repeatedly until an option you want is selected. | |
| Indicates that you press one of the buttons. | |
| 2 sec. | Indicates that you press and hold the button for a specified period. ·The number inside the arrow indicates the period of press (in this example, 2 seconds). ·If no number is inside the arrow, press and hold until the entire procedure is complete or until you get a result you want. |
| Indicates that you turn the control toward the specified direction(s). |
| Remote ONLY | Indicates that this operation is only possible using the remote control. |
| Main Unit ONLY | Indicates that this operation is only possible using the buttons and controls on the main unit. |
Getting Started
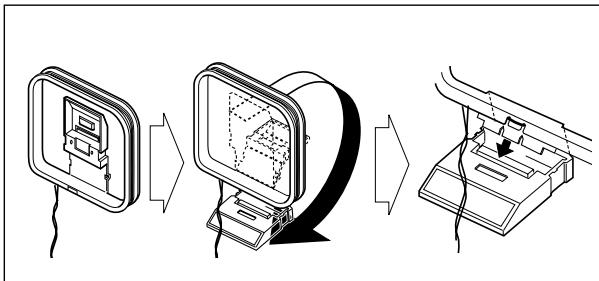
Step 1: Unpack the package and check the accessories.
Step 2: Prepare the remote control.

Step 3: Hook up the components such as AM/FM antennas, speakers, etc. (see pages 4 to 7).
Finally plug the AC power cord.
Now you can operate the System.
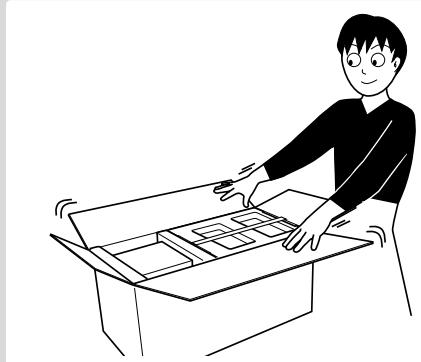
Step 1: Unpack
After unpacking, check to be sure that you have all the following items. The number in parentheses indicates the quantity of each piece supplied.
FM antenna (1)
- AM loop antenna (1)
- Remote control (1)
Composite video cord (1)
- Batteries (2)
- AC plug adaptor (1)
If any item is missing, consult your dealer immediately.
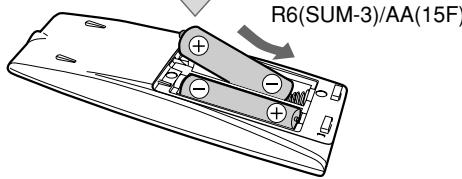
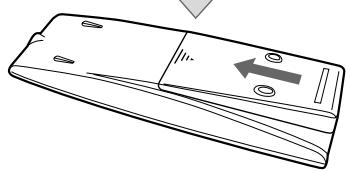
Step 2: Prepare the Remote Control
Insert the batteries into the remote control by matching the polarity (+ and -) correctly.

1
2
3

DO NOT use an old battery together with a new one.
- DO NOT use different types of batteries together.
- DO NOT expose batteries to heat or flame.
- DO NOT leave the batteries in the battery compartment when you are not going to use the remote control for an extended period of time. Otherwise, the remote control will be damaged from battery leakage.
Step 3: Hook Up
If you need more detailed information, see pages 6 and 7.
Illustrations of the input/output terminals below are typical examples.
When you connect other components, refer also to their manuals since the terminal names actually printed on the rear may vary.
Turn the power off to all components before connections.
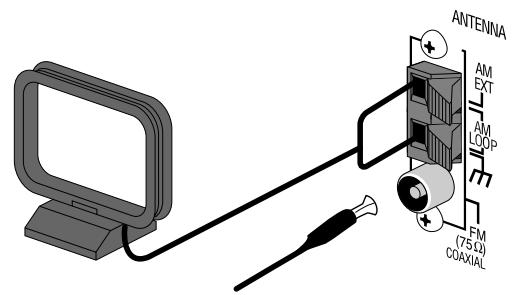
AM loop antenna (supplied)
Turn it until the best reception is obtained.
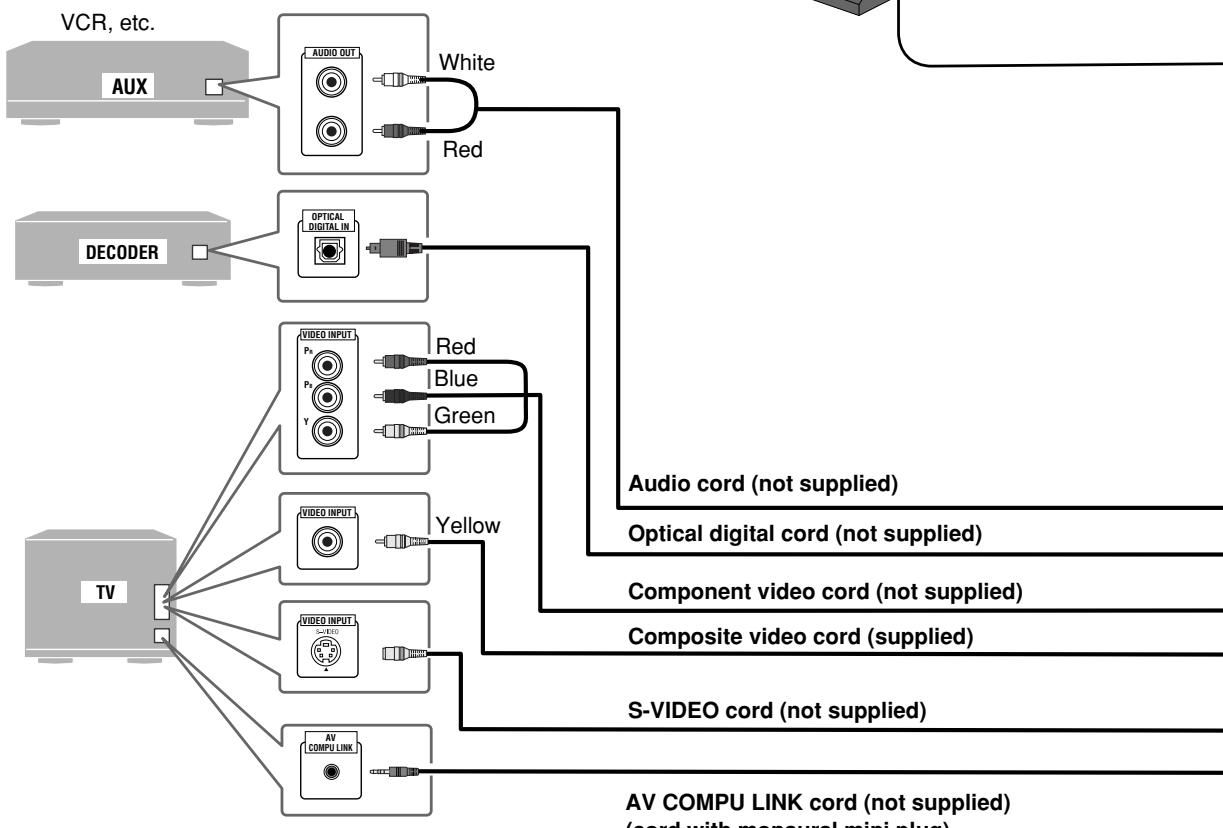
AV COMPU LINK cord (not supplied) (cord with monaural mini plug)
- For details, see "To connect the AV COMPU LINK cords" on page 7.
To a wall outlet
Plug the AC power cord only after all connections are complete.
- If the wall outlet does not match the AC plug, use the supplied AC plug adaptor.
For better FM/AM reception
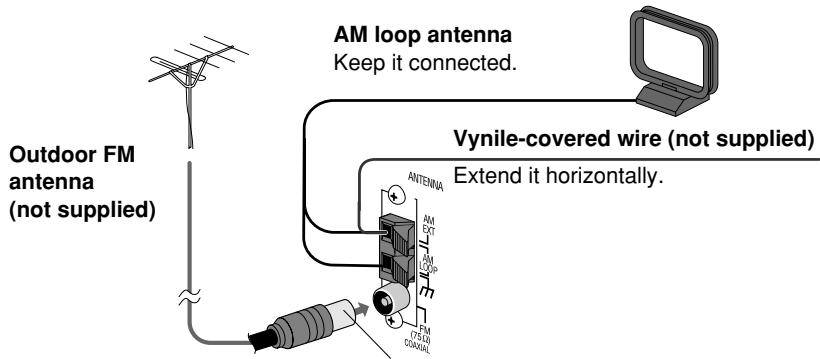
Disconnect the supplied FM antenna, and connect to an outdoor FM antenna using a 75 wire with coaxial type connector (IEC or DIN45325).
FM antenna (supplied)

To assemble and connect the AM loop antenna To assemble the AM loop antenna
To connect the AM loop antenna

- If the AM loop antenna wire or speaker cords are covered with vinyl, remove the vinyl to expose the tip of the antenna by twisting the vinyl.
- Make sure the antenna conductors do not touch any other terminals, connecting cords and power cord. Also, keep the antennas away from metallic parts of the System, connecting cords, and the AC power cord. This could cause poor reception.
To connect the speaker cords
Connect the right speaker to the RIGHT terminals, and the left speaker to the LEFT terminals.

When connecting the speaker cords, match the polarity of the speaker terminals:
- For LOW terminals: Red cord to (+) and black cord to (-).
- For HIGH terminals: Grey cord to (+) and blue cord to (-)
The speakers are magnetically shielded to avoid color distortions on TVs. However, if not installed properly, it may cause color distortions. So, pay attention to the following when installing the speakers.
- When placing the speakers near a TV set, turn off the TV's main power switch or unplug it before installing the speakers.
Then wait at least 30 minutes before turning on the TV's main power switch again.
Some TVs may still be affected even though you have followed the above. If this happens, move the speakers away from the TV.

DO NOT connect more than one speaker to each terminal.
- DO NOT allow the conductor of the speaker cords to be in touch with the metallic parts of the System.
To connect the AV COMPU LINK cords
This system allows you to use JVC's TV with simple operations; by starting playing back a disc, the TV automatically turns on and changes the input mode to the appropriate position so that you can view the playback picture.
To use AV COMPU LINK, you need to connect the System and the TV by using a cord with monaural mini-plugs (not supplied) in addition to the video input/output connection through the COMPONENT jacks, S-VIDEO jack or VIDEO (composite) jack on the rear.

To connect digital audio
Before connecting optical digital cord, remove the protective cap from the DVD OPTICAL DIGITAL OUT terminal.
To set the video output selector
You can select the video output to match it to the color system of your TV.

NTSC: For an NTSC TV or Multi-color system TV.
PAL: For a PAL TV or Multi-color system TV.
Adjusting the Voltage Selector
Use a screwdriver to slide the voltage selector so that the voltage marker is pointing at the same voltage as where you are plugging in the unit. (See also the back cover page.)


DO NOT plug in before setting the voltage selector on the rear of the unit and all connection procedures are complete.
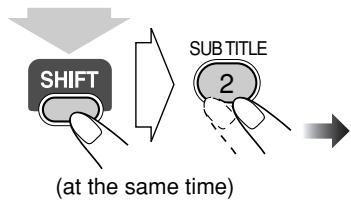
Changing the Scanning Mode

This System supports progressive scanning.
If you connect a progressive TV through the COMPONENT jacks, you can enjoy a high quality picture from the built-in DVD player by selecting "PROGRE."

(at the same time)
PROGRE
Progressive scanning. For a progressive TV.
INTER
Interlaced scanning. For a conventional TV.
Before Operating the System
Playable Disc Types
This unit has been designed to play back the following discs:
| Disc Type | Mark (Logo) | Video Format | Region Code* Number |
| DVD Video | DVD VIDEO TM DVD VIDEO | NTSC or PAL | 2 or ALL |
| DVD Audio | DVD AUDIO TM DVD AUDIO/VIDEO | ||
| Video CD (VCD) | COMPACT 015G DIGITAL VIDEO Video CD | — | |
| Super Video CD (SVCD) | COMPACT 015G SUPER VIDEO VIDEO | — | |
| Audio CD | COMPACT 015G DIGITAL AUDIO | — | — |
| CD-R | The System can play back CD-R or CD-RW recorded in the Audio CD, Video CD, SVCD, MP3, WMA, and JPEG formats. | ||
| CD-RW | |||
| DVD-R | The System can play back DVD-R or DVD-RW recorded in the video format. | ||
| DVD-RW | |||
In addition to the above discs, this system can play back audio data recorded on CD Text, CD-G (CD Graphics), and CD-Extra.
- The following discs cannot be played back: DVD-ROM, DVD-RAM, DVD+R, DVD+RW, CD-I (CD-I Ready), CD-ROM, Photo CD, etc. Playing back these discs will generate noise and damage the speakers.
- In this manual, "file" and "track" are interchangeably used for MP3/WMA/JPEG operations.
* Note on Region Code
DVD players and DVDs have their own Region Code numbers. This System can play back only DVDs recorded with the NTSC or PAL color system whose Region Code numbers including "2."
EX.:


If a DVD with the improper Region Code numbers is loaded, "RGN ERR (REGION CODE ERROR)" appears on the display and playback will not start.
DVD Video—digital audio formats
The System can play back the following digital audio formats.
- Linear PCM: Uncompressed digital audio, the same format used for CDs and most studio masters.
- Dolby Digital: Compressed digital audio, developed by Dolby Laboratories, which enables multi-channel encode to create the realistic surround sound.
- DTS (Digital Theater Systems): Compressed digital audio, developed by Digital Theater Systems, Inc., which enables multi-channel like Dolby Digital. As the compression ratio is lower than for Dolby Digital, it provides wider dynamic range and better separation.
When playing a multi-channel encoded DVD, the System properly converts these multi-channel signals into 2 channels, and emits the downmixed sound from the speakers.
- To enjoy the powerful sound of these multi-channel encoded DVDs, connect a proper decoder or an amplifier with a proper built-in decoder to the digital output terminal on the rear.
IMPORTANT: Before playing a disc, make sure of the following...
- Turn on the TV and select an appropriate input mode on the TV to view the pictures or on-screen displays on the TV screen.
- For disc playback, you can change the initial setting to your preference. See "Setup Menu Operations" on page 37.
If “ ” appears on the TV screen when you press a button, the disc cannot accept the operation you have tried to do, or data required for that operation is not recorded on the disc.
- Manufactured under license from Dolby Laboratories. "Dolby", "Pro Logic", "MLP Lossless", and the double-D symbol are trademarks of Dolby Laboratories.
- "DTS" and "DTS2.0+DIGITAL OUT" are registered trademarks of Digital Theater Systems, Inc.
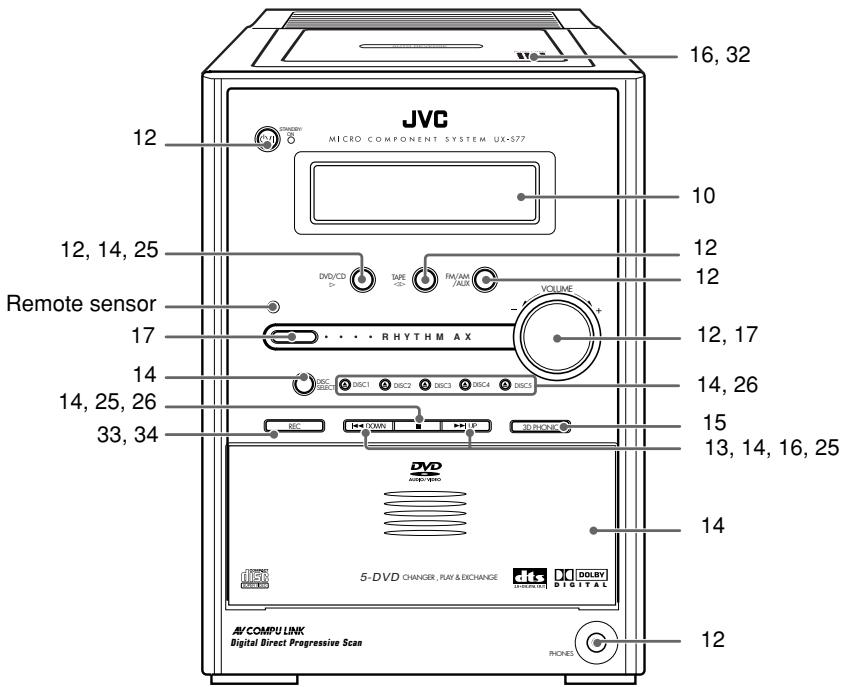
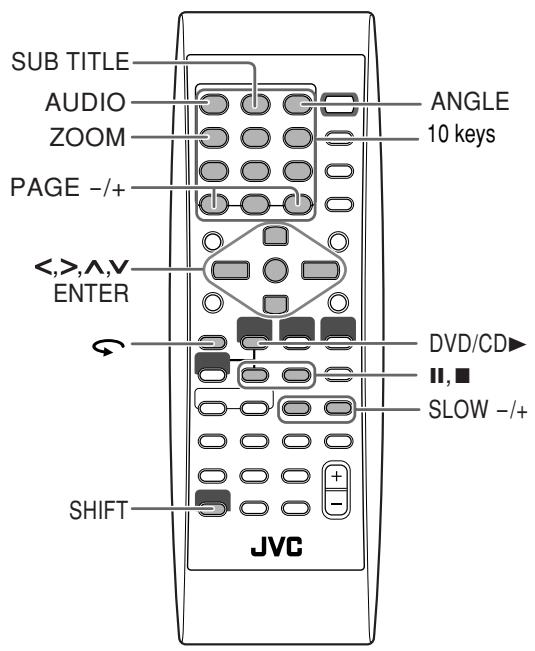
Parts Index
Refer to the pages to see how to use the buttons and controls.

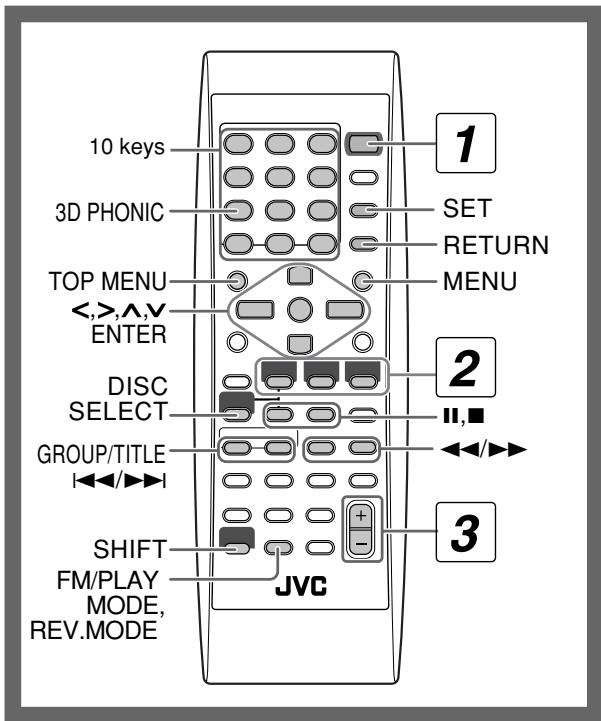
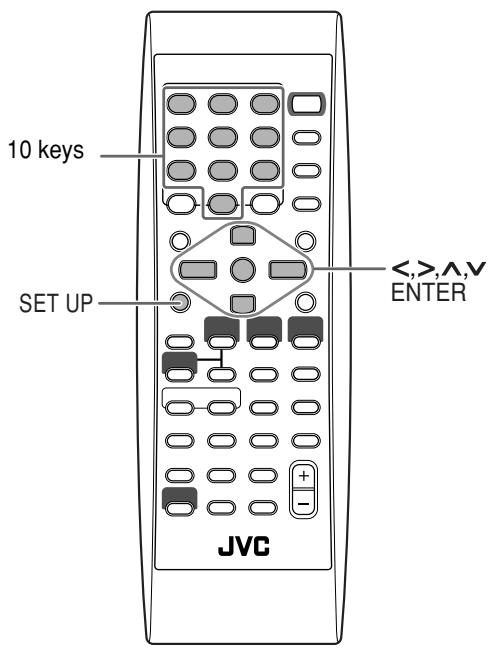
Remote control
Main unit
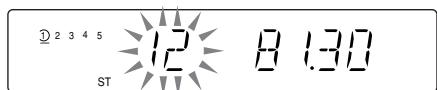
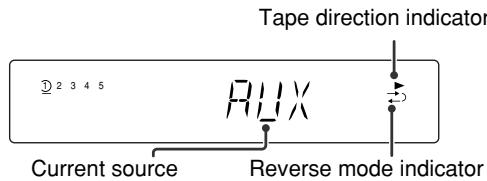
Display Indicators
The indications on the display teach you a lot of things while you are operating the System. Before operating the System, be familiar with when and how the indicator illuminates on the display.
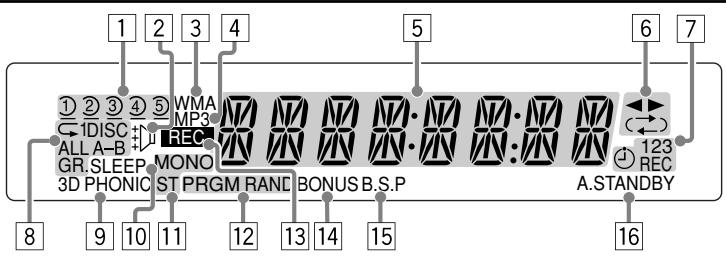
Disc tray indicators
1-5: Disc tray number indicators.
- (tray indicator):
-Lights when the disc is detected.
-Flashes while playing back a disc.
- Goes off when there is no disc in the tray.
- (disc indicator): lights below when the tray indicator indicates the current selected disc.
2 RHYTHM AX indicator
- Lights when RHYTHM AX is activated (see page 17).
3 WMA indicator
- Lights when the current track is recorded in WMA format.
4 MP3 indicator
- Lights when the current track is recorded in MP3 format.
5 Main display
- While listening to radio: band (or preset number) and station frequency appear.
While selecting tape: "TAPE" appears. - While selecting "AUX": "AUX" appears.
- While playing a disc: see "Indications on the main display while operating a disc" on page 11.
6 Tape operation indicators
- (tape direction):
-Lights to indicate the current tape running direction. - Flashes slowly during playback and recording.
- Flashes quickly while rewinding a tape.
()(Reverse mode)
-() : tape play continues endlessly.
- : tape automatically reverses once.
- : tape play stops at the end of one side.
7 Timer indicators
- : lights when Daily Timer or Recording Timer stands by; flashes while working.
- 1/2/3: lights up when a Daily Timer (1, 2, or 3) stands by; flashes while setting or working.
- REC: lights when the Recording Timer stands by; flashes while setting or working.
Repeat mode indicators
-
: lights when Repeat mode is activated.
1 DISC ALL A-B GR.: -
1: lights when One Track Repeat is activated.
- 1DISC: lights when One Disc Repeat is activated.
- ALL: lights when All Disc Repeat is activated.
-A-B: lights when A-B Repeat is activated.
-GR.: lights when Group Repeat is activated.
93D PHONIC indicator
- Lights when 3D PHONIC is activated (see page 15).
10 SLEEP indicator
- Lights when the Sleep Timer is activated.
FM reception indicators
- MONO: lights when FM reception mode is monaural.
- ST (stereo): lights while an FM stereo station with sufficient signal strength is tuned in.
12 Disc operation indicators
- PRGM (program): lights when Program Play mode is activated.
- RAND (random): lights when Random Play mode is activated
13REC indicators
- Lights while recording.
14BONUSindicator
- Lights when a DVD Audio with a bonus group is detected (see page 22).
15 B.S.P indicator
- Lights when the current disc is DVD Audio with browsable still picture (see page 23).
16A (auto).STANDBY indicator
- Lights when Auto Standby is activated.
- Flashes when disc playback stops with Auto Standby activated.
Indications on the main display while operating a disc
| While playing back a disc: | While disc play is stopped: |
| · DVD Video: Chapter no. Elapsed playing time 2 2 3 4 5 5 10 15 · By pressing DISPLAY, you can show the current title and chapter numbers for a few seconds. | · DVD Video: Total title no. 2 2 3 4 5 11 11 15 |
| · DVD Audio: Track no. Elapsed playing time 2 2 3 4 5 5 10 15 · By pressing DISPLAY, you can show the current group and track numbers for a few seconds. | · DVD Audio: Group no. Track no. |
| · Audio CD: Track no. Elapsed playing time 2 2 3 4 5 5 17 | · Audio CD: Total track no. Total playing time 2 2 3 4 5 8 17 19 |
| · SVCD/VCD: Track no. Elapsed playing time* 2 2 3 4 5 5 10 10 * “PBC” appears while playing a disc with PBC. | · SVCD/VCD: Total track no.* Total playing time 2 2 3 4 5 7 60 38 * Changes to “PBC” when stopping PBC playback. |
| · MP3/WMA: Track no. Elapsed playing time 2 2 3 4 5 MP3 5 16 10 · By pressing DISPLAY, you can show the current group and track numbers for a few seconds. | · MP3/WMA: Current group no. Current track No. 2 2 3 4 5 MP3 5 15 10 29 |
| · JPEG: Group no. File no. 2 2 3 4 5 5 16 10 · By pressing DISPLAY, you can show the current group and track numbers for a few seconds. | · JPEG: Current group no. Current file No. 2 2 3 4 5 5 16 10 29 |
- If Resume is turned "ON" (see page 40), "RESUME" appears when you stop playback (except for Audio CD and MP3/WMA/JPEG discs).
Daily Operations—Playback

In this manual, the operation using the remote control is mainly explained; however, you can use the buttons and controls on the main unit if they have the same (or similar) name and marks.
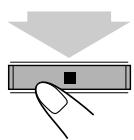
1 Turn on the power.
The STANDBY/ON lamp on the main unit lights in green.
- Without pressing STANDBY/ON / , the System turns on by pressing one of the source selecting buttons in the next step.
2 Select the source.
Playback automatically starts if the selected source is ready to start.
- If you press AUX, start playback source on the external component.
3 Adjust the volume.
4 Operate the target source as explained later.
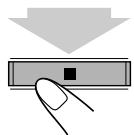
To turn off (stand by) the unit
STANDBY/ON

01
The STANDBY/ON lamp on the main unit lights in red.
- A small amount of power is always consumed even while on standby.
For private listening
Connect a pair of headphones to the PHONES jack on the main unit. The sound will no longer come out of the speakers. Be sure to turn down the volume before connecting or putting the headphones.
- Disconnecting the headphones will activate the speakers again.

DO NOT turn off (stand by) the System with the volume set to an extremely high level; Otherwise, the sudden blast of sound can damage your hearing, speakers and/or headphones when you turn on the System or start playback.
Listening to the Radio
To select the AM tuner interval spacing
Some countries space AM stations 9kHz spacing, and other countries use 10kHz spacing.
You can change the AM tuner intervals while the System is on stand by and the last selected source is AM.


(at the same time)

(at the same time)
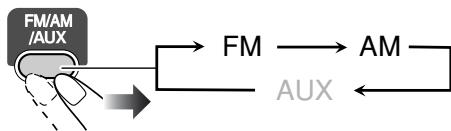
To select the band (FM or AM)

To tune in to a station
While FM or AM is selected...
| Remote control: | Main unit: |
| 2 sec. GROUP/TITLE | 2 sec. DOWN →UP |
Frequency starts changing on the display.
When a station (frequency) with sufficient signal strength is tuned in, the frequency stops changing.
- When you repeatedly press the button, the frequency changes step by step.
To stop searching manually, press either button.
If the received FM station is hard to listen


The MONO indicator lights on the display. Reception will improve though stereo effect is lost—Monaural reception mode.
To restore the stereo effect, press the button again (the MONO indicator goes off).
To preset the stations

You can preset 30 FM and 15 AM stations.
1 Tune in to a station you want to preset.
- You can also store the monaural reception mode for FM preset stations if selected.
2 Activate the preset number entry mode.

- Finish the following process while the indication on the display is flashing.
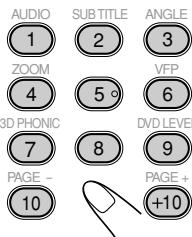
3 Select a preset number for the station you store.
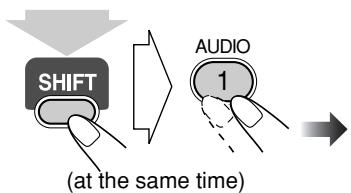
AUDIO 1
SUBTITLE ANGLE 2 3
Examples:
4
5 6
To select preset number 5, press 5.
3D PHONIC 7
DVDLEVEL 8 9
To select preset number 15, press +10 , then 5.
PAGE 10
PAGE+ +10
To select preset number 30, press +10 , +10 , then 10.
4 Store the station.


To tune in to a preset station

1 Select the band (FM or AM).
2 Select a preset number for the station you store.
- You can also use the button to select a preset station.
Playing Back a Disc
Before operating a disc, be familiar how a disc is recorded.
DVD Video comprises of "Titles" which includes "Chapters," DVD Audio/MP3/WMA comprise of "Groups" which include "Tracks," and CD/SVCD/VCD comprise of only "Tracks."
- For JPEG playback, see "Operations on the CONTROL Screen" on page 30.
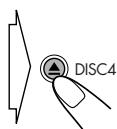
To insert a disc
You can insert a disc while playing another source.
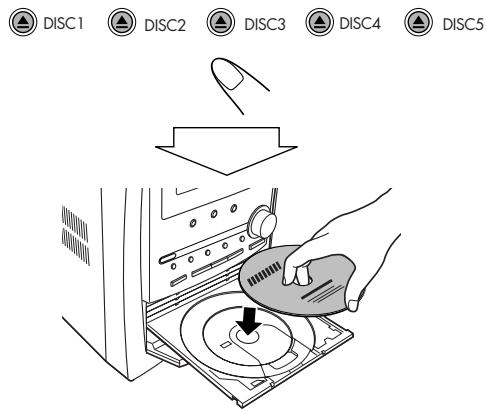
To close the disc tray, press the same again.
- When current selected disc tray open, you use DVD/CD▶ button to close disc tray and start playback (depending on how the disc is programmed internally).
- When you press for the next tray you want to place another disc onto, the first disc tray automatically closes and then next tray comes out.
| To start: | To pause: | To stop: |
| DVD/CD | To release, press DVD/CD ▶. |
- While playing DVD/SVCD/VCD: This System can store the stop point, and when you start playback again by pressing DVD/CD▶, it starts from the position where you have stopped—Resume Play. ("RESUME" appears on the display when you stop playback.)
To stop completely while Resume is activated, press twice. (To cancel Resume, see "RESUME" on page 40.)
- When operating the System, the on-screen guide icon (see the following table) appears on the TV. To deactivate the on-screen guide icons, see "ON SCREEN GUIDE" on page 40.
On-screen guide icons
- During DVD Video playback, the following icons may appear on the TV screen:
At the beginning of a scene containing multi-angle views.
At the beginning of a scene containing multi-audio sounds.
At the beginning of a scene containing multisubtitles. - The following icons will be also shown on the TV screen to indicate your current operation.
,Ⅱ,,,,
To select a disc

- When current source is not disc, press DVD/CD▶ to select the disc player as the source during "PLAY" flashing on the display.
To select a title/group

While playing...

- Group name appears for MP3/WMA discs.
To select a chapter/track
While playing...

- First time you press , you can go back to the beginning of the current chapter/track.
To locate a particular portion

While playing a disc except MP3/WMA...

- No sound comes out while searching on DVD Video/SVCD/VCD.
To return to normal playback, press DVD/CD▶.
To locate an item directly

You can select a title/chapter/track directly and start playback.
- For DVD Video, you can select a title before starting playback, while you can select a chapter after starting playback.

Examples:
To select number 5, press 5.
To select number 15, press +10 , then 5.
To select number 30, press +10 , +10 , then 10.
To use 3D Phonic
While playing...
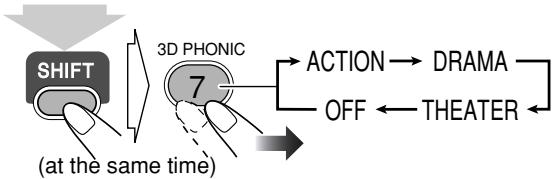
3D PHONIC ACTION
On the TV screen
| ACTION | Suitable for action movies and sports programs. |
| DRAMA | Creates natural and warm sound. Enjoy movies in a relaxed mood. |
| THEATER | Enjoy sound effects like in a major theater. |
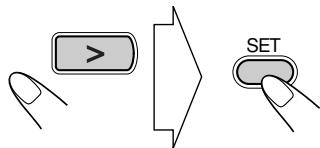
To play back using the disc menu

You can operate a disc—DVD and SVCD/VCD with Playback Control (PBC)—using the disc menu shown on the TV screen.
For DVD Video/DVD Audio:
1 Show the disc menu.

2 Select an item on the disc menu.
- With some discs, you can also select items by entering the number using the 10 keys.
For SVCD/VCD with PBC:
While playing a disc with PBC, "PBC" appears on the display.
When disc menu appears on the TV screen, select an item on the menu. Playback of the selected item starts.

Examples:
To select number 5, press 5.
To select number 15, press +10 then 5.
To select number 30, press +10 , +10 , then 10.
To move to the next or previous page of the current menu:

To return to the previous menu:

To cancel PBC

- You can also cancel PBC function by pressing the number button to select a track.
To reactivate PBC, press , then press .
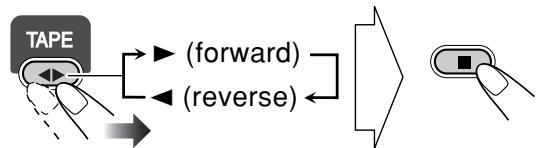
Playing Back a Tape
To insert a tape
You can play back type I tapes.
Push Insert Close
With the tape side facing outside
| To start: | To stop: |
| TAPE |
To rewind tape:

To change the tape running direction

To reverse the tape automatically

(at the same time)
| ←) | Tape is played from the forward side to the reverse side. When the reverse side is played back, playback stops. |
| (→) | Tape is automatically reversed, and playback repeats until you stop it. |
| →←) | Tape will not be reversed. When the current side of the tape reaches its end, playback stops. |
Daily Operations—Sound&Other Adjustments
Remote control


Main unit
Adjusting the Volume
You can adjust the volume level from level 0 (VOL MIN) to level 50 (VOL MAX).
| Remote control: | Main unit: |
| + VOLUME | VOLUME |
To drop the volume in a moment

To restore the volume, press again, or adjust the volume level.
Adjusting the Sound
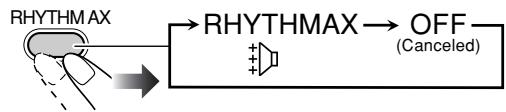
To emphasize rhythm feeling—RHYTHM AX
This function emphasizes bass attack feeling.
To adjust the tone
You can adjust the bass and treble level from -5 to +5 .
To adjust the bass

To adjust the treble

Presetting Automatic DVD Sound Increase
Level

The DVD sound is sometimes recorded at a lower level than for other discs and sources. You can set the increase level for the currently loaded DVD, so you do not have to adjust the volume every time you change the source.

| NORMAL | Original recording level. |
| MIDDLE | Output level is increased (less than “HIGH”). |
| HIGH | Output level is increased (more than “MIDDLE”). |
- Once the current DVD is ejected, this setting is canceled and set automatically to "NORMAL."
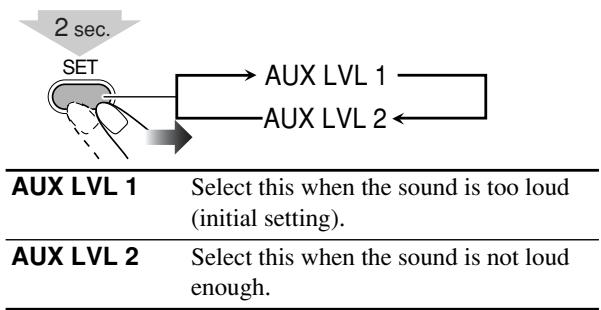
Adjusting the Audio Input Level

If the sound from the component connected to the AUX jacks is too loud or is not loud enough when changing from another source to "AUX," you can change the audio input level through the AUX jacks (without changing the volume level).
While the "AUX" is selected as a source...
Changing the Display Brightness

You can dim the display window.
| DIMMER → DIM 1 → DIM 2 → DIM OFF ← AUTO DIM ← (Canceled) | |
| DIM 1 | Dims the display. |
| DIM 2 | Erases the display illumination. |
| AUTO DIM | Erase the display illumination a few seconds after disc playback starts. · The display illuminates when playback stops. |
Changing the Picture Tone

While showing a playback picture on the TV screen, you can select the preset picture tone, or adjust it and store your own taste.
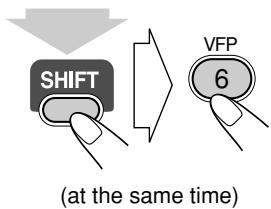
To select a preset picture tone
1 Activate VFP.
| NORMAL | |
| GAMMA | 0 |
| BRIGHTNESS | 0 |
| CONTRAST | 0 |
| SATURATION | 0 |
| TINT | 0 |
| SHARPNESS | 0 |
2 Select a preset picture tone.

| NORMAL | Normally select this. |
| CINEMA | Suitable for a movie source. |
| USER1/USER2 | You can adjust parameters and can store the settings (see page 19). |
To adjust the picture tone
1 Select "USER1" or "USER2."
- Follow steps 1 and 2 explained on page 18.
2 Select a parameter you want to adjust.
| GAMMA | Adjust if the neutral color is bright or dark (-3 to +3). |
| BRIGHTNESS | Adjust if the entire picture is bright or dark (-8 to +8). |
| CONTRAST | Adjust if the far and near positions are unnatural (-7 to +7). |
| SATURATION | Adjust if the picture is whitish or blackish (-7 to +7). |
| TINT | Adjust if the human skin color is unnatural (-7 to +7). |
| SHARPNESS | Adjust if the picture is indistinct (-8 to +8). |
3 Adjust the parameter.
4 Repeat steps 2 to 3 to adjust other parameters.
To erase the screen, press VFP again while holding SHIFT.
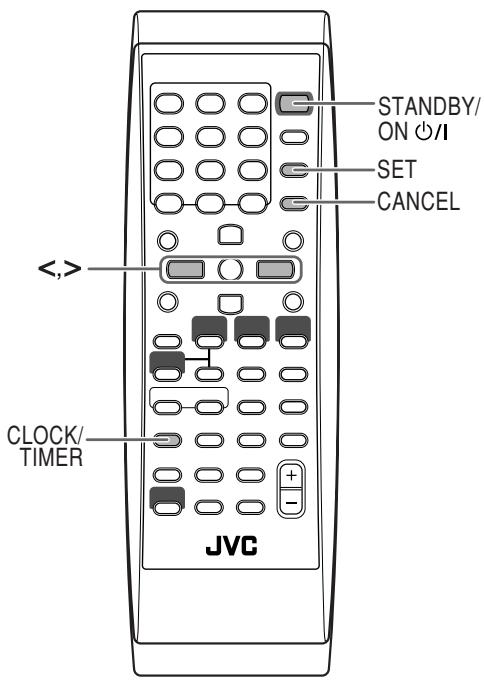
Setting the Clock

Without setting the built-in clock, you cannot use Daily Timers (see page 35) and Sleep Timer.
- To exit from the clock setting, press CLOCK/TIMER as required.
- To go back to the previous step, press CANCEL.
1 Activate the clock setting mode.


- If you have already adjusted the clock before, press the button repeatedly until the clock setting mode is selected.
2 Adjust the hour.

3 Adjust the minute.


Now the built-in clock starts working.
To check the current clock time during play

- While playing a DVD and MP3/WMA, you cannot check the current clock time (see page 11).
Turning Off the Power
Automatically Remote CNYL
To turn off the unit after playback is over—Auto Standby
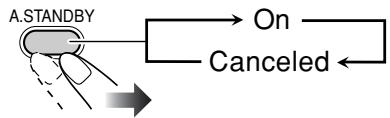
When Auto Standby is in use, the A.STANDBY indicator lights on the display.
When disc or tape play stops, the A.STANDBY indicator starts flashing. If no operation is done for about 3 minutes while the indicator is flashing, the System turns off (stands by) automatically.
- Auto Standby does not work while you are listening to radio (FM/AM) and the external component (AUX).
To turn off the unit after a certain period of time —Sleep Timer
1 Specify the time (in minutes).

2 Wait until the set time goes off.
To check the time remaining until the shut-off time

12345
SLEEP
5LEEP
1
- If you press the button repeatedly, you can change the shut-off time.
Unique DVD/VCD Operations
Remote control
Selecting the Sound Track


For DVD Video: While playing back a chapter containing audio languages, you can select the language to listen to.
For DVD Audio: While playing back a track containing audio channels, you can select the audio channel to listen to. For SVCD/VCD: When playing back a track, you can select the audio channel to play.
- You can also select the audio track using the on-screen bar (see page 27).
While playing a DVD Video...

Ex.:
While playing a DVD Audio...
Ex.:
While playing an SVCD or VCD...

ST1/ST2/ST To listen to normal stereo (2 channel) playback.
| L1/L2/L | To listen to the left audio channel. |
| R1/R2/R | To listen to the right audio channel. |
- SVCD can have 4 audio channels. Karaoke SVCD usually uses these 4 channels to record two 2-channel recordings (ST1/ST2).
Selecting the Subtitle Language

For DVD Video: While playing back a chapter containing subtitles in different languages, you can select the subtitle language to display on the TV screen.
For SVCD: While playing, you can select the subtitles even if no subtitles are recorded on the disc.
- You can also select the subtitle language using the on-screen bar (see page 27).
While playing a DVD Video...
1 Display the subtitle selection window.

2 Select the subtitle language.


Ex.:
While playing an SVCD...

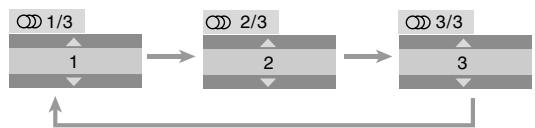
Selecting the View Angle

While playing back a chapter (of DVD Video) containing multi-view angles, you can view the same scene from different angles.
- You can also select the multi-view angles using the on-screen bar (see page 27).
While playing...

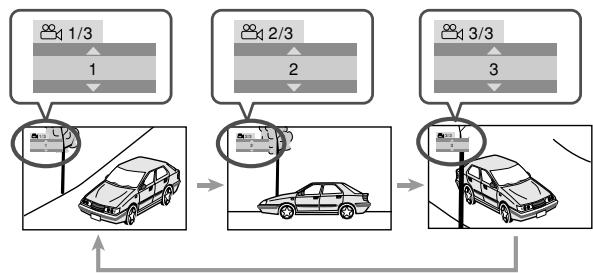
Ex.:
Playing Back a Bonus Group

Some DVD Audios have a special group called "bonus group" whose contents are not open to the public.
- To play back a bonus group, you have to enter the specific "key number" (a kind of password) for the bonus group. The way of getting the key number depends on the disc.
1 Select the bonus group.
- The bonus group is usually recorded as the last group (for example, if a disc contains 4 groups including a bonus group, "group 4" is the bonus group).
- For how to select the group, see "To select a title/group" on page 14.
2 Enter the key number.
3 Follow the interactive instructions shown on the TV screen.
To cancel the key number entry, press
Selecting Browsing Still Pictures

While playing back a track (of DVD Audio) linked to browsable still pictures (BSP), you can select the still picture (turn the page) to be shown on the TV screen.
- If a track is linked to browsable still pictures (BSP), they are usually shown in turn automatically during playback.
- You can also select the page using the on-screen bar (see page 27).
(at the same time)
Special Effect Playback

Still picture playback
| To start still picture playback: | To resume normal playback: |
| While playing... | DVD/CD |
Frame-by-frame playback
1 While playing...

Still picture playback starts.
2 Advance the still picture frame by frame.

To resume normal playback, press DVD/CD▶.
Slow-motion playback
1 While playing...

Still picture playback starts.
2 Select slow motion speed.
*Not available for SVCD/VCD.
To resume normal playback, press DVD/CD.
To replay the previous scenes (One touch replay function)
- This function is only used while playing DVD Video.

The playback position moves back 10 seconds before the current position (only within the same title).

1 While playing back....

As the number increases, magnification also increases.
2 Move the zoomed-in position.

To resume normal playback, press ZOOM repeatedly until "ZOOM OFF" appears on the TV screen.
Advanced Disc Operations
Remote control
Main unit
Programming the Playing Order—
Program Play

You can arrange the playing order of the chapters or tracks (up to 99) before you start playback.
1 Before starting playback, activate Program Play.

On the display
On the TV screen
2 Select chapters or tracks you want for Program Play.
- For DVD/MP3/WMA:
① Select a disc number.
② Select a title or group number.
③ Select a chapter or track number.
- For SVCD/VCD/CD:
① Select a disc number.
② Select tracks.
- If the disc is not in current tray, the System may prompt for the group/title number entry as well, however, during playback, the System will ignore these entries.
- You can use ENTER button to skip the group/title number entry.
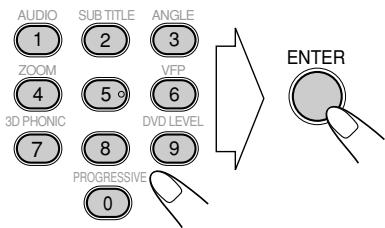
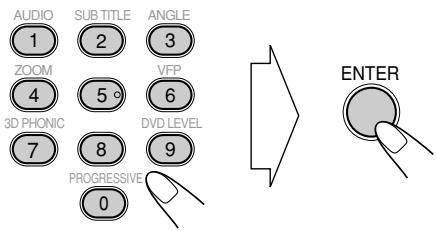
To enter the numbers:
AUDIO
1
ZOOM
4
3D PHONIC
7
PAGE -
10
SUBTITLE
2
5°
8
C
()
ANGLE
3
VPP 6
VD LEVEL
9
PAGE+
+10
Examples:
To enter number 5, press 5.
To enter number 15, press +10 then 5.
To enter number 30, press +10 , +10 , then 10.
3 Repeat the above step 2.
4 Start playback.

Playback starts in the order you have programmed.
| To skip a step: | To pause: | To stop: |
| GROUP/TITLE → → | To release, press DVD/CD▶. |
To check the programmed contents
Before or after playback...
To modify the program
Before or after playback...
| To erase the last step: | To erase the entire program: |
| RETURN CANCEL | |
| To add steps in the program: | |
| Repeat steps 2 and 3 on page 24. | |
To exit from Program Play
Before or after playback...

Playing at Random—Random Play

You can play the chapters or tracks of all loaded discs at random.
- Random Play cannot be used for some DVDs.
1 Before starting playback, activate Random Play.


2 Start playback.

Playback starts in random order. Random Play ends when all the tracks are played once (when Repeat Play is not activated).
| To skip a chapter/ track: | To pause: | To stop: |
| → To skip to the begin- ning of the current track, press ⇌. | → To release, press DVD/CD▶. | → To release, press DVD/CD▶. |
- During Random Play, you cannot select disc by using DISC SELECT button.
To exit from Random Play
Before or after playback...

Playing Repeatedly

- You can also select the repeat mode using the on-screen bar (see page 28).
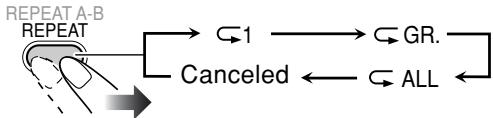
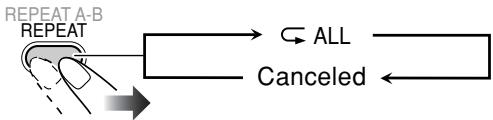
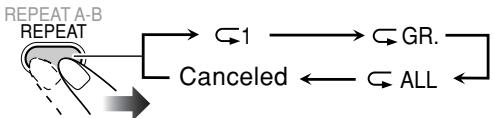
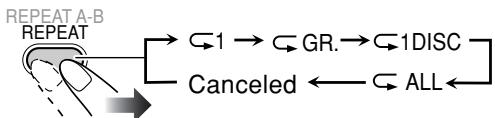
Repeat Play
You can repeat playback.
For DVD Video:
While playing...
Before starting playback...
- For DVD Audio:
While playing or before playback...
- For MP3/WMA:
While playing or before playback...
- For CD/SVCD/VCD:
While playing (without PBC for SVCD/VCD) or before playback...

While playing (with PBC for SVCD/VCD) ...

- For Program Play:
While playing or before playback...

- For Random Play:
While playing or before playback...

| → ALL | Repeats all discs in all tray or all programmed tracks. |
| → 1 | Repeats the current chapter/track. |
| → GR. | Repeats the current title/group. |
| → 1DISC | Repeats the current disc. |
| Canceled | Cancels Repeat Play mode. |
A-B Repeat
You can repeat playback of a desired portion by specifying the beginning (point A) and the ending (point B).
- A-B Repeat cannot be used for MP3/WMA and for some DVDs.
- A-B Repeat can be used within the same title while playing a DVD Video, and within the same track for the other discs.
1 While playing (without PBC for SVCD/VCD), select the start point (A).

A- lights on the display.
- appears on the TV screen if the TV is turned on.
2 Select the end point (B).
(at the same time)
A-changes to A-B.
A-B appears on the TV screen.
- You can search for the end point using the button.
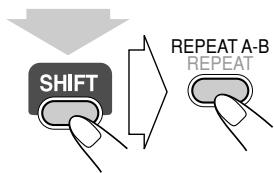
To cancel A-B Repeat, press REPEAT A-B again while holding SHIFT.
Prohibiting Disc Ejection—Child Lock

You can lock the disc trays so that no one can eject the loaded disc.
- This is possible while the System is on standby.
While the disc trays are closed...

To cancel the prohibition, repeat the same procedure.
"UNLOCKED" appears on the display.
On-Screen Disc Operations

Remote control
On-screen bars DVD Video
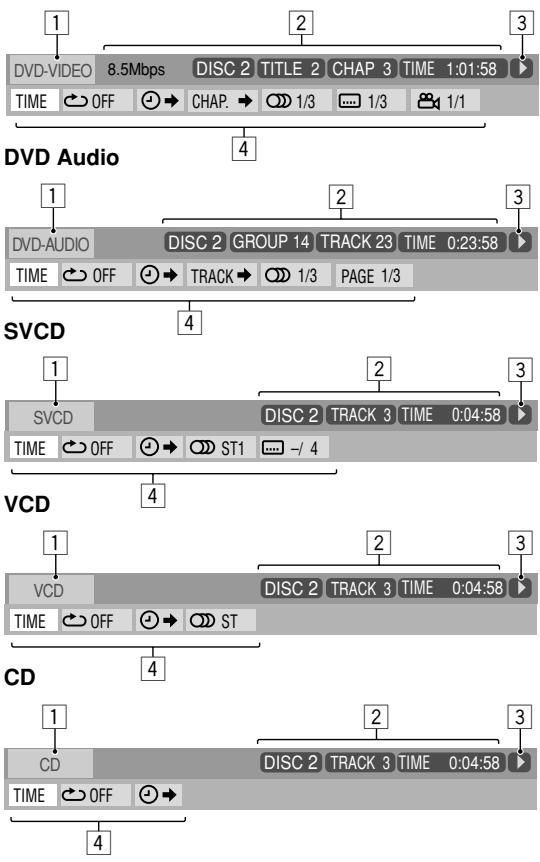
On-screen Bar Information
You can check the disc information (except for MP3/WMA/JPEG disc) and use some functions through the on-screen bar.
1 Disc type
2Playback information
Indication
Meanings
Mbps
Current transfer rate
Forward/Reverse search
D/
Forward/Reverse slow-motion
Pause
Stop
4 Function icons (on the pull-down menu)
Indication
Meanings
TIME
Select to change the time indication.
OFF
Select to repeat playback.
Select for time search.
CHAP.
Select for chapter search.
TRACK
Select for track search.
1/3
Select to change the audio language or channel (see also page 21).
1/3
Select to change subtitle language (see also page 22).
1/3
Select to change the view angle (see also page 22).
PAGE 1/5
Select to change the page (see also page 23).
Operations Using the On-screen Bar

Ex.: Selecting a subtitle (French) for DVD Video:
While a disc is selected as the source...
1 Display the on-screen bar with the pull-down menu.
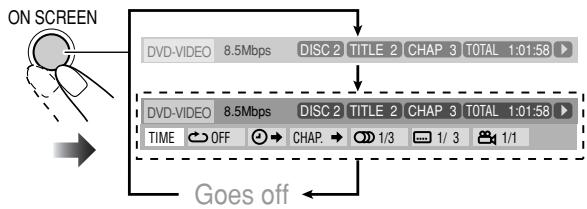
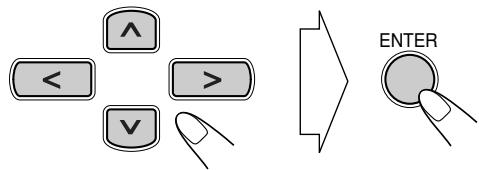
2 Select (highlight) the item you want.


3 Display the pop-up window.


4 Select the desired option in the pop-up window.

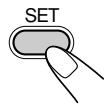
5 Finish the setting.

Pop-up window goes off.
To erase the on-screen bar
ON SCREEN

For detailed operations of the following functions, see also "Operations Using the On-screen Bar" on the left.
Changing the time information
You can change the time information in the on-screen bar and the display window on the main unit.
1 Display the on-screen bar with the pull-down menu.

2 Make sure TIME is selected (highlighted).
3 Change the time indication.
| TOTAL | Elapsed disc time. |
| T. REM | Remaining disc time. |
| TIME | Elapsed playing time of the current chapter/track. |
| REM | Remaining time of the current chapter/track. |
To erase the on-screen bar
ON SCREEN

Repeat Play
See also page 26.
1 While playing a disc (without PBC for SVCD/VCD), display the on-screen bar with the pull-down menu.
2 Select OFF
3 Display the pop-up window.

4 Select the repeat mode you want.
5 Finish the setting.
| ALL | Repeats all discs or all programmed track. |
| A-B | Repeats a desired portion (see next column). |
| TITLE | Repeats the current title. |
| GROUP | Repeats the current group. |
| DISC | Repeats the disc (except for DVD). |
| CHAPTER | Repeats the current chapter. |
| TRACK* | Repeats the current track. |
| OFF | Cancels Repeat Play. |
- During Program Play and Random Play, "STEP" appears.
5 Finish the setting.

A-B Repeat
See also page 26.
1 While playing, display the on-screen bar with the pulldown menu.
2 Select OFF
3 Display the pop-up window.

4 Select "A-B".

5 Select the start point (A).


6 Select the end point (B).

A-B Repeat starts. The selected portion plays repeatedly.
- Before pressing ENTER, you can search for the end point using .
Time Search
You can move to a particular point by specifying the elapsed playing time from the beginning.
1 While playing (without PBC for SVCD/VCD), display the on-screen bar with the pull-down menu.
- Except for DVD: Time Search can be used before starting playback.
2 Select
3 Display the pop-up window.

4 Enter the time.
You can specify the time in hours/minutes/seconds.
Examples:
To move to a point of 1
(hours): 02 (minutes): 00
(seonds), press 1, 0, 2, 0, then 0.
To move to a point of 54 (minutes): 00 (seconds), press 0, 5, 4, 0, then 0.
- It is always required to enter the hour digit (even "0" hour), but it is not required to enter trailing zeros (the last two digits in the examples above).
- To correct a misentry, press cursor < to erase the last entry.

The System starts playing the disc from the selected playing time.
Chapter/Track Search
You can search for the chapter (DVD Video) or track (DVD Audio) number to play.
1 While playing, display the on-screen bar with the pulldown menu.
2 Select CHAP. or TRACK
3 Display the pop-up window.

4 Enter the desired chapter/track number.
AUDIO
1
ZOOM
4
DPHONIC
7
SUB TITLE
2
50
一
8
PROGRESS
ANGLE
3
VFP
6
DVD LEVEL
9
()

- To correct a misentry, press the 10 keys until the desired number shown in the pop-up window.
5 Finish the setting.

ENTER
The System starts playing the searched chapter or track.
Operations on the CONTROL Screen

The CONTROL screen automatically appears on the TV screen when you load an MP3, WMA, or JPEG disc.
You can search for and play the desired tracks through the CONTROL screen.
- If both types of files (MP3/WMA files and JPEG files) are recorded on a disc, select the file type to play (see page 39).
Ex.: When the MP3 disc is loaded.

CONTROL screen
① Current group number/total group number
② Current group
③ Group list
④ Current track (in blue)
⑤ Track information (ID3 Tag Version 1.0: only for MP3/WMA)
⑥ Repeat Play setting
⑦ Elapsed playing time of the current track (only for MP3/WMA)
⑧ Operation mode icon
⑨ Current track number/total number of tracks in the current group (total number of tracks on the loaded disc)
10 Highlight (green) bar
⑪ Track list
To move the highlight bar between group list and track list

To select a group/track in the list
Move the highlight bar to a desired item.
- If you move the highlight bar while playing back an MP3/WMA disc, the selected track starts playback automatically.
To start playback
| For MP3/WMA: | |
| ENTER | Playback starts with the selected track. • Pressing DVD/CD▶ also starts playback. |
| For JPEG: | |
| ENTER | The selected track (still picture) is displayed until you change it. |
| DVD/CD | Slide-show playback starts. Each track (still picture) is shown on the screen for few seconds, then changes one after another. |
- Once you start playing back a JPEG track, the CONTROL screen goes off.
- To cancel slide-show, and display the current still picture, press ENTER.
| To skip a track: | To pause: | To stop playback: |
| GROUP/TITLE → → | To release, press DVD/CD ▷. |
To repeat slide-show for JPEG
While playing or before starting playback...

| GR. | Repeats the current group. |
| 1DISC | Repeats the current disc. |
| ALL | Repeats all disc. |
- For Repeat Play of MP3/WMA, see page 26.
To zoom in the still picture
- You cannot zoom in the still picture during slide-show.
1 While playing...


2 Change the magnification.

As the number increases, magnification also increases.
3 Move the zoomed-in position.
To resume normal playback, press ZOOM repeatedly until "ZOOM OFF" appears on the TV screen.
Advanced Tape Operations

Remote control
Main unit

IMPORTANT
It may be unlawful to record or play back copyrighted material without the consent of the copyright owner.
Recording on a Tape
You can use type I tapes for recording.
To play a tape, see page 16.
1 Insert a recordable cassette.

2 Check the tape running direction and Reverse mode settings on the display.
To change the direction

To change the Reverse mode if necessary
(at the same time)
| (←) | To record on both sides. ·When using Reverse mode, start recording in the forward (▶) direction. |
| → | To record on only one side. |
4 Start recording.
3 Select and start playing the source—"FM," "AM," "DVD/CD," or "AUX."
- When recording a disc, you can also use "Synchronized Disc Recording" (see below).

To stop recording:

- While recording a disc, recording stops automatically after the disc player plays back the disc.
Synchronized Disc Recording

You can start and stop both disc play and tape recording at the same time.
1 Load a disc and insert a recordable cassette.
- If the current playing source is not the disc player, press DVD/CD , then .
2 Check the tape running direction and Reverse mode settings on the display.
See step 2 of "Recording on a Tape" on page 32.
3 Select the disc number you want to start recording from.

4 Select the Recording mode.

ONE DISC Records the entire disc.
ALL DISC Records the all loaded discs continuously (except for DVD Video/DVD Audio).
1ST TRK Records the first track of each disc (only for SVCD/VCD/CD).
5 Start recording when the recording mode selected in step 4 is still shown on the display.

The System automatically creates 4-second blanks between the tunes recorded on the tapes.
On the main unit
- If the loaded disc is not compatible for the current recording mode, the disc player skips the disc and loads the next one.
- When either disc play or recording ends, both disc player and the cassette deck stop at the same time.
To record a "Live" disc
It will not be desirable to put 4-second blank portions between the tunes recorded on the tape.
To record the entire disc without any interruption recorded, pause the disc play (press on the remote control) before pressing REC.
To record Program Play or Random Play
1 Select Program Play (and make a program) or Random Play, but do not start playback.
2 Press REC to start recording.
- When disc play stops, recording continues. It is required that recording be stopped manually.
To record only your favorite track
You can specify tracks to be recorded on the tape while listening to a disc.
- This function is not available for DVD Video.
1 Start playing a disc.

2 While a track you want to record on the tape is playing...

On the main unit
The disc player returns to the beginning of that track and the track is recorded on the tape. After recording the track, the disc player and cassette deck automatically stop.
3 Repeat steps 2 and 3 to record other tracks you want.
- You can exchange the discs if necessary.
To protect your recording
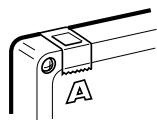
Cassettes have two small tabs on the back to protect from unexpected erasure or re-recording.
To protect your recording, remove these tabs.

To re-record on a protected tape, cover the holes with adhesive tape.
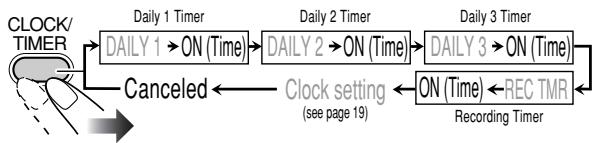
Timer Operations
Remote control
Setting the Timer

Using Daily Timer, you can wake up with your favorite music. On the other hand, with Recording Timer, you can make a tape of a radio broadcast automatically.
- You can store three Daily Timer settings and one Recording Timer setting; however, you can activate only one of Daily Timers or Recording Timer at the same time.
- To exit from the timer setting, press CLOCK/TIMER as required.
- To correct a misentry during the process, press CANCEL. You can return to the previous step.
Timer initial settings when shipped from the factory:
DAILY 1:ON Time (6:00)/OFF Time (8:00)/ Source (TUNER FM 1)/Volume level (- - )
DAILY 2:ON Time (12:00)/OFF Time (14:00)/ Source (TUNER FM 1)/Volume level (- - )
DAILY 3:ON Time (18:00)/OFF Time (20:00)/ Source (TUNER FM 1)/Volume level (- - )
- REC TMR:ON Time (8:00)/OFF Time (10:00)/ Source (TUNER FM 1)
1 Select one of the timer setting modes you want to set— Daily 1 ON time, Daily 2 ON time, Daily 3 ON time, or Recording Timer ON time.
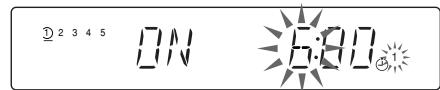
Ex. When Daily Timer 1 setting mode is selected
- When the clock has not been adjusted, pressing CLOCK/TIMER makes the System enter the clock setting mode.
2 Make the timer setting as you want.
Repeat the following operations until you finish setting in the following order—
① Set the hour then minute for on-time.
② Set the hour then minute for off-time.
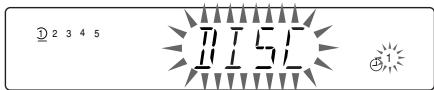
③ For Daily Timers: Select the playback source—“TUNER FM,” “TUNER AM,” “TAPE,” “DISC” or “AUX.”
For Recording Timer: Select the playback source—"TUNER FM,"“TUNER AM” or “AUX.”
(4) For “TUNER FM” and “TUNER AM”: Select a preset channel.
For "DISC": Select the disc number, group/title number, then the track/chapter number.
For Daily Timers: Select the volume level.
- You can select the volume level ("VOL 1" to "VOL 50" and "VOL - -"). If you select "VOL - -," the volume is set to the last level when the unit has been turned off.
For Recording Timer: The volume level is set automatically to the last level when the unit has been turned off.
Once settings are complete, the Timer setting information appears in sequence.
3 Turn off the unit (on standby) if you have set the timer with the System turned on.
STANDBY/ON

How Daily Timer actually works
Once the Daily Timer has been set, the timer ( ) indicator and timer number indicator (1/2/3) are lit on the display. Daily Timer is activated at the same time everyday until the timer is turned off manually (see the next column) or another timer is activated.
When the on-time comes
The System turns on, tunes in to the specified station or start playing the loaded disc with the specified chapter or track, and sets the volume level to the preset level.
- While Daily Timer is working, the timer ( ) indicator and timer number indicator (1/2/3) flash on the display.
When the off-time comes
The System stops playback, and turns off (stands by) automatically.
- The timer setting remains in memory until you change it.
How Recording Timer actually works
When Recording Timer has been set, Timer ( ) indicator and the REC indicator are lit on the display. Recording Timer works only once.
When the on-time comes
The System turns on, tunes in to the specified station, sets the volume level to last level when the unit has been turned off, and starts recording.
When the off-time comes
The System stops recording, and turns off (stands by).
- The timer setting remains in memory until you change it.
To turn off the Timer after its setting is done
Since Daily Timer is activated at the same time everyday, you may need to cancel it on some particular days.
1 Select the Timer you want to cancel.
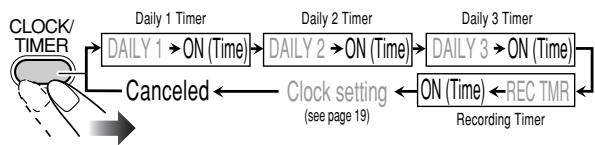

Ex.To cancel Daily Timer 1
2 Turn off the selected Timer.

To turn on the Timer
1 Select the Timer (DAILY 1, DAILY 2, DAILY 3, or REC TMR) you want to activate.
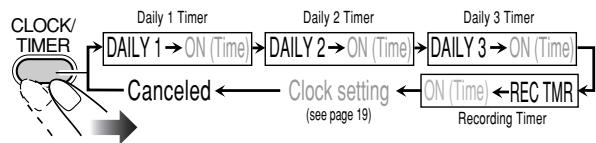

Ex.When Daily Timer 1 is selected
2 Activate the selected Timer.
Setup Menu Operations
Remote control
Setup Menu Icons
The icon for the selected Setup Menu will be highlighted.
Ex.: LANGUAGE Setup Menu is selected.
① LANGUAGE Setup Menu
② PICTURE Setup Menu
③ AUDIO Setup Menu
④ OTHERS Setup Menu
Operating Procedure


You can use the Setup Menu only when a disc is selected as the source and its playback is not yet started.
Ex.: Selecting "STILL PICTURE" for "FILE TYPE":
1 Display the Setup Menu.

2 Select one of the Setup Menus.
3 Select the item you want to adjust.
4 Display the pop-up window.


5 Select the desired option in the pop-up window.


6 Finish the setting.

7 Repeat steps 3 to 4 to set other items on the same Setup Menu. Repeat steps 2 to 4 to set other items on another Setup Menu.
To erase the Setup Menu

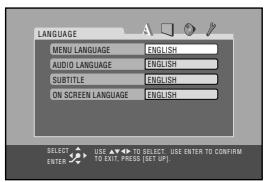
LANGUAGE Setup Menu
You can select the initial languages for disc playback. You can also select the language shown on the TV screen while operating this System.
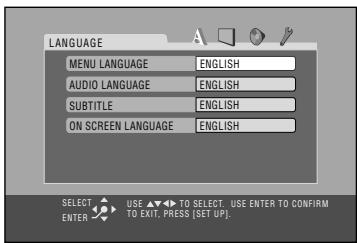
MENULANGUAGE
Some discs have multiple menu languages.
Select from—ENGLISH, SPANISH, FRENCH, CHINESE, GERMAN, ITALIAN, JAPANESE, AA-ZU (see "Language Code List" on page 47).
AUDIO LANGUAGE
Some discs have multiple audio languages.
Select from—ENGLISH, SPANISH, FRENCH, CHINESE, GERMAN, ITALIAN, JAPANESE, AA-ZU (see "Language Code List" on page 47).
SUBTITLE
Some discs have multiple subtitle languages.
Select from-ENGLISH,SPANISH,FRENCH,CHINESE, GERMAN,ITALIAN,JAPANESE,AA-ZU (see
"Language Code List" on page 47) or "OFF (no subtitle)."
ON SCREEN LANGUAGE
Select one of the languages shown on the TV from—ENGLISH, CHINESE, and SPANISH.
PICTURE Setup Menu
You can select the desired options concerning a picture or monitor screen.
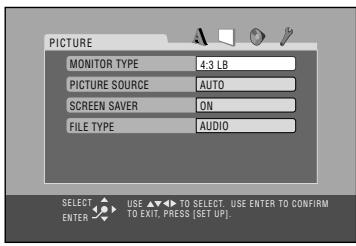
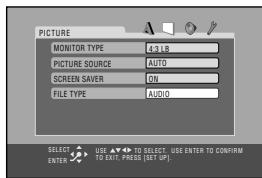
MONITOR TYPE
You can select the monitor type of your TV when you play DVD Video recorded with aspect ratio of 16:9.
For the multi-color system TV
When you use a multi-color system TV, you can change the color system of the System automatically by selecting "MULTI" options as the monitor type. In this case, the color system of the System is changed to match the color system of the loaded disc regardless the VIDEO OUT SELECT setting for better picture quality (see "To set the video output selector" on page 7).
Select one of the following:
16:9 / 16:9 MULTI (Wide television conversion):
Select when the aspect ratio of your TV is 16:9 and when the TV has the screen size adjustment function.
4:3 LB (Letter Box)/ 4:3 MULTI LB:
Select when the aspect ratio of your TV is 4:3. While viewing a wide screen picture, the black bars appear on the top and the bottom of the screen.
4:3 PS (Pan Scan) / 4:3 MULTI PS:
Select when the aspect ratio of your TV is 4:3. While viewing a wide screen picture, the black bars do not appear; however, the left and right edges of the pictures will not be shown on the screen.

Ex.: 16:9

Ex.: 4:3 LB

Ex:4:3PS
PICTURE SOURCE
You can obtain optimal picture quality by selecting an appropriate option—picture source type (either video source or film source).
Select one of the following:
| AUTO: | Normally select this. |
| When playing back a disc containing both video and film sources, the System automatically changes the processing to match it to the picture type (film or video source) of the current chapter. |
FILM: To play a film source disc.
VIDEO: To play a video source disc.
SCREENSAVER
You can activate or deactivate screen saver while operating the built-in disc player.
Select one of the following:
| ON: | The picture on the TV becomes dark when no operation is done for about 5 minutes. |
| OFF: | To cancel the screen saver. |
FILE TYPE
If both audio tracks (MP3 or WMA files) and still picture (JPEG files) are recorded on a disc, you can select which to play.
Select one of the following:
| AUDIO: | To play MP3/WMA files. |
| STILL PICTURE: | To play JPEG files. |
■ AUDIO Setup Menu
You can adjust the sound settings of the System.
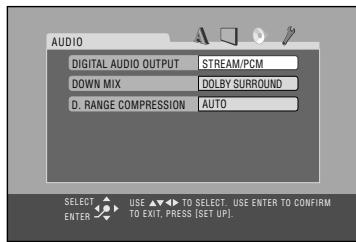
DIGITAL AUDIO OUTPUT
When using the digital output terminal on the rear, set this correctly according to the connected component.
Select one of the following:
| PCM ONLY: | To connect to a linear PCM digital equipment. |
| DOLBY DIGITAL /PCM: | To connect to a Dolby Digital decoder or an amplifier with a built-in Dolby Digital decoder. |
| STREAM/PCM: | To connect to a DTS decoder or an amplifier with a built-in DTS decoder. |
See also "DVD OPTICAL DIGITAL OUT Signals" on page 49.
DOWN MIX
When using the digital output on the rear, set this correctly according to the connected component.
When playing a multi-channel DVD, the System converts the signals into 2 channels properly.
Select one of the following:
| DOLBY | To connect an amplifier with the Dolby |
| SURROUND: | Pro Logic decoder. |
| STEREO: | To connect a conventional stereo amplifier, receiver, MD player, TV, etc. |
D. RANGE COMPRESSION
You can compress the dynamic range (the difference between the loudest sound and the softest sound) to enjoy a powerful sound even at a low volume level when listening to Dolby Digital software. This is useful at night.
- The effectiveness varies depends on a software.
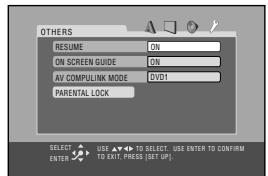
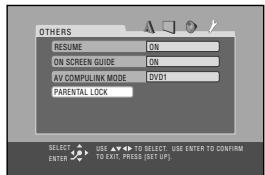
Select one of the following:
| AUTO: | To apply the compression effect to the downmixed multi-channel sound. |
| ON: | To always apply the compression effect for all Dolby Digital software. Loud sound will become low and vice versa. |
OTHERS Setup Menu
You can change some other convenient functions.
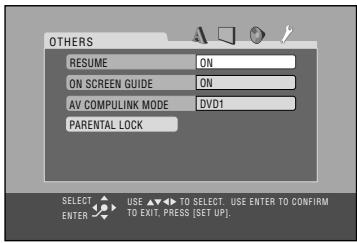
RESUME
You can activate or deactivate Resume for disc playback (see page 14).
Select one of the following:
| ON: | To activate Resume. |
| OFF: | To cancel Resume. |
ON SCREEN GUIDE
You can activate or deactivate the on-screen guide icons (see page 14).
- When recording the picture on a VCR, select "OFF" to avoid recording the guide icons on your video tape.
Select one of the following:
| ON: | To activate the on-screen guide icons. |
| OFF: | To cancel the on-screen guide icons. |
AV COMPULINK MODE
When connecting the System to a JVC's TV with the AV COMPU LINK remote control system, select the proper setting.
Select one of the following:
| DVD1: | To connect to the VIDEO-3 Input jack on the TV. |
| DVD2: | To connect to theVIDEO-1 Input jack on the TV. |
| DVD3: | To connect to theVIDEO-2 Input jack on the TV. |
For details, see "To connect the AV COMPU LINK cords" on page 7.
PARENTAL LOCK
Select this to enter the PARENTAL LOCK submenu.
See the section that follows.
Restricting the Review
—Parental Lock Remote ONLY
You can restrict playback of DVD Video containing violent scenes and those unsuitable for your family members. Once you have set the rating level, such violent scenes (for which a higher level than you set is assigned) may be skipped or changed to another scene (depending on how the disc is programmed).
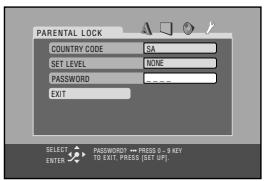
To set Parental Lock
Set the rating level—Level 1 (most restrictive) to Level 8 (least restrictive).
1 Display the Setup Menu.

2 Select the OTHERS Setup Menus.
3 Select "PARENTAL LOCK."

4 Enter the PARENTAL LOCK submenu.

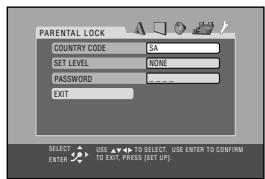
5 Select "COUNTRY CODE," then display the pop-up window.


6 Select the country code of your area.
- See "Country/Area Codes List" on page 48 to find your country code.

7 Make sure "SET LEVEL" is selected, then display the pop-up window.
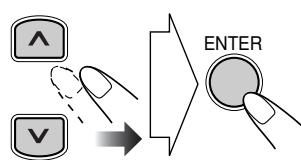
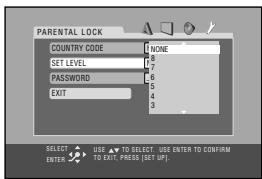
8 Set the rating level (NONE, 8-1).

The System automatically enters "password" entry mode.
9 Make sure "PASSWORD" is selected, then enter any 4-digit number for your password.

10 Finish the setting.

To change the setting
1 Display the PARENTAL LOCK sub menu.
- Follow steps 1 to 4 of "To set Parental Lock".
"password" is automatically selected.
- You cannot select any item other than "EXIT" until you enter the correct password.
2 Enter your password.
- If you enter a wrong password, “---” appears again.
- If you enter a wrong password three times, "EXIT" is automatically selected. In this case, press ENTER to exit from the PARENTAL LOCK submenu.
- If you forget your password, enter "8888."
3 Change the settings.
- Follow steps 5 to 8 of "To set Parental Lock".
4 Enter your password again.

- If you want to change a password, enter a new four-digit number in this step.
To release Parental Lock temporarily
When you set a strict rating level, some discs may not be played back at all. When you try to play such a disc, the following screen appears on the TV.
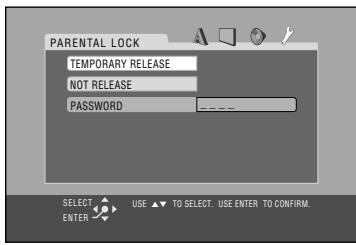
1 Select "TEMPORARY RELEASE," then press ENTER.

"password" is automatically selected.
- If you do not play back such a disc, select "NOT RELEASE," then press ENTER. Then eject the disc.
2 Enter your password.
- If you enter a wrong password three times, "NOT RELEASE" is automatically selected. In this case, press ENTER. Then eject the disc.
Additional Information
Learning More about This System
Getting Started (see pages 3 to 7)
Changing the Scanning Mode:
- To enjoy the progressive video picture, connect a TV with the progressive video input using component video cord.
Before Operating the System (see pages 8 to 11)
Playable Disc Types:
- If you play back an NTSC disc with this setting set to "PAL," you can watch the playback pictures (the disc will be reproduced using "PAL 60" format), but the TV screen may roll over upward and downward rapidly.
-
If you play back a PAL disc with this setting set to "NTSC," you can watch the playback pictures, but the following symptoms may occur:
-
The items on the disc menu will be blurred, and be shown slightly shifted when highlighted.
- The aspect ratio of the picture may differ from the original aspect ratio.
- The picture movement is not smooth.
Daily Operations—Playback (see pages 12 to 16)
Listening to the Radio:
- If you store a new station into an occupied preset number, the previously stored station in that number will be erased.
- When you unplug the AC power cord or if a power failure occurs, the preset stations will be erased in a few days. If this happens, preset the stations again.
Playing Back a Disc:
- When using an 8cm disc, place it on the inner circle of the disc tray.
- On some DVD, SVCD, or VCD discs, the actual operations may be different from what is explained in this manual, due to the programming and disc structure; such differences are not a malfunction of this System.
- When discs* in more than one tray are loaded on the disc trays, they are played in sequence as follows:
Ex.:When DISC 2 is selected: DISC 2 DISC 3 DISC 4 DISC 5 DISC1 (then stops)
-
When no disc is loaded on the tray, that disc number is skipped.
-
You can exchange discs while playing or selecting another disc.
- Some DVD Audio discs prohibit downmixed output. When you play back such a disc, "LR ONLY" appears on the display and the System plays back the left front and right front signals.
- 3D Phonic setting is also applied to the optical digital output signals through the DVD OPTICAL DIGITAL OUT terminal.
-
When using Resume on SVCD or VCD with PBC, the playback might start on a position slightly different from where you have stopped.
-
You can use Resume only for the DVD/SVCD/VCD except for some discs—depending how the disc is programmed.
- Resume function does not work during Program Play and Random Play.
-
For MP3/WMA/JPEG playback...
-
This System cannot play "packet write" discs.
- MP3/WMA/JPEG discs are required a longer readout time than regular CDs. (It depends on the complexity of the group/file configuration.)
- Some MP3/WMA/JPEG files cannot be played back and will be skipped. This result from their recording processes and conditions.
- When making MP3/WMA discs, use ISO 9660 Level 1 or Level 2 for the disc format.
- This System can play back MP3/WMA/JPEG files with the extension code <.mp3> , <.wma> or <.jpg> (regardless of the letter case—upper/lower).
- It is recommended that you make each MP3 file at a sampling rate of 44.1kHz and at bit rate of 128 kbps. This System cannot play back files made at bit rate of less than 64 kbps.
- This System can recognize the total of 1000 tracks and of 99 groups (each group can contain up to 150 tracks). Those exceeding the maximum number cannot be recognized.
Daily Operations—Sound&Other Adjustments (see pages 17 to 20)
Adjusting the Volume:
- Be sure to turn down the volume before connecting or putting the headphones.
Adjusting the Sound:
- This function also affects the sound through the headphones.
Setting the Clock:
- "0:00" will flash on the display until you set the clock.
- The clock may gain or lose 1 to 2 minutes per month. If this happens, reset the clock.
Unique DVD/VCD Operations (see pages 21 to 23)
- During slow-motion playback, no sound will be reproduced.
- One touch replay function works only within the same title, though it works between chapters.
- One touch replay function does not work during Program Play and Random Play.
- While zoomed in, the picture may look coarse.
Advanced Disc Operations (see pages 24 to 26)
Programming the Playing Order—Program Play:
- If you try to program a 100th track, "MEM FULL (memory full)" appears on the display.
While programming steps...
Your entry will be ignored if you have tried to program an item number that does not exist on the disc (for example, selecting track 14 on a disc that only has 12 tracks).
- You cannot use Program Play and Random Play for JPEG discs.
- You cannot eject tray while in Program Play.
Playing at Random—Random Play:
- The button does not work for skipping chapters or tracks, but only work for going back to the beginning of the current chapter or track.
On-Screen Disc Operations (see pages 27 to 31)
-
For JPEG files playback...
-
It is recommended that you record a file at 640 × 480 resolution. (If a file has been recorded at a resolution of more than 640 × 480 , it will take a long time to be shown.)
- This System can play only baseline JPEG files.
Progressive JPEG files or lossless JPEG files cannot be played.
Baseline JPEG format: Used for digital cameras, web, etc.
Progressive JPEG format: Used for web.
Lossless JPEG format: An old type and rarely used now.
- This System may not play back JPEG files properly which are recorded by the devices other than digital still camera.
- If progressive or lossless JPEG files are played back, a black screen appears. In this case, stop playback and select a baseline JPEG file. Note that it may take a long time to select another file.
Advanced Tape Operations (see pages 32 to 34)
Recording on a Tape:
- The recording level is automatically set correctly. Thus, you can adjust the sound you are actually listening to without affecting the recording level.
- There is leader tape which cannot be recorded onto at the start and end of cassette tapes. Thus, when recording CDs or radio broadcasts, wind the leader tape first to ensure that the recording will be made without any music part lost.
- If you start recording with no cassette inserted, "NO TAPE" appears on the display. If a protected tape has been inserted, "NO REC" appears.
- When using Reverse mode for recording, start recording in the forward () direction first; otherwise, recording will stop when only one side (reverse) of the tape is recorded.
- You can also change Reverse mode setting () and after starting recording.
- You cannot open or close the disc tray while recording a disc.
Synchronized Disc Recording:
- When the tape reaches its end in the forward direction () during recording with Reverse mode set to , the last tune will be re-recorded at the beginning of the reverse side (except for DVD Video).
Timer Operations (see pages 35 and 36)
- When you unplug the AC power cord or if a power failure occurs, the timer will be canceled. You need to set the clock first, then the timer again.
- Without stopping the recording, you cannot change the source after Recording Timer start recording.
- If you set the Sleep Timer after Daily Timer starts playing the selected source, Daily Timer is canceled.
- If you set the Sleep Timer after Recording Timer starts recording, Recording Timer is canceled, but recording continues until Sleep Timer shuts off the power.
Setup Menu Operations (see pages 37 to 42)
LANGUAGE Setup Menu:
- When the language you have selected for "MENU LANGUAGE," "AUDIO LANGUAGE," or "SUBTITLE" is not recorded on a disc, the original language is used as the initial language.
PICTURE Setup Menu-MONITOR TYPE:
- Even if "4:3 PS" is selected, the screen size may become 4:3 letter box with some DVD Video discs. This depends on how the discs are recorded.
- When you select "16:9" for a picture whose aspect ratio is 4:3, the picture slightly changes due to the process for converting the picture width.
- This setting is not effective when DTS multi-channel software is played back.
OTHERS Setup Menu-ON SCREEN GUIDE:
- Setup Menus and on-screen bar will be displayed (and recorded) even though this function is set to "OFF." Subtitles and the information for zooming in always appear on the display regardless of this setting.

MP3/WMA/JPEG groups/tracks configuration
This System plays back the tracks as follows.

Maintenance
To get the best performance of the System, keep your discs, tapes, and mechanism clean.
Handling discs
- When removing the disc from its case, hold it at the edge while pressing the center hole lightly.
- Do not touch the shiny surface of the disc, or bend the disc.
- Put the disc back in its case after use to prevent warping.
- Be careful not to scratch the surface of the disc.
- Avoid exposure to direct sunlight, temperature extremes, and moisture.
To clean the disc:
- Wipe the disc with a soft cloth in a straight line from center to edge.
Handling cassette tapes
- If the tape is loose in its cassette, take up the slack by inserting a pencil in one of the reels and rotate it.
- If the tape is loose, it may get stretched, cut, or caught in the cassette.
- Be careful not to touch the tape surface.
- Avoid the following places to store the tape—in dusty places, in direct sunlight or heat, in moist areas, on a TV or speaker, or near a magnet.
To keep the best recording and playback sound quality:
- Use a cotton swab moistened with alcohol to clean the heads, capstans, and pinch rollers.
- Use a head demagnetizer (available at electronics and audio shops) to demagnetize the heads (when the System turned off).
Cleaning the System
- Stains should be wiped off with a soft cloth. If the System is heavily stained, wipe it with a cloth soaked in water-diluted neutral detergent and wrung well, then wipe clean with a dry cloth.
-
Since the System may deteriorate in quality, become damaged or get its paint peeled off, be careful about the following:
-
DO NOT wipe it with a hard cloth.
- DO NOT wipe it strongly.
- DO NOT wipe it with thinner or benzine.
- DO NOT apply any volatile substance such as insecticides to it.
- DO NOT allow any rubber or plastic to remain in contact for a long time.

To remove the speaker grilles
Troubleshooting
If you are having a problem with your System, check this list for a possible solution before calling for service.
General:
Adjustments or settings are suddenly canceled before you finish.
There is a time limit. Repeat the procedure again.
Operations are disabled.
The built-in microprocessor may malfunction due to external electrical interference. Unplug the AC power cord and then plug it back in.
Unable to operate the System from the remote control.
The path between the remote control and the remote sensor on the System is blocked.
The batteries are exhausted.
No sound is heard.
Speaker connections are incorrect or loose.
Headphones are connected.
No picture appears on the screen.
The video cord connections are incorrect or loose.
No picture is displayed on the TV screen, the picture is blurred, or the picture is divided into two parts.
The System is connected to a TV which does not support progressive scanning.
Incorrect color system is selected (see "To set the video output selector" on page 7).
The left and right edges of the picture are missing on the screen.
Select "4:3 LB/ 4:3 MULTI LB" for "MONITOR TYPE" (see page 38).
Radio Operations:
Hard to listen to broadcasts because of noise.
Antennas connections are incorrect or loose.
The AM loop antenna is too close to the System.
The FM antenna is not properly extended and positioned.
Disc Operations:
The disc does not play.
The disc is placed upside down. Place the disc with the label side up.
ID3 Tag on an MP3/WMA disc cannot be shown.
There are two types of ID3 Tag—Version 1 and Version 2. This System can only show ID3 Tag Version 1.
MP3/WMA/JPEG groups and tracks are not played back as you expect.
The playing order is determined when the disc was recorded. It depends on the writing application.
MP3/WMA or JPEG tracks are not played back.
The inserted disc may include both type of tracks (MP3/WMA files and JPEG files). In this case, you can only play back the files selected by the "FILE TYPE" setting (see page 39).
You have changed the "FILE TYPE" setting after you inserted a disc. In this case, reload the disc.
"NO AUDIO" appears.
This System cannot play back illegally produced DVD Audio discs.
"LR ONLY" appears.
Some DVD Audio discs prohibit downmixed output. When you play back such a disc, this System plays back the left front and right front signals only.
The disc sound is discontinuous.
The disc is scratched or dirty.
The disc tray does not open or close.
The AC power cord is not plugged in.
Child Lock is in use (see page 26).
Tape Operations:
The cassette holder cannot be opened.
Power supply from the AC power cord has been cut off while the tape was running. Turn on the System.
Recordings:
Impossible to record.
Small tabs on the back of the cassette are removed. Cover the holes with adhesive tape.
Timer Operations:
Daily Timer and Recording Timer do not work.
The System has been turned on when the on-time comes. Timer starts working only when the System is turned off.
Setup Menu Operations:
No subtitle appears on the display though you have selected the initial subtitle language.
Some DVDs are programmed to always display no subtitle initially. If this happens, press SUB TITLE (while holding SHIFT) after starting play (see page 22).
Audio language is different from the one you have selected as the initial audio language.
Some DVDs are programmed to always use the original language initially. If this happens, press AUDIO (while holding SHIFT) after starting play (see page 21).
Language Code List
| AA | Afar |
| AB | Abkhazian |
| AF | Afrikaans |
| AM | Ameharic |
| AR | Arabic |
| AS | Assamese |
| AY | Aymara |
| AZ | Azerbaijani |
| BA | Bashkir |
| BE | Byelorussian |
| BG | Bulgarian |
| BH | Bihari |
| BI | Bislama |
| BN | Bengali, Bangla |
| BO | Tibetan |
| BR | Breton |
| CA | Catalan |
| CO | Corsican |
| CS | Czech |
| CY | Welsh |
| DA | Danish |
| DZ | Bhutani |
| EL | Greek |
| EO | Esperanto |
| ET | Estonian |
| EU | Basque |
| FA | Persian |
| FI | Finnish |
| FJ | Fiji |
| FO | Faroese |
| FY | Frisian |
| GA | Irish |
| GD | Scotts Gaelic |
| GL | Galician |
| GN | Guarani |
| GU | Gujarati |
| HA | Hausa |
| HI | Hindi |
| HR | Croatian |
| HU | Hungarian |
| HY | Armenian |
| IA | Interlingua |
| IE | Interlingue |
| IK | Inupiak |
| IN | Indonesian |
| IS | Icelandic |
| IW | Hebrew |
| JI | Yiddish |
| JW | Javanese |
| KA | Georgian |
| KK | Kazakh |
| KL | Greenlandic |
| KM | Cambodian |
| KN | Kannada |
| KO | Korean (KOR) |
| KS | Kashmiri |
| KU | Kurdish |
| KY | Kirghiz |
| LA | Latin |
| LN | Lingala |
| LO | Laothian |
| LT | Lithuanian |
| LV | Latvian, Lettish |
| MG | Malagasy |
| MI | Maori |
| MK | Macedonian |
| ML | Malayalam |
| MN | Mongolian |
| MO | Moldavian |
| MR | Marathi |
| MS | Malay (MAY) |
| MT | Maltese |
| MY | Burmese |
| NA | Nauru |
| NE | Nepali |
| NL | Dutch |
| NO | Norwegian |
| OC | Occitan |
| OM | (Afan) Oromo |
| OR | Oriya |
| PA | Panjabi |
| PL | Polish |
| PS | Pashto, Pushto |
| PT | Portuguese |
| QU | Quechua |
| RM | Rhaeto-Romance |
| RN | Kirundi |
| RO | Rumanian |
| RU | Russian |
| RW | Kinyarwanda |
| SA | Sanskrit |
| SD | Sindhi |
| SG | Sangho |
| SH | Serbo-Croatian |
| SI | Singhalese |
| SK | Slovak |
| SL | Slovenian |
| SM | Samoan |
| SN | Shona |
| SO | Somali |
| SQ | Albanian |
| SR | Serbian |
| SS | Siswati |
| ST | Sesotho |
| SU | Sundanese |
| SV | Swedish |
| SW | Swahili |
| TA | Tamil |
| TE | Telugu |
| TG | Tajik |
| TH | Thai |
| TI | Tigrinya |
| TK | Turkmen |
| TL | Tagalog |
| TN | Setswana |
| TO | Tonga |
| TR | Turkish |
| TS | Tsonga |
| TT | Tatar |
| TW | Twi |
| UK | Ukrainian |
| UR | Urdu |
| UZ | Uzbek |
| VI | Vietnamese |
| VO | Volapuk |
| WO | Wolof |
| XH | Xhosa |
| YO | Yoruba |
| ZU | Zulu |
Country/Area Codes List
| AD | Andorra |
| AE | United Arab Emirates |
| AF | Afghanistan |
| AG | Antigua and Barbuda |
| AI | Anguilla |
| AL | Albania |
| AM | Armenia |
| AN | Netherlands Antilles |
| AO | Angola |
| AQ | Antarctica |
| AR | Argentina |
| AS | American Samoa |
| AT | Austria |
| AU | Australia |
| AW | Aruba |
| AZ | Azerbaijan |
| BA | Bosnia and Herzegovina |
| BB | Barbados |
| BD | Bangladesh |
| BE | Belgium |
| BF | Burkina Faso |
| BG | Bulgaria |
| BH | Bahrain |
| BI | Burundi |
| BJ | Benin |
| BM | Bermuda |
| BN | Brunei Darussalam |
| BO | Bolivia |
| BR | Brazil |
| BS | Bahamas |
| BT | Bhutan |
| BV | Bouvet Island |
| BW | Botswana |
| BY | Belarus |
| BZ | Belize |
| CA | Canada |
| CC | Cocos (Keeling) Islands |
| CF | Central African Republic |
| CG | Congo |
| CH | Switzerland |
| CI | Côte d’Ivoire |
| CK | Cook Islands |
| CL | Chile |
| CM | Cameroon |
| CN | China |
| CO | Colombia |
| CR | Costa Rica |
| CU | Cuba |
| CV | Cape Verde |
| CX | Christmas Island |
| CY | Cyprus |
| CZ | Czech Republic |
| DE | Germany |
| DJ | Djibouti |
| DK | Denmark |
| DM | Dominica |
| DO | Dominican Republic |
| DZ | Algeria |
| EC | Ecuador |
| EE | Estonia |
| EG | Egypt |
| EH | Western Sahara |
| ER | Eritrea |
| ES | Spain |
| ET | Ethiopia |
| FI | Finland |
| FJ | Fiji |
| FK | Falkland Islands (Malvinas) |
| FM | Micronesia (Federated States of) |
| FO | Faroe Islands |
| FR | France |
| FX | France, Metropolitan |
| GA | Gabon |
| GB | United Kingdom |
| GD | Grenada |
| GE | Georgia |
| GF | French Guiana |
| GH | Ghana |
| GI | Gibraltar |
| GL | Greenland |
| GM | Gambia |
| GN | Guinea |
| GP | Guadeloupe |
| GQ | Equatorial Guinea |
| GR | Greece |
| GS | South Georgia and the South Sandwich |
| GT | Guatemala |
| GU | Guam |
| GW | Guinea-Bissau |
| GY | Guyana |
| HK | Hong Kong |
| HM | Heard Island and McDonald Islands |
| HN | Honduras |
| HR | Croatia |
| HT | Haiti |
| HU | Hungary |
| ID | Indonesia |
| IE | Ireland |
| IL | Israel |
| IN | India |
| IO | British Indian Ocean Territory |
| IQ | Iraq |
| IR | Iran (Islamic Republic of) |
| IS | Iceland |
| IT | Italy |
| JM | Jamaica |
| JO | Jordan |
| JP | Japan |
| KE | Kenya |
| KG | Kyrgyzstan |
| KH | Cambodia |
| KI | Kiribati |
| KM | Comoros |
| KN | Saint Kitts and Nevis |
| KP | Korea, Democratic People's Republic of |
| KR | Korea, Republic of |
| KW | Kuwait |
| KY | Cayman Islands |
| KZ | Kazakhstan |
| LA | Lao People's Democratic Republic |
| LB | Lebanon |
| LC | Saint Lucia |
| LI | Liechtenstein |
| LK | Sri Lanka |
| LR | Liberia |
| LS | Lesotho |
| LT | Lithuania |
| LU | Luxembourg |
| LV | Latvia |
| LY | Libyan Arab Jamahiriya |
| MA | Morocco |
| MC | Monaco |
| MD | Moldova, Republic of |
| MG | Madagascar |
| MH | Marshall Islands |
| ML | Mali |
| MM | Myanmar |
| MN | Mongolia |
| MO | Macau |
| MP | Northern Mariana Islands |
| MQ | Martinique |
| MR | Mauritania |
| MS | Montserrat |
| MT | Malta |
| MU | Mauritius |
| MV | Maldives |
| MW | Malawi |
| MX | Mexico |
| MY | Malaysia |
| MZ | Mozambique |
| NA | Namibia |
| NC | New Caledonia |
| NE | Niger |
| NF | Norfolk Island |
| NG | Nigeria |
| NI | Nicaragua |
| NL | Netherlands |
| NO | Norway |
| NP | Nepal |
| NR | Nauru |
| NU | Niue |
| NZ | New Zealand |
| OM | Oman |
| PA | Panama |
| PE | Peru |
| PF | French Polynesia |
| PG | Papua New Guinea |
| PH | Philippines |
| PK | Pakistan |
| PL | Poland |
| PM | Saint Pierre and Miquelon |
| PN | Pitcairn |
| PR | Puerto Rico |
| PT | Portugal |
| PW | Palau |
| PY | Paraguay |
| QA | Qatar |
| RE | Réunion |
| RO | Romania |
| RU | Russian Federation |
| RW | Rwanda |
| SA | Saudi Arabia |
| SB | Solomon Islands |
| SC | Seychelles |
| SD | Sudan |
| SE | Sweden |
| SG | Singapore |
| SH | Saint Helena |
| SI | Slovenia |
| SJ | Svalbard and Jan Mayen |
| SK | Slovakia |
| SL | Sierra Leone |
| SM | San Marino |
| SN | Senegal |
| SO | Somalia |
| SR | Suriname |
| ST | Sao Tome and Principe |
| SV | El Salvador |
| SY | Syrian Arab Republic |
| SZ | Swaziland |
| TC | Turks and Caicos Islands |
| TD | Chad |
| TF | French Southern Territories |
| TG | Togo |
| TH | Thailand |
| TJ | Tajikistan |
| TK | Tokelau |
| TM | Turkmenistan |
| TN | Tunisia |
| TO | Tonga |
| TP | East Timor |
| TR | Turkey |
| TT | Trinidad and Tobago |
| TV | Tuvalu |
| TW | Taiwan |
| TZ | Tanzania, United Republic of |
| UA | Ukraine |
| UG | Uganda |
| UM | United States Minor Outlying Islands |
| US | United States |
| UY | Uruguay |
| UZ | Uzbekistan |
| VA | Vatican City State (Holy See) |
| VC | Saint Vincent and the Grenadines |
| VE | Venezuela |
| VG | Virgin Islands (British) |
| VI | Virgin Islands (U.S.) |
| VN | Vietnam |
| VU | Vanuatu |
| WF | Wallis and Futuna Islands |
| WS | Samoa |
| YE | Yemen |
| YT | Mayotte |
| YU | Yugoslavia |
| ZA | South Africa |
| ZM | Zambia |
| ZR | Zaire |
| ZW | Zimbabwe |
DVD OPTICAL DIGITAL OUT Signals
| DIGITAL AUDIO OUTPUTPlayback disc | Output Signals | ||
| STREAM/PCM | DOLBY DIGITAL/PCM | PCM ONLY | |
| DVD Videowith 48 kHz, 16/20/24 bitLinear PCM | 48 kHz, 16 bit Linear PCM* | ||
| with 96 kHz, Linear PCM | 48 kHz, 16 bit Linear PCM | ||
| with Dolby Digital | Dolby Digital bitstream | 48 kHz, 16 bit Linear PCM | |
| with DTS | DTS bitstream | 48 kHz, 16 bit Linear PCM | |
| DVD Audiowith 48/96/192 kHz,16/20/24 bit Linear PCM | 48 kHz, 16 bit Linear PCM | ||
| with 44.1/88.2/176.4 kHz,16/20/24 bit Linear PCM | 44.1 kHz, 16 bit Linear PCM | ||
| with Dolby Digital | Dolby Digital bitstream | 48 kHz, 16 bit Linear PCM | |
| with DTS | DTS bitstream | 48 kHz, 16 bit Linear PCM | |
| SVCD, VCD, CD | 44.1 kHz, 16 bit Linear PCM/48 kHz, 16 bit Linear PCM | ||
| CD with DTS | DTS bitstream | 44.1 kHz, 16 bit Linear PCM | |
| MP3/WMA disc | 32/44.1/48 kHz, 16 bit Linear PCM | ||
- While playing some DVDs, digital signals may be emitted at 20 bits or 24 bits (at their original bit rate) through the DVD OPTICAL DIGITAL OUT terminal if the discs are not copy-protected.
Specifications
Amplifier section
Output Power:
HIGH: 40W (20W + 20W) at 4 (10% THD)
50 W (25 W+ 25 W) at 4 Ω (10% MAX)
LOW: 40 W (20 W+ 20 W) at 4 Ω (10% THD)
50 W (25 W+ 25 W) at 4 Ω (10% MAX)
Analog input:
AUX: Sensitivity/Impedance (at 1 kHz)
400mV / 47k (at "AUX LEVEL 1")
200mV / 47k (at "AUX LEVEL 2")
Digital output:
DVD OPTICAL DIGITAL OUT:
-21 dBm to -15 dBm (660 nm ±30 nm)
VIDEO OUT:
Color system:NTSC/PAL selectable
VIDEO (composite): 1 V(p-p)/75 Ω
S-VIDEO: Y (luminance) 1 V(p-p)/75 Ω
C (chrominance, burst)
0.286 V(p-p)/75 Ω
COMPONENT: (Interlace/Progressive):
(Y) 1V(p - p) / 75
(P_B / P_R) 0.7 V(p-p)/75 Ω
Speaker Terminals: 4 -16
Others:
AV COMPU LINK x 2 (Φ 3.5)
Tuner section
FM tuning range: 87.50 MHz - 108.00 MHz
AM tuning range: 531kHz - 1602kHz (at 9kHz )
530kHz - 1600kHz (at 10kHz )
Disc player section
Playable disc: DVD Video/DVD Audio/CD/VCD/SVCD
CD-R/CD-RW (recorded in Audio CD/
Video CD/ Super Video CD/ MP3/ WMA/
JPEG format)
DVD-R/DVD-RW (recorded in video format)
Dynamic range: 90 dB
Horizontal resolution: 500 lines
Wow and flutter: Immeasurable
MP3 recording format: MPEG 1/2 Audio Layer 3
Max. Bit rate: 320 kbps
Cassette deck section
Frequency response
Normal (type I): 50Hz - 14000Hz
Wow and flutter: 0.15% (WRMS)
General
Power requirement: AC 110 V / AC 127 V / AC 220 V - AC 230 V (adjustable with the voltage selector), 50Hz / 60Hz
Power consumption: 90 W (at operation)
12 W (on standby)
5.3 W (with deactivating the clock indication)
Dimensions (approx.): 175mm× 237mm× 375mm
(W/H/D)
Mass (approx.): 7.5 kg
Supplied Accessories
See page 3.
Speakers
Type: 2-Way Bass-reflex type
Speaker Systems: Woofer: 10 cm cone x 1
Tweeter: 4 cm cone x 1
Power handling capacity: HIGH: 20 W
LOW: 20 W
Impedance: HIGH: 4
LOW: 4
Frequency range: 56Hz - 40000Hz
Sound pressure level: 84 dB/W·m
Dimensions (approx.): 145 ~mm × 236 ~mm × 205 ~mm (W/H/D)
Mass (approx.): 2.3 kg each
Design and specifications are subject to change without notice.
This product incorporates copyright protection technology that is protected by method claims of certain U.S. patents and other intellectual property rights owned by Macrovision Corporation and other rights owners. Use of this copyright protection technology must be authorized by Macrovision Corporation, and is intended for home and other limited viewing uses only unless otherwise authorized by Macrovision Corporation.
Reverse engineering or disassembly is prohibited.
"CONSUMERS SHOULD NOTE THAT NOT ALL HIGH DEFINITION TELEVISION SETS ARE FULLY COMPATIBLE WITH THIS PRODUCT AND MAY CAUSE ARTIFACTS TO BE DISPLAYED IN THE PICTURE. IN CASE OF 525 OR 625 PROGRESSIVE SCAN PICTURE PROBLEMS, IT IS RECOMMENDED THAT THE USER SWITCH THE CONNECTION TO THE 'STANDARD DEFINITION' OUTPUT. IF THERE ARE QUESTIONS REGARDING OUR TV SET COMPATIBILITY WITH THIS MODEL 525p AND 625p DVD PLAYER, PLEASE CONTACT OUR CUSTOMER SERVICE CENTER."
1
11 1
rr .
10
ro
V
RV
RA LANGUAGE
PICTURE
AUDIO
OTHERS
31
24 1
行
_0
17 2
E V
A
.DVD OPTICAL DIGITAL OUT
0.
Lg
1
1. _y___
j14..
1
1
8
V
A
A
9
1.
17
15
12 15. a < 0.
17
aagaaagaaagaaagaaagaaagaaagaaagaaagaaagaaagaaagaaagaaagaaagaaagaaagaaagaaagaaagaaagaaagaaagaaagaaagaaagaaagaaagaaagaaagaaagaaagaaagaaagaaagaaagaaagaaagaaagaa
V
17
V
V DVD
11
M
11 2
19. il
1.
DVD/VCD
17 20 all jiào jiān
Y
1
1
1
1
Y2 ...
Y
10
17 3
17
V.
IV.
YA ...
. CONTROL
aillll jlll jil lglj 1jll jll jll jll jll jll
AC 111111111111111111111111
1 1
Ld aal 1aai yll lal yll aal yll aal ll al lal ll al lal ll al lal ll al lal ll al
aI 105c AC aI bI aI bI aI aI

aagbll
aaii iiaaiiie
aB
J 1 J 1 J 1 J 1 J 1 J 1 J 1 J 1 J 1 J 1 J 1 J 1 J 1 J 1 J 1 J 1 J 1 J 1 J 1 J 1 J 1 J 1 J 1 J 1
1
a a a a a a a a a a a a a a a a a a a a a a a a a a a a a a a a a a a a a a
c


#
aallll l jj j j j j j j j j j j j j j j j j j j j j j j j j j j j j j j j j j j j j j j j j j j j j j j j j j j j j j j j j j j j j j j j j j j j j j j jj
a a a a a a a a a a a a a a a a a a a a a
jlll 10000000000000000000000000000
(1) FM
(1) AM 2545
(1)
(1)
(4) _ = _ + _
(1) AC aLglll lal
yds dac ydss
#
(-+)lll 1
m = 311

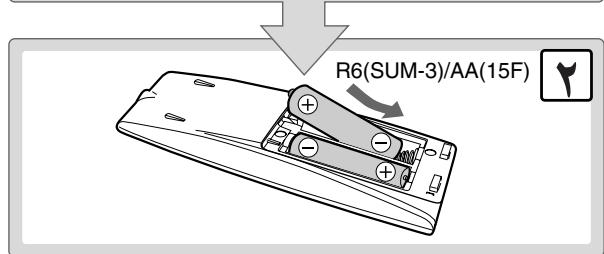

.
a 1
ailll jlrjllalll
Lioie 1jlll jll l
xixixi 1000000000000000000000000000000000000000
yss sssssssssssssssssssssssssssssssssssssssssssssssssssssssssssssssssssssssssssss
.
1
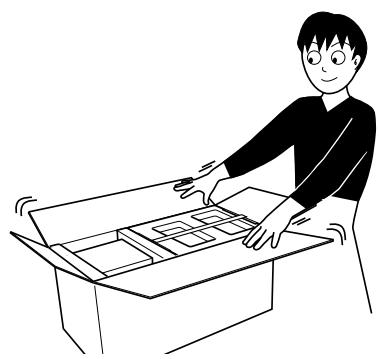
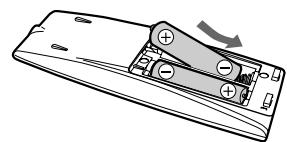
JgJgJgJgJgJgJgJgJgJgJgJgJgJgJgJgJgJgJgJgJgJgJgJgJgJgJgJgJgJgJgJgJgJgJgJgJgJgJgJgJgJgJgJgJgJgJgJgJgJgJ
V
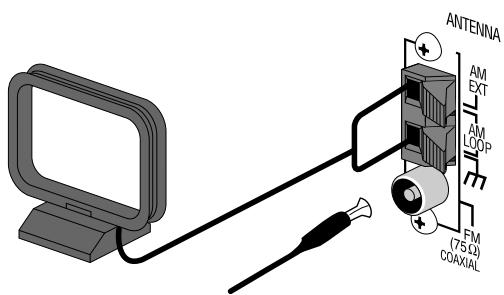
AC
jglall jieui diu jy
jllxg:
V 1 1 1 1 1 1 1 1 1 1
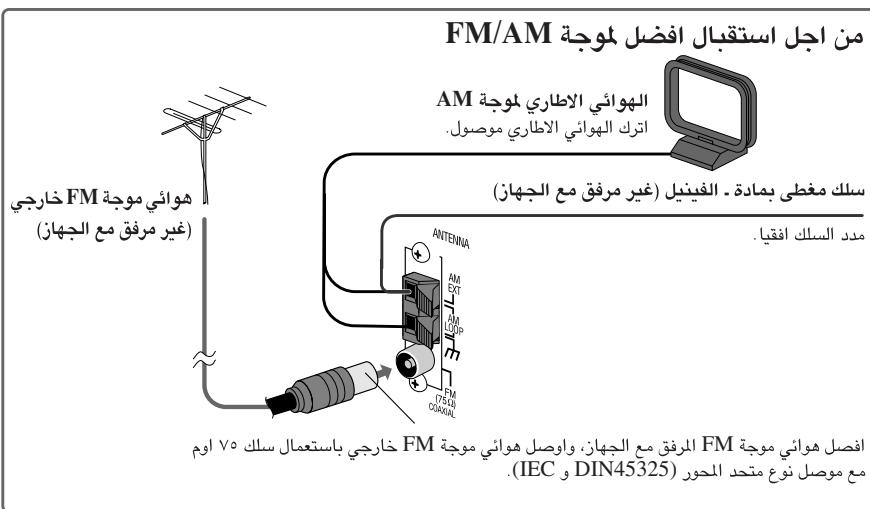
/1jLJI 1
aol aJauyI g oJgJgC
.
syluligsslljaglusgic
aia aiee eae ee
a 1
aalilglacgabalt alalll
jzJ 15 jz aiiyjS11 aiil
Jgll

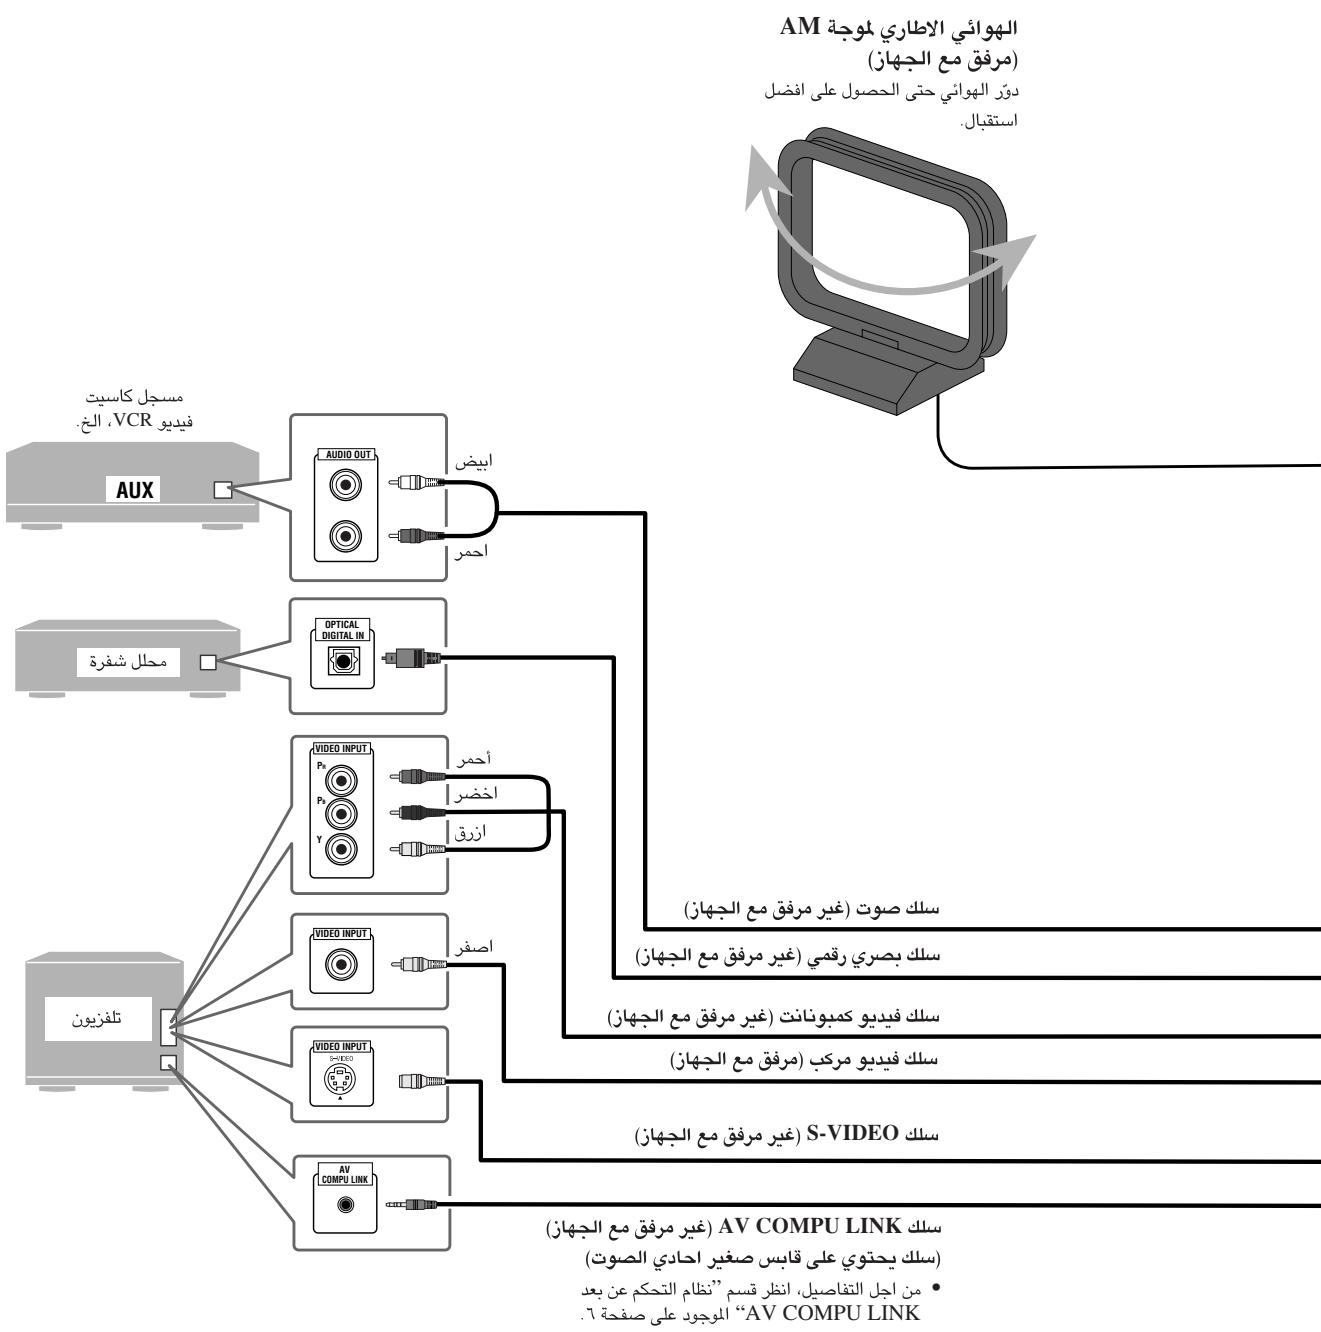
1
J
sLALL. RIGHT 1
LLEFT
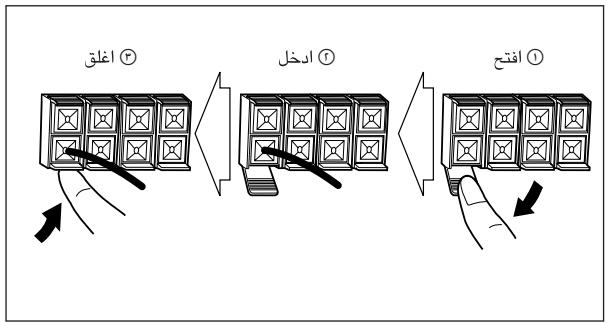
:clallll jbjol jjgl .clallll lwl sic .(-)co wssll +)cooL LOW Lglll 1.(-)co ojjll +)coyolll HIGH Lglll
aLwle 1JnJn JnJn JnJn JnJn JnJn JnJn JnJn JnJn JnJn JnJn JnJn JnJn JnJn JnJn JnJn JnJn JnJn JnJn JnJn JnJn JnJn JnJn JnJn JnJn JnJn JnJn
aaiyaiyaiyaiyaiyaiyaiyaiyaiyaiyaiyaiyaiyaiyaiyaiyaiyaiyaiyaiyaiyaiyaiyaiyaiyaiyaiyaiyaiyaiyaiyaiyaiyaiyaiyaiyaiyaiyaiyaiyaiyaiyaiyaiyaiyaiyaiyaiyaiyaiyai
aLi a 1
131 1
jeg jg jgsaal, jz jz jz jz jz jz jz jz jz jz jz jz jz jz jz jz jz jz jz jz jz
a. AC a a a a a a a a a a a a a a a a a a a a a
J
alglell iio bo
e 1 1 1 1 1 1 1 1 1 1 1 1 1 1 1 1 1 1 1 1 1 1 1 1 1 1 1 1 1 1 1 1

aalglall aaiy gaa jagll aygell aljagl y
clibalt aalall aybalglle jagll aale g
Jolg aia jay gail lalg

Remote ONLY
C. 12121212121
Ji j 11
DVD Jn no n 11.
"PROGRE"
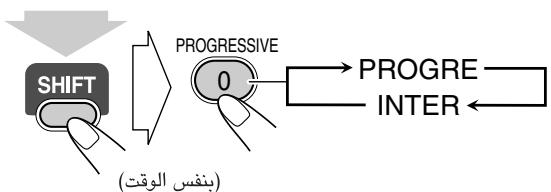
J 1
PROGRE
guliei jyjbjd. yliu
INTER
AV COMPU LINK
JVC 10000000000000000000000000000000000000000000000000000000000000000000000000000000000000000000000000000
Jg
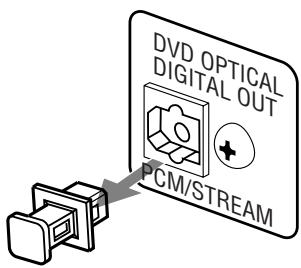
Jus jn Juaa aegj s yssyddlll. dddd. DVD OPTICAL DIGITAL OUT
gall
jaiit jil 1000
NTSC NTSC
aaiii 1. jaoi joi joi
PAL
. 1
PAL

| aproje | PROGRE |
| proble | INTER |
DVD Video
...Lao laa aai glabwI Jiai iip
Jiai jiai jiai jiai jiai jiai jiai jiai jiai jiai jiai jiai jiai jiai jiai jiai jiai jiai jiai jiai jiai jiai jiai jiai jiai jiai jiai jiai jiai jiai jiai jiai jiai jiai j
. Dolby Laboratories 念 . D "MLP Lossless", "Pro Logic", "Dolby" 1. Dolby Laboratories 念 . "DTS2.0+DIGITAL OUT" , and "DTS" Digital Theater Systems, Inc.
J 1
ailll lalglal jlll jlll llae p
| الصحيى الصحيى *الصحيى | الصحيى الصحيى | (العربية)العربية | الصحيى الصحيى |
| ALL | NTSC AL PAL | DVD VIDEO VIDEO AUDIO AUDIO/VIDEO | الصحيى DVD Video |
| DVD AUDIO AUDIO/VIDEO | الصحيى DVD Audio | ||
| —— | COMPACT DISC DIGITAL VIDEO | Video CD الصحيى (VCD) | |
| —— | COMPACT DISC SUPERVIDEO | الصحيى سوير CD (SVCD) صحيى | |
| —— | —— | COMPACT DIGITAL AUDIO | Audio CD الصحيى |
| Audio CD-R Audio CD JPEG | Audio CD Audio CD WMA | Audio CD Audio CD JPEG | Audio CD Audio CD JPEG |
| Audio CD Audio CD JPEG | |||
| Audio CD-R Audio CD JPEG | Audio CD Audio CD Audio CD Audio CD | DVD-R Audio CD Audio CD DVD-RW | Audio CD Audio CD DVD-RW |
| Audio CD Audio CD DVD-RW |
aagla jiai jiajglkai iie 1s sssll aal alal alal alal alal alal alal alal alal alal alal alal alal alal alal alal alal alal alal alal alal alal alal alal alal alal alal alal alal alal alal alal alal alal alal alal alal
L
aJbI bI aI bI aI bI aI aI DVD JbI bI bI J I dI J I dI I I I I I I I I I I I I I I I I I I I I I I I I I I I I I I I I I I I I I I I I I I I I I I I I I I I I I I I I I I I I
alglalll jlll laiiwl aiee eaeell all
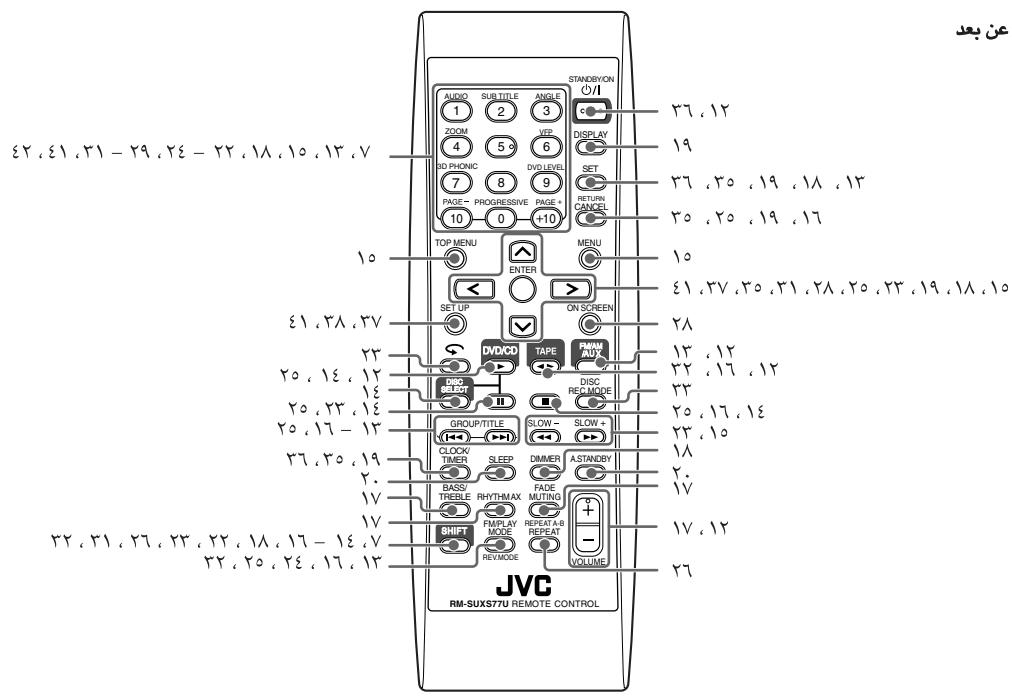
aee pseill 5.0
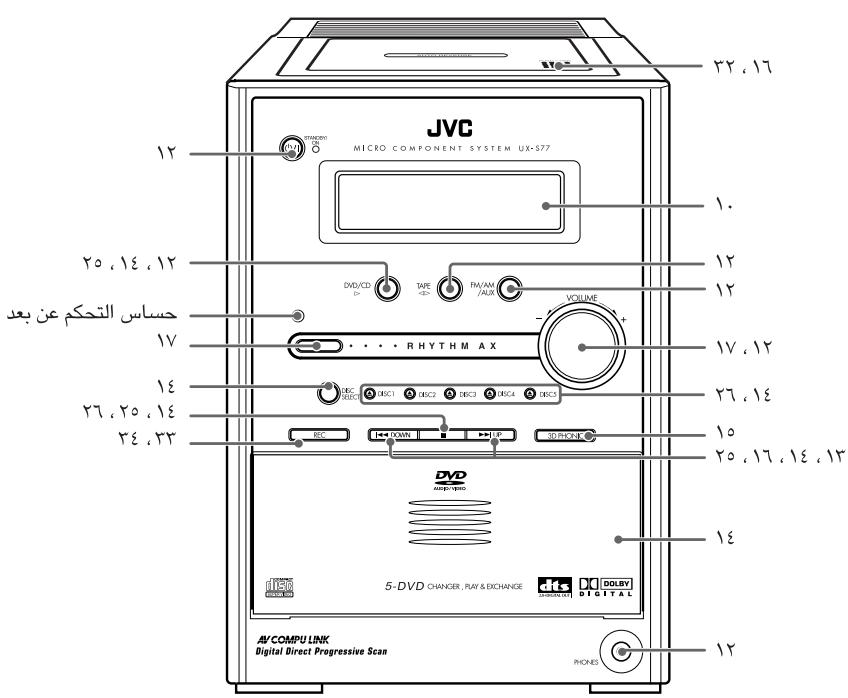
1
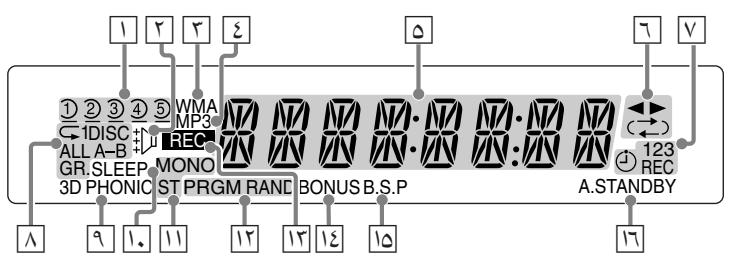
Jill
- Sill bduu u:
:1 DISC ALL A-B GR.
Jalg Jauo jsiie 1
.1DISC
ALL
A-B: A-B
dsgagssj:GR.
3D PHONIC
(10 a 3D PHONIC
SLEEP
.
FM 1
FM :MONO
DVD Audio aIgaww wlll IaIgaww wlll 1s sioe
(14 a 15)
()A.STANDBY
Laiy jai lii nn laoie
Laii jilalil lssu w g uulwau Laiu yu lyu
a
1-5
:():
iJyBnI yjdi jie 1
i 1
a a a a a a a a a a a a a a a a a a a a a a a a a a a a a
11 1
山
:(b)
1 1
J 1
-
:()
JusgKjJyawbysdJz:()-
()-
1 1
a 1
Ji 1
(3)2.1 10:1/2/3
Jlll lll
L:J:J:J:J:J:J:J:J:J:J:J:J:J:J:J:J:J:J:J:J:J:J:J:J:J:J:J:J:J:J:J:J:J:J:J:J:J:J:J:J:J:J:J:J:J:J:J:J:J:J:
Jll
aaiy
| :DVD Video 2345 ⅡⅠⅡⅢⅣ | :DVD Video 2345 ⅡⅠⅡⅢⅣ |
| :DVD Audio 2345 ⅡⅢⅣ | :DVD Audio 2345 ⅡⅠⅡⅢⅣ |
| Audio CD 2345 ⅡⅢⅣ | Audio CD 2345 ⅡⅠⅡⅢⅣ |
| SVCD/VCD 2345 ⅡⅢⅣ | SVCD/VCD 2345 ⅡⅠⅡⅢⅣ |
| PBC "PBC" | |
| :MP3/WMA 2345 ⅡⅢⅣ | :MP3/WMA 2345 ⅡⅠⅡⅢⅣ |
| :JPEG 2345 ⅡⅢⅣ | :JPEG 2345 ⅡⅠⅡⅢⅣ |
Audio CD 111111111111111111111111111111111111111111
.(MP3/WMA/JPEG
Jaaaiw alawg jiaaill cya aai 1
Jiaicui dixai gag aee yegaae eae
aball FM albal yalal yalal Jusu w jzL aydiay
LjLjI pJl J
aaii aaii jaiiaai
aaiiie 1 aaiiie
aigjialabaaallgawatbayalpa jzil
:
( {5b}\dot{1}\dot{2}\dot{1}0,\dot{0}\dot{0}u\dot{1}\dot{1}u\dot{2}\dot{1}u\dot{2}\dot{1}u\dot{2}\dot{1}u\dot{2}\dot{1}u\dot{2}\dot{1}u\dot{2}\dot{1}u\dot{2}\dot{1}u\dot{2}\dot{1}u\dot{2}\dot{1}u\dot{2}\dot{1}u\dot{
+10b#i,10 ##uill b##ll p
5.1
+10 bai 1.
1.10+10
AUDIO SUBTITLE ANGLE
1 2 3
ZOOM VFP
4 5 6
3D PHONIC DVD LEVE
7 8 9
PAGE+
(10)
ab+1j+1
D2345
5
1
T
74
1
T
7
C
一
一

Remot ONLY
Laaa aagaaa aagaae aagg
.(AM FM)

aigjaiabaaal gaaatbuaai j
AUDIO

ZOOM

DPHONIC

PAGE

SUB TITLE

一


ANGLE

VFP

DVD LEVEL

PAGE

aball gswll bwl jz1 4/4> jjll Jlaaal Lz| dka

AM aagagallgagaaaagaaagaaagaaagaaagaaagaaagaaagaaagaaagaaagaaagaaagaaagaaagaaagaaagaaagaaagaaagaaagaaagaaagaaagaaagaaagaaagaaagaaagaaagaaagaaagaaagaaagaa
AM 1
eaiy1 aayaa FM ayoo cts 1
LMOONO
jss jn jy Jyy
Jus Jus
(2) a1 + a2 + a_3 = 6
(MONO 1

FM/PLAY
MODE
Jaaa aae aee aee ae aee aee
JUJUJUJUJUJUJUJUJU

DVD/CD 1
aLILIe "PLAY" aaii iiaai

agai1/ajgiailj
L

()
.MP3/WMA 1
JUa/JuJU
L
i k y jll 1000
GROUP/TITLE

a1gauy
Jgss Jss
“J”J 1DVD Video
J "DVD Audio/MP3/WMA
CD/SVCD/VCD 1
baas "jIw
pAe aee eae ee eae eae eae eae eae eae eae eae eae eae eae eae eae eae eae eae eae eae eae eae eae eae eae eae eae eae eae eae eae eae eae eae eae eae eae eae eae eae eae eae eae eae eae eae eae eae eae eae eae eae e ae
"CONTROL
Lg
jai jia
aagaae gaiyagaiy jall aal 1jbaLaoie
ailllll llllll llllll llllll
Jus (PBC) Jus SVCD/VCD
yjbjdll jai jie jia jia jia jia jia jia jia
:DVD Video/DVD Audio
aIgawyI aiai jai
TOP MENU

MENU

O
aIgawyiaiaiege ann j
ENTER


jlll lalabwlgblalldkayagglge
.1

Juaa
MP3/WMA
DVD Video/SVCD/VCD 1
DVD/CD 1

a
J 1
DVD Video
J 1
:laol
AUDIO

SUB TITLE

ANGLE

VFP

VNDLVD/

9

PAGE


3D Phonic abg Jaaus
...Jl Jld.
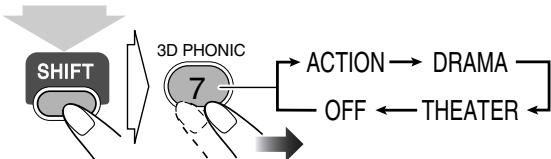
()
3D PHONIC
ACTION
| .action . ACTION . DRAMA . THEATER |
y
J
Ie gai jia 1

jlll lal y
:PBC SG SVCD/VCD
PBC PBC 100000000000000000000000000000000000000000000000000
jidid jidj 1d
:
5 bai 0 1
Laaabgauall gagll jay
VFP


()
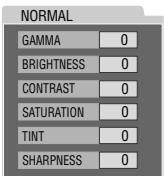
jbjjbjll 1
aagaae aegaae

aal al aallll lal lal
SHARPNESS
( + ) -
jial jil jie

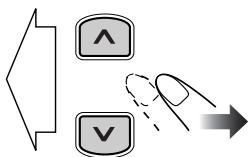
.SHIFT jllgbe blll . 1111111111 VFP jllblll l
Remote ONLY
LsIogglgAysySll
aaiill aaii aaiial aaiil
jll bla 1
J 1 J 1 1 1 1 1 1 1 1 1 1 1 1 1 1 1 1 1 1 1 1 1 1 1 1 1 1 1 1 1 1 1 1 1 1 1 1 1 1 1 1 1 1 1 1 1 1 1 1 1 1 0
.
.
.
.
.
.
.
.
.
.
.
.
.
.
.
.
.
.
.
.
.
.
.
.
.
.
...DVD Video
aal jai aai jai aai jai

gai jiaai jai

:J

... SVCD Video
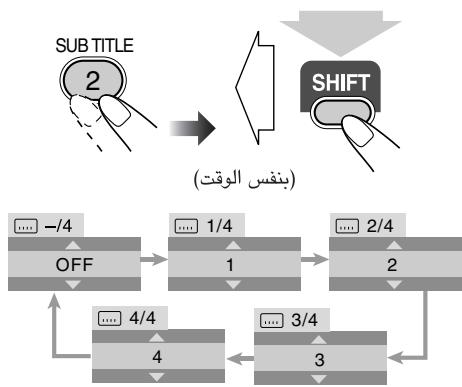
.aaalasjall ayjw jzil

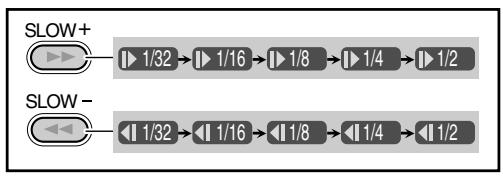
.SVCD/VCD 1
DVD/CD 1
aill jilil Jooos
(olg. aulaly Juaa oJcl)
DVD Video
g j 1.
.(j)


99j1
- 1,2,3 , 4,5,6
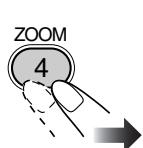


()
Sill Ls! sJy jLs! Ls
Jstl jstl d


ZOOM 3333
"ZOOM OFF"
Remote 1
PQ = 2

()
Remote CNYL
aaii aee

jIbI.
- 1,2,3 , 4,5,6
aillllss

JbI. 1. JbI aaii o

.DVD/CD
aill. asy
1
a 1


a 19 a


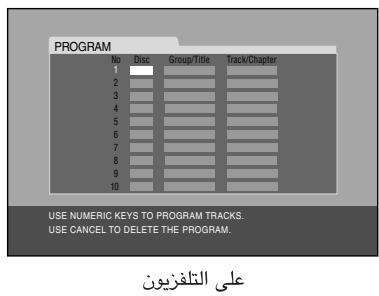
J 1
gaiall jiuuiu c uo guo
J 1

j00 jill jill jll jll
J

Aa (A aab) 1y B yBaaBaaBaaBaaBaaBaaBaaBaaBaaBaaBaaBaaBaaBaaBaaBaaBaaBaaBaaBaaBaaBaaBaaBaaBaaBaaBaaBaaBaaBaaBaaBaaBaaBaaBaaBaaBaaBaaBaaBaaBaaBaaBaaBaaBaaBaaBaaBaaBaaBaaBaaa Baaa Baaa Baaa Baaa Baaa Baaa Baaa Baaa Baaa Baaa Baaa Baaa Baaa Baaa Baaa Baaa Baaa Baaa Baaa Baaa Baaa Baaa Baaa Baaa Baaa Baaa Baaa Baaa Baaa Baaa Baaa Baaa Baaa Baaa Baaa Baaa Baaa Baaa Baaa Baaa Baaa Baaa Baaa Baaa Baaa Baaa Baaa Baaa Baaa Baaa
(SVCD/VCD aIgBpN PBC aIg g)Jaiil (A)
A 1c A- sA

A-B A-A B A-B
aill abii jdi k
.(B) a#i#i #
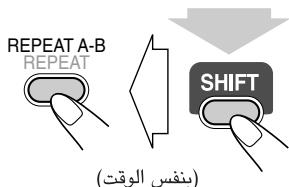
REPEAT A-B jll bai A-B jll jkiy J. SHIFT jll gie bai

Jl 1
Laii iiai jaii jaii jaii jaii jaii jaii jaii jaii jaii jaii jaii jaii jaii jaii jaii jaii jaii jaii jaii jaii jaii jaii jaii jaii jaii jaii jaii jaii jaii jaii jaii jaii jaii jai

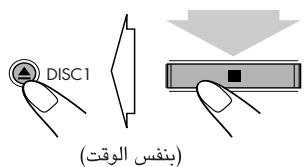
aI. .J. .J. J. J. J. J. J. J. J. J. J. J. J. J. J. J. J. J. J. J. J. J. J. J. J. J. J. J. J. J. J. J. J. J. J. J. J. J. J. J. J. J. J. J. J. J. J. J. J. J. J. J. .J 1J 1J 1J 1J 1J 1J 1J 1J 1J 1J 1J 1J 1J 1J 1J 1J 1J 1J 1J 1J 1J 1J 1J 1J 1J 1J 1J 1J 1J 1J 1J 1J 1J 1
Remote
iL - 1e jzalb yjil Jaiuuiy jsiill iJaii Laii dki. (Aiaa)
1
.
DVD Video
1

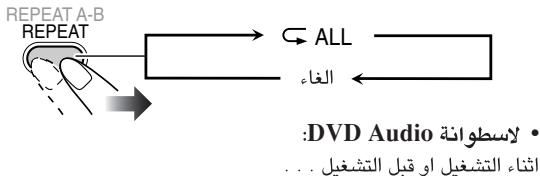

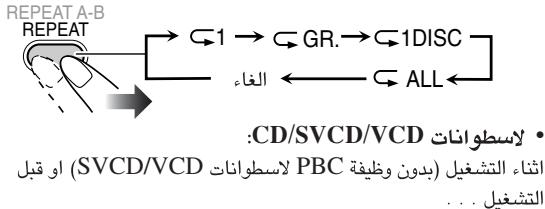

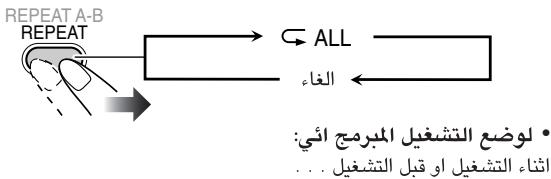


aalal . gld jolal
(MP3/WMA/JPEG 1

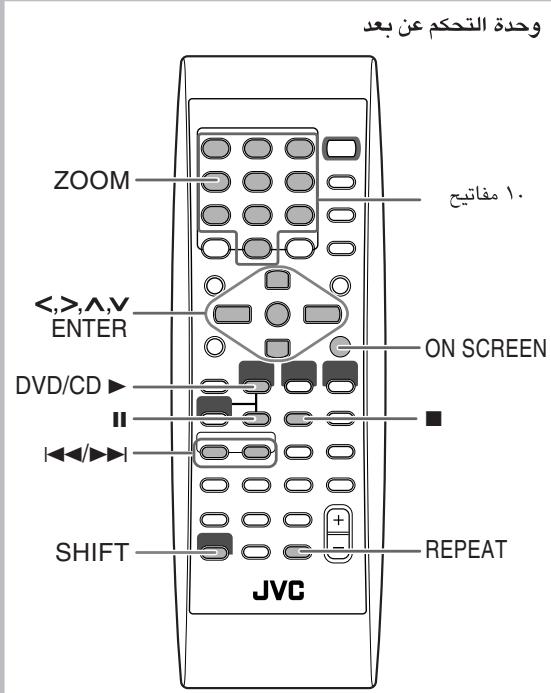
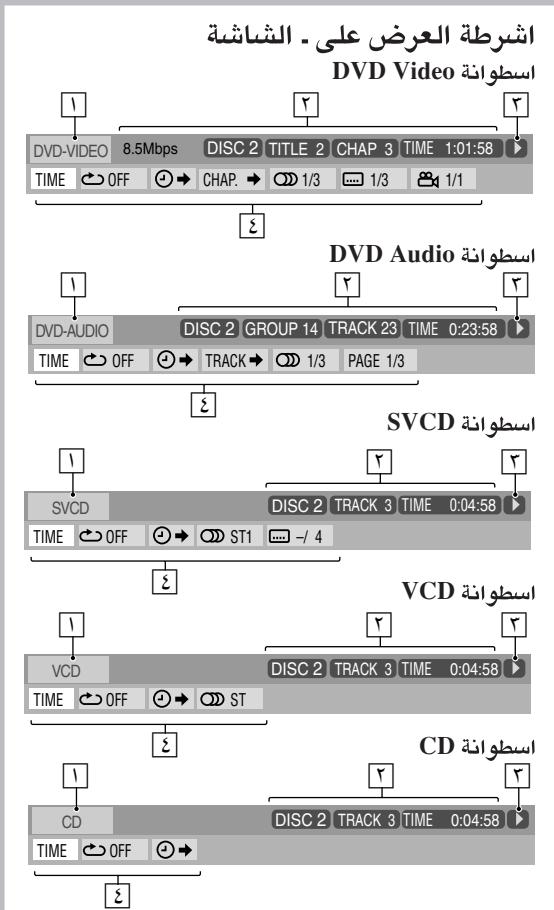
Jiauui Juaaill" pss jbi aill clll laloo Jauo uoc Jao o
gll Logla 1
aagaaagaaagaaagaaagaaagaaagaaagaaagaaagaaagaaagaaagaaagaaagaaagaaagaaagaaagaaagaaagaaagaaagaaagaaagaaagaaagaaagaaagaaagaaagaaagaaagaaagaaagaaagaaagaaagaaagaaagaaagaaagaa
aaiiaaii.

.()

(SVCD/VCD PBC 12000000000000000000000000000000000000000000000000000000000000000
. ②→
jaii. jaii jao

#
[\rho \left( {L + L}\right) = n]
jss, aagaaal gaaal aai jgaaa gl aagaaa aaoa jgaa
aigilzaclae yillgalslo aalgo

JusillIgbiabjolJiaaiuLi
17 1
JdE JdEe
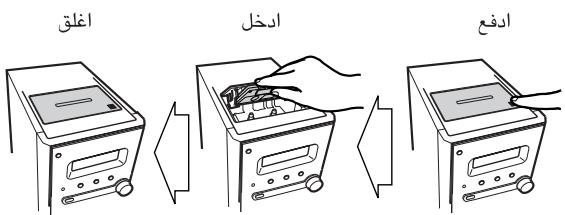
1
aaiiie giee eae gge aeg
.
a
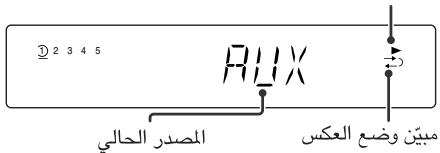
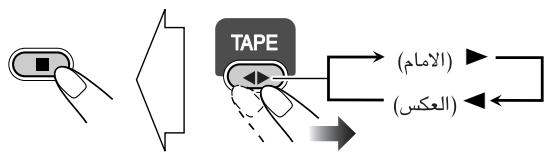
a

| بُزَمِلَهُفَسَعَلْهُفَسَعَلْهُفَسَعَلْهُفَسَعَلْهُفَسَعَلْهُفَسَعَلْهُفَسَعَلْهُفَسَعَلْهُفَسَعَلْهُفَسَعَلْهُفَسَعَلَلْهُفَسَعَلْهُفَسَعَلْهُfَسَعَلْهُfَسَعَلْهُfَسَعَلْهُfَسَعَلْهُfَسَعَلْهُfَسَعَلْهُfَسَعَلْهُfَسَعَلْهُfَسَعَلْهُfَسَعَلْهُ fَسَعَلْهُfَسَعَلْهُfَسَعَلْهُfَسَعَلْهُfَسَعَلْهُfَسَعَلْهُf· | (←) |
| . . . . . . . . . . . . . . . . . . . . . . . . . . . . . . . . . . . . . . . . . . . . . . . . . . . . . . . . . . . . . . . . . . . . . . . . . . . . . . . . . . . . . . . . . . . . . . . . . . . . . . . . . . . . . . . . . . . . . . . . . . . . . . . . . . . . . . . . . . . . . . . . . . . . . . . . . . . . . . . . . . . . . . . . . . . . . . . . . . . . . . . . . . . . . . . . . . . . . . . . .. . . . . . . . . . . . . . . . . . . . . . . . . . . . . . . . . . . . . . . . . . . . . . . . . . . . . . . . . . . . . . . . . . . . . . . . . . . . . . . . . . . . . . . . . . . . . . . . . . . . . . . . . . . . . . . . . . . . . . . . . . . . . . . . . . . . . . . . . . . . . . . . . . . . . . . . . . . . . . . . . . . . . . . . . . . . . . . . . . . . . . . . . . . . . . . . . . . . . . . . . . . . . . . . . . . . . . . . . . . . . . . . . . . . . . . . . . . . . . . . . . . . . . . . . . . . . . . . . . . . . . . . . . . . . . . . . . . . . . . . . . . . . . . . . . . . . . . . . . . . . - . . . . . . . . . . . . . . . . . . . . . . . . . . . . . . . . . . . . . . . . . . . . . . . . . . . . . . . . . . . . . . . . . . . . . . . . . . . . . . . . . . . . . . . . . . . . . . . . . . . ? . . . . . . . . . . . . . . . . . . . . . . . . . . . . . . . . . . . . . . . . . . . . . . . . . . . . . . . . . . . . . . . . . . . . . . . . . . . . . . . . . . . . . . . . . . . . . . . . . . . \. . . . . . . . . . . . . . . . . . . . . . . . . . . . . . . . . . . . . . . . . . . . . . . . . . . . . . . . . . . . . . . . . . . . . . . . . . . . . . . . . . . . . . . . . . . . . . . . . . . ; . . . . . . . . . . . . . . . . . . . . . . . . . . . . . . . . . . . . . . . . . . . . . . . . . . . . . . . . . . . . . . . . . . . . . . . . . . . . . . . . . . . . . . . . . . . . . . . . . . . - - - - - - - - - - - - - - - - - - - - - - - - - - - - - - - - - - - - - - - - - - - - - - - - - - - - - - - - - - - - - - - - - - - - - - - - - - - - - - - - - - - - - - - - - - - - - - - - - - - - - - - - - . . . . . . . . . . . . . . . . . . . . . . . . . . . . . . . . . . . . . . . . . . . . . . . . . . . . . . . . . . . . . . . . . . . . . . . . . . . . . . . . . . . . . . . . . . . . . . . . . . . • • • • • • • • • • • • • • • • • • • • • • • • • • • • • • • • • • • • • • • • • • • • • • • • • • • |
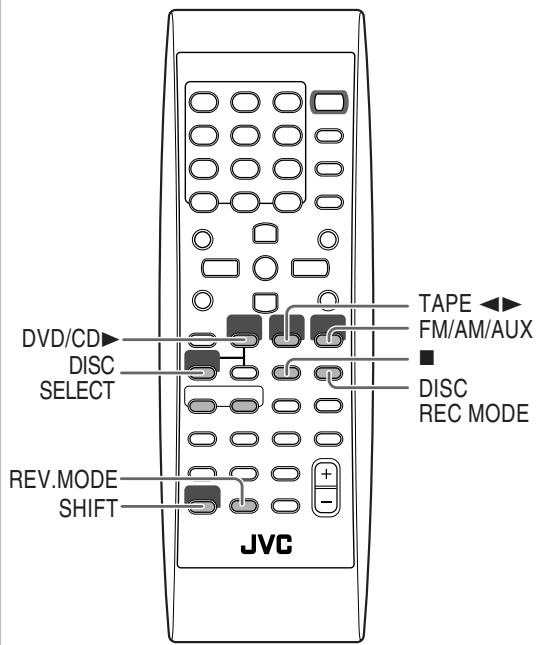
1
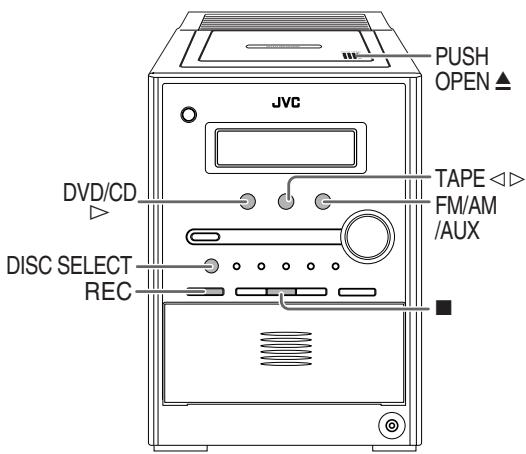
山

L
ONE DISC
Jolgio Jokiy stall algbwn oljzoo
ALL DISC
zglb/2dvd DVD Audio zglb
DVD Video
ilgbbs bii) ilgbss J no JnJnJn
1ST TRK
2.SVCD/VCD/CD
gabill jjil Jwll gjg loie Jwll 1d
e 1
abzil yle aalll alaiy

aessssssss
Jusy. glll Jusill goo aalgio slalil gnn jsi ljl
REC jbjb (aee aill 100
gaiy
2 jslgai glll (olalla Jao) oolal l
1
REC
Jusill slal yllb. Jusill gil, tglabnll Jusill ooyloie
山
g“DVD/CD”AM"FM"
"AUX"
Joojoll Jull" Juaauiu Lai diKa aia gauwJoo Juaaill jie
.(J)
J

J

aIgawJia gaoLoa Jilai Juaill aagw, aIgawJuaui ciie
Jilj
aIgawJ no joljH Jwll
cagg
Jaii Jaii iuiuui jiaig aig bua
jll jll lal 100000000000000000000000000000000000000
JALI. 1
Lalagjgl jglln jol paaa dka.aa - jol paaa n jol aaii l aie aill aiae gil "MULTI" saaill aaiy aaiy aaiy baaay baaay aaiy aaiy aaiy aaiy aaiy aaiy aaiy aaiy aaiy aaiy aaiy aaiy aaiy aaiy aaiy aaiy aaiy aaiy aaiy aaiy aaiy aaiy aaiy aaiy aaiy aaiy aaiy aaiy aaiy aaiy aaiy aaiy aaiy
V 1
10 1
:((s + s) / (s + s) 16:9 MULTI / 16:9
16:9 1234567890
:4:3 MULTI LB / 4:3 LB (Letter Box)
4:3 jyjaiitl aaiw yae lglb ayw jss Lioie gaii li jzil
gall oaiy d 1ayw sacel gaiy ayw ayw ayw saoi oai
Lalal
:4:3 MULTI PS / 4:3 PS (Pan Scan)
4:3 jn jnnn n nn nnnn nn nnnn nn nnnn nn nnnn nn nnnn nn nnnn nn nnnn nn nnnn nn nnnn nn nnnn nn nnnn nn nnnn nn nnnn nn nnnn nn nnnn nn nnnn nn nnnn nn nnnn nn nnnn nn nnnn nn nnnn nn nnnn nn nnnn nn nnnn nn nnnn nn nnnnn nn nnnn nn nnnn nn nnnn nn nnnn nn nnnn nn nnnn nn nnnn nn nnnn nn nnnn nn nnnn nn nnnn nn nnnn nn nnnn nn nnnn nn nnnn nn nnnn nn nnnn nn nnnn nn nnnn nn nnnn nn nnnn nn nnnn nn nnnn nn nnnn nn nnn

4:3PS:Jt。

4:3 LB::Jt。

16:9:Jt

ENTER
1aaiia 15 yjy jgiil bai 2 gllgblal 1 V
15 aaiia 15 yjy jgiil bai 2 gllgblal 1
1a 1

SETUP
LANGUAGE
aill llll llll llll llll llll llll llll
jgllll jld jld tll jyjdtllle
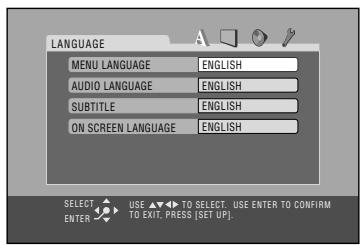
MENULANGUAGE
.
FRENCH,SPANISH,ENGLISH 一AA-ZU,JAPANESE,ITALIAN,GERMAN,CHINESE
(1Vzaiygljglll“diiljjj
AUDIO LANGUAGE
1
FRENCH,SPANISH,ENGLISH 一AA-ZU,JAPANESE,ITALIAN,GERMAN,CHINESE
(1Vz 150gll "dilll a 150" jdl)
SUBTITLE
FRENCH,SPANISH,ENGLISH- AA-ZU,JAPANESE,ITALIAN,German,CHINESE "((J) OFF" (EV SAe Jglll "ailll jd)
ON SCREEN LANGUAGE
ENGLISH-
.SPANISH,CHINESE
AUDIO
jL

DIGITAL AUDIO OUTPUT
aay 1a baa aal al ae yaa aal aa aai
1
la la jia jia
| :PCM ONLY | |
| DOLBY DIGITAL :PCM/ | |
| :STREAM/PCM |
J L 1" DVD OPTICAL DIGITAL OUT
DOWN MIX
Jc jll l b aai i aai gai gai gai gai gai gai
Jgll jgl gll
ylll llll ylll lllllllllllllllllllllllllllllllllllllllllllllllllllllllllllllllllllllllllllllllllllllllllllllllllllllllllllllllllllllll
ylo
iJlloalj
Lg 1000
DOLBY
:SURROUND
MD Jua, Juaa, (sui) juaa a
:STEREO
·
PICTURE SOURCE
Jzlll Jzlll 1abw yS kay la Jzslly sss sss
(1) 2000
iLolaljdi
: AUTO
pduo aoe 1000000000000000000000000000000000000000000
a aaa aee
all all (y
:FILM
VIDEO
SCREENSAVER
| VIDEO-3 J吕吕吕吕吕吕吕吕吕吕吕吕吕吕吕吕吕吕吕吕吕吕吕吕吕吕吕吕吕吕吕吕吕吕吕吕吕吕吕吕吕吕吕吕吕吕吕吕吕吕吕吕吕吕吕吕吕吕吕吕吕吕吕吕吕吕吕吕吕吕吕吕吕吕吕吕吕吕吕吕吕吕吕吕吕吕吕吕吕吕吕吕吕吕吕吕吕吕吕吕 |
| DVD1 |
| DVD2 |
| DVD3 |
"AV COMPU LINK 2e jp klll pai" wabjil. Juslil JnJ . V aee s
PARENTAL LOCK
PARENTAL LOCK 1
D. RANGE COMPRESSION
gaiu (i 1d g u g u g u g u g u g u g u g u g u g u g u g u g u g u g u g u g u g u g u g u g u g u g u g u g u g u g u g u g u g u g u g u g u g u g u g u g u g u g u g u g u g u g u g u g u g u g u g u g u g u g
Jd 1 1 1
10.4.2.1
: AUTO
y j 150000000000000000000000000000000000000000000000000000000000000000000
:ON
S_all = 12
OTHERS
sJdJIaJIbJIgJnJyJnJcJy
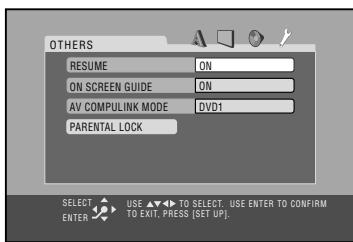
RESUME
(120 1
100
:ON
:OFF
ON SCREEN GUIDE aee
"SET LEVEL" 10000000000000000000000000000000000000000000000000
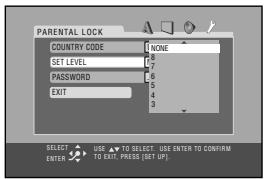
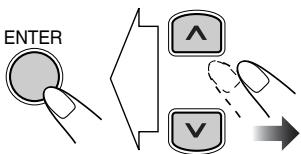
(1-8, NONE)
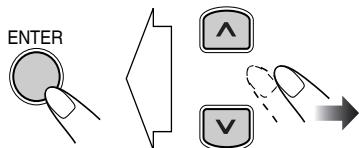
"PASSWORD" 100000000000000000000000000000000000000000000000000000000000000000000000000000000


AUDIO

SUB TITLE

ANGLE


一

DVD LEVEL


Jooi Joo
JbIe JcJyDVD Video 1111111111111111111111111111111111111111111111111
Jai jai bai Jai (1jai jai) A gsiu 11 (1jai jai) ssiu
.1a


OTHERS
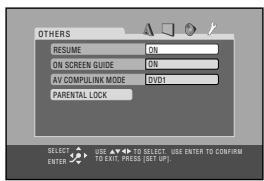
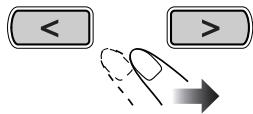
.PARENTAL LOCK"
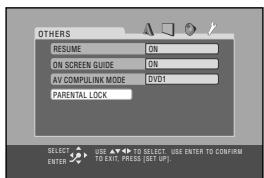
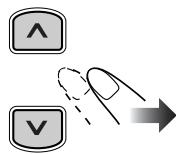
.PARENTAL LOCK JdJdJIaIeJgJdJIaIeJdJIg


aagaae
sALL kJ 1
"PASSWORD"
.

J. ENTER JJJJJJJJJJJJJJJJJJJJJJJJJJJJJJJJJJJJJJ
y


AUDIO
1
ZOOM
4
IDPHONIC
7
SU
C
C
C
(
PROGRESSIVE
0
ANGLE
3
VFP
6
OVD LEVEL
9
M
8888" pJJJ Jssll 100
"Jaa Jaa baa" aaaa
"Password" yll aal alaal aal alal

a 1
DVD/SVCD/VCD 1aIbss bbs 11111111111111111111111111111
Jgall Jauuill Jauuill Lai Jauuill auiuiaa Jauuay
... MP3/WMA/JPEG
“aIgLoa oJ” 1111111111111111111111111111111111111111111111111111
(.).CD
MP3/WMA/JPEG 1
ISO 9660 MP3/WMA JgJc
MP3/WMA/JPEG 1
<.jpg> <.wma> <.mp3> all
(3)
15 15 MP3 15 15
jalliaibiu 2. aillbuiy jay 11Aloglao jiaaigjra
iiitj 15 10
jay) aegaa 99 y Jauo 1... gao 1le jaiill jaiill liis
JLL 10.2
14 15
aagaaagaaagaaagaaagaaagaaagaaagaaagaaagaaagaaagaaagaaagaaagaaagaaagaaagaaagaaagaaagaaagaaagaaagaaagaaagaaagaaagaaagaaagaaagaaagaaagaaagaaagaaagaaagaaagaaagaaagaaagaaagaa
(VJLJI)
gall ogg ginnu h
a a a a a a a a a a a a a a a a a a a a a a a a a a a a a a a a a a a a a a a a a a a a a a a a a a a a a a a
...
aIglaalge gaoe aie paae eae aegla I al dlll Jll
(1)
jlll jg j
(Vgll 1 1
e
yall Jj 10 jyjll lgl a yjll yall o yjg yjg
lll
(11) all 1
Jaiilalilalilalilalil
e 1000000000000000000000000000000000000000000000
“PAL”
LAL 100
J
e 1aasaaal lssoLs PAL pblzglbaw
“NTSC"
4-2000 1
Jitill icie iis jss
jge yll jgb aaii jzssall jyegll jglb aaii jbi jI sO -
-
(17) 11
a 1
ylll yjldlaal
aIbJcUacUaAC 124
131 p 132
aii 1y0 1000 all gann llal Jcl, dll
aai gaaai
a aaii iiaii lll aiiil gis gauw wiaialgul Jiauiu jie
1,2,3
VCD SVCD DVD
a 100000000000000000000000000000000000000000
1
Lwlll lal yol o j 1
DISC2JlaI Jl
DISC 1 DISC 5 DISC 4 DISC 3 DISC2
(g)
ilgblalll pgsbiy aannall gilgblal ypspeie
jglgblj j1 jlll lglbln
JIO JIO JIO JIO DVD Audio 1000
Jzssssssssssssssssssssssssssssssssssssssssssssssssssssssssssssssssssssssssssssssssssssssssssssss
aolal oolal 1
JLJ 3D Phonic
DVD OPTICAL DIGITAL OUT
VCD SVCD 1
jLd jks jJ 1s J 1s PBC
. 1. i.i.e. 12 , 13 , 14 , ·s
(11)
yIgSlllglbAaACsllllll
aai 1
Jusu
1 1
0.5251 二
gao clll jiuuiuuiuuiiueo 12 aegill gao cibiai lj
a 1
(1)
LANGUAGE
"MENU LANGUAGE" aaii iiei
“AUDIO LANGUAGE”
"SUBTITLE
a1 = 1 又 a5 = 12
P 图TRE 1
:MONITOR TYPE
4:3 4:3PS
e DVD Video letter box
CuljIgJUJI Juaa
4:3 48 yll 169
a aaa
:DOWNMIX 一AUDIO
.1sill . DTS 0i jai y lae lss Jie bll
OHTHERS
:ON SCREEN GUIDE
()
"OFF" 1
jll jn jnnn nn nnnn nnnn nnnn nnnn nnnn nnnn nnnn nnnn nnnn nnnn nnnn nnnn nnnn nnnn nnnn nnnn nnnn nnnn nnnn nnnn nnnn nnnn nnnn nnnn nnnn nnnn nnnn nnnn nnnn nnnn nnnn nnnn nnnn nnnn
- a4 = a1 + 3 = 4
MP3/WMA/JPEG
1 1
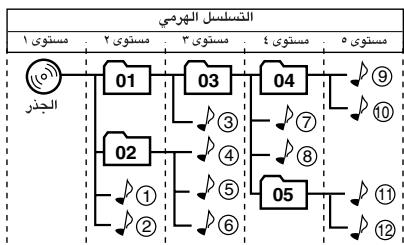
L
01
1 ①
gill giall Jaiii Ijai jai
.JPEG
aal laii aaiai
alglall Jauuall aai gie 8a
aill bdd jzj zkgl aJgall jll J
Jlll Jlll Jlll Jlll
()a1gawuuaai-
(1)V
JPEG
1111 ).x.×7.1111
(.)
jay y. gela bJPEG oIoo jol lai
JPEG JPEG
g j 1
JGL JALI JPEG
JPG
JPG 1 j
a 1
Jg j 1j j j j j j j j j j j j j j j j j j j j j j j j j j j j j j j j j j j j j j j j j j j j j j j j j j j j j j j
JPG 1
Jal Jol Jol Jol Jol Jol Jol
(rrr rlll jil) aegbbl bayll
:duyill
JL. 1. Lgoljg Jssssssssssssssssss
jij j j j j j j j j j j j j j j j j j j j j j j j j j j j j j j j j j j j j j j j j j j j j j j j j j
Jill
aie 1i i
pLsly sioi, i. y 1y j 1y
aessssssssssssssssssssssssssssssssssssssssssssssssssssssssssssssssssssssssssss
y 1
Jgblal Jusll 1iul alglbwlai iie jcky
aIglawyJoojoljdt Jauwll
Jusll 1 (▶) oLsIolzIg aIyIg ll bIuill Iosie
gie aie jai jai wai sai e i jy gao
(DVD Video 1
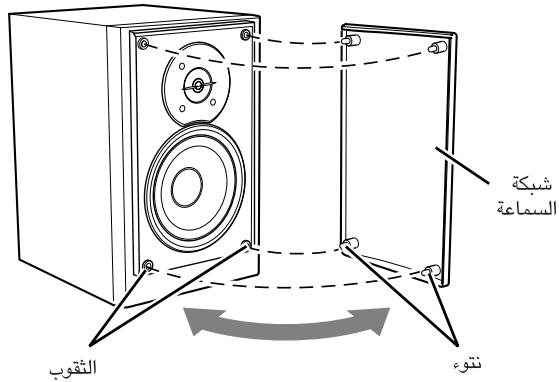
abulgolglallglalbalejglalnololj
aaii aaii
a aai iil g yu aie
aie binaaii aiai gao jkaiaiaiaiaiaiaiaiaiaiaiaiaiaiaiaiaiaiaiaiaiaiaiaiaiaiaiaiaiaiaiaiaiaiaiaiaiaiaiaiaiaiaiaiaiaiaiaiaiaiaiaiaiaiaiaiaiaiaiaiaia
K
aIgblaln lglal 2g. gIgblaln n o
iJgblnI e gill uaiuui 1
山
aillgawllcbw wjdzjol joo
a 1
aallll llll llll
:ii|glw|
gai 1i i jshui jyoo jao aiau biae laa aabay
A
a a 100
J 1
J 1
1 1
J 1
JSLK JALL OJSLK 1abjzjjll JSLK
e 1
aill l 1
:JUuUg Juaauiuul 1uai uuaauiu
Lilililililg, gjy jbiil JgSll ydi dill aikh kaoa Jaoi
a|gall sall
aikjckl a jkckn k jckn k jckn k jckn
(1jlll l 11)
j4-11
aill 11. acll aas aas laaiiil ay
jlaia kaiy illa jalas taibab aubu yalea, alljil i aie jall
a 1
Jg j g Jg Jg Jg Jg Jg Jg Jg Jg Jg Jg Jg
aaii i 1
-
a. j all
Jbbs kay. (JPEG 10 MP3/WMA
"FILE TYPE" allg bbsbss
“FILE TYPE”
aIgawwJ IaJoo Jel, aIe all oia
. "NO AUDIO"
DVD Audio
a
.LRONLY"
Jio Jie. iue. vssll DVD Audio 1uulgus
gaiy aolal y gssll aolal ay jaijai jai jai jai jai
.bao
gao 1gao 1
aaggl aagaaaglaag
gaiy gciy ayglawy aiin
a 11 a a a a a a a a a a a a a a a a a a a a a a
()julil julil
:
L
AC 11111111111111111111111
jll j
:
Jauill say
( x + 1) ( y + 1) = 0
Jnlll Ggogg Jaa
aaii jn nnnn nn nnnn nnnn nnnn nnnn nnnn nnnn nnnn nnnn nnnn nnnn nnnn nnnn nnnn nnnn nnnn nnnn nnnn nnnn nnnn nnnn nnnn nnnn nnnn nnnn nnnn nnnn nnnn nnnn nnnn nnnn nnnn nnnn nnnn nnnn
a
Jy jn nn n nn nn nn nn nn nn nn nn nn nn nn nn nn nn nn nn nn nn nn nn nn nn nn nn nn nn nn nn nn nn nn nn nn nn nn nn nn nn nn nn nn nn nn nn nn nn nn nn nn nn nn nn nn nn nn nn nn nn nn nn nn nn nn nn nn nn nn nn nn nn nn nn nn nn nn nn nn nn nn nn nn nn nn nn nn nn nn nn nn nn nn nn nn nn nn nn nn nn nn nn
SHIFT jjlllai Lai)SUB TITLE 1
(1) (2)
aagg aegaae gaae
DVD
SHIFT LALI AUDIO
(1) a4 = a2 + 3 = 4
xJgJxJx
Jl j 1111 Jj 1111 Jj 1111 Jj 1111
aJlal aJd JcJU JJIbJgJLdl jck Jgl
P_LC
ydaas o sglaii joo lalagall gl yduell fll
1 1
.1100
yK 1
Aa 1
lg// = ( x - 1)
A
aL
ailllllglgss
120000000000000000000000000
gl. 12345678901123456789011234567890112345678901123456789011234567890112345678901123456789011234567890112345678901
aagaae aegaae
j
"gell 100000000000000000000000000000000000000000000000
(IV) 12x - 1 > 0 或 12x + 1 > 0
aullllgdsgaaaagaaall gaaalgl
4:3 LB/4:3 MULTILB
(MONITOR TYPE)
:
aannnnn nnnn nnne
AM
FM
aai gbsy1
Jglgjll Jia
j 1 j 1e 10 g i g b 10 .g 10 k g 10 g
10
.MP3/WMA aagglge ID3 aagllg
jglll 136 136 136 136 136 136 136 136 136 136 136 136 136 136 136 136 136 136 136 136 136 136 136
ID3 1bbs
gLo MP3/WMA/JPEG 1
g
c01y
.上
DVD OPTICAL DIGITAL OUT
| الإستعمال الحرفية | DIGITAL AUDIO OUTPUT | |||
| PCM ONLY | DOLBY DIGITAL/PCM | STREAM/PCM | الإستعمال الحرفية | |
| بُّلَبْدِهُ PCM* , بُّلَبْدِهُ δΛ | DVD Video الحرفية USB بُّلَبْدِهُ PCM, مع ⒊ε/⒊.17, بُّلَبْدِهُ δΛ | |||
| بُّلَبْدِهُ PCM | bitstream | bits | USB PCI PCI PCI PCI PCI PCI PCI PCI PCI PCI PCI PCI PCI PCI PCI PCI PCI PCI PCI PCI PCI PCI PCI PCI PCI PCI PCI PCI PCI PCI PCI PCI PCI PCI PCI PCI PCI PCI PCI PCI PCI PCI PCI PCI PCI PCI PCI PCI PCI PCI PC PCI PCI PCI PCI PCI PCI PCI PCI PCI PCI PCI PCI PCI PCI PCI PCI PCI PCI PCI PCI PCI PCI PCI PCI PCI PCI PCI PCI PCI PCI PCI PCI PCI PCI PCI PCI PCI PCI PCI PCI PCI PCI PCI PCI PCI PCI PCI PCI PCI PGN PGN PGN PGN PGN PGN PGN PGN PGN PGN PGN PGN PGN PGN PGN PGN PGN PGN PGN PGN PGN PGN PGN PGN PGN PGN PGN PGN PGN PGN PGN PGN PGN PGN | USB PCI PCI PCI PCI PCI PCI PCI PCI PCI PCI PCI PCI PCI PCI PCI PCI PCI PCI PCI PCI PCI PCI PCI PCI PCI PCI PCI PCI PCI PCI PCI PCI PCI PCI PCI PCI PCI PCI PCI PCI PCI PCI PCI PCI PCI PCI PCI PCI PC PC PC PC PC PC PC PC PC PC PC PC PC PC PC PC PC PC PC PC PC PC PC PC PC PC PC PC PC PC PC PC PC PC PC PC PC PC PC PC PC PC PC PC PC PC PC PC PC PC PCI PCI PCI PCI PCI PCI PCI PCI PCI PCI PCI PCI PCI PCI PCI PCI PCI PCI PCI PCI PCI PCI PCI PCI PCI PCI PCI PCI PCI PCI PCI PCI PCI PCI PCI PCI PCI PCI PCI PCI PCI PCI PCI PCI PCI PCI PCI PCI PC PGN PGN PGN PGN PGN PGN PGN PGN PGN PGN PGN PGN PGN PGN PGN PGN PGN PGN PGN PGN PGN PGN PGN PGN PGN PGN PGN PGN PGN PGN PGN PGN PGN |
| bitstream | bits | DTS bitstream | DTS | |
| bitstream | bits | DTS bitstream | DTS | |
| bitstream | bits | DTS bitstream | DTS | |
| bitstream | bits | DTS bitstream | DTS | |
| bitstream | bits | DTS bitstream | DTS | |
| bitstream | bits | DTS bitstream | DTS | |
| bitstream | bits | DTS bitstream | DTS | |
| bitstream | bits | DTC bitstream | DTC | |
| bitstream | bits | DTC bitstream | DTC | |
| bitstream | bits | DTC bitstream | DTC | |
| bitstream | bits | DTC bitstream | DTC | |
| bitstream | bits | DTC bitstream | DTC | |
| bitstream | bits | DTC bitstream | DTC | |
| bitstream | bits | DTC bitstream | DTC | |
| bitstream | bits | DTS bitstream | DTS | |
| bitstream | bits | DTS bitstream | DTS | |
| bitstream | bits | DTC bitstream | DTC | |
| bitstream | bits | DTC bitstream | DTC | |
| bitstream | bits | DTC bitstream | DTC | |
| bitstream | bits | DTC bitstream | DTC | |
| bitstream | bits | DTS bitstream | DTS | |
| bitstream | bits | DTC bitstream | DTC | |
Jg j 1000000000000000000000000000000000000000000000000000000000
#
/125 1V/12511.AC 123456789. AC 123456789. AC 123456789. (jLgall abuabduaill Jla) jy7./jz0. (Jusll li) sbg9. (Jusll uaiuW) sbg11
(aclll aIul Ic) bgl O.
po rvo x pR rVx po V0
(ge/c/le/1/2e)
p≤V,0
aLgSll aall lll
a
:1j
:()
#
- a = 2
#
aALLsle gjJz
1xgbsy 1:
1xgbsy 2:
1g. :HIGH
1g. :LOW
psl :HIGH
psl :LOW
jya . - jya 07
Wm/luw w
r.0xpo rrrx po 1e0
(2ac/c laj/2ae)
aclaw kS r
:
:laIoll
JUJJU JUJU UUUU UUUU UUUU UUUU UUUU UUUU UUUU UUUU UUUU UUUU UUUU UUUU UUUU UUUU UUUU UUUU UUUU UUUU UUUU UUUU UUUU UUUU UUUU UUUU UUUU UUUU UUUU UUUU UUUU UUUU UUUU UUUU UUUU UUU
j
aall lcll yllal gddg aiaagle gslbl jlll lla
glall giall yllal gall gaaag aayol alg 111111111111111111111111111111111111111111111111111111111111111
ylll llll llllllllllllllllllllllllllllllllllllllllllllllllllllllllllllllllllllllllllllllllllllllllllllllllllllll l l l l l l l l l l l l l l l l l l l l l l l l l l l l l l l l l l l l l l l l l l l l l l l l l l l l l l l l lll 625 5 525 625 625 625 625 625 625 625 625 625 625 625 625 625 625 625 625 625 625 625 625 625 625 625 625 625 11111111111111111111111111111111111111111111111111111111
山
gall
iigaiy
()HIGTHD
()
()LW (THD%
()
X
(j)
(AUX LEVEL 1) t t = t t (AUX LEVEL 2) t t = t t
1
DVD OPTICAL DIGITAL OUT
(jzolil.±jzoli7)dBm-10 1 dBm-1j
VIDEO OUT
NTSC/PAL
^&^&^ ^&^&^ (p-p)V VIDEO ^&-
_p^p / (p - p) V ·, r, v : (j, y, z, u) C _p^p / (p - p) V ·, r, u) C _p^p / (p - p) V ·, v : (PB / PR)
( p - 1) + p - 1 > 0
:clawll
S = 1
(, 上) xAVCOMPULINK
11g1
jlaA.,…-jlaAaN,0
FM a 10
( 1 + u) + ·s + ( 1 - u) + ( 1 - 1) < 1 + u + ·s + 1 + 1 + 100
AM 1
()
(a) j1a2 ≤ 1, - j2a3 ≤ 0 .
(j)
aIgawJiao pws
:Jzll 11111111
DVD Video/DVD Audio
SVCD/VCD/CD
s/CD sJzss) CD-RW/CD-R
(JPEG/WMA/MP3/CD /CD
(20) DVD-RW/DVD-R
J.
b 的
soll
wlll llae
aai jiu
MPEG 1/2
:山
:MP3
iiitll 1
:ssall
#
J 1
j1j0.
:Ig) sLd
(WRMS) %

1
1
1. N^2( k > 3n - 2) .
S_ AOB = 12 · AO · OB = 12 × OB × 5
10
3^x - 2^x = 0
RV
V
YALANGUAGE
PICTURE
AUDIO
OTHERS
+ = 8 + ( x + 4) - ^2
F
+ = 2
· s = · s
49
FV 16j.5
·s
DVD OPTICAL DIGITAL OUT
0
Y
Y
Y
1
ai a ai 的最小值为 k .
ai a ai
V
A
A
9
1.
14
14 2
14
19 2
IV.
17. ( x) = x - 1x
17 110
11 DVD
11 11lo
11
11
19
y.
DVD/VCD
1
YJ
11 111 11
41
1
1
YF
y 1
10
19
9 9
YV
YV.
YI .
. CONTROL
AC 10000000000000000000000000000000000000000000000000000000000000000
1
oalaiy jj yj loolol ool 1s yj 00000000000000000000000000000000000000000000000000000000000000000000000000
( x + 2) ( x + 4) = 0
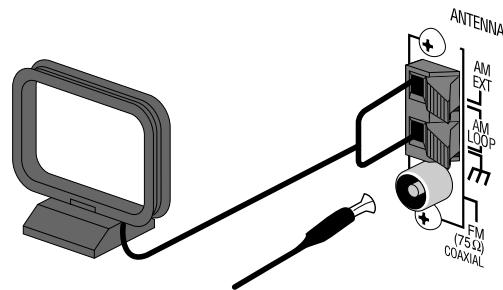
A
.150
- S ACD = S COD + S BDO = S DCA +
FM/AM

20 1520
.
4.1.5 (a)
10 10
100 100 100 100 100 100 100 100
.1i 10
- 1,2,3,4 1,2,3,4 1,2,3,4
(c)FM
1
L
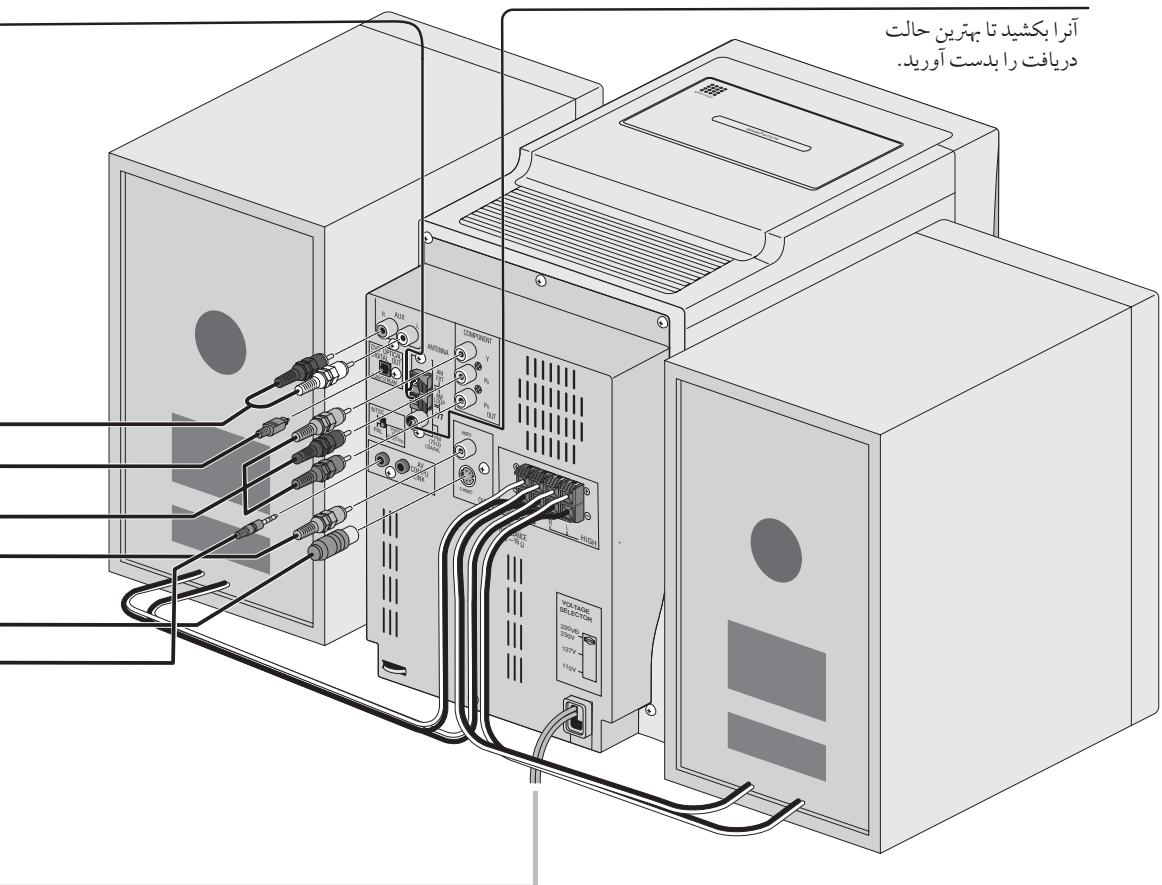
()AM
1
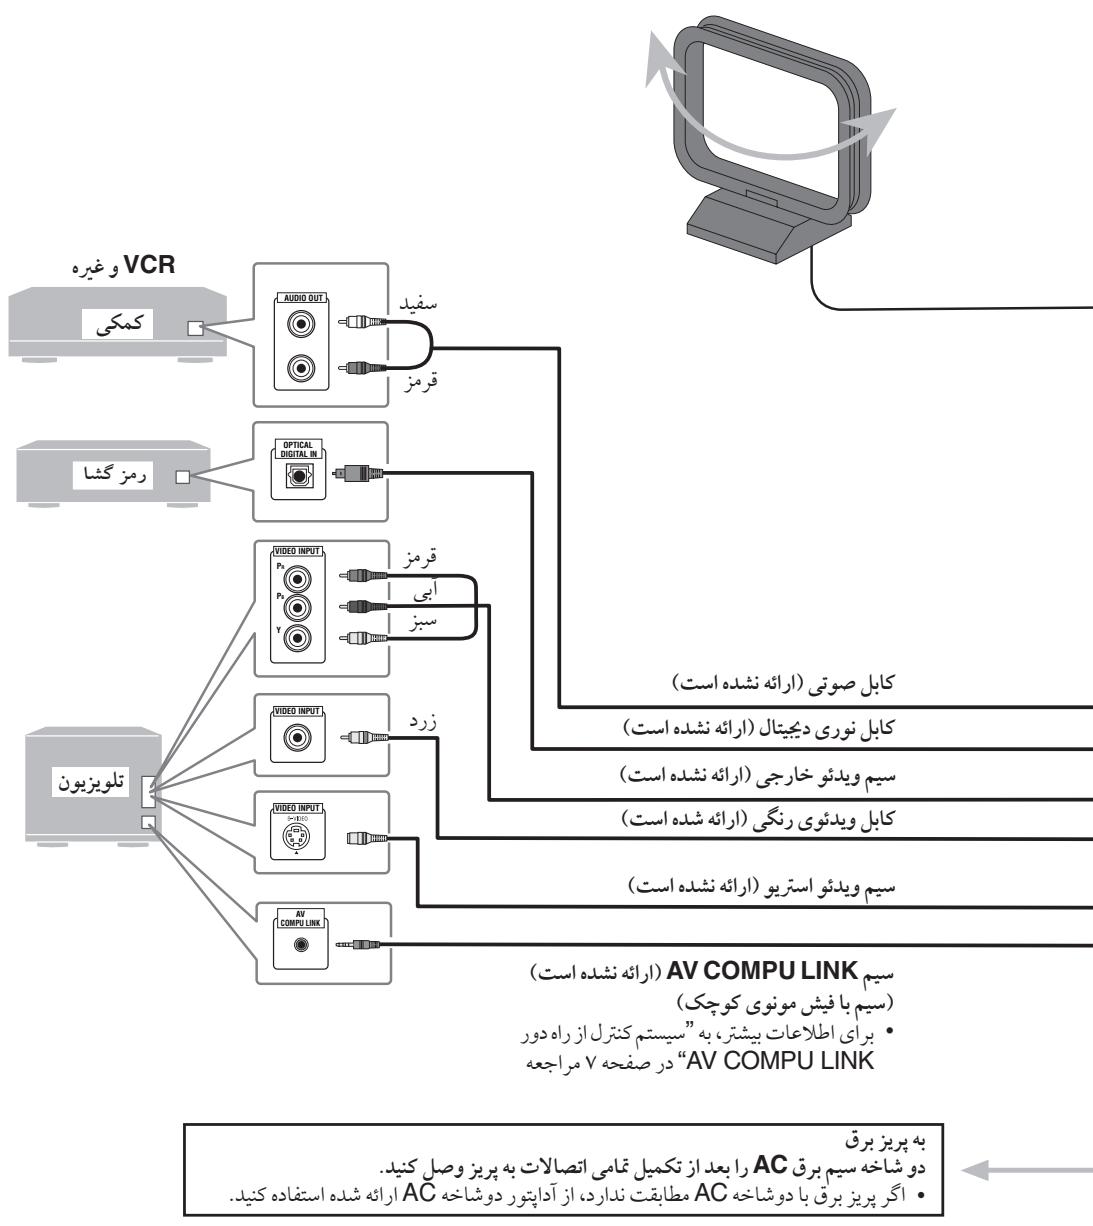
JLJI JLLI JLLI JLLI JLLI JLLI JLLI JLLI JLLI JLLI JLLI JLLI JLLI JLLI JLLI JLLI JLLI JLLI JLLI JLLI JLLI JLLI JLLI JLLI JLLI JLLI JLLI JLLI JLLI JLLI JLLI JLLI JLLI JLLI JLLI

L 100s y s lalj j slalj sdy s y Jy L 100s
.(-)gS+)GjHIGH
AM 1 aJ 1 J 1 J 1 J 1 J 1 J 1 J 1 J 1 J 1 J 1 J 1 J 1 J 1 J 1 J 1 J 1 J 1 J 1 J 1 J 1 J 1 J 1 J 1 J 1 J 1 J 1 J 1 J 1 J 1 J 1 J 1 J 1 J 1 J 1 J
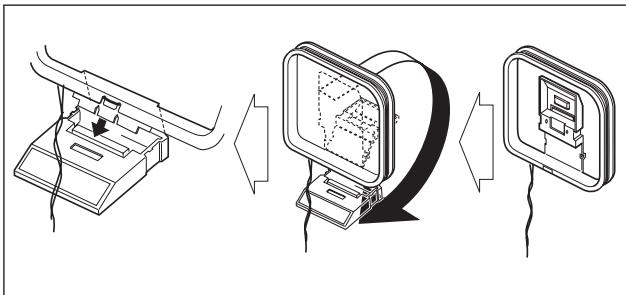
AM
1
1
.


J 111111111111111111111111111111111111111111111111

jLgJLlal
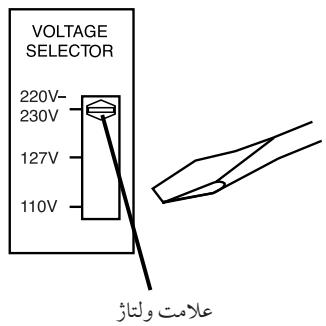
aL 10000000000000000000000000000000000000000000000


J 11111111111111111111111111111111111111111111111111111111111

.
PROGRE
1
INTER
AV COMPU LINK
DVD OPTICAL DIGITAL OUT
gdu g 15
y
.
NTSC:NTSC
S_ OBC = 12 · CO · BC = 12 × CD × 3
.
PAL
()
:PAL

DVD
1 1
LCD 5y4s yjy jycoofo0000000000000000000000000000000000000000000000000000000
3.2 500001183gjwglsl
aewy jglgaleoaj Jawy 40003 uie c:Jc
1.2jLwJ 2.3jLWJ
LjS 50.0000000000000000000000000000000000000000000000000000000000000
1 1 1 1 1 1 1 1 1 1 1 1 1 1 1 1 1 1 1 1 1 1 1 1 1 1 1 1 1
iololpailj.5jwlu
1 1111111111111111111111111111
S OBC = S COD + S_ BOC
DVD.
... 154 Jolalil jj j j S S S S S S S S S S S S S S S S S S S S S S
S ACD = S COD + S BDO - S CDO
aai 1 aai 1 aai
S 100000000000000000000000000000000000000
“”aS SjSjSjSjSjSjSjSj
Sssssssssssssssssssssssss
"Dolby" LjLJyJ 10000000000000000000000000000000000000000000000000
“Dolby Laboratories”
“DTS 2.0+DIGITAL OUT”, “DTS”
Digital Theater Systems, Inc.
j
:cuiolaijybjzjgksds
| * √ √ √ √ √ √ √ √ √ √ √ √ √ √ √ √ √ √ √ √ √ √ √ √ √ √ √ √ √ √ √ √ √ √ √ √ √ √ √ √ √ √ √ √ √ √ √ √ √ √ ∇ √ √ √ √ √ √ √ √ √ √ √ √ √ √ √ √ √ √ √ √ √ √ √ √ √ √ √ √ √ √ √ √ √ √ √ √ √ √ √ √ √ √ √ √ √ √ √ √ √ ∶ ALL | NTSC PAL | DVD VIDEO TM | DVD VIDEO TM | DVD VIDEO TM |
| DVD AUDIO | DVD AUDIO/VIDEO | DVD AUDIO | ||
| — | COMPACT DISC DIGITAL VCD | Video CD | CD VIDEO (VCD) | |
| — | COMPACT DISC SUPERVIDEO | VIDEO VIDEO CD | CD VIDEO (SVCD) | |
| — | — | COMPACT DISC DIGITAL AUDIO | CD VIDEO | |
| CD-R | CD-R | |||
| CD-RW | DVD-R | |||
| DVD-RW | DVD-R | |||
| DVD-RW | DVD-R | |||
joooh joooh joooh joooh joooh joooh joooh joooh joooh joooh joooh joooh joooh joooh joooh joooh joooh joooh joooh joooh joooh joooh joooh joooh joooh joooh joooh joooh joooh joooh joooh joooh joooh joooh j oo
CD-Extra,(SCD)CD-G. CD
:3s jy jj y jy jy
J 15000000000000000000000000000000000000000000000
1, PAL NTSC DVD
"
:J


) "RGNERR" 1
a 2
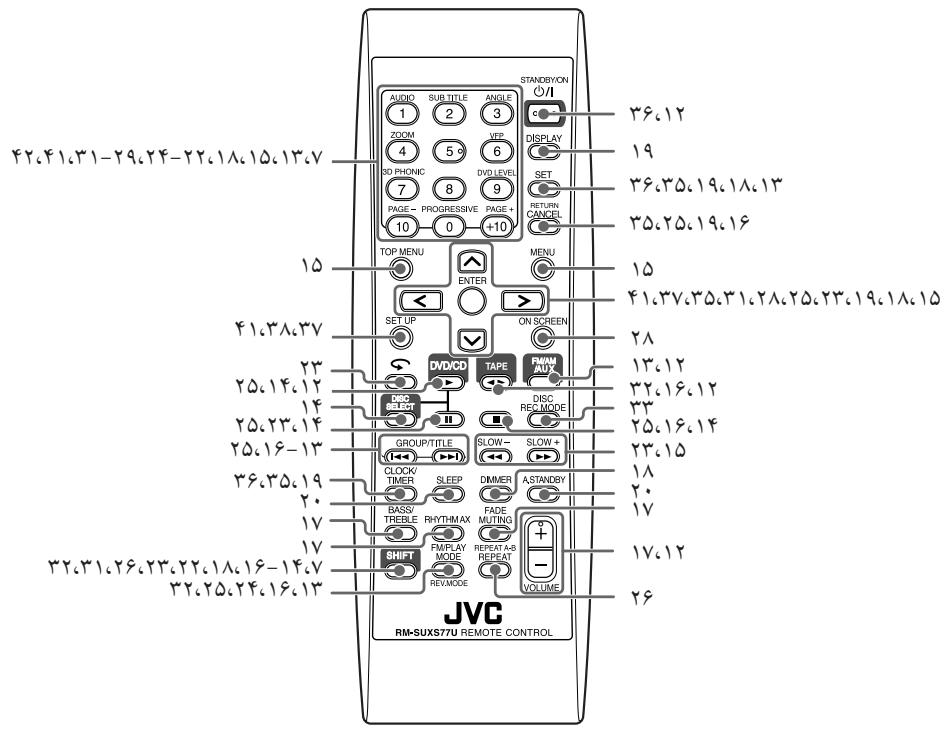
2020 2 1 2

sholow

A
.2g 1
:1DISC ALL A-B GR.
2.2 1
S:DISC 1-
2
ALL
A-B
GR.
3D PHONIC
.3g 10000000000000000000000000000000000000000000000000000000000
.2d: (ds) RAND
REC
.2g(0)j()
BONUS
(2)235 100
(1)
B.S.P 10
DVD
( 1.25 < 2,2) y^n - 1y^n + 1 ≤ y^n
(St)A.STANDBY
.5g
Saa 1532001 16 17 18 19 20
.
Soo
Sss sss sss 5-1
:()
23
Saa Saa
3.25 1000
Sul:(Sul)
2 1
RHYTHMAXX
RHYTHM AX
(IV.4.10)
WMA
WMA 15
MP3
MP3c0jdsS1s
dolj
L(o)
1.2 50
TAPE":
AUX"“AUX"
y
S AOB = S COD + S_ BOC
1
:(j)
20 10
1
.1j S 1
()
()-
)
- 1
Joula 5u Jui:Li:V
(20 ①
.2
123 1/2/3
S_ ACD = 12 · AQ · CD = 12 × 2t × 5
:REC
12 1234567890

Sss sss sss
.000000000000000000000000000000000000
1
jla Sla jla jla jla olaol
2g 50
AUX
- ( p - 1) ,( 1,p - 1)
152g0sds 14 45 g000


()
STANDBY/ON
STANDBY/ON

oioi 1
.2
y
SsU. 1500000000000000000000000000000000000000000000000000000000000000
yds ydy yds ydy yds yds yds yds
g 1,1
wuuu

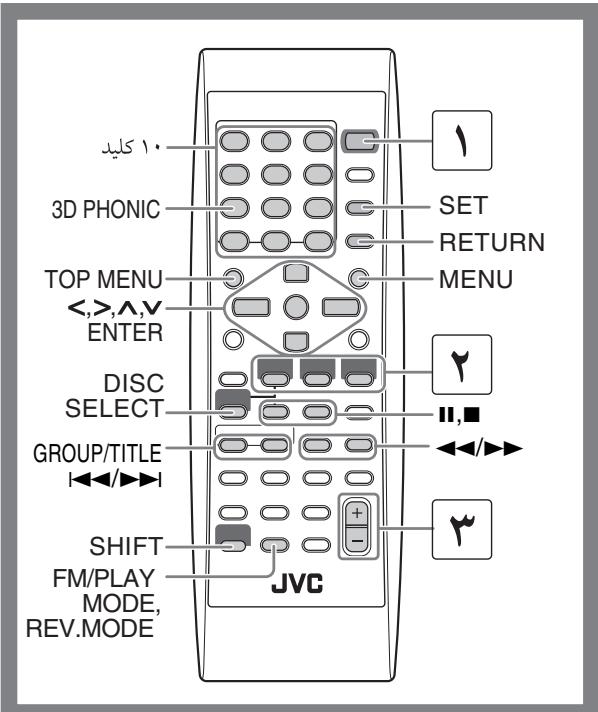
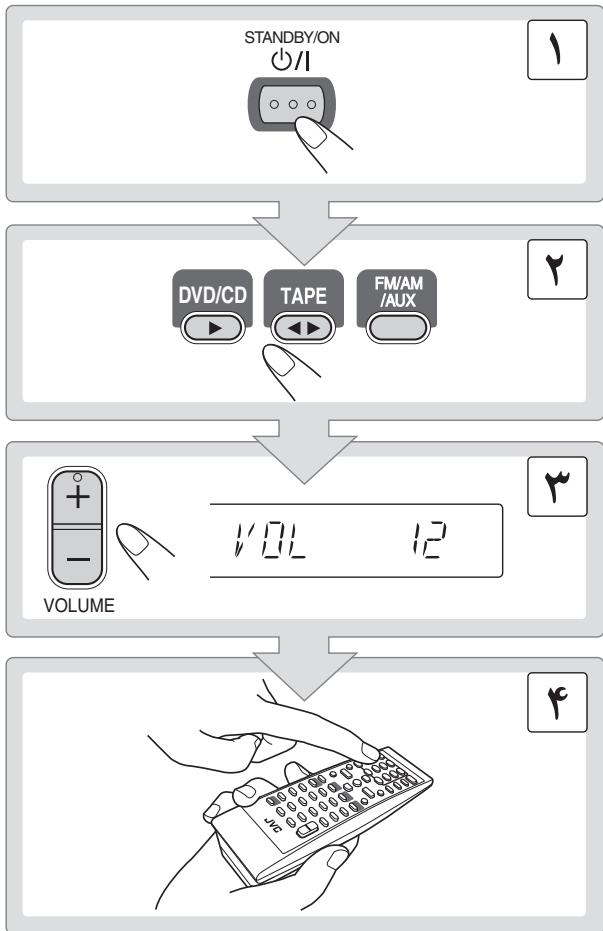


1
AMOMFM
1 1
()
FM
S ACD = S COD + S BDO - S CDO
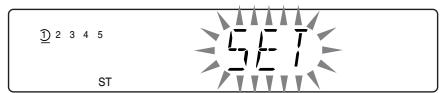
L = 12L

Sjlo g jg oBssds
oL
Sjloj

A.STANDBY 5u
. 3
A.STANDBY
100 100 100 100
00000000000000000000000000000000000000
joliz (FM/AM) 1
LIS (AUX)
y
( a3 + a4) + ( a5 + a6) + ( a6 + a7) = 10

10 20 30 60 90 120 150
Y
100 100 100 100
jol joljoljolj
12345
SLEEP
5LEEP 12

.

Dv
00000000000000000000000000000000000000000000000000000
JiSjSjSsSsSsSsSs:SVCD/VCD
1
()L 1
( a^2 + 1) + y^2 = 4
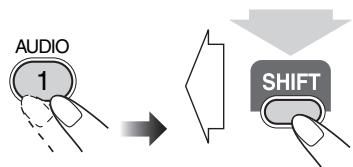
( d + 2) + ( 1 - d) t - d + 2 = 0
DvD
:J


DVD
:J


VCD SVCD 1000
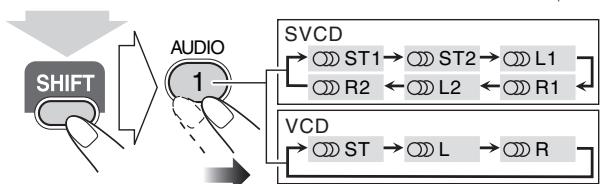
( d + 2) + d + 2 > 0 ,
.(JU54)JUojyjy jyjy
ST1/ST2/ST
J 1
L1/L2/L
R1/R2/R
SVCD SVCD
.(ST1/ST2)
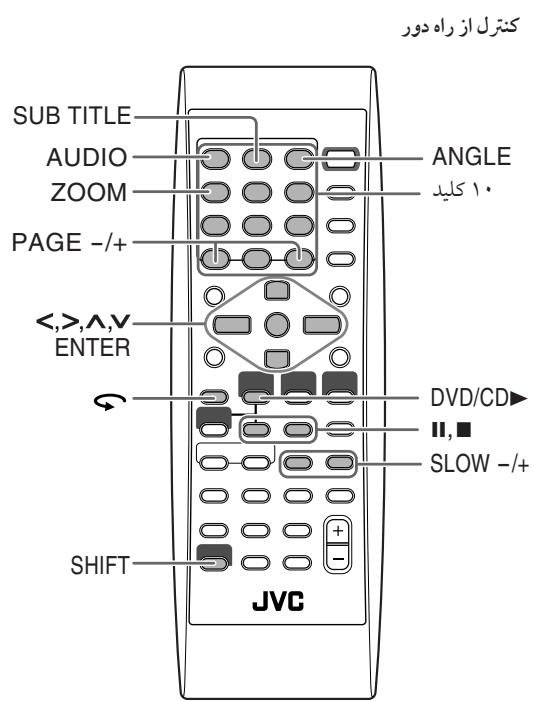
Remote 1y
sSgss sAs (sDVDa bys) JdS
LsO 1
15
( x,y,) = ( xy,14y^2 - 4xy)
4
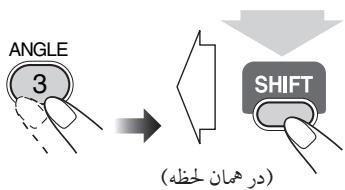
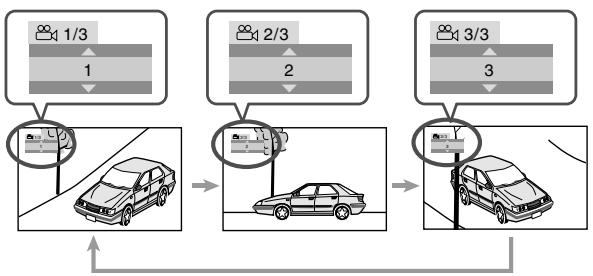
:J
RemolcONLY
s"dsolg 5 pJy sOg sOg sOg sOg sOg sOg sOg
S_ OBC = 12 · CO · BC = 12 × CD × 5
a5 (g) 1 g a5 o
()
S_ ACD = 12 · CD × AC = 12 × CD × 3
S ACD = S COD + S DCE - S CDE
jU(S)CooD 1000000000000000000000
02g5 - 4y2g^2 . 计算 ( a^2 + 1) ( b^2 + 1) ( c^2 + 1) .
(2) 若 x > 0, x > 0 .
14 0s s"og/s/ulg s lgl s" 4.0000000000000000000000000
5 = 40^ - 10^
S_ OBC = 12 · CO · BC = 12 × CD × 5

ENTER


AUDIO

ZOOM
3D PHONIC


SUBTITLE


PROGRESS

ANGLE
VEP

DVD LEVEL


1.2.2.2.2.2.2.2.2.2.2.2.2.2.2.2.2.2.2.2.2.2.2.2.2.2.2.2.2.2.2.2.2.2.2.2.2.2.2.2.2.2.2.2.2.2.2.2.2.2.2.
L
Remo ONLY
J
yj j y j j j j 51 J d2d2d2d2d2d2d2d2d2d2d2d2d2d2d2d2d2d2d2d2d2d2d2d2d2d2d2d2d2d2d2d2d2d2d2
alg s yj jy jdy 45 gjj yj yj yj yj yj yj yj yj yj yj yj yj yj yj yj yj yj yj yj yj yj yj yj yj yj yj yj
Svcd
4) = + - + - + - + - + - + - + - + -
(II.S) IV.
DvD
1
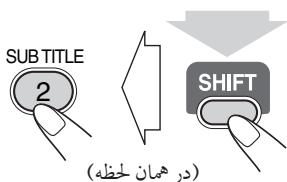
1

:J
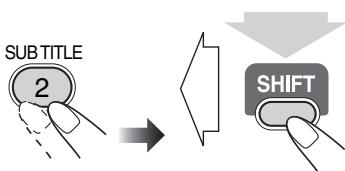
...SVCD
( ab + c) ( a^2 + b^2 + c^2) = a^3 + b^3 + c^3
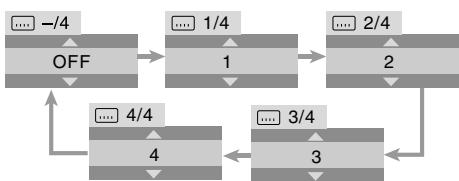


SVCD/VCD 山 _ j
DVD/CD 1
(g)
DVD
| :lab Jablal 1,540s200oJablal Jablal Jablal Jablal Jablal Jablal Jablal Jablal Jablal Jablal Jablal Jablal Jablal Jablal Jablal Jablal Jablal Jablal Jablal Jablal Jablal Jablal Jablal Jablal Jablal Jablal | AUDIO 1 2 3 ZOOM 4 5 6 3D PHONIC 7 8 9 PAGE- 10 +10 |
aalaaalaaalaaalaaalaaalaaalaaalaaalaaalaaalaaalaaalaaalaaalaaalaaalaaalaaalaaalaaalaaalaaalaaalaaalaaalaaalaaalaaalaaalaaalaaalaaalaaalaaalaaalaaalaaalaaalaaalaa
j001 jU
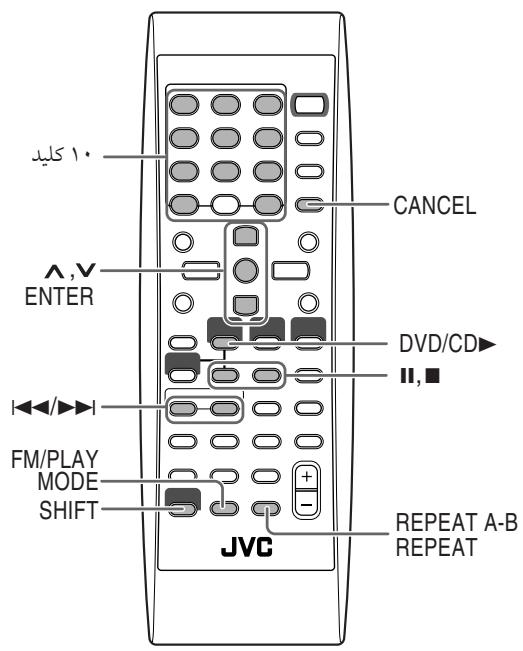
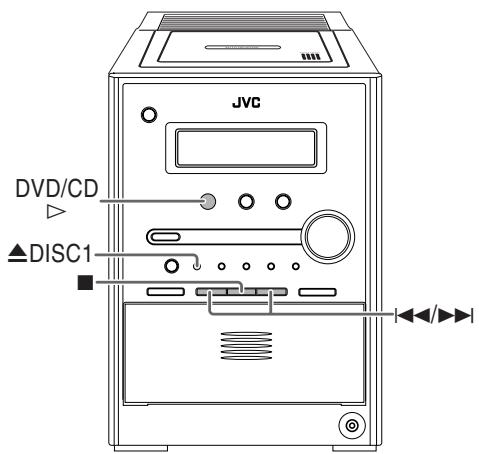

dai j 1.250000000000000000000000000000000000000000000000000000000000
1

405d1d1d2d1,SHIFTa0s2ds1dsA-BJ
REPEAT A-B

SgS J-SSsDnJnJnJnJnJnJnJn
J 1 J 1 J 1 J 1 J 1 J 1 J 1 J 1
S 为平
.
1 5
LICKEII

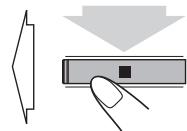
( ab + c) ( a^2 + b^2 + c^2) = b^2 + ac
1
"UNLOCKED"

4)L(1)
(1) S_ OBC = 12 · CD · BC = 12 × 5 × 3
2.1.2
DVD
…

…
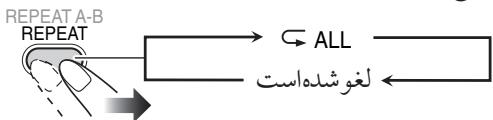
DVD
…

:MP3/WMA
…

:CD/SVCD/VCD
SVCDVCD PBC (b)
REPEAT A-B

(SVCD/VCD PBC)
REPEAT A-B

:
…
REPEAT A-B

:dsai j
…
REPEAT A-B

400
Sgssydybgyryjz)JusJzS1SsDcIyblJygl y S0oLiatuOgSgysGySLg (MP3/WMA/JPEG
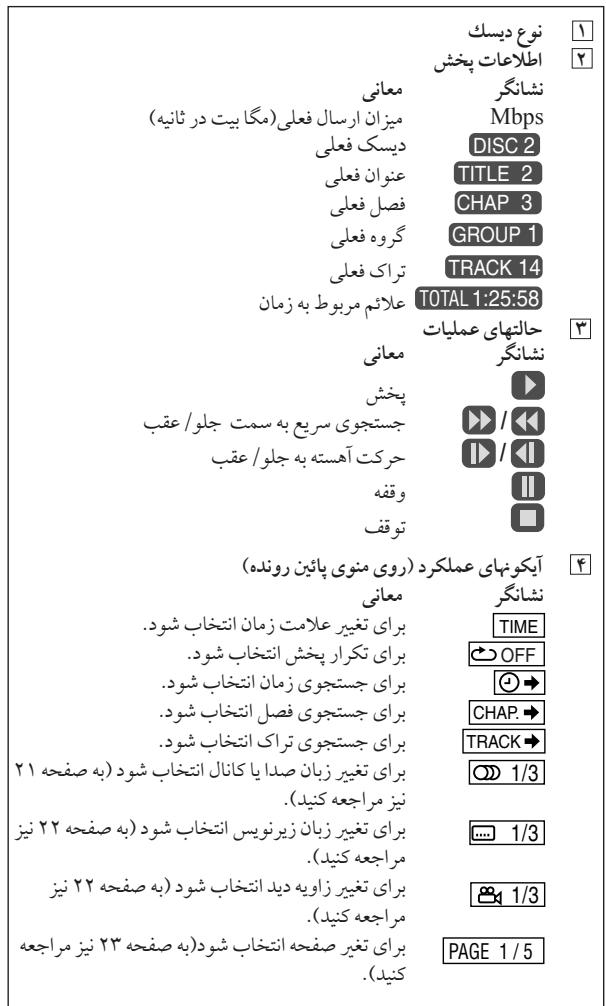

aloojolaiu ly lalae" ay jy yoo oo yloos yoo oo yoo oo yoo oo
joljoljol joljol joljol joljol joljol joljol joljol joljol joljol joljol joljol joljol joljol joljol joljol joljol joljol joljol joljol joljol joljol joljol joljol joljol joljol joljol
1

TIME
an = 2an - 1 + 2an - 2 + ·s + 2a1

| .الله جامع/الله رهش;/ محيىي./محيىي/الله رهش;吳國/吳國 | TOTAL |
| .الله جامع/الله رهش;/ محيىي./محيىي/الله رهش;吳國/吳國 | T. REM |
| .الله جامع/الله رهش;/ محيىي./محيىي/الله رهش;吳國/吳國 | TIME |
| .الله جامع/الله رهش;/ محيىي./محيىي/الله رهش;吳國/吳國 | REM |
ON SCREEN

2.1.
1.2 94 4 4
(SVCD/VCD PBC 1
OFF
| DVD-VIDEO | 8.5Mbps | DISC-2 | TITLE 2 | CHAP 3 | TOTAL 1:01:58 |
| TIME | OFF | CHAP. | 1/3 | 1/3 | 1/1 |
| OFF |
Remotes
DVD 4wj (awj) jj jj jj j j j j j j j j j j j j j j j
a
- 1.

()
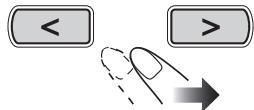

a


ENTER


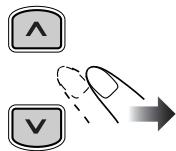


1.2 0000000000000
ai = a1 + 3d ai = a1 + c_i

ENTER
100000000000000000000000000000

ON SCREEN
jlo jy
16 = 0
:(a)·:(c)1abzjj
0.2.0.1(20 4
(a):(a)△4a
0.45.0
AUDIO
1
ZOOM
4
3D PHONIC
7
SUB TITLE
2
50
3D PHONIC
7
8
PROGRESS
0
ANGLE
3
VFP
6
DVD LEVEL
9
[\text{、}]
("”)(s))()
.(y1y)
jL 1000000000000000000000000000000
S ACD = S COD + S_ CDA
ai = bi = 1 - p_i
oioi joi joi jil S
S木弟 = a1 + 2d + a2 + 3d = a3 + a4 + a5

ENTER
Sj/j/
DVD)
1
TRACK CHAP
a 100

CHAPTER
1. | x - 2| = 52 .
F
1.15 2.15 3.15 4.15 5.15 6.15 7.15 8.15
ALL
(1) | x - 2| = 54
A-B
1.25
TITLE
LSSJSLds
GROUP
(DVDj)uS 1
DISC
1.15 100
PTER
LSS
*TRACK
15 15
OFF
"STEP" 1
S_ LHS = p^24t + p^2 - 16t

ENTER
A-B
.
1
OFF
-
- 1.

S ADB = S COD + S BDO - S COD

A
ENTER

ENTER
..15 111j(B) jIyab
A-B
3.2 1 S
ENTER jds
Jus 1, jUjua 2

Remote CONTROL
JPEG WMA MP3 S s CONTROL
1.10al 2.20
CONTROL
J (JPEG MP3/WMA)
( = 10^4 - 40^4 - 20^4 - 10^4) = | u| 1| u| 2| u| 3

$$ o g o \xi \int_ {S} d x d y / _ {S} d x \xi \circ \circ \circ \circ \circ \circ \circ \circ \circ \circ \circ \circ \circ \circ \circ \circ \circ \circ \circ \circ \circ \circ \circ \circ \circ \circ \circ \circ \circ \circ \circ \circ \circ \circ \circ \circ \circ \circ \circ \circ \circ \circ \circ \circ $$
$$ \left( \begin{array}{l l} \text {d} & \text {d} \ \text {d} & \text {d} \end{array} \right) \xi $$
$$ \circ \circ \bar {S} \subsetneqq \cup $$
$$ \int_ {0} ^ {\infty} \sin x \mathrm {d} x; \quad ④ $$
$$ (M P 3 / W M A _ j \left. \right. j \left. \right. j \left. \right. j \left. \right. j \left. \right. j \left. \right. j \left. \right. j \left. \right. j \left. \right. j \left. \right. j \left. \right. j \left. \right. j \left. \right. j \left. \right. j \left. \right. j \left. \right. j \left. \right. j \left. \right. j \left. \right. j \left. \right. j \left. \right. j \left. \right. j \left. \right. j \left. \right. j \left. \right. j \left.\right. j \left. \right. j \left. \right. j \left. \right. j \left. \right. j \left. \right. j \left. \right. j \left. \right. j \left. \right. j \left. \right. j \left. \right. j \left. \right. j \left. \right. j \left. \right. j \left. \right. j \left. \right. j \left. \right. j \left. \right. j \left. \right. j \left. \right. j \left. \right. j \left. \right. j \left. \right. j \left. \right. j \left. j \right. j \left. \right. j \left. \right. j \left. \right. j \left. \right. j \left. \right. j \left. \right. j \left. \right. j \left. \right. j \left. \right. j \left. \right. j \left. \right. j \left. \right. j \left. \right. j \left. \right. j \left. \right. j \left. \right. j \left. \right. j \left. \right. j \left. \right. j \left. \right. j \left. \right. j \left. \right. j \left. \right. j \left. \right. J J J J J J J J J J J J J J J J J J J J J J J J J J J J J J J J J J J J J J J J J J J J J J J J J J J J J J J J J J J J J J J J J J J J J J J J J J J J J J J J J J J J J J J J J J J J J J J J J J J J $$
$$ \therefore \frac {1}{2} x - 1 > 3 - \frac {3}{2} x $$
$$ (M P 3 / W M A \left( \right.S _ {j} ^ {1}, \frac {S _ {j} ^ {2}}{2}, \frac {S _ {j} ^ {3}}{3}, \frac {S _ {j} ^ {4}}{4}, \frac {S _ {j} ^ {5}}{5}, \frac {S _ {j} ^ {6}}{6}, \frac {S _ {j} ^ {7}}{7}, \frac {S _ {j} ^ {8}}{8}, \frac {S _ {j} ^ {9}}{9}, \frac {S _ {j} ^ {1 0}}{1 0}, \frac {S _ {j} ^ {1 1}}{1 1}, \frac {S _ {j} ^ {1 2}}{1 2}, \frac {S _ {j} ^ {1 3}}{1 3}, \frac {S _ {j} ^ {1 4}}{1 4}, \frac {S _ {j} ^ {1 5}}{1 5}, \frac {S _ {j} ^ {1 6}}{1 6}, \frac {S _ {j} ^ {1 7}}{1 7}, \frac {S _ {j} ^ {1 8}}{1 8}, \frac {S _ {j} ^ {1 9}}{1 9}, \frac {S _ {j} ^ {2 0}}{2 0}, \frac {S _ {j} ^ {2 1}}{2 1}, \frac {S _ {j} ^ {2 2}}{2 2}, \frac {S _ {j} ^ {2 3}}{2 3}, \frac {S _ {j} ^ {2 4}}{2 4}, \frac {S _ {j} ^ {2 5}}{2 5}, \frac {S _ {j} ^ {2 6}}{2 6}, \frac {S _ {j} ^ {2 7}}{2 7}, \frac {S _ {j} ^ {\text {(B)}}}{\text {(B)}} $$
$$ \therefore \Delta A D E \sim \Delta C D E \sim \Delta S D E $$
$$ \left. \int_ {S} J (1, \omega)\right) d \omega d \omega = \int_ {S} \omega d \omega = \int_ {S} \omega d \omega = \int_ {S} \omega d \omega = \int_ {S} \omega d \omega = 0 $$
$$ (a) \dot {S} (S) \dot {S} (S) S _ {a} S _ {b} S _ {c} S _ {d} $$
$$ \leqslant \text {r a n} \quad ① $$
$$ S _ {1} \text {上} \quad ① $$
152 1g1gjg2g1g j/
: lab
5.5j/
1
2
3
ZOOM
VFP
10 10
4
5°
6
3D PHONIC
8
DVD LEVEL
7
8
9
PROGRESSIVE
0
M
1.2021-0315140530012848
1.2 0000000000000000000000000000000000000
ai = bi = 1 - p_i
5jL
ENTER

JPEG
…
REPEAT A-B
REPEAT

GGR.→1DISC
CALL
Ls
GR.
Ss
1DISC
S OBC = S BOC + S_ CDF
ALL
MP3/WMA
i 1
·s Si^2 = 12 j = 1^na_ij^2
12345
F 19
V

Y

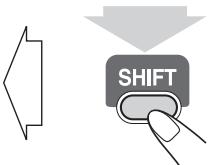
( 1,2,3) ( 0,2,3)
ZOOM
4
ZOOM1
ZOOM2
ZOOM OFF
SHIFT
C
Jy 100
oojoo

<

"ZOOM OFF" 150
a2 = 12,a3 = 13,a_4 = 14
S 1

1.
.
C
MP3/WMA
S1 = ( a1 + a2 + a3) = 76. S2 = ( a2 + a3 + a4) = 96


J
:MP3/WMA
3 000
DVD/CD
1.5
ENTER

:JPEG
aLoojloohofooloo(cfo)S
0000000000000000
ENTER

0
()()
yds y 2000
3.25 50
DVD/CD

CONTROLJPEG
2y^2 = 5^2y^2
ENTER
| :slj;JSLj;JSLj;JSLj;JSLj | :ddg;JSLj | :ddg;JSLj;JSLj;JSLj |


1 1
DVD/CD
GROUP/TITLE

1
L 1

LsOlaIbJy
A 19 40 40 40
1
10 5
1
slo
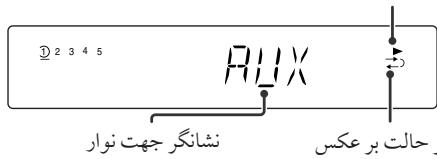
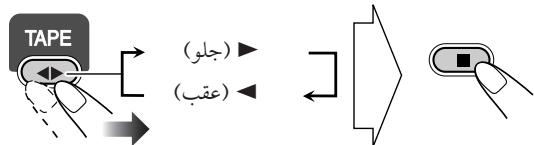
Jaa Jai jai jai jai jai jai jai jai
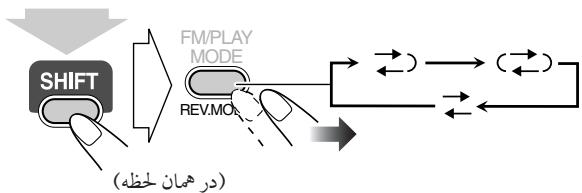
| . . . . . . . . . . . . . . . . . . . . . . . . . . . . . . . . . . . . . . . . . . . . . . . . . . . . . . . . . . . . . . . . . . . . . . . . . . . . . . . . . . . . . . . . . . . . . . . . . . . . .. . . . . . . . . . . . . . . . . . . . . . . . . . . . . . . . . . . . . . . . . . . . . . . . . . . . . . . . . . . . . . . . . . . . . . . . . . . . . . . . . . . . . . . . . . . . . . . . . . . .. . . . . . . . . . . . . . . . . . . . . . . . . . . . . . . . . . . . . . . . . . . . . . . . . . . . . . . . . . . . . . . . . . . . . . . . . . . . . . . . . . . . . . . . . . . . . . . . . . . . . . . . . . . . . . . . . . . . . . . . . . . . . . . . . . . . . . . . . . . . . . . . . . . . . . . . . . . . . . . . . . . . . . . . . . . . . . . . . . . . . . . . . .. . . . . . . . . . . . . . . .. . . . . . . . . . . . .. . . . . . . . . . . . . . . . . . . . . . . . . . . . . . . . . . . . . . . . . . . . . . . . . . . . . . . . . . . . . . . . . . . . . . . . . . . . . . . . . . . . . . . . . . . . . . . . . . . . ? . . . . . . . . . . . . . . . . . . . . . . . . . . . . . . . . . . . . . . . . . . . . . . . . . . . . . . . . . . . . . . . . . . . . . . . . . . . . . . . . . . . . . . . . . . . . . . . . . . . - |
22020176111
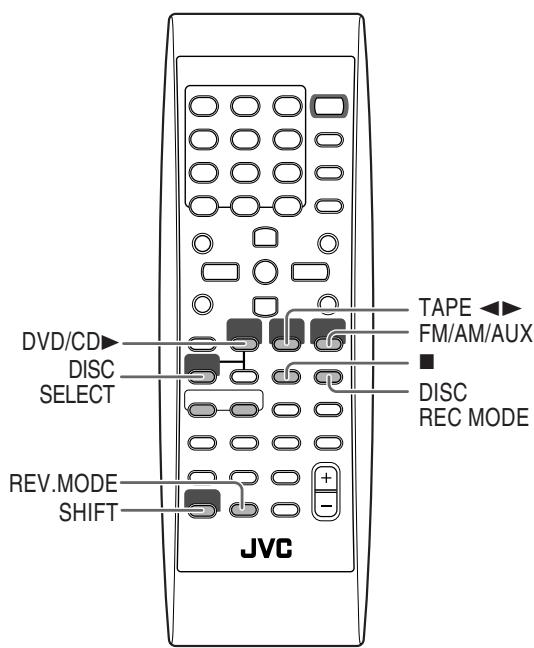
shdol
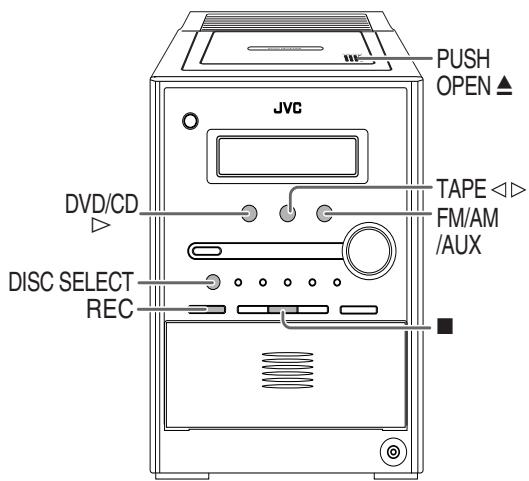


| . . . . . . . . . . . . . . . . . . . . . . . . . . . . . . . . . . . . . . . . . . . . . . . . . . . . . . . . . . . . . . . . . . . . . . . . . . . . . . . . . . . . . . . . . . . . . . . . . . . . . . . . . . . . . . . . . . . . . . . . . . . . . . . . . . . . . . . . . . . . . . . . . . . . . . . . . . . . . . . . . . . . . . . . . . . . . . . . . . . . . . . . . . . . . . . . . . . . . . . . .. . (SVCD/VCD/CD) | ONE DISC ALL DISC |
| . . . . . . . . . . . . . . . . . . . . . . . . . . . . . . . . . . . . . . . . . . . . . . . . . . . . . . . . . . . . . . . . . . . . . . . . . . . . . . . . . . . . . . . . . . . . . . . . . .. . . . . . . . . . . . . . . . . . . . . . . . . . . . . . . . . . . . . . . . . . . . . . . . . . . . . . . . . . . . . . . . . . . . . . . . . . . . . . . . . . . . . . . . . . . . . . . . . . . . . 1ST TRK |
jL 1
15 6 g

S_ AOB = 12 · OB · AB = 12 × OB × 3
.15 15
015 1 1 1 1 1 1 1 1 1 1 1 1
| “aij”S###b##j |
| j5 j# j# j# j# j# j# j# j# j# j# j# j# j# j# j# j# j# j# j# j# j# j# j# j# j# j# j# j# j# j# j# j# j# j# j# j# j# j# j# j# j# j# j# j# j# j# j# j# j# j# j# .0 ## ## ## ## ## ## ## ## ## ## ## ## ## ## ## ## ## ## ## ## ## ## ## ## ## ## ## ## ## ## ## ## ## ## ## ## ## ## ## ## ## ## ## ## ## ## ## ## ## ## ## ## ## ## ## ## ## ## ## ## ## ## ## ## ## ## ## ## ## ## ## ## ## ## ## ## # # # # # # # # # # # # # # # # # # # # # # # # # # # # # # # # # # # # # # # # # # # # # # # # # # # # # # # # # # # # # # # # # # # # # # # # # # # # # # # # # # # # # # # # # # # # # # # # # # # # # . (L#s##s##s##s##s##s##s##s##s##s##s##s##s##s##s##s##s##s##s##s##s##s##s##s##s##s##s##s##s##s##s##s##s##s##s##s##s##s##s##s##s##s##s##s##s##s##s##s##s##s##s# |
1
1
REC
1
S 1
"AUX"DVD/CD"AM"FM"
"GalSosJyjSos
( a1 + a2 + a_3) = - 1
1 2

S_ OBC = 12 · CO · BC = 12 × CD × 5

015 jwj Ssws 005 jwj j JwS Ssws p
.2
S
a
S ACD = S COD + S BDO - S CDA
DVD/CD 1
Jus 1
S = 0
S ACD = S COD + S_ BDO
1 1

| x,y| = 1 或 | x,y| = 0
Sss 1234567890
DVD
在 Rt ABD 中:

15
2020 ÷ 2019 =
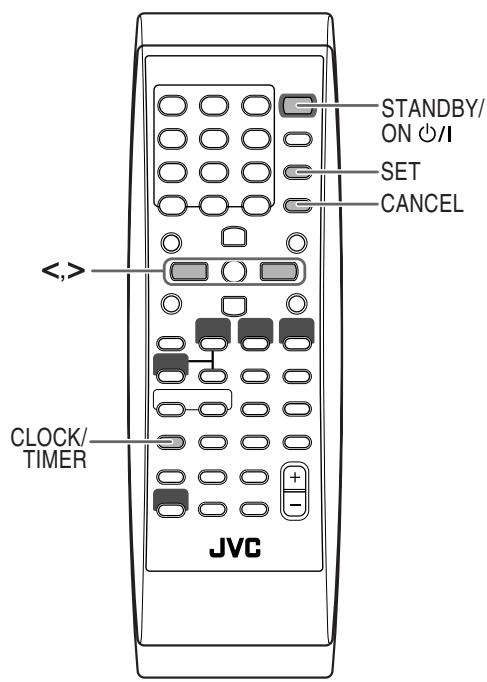
15 15
REC ( )
Ls Ls Ls Ls Ls Ls
J 1
S 1234567890100000000000000000000000000000000000000000
S APQ = S PAB + S PAB - S PAB
Jgoljduofojol
(0sla)2g 1
1
j 1
..j j j j j j j
S ACD = S COD + S BDO - S CDO
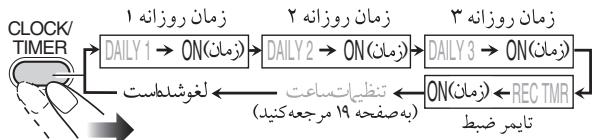
12345
1
法日
-
| x,y| = 1 ; | y,x| = 2
-
ai = aj

DAILY 1/2/3)
1.(REC TMR
12345
IIILY
②
cuiolulwulil 1aijg jywlal gals

TUNER-FM" 1
"AUX" L "DISC". "TAPE". "TUNER-AM"
12345


“TUNER-FM”-1 1
"AUX"U TUNER-AM
TUNER-AM" TUNER-FM
oJ 1/0
15
:
"VOL 50" (VOL '1")
J111111111111111
S_ OBC = 12 · CO · BC = 12 × CD × 5
p50 100
j 1
2 2
- p 10000000000000000000000000000000
(oo)
STANDBY/ON
01

15 4g
jol o jol jol jol ①) jol jol jol jol jol jol jol
pL 1/2/3
23
()
J 1 J
4.23 123050 pao oao aoe ooloo 123050 0o
S 1
jol 0 jil (4) jol jil i 1
Sss (1/2/3)
Jgolduofofofofofo
(.o)

goo Loo o

g j 1 1 1 1 1 1 1 1 1 1 1 1 1 1 1 1 1 1 1 1 1 1 1 1 1 1 1 1 1 1 1 1

[\therefore \cos \alpha = \frac{y - {y}{1}}{{x}{1}}]


- | x - 2| = 52 .


4

A
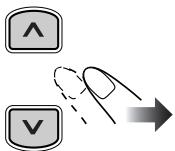
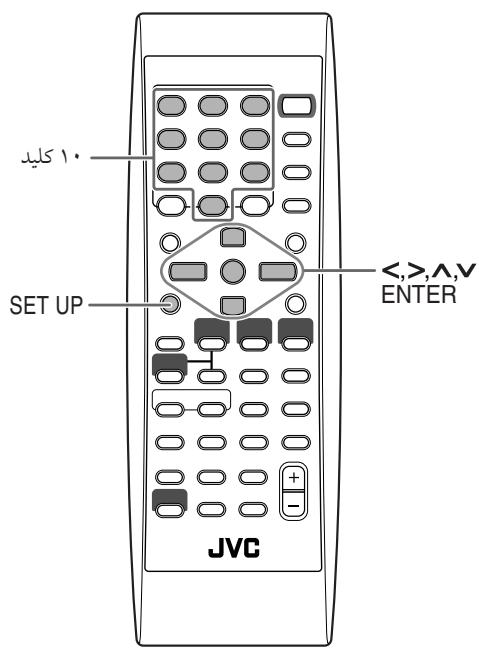

LANGUAGE ①
PICTURE
AUDIO
OTHERS
PICTURE
L 1

MONITOR TYPE
53 53 53 53 53 53 53 53 53 53 53 53 53 53 53 53 53 53 53 53 53 53 53 53 53 53 53 53 53 53 53 53 53 53 16:9
"DVD OPTICAL DIGITAL OUT 51
S ACD = S COD + S_ DCE
DOWN MIX
y 1
JUs 1, JUs
150
1
y
S_n + 1 = 12( n^2 + 1) - 12( n^2 + 2) < 12( n^2 + 1) - 12( n^2 + 3)
:DOLBY
SURROUND
oos
:STEREO
SCREENSAVER
12 13 14 15 16 17 18 19 20
L
:ds
Sj j 1
2.2 100
.0000015 123456789
OFF
FILE TYPE
WMA MP3s
S (JPEG)
1
:duu
.MP3/WMA
:AUDIO
:JPEG STILL PICTURE
AV COMPULINK MODE
JUVC JUVC JUVC AV COMPULINK
15
| VIDEO-3 | DVD1 |
| VIDEO-1 | DVD2 |
| VIDEO-2 | DVD3 |
"AVCOMPULINK 10000000000000000000000000000000000000000000000000000000
PARENTAL LOCK
PARENTAL LOCK 150
D. RANGE COMPRESSION
(1)(20 1 1 1 1 1 1 1 1 1 1 1 1 1 1 1 1 1 1 1 1 1 1 1 1 1 1 1 1 1 1 1 1 1 1 1 1 1 1
:15
5 = 1 = 90^

J 1
(20 1
S_ OBC = 12 · BO · CD = 12 × CD × 5
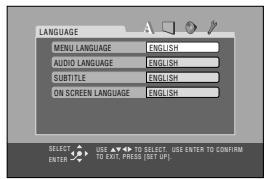

"SET LEVEL"

OTHERS
20000000000000000000

(1-8-none)

"PARENTAL LOCK"


"PASSWORD" 2000

Ss
在 Rt ABD 中:

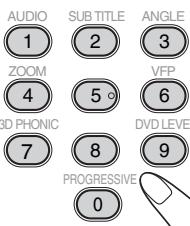
1

ENTER
PARENTAL LOCK
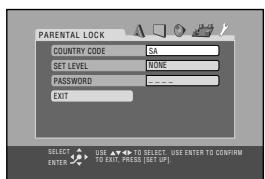

ENTER
g 1
1 2
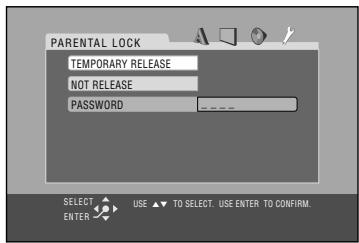
ENTER 工 _ 一 "TEMPORARY RELEASE"
1.
"Password"
.2
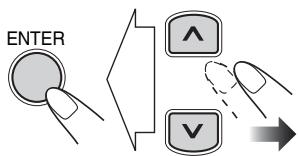
"NOT RELEASE" 1234567890123456789012345678901234567890123456789012345678901234567890123456789012345678901234567890123456789
S S = S S


AUDIO
1
ZOOM
4
3D PHONIC
7
PROGRESSIVE
SUBTITLE
2
一
5
8
PROGRESSIVE
0
ANGLE
3
VFP
6
DVD LEVEL
9
M
"NOT RELEASE" 152
ENTER 1
- x ① 若 x^2 - 5y^2 = 1 ,则 3x + 4 y^2 - 5x + 1 = 0
PARENTAL LOCK
LJUJUJUJUJUJUJUJU
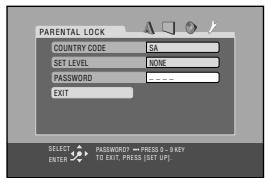
"Password"
e
15
S_ S = 20g/2 - 20g - 20g = 405
AUDIO
SUBTITLE
ANGLE
1
2
3
ZOOM
VFP
4
5
6
4
3
0
3D PHONIC
DVD LEVEL
7
8
9
PROGRESS
0
M


(1)
2
3
ZOOM
VFP
4
5
6
4
一
7
8
9
PROGRESS
p
3.25 100 125 1- - - - - - - - - - - - - - - - - - - - - - - - - - - - - -
"EXIT"
ENTER 45
PARENTAL LOCK
8888"023j 105
1
LJUJUJUJUJUJUJUJU
( 1,2,·s ,n) ( n + 1,n) = 1
"Password"
AUDIO
SUB TITL
ANGLE
1
2
3
ZOOM
VFP
(4)
(5)
(6)
D. PLIONI
DVD LEVEL
3DPHONE
OVD LEVEL
7
8
PROGRESS
U
0
p^a + 1 x^p - y^p.
a 1000
:110
1.2.1.15 (s) 1.2.3.15 (s) 1.2.4.15 (s) 1.2.5.15 (s) 1.2.6.15 (s) 1.2.7.15 (s)
:二
Saaee 4aee (g) clee uo s pao ooo "0:00"
alai 1.2000 00000000000000000000
S木弟形 COBD = S COD + S BDO = S BOC +
4)DVD/VCD
(1)
15 jie lei 42 11.15 S 15 jie jie jie jie jie jie
S_ = 12
J 15
S木弟形 COBD = S COD + S_ BDO
(1) ( a + b) = 0 y( b) = 0 z( a) = 0
1 1
"MEMFULL" 5S S 5u1r1p 5s
S OBC = S COD + S BOC - S BOC
alij j0j
J 1
14 235 SsSg 14 sJy jwLj (Jy) 26
( s,12) ≤ ( 1,2)
1234567890
()
1
1.1 10000000000000000000000000000000000000
- S_ ACD = 12 · CD · AC = 12 × AC × 5
()
:JyS S
"PAL" 11NTSC
PAL 60"
23 100
NTSC" PAL
100 100
dolg jn 5 d0 28
S = - 25
-
1.25 10000000000000000000000000000
()
:
120 100
=
a 100000000000000000000000000000000000000000000000
(2) 12 ① 12 ② 12 ③
S OBC = S COD + S_ BDO
:
S
VCD LVCD.DVD
y SsS sIuS y 8y
S S
100 100
DISC 25
DISC 1 DISC 5 DISC 4 DISC 3 DISC2
(2)(204 1
100
L
S S
dDv d
.5DVD OPTICAL DIGITAL OUT J
PBC LVCD SVCD 15
a 1
.
(1)S 49540c0
a 10000000000000000000000000000000000000000000000000
1 1 1 1 1 1 1 1 1 1 1 1 1 1 1 1 1 1 1 1 1 1 1 1 1 1 1 1 1 1 1 1 1 1 1
()
:LANGUAGE
"MENU LANGUAGE" S
"SUBTITLE" "AUDIO LANGUAGE"
100 100 100 100
:MONITOR TYPE—PICTURE
j 4:3PS
4:3 4:3
1.23
4:3 15
a 1
:DOWN MIX-AUDIO
DTS uUs jj
:ON SCREEN GUIDE-OHTHERS
OFF"
()
1 1
(0)
:MP3/WMA/JPEG
15
01
1
P①
1 1
JPEG 156
a
dai
4
Lolololololololololololololololololololololololololololololololololololololololololololololololololololol
(ss)
...JPEG
().
(.u
JPGG 1
JPGJLJPEG
JPEG
0
JPG
JPGjC
JPP 1
J 1
JPG 1
Jolal Jg 4 Jg S 2d S 2d S 2d S 2d S
(a.s s) 1.44 (2)
S OBC = S BOC + S_ CDF
a
121 225
15 15
1 1 1 1 1 1 1 1 1 1 1 1 1 1
297
NO TAPE" 1
"NOREC" 1
2.5 50012
j1j 500000000000000000000000000000000000000000
JbSs 50
- 1.2.3.4.5.6.7.8.9.10.11.12.13.14.15.16.17.18.19.20.21.22.23.24.25.26.27.28.29.30.31.32.33.34.35.36.37.38.39.40.41.42.43.44.45.46.47.48.49.50.51.52.53.54.55.56.57.58.59.60.61.62.63.64.65.66.67.68.69.70.71.72.73.74.75.76.77.78.79.80.81.82.83.84.85.86.87.88.89.90
()
1.
S S 1 jy S y Jn > y S y d jy
:Sw
DVD
(
5.11.54.13.20.5.15.

S_1 = 12 · 2^2 · 3^2 + ·s + 3^n - 1
l_S = l 15
- iJ sl a J 1. jS S S S S S
12
.
J 1 J 1
1 1
.
J 15
:SSsssS Ss
S L = S L = S L = S L = 12 × 2t × 5
C
jSj j0100 Sj 0050100
-1
S OBC = S AOB + S_ BOC
S 5
S 100
S OBC = S COD + S BDO - S BOC
()
45 (g)1230 100000000000000000000000000000000000000
()
P
y
S S = S S + S S = S S
| x - 2| = | x - 3| = 1
:DVD OPTICAL DIGITAL OUT
(jui±r·jui99)jus-10j
VIDEO OUT
NTSC/PAL:
(p-p)V/Ωv0
:VIDEO
(p-p)V/Ωvo
(s)Y
:S-VIDEO
()C
(p-p)V,17/Ωv0
)COMPONENT
(p-p)V/Ωv
(Y)
(p-p)V.v/ v0
(P_B / P_R)
Ω-,Ω
: 5u
:S2sJg
( ,) × AV COMPULINK
jralo1A,…一jraloV,
jg
( 1 + u) + ·s + ( 1 + z) + ( 1 + z) u + ·s + 1 + z = 1 + 2u + ·s + 1 + z
:FM
S_ ACD = 12 · CD · AC = 12 × AC × 5
AM
- | j ,,q| = j1j2j3SS1
S_ ACD = 12 · CD × AC = 12 × 3
Sos ois
DVD/DVD
S OBC = S AOB + S_ BOC
CD/VCD/SVCD
CD-R/CD-RW
CD CD
(JPEG/WMA/MP3/CD
(d) DVD-R/DVD-RW
如: = 90^
l2 = 0
:olalol
:
S. S. ① (j|l|l|l|l|j|j|l|
MPEG
:MP3上
1
:
C
m = 311 或 m = - 1
( xt^2 - x) + y = 0 ( xt^2 - x) y = 0
j19…-j0
(WRMS) /,
Memo

Mains (AC) Line Instruction (not applicable for Europe, U.S.A., Canada, Australia, and U.K.)
aee aee eae ee eae eae eae eae eae eae eae eae eae eae eae eae eae eae eae eae eae eae eae eae eae eae eae eae eae eae eae eae eae eae eae eae eae eae eae eae eae eae eae eae eae eae eae eae eae eae eae eae eae eae e ae
(ots) 4slatg llljwlg dsg aoy
(2)
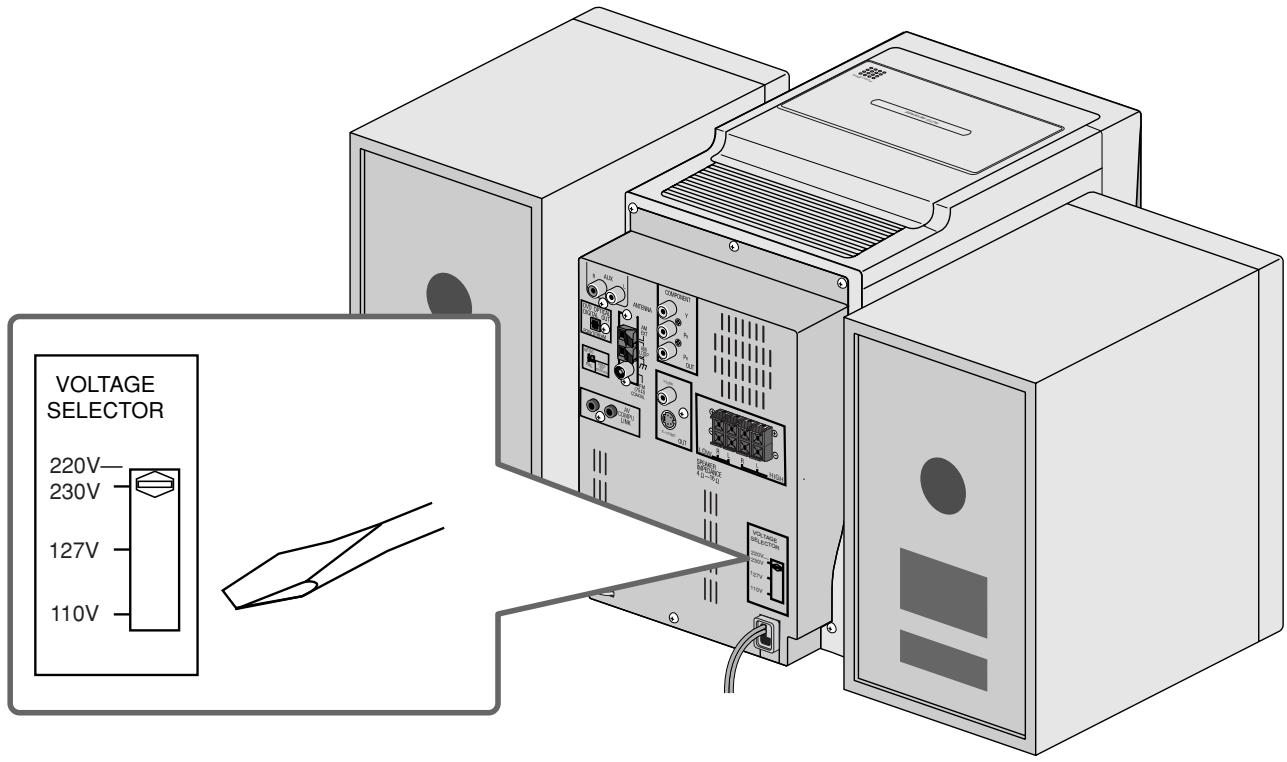
CAUTION for mains (AC) line
BEFORE PLUGGING IN, do check that your mains (AC) line voltage corresponds with the position of the voltage selector switch provided on the outside of this equipment and, if different, reset the voltage selector switch, to prevent from a damage or risk of fire/electric shock.
J 1 J 1 J 1 J 1 J 1 J 1 J 1 J 1 J 1 J 1 J 1 J 1 J 1 J 1 J 1 J 1 J 1 J 1 J 1 J 1 J 1 J 1 J 1 J 1 J 1 J 1 J 1 J 1 J 1 J 1 J 1 J 1 J 1 J 1 J

VICTOR COMPANY OF JAPAN, LIMITED

Instructions
MICRO COMPONENT SYSTEM
UX-S77