
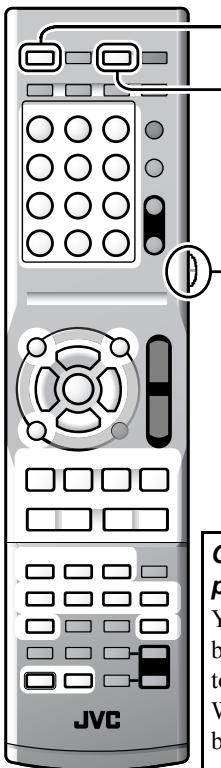
TH-D60 - Audio System JVC - Free user manual and instructions
Find the device manual for free TH-D60 JVC in PDF.

| Product type | Audio system (hi-fi system) |
| Brand | JVC |
| Model | TH-D60 |
| Net weight | 30.7 kg |
| Laser class | 1 (compliant with IEC 60825-1) |
| Power supply | Mains (AC) |
| Standby indicator | Red in standby, off when operating |
| Remote control | Yes |
| Headphone jack | Yes |
| Intended use | Domestic, indoor |
| Laser safety | Do not open – invisible radiation |
| Maintenance | Clean with a dry cloth, do not use chemical products |
| Compatible peripherals | Headphones, speakers (depending on model) |
| Included accessories | Remote control, power cable (likely) |
| Warranty | See supplier terms |
Frequently Asked Questions - TH-D60 JVC
User questions about TH-D60 JVC
0 question about this device. Answer the ones you know or ask your own.
Ask a new question about this device
Download the instructions for your Audio System in PDF format for free! Find your manual TH-D60 - JVC and take your electronic device back in hand. On this page are published all the documents necessary for the use of your device. TH-D60 by JVC.
USER MANUAL TH-D60 JVC
DVD DIGITAL THEATER SYSTEM
TH-D60
Consists of XV-THD60, SP-THD6W, SP-THD6F, SP-THD6C and SP-THD6S
TH-D50
Consists of XV-THD50, SP-THD5W, SP-THD5F, SP-THD5C and SP-THD5S
TH-D5
Consists of XV-THD5, SP-THD5W, SP-THD5F, SP-THD5C and SP-THD5S
TH-D4
Consists of XV-THD4, SP-THD5W, SP-THD5F, SP-THD5C and SP-THD5S


Digital Surround

PRO LOGIC II


ULTRA
Hami

READY

MPEG-4 ASF PLAYBACK
Digital Direct Progressive Scan

INSTRUCTIONS
For Customer Use:
Enter below the Model No. and Serial No. which are located either on the rear, bottom or side of the cabinet. Retain this information for future reference.
Model No.
Serial No.


The lightning flash with arrowhead symbol, within an equilateral triangle is intended to alert the user to the presence of uninsulated "dangerous voltage" within the product's enclosure that may be of sufficient magnitude to constitute a risk of electric shock to persons.

The exclamation point within an equilateral triangle is intended to alert the user to the presence of important operating and maintenance (servicing) instructions in the literature accompanying the appliance.

WARNING: TO REDUCE THE RISK OF FIRE OR ELECTRIC SHOCK, DO NOT EXPOSE THIS APPLIANCE TO RAIN OR MOISTURE.
CAUTION — button!
Disconnect the mains plug to shut the power off completely (the STANDBY lamp goes off). When installing the apparatus, ensure that the plug is easily accessible.
The /1 button in any position does not disconnect the mains line.
- When the system is on standby, the STANDBY lamp lights red.
- When the system is turned on, the STANDBY lamp goes off.
The power can be remote controlled.
ATTENTION - Touche 念
To reduce the risk of electrical shocks, fire, etc.:
- Do not remove screws, covers or cabinet.
- Do not expose this appliance to rain or moisture.
ATTENTION
Note to CATV system installer:
This reminder is provided to call the CATV system installer's attention to section 820-40 of the NEC which provides guidelines for proper grounding and, in particular, specifies that the cable ground shall be connected to the grounding system of the building, as close to the point of cable entry as practical.

[European Union only]
This equipment has been tested and found to comply with the limits for a Class B digital device, pursuant to part 15 of the FCC Rules. These limits are designed to provide reasonable protection against harmful interference in a residential installation.
This equipment generates, uses and can radiate radio frequency energy and, if not installed and used in accordance with the instructions, may cause harmful interference to radio communications. However, there is no guarantee that interference will not occur in a particular installation. If this equipment does cause harmful interference to radio or television reception, which can be determined by turning the equipment off and on, the user is encouraged to try to correct the interference by one or more of the following measures: Reorient or relocate the receiving antenna. Increase the separation between the equipment and receiver.
Connect the equipment into an outlet on a circuit different from that to which the receiver is connected.
Consult the dealer or an experienced radio/TV technician for help.
CAUTION
Changes or modifications not approved by JVC could void the user's authority to operate the equipment.
For Canada
THIS DIGITAL APPARATUS DOES NOT EXCEED THE CLASS B LIMITS FOR RADIO NOISE EMISSIONS FROM DIGITAL APPARATUS AS SET OUT IN THE INTERFERENCE-CAUSING EQUIPMENT STANDARD ENTITLED "DIGITAL APPARATUS," ICES-003 OF THE DEPARTMENT OF COMMUNICATIONS.
Pour le Canada
CET APPAREIL NUMERIQUE RESPECTE LES LIMITES DE BRUITS RADIOELECTRIQUES APPLICABLES AUX APPAREILS NUMIRIQUES DE CLASSE B PRESCRITES DANS LA NORME SUR LE MATERIEL BROUILLEUR; "APPAREILS NUMERIQUES", NMB-003 EDICTEE PAR LE MINISTRE DES COMMUNICATIONS.
CAUTION:
Excessive sound pressure from earphones or headphones can cause hearing loss.
ATTENTION:
- CLASS 1 LASER PRODUCT
- CAUTION: Do not open the top cover or cabinet. There are no user serviceable parts inside the unit; leave all servicing to qualified service personnel.
- CAUTION:
(For U.S.A.) Visible and/or invisible class II laser radiation when open. Do not stare into beam. (For Canada) Visible and/or invisible class 1M laser radiation when open. Do not view directly with optical instruments.
- REPRODUCTION OF LABEL: CAUTION LABEL, PLACED INSIDE THE UNIT.
IMPORTANT POUR PRODUITS LASER
To avoid personal injury or accidentally dropping the unit, have two persons unpack, carry, and install the unit.
ATTENTION!
How to read this manual
- Illustrations and button names of the TH-D60 are mainly used for explanation.
- The following icons and illustrations are used to make the explanations simple and easy-to-understand.
| Icons for System operations | |
| Operations from the center unit | |
| Operations from the remote control | |
| The function can be operated from the on-screen bar (21). | |
| Icons for the references and notes | |
| Reference page for the function/ operation | |
| Caution for the function/operation | |
| Note for the function/operation | |
| Tip for the function/operation | |
| Icons for operating information | |
| The function is available while playing. | |
| The function is available while paused. | |
| The function is available while stopped. | |
| There is a time limit on performing the target operation. | |
| Illustrations for button operations | |
| Press the button briefly. | |
| Press the button repeatedly. | |
| Press and hold the button. | |
| Press button A, then press button B. | |
| Press button B while holding button A. | |
Table of contents
Before using this System. 2
Playable discs/devices/files. 3
Playable disc types 3
Playable digital devices 3
Playable file types 4
Getting started 5
Checking the supplied accessories 5
Putting batteries into the remote control 5
Connecting the speakers and subwoofer 5
Speaker layout 6
Connecting the antennas 7
Connecting a TV 7
Connecting external components 8
Connecting the AC power cord 9
Basic and common operations. 10
Sound and monitor settings. 12
Sound settings and adjustments 12
Scanning mode setting. 14
Disc/file playback 15
Basic playback 15
Using the disc menu 17
Locating a desired scene or song 17
Changing the playback mode 18
Advanced operations 19
Special playback for DVD Audio 20
Operation from the TV screen 21
Personal settings 23
XM Satellite Radio operations 25
Preparations 25
Manual tuning. 26
Preset tuning 26
Changing the channel information 26
FM/AMtuner operations. 27
Manual tuning. 27
Preset tuning 27
Selecting the FM reception mode 27
iPod playback 28
Operating external components 29
Setting the manufacturer's code 29
Operating external components 29
References 30
Manufacturer's code list 30
Language code list 30
Messages and icons shown on the TV and display ... 31
Troubleshooting 31
Specifications 33
Precautions
There are no user-serviceable parts inside. If anything goes wrong, unplug the power cord and consult your dealer.
Notes on installing the System
- Select a location which is level, dry and neither too hot nor too cold between 5^ and 35^ (41°F and 95°F).
- Do not install the System in a location subject to vibrations.
- Do not put heavy objects on the System.
Avoid moisture, water, dust, and high temperatures
- Do not install the System in moist or dusty locations.
- If water gets inside the System, turn off the power and remove the plug from the wall outlet, then consult your dealer. Using the System in this state may cause a fire or electrical shock.
- Do not expose the System to direct sunlight or place it near a heating device.
To prevent malfunctions or damage to the System
- Do not insert any metallic objects, such as wires, hairpins, coins, etc. into the System.
- Do not block the vents.
Notes on the power cord
- When you are away on travel or otherwise for an extended period of time, remove the plug from the wall outlet. A small amount of power is always consumed while the power cord is connected to the wall outlet.
- When unplugging the System from the wall outlet, always pull the plug, not the power cord.
- Disconnect the power cord before cleaning or moving the System.
- Do not modify, twist or pull the power cord, or put anything heavy on it. Doing so may cause fire, electric shock, or other accidents.
About copyright laws
Observe the copyright laws in your country before recording from original sources. Recording of copyrighted material may infringe copyright laws.
About the copyguard system
The discs are protected by the copyguard system. When connecting the System to a TV via a VCR, or to a TV with a built-in VCR, the copyguard system activates and distortion of the picture may occur.
Notes on installing and using the speakers
- Place the speakers and subwoofer on a flat and level surface.
-
The speakers are magnetically shielded to avoid color distortions on TVs. If the color on a TV is distorted, perform the following procedure:
-
Turn off the TV's main power switch or unplug it before installing the speakers. Then wait at least 30 minutes before turning on the TV's main power switch again.
Some TVs may still be affected even though you have followed the above procedure. If this happens, move the speakers away from the TV.
- The subwoofer is not magnetically shielded. To avoid color distortion, do not place it near the TV or monitor.
- When moving the speakers and subwoofer, do not pull the speaker cords. Doing so may cause the speakers and/or subwoofer to fall over, causing damage or injury.
- When installing the speakers on a wall, be sure to have them installed by qualified personnel. DO NOT install the speakers on a wall by yourself.
- Do not lean against the speakers, as they could fall down or break, possibly causing an injury. Be especially careful that children do not lean against them.
About the adjustment of volume
Always set the volume to the minimum level before starting any source. If the volume is set at a high level, the sudden blast of sound could permanently damage your hearing and/ or blow out the speakers.
To clean the System
- Use a soft cloth. Follow the relevant instructions on the use of chemically-coated cloths.
- If the System is heavily stained, apply a small amount of water or neutral detergent to the cloth and wipe clean, then wipe with a dry cloth.
- Do not use benzene, thinner or other organic solvents and disinfectants. These may cause deformation or discoloring.
Playable discs/devices/files
Some discs/files may require operations that differ from those explained in this manual.
Some discs/devices/files may not be recognized or played back correctly due to their characteristics.
Playable disc types
| Type of disc | Types of media |
| DVD Video | • Discs on the market • DVD-R/-R DL/-RW • +R/+RW • DualDisc* (DVD side only) |
| DVD Audio | • Discs on the market • DVD-R/-R DL/-RW • +R/+RW |
| Super Video CD (SVCD)/Video CD (VCD) | • Discs on the market • CD-R/-RW |
| Audio CD | • Discs on the market • CD Text (Audio part only) • CD-R/-RW |
| A disc recorded in the DVD VR format | • DVD-R/-RW |
| Audio/video files on a disc (4) | • DVD-R/-R DL/-RW in UDF Bridge format • CD-R/-RW in ISO 9660 format |
This System accommodates the NTSC system, and also can play discs/files recorded with PAL system. Note that an PAL video signal on a disc/file is converted to the NTSC signal and output.
It is possible to play back finalized +R/+RW (DVD Video format only) discs. "DVD" lights on the display panel when a +R/+RW disc is loaded.
DVD-R/-RW: This System does not support "multi-border" discs.
CD-R/-RW:
- This System supports "multi-session" discs (up to 20 sessions).
- This System cannot play "packet write" discs.
Region code of DVD Video
DVD Video players and DVD Video discs have their own Region Code numbers. This system can play back DVD Video discs whose Region Code numbers include "1."
Ex.:


Unplayable discs—unwarranted
Playing back the following discs generates noise and damages the speakers.
DVD-ROM, DVD-RAM, DualDisc* (non-DVD side)
- CD-ROM, CD-I (CD-I Ready), Photo CD, SACD
- Unfinalized discs (except DVD VR)
- Discs with an irregular shape or discs with tape, stickers or paste on either the label side or playback side
- Warped, dirty, or scratched discs
- The Non-DVD side of a "DualDisc" does not comply with the "Compact Disc Digital Audio" standard. Therefore, the use of Non-DVD side of a DualDisc on this product may not be recommended.
Playable digital devices
| JVC bears no responsibility for any loss of data in an iPod and/or USB mass storage class device while using this System. |

iPod
| iPod model | AUDIO | VIDEO |
| iPod nano 1GB/2GB/4GB | √ | |
| iPod nano (2nd Generation) 2GB/4GB/8GB | √ | |
| iPod mini 4GB/6GB | √ | |
| iPod (4th Generation) 20GB/40GB | √ | |
| iPod photo (4th Generation) 20GB/30GB/40GB/60GB | √ | √* |
| iPod video (5th Generation) 30GB/60GB/80GB | √ | √ |
- Only still pictures are available.
If the iPod does not play correctly, update your iPod software to the latest version. For details about updating your iPod, check on the Apple web site http://www.apple.com.
USB mass storage class device
A USB flash memory device, hard disk drive, multimedia card reader, digital camera, etc. can be used with this System through a USB connection.
This System is compatible with USB 2.0 Full-Speed.
This System cannot recognize a USB mass storage class device whose rating exceeds 5V / 500mA .
Playable file types
The following files in a disc or a USB mass storage class device can be played back.
| Type of file | Playable files | Extensions |
| Audio | MP3 | <.mp3> |
| WMA | <.wma> | |
| WAV | <.wav> | |
| Picture | JPEG | <. jpg>, <.jpeg> |
| Movie | ASF | <.ASF> |
| MPEG-1 | <.mpg>, <.mpeg> | |
| MPEG-2 | <.mpg>, <.mpeg>, <.mod> | |
| DivX (6.x, 5.x, 4.x and 3.11) | <.divx>, <.div>, <.avi> |
If a file on a USB mass storage class device exceeds the following conditions, it may not be played back correctly:
Maximum data transfer rate: 2 Mbps
Maximum frame rate: 30 fps for progressive
Maximum file size: 2 GB
The System recognizes up to 150 tracks (files) per group, and 99 groups per disc/device. The total number of tracks (files) that the System can detect is 4000.
Information about the recording conditions for the files on a disc/ device
MP3/WMA files
- The System supports MP3/WMA files recorded at a bit rate of 32 - 320 kbps and a sampling frequency of 16kHz , 22.05 kHz, 24 kHz*, 32 kHz, 44.1 kHz, or 48 kHz.
-
It is recommended to record each file at a sample rate of 44.1kHz and at a data transfer rate of 128 (96^*) kbps.
-
For WMA only
WAV files
- The System supports WAV files recorded at a quantization rate of 8 or 16 bit and a sampling frequency of 8kHz , 11.025kHz , 12kHz , 16kHz , 22.05kHz , 24kHz , 32kHz , 44.1kHz , or 48kHz .
- It is recommended to record each file at a sample rate of 44.1kHz and at a quantization rate of 16 bit Linear PCM.
JPEG files
- It is recommended to record a file at 640 × 480 resolution. (If a file has been recorded at a resolution of more than 640 × 480 , it will take a longer time to be displayed.)
- This System can only play baseline JPEG files.
ASF files
- The System supports MPEG-4 files with the following conditions:
File format: ASF
Visual profile: MPEG-4 SP (Simple Profile)
Audio CODEC: G.726
Max. picture size: 352 × 288 (CIF)
Max. bit rate: 384 kbps
MPEG1/MPEG2 files
- The stream format should conform to the MPEG system/ program stream.
- 720 × 576 pixels (25 fps)/ 720 × 480 pixels (30 fps) is recommended for the highest resolution.
- This system also supports resolutions of 352 × 576 / 480 × 576 / 352 × 288 pixels (25 fps) and 352 × 480 / 480 × 480 / 352 × 240 pixels (30 fps).
- The file format should be MP@ML (Main Profile at Main Level)/SP@ML (Simple Profile at Main Level)/MP@LL (Main Profile at Low Level).
- Audio streams should conform to MPEG1 Audio Layer-2 or MPEG2 Audio Layer-2.
DivX files
- The System supports DivX files whose resolution is 720 × 480 pixels or less (30 fps), and 720 × 576 pixels or less (25 fps).
- Audio stream should conform to Dolby Digital (including multi-channel) or MPEG1 Audio Layer-3 (MP3).
- The System does not support GMC (Global Motion Compression).
- Files encoded in the interlaced scanning mode may not be played back correctly.
Checking the supplied accessories
If anything is missing, contact your dealer immediately.
- Remote control (x 1)
- Batteries (x 2)
FM antenna (x 1)
AM loop antenna (x 1)
Composite video cord (x 1) -
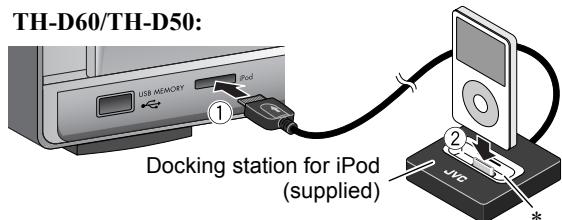
Connector for iPod
-
TH-D60/TH-D50: Docking station for iPod (x 1)
-
TH-D5/TH-D4: Connection cable for iPod (x 1) Stand for iPod (x 1)
-
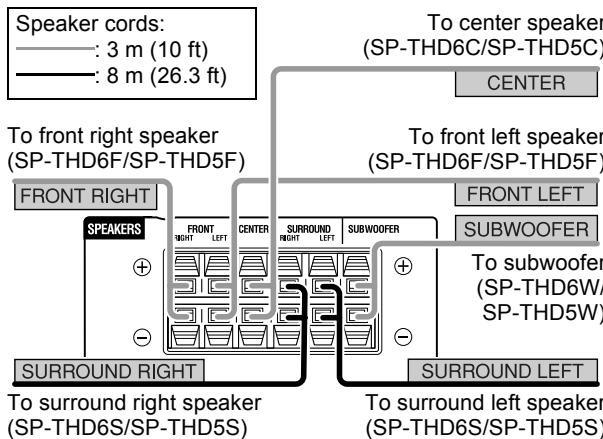
Speaker cords: 3m (10 ft) (x 4), 8m (26.3 ft) (x 2)
-
Feet
-
TH-D60: For surround speakers (x 8)
- TH-D50/TH-D5/TH-D4: For front and surround speakers (x 16)
- Screws (TH-D60 only): M5 x 85 mm (3-3/8 inches) (x 6)
Putting batteries into the remote control
R03 (UM-4)/AAA (24F) type dry-cell batteries (supplied)
Do not expose batteries to heat or flame.
If the range or effectiveness of the remote control decreases, replace both batteries.
Connecting the speakers and subwoofer
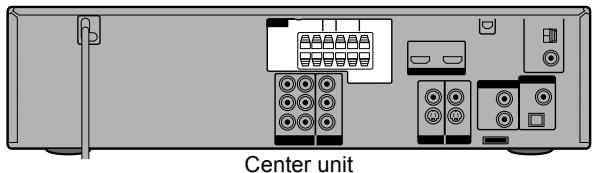
If you connect speakers other than those supplied for the System, use speakers of the same speaker impedance (SPEAKER IMPEDANCE) indicated on the rear of the center unit.
DO NOT connect more than one speaker to one speaker terminal.
Connecting the speaker cords
Connect the speaker cords both to the center unit and to each speaker.
On the center unit:
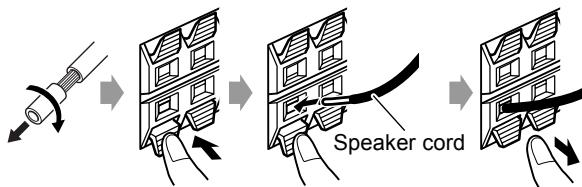
On the speaker:
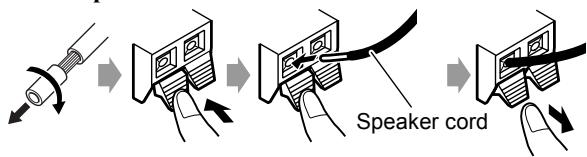
- Connect the black cords to the terminals.
- Connect the white cords to the terminals.
Attaching the base plates—required for the SP-THD6F only

Use the supplied screws (M5 x 85 mm/3-3/8 inches) to attach the base plate to the speaker.
Speaker layout
You can enjoy surround sound by placing the speakers as illustrated (Speaker layout A or B).
Speaker layout A
Select "S.SPK R" as the speaker position mode for this layout. (12)
To obtain the best possible surround sound from this System, place all the speakers except the subwoofer at the same distance from the listening position. If it is impossible, adjust the delay time from DELAY menu. (24)
Speaker layout B
Select "S.SPK F" as the speaker position mode for this layout. (12)
Place the surround speakers close to the center speaker.
It is recommended to place the surround speakers horizontally (see below).
When placing the speakers horizontally
Lay the speakers horizontally so that the JVC logos are positioned as illustrated below.
TH-D50/TH-D5/TH-D4 only: you can also lay the front speakers as illustrated below.
TH-D60: Do not lay down the front speakers horizontally.
You can turn the JVC logos to make them legible.

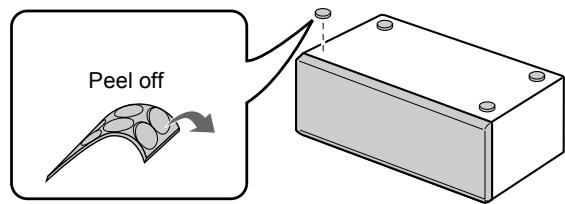
Attaching the feet
When placing the speakers horizontally, attach the feet to the bottom of the speakers as illustrated.
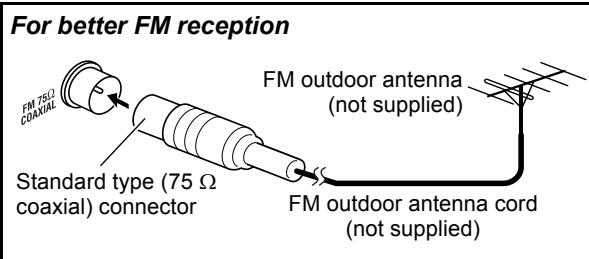
Connecting the antennas
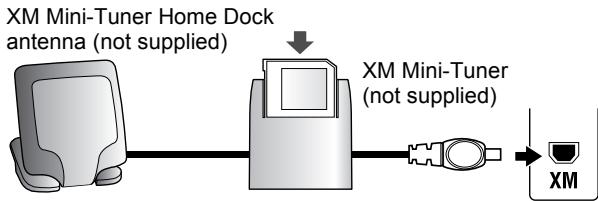
XM Mini-Tuner system—TH-D60 only
For better reception, install the XM Mini-Tuner Home Dock antenna in the following location:
- Near a south-facing window with aiming the antenna at the sky directly
- Where "Channel 1" can be heard clearly
-Where the Antenna Aiming display shows a value higher than 0 for either satellite or terrestrial signal strength (25)
AM and FM antennas
Make sure the antenna conductors do not touch any other terminals, connecting cords or power cords.
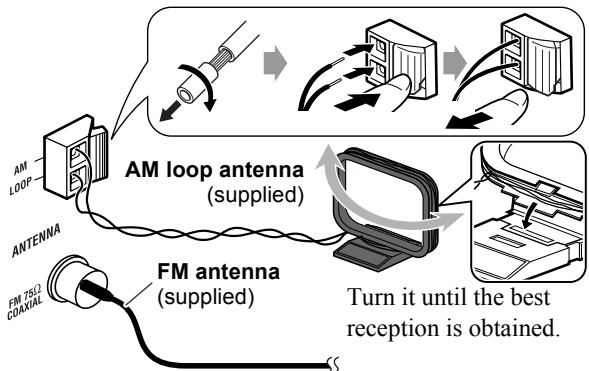
Extend it horizontally.
Connecting a TV
Connect the TV to the appropriate video out jacks to view the playback picture.
The picture quality order is as follows:
HDMI > Component video > S-video > Composite video
Make the following settings after connecting the TV:
-Scanningmode(14)
-MONITOR TYPE (23)
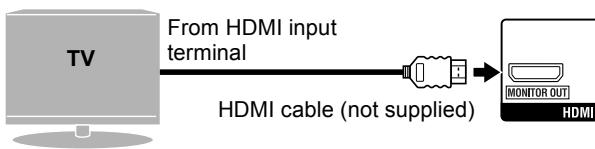
Connection using the HDMI terminal
You can make the following settings for the TV when the HDMI connection is used:
-HDMI DVI COLOR (23)
-HDMI OUT (23)
-HDMI AUDIO OUT (24)
-DOWN MIX (24)*
Use a certified HDMI cable, which has the HDMI logo.
You can use a monitor with a DVI terminal by connecting with a DVI-HDMI conversion cable.
When you play HDCP (High-Bandwidth Digital Content Protection) source, allow a few seconds for the sound and picture to be transmitted to the speakers and TV while the confirmation process is completed.
On some TV, no sound may come out during playback of sources such as DVD Audio even when the HDMI AUDIO OUT setting is "ON" (24).
- This setting is available only when the speaker position mode is set to "S.SPK F" (12).
Connection using the component video jacks
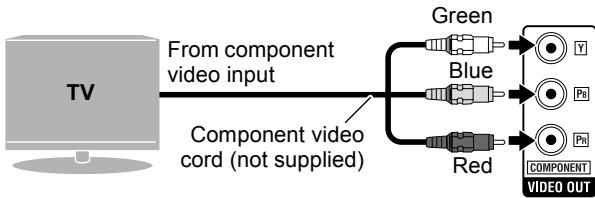
For the BNC connection, use a plug adapter (not supplied).
Connection using the S-video or composite video jack
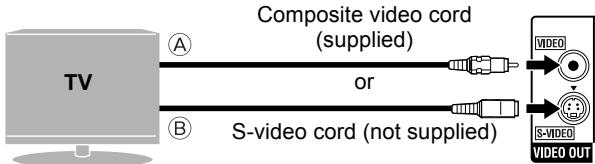
Align the marks.
A From Composite video input
From S-video input
Connecting external components
Connection for "VIDEO1"-TH-D60
Select "VIDEO1" as the source (11) for playing a component connected as follows.
Video connection

No sound signal comes into HDMI VIDEO 1 IN terminal. Make audio connection to listen to the sound (see the right column).
Audio connection
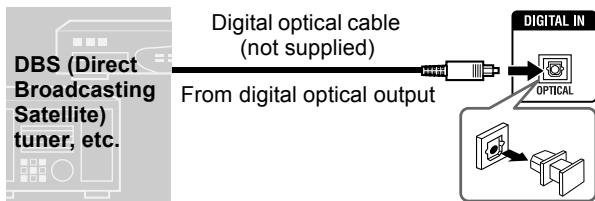
Connecting a digital component
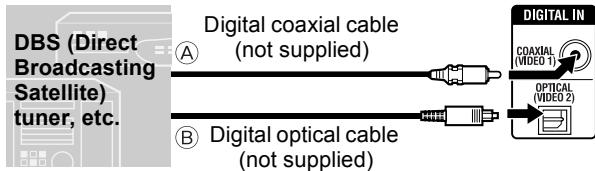
A From digital coaxial output
From digital optical output
The initial setting for the audio input setting is "COAX." When using OPTICAL terminal, change the setting to "OPT" before playing back. (14)
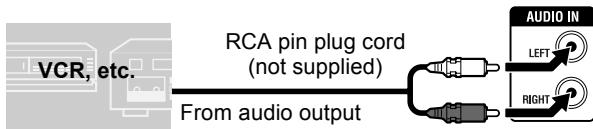
Connecting an analog component
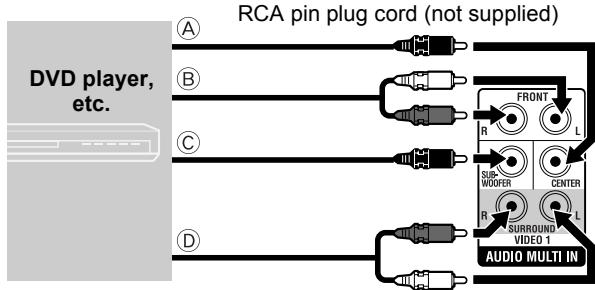
A From center channel audio output
From front left/right channel audio outputs
From subwoofer output
From surround left/right channel audio outputs
To listen to the sound from AUDIO MULTI IN jacks, perform the following procedure:
- Place the speakers by following "Speaker layout A" (6).
- Select "S.SPK R" as the speaker position mode. (12)
Select "5.1CH" as the audio input setting before playing back. (14)
Connection for "VIDEO2"-TH-D60
Select "VIDEO2" as the source (11) for playing a component connected as follows.
Video connection
A From composite video output
From S-video output
Align the
marks.
- Connect an external component with the same kind of cable as the one used to connect TV. (10) 8)
Audio connection
Connecting a digital component
A From digital coaxial output
From digital optical output
The initial setting for the audio input setting is "OPT." When using COAXIAL jack, change the setting to "COAX" before playing back. (14)
Connecting an analog component
Select "2CH" as the audio input setting before playing back. (14)
Connection for "VIDEO" —TH-D50/TH-D5/TH-D4
Select "VIDEO" as the source (11) for playing a component connected as follows.
Video connection
A From composite video output
From S-video output
Align the
marks.
- Connect an external component with the same kind of cable as the one used to connect TV. (134 8)
Audio connection
Connecting a digital component
Select "OPT" as the audio input setting before playing back. (14)
Connecting an analog component
Select "2CH" as the audio input setting before playing back. (14)
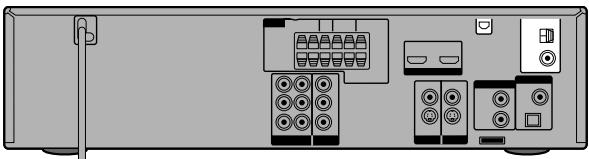
Connecting the AC power cord
Plug in the System only after all the connections have been completed.
Available video output terminals for each source
| Source Terminal | DVD | USB | iPod | VIDEO2/VIDEO | VIDEO1 |
| HDMI | √ | √ | √ | ||
| COMPONENT | √ | √ | |||
| S-VIDEO | √ | √ | √ | √ | |
| VIDEO (Composite video) | √ | √ | √ | √ |
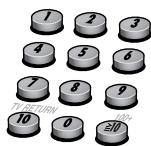
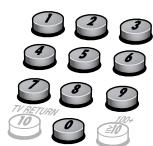
How to use the number buttons
To select 3: Press 3.
To select 10: Press 10.
To select 14: Press ≥ 10, 1 , then 4.
To select 24: Press ≥ 10,2 then 4.
To select 40: Press ≥ 10, 4 , then 0.
To select 114: Press ≥ 10, ≥ 10, 1, 1, then 4.
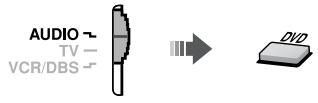
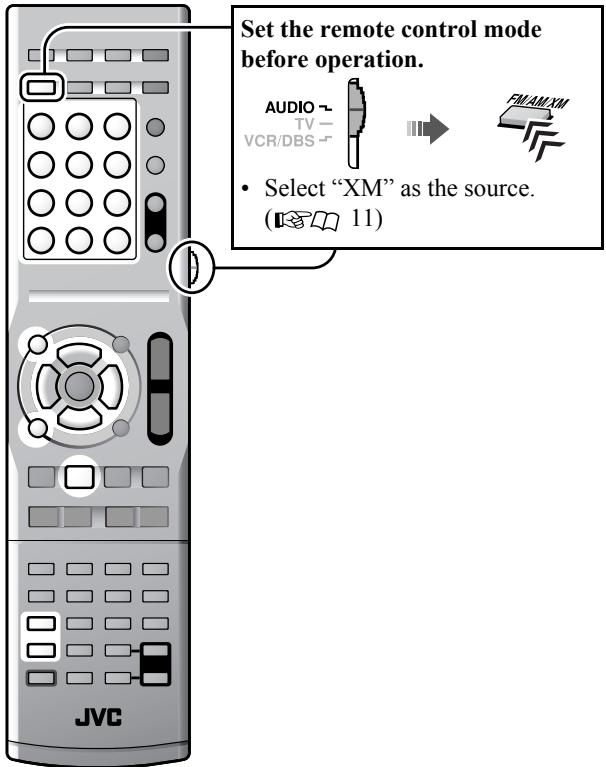
Set the remote control mode before operation.

Point at the remote sensor directly.
Listening with headphones
When the headphones is connected, the System automatically deactivates the speakers and cancels the surround mode (13) temporarily.
"H.PHONE" appears on the display.
Be sure to turn down the volume before connecting or putting on the headphones.

STANDBY lamp:
- Goes off when the System is turned on.
- Lights when the System is turned off.
Display
To change the display brightness

TH-D60 only: XM Satellite Radio indicators (25)
XM: Lights when "XM" is selected as the source.
Y: Shows XM Satellite Radio signal strength.
CAT: Lights while selecting a channel by category.
Digital audio signal format indicators
FM/AMtuner source indicators (27)
Lights when one of the surround modes is activated. (13)
Frequency unit indicators for FM/AM
Source signal and speaker signal indicators
(L(front left),C(center),R(front right),LFE(low frequency effect),LS(around left),RS(around right),S(monaural surround):Light when the signal comes in for the digital input or when the System is ready to receive the signal for the analog input.
SW (subwoofer): Always lights.
- Lights while reproducing the channel's sound through the corresponding speaker.
⑥ Speaker position mode indicators (12)
Lights when both the System and the TV (with HDMI connection) are ready to communicate each other.
① Scanning mode indicators (14)
HD: Lights when "720P" or "1080I" is selected.
PRGR.: Lights when the progressive scanning mode is activated.
Digital device indicators
File type indicators
Lights when the chapter (CHAP.) or track (TRK) number is displayed.
Lights when selecting a program number (PG) or playlist number (PL) of a DVD VR disc by using TITLE/GROUP. (17)
N Special playback indicators for DVD Audio (20)
BONUS: Lights when a bonus group is detected.
B.S.P: Lights when browsable still pictures are detected.
FM reception mode indicators (MONO: monaural / ST: stereo) (27)
Play mode indicators (PRG: program play / RND: random play) (18)
Lights when the System memorizes the position where the playback is interrupted. (16)
Repeat mode indicators (18, 21)
Turning the power on or off
| ==:)) | |
| AUDIO |
To turn off the System by using the sleep timer

| --(off) → 10 → 20 → 30 → 60 → 90 → 120 → 150 → 180 → (back to the beginning) (unit: minutes) |
To check the remaining time, press the button once.
Selecting the source
| To do | ---::) | Indication | ---: |
| Play back a disc | DVD | DVD | 15 |
| Play back a file on a USB mass storage class device | USB MEMORY | USB | 15 |
| Play back an iPod | Pod | IPod | 28 |
| Listen to an XM Satellite Radio*1, FM, or AM station | FM/AXM *2 | XM*1, FM, or AM | 25*1, 27 |
| Play back an external component • TH-D60:VIDEO1/VIDEO2 • TH-D50/TH-D5/TH-D4:VIDEO | VIDEO1 | VIDEO1*3 | 29 |
| VIDEO2 | VIDEO2*3 | 29 | |
| VIDEO | VIDEO*3 | 29 |
To select the source from the center unit

1 TH-D60 only
2TH-D50/TH-D5/TH-D4: The FM/AM button is used instead of FM/AM/XM.
*3 Make sure that the appropriate audio input setting have been made for the source (VIDEO1/VIDEO2 or VIDEO).
(14)
Adjusting the volume
| ::::: | |
| VOLUME |
To turn off the volume instantly

"MUTING" appears on the display.
To restore the volume, press the button again, or adjust the volume level.
Prohibiting disc ejection
1 Turn off the System.
2 Lock the disc tray.

"LOCKED" appears on the display.
To unlock the disc tray, perform the above procedure again. "UNLOCKED" appears on the display.
Sound and monitor settings
Sound settings and adjustments
Selecting the speaker position mode
Select the speaker position mode according to your speaker layout (6).

1 Turn off the System. (11)
3 Select the appropriate speaker position mode according to your speaker layout (6).
As the speaker position mode is changed, the following settings are also changed automatically: - The output level settings of the speakers and subwoofer (see below) are initialized.
- The surround mode (13) is set to "AUTO SUR."
Adjusting the output level of the speakers and subwoofer
1 The items you can adjust differ depending on the selected speaker position mode (see the left column).
- When the speaker position mode is "S.SPK R":
& FRNT~L FRNT~R CENTER SURR~L & SURR~R SUBWFR (back~to~the & beginning)
- When the speaker position mode is "S.SPK F":
CENTER SURR SUBWFR (back to the beginning)
2 Adjust the output level.

Different output level settings can be stored for the following two groups of sources:
- TH-D60: DVD, USB, IPod, VIDEO1*1,VIDEO2 TH-D50/TH-D5/TH-D4: DVD, USB, IPod,VIDEO
- TH-D60: FM, AM and VIDEO1*2 TH-D50/TH-D5/TH-D4: FM and AM
TH-D60 only: When the source is "XM," this adjustment is not available.
You can also make adjustments from the LEVEL menu (24) when the speaker position mode is "S.SPK R."
^1 With “COAX” or “OPT” selected as the audio input setting (14)
^2 With "5.1CH" selected as the audio input setting (14)
Adjusting the bass and treble sounds
| TRE | Adjusts the treble sound |
| BASS | Adjusts the bass sound |
2 Adjust the level.

Using the surround mode

Select one of the available surround modes.

The surround modes you can select depend on the playback source and the selected speaker position mode (12). For details on each surround mode, see "Available surround modes" on the right column.
- During 2-channel playback with "S.SPK R" speaker position mode:
AUTO SUR MOVIE MUSIC STADIUM ALLST OFF (back to the beginning)
When the source is "FM" or "AM," you can only select "ALL ST."
- During multi-channel playback with "S.SPK R" speaker position mode:
AUTO SUR currently selected mode* OFF (back to the beginning)
- When "AUTO SUR" is selected, the System automatically selects a proper multi-channel surround mode, such as "DOLBY D (Dolby Digital)" or "DTS (DTS Digital Surround)."
- During playback with "S.SPK F" speaker position mode:
AUTO SUR MOVIE WIDE/2CH SUPER W OFF (back to the beginning) When the source is "FM" or "AM," the surround mode cannot be activated.
To check the surround mode currently selected, press SURROUND once.
TH-D60 only:
- When the source is "VIDEO 1" with "5.1CH" selected as the audio input setting (14), the surround mode setting is ineffective. All incoming signals are emitted through the corresponding speakers. "MULTI CH" appears on the display.
- When the source is "XM," the surround mode cannot be changed.
During playback of ASF, MPEG-2, or MPEG-1 files, the surround mode setting is ineffective.
For DVD Audio, when "LR ONLY" appears on the display, activate the surround mode for the multi-channel reproduction.
Available surround modes
| Surround mode for “S.SPK R” | |
| AUTO SUR (Auto Surround) | Selects an appropriate surround mode according to the incoming signals |
| MOVIE (Dolby Pro Logic II Movie) | For movie sources |
| MUSIC (Dolby Pro Logic II Music) | For music sources |
| STADIUM | Adds clarity and spreads the sound, as if in an outdoor stadium |
| ALL ST (All Channel Stereo) | Reproduces a larger stereo sound field using all the activated speakers |
| OFF (Off) | Deactivates surround mode |
| Surround mode for “S.SPK F” | |
| AUTO SUR (Auto Surround) | Selects an appropriate surround mode according to the incoming signals |
| MOVIE | For movie or multi-channel music sources |
| WIDE/2CH | For 2-channel music sources |
| SUPER W (Super Wide) | Reproduces broader sound field |
| OFF (Off) | Deactivates surround mode |
Setting the audio input for external components

Set the audio input of the external component for "VIDEO1/VIDEO2" (TH-D60) or "VIDEO" (TH-D50/TH-D5/TH-D4).


2 TH-D60 only: Select a source you want to set the audio input for.

| AIN.1 | For “VIDEO 1” |
| AIN.2 | For “VIDEO 2” |
3 Select an appropriate audio input according to the audio connection. (8, 9)

| 2CH | For connection via the AUDIO IN jacks |
| 5.1CH | For connection via the AUDIO MULTI IN jacks |
| COAX | For connection via the COAXIAL jack |
| OPT | For connection via the OPTICAL terminal |
You can select the following settings for each source (underlined items are the initial settings for each source):
"VIDEO1": 5.1CH*2, COAX*3, and OPT*3
- "VIDEO2": 2CH, COAX ^3 , and OPT ^3
- "VIDEO": 2CH and OPT
If your System is the TH-D60, make the audio input setting for both "VIDEO1" and "VIDEO2."
^1 "AIN.1" or "AIN.2" appears on TH-D60, and "AIN." on TH-D50/TH-D5/TH-D4.
2TH-D60 only: When the speaker position mode is set to "S.SPK F," "5.1CH" is not selectable.
*3 TH-D60 only: It is not possible to select the same audio input setting for "VIDEO 1" and "VIDEO 2." For example, when "COAX" is assigned to "VIDEO 1," it is not selectable for "VIDEO 2."
Scanning mode setting
Select the scanning mode according to the type of TV and connection method.

To use the progressive mode, connect the TV to the HDMI MONITOR OUT terminal or COMPONENT jacks ^1 . (7)
1 Select "DVD" or "USB" as the source. (11)


3 Select an appropriate scanning mode, then confirm the selection.


| 480I*2 | To see the picture in interlaced mode. |
| 1080I*3 | |
| 480P | To see the picture in progressive mode. |
| 720P*3 | |
| AUTO*3 | The System automatically emits the video signal to get the best picture quality on your TV. |
You can get better picture quality in the following orders:
$$ \begin{array}{l} - 1 0 8 0 \mathrm {I} > 7 2 0 \mathrm {P} \ - 4 8 0 P > 4 8 0 I \ \end{array} $$
When the picture is not shown correctly, change the scanning mode to the interlaced mode.
When the TV is connected through S-VIDEO or VIDEO jack, the scanning mode setting has no effect.
1 Activate progressive mode only when your TV supports progressive video signals.
2 Selectable only when the TV is connected via COMPONENT jacks. (13578)
*3 Selectable only when the TV is connected via HDMI MONITOR OUT terminal. (100mm)
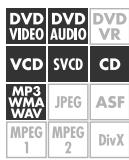
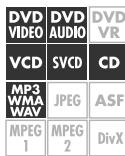
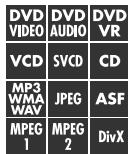
The following icons show the available disc/file types for the target function:
DVD VIDEO|DVD AUDIO|DVD VR|VCD|SVCD|CD|MP3 WMA WAY|JPEG|ASF|MPEG 1|MPEG 2|DivX
Initial settings
Make the following settings before playing back discs/ files.
- Scanning mode (14)
- MONITOR TYPE (23)
- ON SCREEN LANGUAGE (23)
Set the remote control mode before operation.
For disc playback
For playback of a file on a USB mass storage class device

Operating the touch sensor panel
You can operate the playback control buttons on the center unit simply by touching them.
When you touch any one of these buttons, it lights briefly in blue.

If a still picture is displayed for about 5 minutes, the System automatically dims the screen (screen saver function). You can deactivate the screen saver function. (23)
When several types of files (music, picture or movie) are recorded on a disc or device, select the file type you want to play. (23)
For messages and icons appearing on the display, see "Messages and icons shown on the TV during disc/file playback" (31).
Basic playback
Playing back a disc
1 Select "DVD" as the source. (11)
2 (On the center unit)
3 Place a disc on the tray.
When placing an 8 cm (3-3/16 inches) disc
4 Start playback.
| ---1) | |
- JPEG: Slide-show playback starts.
- MP3/WMA/WAV: The file control display appears on the TV. (22)
Playing back a file on a USB mass storage class device
1 Connect a USB mass storage class device while the System is turned off.
2 Turn on the System, then select "USB" as the source. (11)
Playback starts automatically.
Press (play button) to start playback if the file is not played back automatically.
- JPEG: Slide-show playback starts.
- MP3/WMA/WAV: The file control display appears on the TV. (22)
DO NOT connect or disconnect the device when the System is turned on.
You cannot connect a computer to the USB MEMORY terminal of the System.
DO NOT connect the device through a USB hub.
iPod does not play through the USB MEMORY terminal. When iPod is connected to the USB MEMORY terminal, "RESTRICT" appears on the display.
This System may not playback some USB mass storage class devices and does not support DRM (Digital Rights Management).
Use a USB cable of less than 1 m (3.3 ft) in length.
Play/stop/pause/search
| To do | ……… | |
| Start playback | ||
| Stop playback | MEMORY | |
| Pause playback | FIREMODE | |
| Fast-forward/fast- reverse search*1 | SLOW *2 | Hold -TUNING+ |
1 To return to normal playback, press ▷ (play button).
2 Pressing and holding |▲▼/▶▼ also fast-forwards/fast-reverses tracks or files.
Resume function
The System memorizes the position where the playback has been interrupted by one of the following operations:
- Pressing once
- Turning off the power (11)
- Changing the source (11)
To resume playback, press (play button) or the corresponding source button.
To clear the memorized position, press twice.
- Opening the disc tray or disconnecting the USB mass storage class device also clears the memorized position.
This function does not work in program play and random play. (18)
You can deactivate the resume function. (24)
| DVD VIDEO | DVD AUDIO | DVD VR |
| VCD | SVCD | CD |
| MP3 WMA WAV | JPEG | ASF |
| MPEG 1 | MPEG 2 | DivX |
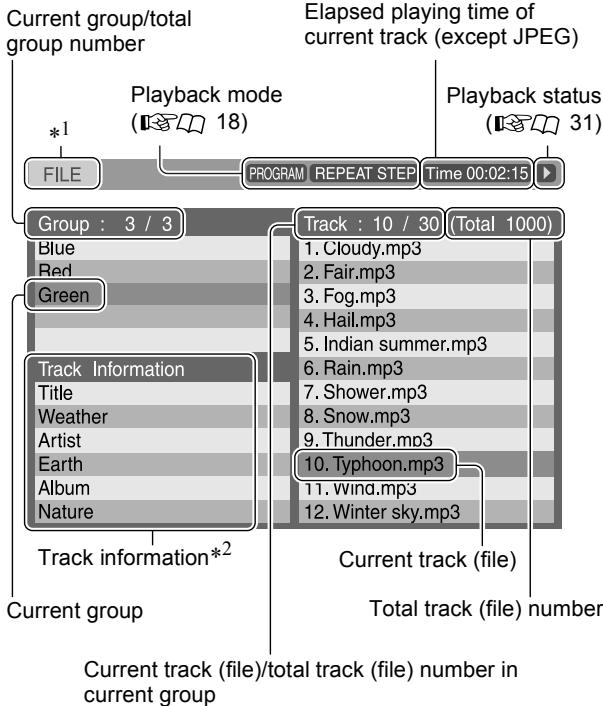
Changing the playback information


Each time you press the button, the playback information alternates between "type A" and "type B" on the display as follows:
Ex.: When a DVD Video disc is played back.
Information type A

Information type B

Title number Chapter number
| Disc/file type | Information type A | Information type B | |
| DVDVIDEO | Chapter number with time information*1 | Title (T) number and chapter (C) number | |
| DVDVR | Program (PG) number/ Playlist (PL) number and chapter (C) number | ||
| VCDCD | SVCD | Track number with time information*1 *2 | |
| DVDAUDIO | MP3WMAWAV | Group (G) number and track (T) number | |
| ASF | MPEG1 | ||
| MPEG2 | DivX | ||
| JPEG | File number | Group (G) number and file (F) number | |
1 For DVD Video, DVD Audio, DVD VR, VCD, SVCD, or CD, you can change the time information mode (21). For MP3, WMA, WAV, ASF, MPEG1, MPEG2, or DivX, elapsed playing time is shown.
2 While playing a VCD or SVCD with PBC (17), only track number is displayed.
Using the disc menu

For DVD Video/DVD Audio

1
For a DVD Video disc
For a DVD Audio disc


2 Select the desired item, then confirm the selection.


Confirm
For some discs, you can also select items by using the number buttons.
* TH-D50/TH-D5/TH-D4: The TOP MENU/PG button is used instead of TOP MENU/PG/DIRECT.

For VCD/SVCD with PBC

The Play Back Control function (PBC) allows you to operate the VCD/SVCD using menus.
Select the number of the desired item while the menu is displayed on the TV.*
- To move to the next or previous page of the current menu

- To return to the previous menu

To perform playback without PBC
- While playback is stopped, select the desired track by using the number buttons.*
- Select the desired track by pressing repeatedly, then press (play button).
To activate the PBC function, press TOP MENU(/PG/DIRECT) or MENU(/PL).
While playing back a VCD or SVCD with PBC ("PBC" appears on the display), some functions such as time search, do not work.
- For details on using the number buttons, see "How to use the number buttons" (10).
Locating a desired scene or song

Selecting the beginning of a desired scene or song
| To do | Disc/file | ||
| Skip chapter/track/file | DVD VIDEO | DVD AUDIO | DVD VR |
| VCD | SVCD | CD | |
| Select the chapter/track/file number*3 *4 | MP3 WMA WAY 1 2 3 4 | JPEG | ASF |
| MPEG 1 | MPEG 2 | DivX | |
| Select the title/ program or playlist/ group number*3 • Enter the number while “--” is flashing on the display | DVD VIDEO | DVD AUDIO | DVD VR |
| VCD | SVCD | CD | |
| MP3 WMA WAY 1 2 3 4 | JPEG | ASF | |
| MPEG 1 | MPEG 2 | DivX | |
1For DVD Video, DVD VR, VCD, and SVCD discs, this function is not available while playback is stopped.
2For DVD Video and DVD VR discs, you can select a title/ program while playback is stopped.
3 For details on using the number buttons, see "How to use the number buttons" (10).
4 When selecting the chapter/track/file number from the on-screen bar, see "Using the on-screen bar" (10-21).

Selecting the desired position of a scene or song
| To do | Disc/file | ||
| Move the playback position back by 10 seconds (one-touch replay)*1 *2 | DVD VIDEO | DVD AUDIO | DVD VR |
| VCD | SVCD | CD | |
| MP3 WMA WAV | JPEG | ASF | |
| MPEG 1 | MPEG 2 | DivX | |
| Skip at approximately 5-minute intervals*1 | DVD VIDEO | DVD AUDIO | DVD VR |
| VCD | SVCD | CD | |
| MP3 WMA WAV | JPEG | ASF | |
| MPEG 1 | MPEG 2 | DivX | |
1This function works only within the same title/program/file.
2This function is not available during repeat play.
Changing the playback mode
Program play and random play cannot be used for a USB mass storage class device.

Programming the playing order-program play
1

Program window

2 Select the desired chapters/ tracks.
- For DVD Video, DVD Audio, MP3 and WMA: Enter a title/group number, then a chapter/track number.*
- For VCD, SVCD and CD: Enter a track number.*
To clear the programs
One by one
once

↓Hold

3

To check the program contents


To return to normal playback

Press the button repeatedly until both the program window and RANDOM
disappear from the TV.
To program the tracks in the bonus group on a DVD Audio disc, perform the "Playing back a bonus group" procedure (20) before operation.
You can program up to 99 steps.
- For details on using the number buttons, see "How to use the number buttons" (10).

Playing at random—random
play
1

RANDOM
2


To return to normal playback

Press the button repeatedly until both the program window and RANDOM disappear from the TV.

To play the tracks in the bonus group on a DVD Audio disc during random play, perform the "Playing back a bonus group" procedure (20) before operation.

Playing repeatedly—repeat play

The repeat modes you can select depend on the playback discs/files.

| On the display | On the TV | Meaning |
| G | GROUP REPEAT GROUP | Repeat current group |
| TITLE | Repeat current title | |
| PG | Repeat current program | |
| PL | Repeat current playlist | |
| ALL | ALL REPEAT ALL | Repeat all titles/programs/tracks/files |
| 1 | TRACK, STEP REPEAT TRACK, REPEAT STEP | Repeat current track |
| CHAP, STEP | Repeat current chapter | |
| No indication | OFF | Repeat mode is deactivated |
You can repeat the desired part from the on-screen bar (A-B repeat). (21)
This function is not available when playing back a VCD/SVCD disc with PBC (17).
* For DVD Video and DVD VR discs, this function is not available while playback is stopped.
Advanced operations
Changing the language/sound/scene angle
| To do | Disc/file | ||
| Select the subtitle language*1 *2 ENGLISH • To show/hide the subtitle, press SUBTITLE. | DVD VIDEO | DVD AUDIO | DVD VR |
| VCD | SVCD | CD | |
| MP3 WMA WAV | JPEG | ASF | |
| MPEG 1 | MPEG 2 | DivX | |
| Select the audio language/audio channel* CD 1/3 ENGLISH | DVD VIDEO | DVD AUDIO | DVD VR |
| VCD | SVCD | CD | |
| MP3 WMA WAV | JPEG | ASF | |
| MPEG 1 | MPEG 2 | DivX | |
| Select the view angle 1/3 1 | ↓Hold SHIFT+ | DVD VIDEO | DVD VR |
| VCD | SVCD | ||
| MP3 WMA WAV | JPEG | ||
| MPEG 1 | MPEG 2 | ||
For DVD Audio, the functions take effect for the moving picture part only.
1 For DVD VR and SVCD discs, the subtitle indication appears and can be changed by performing the above procedure even if no subtitles are recorded.
2 Some subtitle or audio languages are abbreviated in the pop-up window. See "Language code list" (30).
Special picture playback
| To do | Disc/file | ||
| Play back frame by frame | DVD VIDEO | DVD AUDIO | DVD VR |
| VCD | SVCD | CD | |
| MP3 WMA WAV | JPEG | ASF | |
| MPEG 1 | MPEG 2 | DivX | |
| Play back in slow-motion*1 | DVD VIDEO | DVD AUDIO | DVD VR |
| VCD | SVCD | CD | |
| MP3 WMA WAV | JPEG | ASF | |
| MPEG 1 | MPEG 2 | DivX | |
| Enlarge the picture*2 *3 · Change the scene magnification, then move the zoomed-in area. | ↓Hold Shift Down | DVD VIDEO | DVD VR |
| ↓ | SVCD | CD | |
| MP3 WMA WAV | JPEG | ASF | |
| MPEG 1 | MPEG 2 | DivX | |
To return to normal playback
- While playing back frame by frame or in slow-motion, press (play button).
- While zooming in the picture, select "OFF" by pressing ZOOM repeatedly while holding SHIFT.
For DVD Audio, the functions take effect for the moving picture part only.
1 For DVD Video and DVD Audio, reverse slow-motion is also available by pressing SLOW repeatedly.
2 To zoom in JPEG files, pause the playback first.
*3 On some files, using cursor (▶/▲/▼/▲) cannot move the zoomed-in area during playback.
Adjusting the picture quality (VFP)
You can adjust the picture mode.
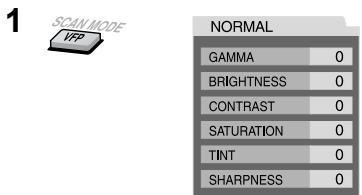
2 Select the desired preset, then finish the setting.
| NORMAL | Normally select this. |
| CINEMA | Suitable for movies |
| USER1/ USER2 | You can adjust parameters that affect picture appearance. (See below.) |
To adjust the picture tone
1 Select "USER1" or "USER2" (see above).
2 Select a parameter, then confirm the selection.

| GAMMA | Controls the brightness of the neutral color |
| BRIGHTNESS | Controls the brightness of the entire picture |
| CONTRAST | Controls the contrast |
| SATURATION | Controls the color depth |
| TINT | Controls the tint |
| SHARPNESS | Controls the sharpness |
3 Adjust the parameter, then confirm the selection.

4 Repeat steps 2 and 3 to adjust others.

When connecting the TV to the HDMI MONITOR OUT terminal (7), the VFP setting has no effect.
Special playback for DVD Audio
Playing back a bonus group
Some DVD Audio discs have a "bonus group." To play back a bonus group, you have to enter the specific "key number" (a password).
1 Select a bonus group.

The key number entry screen appears.
On the TV

2 Enter the key number, then confirm the entry.
Enter the number

Confirm
To clear the key number entry

Selecting browsable still pictures

While playing back a track linked to browsable still pictures (B.S.P), you can select the still pictures (turn the page).
- If a track is linked to browsable still pictures, they are usually shown automatically during playback.
Select the desired still picture.


Operation from the TV screen
Using the on-screen bar
You can use various functions from the on-screen bar.
Basic operation procedure
2 Select the desired item (see the right column), then confirm the selection.

After confirming the selection...
- When the pull-down menu appears, select the desired item by pressing cursor / repeatedly, then confirm the selection by pressing ENTER.

- When a number-entry box appears, enter the number by using the number buttons (0-9), then confirm the entry by pressing ENTER.

To correct a misentry:
- setting: press cursor repeatedly to clear the misentry, then re-enter the number.
-
CHAP. setting: re-enter the number.
-
When changing the time information mode (TIME), select the desired item by pressing ENTER repeatedly.
To clear the on-screen bar

The contents of the on-screen bar differ according to the type of discs/files.
1 TH-D50/TH-D5/TH-D4: The ON SCREEN button is used instead of CAT/ON SCREEN.
2 During playback of ASF, MPEG-1, MPEG-2, or DivX files, the function bar does not appear.
On-screen bar functions
| TIME | Selects the time information mode shown on the display and the status bar.TIME*3: Elapsed time of chapter/track REM*3: Remaining time of chapter/track TOTAL: Elapsed time of title (DVD Video)/ group (DVD Audio)/program (DVD VR)/disc (VCD/CD/SVCD)T. REM: Remaining time of title (DVD Video)/group (DVD Audio)/ program (DVD VR)/disc (VCD/ CD/SVCD) |
| Selects repeat mode.GROUP / TITLE / PG / PL / ALL / TRACK / CHAP / STEP / OFF:See also “Playing repeatedly—repeat play” (18).A-B: Repeats the desired part (A-B repeat).*4 *5After selecting this, select the beginning point (A) by pressing ENTER, then select the end point (B) by pressing ENTER again. | |
| Specifies the playback point by the time. | |
| CHAP. | Specifies a chapter to play back from. |
| TRACK | Specifies a track to play back from. |
| Selects the audio language or audio channel during playback. | |
| Selects the subtitle language during playback. | |
| Selects the desired scene angle in a multi-angle part during playback. | |
| PAGE | Selects the desired browsable still picture. |
3 Not available for DVD VR discs
4 During playback of DVD Video or DVD VR discs, A-B repeat play is available only within the same title/program.
*5 A-B repeat play is not available during program and random playback.
Using the file control display
The file control display appears in the following cases.
Audio files: Always appears.
- Movie and picture files: When TOP MENU(/PG/DIRECT) or MENU(/PL) is pressed or playback is stopped.
File control display
Ex.:
To play back the desired track/file
Select a desired group/track/file, then start playback.

-
For JPEG:
-
To start a slide-show from the selected file, press (play button).
- To play the selected file only, press ENTER.
1 When the source is "DVD," "FILE" appears, and when the source is "USB," "USB" appears.
2 For MP3/WMA/WAV only.
| DVD VIDEO | DVD AUDIO | DVD VR |
| VCD | SVCD | CD |
| MP3 | JPEG | ASF |
| WMA WAV | ||
| MPEG 1 | MPEG 2 | DivX |
Using the program list/ playlist (for DVD VR)

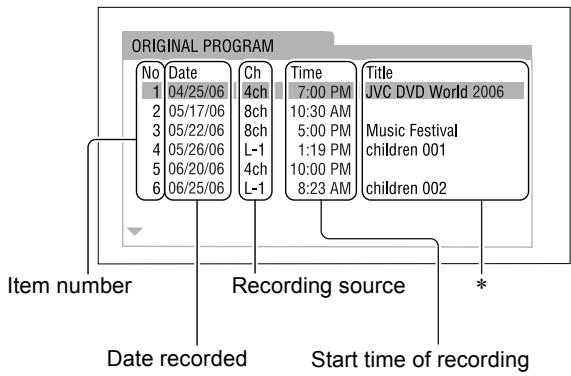
Program list
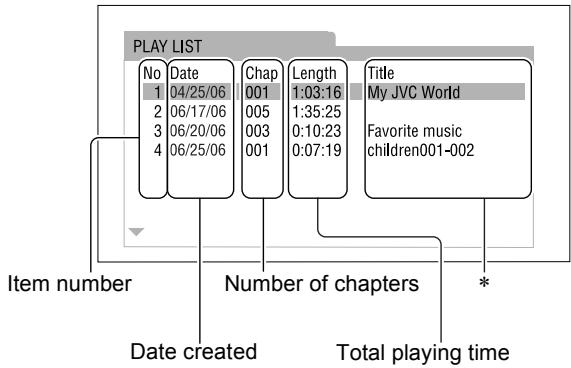
[ \text{Playlist} ]
- The title may not be displayed depending on the recording equipment.
To play back the desired item
1 To display the program list

To display the playlist

The System starts playing the first item.
2 Select the desired item.


3
- TH-D50/TH-D5/TH-D4: The TOP MENU/PG button is used instead of TOP MENU/PG/DIRECT.
Set the remote control mode before operation.
For disc playback
For playback of a file on a USB mass storage class device

You can change the settings of the System according to your preferences and playing environment.

1
2 Select the menu.

3 Select the item, then confirm.

Repeat this procedure until all the options have been confirmed.
To close the setup screen


Language menu (LANGUAGE)
| MENU LANGUAGE | Select the language for the DVD/DivX menu. | See “Language code list” (10 30) for the code of each language, such as “AA,” etc. |
| AUDIO LANGUAGE | Select the language for the audio language. | |
| SUBTITLE | Select the language for the subtitle language. | |
| ON SCREEN LANGUAGE | Select the language for the screen. | |

Picture menu (PICTURE)
| MONITOR TYPE | Select 16:9 wide-screen playback to fit your monitor. For wide TV: 16:9 NORMAL: For fixed 16:9 wide TV 16:9 AUTO: For ordinary wide TV | For conventional (4:3) TV: 4:3 LB 4:3 PS |
| PICTURE SOURCE | Select the source type of the disc/file contents when selecting the progressive scanning mode (100x14). AUTO: Normally select this. FILM: For a film source movie VIDEO: For a video source movie | |
| SCREEN Saver | Activate (ON) or deactivate (OFF) the screen saver function. | |
| FILE TYPE | Select the file type to play when several types of files are recorded on a disc/device. AUDIO: For audio files STILL PICTURE: For picture files VIDEO: For movie files | |
| HDMI DVI COLOR | Select the picture appearance for a TV with an HDMI connection. STANDARD: No effect applied. ENHANCE: Select when you need automatic picture adjustment. | |
| HDMI OUT | Select the type of video signal output from the HDMI MONITOR OUT terminal. AUTO: Normally select this. RGB: Select this when no picture appears on the TV with “AUTO.” | |

Audio menu (AUDIO)
| DOWN MIX | This menu is available only when the speaker position mode is set to “S.SPK F” (12). Select the audio signal output to the TV connected to the HDMI MONITOR OUT terminal. DOLBY SURROUND: For the TV equipped with Dolby Pro Logic decoder STEREO: For ordinary TV |
| D. RANGE COMPRESSION | You can enjoy powerful audio even at low volume level while playing Dolby Digital software. AUTO: Select this to apply the compression only to the multi-channel software (except 1-channel and 2-channel sources). ON: Select this to always apply the compression. |
| HDMI AUDIO OUT | This setting is effective only for the source “DVD” or “USB.” Select whether the System emits the audio signal from the HDMI MONITOR OUT terminal (ON) or not (OFF). For selecting whether the external component emits the audio signal through its HDMI terminal, make the setting on the external component. |

Speaker setting menu (SPKSETTING)
SPKSETTING menu is available only when the speaker position mode is set to "S.SPK R" (12).
| LEVEL | Adjust the output level of each speaker while monitoring the test tone. FRONT LEFT/RIGHT SPEAKER, CENTER SPEAKER, SURROUND RIGHT/LEFT SPEAKER: Select the speaker, then adjust the output level. TEST TONE: Turns on/off the test tone. |
| DELAY | Adjust the delay time of the speakers. EX:: Center 1 ms Subwoofer FRONT LEFT/RIGHT SPEAKER, CENTER SPEAKER, SURROUND RIGHT/LEFT SPEAKER: Select the speaker, then adjust the distance from the listening position to the speakers. • 1 ms increase (or decrease) in delay time corresponds to about 30 cm (1 ft) decrease (or increase) in distance. • Set to 0 ms for the furthest speaker from your position as the basis for the delay time setting. |
| SUBWOOFER | Make the subwoofer setting. LEVEL: Adjust the output level of the subwoofer. CROSS OVER: Select an appropriate crossover frequency according to the size of the cone speaker unit built into the small speaker connected. 120Hz: Select this when the cone speaker unit size is 8 cm (3-3/16 inches) or more. 150Hz: Select this when the cone speaker unit size is between 6 cm (2-3/8 inches) and 8 cm (3-3/16 inches). 200Hz: Select this when the cone speaker unit size is 5 cm (2 inches) or less. |

Other setting menu (OTHERS)
| RESUME | Activate (ON) or deactivate (OFF) the resume function. |
| ON SCREEN GUIDE | Activate (ON) or deactivate (OFF) the on-screen guide icons. |
| DivX REGISTRATION | The System has its own Registration Code for DivX playback. You can confirm the code of your System. • Once you play back a disc created by using the Registration Code, the System's code is overwritten by a totally different new one for copyright protection purposes. |
XM Satellite Radio operations are available on TH-D60 only.
About XM Satellite Radio
XM Satellite Radio offers an extraordinary variety of commercial-free music, plus the best in sports, news, talk and entertainment. XM is broadcast in superior digital audio from coast to coast. From rock to reggae, from classical to hip hop, XM has something for every music fan. XM's dedication to playing the richest selection of music is matched by its passion for live sporting events, talk radio, up-to-the-minute news, stand-up comedy, children's programming, and much more.
For U.S. customers, information about XM Satellite Radio is available online at www.xmradio.com. For Canadian customers, information about XM Canada is online at www.xmradio.ca.
For messages appearing on the display, see "Messages shown on the display while listening to the XM Satellite Radio" (31).
Preparations
Make sure that you have the following items to enable you to listen to the XM Satellite Radio stations:
- The XM Mini-Tuner system—XM Mini-Tuner and XM Mini-Tuner Home Dock antenna
- A subscription to XM Satellite Radio
How to subscribe
Hardware and required monthly subscription sold separately. Other fees and taxes, including a one-time activation fee may apply. Subscription fee is consumer only. All fees and programming subject to change. Channels with frequent explicit language are indicated with an XL. Channel blocking is available for XM radio receivers by calling 1-800-XMRADIO (US residents) and 1-877-GET-XMSR (Canadian residents).
For a full listing of the XM commercial-free channels and advertising-supported channels, visit lineup.xmradio.com (US residents) and xmradio.ca (Canadian residents). Only available in the 48 contiguous United States and Canada.
To start subscribing, you need to have the XM Satellite Radio ID code. To find the ID code, see "How to find the XM Satellite Radio ID code" below.
- The following channels are available without subscription:
- Channel 0: For checking the XM Satellite Radio ID code
- Channel 1: "XM Preview" channel
Select "XM" as the source before starting subscription, and keep the source "XM" until subscribing is completed.
How to find the XM Satellite Radio ID code
Tune in to "Channel 0" to check your XM Satellite Radio ID code.
The 8-digit (alphanumeric) ID code is displayed.
- To cancel the ID code display, select any channel other than "Channel 0."
Finding the best position for the XM Mini-Tuner Home Dock antenna
You can place the XM Mini-Tuner Home Dock antenna optimally by checking the signal strength shown on the display.
1
↓Hold

A.AIMING
Antenna Aiming display
2 Aim the XM Mini-Tuner Home Dock antenna to the direction at where you get best signal strength value—either "S" (Satellite) or "T" (Terrestrial).
- The signal strength value is from 0 (worst) to 4 (best).
- The most reliable reception is achieved when signal strength values are at least 3 on both Satellite and Terrestrial. Terrestrial coverage is available only in large metropolitan cities.
3

Manual tuning
To search a channel

While searching, the invalid and unsubscribed channels are skipped.
TUNING TUNING are not used to select a XM Satellite Radio channel.
To select a channel within the category
1 Enter the category search mode.

2 Select the desired category name, then select the channel.

Select category


Select channel
3 Exit from the category search mode.

To select a channel number directly

2 Select the desired channel number.*
- For details on using the number buttons, see "How to use the number buttons" (10).
Preset tuning
You can preset 30 XM Satellite Radio channels.

Storing the preset channels
1 Tune in to the channel you want to preset.
2 “” flashes on the display. Perform the next step while “” is flashing.
3 Select a preset number, then store the channel to that number.
Enter a preset number*


Store
- "STORED" appears on the display.
Tuning in to a preset channel
Select a preset number.*
You can also select a preset number by pressing PRESET(/CAT) UP or PRESET(/CAT) DOWN when the System is not in the category search mode (the CAT indicator is turned off). To exit from the category search mode, see the left column.
- For details on using the number buttons, see "How to use the number buttons" (10).
Changing the channel information
You can change the type of channel information which appears on the display.

CH (channel number) CHAN (channel name)
NAME (artist name/feature) TITLE (song/program title) CAT (category name)
(back to the beginning)
If you turn off the power or select another source, the display is changed back to the channel name information.
When tuning in to another channel, the channel name appears on the display temporarily.
Some characters cannot be displayed correctly.
FM/AM tuner operations
Set the remote control mode before operation.

- Select the desired source ("FM" or "AM") you want to listen to. (11)
- TH-D50/TH-D5/TH-D4: The FM/AM button is used instead of FM/AM/XM.
Preset tuning
You can preset 30 FM stations and 15 AM stations.

Storing the preset stations
1 Tune in to the station you want to preset.
2 “” flashes on the display. Perform the next step while “” is flashing.
3 Select a preset number, then store the station to that number.
Enter a preset number*
- "STORED" appears on the display.
Tuning in to a preset station
Select a preset number.*
Manual tuning
Tuning in to a station
You can also tune in to a station automatically. Press and hold TUNING /TUNING until the station search starts. The system tunes in the first station of sufficient signal strength found automatically.
You can also tune in to the station by pressing cursor /
You can also select a preset number by pressing PRESET(/CAT) UP or PRESET(/CAT) DOWN.
* For details on using the number buttons, see "How to use the number buttons" (10).
Selecting the FM reception mode
When the stereo FM program currently tuned in is noisy, you can change the FM reception mode to improve the reception.

| AUTO | Normally select this. |
| MONO | Select to improve reception. (You will lose the stereo effect.) |
Starting playback
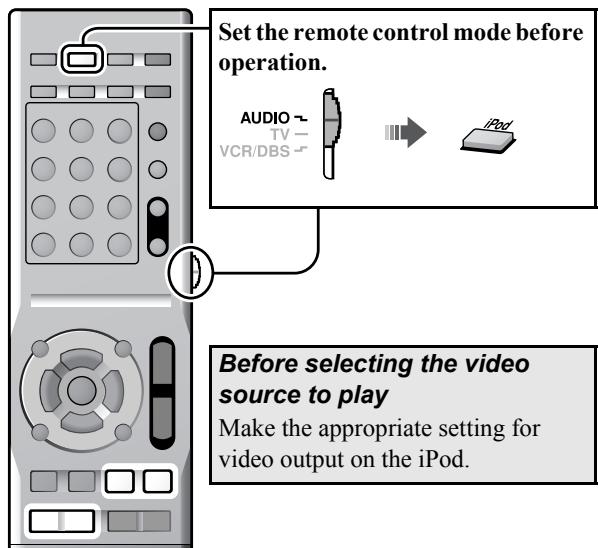
Be sure to reduce the volume on the System to the minimum level before connecting an iPod. Adjust the volume after playback has started.
1 Connect an iPod while the System is turned off.
- Attach the dock adapter (supplied for the iPod or separately purchased) before placing the iPod. (32)
- Face the arrow-mark side up when connecting the plug.
2 Turn on the System, then select "IPod" as the source. (11)
"CONNECT" appears on the display. If an iPod is not connected firmly, "NO CONNE" appears.
3 Start playing the iPod.

- Press (play button) again if iPod does not start playback.
Play/pause/search/skip
| To do | ||
| Start playback | ||
| Pause playback | ||
| Fast-forward/fast-reverse search | Hold | Hold |
| TURNING | -TUNING+ | |
| Skip to the next/previous item* | -TUNING+ |
- Operate on your iPod to skip to the next/previous item while playing back a video.
- The iPod enters sleep mode when you turn off the System or select another source.
- To show still pictures in the iPod, play back in slide-show mode on the iPod.
DO NOT connect or disconnect the iPod when the System is turned on.
DO NOT touch the iPod terminal pins or the connector pins.
When the iPod is not charged through the System, the iPod may not be turned on from the System.
If the sound is distorted when audio sources with high recording levels are played, you are recommended to deactivate the equalizer on your iPod.
To view a video/picture from the iPod on the TV, connect the System to the TV via the composite or S-video jacks. (8)
You cannot send any data to your iPod from the System.
TH-D5/TH-D4 only: To disconnect the iPod cable from the iPod, press the buttons on the sides, then pull it out.
The iPod battery is charged only when "IPod" is selected as the source.
If the iPod which is not listed in "Playable digital devices" (3) is connected, the iPod may not be operated from the System. In this case, deactivate the iPod battery charge function so that the iPod may be operated, but the iPod cannot be charged through the System.
To deactivate the battery charge function
↓Hold

"P.OFF" appears on the display.
To use the battery charge function, perform the above procedure again. "P.ON" appears on the display.
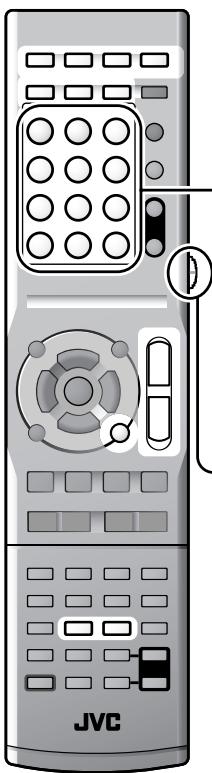
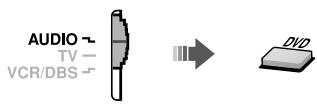
Operating external components
Preparation
Make the audio input setting before operation. (14)
Setting the manufacturer's code
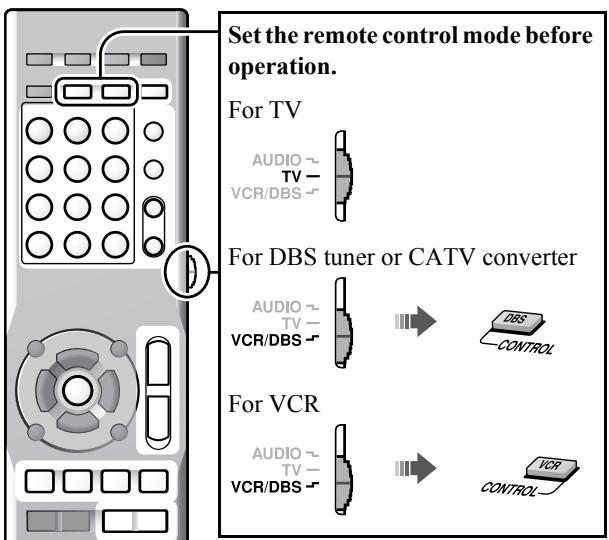
Before operating external components from the remote control, set the manufacturer's code.
1 Set the remote control mode (see above).
2 Press and hold /1 for the target component until the setting is finished.
| For TV | For DBS tuner or CATV converter | For VCR |
| ↓Hold | ↓Hold | |
3

4 Enter the manufacturer's code.
See "Manufacturer's code list" for the manufacturer's code. (30)
5 Release /1
If there is more than one code listed for the corresponding brand, try each one until you enter the correct one.
Set the codes after replacing batteries of the remote control.
Operating external components
Set the remote control mode before operating each external component (see the left column).

Operating the TV
| TV TV | Turns the power on and off |
| TV VOL +/- | Adjusts the volume |
| TV/VIDEO | Selects the input mode (either TV or VIDEO) |
| CH +/- | Changes the channels |
| 1-10, 0, ≥10 (100+) | Selects the channels |
| TV RETURN | Alternates between the previously selected channel and the current channel |

Operating the DBS tuner or CATV converter
| VCR/DBS | Turns the power on and off |
| CH +/- | Changes the channels |
| 1-10, 0, ≥10 (100+) | Selects the channels |

Operating the VCR
| VCR/DBS | Turns the power on and off |
| (play button) | Starts playback |
| ■ | Stops playback |
| II | Pauses playback |
| ► | Fast-forwards the tape |
| ← | Rewinds the tape |
| REC | Press this button together with (play button) to start recording or together with II to enter recording-pause. |
| CH +/- | Changes the TV channels |
| 0 - 9 | Selects the TV channels |
Manufacturer's code list

| JVC | 01* | Samsung | 12 |
| Hitachi | 10 | Sanyo | 13, 14 |
| Magnavox | 02 | Sharp | 06 |
| Mitsubishi | 03 | Sony | 07 |
| Panasonic | 04, 11 | Toshiba | 08 |
| Philips | 15 | Zenith | 09 |
| RCA | 05 | ||

DBS tuner or CATV converter
| Echostar | 21 |
| G.I. | 01*, 02, 03, 04, 05, 06, 07, 08 |
| Hamlin | 15, 16, 17, 18 |
| Jerrold | 01, 02, 03, 04, 05, 06, 07, 08 |
| Pioneer | 13, 14 |
| RCA | 19 |
| Scientific Atlanta | 09, 10 |
| Sony | 20 |
| Zenith | 11, 12 |

| JVC | 01*, 02, 03 | Philips | 09 |
| Emerson | 11, 26 | RCA | 05, 06 |
| Fisher | 29 | Samsung | 24 |
| Funai | 10, 14, 15, 16 | Sanyo | 21, 22, 23 |
| Gold Star | 12 | Sharp | 27, 28 |
| Hitachi | 04 | Shintom | 30 |
| Mitsubishi | 13 | Sony | 18, 19, 20 |
| NEC | 25 | Zenith | 08 |
| Panasonic | 07, 17 | ||
- Initial setting
Manufacturers' codes are subject to change without notice.
Language code list
| AA | Afar | IW | Hebrew | RO | Rumanian |
| AB | Abkhazian | JI | Yiddish | RW | Kinyarwanda |
| AF | Afrikaans | JW | Javanese | SA | Sanskrit |
| AM | Ameharic | KA | Georgian | SD | Sindhi |
| AR | Arabic | KK | Kazakh | SG | Sangho |
| AS | Assamese | KL | Greenlandic | SH | Serbo-Croatian |
| AY | Aymara | KM | Cambodian | ||
| AZ | Azerbaijani | KN | Kannada | SI | Singhalese |
| BA | Bashkir | KO | Korean (KOR) | SL | Slovenian |
| BE | Byelorussian | SM | Samoan | ||
| BG | Bulgarian | KS | Kashmiri | SN | Shona |
| BH | Bihari | KU | Kurdish | SO | Somali |
| BI | Bislama | KY | Kirghiz | SQ | Albanian |
| BN | Bengali, Bangla | LA | Latin | SR | Serbian |
| LN | Lingala | SS | Siswati | ||
| BO | Tibetan | LO | Laothian | ST | Sesotho |
| BR | Breton | LT | Lithuanian | SU | Sundanese |
| CA | Catalan | LV | Latvian, Lettish | SV | Swedish |
| CO | Corsican | SW | Swahili | ||
| CY | Welsh | MG | Malagasy | TA | Tamil |
| DA | Danish | MI | Maori | TE | Telugu |
| DZ | Bhutani | MK | Macedonian | TG | Tajik |
| EL | Greek | ML | Malayalam | TH | Thai |
| EO | Esperanto | MN | Mongolian | TI | Tigrinya |
| ET | Estonian | MO | Moldavian | TK | Turkmen |
| EU | Basque | MR | Marathi | TL | Tagalog |
| FA | Persian | MS | Malay (MAY) | TN | Setswana |
| FI | Finnish | MT | Maltese | TO | Tonga |
| FJ | Fiji | MY | Burmese | TR | Turkish |
| FO | Faroese | NA | Nauru | TS | Tsonga |
| FY | Frisian | NE | Nepali | TT | Tatar |
| GA | Irish | NL | Dutch | TW | Twi |
| GD | Scots Gaelic | NO | Norwegian | UK | Ukrainian |
| GL | Galician | OC | Occitan | UR | Urdu |
| GN | Guarani | OM | (Afan) Oromo | UZ | Uzbek |
| GU | Gujarati | VI | Vietnamese | ||
| HA | Hausa | OR | Oriya | VO | Volapuk |
| HI | Hindi | PA | Panjabi | WO | Wolof |
| HR | Croatian | PS | Pashto, Pushto | XH | Xhosa |
| HY | Armenian | YO | Yoruba | ||
| IA | Interlingua | PT | Portuguese | ZU | Zulu |
| IE | Interlingue | QU | Quechua | ||
| IK | Inupiak | RM | Rhaeto-Romance | ||
| IN | Indonesian | ||||
| IS | Icelandic | RN | Kirundi | ||
Messages and icons shown on the TV and display
Messages and icons shown on the TV during disc/file playback
| OPEN/CLOSE | Opening or closing the disc tray |
| NOW READING | Reading the disc/file information |
| READING INDEX... | Reading the DivX file |
| REGION CODE ERROR! | The Region Code of the DVD Video disc does not match the code the System supports. (1234567890) |
| NO DISC | No disc or an unfinalized disc is loaded. |
| NO USB DEVICE | No USB mass storage class device is loaded. |
| CANNOT PLAY THIS DISC | An unplayable disc is loaded. |
| CANNOT PLAY THIS DEVICE | An unplayable USB mass storage class device is connected. |
| RESTRICTED DEVICE | iPod is connected to the USB MEMORY terminal. |
| NOT SUPPORT | The file cannot be played back. |
| ⊗ | The operation is unacceptable. |
| ▷ | Playback |
| □ | Pause |
| ▷/□ | Fast-forward/fast-reverse |
| ▷/□ | Forward/reverse slow-motion playback |
| ◎ | The scene contains multi-audio languages. |
| ◎ | The scene contains multi-subtitle languages. |
| ◎ | The scene contains multi-angle views. |
You can change the setting so that the on-screen guide icons do not appear on the TV. (24)
Messages shown on the display while listening to the XM Satellite Radio
| NO SIGNAL | No signal is received. |
| CHECK XM TUNER | The XM Mini-Tuner is not properly installed or the XM Mini-Tuner Home Dock is not properly connected. |
| CHECK ANTENNA | XM antenna is not properly connected. |
| LOADING | Loading the channel information and audio data. |
| OFF AIR | The selected channel is not currently broadcasting any signal. |
| UPDATING | Updating the latest encryption. |
| ---- | No text information for the selected channel is available. |
| Preset number and “- - - - - ” | |
| CH- - - | The selected channel does not exist or is not subscribed yet. |
| Preset number and “CH- - -” |
Troubleshooting
Power does not come on.
The power plug is not inserted securely. Plug it in securely.
Unable to operate the System from the remote control.
The path between the remote control and the remote sensor on the center unit is blocked.
The batteries are exhausted.
No sound is heard.
The speaker connections and/or audio cord connections are incorrect or loose. (5, 8, 9)
Headphones are connected.
The sound is distorted
→ The speaker layout (135 6) does not match the speaker position mode (135 12).
No picture appears on the TV.
The video cord connections are incorrect or loose. (7-9)
The picture does not fit the TV.
The monitor type is not set correctly. (23)
No picture is displayed on the TV, the picture is blurred, or the picture is divided into two parts.
The scanning mode is set to the progressive mode even though the TV connected to the System does not support progressive video input. (14)
No picture is displayed on the TV or no sound comes out through the HDMI connection.
The connected TV is not HDCP-compatible. ("HDCP ERR" appears on the display.)
Disconnect the HDMI cable and connect it again, or use a shorter cable.
Video and audio are distorted.
The disc is scratched or dirty.
Audio/video files have not been properly copied on to the USB mass storage class device.
A VCR is connected between the center unit and the TV. Connect the center unit and TV directly. (7)
VCD/SVCD operation cannot be performed.
Some functions do not work for VCDs/SVCDs when the PBC function is used.
No sound is heard from the external components, or the video and audio do not match.
The selected audio input is not appropriate. Select the audio input to match the component connected. (14)
The iPod does not play even though "CONNECT" appears on the display.
The battery of the iPod is exhausted. Leave the iPod connected for at least 10 minutes.
The iPod cannot be operated from the System.
→The iPod battery charge function is deactivated. 28
→The iPod is not compatible with the System. Check the compatibility. (3)
iPod is not charged.
The source is not "IPod."
The iPod battery charge function is deactivated. (28)
The broadcast is hard to hear because of noise.
Antenna connections are incorrect or loose. (7)
→ The AM loop antenna is too close to the System.
→ The FM Antenna is not properly extended and positioned. (7)
- This product incorporates copyright protection technology that is protected by U.S. patents and other intellectual property rights. Use of this copyright protection technology must be authorized by Macrovision, and is intended for home and other limited viewing uses only unless otherwise authorized by Macrovision. Reverse engineering or disassembly is prohibited.
- USE OF THIS PRODUCT IN ANY MANNER THAT COMPLIES WITH THE MPEG-4 VISUAL STANDARD IS PROHIBITED, EXCEPT FOR USE BY A CONSUMER ENGAGING IN PERSONAL AND NON-COMMERCIAL ACTIVITIES.
DivX, DivX Ultra Certified, and associated logos are trademarks of DivX, Inc. and are used under license. - Official DivX® Ultra Certified product
- Plays all versions of DivX® video (including DivX® 6) with enhanced playback of DivX® media files and the DivX® Media Format
- Microsoft and Windows Media are either registered trademarks or trademarks of Microsoft Corporation in the United States and/or other countries.
DVD Logo is a trademark of DVD Format/Logo Licensing Corporation. - iPod is a trademark of Apple Inc., registered in the U.S. and other countries.
- Manufactured under license from Dolby Laboratories. "Dolby", "Pro Logic", "MLP Lossless", and the double-D symbol are trademarks of Dolby Laboratories.
- "DTS" and "DTS Digital Surround" are registered trademarks of DTS, Inc.
- HDMI, the HDMI logo and High-Definition Multimedia Interface are trademarks or registered trademarks of HDMI Licensing LLC.
- HDCP is the abbreviation of "High-bandwidth Digital Content Protection," and is the high-reliable copy control technology licensed by Digital Content Protection, LLC.
- XM Ready® is a registered trademark of XM Satellite Radio Inc. All rights reserved.
Attaching the dock adapter to the docking station
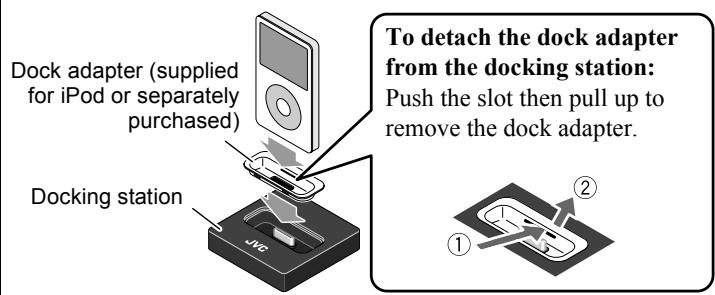
Disconnect the docking station from the center unit when attaching/detaching the dock adapter.
Take care not to damage the terminal on the docking station when attaching/ detaching the dock adapter.
Specifications

Center unit (XV-THD60/XV-THD50/XV-THD5/XV-THD4)
Output power
Front/Surround:
For XV-THD60/XV-THD50: 200 W per channel, RMS at 3 at 1kHz with 10% total harmonic distortion.
For XV-THD5: 180 W per channel, RMS at 3 at 1kHz with 10% total harmonic distortion.
For XV-THD4: 167 W per channel, RMS at 3 at 1kHz with 10% total harmonic distortion.
Center:
For XV-THD60/XV-THD50: 200 W, RMS at 3 at
1kHz with 10% total harmonic distortion.
For XV-THD5: 180 W, RMS at 3 at 1kHz , with 10% total harmonic distortion.
For XV-THD4: 167 W, RMS at 3 at 1kHz , with 10% total harmonic distortion.
Subwoofer:
For XV-THD60/XV-THD50: 200 W, RMS at 3 at 100Hz , with 10% total harmonic distortion.
For XV-THDS: 200 W, RMS at 3 at 100Hz , with 10% total harmonic distortion.
For XV-THD4: 167 W, RMS at 3 at 100Hz with 10% total harmonic distortion.
Audio section
Digital Input*1
DIGITAL IN
OPTICAL: -21 dBm to -15 dBm (660 nm
± 30~nm
COAXIAL*2: 0.5 V(p-p)/75 Ω
Video section
Video System:
NTSC
Horizontal Resolution: 500 lines
Signal-to-Noise Ratio: 64 dB
Video Output Level (VIDEO OUT)
Composite video: 1.0V(p - p) / 75
S-video (Y): 1.0V(p - p) / 75
(C): 0.286V(p - p) / 75
Component (Y): 1.0V(p - p) / 75
(P_B / P_R) .. 0.7V(p - p) / 75
Video Input Sensitivity/Impedance
(VIDEO IN)
Composite: 1.0V(p - p) / 75
S-video (Y): 1.0V(p - p) / 75
(C): 0.286V(p - p) / 75
HDMI
HDMI Input (VIDEO 1 IN)*2:
PASS THROUGH (up to
225 MHz)
HDMI Output (MONITOR OUT):
480p/720p/1080i
USB storage
USB Specification:
Compatible with USB 2.0 Full-Speed
Compatible Device:
Mass Storage Class
Compatible File System:
FAT16,FAT32
Bus Power Supply:
Max. 500mA
Tuner section
Tuner Range
FM: 87.5 MHz to 108.0 MHz
AM: 530 kHz to 1710 kHz
General
Power Requirements:
AC 120V ,60Hz
Power Consumption:
160 W (during operation)
1.3 W (in standby mode)
Dimensions (W× H× D)
435mm× 115mm× 270mm
(17-3/16 inches × 4-3/8 inches × 10-11/16 inches)
Mass:
6.8kg (15.0 lbs)
*1 Corresponding to Linear PCM, Dolby Digital, and DTS
Digital Surround (with sampling frequency — 32 kHz,
44.1 kHz, 48 kHz)
*2Only for XV-THD60

Subwoofer
For SP-THD6W (TH-D60)
Type:
Bass-Reflex Type
Speaker:
20cm (7-7/8 inches) cone × 1
Power Handling Capacity: 200 W
Impedance:
3Ω
Frequency Range:
28 Hz to 200 Hz
Sound Pressure Level:
74 dB/W·m
Dimensions (W× H× D)
353.5mm× 351mm× 248mm
(13-15/16 inches × 13-7/8 inches × 9-13/16 inches)
Mass:
8.5kg (18.8 lbs)
For SP-THD5W (TH-D50/TH-D5/TH-D4)
Type:
Bass-Reflex Type
Speaker:
16cm (6-5/16 inches) cone × 1
Power Handling Capacity:
200 W
Impedance:
3Ω
Frequency Range:
30Hz to 200Hz
Sound Pressure Level:
74 dB/W·m
Dimensions (W× H× D)
353.5mm× 351mm× 174mm
(13-15/16 inches × 13-7/8 inches × 6-7/8 inches)
Mass:
6.3kg (13.9 lbs)
Satellite speakers (For TH-D60)
Front speakers (SP-THD6F)
Type:
2-Way Bass-Reflex Type (Magnetically Shielded Type)
Speaker: 8 cm (3-3/16 inches) cone × 1
3cm (1-3/16 inches) dome × 1
Power Handling Capacity: 200 W
Impedance: 3Ω
Frequency Range: 90Hz to 20000Hz
Sound Pressure Level: 78 dB/W·m
Dimensions (W× H× D) ..
200mm× 574mm× 200mm
(7-7/8 inches × 22-5/8 inches × 7-7/8 inches)
Mass: 2.4kg (5.3 lbs) each
Center speaker (SP-THD6C)
Type:
1-Way 2-Speaker Bass-Reflex Type (Magnetically Shielded Type)
Speaker: 8 cm (3-3/16 inches) cone × 2
Power Handling Capacity: 200W
Impedance: 3Ω
Frequency Range: 90Hz to 20000Hz
Sound Pressure Level: 83 dB/W·m
Dimensions (W× H× D) ..
435mm× 99mm× 93.5mm
(17-3/16 inches × 3-15/16 inches × 3-11/16 inches)
Mass: 2.0kg (4.5 lbs)
Surround speakers (SP-THD6S)
Type:
1-Way Bass-Reflex Type (Magnetically Shielded Type)
Speaker: 8 cm (3-3/16 inches) cone × 1
Power Handling Capacity: 200W
Impedance: 3Ω
Frequency Range: 90Hz to 20000Hz
Sound Pressure Level: 75 dB/W·m
Dimensions (W× H× D)
98.5mm× 214.5mm× 93.5mm
(3-15/16 inches × 8-1/2 inches × 3-11/16 inches)
Mass: 0.85kg (1.9 lbs) each
Satellite speakers (For TH-D50/TH-D5/TH-D4)
Front speakers (SP-THD5F)
Type:
1-Way Bass-Reflex Type (Magnetically Shielded Type)
Speaker: 8 cm (3-3/16 inches) cone × 1
Power Handling Capacity: 200 W
Impedance: 3Ω
Frequency Range: 90 Hz to 20 000 Hz
Sound Pressure Level: 79 dB/W·m
Dimensions (W× H× D)
98.5mm× 214.5mm× 93.5mm
(3-15/16 inches × 8-1/2 inches × 3-11/16 inches)
Mass: 1.0kg (2.2 lbs) each
Center speaker (SP-THD5C)
Type:
1-Way 2-Speaker Bass-Reflex Type (Magnetically Shielded Type)
Speaker: 8 cm (3-3/16 inches) cone × 2
Power Handling Capacity: 200W
Impedance: 3Ω
Frequency Range: 90Hz to 20000Hz
Sound Pressure Level: 83 dB/W·m
Dimensions (W× H× D)
435mm× 99mm× 93.5mm
(17-3/16 inches × 3-15/16 inches × 3-11/16 inches)
Mass: 2.0kg (4.5 lbs)
Surround speakers (SP-THD5S)
Type:
1-Way Bass-Reflex Type (Magnetically Shielded Type)
Speaker: 8 cm (3-3/16 inches) cone × 1
Power Handling Capacity: 200 W
Impedance: 3Ω
Frequency Range: 90 Hz to 20 000 Hz
Sound Pressure Level: 75 dB/W·m
Dimensions (W× H× D) ..
98.5mm× 214.5mm× 93.5mm
(3-15/16 inches × 8-1/2 inches × 3-11/16 inches)
Mass: 0.85kg (1.9 lbs) each
Dimensions of the wall-mount attachment on the center and surround speakers:
SP-THD6C/SP-THD5C
SP-THD6S/SP-THD5S
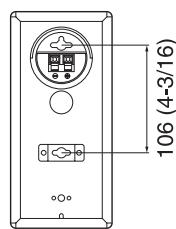
Unit: mm (inch)
JVC COMPANY OF AMERICA (JVC) warrants this product and all parts thereof, except as set forth below ONLY TO THE ORIGINAL RETAIL PURCHASER to be FREE FROM DEFECTIVE MATERIALS AND WORKMANSHIP from the date of original purchase for the period shown below. ("The Warranty Period")
| PARTS | 1 YR | LABOR | 90 DAYS |
THIS LIMITED WARRANTY IS VALID ONLY IN THE FIFTY (50) UNITED STATES, THE DISTRICT OF COLUMBIA AND IN THE COMMONWEALTH OF PUERTO RICO.
WHAT WE WILL DO:
If this product is found to be defective within the warranty period, JVC will repair or replace defective parts with new or rebuilt equivalents at no charge to the original owner. Such repair and replacement services shall be rendered by JVC during normal business hours at JVC authorized service centers. Parts used for replacement are warranted only for the remainder of the Warranty Period. All products may be brought to a JVC authorized service center on a carry-in basis. Color televisions with a screen size of 27'' or greater qualify for in-home service. In such cases, a technician will come to your home and either repair the TV there or remove and return it if it cannot be repaired in your home.
WHAT YOU MUST DO FOR WARRANTY SERVICE:
Please do not return your product to the retailer
Instead, return your product to the JVC authorized service center nearest you. If shipping the product to the service center, please be sure to package it carefully, preferably in the original packaging, and include a brief description of the problem(s). Please call 1-800-252-5722 to locate the nearest JVC authorized service center. Service locations can also be obtained from our website http://www.jvc.com. If your product qualifies for in-home service, the service representative will require clear access to the product.
If you have any questions concerning your JVC Product, please contact our Customer Relations Department at 800-252-5722
WHAT IS NOT COVERED:
This limited warranty provided by JVC does not cover:
- Products which have been subject to abuse, accident, alteration, modification, tampering, negligence, misuse, faulty installation, lack of reasonable care, or if repaired or serviced by anyone other than a service facility authorized by JVC to render such service, or if affixed to any attachment not provided with the products, or if the model or serial number has been altered, tampered with, defaced or removed;
- Initial installation, installation and removal from cabinets or mounting systems.
- Operational adjustments covered in the Owner's Manual, normal maintenance, video and audio head cleaning;
- Damage that occurs in shipment, due to act of God, and cosmetic damage;
- Signal reception problems and failures due to line power surge;
- User Removal Memory Devices/Video Pick-up Tubes/CCD Image Sensors are covered for 90days from the date of purchase;
- Accessories;
- Batteries (except that Rechargeable Batteries are covered for 90 days from the date of purchase);
- Products used for commercial purposes, including, but not limited to rental.
- Loss of data resultant from malfunction of hard drive or other data storage device.
There are no express warranties except as listed above.
THE DURATION OF ANY IMPLIED WARRANTYES, INCLUDING THE IMPLIED WARRANTY OF MERCHANTABILITY, IS LIMITED TO THE DURATION OF THE EXPRESS WARRANTY HEREIN.
JVC SHALL NOT BE LIABLE FOR ANY LOSS OF USE OF THE PRODUCT, INCONVIENCE, OR ANY OTHER DAMAGES, WHETHER DIRECT, INCIDENTAL OR CONSEQUENTAL (INCLUDING, WITHOUT LIMITATION, DAMAGE TO TAPES, RECORDS OR DISCS) RESULTING FROM THE USE OF THIS PRODUCT, OR ARISING OUT OF ANY BREACH OF THIS WARRANTY. ALL EXPRESS AND IMPLIED WARRANTYES, INCLUDING THE WARRANTY OF MERCHANTABILITY AND FITNESS FOR PARTICULAR PURPOSE, ARE LIMITED TO THE WARRANTY PERIOD SET FORTH ABOVE.
Some states do not allow the exclusion of incidental or consequential damages or limitations on how long an implied warranty lasts, so these limitations or exclusions may not apply to you. This warranty gives you specific legal rights and you may also have other rights which vary from state to state.
JVC COMPANY OF AMERICA
DIVISION OF JVC AMERICAS CORP.
1700 Valley Road
Wayne, NJ 07470
http://www.jvc.com
REFURBISHED PRODUCTS CARRY A SEPARATE WARRANTY, THIS WARRANTY DOES NOT APPLY. FOR DETAIL OF REFURBISHED PRODUCT WARRANTY, PLEASE REFER TO THE REFURBISHED PRODUCT WARRANTY INFORMATION PACKAGED WITH EACH REFURBISHED PRODUCT.
For customer use:
Enter below the Model No. and Serial No. which is located either on the rear, bottom or side of the cabinet. Retain this information for future reference.
Model No.:
Purchase date :
Serial No.:
Name of dealer :
THANK YOU FOR PURCHASING THIS JVC PRODUCT.
WE WANT TO HELP YOU ACHIEVE A PERFECT EXPERIENCE.
NEED HELP ON HOW TO HOOK UP?
NEED ASSISTANCE ON HOW TO OPERATE?
NEED TO LOCATE A JVC SERVICE CENTER?
LIKE TO PURCHASE ACCESSORIES?
JVC® IS HERE TO HELP!
TOLL FREE: 1(800)252-5722
http://www.jvc.com
Remember to retain your Bill of Sale for Warranty Service.
Do not attempt to service the product yourself
Caution
To prevent electrical shock, do not open the cabinet.
There are no user serviceable parts inside.
Please refer to qualified service personnel for repairs.