
HBP 742T - Cooking appliance DELONGHI - Free user manual and instructions
Find the device manual for free HBP 742T DELONGHI in PDF.
| Brand | DELONGHI |
| Model | HBP 742T |
| Product type | Heating and hair dryer appliance |
| Supply voltage | 220-240 V |
| Rated current | 10/16 A |
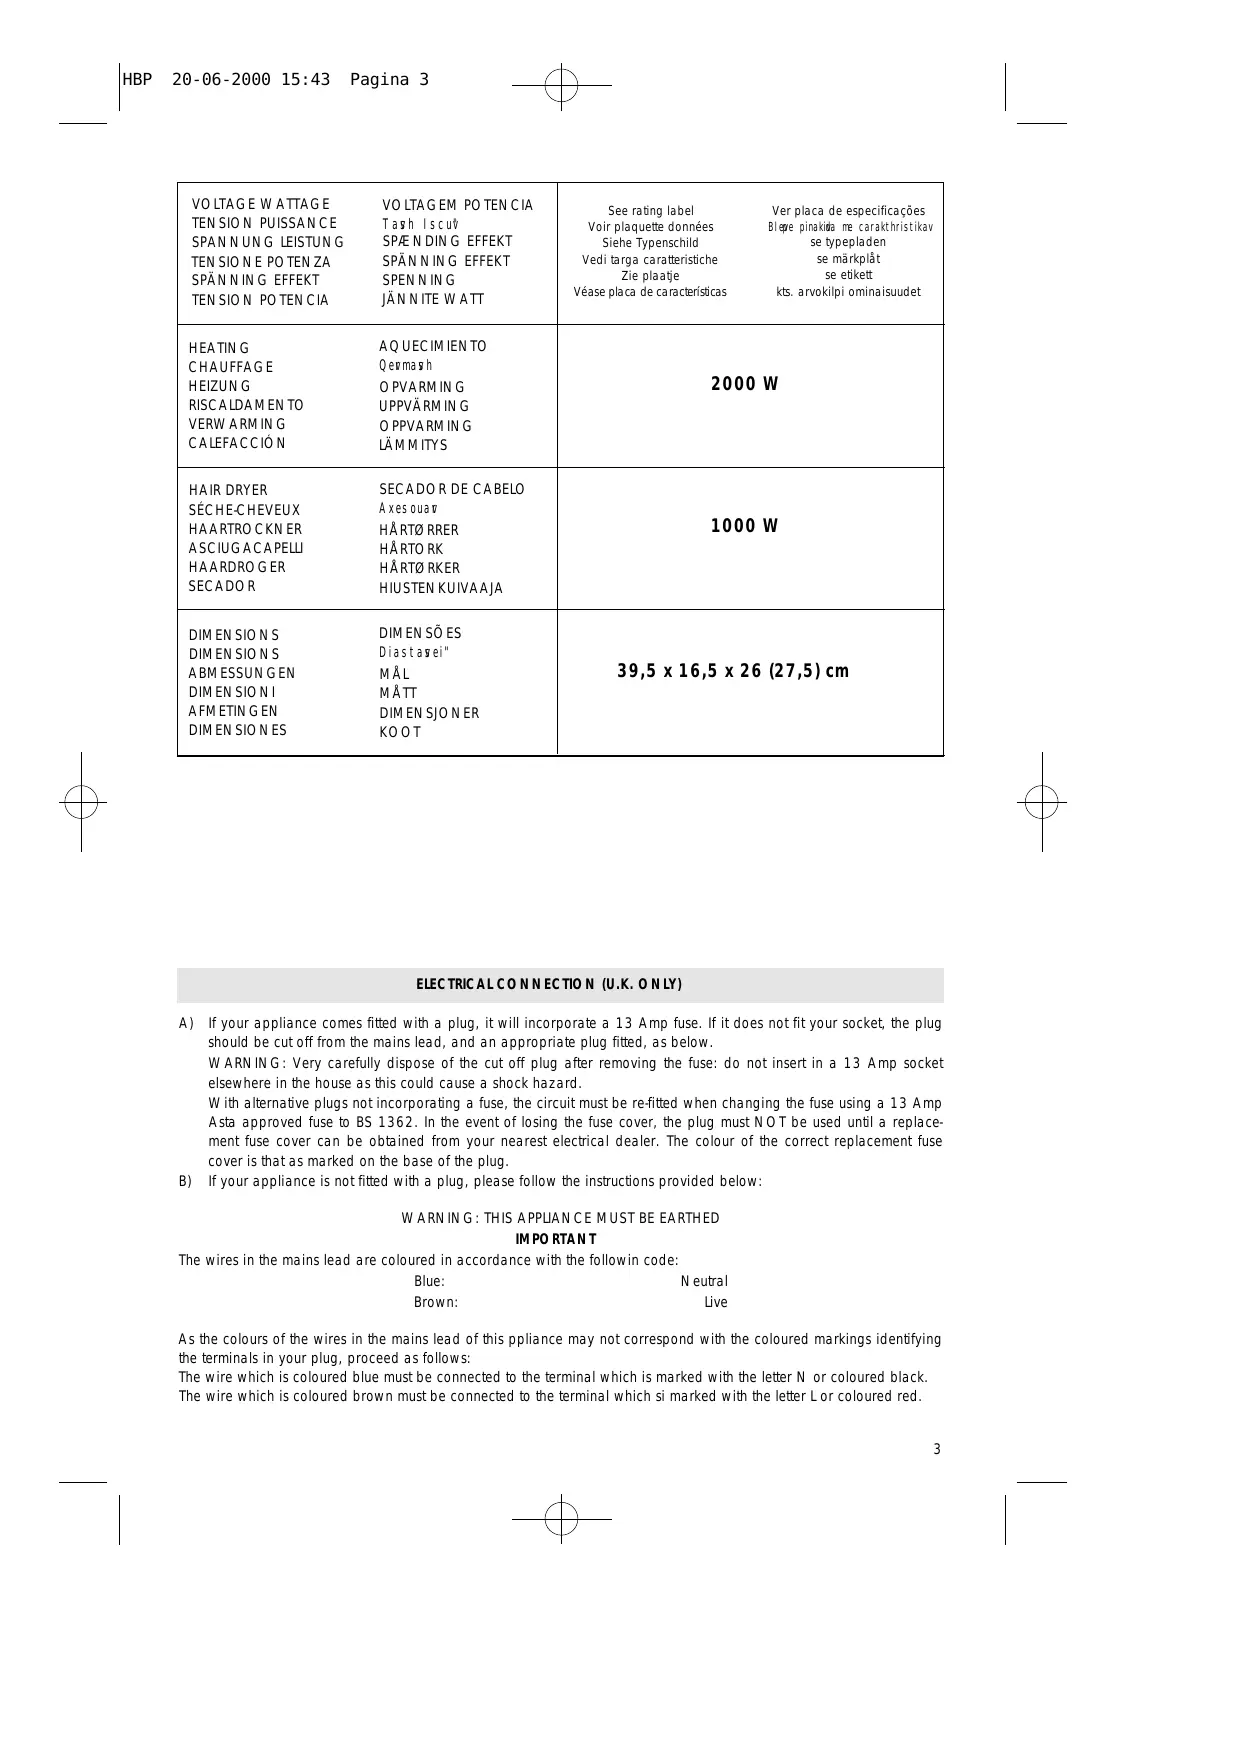
| Maximum power | 2000 W |
| Heating power | 1000 W or 2000 W |
| Hair dryer power | 500 W or 1000 W |
| Functions | Heating, Hair dryer, Timer, Adjustable thermostat, Anti-freeze (5°C) |
| Minimum safety distance | 50 cm |
| Minimum room area | 4 m² |
| Installation | Portable or wall-mounted |
| Safety | Overheat protection device, automatic shut-off |
| Electrical connection | Type Y (replacement by qualified personnel) |
| Programming | Weekly timer with red wedges |
Frequently Asked Questions - HBP 742T DELONGHI
User questions about HBP 742T DELONGHI
0 question about this device. Answer the ones you know or ask your own.
Ask a new question about this device
Download the instructions for your Cooking appliance in PDF format for free! Find your manual HBP 742T - DELONGHI and take your electronic device back in hand. On this page are published all the documents necessary for the use of your device. HBP 742T by DELONGHI.
USER MANUAL HBP 742T DELONGHI
Heating warning light
Témoin de chauffage
Kontrolleuche
Spia riscaldamento
Verklikker verwarming
A) If your appliance comes fitted with a plug, it will incorporate a 13 Amp fuse. If it does not fit your socket, the plug should be cut off from the mains lead, and an appropriate plug fitted, as below.
WARNING: Very carefully dispose of the cut off plug after removing the fuse: do not insert in a 13 Amp socket elsewhere in the house as this could cause a shock hazard.
With alternative plugs not incorporating a fuse, the circuit must be re-fitted when changing the fuse using a 13 Amp Asta approved fuse to BS 1362. In the event of losing the fuse cover, the plug must NOT be used until a replacement fuse cover can be obtained from your nearest electrical dealer. The colour of the correct replacement fuse cover is that as marked on the base of the plug.
B) If your appliance is not fitted with a plug, please follow the instructions provided below:
WARNING: THIS APPLIANCE MUST BE EARTHED
IMPORTANT
The wires in the mains lead are coloured in accordance with the followin code:
Blue:
Neutral
Brown:
Live
As the colours of the wires in the mains lead of this appliance may not correspond with the coloured markings identifying the terminals in your plug, proceed as follows:
The wire which is coloured blue must be connected to the terminal which is marked with the letter N or coloured black.
The wire which is coloured brown must be connected to the terminal which si marked with the letter L or coloured red.
GB
ELECTRICAL CONNECTION
Before plugging in the heater, check that the voltage of your domestic supply corresponds to the voltage (V) indicated on the appliance.
- Check that the electrical socket has a rating of 10/16 Amps.
- THIS APPLIANCE CONFORMS TO DIRECTIVE EN 55014 GOVERNING RADIO INTERFERENCE.
INSTALLATION
Fix bracket to wall, complying with minimum measurement specified in fig. 1.
- Remove appliance from stand, by first turning black locking screw on top of stand 1/4 turn.
- Mount appliance on bracket and lock into place by turning black screw on top of bracket (1/4 turn).
- Should appliance be installed in a bathroom, it must be mounted on the wall outside the "safety area", as shown in fig. 2.
Only use appliance when fixed to a wall or mounted on its stand.
SWITCHING ON AND OFF PROCEDURE
To switch on appliance, whatever the function desired, put timer lever to position for continuous operation, or to position for "programmed" operation (see Timer section).
To switch off appliance, put timer lever to "O".
SELECT KNOB
- Position A: Setting for hair dryer function
- Position B: Setting for hair dryer function + Heating at 1000 W without thermostat
- Position C: Heating at 1000 W without thermostat
- Position D: Heating at 2000 W with thermostat on maximum
- Position E: Anti-freeze function appliance maintains room temperature at about 5^ , preventing freezing with minimum energy consumption).
THERMOSTAT REGULATION
To regulate room temperature, proceed as follows:
Put selector knob to position D;
Wait for room temperature to reach comfort level desired, then slowly rotate selector knob clockwise until warning light goes off.
The temperature thus set will be automatically maintained by the thermostat. Should further temperature adjustment changes be required, turn knob clockwise to lower the temperature and counter clockwise to raise it.
TIMER
For programmed function, appliance must be constantly connected to power supply.
For "programmed" heating, proceed as follows:
- For example, if time is 6 p.m., turn numbered dial of timer clockwise until number 18 is aligned with pointer on timer.
- Set desired operating times by pushing inwards red teeth (fig. 4).
- Put timer lever to position . Appliance is now programmed to function automatically.
- To change programmed operating times, just push teeth back to original position and reset timer for new functioning period.
- For use of appliance, outside preset timer programme, just put timer lever to position.
HAIR DRYER
Put timer lever to and selector knob to position A (also B = dual function).
Hair dryer works at 500 W with switch on handle set on position I ; at 1000 W on position
II.
WARNING
- This apparatus and the hair dryer come with a Y-type connection. The electrical feed cord must be replaced only by officially authorised personnel.
Always use the heater in an upright position. - When the appliance is used as a portable heater, do not place it close to walls, furniture, curtains etc.
- Do not use the heater to dry your laundry. Never obstruct the intake and outlet grilles (danger of overheating).
- The heater must positioned at least 50~cm from furniture or other objects.
- Do not at any time place hair dryer in its storage space while still in use.
- Should accidental overheating occur, (e.g. obstruction of air intake and outlet grilles, motor turning slowly or not at all), a safety device stops fan heater. To restart, put timer lever to position "0" and leave for several minutes. Eliminate cause of overheating, then return lever to position desired.
- The appliance must not be positioned directly underneath a fixed power point.
- The appliance must be installed so that the switches and other controls cannot be reached from a person standing in a bathtub or a shower.
- Do not cover the appliance when in operation as this could cause a fire risk.
- Do not use the appliance in rooms less than 4m^2 in area.
F
BRANCHEMENT ELECTRIQUE
CRHSH TOU DIAKOPTH EPILOGHS
- Qesh A'U Leitourgia tou axesouar.
- Qesh BU Leitourgia tou axesouar + qermansh sta 1000, cwri' qermostath.
- Qesh C'U Qermansh sta 1000, cwri' qermostath.
- Qesh I U Qeymansh sta 2000, me to qermostath sto maximoum.
- Qesh EU Leitourgia apoyuxh" (h suskeuhvdiathreivto peribalon se mia qermokrasi peripou 51C empodixonta" to pagwma, me mia elavisth katanawsh energeia").
RUQMISH TOU QERMOSTATH
Gia th ruwmish th" qermokrasix" tou dwmatou kanete ta exhVU
balt to diakopth epilogh v sth qesh DU otan to dwmatio ftasei sthn epiqumhthvqermokrasia, guriste to diakopth pro" ta aristeravmveri na sbhsei h endeiktikhvlucnia kai ovi parapeva.
Authyh qermokrasia tou dwmatiou qa diathrhqeivautomata staqerhvapovto qermostath. Gia peraitew ruqmisei" labete upoyh otigurixonta" to diakopth pro" ta dexiavmeiw netai h qermokrasia tou dwmatiou, enwvpro" ta dexiavauxawetai.
MONTELA ME CRONODIAKOPTH 24 WRWN
Gia na programmatisete th qevmansh kanete ta exhvu
- Koitaxte thn wva pou deivnei to rolov sa". Upoqetonta" oti h wva eiwai 18, guriv ste pro" ta dexiavton ariqmhmewo disko tou cronodiakopth mevri o ariqmov' 18 na sumpesei me to deikth ▲ pou brisketai panw sto cronodiakopth.
- Kanoniste th cronikhvdiarkeia pou epiquemeite na leitourgeivh suskeuhvpiezonta" ti" egkope" pro" to kentro (eik. 4).
- Balte to moclovtou cronodiakopth sth qesh Ⓒ. Etsi h suskeuhvqa anabei automata kawe meva katavth diarkeia th" programmatismewh" periodou (shmeiwsh. To biv sma prepei na meweip pantote sth prizaa).
- Gia na allaxete ton programmatismov prepei prwta na ferve t a dontakia sthn
arcikhvtou" qesh kai ustera na ruqmisete to nev cronikovdiasthma leitourgia".
Gia th leitourgia th" suskeuhv exw apovto crowo programmatismouy cwri v me autov na allavei to ruqmismemo programma, arkeivna balete to moclovtou cronodiakopth sth qesh.
CRHSH TOU AXESOUAR
Balte to moclovtou cronodiakopth kai to diakopth epilogh'st qesh A (hvBU sun-diasmov' leitourgiwn. To axesouar leitourgeivsta 500, otan o diakopth" paew sth ceirolabhveiwai pathmew" sth qesh I, sta 1000, otan eiwai pathmew" sth qesh II.
SHMANTIKES ODHGIES
- Gia thn suskeuhv problepetai h suwdesh tupou Y. Opoiadhpote allaghvtou kalwdiu paroch'prepei na giwetai apovexousiodothmewo proswpikov
- To hlektrikovkalwio tou axesouar einai sudedememo se U, giautovh antikatasta-shvtou mporeivna ginei mono apovto serbi" ma".
- Potevmh n bazete to axesouar anammeno mesa sth qkh tou.
- Mia diataxh asfaleia" diakoptei th leitourgia tou aerovermou se periptwsh uperqemansh" (p.c.Ufraximo twn persidwn eisodou kai exodou aeva, kinthra" pou den gurizei hvgurizei argay Gia thn epanaleitourgia th" suskeuh, prepei na bavetegia merikavleptavto moclovtou cronodiakopth sth qesh 0, na diorqwsete thn aitia pou prokaleivthn uperqemansh, kai ustera na xanabavete to moclovsth qesh leitourgia".
- Mhn topoqeteite th suskeuhvse ugrouw cwrou" hvkontavse n tou", mpanieve", nipthe", pisire", klp.
- Na crhsimopoeite th suskeuhvmoro se katakovuf qesh.
- Mhn crhsimopoeite th suskeuhvgia na stegnwsete rouva, mhn frazete ti" persiv de" eisou kai exou tou aeva (kinduno" uperqemansh").
- Se mia apostash 50 ekat. mprostavapovth suskeuhvden prepei na uparcoun epipla hvála antikeiwena.
- Otan h suskeuhv crhsimopoieitai san forthhy den prepei na leitourgeiv kontavse toiwou", epipla, kourtine", klp.
- H suskeuhvprepei na egkatastaqeivme tetoio tropo wste an kapoio" crhsimopoieiv th mpaniera hvto ntou" na mhn mporeivna ftasei tou" diakopte".
- H suskeuhvden prepei na topoqeteitai katw apovmia momimh prixa tou reuato".
- Mhn skepazete th suskeuhvkatavth leitourgia, wste na apofugete ton kinduno purkagia'
- Mhn crhsimopoiite authvth suskeuhvse era dwmatio me embadow katw apov4 ^2
DK
ELEKTRISK TILSLUTNING
Do not use hair dryer while in bath, under the shower or standingover washbasin with water in it.
The heater must not be located immediately below a fixed socket-outlet.
- IMPORTANT
- GB
- ELECTRICAL CONNECTION
- INSTALLATION
- SWITCHING ON AND OFF PROCEDURE
- SELECT KNOB
- THERMOSTAT REGULATION
- TIMER
- HAIR DRYER
- WARNING
- F
- BRANCHEMENT ELECTRIQUE
- CRHSH TOU DIAKOPTH EPILOGHS
- RUQMISH TOU QERMOSTATH
- MONTELA ME CRONODIAKOPTH 24 WRWN
- CRHSH TOU AXESOUAR
- SHMANTIKES ODHGIES
- DK
- ELEKTRISK TILSLUTNING
Brand : DELONGHI
Model : HBP 742T
Category : Cooking appliance