
XD 629W - Cooking appliance DELONGHI - Free user manual and instructions
Find the device manual for free XD 629W DELONGHI in PDF.
| Brand | DELONGHI |
| Model | XD 629W |
| Product Type | Electronic countertop oven |
| Power Supply | 120 V, 15 A, polarized alternating current |
| Main Functions | Traditional baking, Keep warm, Broil, Toast |
| Temperature Range for Cooking | 200 °F to 470 °F |
| Timer | Up to 2 hours, with automatic shut-off |
| Toasting Capacity | Up to 6 slices of bread |
| Heating Elements | Upper and lower |
| Included Parts | Wire rack, drip tray, cookie sheet (optional), handle (optional) |
| Safety | Emergency stop via STOP/CANCEL button, hot surfaces, automatic shut-off |
| Care and Cleaning | Clean interior with a damp cloth and mild detergent. Do not use metal scouring pads. |
| Warranty | 1 year from date of purchase |
| Customer Service | Phone assistance: 1-800-322-3848, website: www.delonghi.com |
Frequently Asked Questions - XD 629W DELONGHI
User questions about XD 629W DELONGHI
0 question about this device. Answer the ones you know or ask your own.
Ask a new question about this device
Download the instructions for your Cooking appliance in PDF format for free! Find your manual XD 629W - DELONGHI and take your electronic device back in hand. On this page are published all the documents necessary for the use of your device. XD 629W by DELONGHI.
USER MANUAL XD 629W DELONGHI
OVEN WITH ELECTRONIC CONTROLS
FOUR COMMANDÉ ÉLECTRONIQUEMENT
Instructions for use
Mode d'emploi
CONTENTS
CHAP.1 GENERAL
1.1 Control panel 3
1.2 Description and accessories provided 4
1.3 Important safeguards 5
1.4 Summary of operation 6
1.5 Installation 7
1.6 Important tips and techniques 7
CHAP. 2 USING THE CONTROLS AND SETTING THE MODES
2.1 Setting the clock 8
2.2 BAKE mode. 9
2.3 KEEP WARM mode 12
2.4 BROIL mode 13
2.5 TOAST mode 15
CHAP.3 CLEANING AND MAINTENANCE
3.1 Care and cleaning 16
ELECTRICAL CONNECTIONS
- Your product is equipped with a polarized alternating current line plug (a plug having one blade wider than the other). This plug will fit into the power outlet only one way. This is a safty feature. If you are unable to insert the plug fully into the outlet, try reversing the plug. If the plug should still fail to fit, contact your electrician to replace your obsolete outlet. Do not defeat the safety purpose of the polarized plug.
- Plug the cord into a 120 volt AC outlet.
- The cord length of this product has been selected to reduce the possibility of tangling in or tripping over a longer cord. If more cord length is needed, an extension cord may be used. It should be rated no less than 15 amps., 120 volts, and have Underwriters Laboratories/CSA listing.
- A six feet long, 15 amp. extension cord may be purchased from your local authorized service facility. When using a longer cord, be sure not to let it drape over the working area or dangle where someone could accidentally pull or trip over it.
- Handle the cord carefully for longer life; avoid jerking or straining the cord at the plug and appliance connections.
Chapter 1-General
1.1 - CONTROL PANEL

1 Display
2 ON pilot light
3 BAKE button/pilot light
4 BROIL button/pilot light
5 TEMPERATURE/TOAST COLOR setting
6 CLOCK button
7 " - " button
8 STOP/CANCEL button
9 KEEP WARM button/pilot light
10 TOAST button/pilot light
11 TEMPERATURE/TOAST COLOR setting
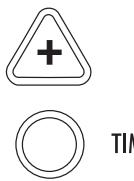
12 TIMER button
13 "+" button
14 START button
Chapter 1-General
1.2 - DESCRIPTION AND ACCESSORIES PROVIDED


A Upper heating element
B Oven light (If provided)
C Control panel
D Lower heating element
E Crumb tray
F Cookie Sheet (optional)
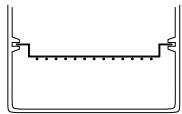
G Broiling rack
H Shallow pan
I Wire shelf
L Handgrip (optional)
Chapter 1-General
1.3 - IMPORTANT SAFEGUARDS
When using electric appliances basic safety precautions should always be followed, including the following:
1) Read all instructions.
2) The temperature of the door or the outer surfaces may be high when the appliance is operating: only ever touch the plastic knobs and handles.
3) To protect against electrical shock, do not immerse cord, plugs, in water or other liquid. See instructions for cleaning.
4) The appliance is not intended for use by young children or infirm persons without supervision. Young children should be supervised to ensure that they do not play with the appliance.
5) Unplug from outlet when not in use and before cleaning. Always press the STOP/CANCEL button before unplugging. Allow to cool before putting on or taking off parts and before cleaning the appliance.
6) If the supply cord is damaged, it must be replaced by the manufacturer or its service agent or a similar qualified person in order to avoid a hazard.
7) The use of accessory attachments not recommended by the appliance manufacturer may cause injuries.
8) Do not use outdoors.
9) Do not place heavy objects on the open door. Do not forcefully push the open door down. Do not place hot pans/baking tins (just removed from the oven) onto the open door.
10) Do not let cord hang over edge of table or counter, or touch hot surfaces.
11) Do not place on or near a hot gas or electric burner, or in a heated oven. Do not place anything on top of the oven while in use.
12) Extreme caution must be used when moving an appliance containing hot oil or other hot liquids.
13) If the plug gets hot, please call a qualified electrician.
14) Do not use this appliance for other than intended use.
15) Use extreme caution when removing the shallow pan (H) or disposing of hot grease.
16) Do not clean oven with metal scouring pads. Pieces can break off the pad and touch electrical parts creating a risk of electric shock.
17) To disconnect the appliance, press the STOP/CANCEL button. Then unplug the cord from the wall outlet.
18) To assure safe operation, oversized utensils or food must not be inserted into the oven.
19) Condensation and a grease deposit may form around the door and the air and steam outlet vents. This is normal.
20) CAUTION: Never leave the oven unattended when in use (especially when broiling).
21) Extreme caution should be exercised when using containers other than ovenproof metal, glass or ceramic.
22) Do not store any materials other than the manufacturer's recommended accessories in the oven when not in use.
23) Do not place any of the following materials in the oven: paper, cardboard, plastic and the like.
24) Do not cover crumb tray or any part of the oven with metal foil; this can cause overheating of the oven. Use aluminum foil on or under food only as directed in the appliance instructions.
THIS PRODUCT IS FOR HOUSEHOLD USE ONLY
SAVE THESE INSTRUCTIONS
Chapter 1-General
1.4 - SUMMARY OF OPERATION
| PROGRAM | MODES | TEMPERATURE SETTING/DISPLAY INDICATION | POSITION OF WIRE RACK/ ACCESSORIES | NOTES/TIPS |
| KEEPING WARM | KEEP WARM | 140°F | Select this function to keep hot food warm. Do not hold food more than an hour or reheat cold food. | |
| TRADITIONAL OVEN COOKING | BAKE | 250° - 470°F | Ideal for meat, bake casseroles, pizza fruit desserts, fish, stuffed vegetables, puddings, cakes, and other moist foods that don’t require browning and crisping. | |
| BROILING AND TOP BROWNING | BROIL | 6 r! | Always use the broiling rack set in the shallow pan. Place it on the wire shelf in position that puts the food about two inches from the top element, more for thick food such as chicken. Foods such as hamburgers, steaks, kebabs, sausages are to be placed directly on the broiling rack. Use the broil settings to top-brown open-face sandwiches, cheese toppings, hors d’ouevres. | |
| TOASTING | TOAST | 61 to 67 | Some breads, muffins, etc. will take longer than others. Reset dial if results are too light. Place the bread to be toasted following instructions on page. 15. |
Chapter 1-General
1.5 - INSTALLATION
1) Check that the appliance has not suffered any damage due to transportation.
2) Place the appliance on a flat, stable surface out of the reach of children (the glass door becomes very hot while the oven is in operation).
3) Before using this appliance, move it two to four inches away from the wall or any object on the counter top. Remove any object that may have been placed on top of the appliance. Do not use on surfaces where heat may be a problem.
4) When a function is started, the pilot light (2) turns on.
Note: Initial start-up operation may result in minimal smell and smoke (about 15 min.). This is normal. It is due to the protective substance on heating elements which protects them from salt effects during shipping from the factory.
5) Condensation and a grease deposit may form around the door; this is normal.
6) Before using the appliance for the first time, remove all paper contents such as: protection cardboard, instructions for use, plastic bags and so on.
1.6-IMPORTANT TIPS AND TECHNIQUES
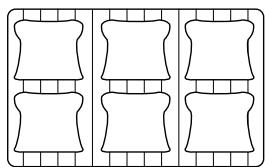
POSITIONING THE WIRE SHELVE:
(1)

(2)
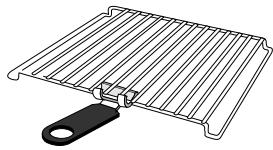
COOKIE SHEET
The cookie sheet F provided must also be centered on the shelf. When using both sheet on wire shelve, place wire shelve in position 1.
Use handgrip (if fitted) to bring the wire rack out of the oven when it is hot.
PREHEATING THE OVEN
To pre-heat the oven, press the required function (BAKE, BROIL) and set the desired temperature (only for BAKE). After having pressed START, if no duration has been set, the display will show the countdown starting from the default duration of 1:00 (one hour). On reaching the set temperature, the control will emit 3 times 3 beeps. The ON light (2) will stay on.
USE ALUMINUM FOIL
Do NOT allow foil to touch sides of the oven or the heating elements. Foil can be used to cover foods or the shallow pan (for easier clean-up) provided foil is tucked in securely around the food or the edges of the pan or dish. DO NOT cover the broiling rack as this can cause accumulated grease to catch fire. DO NOT cover the crumb tray (E).
Unlike an ordinary toaster-oven, the DE'LONGHI features 5 functions: traditional baking and roasting, toasting, broiling, and keeping food warm.
2.1 - SETTING THE CLOCK
- When the appliance is connected to the domestic power supply for the first time, or after a power out, four dashes will appear on the display (·s·s) . In order to set the time of day, proceed as described below:


1 Press the CLOCK button (6). (the hours and the minutes flash on display)


2 Set the desired time by pushing the "min +" or "min -" buttons (7-13). The times set will begin blinking on the display.


R
3 Press the CLOCK button (6) at any time during cooking to display the current time. (the display shows the time set)

- If you wish to change the hour on the dial once it has been set, press the CLOCK button (6) before proceeding to set the new time as described above.
- It is possible to display the current time even after starting a function, by pressing the CLOCK button (6) (the time is displayed for 2 seconds).
Chapter 2-Using the control and setting the modes
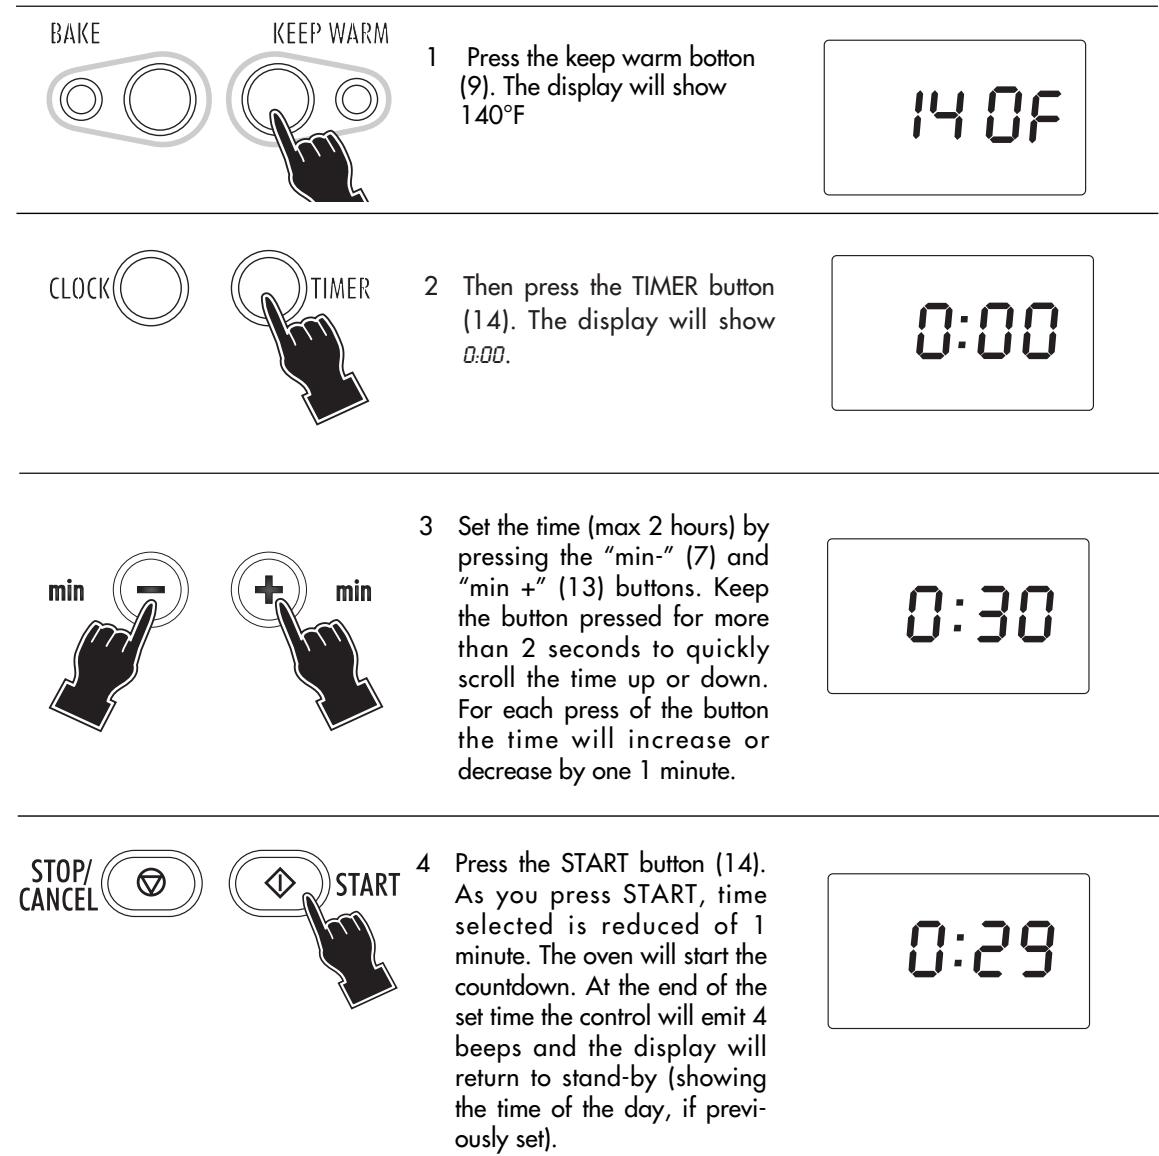
2.2 - BAKE MODE
| BAKE KEEP WARM 1 Press the BAKE button (3). The display will show the default temperature (350°F) | 35.0F |
| TEMPERATURE/TOAST COLOR 2 If necessary, the desired temperature can be modified by pressing the temperature +/- buttons (5) or (11). The avail-able temperatures are: 200 - 250 - 275 - 300 - 325 - 350 - 375 - 400 - 425 - 450°F. 470°F. The display will show the chosen temperature. | 30.0F |
| CLOCK TIMER 3 Then press the TIMER button (12). The display will show 0:00. | 0:00 |
| min + min 4 Set the time (max 2 hours) by pressing the "min-" (7) and "min+" (13) buttons. Keep the button pressed for more than 2 seconds to quickly scroll the time up or down. For each press of the button the time will increase or decrease by one 1 minute. | 1:30 |
| STOP/CANCEL START 5 Press the START button (14). As you press START, time selected is reduced of 1 minute. The oven will start the countdown. At the end of the set time the control will emit 4 beeps and the display will return to stand-by (showing the time of the day, if previously set). | 1:29 |
Notes:
- If the cooking time is not set (skipping points 3 and 4), the display will show the countdown starting from the default duration of 1:00 (1 hour).
- The oven should always be preheated. Wait for the aoible signal (3 times 3 short beeps) before placing the tray (5) with food in the oven.
- The set time can be modified during cooking by simply repeating points 3 and 4. The countdown will automatically restart 3 seconds after the last setting.
- To display the current temperature (during cooking), simply press either one of temperature - / + : (5) or (11) buttons. To modify the set temperature, press again, within 3 seconds, one of the two buttons until the new desired setting will be displayed.
- If the START button is not pressed within 3 minutes from the previous setting, the control will return to stand-by.
Chapter 2-Using the control and setting the modes
BAKING OF CONVENIENCE FOODS
In general, follow the package directions for temperature and time. However, lower the temperature by 25^ F. for more even cooking of larger items, frozen foods (except waffles and pancakes) and packaged casserole mixtures. There is such a wide choice of convenience foods on the market and variations in packaging, quantities and initial temperatures (frozen, refrigerated and shelf temperature) that it's best to follow the package instructions. Check the food 5 to 10 minutes before the time is up; you may need to adjust the time and/or temperature
for best results
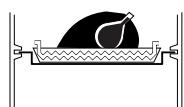
We recommend cooking chicken, roasts and small fowl directly on the broiling rack resting on the dripping-pan (see fig. on the left) to avoid fat spattering onto the sides of the oven and dripping onto the bottom. See the following sections for further details.
Here are some tips for different types of convenience foods:
If directions call for placing the food container on a metal pan or cookie sheet to avoid spills or to aid even cooking, use the shallow pan provided. Use it or the cookie sheets provided for foods, such as rolls, cookies, turnovers or frozen French fries, breaded fish or chicken pieces, that are placed directly on a pan or cookie sheet.
- Some frozen foods come in "oven-proof" plastic or paper containers which can be cooked in a microwave oven and, within limits, a conventional oven. Be sure to follow directions for maximum baking temperature. The container can melt or scorch if too high a temperature is used. To be on the safe side, set the oven 25^ . lower than the recommended temperature.
- When baking packaged mixtures (such as scalloped potatoes, macaroni and cheese, brownies, corn bread, coffeecake and cake mixes) check the package directions for recommended sizes of pan, casserole or dish and the proper baking times for each. A 9-inch round or an 11/7 - by 11/2 inch rectangular pan will fit in the oven with room on all sides for air circulation.
Layer cake mixes can be baked one layer at a time in a 8- or 9-inch round pan or all of the batter in a 3-inch deep 9-inch round bundt or spring-form pan.
| FOOD | TEMPERATURE SET-TING/DISPLAY INDICATOR | APPROX. TIME | NOTES AND TIPS |
| Whole chicken 3-3.5 lbs. Unstuffed. | 350°F | 75 min. or until internal temperature of 175°F in thigh and breast | Roast in shallow pan with broiling rack inverted, with shelf in position 1 |
| Pork Loin or Rib Roast, 2 - 4 lbs. | 325°F | 90 min. or until internal temperature of 170°F is reached. | Roast as for whole chicken. Broiling rack may be in its higher position if oven space allows. |
| Pork Baby Back Ribs 1.75 - 2 lbs. in 6 - to 10 - inch strips. | 300°F for 20 min. then BROIL for 30 min. | Total time 50 min. or until brown and very tender. | Use pan without rack, lined with foil, on shelf position 1. See recipe to follow for full directions. |
| Beef Sirloin or Rib Roast 3 - 5 lbs, boned. | 350°F | 20 min./lb. for rare 25 min./lb for medium 30 min./lb. well | Have roast tied for even cooking. Use broiling rack in low or high position as oven space allows. |
| Cornish Hens 1.5 lbs. each, two split into four halves. | 350°F | 45 - 50 min. or until tender and juice is clear when pierced with fork. | Roast on pan with broiling rack in high position, skin side up. Brush with orange marmalade or honey. Turn and brush several times until done. |
Chapter 2-Using the control and setting the modes
| FOOD | TEMPERATURE SET-TING/DISPLAY INDICATOR | APPROX. TIME | NOTES AND TIPS |
| Baking Potatoes 1 to 4 large | 450°F | 45 - 50 min. or until fork-tender. | Wash and pierce raw potatoes with fork. Rub skins with salad oil if desired. Bake on wire shelf in position 1. |
| Pizza, homemade. | 450°F to 470°F | 20 - 25 min. depending on size and topping. Bake until bubbling hot and crust crisp. | Place the shallow pan on wire shelf in position 1. |
| Cakes: Layer, Sheet cake or Loaf cake. Pies: Fruit, 9-inch double crust. | 300°F to 350°F | Follow traditional recipe timing but lower temper-ature by 25 to 50°F. | Place 1 inch apart on the cookie sheet place wire rack in position 1. Grease sheets if the recipe directs. Remove promptly to cooling rack. |
| Brownies, Bar, Cookies | 300 to 325°F | Follow traditional recipe tim-ing but lower temperature by 25 to 50°F. Use 7x11 inch or 8- or 9 inch square pan or oven-glass dish. | Place wire shelf in position 1. Check for doneness 5 - 10 min. before time is up. Cut while still warm. Let cool 5 - 10 min. to firm up before removing from pan or dish. |
Chapter 2-Using the control and setting the modes
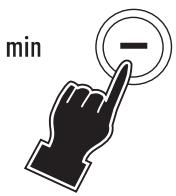
2.3 - KEEP WARMING MODE
- If the keep warming time is not set (skipping points 2 and 3) the display will show the countdown starting from the default duration of 1.00 (1 hour).
- The set time can be modified during cooking by simply repeating point 2 and 3. The countdown will automatically restart 3 seconds after the last setting.
- If the START button (14) is not pressed within 3 minutes from the previous setting the control will return to stand-by.
- The feature is designed to keep food warm, after they are cooked for short periods of time without overcooking. We do not recommend keeping foods warm for prolonged periods or using this feature to reheat frozen or cold foods.
2.4 - BROILING MODE
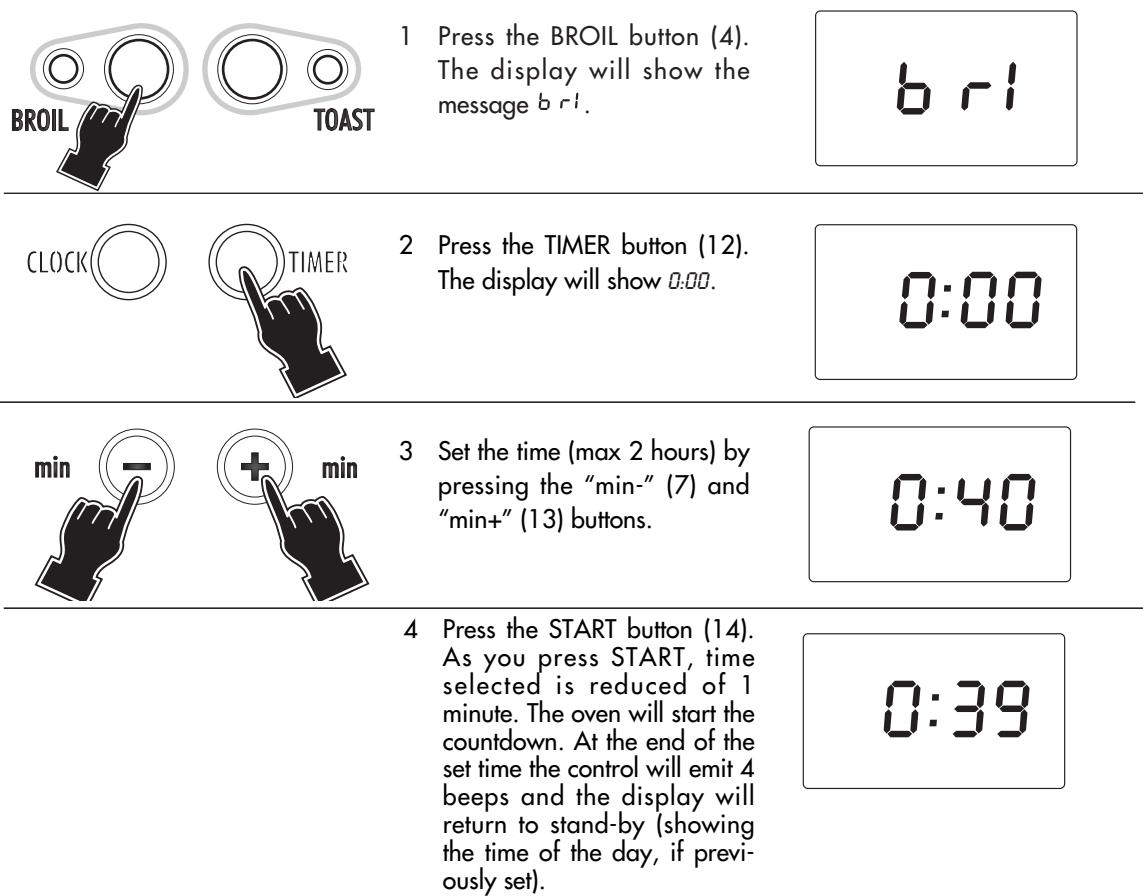
Notes:
- If the cooking time is not set, the display will show the countdown starting from the default duration of 1:00 (1 hour).
- If the START button is not pressed within 3 minutes from the previous setting, the control will return to stand-by.
Always leave the door open to the stop position (as shown in the figure 1).
- Preheat 5 to 10 minutes on BROIL.
- Trim excess fat from meat. Dry meat, fish and poultry surfaces with paper towel.
- Place the food on the broiling rack set in the shallow pan as shown in the figure 2). Position wire shelf so that food will be about 2 inches from top heating element.
Thick foods such as chicken pieces should be 3 - 4 inches from the element.
- The broiling rack can be inverted if necessary, but do not attempt to broil without the rack as fat drippings can smoke or flame.
- For easier clean-up, the shallow pan can be lined with foil. Be sure not to cover the broiling rack or let foil extend beyond the edges of the pan.
- Be careful when turning food or removing the pan. Use hot pads and avoid spilling drippings.
- Never cover heating elements with foil.

fig. 1
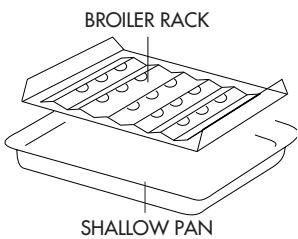
fig. 2
Chapter 2-Using the control and setting the modes
- To top-brown casseroles with crumb or cheese toppings, place the dish directly on the wire shelf (in the position 1) 2 - 3 inches from the top element. Leave the door open to the stop position and watch carefully to avoid burning the toppings. NOTE: Oven-glass dishes should not be exposed to direct broiler heat.
When the function and the temperature controls are set to BROIL only the top element heats at full power. Be sure to leave door open to stop position only, as shown in the figure 1 on page 14. Set the broiling rack in the drip pan on the wire shelf in position 2 so that the food is few inches from the top element. If necessary, the broiling rack can be inverted in the pan. The broiling rack shields the fat drippings from direct heat, reducing spattering, smoking and possible flaming. Always use the shallow pan when broiling any fatty foods.
SUGGESTED BROILING TIMES
| FOOD | WEIGHT OR THICKNESS | APPROX. TIME (Turn at half time) |
| Beef Sirloin, Porterhouse Steak | 1-1 1/2 in. | Rare 12 - 15 min. Medium 16 - 18 min. |
| Beef Flank Steak, Filet | 3/4 - 1 in. | Rare 10 - 12 min. Medium 13 - 16 min. |
| Hamburger | 1 in. | Medium-well 15 - 18 min. |
| Pork Chop | 3/4 - in. | Well 18 - 22 min. |
| Fish Fillets, Steak (See note) | 1/2 - 1 in. | 10 - 16 min. |
| Chicken Piece, Broiler-fryer | 3 - 4 lb. | 40 - 50 min. until juices run clear when fork-tested and no pink when cut. |
| Bacon, Sausage, Links or Patties | Up to capacity of broil-rack. | 10 - 15 min. for crisp bacon, well-done sausage. |
Since fish is non-fatty it can be broiled directly on shallow pan. Broil until it flakes easily with a fork. Thin fillets need not to be turned.
2.5 - TOASTING MODE

BROIL

1 Press the TOAST button (10). The display will flash 4.
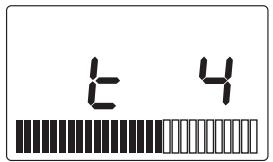

TEMPERATURE/TOAST COLOR

2 Press TEMPERATURE/TOAST COLOR - / + adjust buttons (5) and (11)to modify the desired level ofasting.


3 Press the START button. The display will show the toasting time. At the end of the set time the control will emit 4 beeps and the display will return to stand-by (showing the time of the day, if previously set).

Note:
You have seven browning selection shades to choose from (indicated on the display with
- When toasting, the toasting time will count down on the clock display. The timing will be different for each custom setting you choose. Keep in mind that the timing is adjusted by the oven thermostat. So if your oven is already warm, the toasting time will be less than if you start with a cold oven.
- Should it be necessary for any reason to suspend the cooking, you only need press the STOP/CANCEL (8). The display will go back to showing the clock.
- If the START button is not pressed within 3 minutes from the previous setting, the control will return to stand-by.
- Correct position of the slices according to number.
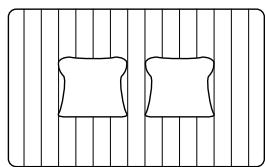
2 slices

4 slices
6 slices
Naturally, to toast a smaller number of slices, choose a lowerasting level. example:
2 slices
light
set 2
6 slices
light
set
Chapter 3-Cleaning and maintenance
3.1 - CARE AND CLEANING
Always unplug the toaster-oven-broiler and allow it to cool before cleaning. This unit has been designed and engineered with your safety in mind. To assure maximum safe operation, keep unit clean free of grease and build up of food particles.
- Remove the wire oven rack.
- To clean the inside walls, use a damp cloth and a mild liquid soap solution. Never use harsh abrasives, corrosive products or spray detergents.
Note:
Do not clean interior with metal scouring pads. Pieces can break off and touch electrical parts, creating risk of electrical shock.
- To clean the glass door, use a glass cleaner or a damp cloth. Wipe dry with a clean cloth.
- To clean the exterior finish, use a damp, sudsy cloth. For stubborn stains, a non-abrasive liquid cleaner or spray glass cleaner may be used. Do not use metal scouring pads, as they might mar the finish. Always remove cleaning agents by polishing with a dry cloth.
- The wire rack, the oven pan and the broiling rack may be washed as other kitchenware.
OTHER SERVICING
Any servicing requiring disassembly should be performed by an authorized service representative. If the display shows ER (error), it means that the oven is damaged.
OVEN LIGHT (IF PROVIDED)
It remains on during all cooking operations. To replace a burned out bulb unscrew the protective glass cover. Remove the bulb and replace it with the same type, a high-temperature appliance bulb.
ITED WARRANTY
What does the warranty cover?
We warrant each appliance to be free from defects in material and workmanship. Our obligation under this warranty is limited to repair at our factory or authorized service center of any defective parts or part thereof, other than parts damaged in transit. In the event of a products replacement or return, the unit must be returned transportation prepaid. The repaired or new model will be returned at the company expense.
This warranty shall apply only if the appliance is used in accordance with the factory directions, which accompany it, and on an Alternating current ( AC ) circuit.
How long does the coverage last?
This warranty runs for one year ( 1 ) from the purchase date found on your receipt and applies only to the original purchaser for use.
What is not covered by the warranty?
The warranty does not cover defects or damage of the appliance, which result from repairs or alterations to the appliance outside our factory or authorized service centers, nor shall it apply to any appliance, which has been subject to abuse, misuse, negligence or accidents. Also, consequential and incidental damage resulting from the use of this product or arising out of any breach of contract or breach of this warranty are not recoverable under this warranty. Some states do not allow the exclusion or limitation of incidental or consequential damage, so the above limitation may not apply to you.
How do you get service?
If repairs become necessary please contact our toll free hotline at 1-800-322-3848 or log onto our website at www.delonghi.com.
The above warranty is in lieu of all other express warranties and representations. All implied warranties are limited to the applicable warranty period set forth above. This limitation does not apply if you enter into an extended warranty with De'Longhi. Some states do not allow limitations on how long an implied warranty lasts, so the above exclusions may not apply to you. De'Longhi does not authorize any other person or company to assume for it any liability in connection with the sale or use of its appliance.
How does state law apply?
This warranty gives you specific legal rights, and you may also have other rights, which vary from state to state.
- OVEN WITH ELECTRONIC CONTROLS
- FOUR COMMANDÉ ÉLECTRONIQUEMENT
- CONTENTS
- CHAP.1 GENERAL
- CHAP. 2 USING THE CONTROLS AND SETTING THE MODES
- CHAP.3 CLEANING AND MAINTENANCE
- ELECTRICAL CONNECTIONS
- - CONTROL PANEL
- Chapter 1-General
- - DESCRIPTION AND ACCESSORIES PROVIDED
- - IMPORTANT SAFEGUARDS
- THIS PRODUCT IS FOR HOUSEHOLD USE ONLY
- SAVE THESE INSTRUCTIONS
- - INSTALLATION
- 1.6-IMPORTANT TIPS AND TECHNIQUES
- POSITIONING THE WIRE SHELVE:
- COOKIE SHEET
- PREHEATING THE OVEN
- USE ALUMINUM FOIL
- - SETTING THE CLOCK
- Chapter 2-Using the control and setting the modes
- - BAKE MODE
- Notes:
- BAKING OF CONVENIENCE FOODS
- Here are some tips for different types of convenience foods:
- - KEEP WARMING MODE
- - BROILING MODE
- - TOASTING MODE
- Note:
- Chapter 3-Cleaning and maintenance
- - CARE AND CLEANING
- OTHER SERVICING
- OVEN LIGHT (IF PROVIDED)
- ITED WARRANTY
- What does the warranty cover?
- How long does the coverage last?
- What is not covered by the warranty?
- How do you get service?
- How does state law apply?
Brand : DELONGHI
Model : XD 629W
Category : Cooking appliance