SB-WM-F-XL-BL - Wall mount SunBriteTV - Free user manual and instructions
Find the device manual for free SB-WM-F-XL-BL SunBriteTV in PDF.

User questions about SB-WM-F-XL-BL SunBriteTV
0 question about this device. Answer the ones you know or ask your own.
Ask a new question about this device
Download the instructions for your Wall mount in PDF format for free! Find your manual SB-WM-F-XL-BL - SunBriteTV and take your electronic device back in hand. On this page are published all the documents necessary for the use of your device. SB-WM-F-XL-BL by SunBriteTV.
USER MANUAL SB-WM-F-XL-BL SunBriteTV
Weatherproof Universal Fixed and Tilt Mounts
for Very Large Displays

natural_image
Black metal TV frame with vertical connectors and a horizontal panel (no text or symbols visible)
natural_image
Black wall-mounted device with two vertical supports and a central horizontal frame (no text or symbols visible)Install Guide
Warnings
Installation by a qualified professional is highly recommended for this product.
Do not begin installation until you have thoroughly read and understand these instructions.
This mount supports displays up to VESA 1000×700, and a maximum load of 250 lbs (113.6 kg).
Ensure the wall can safely support four times the combined weight of the mount and display.
The manufacturer does not accept responsibility for incorrect installation.
Specifications Box Contents Tools Required
Maximum Load: 250 lbs (113.6 kg) Wall Plate (1) Power Drill
Forward Tilt Range: -8^ / +13^ Left Arm (1) 1/4" & 3/8" Drill Bits
Horizontal Tilt Range: +5° Right Arm (1) Level
Dacromet Coated Assembly Hex Wrench (1) 1/2" (13mm) Wrench
Stainless Steel Mounting Hardware Security Wrench (1) Stud Finder
Hardware Kit Phillips Screwdriver
Hardware Kit
| Bag 1: TV Arm Mounting | |||||
 M4×10 bolt × 4 M4×10 bolt × 4 |  M4×16 bolt × 4 M4×16 bolt × 4 |  M4×20 bolt × 4 M4×20 bolt × 4 |  M4×30 bolt × 4 M4×30 bolt × 4 |  M4×40 bolt × 4 M4×40 bolt × 4 | |
 M5×10 bolt × 4 M5×10 bolt × 4 |  M5×16 bolt × 4 M5×16 bolt × 4 |  M5×20 bolt × 4 M5×20 bolt × 4 |  M5×30 bolt × 4 M5×30 bolt × 4 |  M5×40 bolt × 4 M5×40 bolt × 4 | |
 M6×10 bolt × 4 M6×10 bolt × 4 |  M6×16 bolt × 4 M6×16 bolt × 4 |  M6×20 bolt × 4 M6×20 bolt × 4 |  M6×30 bolt × 4 M6×30 bolt × 4 |  M6×40 bolt × 4 M6×40 bolt × 4 | |
 M8×10 bolt × 4 M8×10 bolt × 4 |  M8×16 bolt × 4 M8×16 bolt × 4 | 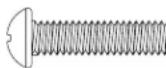 M8×20 bolt × 4 M8×20 bolt × 4 |  M8×30 bolt × 4 M8×30 bolt × 4 | ||
| Bag 2: TV Arm Mounting | |||||
 M8×40 bolt × 4 M8×40 bolt × 4 |  M4/M5 spacer × 12 M4/M5 spacer × 12 |  M6/M8 spacer × 12 M6/M8 spacer × 12 |  M5 washer × 16 M5 washer × 16 |  M8 Washer × 8 M8 Washer × 8 | |
| Bag 3: Mount to Wall | |||||
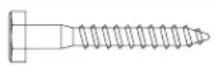 M8×63 Lag Bolt (x6) M8×63 Lag Bolt (x6) |  Washer (x6) Washer (x6) |  Concrete anchor (x6) Concrete anchor (x6) | 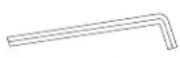 Hex wrench Hex wrench | ||
Bag 2: TV Arm Mounting
Bag 3: Mount to Wall
Installation
Caution: Overtightening bolts can damage the bolts and reduce their holding strength.
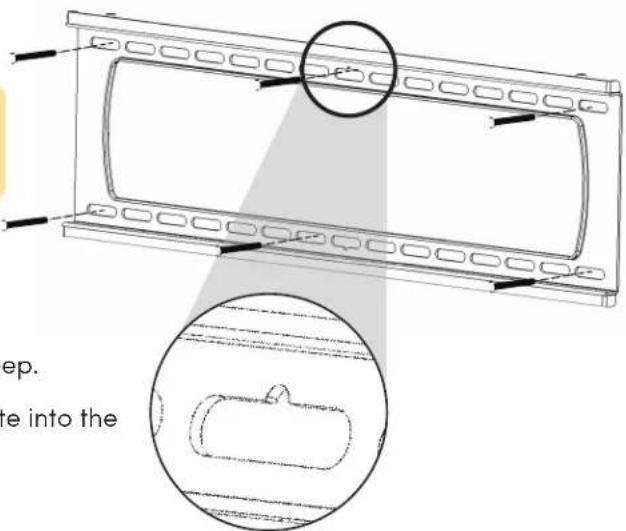
Mount the Wall Bracket
Pro Tip: The wall bracket features a screw slot for temporary placement to help mark pilot holes.
For Mounting on a Stud Wall
Use a stud finder to locate your studs. Drill two pilot holes each into three wood studs using a 1/4" drill bit. Drill into the center of the studs at least 2-1/2" deep.
Insert six lag bolts and washers through the wall plate into the pilot holes and tighten.
text_image
ep. te into theFor Mounting on a Concrete Wall
Drill anchor holes into concrete using 3/8" drill bits to a depth of 2-1/2". Insert concrete wall anchors and tap in with a hammer. Ensure the anchors are embedded entirely within the concrete.
Insert four lag bolts (U) into the wall anchors through the wall plate. Tighten all bolts.
Caution: Concrete must be 2000 psi density minimum. Lighter density concrete may not hold concrete anchor. Cinder block must meet ASTM C-90 specifications.
Caution: Before drilling, verify the concrete is at least 1-3/8" thick. Mount in a solid part of the block, generally 1" minimum from the side of the block. Do not drill into mortar joints. Use a standard electric drill on slow setting. Do not use a hammer drill to avoid damage.
Mount Arms to TV
Determine the screw size that fits your TV by carefully hand-threading them into the threaded insert on the rear of the TV. If there is any resistance, stop immediately.
Thread the screw through the washer, arm, spacer (if needed), and into the TV. Spacers are commonly needed on TVs with curved backs or recessed screw inserts.
Ensure the arms are installed flat side to the TV and square to each other after all screws have been installed.
natural_image
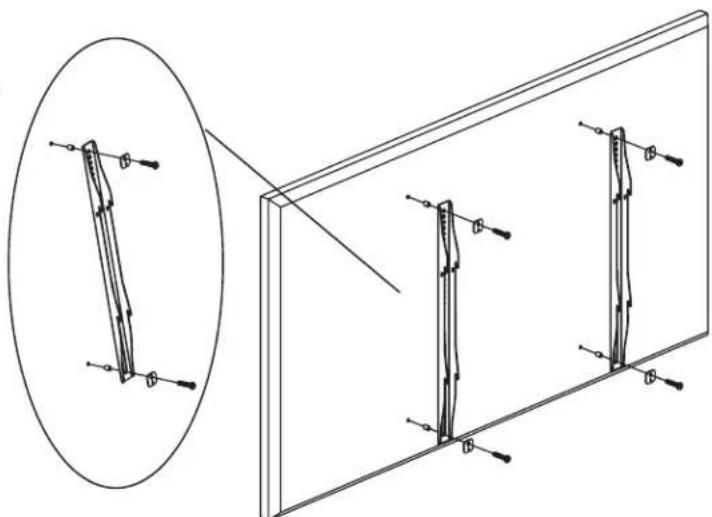
Technical line drawing showing a magnified view of a vertical structure with arrows indicating direction, alongside a 3D panel view (no text or symbols)Hang the TV on the Wall Plate
Carefully lift the TV to hook the arms over the top lip of the wall plate. Allow the lower portion of the arms to swivel in under the bottom lip of the wall plate. Do not release the TV until it is completely seated.
Adjustments
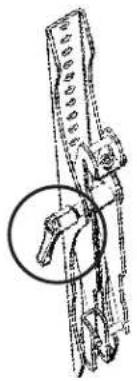
Forward Tilt Adjustment (SB-WM-T-M-BL only)
Using the included long hex wrench, loosen the tilt adjustment locks (circled) on the sides of the arms enough to allow movement.
Set the tilt to the desired angle, then tighten the locks. If the locks cannot be tightened enough, remove the TV from the wall for better access.
natural_image
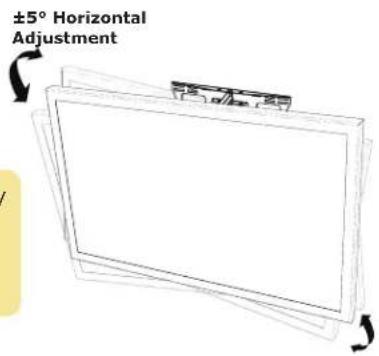
Technical line drawing of a mechanical assembly with a circular annotation highlighting a component (no text or symbols present)Horizontal Adjustment
The arms feature tilt adjustment screws toi help fine-tuine the display's alignemnt. Use provided hex wrench to adjust the screw for perfect leveling.
Pro Tip: Due to display weight, it may be easier to lift the panel slightly while adjusting the screw.
text_image
±5° Horizontal Adjustment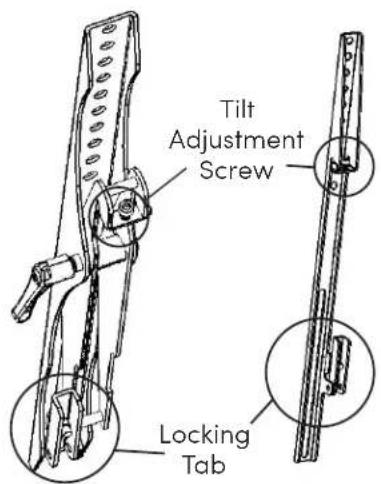
text_image
Tilt Adjustment Screw Locking TabLocking
To lock the arms to the wall bracket, twist the locking tabs until the edge catches behind the bracket. The hex wrench can be used as a tool to help with this step. Add a padlock (not included) if desired.
Technical Support
For technical support, please call 866-357-8688 or visit https://www.sunbritetv.com/support/services/contact-support, fill out the support request form, and our support team will respond via email.
Visit tech.control4.com/technician for discussions, instructional videos, news, and more.
Warranty and Legal Notices
Find details of the product's Limited Warranty and other resources such as regulatory notices and patent and safety information, at snapone.com/legal or request a paper copy from Customer Service at 866.424.4489.
Copyright ©2022, Snap One, LLC. All rights reserved. Snap One and its respective logos are registered trademarks or trademarks of Snap One, LLC, in the United States and/or other countries. Control4 and SunBriteTV are also registered trademarks or trademarks of Snap One, LLC. Other names and brands may be claimed as the property of their respective owners. Snap One makes no claim that the information contained herein covers all installation scenarios and contingencies, or product use risks. Information within this specification subject to change without notice.
220308-1400
Part # 200-SB-WM-FT-XL-BLK-A