KASMGPH24YB - Heating Kogan - Free user manual and instructions
Find the device manual for free KASMGPH24YB Kogan in PDF.

User questions about KASMGPH24YB Kogan
0 question about this device. Answer the ones you know or ask your own.
Ask a new question about this device
Download the instructions for your Heating in PDF format for free! Find your manual KASMGPH24YB - Kogan and take your electronic device back in hand. On this page are published all the documents necessary for the use of your device. KASMGPH24YB by Kogan.
USER MANUAL KASMGPH24YB Kogan
natural_image
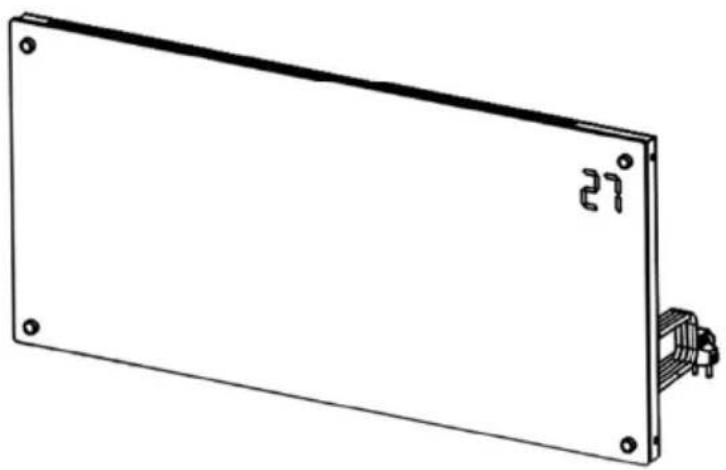
Line drawing of a rectangular mechanical device with wheels and a 27-degree angle label (no text or symbols beyond the angle marker)Kogan SmarterHome™ Premium Glass Panel Heater
1500W, 2000W, 2400W
KASMGPH15YA, KASMGPH15YB, KASMGPH20YA, KASMGPH20YB, KASMGPH24YA & KASMGPH24YB
Safety & Warnings 3
Components 5
Overview 6
Installation 8
Connect to the SmarterHome™ App 12
Google Home 15
Alexa Axela 18
Operation 22
Cleaning & Care 26
Specifications 27
Troubleshooting 27
Notes 29
Safety & Warnings
- Read all instructions fully before using the product for the first time and retain for reference. If passing this product on to a new owner, include a copy of this guide.
• Power Input : 220-240V\~50Hz
- Do not leave this unit unattended while it is in use.
- Some parts of this product can become very hot and cause burns. Particular attention must be given when children and vulnerable people are present. Keep children and pets at a safe distance from the unit.
- This appliance is not intended for use by persons (including children) with reduced physical, sensory or mental capabilities or lack of experience and knowledge, unless they have been given supervision or instruction concerning use of the appliance by a person responsible for their safety.
- Children must not play with the appliance. Cleaning and user maintenance must not be made by children without supervision.
- This heater is not equipped with a device to control the room temperature. Do not use this heater in small rooms when occupied by persons not capable of leaving a room on their own, unless constant supervision is provided.
- To avoid overheating and potential fire hazard, ensure the heater is not covered. Do not use it for drying clothes.
- Do not attempt to repair this product yourself. If the product or its power supply experiences any malfunction or damage, stop using it immediately and contact help.Kogan.com for support
- If the power cable shows any signs of damage, cease use immediately and contact help.Kogan.com for support.
- Do not handle the element with bare hands. If it is inadvertently touched, remove finger marks with a soft cloth and methylated spirits or alcohol: otherwise, the marks will burn into the element causing premature heater failure.
• This product is suitable for indoor use only.
- Do not use this heater in the immediate surroundings of a bath, shower or swimming pool.
- Do not touch the plug with wet or damp hands.
- Do not run the power cable under carpeting. Do not cover the power cable with rugs, runners or similar coverings. Arrange the power cable away from foot traffic and where it will not be tripped over.
- Do not wind the power cable around the unit.
- Do not insert or allow foreign objects to enter any ventilation or opening on the heater, as this may result in electric shock, fire or damage to the heater.
- Where possible, avoid the use of an extension cable as this may overheat and cause a fire. However, if you have to use an extension cable, ensure it is suitable for the purpose, has been tested for outdoor use and preferably has an RCD device fitted or attached.
• Always ensure that the heater is plugged into a suitable electrical outlet. - Do not position directly above or below an electrical outlet.
• Always use on a dry, suitably strong, stable, flat and level surface. - Always unplug the unit and ensure that the unit has cooled completely before moving, cleaning or storing.
- This heater is intended for domestic use only and should not be used commercially for contract purposes. Any alternative use, not recommended by Kogan.com, may result in fire, electric shock or injury to persons.
- Check exterior walls for areas of damage before installing the heater.
- Check exterior walls for communication and electrical cables and pipelines. Should any service lines be present in the immediate vicinity do not install your heater, find an alternative location to install this product.
- Do not remove any of the warning stickers or signs from the product.
- This appliance is not intended for use by persons (including children) with reduced physical, sensory or mental capabilities or lack of experience and knowledge, unless they have been given supervision or instruction concerning use of the appliance by a person responsible for their safety.
• Children should be supervised to ensure that they do not play with the appliance. - When the appliance is not in use and before cleaning, unplug the appliance from the outlet firstly.
- WARNING: To avoid overheating, do not cover the heater.
- The heater must not be located immediately below an electrical outlet.
- Do not use this heater if it has been dropped.
- Do not use if there are visible signs of damage to the heater.
- Use this heater on a horizontal and stable surface or attach it to the wall.
- WARNING: Do not use this heater in small rooms when they are occupied by persons not capable of leaving the room on their own, unless constant supervision is provided.
- WARNING: To reduce the risk of fire, keep textiles, curtains or any other flammable material a minimum distance of 1 metre from the air outlet.
- The heater is to be installed so that switches and other controls cannot be touched by a person in the bath or shower.
Components
natural_image
Simple line drawing of a rectangular panel with mounting holes and a small internal component (no text or symbols)Panel Heater
natural_image
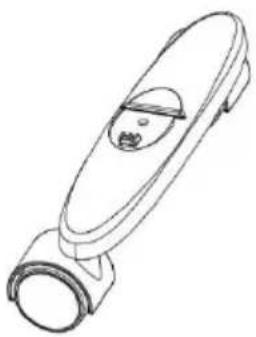
Line drawing of a stylized object resembling a device or tool, with no visible text or symbols.Castors (x2)
natural_image
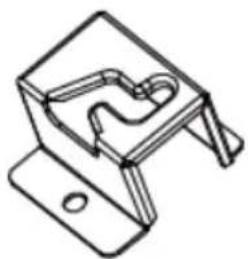
Technical line drawing of a mechanical clamp or bracket component (no text or symbols)Wall Bracket (x2)
Support
natural_image
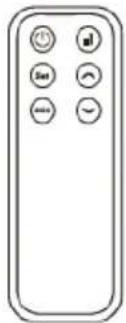
Front view of a remote control with six function buttons (no text or symbols)Remove
AAA Battery (x2)

M5x12 Screw (castors) (x2)
Wall Anchor (x2)

M5x35 Screw (x2)
text_image
Air Outlet Control Panel 27° Switch LegsControl Panel
text_image
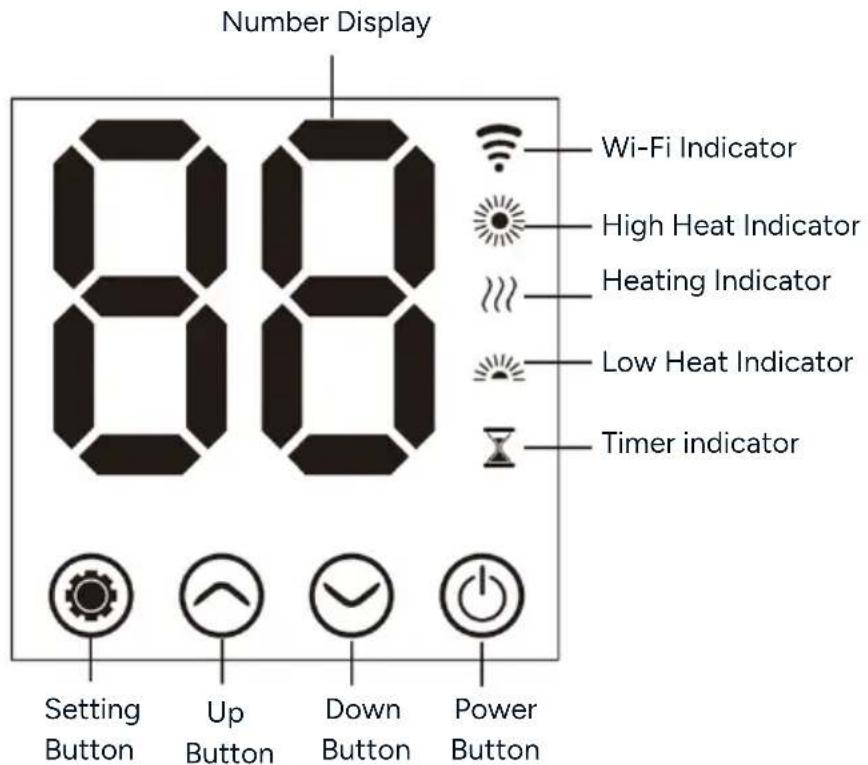
Number Display 88 Wi-Fi Indicator High Heat Indicator Heating Indicator Low Heat Indicator Timer indicator Setting Button Up Button Down Button Power Button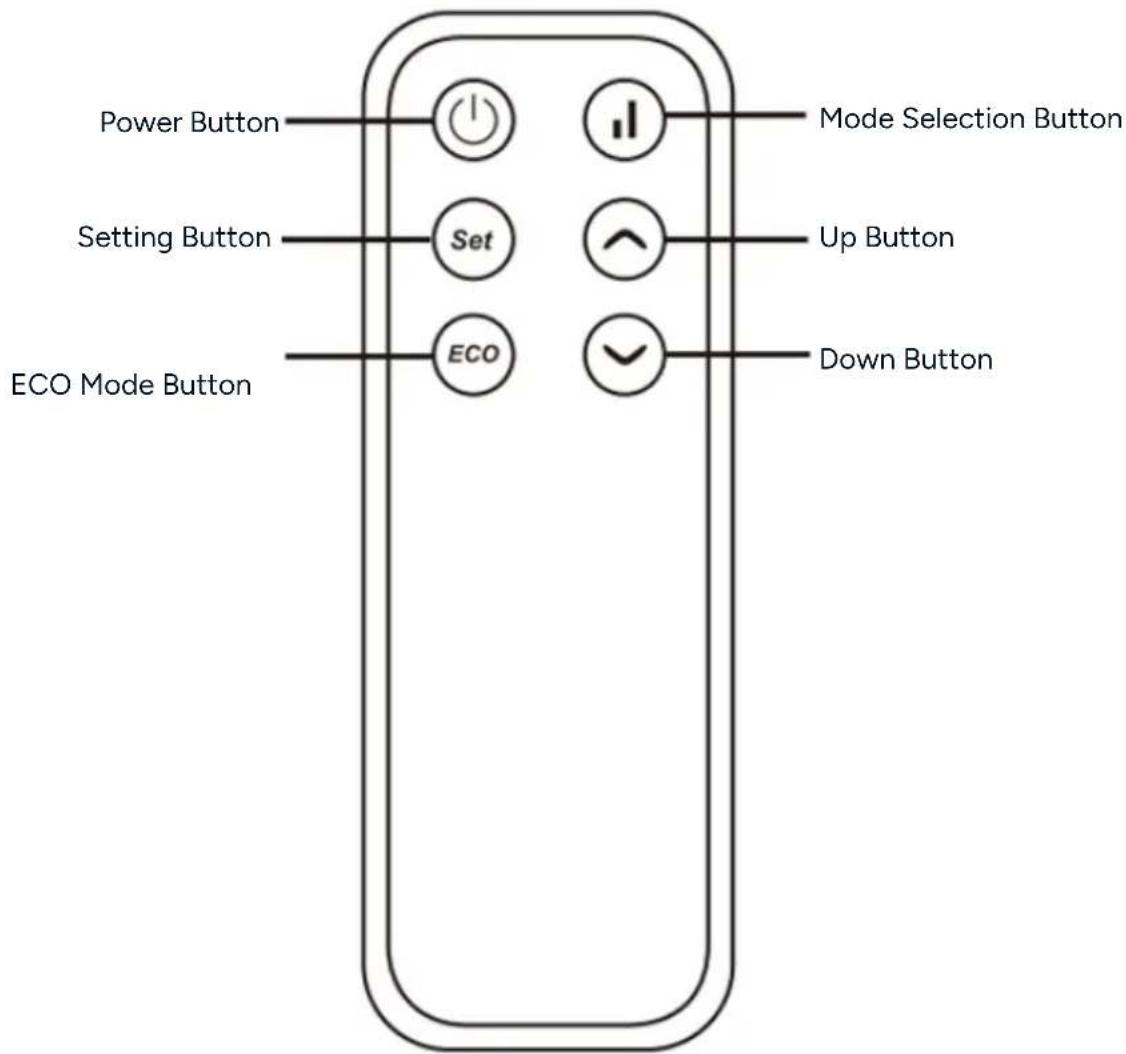
text_image
Power Button Setting Button ECO Mode Button Set ECO Mode Selection Button Up Button Down ButtonInstallation
Wall Mounting
text_image
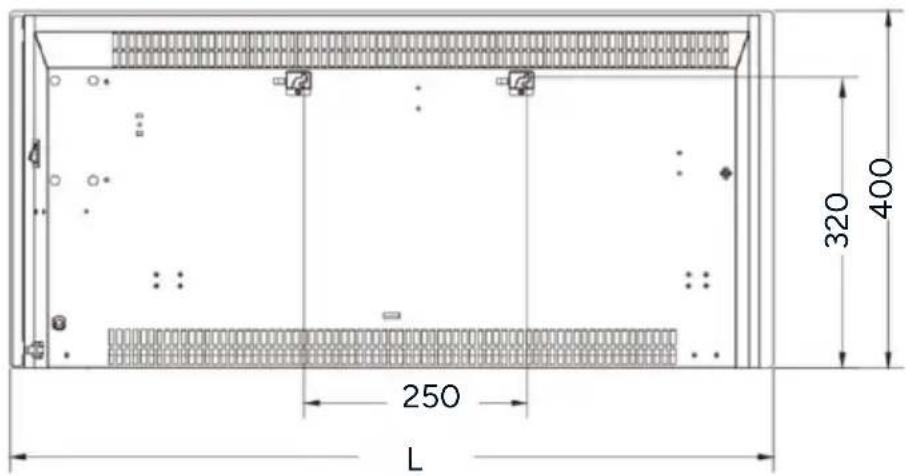
4 250 L 320 400| Model | L(mm) |
| KASMGPH15YA & KASMGPH15YB | 597 |
| KASMGPH20YA & KASMGPH20YB | 832 |
| KASMGPH24YA & KASMGPH24YB | 952 |
text_image
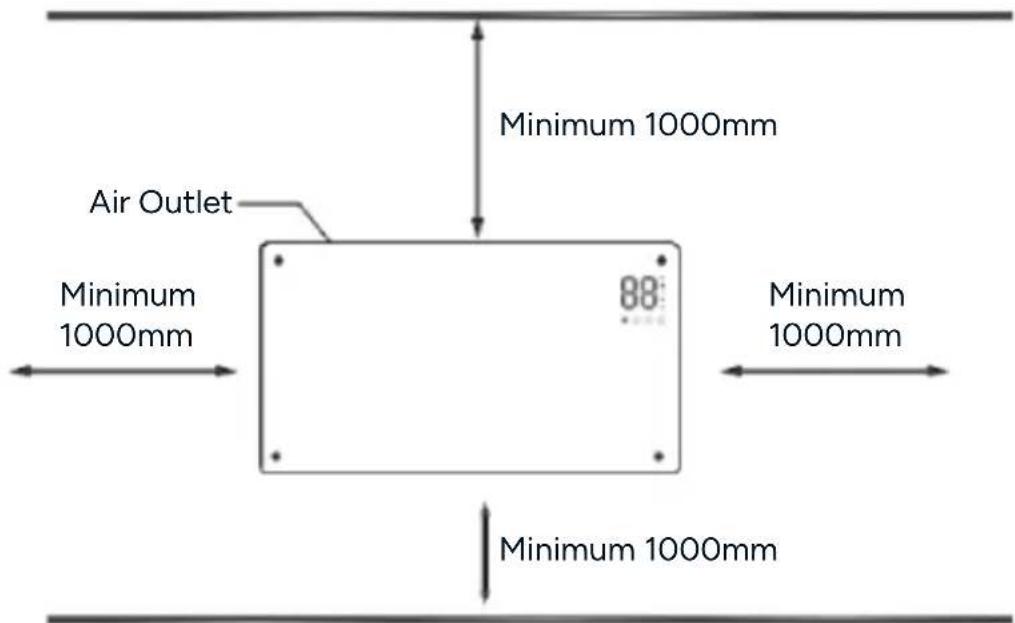
Minimum 1000mm Air Outlet Minimum 1000mm 88° Minimum 1000mm Minimum 1000mmFloor
Note:
The heater MUST be installed with a minimum distance of 1000mm from all 4 sides of the heater.
- Insert the wall bracket into the hole, align the bracket with screw holes and tighten the x2 M4x12 screws.
- Insert the spacer support into the hole in the rear of the heater and push down. Use a screwdriver to adjust the required tightness of the space support.

text_image
Wall Bracket M4x12 Screw Space Support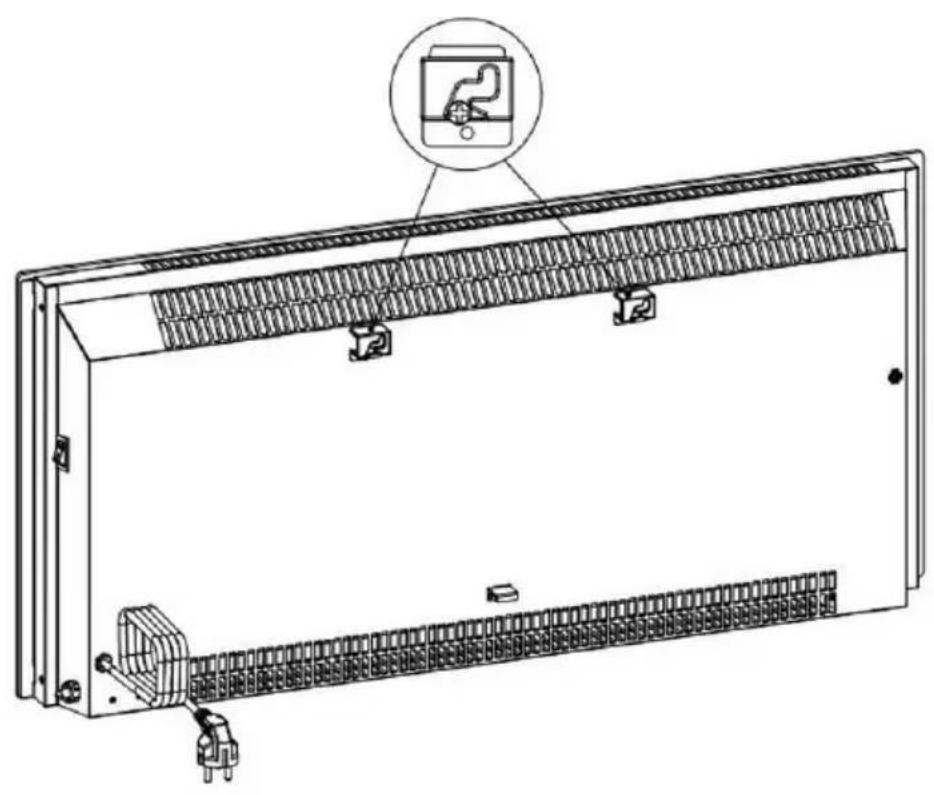
natural_image
Technical line drawing of an electrical enclosure with internal components and a close-up inset showing a device (no text or symbols present)-
Drill 2 holes 250mm (L1) apart, ensuring they are straight using a spirit level, then insert the wall anchors.
-
Ensuring the holes are aligned, attach the heater to the wall with 35mm self-tapping screws.
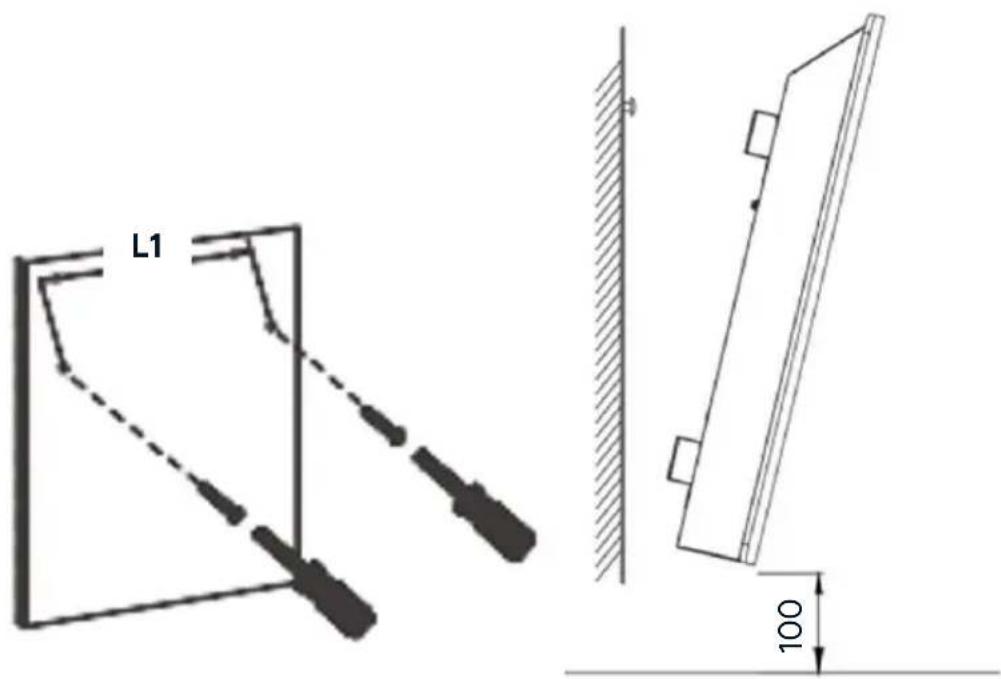
text_image
L1 100Removing the Heater
To remove the heater from the wall, pull the heater 5mm outward and then move it 10mm to the left and lift it up and away from the wall.

text_image
Technical diagram showing installation of a wall-mounted device with two circular insets illustrating the internal components.Leg Installation
- Attach the legs into the hole in the underside of the heater and push it upwards.
- Align the legs with the screw hole and secure them in place using the x2 supplied M5x12 screws.
- To remove the legs, perform the above steps in reverse order.

Battery Installation
- Remove the battery compartment cover.
- Insert x2 AAA batteries, ensuring the polarity matches the symbols inside the compartment.
- Replace the battery compartment cover securely.
Connect to the SmarterHome™ App
Install the App
Download the Kogan SmarterHome™ app from the Apple App Store (iOS) or the Google Play Store (Android).

text_image
QR code image containing encoded data, no visible human-readable textApp Store (iOS)


text_image
QR code image containing encoded data, no visible human-readable textPlay Store (Android)

Log In or Sign Up
- If you already have a SmarterHome account, tap 'Log In'. To register a new account, tap 'Sign Up'.
- The app will automatically recognise your country. If needed, you can manually select your country from the drop down menu. Enter your email address, agree to the Privacy Policies and User Agreement, and tap 'Get Verification Code' to continue.
- A 6-digit code will be sent to the submitted email address. Enter the code before the one-minute timer expires.

text_image
logon Log In Sign Up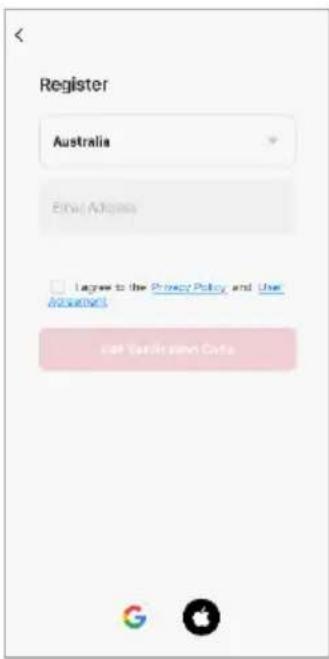
text_image
Register Australia Email Address I agree to the Privacy Policy and Use Accounted self-Validation Guide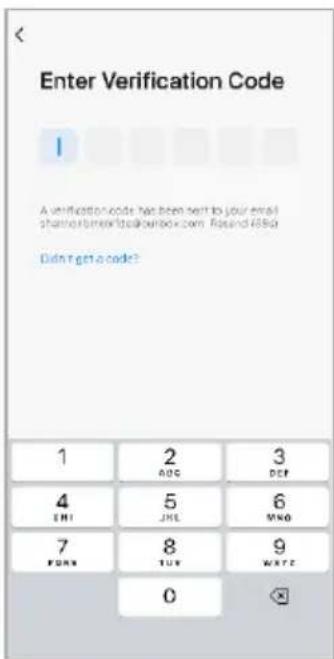
text_image
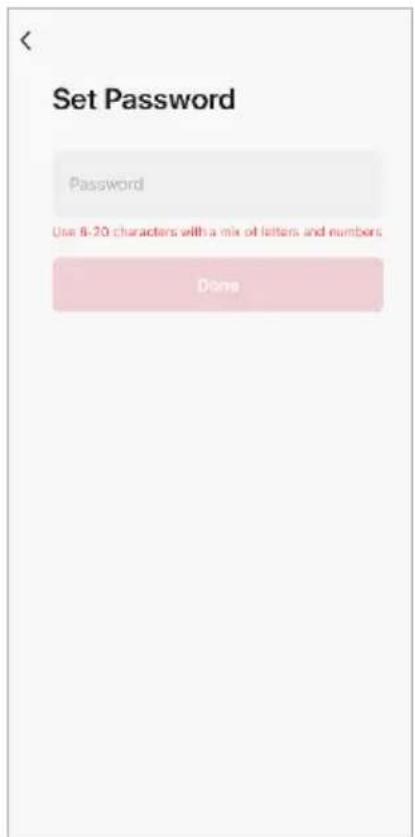
Enter Verification Code A verification code has been sent to your email share@bemcitalbook.com. Rcsnd i65d Didn't get a code? 1 2 3 ABC DEC 4 5 6 ENI JHE NHO 7 8 9 FORD TUY WATE 0- Enter a password that uses 6-20 characters with a mix of letters and numbers and tap 'Done'.
- Enable the permissions and tap 'Go to App'.
text_image
Set Password Password Use 8-20 characters with a mix of letters and numbers Done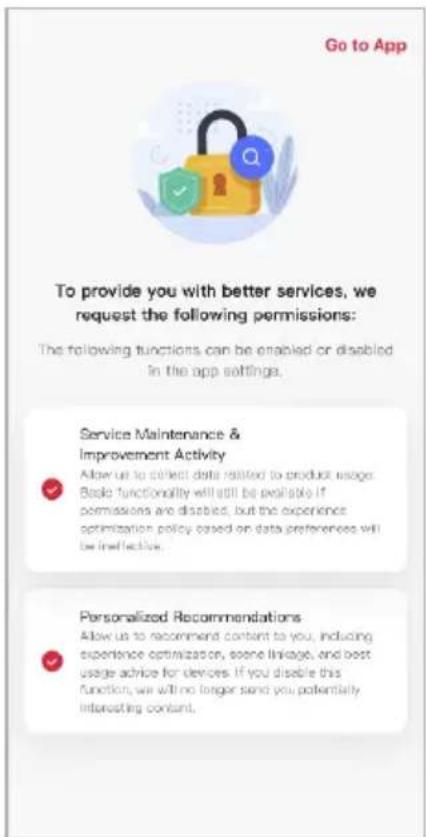
text_image
Go to App To provide you with better services, we request the following permissions: The following functions can be enabled or disabled in the app settings. Service Maintenance & Improvement Activity Allow us to collect data related to product usage. Book functionality will still be reliable if permissions are disabled, but the experience optimization policy based on data preferences will be ineffective. Personalized Recommendations Allow us to recommend content to you, including experience optimization, some linkage, and best usage advice for devices. If you disable this function, we will no longer send you potentially interesting content.
text_image
No devices Add Device Home Scene NoSet the Device in Pairing Mode
When the device is first turned on, it may automatically enter pairing mode (Wi-Fi indicator is flashing rapidly).
If not automatically in pairing mode when powered on, you can manually set the device in pairing mode by pressing and holding the 'Setting' and 'Down' buttons for 3 seconds until the Wi-Fi indicator is flashing rapidly.
Add the Device to the App
- Open the SmarterHome™ app.
- Tap the '+' icon in the top right corner of the screen and then tap 'Add Device'.
- Tap 'Add' when the device appears. Alternatively, select the product type from the list of options in the app (Heating & Cooling → Heaters).
- Follow the prompts to add your device to the app.
Notes:
• The device and the app must use the same Wi-Fi network.
• The device is only compatible with 2.4Ghz networks.
Connectivity Support
Scan the QR code below or go to https://help.kogan.com/s/article/Kogan-SmarterHome-App-Connectivity-Support and follow the pairing instructions for EZ mode.

text_image
QR code image containing encoded data, no visible human-readable textGoogle Home
- Ensure you are logged into the Kogan SmarterHome™ app.
- Open the Google Home app.
- Go to the devices tab and tap the '+ Add' button in the lower right corner.
- Tap 'Works with Google Home'.
- Search for 'Smarter Home' in the search bar and select 'Smarter Home' from the results.

text_image
Devices Dining Dining Off Kitchen Kitchen Off Living Lounge Off Senses TV Control Live... Living Room > Add Master bedroom Favourites Devices Automatic... Activity Settings
text_image
Choose a device Matter-enabled device Add devices with the Matter logo Google Nest or partner device Add Nest devices, Chromecast, Google Assistant-enabled devices or partner devices labelled 'Seamless Setup with the Google Home app' Works with Google Home Link existing devices or services labelled 'Works with Google Home'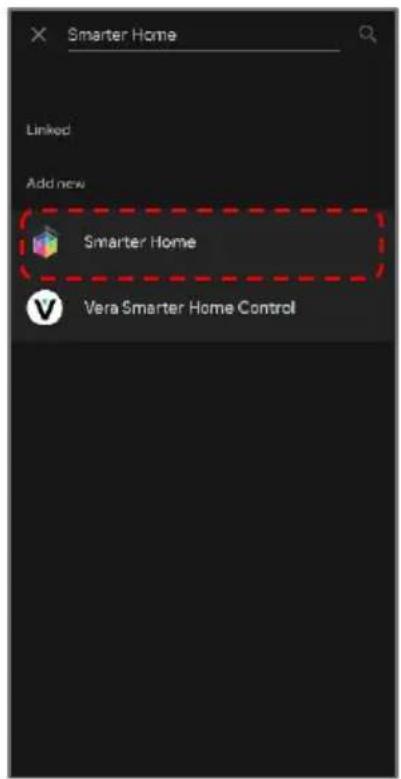
text_image
Smarter Home Linked Add new Smarter Home Vera Smarter Home Control- Tap the 'Agree and link' button.
- Search for 'Smarter Home' in the search bar and select 'Smarter Home' from the results.
- Once linked, a 'Smarter Home is linked' pop-up will appear at the bottom of the screen.
- Tap your device and then tap the 'Next' button.

text_image
Link your "Kogan Smarterhome" account with "Google" The App will have the following permissions after authorization: "Devices status and control permission" Agree and link Cancel
text_image
Smarter Home Linked Add new Smarter Home Vara Smarter Home Control Smarter Home is linked
text_image
Choose device Robot Vacuum Vacuum Next-
Select the home you wish to add the device to and tap the 'Next' button.
-
Select the room your device is in and tap the 'Next' button.

text_image
Choose a home You'll be able to control the devices and services in this home. ✓ Our House + Create another home Next Front garden Garage Hall Kitchen Living Room Loft Master bedroom ✓ Office Shed Side door Add custom room NextAmazon Alexa
- Ensure you are logged into the Kogan SmarterHome™ app.
- Open the Amazon Alexa app.
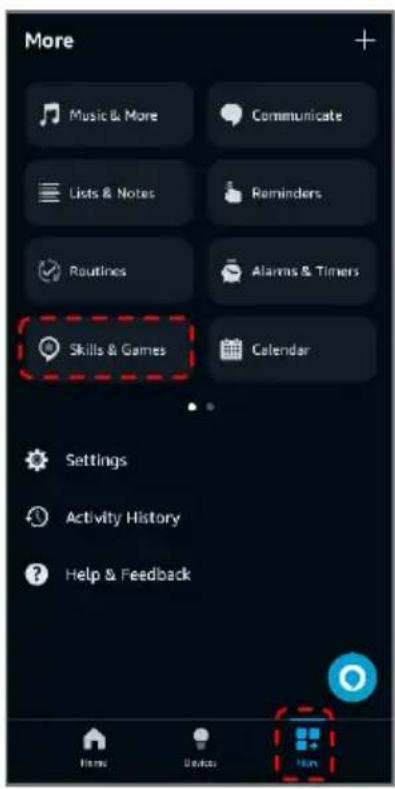
- Go to the 'More' tab and tap 'Skills & Games'.
- Search for 'Smarter Home' in the search bar and select 'Smarter Home' from the results.
- Tap the 'ENABLE TO USE' button.
text_image
More Music & More Communicate Lists & Notes Reminders Routines Alarms & Timers Skills & Games Calendar Settings Activity History Help & Feedback Home Desktop Help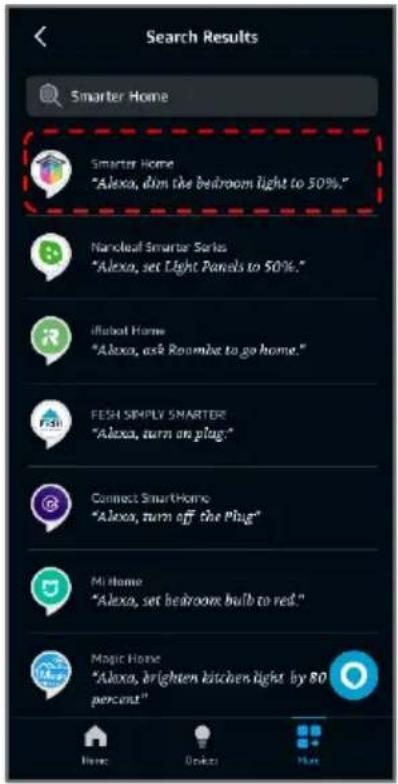
text_image
Search Results Smarter Home Smarter Home "Alexa, dim the bedroom light to 50%." Narcoleaf Smarter Series "Alexa, set Light Panels to 50%." iRobot Home "Alexa, ask Roombie to go home." FESH SIMPLY SMARTER "Alexa, turn on plug." Connect SmartHome "Alexa, turn off the Plug" Mi Home "Alexa, set bedrooms bulb to red." Magic Home "Alexa, brighten kitchen light by 80 percent"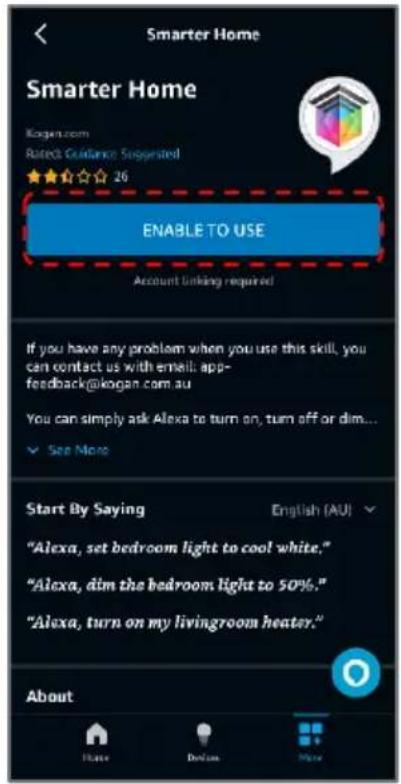
text_image
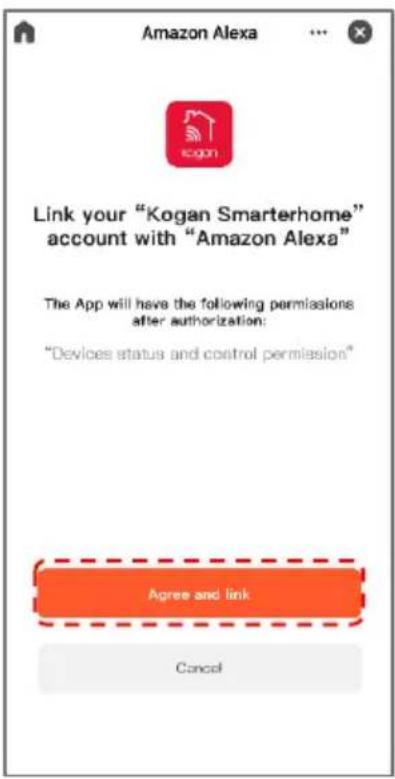
Smarter Home Smarter Home Kogers.com Rated Guidance Suggested ★★★☆☆ 26 ENABLE TO USE Account linking required If you have any problem when you use this skill, you can contact us with email: app-feedback@kogan.com.au You can simply ask Alexa to turn on, turn off or dim... ✓ See More Start By Saying English (AU) "Alexa, set bedroom light to cool white." "Alexa, dim the bedroom light to 50%." "Alexa, turn on my livingroom heater." About- Tap the 'Agree and link' button.
- Once linked, tap 'Next'. Alexa will search for any compatible devices.
text_image
Amazon Alexa Link your "Kogan Smarterhome" account with "Amazon Alexa" The App will have the following permissions after authorization: "Devices status and control permission" Agree and link Cancel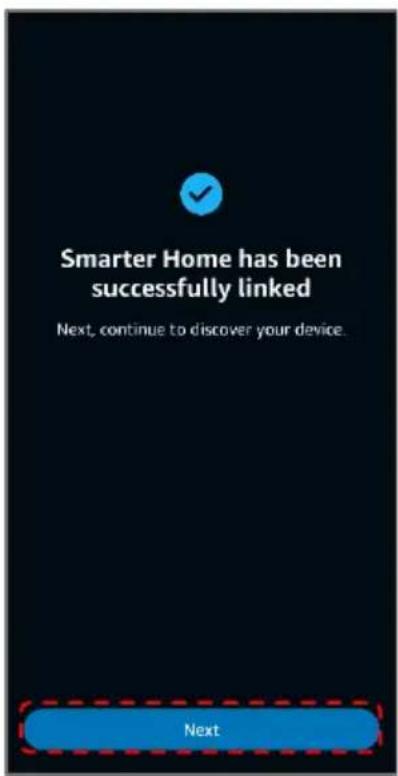
text_image
Smarter Home has been successfully linked Next, continue to discover your device. Next
text_image
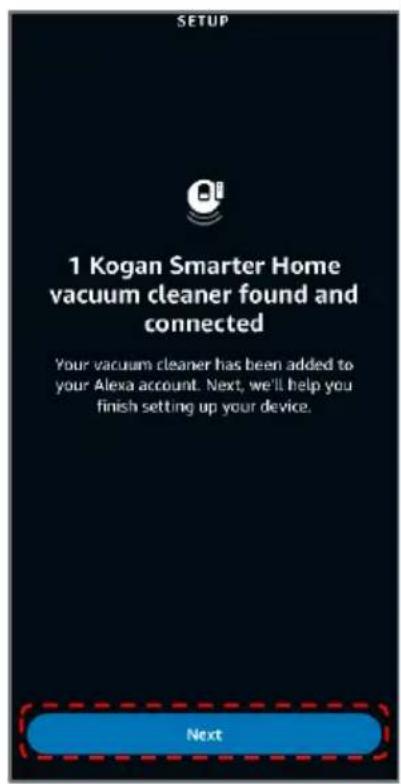
SETUP Alexa is looking for devices to connect... This may take up to a minute- Once your device has been found, tap 'Next'.
- Rename the device to your desired name and tap 'Update Name'.
- Select the room your device is in and tap 'Add To Group'
text_image
SETUP 1 Kogan Smarter Home vacuum cleaner found and connected Your vacuum cleaner has been added to your Alexa account. Next, we'll help you finish setting up your device. Next
text_image
Rename Device Use the name provided or enter a new name Product Name Skip Update Name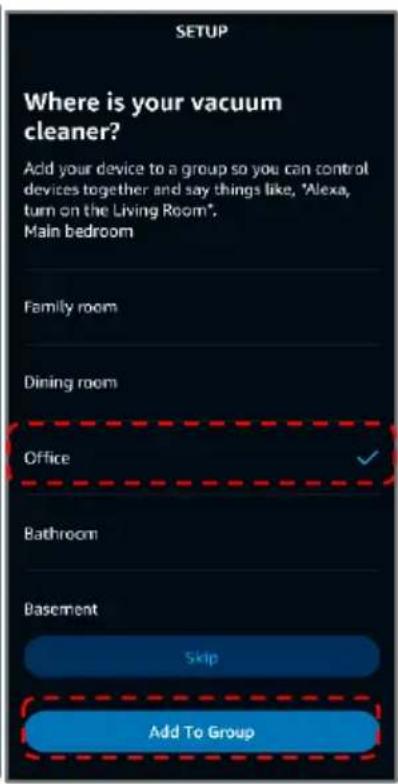
text_image
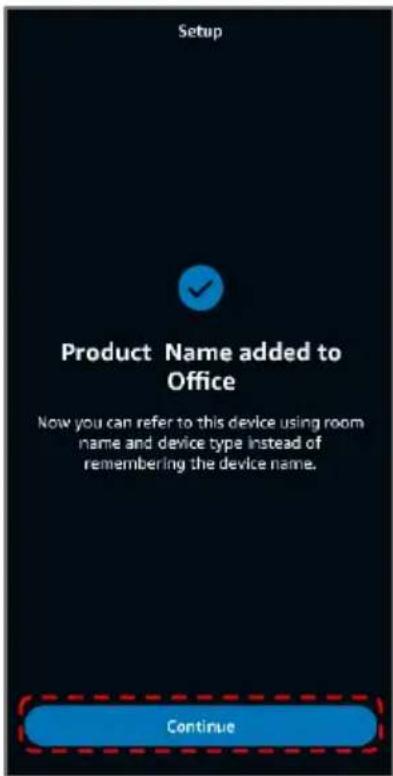
SETUP Where is your vacuum cleaner? Add your device to a group so you can control devices together and say things like, "Alexa, turn on the Living Room". Main bedroom Family room Dining room Office Bathroom Basement Skip Add To Group- Once the device has been successfully added to your desired room, tap 'Continue'.
- You can view and manage your device from the 'Devices' tab.
text_image
Setup Product Name added to Office Now you can refer to this device using room name and device type instead of remembering the device name. Continue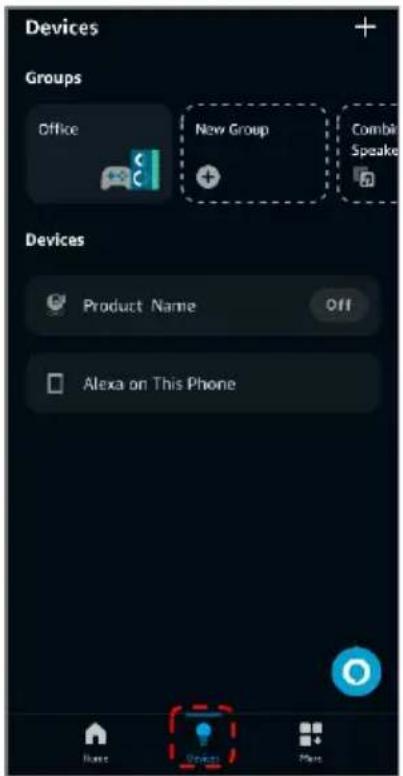
text_image
Devices Groups Office New Group Combi Speaker Devices Product Name Off Alexa on This Phone Base Next MoreOperation
Turn the Heater On/Off
- Connect the heater to an electrical outlet and turn on the main switch: the heater will be in standby (setting, up, down and power buttons illuminate).
- Press the 'Power' button to begin heating operation: the display will show the current ambient temperature.
- Press the 'Power' button to turn the heater off.
Mode Selection
Press the 'Setting' button on the remote and then press the 'Mode Selection' ( ) button to toggle high, low power and standby modes. The respective indicator will be on.
| Model | Mode | Power | Description |
| KASMGPH15YA & KASMGPH15YB | Low (50%) | 750W | The heater's power consumption will be reduced, but it will require a longer time to reach the desired temperature. |
| High (100%) | 1500W | In high power mode, the heater will consume more power, allowing it to reach the desired temperature more quickly. | |
| Standby | 0 | The heater is not currently heating, but a timer can be set to initiate heating. |
| Model | Mode | Power | Description |
| KASMGPH20YA & KASMGPH20YB | Low (50%) | 1000W | The heater's power consumption will be reduced, but it will require a longer time to reach the desired temperature. |
| High (100%) | 2000W | In high power mode, the heater will consume more power, allowing it to reach the desired temperature more quickly. | |
| Standby | 0 | The heater is not currently heating, but a timer can be set to initiate heating. | |
| KASMGPH24YA & KASMGPH24YB | Low (50%) | 1200W | The heater's power consumption will be reduced, but it will require a longer time to reach the desired temperature. |
| High (100%) | 2400W | In high power mode, the heater will consume more power, allowing it to reach the desired temperature more quickly. | |
| Standby | 0 | The heater is not currently heating, but a timer can be set to initiate heating. |
- Pressing the 'Up' (💡) button on the heater during operation will enable High power mode. The indicator will illuminate. To return to standby mode, press the 'Up' (💡) button again. The indicator will turn off.
- Pressing the 'Down' (✅) button on the heater during operation will enable Low power mode. The indicator will illuminate. To return to standby mode press the 'Down' (💡) button again. The indicator will turn off.
Temperature Setting
- Press the 'Setting' button first to enter the temperature setting mode. Use the 'Up' and 'Down' buttons to select the desired temperature (5-45°C).
- The selected temperature will be set when there is no input for 5 seconds.
Timer Setting
- With a timer set, the heater will turn off automatically once the set time has been reached.
- Press the 'Setting' button twice to enter the timer setting mode. Use the 'Up' and 'Down' buttons to select the desired timer (in hours).
- The current timer setting will be accepted when there is no input for 5 seconds.
- If you set the timer when the heater is in standby mode, the heater will switch to high mode when the timer ends.
Child-Lock Function
- In heating mode, press and hold both 'Up' and 'Down' buttons on the display for 3 seconds and the child lock function will be enabled. After 5 seconds, the display will show the ambient temperature.
- To remove the child lock, press and hold both 'Up' and 'Down' buttons on the display for 2 seconds again.
Display Buttons Activation
During operation, the display buttons will not be illuminated. Touch the panel below the display and they will come on.
Switching Temperature Units
Press the 'Setting' button and the 'Up' button at the same time for 10 seconds.
ECO Function (Night Mode)
In this mode the heater will turn off the display and only the heating mode & timer indicators will be shown.
- To enable ECO mode, press and hold the 'Setting' and 'Down' buttons for 3 seconds. Alternatively, press the 'ECO' button on the remote control.
- To turn the display back on, press the 'ECO' button on the remote or touch the display.
Wi-Fi Reset
- During operation, press and hold the 'Setting' button for 5 seconds.
- Wi-Fi will now be reset and the Wi-Fi indicator will be flashing rapidly.
- Connect the heater to the Kogan SmarterHome™ app following the steps from the "Connect to SmarterHome™ App" section of this user guide.
Tip-over switch
Auto turn off function: The product is equipped with tip-over switch, if the heater falls over, place it back upright and restart.
App Interface

text_image
Heating Mode Set Temperature Heating Decrease Temp. Ambient Temp. Increase Temp. Power Mode Timer Setting 43 620 Lock Temp unit conrot Schedule Open window detection Child lock °C/°F Schedule 5.00 17.08 10.07 Power 1.0 1.0 1.0Notes:
- When device is online, it can be controlled.
- When device is offline, it displays 'Offline' and cannot be remotely powered on.
Cleaning & Care
Cleaning the Heater
- Disconnect the power supply to the heater before cleaning.
- Ensure that the heater has been allowed to cool down completely before cleaning.
- Holding both sides of the heater, lift upwards and then pull forwards. The heater requires regular cleaning, to ensure trouble-free operation.
- Use a damp cloth (not wet) to wipe the exterior of the heater to remove dust and dirt.
- Use a vacuum cleaner to remove dust and fluff from around the grilles. Failure to do this may cause discoloration.
- Ensure the heater is dry before connecting back into the power supply.
Power Cord
If the power cord is damaged must be replaced. Cease use immediately and contact help.Kogan.com for support.
Storage
If you do not plan to use the heater for extended periods of time, it is recommended that the heater is cleaned and then stored (preferably in its original packaging) in a cool dry place.
Disposal

natural_image
Symbol of a trash bin with crossed lines indicating no waste or restriction, and a solid black rectangle below (no text or labels)This marking indicates that this appliance should not be disposed with other household wastes. To prevent possible harm to the environment or human health from uncontrolled waste disposal, recycle it responsibly to promote the sustainable reuse of material resources.
Specifications
| Model | KASMGPH15YA & KASMGPH15YB | KASMGPH20YA & KASMGPH20YB | KASMGPH24YA & KASMGPH24YB |
| Rated Power | 1500W | 2000W | 2000-2400W |
| Rated Voltage | 220-240V~50Hz | 220-240V~50Hz | 220-240V~50Hz |
| Dimensions (mm) | 597 x 70 x 400 | 832 x 70 x 400 | 952 x 70 x 400 |
| Battery | 2 x AAA batteries | 2 x AAA batteries | 2 x AAA batteries |
Troubleshooting
| Issue | Cause | Solution |
| Heater does not heat. | Heater is in standby mode. | Ensure the heater is in heating mode. |
| Desired temperature is lower than the ambient temperature. | Set the desired temperature higher (5-45°C). | |
| Heater not pairing to the SmarterHome app. | Wi-Fi function is not activated. | Press and hold the Set button for 3 seconds to activate Wi-Fi. |
| Poor Wi-Fi signal. | Ensure the router, heater and phone are within a 3-5 meter range. | |
| Rattling sound from heating element. | Normal expansion and contraction of metal during heating and cooling. | This is a natural phenomenon and will reduce or stop with continuous use. |
| Touch buttons are not working. | Hands touched the button area during power-on, affecting sensitivity. | Reboot the heater to restore button sensitivity. |
| Child lock is activated. | Unlock the child lock. | |
| Remote control buttons not working. | Remote control battery is low or empty.Incorrect alignment with the heater's receiver. | Replace the battery or check if the remote control is damaged.Operate the remote in the direction of the display panel. |
| Poor heating performance. | Heater is in low power mode. | Set the heater to high power mode. |
| Air inlets/outlets are blocked. | Ensure air inlets and outlets are clear. | |
| Open doors/windows reduce insulation. | Close doors and windows to improve efficiency. | |
| Bad odour during heating. | Protective coating on a new heater emits an odour on initial use. | Ventilate the area and run the heater for 1 hour to dissipate the odour. |
Error Codes
| Error Code | Cause | Solution |
| E1 | The ambient temperature sensor circuit is disconnected (accompanied by 5 beeping sounds). | Contact help.Kogan.com for support. |
| E2 | The ambient temperature sensor is short-circuited (accompanied by 5 beeping sounds). | Contact help.Kogan.com for support. |
| E3 | The heater is near another heat source and the sensor detects an ambient temperature ≥55°C (5 beeping sounds). | Turn off the power and move the heater away from heat sources. |
- To view the cyber security Statement of Compliance, search for the model number at help.kogan.com.
• To report a cyber security vulnerability, visit help.kogan.com/s/product-cybersecurity.
Notes
Need more information?
We hope that this user guide has given you the assistance needed for a simple set-up.
For the most up-to-date guide for your product, as well as any additional assistance you may require, head online to help.Kogan.com.
kogan.com