SWKG 3000 A1 - Kettle SILVERCREST - Free user manual and instructions
Find the device manual for free SWKG 3000 A1 SILVERCREST in PDF.

User questions about SWKG 3000 A1 SILVERCREST
0 question about this device. Answer the ones you know or ask your own.
Ask a new question about this device
Download the instructions for your Kettle in PDF format for free! Find your manual SWKG 3000 A1 - SILVERCREST and take your electronic device back in hand. On this page are published all the documents necessary for the use of your device. SWKG 3000 A1 by SILVERCREST.
USER MANUAL SWKG 3000 A1 SILVERCREST
GB Electric Kettle
IE Operating instructions
CONTENT
PAGE
| Intended use | 2 |
| Technical Data | 2 |
| Items supplied | 2 |
| Safety information | 2 |
| Operating Elements | 3 |
| Commissioning | 3 |
| Boiling water | 3 |
| Cleaning and Care | 4 |
| Storage | 5 |
| Disposal | 5 |
| Warranty and Service | 5 |
| Importer | 6 |
Read these operating instructions carefully before using the appliance for the first time and preserve this maul for later reference. Pass this manual on to whoever might acquire the appliance at a future date.
Intended use
This appliance is intended for the boiling-up of water in domestic households. It is not intended for use with other liquids or for commercial use.
Technical Data
Voltage: 220 - 240 V ~ / 50 Hz
Power consumption :2500 - 3000 W
Volume: max. 1.7 l
min. 0.251
① In older electrical installations, the building fuse (12A) may be triggered due to the high power consumption.
Items supplied
Electric kettle
Base
Operating instructions
Check the items supplied for totality directly after unpacking the carton.
Remove all packaging material.
Safety information
To avoid potentially fatal injury through electric shock:
-
Ensure that the base with the electrical connections does not come into contact with water! If it has unintentionally come into contact with water, first allow it to dry out completely before taking it into use.
-
Only use the water boiler with the supplied base.
- Ensure that the power cable never becomes wet or damp during operation. Lay the cable so that it cannot be trapped or otherwise damaged.
- Arrange for defective power plugs and/or cables to be replaced at once by qualified technicians or our Customer Service Department.
Always remove the plug from the power socket after use. Simply switching the appliance off is not sufficient, as the appliance is under power for as long as the plug is connected to the socket.
To avoid burns and other injuries:
Always heat water with the lid closed, otherwise the automatic cut-out may not function. Boiling water could then spray out over the rim.
- Hot steam clouds may be released. The boiler also becomes very hot during operation. Wear oven mitts.
- Ensure that the appliance is standing securely and vertically before switching it on. Boiling water can cause an unstable kettle to fall over.
Exercise caution with the glass carafe. Shattered glass can cause serious cut injuries.
- This appliance is not intended for use by individuals (including children) with restricted physical, physiological or intellectual abilities or deficiencies in experience and/or knowledge unless they are supervised by a person responsible for their safety or receive from this person instruction in how the appliance is to be used.
Children should be supervised to ensure that they do not play with the appliance.
- Do not use an external timing switch or a separate remote control system to operate the appliance.
You can thus prevent the appliance from being damaged:
- Under NO circumstances should you fill the carafe with cold water immediately after boiling water. This could create tensions in the glass that would cause it to shatter!
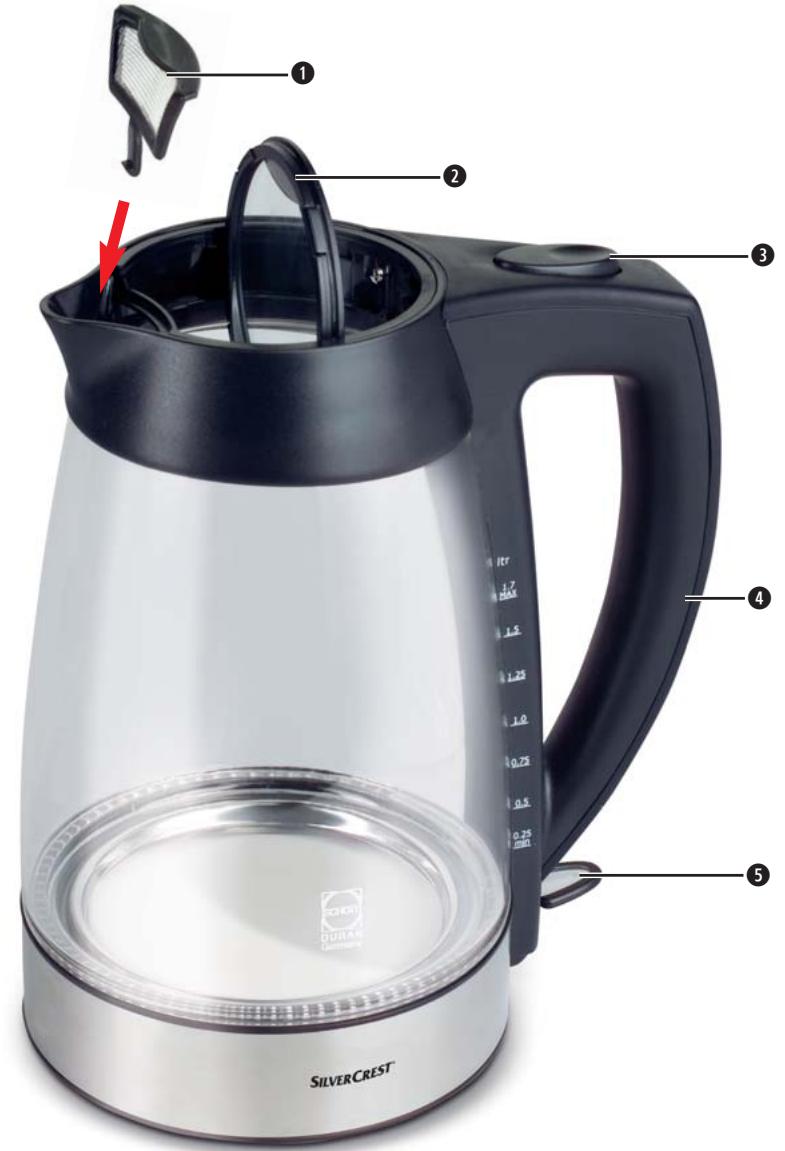
Operating Elements
1 Pouring sieve
Lid
3 Release button
4 Handle
On/Off switch
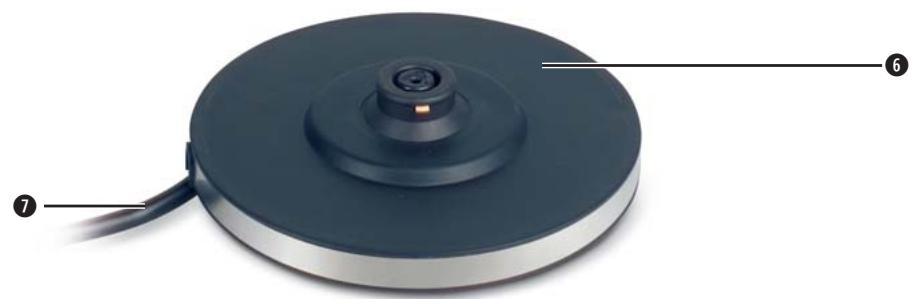
6 Base
Power cable
Commissioning
Attention
Always and only use freshly drawn mains water in the water boiler! Do not drink water that is not specifically designated as drinking water. Otherwise, there is a risk of sever damage to your health!
Before taking the appliance into use, check to ensure that ...
- the appliance itself, the plug and the power cable
- are in a serviceable condition, and...
- the power cable ① has been completely unwound from the retainer under the base of the appliance, and...
- all packaging materials have been removed from the appliance.
- Fill the appliance with water up to the MAX marking and let it come to a full boil once - as described in the next section.
After it has boiled, pour this water away.
- Rinse the appliance with freshly drawn water.
- Fill the appliance once again with water up to the MAX marking on the scale and then bring it to the boil. When done, pour this water away also.
The appliance is now ready for use.
Boiling water
Danger
NEVER place the electrical base 6 adjacent to water - a potentially fatal risk!
① Notice
Always use freshly drawn water. Do not consume any water that has already stood in the water boiler for longer than one hour. Do not reboil water that has cooled down. Always pour old water away. Microbes could have formed in it!
- Lift the kettle off of the base when filling it!
- Open the lid ② by pressing down on the release button ③.
- Hold the carafe upright while filling it. Only in this way can you correctly read the markings. Fill the carafe...
- at least to the MIN mark, so that the appliance does not overheat,
- no higher than the MAX mark, so that no boiling water spills out.
- First close the lid 2...
and then place the carafe on the base 6, such that it is standing absolutely upright on the base 6. - Now insert the plug into the power socket.
- Press the ON/OFF switch ⑤ down until it engages.
- The integrated blue control lamp in the carafe indicates that the appliance is now heating the water up.
- The appliance switches itself off, and the blue control lamps goes out as soon as the water is on the boil. The ON/OFF switch ⑤ springs out.
Warning
Remove the power plug from the wall socket before you take the kettle from the base ⑥. This prevents causing a potential short circuit by water possibly spilling out of the carafe and falling onto live electrical connections in the base ⑥.
Injury hazard
For safety reasons, the lid 2 should not be opened while the water is boiling or is very hot. There is a risk of receiving severe scalds.
Cleaning and Care
Danger
Do not open any part of the housing. There are no user-servicable elements inside. An open housing can create the risk of a lethal electrical shock.

Never submerge any parts of the appliance in water or other liquids! This can create the risk of a life-threatening electrical shock if residual liquid comes into contact with powered components.
Before cleaning the appliance, ....
- first, remove the plug from the power socket and allow the appliance to cool down completely.
- Clean the exterior surfaces and the power cable ⑦ with a slightly damp cloth. Be sure to dry the appliance well before taking it back into use.
- Never use detergents, abrasive cleaners or solvents. These can damage the appliance.
In the event of scale deposits:
- Before descending, remove the pourer sieve (see chapter "Removing/replacing the pouring sieve").
-
Obtain any decalcifying agent suitable for kitchen utensils (e.g. decalcifiers for coffee machines) from a hardware shop. Proceed as detailed in the instructions provided for the use of the decalcifying agent.
-
For cleaning the stainless steel container bottom you can use a suitable product from a specialist dealer.
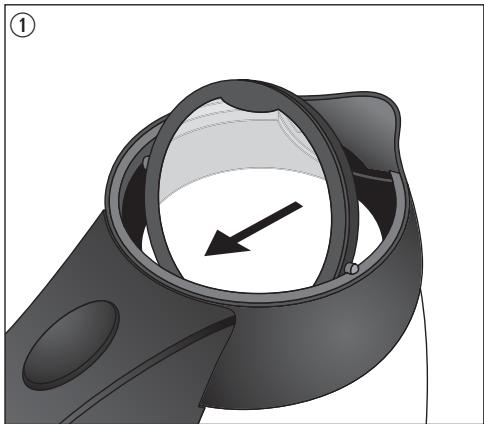
Removing the lid
To make the cleaning of the appliance interior easier, you can remove the lid ②:
- Open the lid ②.
- Press the lid ②, as shown in the diagramme, to the rear ①.
- You can then pull out the hinge and lift out the lid ②, as shown in the diagramme ②.
- On reassembly, ensure that the lid ② is put in the correct way round. The thickening at the frame of the lid ② must point upwards when it is being replaced, and also the level surface of the frame to the handle ④. Otherwise, the lid ② cannot be closed!

Removing/replacing the pouring sieve
- Open the lid ②.
- Press from the inside against the pouring sieve ① and at the same time push it upwards.
- Clean the pouring sieve ① with a lightly moistened dishcloth and under running water.
After cleaning, insert the pouring sieve 1 from above and press it firmly into place. Ensure that the bar on the pourer sieve 1 is gripped in the guide rail. - Should the scale deposits in the pourer sieve ① be firmly settled, lay it in a water-vinegar solution, with a ratio of 6:1, for a few hours. The scale deposits will dissolve themselves. Rinse the pourer sieve ① with lots of clear water.
Storage
Allow the appliance to cool off completely before putting it into storage.
- Wind the power cable ① around the holder on the bottom of the appliance.
- Store the appliance in a dry place.
Disposal

Do not dispose of the appliance in your normal domestic waste. This product is subject to the European guideline 2002/96/EC.
Dispose of the appliance through an approved disposal centre or at your community waste facility. Observe the currently applicable regulations. In case of doubt, please contact your waste disposal centre.

Dispose of the packaging materials in an environmentally responsible manner.
Warranty and Service
The warranty for this appliance is for 3 years from the date of purchase. The appliance has been manufactured with care and meticulously examined before delivery. Please retain your receipt as proof of purchase. In the event of a warranty claim, please make contact by telephone with our Service Department. Only in this way can a post-free despatch for your goods be assured.
The warranty covers only claims for material and manufacturing defects, but not for transport damage, for wearing parts or for damage to fragile components, e.g. buttons or batteries. This product is for private use only and is not intended for commercial use. The warranty is void in the case of abusive and improper handling, use of force and internal tampering not carried out by our authorized service branch. Your statutory rights are not restricted in any way by this warranty.
The warranty period will not be extended by repairs made under warranty. This applies also to replaced and repaired parts. Any damage and defects extant on purchase must be reported immediately after unpacking the appliance, at the latest, two days after the purchase date. Repairs made after the expiration of the warranty period are subject to payment.
GB DES UK LTD
Tel.: 0871 5000 700 (£ 0.10 / minute)
e-mail: support.uk@kompernass.com
IE Kompernass Service Ireland
Tel: 1850 930 412 (0,082 EUR/Min.)
Standard call rates apply. Mobile operators may vary. e-mail: support.ie@kompernass.com
Importer
KOMPERNASS GMBH
BURGSTRASSE 21
D-44867 BOCHUM, GERMANY
www.kompernass.com