KAMN40XQUCLA - Suivi Kogan - Free user manual and instructions
Find the device manual for free KAMN40XQUCLA Kogan in PDF.

User questions about KAMN40XQUCLA Kogan
0 question about this device. Answer the ones you know or ask your own.
Ask a new question about this device
Download the instructions for your Suivi in PDF format for free! Find your manual KAMN40XQUCLA - Kogan and take your electronic device back in hand. On this page are published all the documents necessary for the use of your device. KAMN40XQUCLA by Kogan.
USER MANUAL KAMN40XQUCLA Kogan
natural_image
Modern monitor with three tripod stand, no visible text or symbols on the screen or legs40" WQHD IPS ULTRAWIDE HDR GAMING MONITOR
3440 X 1440, 144HZ
KAMN40XQUCLA
Safety & warnings 3
Components 4
Overview 5
Stand assembly 7
VESA mount assembly 8
Connectivity 9
Settings 12
Specifications 18
SAFETY & WARNINGS
- Read all instructions before using the appliance and retain for reference.
- Do not open the back panel of the monitor, as it contains a high-voltage current even when not plugged in.
- Avoid placing the monitor near heaters, stoves, fireplaces or other sources of heat, as well as in rooms lacking adequate ventilation.
- Do not place heavy objects on the monitor, its power cord or any connected cable.
- Unplug the monitor if it is not going to be used for an extended period.
- This monitor is designed with ventilation holes on the back of the casing. Do not cover or block them.
- Do not insert any object or spray any liquid into the vents.
- Do not position the monitor in unsafe locations. If the monitor falls, it may be damaged and may injure nearby people.
- Unplug the monitor before cleaning it.
- Use a clean, slightly dampened cloth to wipe the main monitor body.
- To clean the screen: turn it off, unplug it and wait for it to cool completely, then wife it with a dry microfibre cloth.
- Do not use cleaning alcohol, ammonia-based liquids or other harsh cleaners.

HIGH-DEFINITION MULTIMEDIA INTERFACE
The terms HDMI and HDMI High-Definition Multimedia Interface and the HDMI Logo are trademarks or registered trademarks of HDMI Licensing Administrator, Inc. in the United States and other countries.
COMPONENTS

natural_image
Empty rectangular frame with black border and small dot at bottom (no text or symbols)A 40" Ultrawide Monitor (x1)

B Stand stem (x1)

natural_image
Simple line drawing of a tripod-like tool or clamp (no text or symbols)C Stand base (x1)

text_image
15mmD 15mm screws (x3)

natural_image
Simple circular diagram with four inward-pointing rings and corner brackets (no text or symbols)E VESA adapter (x1)

text_image
16mmF 16mm VESA screws (x4)

natural_image
Simple line drawing of a coiled electrical plug (no text or symbols)G Power cable (x1)

natural_image
Pure diagram of two connected USB connectors without any text or symbolsH DisplayPort cable (x1)
natural_image
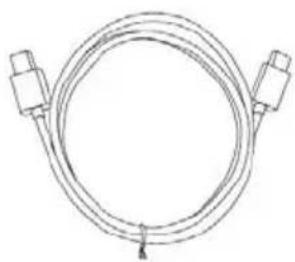
Simple line drawing of a coiled cable with two connectors (no text or symbols)I Type-C USB cable (x1)
text_image
USER GUIDE kogan.com 40° WQHD IPS ULTRAWIDE HDR GAMING MONITORJ User guide (x1)
OVERVIEW
Controls

text_image
Technical diagram of a mechanical component with labeled parts and an inset showing five numbered connection points.1 Left button (scene mode switching)
2 ▼ Down button (LED effects)
3 ▶ Right button (main menu)
4 ⏻ Power On/Off
5 Up button (display crosshairs)
Ports

text_image
HDMI 2 HDMI1 DP Type C AUDIO AC N 6 7 8 9 106 HDMI port
9 Audio out (3.15mm) port
7 DisplayPort port
10 AC power input
8 Type-C USB port
Indicator Light

text_image
Indicator light| Light | Status |
| Solid blue | Power is on and the monitor is operating normally. |
| Flashing red | No video source.no horizontal or vertical signal has been detected.Please ensure your computer is on and all video cables are fully inserted and/or connected. |
STAND ASSEMBLY
Step 1: Attach the Stand stem (B) to the Stand base (C) with x3 15mm screws (D). Use a screwdriver (not supplied) to secure the screws.

text_image
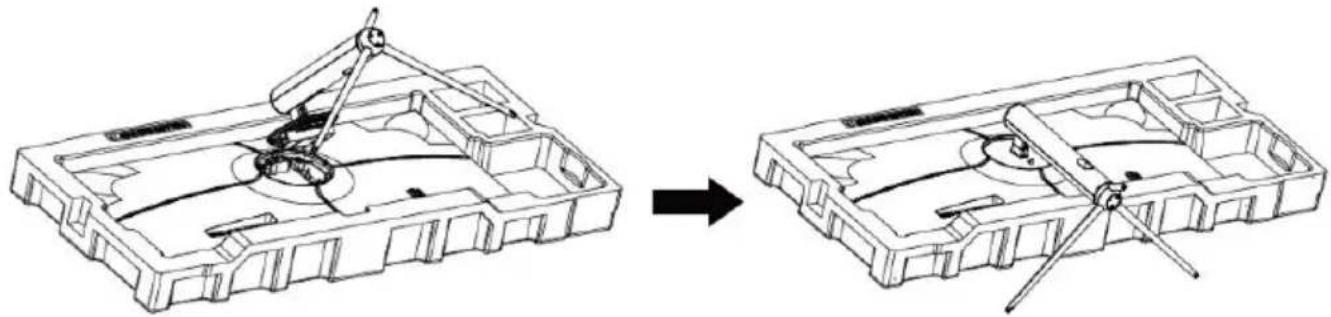
Stem Screws (15mm x 3) BaseStep 2: Place the monitor (A) face down on the flat foam. Insert the stand assembly to the back of the monitor.
natural_image
Technical line drawing showing a mechanical assembly before and after modification (no text or symbols)Step 3: Use both hands to stand the assembled monitor on a flat desktop.
natural_image
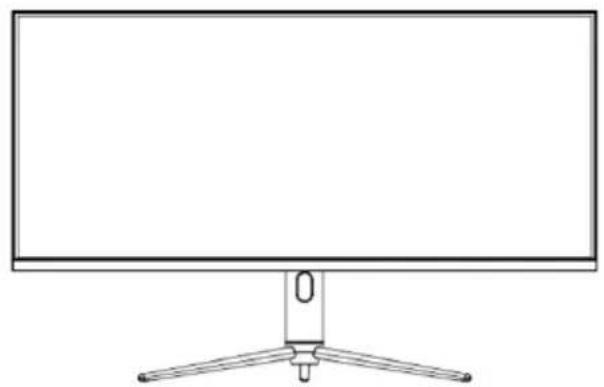
Line drawing of a flat-screen monitor with three tripod legs (no text or symbols)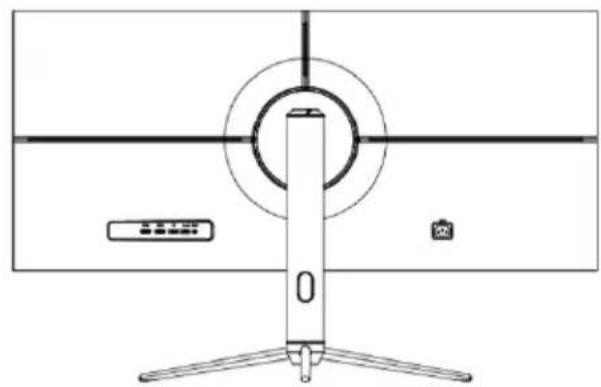
natural_image
Top-down line drawing of a monitor with a central vertical stand and two small icons on the sides (no text or symbols)VESA MOUNT ASSEMBLY
Step 1: Remove the monitor from the packaging, keeping the protective foam attached. Gently place it face-down on a flat surface and remove the upper foam.
natural_image
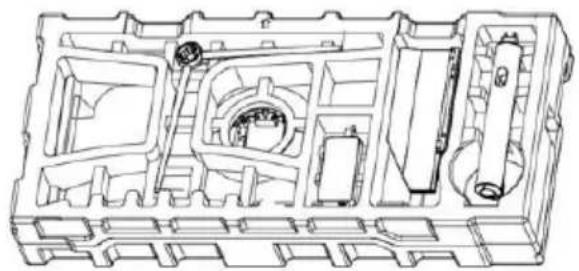
Technical line drawing of a mechanical housing or enclosure with internal components (no text or symbols)
text_image
40MM EPS BOTTOM 高亮电源 油Step 2: Place the VESA adapter (E) over the opening at the back of the monitor. Using a screwdriver, secure the VESA adapter to the monitor with x4 16mm screws (F).

text_image
VESA adapter PM4*16mm VESA screws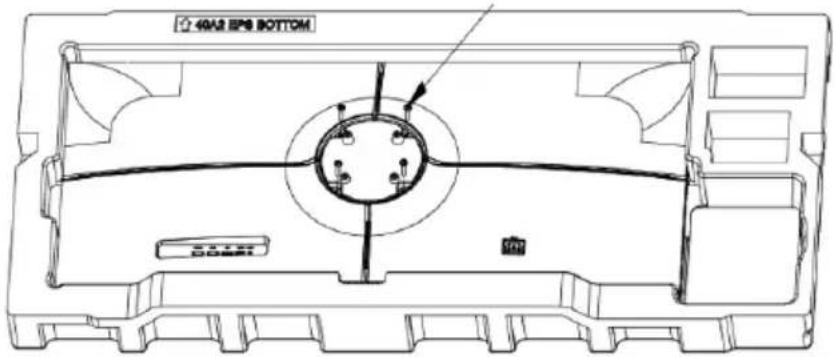
text_image
40A2 EPS BOTTOM 50mmStep 3: The monitor is now ready to be attached to a wall-mounting bracket or monitor mount (not supplied). For wall mounting instructions, follow the user guide supplied with the wall mount.
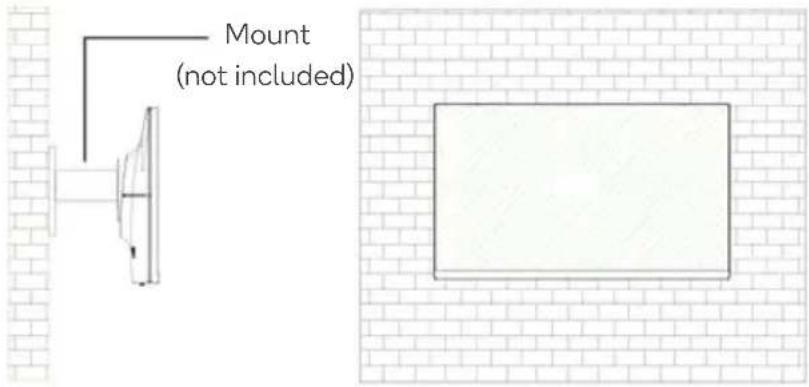
text_image
Mount (not included)Note:
Wall mount or mounting accessories are not included.
CONNECTIVITY
Power input
Connect the included power cable (G) to the power input, then plug the other end into a wall outlet and turn on.
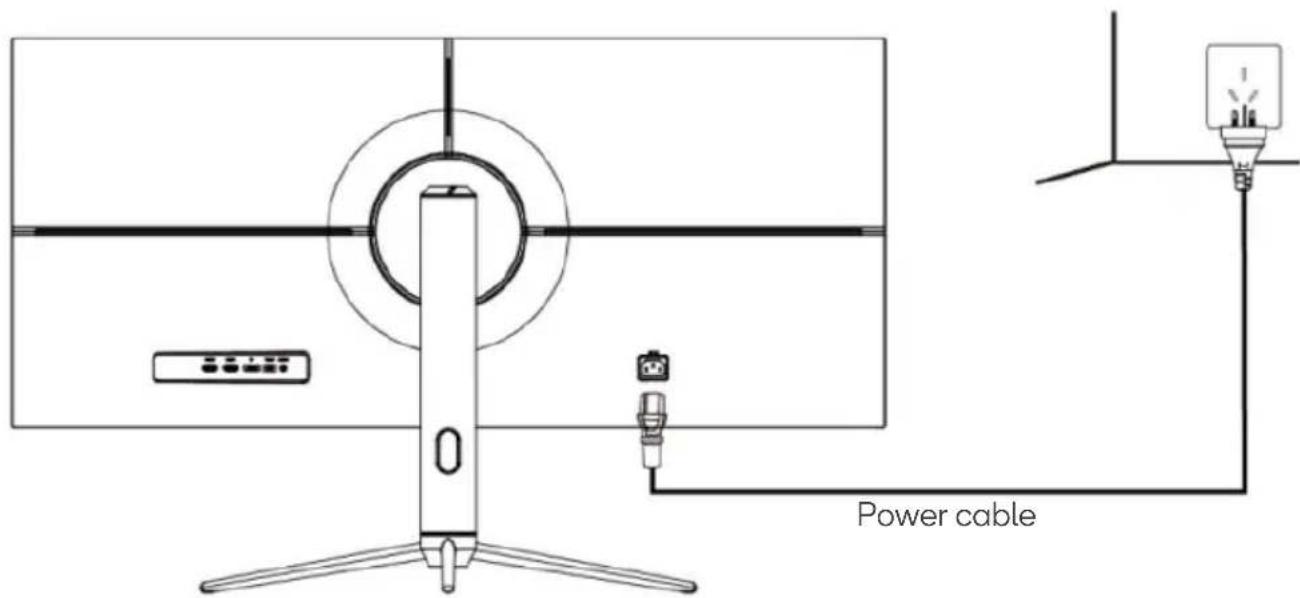
text_image
Power cableDisplayPort connection
For the monitor to receive DisplayPort signals from the computer, use the supplied DisplayPort cable (H) to connect the monitor to the computer.

text_image
DisplayPort port (monitor) DP cable (included) DisplayPort output (computer)HDMI connection
For the monitor to receive HDMI signals from the computer, use an HDMI cable (not supplied) to connect the monitor to the computer.
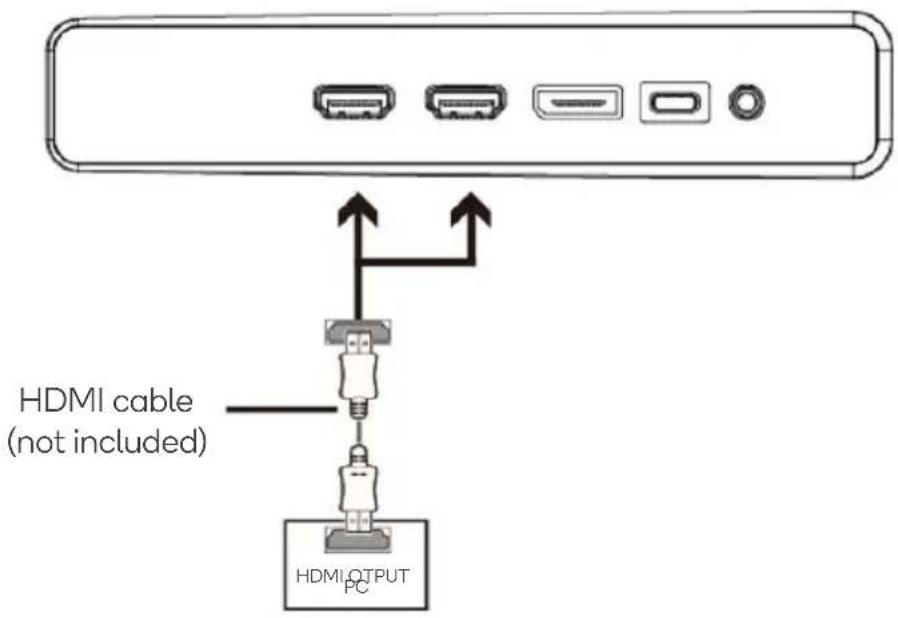
text_image
HDMI cable (not included) HDMILOTPUT PCType-C USB connection
Connect to this monitor from your compatible computer using a Type-C USB cable (included) to receive a high-quality digital video signal.
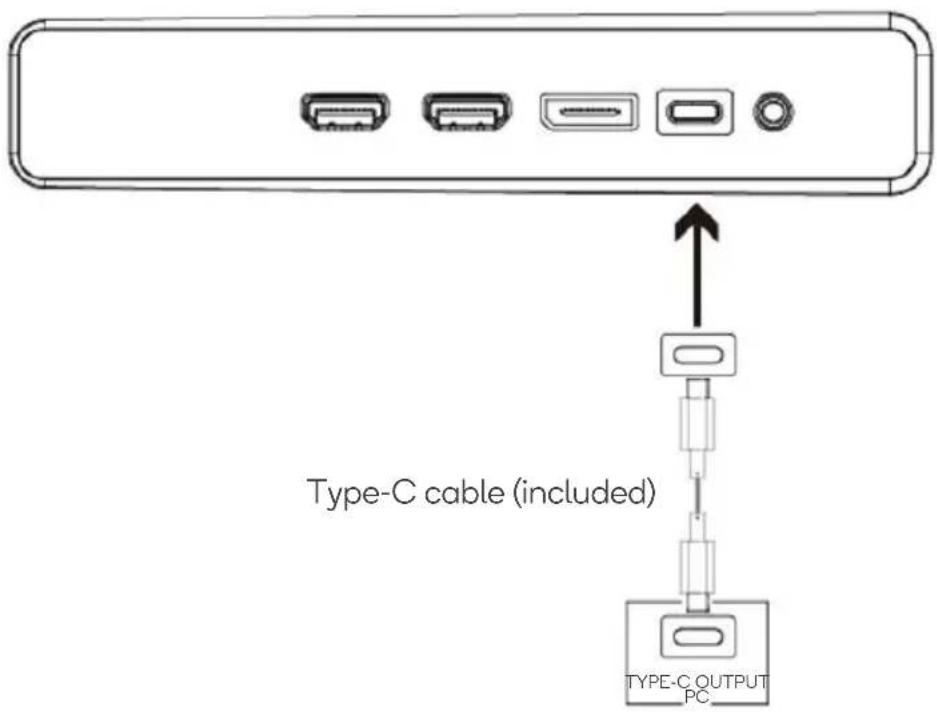
text_image
Type-C cable (included) TYPE-C OUTPUT PCEarphones
Plug in your earphones to receive audio signals from your monitor. If your earphones are connected to the monitor and audio devices are connected to your computer the same time, the audio devices will not produce sound. Earphones and other audio devices not included.
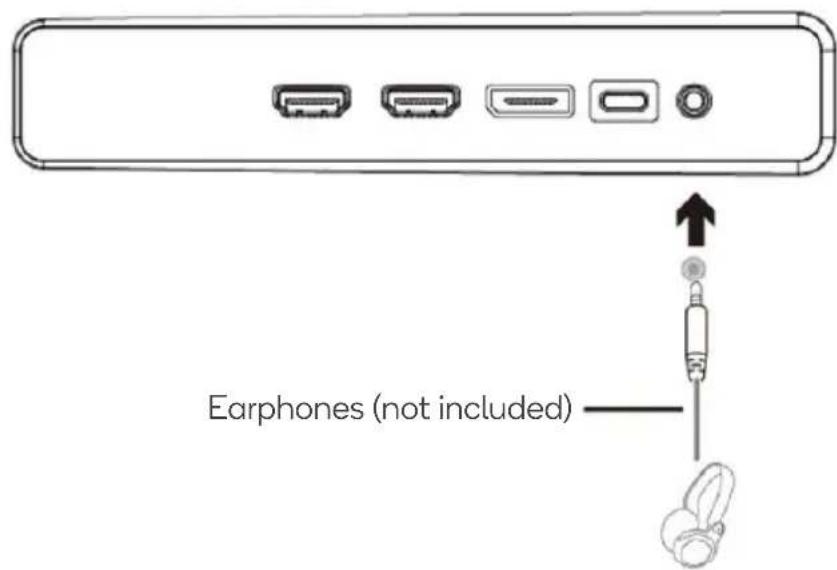
text_image
Earphones (not included)SETTINGS
To open the On-Screen Display (OSD) menu, press the right button (▶ / ○) while the monitor is powered on. Here you will find all adjustable options for your monitor's settings.
When using the monitor for the first time, settings will automatically adjust to optimal settings according to your computer's configuration.
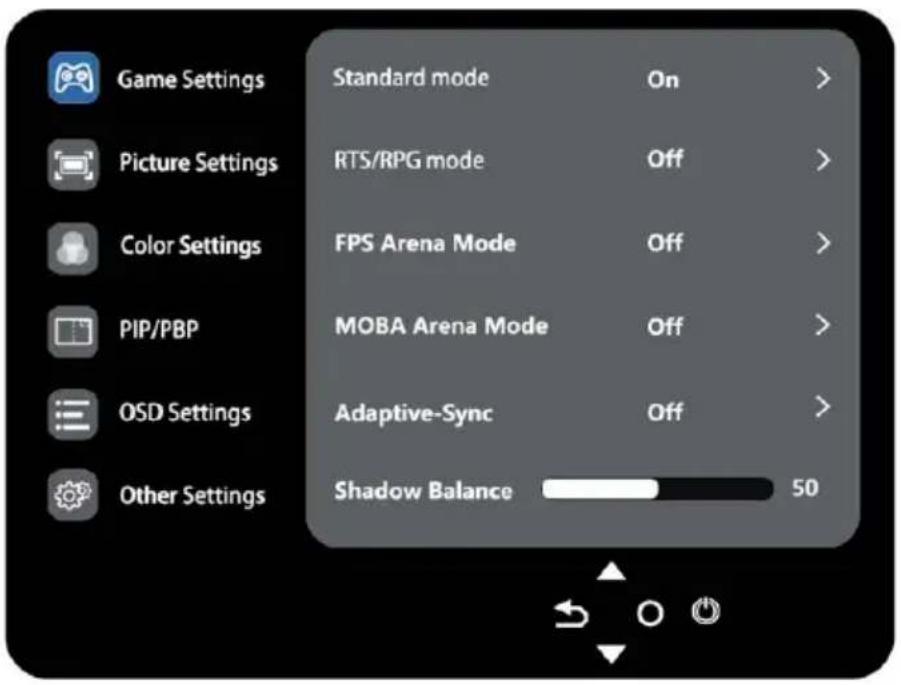
text_image
Game Settings Picture Settings Color Settings PIP/PBP OSD Settings Other Settings Standard mode On > RTS/RPG mode Off > FPS Arena Mode Off > MOBA Arena Mode Off > Adaptive-Sync Off > Shadow Balance 50Press up and down buttons (▼ and ▲) to browse functions.
Select the desired function and press right button (▶ / ○) to enter the submenu.
Press ▼ or ▲ to browse the submenu and then press right button (▶ / ○) to confirm the selection of the desired function.
Press ▼ or ▲ to select an option, then press right button (▶ / ○) to confirm the settings and exit the current menu.
Press left button (◀/◀) to exit the menu interface.
Note:
Ambient lighting adjustments are not available in this model.
List of Functions
| Main Menu | Sub-Menu | Options | Description |
| Game Settings | Standard Mode | On, Off | Turn the game standard mode on/off |
| RTS/RPG Mode | On, Off | Turn the game RTS/RPG mode on/off | |
| FPS Arena Mode | On, Off | Turn the game FPS arena mode on/off | |
| MOBA Arena Mode | On, Off | Turn the game MOBA arena mode on/off | |
| Adaptive-Sync | On, Off | Turn the Adaptive-Sync function on/off | |
| Shadow Balance | 0~100 | Adjust the Shadow balance of the monitor | |
| Response Time | OFF, Normal, Fast, Ultrafast | Adjust response time | |
| Refresh Rate | On, Off, Position (Top Right, Top Left, Bottom Right, Bottom Left) | Turn the Refresh Rate function on/off | |
| Game Crosshair | Off, Crosshair 1, Crosshair 2, Crosshair 3, Crosshair 4, Crosshair 5, Crosshair 6 | Set the game crosshairs | |
| Game Time | Off, 15:00, 30:00, 45:00, 60:00, Position (Top Right, Top Left, Bottom Right, Bottom Left) | Adjust Game Time | |
| Dynamic Brightness | Off, Normal, Expert, Elaboration | Adjust display dynamic brightness | |
| HDR | Off, HDR Standard, HDR Movie, HDR RTS/RPG, HDR FPS | Adjust the HDR mode | |
| MPRT | On, Off | Moving Picture Response Time | |
| Ambient Lighting | N/A | Not applicable for this model | |
| Physical Super View | On, Off, Position | Set the physical super view | |
| Picture Settings | Brightness | 0~100 | Adjust display brightness |
| Contrast | 0~100 | Adjust display contrast | |
| DCR | On, Off | Turn the DCR function on/off | |
| Contextual Model | Off, Movie Mode, Reading Mode, Night Mode, Care Eyes Mode | Adjust display Contextual model | |
| Low Blue Light | 0~100 | Set blue light filtering level | |
| Sharpness | 0~100 | Set display sharpness | |
| Gamma | 1.8, 2.0, 2.2, 2.4, 2.6, S. curve | Set Gamma add-in | |
| Aspect Ratio | Wide Screen, 1:1, 4:3, Auto | Select on-screen aspect ratio | |
| Colour Settings | Warm | On, Off | Turn on/off warm colours temperature |
| Cool | On, Off | Turn on/off cool colours temperature | |
| User 1 | On, Off | Turn on/off user 1 colours temperature | |
| User 2 | On, Off | Turn on/off user 2 colours temperature | |
| User 3 | On, Off | Turn on/off user 3 colours temperature | |
| Hue | R, G, B, C, M, Y | Adjust hue levels | |
| Saturation | R, G, B, C, M, Y | Adjust saturation levels | |
| PIP/PBP | PIP/PBP Mode | Off, PIP Mode, PBP 2Win 1:1, PBP 2Win 2:1, PBP 2Win 1:2 | Swap the PIP/PBP mode |
| Sub-Signal Source | Auto, Type-C, DP, HDMI 1, HDMI 2 | Select audio signal input via HDMI or DP or Type-C | |
| Audio Source | Type-C, DP, HDMI 1, HDMI 2 | Select audio signal input via HDMI or DP or Type-C | |
| PIP Position | Top Right, Top Left, Bottom Right, Bottom Left | Freely adjust the sub-screen position. | |
| PIP Size | Small, Medium, Large | Resize the PIP window | |
| Window Swap | NONE | Main and sub screen channel swap | |
| OSD Settings | Language | English, 简体中文, 한국어, بيرع, Portugues do Brasil, Deutsch, Nederland, Suomi, Français, Елляnu İкá, Indonesia, Italiano, 日本語, Malaysia, Polskie, Português Русский, Español İну, Українська, Tiếng Việt, 繁體中文, Türkçe | Set OSD language |
| OSD Time Out | 5~100 | Set how long the OSD stays on | |
| OSD H-Position | 0~100 | Adjust the OSD's horizontal position | |
| OSD V-Position | 0~100 | Adjust the OSD's vertical position | |
| OSD Transparency | 0~5 | Set the OSD's overall transparency | |
| OSD Rotation | Normal, 90, 180, 270 | When the user flips the display, this function can also flip the OSD to achieve the best display angle | |
| OSD Lock | On, Off | Turn on/off the OSD lock | |
| Hotkey1 Setting | Brightness, Contrast, Volume, Mute, Shadow Balance, Game Crosshair, Refresh Rate, Game Time, Contextual Model, PIP/PBP Mode, Input Signal, Dynamic Brightness, Physical Super View, HDR, *Ambient Lighting | Adjust Hotkey1, 2, 3 Setting | |
| Hotkey2 Setting | |||
| Hotkey3 Setting |
* Ambient lighting settings are not applicable for this model.
| Other Settings | Input Signal | Auto, Type-C, DP, HDMI 1, HDMI 2, Auto | Switch display signal input |
| Volume | 0~100 | Adjust audio volume | |
| Mute | On, Off | Turn mute mode on/off | |
| Auto Power | On, Off | Turn Auto power mode on/off | |
| Eye shield Remind | On, Off | Turn Eye shield Remind mode on/off | |
| Reset | No | Reset monitor configurations | |
| Information | Input Source, Resolution, Mode, HDR Ver, SN | Display part of the monitor information. |
SPECIFICATIONS
| Screen Size | 40" |
| Aspect Ratio | 21:9 |
| Backlight | E-LED |
| Brightness | 400 cd/m ^2 (Typ.) / 400 cd/m ^2 (Min.) |
| Panel | IPS |
| Resolution | 3440 x 1440 |
| Refresh Rate | 144 Hz |
| Response Time | OD 5ms |
| Viewing Angle | ≥ 178° (H) / 178° (V) |
| Contrast Ratio | 1200 : 1 |
| VESA Mounting | 75 x 75 |
| Colours | 16.7 M |
| Adaptive-Sync | YES |
| Signal Input | DP1.4 (x1), HDMI2.0 (x2), USB Type-C (x1) |
| Power | AC 100-240V~ 50/60Hz 3.0A |
| Audio | |
| Built-in speakers | YES |
| Audio out | YES |
| Additional Functions | |
| Low Blue Light | YES |
| Physical Dimensions | |
| Dimensions (with stand) | 944.1 x 596.4 x 286.8 (mm) |
| Dimensions (without stand) | 944.1 x 418.3 x 82.4 (mm) |
| Net Weight | 10.98 kg |
| Gross Weight | 14.38 kg |
Need more information?
We hope that this user guide has given you the assistance needed for a simple set-up.
For the most up-to-date guide for your product, as well as any additional assistance you may require, head online to help.kogan.com
kogan.com