
KAMN32F16PB - Tracking Kogan - Free user manual and instructions
Find the device manual for free KAMN32F16PB Kogan in PDF.


| Product Type | Curved Monitor |
| Model | KAMN32F16PB |
| Screen Size | 31.5 inches |
| Resolution | 1920 x 1080 (Full HD) |
| Refresh Rate | 165Hz |
| Panel Curvature | Curved (curvature not specified, assume 1500R or similar) |
| Adaptive Sync | FreeSync |
| Connectivity | 2 x HDMI, 1 x DisplayPort, 1 x Audio Out (3.5mm) |
| Power Input | 19V 3.42A (external adapter) |
| Power Consumption (Normal) | ≤ 65W |
| Power Consumption (Standby) | ≤ 0.5W |
| Working Temperature | 0°C to 40°C |
| Storage Temperature | -10°C to 60°C |
| Working Humidity | 20% to 85% |
| Storage Humidity | 10% to 90% |
| VESA Mount | Not specified, likely 100x100mm (assumed) |
| Safety Features | Ventilation holes, do not cover; high-voltage warning; polariser layer |
| Included Accessories | Power adapter, power cord, HDMI cable, user guide, warranty card |
| Earphone Jack | Yes, 3.5mm audio out |
Frequently Asked Questions - KAMN32F16PB Kogan
User questions about KAMN32F16PB Kogan
0 question about this device. Answer the ones you know or ask your own.
Ask a new question about this device
Download the instructions for your Tracking in PDF format for free! Find your manual KAMN32F16PB - Kogan and take your electronic device back in hand. On this page are published all the documents necessary for the use of your device. KAMN32F16PB by Kogan.
USER MANUAL KAMN32F16PB Kogan
natural_image
Curved black-and-white monitor displaying a fantasy, horned monster with green eyes and claws against a dark purple night sky (no text or symbols visible)32" CURVED FULL HD 165HZ FREESYNC MONITOR
1920 x 1080
KAMN32F16PB
SAFETY & WARNINGS
- Read all instructions before using this monitor and retain this user guide for future reference.
- This monitor is designed with ventilation holes on the back of the casing. Do not cover or block them.
- Do not insert any object or spray any liquid into the vents.
- Avoid placing the monitor near heaters, stoves, fireplaces or other sources of heat, as well as in rooms lacking adequate ventilation.
- Do not position the monitor in unsafe locations. If the monitor falls, it may be damaged and may injure nearby people.
• Unplug the monitor if it is not going to be used for an extended period. - Do not place heavy objects on the monitor, its power cord or any connected cable.
- Do not open the back panel of the monitor as it contains a high-voltage current even when not plugged in.
- There is a polariser layer (not a protective film) on the surface of the screen. Do not peel it off or the monitor may be damaged.

HIGH-DEFINITION MULTIMEDIA INTERFACE
The terms HDMI and HDMI High-Definition Multimedia Interface and the HDMI logo are trademarks or registered trademarks of HDMI Licensing Administrator, Inc. in the United States and other countries.
COMPONENTS
Monitor (including base)
Power cord
Power adapter
HDMI cable
User guide
Warranty card
OVERVIEW

1 Power button
2 Power input port
3 HDMI port
4 HDMI port
5 DisplayPort
6 Audio in (3.5mm)
ASSEMBLY
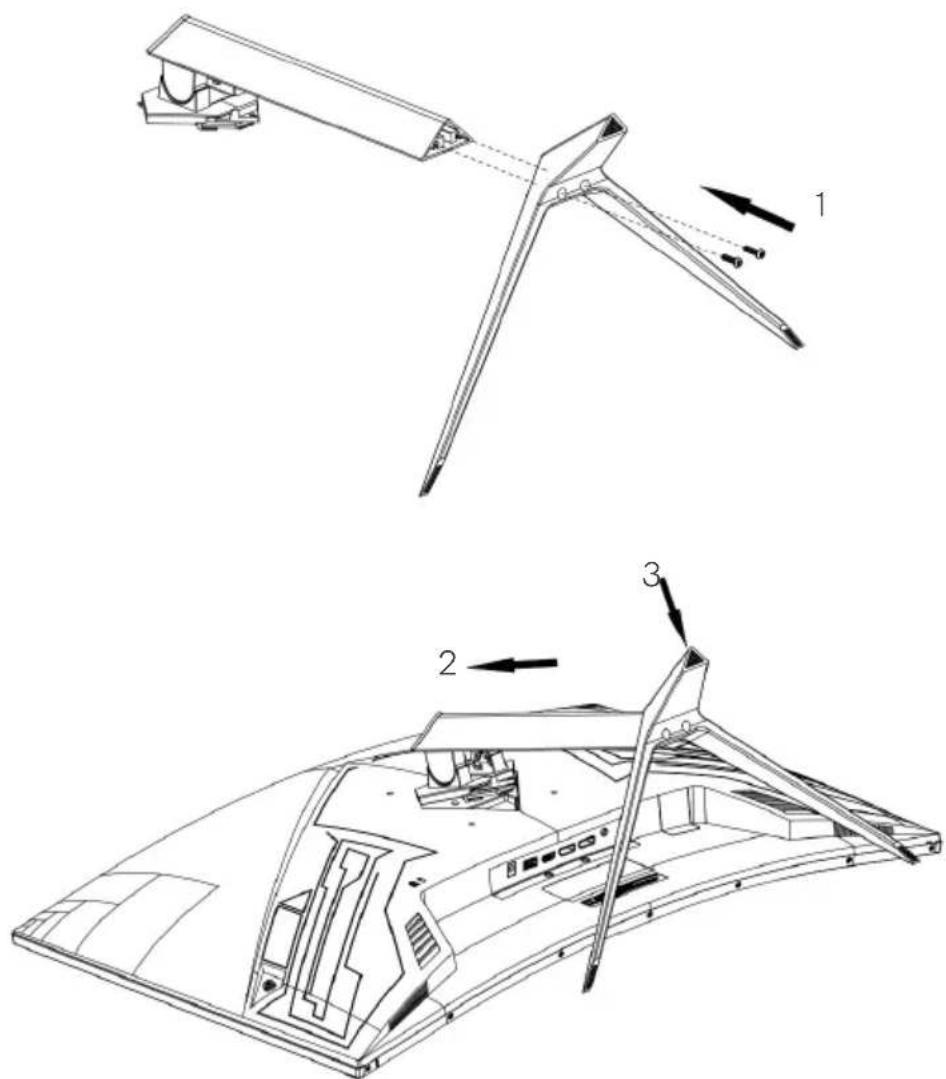
Base installation
- Attach the stand base to the stand arm with using the x2 M4x16 screws
- Attach the assembled stand into the rear of the monitor as shown below.
- Rotate the stand clockwise and downwards to install it.
Removing the base
-
Push the slider on the rear cover.
-
Rotate the stand counter-clockwise.
-
Pull the stand away from the monitor in the direction of the arrow.

Tips:
- If you need to remove the stand, first place the monitor face down in the original packaging protection material to avoid screen damage.
- For a base with quick disassembly and assembly functions, press the release button to remove the base in the reverse operation.
INSTALLATION
Display installation
• This monitor should be installed adjacent to an easily luggable electrical outlet.
- To ensure safety, this monitor must always be mounted using the stand or a wall bracket (not supplied).
- In order to prevent injury, this monitor must be placed on a stable and level surface or fixed on a firm wall.
• Do not place this monitor in locations with mechanical vibration.
- Do not place this monitor in locations where it is exposed to insects.
- Do not install this monitor directly opposite to an air-conditioner.
- Do not place this monitor in locations within a strong electromagnetic field.
- Never cover the vents or insert any objects into the shell of the monitor.
- Do not place this monitor in confined spaces such as a book case or embedded closets, unless well ventilated.

CONNECTIVITY

Before connecting the monitor to your PC, shut off the power to both the PC and the monitor.
Power Cable
Connect the included power cable to the monitor power port, then connect the other end to a power outlet.
HDMI
In order for the monitor to receive HDMI signals from the computer, use the HDMI cable to connect the monitor to the computer.
DP
Connect a DisplayPort cable (not provided) from the computer's DisplayPort to the monitor's DisplayPort.
Earphones (Audio Out)
Earphones, headphones or other audio devices can be connected to the 3.5mm audio port (Audio Out) on the monitor. The monitor may need to be set as the PC's default sound output device.
OPERATION
- Connect the monitor to the input device via HDMI/DisplayPort.
- Connect the power adapter to the monitor and then connect the other end directly to an electrical outlet.
- Press the power button to turn the monitor on.
FreeSync
- In order to use this feature, ensure your hardware has FreeSync capability and the graphics drivers are fully up to date.
- After connecting, you may receive a prompt to enable the feature on your computer. If you do not receive the prompt, you may need to enable the function in your graphics card menu.
- See your graphics card manufacturer's documentation for instructions on how to turn on and/or enable FreeSync.
Safety protection
When the video signals of PC exceed the frequency range of the display, you have to set the PC output frequency to an acceptable range so as to make the display work normally. Horizontal and field synchronising signals will be shut down to protect the display.
On-Screen Display (OSD)
- The On-Screen Display (OSD) menu may be used to adjust your monitor's settings.
- Turn the monitor on and press the power button to view the OSD menu.
- When using the monitor for the first time, the monitor will configure optimal settings automatically.
- Press the power button to the right to enter the sub-menus.
- Press power button up and down to highlight an option, then press the power button to confirm the settings and exit the current screen.

SPECIFICATIONS
Panel size 31.5"
Optimal working resolution 1920×1080@165Hz
Power input 19V 3.42A
Power supply management system:
Normal working ≤ 65W
Standby ≤ 0.5W
Requirements for working environment:
Altitude ≤5000m
Working temperature and humidity 0°C\~40°C 20%\~85%
Warehousing temperature and humidity -10°C\~60°C 10%\~90%
TROUBLESHOOTING
| Phenomenon | Troubleshooting |
| Power indicator is off and monitor is off. | Check the power adapter and ensure it is properly connected to the electrical outlet and the rear of the monitor |
| Image is blurry, too large or too small. | Open the OSD and go to “Image Settings” and select “Auto Image Adjust” to automatically adjust the display. |
| Image is too dark | Open the OSD and go to “Brightness and Contrast” to adjust the brightness and contrast of the display. |
| Display overheating | Ensure there is at least 5cm of distance for ventilation around the display and ensure there are no objects placed on top of the display. |
| Dark/light spots when powering on | This is normal. It is due to the backlight illuminating unevenly at the initial phase of powering on caused by temperature difference. The backlight will illuminate normally after 20 minutes and then the dark/light spots will be corrected. |
| Image distortion, blinking, shaking | Check your computer settings, select the correct resolution and re-adjust the refresh frequency. |
| The display makes a noise when powering off | This is normal and is caused by the display discharging in the process of powering off. |
Need more information?
We hope that this user guide has given you the assistance needed for a simple set-up.
For the most up-to-date guide for your product, as well as any additional assistance you may require, head online to help.kogan.com
kogan.com


- 32" CURVED FULL HD 165HZ FREESYNC MONITOR
- SAFETY & WARNINGS
- COMPONENTS
- OVERVIEW
- ASSEMBLY
- Base installation
- Removing the base
- Tips:
- INSTALLATION
- Display installation
- CONNECTIVITY
- Power Cable
- HDMI
- DP
- Earphones (Audio Out)
- OPERATION
- FreeSync
- Safety protection
- On-Screen Display (OSD)
- SPECIFICATIONS
- Power supply management system:
- Requirements for working environment:
- TROUBLESHOOTING
- Need more information?
Brand : Kogan
Model : KAMN32F16PB
Category : Tracking