KAVWACI22YA - Washing machine Kogan - Free user manual and instructions
Find the device manual for free KAVWACI22YA Kogan in PDF.

User questions about KAVWACI22YA Kogan
0 question about this device. Answer the ones you know or ask your own.
Ask a new question about this device
Download the instructions for your Washing machine in PDF format for free! Find your manual KAVWACI22YA - Kogan and take your electronic device back in hand. On this page are published all the documents necessary for the use of your device. KAVWACI22YA by Kogan.
USER MANUAL KAVWACI22YA Kogan
natural_image
Front view of a white air conditioner unit with digital display and ventilation slots (no visible text or symbols)INVERTER VERTICAL WINDOW AIR CONDITIONER
2.2KW
KAVWACI22YA
Safety & Warnings 3
Overview 5
Installation 8
Operation 20
Cleaning & Care 23
Troubleshooting 28
Notes 30
SAFETY & WARNINGS
Ensure to read all instructions in this user guide prior to first use. Retain this user guide for future reference. Misuse may cause injuries to people and damage property.
READ ALL INSTALLATION INSTRUCTIONS BEFORE MOUNTING THE STANDARD FRAME ONTO YOUR WINDOW TO PREVENT FROM FALLING.
WARNING: This air conditioner can be used by children aged 8 years and above and by persons with reduced physical, sensory, or mental capabilities or lack of experience and knowledge if they have been given supervision or instruction concerning the use of the appliance in a safe way and understand the hazards involved.
- Children should be supervised to ensure they do not play with the product.
- Danger: It is hazardous for anyone other than an authorized service person to service this appliance. In Queensland, the authorized service person MUST hold a Gas Work Authorization for hydrocarbon refrigerants to carry out servicing or repairs which involve the removal of covers.
- This appliance contains approximately 330 grams of R32 refrigerant gas.
- The appliance shall be installed, operated, and stored in a room with a floor area larger than the specified minimum.
- Install the appliance correctly to ensure it is at a minimum allowable distance from the adjacent structures. For more details, see the 'Installation' section of this user guide.
- Follow the correct wiring connection type when operating or repairing.
- Do not use the appliance in areas with flammable or explosive items.
- Do not use the appliance in a corrosive environment.
- Keep the appliance upright and stable.
- Allow the appliance to dry after wet cleaning.
- Do not operate the air conditioner when wet.
- Do not use the appliance with wet hands.
- Do not spray water or any other liquid directly on the appliance.
- Never insert any objects or limbs into the appliance.
- Do not cover or transport the appliance during operation.
- Do not sit on the appliance.
- Do not leave the device unattended during operation.
- Electrical connections must meet technical requirements.
- Insert the power plug into a properly secured power outlet.
- When selecting an extension cord for a power cord, pay attention to the power input of the device, the cable length, and the intended use. Fully extend the extension cable.
- If using an extension cord, avoid electrical overload.
- Before repairing the appliance, unplug the power plug from the electrical outlet. Hold the power plug when doing this; do not pull on the cord.
- When not using the appliance, turn off the device and unplug the power cord from the power outlet.
- If you notice damage to the power plug or power cord, cease the use of the appliance and contact help.Kogan.com for support.
- When placing the appliance, pay attention to the minimum distance from walls and other objects. For storage and operating conditions, see the 'Cleaning and Care' section of this user guide.
- Do not remove any safety signs, stickers, or labels from the device.
- Drain any collected water before transportation and storage. Do not drink it as it is harmful to health.

natural_image
Warning symbol of a flame inside a triangle (no text or numbers)Note:
Refer to the rating plate on the appliance to know the type of refrigerant gas used.
- If you notice damage to the power plug or power cord, cease the use of the appliance and contact help.Kogan.com for support.
OVERVIEW
Air Conditioner
text_image
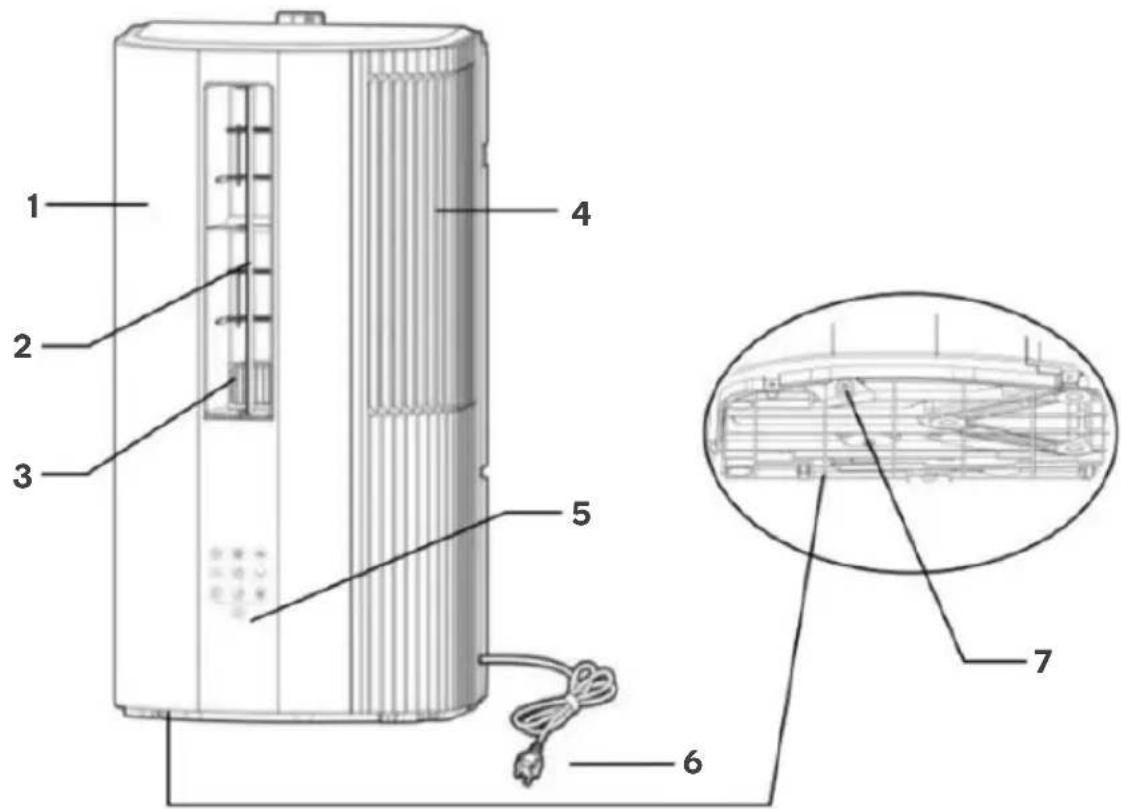
Technical diagram of an air conditioner unit with numbered parts and a close-up view of internal components.1 Front Panel
2 Vertical Blade (Auto Swing)
3 Level Blade (Manual Swing)
4 Filter
5 Control Panel
6 Power Cord
7 Indoor Water Outlet

text_image
8 9 10 11 12 138 Back Panel
9 Outdoor Air Inlet
10 Outdoor Water Outlet
11 Outdoor Air Outlet
12 Mounting Bracket
13 Base Plate
Window Frame Bracket

text_image
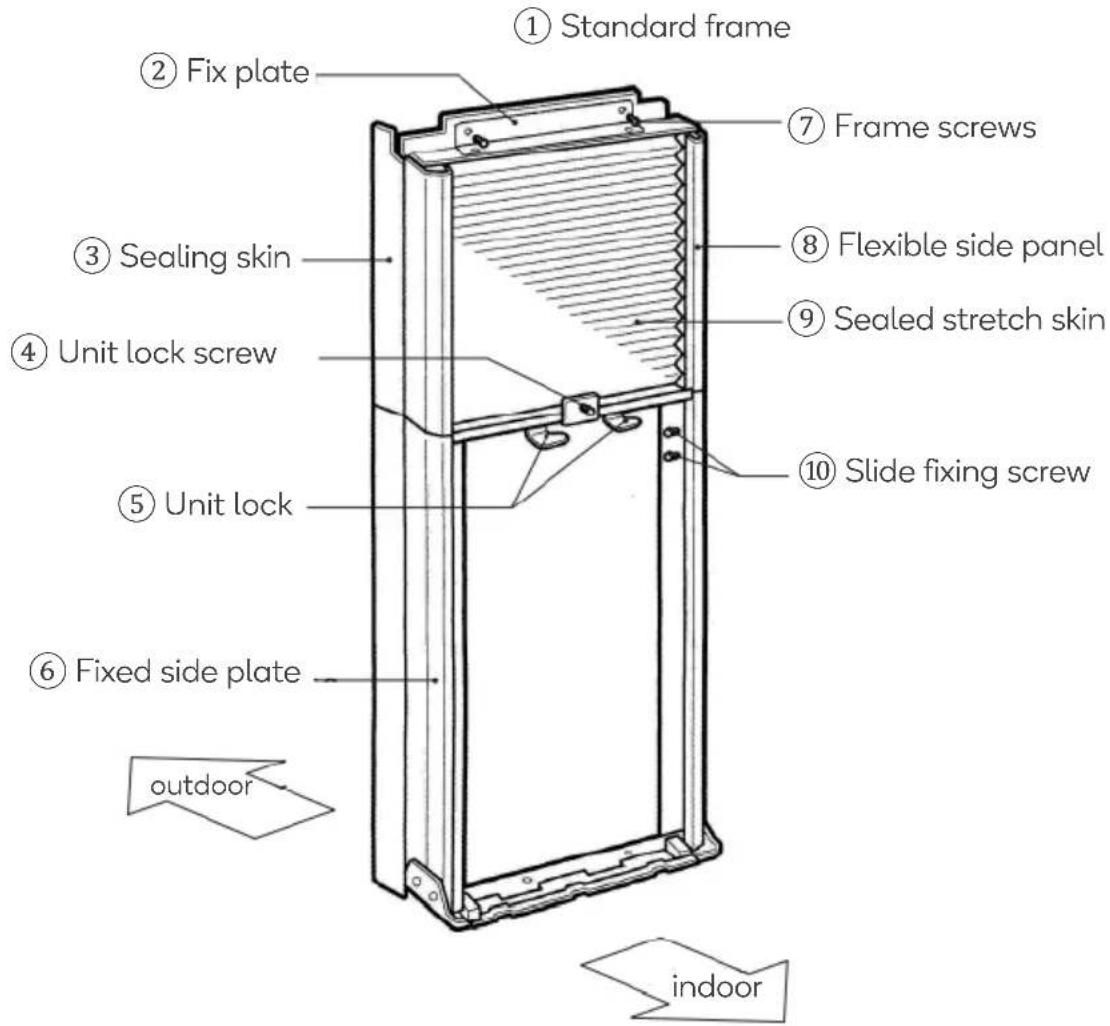
Standard Frame Fix plate Frame screws Sealing skin Flexible side panel Sealed stretch skin Unit lock screw Unit lock Slide fixing screw Fixed side plate
INSTALLATION
Location
- Do not use in commercial environments, factories, and high humidity area such as hot springs.
- Do not install in a location where flammable gases (propane, acetylene) are present.
- Select a location near the entrance or exit of the room, where there is no obstructions to the airflow and the entire room can be cooled.
- Keep electronic devices such as televisions and radios at least 1m away from air conditioners.
Noise
- During installation, choose a place that can withstand the weight of the air conditioner without increasing noise and vibration.
- Avoid a location where the operation noise will disturb your neighbours.
- If you the air conditioner is emitting abnormal sounds during operation, cease use immediately and contact help.Kogan.com for support.
Electrical safety
If any electrical work is required for the installation of this appliance, it must be performed by a licenced trade professional.

It is essential to install proper earth grounding and earth leakage circuit breakers to prevent electric shock. Failure to comply with these standards may result in serious injury or damage to property. It is recommended to seek the assistance of a licensed electrician to ensure proper installation and compliance with electrical standards.

Do not connect a ground wire in the following places:
Gas pipe: danger of explosion or fire.
Water pipe: plastic part, there is no grounding effect.
Lightning rod and telephone ground: It is dangerous if a large current flows during a lightning strike.
Power safety
- To prevent potential danger, avoid using an extension cord or connecting the power cord to other electrical equipment.
- In the event there are two power sockets available, do not share the outlet with another appliance.
- Ensure the electrical rating of the appliance matches the rating of the power outlet (220V 16A or higher). Failure to do so may cause fire, electric shock or overheating of the power plug.
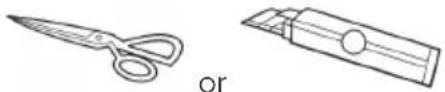
Tools required
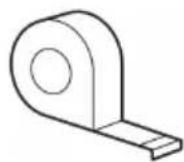
Tape measure

natural_image
Line drawing of a screwdriver with a flat head and threaded shaft (no text or symbols)Screwdriver
natural_image
Illustration of two types of scissors: one with a pair of scissors, the other with a flat blade and handle (no text or symbols)Scissors or utility knife
Frame parts description
text_image
① Standard frame ② Fix plate ③ Sealing skin ④ Unit lock screw ⑤ Unit lock ⑥ Fixed side plate outdoor ⑦ Frame screws ⑧ Flexible side panel ⑨ Sealed stretch skin ⑩ Slide fixing screw indoor| 2 | Fix plate: (x2) (upper frame & lower frame) |
| 4 | Body fixing screw (M4X14): fix unit and frame |
| 7 | Frame screw (M4X30): (x4) Used to install frame on the window |
| 10 | Slide fixing screw (M4X16): (x4) x2 on the inside frame to fix slide distance |
| 11 |  | Adhesive Foam TapeUsed in places where air leaked is possible after installation is completed to create a better seal. |
| 12 |  | Protection PlateUsed to install the bracket between the window and the screw to prevent the screw from directly contacting the window and causing damage to the window. |
| 13 |  | Drainage PipeUsed to drain water. |
| 14 |  | Window LockUsed to fix the position of the window to better maintain the seal between the bracket and the window. |
Notes:
Any accessories and parts that are not used must be keep in a safe place.
Window Type
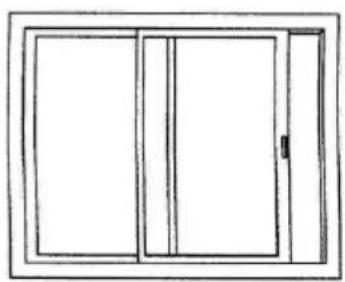
natural_image
Simple line drawing of a two-panel door with vertical and horizontal panels (no text or symbols)

natural_image
Simple line drawing of a rectangular frame with two internal compartments (no text or symbols)

natural_image
Line drawing of an open-framed window with multiple panes (no text or symbols)
• Window frames must have grooves.
- If there are no grooves are present, or the location is difficult to install, contact help.Kogan.com for support.
Window Size Requirements

text_image
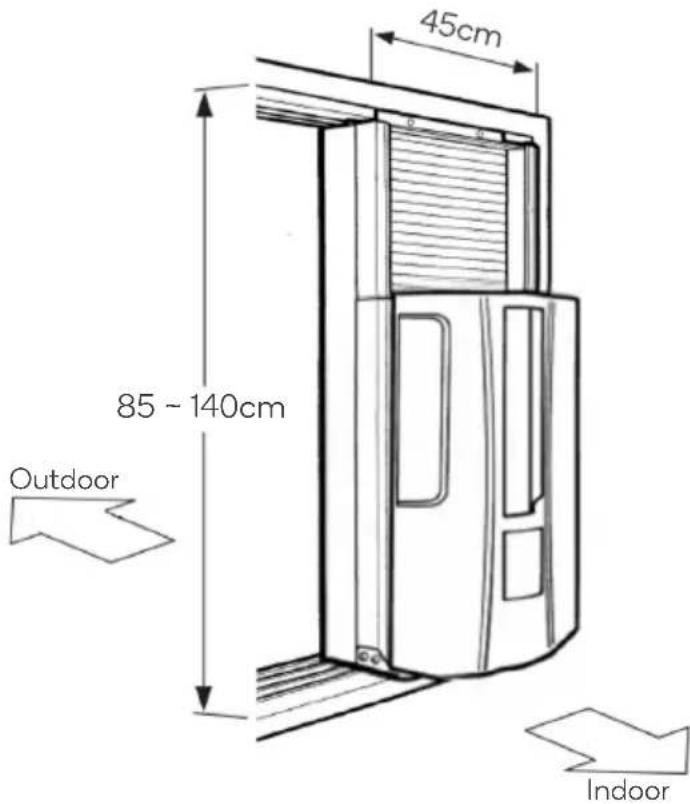
85 - 140cm 140 - 190cm 50cm 45cm- Standard frame:
(1) The opening width of the window should be more than 46 cm.
(2) The height of the window opening must be more than 90 cm and the maximum cannot exceed 145 cm.
- Standard frame + 60cm extension bracket (not included):
(1) The opening width of the window should be more than 46 cm.
(2) The height of the window opening must be more than 150 cm and the maximum cannot exceed 205 cm.
- Standard frame + 90cm extension bracket (not included):
(1) The opening width of the window should be more than 46 cm.
(2) The height of the window opening must be more than 180 cm and the maximum cannot exceed 235 cm.
Notes:
- The size of the installation window should not exceed the size that can be installed on the window frame;
- For the connection between the extension bracket and the standard bracket, refer to the extension bracket installation instructions.
Complete Diagram
text_image
45cm 85 - 140cm Outdoor IndoorInstallation Location
When selecting an installation location, ensure the following considerations are taken:
• There are no obstructions in front of the cold air outlet.
• Hot air is not being vented near the unit.
• The chosen window is sturdy and resistant to vibrations.
• The unit is not directly under the rain gutter.
• Hot air from the unit is not vented directly into windows of adjacent houses.
- Flammable gases are not present.
Noise Considerations
- When installing, choose a location that can withstand the weight of the air conditioner without increasing operating noise or vibration.
- Choose a location where the hot air and operation noise from the outdoor air outlet of the air conditioner do not disturb the neighbours.
- Ensure there are no obstructions in front of the outdoor air outlet.
Bracket Installation
1. Window Position
Open the window to be installed
a. The thickness of the convex groove of the window between the brackets is 1-10mm.
b. The thickness of the convex groove of the window between the brackets is 10-63mm.
text_image
a b- Remove the fixing plate ② from position a. and install it in position b. according to the illustration.
text_image
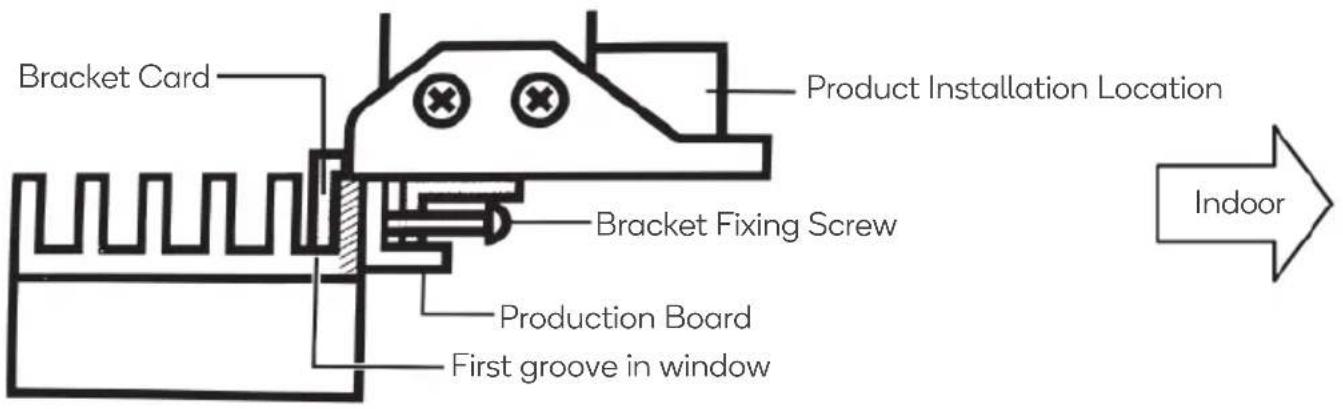
Bracket Card Product Installation Location Bracket Fixing Screw Production Board First groove in window IndoorNote:
After the mounting bracket is stretched, the upper mounting position is the same as this figure.
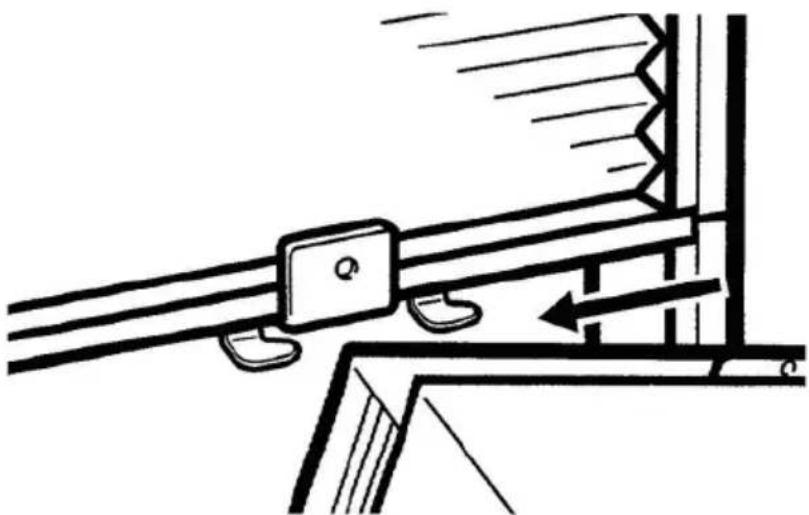
Bracket Installation

text_image
Internal Frame Standard Frame 1 2 4 Slide Fixing Screw 3 5-
When the standard mounting frame is placed on the window, the bracket retaining plate of the mounting frame is installed in the first groove of the window.
-
To increase the height of the mounting frame, stretch the inner frame upward to ensure that the bracket retaining plate above the mounting bracket is installed in the first groove above the window.
-
Push the standard mounting bracket to the edge side of the window frame.
-
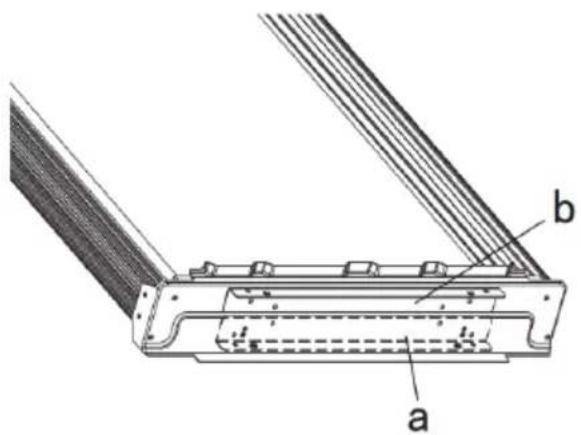
On the inner side of the mounting frame, there are two sliding fixing screws on each side. After confirming the extension height of the mounting bracket, use a Phillips screwdriver to fasten the four sliding fixing screws. Once secured, put the protective plate ⑫ into the gap between the top and bottom of the window frame and the standard mounting frame (see the installation window location diagram) and then tighten the upper and lower bracket fixing screws to ensure that the standard mounting frame is secured the window.
-
After the mounting bracket is installed, move the open window to the sealing skin of the mounting bracket, make the edge of the window fit the sealing skin and cut the adhesive foam tape to the required height to seal the gap.
Note:
Standard installation frame. When installing, it is necessary to cover the entire window frame.
Installation the Air Conditioner
Note:
To ensure refrigerant stability, wait at least 2 hours after receiving the product before installing the air conditioner.
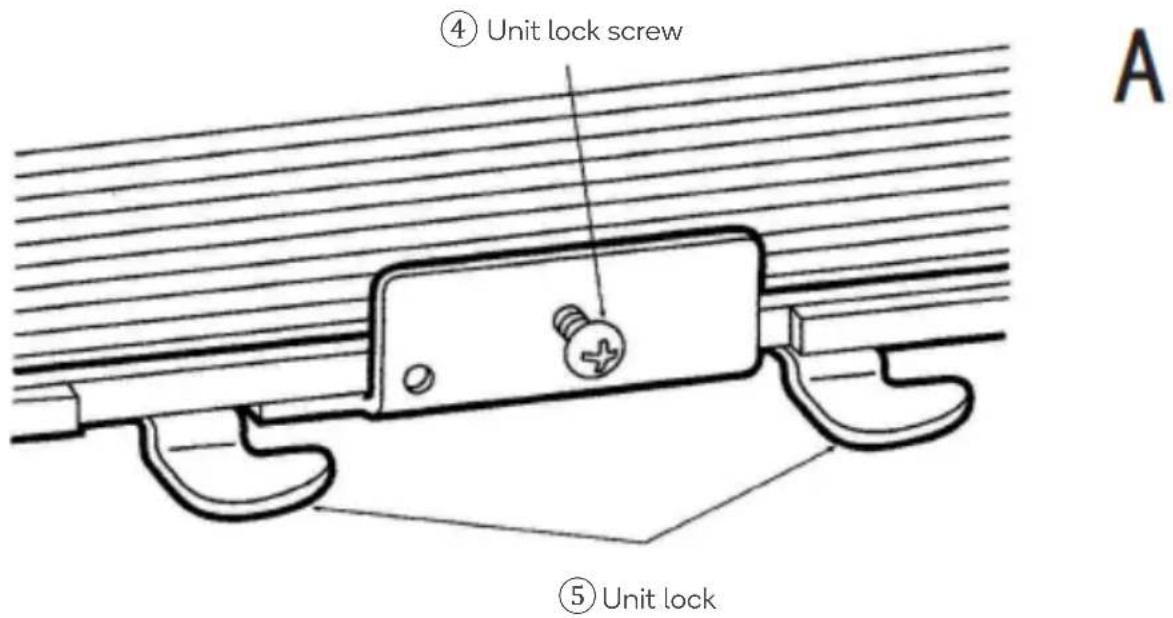
- Remove the unit lock screw ④ and retain it for later.
text_image
④ Unit lock screw ⑤ Unit lock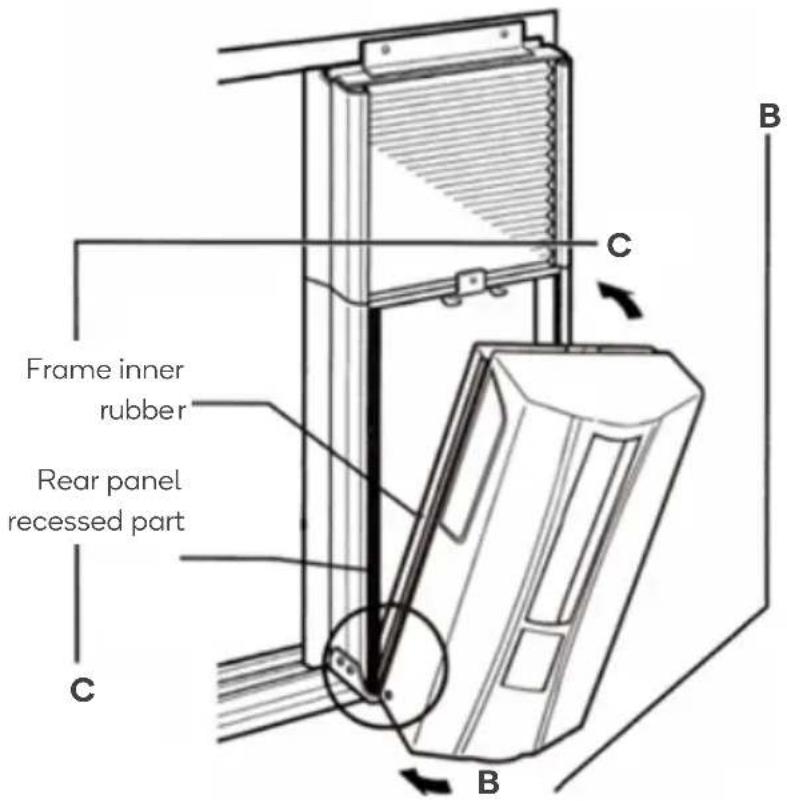
text_image
Frame inner rubber Rear panel recessed part C B C B
natural_image
Technical line drawing of a mechanical bracket or support structure (no text or symbols)- Place the base of the air conditioner on the standard mounting bracket. The two sides of the bottom and the black seals on the sides of the bracket are attached respectively. The groove at the bottom of the bracket snaps into the groove on the air conditioner unit to secure it in place.

text_image
Left side ⑤ Unit lock Right side- There are 2 holes in the upper part on the rear of the air conditioner. Each hole corresponds to a tab on the unit lock. After the bottom of the air conditioner is seated, push the unit lock ⑤ to the left to insert them into the 2 holes in the rear of the air conditioner.
Once inserted, push the unit lock to the right to ensure that the hole on the air conditioner is aligned with the screw hole on the unit lock.
- Once the air conditioner is seated correctly, secure it in place using the previously removed unit lock screw ④. Upon completion, double check the air conditioner to make sure it is properly secured.
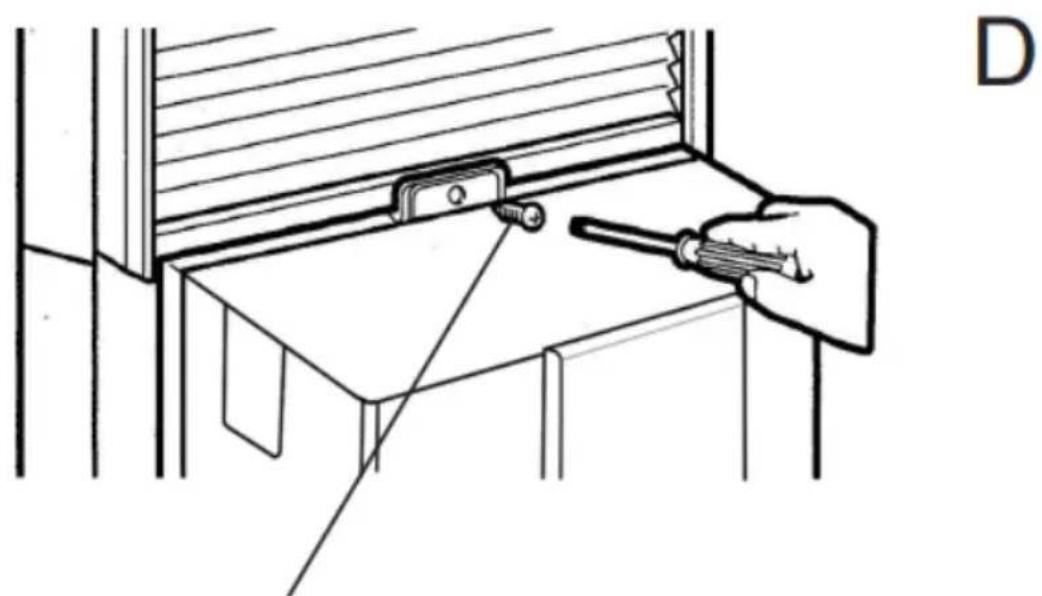
natural_image
Line drawing of a hand using a tool to adjust or install a window frame (no text or symbols present)④ Unit lock screw
Note: If the air conditioner is not completely secure, double check that the brackets and unit lock are properly aligned and seated correctly. Make any necessary adjustments and ensure all fasteners are tightened.
Window Lock Installation
After the air conditioner is installed, place the window lock in the window groove, on the opposite side of the window where the air conditioner is installed. Turn the knob on the window lock in a clockwise direction to lock it firmly against the window.
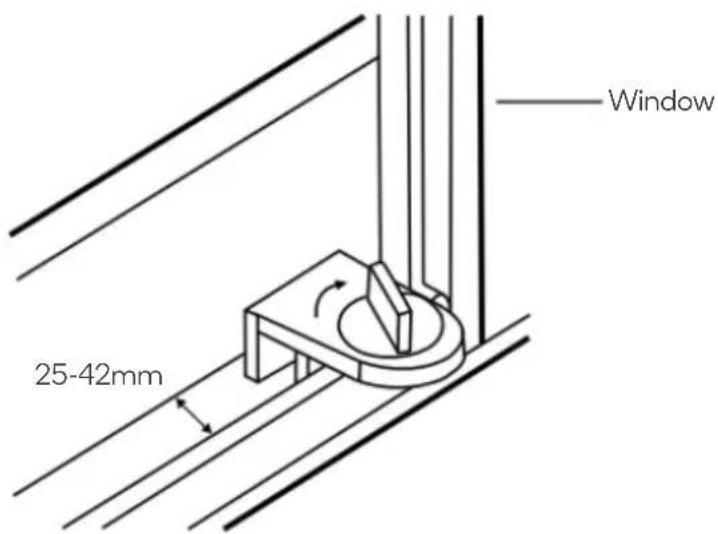
text_image
Window 25-42mmDisassembly
To disassembling and remove the air conditioner, follow the installation steps in the reverse order.
Note: Before removing the unit lock screw ④ and sliding the unit ⑤ ensure the air conditioner is properly supported to prevent it from suddenly falling forward and causing danger.
natural_image
Technical line drawing of a mechanical assembly with no visible text or symbolsOPERATION
Operation Panel and Remote Control
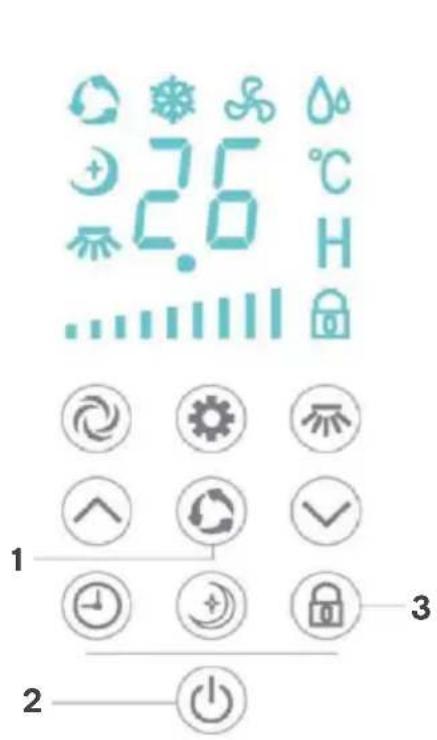
text_image
2.6 °C C.0 H ... 1 2 3
text_image
Auto Cool Fan Timer Sleep Dry Swing TIMER SWING SLEEP UP FAN POWER NODE DOWN 7 8 9 4 5 6| 1 AUTO | Press this button to operate air conditioner in the automatic mode. | |
| 2 | POWER | Turn the air-conditioner ON/OFF |
| 3 | CHILD LOCK | Press this button to lock the operation panel. |
| 4 | TIMER | Press this button to turn the timer ON/OFF |
| 5 | FAN | Press this button to change the fan speed (high, middle or low). |
| 6 UP/DOWN | Press to increase or decrease the temperature and timer settings. | |
| 7 | SWING | Press to turn the swing function ON/OFF |
| 8 | SLEEP | Press this button to put the air conditioner into sleep mode. |
| 9 MODE | Press this button to switch between auto, cooling, fan and dry modes. | |
Timer
To set the timer to turn off the air conditioner:
- Ensure the air conditioner is currently on. Press the TIMER button to set the timer.
- Press the UP and DOWN keys to set the desired time. For times between 0-6 hours, each adjustment changes the time by 0.5 hours. After 6 hours, each adjustment changes the time by 1 hour. The corresponding timer status indicator will light up.
Modes
This air conditioner features five modes:
- Cool: Typically used to lower the temperature of rooms in hot conditions.
• Dry: Used to decrease the level of humidity.
• Fan: Operates the fan only. - Auto: Used in cool mode but automatically adjusts its fan speed according to the set temperature.
- Sleep: Uses a lower fan speed for a quiet night's sleep
Cool mode:
- Press the MODE button to select the cool mode. The corresponding indicator should light up.
- Press the UP and DOWN buttons to set the appropriate temperature. The setting range is 16-30°C. Each time you press the UP or DOWN button, the temperature will rise or fall by 1°C.
- Press the FAN button to select the appropriate fan speed. The speeds cycle through low, mid, and high.
- Press the SWING button to turn the swing function on or off.
Dry mode:
- Press the MODE button to select the dry mode. The corresponding indicator will light up.
- Press the SWING button to turn the swing function on or off.
Note: Fan speed is not adjustable in this mode.
Fan mode:
- Press the MODE button to select the fan mode. The corresponding indicator will light up.
- Press the FAN button to select the appropriate fan speed. The speeds cycle through low, mid, and high.
- Press the SWING button to turn the swing function on or off.
Note: Temperature is not adjustable in this mode.
Auto Mode
- Press the MODE button to select the auto mode or press the AUTO button on the remote control. The corresponding indicator will light up.
- The automatic mode operates in the cooling mode with the default setting temperature being 24^ C. The setting range is 16-30^ C. Use the UP and DOWN buttons to adjust the temperature within this range.
Sleep Mode
- Press the SLEEP button to activate the mode. The corresponding indicator will light up. In this mode, the air conditioner operates in cool mode.
- The automatic mode operates in the cooling mode with the default setting temperature being 26^ C. The setting range is 16-30^ C. Use the UP and DOWN buttons to adjust the temperature within this range.
- Press the SWING button to turn the swing function on or off.
- After entering sleep mode, the indicator light will turn dark, and the set temperature will increase by 2^ C for two hours. After 8 hours of sleep mode, the air conditioner will shut down automatically.
Note: Fan speed will be set to low and is not adjustable in this mode.
Child Lock Function
Press and hold the CHILD LOCK button for 3 seconds to lock the operation panel. Press this button again for 3 seconds to unlock.
Note:
When the water level indicator shows water is full, the machine will stop working and you should drain the water. After draining, the air conditioner can be restarted. See the Cleaning and Care section of this user guide.
CLEANING & CARE
Note:
Turn off the air conditioner and remove the plug connected to a power supply before cleaning.
Cleaning the surface
Wipe the surface of the air conditioner with a soft, damp cloth. Do not use any solvents such as benzene, alcohol, or gasoline. Failure to do so, may cause the surface damage to the air conditioner and lead to potential operational issues.
Cleaning the filter
If the filter is clogged with dust, it will affect the air conditioner's performance. Clean the filter every two weeks.
- Remove the standard screws fixed on the grille and the front panel.
- Pull down the grille to remove it, then remove the filter from the front panel.
- Put the filter into warm water (about 40^ C) with neutral detergent, rinse it and dry it in a cool place.

text_image
Screw Hole Filter Grille Pull-Up to Close Pull-Down to OpenDraining water
When the full water indicator is displayed, the machine will stop working. In this case, it is necessary to remove the excess condensed water. Remove the indoor water drain plug or the outdoor water drain plug to drain out the water.
Note:
Draining water through the indoor drain hole requires a barrel or a bucket that can hold water to prevent the water from flowing to the floor directly.
Storing the air conditioner
- Pull out the indoor drain plug, drain the water to other water containers or directly pull out the outdoor water drain plug to drain the water out of the room.
- Adjust the mode to the low speed of the air supply mode or turn on the self-clean function, keep this mode on until the inside pipe is dry. This operation can dry the inside of the body and prevent mould.
- Turn off the machine and unplug the power cord, wrap the power cord and install the drain plug.
- Remove the machine from the window and remove the mounting bracket and keep it in a good condition.
- Put the air conditioner in a plastic bag and put the air conditioner in a dry place to prevent dust. Keep children away from the bag.
Maintenance
Checks to the Area
Before starting work on systems containing flammable refrigerants, safety checks are essential to minimize the risk of ignition. Follow these precautions before conducting any work on the system.
Work Procedure
Undertake work under controlled procedures to minimize the presence of flammable gas or vapor during the task.
General Work Area
Instruct all maintenance staff and others working nearby on the nature of the work being conducted.
Avoid working in confined spaces.
Checking for Presence of Refrigerant
Use an appropriate refrigerant detector before and during work to detect potentially toxic or flammable atmospheres. Ensure that leak detection equipment is suitable for use with all applicable refrigerants (non-sparking, adequately sealed, or intrinsically safe).
Presence of Fire Extinguisher
If hot work is required on the refrigerating equipment or any associated parts, ensure appropriate fire extinguishing equipment (dry powder or CO2 fire extinguisher) is available nearby.
No Ignition Sources
No person working on refrigerating systems should use ignition sources that could lead to fire or explosion. All possible ignition sources, including smoking, should be kept far from the installation, repair, removal, and disposal sites where refrigerant might be released. Display "No Smoking" signs around the area.
Ventilated Area
Ensure the area is open or adequately ventilated before breaking into the system or conducting any hot work. Ventilation should continue during the work period to safely disperse any released refrigerant and preferably expel it externally.
Checks to the Refrigerating Equipment
When changing electrical components, ensure they meet the correct specifications and follow the manufacturer's maintenance and service guidelines. Consult a professional if in doubt.
Checks to Electrical Devices
Initial safety checks and component inspections are necessary for repairs and maintenance of electrical components. If a fault exists that compromises safety, do not connect the electrical supply until it is resolved. If immediate correction is not possible but continued operation is necessary, use an adequate temporary solution and inform the equipment owner.
Initial safety checks include:
- Discharging the capacitor safely to avoid sparking.
- Ensuring no live electrical components and wiring are exposed while charging, recovering, or purging the system.
- Checking the continuity of earth bonding.
Repairs to Sealed Components
Disconnect all electrical supplies before removing sealed covers or components. If electrical supply is necessary during servicing, use a permanently operating leak detection system at the most critical point to warn of hazardous situations.
Pay particular attention to:
- Ensuring the casing is not altered in a way that affects the protection level.
• Securing the apparatus properly. - Checking that seals or sealing materials have not degraded.
• Repair to Intrinsically Safe Components
Do not apply permanent inductive or capacitive loads to the circuit without ensuring they do not exceed the permissible voltage and current. Only work on intrinsically safe components in the presence of a flammable atmosphere. Use test apparatus with the correct rating and replace components only with parts specified by Kogan.com
Cabling
Ensure cabling is not subject to wear, corrosion, excessive pressure, vibration, sharp edges, or adverse environmental effects. Consider the effects of aging or continuous vibration from sources like compressors or fans.
Detection of Flammable Refrigerants
Never use potential ignition sources for detecting refrigerant leaks. Do not use a halide torch or any other detector with a naked flame.
Removal and Evacuation
When breaking into the refrigerant circuit for repairs or other purposes, use conventional procedures while considering flammability. Follow this procedure:
- Remove refrigerant.
- Purge the circuit with inert gas.
- Evacuate.
- Purge with inert gas again.
- Open the circuit by cutting or brazing.
Recover the refrigerant charge into the correct recovery cylinders. For systems with flammable refrigerants, purge with oxygen-free nitrogen to render the appliance safe. Repeat the process as needed. Do not use compressed air or oxygen for purging.
For systems with flammable refrigerants, achieve purging by breaking the vacuum with oxygen-free nitrogen, filling to working pressure, venting, and pulling down to a vacuum. Repeat until no refrigerant remains. When using the final nitrogen charge, vent to atmospheric pressure before starting work.
Charging Procedures
In addition to conventional charging procedures, follow these requirements:
- Avoid contamination of different refrigerants.
- Keep hoses or lines short to minimize contained refrigerant.
- Position cylinders appropriately as per instructions.
- Ensure the refrigerating system is earthed before charging.
- Label the system when charging is complete.
- Avoid overfilling the system.
- Pressure-test with appropriate purging gas before recharging.
- Leak-test upon charging completion and before commissioning. Conduct a follow-up leak test before leaving the site.
Decommissioning
Ensure familiarity with the equipment before starting. Recover refrigerants safely and isolate the system electrically. Follow these steps:
- Ensure mechanical handling equipment is available for refrigerant cylinders.
- Use all required personal protective equipment correctly.
- Supervise the recovery process by a qualified person.
- Use recovery equipment and cylinders conforming to standards.
- Pump down the refrigerant system or use a manifold to remove refrigerant from various parts.
- Start the recovery machine and operate it per manufacturer instructions.
- Do not overfill cylinders (max 80% volume liquid charge) or exceed cylinder pressure limits.
- Remove filled cylinders and equipment promptly, closing all isolation valves.
- Recovered refrigerant must be cleaned and checked before use in another system.
Labelling
Label equipment as decommissioned and emptied of refrigerant. Include the date and signature. For flammable refrigerants, ensure appropriate labels are present.
Recovery
When removing refrigerant, use appropriate recovery cylinders. Ensure enough cylinders are available and they are designated and labelled for the recovered refrigerant. Cylinders must have pressure-relief valves and shut-off valves in good condition. Use properly maintained recovery equipment with instructions. Hoses must be leak-free and in good condition.
Return recovered refrigerant to the supplier in the correct cylinder and arrange a waste transfer note. Do not mix refrigerants in recovery units or cylinders.
Handling Compressors and Oils
Evacuate compressors to remove flammable refrigerant before returning to suppliers. Use electric heating to the compressor body if necessary. Safely drain oil to ensure no flammable refrigerant remains.
TROUBLESHOOTING
Note:
Do not repair or disassemble the air conditioner yourself. Repairs done by unqualified persons may cause damage to the air conditioner.
| Problem Cause $olution | ||
| The air conditioner is not working. | There is no power. | Turn on the power after plugging into the electrical socket. |
| The water level indicator displays ‘FL’. | Drain water from the air conditioner. | |
| Temperature is too low or too high. | Ensure the ambient temperature is between 7-35°C. | |
| The ambient temperature is lower than the set temperature in cooling mode. | Change the set temperature to be above the ambient temperature. | |
| Low ambient temperature in the dry mode. | Ensure the room has an ambient temperature greater than 17°C. | |
| The cooling effect is weak. | There is direct sunlight. | Draw the curtains or coverings to minimise direct sunlight. |
| The doors and windows are open. | Close the door or window. | |
| The frame is not sealed or there are some other heat sources. | Seal the frame. | |
| The filter is dirty. Clean or replace the filter. | ||
| The air inlet or outlet is blocked. | Clear anything covering the air inlet and air outlet. | |
| The air conditioner is making loud noises. | The air conditioner is not installed correctly. | Check the frame and air conditioner to ensure proper and correct installation. |
| Compressor is not working | Overheat protection is on. | Wait for 3 minutes until the temperature drops and then turn on the air conditioner. |
| The remote control does not work. | The remote is used from a long distance. | Keep the remote control close to the air conditioner and ensure the remote control faces the air conditioner when used. |
| The battery has drained completely. | Change the battery. | |
| The air conditioner displays ‘E1’. | The tube temperature sensor senses an abnormal temperature. | Check the tube temperature sensor and related circuits. |
| The air conditioner displays ‘E2’. | The room temperature sensor senses an abnormal temperature. | Check the room temperature sensor and related circuits. |
NOTES
Need more information?
We hope that this user guide has given you the assistance needed for a simple set-up.
For the most up-to-date guide for your product, as well as any additional assistance you may require, head online to help.kogan.com
kogan.com