KAVACSTWD10 - Vacuum Cleaner Kogan - Free user manual and instructions
Find the device manual for free KAVACSTWD10 Kogan in PDF.

User questions about KAVACSTWD10 Kogan
0 question about this device. Answer the ones you know or ask your own.
Ask a new question about this device
Download the instructions for your Vacuum Cleaner in PDF format for free! Find your manual KAVACSTWD10 - Kogan and take your electronic device back in hand. On this page are published all the documents necessary for the use of your device. KAVACSTWD10 by Kogan.
USER MANUAL KAVACSTWD10 Kogan
natural_image
Line drawing of a vacuum cleaner with handle and wheels (no text or symbols)X10 PRO WET & DRY CORDLESS STICK VACUUM CLEANER
KAVACSTWD10
Safety & Warnings 3
Components 6
Overview 7
Assembly 9
Operation 13
Cleaning & Care 15
Specifications 20
Troubleshooting 21
Notes 22
SAFETY & WARNINGS
- Read all instructions before using and retain this user guide for future reference.
• This appliance is for household use only.
- This vacuum can be used by children aged from 8 years and above and persons with reduced physical, sensory or mental capabilities or lack of experience and knowledge if they have been given supervision or instruction concerning use of the vacuum in a safe way and understand the hazards involved. Cleaning and user maintenance shall not be made by children without supervision.
- Children should be supervised to ensure they do not play with the vacuum.
- Do not immerse your vacuum into water or liquid.
- Keep hair, loose clothing, fingers and all parts of body away from openings and moving parts of the vacuum and its accessories.
- Do not use with damaged cable or plug.
- If the supply cord is damaged, it must be replaced by Kogan.com, its service agent or qualified person to avoid a hazard.
- Please dispose of the battery safely.
- The batteries can only be replaced by the trained person.
- Do not burn the vacuum even though damaged seriously because the battery could be exploded on the fire.
- In the case of excessive force, liquid may spill from the battery, avoid touching the liquid, please flush with water if accident happen. If the fluid goes into your eyes, ask for medical help. The spilled liquid may cause pain or burns.
- Charge only with the charger specified by Kogan.com. A charger suitable for one type of battery pack can cause a fire when mixed with another.
- The battery must be removed from the unit before disposal.
- Do not use damaged power cords or chargers.
- If the vacuum does not work properly or has been dropped on the ground to be damaged, left outside or dropped in water, do not attempt to operate it and have it repaired at an authorised service centre.
- Use only the type and amount of liquids specified as instruction.
- Liquid must not be directed towards equipment containing electrical components.
- Do not pull or carry by cable, use cable as a handle, close door on cable or pull cable around sharp edges or corners.
- Do not unplug by pulling on cable
- To unplug, grasp the plug, not the cable.
- Do not handle plug or appliance with wet hands.
- Do not short-circuit the output terminal of the battery string or charger base.
- Do not charge the device outdoors.
- When removing the battery, disconnect the power supply of the device.
- Do not charge, disassemble, heat (above 60 °C) or burn waste batteries.
- Please dispose of the discarded battery in time.
- Keep the battery out of reach of children.
- Do not put battery in mouth. If swallowed by mistake, contact your physician or local poison control centre.
- To reduce the risk of injury from moving parts, assemble the brush cover correctly in place before operation.
- Do not put any object into openings.
- Do not use with any opening blocked; keep free of dust, lint, hair and anything that may reduce air flow.
- Turn off all controls before unplugging.
- Use extra care when cleaning on stairs.
- Do not use to pick up flammable or combustible liquids, such as petrol or use in areas where they may be present.
- Do not suck toxic material (chlorine bleach, ammonia, drain cleaner, etc.)
- Do not use vacuum in an enclosed space filled with vapours given off by oil base paint, some mothproofing substances, flammable dust or other explosive or toxic vapours.
- Do not suck hard or sharp objects such as glass, nails, screws, coins, etc.
- Do not use to sweep up burning or smoking objects, such as cigarettes and matches.
• Install the filter in proper before starting the vacuum.
- Do not use it outside of houses.
- Do not store the vacuum in places where icing may occur.
- Do not expose to rain. Store indoors.
- Use only manufacturer's recommended attachments.
- Do not allow to be used as a toy.
- Keep vacuum on a level surface.
- Please use the cleaning solution specified by manufacturer and use it in the specified proportion. Cleaning fluids that are not approved by manufacturer may cause damage and injury to users, the environment and parts inside the fuselage.
- Prevent accidental start. Make sure the switch is in the off position before lifting or handling the unit.
- Do not use damaged or modified devices. Damaged or modified batteries can behave in unpredictable ways, resulting in a risk of fire, explosion or injury.
- Do not expose the device to flame or excessive temperature. Exposure to flame or temperature above 130^ C may cause explosion.
- Please follow all charging instructions and do not charge the device outside the temperature range specified in the instructions. Improper charging or charging outside the specified temperature range can cause battery damage and increase the risk of fire.
- Repair work must be conducted by qualified personnel and use only the same spare parts. This ensures sustainable product safety.
- Do not modify or attempt to repair the device unless expressly stated in the instructions for use and maintenance.
- Keep the temperature between 4^ C and 40^ C during battery charging, device storage or device use.
- If storing or not using the vacuum for a long time, it's important to ensure the battery is kept charged. Charge the battery every three months.
- Do not use without water tank or filters in place.
- Do not carry the appliance with your finger on the switch, or power on the appliance with the switch on.
- Use of any other battery packs may create a risk of injury and fire.
- Do not run appliance over cord.
- Keep cord away from heated surfaces.
- Plastic film can be dangerous. Keep away from children to avoid danger of suffocation.
- Use only as described in this user guide.
- Recharge only with the adapter and the battery pack specified by Kogan.com. Use of any damaged, modified, or any other battery packs and adapters may create a risk of injury and fire.
COMPONENTS

natural_image
Line drawing of a mechanical lever or handle component (no text or symbols)Vacuum handle
natural_image
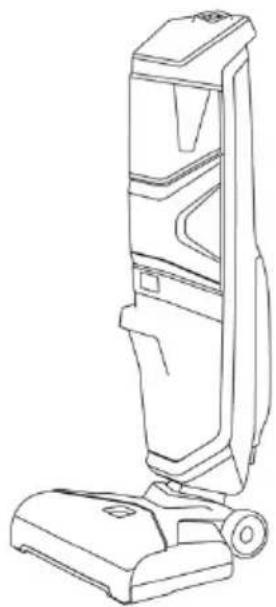
Line drawing of a vacuum cleaner with handle and base (no text or symbols)Vacuum body
natural_image
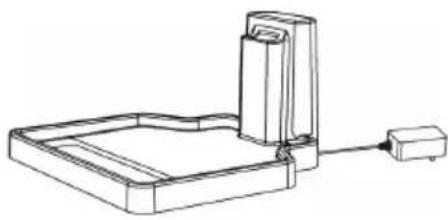
Line drawing of a mechanical device with a base plate and connecting rod (no text or symbols)Charging dock

Cleaning tool

Multi-surface
rolling brush

Replacement filter

text_image
100 PRO WTT & DIY CORTOLESS STICK VACUUM CLEANERUser guide
OVERVIEW

text_image
Speed button (High/Low) Power button Self-cleaning button Dirty water tank Filter cover Filter Float LED display panel Clean water tank Rolling brush cover Rolling brushUnderside

text_image
Wheels Base Auxiliary wheelsCharging dock
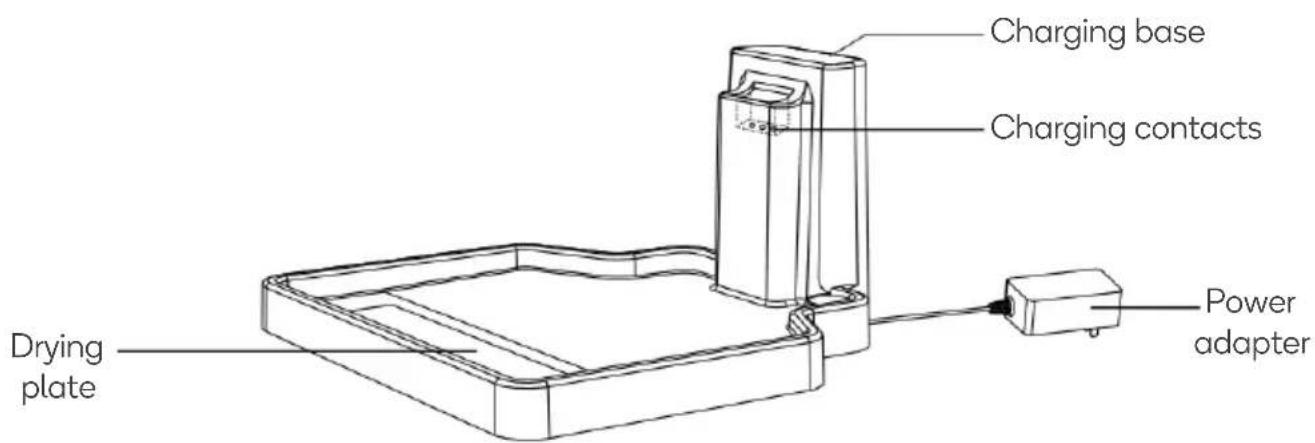
text_image
Charging base Charging contacts Drying plate Power adapterASSEMBLY
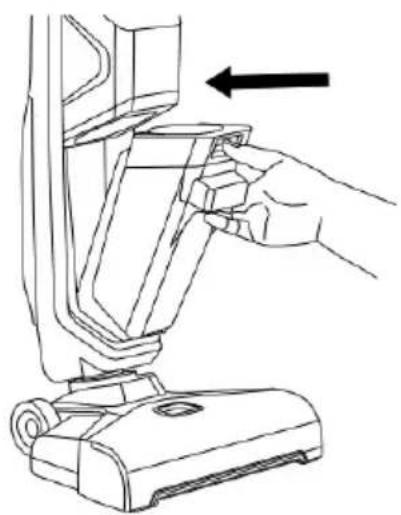
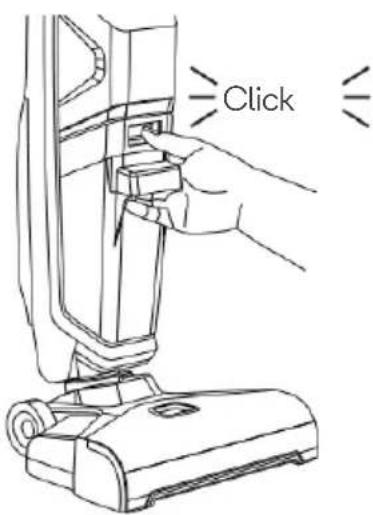
This vacuum cleaner comes in three parts: handle, vacuum body and charging dock. Assemble the cleaner following steps below, after unpacking the box:

text_image
Handle Vacuum body Charging dockInsert the handle into the vacuum body until is clicks into place.

text_image
ClickCharging Vacuum
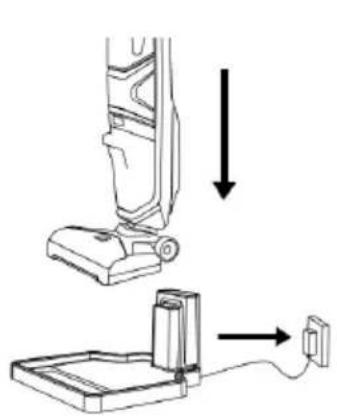
- Connect the charging dock AC adapter plug to electrical outlet and turn on.
- Place the vacuum on the dock to charge.
- The indicator on the display panel will indicate the status of charging.
Note: Before first use, ensure it has been charged for at least 5 hours.

text_image
Technical diagram showing a vacuum cleaner assembly with labeled components and connection arrowsLifting
An ergonomically correct lift design has been applied on back of vacuum, we recommend you lift or move the vacuum via this point rather than holding by the handle.

Display Panel
Display panel indicates status for battery charge, self-clean, roller brush drying, clean water shortage, dirty water tank cleaning and water spray.

text_image
Brush jam/clean reminding Brush drying indicating Clean water tank filling reminding Dirty water tank & filter cleaning reminding Charging indicating Water spray indicatingFill Clean Water Tank
- Remove the clean water tank from the vacuum, fill with warm water to the "MAX" line, and then add 2 to 3 caps of a floor cleaner liquid (not supplied).
- Seal with the rubber cap, then place the water tank back into vacuum.

Note:
- Fill with hot (60°C MAX) tap water and add the appropriate cleaning solution.
- Do not using boiling water.
- Never heat water or tank in microwave.
OPERATION
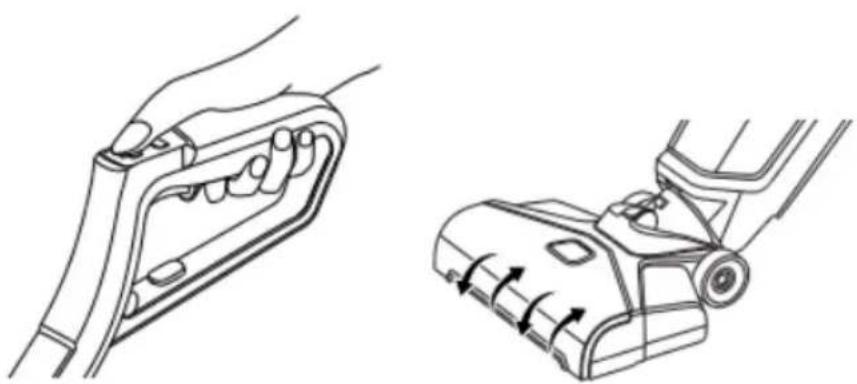
- Hold the base with your foot and press the handle downwards.

natural_image
Line drawing showing a person using a vacuum cleaner to lift a device, with no text or symbols present.- Recline the body of vacuum backward to start the roller brush spinning.
natural_image
Technical line drawing of a hand gripping a mechanical component, shown in two views (no text or symbols)- To select deep cleaning mode, press the Speed control button (next to Power button)

natural_image
Line drawing of a hand holding a tool or clamp device (no text or symbols)- After cleaning, ensure the vacuum is stood upright. To stop roller brush spinning, push the handle forward until a "CLICK" sounds.

text_image
ClickCLEANING & CARE
Emptying Dirty Water Tank & Cleaning the Filter
The float is what prevents your dirty tank from overflowing. When your dirty tank is full, the float will shut off your suction motor creating a high-pitched sound indicating it is time to empty your dirty water tank.

natural_image
Diagram of a device panel with labeled components and wiring (no text or symbols)Dirty water tank & filter cleaning reminding
natural_image
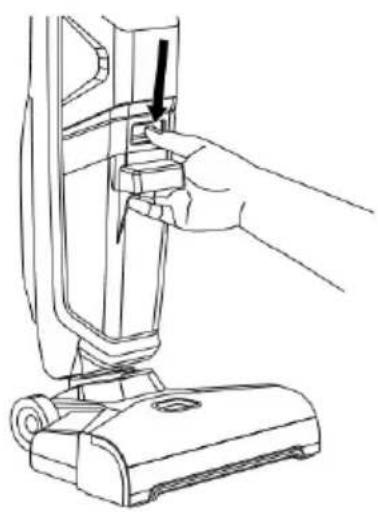
Line drawing of a hand inserting a component into a vacuum cleaner's air vent (no text or symbols)- To empty dirty water tank, press down on recessed button at the top of the tank.

natural_image
Line drawing of a hand using a vacuum cleaner to adjust or install a component (no text or symbols present)- While pressing down on the button, grab the front handle and pull dirty water tank away from the unit.
natural_image
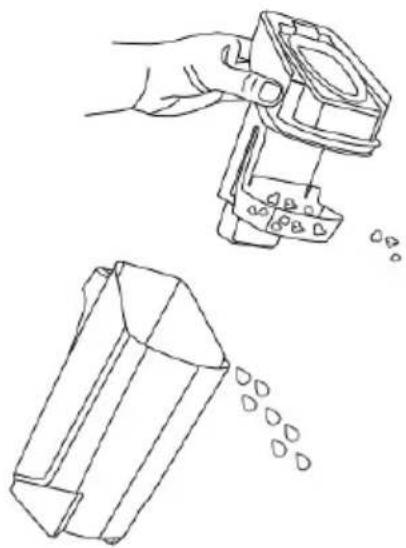
Line drawing showing a hand using a mechanical component to add liquid into a 3D block, with no text or symbols present.- Remove the float from the dirty water tank to separate solid waste and dirty water.
natural_image
Line drawing of a hand using a tool to clean or brush the drain of a water tap (no text or symbols)- Pour dirty water and debris out. Rinse the inside of the dirty water tank.

natural_image
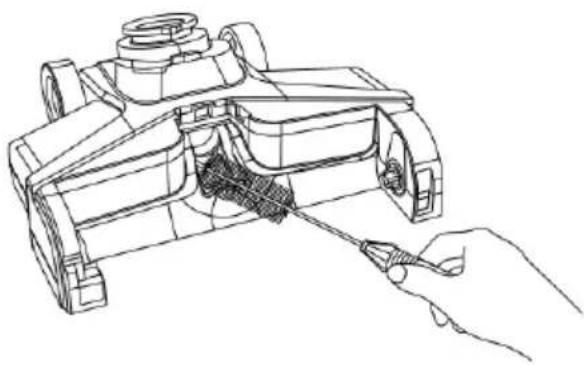
Line drawing of a hand using a screwdriver to adjust or install a mechanical component (no text or symbols present)- Clean here to avoid air blockages.
natural_image
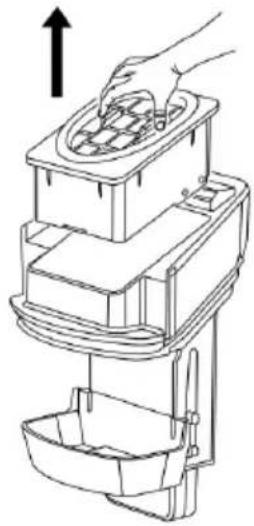
Line drawing of a hand using a multi-tiered appliance to lift a bowl (no text or symbols)- Remove the filter from the dirty water tank top by pulling it up.
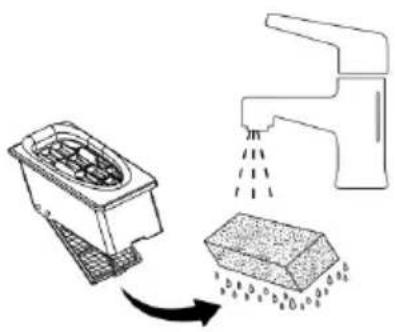
natural_image
Diagram showing a kitchen appliance with a drain and a water drop, illustrating the process (no text or symbols)- Open the mesh cover to take out the filter, clean & dry the filter

natural_image
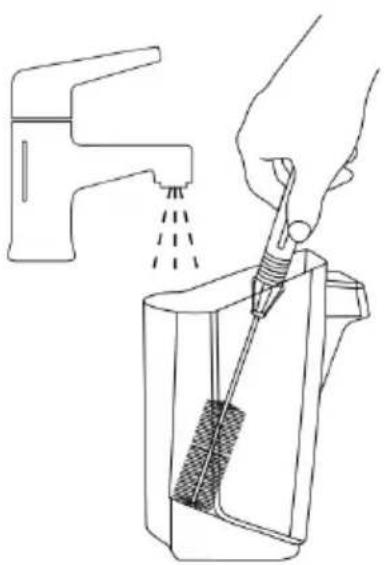
Line drawing of a faucet spraying water onto a square kitchen appliance (no text or symbols)- Hand wash the vacuum filter and screen with warm water and mild detergent.

natural_image
Line drawing of a kitchen faucet with spray application (no text or symbols)- Rinse the float located at the bottom of the dirty water tank's top.
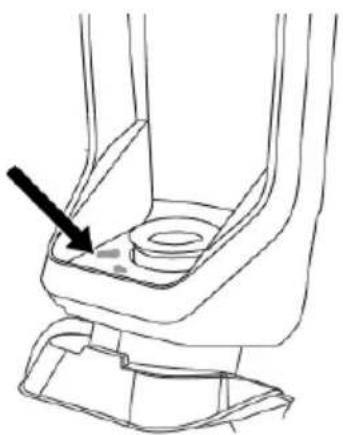
natural_image
Technical line drawing of a mechanical component with a black arrow pointing to a specific part (no text or symbols present)- If the inside area where the dirty water tank sits is dirty, wipe it clean with a rag or towel.

text_image
Diagram illustrating solar heating process with labeled components and a 'Click' button-
Leave parts out to dry naturally in a well ventilated location. Avoid direct exposure to the sun or heating, as this can age or damage the parts.
-
Once parts are dry, place vacuum filter back into dirty water tank top.

natural_image
Line drawing of a hand inserting a device into a container with an arrow indicating the process (no text or symbols present)- Reassemble and replace the top of dirty water tank.
natural_image
Line drawing of a hand inserting a component into a vacuum cleaner's housing (no text or symbols)- Angle the dirt tank back into body or machine inserting bottom first, then tilt the top of the dirt tank toward the machine and push into place until you hear a click.
text_image
ClickNotes:
Make sure to clean your dirty tank and let all components dry out after each use to keep your product at its best.
Note:
Ensure the vacuum has been turned off before removing the roller brush cover.

natural_image
Line drawing of a hand using a vacuum cleaner to press down a component, with an arrow indicating the motion (no text or symbols present)- Grasp cover at the front and pull upward to remove.
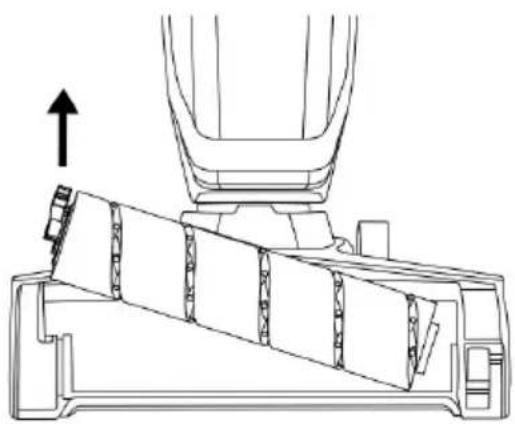
natural_image
Technical line drawing of a mechanical assembly with an upward arrow indicating motion (no text or symbols present)- Pull roller brush via lifting the nose of roller brush.
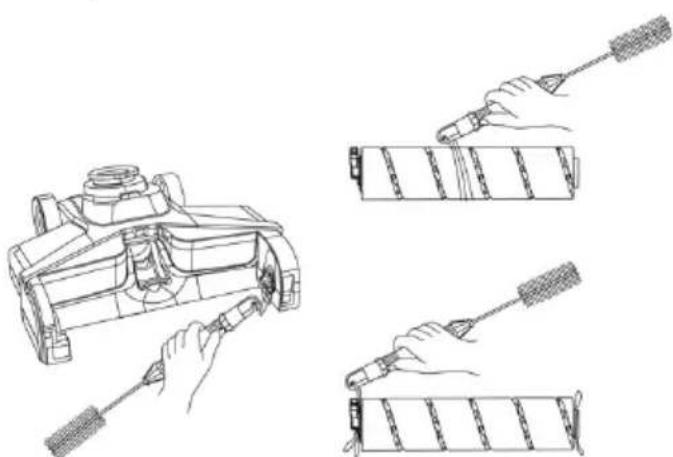
natural_image
Technical line drawings of mechanical components with hands operating, showing assembly and assembly steps (no text or symbols)- Use the supplied cleaning tool to cut and clean out all hair and debris.
natural_image
Technical line drawing of a mechanical component being processed with a tool (no text or symbols present)- Clean the nozzle with the cleaning tool's brush end.

-
Insert the end of roller into one side of the base and then to fix the pin of roller into the hole on the other side of the foot.
-
Align the cover to the edges of the base and then to lock the cover into place until a CLICK sound is heard.
Self-Clean and Drying
After floor cleaning, place the vacuum on charging station to charge. Ensure vacuum is well-charged and there's sufficient cleaning solution in the clean water tank prior to pressing the Self-Cleaning button. The voice guide will confirm when self-cleaning and drying is complete.
natural_image
Diagram showing a vacuum cleaner's base with an attached device and cable, no text or symbols presentPlace on charging dock.
natural_image
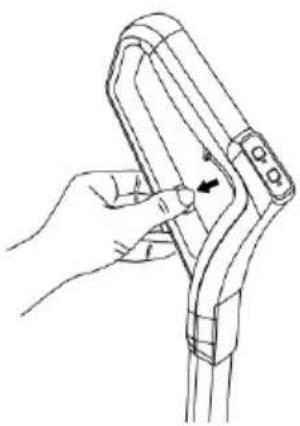
Line drawing of a hand holding a tool with an arrow indicating movement (no text or symbols)Self-cleaning button

natural_image
Line drawing of a vacuum cleaner's base with handle and vent slots (no text or symbols)Roller brush self- cleaning
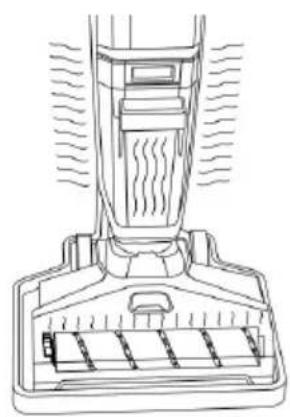
natural_image
Line drawing of a vacuum cleaner's head and side panel, showing airflow and component structure (no text or symbols)Roller brush drying
Note: Press and hold the key of self-cleaning button for 3 seconds to enable/disable the voice guide.
SPECIFICATIONS
| Voltage | 25.9V |
| Power | 250W |
| Battery SPEC | BP2926 18650 (7 cells) |
| Battery volume | 2600mAh |
| Suction motor | BLDC |
| Suction power | 15kPa |
| Roller brush speed | 2550rpm with Hi-level / 2000rpm with low level |
| Working duration | 28Mins |
| Charging time | 4H |
| Self-clean for roller brush | Yes |
| Drying for roller brush | Yes |
| Voice guide | Yes |
| Noise | 72dBA |
| Clean water tank volume | 600mL |
| Dirty water tank volume | 550mL |
| Net weight | 4.4kg |
| Dimensions | 1160x280x245mm |
| Carton dimension | 352x302x745 mm |
Disposal:
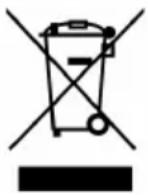
This marking indicates that this appliance should not be disposed with other household wastes. To prevent possible harm to the environment or human health from uncontrolled waste disposal, recycle it responsibly to promote the sustainable reuse of material resources.
TROUBLESHOOTING
Vacuum is not operating:
- Ensure battery is sufficiently charged.
- Ensure the vacuum is standing upright.
- Check the roller brush is locked in place.
Self-cleaning is not completing:
If self-clean is failing, it could be low power. Charge the vacuum for at least five minutes before running the self-clean mode.
Low suction, or abnormal noise:
- Make sure no objects stuck in entrance places.
- Make sure dirty water tank relocates in place.
- Make sure to clean thoroughly the dirty water tank unit and filter sponge.
NOTES
Need more information?
We hope that this user guide has given you the assistance needed for a simple set-up.
For the most up-to-date guide for your product, as well as any additional assistance you may require, head online to help.kogan.com
kogan.com