KABLFAN1CSA - Fan Kogan - Free user manual and instructions
Find the device manual for free KABLFAN1CSA Kogan in PDF.

User questions about KABLFAN1CSA Kogan
0 question about this device. Answer the ones you know or ask your own.
Ask a new question about this device
Download the instructions for your Fan in PDF format for free! Find your manual KABLFAN1CSA - Kogan and take your electronic device back in hand. On this page are published all the documents necessary for the use of your device. KABLFAN1CSA by Kogan.
USER MANUAL KABLFAN1CSA Kogan
natural_image
White smart air purifier device with a curved handle and perforated grille (no visible text or symbols)KOGAN SMARTERHOME™ BLADELESS PURIFIER FAN
KABLFAN1CSA
Safety & Warnings 3
Overview 4
Before First Use 5
Operation 7
Connect to SmarterHome™ App 10
Google Home Control 15
Amazon Alexa Control 18
Cleaning & Care 21
Specifications 23
SAFETY & WARNINGS
Ensure to read all instructions and warnings in this user guide prior to first use. Retain this user guide for future reference.
- This fan is not intended for use by persons (including children) with reduced physical, sensory or mental capabilities, or lack of experience and knowledge, unless they have been given supervision or instruction concerning use of the fan in a safe way by the person responsible for their safety, and understand the hazards involved.
- Children must be supervised to ensure that they do not play with the fan as a toy.
- Always use a separate outlet according to the current / voltage of the fan. Do not use a multi-purpose socket for simultaneous use with other electrical devices.
- The fan must not be placed on wet, inclined, soft, and/or unstable surfaces.
- Ensure there is at least a 30cm clearance between the fan and any walls or obstructions.
- Do not use the fan outdoors.
- Do not immerse the fan or power cord in water or any other liquids.
- Do not use an air cleaner or similar product next to the fan.
- Do not run the cable under carpets, and do not cover it with carpets or similar covers. Route the cable outside high traffic areas to avoid tripping the cable.
- Keep the cable away from heat sources.
- Do not place any objects on the air inlet or outlet.
- If the power cord is damaged, stop use immediately and contact help.Kogan.com for assistance.
- Do not move the fan when pulling the plug out of the socket.
- Do not pull out the plug by the cable. Pull out the plug directly and do not grip the cable.
- Do not stretch the cable.
- Turn off all controls before pulling the plug and pull the plug out of the socket if the fan will not be used for an extended period.
- Ensure ventilation openings are free of dust, lint, hair, and other obstacles that could impair the airflow.
- It is not recommended to use an extension cord.
- Ensure the fan is unplugged before cleaning or performing maintenance.
OVERVIEW

text_image
Air outlet Air duct Air purifier filter cover Air inlet Display Base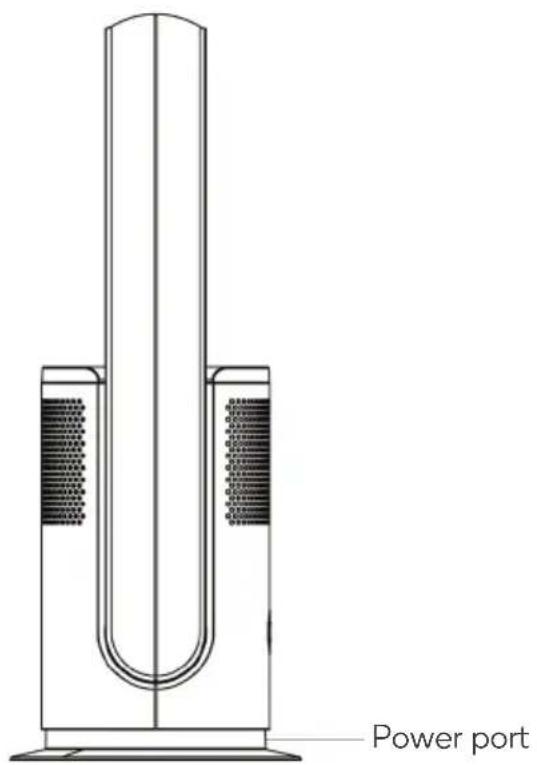
text_image
Power port
text_image
AC adapter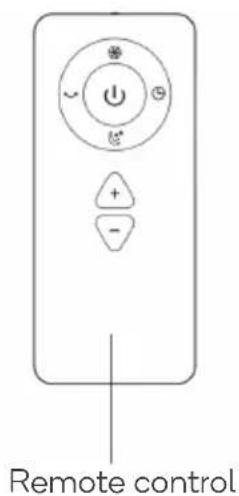
text_image
Remote controlBEFORE FIRST USE
Placement
• Use the fan on a dry, flat surface.
- Ensure there is at least a 30cm clearance between the fan and any walls or obstructions.
Notes:
- Do not place the fan on unstable, inclined, or soft surfaces to avoid damage or malfunctions caused by the fan tipping over.
- Avoid blocking the air inlet when in use. Locate the fan away from curtains to avoid objects blocking the air inlet and the fan not working.
natural_image
Line drawing of a portable air conditioner unit with arched top and front panel (no text or symbols)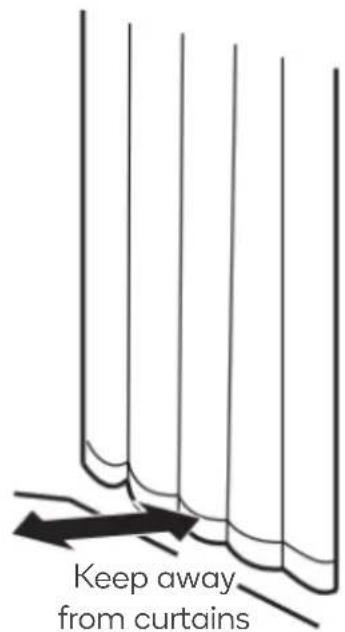
text_image
Keep away from curtainsFilter installation
This fan is equipped with an air cleaning filter.
Before using the fan, the filter should be installed in the fan so the air can be cleaned.

natural_image
Simple line drawing of a cylindrical device with a textured surface and a curved arrow indicating rotation (no text or symbols)- Turn the air purifier filter cover anti-clockwise to unlock and remove.

- Secure the filter to the air purifier filter cover with the buckle.

natural_image
Close-up of a mechanical component with a meshed top and a downward arrow indicating motion (no text or symbols)- After assembling, put it back in the main unit and turn it clockwise to secure it.
Remote control battery
This remote control requires x2 1.5V alkaline AAA batteries to operate.
- Remove the battery cover.
- Noting the battery polarities (+/-), insert x2 1.5V alkaline batteries into the remote control.
- Ensuring the locking tabs click into place, secure the battery cover onto the remote control.
Battery cover
Notes:
- If the remote control will not be used for an extended period, remove the batteries.
- Batteries are not rechargeable.
- When using the remote control, ensure to point it towards the signal receiver.
OPERATION
Powering on
- Connect one end of the AC adapter into the power port. Connect the other end into an outlet.
- Turn the outlet on. The LED display will illuminate and the fan will go into standby.
- Press the power button. The fan will beep once and the fan will start.
Powering off
Press and hold the power button for two seconds and the fan will beep twice. The fan will stop running after you release your hand.
Remote control
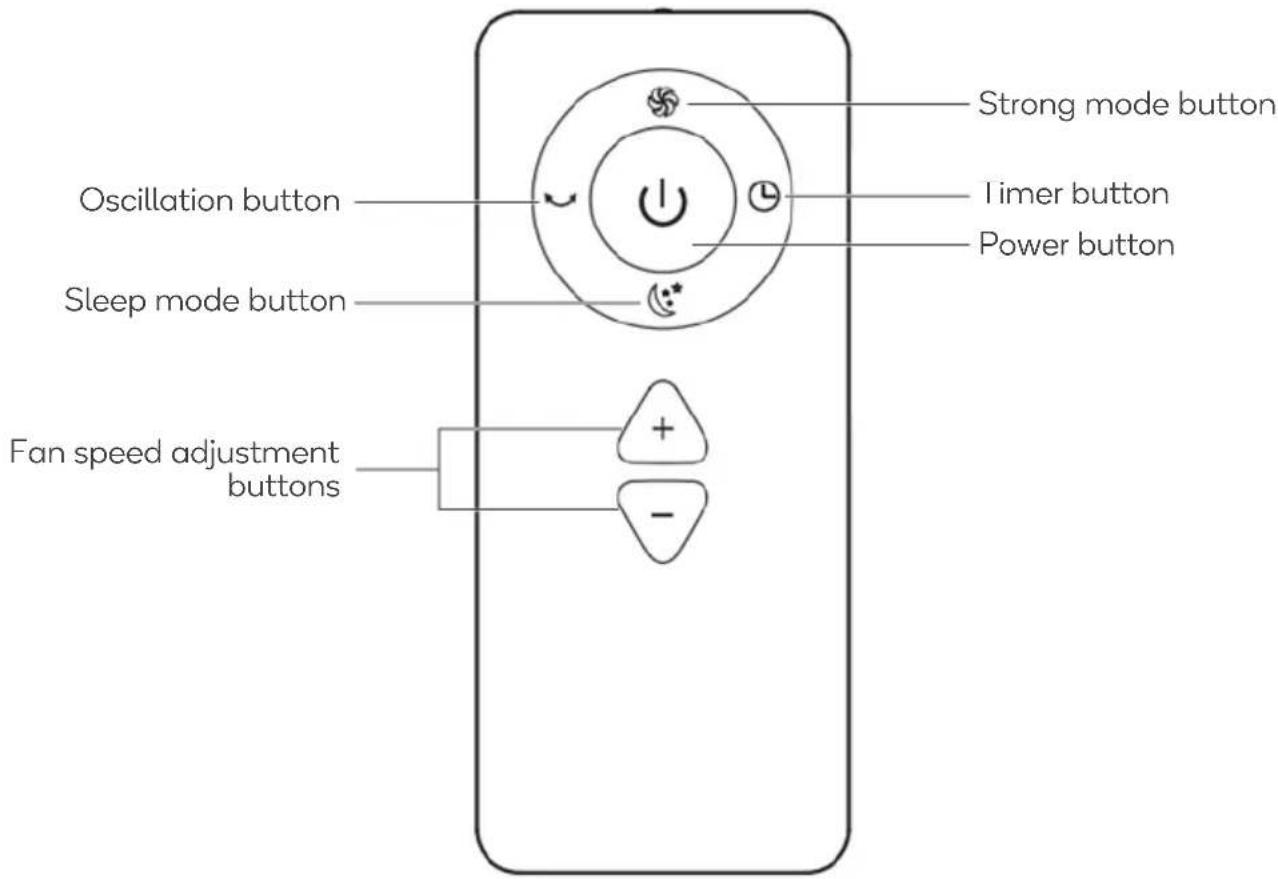
text_image
Strong mode button I timer button Power button Oscillation button Sleep mode button Fan speed adjustment buttons| Name | Icon | Description |
| Power button |  | When in standby, press this button to turn the fan on.Press and hold the power button again to turn the fan off. |
| Strong mode button |  | Strong mode will increase the fan speed to constant high speeds.Press the strong mode button to activate. ‘H’ will be shown on the display.Press the button again to exit strong mode. |
| Sleep mode button |  | Sleep mode is ideal for overnight use. The fan will run at a low setting perfect for a quiet night sleep.Press the sleep mode button to activate. ‘L’ will be shown on the display.Press the button again to exit sleep mode. |
| Oscillation button |  | This fan can oscillate up to 80° left and right.Press the oscillation button to turn the oscillation function on.Press the button again to turn the oscillation function off. |
| Fan speed adjustment buttons | 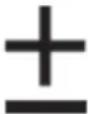 | This fan features 9 levels of speed.Press the ‘+’ button on the remote control to increase the fan speed.Press the ‘-’ button to decrease the fan speed. |
| Timer button |  | The timer function can be set to automatically turn the fan off after 1-8 hours.Press the timer button on the remote control repeatedly to set the timer to a time between 1-8 hours. The number of hours selected will be reflected on the display.After the timer is set, the tower can be used normally.To cancel the timer, press the timer button repeatedly until the display shows ‘0’.The timer will also be cancelled if the fan is turned off prior to the timer’s lapse. |
Oscillation using the display
When the fan is operating, oscillation can also be activated by touching the display.
- Touch and hold the display for one second. The fan will beep once and start oscillating.
- Touch and hold the display again for one second. The fan will beep once and stop oscillating.
Tilting the fan
Ensure the fan has been turned off before tilting.
Hold the fan body with one hand and set the wind outlet 15° forwards or backwards.

natural_image
Three diagrams showing a U-shaped tube with internal segments, each with an arrow indicating rotation or compression (no text or symbols present)Note when using the remote control
This fan may respond to the remote controls of other devices and vice versa. This is due to the remote controls being of the same frequency and is a normal phenomenon.
To prevent this from happening:
- Keep the remote controls of other devices away from the fan.
- When using the remote control, point it towards the signal receiver.
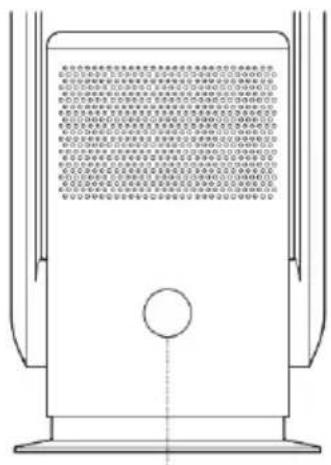
text_image
Technical diagram of a device with Chinese text annotations describing internal components and functions.Signal receiver

natural_image
Line drawing of a hand holding a remote device with wireless signal waves (no text or symbols)CONNECT TO SMARTERHOME™ APP
Install App
Download the 'Kogan SmarterHome' app from the Play Store (Android) or App Store (iOS).

text_image
QR code image containing encoded data, no visible human-readable textPlay Store (Android)


text_image
QR code image containing encoded data, no visible human-readable textApp Store (iOS)

To register:
- If you already have a SmarterHome account, select 'Log In'. To register a new account, select 'Sign Up'.
- The system will automatically recognise your country. If needed, you can manually select your country from the drop-down box. Enter your email address and tap 'Get Verification Code' to continue.
- A 6-digit code will be sent to the submitted email address. Enter this code before the one-minute timer expires.
- Continue to the next page and complete your SmarterHome profile.
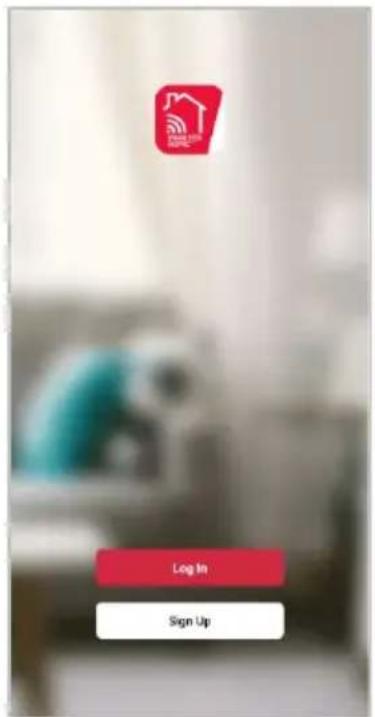
text_image
Log In Sign Up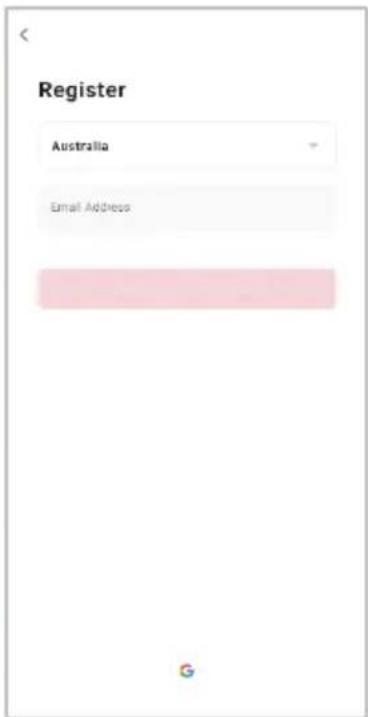
text_image
Register Australia Email Address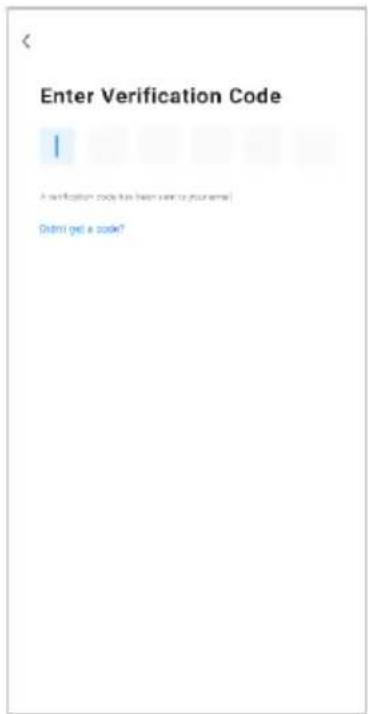
text_image
Enter Verification Code 1 Verification code to be sent to your email! Did you get a code?Set device in pairing mode
When the device is first turned on, it may automatically enter pairing mode (the display will be flashing 'F' rapidly).
If not automatically in pairing mode when powered on, you can manually set the device in pairing mode by pressing and holding the display for five seconds until you hear three beeps and the display shows 'F' flashing rapidly.
Add device through network
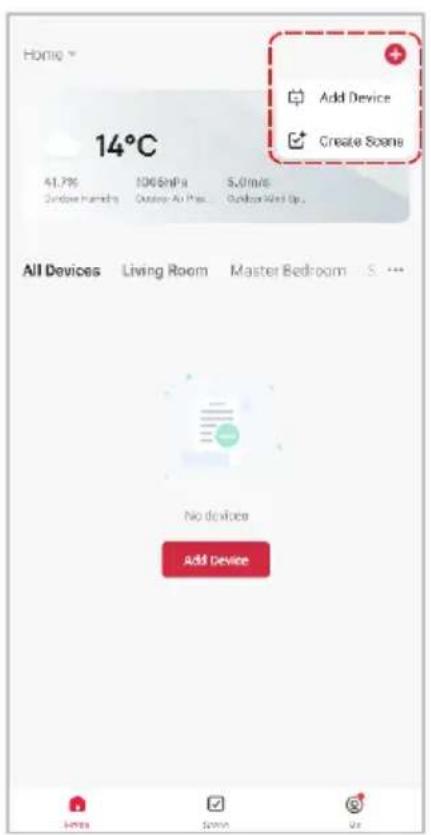
- Once registered, tap 'Add Device' on the app's home page, or the '+' in the upper right corner, to add a new device through the network.
- Select the product type from the list of options in the app (Heating & Cooling > Fans).
- Enter your Wi-Fi details. It is important that your SmarterHome™ device and the app are connected to the same Wi-Fi network during setup.
text_image
Home 14°C Add Device Create Soaps 41.7% 100 $/MPa 5.0 m/s Window Frames Outdoor Air Pass Outdoor Wind Up. All Devices Living Room Master Bedroom S. --- No devices Add Device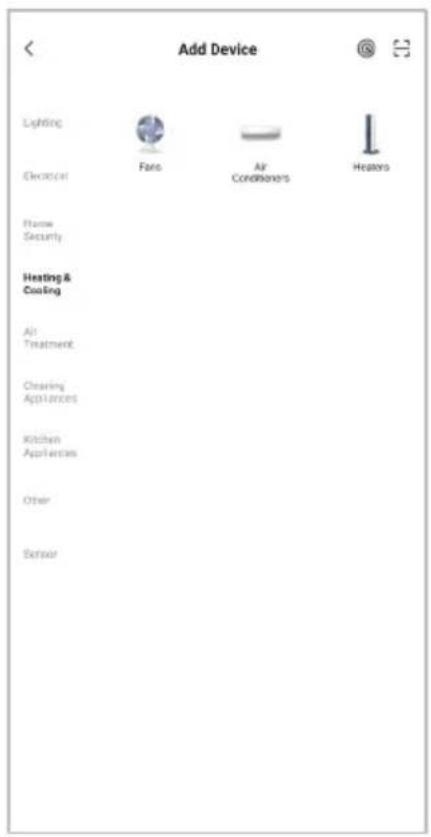
text_image
Add Device Lighting Electrical Fan Air Conditioners Heaters Name Security Heating & Coating Air Treatment Cleaning Appliances Kitchen Appliances Other Sensor
text_image
Cancel Select 2.4 GHz Wi-Fi Network and enter password. If your WiFi is 5GHz, please set it to be 2.4GHz Common route setting method OK 5GHz ✓ WiFi - 2.4GHz Your Wi-Fi network (2.4GHz) Password NextNotes:
• The device and the app have to use the same Wi-Fi network.
• The device is only compatible with 2.4Ghz networks.
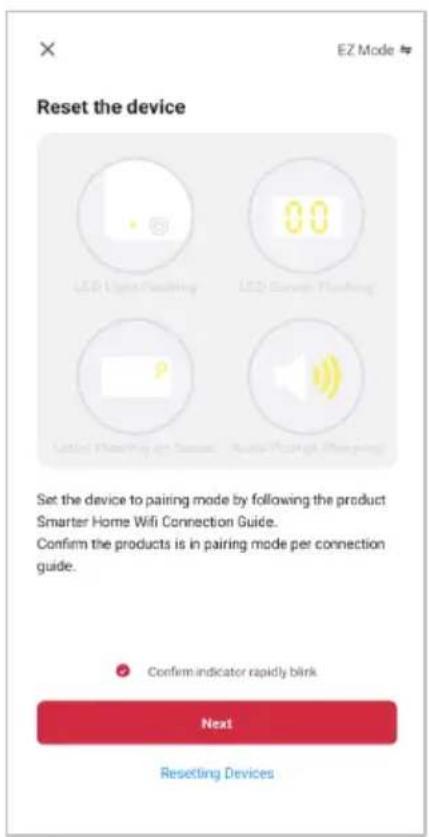
- Ensure that the device is in pairing mode, with 'F' flashing rapidly on the display, and tap 'Confirm light is rapidly flashing'.
- The device will commence the pairing process and connect to the app. Ensure your Wi-Fi router, mobile phone, and the SmarterHome™ device are kept close until connection is complete.
- After successfully being added, you will have the option to rename the device and assign it to a location. It will now be listed on the app's home page. Tap the device listing to enter its control page.
text_image
EZ Mode Reset the device LED Light/Flushing LED Cover/Flushing LED Lighting to Screen Audio Package (Cycling) Set the device to pairing mode by following the product Smarter Home Wifi Connection Guide. Confirm the products is in pairing mode per connection guide. Confirm indicator rapidly blink Next Resetting Devices
text_image
Cancel Adding device... Ensure that the Wi-Fi signal is good. 01:56 Scan devices Register your Add Include this device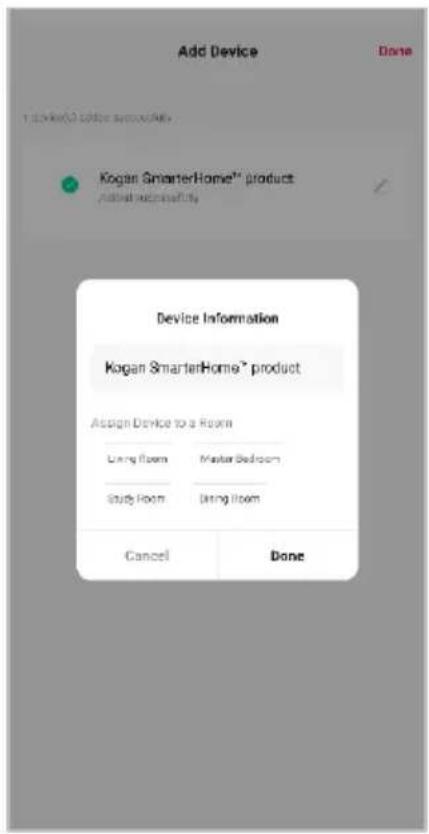
text_image
Add Device Done 1. Add to 3 daily schedule Kogan SmarterHome® product Add new facility Device Information Kogan SmarterHome® product Assign Device to a Room Using Room Master Bedroom Study Room Using Room Cancel DoneNote:
Once connected, you can select Create Scene from the ‘+’ in the upper right corner (or from the Scene tab) to group connected SmarterHome™ products and automate their functions.
Having trouble connecting?
The prior steps detail the process for 'EZ Mode' connection. If that does not work for your connection, we suggest trying it again, and if still no success, attempting the following method for AP Mode connection.
Set device in AP pairing mode
Set the device in pairing mode pressing and holding the oscillation button/display for five seconds again until the fan emits three beeps the display shows 'F' flashing slowly.
Using AP Mode to add device
- Follow the previous steps to select your product type (Heating & Cooling > Fans).
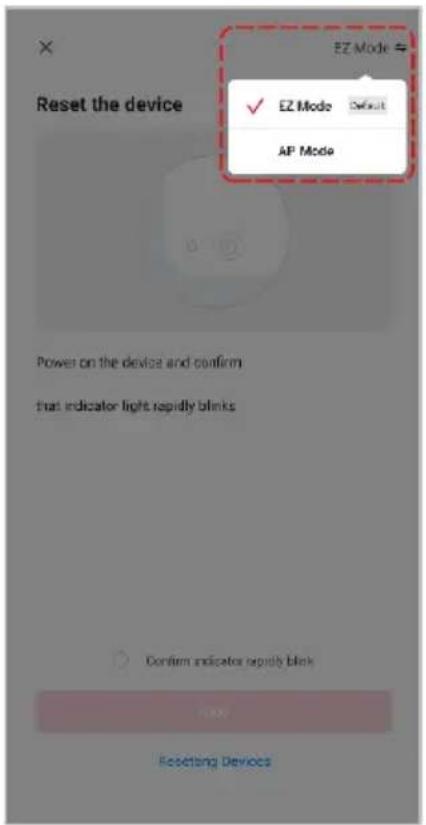
- Adjust your connection method by tapping on the mode type in the top-right corner of the screen. Select 'AP Mode' for the set-up type.
- Ensure that the device is in pairing mode, with the display flashing 'F' slowly, and tap 'Confirm light is slowly flashing'.
- Enter your Wi-Fi details. It is important that your SmarterHome™ device and the app are connected to the same Wi-Fi network during setup.
text_image
Reset the device EZ Mode ✓ EZ Mode Default AP Mode Power on the device and confirm that indicator light rapidly blinks Confirm indicator rapidly blank Resetting Devices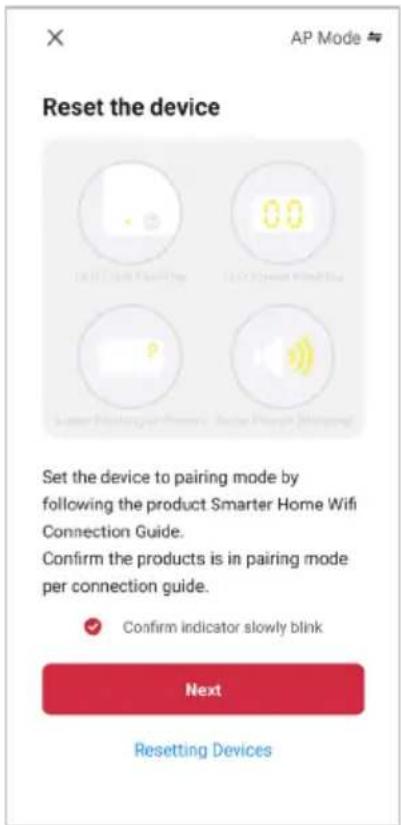
text_image
Reset the device Set the device to pairing mode by following the product Smarter Home Wifi Connection Guide. Confirm the products is in pairing mode per connection guide. Confirm indicator slowly blink Next Resetting Devices
text_image
Cancel Select 2.4 GHz Wi-Fi Network and enter password. If your WiFi is 5GHz, please set it to be 2.4GHz Common router setting method W-Fi - 5GHz W-Fi - 2.4GHz Your WiFi network (2.4GHz) Password NextNotes:
• The device and the app have to use the same Wi-Fi network.
• The device is only compatible with 2.4Ghz networks.
- Follow the in-app prompts to continue AP Mode connection, which will pair your mobile phone to the device's Wi-Fi hotspot to ensure a connection. This may be named 'SL-KoganSmart', 'SmartLife-XXXX', or another similar name.
Note:
If the Wi-Fi hotspot does not appear on your phone in the list of available networks, your device may not be set in AP Pairing Mode correctly. Try repeating the steps outlined above to ensure your device is ready for connection.
- The device will commence the pairing process and connect to the app. Ensure your Wi-Fi router, mobile phone, and the SmarterHome™ device are kept close until connection is complete.
- After successfully being added, you will have the option to rename the device and assign it to a location. It will now be listed on the app's home page. Tap the device listing to enter its control page.

text_image
Connect your mobile phone to the device's hotspot ● Connect your phone to the hotspots shows below: WLAN SL-KoganSmart ● Go back and add devices. Go to Connect
text_image
Cancel Adding device... Ensure that the Wi-Fi signal is good. 01:56 Stop Service... Register on Cloud... Reduce the Device...
text_image
Add Device Done Kogan Smart Home™ product Active successfully Device Information Kogan Smart Home® product Assign Device to a Room Long Room Master Bedroom Study Room Bring Room Cancel DoneNote:
Once connected, you can select Create Scene from the ‘+’ in the upper right corner (or from the Scene tab) to group connected SmarterHome™ products and automate their functions.
GOOGLE HOME CONTROL
Note:
You will need to have set up a Google Home account prior to linking your Kogan SmarterHome™ device.
Adding 'SmarterHome' to the Google Home app
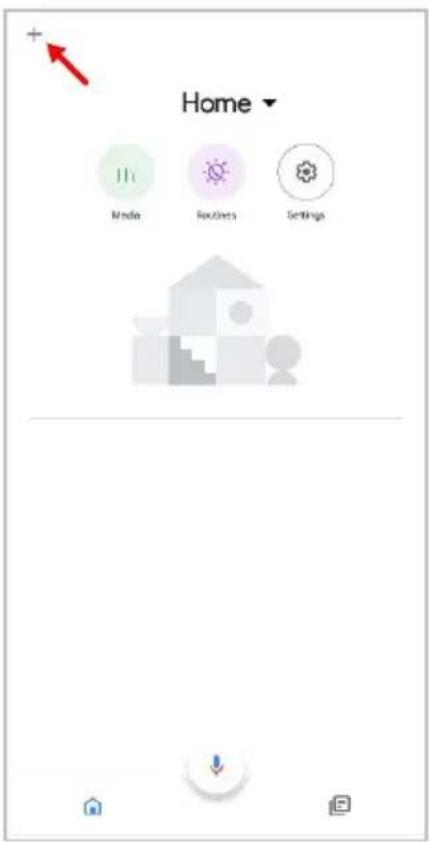
- From the home page of the Google Home app, select the '+' icon (top left corner, see arrow in the below screenshot) to access the 'Add and manage' page.
- Select 'Set up device', then select the 'Works with Google' option.
text_image
Home Media Routes Settings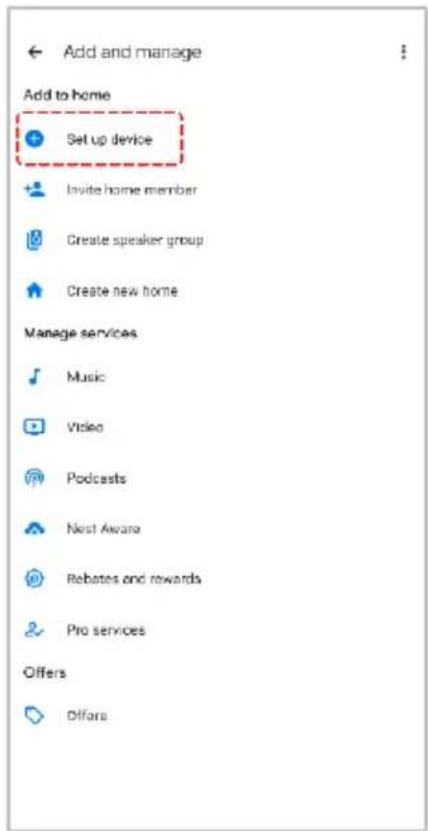
text_image
Add and manage Add to home Set up device Invite home member Create speaker group Create new home Manage services Music Video Podcasts Nest Awana Rebates and rewards Pro services Offers Offers
text_image
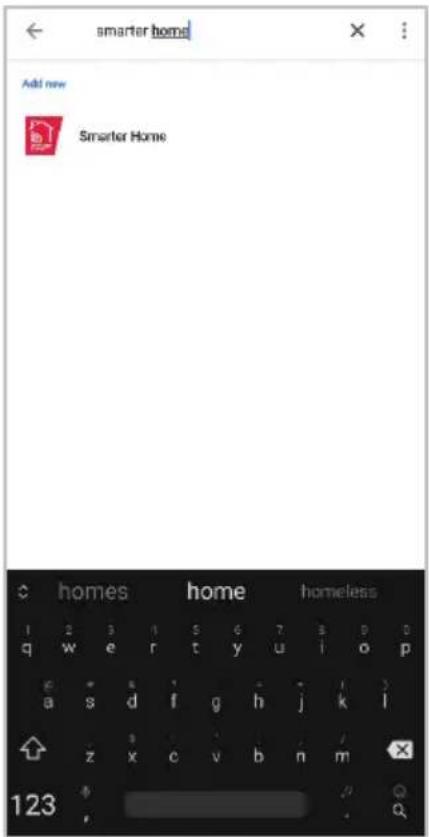
Set up a device Set up a new device or add an existing device or service to your home New device Add something new. Like a Chromecast, Google Nest speaker or display or a partner device, including those labelled Seamless Setup with the Google Home App. Works with Google Link one of your existing devices or services, such as connected light bulbs or plugs.- Select the search bar and type 'Smarter Home' to locate the Kogan SmarterHome™ service.
- From here, you will be prompted to sign into your SmarterHome™ account using either your email or mobile phone number, depending on which method you used to register your account.
- Select 'Kogan SmarterHome™' from the app options.
text_image
smarter home Add new Smarter Home homes home homeless 1 2 3 4 5 6 7 8 9 0 q w e r t y u i o p e * s i * j k l a s d f g h j k l z x c v b n m 123 ,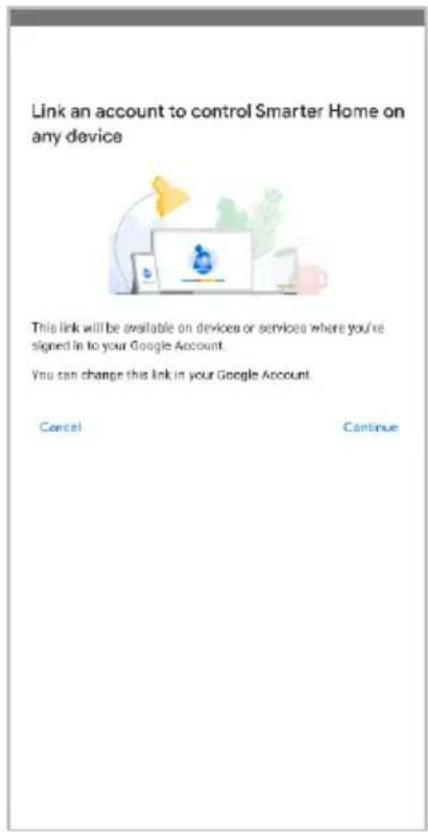
text_image
Link an account to control Smarter Home on any device This link will be available on devices or services where you're signed in to your Google Account. You can change this link in your Google Account. Cancel Cancel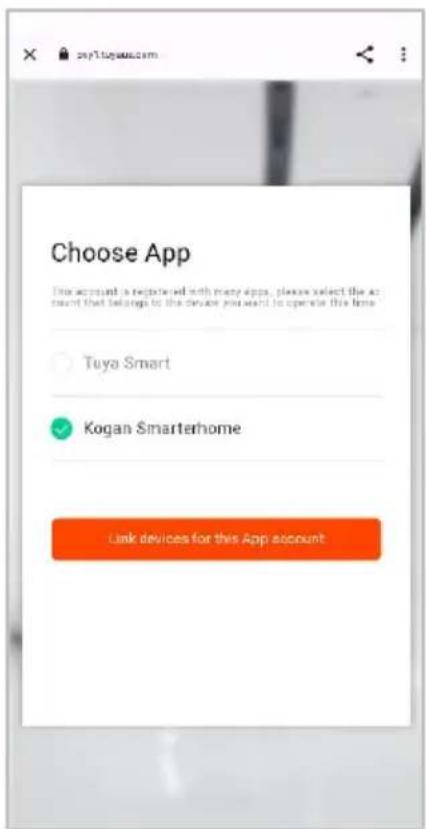
text_image
Choose App This account is registered with many apps, please select the account that belongs to the device you want to operate this time. Tuya Smart Kogan Smarterhome Link devices for this App account- Tap 'Authorise' to grant Google permission to access the SmarterHome™ app and your devices.
- Once connected, the app will display any compatible devices linked to your SmarterHome™ account. From here you can assign them to rooms and set up any routines. Tap on any of the devices to view a list of available commands.

text_image
By signing in, you are authorizing Google to control your devices. Authorize You can make permission at any time.
text_image
Add smart home devices Select devices and add to a room Devices connected within the SmarterHome™ app will appear here if compatibleNote:
Please note that Google Home can only control the base/core functions of any compatible SmarterHome™ devices. To make full use of this product's smart functionality, please use the Kogan SmarterHome™ app.
AMAZON ALEXA CONTROL
Note:
You will need to have set up an Alexa account prior to linking your Kogan SmarterHome™ device.
Adding 'SmarterHome' to the Alexa app
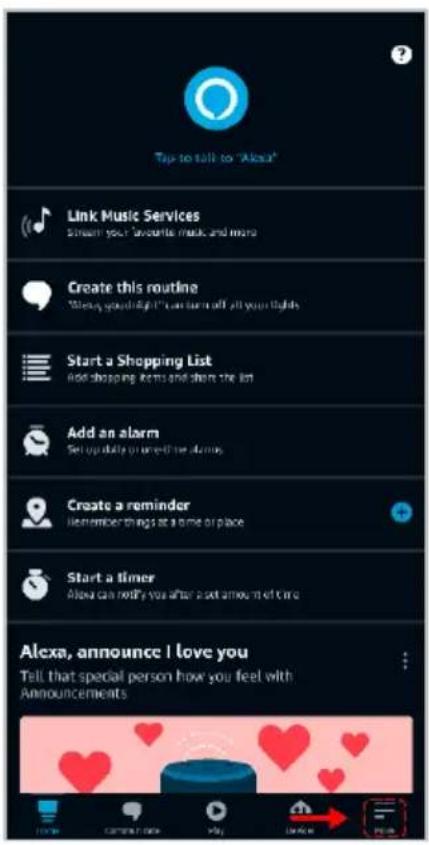
- From the home page of the Alexa app, select the “≡” icon in the bottom-right and select ‘Skills & Games’ from the sidebar.
- Select the search bar and type 'Smarter Home' to locate the Kogan SmarterHome™ skill.
text_image
Tips to talk to "Alexa" Link Music Services Stream your favorite music and more Create this routine "Always spend right" can turn off all your lights Start a Shopping List Add shopping items and share the list Add an alarm Set up daily or next day alarm Create a reminder Remember things at a time or place Start a timer Allow can notify you after a set amount of time Alexa, announce I love you Tell that special person how you feel with Announcements
text_image
Add a Device Lists & Notes Reminders Alarms & Timers Routines Skills & Games See More > Settings Activity Help & Feedback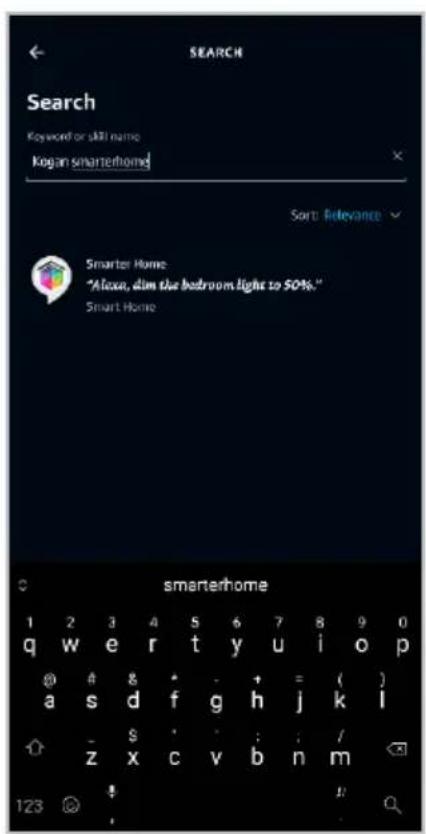
text_image
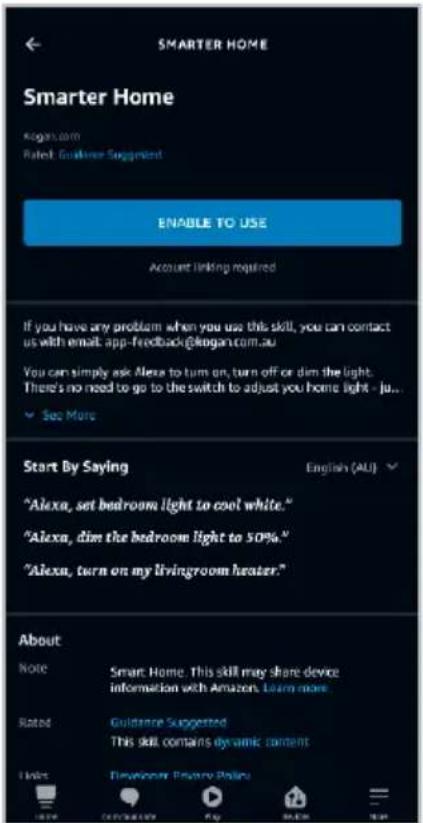
SEARCH Search Keyword or skill name Kogan smarterhome Sort Relevance Smarter Home "Abox, dim the bedroom light to 50%." Smart Home smarterhome 1 2 3 4 5 6 7 8 9 0 q w e r t y u i o p @ # s * - + = ( ) a s d f g h j k l - $ : : / z x c v b n m 123- Tap 'Enable to Use' to add the Kogan SmarterHome™ skill to Alexa.
- From here, you will be prompted to sign into your SmarterHome™ account using either your email or mobile phone number, depending on which method you used to register your account.
- Select 'Kogan SmarterHome™' from the app options.
text_image
SMARTER HOME Smarter Home Kogan.com Rated: Guideline Suggested ENABLE TO USE Account linking required If you have any problem when you use this skill, you can contact us with email: app-feedback@kogan.com.au You can simply ask Alexa to turn on, turn off or dim the light. There's no need to go to the switch to adjust you home light - ju... See More Start By Saying "Alexa, set bedroom light to cool white." "Alexa, dim the bedroom light to 50%." "Alexa, turn on my livingroom heater." English (AU) About Note Smart Home. This skill may share device information with Amazon. Learn more. Rated Guidance Suggested This skill contains dynamic content I like Developer Privacy Policy
text_image
pxyl.tuyueb.com/pl/?from=koga English Australia Print Number/Email Address Next Step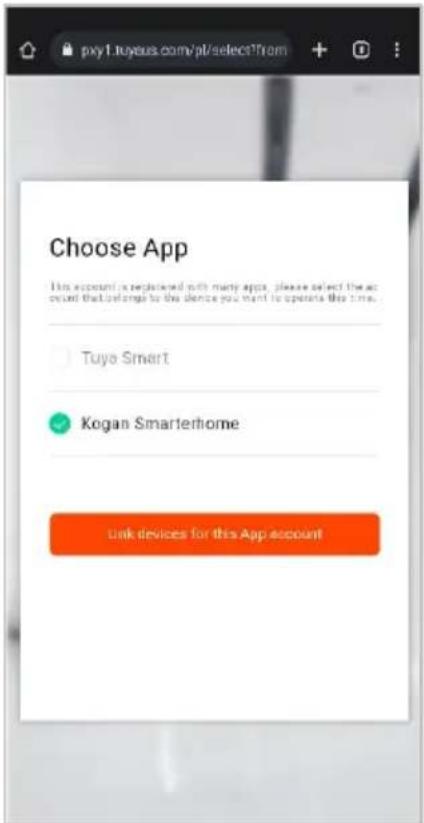
text_image
pxy1.tuyous.com/pt/selectTrom Choose App This account is registered with many apps, please select the account that belongs to the device you want to operate this time. Tuya Smart Kogan Smarterhome Link devices for this App account- Tap 'Authorise' to grant Alexa permission to access the SmarterHome™ app and your devices.
- Once connected, the app will perform a search and display the devices linked to your SmarterHome™ account. When your devices have successfully connected to the Alexa app, you will be able to control your Kogan SmarterHome™ devices via Alexa's voice commands.

text_image
pxy1.tuyaus.com/p/authorization?fi Alexia by Amazon will be able to: Receive your public profile Control your devices over internet Authorize You can review permission at any time.
text_image
ACCOUNT LINKING Your Smarter Home account has been successfully linked. What to do next. Close this window to discover smart home devices you can control with Alexa. CLOSENote:
Please note that Alexa can only control the base/core functions of any compatible SmarterHome™ devices. To make full use of this product's smart functionality, please use the Kogan SmarterHome™ app.
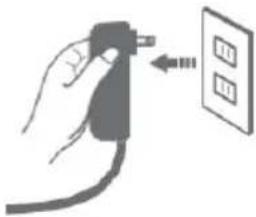
CLEANING & CARE
Before cleaning and maintenance, turn off the fan and pull the plug out of the socket.
natural_image
Hand holding a plug with three buttons and a wall-mounted panel (no text or symbols visible)Surface
Gently wipe the fan surface with a soft, dry cloth
If the surface of the fan is dirty, use a solution of water and diluted detergent and wipe the surface of the fan with a soft cloth.
Wipe dry with a soft cloth.
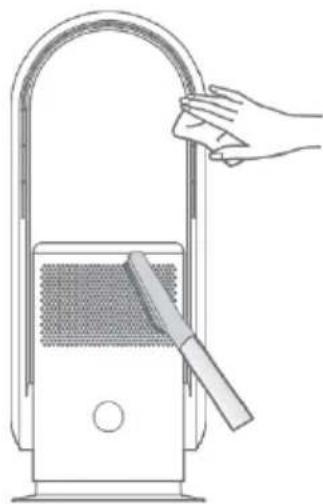
Air inlet and air outlet
Use a soft brush or vacuum cleaner to clean the dust at the air inlet and outlet. If there is too much dust, this can affect the fan's performance.
natural_image
Line drawing of a hand cleaning a curved pipe with a device (no text or symbols)Remote control
Gently wipe the surface of the remote control with a soft, dry cloth. If it will not be used for an extended period, remove the batteries.
Plug
Clean the plug with a soft, dry cloth.
Notes:
Do not use any harsh cleaning agents or lubricants on this fan.
Filter replacement
This fan has a memory function for filter replacement. After 720 hours of operation, the display will illuminate a sequence of indicators (as shown below) when the fan is turned on. The fan will make a buzzing sound five times after the display shows as below to notify the filter must be replaced.

text_image
-= -=The steps to replace the filter are as follows:
natural_image
Line drawing of a device with a circular top and textured grille, connected to vertical rods (no text or symbols)- Turn the air purifier filter cover anticlockwise to unlock and remove the filter.
natural_image
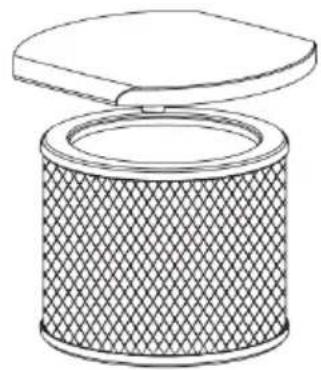
Line drawing of a cylindrical object with a lid, showing internal texture and mesh pattern (no text or symbols)- Disconnect the old filter from the air purifier filter cover.

natural_image
Simple line drawing of a cylindrical object with a mesh pattern and a flat top (no text or symbols)- Attach the new filter to the air purifier filter cover with the buckle. This creates the filter assembly.
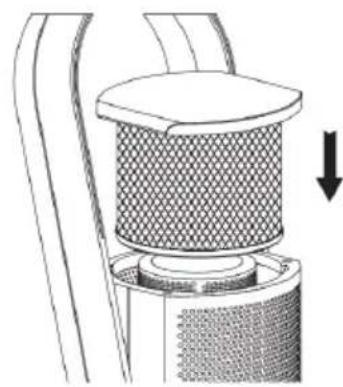
natural_image
Technical illustration of a mechanical component with a meshed top and directional arrow (no text or symbols)-
Place the filter assembly back in into the tower fan body and turn it clockwise to secure.
-
After replacing the filter, press and hold the power button on the remote control for five seconds to stop the buzzing. The fan will reset its memory function.
Storage
After the fan has been cleaned and dried, store in a plastic bag away from children.
Notes:
- Keep away from vibrations and electrical devices with cooling/heating functions.
- Do not expose it to direct sunlight, hot, and humid places.
SPECIFICATIONS
Operating voltages supported 100-240V
Rated frequencies supported 50Hz, 60Hz
Oscillation 80 ± 5^
Rated voltage 24V
Timer 1-8H
Rated power 35W
Weight 2.84kg
Dimensions 235 x 235 x 592mm
Need more information?
We hope that this user guide has given you the assistance needed for a simple set-up.
For the most up-to-date guide for your product, as well as any additional assistance you may require, head online to help.kogan.com
kogan.com