
KASH52DCCFW - Fan Kogan - Free user manual and instructions
Find the device manual for free KASH52DCCFW Kogan in PDF.


| Product Type | Ceiling Fan |
| Brand | Kogan |
| Model | KASH52DCCFW |
| Blade Span | 52 inches (132 cm) |
| Motor Type | DC Motor |
| Number of Blades | 3 |
| Blade Material | ABS Plastic |
| Remote Control | Included (6-speed + reverse) |
| Voltage | 120V / 60Hz |
| Power Consumption | 35W (max) |
| Airflow | 4,500 CFM |
| Speed Settings | 6 speeds + natural breeze mode |
| Reversible Motor | Yes (summer/winter) |
| Timer | 1, 2, 4, 8 hours |
| Weight | 5.5 kg (12.1 lbs) |
| Dimensions | 52 x 19 x 19 inches (132 x 48 x 48 cm) |
| Mounting | Ceiling mount (standard downrod) |
| Included Components | Fan body, remote, receiver, downrod, mounting kit |
| Cleaning | Wipe blades and housing with damp cloth; dry immediately |
| Safety | Do not install near water; ensure proper electrical grounding |
| Spare Parts Availability | Contact Kogan support for replacement blades, remote, receiver |
Frequently Asked Questions - KASH52DCCFW Kogan
User questions about KASH52DCCFW Kogan
0 question about this device. Answer the ones you know or ask your own.
Ask a new question about this device
Download the instructions for your Fan in PDF format for free! Find your manual KASH52DCCFW - Kogan and take your electronic device back in hand. On this page are published all the documents necessary for the use of your device. KASH52DCCFW by Kogan.
USER MANUAL KASH52DCCFW Kogan
natural_image
Line drawing of a three-blade propeller with a central hub and top blade (no text or symbols)KOGAN SMARTERHOME™ DC MOTOR CEILING FAN
WITH LED LIGHT (132CM)
KASH52DCCFW
Safety & Warnings 3
Components 5
Overview 6
Installation 7
Operation 17
Connect to SmarterHome™ App 19
Google Home Control 22
Amazon Alexa Control 25
App Operation 28
Cleaning & Care 30
Troubleshooting 31
Specifications 32
Notes 33
SAFETY & WARNINGS
IMPORTANT: For your safety, this product must be installed by a licensed electrical contractor.
- Make sure that the mains voltage matches the voltage stated on the rating label of the appliance.
- Check the power cord regularly for visible damage. If the cord is damaged, cease use immediately and contact help.Kogan.com for support, in order to avoid danger.
WARNING: Do not use the appliance if its cord, plug, or housing is damaged, or if it malfunctions or has been dropped or damaged in any way.
- Do not use the appliance in confined spaces with explosive or toxic vapours.
- The appliance is not intended to be used by children under the age of 8. It can be used by children over the age of 8, if they are given continuous supervision.
- This appliance is not intended to be used by persons with reduced physical, sensory, or mental capabilities, or lack of experien7ce or knowledge, unless they have been given supervision or instruction concerning the use of the appliance in a safe way by a person responsible for their safety, and understand the hazards involved.
- Supervise young children to make sure that they do not play with the appliance. Close supervision is necessary when the appliance is being used by or near children.
- Keep the appliance and its cord out of reach of children under the age of 8.
- Do not try to repair the appliance yourself. Contact help.Kogan.com for support.
- Cleaning and maintenance must be carried out according to this user guide to make sure the appliance functions properly. Always turn off and unplug the appliance before cleaning.
- Cleaning and maintenance tasks must not be carried out by children.
- Make sure the fan is not placed near drapes, curtains, or any object that may be drawn into the fan.
- Never attach the fan to a power point, but to the ceiling itself.
- The minimum distance between the fan blades and the floor must be 2.1m. The minimum carrying capacity of the outlet box from which the fan is hung must be 45kg.
- Make sure you install an all-poles disconnection switch with a minimum distance of 3mm between poles in the supply wiring to the ceiling fan.
- Make sure the installation site will not allow the rotating fan blades to contact any objects and that there is a minimum distance of 150mm (6") from the blade tip to the wall or ceiling. Please note that the bigger this distance is, the more airflow the fan will produce.
- Switch off the power before connecting the fan.
- The electrical wiring must be in accordance with local regulations. The fan must be properly grounded to avoid the risk of electric shocks.
- Never mount the fan in a moist or wet room. Be careful when working near the rotating blades.
- This appliance must be installed in accordance with national electrical installation regulations.
WARNING: In order to ensure your children's safety, please keep all packaging (plastic bags, boxes, polystyrene etc.) out of their reach.
IMPORTANT: Shut off the main electric switch during installation or maintenance. It is enough to switch off).
- Do not use outdoors. The product must be installed in a dry place, where it is not exposed to water or moisture.
- Do not connect the fan motor to a dimmer switch. This could result in malfunction or motor damage.
- It is not recommended that ceiling fans and gas appliances operate in the same room at the same time.
- The fan must be completely turned off and stopped before reversing the fan direction. This will prevent the fan motor and controller from getting damaged. (if installed).
- Do not insert any object into the fan blades during operation. This will damage the blades and upset the balance of the fan causing the unit to wobble.
- After the fan is completely installed make sure all base and fan blade fixings are secured and tightened to prevent any problems.
- Some of the connections may loosen due to the fan's natural movement. Check the support connections brackets and blade attachments twice a year to make sure they remain secured. If any are loose, tighten.
- Do not touch the appliance with wet hands or feet.
- Never expose the appliance to atmospheric conditions (rain, sun...).
- Do not use the device next to potentially explosive or inflammable liquids or gases.
- This product is intended for household use ONLY and not for commercial/industrial or outdoor use.
- Keep batteries out of the reach of children and animals, they could cause damage if swallowed. If they were swallowed, contact your doctor immediately.
- If any visible signs of damage, holes or deterioration are observed, avoid direct contact between batteries and skin or eyes. If batteries leak and come in contact with your eyes, immediately wash them with clean water and contact your doctor.
COMPONENTS

natural_image
Technical line drawing of a mechanical bracket or bracket (no text or symbols)1 Mounting bracket

2 Extended down rod and hanging ball

3 Canopy

4 Cover cap
natural_image
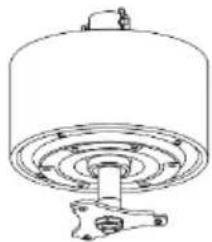
Technical line drawing of a cylindrical mechanical component with concentric rings and mounting base (no text or symbols)5 Fan motor housing

natural_image
Simple line drawing of a tool handle (no text or symbols)6 Blades (x3)
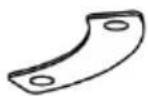
7 Fan blade gasket (x3)

8 Fan screw (x7)
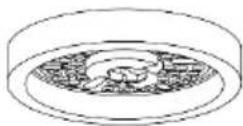
9 LED panel
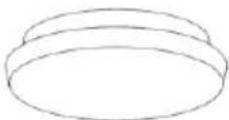
10 Lamp shade

11 Remote & receiver

12 Mounting hardware*
*Screw kit, mounting bracket hanging ball hardware (wire, nuts, rubber washers).
Additional Tools and Material Required (Not Included)

natural_image
Illustration of six different tools and equipment: screwdriver, wrench, ladder, pliers, washer, and ring (no text or symbols)- Phillips screwdriver
-
Flat blade screwdriver
-
Step ladder
-
Wire cutter
-
Adjustable pliers or wrench
- Electrical tape
OVERVIEW

INSTALLION
Unpack your ceiling fan carefully, remove all ports and components and lay on a cloth cc soft surface to avoid damage. Do not lay the motor housing on its side, the housing may get damaged. Before commencing installation, check that all parts are included.
WARNING: All electrical tasks should only be undertaken after disconnection of electricity by removing fuses or turning off the circuit breaker to avoid the risk of electric shock.
Installation of the Mounting Bracket
The hanger bracket must be screwed on to a firm, flat surface. The structure to which it is installed must be able to withstand ten times the static weight of the fan.
Wooden surface:
-
If installing the ceiling fan into o wooden ceiling or joist, attach the mounting bracket using the 4 supplied self-trapping screws. Note: Self-tapping screws ore only suitable for wooden ceilings.
-
Ensure the mounting bracket is properly scared to prevent the fan from falling.
-
Loosen the two canopy screws from the mounting bracket.

natural_image
Technical line drawing of a mechanical assembly with screws and a tool, no text or symbols presentConcrete surface:
- If installing the ceiling fan into a concrete ceiling, drill out the fax holes in the mounting bracket using on 8mm drill bit
- Attach the mounting bracket using the 4 M6 expansion bolts.
- Once the mounting bracket is installed, drill a 10mm hole next to the bracket.
Note:
Be cautious when drilling the 10mm hole to avoid hitting an electrical wiring.
- Install the expansion screw hook in the 10mm hole.

Installation of The Dawn Red and Hanger Ball
- Unscrew the screw on the down rod's hanger ball, then loosen the hanger ball.
- Remove the stop pin from inside the down rod and remove the hanger ball.
- Remove the clevis pin and hairpin clip from the down rod.
Note:
For installation in higher ceilings, you may require the extended down rod. Transfer the hanger ball on it and make sure to move the earth wire from one to the other. Pass the electrical supply leads form the top of the motor all the way through the down rod until they come out the other end.

- Insert the down rod into the motor housing's hole and align the holes on both sides with the holes on the down rod.
- Carefully insert the clevis pin through the holes so that it passes through the down rod. Secure the clevis pin in place using the hairpin clip.

natural_image
Line drawing of a funnel with a central rod and base, no text or symbols present- Tighten all the fastener to ensure there is minimal rod and fan movement during operation.
IMPORTANT: Ensure all screws ore fastened properly. Loose screws will cause; the motor to oscillate excessively, damage to the fan or fatal injuries.
- Once the above steps are all finished, install the hanger ball onto the down rod.

natural_image
Technical line drawing of a ceiling lamp with adjustable base and support structure (no text or symbols)-
Insert the stop pin in the down rod and lift the hanger ball.
-
Tighten all the screws firmly so that all the components are properly secured.

Hanging The Fan to The Mounting Bracket
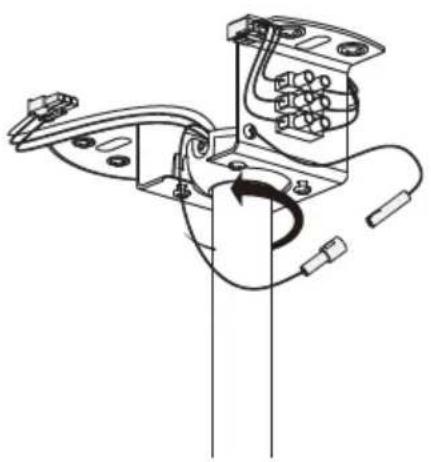
- Lift the fan up to the mounting bracket insert the hanger ball in the mounting bracket through the opening and carefully let it rest.
- Rotate the. hanger ball and woke sure that the tab located in the moulting bracket is aligned with the hanging balls slot
- When aligned, the fan will automatically sit on its correct position. This will prevent rotation of the rod and fan when the unit is operating.
Note:
When installing the fan, ensure the fan ceiling cover doesn't press the antenna (or other wire). Doing so may cause damage to the wire or short-circuiting.
natural_image
Technical line drawing of a mechanical assembly with no visible text or symbols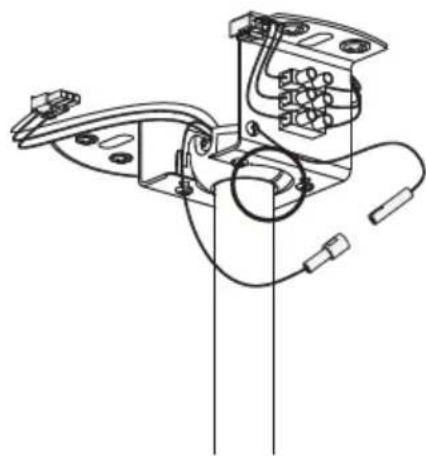
natural_image
Technical line drawing of an electrical connector assembly (no text or symbols)Install the Canopy
Push the canopy plate upward and tighten all screws.

natural_image
Line drawing of a ceiling-mounted lamp with three hanging weights (no text or symbols)Installing the LED Panel and Lamp Shade
- Before installing the fan blades, remove the positioning pieces and screws.

natural_image
Mechanical assembly diagram showing a rotating component before and after assembly, with no visible text or symbols.Blade Assembly
-
Remove the 2 screws and the lamp holder from the fixing panel.
-
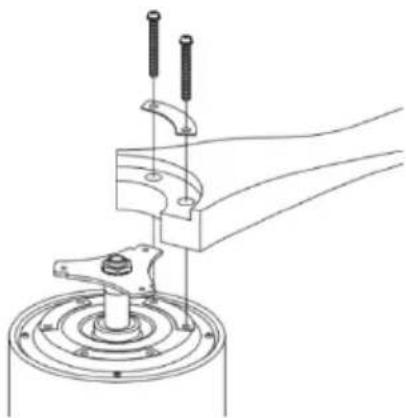
Insert the blades through the motor housing's side slots and align them with the 3 holes.
-
Secure the blades using 2 blade screws and ensure that the blade screws are tightened properly. Do not over tighten the screws as this can damage the blades.
natural_image
Technical line drawing of a mechanical assembly with a central component and two vertical rods (no text or symbols)Note:
If installing more than one fan, be careful not to mix up the blades and screws as each model is designed with specific materials and parts.
-
Repeat this process for the remaining blades.
-
Align the LED panel screw holes with those on the motor and attach both parts by means of the screws provided.

natural_image
Technical line drawing of a mechanical assembly with no visible text or symbols- Carefully install the lamp shade into the main body and turn it clockwise to secure it in place.

natural_image
Pure technical line drawing of a mechanical component with no text or symbolsWARNING: Do not over tighten when installing the glass shade.
Remote Receiver and Wiring Instruction
- Place the receiver through the hanging bracket and connect the wires following the colour codes.
- Connect the push connectors from the fan to the remote receiver.
Notes:
- Refer to the "Warning Diagram" section for more detailed information.
- Ensure the ground wire is connected correctly, otherwise it will cause the fan or light to malfunction.

natural_image
Technical line drawing of a mechanical component with a magnified inset showing its three-pin terminal (no text or symbols present)L -Live wire
N - Null Line
Earth wire
Wiring the Fan
- Connect the 220-240V mains power (dwelling) to the terminal black on the mounting bracket.
- Attach the receiver to the mounting bracket with the flat side facing upwards.
- Connect the 3P connector from the hanger bracket into the AC POWER INPUT socket on the receiver.
- Connect the 3P light connector from the fan motor assembly into the 3P LIGHT socket on the receiver.
- Insert the 3P motor connector from the fan motor assembly into the 3P MOTOR socket on the receiver.
WARNING: To avoid potential electric shock, ensure the electricity is turned off at the main fuse box before wiring.
Wiring diagram

Pairing the Remote to the Receiver
Turn 'ON" the power supply and then within 30 seconds, on the remote press and hold the
“ ⏻” Button for 5 seconds the fan will emit a long "beep" sound Indicating pairing is successful.
Note:
The fan will exit leaning mode after the power supply has been on for longer than 30 seconds.
- If pairing fails, double check that all wiring is correct, the batteries are installed with the correct polarity (+/-) and that the batteries are not flat.
- Check if there are any similar remote-controlled products nearby. Remote controlled products using the same frequency will interfere with each other.
- Low battery will affect the sensitivity and signal reception accordingly of the remote control. The indicator flash when the batteries are getting get low and need to be replaced.
- If leaving unused for an extended period, remove the batteries form the remote control.
Note:
- Adopt RF wireless digit emission technique, biunique controlled, coincident code rate is less than one millionth,
- If the remote control or receiver are damaged. Contact help.Kogan.com support for maintenance.
- The remote control can be used from any angle of the receiver.
- With the memory function, the controller can save the status (light and direction) while the supply power is OFF and will resume after turning the power supply book ON.
Balancing Kit
- The Balancing Kit should only be used if there is an unacceptable amount of fan wobble after completing the previous installation steps.
- Turn the fan on and set the speed control setting to a speed at which the wobble is the greatest.
- Turn off the fan and allow it to come to a complete stop. Select one blade and place the balance clip on it, halfway between the blade holder and the blade tip on the trailing edge of the blade.
- Turn the fan on. Note whether the wobble has increased or decreased. Turn the fan off, move the clip to another blade and retest. Repeat this procedure on all blades noting the blade on which the greatest improvement is achieved.
- Move the clip back to the blade that showed the greatest improvement. Move the clip inward and outward on this blade and operate the fan to find the optimum position where the clip gives the greatest improvement.
- Remove the clip and install a balancing weight to the top of the blade along the centreline near the point where the clip was positioned.
- If the fan wobble problem has not been corrected, you may wish to try to improve the balancing further by using the balancing clip and additional weights.
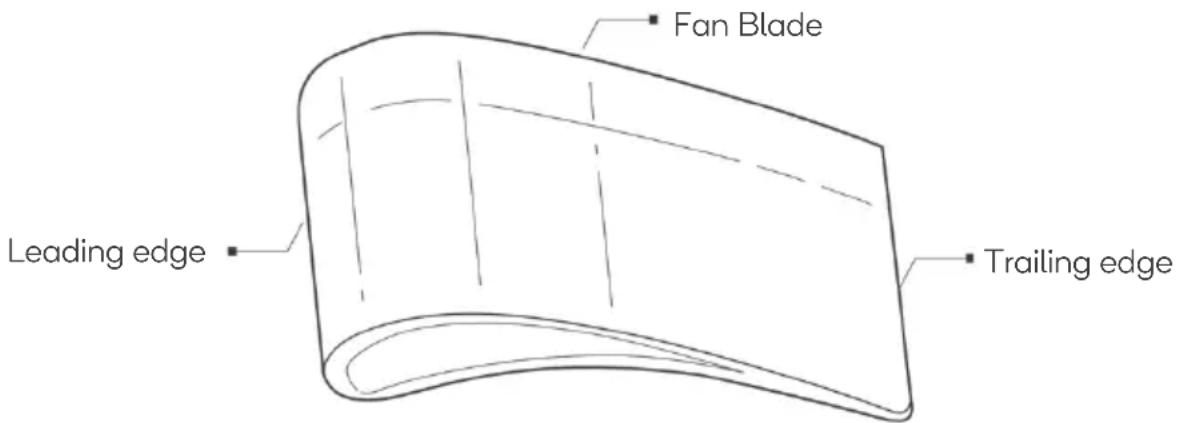
The image is for illustrative purposes only. Actual fan blades may differ in appearance.
OPERATION
The direction switch on the fan body controls air flow:
- Winter function: Press the switch UP for the blades to move warm air near the eel around.
- Summer function: Press the switch DOWN for blades to create a breeze and impair circulation.
WARNING: Before using the direction switch, turn the fan off and make sure the fan has stopped rotating to prevent possible injuries and motor damage.
Change direction by pushing the switch up or down when the fan is off.
Remote Control
Restore electrical to the outlet box by turning the electricity on at the main fuse box.
Remove the battery cover from the remote control install the battery and reset the cover.

Use 2x1.5V AAA battery to replace battery.
If not using for long periods of time, remove the battery to prevent damage to the remote control and store the remote control away from excess heat or humidity.
Wi-Fi/Bluetooth Connectivity and Pairing
- You may download the Smart life from App Store.
- To begin pairing your Ceiling Fan to the App, press "4h" on the remote control for 5 seconds until you hear a beeping sound.
- Follow the next instructions within the App to continue the pairing process.
Changing the Light Mode
The light has three inbuilt colour modes. You can cycle through the options by turning the light on and off with the button on the remote.
The colour options are cool white, yellow and natural.
Wi-Fi Pairing
To place the fan in Wi-Fi pairing, press and hold the "4h" button on the for 5 seconds until you hear a beeping sound.
Refer to the "Connect to SmarterHome™ App" section.
Changing the Light Mode
The light has 3 inbuilt colour modes. You can cycle through the options by turning the light on and off with the button on the remote.
The colour options ore: cool white, yellow and natural.
CONNECT TO SMARTERHOME™ APP
Install App
Download the "Kogan SmarterHome" app from the Play Store (Android) or App Store (iOS).
Play Store (Android)

App Store (iOS)

To register:
- If you already have a SmarterHome account, select 'Log In'. To register a new account, select 'Sign Up'.
- The system will automatically recognise your country. If needed, you can manually select your country from the drop-down box. Enter your email address and tap 'Get Verification Code' to continue.
- A 6-digit code will be sent to the submitted email address. Enter this code before the one-minute timer expires.
- Continue to the next page and complete your SmarterHome profile.


Set Device in Pairing Mode
When the device is first turned on, it may automatically enter pairing mode (the light may be flashing).
If not automatically in pairing mode when powered on, you can manually set the device in pairing mode by pressing and holding the button on the light strip controller until the light begins flashing.
Add Device Through Network
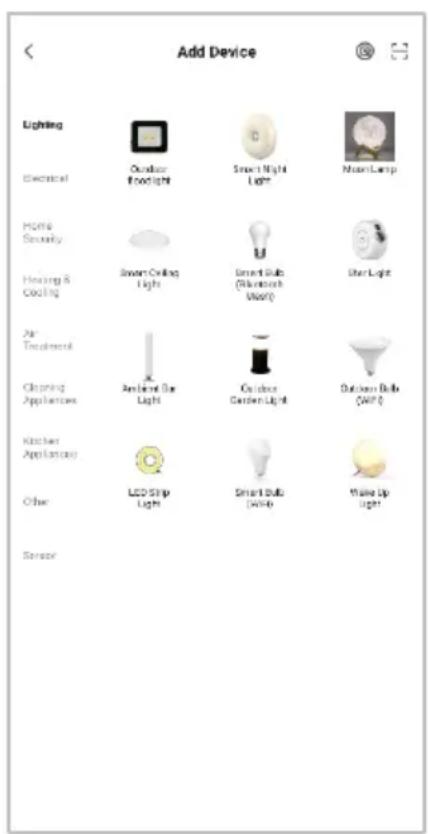
- Once registered, tap "Add Device" on the app's home page, or the "+" in the upper right corner, to add a new device through the network.
- Select the product type from the list of options in the app (Heating & Cooling > Ceiling Fan).
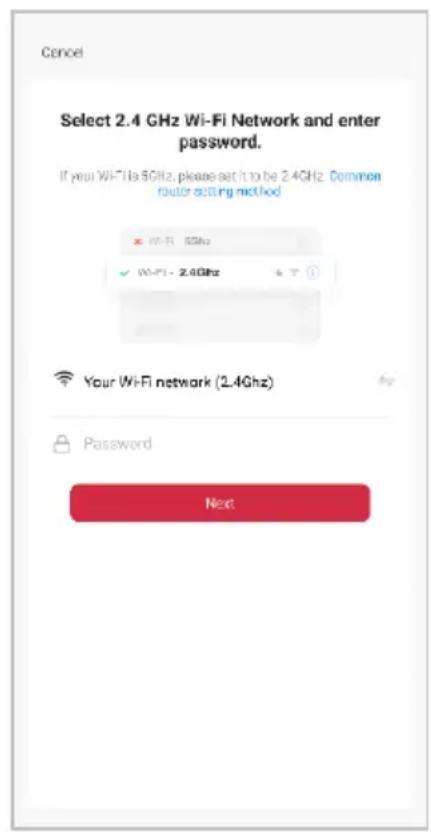
- Enter your Wi-Fi details. It is important that your SmarterHome™ device and the app are connected to the same Wi-Fi network during setup.

Notes:
- The device and the app have to use the same Wi-Fi network.
- The device is only compatible with 2.4Ghz networks.
-
Depending on the product, Steps 3 and 4 may be in opposite order.
-
Ensure that the device is in pairing mode, with the light flashing, and tap "Confirm light is rapidly flashing".
- The device will commence the pairing process and connect to the app. Ensure your Wi-Fi router, mobile phone, and the SmarterHome™ device are kept close until connection is complete.
- After successfully being added, you will have the option to rename the device and assign it to a location. It will now be listed on the app's home page. Tap the device listing to enter its control page.


Note:
Once connected, you can select Create Scene from the “+” in the upper right corner (or from the Scene tab) to group connected SmarterHome™ products and automate their functions.
GOOGLE HOME CONTROL
Adding "SmarterHome" to the Google Home app
- From the home page of the Google Home app, select the “+” icon (top left corner, see arrow in the below screenshot) to access the ‘Add and manage’ page.
- Select 'Set up device', then select the 'Works with Google' option.

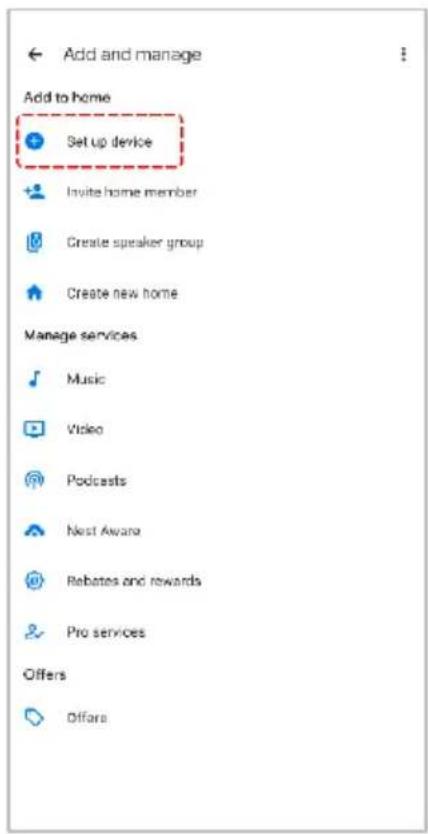

- Select the search bar and type 'Smarter Home' to locate the Kogan SmarterHome™ service.
- From here, you will be prompted to sign into your SmarterHome™ account using either your email or mobile phone number, depending on which method you used to register your account.
- Select "Kogan SmarterHome™" from the app options.


- Tap 'Authorise' to grant Google permission to access the SmarterHome™ app and your devices.
- Once connected, the app will display any compatible devices linked to your SmarterHome™ account. From here you can assign them to rooms and set up any routines. Tap on any of the devices to view a list of available commands.


Note:
Please note that Google Home can only control the base/core functions of any compatible SmarterHome™ devices. To make full use of this product's smart functionality, please use the Kogan SmarterHome™ app.
AMAZON ALEXA CONTROL
Note:
You will need to have set up an Alexa account prior to linking your Kogan SmarterHome™ device.
Adding "SmarterHome" to the Alexa app
- From the home page of the Alexa app, select the “=” icon in the bottom-right and select “Skills & Games” from the sidebar.
- Select the search bar and type 'Smarter Home' to locate the Kogan SmarterHome™ skill.

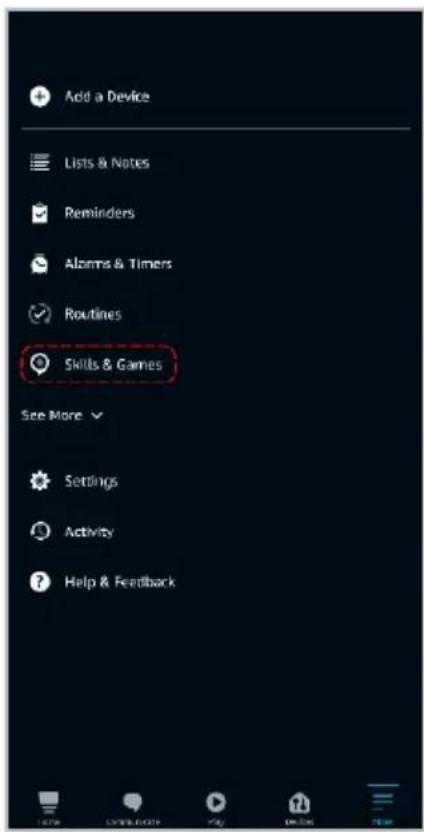

- Tap 'Enable to Use' to add the Kogan SmarterHome™ skill to Alexa.
- From here, you will be prompted to sign into your SmarterHome™ account using either your email or mobile phone number, depending on which method you used to register your account.
- Select "Kogan SmarterHome™" from the app options.

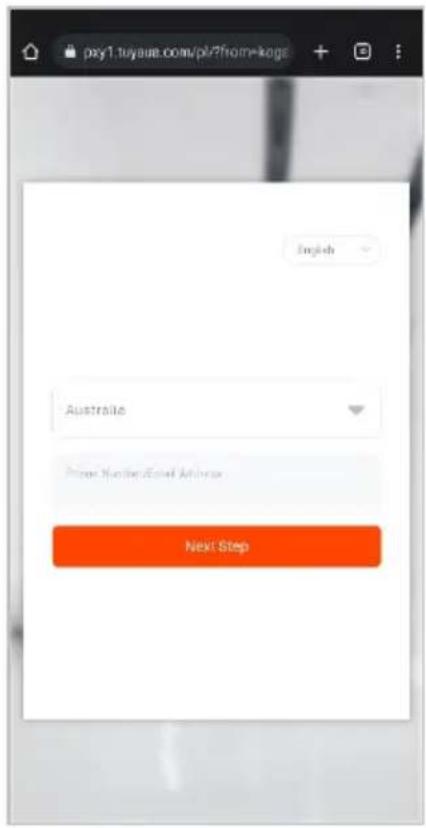

- Tap 'Authorise' to grant Alexa permission to access the SmarterHome™ app and your devices.
- Once connected, the app will perform a search and display the devices linked to your SmarterHome™ account. When your devices have successfully connected to the Alexa app, you will be able to control your Kogan SmarterHome™ devices via Alexa's voice commands.

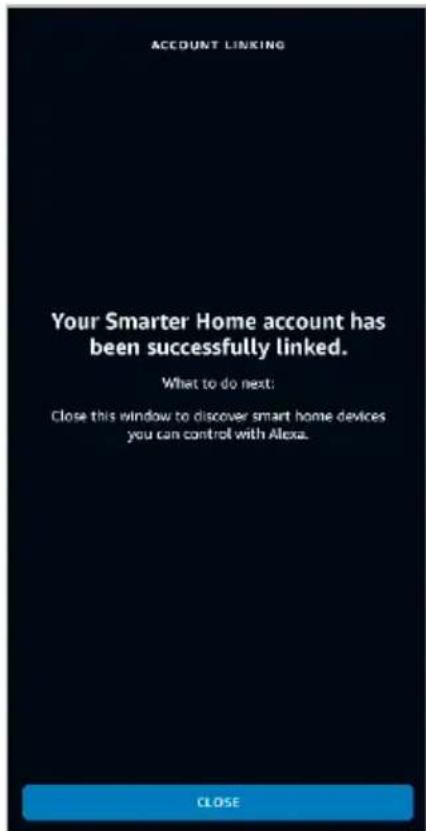
Note:
Please note that Alexa can only control the base/core functions of any compatible SmarterHome™ devices. To make full use of this product's smart functionality, please use the Kogan SmarterHome™ app.
APP OPERATION
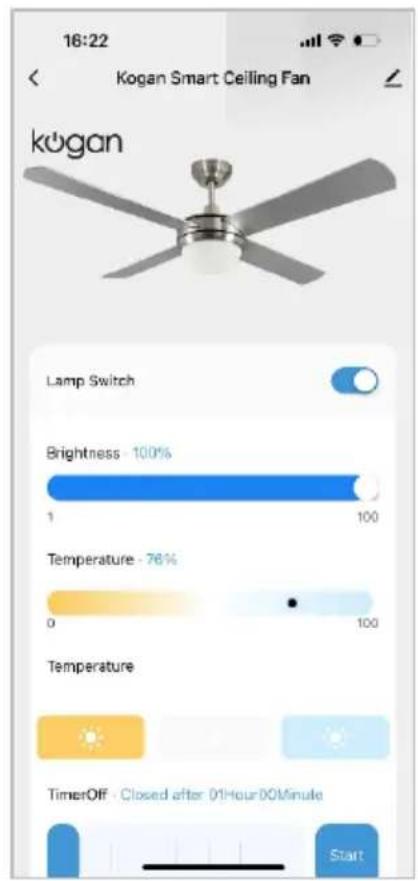
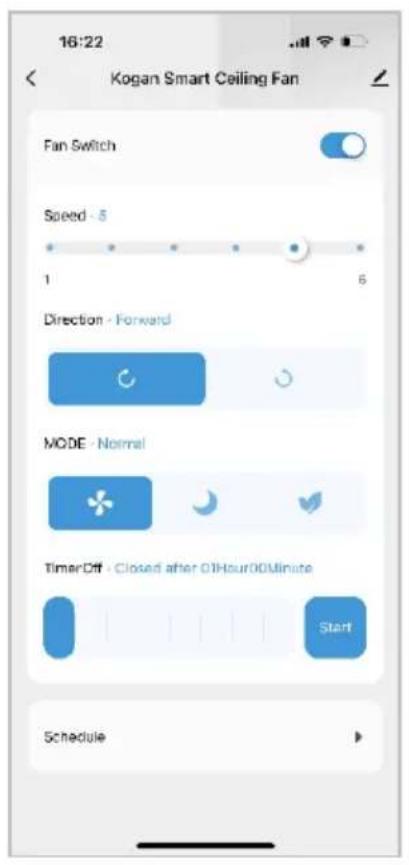
After successfully pairing the fan with the SmarterHome app, use your phone to control the fan and light.


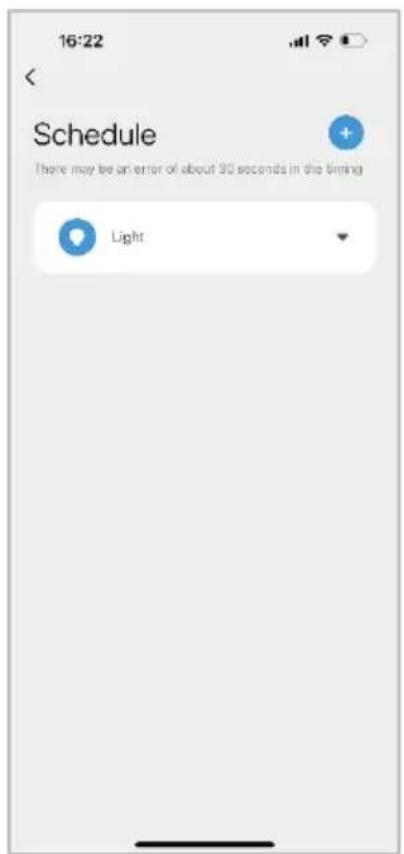
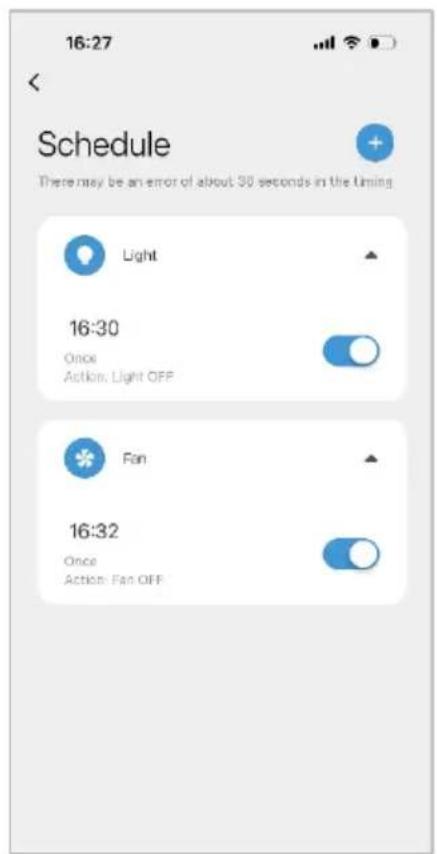
Use the app to setup schedules for the fan.


CLEANING & CARE
Remote Control
- To replace the remote-control batteries, press the battery cover and slide it towards the arrow direction.
- This remote control requires x2 AAA batteries.
- Reassemble the battery compartment cover.
■ Always ensure the battery comportment cover is closed properly.
- Do not leave the remote control in an area exposed to direct sun light.
- Do not by recharging the discharged batteries by heating them or with a battery charger.
■ Rechargeable batteries are always specified as so.
■ Do not throw batteries to fire, it could cause explosion.
Fan
Always turn the fan off and disconnect it from the power supply and allow it to stop before cleaning it
- Clean the outside surface with a soft damp cloth.
- Do not immerse then fan in water.
- Never use scouring pads, abrasive or chemical cleaners.
- Clean your fan periodically. Use only a cloth or brush.
- Metal finishes are finished with a lacquer to prevent tarnishing.
- Do not allow the inner parts of the fan to get wet (especially the circuit board). Doing so may cause an electric shock and damage the fan.
- While the product is not in use. Make sure it is unplugged from the power supply. To store it, place it in its original box in a safe and dry location until it is used again.
- In case of fault or damage do not try to repair the fan by yourself to ovoid risk of fire or electric shock. Cease use immediately and contact help.Kogan.com for support.
TROUBLESHOOTING
| Problem Troubleshooting Steps | |
| The fan does not Start up | Check all the fuses or circuit breakers.Turn off the electrical power and check all wire connections. |
| The fan emits noises | Always allow o few days "break in" time for any new fan of medium or high speed. Try to diagnose the exact location of the noise by listening carefully from several sides (blades, motor, light kit, etc4Ensure ad screws in the fan assembly and light kit are tight and properly threaded. If not, back out and retighten. Tighten these screws at least once a year because they may loosen slowly over time and cause a clicking noise.Make sure the light kit is securely fastened to the fan and all glass screws are finger tightened only. Do not tighten with pliers or a screwdriver.Make sure the mounting bracket is installed snugly to the junction box.Make sure wire nuts in the switch housing or the canopy ore not rattling against each other or against the housing's wall. Wrap with electrical tape if necessary.Make sure the canopy is not touching the ceiling.Ensure that the screws fastening the blade holders to the motor are tight and the lock washers provided for that purpose have been used. |
| The fan does not produce much air | The fan may be running in reverse, so air is directed upward.The room may contain items that obstruct the airflow.The fan may be too small for the size of the room. |
| Fan wobbling | Note: a small amount of wobble is considered acceptable and should not be considered o defect.Make sure the mounting bracket is fixed tightly to the ceiling with no movement at all. Tighten screws if necessary.Make sure all screws holding the blades to the blade support and blade support to motor are tight.Make sure the light kit and the glass screws are tight |
SPECIFICATIONS
Voltage 220\~240V
Fan (Max.) 40W
Lamp (Max.) 20W
NOTES
Need more information?
We hope that this user guide has given you the assistance needed for a simple set-up.
For the most up-to-date guide for your product, as well as any additional assistance you may require, head online to help.kogan.com
kogan.com

- KOGAN SMARTERHOME™ DC MOTOR CEILING FAN
- SAFETY & WARNINGS
- IMPORTANT: For your safety, this product must be installed by a licensed electrical contractor.
- COMPONENTS
- Additional Tools and Material Required (Not Included)
- OVERVIEW
- INSTALLION
- Installation of the Mounting Bracket
- Wooden surface:
- Concrete surface:
- Note:
- Installation of The Dawn Red and Hanger Ball
- Hanging The Fan to The Mounting Bracket
- Install the Canopy
- Installing the LED Panel and Lamp Shade
- Blade Assembly
- Remote Receiver and Wiring Instruction
- Notes:
- Wiring the Fan
- Pairing the Remote to the Receiver
- Balancing Kit
- OPERATION
- Remote Control
- Use 2x1.5V AAA battery to replace battery.
- Wi-Fi/Bluetooth Connectivity and Pairing
- Changing the Light Mode
- Wi-Fi Pairing
- CONNECT TO SMARTERHOME™ APP
- Install App
- To register:
- Set Device in Pairing Mode
- Add Device Through Network
- GOOGLE HOME CONTROL
- Adding "SmarterHome" to the Google Home app
- AMAZON ALEXA CONTROL
- Adding "SmarterHome" to the Alexa app
- APP OPERATION
- CLEANING & CARE
- Fan
- TROUBLESHOOTING
- SPECIFICATIONS
- NOTES
- Need more information?
Brand : Kogan
Model : KASH52DCCFW
Category : Fan