KAVWAC26YA - Washing machine Kogan - Free user manual and instructions
Find the device manual for free KAVWAC26YA Kogan in PDF.

User questions about KAVWAC26YA Kogan
0 question about this device. Answer the ones you know or ask your own.
Ask a new question about this device
Download the instructions for your Washing machine in PDF format for free! Find your manual KAVWAC26YA - Kogan and take your electronic device back in hand. On this page are published all the documents necessary for the use of your device. KAVWAC26YA by Kogan.
USER MANUAL KAVWAC26YA Kogan
natural_image
Line drawing of a white electronic device with a cable and plug, no text or symbols presentVERTICAL WINDOW AIR CONDITIONER (REVERSE CYCLE)
2.6KW
KAVWAC26YA
Safety & Warnings 3
Components 5
Before First Use 6
Installation 8
Overview 27
Operation 31
Cleaning & Care 33
Troubleshooting 35
Specifications 38
Notes 39
SAFETY & WARNINGS
Ensure to read all instructions in this user guide prior to first use. Retain this user guide for future reference. Misuse may cause injuries to people and damage property.
READ ALL INSTALLATION INSTRUCTIONS BEFORE MOUNTING THE STANDARD FRAME ONTO YOUR WINDOW TO PREVENT FROM FALLING.
WARNING: This air conditioner can be used by children aged 8 years and above and by persons with reduced physical, sensory, or mental capabilities or lack of experience and knowledge if they have been given supervision or instruction concerning the use of the appliance in a safe way and understand the hazards involved.
- Children should be supervised to ensure they do not play with this product.
- Pay close attention to the required space and the minimum allowable distance to adjacent structures.
- Follow the correct wiring connection type when operating or repairing.
- If the power cord is damaged, cease use immediately and contact help.Kogan.com for support.
- Do not use the device in an explosion-hazardous room.
- Do not use the device in a corrosive environment.
- Ensure appliance is standing upright and stable.
- After cleaning, allow the device to dry completely before resuming operation. Do not operate when wet.
- Do not use the device with wet hands.
- Do not spray water directly on the device.
- Never insert any objects or limbs into the device.
- Do not cover or transport the device during operation.
- Do not sit on the device.
- This product is not a toy. Keep away from children and animals. Do not leave the device unattended during operation.
- It is important to ensure that all electrical connections meet the necessary technical requirements in order to guarantee safe and efficient operation of the air conditioner.
- To ensure safe operation of the device, please insert the power plug into a power outlet that is securely installed and in good condition.
- When selecting an extension cord for a power cord, pay attention to the power input of the device, the cable length and the intended use. Fully extend the extension cord during operation. Avoid electrical overload.
- Before performing any maintenance, unplug the power cord from the power outlet. Hold the power plug when doing this.
- When not in operation, turn off the device and unplug the power cord from the electrical outlet.
- If you notice damage to the power plug or power cord, cease use immediately and contact help.Kogan.com for support.
- When placing the device, pay attention to the minimum distance from walls and other objects.
- Ensure that air inlets and outlets are not blocked.
- Ensure the suction side is free of dust and loose objects.
- Do not remove any safety signs, stickers or labels from the device. Keep all safety signs, stickers and labels clearly visible.
- Drain the collected condensed water before transportation and storage. Do not drink the water as it may be hazardous to your health.
COMPONENTS

text_image
Technical diagram of an air conditioner unit with numbered components and a close-up inset showing internal wiring structure.
text_image
Technical diagram of a battery module with numbered components for identification1 Front panel
2 Vertical blade (auto swing)
3 Level blade (manual swing)
4 Indoor air inlet
5 Operation panel
6 Indoor water outlet
7 Back panel
8 Outdoor air inlet
9 Outdoor water outlet
10 Outdoor air outlet
11 Standard mounting bracket
12 Base plate
13 Automatic drain outlet
BEFORE FIRST USE
Drain outlet

text_image
Drain hose Automatic drain outletAutomatic drain
When the air conditioner is in cooling/dehumidification mode, it utilizes self-evaporation technology to dissipate heat through condensed water. If the water full indicator "FL" appears, you have two options: manually open one of the drain outlets or wait for the automatic drainage function to start after a delay of 15 minutes following shutdown.
Note:
When installing install the automatic drain hose, then the machine will automatic drain through the drain outlet according to the program setting.
Automatic drainage during the heating
- Firmly insert the drain hose to the automatic drain outlet
- Ensure the angle of the drain hose is inclined downward more than 1^ .
- To avoid blockages and poor drainage, ensure the drain hose is free of kinks and there is no foreign matter in it.

text_image
Rear of appliance Air conditioner Front of appliance >1° Drain hose Automatic drain outletLocation
- Do not use in commercial environments, factories, and high humidity area such as hot springs.
- Do not install in a location where flammable gases (propane, acetylene) are present.
- Select a location near the entrance or exit of the room, where there is no obstructions to the airflow and the entire room can be cooled.
- Keep electronic devices such as televisions and radios at least 1m away from air conditioners.
Noise
- During installation, choose a place that can withstand the weight of the air conditioner without increasing noise and vibration.
- Avoid a location where the operation noise will disturb your neighbours.
- If you the air conditioner is emitting abnormal sounds during operation, cease use immediately and contact help.Kogan.com for support.
Electrical safety
If any electrical work is required for the installation of this appliance, it must be performed by a licenced trade professional.

It is essential to install proper earth grounding and earth leakage circuit breakers to prevent electric shock. Failure to comply with these standards may result in serious injury or damage to property. It is recommended to seek the assistance of a licensed electrician to ensure proper installation and compliance with electrical standards.

Do not connect a ground wire in the following places:
Gas pipe: danger of explosion or fire.
Water pipe: plastic part, there is no grounding effect.
Lightning rod and telephone ground: It is dangerous if a large current flows during a lightning strike.
Power safety
- To prevent potential danger, avoid using an extension cord or connecting the power cord to other electrical equipment.
- In the event there are two power sockets available, do not share the outlet with another appliance.
- Ensure the electrical rating of the appliance matches the rating of the power outlet (220V 16A or higher). Failure to do so may cause fire, electric shock or overheating of the power plug.
Tools required

Tape measure

natural_image
Line drawing of a screwdriver with ridged shaft (no text or symbols)Screwdriver

natural_image
Illustration of scissors and a rectangular tool (no text or symbols)Scissors or utility knife
Frame parts description

text_image
① Standard frame ② Fix plate ③ Sealing skin ④ Unit lock screw ⑤ Unit lock ⑥ Fixed side plate outdoor ⑦ Frame screws ⑧ Flexible side panel ⑨ Sealed stretch skin ⑩ Slide fixing screw indoor| 2 | Fix plate: (x2) (upper frame & lower frame) |
| 4 | Body fixing screw (M4X14): fix unit and frame |
| 7 | Frame screw (M4X30): (x4) Used to install frame on the window |
| 10 | Slide fixing screw (M4X16): (x4) x2 on the inside frame to fix slide distance |
| 11 |  | Adhesive Foam TapeUsed in places where air leaked is possible after installation is completed to create a better seal. |
| 12 |  | Protection PlateUsed to install the bracket between the window and the screw to prevent the screw from directly contacting the window and causing damage to the window. |
| 13 |  | Drainage PipeUsed to drain water. |
| 14 |  | Window LockUsed to fix the position of the window to better maintain the seal between the bracket and the window. |
Notes:
Any accessories and parts that are not used must be keep in a safe place.
Window Type

natural_image
Simple line drawing of a two-panel door with vertical and horizontal panels (no text or symbols)

natural_image
Simple line drawing of a rectangular frame with two internal compartments (no text or symbols)

natural_image
Line drawing of an open-framed window with multiple panes (no text or symbols)
• Window frames must have grooves.
- If there are no grooves are present, or the location is difficult to install, contact help.Kogan.com for support.
Window Size Requirements

text_image
90 - 145cm 150 - 205 (180 - 235) cm 60 (90) cm 46cm- Standard frame:
(1) The opening width of the window should be more than 46 cm.
(2) The height of the window opening must be more than 90 cm and the maximum cannot exceed 145 cm.
- Standard frame + 60cm extension bracket (not included):
(1) The opening width of the window should be more than 46 cm.
(2) The height of the window opening must be more than 150 cm and the maximum cannot exceed 205 cm.
- Standard frame + 90cm extension bracket (not included):
(1) The opening width of the window should be more than 46 cm.
(2) The height of the window opening must be more than 180 cm and the maximum cannot exceed 235 cm.
Notes:
- The size of the installation window should not exceed the size that can be installed on the window frame;
- For the connection between the extension bracket and the standard bracket, refer to the extension bracket installation instructions.
Complete Diagram

text_image
60cm 90 ~ 145cm Outdoor IndoorInstallation Location
When selecting an installation location, ensure the following considerations are taken:
• There are no obstructions in front of the cold air outlet.
• Hot air is not being vented near the unit.
• The chosen window is sturdy and resistant to vibrations.
• The unit is not directly under the rain gutter.
- Hot air from the unit is not vented directly into windows of adjacent houses.
- Flammable gases are not present.
Noise Considerations
- When installing, choose a location that can withstand the weight of the air conditioner without increasing operating noise or vibration.
- Choose a location where the hot air and operation noise from the outdoor air outlet of the air conditioner do not disturb the neighbours.
- Ensure there are no obstructions in front of the outdoor air outlet.
Bracket Installation
1. Window Position
Open the window to be installed
a. The thickness of the convex groove of the window between the brackets is 1-10mm.
b. The thickness of the convex groove of the window between the brackets is 10-63mm.

text_image
a b- Remove the fixing plate ② from position a. and install it in position b. according to the illustration.

text_image
Bracket Card Product Installation Location Bracket Fixing Screw Production Board First groove in window IndoorNote:
After the mounting bracket is stretched, the upper mounting position is the same as this figure.
Bracket Installation

text_image
Internal Frame Standard Frame 1 2 4 Slide Fixing Screw 3 5-
When the standard mounting frame is placed on the window, the bracket retaining plate of the mounting frame is installed in the first groove of the window.
-
To increase the height of the mounting frame, stretch the inner frame upward to ensure that the bracket retaining plate above the mounting bracket is installed in the first groove above the window.
-
Push the standard mounting bracket to the edge side of the window frame.
-
On the inner side of the mounting frame, there are two sliding fixing screws on each side. After confirming the extension height of the mounting bracket, use a Phillips screwdriver to fasten the four sliding fixing screws. Once secured, put the protective plate ⑫ into the gap between the top and bottom of the window frame and the standard mounting frame (see the installation window location diagram) and then tighten the upper and lower bracket fixing screws to ensure that the standard mounting frame is secured the window.
-
After the mounting bracket is installed, move the open window to the sealing skin of the mounting bracket, make the edge of the window fit the sealing skin and cut the adhesive foam tape to the required height to seal the gap.
Note:
Standard installation frame. When installing, it is necessary to cover the entire window frame.
Special Installation Methods
The following installation methods require window protection plates.
Aluminium Window

text_image
Outdoor Indoor More than 63mm Upper window frame Less than 8mm
text_image
Lower window frame Less than 8mm More than 63mmNote:
Attach the sealing glue between the window protection plate and the window frame on the underside of the window to make it waterproof.

flowchart
graph TD
    A["Protection plate"] --> B["Sealing glue"]
    B --> C["Close to window frame"]
    D["Window protection plate"] --> E["Wood screws 4 X 20 (6 pcs)"]
    D --> F["Self-tapping screws ST4 X 12 (6 pcs)"]
    G["Window protection plate: Install near the edge of the window"] --> H["Close to window frame"]
Wooden Window

text_image
Outdoor Indoor Top of the window frameBottom of the window frame

natural_image
Simple diagram of a rectangular container with wavy top edge and two circular markers at top (no text or symbols)Note:
Install the window protection panel in a position where you can open and close the window. Attach the sealing glue between the window protection plate on the underside of the window and the window frame to make it waterproof.

text_image
Align this side Protection plate Protection plate Sealing glue Wood screws 4 X 20 (6 Pcs) Window protection plate: Install near the edge of the windowIron Window

text_image
Outdoor Indoor Upper window frameLower window frame

natural_image
Simple line drawing of a wall corner with a curved top edge (no text or symbols)Note:
Due to the unique shape of this window frame, the window may not close properly.
Notes:
- If the window cannot be closed after installation, install it on the left side.
- Attach the sealing glue between the window protection plate on the underside of the window and the window frame to make it waterproof.

text_image
Window protection plate Align this side Protection plate Self-tapping screws ST4 X 12 (6 Pcs) Protection plate Sealing glue Align vertically with dotted lines Window protection plate: Install near the edge of the windowNote:
Drill pilot holes (diameter 3.2mm - 3.4mm)
Install the standard mounting bracket to the window protection plate
Note: Ensure that the window can be completely closed after installation without hitting the mounting bracket.
| Aluminium window | Wooden window | Iron window |
Outdoor Indoor Window protection plate  Tighten the upper screws (2) Tighten the lower screws (2) Tighten the upper screws (2) Tighten the lower screws (2)  Window protection plate Window protection plate | Outdoor Indoor Window protection plate  Tighten the upper screws (2) Tighten the lower screws (2) Tighten the upper screws (2) Tighten the lower screws (2) 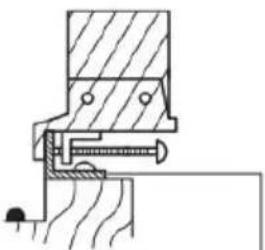 Window protection plate Window protection plate | Outdoor Indoor Window protection plate 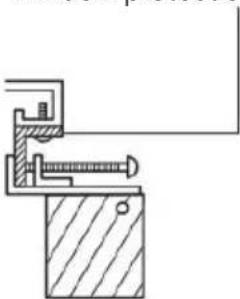 Tighten the upper screws (2) Tighten the lower screws (2) Tighten the upper screws (2) Tighten the lower screws (2)  Window protection plate Window protection plate |
Installation the Air Conditioner
Note:
To ensure refrigerant stability, wait at least 2 hours after receiving the product before installing the air conditioner.
- Remove the unit lock screw ④ and retain it for later.

text_image
④ Unit lock screw ⑤ Unit lock
-
Place the base of the air conditioner on the standard mounting bracket. The two sides of the bottom and the black seals on the sides of the bracket are attached respectively. The groove at the bottom of the bracket snaps into the groove on the air conditioner unit to secure it in place.
-
There are 2 holes in the upper part on the rear of the air conditioner. Each hole corresponds to a tab on the unit lock. After the bottom of the air conditioner is seated, push the unit lock ⑤ to the left to insert them into the 2 holes in the rear of the air conditioner.
Once inserted, push the unit lock to the right to ensure that the hole on the air conditioner is aligned with the screw hole on the unit lock.
- Once the air conditioner is seated correctly, secure it in place using the previously removed unit lock screw ④. Upon completion, double check the air conditioner to make sure it is properly secured.

natural_image
Line drawing of a hand using a tool to adjust or install a window frame (no text or symbols present)④ Unit lock screw
Note: If the air conditioner is not completely secure, double check that the brackets and unit lock are properly aligned and seated correctly. Make any necessary adjustments and ensure all fasteners are tightened.
Window Lock Installation
After the air conditioner is installed, place the window lock in the window groove, on the opposite side of the window where the air conditioner is installed. Turn the knob on the window lock in a clockwise direction to lock it firmly against the window.

text_image
Window 25-42mmDisassembly
To disassembling and remove the air conditioner, follow the installation steps in the reverse order.
Note: Before removing the unit lock screw ④ and sliding the unit ⑤ ensure the air conditioner is properly supported to prevent it from suddenly falling forward and causing danger.

natural_image
Technical line drawing of a mechanical assembly with no visible text or symbolsOVERVIEW
Operation Panel

flowchart
graph TD
    A["Digital display"] --> B["2.6°C"]
    C["Timer icon"] --> B
    D["Auto icon"] --> E["Auto"]
    F["Heat icon"] --> G["Heat"]
    H["Fan icon"] --> I["Fan"]
    J["Up/Down key"] --> K["Mode"]
    L["Swing"] --> M["Switch"]
    N["Child lock icon"] --> O["Child lock"]
    P["Celsius icon"] --> Q["Celsius"]
    R["Time icon"] --> S["Time"]
    T["Fan speed icon"] --> U["Fan speed"]
    V["Dry icon"] --> W["Dry"]
    X["Cool icon"] --> Y["Cool"]
    Z["Swing icon"] --> AA["Swing"]
Fan Speed
| 1 | 1st speed, 1 blade, display shows 1; | 6 | 6 the speed, 6 blades, display shows 6; |
| 2 | 2nd speed, 2 blades, display shows 2; | 7 | 7 the speed, 7 blades, display shows 7; |
| 3 | 3rd speed, 3 blades, display shows 3; | tu | Turbo mode, 8 blades, display shows tu; |
| 4 | 4th speed, 4 blades, display shows 4; | Ru | Auto speed, 8 blades, display shows Au; |
| 5 | 5th speed, 5 blades, display shows 5; | ||
Digital Display
Mode switching sequence : Auto→Cool→Dry→Heat→Fan,


text_image
Auto Cool Dry Heat Fan Sleep Child lock Swing Follow Me Fan speed Quiet Fan speed blade 8.8 H Time icon Celsius icon TURBO AUTO Turbo icon Auto fan speed icon
text_image
8.8 H °C TURBO AUTO 1 2 3 5 6 8 11 12 Mode Swing Follow me My Mode Sleep LED Quiet Fan lock Timer Turbo Self-Clean 4 7 10 9 13- Power: Turn the air-conditioner ON/OFF
- Mode: Press this button to switch between auto → cooling → dry → heating → fan modes (If the machines have heating function).
- Up/Down: Press to increase/decrease the temperature when auto, cooling and dehumidification modes, press to increase/decrease the setting time when timer mode.
- Fan speed: Press to select the fan speed:1st speed→2nd speed→3rd speed→4th speed→5th speed→6th speed→7th speed → auto swing.
- Swing: Press to turn the swing function ON/OFF
- Sleep: Press this key to turn on the sleep mode. The display luminance will decrease by 50%, then the sleep icon will blink five times. The sleep mode is only available in the cooling and heating modes. (If the machine has heating function)
- Timer: Press to set time to turn off the machine when it is on, press it to set time to turn on the machine when it is in standby state. Press Up/Down buttons to adjust the setting time from 0.5h\~24h, before 10 hours, adjust 0.5 hour per press, after 10 hours, adjust 1 hour per press. You can also keep pressing the up or down button, the time will continuously increase or decrease.
- Follow me: Press this to turn the "Follow me" function ON/OFF. Follow me function is only valid in cooling and heating mode and can only be turned on by the remote control. When the machine is running, press the Follow me button on the remote control to start the function. The corresponding icon on machine and controller is displayed. The status of the machine remains unchanged. Send the room temperature information to the device every 3 minutes, the air conditioner can sense the indoor temperature through the remote control.
- LED: Press to turn on/turn off the LED display on machine.
- Turbo: Press this key to turn Turbo fan speed ON/OFF. In this mode the fan is forced to run at Turbo speed for 30 minutes, then restore the previous fan speed, this button is only effective in cooling mode.
- My mode: Press this key to enable My mode. This feature allows you to easily access your preferred settings. To set My mode, press and hold the button for 2 seconds to save the current temperature, fan speed and swing. If no settings have been previously saved, pressing this button will revert to auto mode with the temperature set to 26^ C.
- Quiet: Press this key to adjust the fan speed to quiet fan, digital display shows "LO", press this Key or any fan speed key again to exit the quiet fan and return to the previous fan speed operation.
- Self-clean: In cooling and dry mode, pressing this button will enable self-clean mode. After powering off the air conditioner, the digital display shows "SC", the compressor will stop working and the fan will run at quiet speed for 30 minutes.
- Lock: Press Fan + Timer keys at the same time on machine and remote controller to turn on / off the child lock function.
OPERATION
1. Auto mode
- Press the mode key to select the automatic mode while the machine is on. At this time, the corresponding indicator on the panel lights up.
- In this mode, the product will automatically adjust the corresponding operating function according to the current ambient temperature.
- The cooling function is operated when the ambient temperature is higher than 27^ C, the set temperature is 24^ C and the default fan speed is automatic.
- The dehumidification function is operated when the ambient temperature is 24^ C - 27 ^ C, the set the fan speed is 1st.
- The air supply function is operated when the ambient temperature is 20 - 24°C, fan speed defaults to 4 levels, showing ambient temperature. The heating function is operated when less than 20°C, the fan speed is auto and the set temperature is 24°C.
- The fan speed can be adjusted. The next time the auto mode is started, the fan speed returns to the system setting.
- Follow me, Turbo, mute in auto mode, self-cleaning function is effective
2. Cooling and heating modes (cooling only models without heating mode)
- Select the cooling or heating mode by pressing the mode key while the power is ON or the timer is on. Currently, the corresponding indicator lights on the panel.
- Press the up and down keys to set the appropriate temperature. The setting range is 16 \~ 30 °C (60-86 °F). Each time you press the up or down key, the temperature will rise or fall by 1°C or 1°C.
- Press the fan speed button to select the appropriate fan speed, you can choose 1-7 speed and TURBO fan speed.
- Press the swing key to turn the left and right swing function on or off.
- Auto fan speed: (Tr represent room temperature, Ts represent setting temperature)
When Tr-Ts ≥ 3°C, the fan speed runs at 7th speed.
When Ts + 1^ ≤ Tr < Ts + 3^ , the fan speed runs at 4th speed
When Tr-Ts <1 °C, fan speed runs at 1st speed
Fan speed changes from low to high without 3min delay, wind speed changes from high to low with 3min delay.
3. Dry mode
- Press the mode key to select the dehumidification mode while the machine is on. The corresponding indicator lights up.
- Set temperature is same as cooling mode.
• Fan speed is not adjustable. - Press the swing key to turn the swing function ON or OFF.
4. Fan mode
- When the machine is on, press the mode key to select the air supply mode. The corresponding indicator lights up
- Press the fan speed button to select the appropriate fan speed, from 1-7 speeds.
• Fan speed is not adjustable. - Press the swing key to turn the swing function on or off.
• Auto fan speed in air supply mode:
When Tr > 27 °C, the fan speed runs at 7t h speed;
When 24 < Tr ≤ 27^ , the fan speed runs in the 4th speed;
When Tr≤24 °C, the fan speed runs at 1st speed;
Fan speed changes from low to high without 3min delay, fan speed changes from high to low with 3min delay
5. Sleep mode
- When power ON, press the sleep button on the remote control to turn on the sleep function which will increase (cooling) or decrease (heating) by 1°C per hour for the first 2 hours. Thereafter it keeps this new temp. for 6hrs' running then machine will be switched off automatically, which means machine will be turned off automatically after 8 hours of sleep mode running. This function is only effective in cooling and heating modes. (If the machine has heating function)
- The fan speed will lower to 4th speed directly, If fan speed lower than level four before Sleep mode, then fan speed will decrease one level per 0.5 hour until fan speed reaches level 1 and stay at level 1 thereafter.
Note: If press Turbo or Fan or Mode button, sleep mode will be cancelled automatically.
CLEANING & CARE
Turn off the unit and remove the plug before cleaning or performing any maintenance.
Wipe the surface of the air conditioner with a soft, damp cloth. Do not use any solvents such as benzene, alcohol, or gasoline. Failure to do so, may cause the surface damage to the air conditioner and lead to potential operational issues.
Cleaning the filter
To ensure optimal performance, the filter will need to be cleaned at least every two weeks.
-
Hold the buckle on the grille by hand, rotate the inlet grille to open and then pull out the filter net from the interior of the grille. Note: the inlet grille can only be opened 7 \~ 8 degrees, do not apply excessive force when opening.
-
Put the filter into warm water (about 40^ C / 104^ F) that has been added with neutral detergent. Rinse and dry in a cool place before inserting.

text_image
Ait inlet grille Filter3. Water full
When the full water indicator is displayed, the machine will stop working. In this case, it is necessary to remove the excess condensed water. Remove the indoor water drain plug or the outdoor water drain plug to drain out the water.
Save after season:
-
Pull out the indoor drain plug, drain the water to other water containers or directly pull out the outdoor water drain plug to drain the water out of the room.
-
Adjust the mode to the low speed of the air supply mode or turn on the self-clean function, keep this mode on until the inside pipe is dry. This operation can dry the inside of the body and prevent mould.
-
Turn off the machine and unplug the power cord, wrap the power cord and install the drain plug.
-
Remove the machine from the window and remove the mounting bracket and keep it in a good condition.
-
Put the air conditioner in a plastic bag and put the air conditioner in a dry place to prevent dust. Keep children away from the bag.
TROUBLESHOOTING
Do not repair or disassemble the air conditioner yourself. Unqualified repairs will void the warranty card and may cause damage to the user or its property.
| Error code | Description |
| F1 | Compressor drive IPM failure |
| F2 | PFC /IPM failure |
| F3 | Compressor starts failure |
| F4 | Compressor running out of step (compressor off position) |
| F5 | Position detection circuit failure |
| FA | Phase current over-current protection |
| P2 | DC bus over- voltage protection |
| E4 | Indoor and outdoor communication failure |
| F6 | Communication failure between main control board and drive board |
| P3 | AC input voltage protection |
| P4 | AC over-current protection |
| P5 | AC Over-voltage protection |
| F7 | Outdoor coil sensor failure |
| E0 | Exhaust air sensor failure |
| E6 | Outdoor environmental sensor failure |
| E7 | Outdoor DC fan failure |
| FE | Outdoor EE failure |
| P1 | Over-temperature protection at the top of the compressor |
| PE | Abnormal refrigerant circulation |
| PH | Exhaust temperature protection |
| PC | Outdoor coil overload protection |
| E3 | Indoor DC fan feedback failure |
| P6 | Indoor coil overload protection |
| P7 | Indoor coil freeze protection |
| E2 | Indoor coil sensor failure |
| E1 | Indoor ambient temperature sensor failure |
| EE | Indoor EE failure |
| E5 | Splashing water motor feedback failure |
| E8 | Fan failure |
| FL | Water full protection |
| Problem | Cause | Solution |
| Not working | No power | Turn on the power after receiving the power socket. |
| Water full indicator display FL. | Drain water | |
| Is the ambient temperature too low or too high? | Recommend using the machine between 7-35 °C (44-95 °F). | |
| Room temperature is lower than the set temperature in cooling mode | Change set temperature | |
| Low ambient temperature in dehumidification mode | Low ambient temperature in dehumidification mode | |
| Inefficient cooling | There is direct sunlight. | Move to an area away from sunlight. |
| The doors and windows are open or the frame is not sealed and there are many people or other heat sources. | Close the door or window or seal the frame. | |
| Close the door or window or seal the frame. | Close the door or window or seal the frame. | |
| The air inlet or outlet is blocked. | Clear obstacles. | |
| Loud noise | The air conditioner is not installed correctly. | Check the frame and air conditioner to ensure proper and correct installation. |
| The compressor is not working | Overheat protection starts. | Wait for 3 minutes until the temperature drops and then turn it on. |
| The remote does not work | The remote does not work | Keep the remote control close to the air conditioner and ensure the remote control is facing the remote control |
| The remote controller does not align with the remote control to receive the head orientation. | ||
| The battery is flat. | Change battery | |
| E1 | The tube temperature sensor senses an abnormal temperature. | Check the tube temperature sensor and related circuits. Contact help.Kogan.com for support. |
| E2 | The room temperature sensor senses an abnormal temperature. | Check the room temperature sensor and related circuits. Contact help.Kogan.com for support. |
| E4 | Check the room temperature sensor and related circuits. Contact Service Agent | Place in a room with a higher ambient temperature or replace the tube sensor |
| E5 | Abnormal water motor | Change the water motor |
| EF or EC | Abnormal motor | Abnormal motor |
SPECIFICATIONS
Performance
| Cooling capacity | 8870 BTU/hr, 2.6kW |
| Heating capacity | 9900 BTU/hr, 2.9kW |
| Dehumidification capacity | 1.1L/hr |
| Power | 0.87kW |
| Air flow volume | 370m ^3 /hr |
| Maximum coverage area | 22.8m ^2 |
| Cooling temperature range | 16–30°C |
| Swing | 115° left and right |
Power
| Power supply | 220–240V, 50Hz |
| Current rating | 4.3A |
| Current (cooling) | 6.0A |
| Current (heating) | 7.5A |
| Power input (cooling) | 870W |
| Power input (heating) | 900W |
Energy rating
| Average consumption | 285kWh/year |
| Maximum discharge pressure | 5.0MPa |
| Maximum suction pressure | 1.5MPa |
Other specifications
| Dimensions | 415 x 820 x 318mm |
| Net weight | 27.5kg |
NOTES
Need more information?
We hope that this user guide has given you the assistance needed for a simple set-up.
For the most up-to-date guide for your product, as well as any additional assistance you may require, head online to help.kogan.com
kogan.com