KH 1172 - Bread maker SILVERCREST - Free user manual and instructions
Find the device manual for free KH 1172 SILVERCREST in PDF.
| Product type | Bread machine |
| Brand | SILVERCREST |
| Model | KH 1172 |
| Power supply | 220-240 V ~ 50 Hz |
| Power | 600 W |
| Capacity (bread weight) | 700 g or 900 g |
| Number of programs | 11 baking programs |
| Available programs | Basic, French, Whole wheat, Rapid, Sweet, Gluten-free, Express, Dough, Jam, Cake, Bake |
| Browning levels | 3 (light, medium, dark) |
| Delay timer | Up to 13 hours |
| Keep warm | 1 hour after baking |
| Pan material | Non-stick coating |
| Included accessories | Baking pan, kneading hook, measuring cup, measuring spoon, hook extractor, recipe book |
| Dimensions (approx.) | 30 x 25 x 30 cm |
| Weight (approx.) | 5 kg |
| Safety features | Thermal fuse, automatic shut-off, short-circuit protection |
| Cleaning | Pan and accessories hand washable, do not immerse housing |
| Warranty | 3 years |
| Intended use | Domestic use only |
Frequently Asked Questions - KH 1172 SILVERCREST
User questions about KH 1172 SILVERCREST
0 question about this device. Answer the ones you know or ask your own.
Ask a new question about this device
Download the instructions for your Bread maker in PDF format for free! Find your manual KH 1172 - SILVERCREST and take your electronic device back in hand. On this page are published all the documents necessary for the use of your device. KH 1172 by SILVERCREST.
USER MANUAL KH 1172 SILVERCREST
GB Bread Maker
IE Operating instructions
INDEX
PAGE
Safety instructions 2
Appliance Overview 3
Items supplied 4
Intended use 4
Technical data 4
Characteristics 4
Before the First Use 4
Before baking 5
Control panel 5
Functions of the Bread Baking Machine 7
Error Messages 8
Baking bread 8
Inserting the ingredients 8
Inserting the baking mould. 8
Switching on. 8
Programme selection 8
Time delay/Timer function 8
Mixing and kneading dough 9
Allowing the dough to rise 9
Bake 9
Keeping warm 10
End of the programme 10
Cleaning and Care 11
Disposal 11
Warranty and Service 12
Importer 12
Programme time periods 13
Troubleshooting the Bread Baking Machine 15
Read these operating instructions carefully before using the appliance for the first time and preserve this booklet for later reference. Additionally, pass this booklet on to whoever might acquire the appliance at a future date.
Safety instructions
- Please read the operating instructions through completely before using the appliance for the first time!
- Risk of suffocation! Children can suffocate through the improper use of packaging materials. Dispose of them immediately after unpacking or store them in a place that is out of reach of children.
- After unpacking, check the appliance for damage that may have occurred during transportation. In the event of damages, contact the supplier.
- Place the appliance on a dry, level and heat-resistant surface.
- Do not place the appliance close to a gas burner, electric stove or other sources of heat.
- Do not place the appliance near inflammable materials or explosive/inflammable gases. A minimum distance of 10cm must be maintained to all other materials.
- Do not use the Bread Baking Machine for the storage of foods or utensils.
- Do not use an external timing switch or a separate remote control system to operate the appliance.
Risk of fire!
- Ensure that the ventilation slots of the appliance cannot be blocked at any time.
- Before plugging the appliance in, check to ensure that the electricity type and mains voltage tally with the information on the type plate.
-
NEVER cover the appliance with a tea-towel or other material. Heat and steam must be able to escape. A fire could occur if the appliance is covered with an inflammable material or comes into contact with inflammable materials, e.g. curtains.
-
Start a baking programme only when a baking mould is fitted in the appliance.
- Do not place any objects on the appliance and do not cover it during use. Risk of fire!
- NEVER lay aluminium foil or other metallic objects in the Bread Baking Machine. This could lead to a short circuit. Risk of fire!
- NEVER use the appliance without a baking mould or with an empty one.
Risk of electric shock
- Always check the power cable and plug before use. To reduce potential risks in the event of damage to the power cable, arrange for it to be examined and repaired as soon as possible by the manufacturer, by Customer Services or by a similarly qualified person.
- Do not place the power cable over sharp edges or close to hot surfaces or objects. These may damage the insulation of the power cable.
- To avoid potentially fatal risks, arrange for defective power plugs and/or cables to be replaced at once by qualified technicians or our Customer Service Department.
- If you use an extension cable, ensure that the maximum permitted power rating for the cable corresponds to that of the bread baking machine.
- If the appliance is not in use, and also before cleaning it, remove the plug from the power socket.
- Before taking out or inserting accessories, unplug the power cable and allow the appliance to cool down.
- Do not clean the appliance with abrasive sponge cleaning pads. Should particles break away from the sponge and come into contact with electrical components, you could receive an electric shock.

NEVER place the Bread Baking Machine in water or other liquids. Risk of electric shock!

CAUTION!
Potential Appliance Damage!
- Only use the appliance inside buildings.
- NEVER place the appliance on or close to a gas or electric cooker or a hot oven.
- The use of ancillaries not recommended by the manufacturer could cause damage to the appliance. Only use the appliance for its intended purposes. Improper usage invalidates all claims under the warranty.
- This appliance complies with all relevant safety regulations. Inspection, repair and technical maintenance may only be performed by a qualified specialist. The warranty will become void in cases of non-compliance.
- Do not pull on the cable to remove the plug, rather, pull the the plug itself from the socket.

Risk of personal injury!
- Allow the appliance to cool down before removing individual parts.
- Place an extension cable in such a way that no one can be tripped over by it or anyone can inadvertently pull on it.
- To avoid the risk of tripping accidents the appliance is fitted with a short power cable.
- This appliance is not intended for use by individuals (including children) with restricted physical, physiological or intellectual abilities or deficiencies in experience and/or knowledge unless they are supervised by a person responsible for their safety or receive from this person instruction in how the appliance is to be used.
Children should be supervised to ensure that they do not play with the appliance. - Caution: The bread maker becomes very hot. Do not touch the appliance until it has cooled down, or, if need be, use oven gloves.
- NEVER remove the baking mould during use.
DO NOT transport the Bread Baking Machine if the baking mould contains fluid or hot contents, e.g. jams. Risk of Burns!
During use, NEVER come into contact with the rotating kneading hook.
- When not in use, and before cleaning the appliance, remove the power cable from the plug.
Always close the lid when the machine is in use.
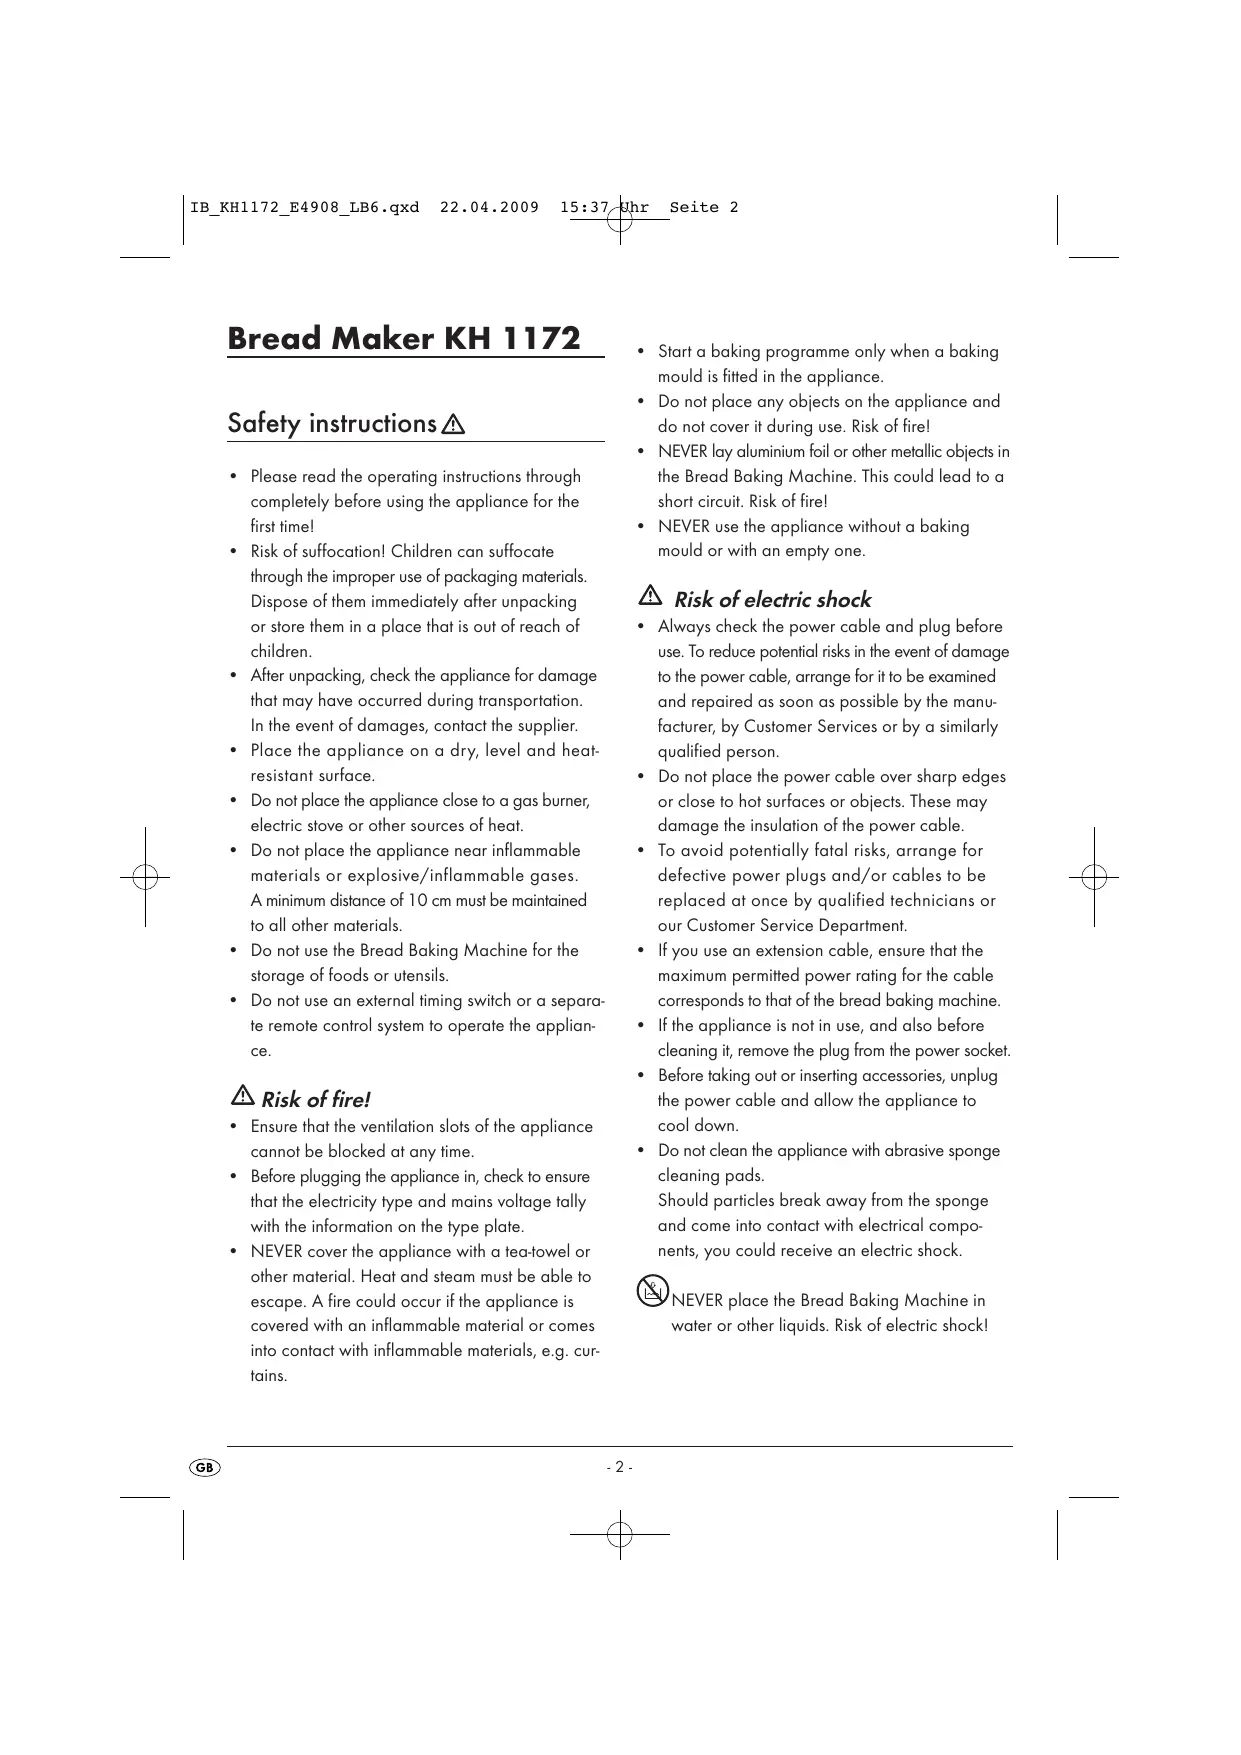
Appliance Overview
1 Handle
2 Appliance lid
Viewing window
Baking mould
Drive shaft
6 Ventilation slots
7 Display
3 Control panel
Baking programmes
10 Baking space
Accessories
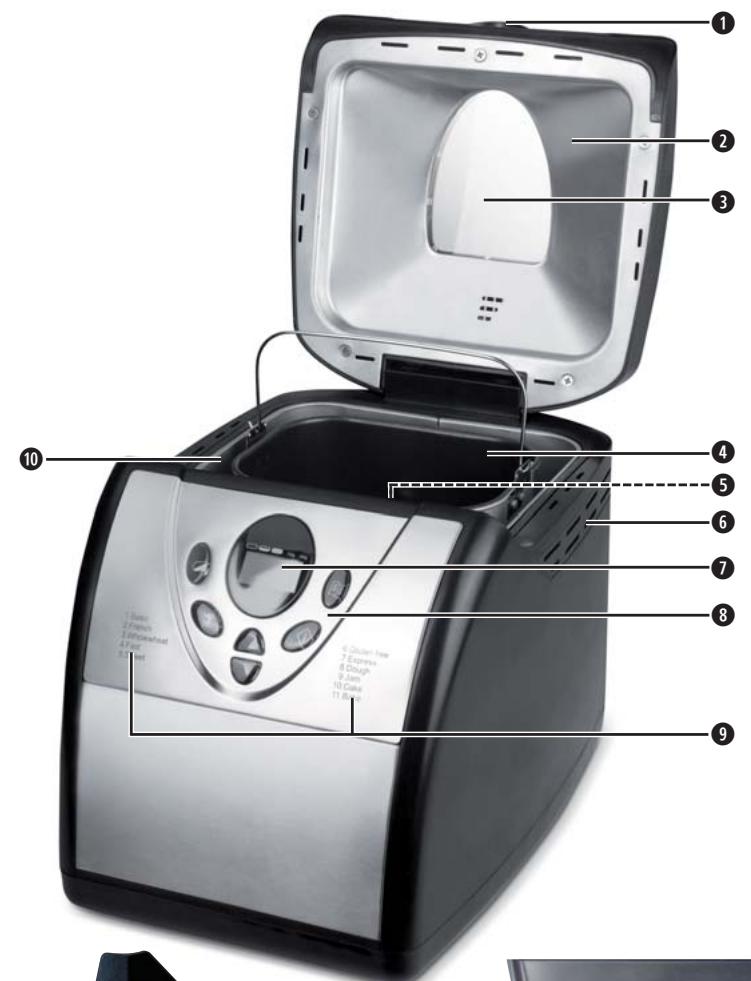
1 Kneading hook
12 Measuring beaker
18 Kneading hook remover
14 Measuring spoon

CAUTION! Hot surfaces!
This symbol on your Bread Baking Machine warns you of the risk of burns.
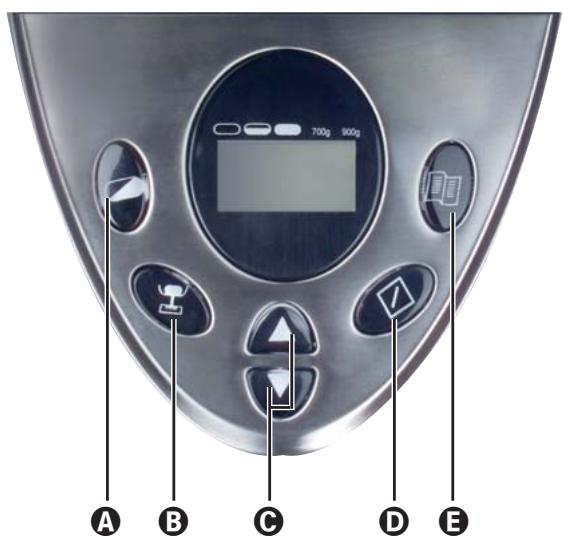
Overview - Control panel
A Button - Browning Level
B Button-Bread Weight
Level I: 700 g
Level II: 900 g
Button-Time
Button-Start/Stop
Button-Programme selection
Items supplied
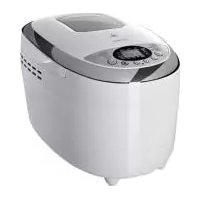
Bread Baking Machine KH 1172
Kneading hook
Baking mould
Measuring beaker
Measuring spoon
Kneading paddle remover
Operating Instructions
Concise instruction sheet
Order card
Recipe Book
Intended use
Use your Bread Baking Machine only in domestic areas and only for baking bread or making jams and marmalades.
Do not use the appliance for drying foodstuffs or other objects. Do not use the bread machine outdoors.
Use only the ancillaries recommended by the manufacturer. Accessories not recommended may cause damage to the appliance.
Technical data
Rated voltage: 220-240V~50Hz
Power consumption: 600 Watt
Characteristics
With this Bread Baking Machine you have the possibility to bake bread according to your personal taste.
- You can choose from 11 different baking programmes.
- You can employ ready-to-use baking mixtures.
- You can knead dough for bread rolls and make jams.
Before the First Use
Disposal of the packaging material
Unpack your appliance, remove all transportation restraints and dispose of the packaging material as per the current regulations for your locality.
Initial cleaning
Wipe the baking mould 4, kneading hook 1 and upper surfaces of the Bread Baking Machine with a clean moist cloth before taking it into use for the first time. Do not use abrasive sponges or cleaning powders. Remove the protective foil from the display panel 7.
Pre-heating
Please take note of the following details regarding the first usage:
Risk of fire!
Do not allow the Bread Baking Machine to warm up for more than 5 minutes with an empty baking mould ④ . There is a real danger of it overheating.
① Note:
For the first heating up ONLY, place the empty baking mould 4 into the appliance. Close the appliance lid 2. Select the programme Bake, as described in the chapter "Baking bread", and press the button Start/ Stop D to warm up the appliance for 5 minutes.
After 5 minutes, press the button Start/Stop until a signal tone is heard, this will terminate the procedure. As the heating elements are lightly greased, a slight smell may occur when first putting the appliance into operation. This is harmless and stops after a short time. Provide for sufficient ventilation, for example, open a window.
Allow the appliance to cool down completely and once again wipe the baking mould 4, kneading hook 1 and the outer surfaces of the Bread Baking Machine with a clean moist cloth.
Removing and replacing the baking mould
To take out the baking mould (Fig.1):
Turn the baking mould 4 slightly in an anti-clockwise direction, until you can lift it out of the Bread Baking Machine (Marking "REMOVE " in the baking space 10).
To replace the baking mould (Fig. 2):
Place the baking mould 4 slightly slanting on the drive shaft. Turn the baking mould 4 lightly in a clockwise direction, until it is sitting correctly in the baking space 10. (Marking " LOCK" in the baking space 10).
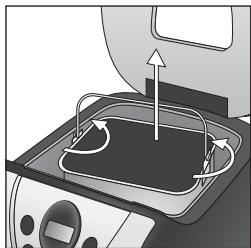
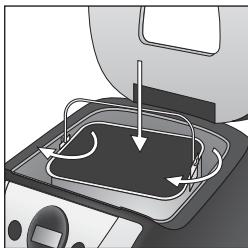
Fig. 1: To remove :
Fig. 2: To replace
Tips for baking
For a successful baking process, please consider the following factors:
- Remove the baking mould 4 from the housing before filling it with ingredients. Should ingredients fall into the baking space 10, a fire may be caused by them burning on the heating elements.
- Place ingredients into the baking mould 4 in the sequence specified.
To ensure an optimal rising result from the yeast, all ingredients should be at room temperature.
- Measure the ingredients precisely. For this use, for example, the supplied measuring beaker 12. With the scales on the measuring beaker 12 being in Milliliter (ml) and Ounces (oz) you can measure ingredients in various measurement units. Even seemingly negligible deviations from the quantities specified in the recipe may affect the baking results.
Risk of fire!
NEVER use quantities larger than those specified. If there is too much dough, some could spill over the baking mould ④ , drop onto the hot heating elements and cause a fire.
Control panel
Display 7
Basic adjustments
The default adjustments are shown as soon as the appliance is connected to a power source. This display signalises operational readiness. It corresponds to the programme Basic:
- In the display appears 7 13:10 . The "1" indicates which programme is currently selected, "3:10" is the programme duration in hours and minutes.
- The positions of the two arrows on the upper edge of the display ① give information about the selected level of browning (left arrow) and the volume (right arrow). The default adjustments when switching on are: Bread weight 900 g and "Medium browning level".
During use, the programme progress can be read off from the backwards running time countdown in the display ①.
A Button - Browning Level
With the Browning Level A button you can determine the preferred level of browning: LIGHT
MEDIUM 一 DARK
This function cannot be activated with the programmes 8. Dough and 9. Jam.
3 Button - Bread Weight
With the Bread Weight button you can vary the bread weight:
For a smaller bread weight of 700g
For a larger bread weight of 900g
This function cannot be activated with the programmes 8.Dough,9.Jam,10.Cake and 11.Bake.
Button-Time
With the button Time your can start the programme after a time delay.
(1) Tips:
- The programmes that can be started with a time delay are listed in the table "Programme time periods".
- The programmes Fast, Express, and Jam cannot be started with a time delay.
For further information see the chapter "Time delay/Timer function".
D Button-Start/Stop
- To start and stop the programme, press the button Start/Stop D.
- As soon as the button Start/Stop is pressed, the double-point between the time display starts to blink.
- With the button Start/Stop D you can break off the programme in any position: Hold the button Start/Stop D pressed down until a signal tone is heard. In the display D the default settings appear. Should you wish to use a different programme, select it with the button Programme selection D.
Button-Programme selection
Press the button Programme selection E, to switch through the various programmes described in detail in the table "Programme time periods". Use the programmes for the following preparations:
1. Programme Basic
For white and mixed-flour breads, comprising predominantly wheat and rye. The bread has a compact consistency. Set the browning of the bread with the Browning Level A button.
2. Programme French
For preparation of an especially loose white bread.
3.Programme Wholewheat
For breads made from robust flours, e.g. whole wheat flour and whole rye flour. The bread will be more compact and heavy.
4. Programme Fast
For the fast preparation of white and mixed-flour bread.
5. Programme Sweet
For breads with ingredients like fruit juices, coconut flakes, raisins, dried fruit, chocolate or additional sugar. By means of an extended rising phase the bread is lighter and airier.
6. Programme Gluten free
For breads made of gluten-free flours and baking mixtures. Gluten-free flours require longer for the absorption of liquids and have differing rising properties.
7. Programme Express
Dough in the programme Express rises appreciably less and the breads are therefore compacter and less loose. A time preselect is not possible. In this programme please always use fluids warmed up to approx. 50^ / 122^ . This programme is the fastest of all of the baking programmes.
8. Programme Dough (kneading)
For the preparation of yeast dough for buns, pizza or plaits. In this Programme no baking is done.
9. Programme Jam
For making jams, preserves, jellies and fruit spreads.
10. Programme Cake
In this programme the ingredients are kneaded, allowed to rise and then baked. Use baking powder for this programme.
11. Programme Bake
For the after-baking of breads that are not brown enough, not baked through or ready-made dough. All kneading and rising processes are dispensed with in this programme. The bread is kept warm for up to one hour after the baking process. This prevents the bread from becoming too moist.
Programme 11 bakes the bread for 60 minutes. To terminate the programme "Bake" prematurely, press the Start/Stop button until a long signal tone is heard. To switch the appliance off, remove the plug from the wall power socket.
① Note:
The programme "Bake" does not allow itself to start until the appliance has cooled itself down. Before after-baking a loaf, wait until the appliance has cooled itself down.
Functions of the Bread Baking Machine
Signal tone function
The signal tone sounds
on pressing all programme buttons,
- in the programmes 1 to 7 to give notice that grains, fruits, nuts or other ingredients can now be added,
on reaching the end of the programme
- During the keep-warm phase, at the end of the baking process, the signal tone sounds several times in succession.
Repeat function
Should there be an electricity power cut of more than 10 minutes the Bread Baking Machine must be started anew. This is only practicable if the dough, at the time of interruption in the programme process, had not passed beyond the kneading process. In all other cases, one must start again from the beginning! With electricity power cuts of less than 10 minutes duration the programme continues itself automatically from the appropriate position (see chapter "Memory function").
Memory function
The programme is, with the switch-on after electricity power cuts of less than ca. 10 minutes duration, automatically continued from the same position. This memory function is intended for power cuts.
① Note:
Pressing the Start/Stop button terminates the programme. The programme does not allow itself to be continued.
Error Messages
- If the display ① shows "HHH" after the programme has been started, it indicates that the temperature in the Bread Baking Machine is still too high. Remove the power plug. Open the appliance lid ② and allow the machine to cool down before re-using it.
- If a new Programme cannot be started directly after the Bread Baking Machine has completed a baking process, it means the appliance is still too hot. In this case the display panel reverts to the default setting (Programme 1). Open the appliance lid and allow the machine to cool down before re-using it.
① Note:
The appliance does not allow itself to start until the appliance has cooled itself down.
- If the display ① indicates "EEE" after the programme has been started, first of all switch the Bread Baking Machine off and then back on by removing and then re-inserting the power plug from/into the wall socket. Should the error display continue, make contact with Customer Services.
Baking bread
Inserting the ingredients
- Attach the kneading hook ⑪ on the drive shaft ⑤.
- Insert the ingredients into the baking mould 4. The ingredients must be placed into the baking mould 4 in the sequence detailed in the individual recipe. Ensure that no contamination from outside can adhere to the baking mould 4.
Inserting the baking mould
Place the baking mould 4 slightly slanting on the drive shaft. Turn the baking mould 4 lightly in a clockwise direction, until it is sitting correctly in the baking space 10. (Marking " LOCK" in the baking space 10).
Switching on
- Insert the plug into a properly installed power socket.
Programme selection
- Choose the desired programme with the button Programme selection .
- Choose the desired browning with the button Browning Level A.
- Choose the desired bread weight with the button Bread Weight B .
To start the programme immediately, press the button Start/Stop D.
Time delay/Timer function
- Choose the desired programme with the button Programme selection .
- Choose the desired browning with the button Browning Level A.
- Choose the desired bread weight with the button Bread Weight ③.
- With the button Time you can delay the start of the programme.
- Add to the time automatically given in the respective programme the number of hours and minutes after which the programme should be finished. If necessary, take into consideration the keepwarm time of one hour (on completion of the baking process)!
The programme can, with the help of the time delay, be finished a maximum of 13 hours after the start of the programme.
Warning!
Before you bake a particular type of bread with time delay first try out the recipe under observation, to ensure that the relationships of the ingredients to each other is correct, the dough is not too firm or too thin, or the amounts are not too large and could then possibly overflow. Risk of fire!
Example
A standard mixed-flour bread with medium browning and a larger bread weight is to be baked during a later period of time. For this, select first of all Programme 1 E, medium Browning Level A and the Bread Weight 900 g B (large bread weight). Let us assume it is 08:00 and the bread should be ready in the evening at around 17:30, i.e. in 9 hours and 30 minutes time. Press the button Time C until 9:30 appears, as the time period to be considered is one of nine hours and 30 minutes, between "now" (08:00) and the desired time of completion. With time delayed baking please do not use perishable ingredients such as milk, eggs, fruit, yoghurt, onions etc..!
To start the programme, press the button Start/Stop D.
Mixing and kneading dough
The Bread Baking Machine mixes and kneads the dough for as long as is scheduled in the baking programme (see Table).
Tip: After 5 minutes of kneading, check the consistency of the dough. It should be a soft, sticky lump. If it is too dry, add some liquid to it. If it is too moist, add some flour (1/2 to 1 teaspoon, one or more times as required).
Tip: If you remove the kneading hook 1 from the dough after the last kneading process, the bread will not be torn when removing it from the baking mould 4. For this, you must interrupt the baking programme.
- To interrupt the baking programme remove the plug from the wall socket. DO NOT press the button Start/Stop D.
- Open the appliance lid ② and remove the baking mould ④.
Take the dough out with floured hands and remove the kneading hook 1
- Place the dough back into the baking mould ④ , replace the baking mould in the appliance and close the lid ② .
- Reinsert the plug into the wall socket. The baking programme will be continued automatically.
① Note:
The interruption may not last longer than 10 minutes! If it does, the baking programme will not be continued.
Allowing the dough to rise
After the last kneading, the Bread Baking Machine creates the optimal temperature for the dough to rise. Absolutely leave the appliance lid ② closed during this period.
Bake
Risk of Burns!
Never open the appliance lid 2 during the baking process.
① Note
Do not open the appliance lid 2 during the baking process. The bread could collapse.
The Bread Baking Machine automatically regulates the baking temperature and time. Should the bread still be too light on completion of the baking programme, it can be after-baked using the programme Baking:
- Press and hold the button Start/Stop until the signal tone sounds and allow the appliance to cool down with the lid 2 open.
- Press the button Programme selection ③ several times to choose the programme Bake.
To start the after-baking programme, press the Start/Stop button. - When the desired browning has been obtained, stop the baking process by pressing the button Start/Stop until a signal tone is heard.
Keeping warm
When the baking process is complete a signal tone sounds several times to signify that the bread or other food item can be removed. In the display appears 7,0:00'' . At the same time a keep warm period of one hour begins. Excluded are the programmes Dough and Jam.
End of the programme
Warning!
Before you open the appliance lid 2, remove the plug from the wall socket to avoid an unintentional switching on of the appliance. Risk of injury!
Warning!
To avoid the risks from short circuits, thunderstorms or voltage fluctuations, ALWAYS separate the appliance from the electrical mains when it is not in use.
- On completion of the programme remove the baking mould ④ with the help of an oven cloth or gloves.
Warning!
Always use oven cloths or gloves to remove the baking mould 4 from the Bread Baking Machine.
- Place the baking mould ④ upside down and, insofar as the bread does not immediately fall onto the grill, shift the drive shaft ⑤ back and forth a few times from below until the bread falls out.
Should the kneading hook 11 become stuck in the bread, use the supplied kneading hook remover 13 to dislodge it:
- Insert it into the round opening of the kneading hook 1 on the underside of the warm bread and jam the kneading hook remover 13 against the lower edge of the kneading hook 11.
- Then carefully draw the kneading hook ① with the kneading hook remover ⑧ upwards. Whilst doing this one can see at which position in the bread the wing of the kneading hook ① is located.
Lightly cut the bread at this position and then pull the kneading hook 1 out.
Note
Do not use any metal objects which may cause scratches on the non-stick coating.
Rinse the baking mould ④ with warm water directly after removing the bread. This prevents the adhesion of the kneading hook ① on the drive shaft ⑤ .
Allow the bread to cool for 15-30 minutes before eating it.
Attention!
Before cutting the bread, ensure that the kneading hook has been removed. The kneading hook could be damaged.
Cleaning and Care
Warning!
Before cleaning the appliance, ALWAYS remove the plug from the wall socket and allow the appliance to cool down completely.
Protect the appliance against splashing water and moisture, these could cause you to receive an electric shock.
Please also observe the safety instructions.
Important
The appliance and its ancillaries are not suitable for being cleaned in a dish washing machine!
Housing, lid, baking space
- Remove all residual matter in the baking space 10 with a moist cloth or a lightly moistened soft sponge.
- Wipe also the housing and the lid, again only with a moist cloth or sponge.
Ensure that the interior is completely dry.
Baking mould and kneading hook
The surfaces of the baking mould 4 and the kneading hook 1 have been given a coating of anti-stick materials.
When cleaning the appliance do not use aggressive detergents, cleaning powders or objects that may cause scratches to the surfaces.
Due to moisture and vapours the surfaces of various parts may undergo changes in their appearance over a period of time. This has no influence on the function nor does it reduce the quality of the baking results.
Before cleaning, remove the baking mould ④ and the kneading hook 11 from the baking space 10 . Wipe the exterior surfaces of the baking mould 4 with a moist cloth.
Important
Never submerse the baking mould 4 in water or other liquids. It could cause irreparable damage to the baking mould 4.
Clean the interior areas of the baking mould 4 with warm soapy water.
Should the kneading hook 1 be encrusted and it is difficult to remove, fill the baking mould 4 with hot water for around 30 minutes.
If the mounting of the kneading hook is clogged, you can clean it by carefully using a wooden toothpick.
Do not use any chemical cleaning agents or solvents to clean the Bread Baking Machine.
Accessories
Clean the accessories (Measuring beaker 12, measuring spoon 14 and kneading hook remover 13) in a mild soapy solution and then rinse the accessories thoroughly.
Do not use aggressive detergents or abrasive cleaners when cleaning. These could damage the accessories.
Disposal

Do not dispose of the appliance in your normal domestic waste. This product is subject to the European Directive 2002/96/EC.
Dispose of the appliance through an approved disposal centre or at your community waste facility. Observe the currently applicable regulations. In case of doubt, please contact your waste disposal centre.

Dispose of all packaging materials in an environmentally friendly manner.
Warranty and Service
You receive a 3-year warranty for this device as of the purchase date. The device has been manufactured with care and meticulously examined before delivery. Please retain your receipt as proof of purchase. In the case of a warranty claim, please make contact by telephone with our service department. Only in this way can a post-free despatch for your goods be assured. The warranty covers only claims for material and manufacturing defects, not for worn parts or for damage to fragile components, e.g. buttons or batteries. This product is intended for domestic use only, it is not intended for commercial appliacations. In the event of misuse and improper handling, use of force and interference not carried out by our authorized service branch, the warranty will become void. Your statutory rights are not restricted in any way by this warranty.
GB DES Ltd
Units 14-15
Bilston Industrial Estate
Oxford Street
Bilston
WV147EG
Tel.: 0870/787-6177
Fax: 0870/787-6168
e-mail: support.uk@kompernass.com
IE Kompernass Service Ireland
Tel: 1850 930 412 (0,082 EUR/Min.)
Standard call rates apply. Mobile operators may vary.
e-mail: support.ie@kompernass.com
Importer
KOMPERNASS GMBH
BURGSTRASSE 21
44867 BOCHUM, GERMANY
www.kompernass.com
| Programme No. | 1 | 2 | 3 | 4 | 5 | 6 | ||||||
| Basic | French | Wholewheat | Fast | Sweet | Gluten free | |||||||
| Bread size | 700 g | 900 g | 700 g | 900 g | 700 g | 900 g | 700 g | 900 g | 700 g | 900 g | 700 g | 900 g |
| Clock timer (max.) | 13 Std. | 13 Std. | 13 Std. | 13 Std. | 13 Std. | 13 Std. | - | 13 Std. | 13 Std. | 13 Std. | 13 Std. | |
| Level of browning | ✓ | ✓ | ✓ | ✓ | ✓ | ✓ | ✓ | ✓ | ✓ | ✓ | ✓ | ✓ |
| Signal tone insert ingredients | ✓ | ✓ | ✓ | ✓ | ✓ | ✓ | ✓ | ✓ | ✓ | ✓ | ✓ | ✓ |
| Total time hours. | 3:00 | 3:10 | 3:30 | 3:40 | 3:40 | 3:50 | 1:55 | 1:58 | 3:05 | 3:10 | 3:15 | 3:30 |
| All of the following time details in minutes | ||||||||||||
| Knead 1 | 10 | 11 | 16 | 18 | 9 | 10 | 7 | 10 | 12 | |||
| Allow dough to rise 1 | 23 | 28 | 35 | 40 | 20 | 25 | 6 | 20 | 22 | 20 | ||
| Signal tone (Addition of ingredients during the second kneading phase) | ✓ | ✓ | ✓ | ✓ | ✓ | ✓ | ✓ | ✓ | ✓ | ✓ | ✓ | ✓ |
| Time details in the display | ap-prox. 2:20 | ap-prox. 2:23 | ap-prox. 2:27 | ap-prox. 2:30 | ap-prox. 3:06 | ap-prox. 3:10 | ap-prox. 1:37 | ap-prox. 1:40 | ap-prox. 2:31 | ap-prox. 2:28 | ap-prox. 2:48 | ap-prox. 2:53 |
| Knead 2 | 12 | 13 | 17 | 18 | 20 | 10 | 10 | 15 | 13 | |||
| Allow dough to rise 2 | 35 | 30 | 55 | 15 | 15 | 35 | 50 | |||||
| Allow dough to rise 3 | 40 | 50 | 60 | - | - | 50 | 50 | |||||
| Bake | 60 | 63 | 62 | 58 | 60 | 62 | 65 | 55 | 58 | 60 | 65 | |
| Time details in the display | 0:00 | 0:00 | 0:00 | 0:00 | 0:00 | 0:00 | 0:00 | 0:00 | 0:00 | 0:00 | 0:00 | 0:00 |
| Keeping warm | 60 | 60 | 60 | 60 | 60 | 60 | ||||||
| Programme No. | 7 | 8 | 9 | 10 | 11 | |
| Express | Dough | Jam | Cake | Bake | ||
| Bread size | 700 g | 900 g | - | - | - | - |
| Clock timer (max.) | - | - | 13 Hrs. | - | 13 Hrs | - |
| Level of browning | ✓ | ✓ | - | - | ✓ | ✓ |
| Signal tone insert ingredients | ✓ | ✓ | - | - | - | - |
| Total time hours. | 0:59 | 1:15 | 1:30 | 1:20 | 1:28 | 1:00 |
| All of the following time details in minutes | ||||||
| Knead 1 | 11 | 12 | 20 | - | 15 | - |
| Allow dough to rise 1 | - | - | 15 | 8 | - | |
| Signal tone (Addition of ingredients during the second kneading phase) | ✓ | ✓ | - | - | - | - |
| Time details in the display | ap-prox. 0:54 | ap-prox. 1:10 | - | - | - | - |
| Knead 2 | - | - | 45 | - | - | |
| Allow dough to rise 2 | - | 30 | - | - | - | |
| Allow dough to rise 3 | 10 | 20 | 40 | 20 | - | - |
| Bake | 38 | 43 | - | - | 65 | 60 |
| Time details in the display | 0:00 | 0:00 | 0:00 | 0:00 | 0:00 | 0:00 |
| Keeping warm | 60 | - | - | 60 | 60 | |
Troubleshooting the Bread Baking Machine
| What do I do if the kneading hook ① is stuck in the baking mould ④ after baking? | ·Fill the baking form ④ with hot water and twist the kneading hook ⑪ to loosen the encrustation underneath. |
| What happens if the finished bread is left inside the bread maker? | ·Through the "Keep-warm function" it is ensured that the bread is kept warm for approx. 1 hour and is also protected against moisture. If the bread remains in the baking machine for longer than 1 hour, it may become moist. |
| Is the baking mould ④ suitable for a dish washing machine? | ·No. Please rinse the baking mould ④ and the kneading hook ⑪ by hand. |
| Why doesn't the dough get stirred, even if the motor is running? | ·Check to see if the kneading hook ⑪ and the baking mould ④ have correctly engaged. |
| What do I do if a kneading hook ① is stuck in the bread? | ·Remove the kneading hook ⑪ with the kneading hook remover ⑫. |
| What happens if there is a power failure when a Programme is running? | ·With power failures of up to 10 minutes or less, the Bread Baking Machine continues to the end the last procedure programmed into it. |
| How long does it take to bake bread? | ·Please take note of the exact times given in the table "Programme time periods". |
| What bread sizes can I bake? | ·You can bake the following bread sizes with the baking mould ④: -Breads with a weight of 700 g: -Breads with a weight of 900 g |
| Why can fresh milk not be used with time-delayed baking? | ·Fresh products such as milk or eggs spoil if they remain in the appliance for too long. |
| The appliance crushes the added raisins. | ·To avoid the crushing of ingredients such as fruit or nuts, add them to the dough after the signal has sounded. |
| What do I do if smoke comes from the baking space ⑩ or the ventilation slots ⑥? | ·Remove the power plug immediately! Allow the appliance to cool down, then remove the baking mould ④. Clean the exterior of the baking mould ④ as well as the baking space ⑩, as the smoke was probably caused by food residues. Should there be no food residues in the baking space ⑩ or on the exterior surfaces of the baking mould ④, do not switch the appliance back on. Make contact with the Customer Service department. |
| What has happened if the ingredients are not correctly mixed or the bread is not correctly baked through? | ·A false programme has been selected. ·The button Stop/Start ① has been pressed during operation. ·During the baking process there was an extended power failure. ·The appliance lid ② was opened several times during the baking process. ·The kneading hook ① is blocked. Remove the ingredients and do not re-use them. Remove the baking mould ④ and check to ensure that the drive shaft ⑤ turns. Should this not be so, make contact with our customer service department. |
| Why does the display ⑦ show „H:HH" and the appliance doesn't allow itself to be started? | ·The appliance is still too hot from the previous baking process. Press the button Stop/Start ① until the default adjustments appear in the display ⑦. Leave the appliance to cool down, with the lid ② open, for approx. 20 minutes. Afterwards, the appliance allows itself to be used as normal. |