MiCam Truck - Gps NAVMAN - Free user manual and instructions
Find the device manual for free MiCam Truck NAVMAN in PDF.

User questions about MiCam Truck NAVMAN
0 question about this device. Answer the ones you know or ask your own.
Ask a new question about this device
Download the instructions for your Gps in PDF format for free! Find your manual MiCam Truck - NAVMAN and take your electronic device back in hand. On this page are published all the documents necessary for the use of your device. MiCam Truck by NAVMAN.
USER MANUAL MiCam Truck NAVMAN
MICAM GPS MICAM EXPLORE MICAM TRUCK
User Manual
Important safety information 3
Precautions 3
Declaration of conformity....5
Product overview 6
Mounting your device in a vehicle....7
Using a memory card....9
Improving battery performance....9
Establishing a GPS fix.... 10
Switching the device on/off ....11
Changing Vehicle Mode 12
Planning your route....13
Selecting a destination....13
Viewing location info 14
Planning a new route....15
Changing an existing route....16
Changing the route by performing another search....16
Marking locations with map pins 16
Saving places/trips as Favourites....17
One Touch 17
Saving a location....17
Saving a search....18
My Trips 19
GPS navigation....20
The map screen 20
Changing display mode 20
The menu bar 21
Accessing quick options....22
Finding a place to park 23
Unpairing your devices 25
Searching for & sending location info to MiCam 26
Getting live traffic updates.... 27
Locating your parked vehicle 28
Exporting mileage reports 28
Making calls & receiving notifications....30
Checking for map and software updates 32
Using the dashcam....33
Important notices....33
Recording videos 33
The dashcam view 34
Configuring dashcam settings....34
Viewing videos and photos 35
MiVue Manager ....36
Installing MiVue Manager 36
Viewing recorded files 36
Reference 38
Caring for your Navman product 38
Appendix....39
Menu Options 39
POI Icons 41
Safety Camera Icons....43
Driver Warning Icons.... 43
Branded POIs 44
For more information....45
Online support 45
Navman customer support 45
Speed limit 45
Safety camera POIs 45
Important safety information
■ Removing original equipment, adding accessories or modifying your vehicle could affect vehicle safety or make it illegal to operate in some jurisdictions.
■ Follow all product instructions and instructions in your vehicle owner's manual regarding installing accessories or making modifications.
- Consult your country's and/or state's laws regarding operation of a vehicle with any accessories or modifications.
- It is your sole responsibility to place, secure and use your Navman in a manner that will not cause accidents, personal injury or property damage. Always observe safe driving practices.
- Do not mount your Navman product in a way that may interfere with the safe operation of the vehicle, the deployment of air bags or other safety equipment.
■ Do not operate your Navman product while driving.
■ Before using your Navman product for the first time, familiarize yourself with your device and its operation.
- On main roads, the distance to an exit calculated by your Navman may be further than the distance shown on road signs. Road signs show the distance to the start of an exit while your Navman shows the distance to the next intersection, i.e., the end of the exit ramp or road. To prepare to exit a road, always follow distance information on road signs.
■ The use of information regarding safety or speed camera locations may be subject to local laws in the country of use. You are responsible for checking that you can legally use the information in your country or in the country where the information will be used.
- Do not handle your Navman while it is hot. Let the product cool off and keep it out of direct sunlight.
Precautions
Failure to adhere to these warnings and cautions may lead to death, serious injuries or property damage. Navman disclaims all liability for installation or use of your Navman that causes or contributes to death, injury or property damage or that violates any law.
About charging
■ Use only the charger supplied with your device. Use of another type of charger will result in malfunction and/or danger.
This product is intended to be supplied by a LISTED Power Unit marked with "LPS," "Limited Power Source" and output rated +5 V dc / 2.0 A.
About the charger
- Do not use the charger in a high moisture environment. Never touch the charger when your hands or feet are wet.
- Allow adequate ventilation around the charger when using it to operate the device or charge the battery. Do not cover the charger with paper or other objects that will reduce cooling. Do not use the charger while it is inside a carrying case.
■ Connect the charger to a proper power source. The voltage requirements are found on the product case and/or packaging.
■ Do not use the charger if the cord becomes damaged. - Do not attempt to service the unit. There are no serviceable parts inside. Replace the unit if it is damaged or exposed to excess moisture.
About the battery
■ Use a specified battery in the equipment.
■ CAUTION: The battery can burst or explode, releasing hazardous chemicals. To reduce the risk of fire or burns, do not disassemble, crush, puncture, or dispose of in fire or water.
■ Important instructions (for service personnel only)
- Caution: Risk of explosion if battery is replaced by an incorrect type. Dispose of used batteries according to the instructions.
■ Replace only with the same or equivalent type recommended by the manufacturer.
■ The battery must be recycled or disposed of properly.
■ Use the battery only in the specified equipment.
- Only use the correct home charger (may be sold separately) or in-car power adapter supplied by Navman to charge your Navman internal battery.
■ Only use your Navman internal battery with your Navman unit.
- Your Navman uses a Lithium-ion battery. It is important to follow the guidelines set out regarding this type of Battery.
Electronic devices using a lithium – ion battery such as Mobile phones, GPSs and cameras are designed to operate at a temperature range of approximately 0^ C to 50^ C. Beyond these temperature limits, there may be a risk of battery failure, when these electronic goods are exposed to extreme heat conditions for long periods.
It is recommended that you do not use your Navman in a humid, wet and/or corrosive environment. Do not put, store or leave your product in or near a heat source, in a high temperature location, in strong direct sunlight and do not expose it to temperatures over 60^ C ( 140^ F). Failure to follow these guidelines may cause the Lithium-ion battery to leak acid, become hot, explode or ignite and cause injury and/or damage.
Do not pierce, open or disassemble the battery. If the battery leaks and you come into contact with the leaked fluids, rinse thoroughly with water and seek medical attention
immediately. For safety reasons, and to prolong the lifetime of the battery, charging should not occur at low (below 0^ C/32°F) or high (over 45^ C/113°F) temperatures.
THE LITHIUM-ION BATTERY CONTAINED IN THE PRODUCT MUST BE RECYCLED OR DISPOSED OF PROPERLY.
It is highly recommended you use your Navman only WITH THE SUPPLIED DC POWER LEAD (CAR CHARGER/BATTERY CABLE) AND AC ADAPTER (HOME CHARGER) FOR BATTERY CHARGING.
For more information on how to recycle your old electronic devices, please contact your local council office. You can also visit www.navman.com.au / www.navman.co.nz to view our latest trade-in offers.
Declaration of conformity
Note: For regulatory identification purposes, this product is assigned a model name of N657.
Labels located on the exterior of your Navman indicate the regulations your product complies with. Please check the marking labels on your Navman and refer to the corresponding statements in this chapter. Some notices apply to specific models only.

The user needs to switch off the device when exposed to areas with potentially explosive atmospheres such as petrol stations, chemical storage depots and blasting operations.
Bluetooth

Bluetooth®
DID D046616
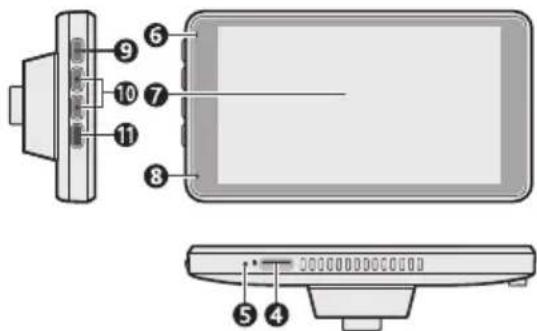
Product overview
MiCam Series Models
MiCam GPS (5-inch model):
text_image
Diagram of a computer monitor with labeled ports and connectors, showing front and side views with numbered labels.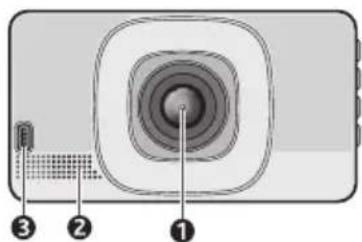
text_image
Diagram of a device rear panel with labeled components: numbered parts ①, ②, and ③.MiCam GPS Explore/Truck (7-inch models):

text_image
Diagram of a device with numbered components, likely illustrating a mechanical or electrical assembly.
text_image
Diagram of a device with labeled parts, showing numbered components and concentric rings| NameDescription | ||
| 1 | Camera lens Make sure that | no object is blocking the camera lens and no reflective material appears near the lens |
| 2 | Speaker Produces audio output | |
| 3 | Micro-USB connector | Connects to the charger or USB cable |
| 4 | Memory card slot Accepts | a MicroSD card for recording |
| 5 | Microphone (for video recording) | Receives sound and voice during recording |
| 6 | Power/Charging LED Red | - The device is chargingGreen - The device is fully charged |
| 7 | Touch screen A display that | also accepts user input |
| 8 | Microphone (for hands-free calling) | Receives sound and voice during a phone conversation |
| 9 | Home button Returns to the Home screen | |
| 10 | Volume up/down Adjusts the volume | |
| 11 | Power button Turns your Navman on and off | |
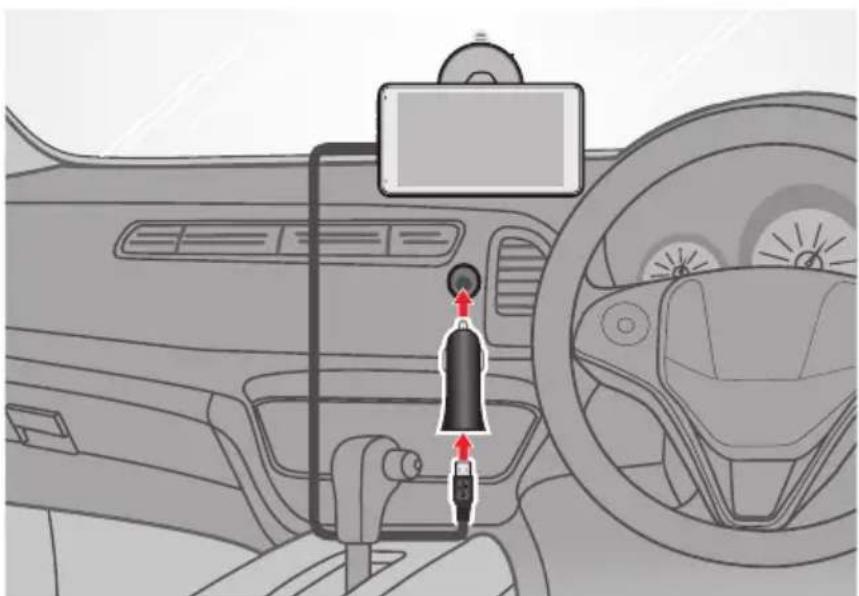
Mounting your device in a vehicle
Use the provided device holder and mount to secure your Navman in the vehicle.
The device will turn on automatically when connected to an external power source.
When disconnecting from the external power source, the device will enter a suspended state after 15 seconds. To continue using the device, tap Use Battery.
CAUTION:
- Never mount your device where the driver's field of vision is blocked.
-
If the windscreen is tinted with a reflective coating, it may be athermic and impact GPS reception. In this instance, please mount your Navman in a "clear area" - located just beneath the rear-view mirror in most instances.
-
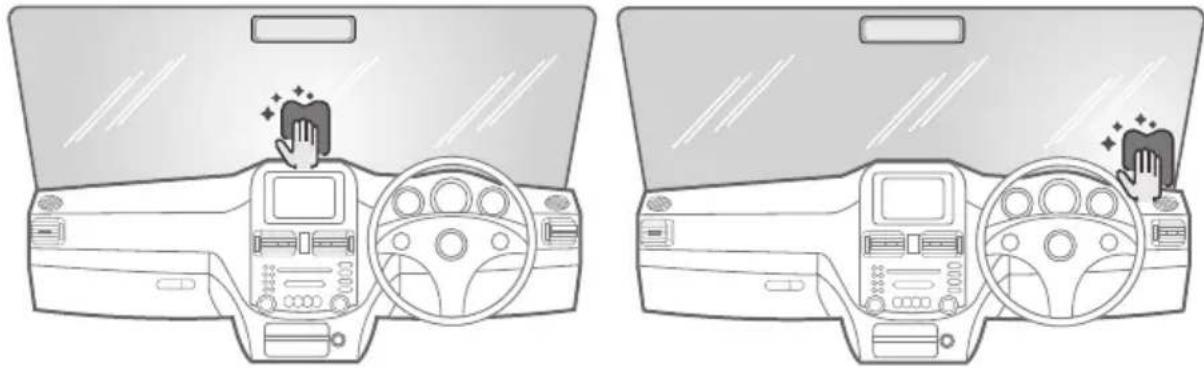
Clean the area of the windscreen where you intend to mount the device.
natural_image
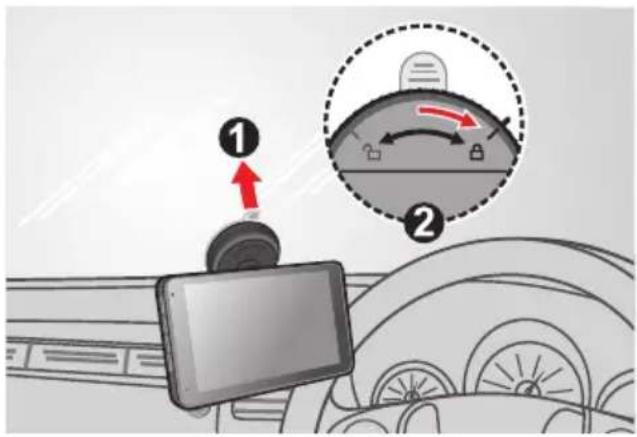
Two identical line drawings of a car dashboard with hand gestures and control panels, no text or symbols present.- Attach the mount to the device by inserting the camera lens through the centre opening of the mounting plate. Magnets will ensure proper alignment.

natural_image
Diagram showing a device with two panels and directional arrows indicating movement or orientation (no text or symbols present)- Peel the plastic cover off and press the suction cup firmly in place. Rotate the knob in the clockwise direction to secure the device in place (rotate in the counter-clockwise direction to release the mount from the windscreen). Please ensure the mount is in the LOCKED position after the device is positioned correctly on the windscreen.
text_image
Diagram showing a device with labeled parts and a magnified view of the device's adjustment mechanism.- Connect the power cable.
natural_image
Interior view of a car dashboard with steering wheel and belt switch (no text or symbols)- Activate Dashcam Mode from the main menu by tapping and adjust the camera angle as necessary.
natural_image
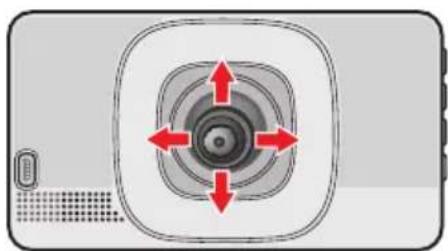
Diagram of a camera with concentric rings and red directional arrows, no text or symbols presentUsing a memory card
In order to record video footage, a microSD card is required. It is very important to use a microSD card specifically designed to be used in dash cameras. It will ensure the card will be more reliable and last longer; the wrong type of card has a greater chance of failing, even after a short period of time. Please visit www.navman.com.au/memory-card for more information on recommended SD cards.
To insert the SD card, hold its edges and gently insert it into the slot as shown in the illustration.
To remove the card, gently push the top edge of the card inwards to release it and pull it out of the slot.

natural_image
Illustration of a tablet device with a red arrow pointing to its screen (no text or symbols)CAUTION:
- Navman dash cameras are only compatible with Class 10/UHS 1 micro SD cards. High-endurance cards as they are specifically designed and built for high intensity recording devices such as dash cameras.
- Do not apply pressure to the centre of the memory card.
- Forcing the memory card into the slot backwards may cause damage.
- Do not insert or remove the memory card when the device is on or in suspend mode.
- Do not share the microSD card with other mobile devices to prevent data/folder structure from being overwritten.
- Navman does not guarantee the product's compatibility with memory cards from all manufacturers. Please always check the specifications/warranty to ensure the memory card can be used in dash cameras and loop recording devices.
- For more information on memory cards, please visit www.navman.com.au/memory-card
Improving battery performance
Please follow the guidelines below to improve the overall performance of your battery:
- Do not charge the battery where the temperature is high (e.g. in direct sunlight).
- There is no need to fully discharge the battery before charging. You can charge the battery before it is discharged.
- When storing the product for a long period of time, be sure to fully charge the battery at least once every two weeks. Over discharge of the battery can affect the charging performance.
- Failure to follow battery usage instructions could cause damage to your device, the battery, and even bodily injury or property damage and will void any warranty.
Establishing a GPS fix
The Global Positioning System (GPS) is available at any time, free of charge, and accurate to within 5 m (15 ft). GPS navigation is made possible by a network of satellites orbiting the Earth at around 20,200 km (12,552 mi). Each satellite transmits a range of signals which are utilized by GPS receivers, such as your Navman, to determine an exact location. Although a GPS receiver can detect signals from up to 12 satellites at any time, only four signals are required by vehicle navigation systems to provide a position or "GPS fix" (latitude and longitude).
Your Navman product receives GPS signals via its internal GPS antenna. To guarantee optimum GPS signal strength, ensure your Navman is outdoors, or in a vehicle outdoors, and has an unobstructed view of the sky. GPS reception is generally not affected by weather conditions, however, heavy rain or snow may have a negative effect on the reception.

text_image
Diagram comparing two smart vehicle scenarios: one with satellite signal detection and green checkmark, the other with a car parking roof and red X signal detection.Switching the device on/off
- Press and hold the power button for two seconds to turn on your Navman.

natural_image
Illustration of a door with a hand pointing to the left button (no text or symbols)Note: When you turn on your device for the first time, it may take several minutes to establish a GPS connection. Follow the on-screen prompts to select the language, map set, and vehicle type.
■ To put your Navman in a suspended state, briefly press the power button.
■ To resume using the device, do one of the following:
■ Press the power button briefly.
■ Connect the device to an external power source.
- To turn off your Navman, press and hold the power button until the "Turn off the device?" message appears, tap Turn off to confirm.
Note: After turning your device off, please wait at least 10 seconds before turning MiCam on again to allow the system to properly shut down.
Note: This feature is not available on all models.
If you are driving a large sport utility vehicle/van, or you are a professional tow truck/delivery truck driver, then setting Vehicle Mode to SUV/Van, Towing, or Truck and entering your vehicle information will allow MiCam to help you find safer and more efficient routes. This feature is designed to help large vehicles avoid tunnels and bridges with size and/or weight restrictions, as well as narrow streets and sharp corners.
The default Vehicle Mode setting is Car. To change this setting, tap on the main menu bar, go to Navigation > Vehicle Mode and select a vehicle type.

text_image
Vehicle Mode Car SUV/Van Towing Truck Total Weight(max 9T) - 1.8 t + Maximum Axle Weight - 0.0 t + Total Length - 5.3 m + Max Width - 2.4 m +Note: Do not rely solely on this product and its features. Using this product does not exempt the driver from taking full responsibility for his/her own driving behaviour, which includes observing all traffic rules and regulations in order to avoid traffic accidents, personal injuries, and/or property damage.
CAUTION: Always plan your route in advance. Do not operate the device while driving.
Selecting a destination
In addition to using search keywords, you can also specifying a number of search parameters to help you pinpoint a destination.
-
Tap anywhere on the map screen to bring out the main menu, then tap ☐ open the Search window.
-
In the Search window, the default search criteria is Near Me (near your current location). Tap the button to change the search criteria to City/Area/Postcode, POIs Along the Route (once a route is set up), or Near Destination (once a destination is selected).

text_image
Near Me Enter keyword. e.g.,4WD Search Criteria Near Me City/Area/Postcode POI Along the Route Near Destination- If City/Area/Postcode was selected, enter the appropriate information into the text box. Tap the flag icon next to the text box to switch to a different map (if installed). Tap to select an item from the list of results.
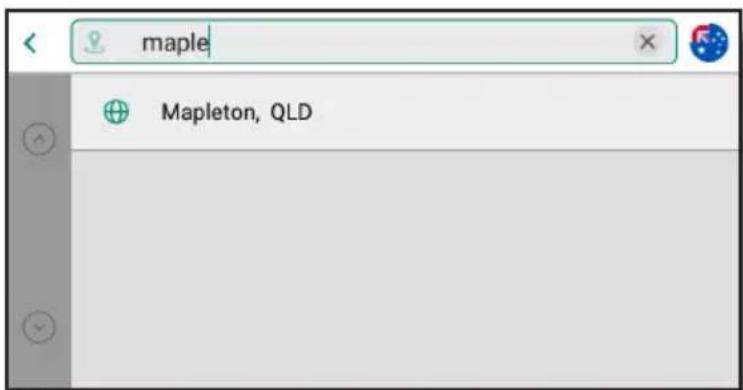
text_image
maple Mapleton, QLD- If you are looking for a specific type of business or establishment, select a category by tapping on one of the icons located under the search box.
| Icon Description | |
 | List nearby petrol stations |
 | List nearby parking facilities |
 | List nearby rest areas |
 | List nearby eateries |
 | List nearby shops |
 | List other categories such as banks/ATMs and emergency service providers |
- Enter search keyword(s) into the text box and tap to initiate a search.
- Search results (sorted by distance) are listed on the screen.
- Tap to select a destination from the list of results.

text_image
Eating & Drinking burgers 1 Burgers Anonymous 3.1 km | 3 Gleeson Ave Sydenham, New South Wales... 2 Burgers on Broadway 5.5 km | 231 Kingsgrove Rd Kingsgrove, New South... 3 Burgers Anonymous X Hopstix 5.9 km | Sunbeam St Campsie, New South Wales 219... 4 Burgers on Broadway 6 km | 99 Smith St Summer Hill, New South Wales 21...Viewing location info
Once a destination has been selected in the Search window. The Location Info window will open to show its name, address, phone number (if available), and map location. If the device is paired with a mobile phone via Bluetooth, you can tap on the phone number to make a hands-free call.
Buttons on the bottom of the Location Info window provide the following functions:
| Button Description | |
| Find another location near your selected destination | |
| Save the location information to My Places | |
| View different route options and select the one to take | |
| Begin turn-by-turn navigation to the selected destination | |
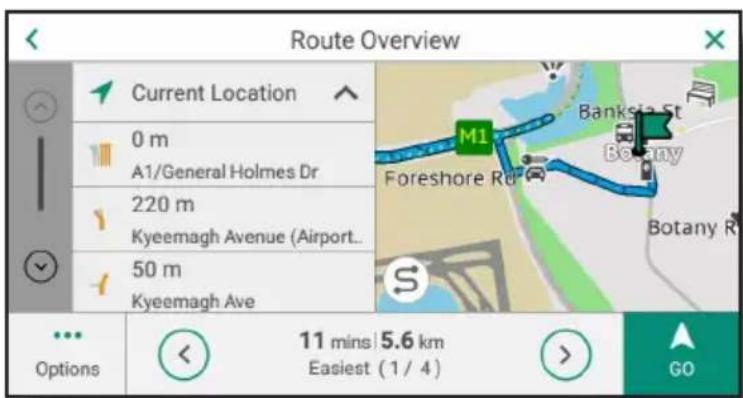
Planning a new route
Detailed route information can be viewed in the Route Overview window, which can be opened by tapping Four different routes are provided to a selected destination:
Easiest (default), Fastest, Economical, and Shortest. Use the Left and Right buttons on the bottom of the screen to cycle through the routes and view each route's travel time and distance. The map can be moved around by dragging your finger on the touchscreen, tap to quickly return the planned route to the centre of the display.
text_image
Route Overview Current Location 0 m A1/General Holmes Dr 220 m Kyeemagh Avenue (Airport... 50 m Kyeemagh Ave M1 Banksia St Botany Foreshore Rd S Botany R Options 11 mins 5.6 km Easiest (1 / 4) GOAdditional functions are provided in the Options menu, which include:
- Add Next Waypoint: Opens the Search window to find another destination to append to the new route.
- Route Settings: Opens a pop-up window for enabling/disabling Avoid unpaved roads, Avoid tolls, and Avoid ferries.
■ Save as Trip: Saves the trip to My Trips.
Tap GO to begin turn-by-turn navigation.
Changing an existing route
While following the device's turn-by-turn directions to reach a destination, you can make changes to the current route by overwriting it completely or adding other waypoints.
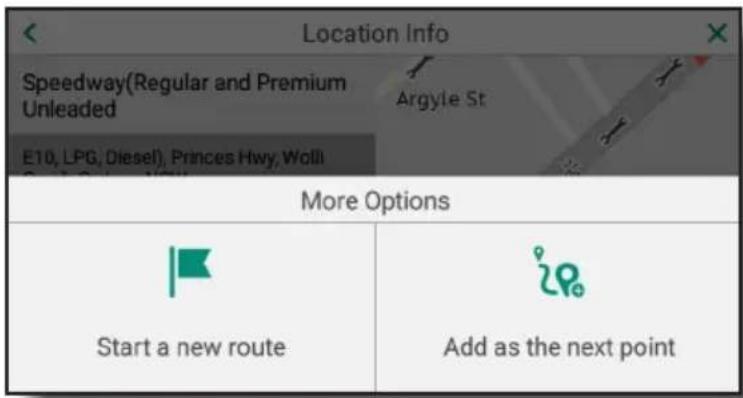
Changing the route by performing another search
Tap 📄 on the map screen to begin a search for a different location, then tap Route or Go and select Start a new route or Add as the next point to continue.
text_image
Location Info Speedway(Regular and Premium Unleaded E10, LPG, Diesel), Princes Hwy, Wolli Argyle St More Options Start a new route Add as the next pointMarking locations with map pins
Tap and hold a location on the map screen to quickly mark a location or POI. Once a location is pinned, a window will appear to display its street address and/or location information.
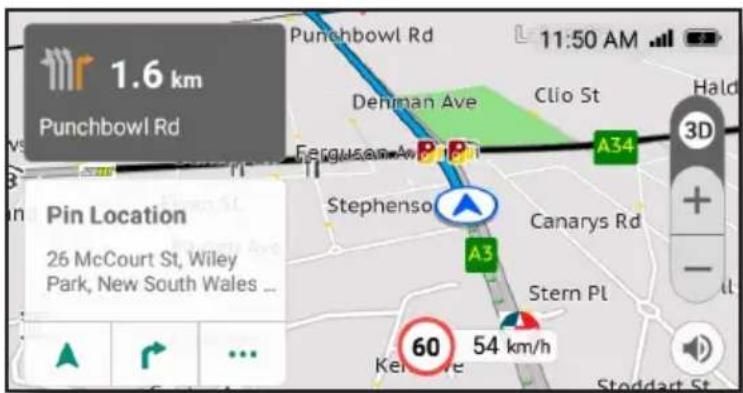
text_image
1.6 km Punchbowl Rd Pin Location 26 McCourt St, Wiley Park, New South Wales ... 11:50 AM Deniman Ave Clio St A34 Stephenso Canarys Rd A3 Stern Pl Kenolve 54 km/h 60 3D + - Stoddart StUse the buttons located on the bottom of the information window to:
| Button Description | |
| Start turn-by-turn navigation to this location | |
| Open the Route Overview window | |
| Open the Location Information window | |
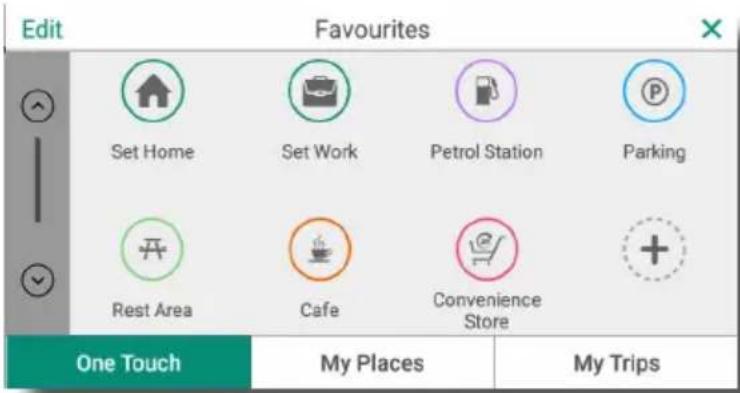
Saving places/trips as Favourites
text_image
Edit Favourites Set Home Set Work Petrol Station Parking Rest Area Cafe Convenience Store One Touch My Places My TripsThe Favourites window offers a convenient way to access locations or trips without having to enter an address, keywords, or search parameters again. Tap on the menu bar to open the Favourites window, which contains the following tabs:
One Touch
You can save up to 16 locations and or searches under the One Touch tab. Your device will already have several default locations (Home and Work) and searches (Petrol Station, Parking, and Rest Area) set up.
Saving a location
To edit one of the two default locations, tap Set Home or Set Work to open the Search window and find your place of residence or work, then tap Save as Home or Save as Work to save your settings.

text_image
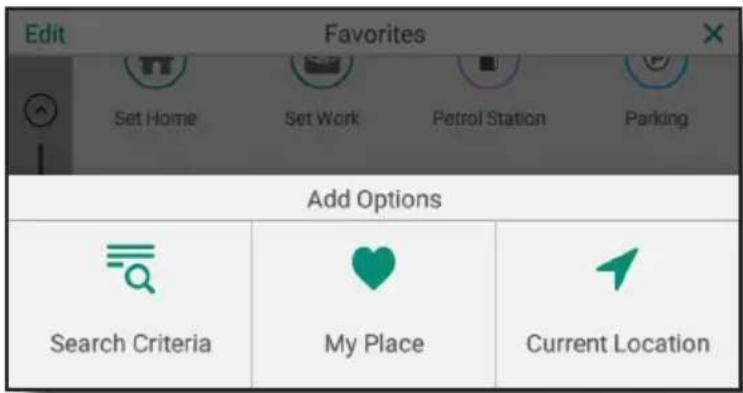
Location info Shire of Mullewa 5 Thomas St Mullewa, Western Australia 6630 Australia Elder St Bowie Birdwood St Doney S Carson St Mullewa Short St FryrSti Burges St Lovers Ln Mitche Save as HomeTo add a new location, tap under the One Touch tab and select My Place to import a saved location from My Places or Current Location to save your current location.
text_image
Edit Favorites Set Home Set Work Petrol Station Parking Add Options Search Criteria My Place Current LocationSaving a search
To add a new search, tap under the One Touch tab and select Search Criteria to open the Search window. Enter your search keyword(s) or select a POI category and add the appropriate search criteria/keyword filter then tap Add to One Touch.
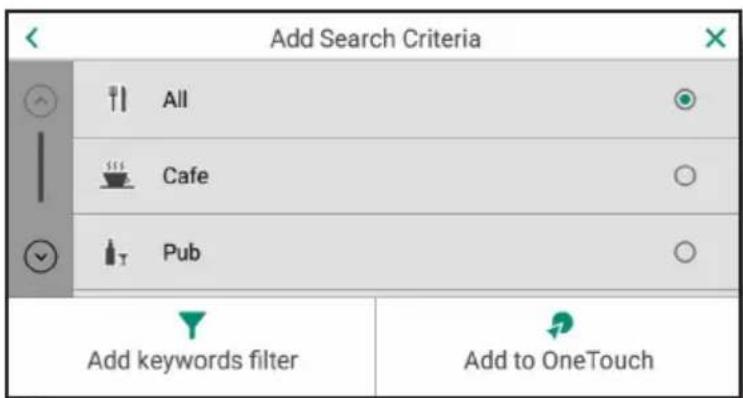
text_image
Add Search Criteria All Cafe Pub Add keywords filter Add to OneTouchTo receive turn-by-turn driving directions to a saved location or repeat a saved search, simply tap the corresponding tile then follow the on-screen instructions. Tap Edit in the upper-left corner of the display and select an item to rename, delete, or make changes. You can also drag-and-drop to reorder tiles while in editing mode.
My Places
Items under the My Places tab are generally saved to Favourites (by tapping in the Location Info window) after you have performed a search or pinned a location on the map. If no records are saved under this tab, you can also tap Search to locate and add new destinations. You can quickly access a saved location by tapping an entry to view nearby places, modify route options, or start turn-by-turn navigation. These records can be deleted
or sorted by tapping Edit in the upper-left corner of the display. While in editing mode, select the record(s) you wish to delete then tap Delete to remove the item(s), or tap Reorder to sort the records alphabetically or by distance/date created. Tap Add to open the Search window and add new places or tap Done to save your changes.
| Done Edit | ||
| Domino's Pizza 1 Gertrude St Wolli Creek, New South Wales 2205 Australia | ||
| Three Olives Bistro 29 Burrows St Arncliffe, New South Wales 2205 Australia | ||
| Add | Reorder | Delete |
To navigate to a saved place, select a location listed under the My Place tab and tap GO.
My Trips
Trips can be saved to Favourites from the Location Info window by tapping Route selecting Options from the Route Overview window, and tapping Save as Trip. Enter a name for the trip using the on-screen keyboard tap Save.

text_image
Route Overview Current location George St Options Add waypoint Route Setting Save As TripIf no records are saved under the My Trips tab, you can tap Search to find a location and view its location info, tap 🤒 to open the Route Overview window, select the route (easiest, fastest, economical, shortest) to follow, and tap 🤒 and select Save as Trip.
To follow a previously saved trip, select a trip listed under the My Trips tab and select Start a new route or Add as the next point.
The map screen
The map screen is shown while turn-by-turn instructions are provided. Elements on the map screen include:

text_image
160 m Marsh Street (Rockdale) 00 hr 05 min 2.6 km 02:39 PM Firmstone Gdn Eve St 60 58 km/h B: 11:34 AM A36 Kee St M5 M5 3D Innesdale R Mars + - 60 8 9 10① Direction and distance of next turn
② Menu bar
3 Trip information
4 Display mode (tap to cycle between 3D, 2D track up, and 2D north up)
5 Zoom in button
6 Zoom out button
⑦ Voice notifications (tap to cycle between On, Mute, and Alerts Only)
8 Speed limit
9 Current travel speed
10 Current position/route
In addition to simply tapping on various elements on the touch screen, you can also use the two-finger pinch gesture to zoom in and out on the map.
Changing display mode
To help reduce eye strain and avoid distractions while driving, the system's user interface can be changed to night or dark mode by tapping 📂 on the menu bar and going to
General > Screen to set the Screen Mode to Day, Night, or Auto. When set to Auto, the display will automatically change to day or night mode during day-time or evenings hours, respectively.
Day Mode Night Mode
text_image
4 mi Lansdowne Rd 00 hr 46 min 28 mi 05:46 PM Day St Chadocton St Lansdowne Rd A22 Berkenham St 35 mph Cabramatta Rd Chancery Ailsa Way Willowbank 43
text_image
460 m Lansdowne Rd 00 hr 43 min 31.1 km 11:29 AM 70 60 km/hThe menu bar
The system's main menu bar is located on the left side of the map screen. The menu bar is automatically hidden when not in use, simply tap anywhere on the screen to bring out the menu bar. Buttons on the main menu bar are described below:
| Button Description | |
 | Opens the Search window to find a destination |
 | Opens the Favourites window to quickly select a previously saved location or trip |
 | Opens Dashcam view to access driving recorder functions |
 | Opens the Traffic Information window to view traffic data downloaded from your smartphone |
 | Opens the Roadside Assistance window to request help |
 | Opens Bluetooth hands-free calling and messaging options |
 | Open the Settings window to configure various device settings |
Icons on certain buttons will change to reflect its current status. Please refer to the following table for more information:
| Button Icon Description | ||
| Dashcam |  | Continuous video recording in progress |
 | Emergency video recording in progress | |
 | Recording paused/no memory card installed | |
| Traffic updates |  | Connection established |
 | New events detected | |
 | No connection | |
| Hands-free calling |  | Connection established |
 | No Connection | |
Accessing quick options
While following turn-by-turn directions, a menu containing a set of quick options can be accessed directly from the map screen by tapping ⋯
- Overview - Open the Route Overview window for choosing a different route, adding waypoints, or saving the route.
- Route Settings - Show additional settings for avoiding dirt roads, tolls, and ferry crossings.
- Detour - Find an alternative route based on distance
- Skip Next Waypoint - Skip the next destination (only available when multiple waypoints are added to your route)
- Cancel Route - Terminate turn-by-turn navigation
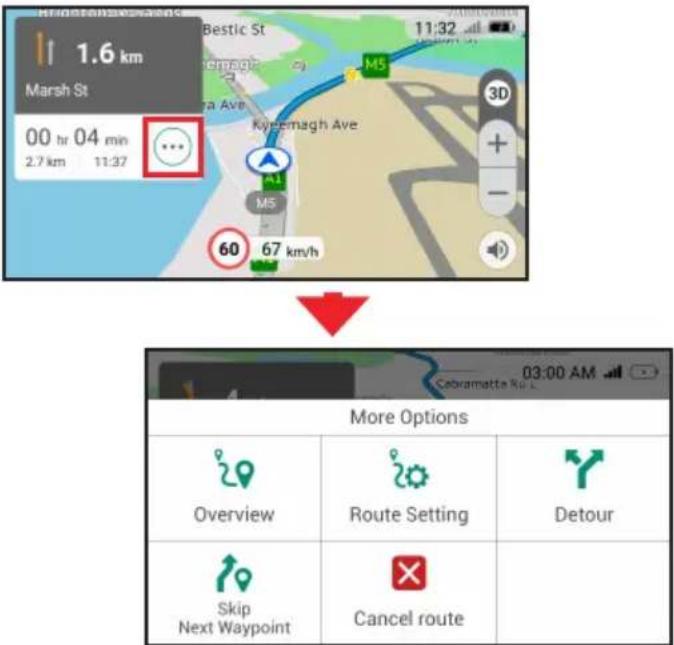
text_image
1.6 km Marsh St 00 hr 04 min 2.7 km 11:37 Bestic St M5 Kyremagh Ave A1 MS 60 67 km/h 3D + - 03:00 AM More Options Overview Route Setting Detour Skip Next Waypoint Cancel routeTapping the Detour button allows you to quickly find an alternative route to the current destination. More than one option may be available and the different routes (ordered by distance) are shown at the bottom of the display. Select an alternative route by tapping the corresponding distance button and MiCam will automatically recalculate the current route (indicated by the blue line). The original route is indicated by a purple line.

text_image
310 m Castlereagh St 00 hr 08 min 2.7 km 03:02 PM The Rocks M1 Bridge St Cahill Expy St James Rd Art Gallery Hospital Rd Cathedral Druitt Pl Town Hall George St Cross City Tunl Castlereagh 40 0 km/h Park St Busby Ln BoomerangFinding a place to park
Once you are within 1,000m of the selected destination, the Search for Parking button will appear on the screen if the Parking Near Destination function is enabled. To enable this function, tap 📋 on the menu bar, select Navigation, then toggle the Parking Near Destination switch to the "ON" position.
Once the Search for Parking button is visible, tap the button to show a list of parking facilities nearby.

text_image
150 m M1/General Holmes Dr 00 hr 00 min 150 m | 02:32 PM Lawrence Hardo M1 M1 60 70 kph Search for Parking 3D + - Ross SmithPairing MiCam with a smartphone
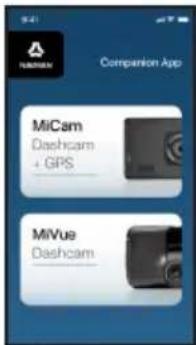
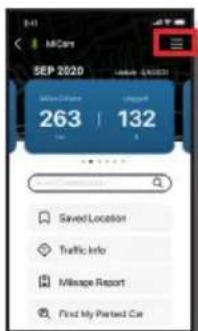
By pairing MiCam to a smartphone (with Navman MiVue Pro installed) via Bluetooth, you will gain access to additional features such as receiving live traffic updates, exporting mileage reports, and locating your parked vehicle. Search for "Navman MiVue Pro" in the Google Play Store or Apple App Store to download the app for free.
Once the app is installed, perform the following steps to pair your devices:
-
Launch Navman Mivue Pro and select MiCam Dashcam + GPS to continue.
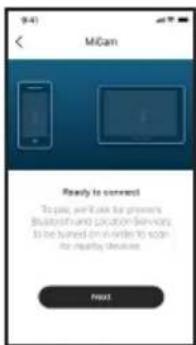
-
Tap Next and OK on the next two screens to start searching for MiCam.
text_image
MiCam Dashcam + GPS MiVue Dashcam- Tap add your device here! to initiate the pairing process.
text_image
9:41 MCan Ready to connect To pay, pay it can be prnners Bluetooth and location services to be turned off or write to scan for reaching devices Next- Tap on the device name (MiCam_XX:XX) to continue.
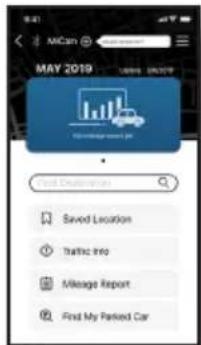
text_image
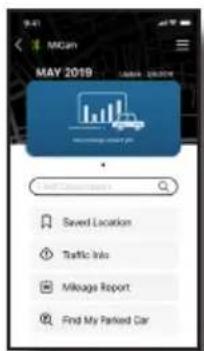
MAY 2019 Search Description Saved Location Traffic Info Mileage Report Find My Parked Car
text_image
Select an accessory MFCam ID 27- Give MiCam access to your phone's contacts and call history and tap Pair to complete the pairing process.
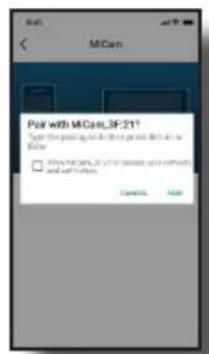
text_image
MCom Pair with MCom,3F.211 □ Any MCom, 2017 is missing or complete and will be found. Cancel Help- The Bluetooth icon will turn green once a connection has been established.
text_image
MGM MAY 2019 Served Location Traffic Info Mileags Report Find My Parked CarUnpairing your devices
To unpair the devices, tap 📋 on MiCam's menu bar, select Network > Bluetooth to open Bluetooth Settings, then tap Unpair.
In MiVue Pro, tap the hamburger icon (☐) in the upper-right corner of the Home screen and select Unpair Device to continue.
MiCam MiVue Pro
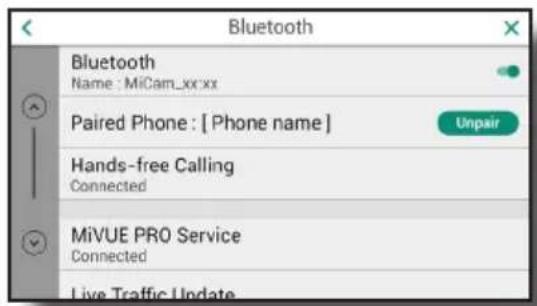
text_image
Bluetooth Name : MiCam_xx.xx Paired Phone : [ Phone name ] Unpair Hands-free Calling Connected MiVUE PRO Service Connected Live Traffic Update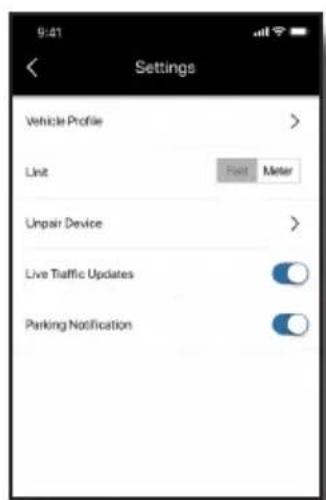
text_image
9:41 Settings Vehicle Profile Limit Foot Meter Unpair Device Live Traffic Updates Parking NotificationNote: You will also need to enter your mobile phone's Bluetooth settings and tap Unpair (Android) or Forget Device (iOS) to fully unpair MiCam and your phone.
iOS Android
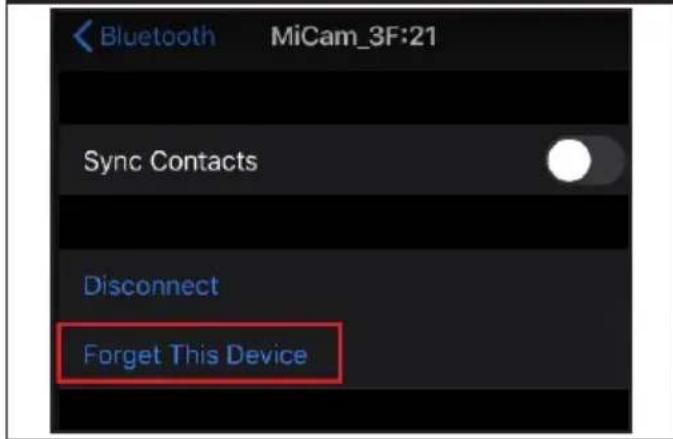
text_image
Bluetooth MiCam_3F:21 Sync Contacts Disconnect Forget This Device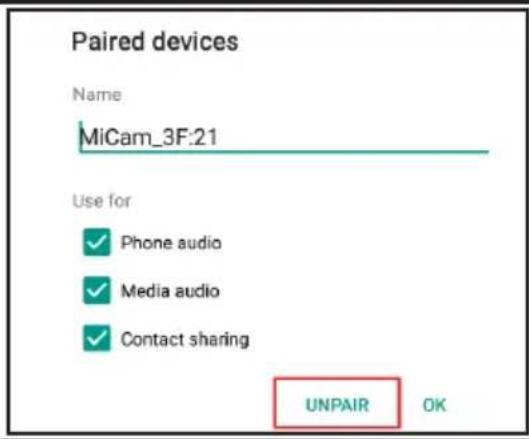
text_image
Paired devices Name MiCam_3F:21 Use for ✓ Phone audio ✓ Media audio ✓ Contact sharing UNPAIR OKSearching for & sending location info to MiCam
Once the devices are paired via Bluetooth, you can use MiVue Pro to search for a location and send the information to your MiCam to begin navigation. Tap the search box to open the search window and enter the street/city/place name using the on-screen keyboard, then select a location from the list of search results below to show the location on a map. On the map screen, tap Send to MiCam to forward the location information to your MiCam device.

text_image
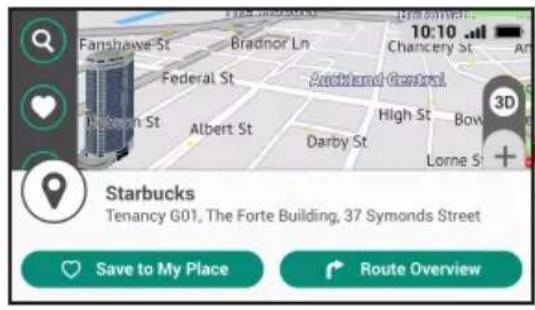
9:41 MiCam SEP 2020 Miles Driver Logistic 263 | 132 km 5 Find Destination Saved Location Traffic Info Mileage Report Find My Parked Car 9:41 starbu Starbucks A Capitol Spencer (276-74) George St. Hayshall Street 2008 3 km > Starbucks B Queen Victoria Building, 28/17 George St. Sydney 15th St. 2008 15 km > Starbucks C Capital Power Building, 291 Clackam St. Sdney, 837-2008 26 km > Starbucks D Q W E R T Y U I O P A S D F G H J K L Z X C V B N M 123 space Go 9:41 Starbucks B Queen Victoria Building, 08/159 Geyge St. Sydney 25.0690457, 121.0657801 Send to MiCamOn the map screen, a pop-up window will appear once location information is received. You can save the information by tapping Save to My Place or view detailed route information by tapping Route Overview. On the Route Overview screen, tap GO to start receiving turn-by-turn directions to your location.
text_image
Fanshaive St Bradnor Ln Federal St Albem St Albert St Darby St Anckland Central High St Bowl St Lorne St 3D Starbucks Tenancy G01, The Forte Building, 37 Symonds Street Save to My Place Route Overview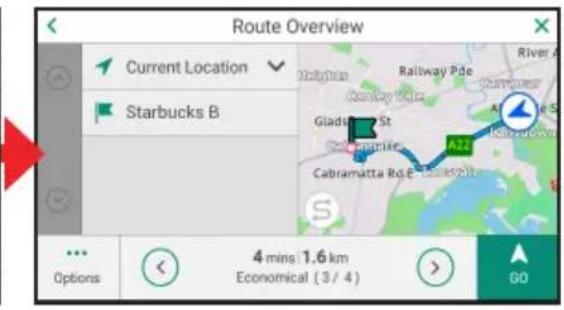
text_image
Route Overview Current Location Starbucks B Gladstone St Cebramatta Ro.E 4 mins 1.6 km Economical (3 / 4) 00Getting live traffic updates
MiVue Pro automatically retrieves local traffic data (within a 25 km radius from your current position) and forwards the information to the MiCam via Bluetooth in five-minute cycles.
Tap on MiCam's menu bar to view the latest traffic information.
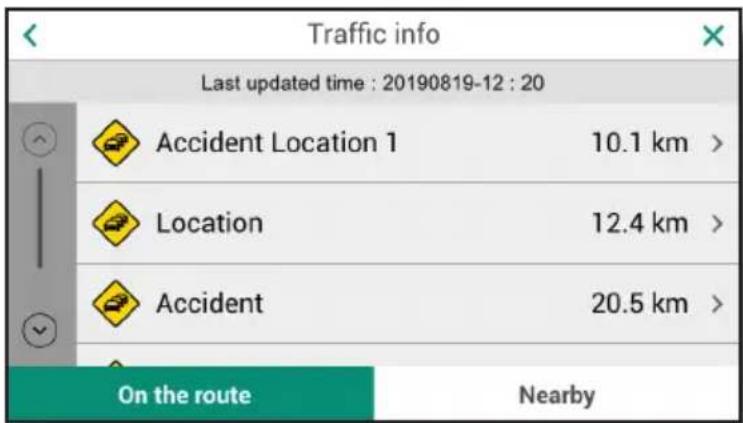
text_image
Traffic info Last updated time : 20190819-12 : 20 Accident Location 1 10.1 km > Location 12.4 km > Accident 20.5 km > On the route NearbyWhile driving, traffic alerts will also appear along the bottom of the display to warn you about what is ahead.
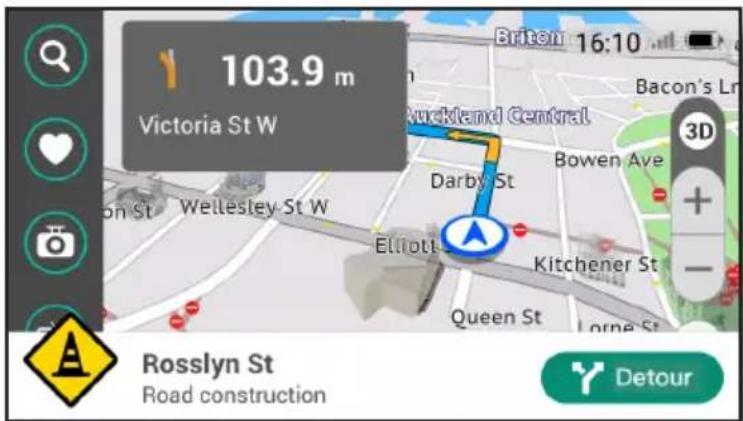
text_image
103.9 m Victoria St W Brixton 16:10 Auckland Central Darby St Bowen Ave 3D + - Elliotl Kitchener St Queen St Lorne St Rosslyn St Road construction DetourLocating your parked vehicle
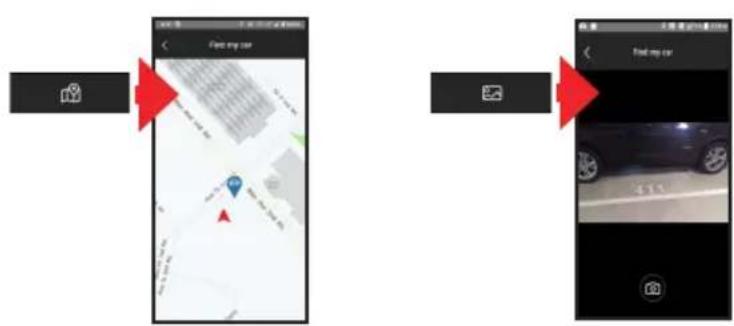
Navman MiVue Pro also includes a feature to help you find your vehicle in case you cannot remember where it was parked, Tap Find My Parked Car to open the Find My Parked Car screen. The direction of your parked vehicle is indicated by a pointer and the distance is shown in the middle of the screen.

text_image
SEP 2020 263 | 132 Find my car 263 Last seeking time 2 hours 22 mins agoOn the Find My Parked Car screen, tap the lower-left button to open a map showing the location of your vehicle and tap the lower-right button to take a photograph of your car's parking space number (or anything that will help you remember where you have parked your vehicle).
text_image
Find my car Find my carNote: The accuracy of the Find My Parked Car feature is based on your phone's GPS signal reception and a clear line of sight to the sky. Performance may be affected if used in an underground or multi-level car park.
Exporting mileage reports
Information about your trips, including time/distance travelled and average/max speed, are automatically recorded by the MiCam. This feature is active by default. To disable logging, tap 📋 on the menu bar, select Navigation > Mileage Record and move the slider to the OFF position.
Vehicle profile
Associating trips to a particular vehicle requires setting up a vehicle profile. This is especially useful if you own multiple vehicles. Perform the following steps to set up a vehicle profile:
- Tap the Menu button located in the upper-right corner of MiVue Pro.
text_image
SEP 2020 263 | 132 Saved Location Traffic Info Mileage Report Find My Parted Car- Select Vehicle Profile and tap Default Vehicle on the next screen.

text_image
Website Profile Information- Enter your vehicle information and tap Save to return to the Vehicle Profile screen.

text_image
Default vehicles Speed: Default vehicle Speed limit: Speed limit: Condition readings Max: +3.0 A.M.D. Return time: 12.000 seconds (12.000 seconds) or 12.000 seconds (12.000 seconds) CancelRetrieving mileage reports to your phone
- Tap Mileage Report in MiVue Pro.

text_image
September 2020 263 | 132 Saved Location Traffic Info Mileage Resort Find My Portland Car- Place a finger on the screen and drag down to begin data transfer.
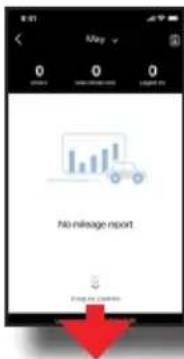
text_image
May 0 0 0 No mileage export drug by Cimml- Reports are organised by month. Each trip can be set as a personal or business trip by toggling the blue switch.
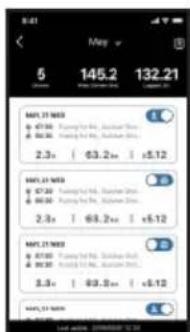
text_image
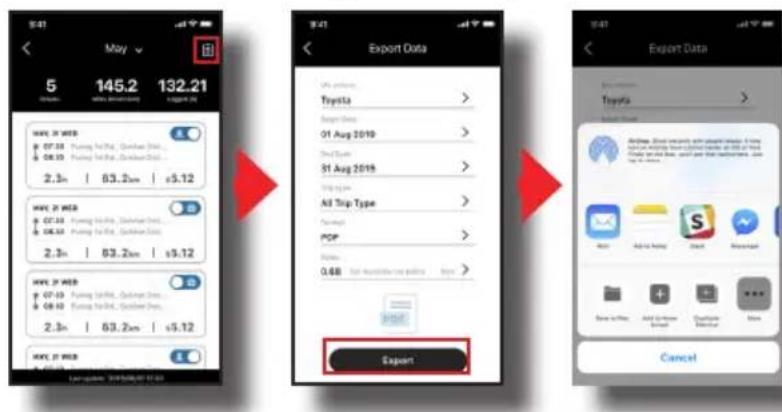
5 145.2 132.21 NEW 21 MDD $7.00 $6.00 2.3x | $3.2x | +5.12 NEW 21 MDD $7.00 $6.00 2.3x | $6.2x | +5.12 NEW 21 MDD $7.00 $6.00 3.3x | $9.3x | +5.12 NEW 21 MDD Last date: 2018/03/03 12:30Exporting Data
From the Monthly Reports screen, tap the clipboard icon in the upper-right corner to open the Export Data screen. Set the value of each field and tap Export to continue. Select the app or method you wish to use for sharing your mileage data.
text_image
5 145.2 132.21 Export Data Toyota Export Data Toyota Export Data Export Export Export Export Export Export Export Export Export Export Export Export Export Export Export Export Export Export Export Export Export Export Export Export Export Export Export Export Export Export Export Export Export Export Export Export Export Export Export Export Export Export Export Export Export Export Export Export Export Export Output Date: 2019/06/07-11:03Note: The list of apps and methods for sharing your mileage data will vary based on the apps installed on your smartphone.
Making calls & receiving notifications
With the devices paired up via Bluetooth, calls and notifications received on your phone can be directed to MiCam while driving. Tap on the menu bar to open the phone interface.

text_image
Phone Favorites > Call History > Contacts > Dial a number > Call NotificationYou can also sync your contact list and call history by giving MiVue Pro permission to access these features on your phone:
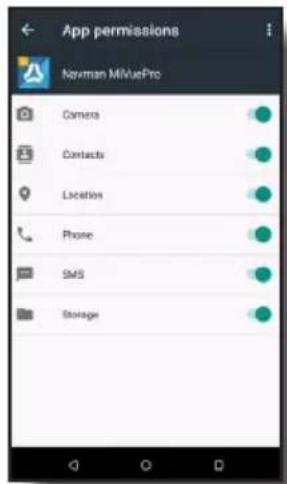
text_image
App permissions Navman MIVuePro Camera Contacts Location Phone SMS StorageNote: The image above should be used as reference only. The actual screen on your phone may be different depending on the make, model, or OS version.
Open MiCam's Bluetooth Settings page by tapping and selecting Network >
Bluetooth. Scroll down on this page to find features include hands-free calling, receiving live traffic updates, and receiving smartphone notifications. Toggle the switch to the right to enable or to the left to disable a function.

text_image
Bluetooth Bluetooth Name : MiCam_xx:xx Paired Phone : [ Phone name ] Unpair Hands-free Calling Connected MiVUE PRO Service Connected Live Traffic Update Live Traffic Update Provide warning when navigation Receive Smartphone Notification Provide warning when receivingOnce everything is enabled, simply follow the on-screen instructions to read a message, dial a number, or take incoming calls.
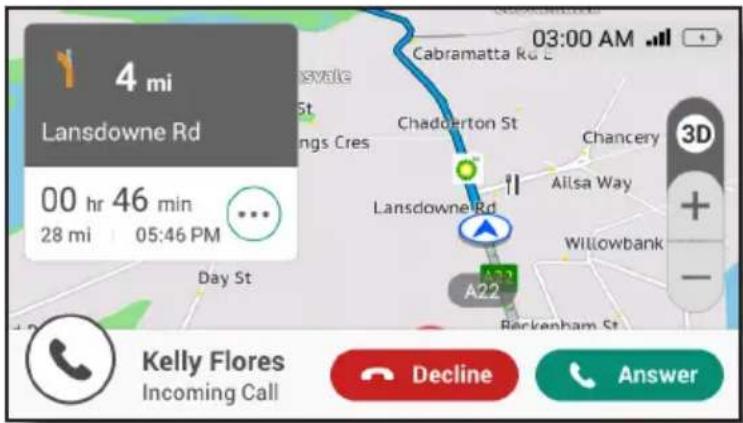
text_image
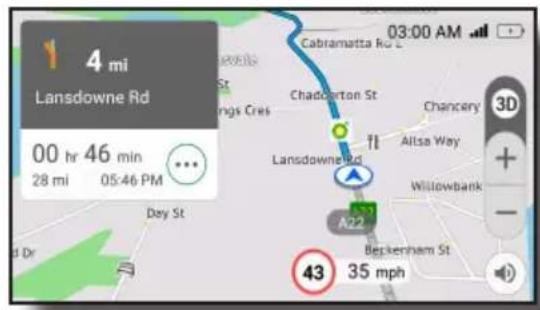
4 mi Lansdowne Rd 00 hr 46 min 28 mi 05:46 PM Day St Cabramatta Rd E Chadderton St Chancery Lansdowne Rd A22 Willowbank Berkenham St 03:00 AM Kelly Flores Incoming Call Decline AnswerChecking for map and software updates
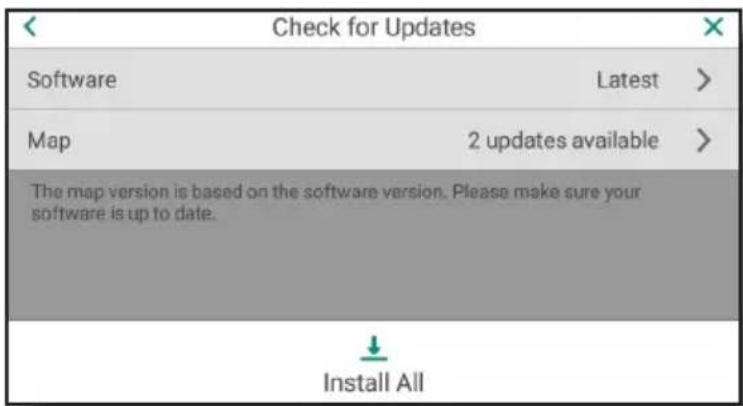
To check for new software and map updates, you must connect the device to an internet-enabled WIFI network. Tap 📋 on the menu bar, go to Network > WIFI to open WIFI settings, then toggle the On/Off switch to the ON position to connect to a wireless network you have access to.
Return to the main Settings page and go to Product Information > Check for Updates to search for the latest updates. Maps available for download are based on your software version, therefore it is important to always have the latest software installed. Tap install all available updates or select Software or Map to perform individual updates.
text_image
Check for Updates Software Latest > Map 2 updates available > The map version is based on the software version. Please make sure your software is up to date. Install AllImportant notices
■ Prior to using the dashcam to record videos, please make sure that the device has established a GPS fix in order to display the correct time stamp on each recording.
■ Make sure that a MicroSD card has been inserted for storing video and image files.
■ Make sure that the camera lens is not blocked and no reflective object is placed near the lens. Please keep the lens clean.
■ If the vehicle's windscreen is tinted with a coating, it may impact recording quality.
■ To ensure proper recording angle, pay attention to the following:
■ Make sure that your car is parked on level ground.
- When adjusting the mounting angle, make sure that the camera's view is parallel with level ground and the ground to sky ratio is approximately six to four.
- Please format each new MicroSD card via Settings > Format SD Card before first use.
Recording videos
Videos are automatically recorded when:
The device is turned on or resumes from suspend mode (continuous recording).
A sudden event (such as running over a road bump, vehicle collision, high-speed driving, or making a sharp turn) has been detected by the G-sensor and recording is initiated automatically (event-driven recording).
Tap on the main menu bar to open the dashcam view and access the device's dashcam features. You can also tap and hold to take an emergency recording (the button icon will change to and you will hear an audible tone).
The dashcam view
The following image shows the main screen of the dashcam view:
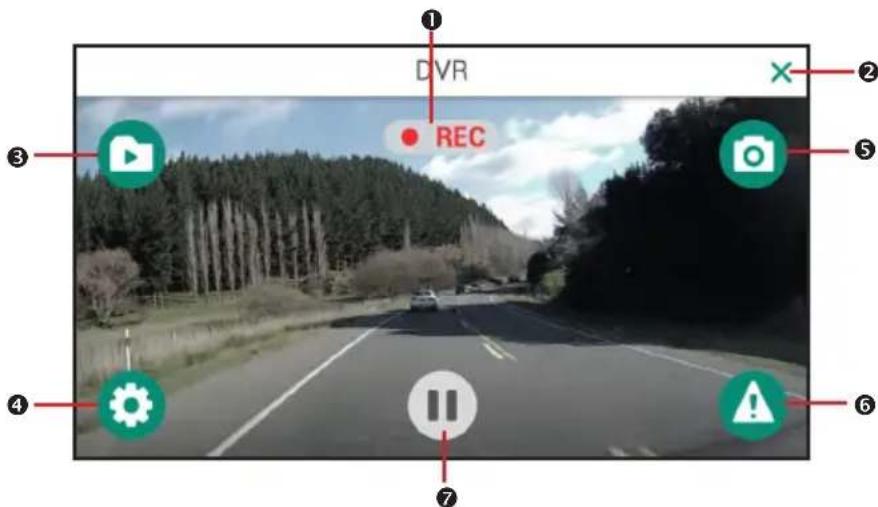
text_image
DVR REC ① ② ③ ④ ⑤ ⑥ ⑦1 Recording indicator
2 Tap to close the window and return to Map screen
3 Tap to view recorded videos/photos (recording is paused)
4 Tap to configure dashcam settings (recording is paused)
5 Tap to capture a photograph (button is enabled only when continuous recording is active)
6 Tap to take a 10-second emergency recording (button is enabled only when continuous recording is active)
⑦ Tap to pause/resume video recording
Note: Tap the screen to toggle between full-screen and windowed display modes.
Configuring dashcam settings
While in dashcam mode, tap to configure various dashcam settings:
Note: Video recording is stopped while accessing dashcam settings.
Video Clip Length: Sets the length (1/3/5 min.) of video clips captured during continuous recording
Video Resolution: Sets the recording resolution (1080P/720P/480P)
Recording Sound: Enables/disables audio recording during video capture
G-sensor Sensitivity: Sets the G-sensor's sensitivity level for triggering event-driven recording
Video Stamp: Enables/disables the display of coordinates and G-sensor info on each recorded video
Speed Stamp: Enables/disables the display of driving speed on each recorded video
Format SD Card: Formats the memory card (all data on the SD card will be erased)
Viewing videos and photos
While in dashcam mode, tap to launch the File Playback window for viewing your videos and photos. Data files are organized into three folders:
| Folder Description | ||
 | Normal | Contains videos captured during continuous recording |
 | Event | Contains videos captured during event-driven or emergency recording |
| [STSZ] | Photos | Contains photos captures by tapping |
Note: Video recording is stopped while accessing data settings.
Enter the folder you wish to view by tapping on the folder name. Each file is identified by the date and time it was captured. Tap to select the data file and view its content.
The following operations are available when viewing files saved under the:
- Normal folder
- Delete - Delete the video file
■ Move to Event - Move the video file to the Event folder
■ Volume - Adjust the volume using + and - buttons
■ Event folder
■ Delete - Delete the video file
■ Volume - Adjust the volume using + and - buttons
- Photos folder
- Delete - Delete the image file
MiVue Manager ^™ is a tool for viewing videos recorded by the dashcam on your PC.
Installing MiVue Manager
Download the Setup file from www.navman.com.au/mivue-update or www.navman.co.nz/mivue-update. Double-click Setup.exe and follow the on-screen prompts to install MiVue Manager.
IMPORTANT! You may be prompted to install MOV and AVI codecs for video playback if they are currently not installed on your PC. Please search online to install the required codecs.
Viewing recorded files
- Access data stored on the memory card by removing the card from the device and inserting it into a card reader. You are advised to copy all data files to the PC for backup and playback.
-
Start MiVue Manager on the computer.
-
By default, MiVue Manager shows the calendar and file list on the right side of the main window.
- Dates with recordings available are marked with a dot (). Select a date to display files recorded on that date.
■ You can filter the file list by video category (Event/Normal). -
To display all files in the current folder, click All. To return to the calendar view, click Calendar.
-
Double-click the desired file on the file list to start playback.
-
The playback controls are described as follows:

text_image
1 2 3 4 5 6 7 00:02 00:02① Skip to the previous/next file on the list
② Start/pause playback
3 Change playback speed to 1/4x, 1/2x, 1x (default), 1.5x, or 2x
4 Mute/unmute the volume
⑤ Adjust the volume level
6 Change to full screen mode
7 Display playback progress. Click on a point along the track bar to jump to a different spot in the video
- During playback, additional vehicle information such as the dashboard panel and G sensor chart are displayed below the video playback screen.
- On the dashboard panel, click 📋 display the map screen.
Note: The map may not display correctly if the computer is not connected to the Internet.
- G sensor chart displays data in 3-axis waveform about the car's shift forward/backward (X), to the right/left (Y) and upward/downward (Z).
- The tool bar allows you to do the following:

text_image
1 2 3 4 5 KML You Tube 6 7① Select the folder that contains recording files
2 Preview and print the current video image
3 Save selected files to a specified location on your computer
4 Captures and saves the current video image to the specified location on your computer.
5 Open the Settings Menu for accessing the following functions:
Change Language: Set the display language of MiVue Manager
Change Skin: Set the colour scheme of MiVue Manager
Check for Update: Check if there is a new version of MiVue Manager. Internet access required
About: Display version No. and copyright information of MiVue Manager
6 Export GPS information of the selected file in the KML format to the specified location on your computer.
⑦ Upload the selected file to YouTube™
Caring for your Navman product
Taking good care of your Navman will ensure trouble-free operation and reduce the risk of damage to your Navman:
- Keep your Navman away from excessive moisture and extreme temperatures.
- Avoid exposing your Navman to direct sunlight or strong ultraviolet light for extended periods of time.
■ Do not place anything on top of your Navman or drop objects on your Navman.
■ Do not drop your Navman or subject it to severe shock. - Do not subject your Navman to sudden and severe temperature changes. This could cause moisture condensation inside the unit, which could damage your Navman. In the event of moisture condensation, allow your Navman to dry out completely before use.
- The screen surface can easily be scratched. Avoid touching it with sharp objects. Non-adhesive generic screen protectors designed specifically for use on portable devices with LCD panels may be used to help protect the screen from minor scratches.
- Never clean your Navman when it is turned on. Use a soft, lint-free cloth to wipe the screen and the exterior of your Navman.
■ Do not use paper towels to clean the screen. - Never attempt to disassemble, repair or make any modifications to your Navman. Disassembly, modification or any attempt at repair could cause damage to your Navman and even bodily injury or property damage and will void any warranty.
- Do not store or carry flammable liquids, gases or explosive materials in the same compartment as your Navman, its parts or accessories.
- Do not expose your device to direct sunlight in an unattended vehicle for prolonged periods. Overheating may damage the unit.
- To discourage theft, do not leave your device, mounting bracket or any cables in plain view in an unattended vehicle.
Menu Options
General
- Audio
Volume: Move the slider left/right to adjust the volume
Touch audio: Enable/disable touch feedback sound
Screen
Screen mode: Change the display mode to Day/Night/Auto
Day: Move the slider to adjust screen brightness for Day Mode
Night: Move the slider to adjust screen brightness for Night Mode
■ Menu Layout: Change menu layout to Side menu/Tile menu
■ Language: Select the system language
■ Voice: Select a different voice
- Distance Units: Switch between Imperial (Miles & yards/Fractional Miles) and Metric systems
Time
24 hours: Enable/disable time display in 24-hour format
Auto time zone: Enable/disable auto time zone
Manual time zone: Select a time zone manually
Network
■ WIFI: Enable (and establish a connection) or disable WIFI
- Bluetooth: Enable (and establish a connection) or disable Bluetooth
Navigation
- Vehicle Mode: Change the mode to Car/SUV(Van), Towing, or Truck (not available on all models)
- Route Option
Default Route Type: Change the default route type to Easiest/Fastest/Economical/Shortest
Route Setting: Change the settings for avoiding dirt roads/tolls/ferry crossings
4WD Tracks: Change the settings for avoiding 4WD tracks
Custom Avoidance: Add roads/areas you would like to avoid
Landmark Guidance PLUS: Enable/disable Landmark Guidance PLUS
Landmark Guidance: Enable/disable Landmark Guidance
- Mileage Record
Mileage Recorder: Enable/disable mileage recorder
Current Trip: Show/reset data for the current trip
All Trips: Show/reset data for all trips
- Parking Near Destination: Enable/disable find parking near selected destination
- Route Simulation: Enable/disable route simulation
Maps
■ Map Scheme: Select a map scheme
■ POI Display: Enable/disable the display of each POI category
■ Map Set: Select a map set
■ Map Version: Show map information
■ GPS Logging: Enable/disable GPS logging
Safety
- Warnings: Customise various alert settings
- Driver Fatigue Warning: Enable/disable driver fatigue warning
■ Safe Driving Mode: Enable/disable safe driving mode
Product Information
- About: Display device hardware/software information
- Check for Updates: Find and install the latest software and map updates
Note: Please install the latest software before installing the latest map.
- View Tutorial: Watch a brief tutorial on how to operate the device.
- Restore Factory Defaults: Reset all device settings to their default values.
POI Icons
| Icon Description Icon Description | |||
 | Airport Airport access |  | |
 | Amusement park Arts & cultural centre |  | |
 | ATM Auto repair shop |  | |
 | Bank Bar/pub |  | |
 | Beach Boat ramp |  | |
 | Bowling centre Bridge |  | |
 | Building Bus station |  | |
| [BY8D] | Cafe Camping ground |  | |
 | Car dealership Caravan park |  | |
 | Casino Cemetery |  | |
 | Cinema City centre |  | |
 | City hall Cluster (tap to zoom-in) |  | |
 | Coffee shop Community centre |  | |
 | Concert hall Convenience store |  | |
| [BXXX] | Courthouse |  | Delivery entrance |
| [BYHG] | Dentist | [BHAH] | Dock |
 | Detention centre | [DHYS] | Driver reviver |
 | Educational institution |  | Embassy |
 | Exhibition centre | [ZZSG] | Factory |
 | Fast food |  | Fire brigade |
 | Four-wheel drive facility |  | Frontier crossing |
 | Gift shop |  | Golf course |
 | Government building |  | Grocery store |
  | Guest houseHigher education institution Historical buil | [DHSK] | Heritage site |
 | Hospital Hotel |  | |
 | House of worship Ice skating rink |  | |
 | Information Library |  | |
| [SHAA] | Loading zone Marina |  | |
 | Medical service Monument |  | |
 | Motorcycle dealer Motoring organisation | [74AS] | |
 | Mountain pass Mountain peak |  | |
| [C57S] | Museum Natural attraction |  | |
 | Nightlife Office building |  | |
 | Park & ride Park garden |  | |
| [Y24S] | Park/recreation area Parking |  | |
 | Payphone Petrol station |  | |
 | Pharmacy Physician |  | |
 | Police station Post office |  | |
 | Pub |  | Public restroom |
 | Railway crossing |  | Recreational facility |
 | Rental car agency Rest area |  | |
 | Restaurant |  | Scenic overlook |
| [6GBY] | Shop |  | Shopping mall |
 | Ski resort |  | Sports airport |
 | Sports centre |  | Sports field |
 | Sports stadium |  | Supermarket |
 | Swimming pool |  | Taxi stand |
 | Tennis court |  | Theatre |
[48TT] | Tourist attractionTransport ferry Travel agency | [HHAB] | Train station |
 | Unidentified POI Veterinarian |  | |
 | Weigh station Wildlife reserve |  | |
 | Winery Zoo |  | |
Safety Camera Icons
| Icon Description | |
 | Safety camera |
 | Safety camera (mobile) |
 | Safety camera (average) |
 | Red light camera |
 | Combined safety camera |
Driver Warning Icons
| Icon Description Icon Description | |||
| Added lane Congestion ahead | |||
| Curved road ahead End of no overtaking z |  For trucks For trucks | ||
| Falling debris Hill ahead | |||
| Lane allocation ahead Left lane ends | |||
| Merge to centre lane Merging traffic ahead | |||
| No engine brake No overtaking for trucks | |||
| No overtaking No stopping zone | |||
| Pedestrian crossing Right lane ends | |||
| Road may be icy Road narrows | |||
| Series of curves ahead, starting to the left | Series of curves ahead, starting to the right | ||
| Sharp left turn | Sharp right turn | ||
| Slippery road conditions | Start of no overtaking zone | ||
 | Steep decline Steep incline |  | |
 | Stock crossing Stop sign ahead |  | |
 | Strong crosswind area Traffic light ahead |  | |
 | Truck may tip over Use low gear |  | |
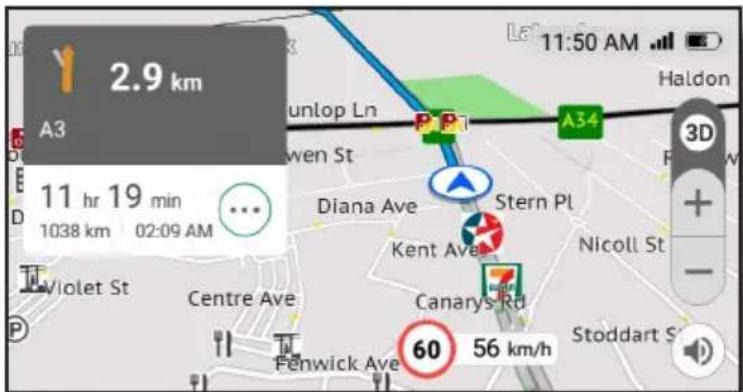
Branded POIs
Branded POIs are available on some maps. These include popular restaurants, accommodation providers, tourist attractions, and petrol stations. In most cases, the icon shown on the map is the company logo.
text_image
2.9 km A3 11 hr 19 min 1038 km 02:09 AM Diana Ave Stern Pl Kent Ave Nicoll St Violet St Centre Ave Canarys Rd Fenwick Ave 60 56 km/h Stoddart S Haldon 3D + - 56 km/hOnline support
For 24/7 help and support on Navman products, visit our Technical Support Website: www.navman.com.au/faq (Australia), or www.navman.co.nz/faq (New Zealand).
Navman customer support
If you have a faulty product or you would like to speak to a member of our Technical Support team, contact:
Australia: 1300 NAVMAN (1300 628 626), or visit www.navman.com.au
New Zealand: 0800 GO NAVM (0800 466 286), or visit www.navman.co.nz
Speed limit
Navman products are designed to be used as an aid to safer driving. Navman does not condone speeding or any other failure to comply with your local traffic laws. It is your responsibility to drive within the posted speed limit at all times and to drive in a careful manner. Navman accepts NO liability whatsoever for you receiving any speeding fines or points on your license through using this device. Navman does not guarantee the accuracy of the data contained within this database either expressed or implied. In the event you receive a fine or any other penalty for speeding or contravention of any traffic law, or are involved in an accident, Navman is not responsible for any damages of any type. In some countries the data information regarding speed limits may conflict with local law and/or regulations. It is your responsibility to make sure that your use of the data is in compliance with local laws and/or regulations. Usage is at your own risk.
Safety camera POIs
Navman products are designed to be used as an aid to safer driving. You can receive messages to alert you to locations of safety cameras, which will enable you to monitor your speed through these areas. Navman does not warrant that all types and locations of safety camera data are available, as cameras may be removed, relocated or new cameras installed. Navman does not condone speeding or any other failure to comply with your local traffic laws. It is your responsibility to drive within the posted speed limit at all times and to drive in a careful manner. Navman accepts NO liability whatsoever for you receiving any speeding fines or points on your license through using this device. Navman does not guarantee the accuracy of the data contained within this database either expressed or implied. In the event you receive a fine or any other penalty for speeding or contravention of any traffic law, or are involved in an accident, Navman is not responsible for any damages of any type. In some countries the data information regarding safety or speed cameras may conflict with local law and/or regulations. It is your responsibility to make sure that your use of the data is in compliance with local laws and/or regulations. Usage is at your own risk.
Revision: R02
(12/2020)
Trademarks
All brand and product names are trademarks or registered trademarks of their respective companies.
Disclaimer
Specifications and documents are subject to change without notice.
Notes
Not all models are available in all regions.
Depending on the model purchased, the colour and look of your device and accessories may not exactly match the graphics shown in this document.
Screenshots and other presentations shown in this document are for reference only. They may differ from the actual screens and presentations generated by the product.