MIMAS - Audio WesAudio - Free user manual and instructions
Find the device manual for free MIMAS WesAudio in PDF.

User questions about MIMAS WesAudio
0 question about this device. Answer the ones you know or ask your own.
Ask a new question about this device
Download the instructions for your Audio in PDF format for free! Find your manual MIMAS - WesAudio and take your electronic device back in hand. On this page are published all the documents necessary for the use of your device. MIMAS by WesAudio.
USER MANUAL MIMAS WesAudio
Copyright 2016 by WesAudio
Thank You for the purchase of _MIMAS
_MIMAS
World's first 1176 style compressor with digital control through VST/AAX/AU plugin
With kind regards

Radosław Wesolowski and Michal Weglicki
World's first 1176 style compressor with digital control through VST/AAX/AU plugin.
Since year 1968 this style of compression dominated hundreds of recordings and to this day it is most commonly used signal processor in the industry. Lightning-fast attack and release times became main companions of audio engineers. WesAudio proudly presents _MIMAS – ng500 series implementation of legendary FET compressor. This time, along with classic analog sound, You will receive most demanded feature in audio industry – DIGITAL RECALL.
natural_image
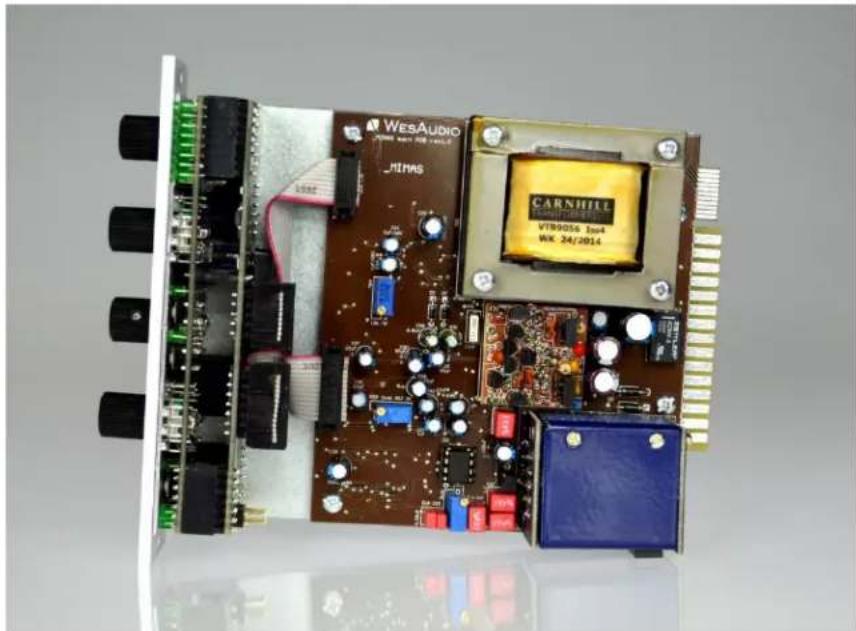
Electronic circuit board with WESAudio and Carnhill components, no visible text or symbols on main components\_MIMAS USER MANUAL REV4
Contents
- Abbreviations and terms....6
- Installation and compatibility....6
- Front panel....9
- Overview....10
- Specification....11
- Software....12
6.1. Installation....12
6.1.1. WINDOWS....12
6.1.2. OSX....12
6.1.3. Troubleshooting....12
6.2. Plugins 14
6.2.1. Dedicated plugin - _mimas....14
6.2.2. GConBlackBox....16
6.3. Setup for mixing....17
6.3.1. HW insert/External effect....17
6.3.2. Direct output ....18
6.4. Memories....19
6.4.1. Synchronization upon connection....19
6.4.2. Memory synchronization between plugin and hardware ....19
6.4.2.1. Synchronized memory enabled....20
6.4.2.2. Synchronized memory disabled 20
6.4.3. Note about Pro Tools "Compare" functionality....20
6.5. Automation 20
6.5.1. Automation record 20
6.6. Digital Side Chain....21
6.6.1. Reaper note about automatic Side Chain detection in VST3....21
6.7. Pro Tools Integration....21
6.8. Multi Host Support....22
6.9. GCon Manager 23
WESAUDIO
3/15/17
_MIMAS USER MANUAL REV4
6.9.1. How to check firmware upgrade....23
6.9.2. How to perform firmware upgrade....24
- Saturation mode 24
- LEDs....25
- Warranty....25
1. Abbreviations and terms
GCon – high speed communication protocol which allows full management and recall of analog devices.
Please note that this is just management protocol, audio signal transfer is not in scope of its capabilities.
NG500 – Next generation 500 series.
NG500 connector – special connector which extends standardized 500 series connector with additional pins.
2. Installation and compatibility.
WesAudio _MIMAS compressor module is designed to be installed into:
• An API™ 500 Series compatible rack
- _TITAN or any other ng500 compatible chassis,
WesAudio _MIMAS cannot function standalone, requiring the power source supplied by the rack system.
After unpacking your _MIMAS module, please check for any visible damage that may have occurred during transit. If there is any problem, please contact your dealer immediately!
!!!Ensure the rack is completely powered down before attempting installation to prevent damage to the module!!!
Module installation walkthrough:
Choose the position in the rack to which you will install the module and slide it in so that the edge connector of the module aligns with the matching connector in the rack. A gentle push and the module should slide home into the rack connector. Attach the front panel to the front of the rack with screws supplied by your rack manufacturer. This is important for mechanical rigidity. Do not over tighten these screws to avoid stripping out the threads. Apply power, test that everything is working OK, and most importantly, enjoy!
500 series compatibility note:
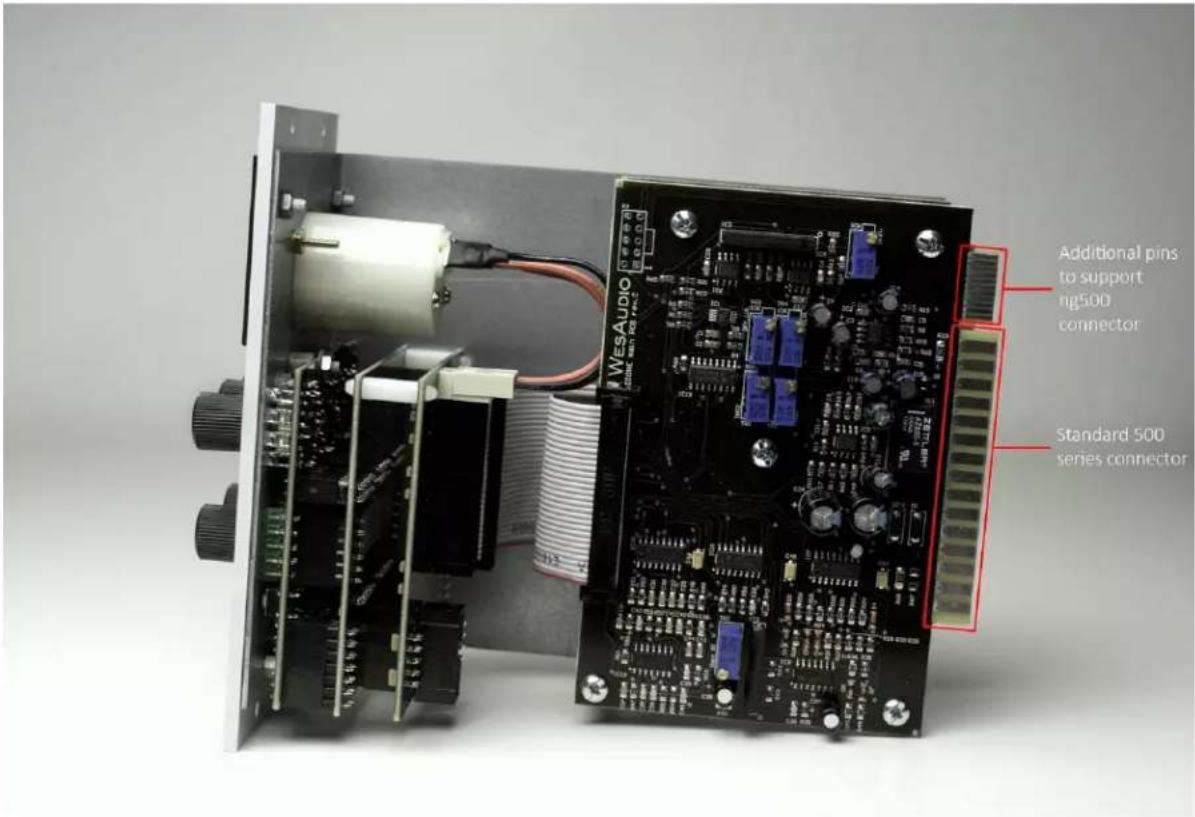
Each WesAudio device in ng500 (Next Generation 500 series) product line is equipped with special connector. This connector is an extension to 500 series, and allows your device to be managed/recalled through specialized GCon protocol (e.g. _Titan 500 series 10 slots frame).
_MIMAS USER MANUAL REV4
text_image
WESAUDIO WESAUDIO Additional pins to support ng500 connector Standard 500 series connectorThis extension is compatible with 500 series standardized plug type, however some manufacturers apply enormous screws to the plug itself, which prevent the device to fit in. Based on official research more than 90% of available 500 series racks will fit just fine. Currently known exceptions:
– Rupert Neve Designs 500 series Rack (confirmed),
- Aphex 500 series rack (not confirmed),
- Some older BAE racks (not produced anymore).
If you are in possession of any of those 500 series racks, there are two options:
1) NG500 module won't fit into this racks because of upper screw attached to 500 series connector. This particular screw can be removed without any side effects in most of listed racks. With such simple modification your rack is ready to host any NG500 module on this particular slot.
2) IMPORTANT ORDER NOTE: Each device can be ordered without special 500 series connector, however:
- The device compatibility with _titan frame is broken, and will not work.
- The device can be managed/recalled via direct USB connection without any problems.
SCREW WHICH PREVENTS NG500 MODULE TO FIT IN

natural_image
Close-up of a blue circuit board with gold connectors and circular components, no visible text or symbols3. Front panel

text_image
1 INPUT 20:1 12:1 8:1 4:1 RATIO OUTPUT 3 ATTACK 9 150 90 Hz 60 SC FILTER RELEASE A B DATA H-LINK 10 11 13 _MIMAS WESAUDIO 5 -1 -3 -6 -9 -12 -16 -20 -24 2 7 8 4 121 Input –Determines the level of the input signal entering the compressor, as well as the threshold. Higher settings will increase amounts of compression or limiting.
2 Output – Determines the level of the output signal leaving the compressor. It is used to recover compression lost signal.
3 Attack – It sets the Attack time from 20 microseconds to 800 microseconds. The attack time is fastest when the Attack knob is in fully clockwise position, and it's slowest when it's in its fully counterclockwise position
4 Release – It sets the Release time from 50 millisecond to 1100 milliseconds. The release time is fastest when Release knob is in its fully clockwise position, and is slowest when it is in its fully counterclockwise position.
5 VU/GR LED meter – It can display level of input and output signal as well as gain reduction level. Switching between display modes is possible from DAW plugin.
6 Ratio - This buttons determines deepness of the compression and limiting. A ratio 4:1 is the smaller possible value of compression, while 20:1 is larger value of limiting. 8:1 is the last button when compression occur, after that, is only limiting. When all LEDs are active – all button mode is engaged. Keeping ratio button for more than 1 second will also activate saturation mode described in chapter 3.
7 Bypass – true bypass button
8 Link – activate link to other module
9 SC Filter/Link – this button determine three side-chain hi-pass filter frequency (60Hz, 90Hz, 150Hz).
10 A/B – two slot memory buttons which can be used to compare two different compressor settings
11 DATA LED – indicates that data is being sent from DAW to device
12 H-LINK LED – indicates state of host-module connection
13 USB – module control USB port
4. Overview
Below picture shows a short overview of _MIMAS implementation.

flowchart
graph TD
    A["Audio in"] --> B["Input transformer"]
    B --> C["Amplifier"]
    C --> D["Amplifier"]
    D --> E["Output transformer"]
    E --> F["Audio out"]
    G["Input VU"] --> H["CPU"]
    I["Input"] --> H
    J["SC"] --> H
    K["Output"] --> H
    L["Input"] --> H
    M["Input"] --> H
    N["In/OUT/ATT/REL control"] --> H
    O["USB"] --> H
    P["Input connector"] --> H
    Q["IN/OUT/GR"] --> H
    R["LLEDs"] --> H
    H --> S["Output VU"]
    S --> T["Output transformer"]
    T --> U["Audio out"]
5. Specification
Short specification summary:
- Input impedance: 2.4 Kohm
• Output impedance: 600 ohm
• Frequency response: 20Hz – 20kHz (+/- 1dB)
• Signal to noise ratio SNR : >83dB - THD+N: <=1%
- Attack time: 20us - 800us
• Release time: 50ms - 1100ms - Compression ratio : 4:1; 8:1; 12:1; 20:1; all button mode
- True Bypass
• SC High Pass filter - 60,90,150Hz
• Output impedance : 600ohm
• Power consumption: 3W
• Dimensions : 38x133x158mm - Warranty: 2 years
6. Software
Software package can be downloaded from http://www.wesaudio.com/download by anyone who purchased related HW unit. To check currently supported plugin types and platforms, please follow above link.
6.1. Installation
To install WesAudio software package, please visit http://www.wesaudio.com/download and download recent version of software.
6.1.1. WINDOWS
Start the installer application, if you will encounter any system warnings about this particular installer, please ignore them*, then select any components which you would like to install**.
- If this is FIRST installation, please unplug all WesAudio devices from your workstation.
- When USB driver will be installed, application will inform that all devices should be connected – please do so.
- If USB driver installation is triggered, user will be asked to restart computer. We know that this is unwanted activity, but it is necessary step for USB driver to install with success.
- If computer restart is triggered, this Installer will start again during start up. If for some reason installer won't be started after the restart, please start same installer manually again.
6.1.2. OSX
Because OSX architecture and USB devices handling is much simpler in concept, the only thing to note is to have all devices connected during install procedure.
Start the installer application, if you will encounter any system warnings about this particular installer, please ignore them * (sometimes it is necessary to open context menu with right mouse button and trigger installation once again).
6.1.3. Troubleshooting
If anything would fail during installation procedure please contact our support at support@wesaudio.com. We will get back to you ASAP.
Below you can find some symptoms and description which will help to investigate the issue:
"Can't find my device on plugin drop down menu"
Unfortunately there could be dozens of root causes. On Windows machine it is very important to check if USB device is successfully connected on system level. That can be checked in "Control Panel->System->Device Manager":

text_image
Device Manager File Action View Help Michal-PC Atmel Batteries Computer Disk drives Display adapters DVD/CD-ROM drives Human Interface Devices IDE ATA/ATAPI controllers Imaging devices Jungo Connectivity Keyboards Mice and other pointing devices Monitors Network adapters Other devices SM Bus Controller Ports (COM & LPT) Processors Sound, video and game controllers System devices Universal Serial Bus controllers WesAudio devices GCon device GCon device** Please note that for WINDOWS it is necessary to install USB driver which is critical to communicate with HW units. It is required step only during first installation, and this option will be automatically disabled during any software upgrades.
6.2. Plugins
_MIMAS unit can be managed through two different plugin types: Dedicated plugin (_MIMAS) and GConBlackBox.
6.2.1. Dedicated plugin - \_mimas
text_image
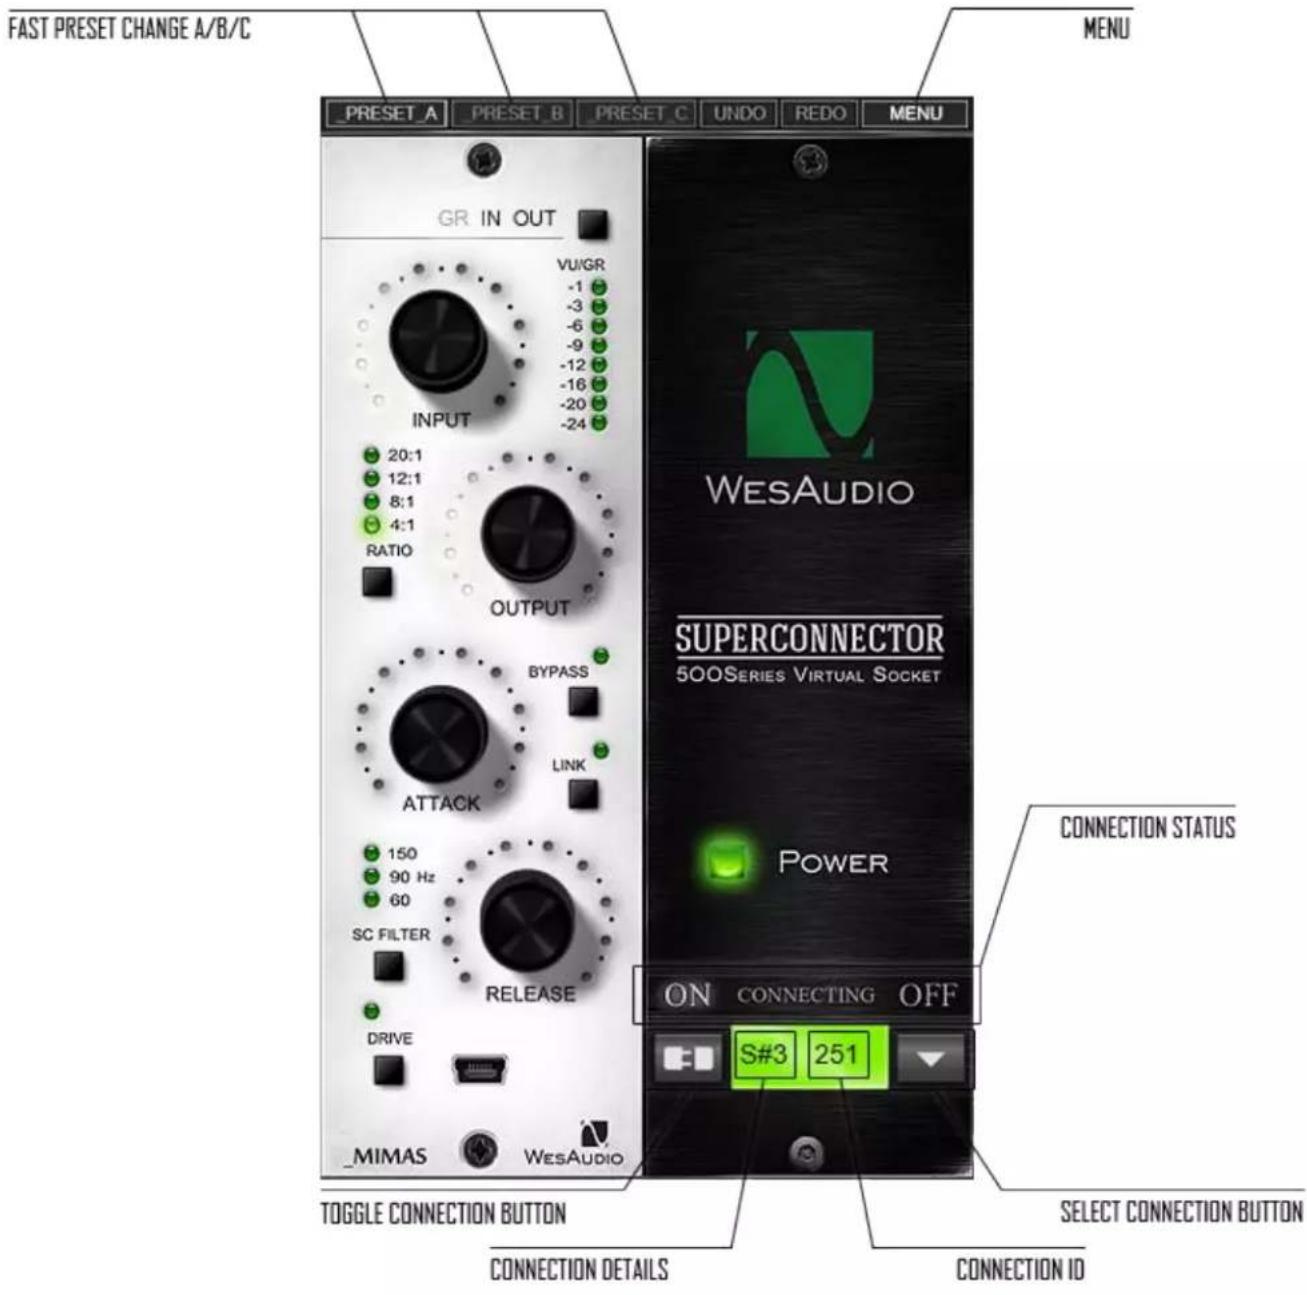
FAST PRESET CHANGE A/B/C GR IN OUT VUIGR -1 -3 -6 -9 -12 -16 -20 -24 INPUT 20:1 12:1 8:1 4:1 RATIO OUTPUT BYPASS LINK ATTACK 150 90 Hz 60 SC FILTER RELEASE DRIVE _MIMAS WESAUDIO ON CONNECTING OFF S#3 251 TOGGLE CONNECTION BUTTON CONNECTION DETAILS MENU UNDO REDO MENU WESAUDIO SUPERCONNECTOR 500SERIES VIRTUAL SOCKET POWER CONNECTION STATUS ON CONNECTING OFF SELECT CONNECTION BUTTON CONNECTION ID\_MIMAS USER MANUAL REV4
1) Connection status: Show current status of connection:
a. ON - Connection is established.
b. OFF – Connection is NOT established.
c. Connecting – Connection process is ongoing. If “Connecting” state is visible for longer period of time (more then 5 seconds), and plugin has no control over the unit, that would mean:
i. HW unit is no longer connected to your Workstation.
ii. HW unit was disconnected or detached by operating system for some reason.
iii. Any other reason which should be consulted with support@wesaudio.com.
2) Select connection button: This button shows all connected devices, if "drop-down" list with element IDs is not visible, that means that no devices has been detected which support GCon protocol.
3) Toggle connection button: Button toggles connection status ON/OFF. Please note that button works only if ID has been previously selected using "Select connection button".
4) Connection details: Additional connection information:
a. USB – module has been connected through direct USB connection in front panel.
b. S#X – Slot number which is functionality available in _Titan frame, and means that internal connection protocol between module and Frame is engaged.
5) Connection ID: Unique Connection ID of connected HW unit.
6) Fast setup change: Button switches between available setups A/B/C. Please note that this presets won't switch any connection related parameters. That means Connection ID is shared between all available setups (A/B/C) and won't be changed if any of those buttons is hit.
7) Undo: Undo last parameter change (up to 20). Please note that setup change button (A/B/C) clears current history.
8) Redo: Redo last parameter change (up to 20). Please note that setup change button (A/B/C) clears current history.
9) Drive: Drive button activates saturation mode described in Chapter 3.
10) Meter selection: Selects particular meter:
a. GR - gain reduction,
b. IN - input signal,
c. OUT - output signal.
11) Menu: New menu button added in release 4.0:
a. Copy/Paste Preset – allows to copy fast presets between each other, or between different plugin instances.
b. Memory write – allows to write current plugin state to hardware internal memory (option active only when global setting "Plugin and hardware memory sync" is disabled).
WesAudio _MIMAS plugin contains two types of plugins: Mono and Stereo. Mono plugin is designed to work with a single HW unit. Stereo plugin links one plugin with 2 hardware units, which allows to keep two devices configured exactly the same way.
6.2.2. GConBlackBox
GConBlackBox plugin is generic recall plugin. It doesn't implement any controls, it was created to easily recall large amount of units.
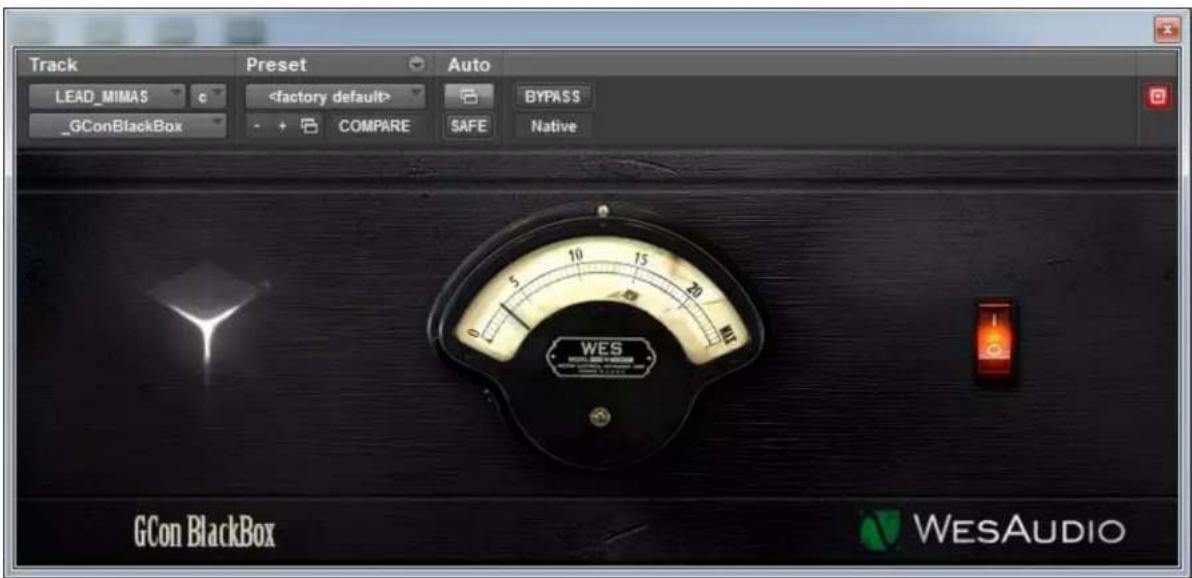
text_image
Track Preset Auto LEAD_MIMAS cHow does it work?
Just start your session and create one instance of GConBlackBox plugin on any track/aux. It will automatically connect to any GCon hardware currently available and synchronize its parameters. From now on, any change of parameter through a hardware front panel will be notified to GConBlackBox plugin. There are many possible use cases, please go through few examples:
- When fast session preparation is a requirement – just load the session and create one instance of GConBlackBox to have total recall of all your units.
- During recording session, when plugin control is not really necessary (GConBlackBox can be inactivated after recording is over – it can be re-activated if necessary in the future)
- To recall large amount of units – when during such session there is a need for some automation moves, dedicated plugin can still be started on top of GConBlackBox (its state will be synchronized with GConBlackBox upon connection with a hardware).
6.3. Setup for mixing
The configuration of devices is plain & simple, and its management side follows Plug&Play principles, so besides physical connection to your machine there are no other steps required.
6.3.1. HW insert/External effect
If you would like to work with WesAudio devices inside your DAW, audio signal has to be sent to & received from the HW unit. Below you can find steps which describe that process in details.

flowchart
graph LR
    A["DAW"] --> B["Audio Interface OUT"]
    B --> C["Audio signal"]
    C --> D["IN"]
    D --> E["HW"]
    F["WesAudio AAX/VST3"] --> G["USB cable"]
    G --> H["Audio signal"]
    H --> I["OUT"]
    I --> J["Audio interface IN"]
To set up you environment two steps are necessary:
1) Device Control Setup:
a. Connect your workstation through USB cable and USB 2.0+ port (**) with your hardware unit or _Titan rack frame.
b. Insert on your track WesAudio plugin which matches with your hardware and select your device from drop down list.
c. After connection state "ON" is light up, your device is ready to use, and saving your session activity will store all the settings as they are.
2) Device Audio Setup:
a. Create any type of external effect which is supported in you DAW (e.g. "External effect" in Cubase/Nuendo, "Hardware Insert" in Pro Tools).
b. Configure "Send" to WesAudio HW unit IN.
c. Configure "Return" to WesAudio HW unit OUT.
d. Connect all the wires from you audio interface, to the unit IN/OUT.
e. Insert this effect after* WesAudio plugin in insert chain.
Now you are ready to work in the Box with external audio units with all digital usability features provided by your DAW.
6.3.2. Direct output
WesAudio devices and plugin management functionalities are perfect solution for hybrid mixing, when on some stage signal is sent to the analog world and summed outside DAW. In that approach:
3) Connect your HW with your machine using USB cable and USB 2.0+ port in your workstation (**) or _Titan rack frame.
4) Insert on your track WesAudio plugin which matches with your HW and select your device from drop down list.
5) Set up track/aux output to audio interface output which routes signal to the WesAudio device.
From now on you can use automation and recall features in analog domain!
* THIS IS IMPORANT ONLY FOR AUTOMATION & SIDE CHAIN FEATURE: In practice audio signal and plugin parameters are mediated through whole insert chain in order, so by keeping Plugin after external effect could cause small latency (equal audio interface latency) which is causes by ASIO buffer setting (it is most pessimistic case and most probably it would be anyway smaller, but it depends on HOST(DAW) implementation). In simpler worlds such latency would be exactly the same, as time which is need to get audio to your audio interface and back. Keeping your plugin before external effect, would “compensate” this unwanted effect, and your device will apply parameters before audio signal gets through it.
** PLEASE NOTE: Officially supported interface is USB 2.0 – please check your USB HUB to be compatible with this particular USB revision.
6.4. Memories
Parameter storage could be summarized like this:
- _MIMAS unit has TWO separate fast presets which can be triggered via A/B buttons.
- _MIMAS plugin can store UNLIMITED number of configurations, when each preset can contain THREE instant configuration changes (A/B/C – fast presets).
6.4.1. Synchronization upon connection
When new plugin instance is loaded into DAW, its state is unmodified, that means that no parameters are yet modified. When user will initiate connection to hardware unit by setting Connection ID, Plugin will download current state of parameters from the unit including any available fast configuration presets. So for instance, if connection between _MIMAS plugin and _MIMAS hardware will be triggered, and plugin will be in unmodified state, all parameters states will be downloaded to the plugin, including _PRESET_A and _PRESET_B states.
6.4.2. Memory synchronization between plugin and hardware
In general there two modes of operation which can be modified through GConManager/_SETTINGS application: synchronization enabled, and synchronization disabled.

text_image
WesAudio GCon System v4.1.1172 Protocols: ✓USB ✓UDP/ETH Logging level: INFO - errors, warnings and important operation details ✓ Network diagnostics level: INFO ✓ Static IP GCon communication port 9020 Plugin and Hadrware memory sync ✓ BACK APPLY CANCEL6.4.2.1. Synchronized memory enabled
This is default setting enabled through "Plugin and Hardware memory sync" option, and it causes direct link between unit and plugin memory. In this case, when plugin is connected with a hardware, all parameters including number of fast presets which unit can store (e.g. A/B) will be synchronized. So when plugin will be disconnected (through manual toggle button hit, DAW session close, etc.) all hardware configuration will remain unchanged.
6.4.2.2. Synchronized memory disabled
In this case, plugin works as separate form of persistence implementation. That means if HW unit is connected to work with the Plugin, all settings from Plugin are applied to the device (or from the hardware to the plugin), however unit configuration will get back to previous state when Plugin will initiate disconnection (through connection toggle button, session close etc.). So in practice HW unit internal memory isn't affected by the software at all. This functionality can be useful if user needs to switch often between different modes, for example session needs to be recalled, but unit is used during production activities without any session loaded (then unit can be easily recalled through session load, and when session is closed, unit will go back to the state before the recall had happened).
6.4.3. Note about Pro Tools "Compare" functionality
Each plugin type (e.g. _mimas) implements compare functionality which can be used to easily compare current settings with saved state. That functionality is implemented, but there is one thing to note:
- HW unit ID, which is selected from drop down menu during plugin connection is stored in a plugin settings (session file or settings file), and if such ID is selected after plugin state is saved, hitting compare button would cause disconnection, and reconnection when it is hit back again. Such behavior is triggered by Pro Tools host implementation which doesn't inform if plugin state is loaded via "Compare" button, or via normal settings load. To avoid this situation, it is recommended to save preset state after plugin is connected with the Hardware.
6.5. Automation
WesAudio devices are capable to follow any automation triggered from your DAW. Our devices were tested against high performance peaks.
6.5.1. Automation record
Besides normal automation feature all knobs are touch sensitive, and this brings possibility to record automation using Hardware unit itself. Just enable automation record in your DAW and start moving HW knobs!
6.6. Digital Side Chain
Side chain feature allows sending side chain signal from your DAW (from plugin itself) to HW unit to trigger the compression. There are no additional actions required to enable this feature on HW side, it is enough to configure side chain signal in WesAudio plugin (exactly the same way any other plugin configures SC). Below you can find high level picture describing possible connection of HW unit to work with side chain feature (Please note that below picture shows only one possible setup, in practice audio signal can be sent from any source).
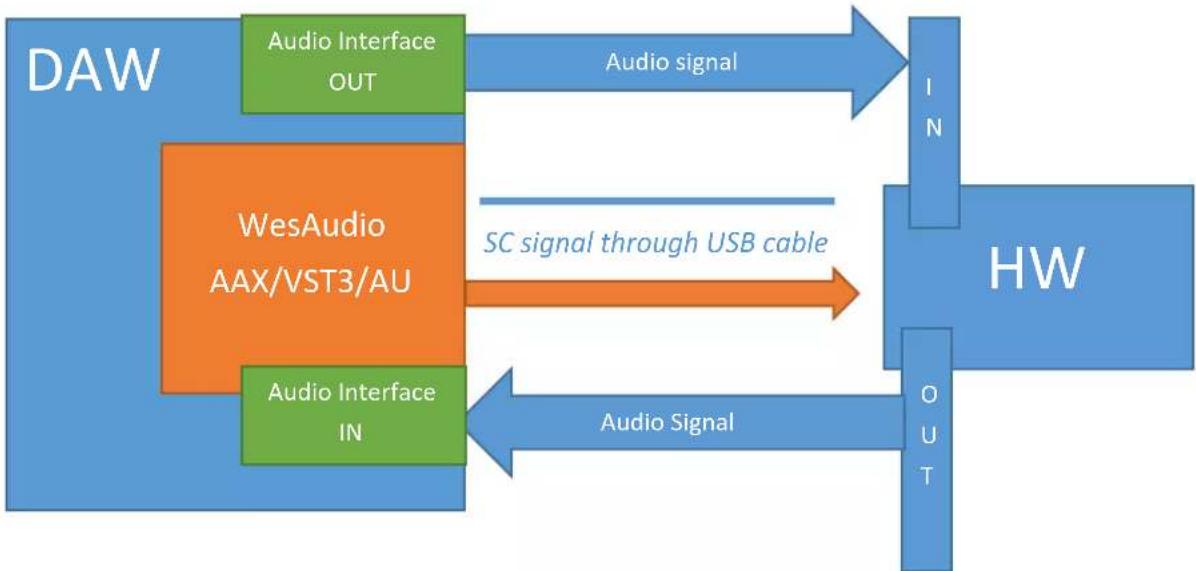
flowchart
graph LR
    A["DAW"] --> B["Audio Interface OUT"]
    B --> C["Audio signal"]
    C --> D["IN"]
    D --> E["HW"]
    F["WesAudio AAX/VST3/AU"] --> G["SC signal through USB cable"]
    H["Audio Interface IN"] --> I["Audio Signal"]
    I --> J["OUT"]
6.6.1. Reaper note about automatic Side Chain detection in VST3
Reaper Side Chain feature works little bit different compared to other VST3 hosts. When user will set side chain signal to be sent to any of WesAudio devices, this will activate Side Chain in the hardware, meaning that only signal sent directly though USB will trigger the compressor. However if that signal path will be removed from the track through “routing” section, Plugin is not notified about this change, and thus it will remain in Side Chain mode. To disable side chain, please go to plugin in/out matrix and disable auxiliary inputs (e.g. “Mono Aux In”). This manual action will disable side chain in the hardware itself.
6.7. Pro Tools Integration
Starting from software release 2.1 WesAudio plugins integrates with Pro Tools using all powerful features:
- PT11+ all meters which are selected through "Meter Selection" button are integrated in the mix view, showing you gain reduction from mixer perspective,
\_MIMAS USER MANUAL REV4
- PT10+ engaging bypass mode from mixer or edit view will now enable hardware bypass on the unit,
- Making plugin instance “inactive” will force the plugin to unload, and because of that it will also disconnect from the hardware. It means that new plugin instance can be used to connect to the same hardware unit where all previous settings are stored through inactivated plugin – very useful to work with one unit on multiple sources keeping all the settings recallable with one mouse click,
-
PT12+ - Commit Functionality – new Pro Tools commit functionality can be used also to print hardware inserts and it is 100% compatible with WesAudio plugins. When commit is triggered for HW Insert and WesAudio plugin, plugin will disconnect from its source and save all the settings. As a result You will get:
-
printed track through analogue processor,
- hardware settings stored on inactivated track through plugin instance,
- new plugin instance can be used to connect to the same hardware on different tracks,
○ inactive track can be re-enabled any time, and WesAudio plugin will reconnect to hardware automatically restoring all the settings (please remember that one instance of the plugin can be connected to the hardware at the same time).
6.8. Multi Host Support
Devices connected through direct (front panel) USB cable will be detected in one HOST application at the same time. First HOST application which will start any WesAudio plugin will enable GCon communication engine, and from now on it will serve as a master. Master application opens all available WesAudio units and keeps all device handles for communication purposes. That activity will prevent other HOST applications started at the same time to communicate with WesAudio units using direct USB connection. Such situation may happen in practice when two different hosts are started at the same time and connected through ReWire interface, in that approach only one host can serve as plugin host for WesAudio products.
6.9. GCon Manager
GCon Manager is generic application which implements configuration management over compatible units. It can be found in Application folder data:
- For OSX: "/Applications/WesAudio/GConManager"
- For WINDOWS: folder specified during installation phase, by default in: "c:/Program Files x86/WesAudio/GConManager.exe".
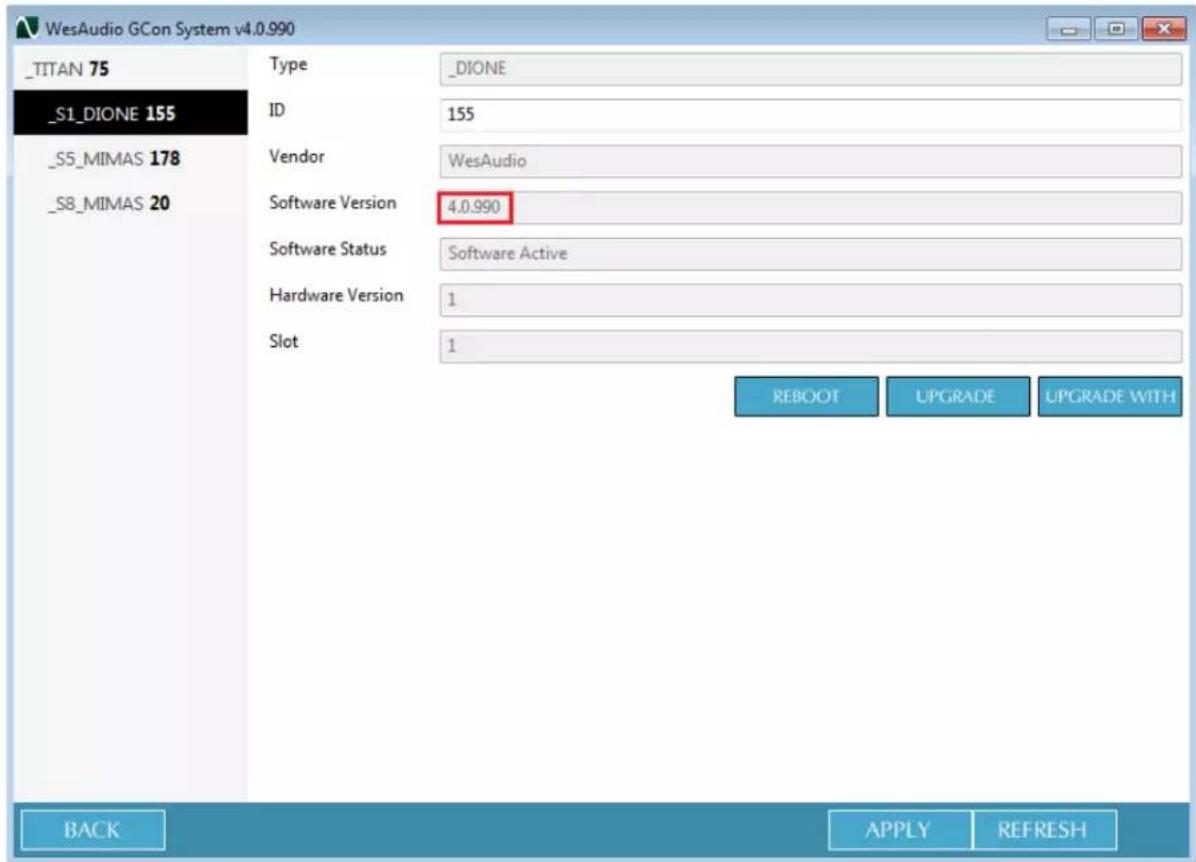
6.9.1. How to check firmware upgrade.
Each device reports to your workstation with particular version, which indicates compatibility between your host application, and remote module. To check firmware upgrade please to GCon Manager CONFIG application:
text_image
_TITAN 75 _S1_DIONE 155 _S5_MIMAS 178 _S8_MIMAS 20 Type _DIONE ID 155 Vendor WesAudio Software Version 4.0.990 Software Status Software Active Hardware Version 1 Slot 1 REBOOT UPGRADE UPGRADE WITH BACK APPLY REFRESH6.9.2. How to perform firmware upgrade.
To perform firmware upgrade go to GConManager upgrade and hit "Start" button. This will trigger upgrade operation for all modules which are not up to date with your host software.
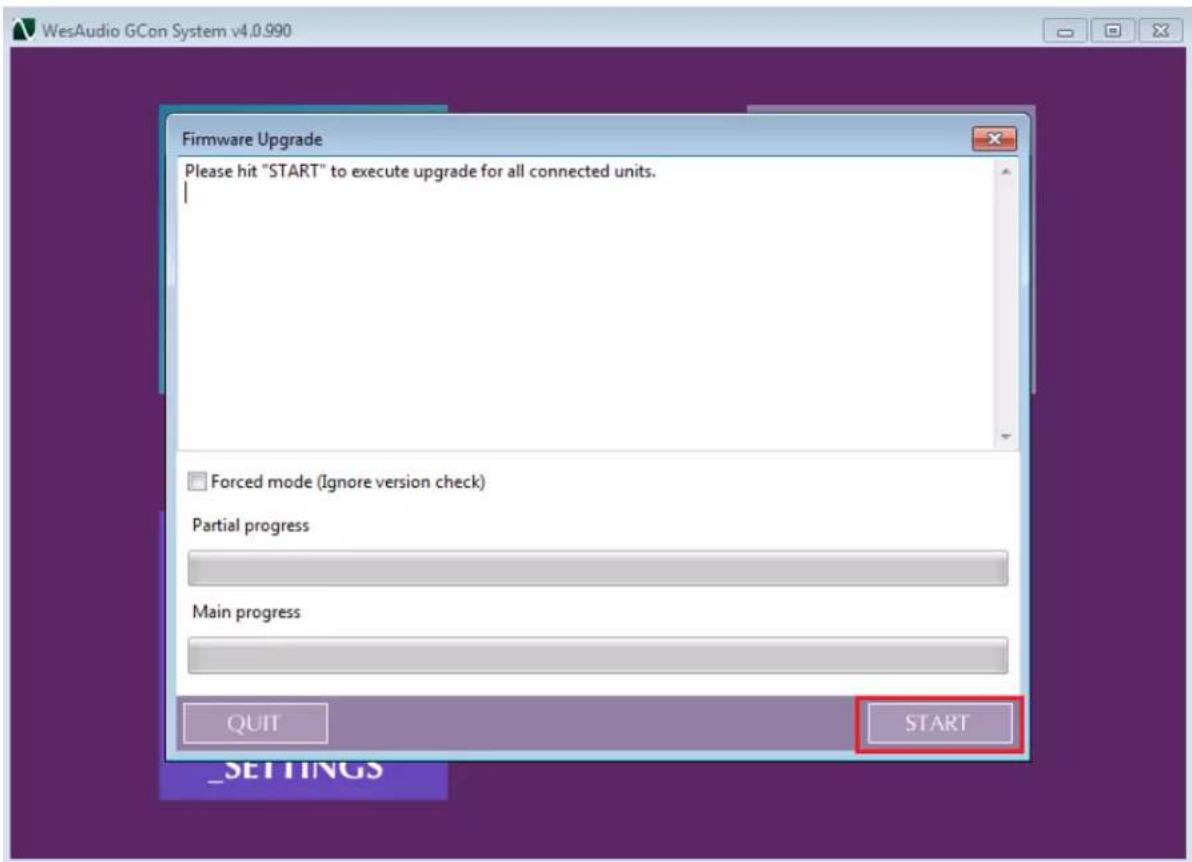
text_image
WesAudio GCon System v4.0.990 Firmware Upgrade Please hit "START" to execute upgrade for all connected units. Forced mode (Ignore version check) Partial progress Main progress QUIT START _SETTINGS7. Saturation mode
_Mimas supports two operation modes:
- Compressor mode – default,
- Saturation mode – Since software release 2.1_Mimas also supports saturation mode. It is designed to use transformer saturation and FET 2-nd harmonic distortion in signal processing.
Saturation mode can be activated from the plugin (using drive button) or from the hardware itself by keeping ratio for more than 1 second. In that mode input knob represents drive level and all other controls except bypass button are disabled and can't be used at the time. In terms of signal processing saturation mode uses gain staging on IN and OUT to create transformer/FET based distortion. To obtain higher magnitude distortion of output signal, input signal should be reasonable high. Output
level is matched with input signal using internal algorithms, keeping signal level unchanged. It is also matched with bypass to allow easy comparison.
8. LEDs
Unit supports two modes of operation when it comes to LEDs:
- Normal mode – when LEDs are lid in clockwise direction showing overall level of particular parameter.
- Single LED indicator, when each parameter is visualized as single led trying to achieve similar effect as Knob with indicator. Please note that in this mode, LED won't bright up upon touching, however your touch sensitive encoders are still working as expected in scope of DAW automation.
Those modes can be switched using front panel bypass button, by keeping it for 3 seconds.
9. Warranty
All WesAudio products are built to the highest standards and should provide reliable performance for many years, subject to reasonable care, use, transportation and storage.
WesAudio warrants all of our products to be free of defective parts and workmanship for a period of two years.
This warranty period begins at the original date of purchase and is transferable to any person who may subsequently purchase the product during this time. This warranty excludes the following conditions: normal wear and tear, misuse, customer negligence, accidental damage, unauthorized repair or modification, cosmetic damage and damage incurred during shipment. During the time of this warranty, WesAudio will repair or replace, at its option, any defective parts or repair defective workmanship without charge, provided the customer has appropriate proof of purchase and that the product has its original factory serial number. In all warranty claims the customer is responsible for shipping costs to the WesAudio facility, and WesAudio pays for return ground shipping.