ngLEVELER - Blender WesAudio - Free user manual and instructions
Find the device manual for free ngLEVELER WesAudio in PDF.

User questions about ngLEVELER WesAudio
0 question about this device. Answer the ones you know or ask your own.
Ask a new question about this device
Download the instructions for your Blender in PDF format for free! Find your manual ngLEVELER - WesAudio and take your electronic device back in hand. On this page are published all the documents necessary for the use of your device. ngLEVELER by WesAudio.
USER MANUAL ngLEVELER WesAudio
Copyright 2021 by WesAudio
Thank You for the purchase of ngLEVELER
ngLEVELER
Next generation 16-channel automation system
With kind regards

Radosław Wesolowski and Michal Weglicki
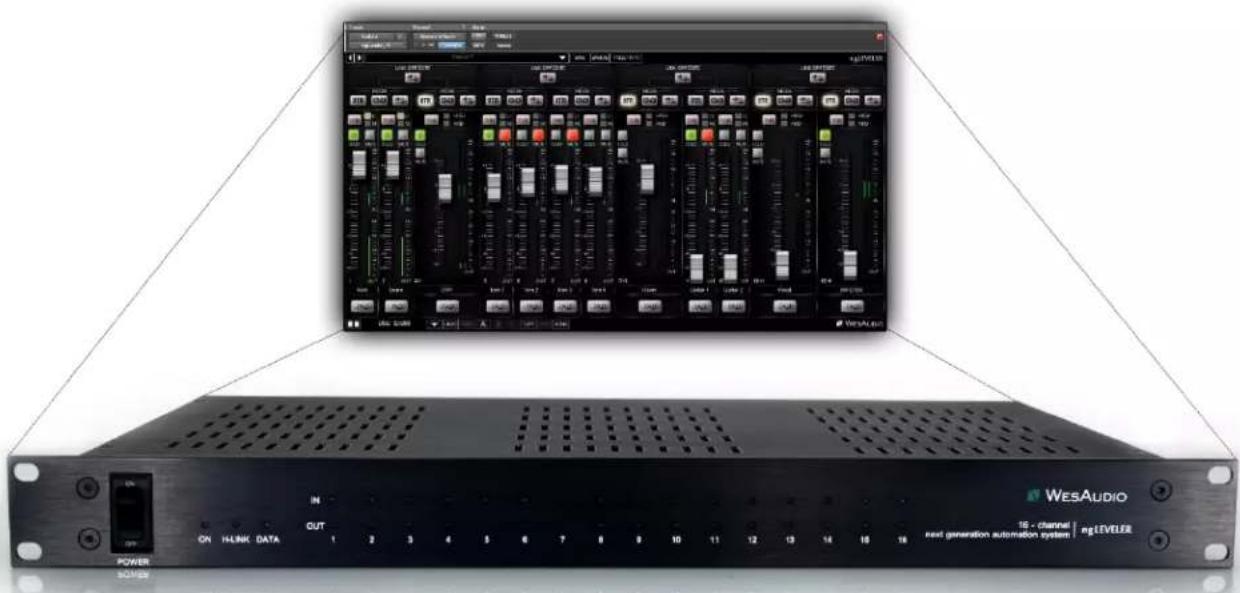
Next Generation 16-channel automation system
ngLEVELER – “Next generation Leveler” is analog automation system with convenient features for better studio integration. Besides its automation engine it also brings analog saturation per each channel which helps tracks to get more presence in the mix.
text_image
WesAudio 16 - channel | ngLEVEL级 next generation automation system | POWER ON HLINK DATA IN OUT 1 2 3 4 5 6 7 8 9 10 11 12 13 14 15 16NGLEVELER
16-CHANNEL NEXT GENERATION AUTOMATION SYSTEM
NGLEVELER USER MANUAL REV3
Contents
- Overview....7
- Specification....8
- Front panel....9
- Software installation....10
4.1. Installation....10
4.1.1. Windows....10
4.1.2. OSX....10
4.1.3. Troubleshooting....11
4.2. GCon Manager 12
4.2.1. How to check firmware upgrade....12
4.2.2. How to perform firmware upgrade....13
- Set up GCon Connection....14
5.1. USB 15
5.2. Ethernet....16
5.2.1. Default network configuration....17
5.2.2. Enable/Disable DHCP 18
5.2.3. Static IP address....19
5.2.3.1. Windows – how to check your IP address....19
5.2.3.2. OSX – how to check your IP address....21
5.2.3.3. Set up static IP address....23
5.2.4. Direct connection – setting IP address on PC/MAC....24
- Audio signal connection....25
- ngLEVELER automation and recall 26
7.1. DAW Plug-in ....26
7.1.1. Plug-in management panel....27
7.1.2. Plug-in channel description ......29
7.1.3. TRIM mode .... 31
7.1.4. Plug-in – Channel groups....32
7.1.5. Monitoring – Solo / Mute / Solo Safe....33
NGLEVELER USER MANUAL REV3
7.1.6. Plug-in - automation of linked or grouped channels 34
7.2. Third party controllers....35
7.2.1. Server mode - ngLEVELER management via HUI or Mackie Control third party controller....36
7.2.1.1. Configuration....37
7.2.2. Server with Mediation mode - ngLEVELER and DAW management via HUI/Mackie control third party controller....38
7.2.2.1. Configuration....38
7.2.2.2. DAW Toggle 42
7.2.2.3. TRIM/FADER Toggle....43
7.2.3. ngLEVELER management via EUCON controller 44
7.2.3.1. Eucon controller in Mackie Control mode / ngLeveler....44
7.2.3.2. Eucon plug-in control / ngLeveler....48
7.2.4. Controller functions mapping to ngLEVELER....49
7.2.5. How to create Virtual MIDI ports .... 50
7.2.5.1. Virtual MIDI on OSX....50
7.2.5.2. Virtual MIDI on Windows 51
7.2.6. Troubleshooting....52
7.2.7. Troubleshooting – known issues ....52
7.3. External controller and ngLEVELER(s) number of channels 53
-
Multiple ngLEVELER units ....54
-
Metering 55
-
Usage examples ....56
10.1.Summing stage automation 56
10.1.1. Summing automation/level management....57
10.1.2. Summing mixer/console insert points automation 58
10.1.3. Summing mixer/console groups insert points automation 59
10.2.Any analog outboard automation 60
10.3. Recording session management 61
-
Abbreviations and terms....62
-
Warranty....62
WESAUDIO
2/22/21
NGLEVELER USER MANUAL REV3
- History......63
1. Overview
ngLEVELER is an Automation system with full digital recall:
MAIN FEATURES:
16 channels of analog automation with total recall
+25 dBu (IN) / +28 dBu (OUT) of headroom
6dB passive attenuator (PAD) for better integration with high level signals
Very low noise and distortion - THD+N(20Hz-20kHz) at 0dBu < 0.008%
MUTE and SOLO for each channel
HUI/Mackie Control integration
16 channels of Proprietary THD
IN and OUT (before and after signal leveling) metering fully integrated with DAW plug-in
Flexible DAW/Live plug-in control for instant recall
DB-25 analog connectivity
Management via Ethernet or USB
Fully digitally controlled and isolated analog circuit,
Full automation record via HUI/Mackie Control
Free software and firmware upgrades
2. Specification
Short specification summary:
• 1U device, depth : 262mm
- Warranty: 2 years
• THD+N(20Hz-20kHz) at 0dBu < 0.008%
• Freq response: 0-250kHz (-3dB)
- Input impedance > 10kohm
• Output impedance < 50ohm
• Channels crosstalk > 100dB
• Max input level: +25dBu
• Max output level: +28dBu
• Dynamic range > 118dB
- Hardware Digital resolution: \~2500 steps per channel*
(*) DAW, or HUI/MACKIE CONTROL controller may support lower resolution, in that case it will translate to lower number of HW steps.
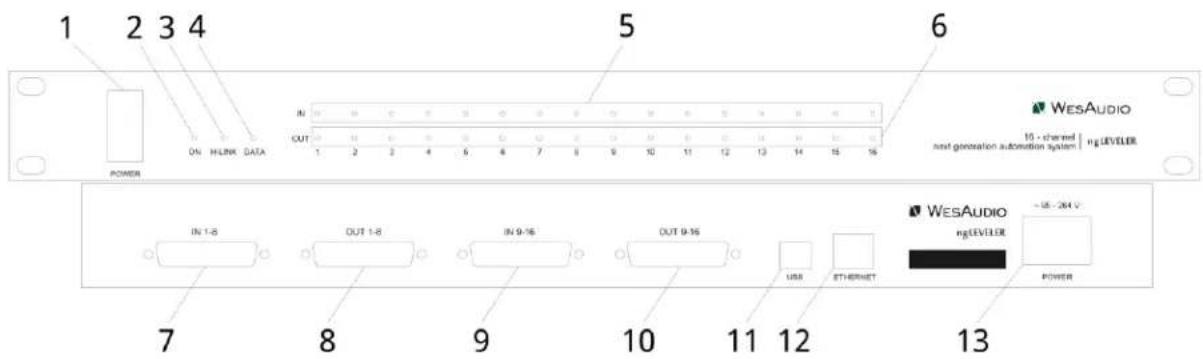
3. Front panel
text_image
1 2 3 4 POWER ON HLINK DATA IN OUT 1 2 3 4 5 6 7 8 9 10 11 12 13 14 15 16 WESAUDIO 15 - channel next generation automation system | ngLEVELER IN 1-8 OUT 1-8 IN 9-16 OUT 9-16 USB ETHERNET WESAUDIO ngLEVELER ~15 - 264 V POWER 7 8 9 10 11 12 131) Power switch.
2) Power LED indicator.
3) H-LINK - indicates unit's connection to HOST - this led will be enabled if plug-in is connected to this particular unit.
4) Data - indicates that data is being sent from DAW plug-in to the device. Please note that for Ethernet connection any communication to the device will cause this led to indicate traffic.
5) IN metering – signal level for each channel measured after PAD, however before ngLEVELER main circuit (Leveling, THD, Solo, Mute).
6) OUT metering - signal level for each channel measured after ngLEVELER main circuit.
7) IN 1-8 DB-25 socket - input to channels 1-8.
8) OUT 1-8 DB-25 socket - output from channels 1-8.
9) IN 9-16 DB-25 socket - input to channels 9-16.
10) OUT 9-16 DB-25 socket - output from channels 9-16.
11) USB socket - unit's control USB port (GCon management connection).
12) Ethernet socket - unit's control Ethernet port (GCon management connection).
13) Power socket.
4. Software installation
Software package can be downloaded from http://www.wesaudio.com/download by anyone who purchased related HW unit. To check currently supported plugin types and platforms, please follow above link.
4.1. Installation
To install WesAudio software package, please visit http://www.wesaudio.com/download and download recent version of software.
4.1.1. Windows
Start the installer application, if you will encounter any system warnings about this particular installer, please ignore them*, then select any components which you would like to install**.
- If this is FIRST installation, please unplug all WesAudio devices from your workstation.
- When USB driver will be installed, application will inform that all devices should be connected – please do so.
- If USB driver installation is triggered, user will be asked to restart computer. We know that this is unwanted activity, but it is necessary step for USB driver to install with success.
- If computer restart is triggered, this Installer will start again during start up. If for some reason installer won't be started after the restart, please start same installer manually again.
4.1.2. OSX
Because OSX architecture and USB devices handling is much simpler in concept, the only thing to note is to have all devices connected during install procedure.
Start the installer application, if you will encounter any system warnings about this particular installer, please ignore them * (sometimes it is necessary to open context menu with "Option" click (or right mouse button) and trigger installation once again).
4.1.3. Troubleshooting
If anything would fail during installation procedure please contact our support at support@wesaudio.com. We will get back to you as soon as possible.
Below you can find some symptoms and description which will help to investigate the issue:
"Can't find my device on plugin drop down menu"
Unfortunately there could be dozens of root causes. On Windows machine it is very important to check if USB device is successfully connected on system level. That can be checked in "Control Panel->System->Device Manager":

text_image
Device Manager File Action View Help Michal-PC Atmel Batteries Computer Disk drives Display adapters DVD/CD-ROM drives Human Interface Devices IDE ATA/ATAPI controllers Imaging devices Jungo Connectivity Keyboards Mice and other pointing devices Monitors Network adapters Other devices SM Bus Controller Ports (COM & LPT) Processors Sound, video and game controllers System devices Universal Serial Bus controllers WesAudio devices GCon device GCon device** Please note that for WINDOWS it is necessary to install USB driver which is critical to communicate with HW units. It is required step only during first installation, and this option will be automatically disabled during any software upgrades.
4.2. GCon Manager
GCon Manager is generic application which implements configuration management over compatible units. It can be found in Application folder data:
- For OSX: "/Applications/WesAudio/GConManager"
- For WINDOWS: folder specified during installation phase, by default in: "c:/Program Files x86/WesAudio/GConManager.exe".
This section describes how manage firmware of available units, but GConManager also provides other functions which will be described in next chapters.
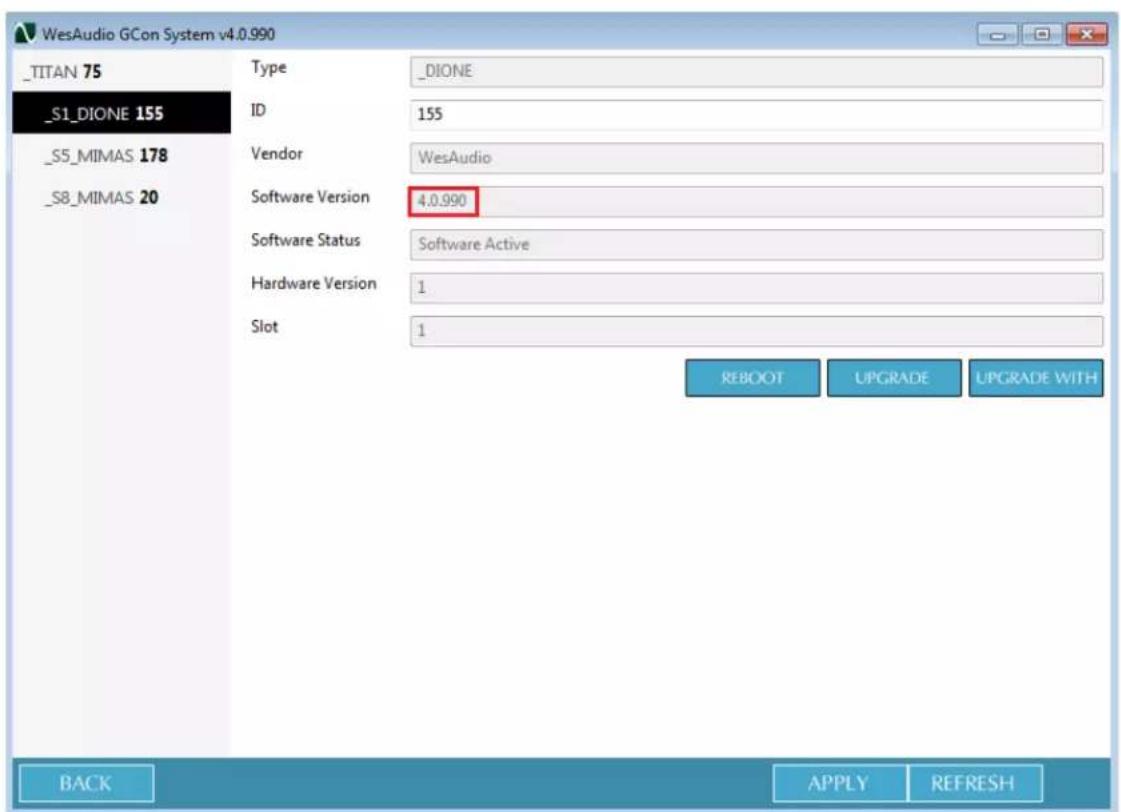
4.2.1. How to check firmware upgrade.
Each device reports to your workstation with particular version, which indicates compatibility between your host application, and remote module. To check firmware upgrade please to GCon Manager CONFIG application:
text_image
_TITAN 75 _S1_DIONE 155 _S5_MIMAS 178 _S8_MIMAS 20 Type _ID Vendor Software Version Software Status Hardware Version Slot _DIONE 155 WesAudio 4.0.990 Software Active 1 1 REBOOT UPGRADE UPGRADE WITH BACK APPLY REFRESH4.2.2. How to perform firmware upgrade.
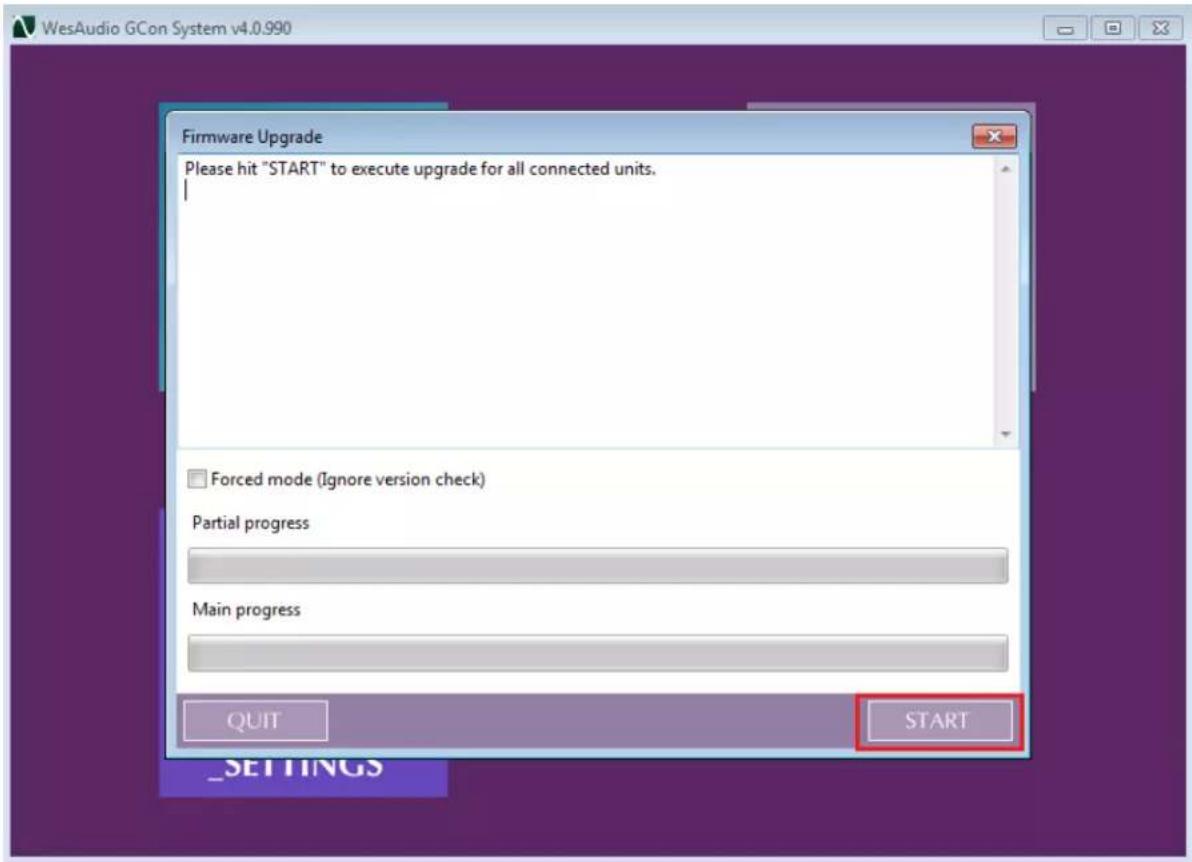
To perform firmware upgrade go to GConManager upgrade and hit "Start" button. This will trigger upgrade operation for all modules which are not up to date with your host software.
text_image
WesAudio GCon System v4.0.990 Firmware Upgrade Please hit "START" to execute upgrade for all connected units. Forced mode (Ignore version check) Partial progress Main progress QUIT START _SETTINGS5. Set up GCon Connection.
This chapter goes through possible setups and describes main configuration steps. Please note that audio signal connectivity is described in next chapter Signal connection, this chapter describes digital management side.
In general ngLEVELER implements two connection types:
- USB 2.0+.
- Ethernet 10/100 – based on UDP protocol (LAN single subnet).

natural_image
Front view of a black WESAudio audio device with ports and indicator lights (no readable text or symbols beyond labels)5.1. USB
To connect your ngLEVELER frame directly to your workstation, just connect it to any available USB 2.0+ socket via USB cable.
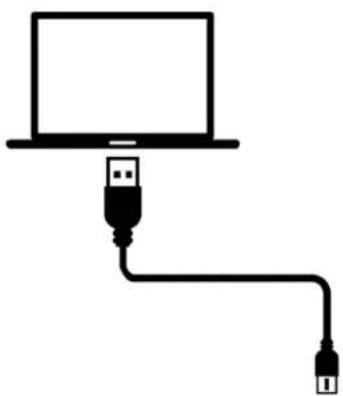
natural_image
Simple line drawing of a laptop connected to two USB cables (no text or symbols)
text_image
WESAUDIO 16 - channel next generation automation system | rg LEVELER POWER OUT 0 0 0 0 0 0 0 0 0 0 0 0 0 0 0 0 0 0 0 0 0 0 0 ON HLANK DATA 1 2 3 4 5 6 7 8 9 10 11 12 13 14 15 165.2. Ethernet
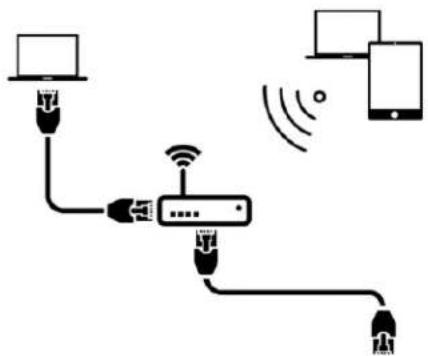
ngLeveler as any network device, can be connected to your workstation in following ways:
- By joining your local area network (LAN)
- Or directly connected to your workstation.
In some cases it is mandatory to set IP addresses* for your workstation and ngLEVELER.
Below you can find possible setup in your local area network, and how different devices can access ngLEVELER resources:
flowchart
graph TD
    A["Laptop"] --> B["USB Port"]
    B --> C["Network Switch"]
    C --> D["Smartphone"]
    D --> E["USB Port"]
    E --> F["Smart Phone"]
    style A fill:#f9f,stroke:#333
    style F fill:#bbf,stroke:#333

text_image
WESAUDIO 10 - channel net generation automatic system | #LENBLR ON 100% DATA OUT 1 2 3 4 5 6 7 8 9 10 11 12 13 14 15 16 POWER(*) In case you would like ngLEVELER to join already existing network, most probably your workstation has IP address already set up through static configuration entry, or through DHCP (by your router).
5.2.1. Default network configuration.
Each ngLEVELER chassis by default has DHCP enabled. So if you would like to connect your ngLEVELER to your router, just do it!
...However if you would like to change that configuration, please read description below.
5.2.2. Enable/Disable DHCP
To change any network specific configuration of your ngLEVELER chassis:
1) Connect your ngLEVELER directly to your workstation through USB cable (If connection to ngLEVELER is already established through Ethernet cable, this step is not necessary).
2) Start GConManager and go to _CONFIG application.
3) Then select your ngLEVELER unit from the elements tree on the left.
4) Then change DHCP option to "ON". Unit will restart, and your connection to ngLEVELER will be established again.

text_image
WesAudio GCon System v7.0.2124 - Connection Type: service NGLEVELER 888 NGLEVELER 999 _TITAN 1050 _S1_PROMETHEUS 1044 _S5_MIMAS 2 _S6_MIMAS 10 _S7_HYPERION 549 _S9_CALYPSO_ADAT 400 Type NGLEVELER ID 888 Vendor WesAudio Software Version 7.0.2124 Software Status Software Active Hardware Version 1 Connection USB DHCP ON IP 0.0.0.0 MAC d8:80:39e1:7fd8 UDP PORT 9020 REBOOT UPGRADE UPGRADE WITH BACK APPLY REFRESHNow you can disconnect USB cable, and connect ngLEVELER using Ethernet cable.
5.2.3. Static IP address
In general there are few use cases when you would like to configure ngLEVELER IP address manually:
1) When you router doesn't support DHCP
2) When your LAN network is configured manually for example through hardware switch.
3) When you would like to connect your ngLEVELER directly to your Ethernet socket in your workstation.
As a first step please check your currently configured IP address.
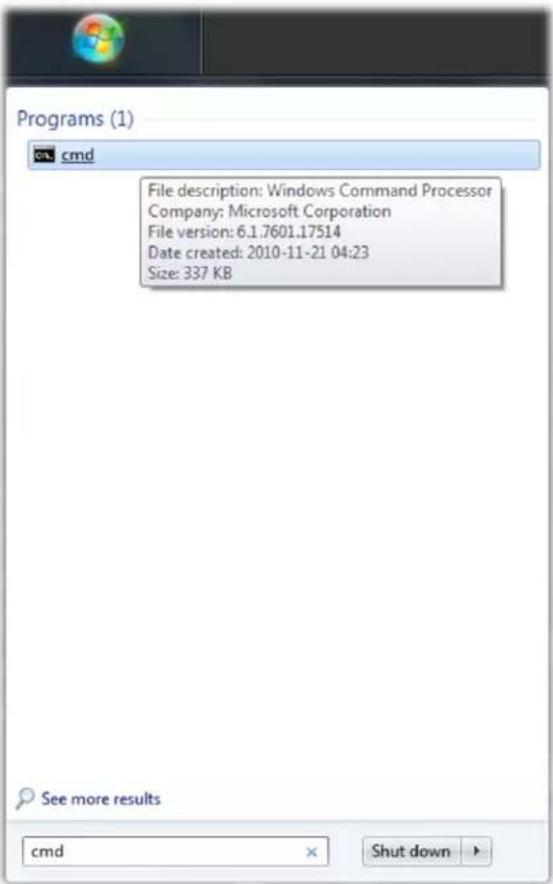
5.2.3.1. Windows – how to check your IP address.
- Start cmd application (hit Windows "START" button and type "cmd"):
text_image
Programs (1) cmd File description: Windows Command Processor Company: Microsoft Corporation File version: 6.1.7601.17514 Date created: 2010-11-21 04:23 Size: 337 KB See more results cmd Shut down- Type "ipconfig" which will show current network configuration:

text_image
Microsoft Windows [Version 6.1.7601] Copyright (c) 2009 Microsoft Corporation. All rights reserved. C:\Users\Michal>ipconfig Windows IP Configuration Ethernet adapter Local Area Connection: Media State . . . . . . . . . . . . : Media disconnected Connection-specific DNS Suffix . : Wireless LAN adapter Wireless Network Connection 3: Media State . . . . . . . . . . . . : Media disconnected Connection-specific DNS Suffix . : Wireless LAN adapter Wireless Network Connection 2: Media State . . . . . . . . . . . . : Media disconnected Connection-specific DNS Suffix . Wireless LAN adapter Wireless Network Connection: Connection-specific DNS Suffix . : Link-local IPv6 Address . . . . . . : fe80::b034:9fb7:4cb2:2e2fz11 IPv4 Address. . . . . . . . . . . : 192.168.0.100 Subnet Mask . . . . . . . . . . . : 255.255.255.0 Default Gateway . . . . . . . . . : 192.168.0.1 Ethernet adapter VirtualBox Host-Only Network: Connection-specific DNS Suffix . Link-local IPv6 Address . . . . . : fe80::7580:e54b:5962:9c3az15 IPv4 Address. . . . . . . . . . : 192.168.56.1 Subnet Mask . . . . . . . . . : 255.255.255.0 Default Gateway . . . . . . . . Tunnel adapter isatap.(F78175D0-A0CF-4EB4-B3E4-9F3AC002D3DA): Media State . . . . . . . . . : Media disconnected Connection-specific DNS Suffix . Tunnel adapter isatap.(OB2A372F-F34D-46F9-A3B6-794F92D185E0): Media State . . . . . . . : Media disconnected Connection-specific DNS Suffix . Tunnel adapter isatap.(E1EA6476-41C5-43AB-BB50-A89F0F3570B0): Media State . . . . . . : Media disconnected Connection-specific DNS Suffix . Tunnel adapter Teredo Tunneling Pseudo-Interface: Media State . . . . . . : Media disconnected- Then you have to find your currently connected network card (Ethernet card or Wi-fi card) and check IP address. In this particular case IP address is 192.168.0.100.ngLEVELER IP address has to be in the same subnet, so for above example it would mean any IP address from 192.168.0.2 to 192.168.0.254, excluding currently occupied addresses by any devices connected to your network (like your workstation address, router address, etc.).
5.2.3.2. OSX - how to check your IP address.
- Start "Terminal" (located in Applications/Utilities) application:

Activity Monitor

AirPort Utility

AU Lab

Audio MIDI Setup

Bluetooth File Exchange

Boot Camp
Assistant

ColorSync Utility

Console

Digital Color Meter

Disk Utility

Grab

Grapher

Keychain Access

Migration Assistant

Script Editor

System Information

Terminal

VoiceOver Utility

X11

ZipRecentLogs.command
- Type "ifconfig" which will show current network configuration:
Mac-mini-Michal:\~ michal\$ ifconfig
lo0: flags=8049
options=3
inet6 ::1 prefixlen 128
inet 127.0.0.1 netmask 0xff000000
inet6 fe80::1%lo0 prefixlen 64 scopeid 0x1
nd6 options=1
gif0: flags=8010
stf0: flags=0<> mtu 1280
en0: flags=8863
options=27
ether 00:23:df:7f:b5:28
inet6 fe80::223:dfff:fe7f:b528%en0 prefixlen 64 scopeid 0x4
inet 192.168.0.103 netmask 0xffffff00 broadcast 192.168.0.255
nd6 options=1
media: autoselect (1000baseT
status: active
en1: flags=8823
ether 00:24:36:eb:b3:51
nd6 options=1
media: autoselect (
status: inactive
fw0: flags=8863
lladdr 00:23:df:ff:fe:7f:b5:28
nd6 options=1
media: autoselect
status: inactive
Mac-mini-Michal:\~ michals
NGLEVELER USER MANUAL REV3
- Then you have to find your currently connected network card (Ethernet card or Wi-fi card) and check IP address. In this particular case IP address is 192.168.0.100. Unit's IP address has to be in the same subnet, so for above example it would mean any IP address from 192.168.0.2 to 192.168.0.254 excluding currently occupied addresses by any device connected to your network (like your workstation address, router address, etc.).
5.2.3.3. Set up static IP address.
To set up IP address for ngLEVELER, first connect it directly to your workstation using USB cable. Then start GConManager and select “_CONFIG” application. Select your ngLEVELER unit at the device list on the left side of the screen, then change IP address:
To change any network specific configuration of your ngLEVELER:
1) Connect your ngLEVELER directly to your workstation through USB cable (If connection to ngLEVELER is already established through Ethernet cable, this step is not necessary).
2) Start GConManager and go to _CONFIG application.
3) Then select your ngLEVELER unit from the left side of the screen.
4) Then change DHCP option to "OFF" (if it is currently "ON"). Unit will restart, and your connection will re-establish.
5) Enter IP address that you would like to set, hit Apply button. Unit will restart, and your connection with ngLEVELER will be established again.

text_image
WesAudio GCon System v7.0.2124 - Connection Type: service NGLEVELER 888 NGLEVELER 999 _TITAN 1050 _S1_PROMETHEUS 1044 _S5_MIMAS 2 _S6_MIMAS 10 _S7_HYPERION 549 _S9_CALYPSO_ADAT 400 Type NGLEVELER ID 888 Vendor WesAudio Software Version 7.0.2124 Software Status Software Active Hardware Version 1 Connection USB DHCP OFF IP 192.166.0.136 MAC d8.00:39:e1.7b:d8 UDP PORT 9020 REBOOT UPGRADE UPGRADE WITH BACK APPLY REFRESHNow you can disconnect USB cable, and connect ngLEVELER using Ethernet cable.
5.2.4. Direct connection – setting IP address on PC/MAC.
To directly connect unit to your workstation via Ethernet cable, it is mandatory to set up IP address for your network interface (Ethernet network card). This activity is not in scope of this manual, however it can be easily find online, please find below help pages:
Windows: http://www.howtogeek.com/howto/19249/how-to-assign-a-static-ip-address-in-xp-vista-or-windows-7/
OSX: http://www.macinstruct.com/node/550
6. Audio signal connection
ngLEVELER can be integrated with any outboard or console configuration and some examples can be found in chapter Usage examples. Audio signal is connected to ngLEVELER via DB-25 connectors on the back – ngLEVELER is fully analog automation system, its digital connectivity only serves management purposes.
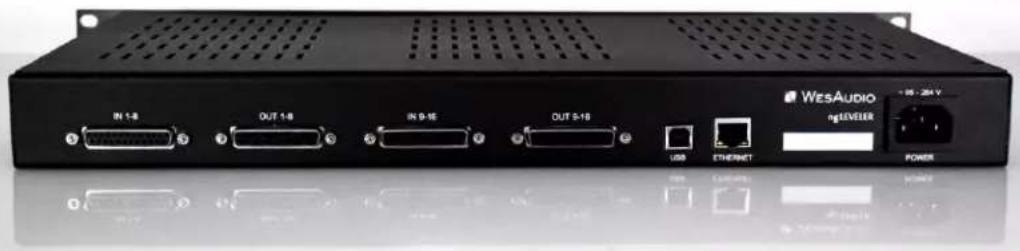
text_image
WESAUDIO ngLEVEER USB ETHERNET POWER IN 1-8 DUT 1-8 IN 9-16 DUT 5-16 IS - 20 VIn that sense ngLEVELER is classic 16-channel outboard equipment and can be integrated in your signal chain according to your needs. Please note that USB and Ethernet connections are implemented just to control the unit, audio signal is not passed to ngLeveler in any form through those interfaces.
7. ngLEVELER automation and recall
This chapter describes all options to manage ngLEVELER and automate its settings. Source of ngLeveler automation is DAW plugin available in all common formats. Depends on the configuration ngLEVELER can also be integrated with:
• Third party controllers (Third party controllers),
- DAW via HUI (ngLEVELER and DAW integration via HUI).
7.1. DAW Plug-in
ngLEVELER plug-in allows to control all unit's parameters, and it is available in all common standards VST2/VST3/AU/AAX.
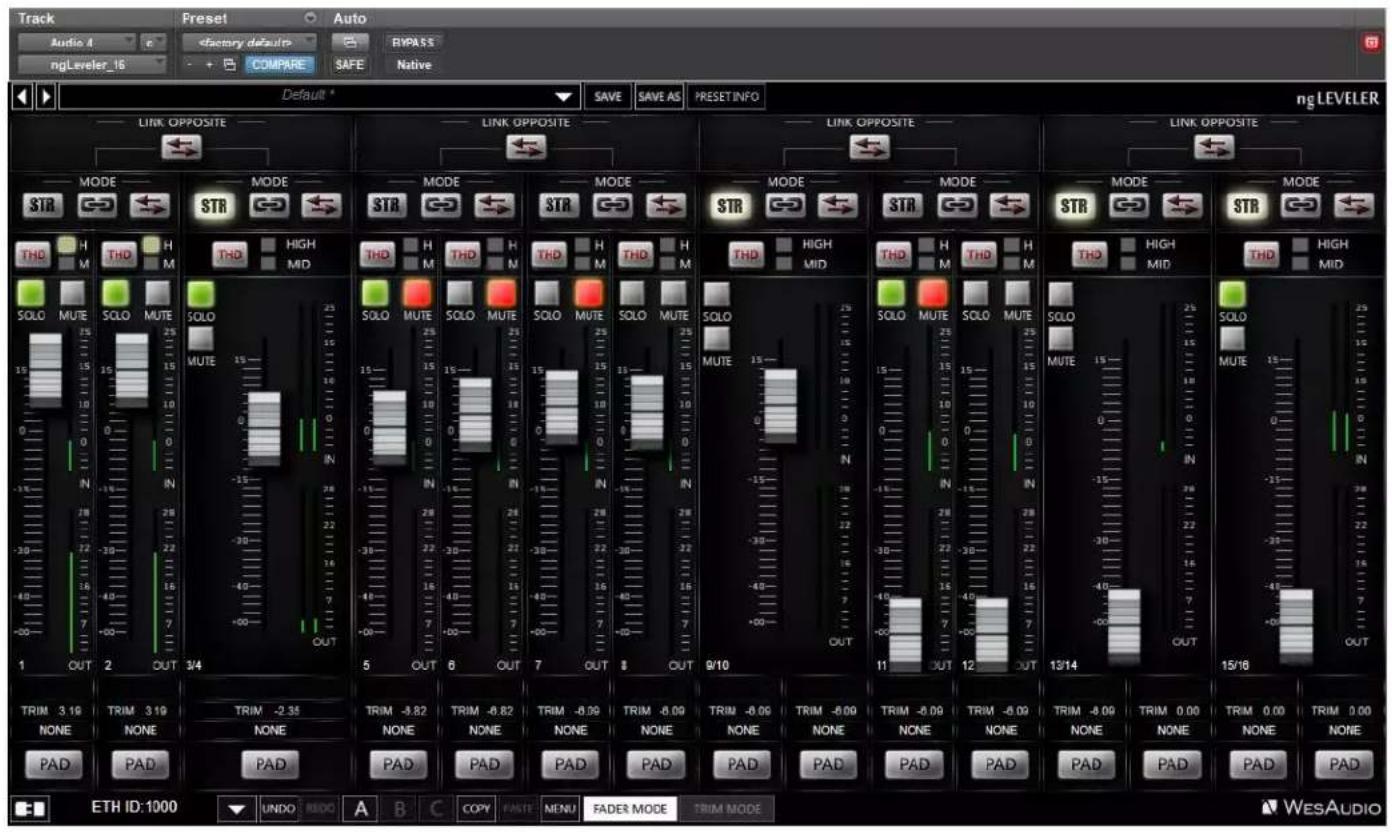
text_image
Track Audio 4 ngLeveler_16 Preset Factory default COMPARE SAFE Native Default * SAVE SAVE AS PRESET INFO ng LEVELER LINK OPPOSITE LINK OPPOSITE LINK OPPOSITE LINK OPPOSITE MODE STR STR STR STR STR STR STR STR STR STR STR STR STR STR STR STR STR STR STR STR STR STR STR STR STR STR STR STR STR STR STR STR STR STR STR STR STR STR STR STR STR STR STR STR STR STR STR STR STR STR MUTE MUTE MUTE MUTE MUTE MUTE MUTE MUTE MUTE MUTE MUTE MUTE MUTE MUTE MUTE MUTE MUTE MUTE MUTE MUTE MUTE MUTE MUTE MUTE MUTE MUTE MUTE MUTE MUTE MUTE MUTE MUTE MUTE MUTE7.1.1. Plug-in management panel

text_image
LINK OPPOSITE LINK OPPOSITE MODE MODE MODE MODE MODE MODE MODE MODE MODE MODE MODE MODE MODE MODE MODE MODE MODE MODE MODE MODE MODE MODE MODE MODE MODE MODE MODE MODE MODE MODE MODE MODE MODE MODE MODE MODE MODE MODE MODE MODE MODE MODE MODE MODE MODE MODE MODE MODE MODE MODE Mode H M THD H M THD H M THD HIGH MID THD H M THD H M THD H M THD H M THD H M THD H M THD H M THD H M THD H M THD H M SOLO MUTE SOLO MUTE SOLO MUTE SOLO MUTE SOLO MUTE SOLO MUTE SOLO MUTE SOLO MUTE SOLO MUTE SOLO MUTE SOLO MUTE SOLO MUTE SOLO MUTE SOLO MUTE SOLO MUTE SOLO MUTE SOLO MUTE SOLO MUTE SOLO MUTE SOLO MUTE SOLO MUTE SOLO MUTE SOLO MUTE SOLO MUTE SOLO MUTE SOLO MUTE SOUT 3/4 TRIM 3.19 TRIM 3.19 TRIM -2.35 TRIM -8.82 TRIM -8.82 TRIM -6.09 TRIM -6.09 TRIM -8.09 NONE NONE NONE NONE NONE NONE NONE NONE NONE NONE NONE NONE NONE NONE NONE NONE NONE NONE NONE NONE NONE NONE NONE NONE NONE NONE NONE NONE NONE NONE NONE NONE NONE NONE NONE NONE NONE NONE NONE NONE NONE NONE NONE NONE NONE None None None None None None None None None None None None None None None None None None None None None None None None None None None None None None None None None None None None None None None None None None None None None None None None None None None None None None None None None None None None None None None None None None None None None None None None None None None None None None None None None None None None None None None None None None None None None None None None None None None None Time: 3/4 OUT 5 OUT 6 OUT 7 OUT 8 OUT 9 OUT 1000 ETH ID:1000 UNDO REDO A B C COPY PASTE MENU FADER MODE TRIM MODE UNDO/REDO COPY/PASTE FAST PRESET (A/B/C) MENU FADER/TRIM MODE TAGGLE CONNECTION BUTTON CONNECTION DETAILS SELECT CONNECTION BUTTON CONNECTION ID- Select connection button: This button shows all connected devices, if "drop-down" list with element IDs is not visible, that means that no devices has been detected which support GCon protocol.
- Toggle connection button: Button toggles connection status ON/OFF. Please note that button works only if ID has been previously selected using "Select connection button".
- Connection details: Additional connection information:
a. USB - unit has been connected through USB.
b. ETH - unit has been connected through Ethernet.
NOTE: This fields shows also connection status:
NGLEVELER USER MANUAL REV3
a. ON – Font WHITE/Style: NORMAL: Connection is established.
b. OFF - FONT GRAY/Style: NORMAL: Connection is NOT established.
c. Connecting FONT GRAY/Style: ITALIC – Connection process is ongoing. If "Connecting" state is visible for longer period of time (more than 5 seconds), and plugin has no control over the unit, that would mean:
i. HW unit is no longer connected to your Workstation.
ii. HW unit was disconnected or detached by operating system for some reason.
iii. Any other reason which should be consulted with support@wesaudio.com.
- Connection ID: Unique Connection ID of connected HW unit.
- Fast preset change (A/B/C): Button switches between available setups A/B/C. Please note that this presets won't switch any connection related parameters. That means Connection ID is shared between all available setups (A/B/C) and won't be changed if any of those buttons is hit.
- Undo: Undo last parameter change.
- Redo: Redo last parameter change.
- Menu:
a. Reset parameters to default – sets all plug-in parameters to default.
b. Disable/Enable IN metering.
c. Disable/Enable OUT metering.
- Fader/Trim mode: ngLeveler supports two levels of volume modification/automation:
a. Fader - Main level automation which works in a range of Mute to +15dB .
b. Trim - Additional level of automation/control which works in a range of: -10dB to +5dB.
7.1.2. Plug-in channel description
Each channel of ngLeveler (either stereo or mono) provides following functions:
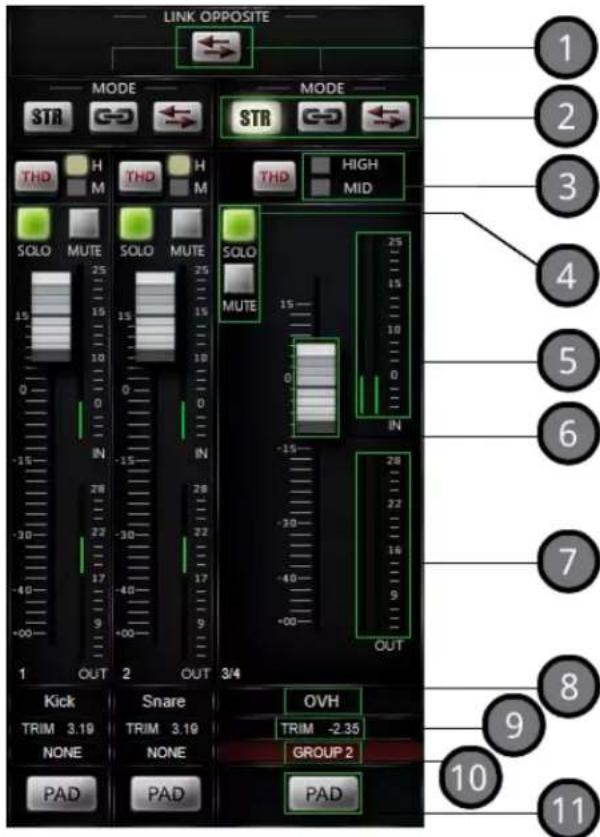
text_image
LINK OPPOSITE MODE STR THD H M THD H M THD HIGH MID SOLO MUTE SOLO MUTE SOLO 15 25 15 15 10 0 IN 28 22 17 9 OUT 3/4 -15 -28 -30 -32 17 17 9 OUT Kick Snare OVH TRIM 3.19 TRIM 3.19 TRIM -2.35 NONE NONE GROUP 2 PAD PAD PAD 1 2 3 4 5 6 7 8 9 10 11-
Opposite quad channel link: This functionality links two stereo channels in an opposite way, it means that by pushing level of channel 1 & 2, channel 3 & 4 signal will be lowered by the same amount, perfect solution to drive our stereo analog units maintaining the same signal level.
-
Channel mode: This parameter defines how two neighbor channels will be linked. There are following options:
a. Off - No linking, pure dual-mono operation.
b. Stereo – Channels will share exactly the same settings (absolute linking).
c. Linked – Channels are linked relatively (relative linking) – perfect solution to compensate different channel levels while using dual mono analog devices as stereo pair.
d. Linked Opposite – Channels are linked relatively (relative linking), but in opposite way, it means if channel 1 level will increase, channel 2 will be lowered by the same amount. It is perfect solution if we have mono unit
NGLEVELER USER MANUAL REV3
that we would like to drive harder to hear how it performs. In that scenario ngLEVELER channel X OUT should go straight to IN of our device, and channel Y IN of ngLEVELER should receive signal from the OUT of device.
- THD - toggles THD level, possible steps – OFF (LEDs disabled), MED, HIGH.
- SOLO/MUTE/SOLO SAFE – Solo and Mute for particular channel, and Solo Safe which can be enabled by clicking on Solo icon with "CTRL" or "SHIFT" pressed.
- IN metering – signal level for particular channel measured after PAD, however before ngLEVELER main circuit (Leveling, THD, Solo, Mute).
- Fader - Level control.
- OUT metering - signal level for particular channel measured after ngLEVELER main circuit.
- Channel name – assignable and fully user configurable channel name – please note that this name will be also communicated to external controller if in use.
- Trim / Level value – depend on the mode (Fader/Trim) this field shows current value of:
a. TRIM – When Fader mode is selected.
b. LEVEL – When Trim mode is selected.
-
Group - Group assigned to particular channel.
-
PAD - Passive 6dB attenuator.
7.1.3. TRIM mode
Starting from Release 7.1 ngLeveler supports TRIM mode. Trim mode (also known as similar feature in many DAWs) is another level of control/automation of the analog circuit.

text_image
Track Inserts 1 - ngLeveler_10 default* Auto-Off Compare Copy Paste Default * SAVE SAVE AS PREST INFO ngLEVELER LINK OPPOSITE LINK OPPOSITE LINK OPPOSITE LINK OPPOSITE MODE STR HIGH MID MODE STR HIGH MID MODE STR HIGH MID MODE STR HIGH MID MODE STR HIGH MID MODE STR HIGH MID MODE STR HIGH MID MODE STR HIGH MID MODE STR HIGH MID MODE STR HIGH MID MODE STR HIGH MID MODE STR HIGH MIDTrim mode allows us to change level of each channel on top of already setup main fader levels. Trim fader also work in very high resolution as it works in limited scale - 10dB to +5dB. Such approach gives us few important benefits:
- With fader mode used as our main leveling mechanism, it is still possible to change the balance if levels in fader mode are already automated or grouped. Let's assume we would like to change the level of a kick channel in already automated drums group!
• We can use group automation in fader mode, and still use Trim mode to either:
○ Automate differently individual channels of our group,
- Or simply change level between individual tracks of our group.
- Trim mode also maybe very convenient for automation, as whole fader scale on the plug-in or controller is relatively small (15dB) compared to full scale of the fader mode.
7.1.4. Plug-in – Channel groups
Starting from Release 7.1 ngLeveler supports channel groups.
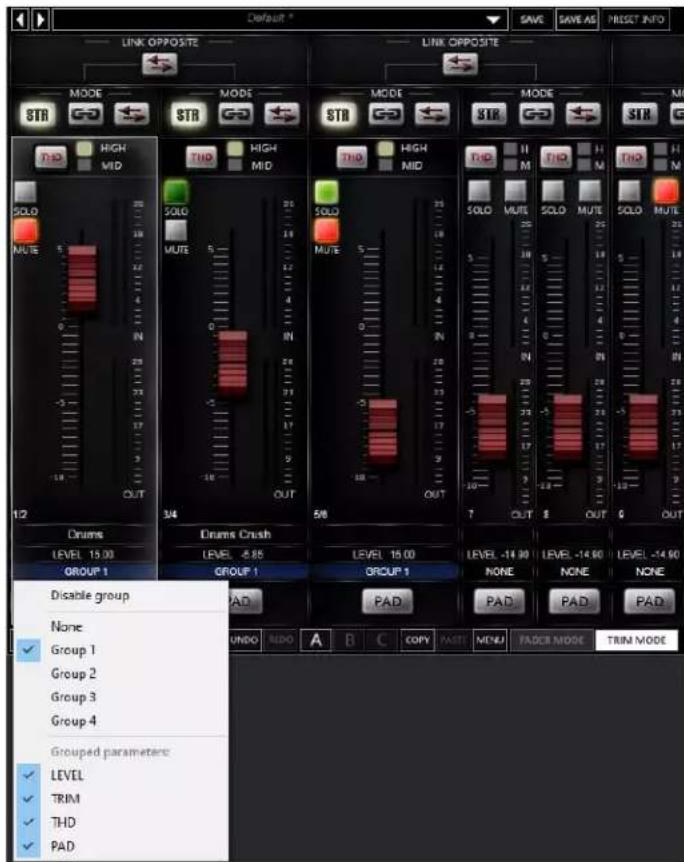
text_image
Default * LINK OPPOSITE LINK OPPOSITE MODE MODE MODE MODE MODE MODE MODE MODE MODE MODE MODE MODE MODE MODE MODE MODE MODE MODE MODE MODE MODE MODE MODE MODE MODE MODE MODE MODE MODE MODE MODE MODE MODE MODE MODE MODE MODE MODE MODE MODE MODE MODE MODE MODE MODE MODE MODE MODE MODE MODE Mode MUTE 5 OUT 346 Draums LEVEL 15.00 GROUP 1 Drums Crush LEVEL 2.85 GROUP 1 Group 1 Group 2 Group 3 Group 4 Grouped parameters: LEVEL TRIM THD PADNow it is possible to:
- Assign each channel to one of 4 groups which technically link all channel parameters in a particular group.
• Some parameters may be disabled from a group link:
o Level (Fader Mode level) / Trim (Trim mode level) / THD / PAD.
EXAMPLE: This approach allows to automate only LEVEL parameter (main fader) for the whole group – keeping exactly same level relations between channels - and all other parameters (Trim/THD/Pad) can be used independently for each channel (as linking is disabled).
- Each group can be also disabled at any time to allow modifications of each parameter for particular channel.
7.1.5. Monitoring – Solo / Mute / Solo Safe
ngLeveler supports following monitoring features:

text_image
CHANNEL MUTE CHANNEL SOLO SAFE CHANNEL SOLO SOLO MUTE 25 18 12 4 0 IN 28 3/4 SOLO MUTE 5 12 4 0 IN 28 3/4 SOLO MUTE 5 12 4 0 IN 28 5/8 SOLO MUTE 5 12 4 0 IN 28 5/81) MUTE-channel is muted.
2) SOLO – Any channel with solo active will pass through the signal with full processing unless it is not explicitly muted. Hitting solo on a particular channel will also mute all other channels unless solo or solo safe is not engaged.
3) SOLO SAFE – Channel will pass through the signal with full processing unless it is not explicitly muted – this channel will pass signal through even if other channels are soloed. Usually this approach is used to mark summed grouped signal to follow solo of individual tracks.
7.1.6. Plug-in – automation of linked or grouped channels
Please note that when channels are linked using LINK or LINK OPPOSITE modes or grouped (assigned to one of four groups) only one channel needs to be automated and rest of channels will follow accordingly. If all channels will be automated, each channel will try to update the other one, which will definitely lead to unexpected and unwanted results.
For STEREO mode, second channel changes are always ignored, so even if we would have automation lane written for CH2, CH1 will always take control upon both channels in analog domain.
7.2. Third party controllers
This chapter describes basic configuration and integration with Third party controllers. Currently supported protocols are HUI and Mackie control, and it can work in two ways:
- Server mode – Controller manages ngLEVELER exclusively.
- Server mediation mode – Controller manages ngLeveler and DAW – please refer to next chapters for more information.
Any of those modes doesn't put any limitations to a possible setup. That means that any number of controllers can manage any number of ngLevelers.
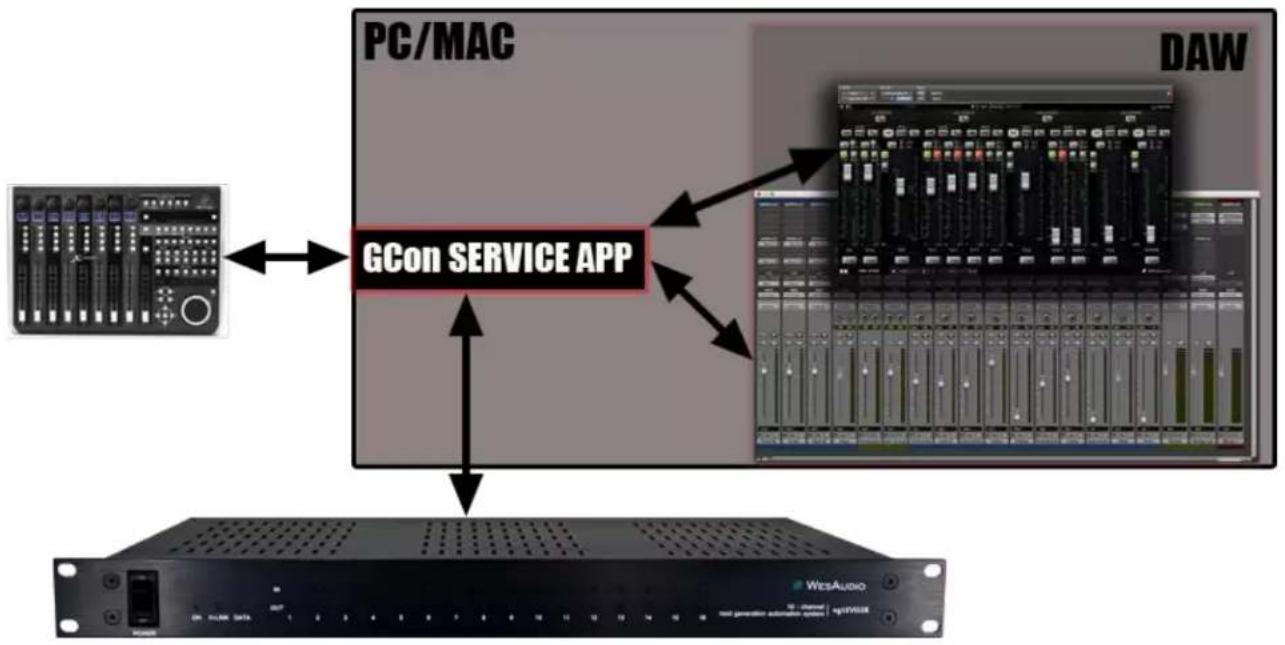
7.2.1. GCon Server mode - ngLEVELER management via HUI or Mackie Control third party controller
In this mode HUI/Mackie control controller manages ngLEVELER (or multiple ngLEVELERs) exclusively – this mode is called "GCon Server mode".
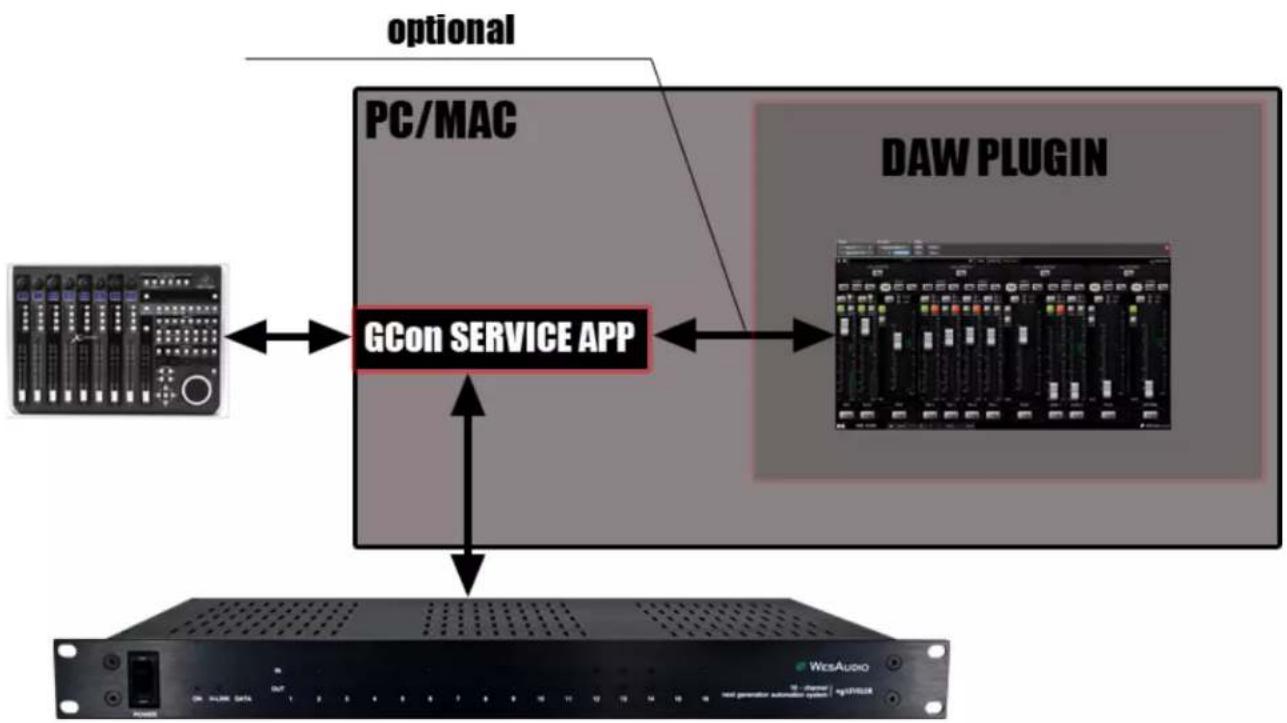
flowchart
graph TD
    A["PC/MAC"] <--> B["GCon SERVICE APP"]
    C["DAW PLUGIN"] <--> B
    B --> D["Network Interface"]
    style A fill:#f9f,stroke:#333
    style C fill:#ccf,stroke:#333
    style D fill:#dfd,stroke:#333
As shown on above figure, controller is connected directly to GCon Service application via MIDI. This particular application runs in background and mediates all necessary information between controller and ngLEVELER. In this setup, DAW plug-in doesn't have to be even started, it is enough to configure GCon server mode, and controller will start to manage ngLeveler parameters.
7.2.1.1. Configuration
To make it work, it is enough to just configure controller MIDI Ports in GConManager_CONTROL application. For example:
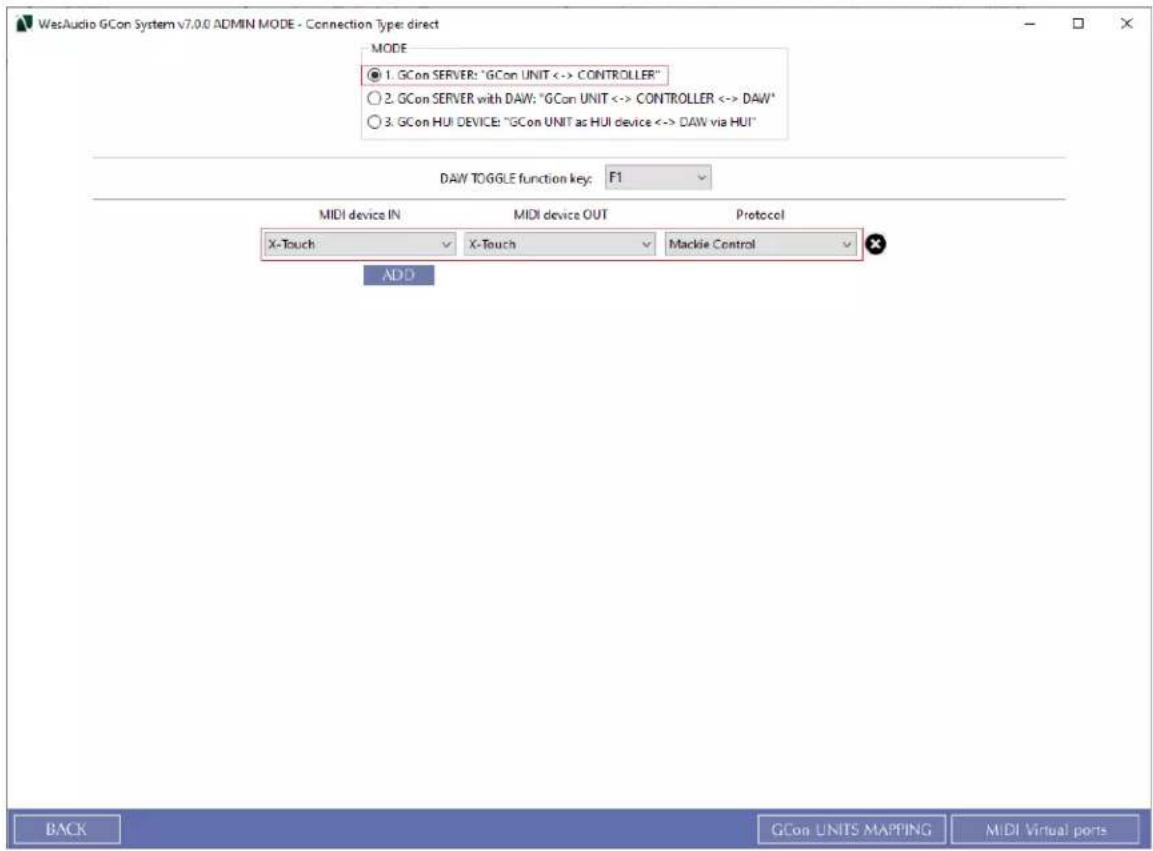
text_image
WesAudio GCon System v7.0.0 ADMIN MODE - Connection Type: direct MODE ● 1. GCon SERVER: "GCon UNIT <-> CONTROLLER" ○ 2. GCon SERVER with DAW: "GCon UNIT <-> CONTROLLER <-> DAW" ○ 3. GCon HUI DEVICE: "GCon UNIT as HUI device <-> DAW via HUI" DAW TOGGLE function key: F1 MIDI device IN Mali device OUT Protocol X-Touch X-Touch Mackie Control ADD BACK GCon UNITS MAPPING MIDI Virtual portsIf more controllers are available, it is enough to add additional MIDI Ports. If adding ports didn't work (controller didn't synchronize to ngLEVELER state), please refer to troubleshooting section for more information - Troubleshooting.
7.2.2. GCon Server with DAW - ngLEVELER and DAW management via HUI/Mackie control third party controller
This mode is an extension to "GCon server mode" and it adds mediation to DAW of controls which are not in use to manage ngLEVELER. That means that all additional controls on the controller which are not related to fader section will be mediated from, and to DAW. That gives us full transport functions control from the controller, while still being able to control all parameters of ngLEVELER. This concept goes further, and allows us to toggle between DAW and ngLEVELER control with one of the function keys – F1 to F8 (assignable in the GConManager application - DAW Toggle).
flowchart
graph TD
    A["PC/MAC"] <--> B["GCon SERVICE APP"]
    C["DAW"] --> B
    B --> D["Network Interface"]
    D --> E["WesAudio"]
7.2.2.1. Configuration
In this mode, configuration is little bit more complicated, as it requires us to create virtual MIDI ports. For more information how to create Virtual MIDI Ports, please refer to chapter: How to create Virtual MIDI ports.
After our Virtual MIDI ports are created (Amount of virtual MIDI ports are connected to number of controllers that we will use), we need to configure our setup in GConManager. To do so, start GConManager and go to _CONTROL application:

text_image
WesAudio GCon System v7.0.0 ADMIN MODE - Connection Type: direct MODE ○ 1. GCon SERVER: "GCon UNIT <-> CONTROLLER" ● 2. GCon SERVER with DAW: "GCon UNIT <-> CONTROLLER <-> DAW" ○ 3. GCon HUI DEVICE: "GCon UNIT as HUI device <-> DAW via HUI" DAW TOGGLE function key: F1 MIDI device IN MIDI device OUT FROM DAW (virtual) TO DAW (virtual) Protocol X-Touch X-Touch WesAudio IN 4 WesAudio OUT 4 Mackie Control ADD BACK GCon UNITS MAPPING MIDI Virtual portsIf more controllers are available, it is enough to add additional MIDI Ports. If adding ports didn't work (controller didn't synchronize to ngLEVELER state), please refer to troubleshooting section (Troubleshooting) for more information.
Next step is to configure DAW to integrate with GCon Service and properly receive mediated information. Now all DAWs have its own configuration methods, this manual will cover configuration for Pro Tools and Studio One – however for all other DAWs please refer to internet tutorials on how to add external controller – instead of Controller MIDI ports, please set up virtual ports previously created and configured in GConManager_CONTROL application.
IMPORTANT: Please note that separate MIDI ports need to be created:
• To DAW – GCon service communication to DAW,
- From DAW – DAW communication to GCon service.
7.2.2.1.1. GCon Server with DAW - Pro Tools configuration
Below example correlates with previous GConManager configuration. You can access this window from Pro Tools application heading to "Setup" menu, then "Peripherals", finally selecting "MIDI Controllers" tab.
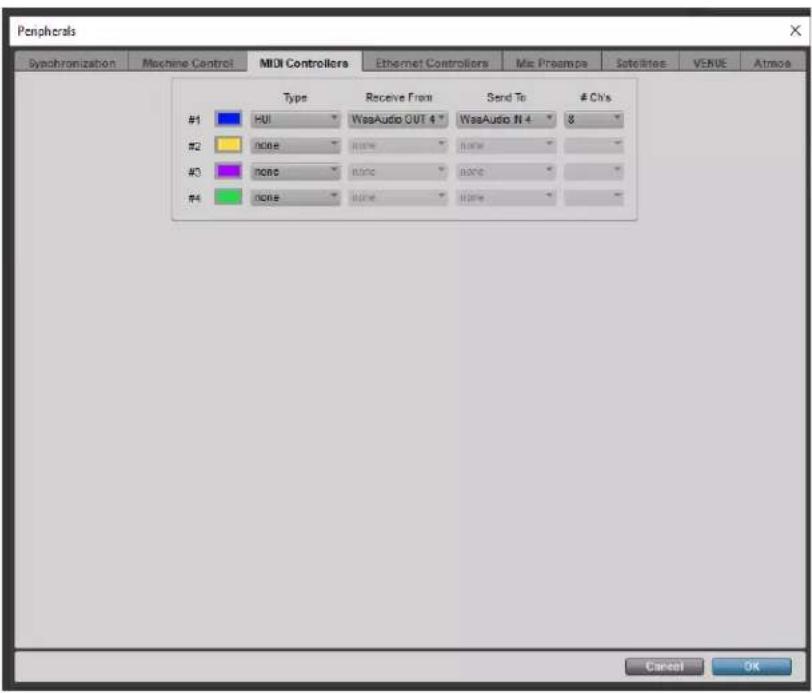
text_image
Peripherals Synchronization Machine Control MIDI Controllers Ethernet Controllers Mix Proamps Satellite Access Type Receive Front Send To # Ch's #1 HUI WasAudio OUT 4 WasAudio N 4 8 #2 none none #3 none none #4 none none Cancel OK7.2.2.1.2. Studio One 4 configuration
Below example correlates with previous GConManager configuration. You can access this window from Studio One 4 application heading to "Studio One" menu, then "Options", "external devices" tab, finally hitting "Add".

text_image
Add Device New Keyboard New Instrument New Control Surface Access Acom Instruments AKAI Behringer CME Doepfer Edirol E-MU Evolution Frontier JLCooper Keyfax KORG Mackie Control Control Extender HUI M-Audio N Device Model Mackie HUI Manufacturer Mackie Device Name HUI Please connect your Mackie HUI and choose the used MIDI ports. Receive From WesAudio OUT 4 Send To WesAudio IN 4 OK Cancel Options Song Setup Apply OK Cancel7.2.2.2. DAW Toggle
In GConManager_CONTROL application it is possible to assign function key (F1 to F8) - in GCon Server mediation mode it allows to toggle fader section of the Controller to either manage:
- DAW session (assigned function key will blink)
- ngLEVELER(s) (assigned function key LED will be ON).
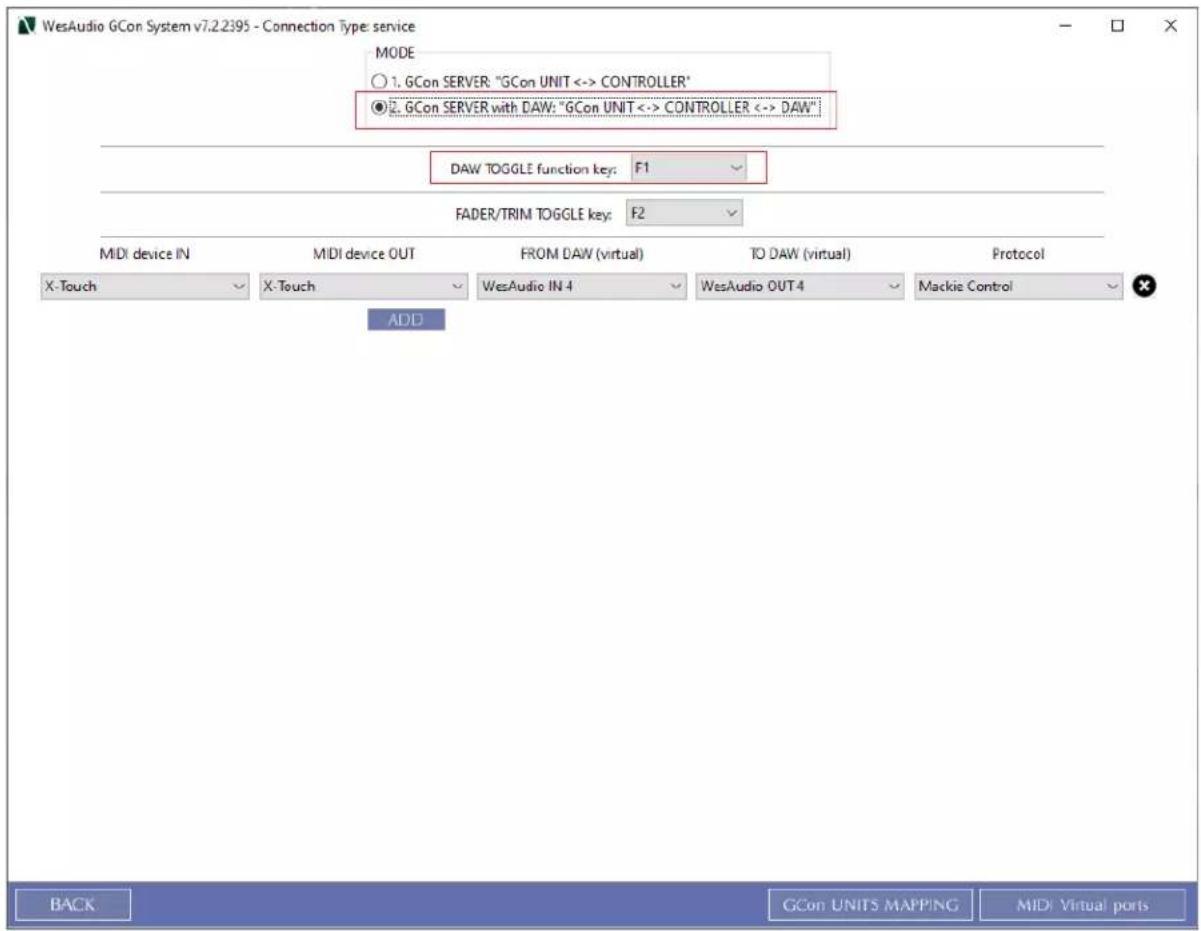
text_image
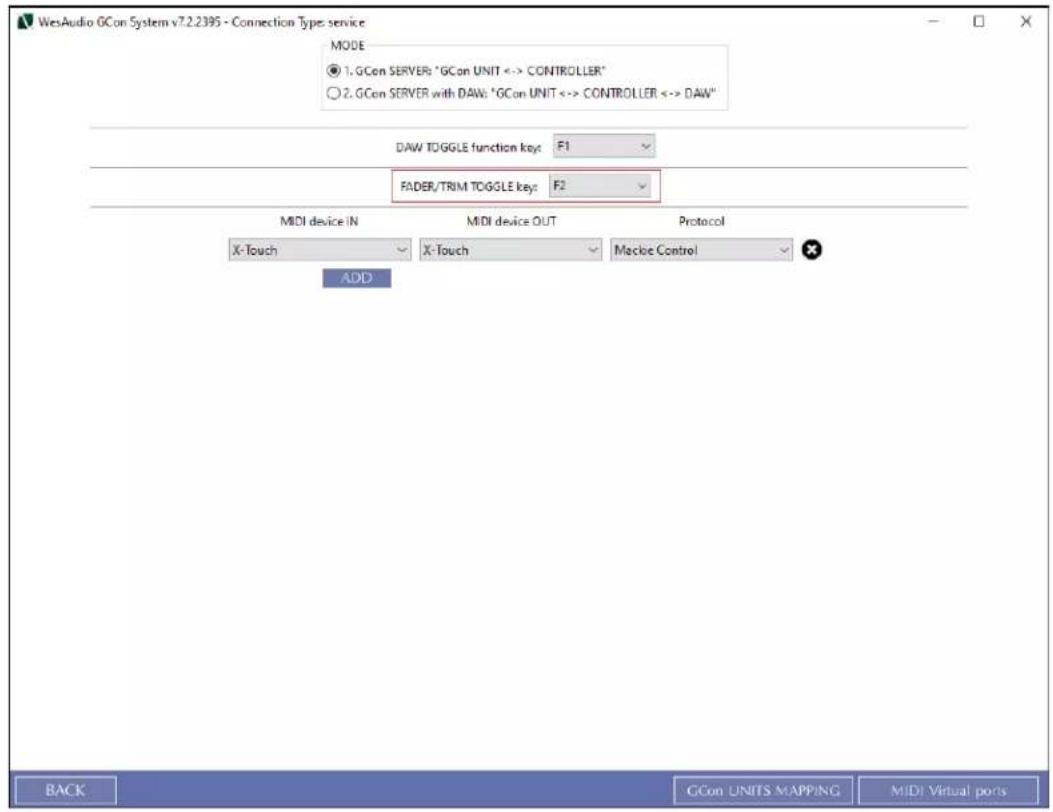
WesAudio GCon System v7.2.2395 - Connection Type: service MODE ○ 1. GCon SERVER: "GCon UNIT <-> CONTROLLER" ● GCon SERVER with DAW: "GCon UNIT <-> CONTROLLER <-> DAW" DAW TOGGLE function key: F1 FADER/TRIM TOGGLE key: F2 MDI device IN MIDI device OUT FROM DAW (virtual) TO DAW (virtual) Protocol X-Touch X-Touch WesAudio IN 4 WesAudio OUT 4 Mackie Control ADD BACK GCon UNITS MAPPING MIDI Virtual ports7.2.2.3. TRIM/FADER Toggle
In GConManager_CONTROL application it is possible to assign function key (F1 to F8) to toggle between fader or trim mode.
text_image
WesAudio GCon System v7.2.2395 - Connection Type service MODE ● 1. GCon SERVER: "GCon UNIT <-> CONTROLLER" ○ 2. GCon SERVER with DAW: "GCon UNIT <-> CONTROLLER <-> DAW" DAW TOGGLE function key: F1 FADER/TRIM TOGGLE key: F2 MIDI device IN MIDI device OUT Protocol X-Touch X-Touch Macroe Control ADD BACK GCon UNITS MAPPING MIDI Virtual ports7.2.3. ngLEVELER management via EUCON controller
This chapter describes ngLEVELER integration with Eucon controller. At current state there are 3 possible solutions:
• Using EUCON workstation configuration via Mackie Control (Recommended).
• Using first DAW channel faders to control ngLeveler.
- Using Plugin Control – but in this mode, only encoder and few buttons can be used to control ngLeveler channels – faders can't be used.
7.2.3.1. Eucon controller in Mackie Control mode / ngLeveler
Eucon controller (e.g. Artist Mix) can control ngLEVELER(s) using a mapping described here - Controller functions mapping to ngLEVELER. To use EUCON controller with ngLEVELER, eucon application needs to be already installed. When it is done, Eucon engine needs be configured in Mackie Control mode, to do so:
- Open EUCON preferences:
- On OSX go to the System Preferences and start EUCON.
- On Windows go Control Panel and start EUCON.
- Drag and drop GConManager application to Eucon configuration. GConManager application can be found:
- OSX: /Applications/WesAudio/GConManager.app
- Windows: c:\Program Files (x86)\WesAudio\GConManager.exe
- Set the protocol to MackieControl, and MIDI ports to 1-4 (as shown below).
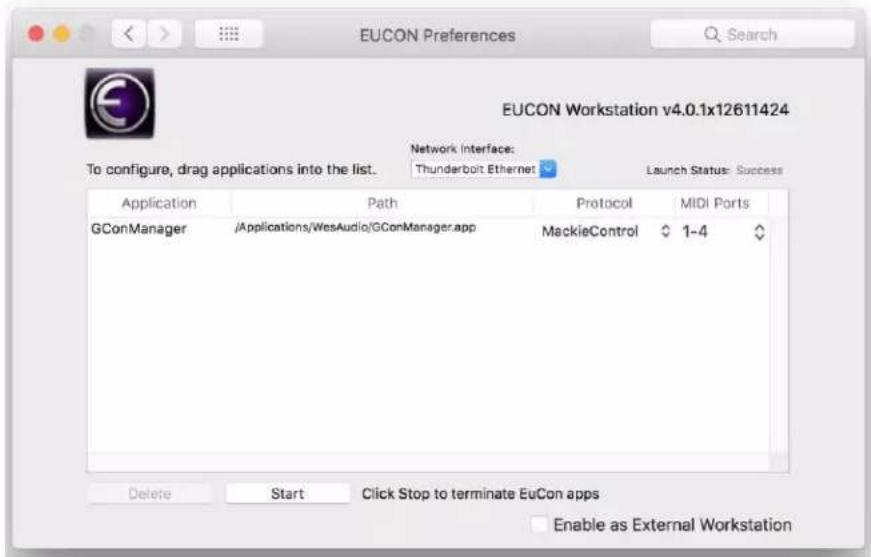
text_image
EUCON Preferences To configure, drag applications into the list. Network Interface: Thunderbolt Ethernet Launch Status: Success Application Path Protocol MIDI Ports GConManager /Applications/WesAudio/GConManager.app MackieControl 1-4 Delete Start Click Stop to terminate EuCon apps Enable as External WorkstationNGLEVELER USER MANUAL REV3
Once this is done, most probably system restart is required. After the restart, GConManager configuration needs to be set up:
- MIDI ports needs to be selected in _CONTROL application:
o MIDI device IN should be set up to Euphonix MIDI port 1,
o MIDI device OUT should be set up to Euphonix MIDI port 1.
• GCon Server mode needs to be selected
- Please note that Eucon service manages toggling between applications, and thus Eucon controller can be used with DAW and GCon at the same time (by switching application from DAW to GConManager) – having that in mind, GCon Server mediation mode is no use in that scenario.
- Please refer to GConManager configuration shown below:

text_image
WesAudio GCon System v7.0.2162 - Connection Type: service MODE 1. GCon SERVER: "GCon UNIT <-> CONTROLLER" 2. GCon SERVER with DAW: "GCon UNIT <-> CONTROLLER <-> DAW" 3. GCon HUI DEVICE: "GCon UNIT as HUI device <-> DAW via HUI" DAW TOGGLE function key: F1 MIDI device IN Euphonix MIDI Euphonix F ADD MIDI device OUT Euphonix MIDI Euphonix F Protocol Mackie Control BACK GCon UNITS MAPPING MIDI Virtual portsNGLEVELER USER MANUAL REV3
- Last step is to connect your Eucon controller to a workstation – it can be done in EuControl settings application (most likely it will happen automatically):
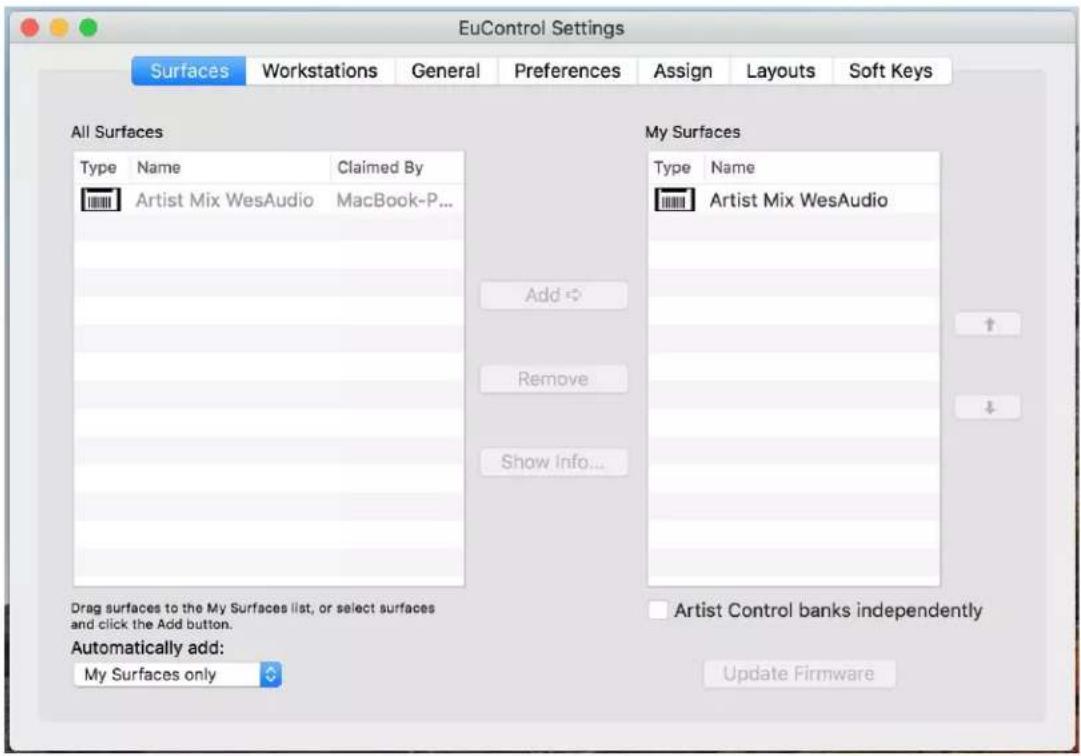
text_image
EuControl Settings Surfaces Workstations General Preferences Assign Layouts Soft Keys All Surfaces Type Name Claimed By Artist Mix WesAudio MacBook-P... My Surfaces Type Name Artist Mix WesAudio Add Remove Show Info... Drag surfaces to the My Surfaces list, or select surfaces and click the Add button. Automatically add: My Surfaces only Artist Control banks independently Update FirmwareAfter this step, when selecting GConManager application (clicking on it) all configuration should be delivered to Eucon controller showing actual state of ngLEVELER(s). If this didn't happen please check chapter Troubleshooting. When DAW window will become focused, Eucon controller will switch to fader section of the DAW. This allows to easily toggle between those two modes. If this is not preferred setup, eucon controller can be locked to particular device – to do so:
- Please go to EuControl Settings App and select "ASSIGN" tab.
- Now select GConManager as the open application and enable "Entire Surface".
- Now Eucon device will control ngLEVELER(s) regardless of currently focused application.
NGLEVELER USER MANUAL REV3
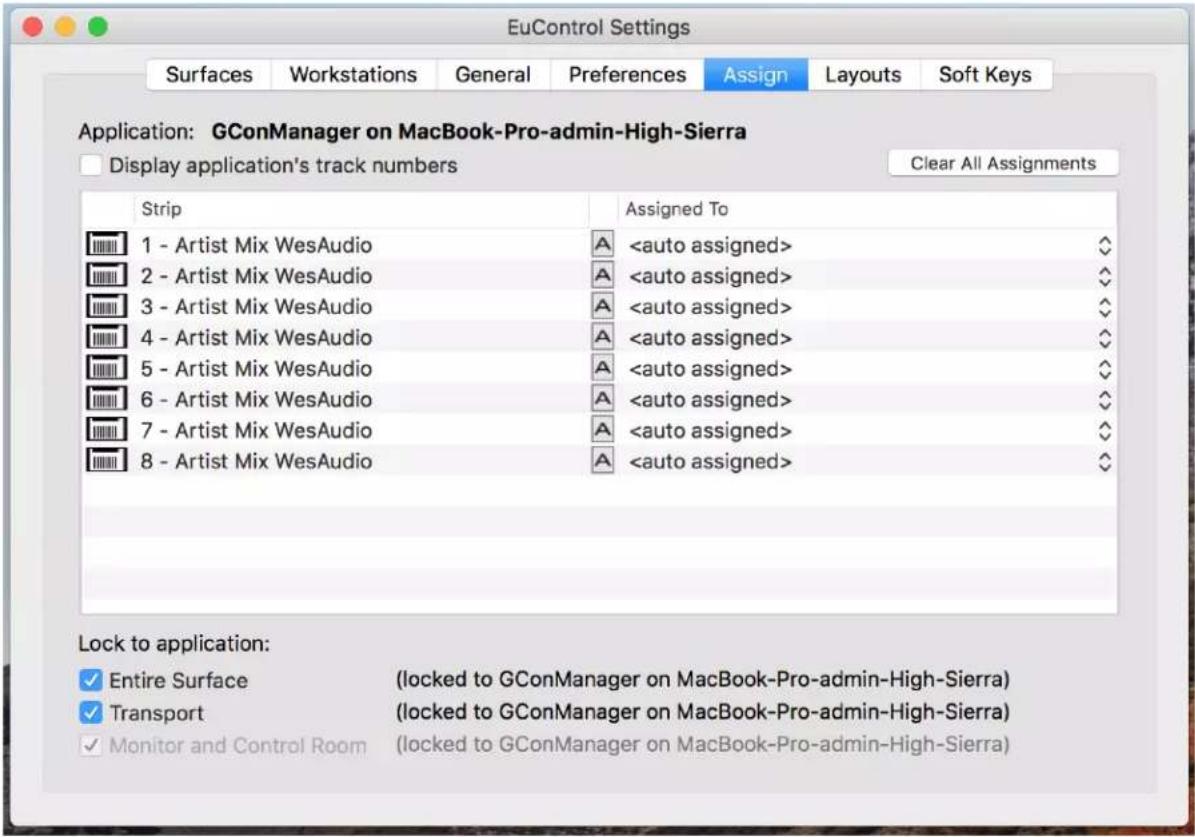
text_image
EuControl Settings Surfaces Workstations General Preferences Assign Layouts Soft Keys Application: GConManager on MacBook-Pro-admin-High-Sierra Display application's track numbers Clear All Assignments Strip Assigned To 1 - Artist Mix WesAudio A7.2.3.2. Eucon plug-in control / ngLeveler
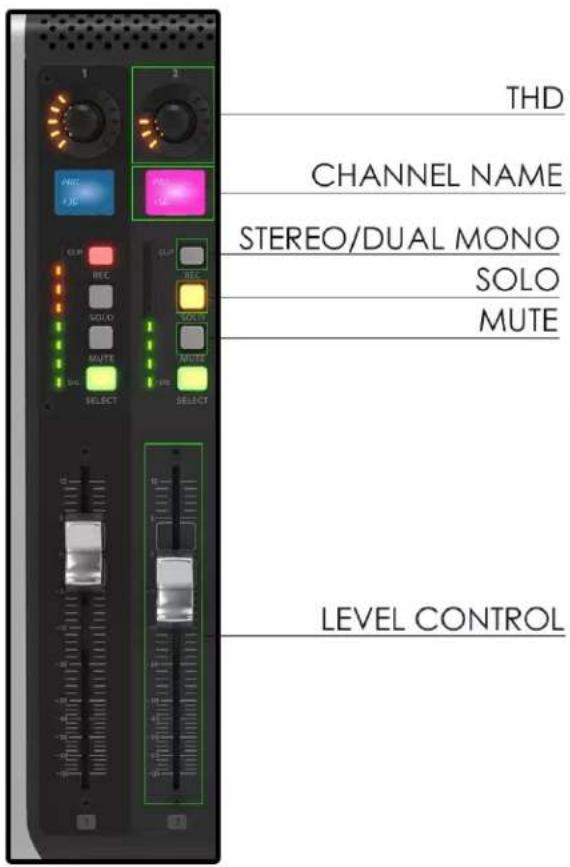
Eucon interface is designed to take control over channel plug-ins in your DAW session. This functionality can be used to control ngLEVELER plug-in, what will translate into HW unit parameter modification. Depends on the controller type, there will be different amount of pages – for instance to control ngLEVELER 16 mono channels – 2 pages on Avid Artist mix will be used. Please find below example based on Artist Mix controller, how ngLEVELER parameters are mapped:
text_image
MUTE SOLO LEVEL SEL SEL SEL SEL SEL SEL SEL SEL SEL SEL ON ON ON ON ON ON7.2.4. Controller functions mapping to ngLEVELER
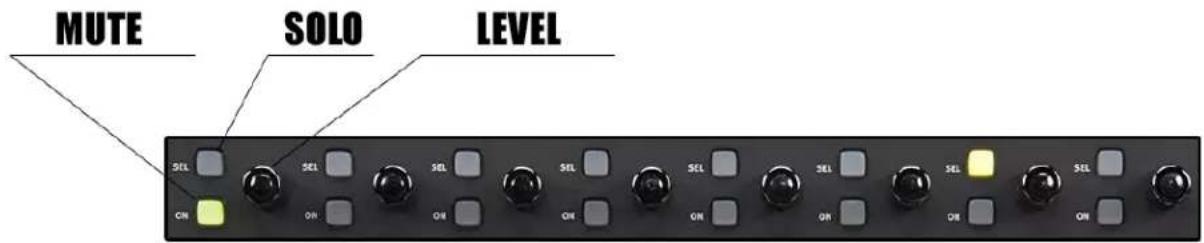
As controllers were created mostly to serve DAW management, not all controls exactly fits ngLEVELER needs. However because whole fader section is locked down to exclusively control ngLEVELER(s), GCon software maps some controls to better integrate with ngLEVELER capabilities. Please find below example of HUI/Mackie Control/Eucon controller of how controls map to ngLEVELER(s):
text_image
THD CHANNEL NAME STEREO/DUAL MONO SOLO MUTE LEVEL CONTROLmode).
- THD: changes THD setting (3 steps) by moving the encoder (for some controllers, THD can be toggled by pushing the encoder).
- Channel Name – channel names are editable from plug-in view.
- STEREO/DUAL MONO – this will either enable Absolute link between channels, or entirely unlink two analog channels. Please note that this function changes number of channels manageable via controller faders (please refer to External control vs number of channels for more information).
• SOLO/MUTE – engages/disengages SOLO or MUTE on the ngLEVELER. - FADER (LEVEL CONTROL/TRIM CONTROL) – controls level or trim (depends on active mode) of particular analog channel (or channels in stereo
7.2.5. How to create Virtual MIDI ports
This chapter describes how Virtual MIDI ports can be added on your platform. Please note that virtual MIDI ports are not necessary in GCon Server mode – in this configuration only controller MIDI ports need to be used.
7.2.5.1. Virtual MIDI on OSX
OSX operating system provides native support for virtual MIDI ports creation, and those are easily manageable with few easy steps described below.
- Go to /Applications/Utilities and open "Audio MIDI setup".
- Open "Audio MIDI Setup" and from "Window" menu, select "Show MIDI Studio".

text_image
Audio MIDI Setup Edit View Window Help Show Audio Devices ⌘1 Show MIDI Studio ⌘2 Show Network Device Browser ⌘3 Close ⌘W Minimize ⌘M Zoom Bring All to Front- Open IAC driver and enable it by checking options "Device is online" – You can manage your ports in this particular section.

text_image
Default WesAudio IN Properties Device Name: WesAudio IN Manufacturer: Apple Inc. Model: IAC Driver ✓ Device is online Ports You can set up the MIDI device's port structure here. First, set the number of sorts on the device. Then indicate the number of MIDI in and out connectors for each port. Ports WesAudio IN 1 WesAudio OUT 1 Connectors for: WesAudio OUT 1 MIDI in: 1 MIDI Out: 1 Add and Remove Ports Revert Apply7.2.5.2. Virtual MIDI on Windows
Windows operating system doesn't provide any native support for virtual ports creation. In order to do so, external application have to be used. There are several options on the market, but to name a few:
• loopMIDI developed by Tobias Erichsen
• MIDI Yoke which is part of the MIDI OX Utility
As external tools configuration is not part of this manual, please refer to online tutorials how to create such ports on Windows.
7.2.6. Troubleshooting
When after configuration created via GConManager_CONTROL application for some reason controller didn't start communication with GCon service, there are few steps that should be checked:
- First, HUI/MC/Eucon controller can be switched off and on – this may fix some problems on system level with MIDI ports.
- If this won't fix the issue, GCon Service application should be restarted – to do so, please go to the WesAudio Tray icon, select "service" and hit "restart".
- If devices still won't start communication – the last resort is workstation restart.
- If GCon Server mediation mode doesn't work correctly, please note that most DAW needs to be aware of MIDI ports during start up, those can't be created while DAW is already running. Also if Virtual MIDI ports doesn't work as expected, it is advised to restart your workstation to make sure that all handles on system level are properly released.
- If Eucon controller is used, please also try to restart Eucon application by selecting EuControl tray icon and selecting "Restart EUCON Applications...".
- EUCON: In some cases (for instance when Eucon control surface is locked to a GConManager application, but still another application will force a Mackie Control connection) to re-establish parameter sync, ngLeveler restart, or connection toggle via Plug-in can be executed.
- Now if it won't help, please archive following folder:
- MAC: /Applications/WesAudio/logs
- Windows: c:/ProgramData/WesAudio/logs
And send it over to support@wesaudio.com.
7.2.7. Troubleshooting – known issues
- WINDOWS:
- Using ngLeveler in Server with Mediation mode and loopMIDI can cause some problems during system restart. Based on some timing conditions loopMIDI ports are not visible after reboot, or windows log in. To remedy that it is enough to wait till loopMIDI GUI will appear after Windows log-in, and restart GCon Service – to do so, please go to the WesAudio Tray icon, select “service” and hit “restart”.
7.3. External controller and ngLEVELER(s) number of channels
As ngLEVELER is 16-channel automation system, by default it requires 16 controller or DAW channels (faders). Of course integration with ngLEVELER(s) allows thirds party controllers to change "Fader bank" or "Channel" to switch between different sections. Channel names will help to identify which section is currently controlled as those will be in line with plug-in configuration. That all being said, number of ngLEVELER channels which are mapped to controller/DAW fader section is dynamic, as each channel pair of ngLEVELER can be either true stereo (absolute link) or dual mono (link, linked opposite, unlinked). Please find below examples on how controller channels map to ngLEVELER(s) channels:

8. Multiple ngLEVELER units
There is no physical limitation on how many ngLEVELER units can be used across one system. In fact theoretically as many as system can handle performance-wise can be used. There are few rules that have to be kept in mind:
- Each ngLEVELER unit have to be connected through separate plug-in instance – each device have its own plug-in counterpart to recall settings or automate parameters.
- ngLEVELER units will be mapped to controller channels (e.g. HUI/Mackie control controller) based on GCon ID. For example - if there are two ngLEVELERs available, one with ID=1000, and second one with ID=1002, 16 channels of ngLEVELER ID=1000 will be assigned to first 16 channels of the controller, and ngLEVELER ID=1002 channels 17 to 32 will be assigned to channels 17 to 32 of the controller:
| ngLEVELER Channels | Controller channels | |
| ngLEVELER ID=1000 | 1-16 | 1-16 |
| ngLEVELER ID=1001 | 1-16 | 17-32 |
| ngLEVELER ID=1002 | 1-16 | 33-48 |
| ... | ... | ... |
Of course this example doesn't take into account channels in "Stereo" mode, as it changes number or controller channels (External controller and ngLEVELER(s) number of channels).
- Solo will work in scope of all connected units. It means if there are two ngLevelers, and channel 1 on first ngLeveler will have solo enabled, second ngLeveler will mute all its channels unless solo, or solo safe is not used.
9. Metering
ngLEVELER implements signal metering on each channel for:
- INPUT – Right after PAD but before main ngLEVELER circuit.
- OUTPUT – after whole processing – THD, Level control, PAD, Solo, Mute.
That being said it is 32 channels of metering which is visualized:
- In the VST2/VST3/AU/AAX plug-in GUI in variable form,
- On the unit front panel – using simple 3 steps LED presentation (Green/Orange/Red).
Main idea behind ngLEVELER metering system, is to give user overview of the changes how internal ngLEVELER controls are affecting signal between input and output. It is simple VU-style metering which doesn't visualize true peak information.
10. Usage examples
This chapter presents various configuration and usage examples of ngLEVELER.
10.1. Summing stage automation
ngLEVELER can be integrated at any stage of analog chain which requires signal level management or automation. One of such situation is level management or automation of signal which goes out from our outboard gear to the summing stage. This gives us few very important benefits:
- POST Compression automation or level management – changing signal level which goes out from our converter (DAW automation) will cause our compressor to behave differently. This makes it impossible to automate, and is quite problematic situation to handle even with simple signal level balance changes. In this setup we can keep our summing stage signal level at same level, and leave automation and signal level management to ngLEVELER so it can be easily recalled upon session load!
-
OUT signal management and automation – all outboard gear have a sweet spot which usually depends on a signal level which comes in. In most cases we don't want to automate signal going in, but signal which goes out from the device. With ngLEVELER we can easily manage this signal:
-
not to clip next analog stage,
- Or automate it when needed!
10.1.1. Summing automation/level management
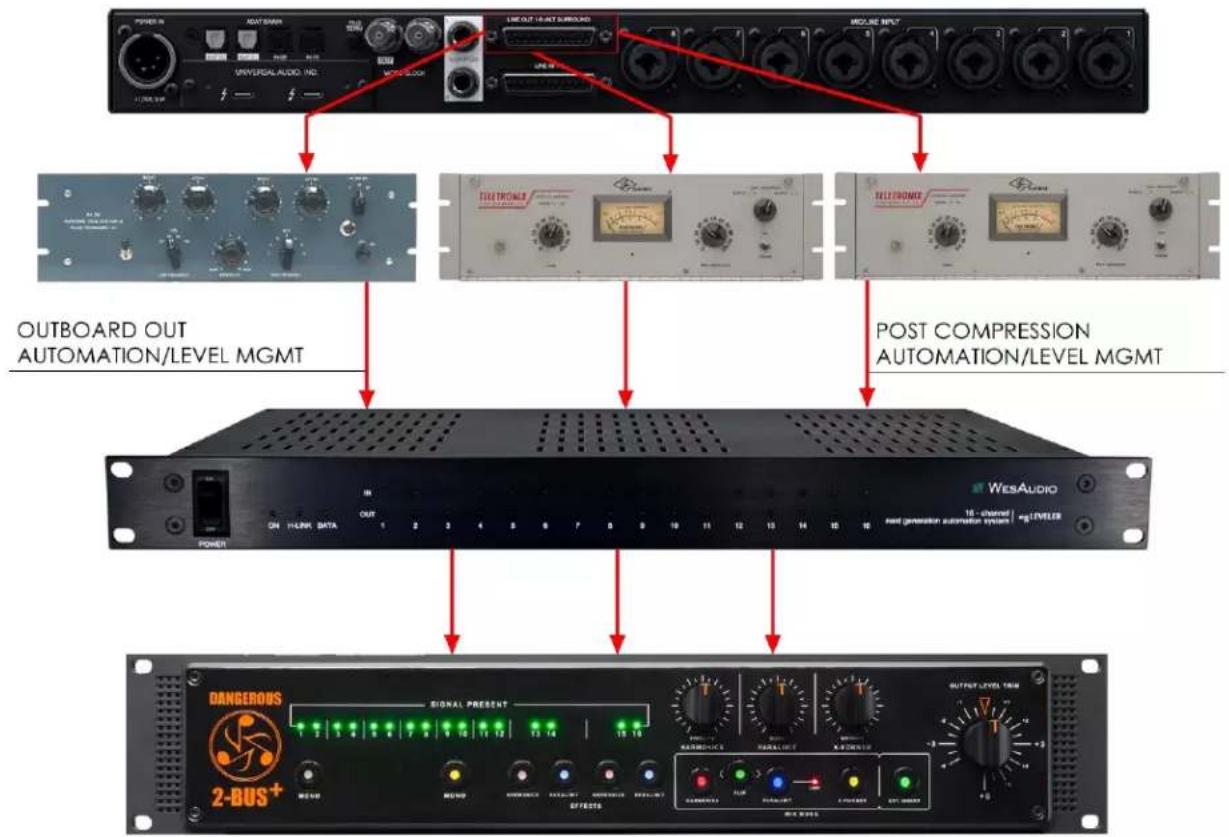
text_image
POWER IN FLOAT BANIN UNIVERSAL AUDIO INC. MOSI-LOCK LINE OUT 14-ACT SURBOOD MOULISE INPUT OUTBOARD OUT AUTOMATION/LEVEL MGMT TELETRONER TELETRONER POST COMPRESSION AUTOMATION/LEVEL MGMT WESAUDIO 16-channel rand generation automation system | #ELEVER DANGEROUS 2-BUS+ SIGNAL PRESENT OUTPUT LEVEL TURB OUTPUT LEVEL TURB10.1.2. Summing mixer/console insert points automation
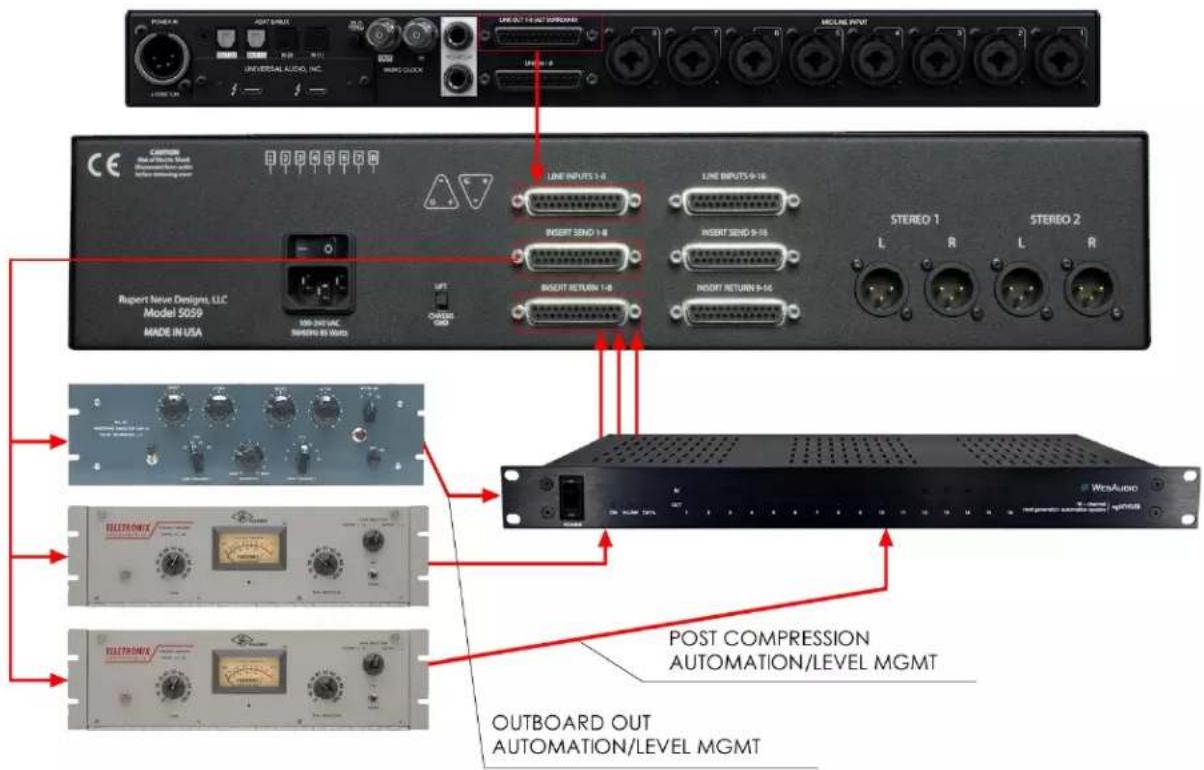
text_image
POWER R RIGHT SENS INVERTICAL AUDIO, INC. UNIVERSAL AUDIO, INC. CIRCUIT 4 INLET GROCCOMS MCLINE INPUT UPR 1-2 CAPTOR Model of Noise Sound before mounting power LINE INPUTS 1-8 LINE INPUTS 9-16 INSERT SEND 1-8 INSERT SEND 9-16 INSERT RETURN 1-8 STEREO 1 L R L R STEREO 2 Rupert Neuro Design, LLC Model 5059 MADE IN USA 100-240 UMC SUPPLY IN MADS OUTGOS GND POST COMPRESSION AUTOMATION/LEVEL MGMT OUTBOARD OUT AUTOMATION/LEVEL MGMT10.1.3. Summing mixer/console groups insert points automation
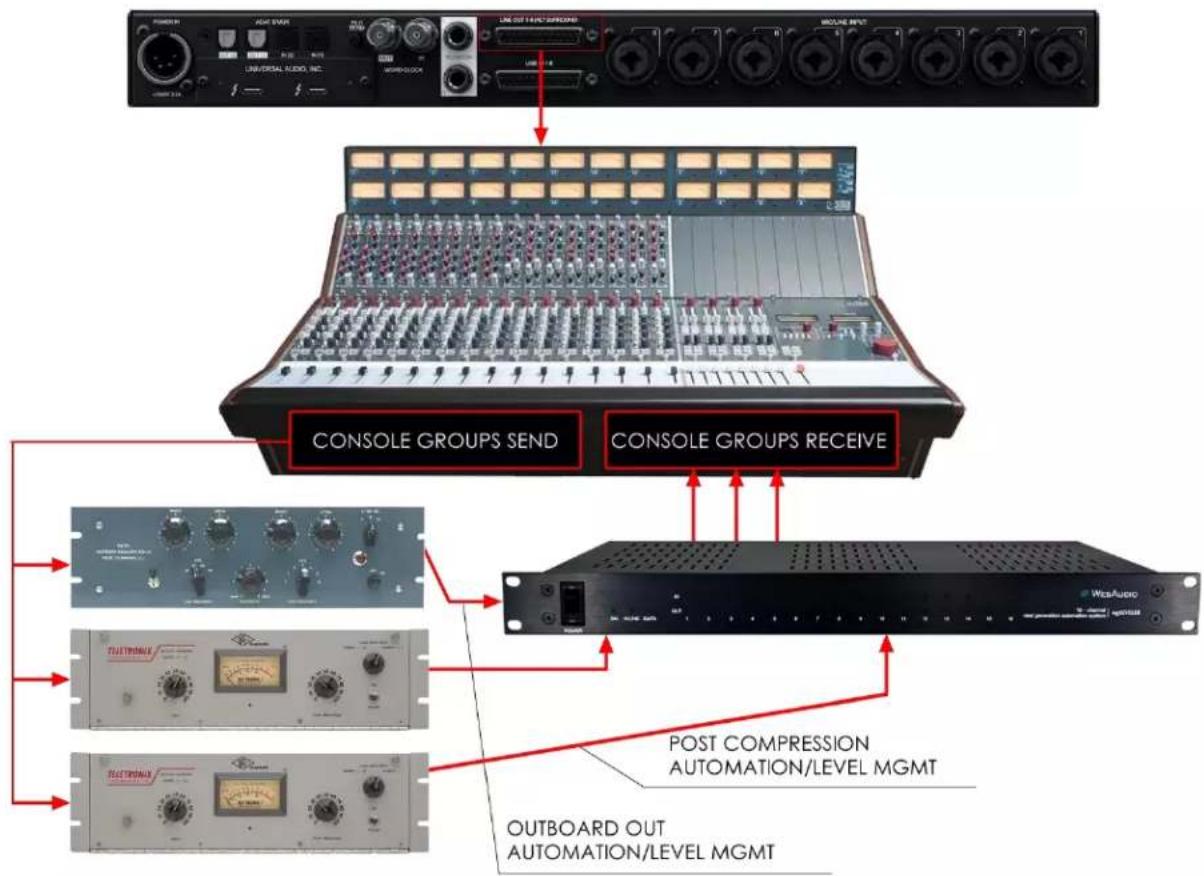
text_image
POWER LIGHT SWEEL LINE OUT ELECTRICALS UNIVERSAL AUDIO, INC. MACRO-2000 MODULE INPUT CONSOLE GROUPS SEND CONSOLE GROUPS RECEIVE POST COMPRESSION AUTOMATION/LEVEL MGMT OUTBOARD OUT AUTOMATION/LEVEL MGMT10.2. Any analog outboard automation
In this particular example, ngLEVELER is integrated between each analog outboard process input, and output, of course it can be configured only to output, or only to input if needed. ngLEVELER allows us to work with very hot signals where many audio interfaces can't deal with. Benefits:
- Precise level management of signal going IN and OUT,
- High level signal support of outboard OUT signal (ngLEVELER +24dBU and 6dB PAD) allows us to properly tune signal going in to our A/D converter.

text_image
POWER ON H-UNIC DATA OUT 1 2 3 4 5 6 7 8 9 10 11 12 13 14 15 16 WESAUDIO LEVEL AUTOMATION TCL - channel | mg LEVEL MUSUAL OUTPUT UNIVERSAL AUDIO, INC. UNIVERSAL AUDIO10.3. Recording session management
Studios of each size need some centerpiece which will help to manage recording and mixing session. Using ngLeveler in such situations, allows to precisely set levels which will hit A/D converter, add some analog saturation, and using "Solo and Mute" buttons manage our sessions with ease. Benefits:
- Signal level management going IN to A/D converter, with ngLEVELER 6dB PAD and +24dBu of headroom, it is very easy to support very hot signals coming from our microphone preamplifiers.
• Each session level signals can be easily recall upon session load!

text_image
WES AUDIO 16 - channel next generation automation system | mgTEVEER POWER IN OUT 1 2 3 4 5 6 7 8 9 10 11 12 13 14 15 16 UNIVERSAL AUDIO, INC. MOLINE INPUT LINE OUT 14 (TURBONE) LINE OUT 14 (TURBONE) MOLINE INPUT MOLINE INPUT MOLINE INPUT11. Abbreviations and terms
GCon – high speed communication protocol which allows full management and recall of analog devices. Please note that this is just management protocol, audio signal transfer is not in scope of its capabilities.
NG500 - Next generation 500 series.
NG500 connector – special connector which extends standardized 500 series connectors with additional pins.
12. Warranty
All WesAudio products are built to the highest standards and should provide reliable performance for many years, subject to reasonable care, use, transportation and storage.
WesAudio warrants all of our products to be free of defective parts and workmanship for a period of two years.
This warranty period begins at the original date of purchase and is transferable to any person who may subsequently purchase the product during this time. This warranty excludes the following conditions: normal wear and tear, misuse, customer negligence, accidental damage, unauthorized repair or modification, cosmetic damage and damage incurred during shipment. During the time of this warranty, WesAudio will repair or replace, at its option, any defective parts or repair defective workmanship without charge, provided the customer has appropriate proof of purchase and that the product has its original factory serial number. In all warranty claims the customer is responsible for shipping costs to the WesAudio facility, and WesAudio pays for return ground shipping.
- History
| Editor | Version | Date | Description |
| Michal Weglicki | V1 | 25.03.2020 | Document created. |
| Michal Weglicki | V2 | 10.04.2020 | Mackie Control and Eucon integration chapters added. Metering chapter added. Linked parameter automation added. |
| Michal Weglicki | V3 | 02.20.2021 | Trim mode, solo safe, global solo information added. Client mode has been removed. |