TITAN - Uncategorized WesAudio - Free user manual and instructions
Find the device manual for free TITAN WesAudio in PDF.


| Product Type | Stereo Compressor/Limiter |
| Rackmount Size | 2U |
| Dimensions (W x H x D) | 482 x 88 x 200 mm |
| Weight | Approx. 3.5 kg |
| Power Supply | 100-240V AC, 50/60Hz |
| Power Consumption | 15W |
| Compression Type | VCA (Voltage Controlled Amplifier) |
| Controls | Threshold, Ratio, Attack, Release, Make-up Gain, Mix |
| Additional Functions | Sidechain HPF, Bypass, Link for stereo operation |
| Digital Recall | Yes, via USB and dedicated software |
| Input Connectors | XLR balanced (analog) |
| Output Connectors | XLR balanced (analog) |
| Frequency Response | 20 Hz - 20 kHz, ±0.5 dB |
| Noise Level | < -90 dBu (unweighted) |
| Maximum Input Level | +24 dBu |
| Maximum Output Level | +24 dBu |
| Operating Temperature | 0°C to 40°C |
| Maintenance | Wipe with dry cloth; avoid liquids |
| Safety | Do not open; refer servicing to qualified personnel |
| Spare Parts / Repairability | Contact WesAudio support for authorized service |
| Warranty | 2 years limited (check local regulations) |
Frequently Asked Questions - TITAN WesAudio
User questions about TITAN WesAudio
0 question about this device. Answer the ones you know or ask your own.
Ask a new question about this device
Download the instructions for your Uncategorized in PDF format for free! Find your manual TITAN - WesAudio and take your electronic device back in hand. On this page are published all the documents necessary for the use of your device. TITAN by WesAudio.
USER MANUAL TITAN WesAudio
_TITAN USER MANUAL REV3
www.WesAudio.com
WESAUDIO
3/15/17
\_TITAN
User manual
EN

WesAudio
Copyright 2016 by WesAudio
_TITAN USER MANUAL REV3
Thank You for the purchase of _TITAN
_TITAN
Ng500 compatible frame with digital control.
With kind regards

Radosław Wesolowski and Michal Weglicki
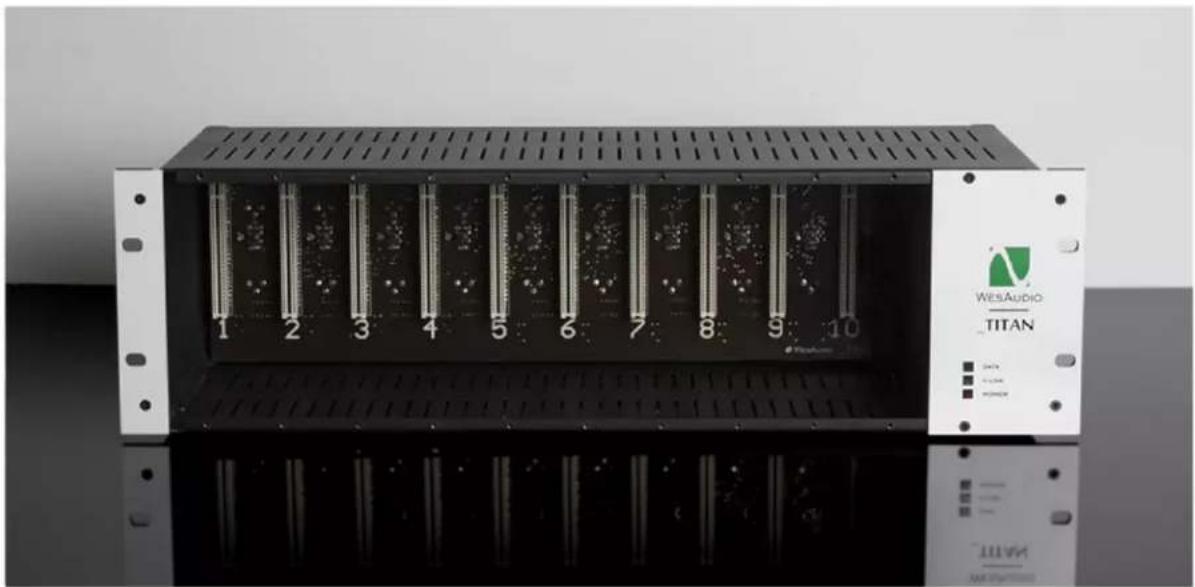
\_TITAN is 500 series compatible (\*) rack frame which implements ng500 connector and GCon protocol.
_TITAN is complete recall system designed to provide total integration with your beloved analogue equipment. It extends 500 series connector with additional pins where modules can be designed to support digital recall or any other vendor specific functionalities. This extension is part of new open standard "ng500" – "Next Generation 500 series" which allows other manufacturers** to design and implement digitally controlled analog devices.
We are proud to present _TITAN – Future of analog processors.
natural_image
Front view of a WESAudio Titan audio workstation with 10 labeled ports (no visible text or symbols on the device body)(*) Important note about 500 series extension: please check "Instalaon and compatibility" chapter.
(**) Please check "GCon Open specicaon framework".
TITAN USER MANUAL REV3
Table of Contents
- Abbreviaons and terms....6
- Installation and compatibility....7
- Front panel....9
- Overview 10
- Soware 11
5.1. Installation....11
5.1.1. WINDOWS....11
5.1.2.OSX....11
5.1.3. Troubleshooting....11
- Set up GCon Connecon....13
6.1. USB 14
6.2. Ethernet....15
6.2.1._TITAN Conguraon....16
6.2.1.1. DHCP 17
6.2.2. Stac IP address....18
6.2.3. Direct conncon – seng IP address on PC/MAC....23
- Set up Audio signal....24
7.1. Rear XLR Connecons....24
7.2. I.A.C. - Internal Audio Connector....25
- Stereo links....27
8.1. Stereo link buons....27
8.2. Stereo links in GConManager....27
8.3. Stereo links integraon with GCon compatible modules. 28
- GConManager 29
9.1. Where is GConManager?......29
9.2. How to start Firmware Upgrade....29
9.3. How to check currently connected devices....30
-
GCon open specicaon framework....31
-
Mul Host Support – USB note. 31
WESAUDIO
3/15/17
_TITAN USER MANUAL REV3
- Warranty 32
1. Abbreviaons and terms
GCon – high speed communication protocol which allows full management and recall of analog devices. Please note that this is just management protocol, audio signal transfer is not in scope of its capabilities.
I.A.C. – Internal Audio Connector, special _TITAN connector which is integrated with internal audio round, and allows to connect audio signal directly without any additional wires (please check "I.A.C – Internal Audio Connector" chapter).
NG500 – Next generaon 500 series.
NG500 connector – special connector which extends standardized 500 series connector with additional pins.
UDP - User Datagram Protocol.
2. Installaon and compatibility.
Aer unpacking your _TITAN frame, please check for any visible damage that may have occurred during transit. If there is any problem, please contact your dealer immediately for advice on what to do.
!!!Ensure the rack is completely powered down before aempng modules
installaon to prevent damage to the frame!!!
Modules installaon walkthrough:
Choose the posion in the rack to which you will install the module and slide it in so that the edge connector of the module aligns with the matching connector in the rack. A gentle push and the module should slide home into the rack connector. Aach the front panel to the front of the rack with screws supplied by your rack manufacturer. This is important for mechanical rigidity. Do not over ghten these screws to avoid stripping out the threads. Apply power, test that everything is working OK, and most importantly, enjoy!
500 series compatibility note:
_Titan connector was designed to deliver new implementation opportunities, but also to remain compatible with most of 500 series modules. Nevertheless ng500 series connector is higher than 500 series standard plug and some standard 500 series modules won't t into _TITAN. The reason for that is module's chassis design at the back, which can prevent the module to t in correctly.
WESAUDIO 3/15/17
_TITAN USER MANUAL REV3
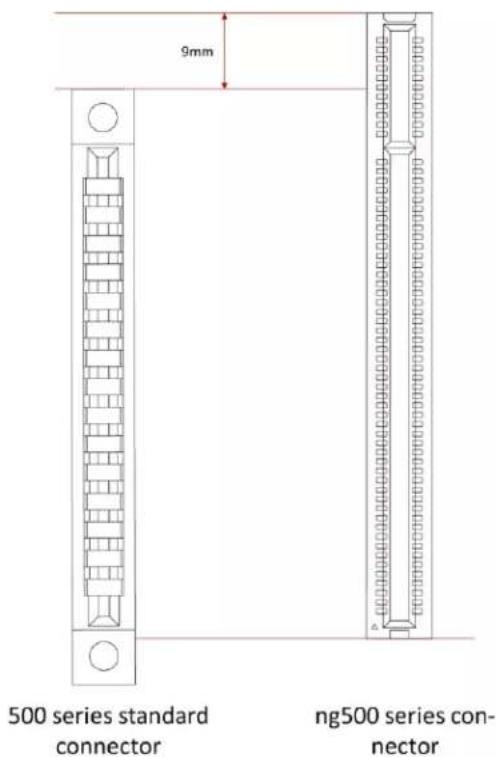
As you can see on above picture, ng500 series connector is higher 9mm comparing to standard 500 series socket (please note that above sockets are matched to each other based on parcular pins). To check if your modules will t into _TITAN you can send us a query to info@wesaudio.com with descripon of modules that you would like to use.
_TITAN USER MANUAL REV3
3. Front panel
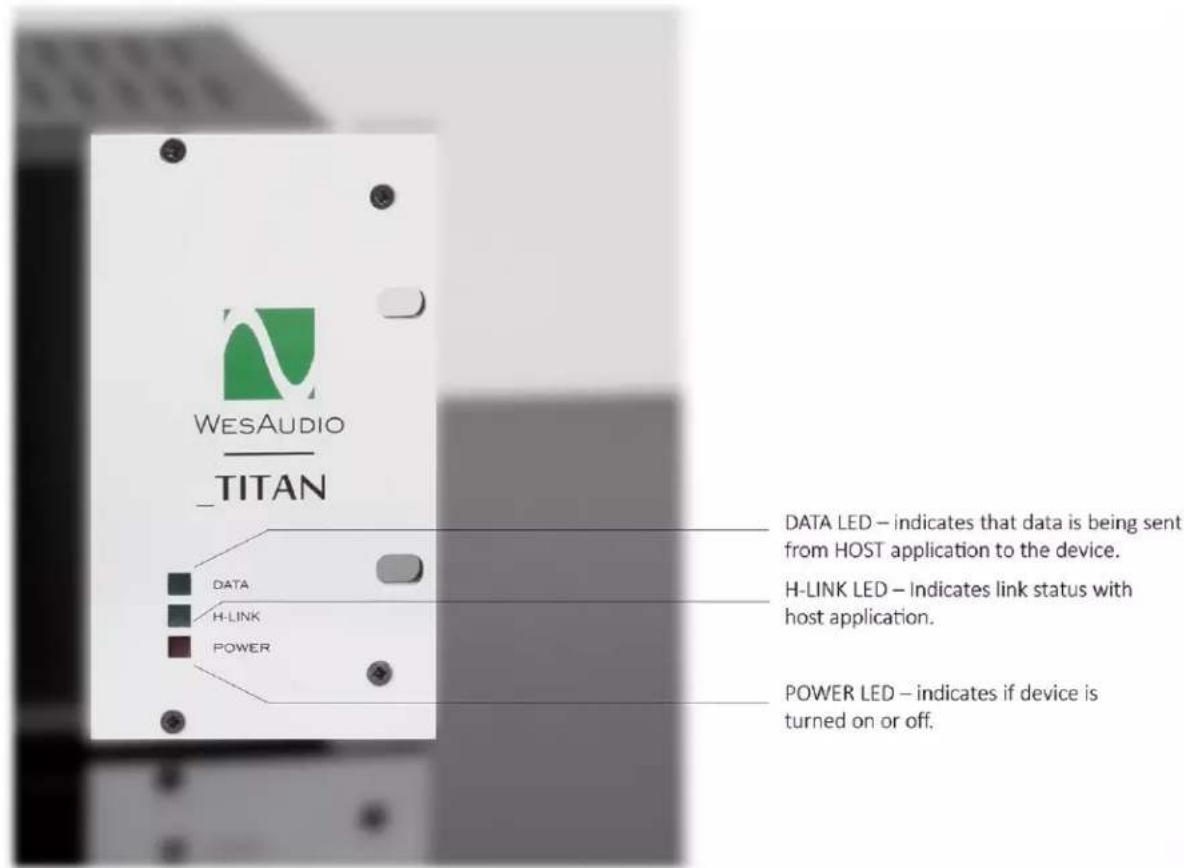
H-LINK note:
If this LED is constantly blinking, that means that _TITAN is in upgrade mode, and rmware upgrade should be triggered through GConManager applicaon.
4. Overview
\_Titan main features:
- GCon compatible frame which allows to communicate with modules through single conncon.
- USB conncon to manage up to 10 modules.
- Ethernet conncon (UDP based) to manage up to 10 modules (LAN single subnet).
- GConManager applicaon which allows to manage stereo links.
- Internal audio signals are routed into special connector accessible on 10th slot, which allows integraon with "Summing Modules" or "Audio interfaces".
- Stereo links are fully integrated. Pressing "Link" buon on 2 modules which support GCon protocol (e.g. _Mimas) sets stereo link on the _Titan.
- Open Specicaon – documentaon and software framework including communicaon drivers for any Vendor that would like to adopt to this standard.
• 10 slots with ng500 series connector. - Remote rmware upgrade – _Titan & all modules inside can be upgraded remotely through USB or Ethernet conncon.
- XLR sockets in/out for each slot.
- Internal stereo link switches which can be also managed through GConManager standalone applicaon.
- Linear power supply capable to deliver 5A of power.
• Power mode switch – 115V/230V. - Warranty: 2 years.
5. Soware
Soware to manage HW units can be downloaded from hp://www.wesaudio.com/download by anyone who purchased related HW unit. To check currently supported plugin types and plaorms, please go to download secon in our website.
5.1. Installaon
To install WesAudio soware package, please visit http://www.wesaudio.com/download and download recent version of soware.
5.1.1. WINDOWS
Start the installer applicaon, if you will encounter any system warnings about this parcular installer, please ignore them*, then select any components which you would like to install**.
- If this is FIRST installaon, please unplug all WesAudio devices from your machine.
- When USB driver will be installed, applicaon will inform that all devices should be connected – please do so.
- If USB driver installaon is triggered, user will be asked to restart its computer. We know that this is unwanted activity, but it is necessary step for USB driver to install with success.
- If computer restart is triggered, this Installer will start again during start up. If for some reason installer won't be started after the restart, please start same installer manually again.
5.1.2. OSX
Because OSX architecture and USB devices handling is much simpler in concept, the only thing to note is to have all devices connected during install procedure.
Start the installer applicaon, if you will encounter any system warnings about this particular installer, please ignore them * (somemes it is necessary to open context menu with right mouse buon and trigger installaon once again).
5.1.3. Troubleshoong
If anything would fail during installaon procedure please contact our support at support@wesaudio.com. We will get back to you ASAP.
Below you can nd some symptoms and descripon which will help to investigate the issue:
TITAN USER MANUAL REV3
"Can't nd my device on plugin drop down menu"
Unfortunately there could be dozens of root causes. On Windows machine it is very important to check if USB device is successfully connected on system level. That can be checked in "Control Panel->System->Device Manager":
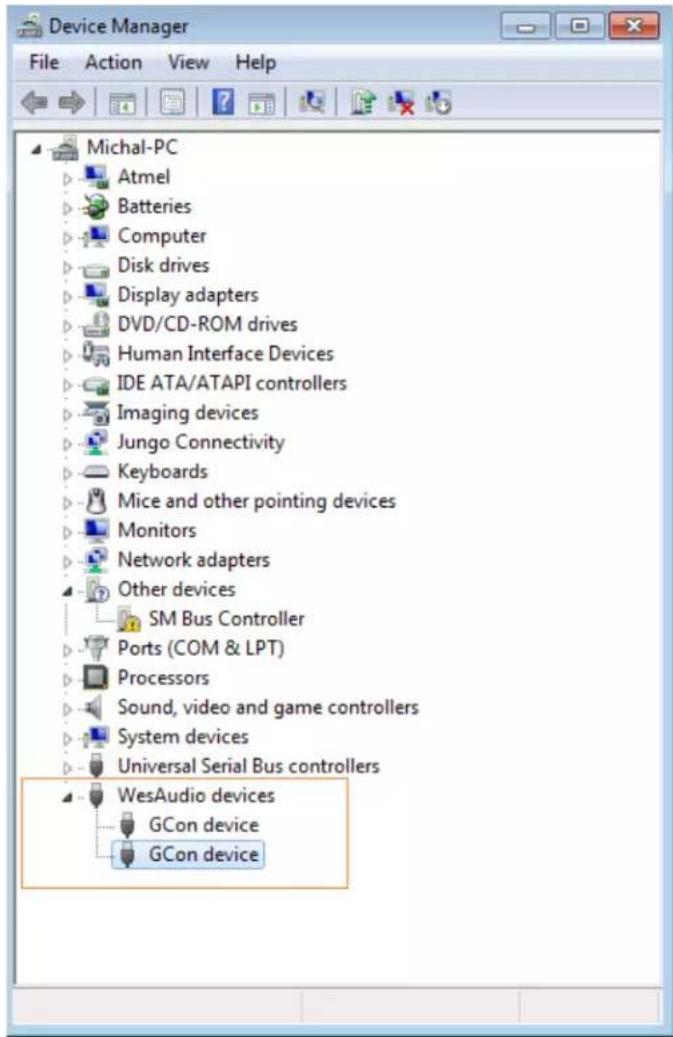
** Please note that for WINDOWS it is necessary to install USB driver which is critical to communicate with HW units. It is required step only during rst installaon, and this opon will be automacally disabled during any soware upgrades.
This chapter goes through possible setups and describes main conguraon steps. In general _TITAN implements two conncon types:
- USB 2.0+ – which allows to manage up to 10 modules inside.
- Ethernet 10/100 – based on UDP protocol (LAN single subnet) which allows to manage up to 10 units from 5 GCon applicaons* at the same me.
(*) GCon applicaon is any process on your workstaon which implements GCon conncon, like your DAW or GConManager. It also means that such applicaons can be started on dierent hosts (workstaons) as long as those are located in same LAN subnet.
Please note that this chapter describes how to establish GCon conncon to manage your devices and recall sengs, how to setup audio signal conncon is described in the next chapter.
_TITAN USER MANUAL REV3
6.1. USB
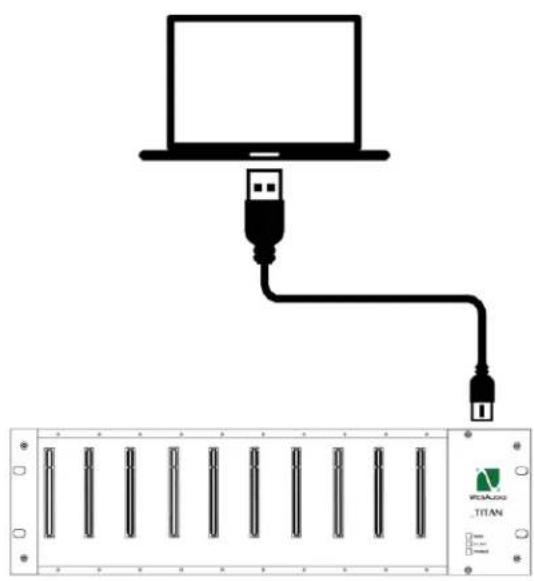
To connect your _TITAN frame directly to your workstaon, just connect it to any available USB 2.0+ socket via USB cable.
natural_image
Diagram showing a laptop connected to an Ethernet cable with two USB ports, mounted on a rack of 8 vertical connectors (no text or symbols visible)6.2. Ethernet
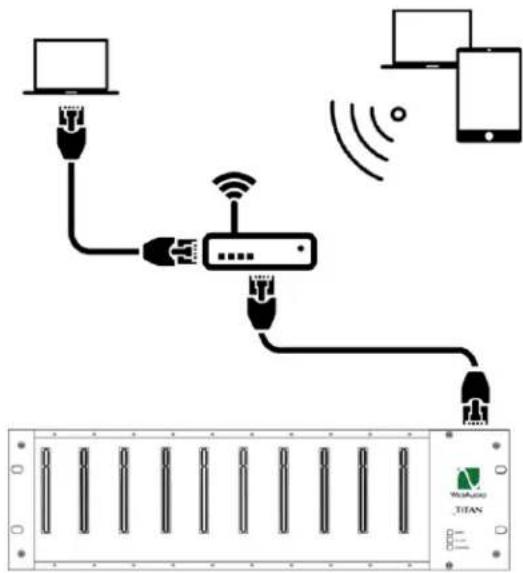
_Titan as any network device, can be connected to your workstaon in following ways:
- By joining your local area network (LAN)
- Or directly connected to your workstaon.
In some cases it is mandatory to set IP addresses* for your workstaon and _TITAN.
Below you can nd possible setup in your local area network, and how dierent devices can access _TITAN resources:
(*) In case you would like _TITAN to join already existing network, most probably your workstaon has IP address already set up through stac conguraon entry, or through DHCP (by your router).
6.2.1. \_TITAN Conguraon.
Each \_TITAN chassis by default has DHCP enabled. So if you would like to connect your \_TITAN to your router, just do it!
...However if you would like to change that conguraon, please read descripon below.
6.2.1.1. DHCP
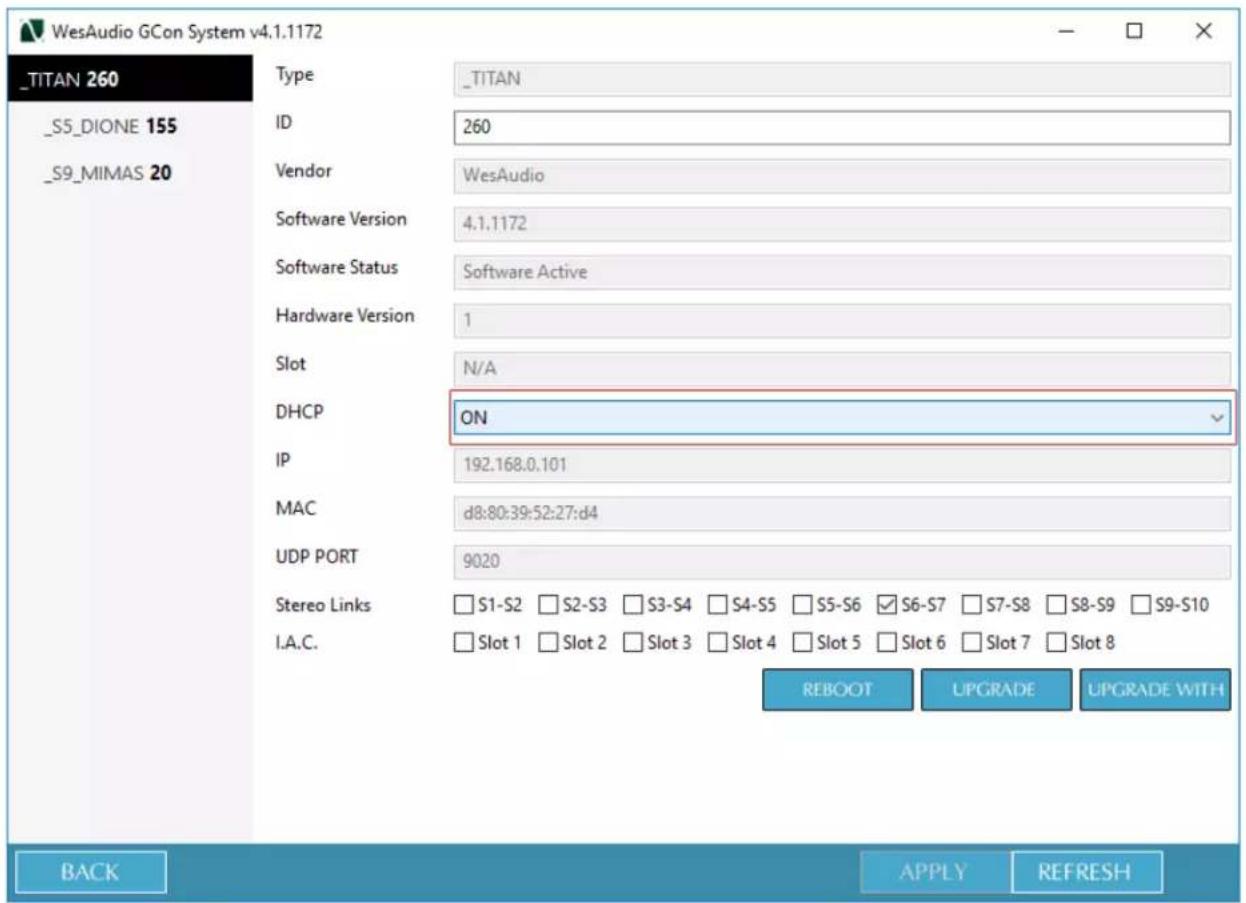
To change any network specic conguraon of your _TITAN chassis:
1) Connect your _TITAN directly to your workstaon through USB cable (If conncon to _TITAN is already established through Ethernet cable, this step is not necessary),
2) Start GConManager and go to _CONFIG applicaon.
3) Then select your _TITAN unit from the elements tree on the le.
4) Then change DHCP upon to "ON". Unit will restart, and your conncon to _TITAN will be established again.
Now you can disconnect USB cable, and connect _TITAN using Ethernet cable.
6.2.2. Stac IP address.
In general there are few use cases when you would like to congure _TITAN IP address manually:
1) When you router doesn't support DHCP
2) When your LAN network is congured manually for example through hardware switch.
3) When you would like to connect your _TITAN directly to your Ethernet socket in your workstation.
As a rst step please check your currently congured IP address.
6.2.2.1. Windows – how to check your IP address.
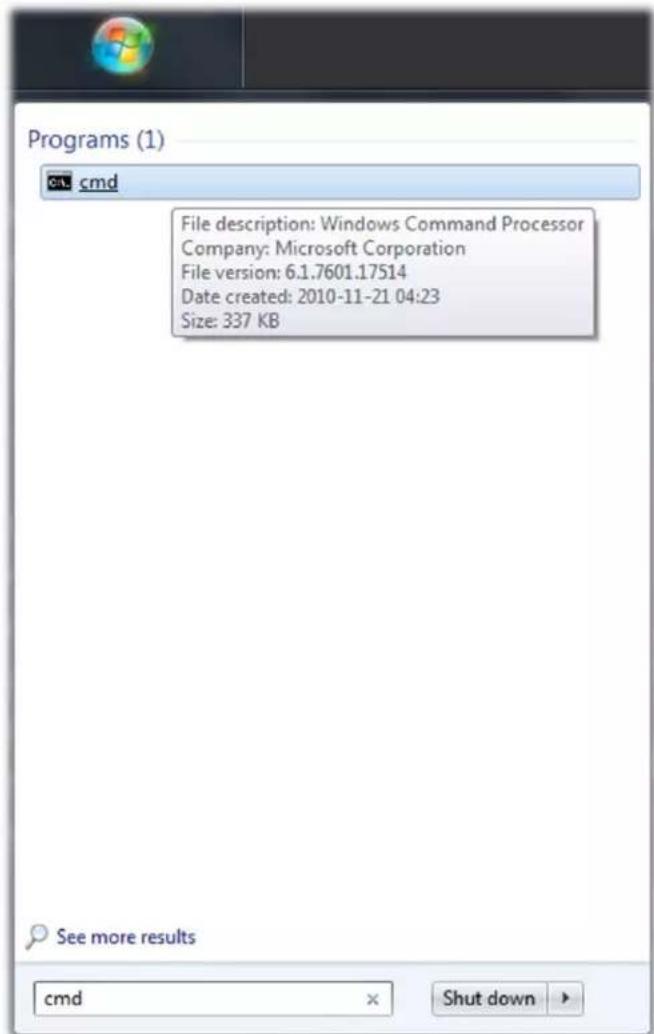
- Start cmd applicaon (hit Windows "START" buon and type "cmd"):
- Type "ipcong" which will show current network conguraon:
TITAN USER MANUAL REV3
![Microsoft Windows [Version 6.1.7601] Copyright (c) 2009 Microsoft Corporation. All rights reserved. C:\Users\Michal>ipconfig Windows IP Configuration Ethernet adapter Local Area Connection: Media State . . . . . . . . . . . : Media disconnected Connection-specific DNS Suffix . : Wireless LAN adapter Wireless Network Connection 3: Media State . . . . . . . . . . . : Media disconnected Connection-specific DNS Suffix . : Wireless LAN adapter Wireless Network Connection 2: Media State . . . . . . . . . . . : Media disconnected Connection-specific DNS Suffix . Wireless LAN adapter Wireless Network Connection: Connection-specific DNS Suffix . : Link-local IPv6 Address . . . . . : fe80::b034:9fb7:4cb2:2e2fz11 IPv4 Address. . . . . . . . . . : 192.168.0.100 Subnet Mask . . . . . . . . . . : 255.255.255.0 Default Gateway . . . . . . . . : 192.168.0.1 Ethernet adapter VirtualBox Host-Only Network: Connection-specific DNS Suffix . Link-local IPv6 Address . . . . : fe80::7580:e54b:5962:9c3az15 IPv4 Address. . . . . . . . . : 192.168.56.1 Subnet Mask . . . . . . . . : 255.255.255.0 Default Gateway . . . . . . Tunnel adapter isatap.: Media State . . . . . : Media disconnected Connection-specific DNS Suffix . Tunnel adapter isatap.: Media State . . . . . . . . : Media disconnected Connection-specific DNS Suffix . Tunnel adapter isatap.: Media State . . . . : Media disconnected Connection-specific DNS Suffix . Tunnel adapter Teredo Tunneling Pseudo-Interface: Media State . . . . . . : Media disconnected](/content/2026/05/894851/images/9a44f81438ee3e9ae04776abdb3f35602f403330a56e864f40f704cb8c3a8f05.jpg)
- Then you have to nd your currently connected network card (Ethernet card or Wi-fi card) and check IP address. In this parcular case IP address is 192.168.0.100. _TITAN IP address has to be in the same subnet, so for above example it would mean any IP address from 192.168.0.2 to 192.168.0.254, excluding currently occupied addresses by any devices connected to your network (like your workstaon address, router address, etc.).
TITAN USER MANUAL REV3
6.2.2.2. OSX – how to check your IP address.
- Start "Terminal" (located in Applicaons/Ulies) applicaon:

Activity Monitor

AirPort Utility

AU Lab

Audio MIDI Setup

Bluetooth File Exchange
Boot Camp
Assistant

ColorSync Utility
Console

Digital Color Meter
Disk Utility

Grab
Grapher

Keychain Access

Migration Assistant

Script Editor
System Information

Terminal

VoiceOver Utility

X11

ZipRecentLogs.command
- Type "ifcong" which will show current network conguraon:
Mac-mini-Michal:~ michal$ ifconfig
lo0: flags=8049<UP,LOOPBACK,RUNNING,MULTICAST> mtu 16384
    options=3<RXCSUM,TXCSUM>
    inet6 ::1 prefixlen 128
    inet 127.0.0.1 netmask 0xff000000
    inet6 fe80::1%lo0 prefixlen 64 scopeid 0x1
    nd6 options=1<PERFORMNUD>
gif0: flags=8010<POINTPOINT,MULTICAST> mtu 1280
stf0: flags=0<> mtu 1280
en0: flags=8863<UP,BROADCAST,SMART,RUNNING,SIMPLEX,MULTICAST> mtu 1500
    options=27<RXCSUM,TXCSUM,VLAN_MTU,TS04>
    ether 00:23:df:7f:b5:28
    inet6 fe80::223:dfff:fe7f:b528%en0 prefixlen 64 scopeid 0x4
    inet 192.168.0.103 netmask 0xffffff00 broadcast 192.168.0.255
    nd6 options=1<PERFORMNUD>
    media: autoselect (1000baseT <full-duplex,flow-control>)
    status: active

en1: flags=8823<UP,BROADCAST,SMART,SIMPLEX,MULTICAST> mtu 1500
    ether 00:24:36:eb:b3:51
    nd6 options=1<PERFORMNUD>
    media: autoselect (<unknown type>)
    status: inactive

fw0: flags=8863<UP,BROADCAST,SMART,RUNNING,SIMPLEX,MULTICAST> mtu 4078
    lladdr 00:23:df:ff:fe:7f:b5:28
    nd6 options=1<PERFORMNUD>
    media: autoselect <full-duplex>
    status: inactive

Mac-mini-Michal:~ michal$
- Then you have to nd your currently connected network card (Ethernet card or Wi-card) and check IP address. In this parcular case IP address is 192.168.0.100. _TITAN IP address has to be in the same subnet, so for above example it would mean any IP address from 192.168.0.2 to 192.168.0.254 excluding currently occupied addresses by any device connected to your network (like your workstaon address, router address, etc.).
6.2.2.3. \_TITAN - set up IP address.
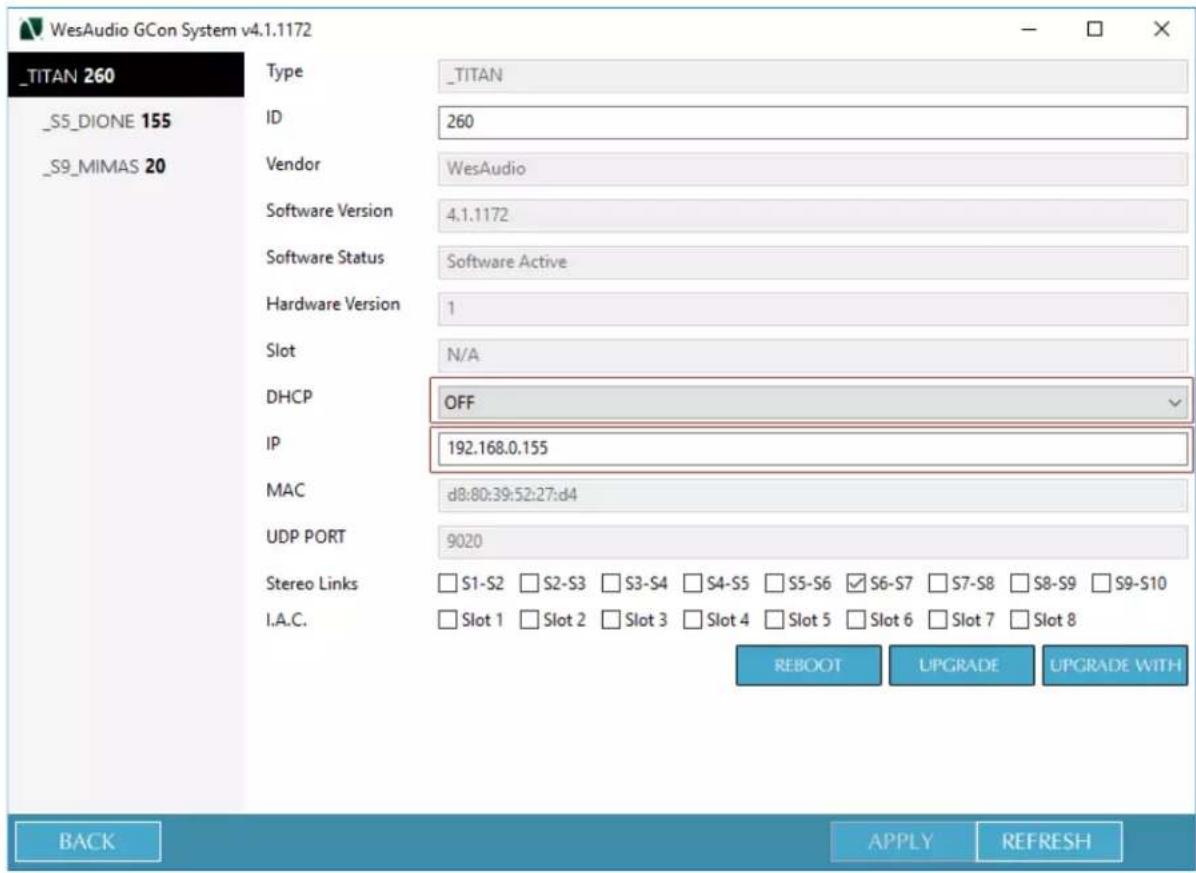
To set up IP address for _TITAN, rst connect it directly to your workstaon using USB cable. Then start GConManager and select "Cong" applicaon. Select your _TITAN frame in devices list on the le side, then change IP address:
To change any network specic conguraon of your _TITAN chassis:
1) Connect your _TITAN directly to your workstation through USB cable (If connection to _TITAN is already established through Ethernet cable, this step is not necessary),
2) Start GConManager and go to _CONFIG applicaon.
3) Then select your _TITAN unit from the le elements tree.
4) Then change DHCP upon to "OFF" (if it is currently "ON"). Unit will restart, and your conncon will re-establish.
5) Enter IP address that you would like to set, hit Apply buon. Unit will restart, and your connection with _TITAN will be established again.
Now you can disconnect USB cable, and connect _TITAN using Ethernet cable.
6.2.3. Direct conncon – seng IP address on PC/MAC.
To directly connect _TITAN frame to your workstaon via Ethernet cable, rst it is mandatory to set up IP address for your network interface (Ethernet network card). This acvity is not in scope of this manual, however it can be easily nd online, please nd below help pages:
Windows: hp://www.howtogEEK.com/howto/19249/how-to-assign-a-stac-ip-address-in-xp-vista-or-windows-7/
OSX: hp://www.macinstruct.com/node/550
TITAN USER MANUAL REV3
7. Set up Audio signal.
_TITAN as any 500 series rack implements XLR conncon to each slot at the back. However this is not the only opon to route your audio signal into _TITAN's modules.
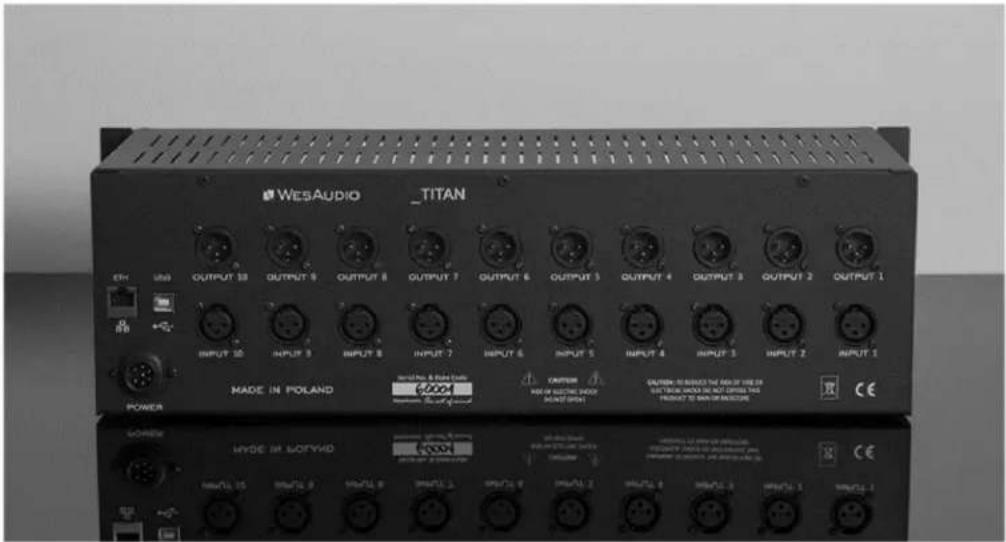
7.1. Rear XLR Connecons.
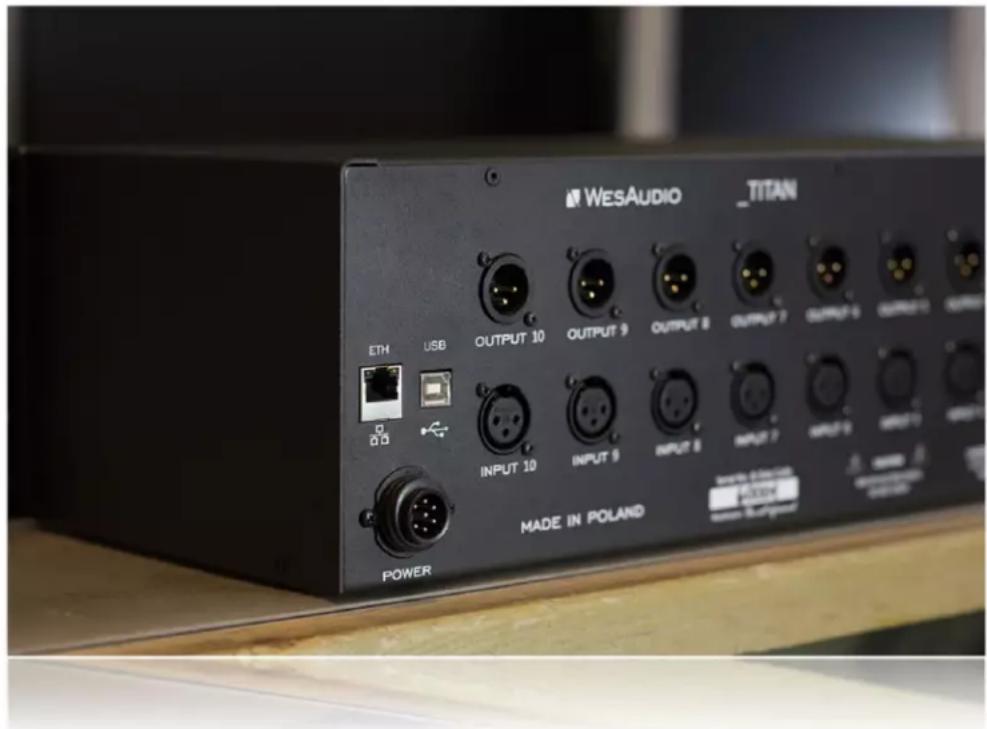
Rear panel of _TITAN features standard XLR connecons at each slot.
7.2. I.A.C. - Internal Audio Connector.
_TITAN also support internal audio round which can be accessed from slot 10 and can be used to send audio signal from and to slots 1-8 through dedicated module which will support "I.A.C.".
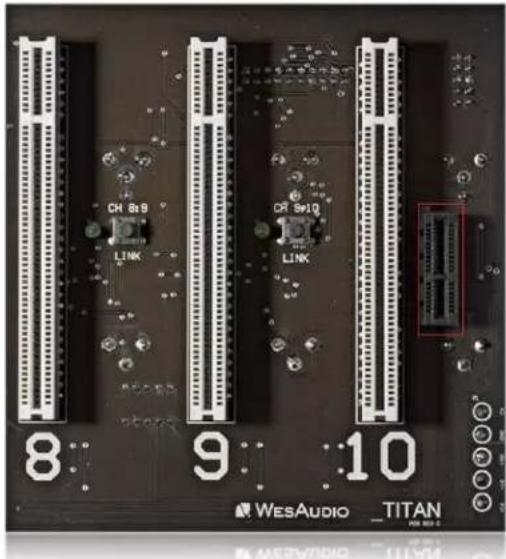
This allows future integraon with dedicated modules such as:
• Digital audio interfaces like ADAT, DANTE etc.
- Analogue summing modules
- Or any other type of multichannel interface, which can transform your _TITAN into the most advanced and complete soluon.
This special connector can be acvated "per slot" using GConManager "Cong" applicaon:
TITAN USER MANUAL REV3
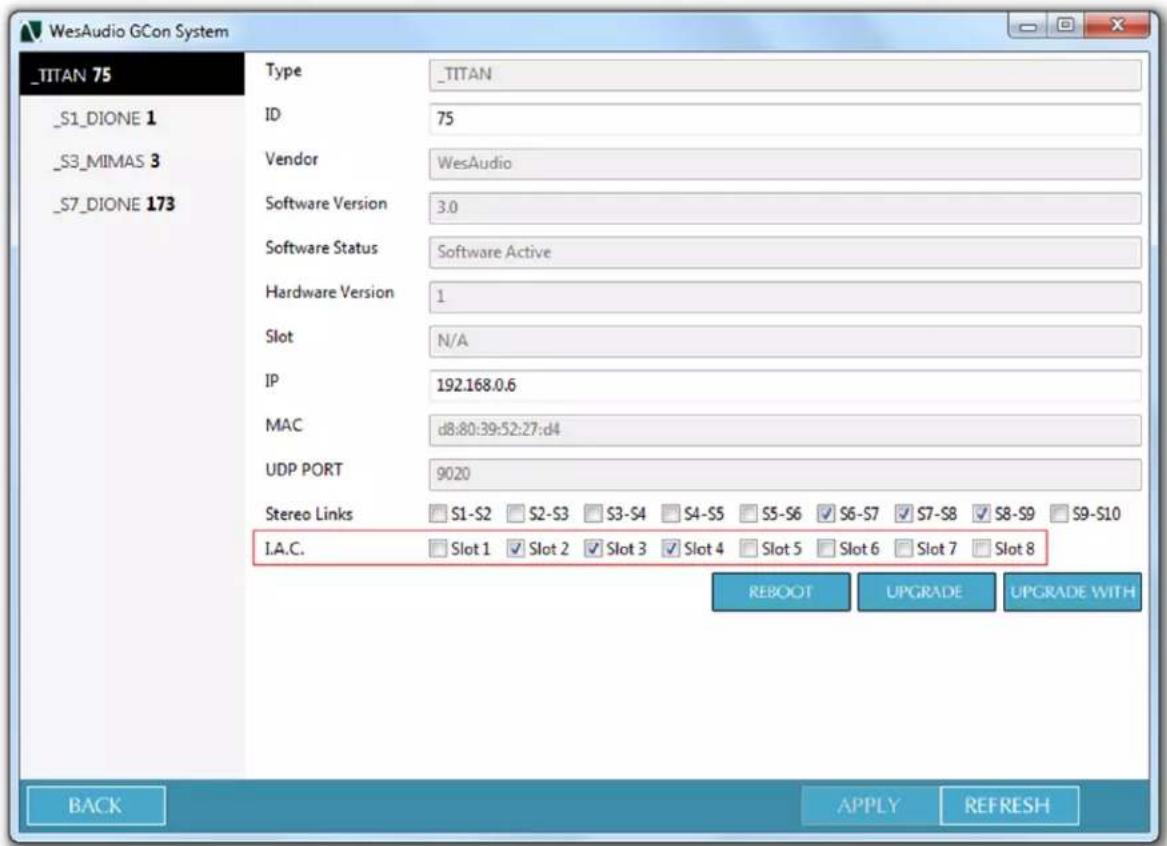
This approach allows you to connect your audio signal through rear XLR connectors and through I.A.C. at the same me, so you can switch between those whenever you like (e.g. you can switch between mixing mode and recording mode).
8. Stereo links.
_TITAN's each slot can be stereo linked, and that functionality can be acvated in several ways.
8.1. Stereo link buons.
Each slot features special internal buon on the PCB, which is responsible for acvang parcular stereo link. By pushing the buon, stereo link is acvated, pushing it again will deacvate it. Next to each buon there is located special led which will show current stereo link state.
8.2. Stereo links in GConManager.
GConManager "CONFIG" applicaon can be used to change stereo link states:
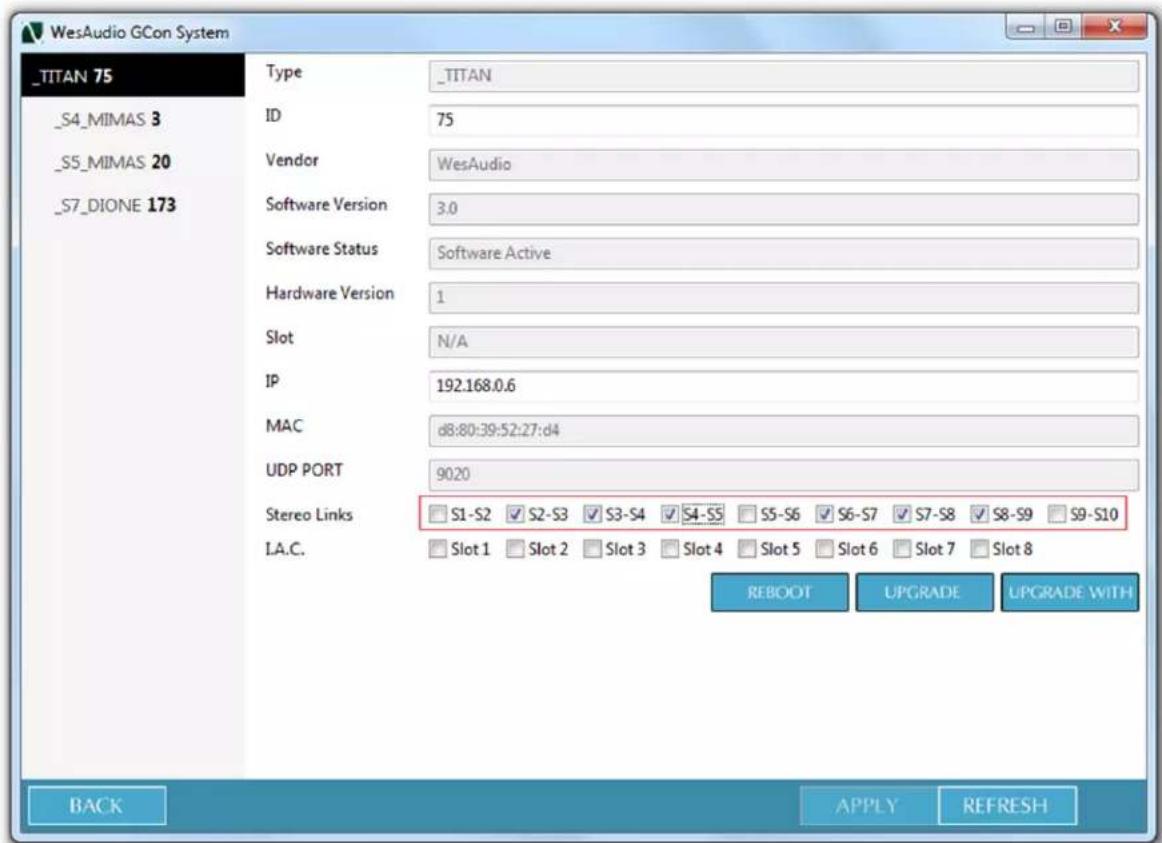
Also when stereo link in GConApplicaon will be engaged, and those two aected slots host GCon compatible devices (with stereo linking capabilities e.g. WesAudio _mimas), link state will be set accordingly for both modules.
8.3. Stereo links integraon with GCon compatible modules.
Each GCon compatible module which supports stereo linking (e.g. WesAudio _mimas) communicates with _TITAN, and if front panel link buons will be pushed at the same me in 2 modules, stereo link in _TITAN frame will be set accordingly to desired state.
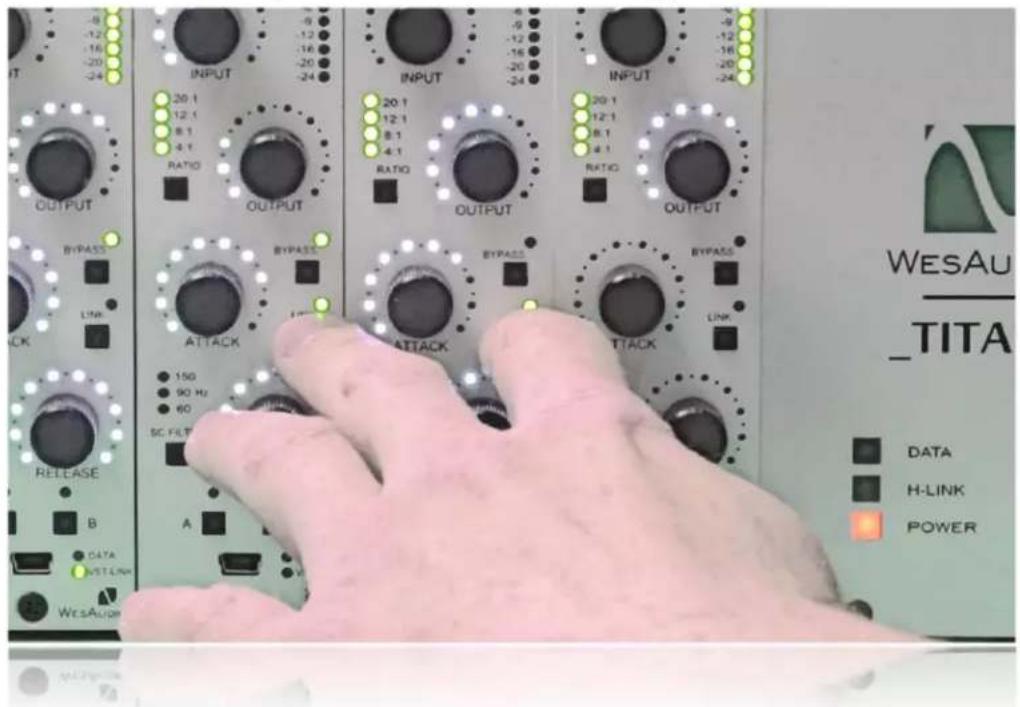
Same funconality is implemented inside your DAW applicaon by compatible Plugins. If two modules will be recalled, link states will be also set up in _TITAN frame according to loaded sengs.
Note about integrated stereo linking:
During recall or when front panel link buons are pushed on parcular modules, link states in _TITAN will always be engaged in pairs. Please follow below example:
There are 4 WesAudio _mimas units inserted into _Titan on slot 1,2,3 and 4.
- 4_Mimas link states are set up through front panel buons (or through recall system).
In that parcular case _Titan will engage stereo link for slot 1 & 2, and stereo link for slot 3 & 4. Stereo link on slot 2 & 3 won't be acvated.
In general it is impossible to disnguish between such situaons, and current implementation links everything in pairs. In the future it is also possible that special _Titan plugin will be created, which will allow to enable and recall more complicated linking scenarios.
9. GConManager
GConManager is generic applicaon which implements conguraon management over GCon compatible units. It allows to execute operaons like rmware upgrade, or change device id, etc.
9.1. Where is GConManager?
By default it can be found in Applicaon folder data:
- For OSX: "/Applicaons/WesAudio/GConManager"
- For WINDOWS: folder specied during installaon phase, by default in: "c:/Program Files x86/WesAudio/GConManager.exe".
9.2. How to start Firmware Upgrade
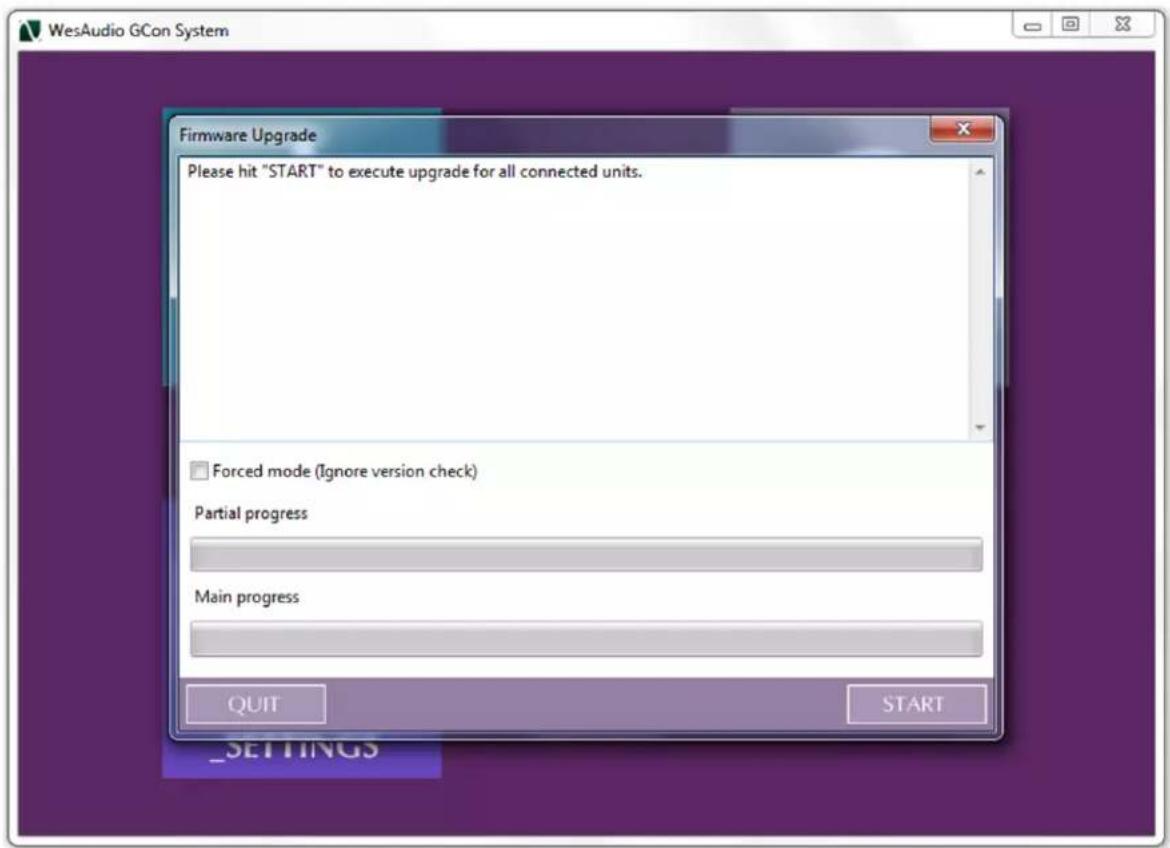
To start rmware upgrade simply start GConManager and go to "Upgrade" applicaon, then hit start. All modules where rmware isn't up to date, will be upgraded automacally.
TITAN USER MANUAL REV3
9.3. How to check currently connected devices.
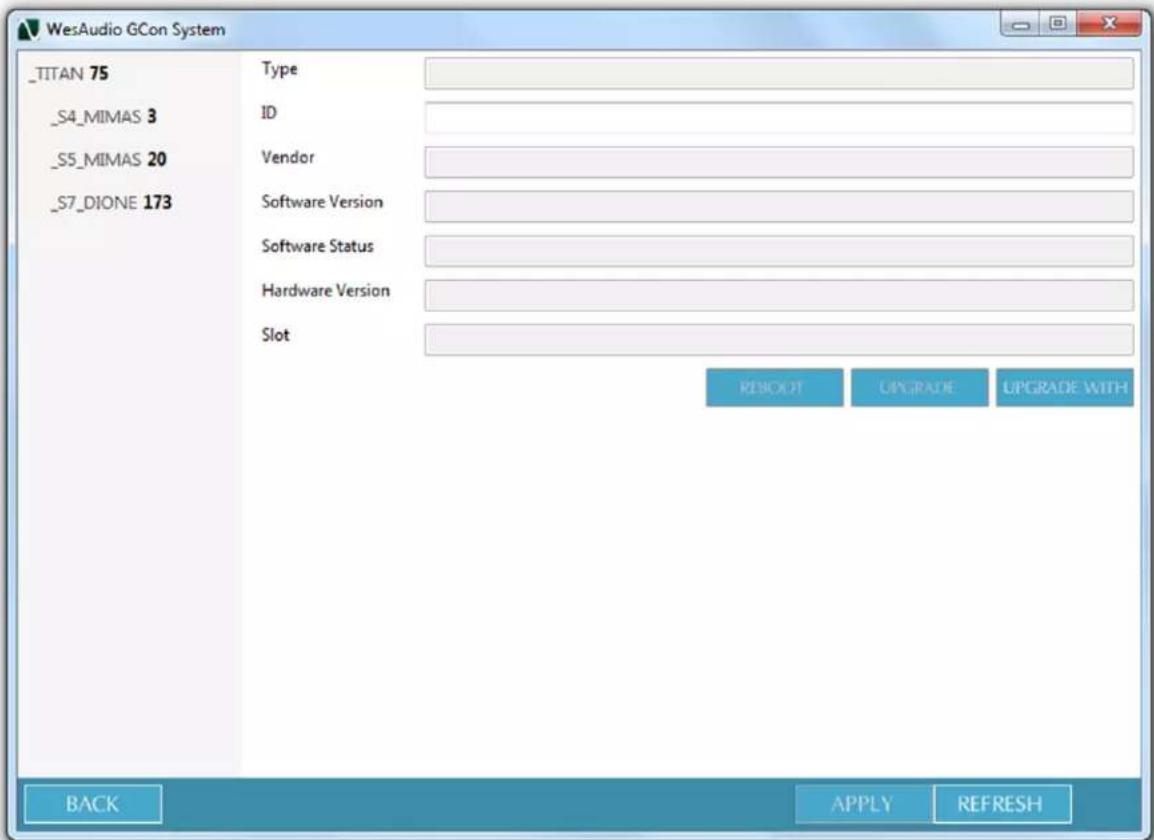
Start GConManager and go to "cong", you should be able to see list of your currently connected modules:
10. GCon open specicaon framework.
_Titan frame is part of open specicaon framework which allows other vendors to adopt to GCon protocol, and create recallable modules. In general it doesn't require any specific GCon knowledge because protocol is wrapped in soware frameworks, which implements all necessary functionalities on northbound (HOST/DAW <-> _TITAN) and southbound (_TITAN <->ng500 series module) side. There are four main packages which can be shared among other vendors:
- GCon open specicaon framework documentaon.
- GPE – GCon protocol environment – C++ API to already existing dynamic library, which supports all main operations on remote modules, and can be easily integrated into any plugin type.
- GConPeriphery – package of drivers and ulies mandatory to communicate with upper system.
- Soware examples.
11. Mul Host Support – USB note.
_TITAN connected through USB cable will be detected in one HOST applicaon at the same me. First HOST applicaon which will start any WesAudio plugin will enable GCon communicaon engine, and from now on it will serve as a master. Master applicaon opens all available WesAudio units and keeps all device handles for communicaon purposes. That acvity will prevent other HOST applicaons started at the same me to communicate with WesAudio units using direct USB conncon. Such situaon may happen in pracce when two dierent hosts are started at the same me and connected through ReWire interface, in that approach only one host can serve as plugin host for WesAudio products. It is also possible to start GConManager and Plugin host applicaon at the same me, which will result in exactly same situaon – only one applicaon will connect to WesAudio devices. This is not valid for Ethernet conncon where up to 5 applicaons can communicate with one _Titan frame.
12. Warranty
All WesAudio products are built to the highest standards and should provide reliable performance for many years, subject to reasonable care, use, transportaon and storage.
WesAudio warrants all of our products to be free of defective parts and workmanship for a period of two years.
This warranty period begins at the original date of purchase and is transferable to any person who may subsequently purchase the product during this me. This warranty excludes the following conditions: normal wear and tear, misuse, customer negligence, accidental damage, unauthorized repair or modicaon, cosmec damage and damage incurred during shipment. During the me of this warranty, WesAudio will repair or replace, at its onpon, any defective parts or repair defective workmanship without charge, provided the customer has appropriate proof of purchase and that the product has its original factory serial number. In all warranty claims the customer is responsible for shipping costs to the WesAudio facility, and WesAudio pays for return ground shipping.
- \_TITAN
- WesAudio
- \_TITAN is 500 series compatible (\*) rack frame which implements ng500 connector and GCon protocol.
- TITAN USER MANUAL REV3
- Table of Contents
- Abbreviaons and terms
- Installaon and compatibility.
- !!!Ensure the rack is completely powered down before aempng modules
- installaon to prevent damage to the frame!!!
- Modules installaon walkthrough:
- series compatibility note:
- Front panel
- H-LINK note:
- Overview
- \_Titan main features:
- Soware
- Installaon
- WINDOWS
- OSX
- Troubleshoong
- USB
- Ethernet
- \_TITAN Conguraon.
- Each \_TITAN chassis by default has DHCP enabled. So if you would like to connect your \_TITAN to your router, just do it!
- DHCP
- Stac IP address.
- Windows – how to check your IP address.
- OSX – how to check your IP address.
- \_TITAN - set up IP address.
- Direct conncon – seng IP address on PC/MAC.
- Set up Audio signal.
- Rear XLR Connecons.
- I.A.C. - Internal Audio Connector.
- Stereo links.
- Stereo link buons.
- Stereo links in GConManager.
- Stereo links integraon with GCon compatible modules.
- Note about integrated stereo linking:
- GConManager
- Where is GConManager?
- How to start Firmware Upgrade
- How to check currently connected devices.
- GCon open specicaon framework.
- Mul Host Support – USB note.
- Warranty
- WesAudio warrants all of our products to be free of defective parts and workmanship for a period of two years.
Brand : WesAudio
Model : TITAN
Category : Uncategorized