ng76 - Compressor WesAudio - Free user manual and instructions
Find the device manual for free ng76 WesAudio in PDF.

| Product Type | Compressor / Limiter |
| Brand | WesAudio |
| Model | ng76 |
| Form Factor | 500 Series Module |
| Width | 1.5 inches (38 mm) |
| Depth | 5.25 inches (133 mm) |
| Height | 6U (1.5 inches / 38 mm) |
| Weight | 1.0 lb (0.45 kg) |
| Power Requirements | +/-16V DC via 500 series rack |
| Current Consumption | 130 mA |
| Compression Topology | Discrete FET (Field Effect Transistor) |
| Input Impedance | 600 Ohms |
| Output Impedance | 75 Ohms |
| Max Input Level | +24 dBu |
| Max Output Level | +24 dBu |
| Frequency Response | 20 Hz - 20 kHz +/- 0.5 dB |
| Attack Time | 0.02 ms - 0.8 ms |
| Release Time | 50 ms - 1.1 s |
| Ratio Settings | 4:1, 8:1, 12:1, 20:1 |
| Threshold Range | -40 dBu to +20 dBu |
| Makeup Gain | 0 to +20 dB |
| Controls | Input, Output, Attack, Release, Ratio, Meter Mode, Bypass, Power |
| Metering | VU meter for gain reduction and output level |
| Features | All-buttons mode, true bypass, transformerless input, output transformer |
Frequently Asked Questions - ng76 WesAudio
User questions about ng76 WesAudio
0 question about this device. Answer the ones you know or ask your own.
Ask a new question about this device
Download the instructions for your Compressor in PDF format for free! Find your manual ng76 - WesAudio and take your electronic device back in hand. On this page are published all the documents necessary for the use of your device. ng76 by WesAudio.
USER MANUAL ng76 WesAudio
Analog Sound Digital Recall

text_image
OUTPUT INPUT 0 0 0 OUTPUT 0 0 0 0 0 0 0 0 0 0 0 0 0 0 0 0 0 0 0 0 0 0 0 0 0 0 0 0 0 0 0 0 0 0 0 0 0 0 WESAUDIO RATIO LIMITING mg76 AMPLIFIER POWERWesAudio
NG76 USER MANUAL REV1
Thank You for the purchase of ng76
ng76
Next Generation FET Compressor with digital recall
With kind regards
Lan
Radosław Wesolowski and Michal Weglicki
Next Generation FET Compressor with digital recall
FET compressors have been an essential tool in recording studios for over 50 years. Its distinctive sound and reliability have made it a go-to for producers and engineers around the world. The 76-style FET compressor has left its mark on countless hit records which has helped to establish its reputation as a reliable and versatile tool in recording technology. We have improved this design, creating a whole new level of versatility with seamless DAW integration - We present ng76 - fully analog FET compressor with digital recall.

text_image
WESAUDIO RATIO LIMITED NG% AMPLIFIER POWER WESAUDIO RATIO LIMITED NG% AMPLIFIER POWERNG76 USER MANUAL REV1
Contents
- Main Features....6
- Stereo Pairs....7
- Hardware 7
3.1. Specification....7
3.2. Front panel....8
3.3. Rear panel 10
3.4. Audio signal connection....12
3.5. Signal Flow....13
3.6. Side Chain EQ 14
3.7. THD....14
3.8. Saturation mode....15
3.9. Input mode – Vintage vs Modern....15
3.10. Stereo operation and matched pairs 15
- Software setup....17
4.1. Installation....17
4.1.1. Windows....17
4.1.2. OSX....18
4.1.3. Troubleshooting....19
4.2. GConManager 20
4.2.1. How to check firmware version....20
4.2.2. How to perform firmware upgrade 21
4.3. Set up GCon Connection ....22
4.3.1. USB....23
4.3.2. Ethernet....24
4.3.3. Default network configuration....25
4.3.4. Enable/Disable DHCP 26
4.3.5. Set up GCon connection using Static IP address 27
4.3.5.1. Windows – which static IP address should I choose?......27
4.3.5.2. OSX – how to check your IP address....29
NG76 USER MANUAL REV1
4.3.5.3. Set up static IP address....31
4.3.6. Direct connection – setting IP address on PC/MAC....32
- Automation and recall ....33
5.1. DAW Plug-in 33
5.1.1. Mono plug-in ....34
5.1.2. Stereo Plug-in .... 36
5.1.3. Stereo Plug-in – automation of linked channels....37
- Abbreviations and terms....38
- Warranty....38
- History....39
1. Main Features
True ANALOG sound with extremely convenient control!
Full Total Recall and plugin control, compatible with most DAWs.
100% analog FET mono compressor with 24dBu of headroom.
Classic lightning speed compression style based on WesAudio Beta76 design.
Classic controls known from FET style compressor - INPUT / OUTPUT / ATTACK / RELEASE.
Additional MIX knob for parallel compression.
Carnhill Transformers (input and output).
Saturation mode - Special mode where static compression is triggered to produce sonics based on FET circuit, and One knob which sets INPUT and OUTPUT in an opposite way. It allows to use the unit as a saturation box / clipper.
Four ratio settings 4:1 / 8:1 / 12:1 / 20:1 - all possible combinations including ALL button mode!
Modern and Vintage modes to support two 1176 revisions (F & G):
• Vintage - transformer balanced input,
- Modern - Electronically balanced input.
Features a sophisticated side chain circuit EQ with two independent sections:
- HPF 60 Hz / 90 Hz / 150 Hz - to maintain low end information while compressing,
- High Shelf of 2kHz / 5kHz, 10kHz - to tame high frequencies by emphasizing high/high mid-range content.
Vintage gain reduction meter.
Very precise INPUT and OUTPUT metering.
Hardware A/B buttons to compare two independent settings.
THD - total harmonic distortion with LOW and HIGH settings, based on the FET circuit.
Fully digitally controlled and isolated analog circuit.
ANALOG AUTOMATION in DAW.
Ethernet and USB connectivity for integration with digital plug-in.
Size: 2U.
2. Stereo Pairs
Ng76 is available in stereo pairs, each pair is carefully calibrated in the factory for stereo usage – of course it still can be used either as dual mono independent compressors or one stereo unit:
- Includes 2 separate mono-channel devices that can be linked together through dedicated software.
- Compression detectors can be linked for true stereo compression using dedicated cable (included).
- All parameters between units can be linked via a dedicated plug-in – change on one channel triggers update on the other channel.
3. Hardware
This chapter explains all physical aspects of ng76 unit.
3.1. Specification
- Attack time 20 us – 800 us
- Release time 50 ms – 1100 ms
• Compression ratio 4:1; 8:1; 12:1; 20:1; all button mode and all combinations - True Bypass
• SC High Pass filter 60,90,150Hz
• SC High Shelf filter 2KHz, 5KHz, 10kHz
• Output impedance 50 ohm
• Frequency response 20Hz to 20kHz (+/- 1dB)
• Signal to noise ratio SNR >83dB
• Max signal level +24dBu - THD+N MIN 0.2%
- Noise floor -95dBu
• Power consumption 8W
• Dimensions 88x483x235mm - Weight 6 kg
• Balanced output and input - Case Rack: 2U
- Warranty: 2 years
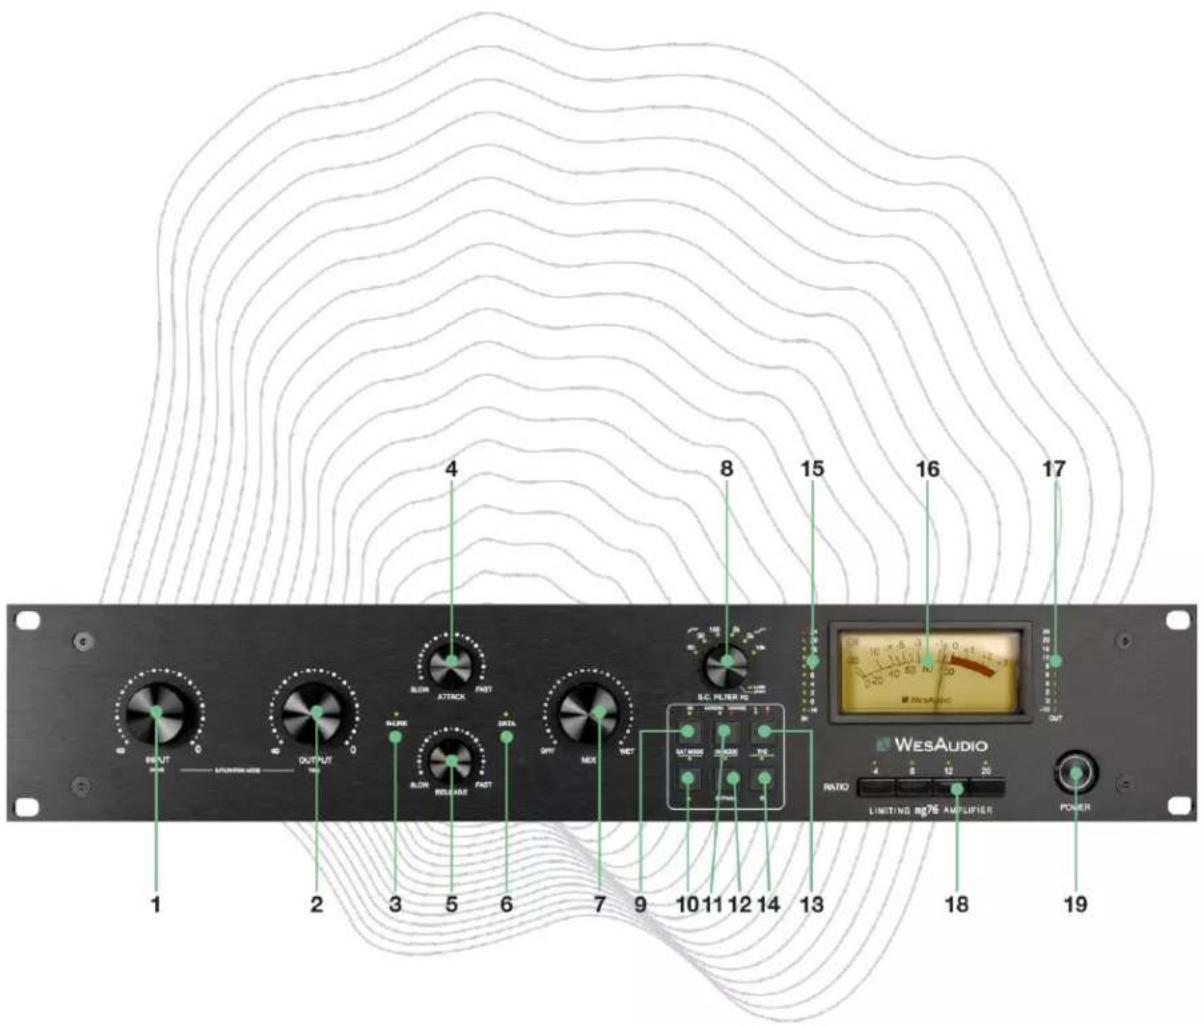
3.2. Front panel
text_image
1 2 3 4 5 6 7 8 9 10 11 12 13 14 15 16 17 WesAudio LIMITING 8p76 AMPLIFIER POWER- Input - Determines the level of the input signal entering the compressor.
- Output - Determines the level of the output signal leaving the compressor. It is used to recover signal level affected by gain reduction in compression circuit.
- H-LINK LED – indicates state of host-module connection.
- Attack – It sets the Attack time from 20 microseconds to 800 microseconds. The attack time is fastest when the Attack knob is in fully clockwise position, and its slowest when it's in its fully counterclockwise position.
- Release – It sets the Release time from 50 milliseconds to 1100 milliseconds. The release time is fastest when Release knob is in its fully clockwise position and is slowest when it is in its fully counterclockwise position.
NG76 USER MANUAL REV1
- DATA LED – indicates that data is being sent from HOST to the device.
- MIX – WET/DRY signal mixer knob. Allows the parallel compression to be used.
- SC Filter EQ/ SC Link – There are two functions for this knob:
a. Pushing the knob toggles sidechain detector LINK on and off when two units are linked via back TRS sockets.
b. Rotary encoder allows to select EQ in the side chain circuit:
i. First 6 position engages separate EQ sections,
ii. Moving further right compressor will start to select various combinations.
-
Saturation mode – Enables/Disables saturation mode. Please note when saturation mode is engaged, sidechain filters, attack, release, ratio controls are disabled and don't have any effect.
-
A – internal preset memory buttons which can be used to compare two different compressor settings.
- INPUT MODE – toggles between VINTATE and MODERN modes INPUT modes (electronically balanced vs transformer balanced input stage).
- BYPASS – True bypass.
- THD – Total Harmonic Distortion – Possible options: OFF/LOW/HIGH.
- B – internal preset memory buttons which can be used to compare two different compressor settings.
- VU IN Metering - INPUT metering before any processing (-10dBu to 24dBu).
- Gain reduction meter – This meter shows gain reduction (please note that this meter is disabled when Saturation Mode is engaged).
- VU OUTPUT Metering - OUTPUT metering (-10dBu to 24dBu).
- Ratio - The Ratio button controls the depth of the compression, with a ratio of 4:1 being the lowest possible compression value and 20:1 being the highest. Additionally, you have the option to disable the ratio to disengage compression and enable any combination of ratios you prefer. To activate more than one ratio (e.g., pressing the All button IN!), you can either press all the ratios at the same time or press one ratio and then press and hold while engaging the others you want.
- POWER Button – Power switch.
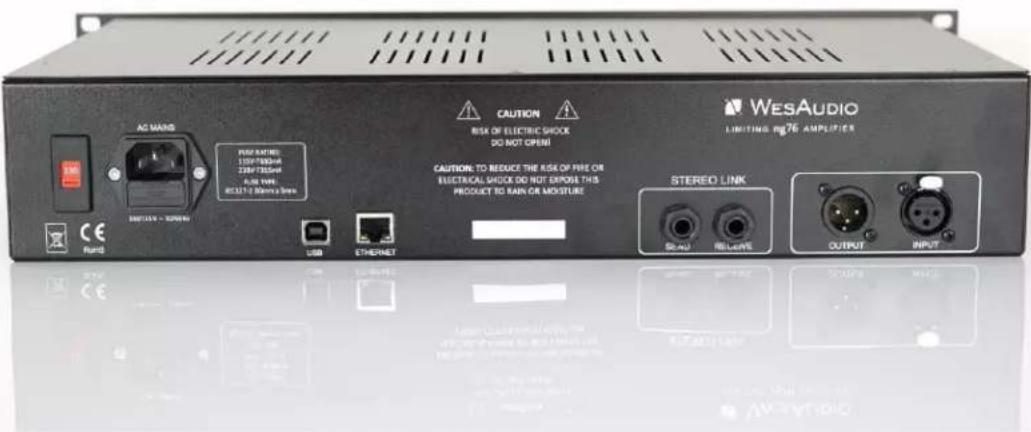
3.3. Rear panel

text_image
AC MAINS 130.55V - 300MHz FUSE RATING: 125V-785mA 220V-785mA FUSE TYPE: ECL2-2.20MHz x 5mm UIC ETHI/PNET CAUTION TO REDUCE THE RISK OF FIRE OR ELECTRICAL SHOCK DO NOT EXPOSE THIS PRODUCT TO RAIN OR MOISTURE WESAUDIO SEND RELOAD OUTPUT INPUT 1 2 3 4 5 6 7 8- Voltage selector – selection between 115V (60Hz) and 230V (50Hz). Please check Fuse holder description before switching.
- AC socket
- Fuse holder – The fuse holder contains two fuses - one is currently in use, while the other one is a spare. If, for any reason, your unit fails to power up, it is recommended to swap the fuses and check if this resolves the issue.
IMPORTANT NOTE: each voltage standard has different fuse type:
a. 115V - T630mA
b. 230V - T315mA.
NG76 USER MANUAL REV1
If You would like to change voltage settings it is mandatory to get proper Fuse!
- USB Socket – USB2+ compatible port for GCon connectivity (management).
- ETHERNET Socket – Ethernet port for GCon connectivity (management) based on UDP protocol (LAN single subnet).
Please note that only one connection type can be used at the same time. - Serial Number
- TRS LINK - connectors for stereo compression.
- XLR INPUT / XLR OUTPUT – input and output signal connection.
3.4. Audio signal connection
Ng76 is digitally controlled analog unit – it means that signal must be connected in analog domain, but all its functions can be controlled via digital management protocol.
Signal is provided via back XLR sockets for each channel, TRS socket is only for side chain detectors link (stereo operation).

text_image
AC MINS H2B MINS 150V 100mA 200V 150mA 300V 50mA 400V 80mA 500V 120mA USB STRENET CAUTION RISK OF ELECTRIC SHOCK DO NOT OPEN CAUTION TO REDUCE THE RISK OF FIRE OR ELECTRICAL SHOCK DO NOT EXPOSE THIS PRODUCT TO MAIN OR MOISTURE WESAUDIO LIMITING rg76 AMPLIFIER STEREO LINK SEAD RELEASE OUTPUT INPUT AC MINS H2B MINS 150V 100mA 200V 150mA 300V 50mA 400V 80mA 500V 120mA USB STRENET CAUTION RISK OF ELECTRIC SHOCK DO NOT OPEN CAUTION TO REDUCE THE RISK OF FIRE OR ELECTRICAL SHOCK DO NOT EXPENSE THIS PRODUCT TO MAIN OR MOISTURE WESAUDIO LIMITING rg76 AMPLIFIER STEREO LINK SEAD RELEASE OUTPUT INPUT3.5. Signal Flow
Below figures show ng76 signal flow.
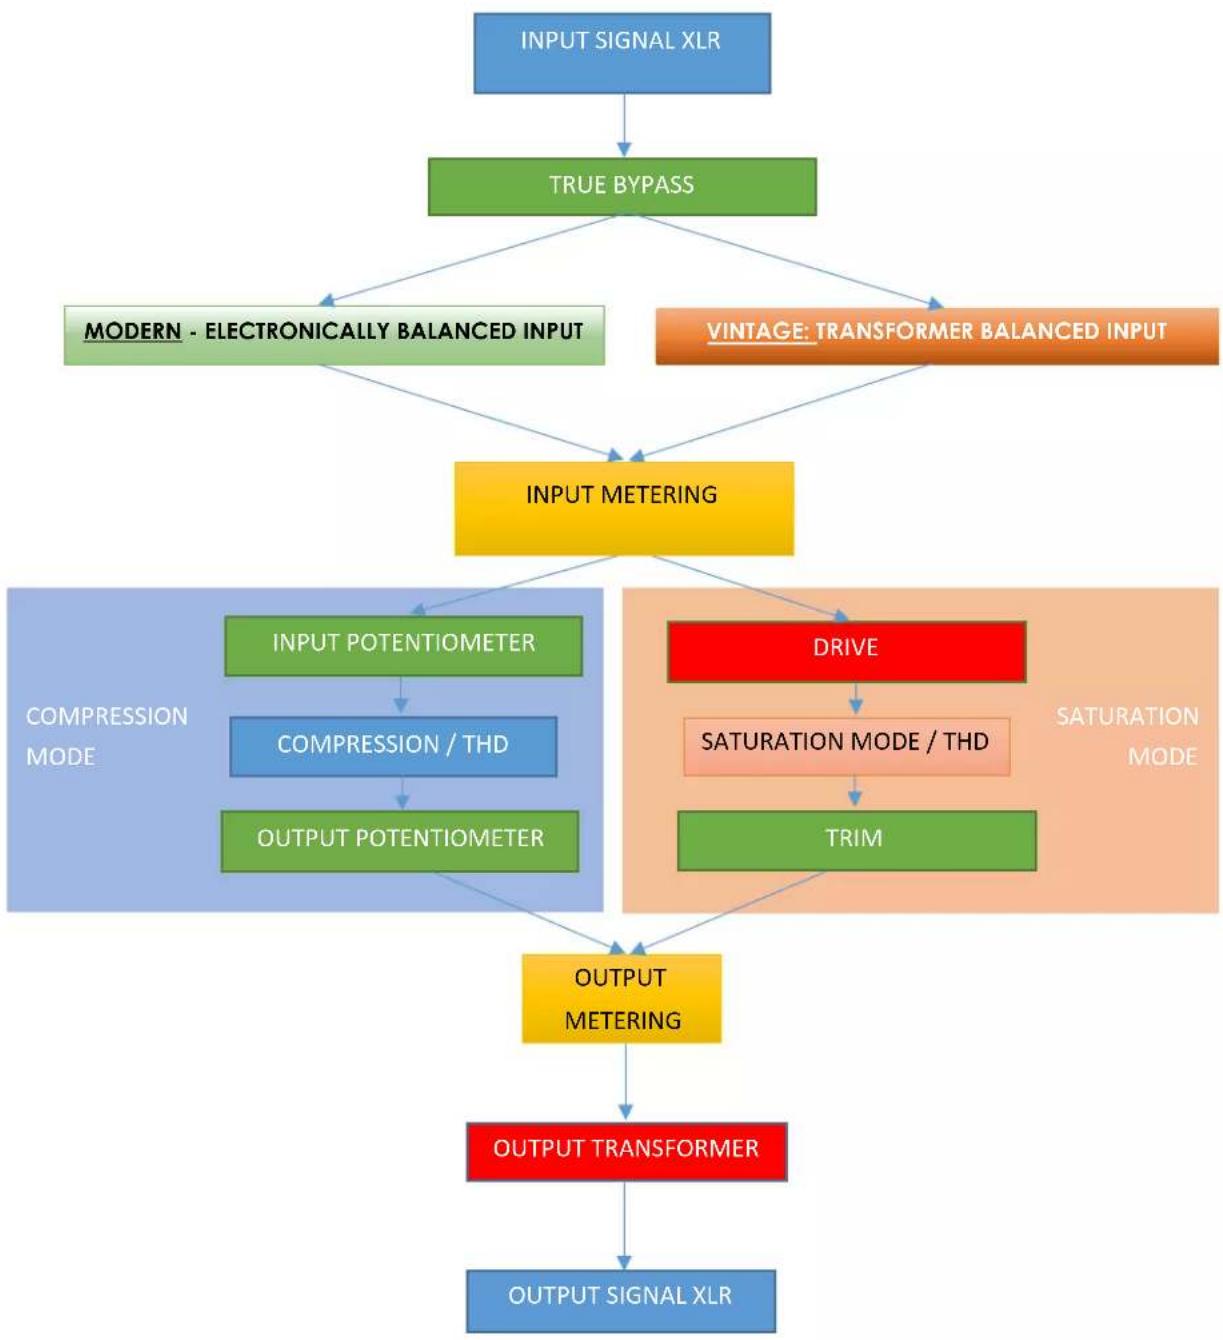
flowchart
graph TD
    A["INPUT SIGNAL XLR"] --> B["TRUE BYPASS"]
    B --> C["MODERN - ELECTRONICALLY BALANCED INPUT"]
    B --> D["VINTAGE: TRANSFORMER BALANCED INPUT"]
    C --> E["INPUT METERING"]
    D --> E
    E --> F["INPUT POTENTIOMETER"]
    E --> G["DRIVE"]
    F --> H["COMPRESSION / THD"]
    G --> I["SATURATION MODE / THD"]
    H --> J["OUTPUT POTENTIOMETER"]
    I --> K["TRIM"]
    J --> L["OUTPUT METERING"]
    K --> L
    L --> M["OUTPUT TRANSFORMER"]
    M --> N["OUTPUT SIGNAL XLR"]
3.6. Side Chain EQ
Ng76 implements 2 independent EQ sections in sidechain circuit:
• HPF at 60 Hz, 90 Hz and 150 Hz (all filters 6dB/Octave),
• High Shelf at 2 kHz, 5 kHz, 10 kHz (all filters 6dB/Octave).
The HPF section helps to avoid the compressor reacting on low end content, while high shelf filters allow to trigger more compression with high content – as a result high shelf filter will make our source material darker depending on the settings.

line
| Hz | dB u | dB u | | ---- | ----- | ----- | | 20 | -15 | 0 | | 50 | -10 | 0 | | 100 | -5 | 0 | | 200 | 0 | 0 | | 500 | 0 | 0 | | 1k | 0 | 0 | | 2k | 0 | 0 | | 5k | 5 | 0 | | 10k | 10 | 0 | | 20k | 15 | 0 |3.7. THD
THD – Total Harmonic Distortion – adds harmonic content to source material.
WesAudio's Total Harmonic Distortion (THD) circuit is renowned for adding harmonic content to the source material. It has been a part of most of the units we produce. However, this time, we wanted to provide you with more color options. In this implementation, we have fully relied on the FET compression circuit, and each level (LOW/HIGH) adds an odd harmonic to the source material.
3.8. Saturation mode
The saturation mode (SAT MODE) is a unique operating mode that triggers the compression side chain circuit through an internal DAC with a high-frequency sine wave (25kHz+) instead of the source material. This results in compression being established at a static level (around 10dB of gain reduction) to achieve the harmonic distortion typical of FET compression and to take advantage of the THD circuit. Moreover, the INPUT and OUTPUT potentiometers are connected in opposite ways through the DRIVE knob, meaning that when DRIVE is at its maximum, INPUT is at its maximum, and OUTPUT is at its minimum, and vice versa. This allows us to engage in clipping because hitting the FET circuit too hard will result in audible distortion. DRIVE is designed to maintain unity gain until clipping occurs, which will most likely lead to signal level loss but an increase in rms level. For this purpose, TRIM was added to enable negative and positive output modification between approximately -8 dB and +8 dB.
When Saturation mode is enabled, attack, release, sidechain filter, ratio, GR metering are disabled.
3.9. Input mode – Vintage vs Modern
This setting allows to select input stage of ng76 compressor:
- MODERN – electronically balanced input where transformer section is bypassed (like revision G of 1176),
- VINTAGE – transformer balanced input stage (like revision F of 1176).
In practice Modern will give us cleaner results, while Vintage will leave its mark on the low-midrange section of the frequency response.
3.10. Stereo operation and matched pairs
Stereo units can work in two modes:
- Dual mono compression – detectors are unlinked.
- True stereo compression – detectors are linked using TRS connection on the back.
NG76 USER MANUAL REV1
How to link two mono units for true stereo compression (detectors linked):
- Link two units using attached cable:
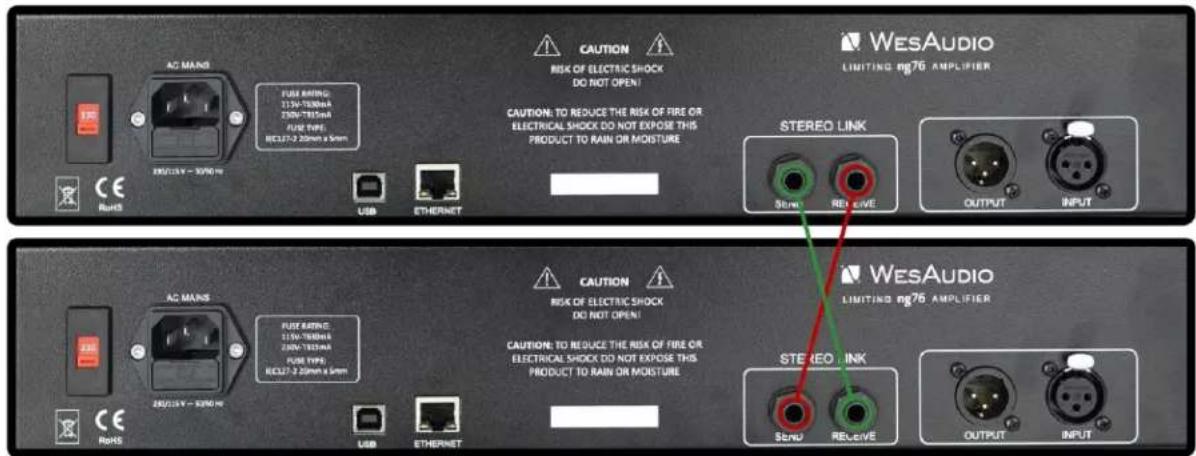
text_image
AG MAINS FUSE RATING: 115W-785MHz 200W-785MHz FUSE TYPE: RECL37-2 20mm x 5mm USB ETHERNET CAUTION RISK OF ELECTRIC SHOCK DO NOT OPEN! CAUTION: TO REDUCE THE RISK OF FIRE OR ELECTRICAL SHOCK DO NOT EXPOSE THIS PRODUCT TO RAIN OR MOISTURE WESAUDIO LIMITING ng76 AMPLIFIER STEREO LINK STREW REX EWE OUTPUT INPUT AC MAINS FUSE RATING: 115W-785MHz 200W-785MHz FUSE TYPE: RECL37-2 20mm x 5mm USB ETHERNET CAUTION RISK OF ELECTRIC SHOCK DO NOT OPEN! CAUTION: TO REDUCE THE RISK OF FIRE OR ELECTRICAL SHOCK DO NOT EXPOSE THIS PRODUCT TO RAIN OR MOISTURER WESAUDIO LIMITING ng76 AMPLIFIER STEREO LINK STREW REX EWE OUTPUT INPUT- Link two units using Stereo plugin (please refer to next chapters for more information).
- Engage stereo link for stereo compression (detectors linked), disengage for dual mono compression (detectors unlinked).
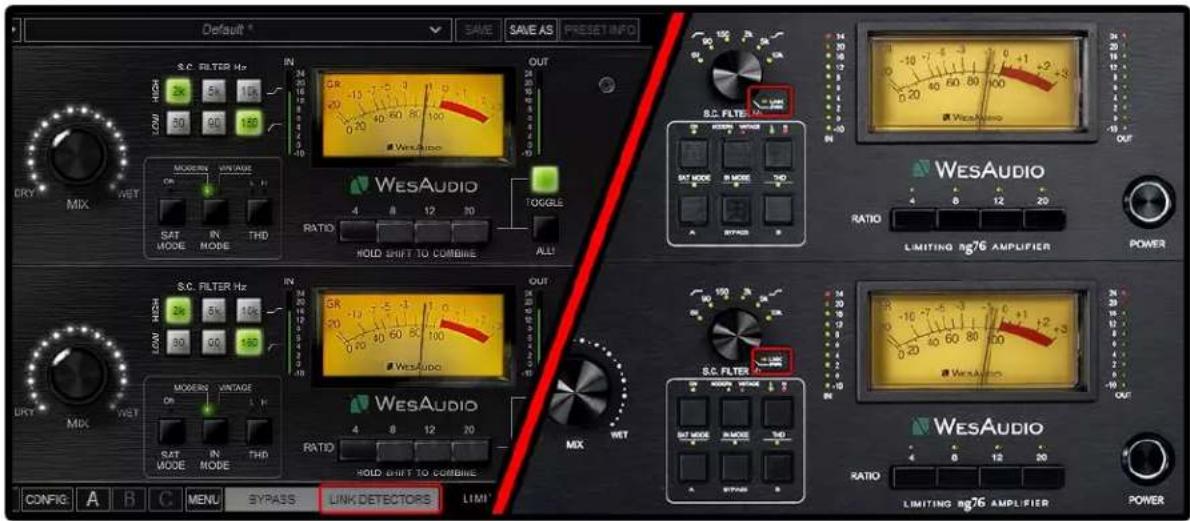
text_image
Default * SAVE SAVE AS PRESET INFO S.C. FILTER Hz IN OUT 2k 5k 10 LOW HIGH 30 90 150 S.C. FILTER Hz IN S.R. 2k 40-60 80 100 WESAUDIO OUT 20 40 WESAUDIO S.C. FILTER WESAUDIO RATIO 4 8 12 10 HOLD SHIFT TO COMBINE ALL S.C. FILTER WESAUDIO RATIO 4 8 12 20 LIMITING BG76 AMPLIFIER POWER S.C. FILTER WESAUDIO RATIO 4 8 12 20 HOLD SHIFT TO COMBINE S.C. FILTER WESAUDIO RATIO 4 8 12 20 LIMITING BG76 AMPLIFIER POWER CONFIG A B C MENU BYPASS: LINK DETECTORS LIMITTo change LINK settings either use the plug-in or push the SC encoder.
Please note that ng76 are available in stereo pairs. Such units are paired on the factory settings level to maintain the lowest possible difference either in level or compression behavior. Getting two independent mono units most likely will end up in different behavior especially in true stereo mode with compression detectors in sidechain circuit linked.
4. Software setup
Software package can be downloaded from http://www.wesaudio.com/download by anyone who purchased related HW unit. To check currently supported plugin types and platforms, please follow the above link.
4.1. Installation
To install Plugin Bundle package, please visit http://www.wesaudio.com/download and download recent version of software.
4.1.1. Windows
Start the installer application, if you will encounter any system warnings about this installer, please ignore them:

text_image
Windows protected your PC Microsoft Defender SmartScreen prevented an unrecognized app from starting. Running this app might put your PC at risk. More Info Don't run Select „More Info" Windows protected your PC Microsoft Defender SmartScreen prevented an unrecognized app from starting. Running this app might put your PC at risk. App: WesAudio_WINx86x54_VST_AAX_v7.3.2451.exe Publisher: Unknown publisher ...And select „Run anyway" Run anyway Don't runSelect any components which you would like to install.
- If this is FIRST installation, please unplug all WesAudio devices from your workstation.
- When the USB driver is installed, the application will inform you that all devices should be connected – please do so.
- If USB driver installation is triggered, the user will be asked to restart the computer. We know that this is an unwanted activity, but it is a necessary step for USB driver to install with success.
- If computer restart is triggered, this Installer will start again during start up. If for some reason the installer won't be started after the restart, please start the same installer manually again.
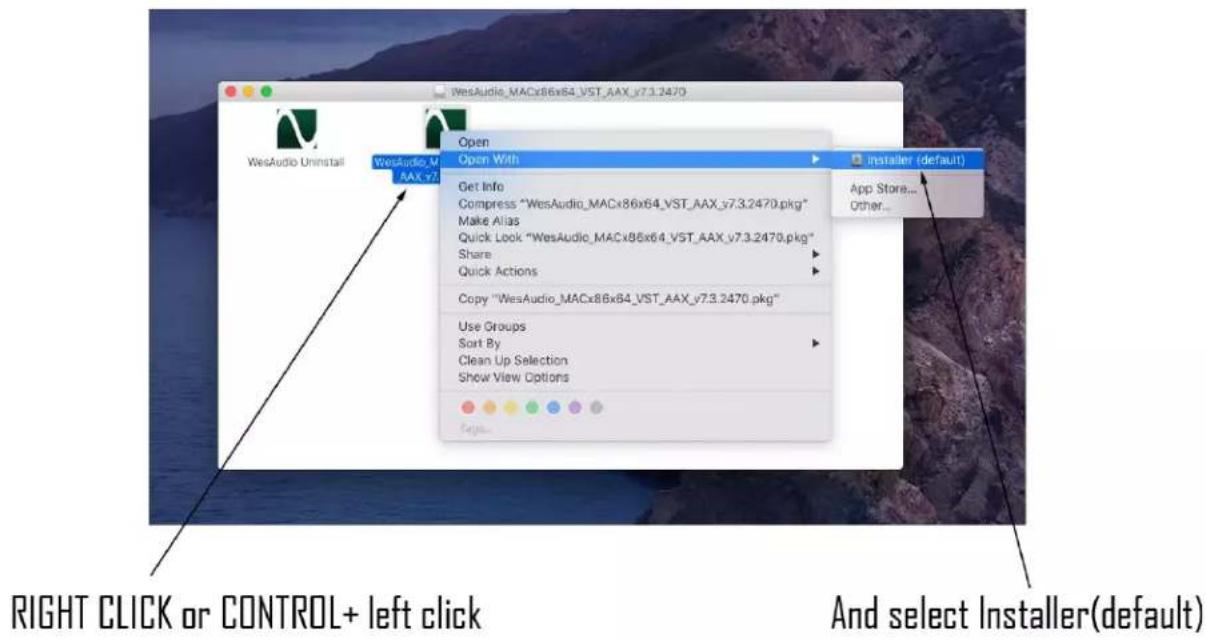
4.1.2. OSX
Because OSX architecture and USB devices handling is much simpler in concept, the only thing to note is to have all devices connected during installation procedure.
Start the installer application, if you will encounter any system warnings about this installer, please ignore them * (sometimes it is necessary to open context menu with right mouse button and trigger installation once again):
text_image
WesAudio Uninstall WesAudio_M AAX v7 Open Open With Get Info Compress "WesAudio_MACx86x64_VST_AAX_v7.3.2470.pkg" Make Alias Quick Look "WesAudio_MACx86x64_VST_AAX_v7.3.2470.pkg" Share Quick Actions Copy "WesAudio_MACx86x64_VST_AAX_v7.3.2470.pkg" Use Groups Sort By Clean Up Selection Show View Options App Store... Other... RIGHT CLICK or CONTROL+ left click And select Installer(default)4.1.3. Troubleshooting
If anything would fail during installation procedure, please contact our support at support@wesaudio.com. We will get back to you as soon as possible.
Below you can find some symptoms and description which will help to investigate the issue:
"Can't find my device on plugin drop down menu."
Unfortunately, there could be dozens of root causes. On Windows machines it is very important to check if a USB device is successfully connected on system level. That can be checked in "Control Panel → System → Device Manager":

text_image
Device Manager File Action View Help Michal-PC Atmel Batteries Computer Disk drives Display adapters DVD/CD-ROM drives Human Interface Devices IDE ATA/ATAPI controllers Imaging devices Jungo Connectivity Keyboards Mice and other pointing devices Monitors Network adapters Other devices SM Bus Controller Ports (COM & LPT) Processors Sound, video and game controllers System devices Universal Serial Bus controllers WesAudio devices GCon device GCon device** Please note that for WINDOWS it is necessary to install USB driver which is critical to communicate with HW units. It is required step only during first installation, and this option will be automatically disabled during any software upgrades.
4.2. GConManager
GCon Manager is a generic application which implements configuration management over compatible units. It can be found in Application folder data:
- For OSX: "/Applications/WesAudio/GConManager"
- For WINDOWS: folder specified during installation phase, by default in: "c:/Program Files x86/WesAudio/GConManager.exe".
This section describes how to manage firmware of available units, but GConManager also provides other functions which will be described in next chapters.
4.2.1. How to check firmware version
Each device reports to your workstation with version, which indicates compatibility between your host application, and remote module. To check firmware upgrade please to GConManager CONFIG application:

text_image
NG76 70 ngBUSCOMP 100 _TITAN 1050 _S1_DIONE 3 _S3_HYPERION 905 NG76 ID WESAUDIO Firmware v10.0.3103 | ACTIVE UP TO ONE HW VERSION CONNECTION: E### UPTIME REBOOT UPGRACE WITH UPGRACE ID 70 DHCP ON IP 192.168.1.234 MAC 68.27.19:bb:be 90 UDP PORT 9020 LEDs TOUCH Mode MEDIUM Power / MEDIUM Resolution BACK CANCEL APPLY4.2.2. How to perform firmware upgrade
To perform firmware upgrade, go to GConManager UPGRADE application and hit "Start" button. This will trigger upgrade operation for all modules which are not up to date with your host software.

text_image
Applications Getting Started Firmware Upgrade Please hit "START" to execute upgrade for all connected units. Forced mode (ignore version check) Partial progress Main progress START 1 _SUPPORT HOWTO send a problem report to the development team4.3. Set up GCon Connection
This chapter goes through possible setups and describes main configuration steps to establish digital connectivity for remote control and instant recall.
Please note that audio signal connectivity is described in next chapter Signal connection, this chapter describes digital management side.
In general, ng76 implements two connection types:
- USB 2.0+.
- Ethernet 10/100 – based on UDP protocol (LAN single subnet).
text_image
AC MANS RAS AMENS 120V/785Hz 728V/785Hz USB TYPE RC311/2.60MHz Low USB ETHERNET CAUTION BISK OF ELECTRIC SHOCK DO NOT OPEN! CAUTION TO REDUCE THE RISK OF FIRE OR ELECTRICAL SHOCK DO NOT EXPOSE THIS PRODUCT TO RAIN OR MOBTURE. WESAUDIO LIMITING RG76 AMPLIERS STEREO LINK SEAWU RELEAVE OUTPUT INPUT4.3.1. USB
To connect your ng76 frame directly to your workstation, just connect it to any available USB 2.0+ socket via USB cable.
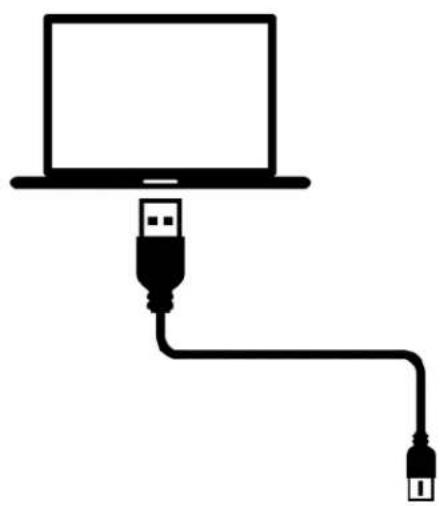
natural_image
Simple line drawing of a laptop connected to two USB cables (no text or symbols)
text_image
INPUT OUTPUT GLOW RELEASE GLOW ATTACK FAST SCL FILTER WesAudio RATIO LIMITING 80% AMPLIFIER POWER4.3.2. Ethernet
ng76 as any network device, can be connected to your workstation in following ways:
- By joining your local area network (LAN)
- Or directly connected to your workstation.
In some cases, it is mandatory to set IP addresses* for your workstation and ng76.
Below you can find possible setup in your local area network, and how different devices can access ng76 resources:

flowchart
graph TD
    A["Device 1"] -->|USB| B["Switch"]
    C["Device 2"] -->|USB| B
    B -->|Wireless Signal| D["Device 3"]
    D -->|USB| E["Device 4"]

text_image
INPUT OUTPUT SLOW RELEASE SLOW ATTACK MUST MIX S.D. RESERVE WESAUDIO RATIO LIMITING SMTG AMPLIFIER POWER(*) In case you would like ng76 to join already existing network, most probably your workstation has IP address already set up through static configuration entry, or through DHCP (by your router).
4.3.3. Default network configuration.
Each ng76 by default has DHCP enabled. If you would like to connect your ng76 to your router, just do it and it will be available right away!
...However, if you would like to change that configuration, please read description below.
4.3.4. Enable/Disable DHCP
To change any network specific configuration of your ng76 chassis:
1) Connect your ng76 directly to your workstation through USB cable.
2) Start GConManager and go to _CONFIG application.
3) Then select your ng76 unit from the elements tree on the left.
4) Then change DHCP option to "ON". Unit will restart, and your connection to ng76 will be established again.

text_image
NG76 70 ngBUSCOMP 100 _TITAN 1050 _S1_DONE 3 _S3_HYPERION 905 NG76 ID WESAUDIO Firmware v10.0.3103 | ACTIVE UP TO DATE HIW VERSION: 1 CONNECTION: 3.1mm UPTIME: 2.5 REBOOT UPGRACE WITH UPGRADE ID 70 DHCP ON IP 192.168.1.234 MAC 68.27.19:bb:bc:90 UDP PORT 9020 LEDs TOUCH Mode MEDIUM Power / MEDIUM Resolution BACK CANCEL APPLYIf You have disabled DHCP, please head to next chapter and set the IP address before using ethernet connection again.
4.3.5. Set up GCon connection using Static IP address
In general, there are few use cases when you would like to configure ng76 IP address manually:
1) When your router doesn't support DHCP
2) When your LAN network is configured manually, for example through hardware switch.
3) When you would like to connect your ng76 directly to your Ethernet socket in your workstation.
As a first step please check your currently configured IP address.
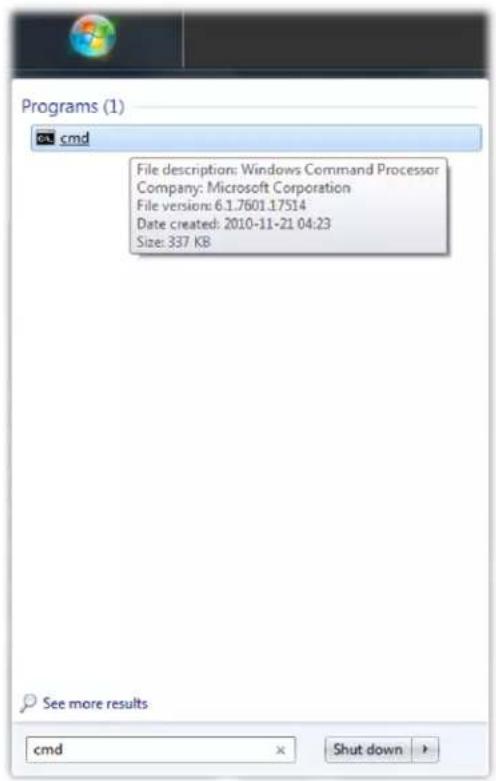
4.3.5.1. Windows – which static IP address should I choose?
If You work on a PC and You would like to configure ng76 with a static IP address, you will need to know which address to set up. It must be from the same network, and it must be unique. Below tutorial shows how to check it.
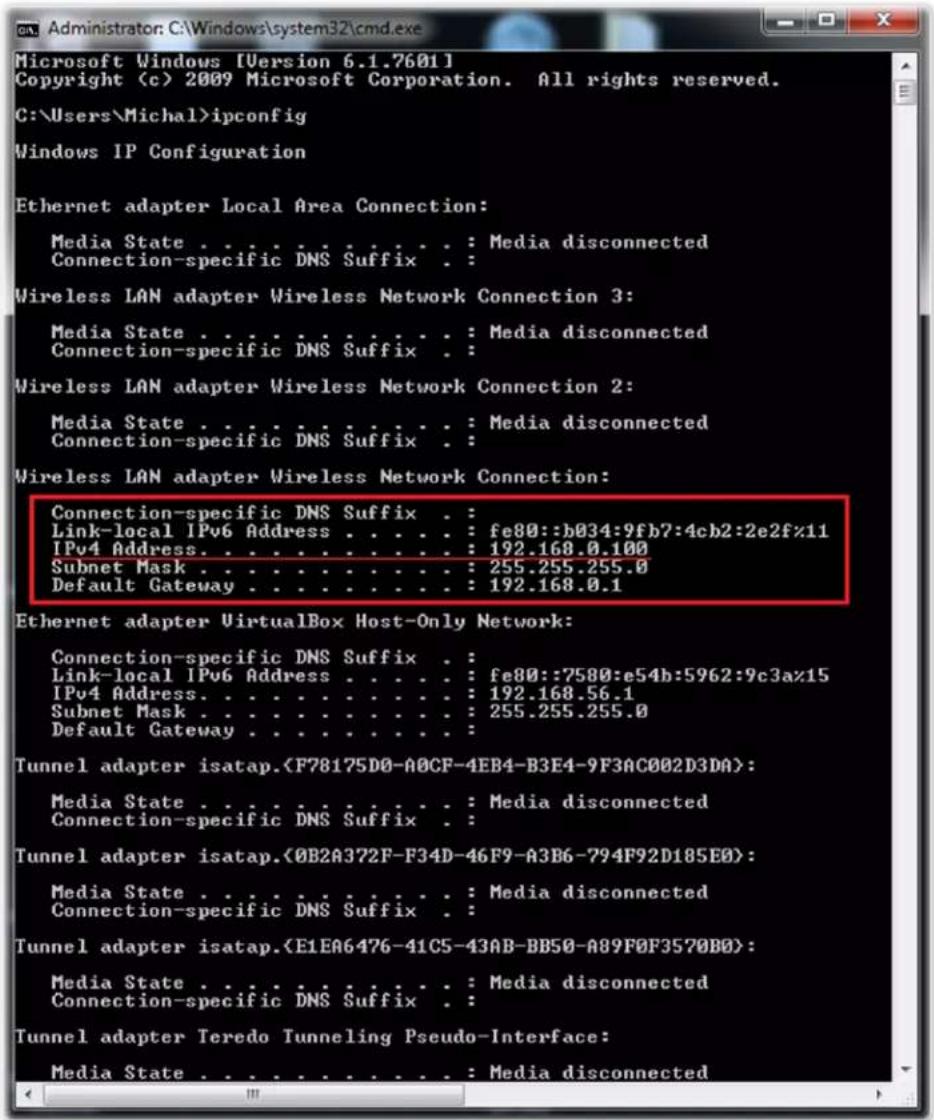
- Start cmd application (hit Windows "START" button and type "cmd"):
text_image
Programs (1) cmd File description: Windows Command Processor Company: Microsoft Corporation File version: 6.1.7601.17514 Date created: 2010-11-21 04:23 Size: 337 KB See more results cmd × Shut down- Type "ipconfig" which will show current network configuration:
text_image
Microsoft Windows [Version 6.1.7601] Copyright (c) 2009 Microsoft Corporation. All rights reserved. C:\Users\Michal>ipconfig Windows IP Configuration Ethernet adapter Local Area Connection: Media State . . . . . . . . . . . : Media disconnected Connection-specific DNS Suffix . : Wireless LAN adapter Wireless Network Connection 3: Media State . . . . . . . . . . . . : Media disconnected Connection-specific DNS Suffix . : Wireless LAN adapter Wireless Network Connection 2: Media State . . . . . . . . . . . . : Media disconnected Connection-specific DNS Suffix . Wireless LAN adapter Wireless Network Connection: Connection-specific DNS Suffix . : Link-local IPv6 Address . . . . . . : fe80::b034:9fb7:4cb2:2e2fz11 IPv4 Address. . . . . . . . . . . : 192.168.0.100 Subnet Mask . . . . . . . . . . . : 255.255.255.0 Default Gateway . . . . . . . . : 192.168.0.1 Ethernet adapter VirtualBox Host-Only Network: Connection-specific DNS Suffix . Link-local IPv6 Address . . . . . : fe80::7580:e54b:5962:9c3az15 IPv4 Address. . . . . . . . . . : 192.168.56.1 Subnet Mask . . . . . . . . . : 255.255.255.0 Default Gateway . . . . . . Tunnel adapter isatap.(F78175D0-A0CF-4EB4-B3E4-9F3AC002D3DA): Media State . . . . . . . : Media disconnected Connection-specific DNS Suffix . Tunnel adapter isatap.(OB2A372F-F34D-46F9-A3B6-794F92D185E0): Media State . . . . . . . : Media disconnected Connection-specific DNS Suffix . Tunnel adapter isatap.(E1EA6476-41C5-43AB-BB50-A89F0F3570B0): Media State . . . . . : Media disconnected Connection-specific DNS Suffix . Tunnel adapter Teredo Tunneling Pseudo-Interface: Media State . . . . . . : Media disconnected- Then you must find your currently connected network card (Ethernet card or Wi-fi card) and check the IP address. In this case the IP address is 192.168.0.100. ng76 IP address must be in the same subnet, so for above example it would mean any IP address from 192.168.0.2 to 192.168.0.254, excluding currently occupied addresses by any devices connected to your network (like your workstation address, router address, etc.).
4.3.5.2. OSX – how to check your IP address.
If You work on a Mac and You would like to configure ng76 with a static IP address, You will need to know which address to set up. It must be from the same network, and it must be unique. Below tutorial shows how to check it.
- Start "Terminal" (located in Applications/Utilities) application:

Activity Monitor

AirPort Utility

AU Lab

Audio MIDI Setup

Bluetooth File Exchange

Boot Camp
Assistant

ColorSync Utility

Console

Digital Color Meter

Disk Utility

Grab

Grapher

Keychain Access

Migration Assistant

Script Editor

System Information

Terminal

VoiceOver Utility

X11

ZipRecentLogs.com
mmand
- Type "ifconfig" which will show current network configuration:
Mac-mini-Michal:\~ michal\$ ifconfig
lo0: flags=8049
options=3
inet6 ::1 prefixlen 128
inet 127.0.0.1 netmask 0xff000000
inet6 fe80::1%lo0 prefixlen 64 scopeid 0x1
nd6 options=1
gif0: flags=8010
stf0: flags=0<> mtu 1280
en0: flags=8863
options=27
ether 00:23:df:7f:b5:28
inet6 fe80::223:dfff:fe7f:b528%en0 prefixlen 64 scopeid 0x4
inet 192.168.0.103 netmask 0xffffff00 broadcast 192.168.0.255
nd6 options=1
media: autoselect (1000baseT
status: active
en1: flags=8823
ether 00:24:36:eb:b3:51
nd6 options=1
media: autoselect (
status: inactive
fw0: flags=8863
lladdr 00:23:df:ff:fe:7f:b5:28
nd6 options=1
media: autoselect
status: inactive
Mac-mini-Michal:\~ michal\$
- Then you must find your currently connected network card (Ethernet card or Wi-fi card) and check the IP address. In this case the IP address is 192.168.0.103. Unit's IP address must be in the same subnet, so for above example it would mean any IP address from 192.168.0.2 to 192.168.0.254 excluding currently occupied addresses by any device connected to your network (like your workstation address, router address, etc.).
4.3.5.3. Set up static IP address.
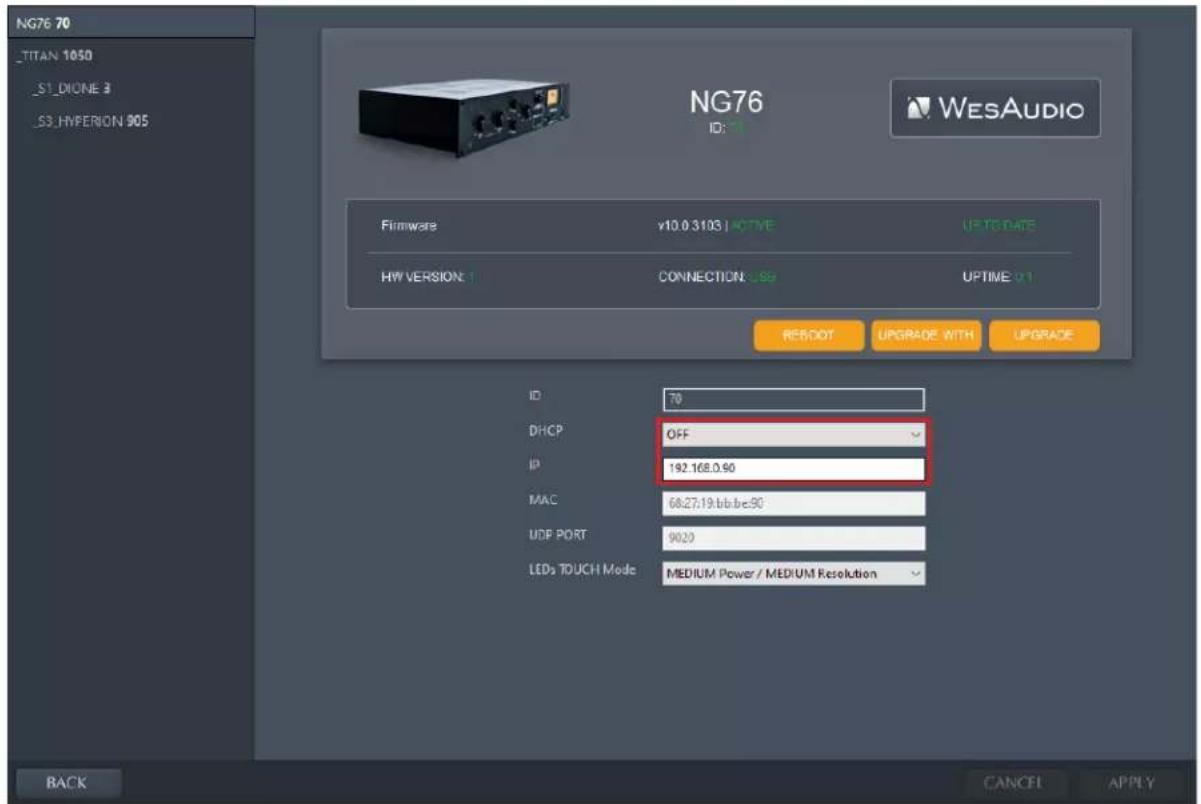
Now if we know which address to set up, first we need to connect ng76 directly to your workstation using USB cable. Then start GConManager and select "_CONFIG" application. Select your ng76 unit at the device list on the left side of the screen, then change IP address:
To change any network specific configuration of your ng76:
1) Connect your ng76 directly to your workstation through USB cable (If connection to ng76 is already established through Ethernet cable, this step is not necessary),
2) Start GConManager and go to _CONFIG application.
3) Then select your ng76 unit from the left side of the screen.
4) Then change DHCP option to "OFF" (if it is currently "ON"). Unit will restart, and your connection will re-establish.
5) Enter the IP address that you would like to set (check out previous chapter if this part isn't clear), hit Apply button. Unit will restart, and your connection with ng76 will be established again.
text_image
NG76 70 _TITAN 1050 _S1_DIONE 3 _S3_HYPERION 905 NG76 ID: 71 WESAUDIO Firmware v10.0.3103 | ACTIVE UP TO DATE HW VERSION: 1 CONNECTION: 5G UPTIME v1 RESET UPGRADE WITH UPGRADE ID 70 DHCP OFF IP 192.168.0.90 MAC 68.27.19.bbb.be90 UDP PORT 9020 LEDs TOUCH Mode MEDIUM Power / MEDIUM Resolution BACK CANCEL APPLYNow you can disconnect USB cable and connect ng76 using Ethernet cable.
4.3.6. Direct connection – setting IP address on PC/MAC
To directly connect unit to your workstation via Ethernet cable, it is mandatory to set up IP address for your network interface (Ethernet network card). This activity is not in scope of this manual; however, it can be easily found online, please find below help pages:
Windows: http://www.howtogeek.com/howto/19249/how-to-assign-a-static-ip-address-in-xp-vista-or-windows-7/
OSX: http://www.macinstruct.com/node/550
5. Automation and recall
This chapter describes all options to manage ng76 and automate its settings. Source of ng76 automation is DAW plugin available in all common formats.
5.1. DAW Plug-in
Ng76 plug-in allows to control all unit's parameters, and it is available in all common standards VST2/VST3/AU/AAX.

text_image
CH1 ETH ID:70 COPY:CH1 to CH2 UNDO READ Default * SAVE SAVE AS PRESET INFO S.C. FILTER Hz IN 24 30 12 8 5 2 10 High LOW HIGH LOW LOW LOW LOW LOW LOW LOW LOW LOW LOW LOW LOW LOW LOW LOW LOW LOW LOW LOW LOW LOW LOW LOW LOW LOW LOW LOW LOW LOW LOW LOW LOW LOW LOW LOW LOW LOW LOW LOW LOW LOW LOW LOW LOW LOW LOW LOW LOW LOW LOW S.C. FILTER Hz IN 24 30 12 8 5 2 10 High LOW HIGH LOW HIGH LOW HIGH LOW HIGH LOW HIGH LOW HIGH LOW HIGH LOW HIGH LOW HIGH LOW HIGH LOW HIGH LOW HIGH LOW HIGH LOW HIGH LOW HIGH LOW HIGH LOW HIGH LOW HIGH LOW HIGH LOW HIGH LOW HIGH LOW HIGH LOW HIGH LOW HIGH LOW HIGH LOW HOLD SHIFT TO COMBINE WESAUDIO OUT 20 10 5 0 0 0 0 0 0 0 0 0 0 0 0 0 0 0 0 0 0 0 0 0 0 0 0 0 0 0 0 0 0 0 0 0 0 0 0 0 0 0 0 0 0 0 0 0 0 0 0 0 0 10.1111111111111111111111111111111111111111111111111111111111111111111111111111111111111111111111111111.96.96.96.96.96.96.96.96.96.96.96.96.96.96.96.96.96.96.96.96.96.96.96.96.96.96.96.96.96.96.96.96.96.96. WESAUDIO OUT 20 10 5 0 0 0 0 0 0 0 0 0 0 0 0 0 0 0 0 0 0 0 0 0 0 0 0 0 0 0 0 0 0 0 0 0 0 0 0 0 0.96.96.96.96.96.96.96.96.96.96.96.96.96.96.96.96.96.96.96.96.96.96. WESAUDIO OUT 20 10 5 0 0 0 0 0 0 0 0 0 5 3 2 2 2 2 2 2 2 2 2 2 2 2 2 2 2 2 2 2 2.96.96.96.96.96.96.96.96.96.96.96.96.96.96.96.96.96.96.96. WESAUDIO OUT 20 8 5 3 2 2 2 2 2 2 2 2 2 2 2 2 2 2 2 2 2 2 2 2 2 2 2 2 2 2 2 2 2 2 2 2 2 .96.96.96.96.96.96.96.96.96.96.96.96.96.96.96. WESAUDIO OUT HOLD SHIFT TO COMBINEng76 comes with two plug-in types:
- Stereo – plug-in has full control over two mono units, this mode supports dual mono and stereo operation/compression.
- Mono – plug-in connects and controls just one unit.
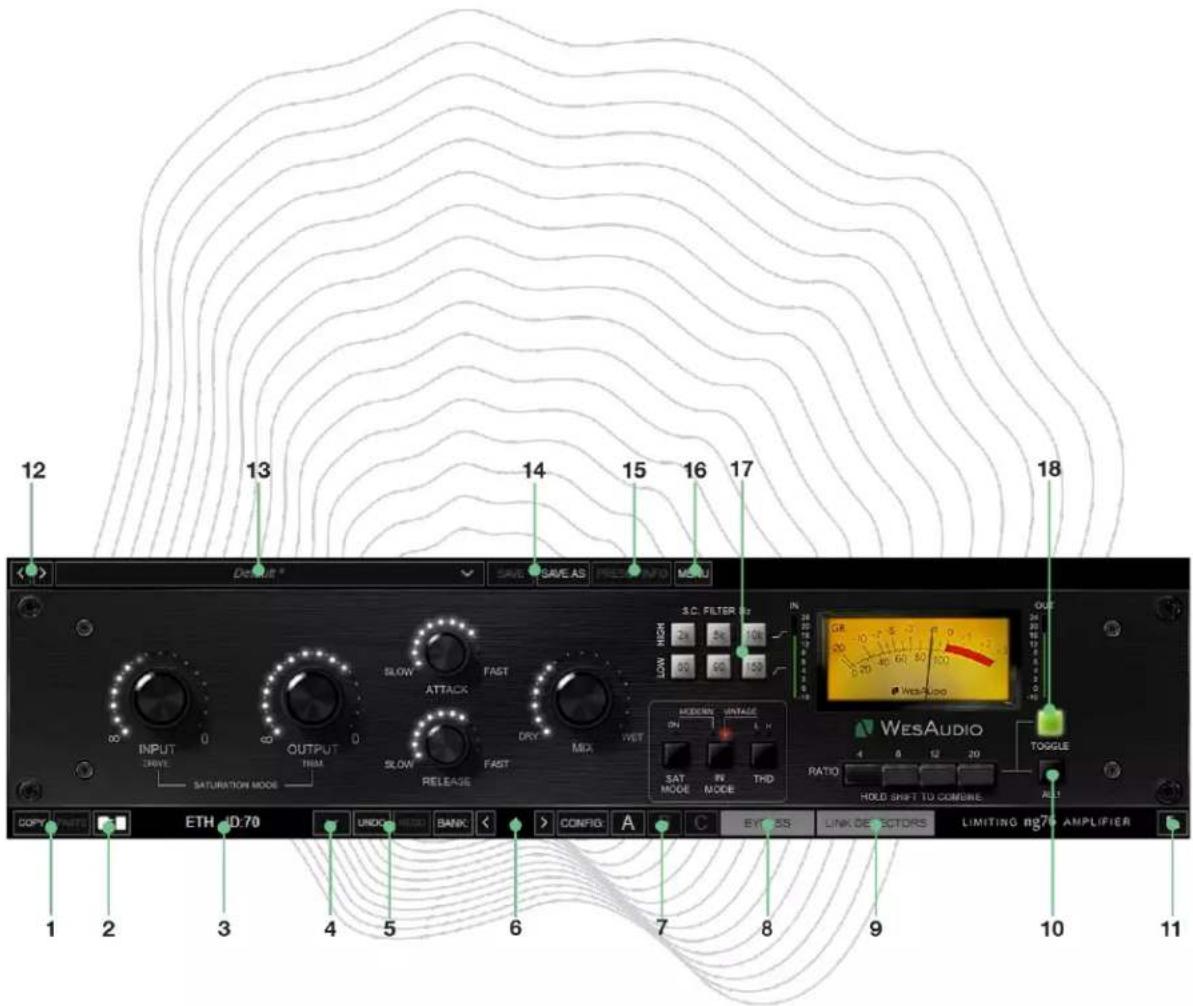
5.1.1. Mono plug-in
text_image
12 Default 13 14 15 16 17 18 SWE Audio WES Audio OUTPUT FAST 3.C FILTER LOW HIGH 2K 5K 10K 80 60 150 SLOW ATTACK DRY MIX WET MODERN VOLTAGE ON SAT MODE INV THD MODE MODE HOLD SHIFT TO COMBIE 10 11 COPY NAME ETH ID:70 UNIC BANK > CONFIG A C EYE SS LINK DE FECTORS LIMITING bg76 AMPLIFIER 1 2 3 4 5 6 7 8 9 10 11- Copy/Paste – copy/paste current parameter state.
- Toggle connection button: Button toggles connection status ON/OFF. Please note that button works only if ID has been previously selected using "Select connection button".
- Connection details: Additional connection information:
a. Connection Type:
i. USB - unit has been connected through USB.
ii. ETH - unit has been connected through Ethernet.
b. Connection ID: Unique Connection ID of connected HW unit.
NOTE: This fields also shows connection status:
a. ON - Font WHITE/Style: NORMAL: Connection is established.
NG76 USER MANUAL REV1
b. OFF – FONT GRAY/Style: NORMAL: Connection is NOT established.
c. Connecting FONT GRAY/Style: ITALIC – Connection process is ongoing. If
"Connecting" state is visible for longer period (more than 5 seconds), and plugin has no control over the unit, that would mean:
i. HW unit is no longer connected to your Workstation.
ii. The HW unit was disconnected or detached by operating system for some reason.
iii. Any other reason which should be consulted with support@wesaudio.com.
- Select connection button: This button shows all connected devices, if "drop-down" list with element IDs is not visible, that means that no devices has been detected which support GCon protocol.
- Undo/Redo: Undo or redo last parameter change.
- Config Bank – config bank selection – each config banks contains 3 configs (A/B/C):
a. This parameter can be automated to trigger different compressor settings on different songs in the same session, or different parts of the song.
- Fast preset change (A/B/C): Button switches between available configs A/B/C. Please note that these presets won't switch any connection related parameters. That means Connection ID is shared between all available setups (A/B/C) and won't be changed if any of those buttons is hit.
- Bypass: bypass button.
- Link Detectors – button engages stereo link of the detectors implemented through external wires on the back (TRS sockets).
- ALL – All button IN! – engages all ratio buttons.
- Resize – Button which selects size of the GUI: 100%/125%/150%/175%/200%.
- Next/Previous preset – button just loads next or previous preset available.
- Preset Selector – allows to select preset, show its details, delete preset.
- Preset Save / Save as – allows to save preset.
- Preset Info – shows currently loaded preset's details.
- Menu:
a. Reset parameters to default – sets all plug-in parameters to default.
b. For stereo plug-in: copy channels function.
-
SC Filter selection – as sidechain filters are implemented as two separate sections, plug-in allows to select proper values with via independent buttons.
-
Ratio Toggle – The Ratio Toggle button governs the behavior of the ratio buttons. By default, when the Toggle is enabled, pressing any button on the ratio panel will automatically disable the previous setting. In this mode, to configure multiple ratios simultaneously, the hardware buttons must be used, and all desired ratios must be set at the same time. When the Toggle button is disabled, each of the ratio buttons operates independently. This allows you the freedom to engage or disengage any combination of ratios as desired, without affecting other settings. With independent operation, you can easily create and adjust various ratio combinations to suit your specific compression requirements.
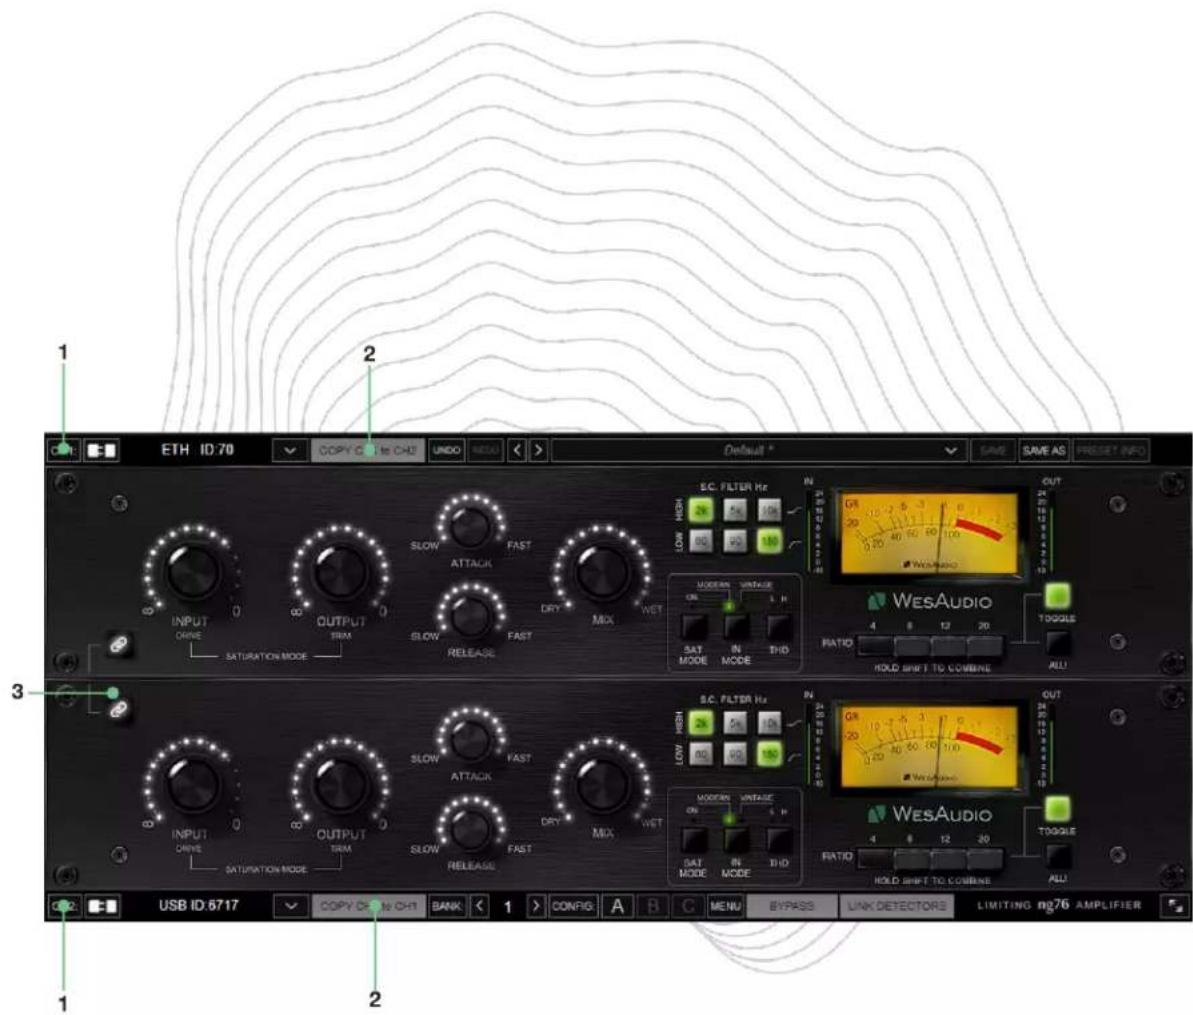
5.1.2. Stereo Plug-in
text_image
ETH ID:70 COPY C 1st CHS UNDO REDU Default * SAVE SAVE AS PROSET INFO INPUT ORIVE OUTPUT TRIM SATURATION MODE SLOW ATTACK FAST SLOW RELEASE FAST DRY MOX WET S.C. FILTER Hz LOW HIGH 50 20 10 MODERN VINTAGE ON L H SAT MODE IN MODE THD OUT WESAUDIO 4 8 12 20 TODGLE RATIO HOLD SHIFT TO COMBINE ALL 3 INPUT ORIVE OUTPUT TRIM SATURATION MODE SLOW ATTACK FAST SLOW RELEASE FAST DRY MOX WET S.C. FILTER Hz LOW HIGH 50 20 10 MODERN VINTAGE ON L H SAT MODE IN MODE THD OUT WESAUDIO 4 8 12 20 TODGLE RATIOThe settings of stereo plug-ins are nearly identical to mono plug-ins. Therefore, this section will focus only on the extra parameters. The purpose of stereo plug-ins is to control two units simultaneously. When two units are connected through a stereo plug-in, any changes made to the parameters, whether through hardware or the plug-in, will affect both channels if the parameter link button is engaged.
- Channel 1/Channel 2 connection controls: All the controls that are explained for mono plug-ins are replicated and accessible for two channels, enabling the plug-in to connect with two separate mono units independently.
-
Copy channels – This button allows you to duplicate the current parameter values to another channel. Typically, it is used when connecting with two units that have been set up differently.
-
Parameter Link – This button links two channels. If for whatever reason we would like to set two different values for each channel, this is the button that needs to be disabled. When there are two different settings on each channel, and link will be engaged, software will maintain all parameter differences in a relative way.
5.1.3. Stereo Plug-in – automation of linked channels
Please note that when channels are linked together using the PARAMETER LINK function, only one channel needs to be automated, and a second channel will follow accordingly. If both channels are automated, each channel will try to update the other one, which will lead to unexpected and unwanted results.
6. Abbreviations and terms
GCon – high speed communication protocol which allows full management and recall of analog devices. Please note that this is just management protocol, audio signal transfer is not in scope of its capabilities.
NG500 - Next generation 500 series.
NG500 connector – special connector which extends standardized 500 series connector with additional pins.
7. Warranty
All WesAudio products are built to the highest standards and should provide reliable performance for many years, subject to reasonable care, use, transportation, and storage.
WesAudio warrants all products to be free of defective parts and workmanship for a period of two years.
This warranty period begins at the original date of purchase and is transferable to any person who may subsequently purchase the product during this time. This warranty excludes the following conditions: normal wear and tear, misuse, customer negligence, accidental damage, unauthorized repair or modification, cosmetic damage and damage incurred during shipment. During the time of this warranty, WesAudio will repair or replace, at its option, any defective parts or repair defective workmanship without charge, provided the customer has appropriate proof of purchase and that the product has its original factory serial number. In all warranty claims the customer is responsible for shipping costs to the WesAudio facility, and WesAudio pays for return ground shipping.
- History
| Editor | Version | Date | Description |
| Michal Weglicki | V1 | 07.04.2023 | Document created. |