
PowerConnect B-RX8 - Network switch DELL - Free user manual and instructions
Find the device manual for free PowerConnect B-RX8 DELL in PDF.

| Product Type | Network switch |
| Model | Dell PowerConnect B-RX8 (BigIron RX-8) |
| Interface Slots | 8 interface module slots |
| Switch Fabric Slots | 3 (2 required, 1 redundant) |
| Management Module Slots | 2 (active/standby) |
| Power Supply Slots | 4 (AC or DC, 2 required, 2 redundant) |
| Cooling | Front fan module with 4 four-speed fans, rear fans on larger models |
| Dimensions (H x W x D) | 7.0 x 17.5 x 24.5 inches (approx., 4U) |
| Rack Mounting | Standard 19-inch EIA310-D rack, up to 6 units per rack |
| Supported Data Rates | 10 Gigabit Ethernet (XFP), 1 Gigabit Ethernet (SFP/RJ-45), 10/100/1000 Mbps |
| Key Features | Non-blocking switching, L2/L3 routing, sFlow, QoS, VLAN, STP, LACP, VRRP, and more |
| Hot-Swappable Components | All modules (management, interface, switch fabric, power supplies, fans) |
| Redundancy | Management (Hitless Failover), switch fabric, power supplies, fans |
| Management Port | 10/100/1000BaseTX Ethernet (RJ-45) and Console (DB-9) |
| Software | BigIron RX series, supports RIP, OSPF, BGP, IGMP, PIM, and more |
| Safety Notices | Class 1 laser products, ESD precautions, operating temperature 0-40°C |
| Maintenance | Replace fan modules, air filters, and power supplies; clean with dry cloth |
| Spare Parts | Management modules, interface modules, switch fabric modules, power supplies, fan trays, XFP/SFP optics |
| Regulatory Compliance | FCC Class A, ICES-003, VCCI Class A, CE, and others |
Frequently Asked Questions - PowerConnect B-RX8 DELL
User questions about PowerConnect B-RX8 DELL
0 question about this device. Answer the ones you know or ask your own.
Ask a new question about this device
Download the instructions for your Network switch in PDF format for free! Find your manual PowerConnect B-RX8 - DELL and take your electronic device back in hand. On this page are published all the documents necessary for the use of your device. PowerConnect B-RX8 by DELL.
USER MANUAL PowerConnect B-RX8 DELL
Supporting BigIron RX running software release 02.7.02
NOTE
A NOTE indicates important information that helps you make better use of your computer.

CAUTION
See the safety and regulatory information that shipped with your system. For additional regulatory information, see the Regulatory Compliance Homepage on www.dell.com at the following location: www.dell.com/regulatory_compliance.

CAUTION
A CAUTION indicates potential damage to hardware or loss of data if instructions are not followed.

DANGER
A DANGER indicates a potential for property damage, personal injury, or death.
Information in this document is subject to change without notice.
© 2009 Dell Inc. All rights reserved.
Reproduction of these materials in any manner whatsoever without the written permission of Dell Inc. is strictly forbidden.
Trademarks used in this text: Dell, the DELL logo, Inspiron, Dell Precision, Dimension, OptiPlex, Latitude, PowerEdge, PowerVault, PowerApp, Dell OpenManage and the YOURS IS HERE logo are trademarks of Dell Inc.; Intel, Pentium, and Celeron are registered trademarks of Intel Corporation in the U.S. and other countries; Microsoft, Windows, Windows Server, MS-DOS and Windows Vista are either trademarks or registered trademarks of Microsoft Corporation in the United States and/or other countries.
Other trademarks and trade names may be used in this document to refer to either the entities claiming the marks and names or their products. Dell Inc. disclaims any proprietary interest in trademarks and trade names other than its own.
Regulatory Model Codes: Brocade DCX-4S, Brocade DCX
About This Document
In this chapter ix
Audience ix
Supported hardware and software ix
Document conventions.... ix
Text formatting....x
Notes, cautions, and danger notices ....x
Notice to the reader .... x
Related publications....xi
Getting technical help or reporting errors....xi
Web access ....xi
E-mail access....xi
Telephone access .....xi
Chapter 1 Product Overview
In this chapter....1
Product overview....1
Hardware features 2
Chassis 2
Management modules 8
Interface modules....10
2-port 10 Gigabit Ethernet module....11
16-port 10 Gigabit Ethernet oversubscribed module .....12
Gigabit Ethernet interface module (SFP)....14
48-port 1 Gigabit Ethernet interface module
(Mini RJ 21 Copper)....15
Switch fabric module....16
Power supplies 17
Cooling system....18
LEDs....22
Rack mount kit....22
Supported software features....23
Chapter 2 Installing a BigIron RX Series Switch
In this chapter 25
Installation precautions....25
General precautions ....26
Power precautions....26
Installing a BigIron RX-4 switch....28
Preparing the installation site .....29
Unpacking a BigIron RX-4 switch .....29
Chassis lifting guidelines for BigIron RX-4 switches .....30
Installing a BigIron RX-4 chassis in a rack . . . . . . . . . . . . . . . . . . . . . . . . . . . . . . . 30
Installing BigIron RX-4 modules .....33
Installing power supplies in a BigIron RX-4 chassis .....35
Connecting AC power to a BigIron RX-4 chassis .....36
Connecting DC power to a BigIron RX-4 chassis . . . . . . . . . . . . . . . . . . . 36
Final steps 37
Installing a BigIron RX-8 switch .....38
Preparing the installation site ....38
Unpacking a BigIron RX-8 switch .....38
Chassis lifting guidelines for BigIron RX-8 switches .....39
Installing the BigIron RX-8 chassis in a rack .....39
Installing BigIron RX-8 modules .....42
Installing power supplies in the BigIron RX-8 chassis .....44
Connecting AC power to a BigIron RX-8 chassis .....45
Connecting DC power to a BigIron RX-8 chassis .....46
Final steps 47
Installing a BigIron RX-16 switch 47
Preparing the installation site 47
Unpacking a BigIron RX-16 switch .....48
Chassis lifting guidelines for BigIron RX-16 switches .....48
Installing a BigIron RX-16 chassis in a rack .....49
Installing BigIron RX-16 modules .....52
Installing power supplies in a BigIron RX-16 chassis .....54
Connecting AC power to a BigIron RX-16 chassis .....55
Connecting DC power to a BigIron RX-16 chassis .....56
Final steps 57
Installing a BigIron RX-32 switch 57
Preparing the installation site 57
Unpacking a BigIron RX-32 switch .....58
Installing a BigIron RX-32 chassis in a rack.....59
Installing BigIron RX-32 modules....62
BigIron RX-32 cable routing. 67
Installing power supplies in a BigIron RX-32 chassis .....75
Connecting AC power to a BigIron RX-32 chassis ..... 77
Final steps 77
Attaching a management station....77
Attaching a PC or terminal to the Console port or Ethernet port 78
Attaching the management module's Ethernet Port to a network....79
Powering-on the power source 79
Verifying proper operation ....80
Observing the LEDs....80
Displaying the module status....85
Chapter 3 Using the Brocade Structured Cabling Components
In this chapter....89
Cable Cinch overview....89
mRJ-21 procedures....90
Cable Cinch with two mRJ-21 cables....90
Cable Cinch with three mRJ-21 cables....91
Cable Cinch with four mRJ-21 cables....91
Cable Cinch with five mRJ-21 cables....92
Cable Cinch with six mRJ-21 cables....92
Cable Cinch with seven mRJ-21 cables .....93
Cable Cinch with eight mRJ-21 cables .....93
RJ-45 procedures....94
Cable Cinch with one group of RJ-45 cables .....94
Cable Cinch with two groups of RJ-45 cables .....94
Cable Cinch with three groups of RJ-45 cables .....95
Cable Cinch with four groups of RJ-45 cables .....95
Cable Cinch with five groups of RJ-45 cables .....96
Cable Cinch with six groups of RJ-45 cables .....96
Cable Cinch with seven groups of RJ-45 cables ..... 97
Cable Cinch with eight groups of RJ-45 cables ..... 97
Chapter 4 Connecting a BigIron RX Series Switch to a Network Device
In this chapter 99
Assigning passwords....99
Configuring IP addresses....102
Support of sub-net masks....102
Assigning an IP address to a management interface .....102
Assigning an IP address to an interface, virtual Interface, or loopback.....103
Enabling and disabling the interfaces....104
Understanding how the management port functions.....105
Connecting a BigIron RX Series switch....105
Installing a fiber optic module ....106
Cabling a fiber optic module .....107
Enhanced Digital Optical Monitoring .....107
Cleaning fiber optic modules .....108
Troubleshooting network connections .....109
Testing network connectivity .....110
Pinging an IP address....110
Tracing a route .....110
Using virtual cable testing to diagnose a cable .....111
Chapter 5 Managing the BigIron RX Series Chassis and Modules
In this chapter....113
Managing the BigIron RX Series chassis....113
Displaying chassis status and temperature readings .....113
Displaying the Syslog configuration and static and dynamic buffers....115
Managing the cooling system....117
Configuring the cooling system.....117
Manually setting the fan speed 121
Monitoring the cooling system....122
Managing the interface modules....123
Configuring interface module boot parameters. . . . . . . . . . . . . . . . 123
Synchronizing the interface module's IronWare images between management and interface modules. 123
Specifying an immediate boot....125
Changing priority of chassis slots for interface modules ....129
Disabling and reenabling power to the interface modules . . .130
Disabling and reenabling power to the switch fabric modules130
Enabling and disabling management module CPU usage
calculations....131
Displaying management module CPU usage .....132
Enabling and disabling packet logging for management and interface
modules....133
Displaying a packet log....134
Removing MAC address entries 135
Chapter 6 Maintaining a BigIron RX Series Switch
In this chapter....137
Replacing a management module....137
Removing a management module ....138
Installing a new management module ....139
Replacing an interface module 139
Removing an interface module.....140
Installing a new interface module....141
Replacing a switch fabric module .....143
Removing a switch fabric module....144
Installing a new switch fabric module .....144
Replacing a fiber-optic transceiver .....145
Removing a fiber-optic transceiver .....145
Installing a new fiber-optic transceiver....146
Cabling a fiber-optic transceiver .....146
Replacing a power supply....147
Determining which power supply failed .....147
Replacing a power supply....147
Replacing cooling system components .....150
Replacing fan assemblies in the BigIron RX- 32 .....150
Replacing fan assemblies in the BigIron RX-16.....153
Replacing the fan assembly in the BigIron RX-4 and BigIron RX-8....155
Replacing the air filters in a BigIron RX Series switch.....158
Chapter 7 Upgrading Software Images and Configuration Files
In this chapter....163
Software images required 163
Software image naming conventions .....165
Displaying flash memory and version information....166 Displaying flash information....166 Displaying version information....171
Upgrading the BigIron RX Series software....174 Changes to software images starting with version 02.5.00..174 Command change....176 Unified software image upgrade to upgrade release 02.6.00 and later....177 Unified software image upgrade to upgrade release 02.2.01 to 02.5.00....178 Upgrading software releases prior to release 02.2.01....179 Basic tasks in the software upgrade process....179 Upgrading the management module's monitor and boot images....180 Upgrading the management module's IronWare image....180 Upgrading the interface module's monitor and boot images .181 Upgrading the interface module's IronWare image....182 Rebooting the management module....183 Upgrading the MBRIDGE FPGA on the management module 183 Hitless Layer 2 OS upgrade....185
Loading and saving configuration files .....189 Replacing the startup configuration with the running configuration .....190 Replacing the running configuration with the startup configuration .....190 Logging changes to the startup-config file.....190 Copying a configuration file to or from a TFTP server .....190 Making local copies of the startup configuration file .....191
Dynamic configuration loading....191 Loading the configuration information into the running-config193
Using SNMP to save and load configuration information.....194
Erasing image and configuration files .....195
File synchronization ....195 File synchronization between the active and standby management modules ....195 File synchronization between the management and interface modules ....196
Scheduling a system reload ....198
Reloading at a specific time .....198
Reloading after a specific amount of time. . . . . . . . . . . . . . . . . . . . . . . . . . . . . . . . . . . . . . . . . . . . 198
Displaying the amount of time remaining before a scheduled reload....199
Canceling a scheduled reload....199
Diagnostic error codes and remedies for TFTP transfers.....199
Chapter 8 Hardware Specifications
In this chapter....201
Hardware specifications....201
Power specifications....201
Physical dimensions .....203
Operating environment....204
Storage environment 204
Safety agency approvals....204
Electromagnetic approvals....204
Port specifications ....205
Console port pin assignments .....205
Management port pin assignments .....206
Appendix A Regulatory Statements
U.S.A. 207
Industry Canada statement....207
Europe and Australia. 207
Japan 207
Korea 208
Appendix B Caution and Danger Notices
Caution statements. 209
Danger notices 216
Appendix C Software Specifications
IEEE compliance....223
RFC support....223
General protocols....223
BGP 224
OSPF 224
RIP....225
IP Multicast....225
Management....225
Internet drafts 226
In this chapter
- Audience. ix
- Supported hardware and software.... ix
- Document conventions ix
- Notice to the reader .... x
- Related publications ...... xi
- Getting technical help or reporting errors .... xi
Audience
This document is designed for system administrators with a working knowledge of Layer 2 and Layer 3 switching and routing.
If you are using a Brocade Layer 3 Switch, you should be familiar with the following protocols if applicable to your network – IP, RIP, OSPF, BGP, ISIS, IGMP, PIM, DVMRP, and VRRP.
Supported hardware and software
The following hardware platforms are supported by this release of this guide:
- BigIron RX - 4
- BigIron RX - 8
- BigIron RX - 16
- BigIron RX - 32
Document conventions
This section describes text formatting conventions and important notice formats used in this document.
Text formatting
The narrative-text formatting conventions that are used are as follows:
bold text Identifies command names
Identifies the names of user-manipulated GUI elements
Identifies keywords
Identifies text to enter at the GUI or CLI
italic text Provides emphasis
Identifies variables
Identifies document titles
code text Identifies CLI output
For readability, command names in the narrative portions of this guide are presented in bold: for example, show version.
Notes, cautions, and danger notices
The following notices and statements are used in this manual. They are listed below in order of increasing severity of potential hazards.
NOTE
A note provides a tip, guidance or advice, emphasizes important information, or provides a reference to related information.

CAUTION
A Caution statement alerts you to situations that can be potentially hazardous to you or cause damage to hardware, firmware, software, or data.

DANGER
A Danger statement indicates conditions or situations that can be potentially lethal or extremely hazardous to you. Safety labels are also attached directly to products to warn of these conditions or situations.
Notice to the reader
This document may contain references to the trademarks of the following corporations. These trademarks are the properties of their respective companies and corporations.
These references are made for informational purposes only.
Corporation Referenced trademarks and products
Phillips Screw Company, Inc Phillips
Related publications
The following Brocade documents supplement the information in this guide:
• BigIron RX Series Configuration Guide.
- IronView MIB Reference Manual.
- IronView Network Manager User Guide.
NOTE
For the latest edition of these documents, which contain the most up-to-date information, refer to Product Manuals at kp.foundrynet.com.
Getting technical help or reporting errors
Brocade is committed to ensuring that your investment in our products remains cost-effective. If you need assistance, or find errors in the manuals, contact Brocade using one of the following options:
Web access
Go to kp.foundrynet.com and log in to the Knowledge Portal (KP) to obtain more information about a product, or to report documentation errors. To report errors, click on Cases > Create a New Ticket. Make sure you specify the document title in the ticket description.
E-mail access
Send an e-mail to IPsupport@brocade.com
Telephone access
United States and Canada: 800-752-8061
International: +800-ATFIBREE (+800 28 34 27 33)
Refer to the Services & Support page on www.brocade.com for additional toll-free numbers that may be available within your country.
Areas unable to access 800 numbers: +1-408-333-6061
In this chapter
- Product overview .... 1
- Hardware features.... 2
- Supported software features 23
Product overview
The BigIron RX Series switch provides high-performance L2/3 switching for the Enterprise, large data centers, and grid computing topologies.
The BigIron RX Series switch provides the following benefits:
- 240 Gbps full-duplex capacity per full slot and over 1.92 Terabit switching capacity for wire-speed, non-blocking switching and routing of up to 1.14 Bpps throughput capacity.
- Non-blocking 10 GbE and 1 GbE port density of up to 64 non-blocking 10 Gigabit Ethernet or 384 Gigabit Ethernet ports within a 16-slot chassis and up to 192 10 Gigabit Ethernet or 1,152 Gigabit Ethernet ports in a standard 7-foot Telco rack.
- Ultra-low latency routing of up to 512,000 IPv4 routes in hardware.
- Support for a comprehensive set of standards-based routing protocols including RIP, IS-IS, BGP4, and OSFP.
- Foundry Direct Routing (FDR) with rule-based ACLs provide wire-speed forwarding, filtering and accelerated convergence.
• End-to-end QoS delivery with Advanced Bandwidth Management (ABM) features.
• The High availability (redundancy) of the following BigIron RX Series critical components are: - Redundant management modules with Hitless Management Failover (HMF)
- Redundant switch fabric elements
- Redundant fans
- Interface modules with hot-pleadable optics
• Hot-swappable power supplies - 80 Gbps of cross-module link aggregation based on 802.3ad for reliant bandwidth scalability between any two BigIron RX Series 10 Gigabit Ethernet switches.
- Built-in sFlow™ technology (RFC 3176) delivers scalable network monitoring, accounting and billing at 10 Gbps speed using Layer 2-7 per-port information, offering detailed capacity planning and security analysis solutions.
- A management (10/100/1000BaseTX Ethernet) port that can provide connectivity to your existing management network.
Hardware features
The BigIron RX Series switches are composed of the following major hardware components:
- Chassis
- Management modules
- Interface modules
- Switch fabric module
- Power supplies
• Cooling system, which is composed of temperature sensors, fans, and fan control modules - Rack mount kit
The following sections provide more information about these components.
Chassis
The BigIron RX Series chassis consists of the following four chassis:
• BigIron RX-4: Provides 4 interface slots
• BigIron RX-8: Provides 8 interface slots
• BigIron RX-16: Provides 16 interface slots
• BigIron RX-32: Provides 32 interface slots
The following figures illustrate the BigIron RX Series chassis:
FIGURE 1 BigIron RX-4 chassis

1 Interface slot 2 6 Switch fabric slot 1
2 Switch fabric slot 2 7 Interface slot 3
3 Switch fabric slot 3 8 Management slot 1
4 ESD connector 9 Management slot 2
5 Interface slot 1 10 Interface slot 4
FIGURE 2 BigIron RX-8 chassis

1 Interface slot 1 10 Interface slot 7
2 Interface slot 2 11 Interface slot 8
3 Interface slot 3 12 Management slot 1
4 Interface slot 4 13 Management slot 2
5 Switch fabric slot 1 14 Power supply slot 1
6 Switch fabric slot 2 15 Power supply slot 2
7 Switch fabric slot 3 16 Power supply slot 3
8 Interface slot 5 17 Power supply slot 4
9 Interface slot 6 18 ESD connector
FIGURE 3 BigIron RX-16 chassis

1 Interface slot 1 13 Interface slot 13
2 Interface slot 2 14 Interface slot 14
3 Interface slot 3 15 Interface slot 15
4 Interface slot 4 16 Interface slot 16
5 Interface slot 5 17 Switch fabric slot 1
6 Interface slot 6 18 Switch fabric slot 2
7 Interface slot 7 19 Switch fabric slot 3
8 Interface slot 8 20 Switch fabric slot 4
9 Interface slot 9 21 Management slot 1
10 Interface slot 10 22 Management slot 2
11 Interface slot 11 23 ESD connector
12 Interface slot 12
FIGURE 4 BigIron RX-32 chassis

1 Interface slot 1 19 Interface slot 19 37 Switch fabric slot 5
2 Interface slot 2 20 Interface slot 20 38 Switch fabric slot 6
3 Interface slot 3 21 Interface slot 21 39 Switch fabric slot 7
4 Interface slot 4 22 Interface slot 22 40 Switch fabric slot 8
5 Interface slot 5 23 Interface slot 23 41 Management slot 1
6 Interface slot 6 24 Interface slot 24 42 Management slot 2
7 Interface slot 7 25 Interface slot 25 43 Captive screws
8 Interface slot 8 26 Interface slot 26 44 ESD strap connector
9 Interface slot 9 27 Interface slot 27 45 Power supply 1
10 Interface slot 10 28 Interface slot 28 46 Power supply 2
11 Interface slot 11 29 Interface slot 29 47 Power supply 3
12 Interface slot 12 30 Interface slot 30 48 Power supply 4
13 Interface slot 13 31 Interface slot 31 49 Power supply 5
14 Interface slot 14 32 Interface slot 32 50 Power supply 6
15 Interface slot 15 33 Switch fabric slot 1 51 Power supply 7
16 Interface slot 16 34 Switch fabric slot 2 52 Power supply 8
17 Interface slot 17 35 Switch fabric slot 3
18 Interface slot 18 36 Switch fabric slot 4
BigIron RX-4
Upon shipment from the factory, the following components are installed in the BigIron RX-4 chassis as described:
- Two switch fabric modules.
- A slot blank in each interface module slot. The slot blank covers a slot that does not currently have a module installed in it, ensuring proper airflow within the chassis.
- A fan tray assembly, which is located in the front right side of the chassis. For more information about the fans, refer to “Cooling system” on page 18.
• One power supply (AC or DC).
In the slots of the chassis you can install the following:
- Up to two management modules (one active and one redundant).
- Up to three switch fabric modules.
- Up to four interface modules.
- Up to three power supplies (AC or DC).
Before installing any modules or power supplies, you must remove the slot blank or blank power supply faceplate, respectively.
BigIron RX-8
Upon shipment from the factory, the following components are installed in the BigIron RX-8 chassis as described:
- Two switch fabric modules.
- A slot blank in each interface module slot. The slot blank covers a slot that does not currently have a module installed in it, ensuring proper airflow within the chassis.
- A fan tray assembly, which is located in the front right side of the chassis. For more information about the fans, refer to “Cooling system” on page 18.
- Two power supplies (AC or DC).
In the slots of the chassis you can install the following:
- Up to two management modules (one active and one redundant).
- Up to three switch fabric modules.
- Up to eight interface modules.
- Up to four power supplies (AC or DC).
Before installing any modules or power supplies, you must remove the slot blank or blank power supply faceplate, respectively.
BigIron RX-16
Upon shipment from the factory, the following components are installed in the BigIron RX-16 chassis as described:
- Three switch fabric modules.
- A slot blank in each interface module slot. The slot blank covers a slot that does not currently have a module installed in it, ensuring proper airflow within the chassis.
- A fan tray assembly located in the front right side of the chassis. and two fan assemblies located at the rear of the chassis. For more information about the fans, refer to “Cooling system” on page 18.
- Four power supplies.
In the slots of the chassis you can install the following:
- Up to two management modules (one active and one redundant).
- Up to four switch fabric modules.
- Up to sixteen interface modules.
- Up to eight power supplies (AC or DC).
BigIron RX-32
Upon shipment from the factory, the following components are installed in the BigIron RX-32 chassis as described:
- One management module (shipped separately).
- Eight switch fabric modules (shipped separately).
- A slot blank in each interface module slot. The slot blank covers a slot that does not currently have a module installed in it, ensuring proper airflow within the chassis.
- Ten fan assemblies located at the rear of the chassis, four for the upper card cage, four for the lower card cage, and two for the power supplies.
- Five AC power supplies.
In the slots of the chassis you can install the following:
- Two management modules.
• Eight switch fabric modules. - Up to 32 interface modules.
- Up to eight AC power supplies.
Before installing any modules or power supplies, you must remove the slot blank or blank power supply faceplate, respectively (BigIron RX-4, -8, and 16). On the BigIron RX-32, before installing any modules, you must remove the shipping panels covering the upper and lower card cages.

CAUTION
If you do not install a module in a slot, you must keep the slot blank in place. If you run the chassis with an uncovered slot, the system may overheat.
Figure 1, Figure 2, Figure 3, and Figure 4 show the BigIron RX Series chassis and the slots into which you install the various modules. You must install the primary power supplies and the redundant power supplies as described in the figures.
Figure 1, Figure 2, Figure 3, and Figure 4 also show an electrostatic discharge (ESD) connector, into which you can plug an ESD wrist strap to ground yourself while handling and installing modules.

DANGER
For safety reasons, the ESD wrist strap should contain a 1 meg ohm series resistor.
The BigIron RX-16 and BigIron RX-32 chassis versions also include a grounding lug connector, located on the rear panel (left side). The BigIron RX-4 and BigIron RX-8 have two threaded holes on the right side of the chassis to accommodate the addition of a ground lug connector.
Management modules
The management module controls the BigIron RX Series hardware components, runs the networking protocols, and provides the Real Time Operating System (RTOS).
Each BigIron RX Series chassis requires one management module and can accept a second one for redundancy. A redundant management module works along with the active management module. If the active module becomes unavailable, the redundant management module automatically takes over the system operation, minimizing system downtime.
You can install management modules in dedicated slots marked M1 and M2. By default, the system considers the module installed in the slot marked M1 to be the active management module.
The BigIron RX-32 chassis uses a different management module than any of the other Brocade products. You cannot use management modules designed for the BigIron RX-32 in any of the other BigIron RX Series chassis or management modules designed for the BigIron RX-4, BigIron RX-8 or BigIron RX-16 in the BigIron RX-32 chassis.
NOTE
The BigIron RX Series management module is dedicated, which means that you must install it in the BigIron RX Series chassis only. If you attempt to install the BigIron RX Series management module in another Brocade chassis or a management module intended for another Brocade chassis in the BigIron RX Series chassis, the chassis and module will not function properly.
Additionally, the BigIron RX-32 chassis uses a different management module than any of the other BigIron RX Series chassis. You cannot use management modules designed for the BigIron RX-32 in any of the other Brocade device, because it will not function properly.
A management module is hot swappable, which allows you to remove and replace it without powering down the system.
Figure 5 shows the management module's front panel.
FIGURE 5 Management module front panel

The front panel includes the following control features:
- Two PCMCIA slots
- A Console port
• A 10/100/1000 Ethernet port - Six LEDs
PCMCIA slots
The PCMCIA slots support a flash PC card. The flash PC card provides storage space in addition to the system's flash memory. A flash PC card can store system files, including boot images, startup configuration files, running configuration files, and so on. As a result, you can perform system management tasks, such as copying files between flash PC cards, copying files between a flash PC card and flash memory, and so on.
Console port
The Console port is a standard DB-9 serial connector through which you can attach a PC or terminal to configure the BigIron RX Series system using the command line interface (CLI).
This port interfaces the control plane only and not the data plane.
10/100/1000 Ethernet port
The front panel includes a 10BaseT/100BaseTX/1000BaseTX auto-sensing, auto-negotiating Ethernet port. This port has an RJ-45 unshielded twisted pair (UTP) connector.
Typical uses of this port include but are not limited to the following:
- Connecting a PC through which you can access the system through a Telnet or SSHv2 connection and configure, monitor, and manage the BigIron RX Series system.
- Connecting to the 10BaseT/100BaseTX/1000BaseTX port of a switch or router, for connectivity to your existing management network. You can then access the BigIron RX Series system and configure, monitor, and manage the system from a management station.
NOTE
The existing management network into which you can connect the 10/100/1000 Ethernet port must be separate and isolated from the network over which user packets are switched and routed.
This port interfaces the control plane only and not the data plane.
LEDs
Table 1 describes the LEDs on the management module's front panel.
TABLE 1 Management module LEDs
| LED Position State Meaning | |||
| Port 1 and Port 2 | Each adjacent to the PCMCIA slot that is represents | On or blinking You have inserted a PCMCIA flash card in a slot or initiated a task related to the file management system on a flash card. As a result, the software is currently accessing the flash card. | |
| Off The software is not currently accessing a PCMCIA flash card inserted in a slot. | |||
| Active Lower Left On The module is functioning as the active management module. | |||
| Pwr Upper Left On The module is receiving power. | |||
| 10/100/1000 Ethernet Port | Above and right of RJ-45 connector | On (Green) | A link is established with the remote port. |
| Off A link is not established with the remote port. | |||
| 10/100/1000 Ethernet Port | Above and left of RJ-45 connector | On or blinking (Yellow) | The port is transmitting and receiving packets. |
| Off for an extended period | The port is not transmitting or receiving packets. | ||
Interface modules
You can install up to 32 BigIron RX Series interface modules in the BigIron RX Series chassis as described:
• BigIron RX-4: Supports up to 4 interface modules
• BigIron RX-8: Supports up to 8 interface modules
• BigIron RX-16: Supports up to 16 interface modules
• BigIron RX-32: Supports up to 32 interface modules
NOTE
A BigIron RX Series interface module is dedicated, which means that you must install it in the BigIron RX Series chassis only. If you attempt to install a BigIron RX Series interface module in another Brocade chassis or an interface module intended for another Brocade chassis in the BigIron RX Series chassis, the module will not boot up to become active. Interface modules can be shared between BigIron RX-4, BigIron RX-8, BigIron RX-16, and BigIron RX-32.
The interface modules are hot swappable, which means you can remove and replace them without powering down the system.
2-port 10 Gigabit Ethernet module
Figure 6 shows the 2-port 10 Gigabit Ethernet module's front panel with XFP modules installed.
FIGURE 6 2-port 10 Gigabit Ethernet module front panel

natural_image
Front view of a computer RAM module with two ports and indicator lights (no text or symbols)The front panel includes the following control features:
- Four LEDs
• Two 10 Gigabit Ethernet XFP slots
LEDs
The module's front panel includes two LEDs that indicate the status of each port.
Table 2 describes the LEDs on the 10 Gigabit Ethernet module's front panel.
TABLE 2 10 Gigabit Ethernet module LEDs
| LED Position State Meaning | ||
| Link Left of each Ethernet port | On A link is established with the remote port. | |
| Off A link is not established with the remote port. | ||
| Active Left of each Ethernet port | On or blinking The port is transmitting and receiving packets. | |
| Off for an extended period | The port is not transmitting or receiving packets. | |
A two 10 Gigabit Ethernet module contain two physical ports, through which you can connect your BigIron RX Series switch to other network devices at a speed of 10 Gigabits.
Into a physical port, you must insert a fiber-optic module provided by Brocade. The XFP-compliant fiber-optic modules provide an optical transceiver or physical medium dependent (PMD) interface for single mode fiber that can be used with the LAN physical layer (PHY).
The following optic modules versions are available from Brocade:
- Short wavelength (86 - 300 meters) - Brocade part number 10G-XFP-SR
- Long wavelength (10 kilometers) - Brocade part number 10G-XFP-LR
- Extra long wavelength (40 kilometers) – Brocade part number 10G-XFP-E=The front panel includes the following control features:
- Eight LEDs
• Four 10 Gigabit Ethernet XFP slots
LEDs
The module's front panel includes two LEDs that indicate the status of each port.
Table 3 describes the LEDs on the 10 Gigabit Ethernet module's front panel.
TABLE 3 10 Gigabit Ethernet module LEDs
| LED Position State Meaning | ||
| Link Left of each Ethernet port | On A link is established with the remote port. | |
| Off A link is not established with the remote port. | ||
| Active Left of each Ethernet port | On or blinking | The port is transmitting and receiving packets. |
| Off for an extended period | The port is not transmitting or receiving packets. | |
10 Gigabit Ethernet ports
A 10 Gigabit Ethernet module contain four physical ports, through which you can connect your BigIron RX Series switch to other network devices at a speed of 10 Gigabits.
Into a physical port, you must insert a fiber optic module provided by Brocade. The XFP-compliant fiber optic modules provide an optical transceiver or physical medium dependent (PMD) interface for single mode fiber that can be used with the LAN physical layer (PHY).
The following optic modules versions are available from Brocade:
- Short wavelength (86 – 300 meters) – Brocade part number 10G-XFP-SR
- Long wavelength (10 kilometers) – Brocade part number 10G-XFP-LR
- Extra long wavelength (40 kilometers) – Brocade part number 10G-XFP-ER
16-port 10 Gigabit Ethernet oversubscribed module
The 16 x 10GE oversubscribed module for the BigIron RX plugs into any port slot of the BigIron switch and is compatible with all previous generations of card on that switch. It provides interfaces to 16 X 10GE ports.
Figure 7 shows the 16-port 10 Gigabit Ethernet module's front panel.
FIGURE 7 16-port 10 Gigabit Ethernet module front panel

natural_image
Pure electrical circuit lines without any symbolsThe front panel includes the following control features:
• 16 LEDs
• 16 x 10 Gigabit Ethernet XFP slots
LEDs
The module's front panel includes 16 LEDs that indicate the status of each port.
Table 4 describes the LEDs on the 10 Gigabit Ethernet module's front panel.
TABLE 4 10 Gigabit Ethernet module LEDs
| LED Position State Meaning | |
| Link Below each Ethernet port | On A link is established with the remote port. |
| Off A link is not established with the remote port. | |
| Active Below each Ethernet port | On or blinking The port is transmitting and receiving packets. |
| Off for an extended period The port is not transmitting or receiving packets. | |
The following optic modules versions are available from Brocade:
- Short wavelength (86 – 300 meters) – Brocade part number 10G-XFP-SR
- Long wavelength (10 kilometers) – Brocade part number 10G-XFP-LR
- Extra long wavelength (40 kilometers) – Brocade part number 10G-XFP-E=The front panel includes the following control features:
• 16 LEDs
• 16 x 10 Gigabit Ethernet XFP slots
BigIron RX -16
- The BigIron RX -16 requires upgrading of the rear fan modules to NI-X-16-FAN-EXH-A modules. If the BigIron RX -16 is not upgraded to support NI-X-16-FAN-EXH-A modules when 16x10G modules are in the BigIron RX system, then the following syslog message will display:
SYSLOG: Mar 26 14:19:53:<12>R1, 48X1G modules in slots 10,11,13,16 shouldn't be running without high speed fans.
This message will display at the time of bootup, or when the 1Gx48-T module is inserted in the NetIron system.
NOTE
Syslog messages and traps are generated.
- This module is not shipped by default with the NetIron MLX-16. Please contact Brocade for purchasing this module.
Hardware limitations
- Mirror (analyzer) ports cannot be assigned to the 16x10 card. You can monitor traffic on 16x10 ports.
- Brocade currently only support "strict" and "destination-weighted" scheduling schemes (qos scheduler). Refer to the Configuring QoS chapter in the BigIron RX Configuration Guide for more information.
10 Gigabit Ethernet ports
A 16 x 10 Gigabit Ethernet module contain 16 physical ports, through which you can connect the BigIron RX Series switch to other network devices at a speed of 10 Gigabits.
You must insert a fiber optic module provided by Brocade into a physical port. The XFP-compliant fiber optic modules provide an optical transceiver or physical medium dependent (PMD) interface for single mode fiber that can be used with the LAN physical layer (PHY).
The following optic modules versions are available from Brocade:
- Short wavelength (86 – 300 meters) – Brocade part number 10G-XFP-SR
- Long wavelength (10 kilometers) - Brocade part number 10G-XFP-LR
- Extra long wavelength (40 kilometers) – Brocade part number 10G-XFP-ER
Gigabit Ethernet interface module (SFP)
The 24-port 1 Gigabit Ethernet mini-GBIC (or SFP) is auto-sensing, auto-negotiating Ethernet port and will select the FE or GE mode of operation based on the link signal received.
NOTE
The device will be FE or GE capable, but will only display that is GE to indicate the maximum speed capability of the module.
NOTE
The actual speed will be displayed once the link is seen and the port auto-senses the speed of the SFP.
You can issue the show media command to display the type of optic installed and determine the speed the port will run at when the link is received.
Figure 8 shows the 24-port 1 Gigabit Ethernet mini-GBIC (or SFP) module's front panel.
FIGURE 8 24-port 1 Gigabit Ethernet SFP module front panel

natural_image
Diagram of a dual-panel electronic device with labeled components and connection lines (no text or symbols)1 P o r t s t a t u s L E D s
The front panel includes the following control features:
• LEDs
• 24 1-Gigabit Ethernet mini-GBIC (SFP) ports
TABLE 5 Gigabit Ethernet module LEDs
| Position State Meaning | |
| Below each Ethernet port(left-side LED supports port in top row while right-side LED supports port in bottom row) | On or blinking The port is transmitting and receiving packets. |
| Off for an extended period The port is not transmitting or receiving packets. | |
Gigabit Ethernet interface module (RJ-45)
Figure 9 shows the 24-port 1 Gigabit Ethernet module's front panel.
FIGURE 9 24-port 1 Gigabit Ethernet module front panel

natural_image
Front view diagram of a dual-chamber network device with multiple Ethernet ports and connectors (no text or labels)The front panel includes the following control features:
• LEDs
• 24 1-Gigabit Ethernet ports
TABLE 6 Gigabit Ethernet module LEDs
| LED Position State Meaning | |||
| Link Left of each | Ethernet port | On A link is established with the remote port. | |
| Off A link is not established with the remote port. | |||
| Active Left of each | Ethernet port | On or blinking The port is transmitting and receiving packets. | |
| Off for an extended period | The port is not transmitting or receiving packets. | ||
48-port 1 Gigabit Ethernet interface module (Mini RJ 21 Copper)
The interface modules are hot swappable, which means you can remove and replace them without powering down the system.
Figure 10 shows the 48-port GoC interface module's front panel.
FIGURE 10 48-port GoC interface module front panel
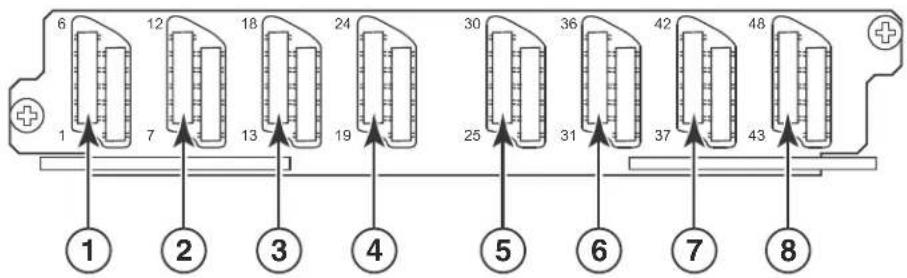
1 Ports 1-6 5 Ports 25-30
2 Ports 7-12 6 Ports 31-36
3 Ports 13-18 7 Ports 37-42
4 Ports 19 -24 8 Ports 43-48
The front panel includes eight Mini RJ-21 Connectors that support six 10/100/1000 Gigabit Ethernet ports each. Figure 10 shows the ports that are supported per RJ-21 connector. A cable connects from the RJ-21 connector on the interface module to a Mini RJ-21 connector on a patch panel. At the patch panel, the ports are broken out into individual RJ-45 connectors for each port.
Cables and patch panels that support this module are available through any Tyco International distribution partner. Information about these products is available at the following URL:
www.ampnetconnect.com/foundrynetworks
Switch fabric module
The switch fabric module switches uses packets from one interface module installed in a chassis to another. The BigIron RX Series switches can be configured with switch fabric modules as described:
- BigIron RX-4: Accommodates three switch fabric elements with two required and one redundant for a fully loaded system. It is shipped with two switch fabric elements. You must purchase an additional switch fabric element if you want your BigIron RX-4 equipped for redundancy.
- BigIron RX-8: Accommodates three switch fabric elements with two required and one redundant for a fully loaded system. It is shipped with two switch fabric elements. You must purchase an additional switch fabric element if you want your BigIron RX-8 equipped for redundancy.
- BigIron RX-16: Accommodates four switch fabric elements with three required and one redundant for a fully loaded system. It is shipped with three switch fabric elements. You must purchase an additional switch fabric element if you want your BigIron RX-16 equipped for redundancy.
- BigIron RX-32: Accommodates and is shipped with eight switch fabric elements. Use with fewer than the minimum number could result in performance degradation.
NOTE
The switch fabric elements used for the BigIron RX-4 are a different part than those used on the BigIron RX-8, BigIron RX-16, and BigIron RX-32.
Also, the switch fabric elements used for the BigIron RX-32 are different than those used on the BigIron RX-4, BigIron RX-8, and BigIron RX-16.
NOTE
The BigIron RX Series switch fabric module is dedicated, which means that it functions properly in the BigIron RX Series chassis only. If you attempt to install a BigIron RX Series switch fabric module in another Brocade chassis or a switch fabric module intended for another Brocade chassis in the BigIron RX Series chassis, the chassis and switch fabric module will not function properly.
Figure 11 shows the switch fabric module's front panel.
FIGURE 11 Switch fabric module front panel

The front panel includes two LEDs, which Table 7 describes.
TABLE 7 Switch fabric module LEDs
| LED Position State Meaning | |||
| Pwr Above Active LED On The module is receiving power. | |||
| Off The module is not receiving power. | |||
| Active | Below Pwr LED | On | The chassis switch fabric is active and ready to switch user packets. |
| Off for an extended period | The chassis switch fabric is not active and cannot switch user packets. | ||
Power supplies
The BigIron RX Series switches support the following power supply options:
- BigIron RX-4: Accommodates three power supplies (AC or DC) with one required and two redundant. It is shipped with one power supply. You must purchase one or two additional power supplies if you want your BigIron RX-4 equipped for redundancy.
- BigIron RX-8: Accommodates four power supplies (AC or DC) with two required and two redundant. Because power is supplied over a common power bus, any power supply purchased in addition to the two required will provide backup for any supply that fails. Equipping a BigIron RX-8 with two additional power supplies provides full redundancy for both of the required power supplies.
- BigIron RX-16: Accommodates eight power supplies (AC or DC) with four required and four redundant. Because power is supplied over a common power bus, any power supply purchased in addition to the four required will provide backup for any supply that fails. Equipping a BigIron RX-16 with four additional power supplies provides full redundancy for all of the required power supplies.
- BigIron RX-32: Accommodates eight power supplies (AC only at this time) with five required and three redundant. Because power is supplied over a common power bus, any power supply purchased in addition to the five required will provide backup for any supply that fails.
In the BigIron RX-8, BigIron RX-16 and BigIron RX-32, you install the power supplies (AC or DC) in the slots along the bottom of the chassis. In the BigIron RX-4, the power supplies (AC or DC) are installed in slots in the rear of the chassis. The installed power supplies provide power to all chassis components, sharing the workload equally and reporting their status to the management module. If the management module detects that one of these power supplies has failed or overheated, the management module will redistribute the failed power supply's workload to the remaining power supplies.
Each power supply has three LEDs on its faceplate that provide status for the input power, output power and notification of alarms sent. If the input power and output power LEDs are on (a steady green), the power supply is providing power to the chassis components. The power supplies are hot swappable, which means you can remove and replace them without powering down the system.

DANGER
The power supplies are hot swappable, which means they can be removed and replaced while the BigIron RX Series chassis is powered on and running. However, Brocade recommends that you disconnect a power supply from its power source before removing and replacing it. The BigIron RX-4, -8, or -16 chassis can be running while a power supply is being removed and replaced, but the power supply itself should not be connected to a power source. Otherwise, you could be injured or the power supply or other parts of the device could be damaged. (In the BigIron RX-32 chassis, you cannot unlatch and remove a power supply without first releasing the cord retainer and removing the power cord.)
Cooling system
The cooling system of BigIron RX Series switches is configured as described:
• BigIron RX-4: Is equipped with a fan module containing two 4-speed fans.
• BigIron RX-8: Is equipped with a fan module containing four 4-speed fans.
- BigIron RX-16: Is equipped with three fan assemblies. The fan tray located in the lower front of the chassis contains six 4-speed fans. There are two fan assemblies located in the rear of the chassis. Each of these contain a 4-speed fan that pulls air through the chassis. The BigIron RX-16 is equipped with eight controllers to support redundancy.
- BigIron RX-32: Is equipped with ten fan assemblies in the rear of the chassis. Each of these contain a 4-speed fan that pulls air through the chassis. The bottom fan tray has two fans each for cooling the power supplies.
As shown in Figure 12 and Figure 13, the fans are located in the front of the BigIron RX-4 and BigIron RX-8 chassis. Figure 14 and Figure 15 show the front and rear locations of the fans on the BigIron RX-16. Figure 16 shows the locations of all 10 fans at the rear of the BigIron RX-32 chassis.
NOTE
A new revision of the controller for the fan tray assemblies has been added for software release 02.2.01 and later. There is no visible change to the fan assemblies or the procedures for replacing the assemblies. Earlier software versions will not recognize the new controller.
FIGURE 12 Fan component locations for the BigIron RX-4

natural_image
Diagram of a server rack with labeled ports and ventilation slots (no text or symbols beyond label)1 F a n m o d u l e
FIGURE 13 Fan component locations for the BigIron RX-8
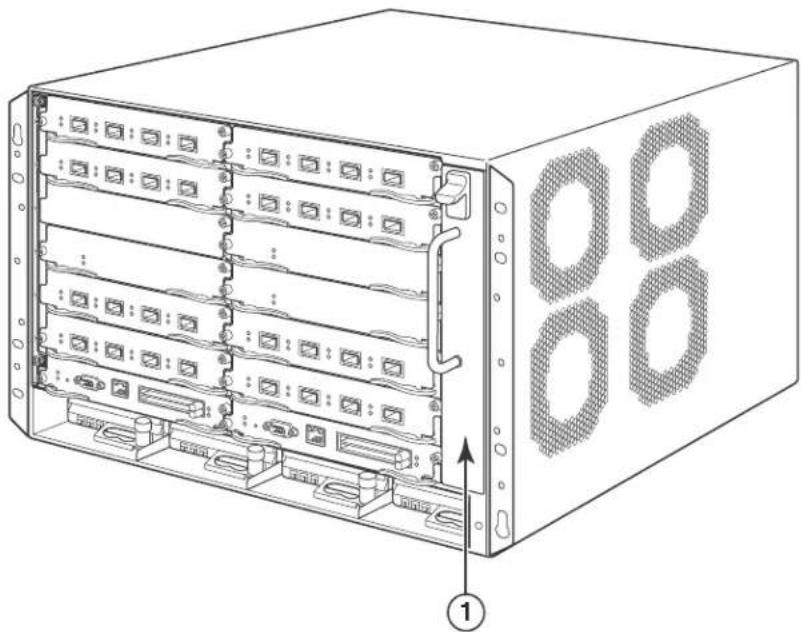
natural_image
Technical diagram of a server rack unit with labeled ports and mounting brackets (no text or symbols beyond labeling)1 F a n m o d u l e
FIGURE 14 Front fan component locations for the BigIron RX-16

natural_image
Technical line drawing of a server rack cabinet with multiple drive bays and ventilation slots (no text or labels)FIGURE 15 Rear fan component locations for the BigIron RX-16
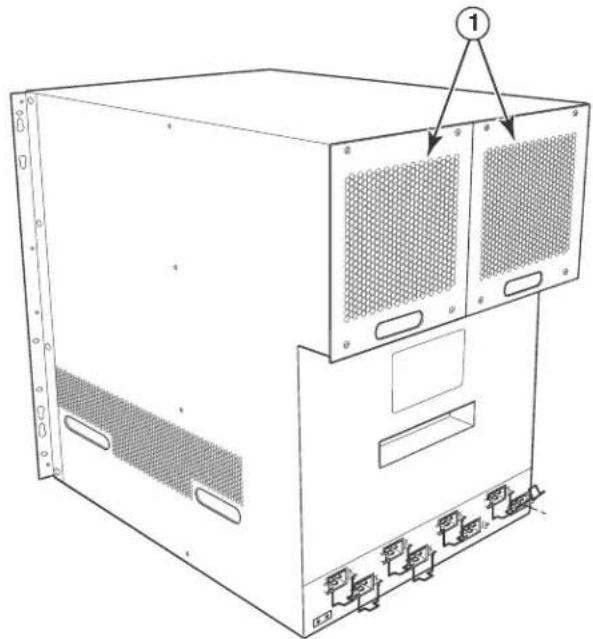
natural_image
Technical line drawing of a computer rack unit with ventilation grilles and mounting base (no text or symbols)1 F a n m o d u l e s
FIGURE 16 Rear fan component locations for the BigIron RX-32
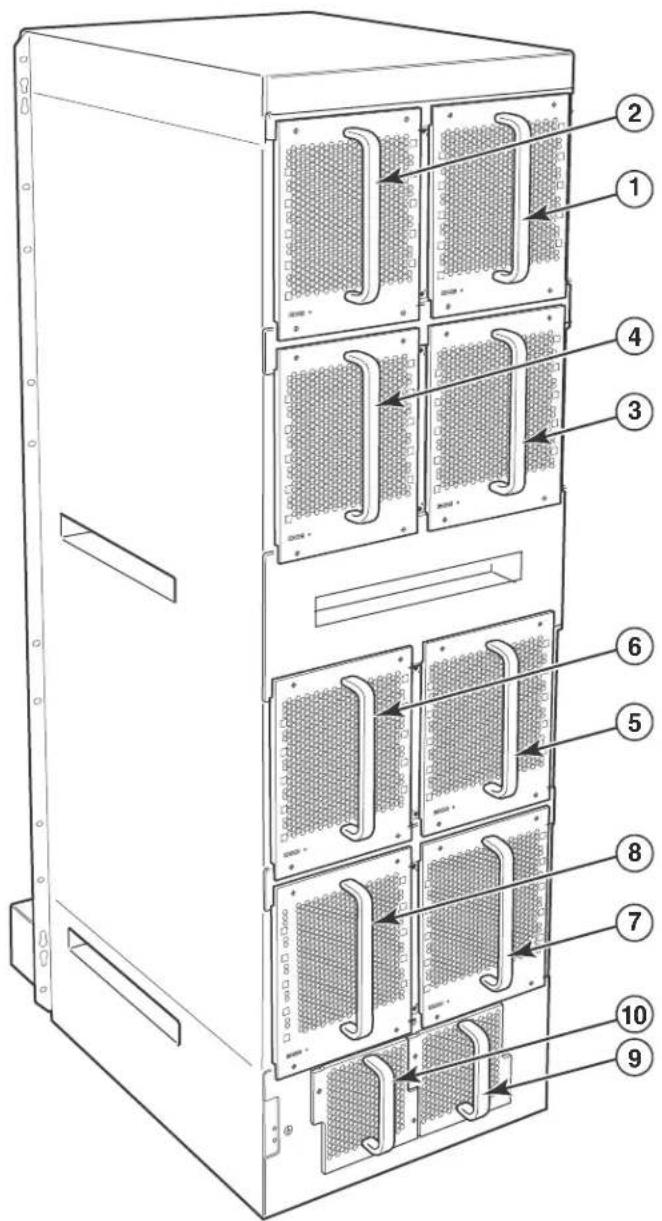
1 Fan module 1 6 Fan module 6
2 Fan module 2 7 Fan module 7
3 Fan module 3 8 Fan module 8
4 Fan module 4 9 Fan module 9
5 Fan module 5 10 Fan module 10
Upon system startup, the fans in the BigIron RX Series switches operate at high speed, then the management module lowers the fan speed to low speed.
By default, the BigIron RX Series switch polls the temperature sensor on each module every 60 seconds to get a temperature reading. Depending on the temperature readings for the modules, the system can do the following:
- Leave the fan speed as is
- Increase the fan speed
• Decrease the fan speed - Shut down a module to prevent damage
If the temperature of a module exceeds specified high temperature thresholds, the system generates a Syslog message and SNMP trap. The system can also shut the module down if the temperature exceeds the highest threshold.
LEDs
The BigIron RX-32 fan control modules include a bi-color LED, which indicates the status of the fans. Table 8 describes the LED.
TABLE 8 Fan control module LED
| LED Position State Meaning | |
| Fan control module | Rear of chassis Off The fans are not receiving power. |
| LED | Green The fans are working and responding to controls from the fan control module. |
| Amber The fans are not working and not responding to controls from the fan control module. | |

CAUTION
To avoid overheating of the BigIron RX Series chassis, do not remove more than one fan at a time.
Rack mount kit
The BigIron RX Series switches are shipped equipped for mounting in a standard 19-inch (EIA310-D) rack as described:
- The BigIron RX-4 and BigIron RX-8 are equipped with built-in mounting brackets and are shipped with mounting screws.
- The BigIron RX-16 and BigIron RX-32 switches ship with two L-shaped mounting brackets and mounting screws.
Alternatively, you can use a mid-mount kit (ordered separately) to center-mount the BigIron RX chassis using two L-shaped mounting brackets. The mid-mount kit comes with instructions for installing the mounting brackets and mounting the device in a rack.
Contact Brocade for information about mid-mount kits.
In a rack, you can install the following number of BigIron RX Series chassis depending on the model:
- BigIron RX-32 – 1 BigIron RX-32 chassis
• BigIron RX-16 – up to 3 BigIron RX-16 chassis
- BigIron RX-8 – up to 6 BigIron RX-8 chassis
- BigIron RX-4 – up to 10 BigIron RX-4 chassis
Supported software features
For a complete list of software features supported on the BigIron RX Series switch, refer to the software release notes for this device. For information about configuring basic, non-protocol software features supported on this device, refer to the BigIron RX Series Configuration Guide.
1 Supported software features
In this chapter
- Installation precautions 25
- Installing a BigIron RX-4 switch 28
- Installing a BigIron RX-8 switch 38
- Installing a BigIron RX-16 switch 47
- Installing a BigIron RX-32 switch 57
- Attaching a management station.... 77
- Powering-on the power source 79
- Verifying proper operation.... 80
Installation precautions
This chapter contains information on how to install a BigIron RX Series switch. Before proceeding, please read the cautions and danger notices below that apply to the entire family of BigIron RX Series switches.

DANGER
The procedures in this manual are for qualified service personnel.

DANGER
If the installation requires a different power cord than the one supplied with the device, make sure you use a power cord displaying the mark of the safety agency that defines the regulations for power cords in your country. The mark is your assurance that the power cord can be used safely with the device.
Follow these precautions when installing a BigIron RX Series switch.
General precautions

DANGER
All fiber-optic interfaces use Class 1 Lasers.

CAUTION
Do not install the device in an environment where the operating ambient temperature might exceed 40o C (104o F).

CAUTION
Make sure the air flow around the front, sides, and back of the device is not restricted.

CAUTION
If you do not install a module in a slot, you must keep the slot blank in place. If you run the chassis with an uncovered slot, the system may overheat.

CAUTION
Never leave tools inside the chassis.
Power precautions

CAUTION
Use a separate branch circuit for each AC power cord, which provides redundancy in case one of the circuits fails.

DANGER
Make sure to choose the appropriate circuit device, depending on the number of AC power supplies installed in the chassis.

DANGER
Disconnect the power cord from all power sources to completely remove power from the device.

DANGER
Make sure that the power source circuits are properly grounded, then use the power cord supplied with the device to connect it to the power source.

DANGER
If the installation requires a different power cord than the one supplied with the device, make sure you use a power cord displaying the mark of the safety agency that defines the regulations for power cords in your country. The mark is your assurance that the power cord can be used safely with the device.

DANGER
Make sure the rack or cabinet housing the device is adequately secured to prevent it from becoming unstable or falling over.

DANGER
Mount the devices you install in a rack or cabinet as low as possible. Place the heaviest device at the bottom and progressively place lighter devices above.

CAUTION
Ensure that the device does not overload the power circuits, wiring, and over-current protection. To determine the possibility of overloading the supply circuits, add the ampere (amp) ratings of all devices installed on the same circuit as the device. Compare this total with the rating limit for the circuit. The maximum ampere ratings are usually printed on the devices near the input power connectors.

CAUTION
BigIron RX-4, -8, and -16 devices with DC power sources are intended for installation in restricted access areas only. A restricted access area is where access can be gained only by service personnel through the use of a special tool, lock and key, or other means of security, and is controlled by the authority responsible for the location.

CAUTION
All devices with AC power sources (BigIron RX-32 only) are intended for installation in restricted access areas only. A restricted access area is a location where access can be gained only by service personnel through the use of a special tool, lock and key, or other means of security.

CAUTION
For a DC system, the gauge of wire will be determined by the power source as well as the power supply draw (refer to Table 9). Use a grounding wire of at least 6 American Wire Gauge (AWG). The AWG wire should be attached to an agency-approved crimp connector (provided on the BigIron RX Series chassis), crimped with the proper tool. The single crimp connector should allow for securement to both ground screws on the enclosure. For BigIron RX-16, -8, and -4, use a grounding wire of at least 6 AWG. For the grounding lug, use UL-listed Panduit crimp connector, P/N LCD6-10A, and two 10-32, PPH screws to secure the crimp connector to chassis. The grounding position is located on the side of chassis adjacent ground symbol.
TABLE 9 The American Wire Gauge (AWG) guidelines
| AWG Ohms per 100 feet Maximum Amps for chassis wiring Maximum Amps for power transmission | |||
| 5 0.3133 118 47 | |||
| 6 0.3951 101 | 37 | ||
| 7 0.4982 | 89 | 30 | |
| 8 0.6282 | 73 | 24 | |
| 9 0.7921 64 | 19 | ||
| 10 | 0.9989 | 55 | 15 |
| 11 | 1.26 | 47 | 12 |
| 12 | 1.588 | 41 | 9.3 |

CAUTION
For the DC input circuit to the system, make sure there is a UL-Listed 30 amp circuit breaker, minimum -48Vdc, double pole, on the input to the terminal block. The input wiring for connection to the product should be Listed copper wire, 8 AWG, marked VW-1, and rated minimum 9o C.

CAUTION
For a BigIron RX-32 AC system, use a ground wire of at least 6 American Wire Gauge (AWG). The ground wire should have an agency-approved crimped connector (provided with the chassis) attached to one end, with the other end attached to building ground. The connector must be crimped with the proper tool, allowing it to be connected to both ground screws on the enclosure.
Installing a BigIron RX-4 switch
This section describes the steps you will perform to install a BigIron RX-4 switch:
- "Preparing the installation site"
- "Unpacking a BigIron RX-4 switch"
-
"Chassis lifting guidelines for BigIron RX-4 switches"
-
"Installing a BigIron RX-4 chassis in a rack"
- "Installing BigIron RX-4 modules"
- "Installing power supplies in a BigIron RX-4 chassis"
- "Connecting AC power to a BigIron RX-4 chassis"
- “Connecting DC power to a BigIron RX-4 chassis”
- "Final steps"
Preparing the installation site
Cabling infrastructure
Ensure that the proper cabling is installed in the site.
For information on cabling, refer to “Installing power supplies in a BigIron RX-4 chassis” on page 35, “Attaching a management station” on page 77, and “Connecting a BigIron RX Series switch” on page 105.
Installation location
Before installing the switch, plan its location and orientation relative to other devices and equipment. For cooling purposes, allow a minimum of six inches of space between the sides, front, and the back of the chassis and walls or other obstructions. If a chassis is installed within a perforated enclosure, the perforations must have openings of at least 60 percent of the surface.
Unpacking a BigIron RX-4 switch
The BigIron RX-4 switch ships with several items. Review the list below, and verify the contents. If any items are missing, contact the place of purchase:
- BigIron RX-4 chassis with the appropriate number of switch fabric modules already installed in the slot marked SF and a slot blank installed in all other module slots.
NOTE
You must provide standard #12-24 pan-head screws for mounting the BigIron RX-4 chassis into a rack.
- CD-ROM containing software images and the user documentation (including this guide).
- Warranty card.
- A 115V AC power cable for each AC power supply you purchase from Brocade.
Follow the steps given below to unpack a BigIron RX-4 chassis.
- Move the pallet to a staging area as close to the installation site as possible.
- Position the shipping carton with the arrows pointing up.
- Remove the strap that secures the shipping carton to the pallet.
- Remove the plastic cover and shipping carton.
- Save the shipping carton, pallet, and packing materials in case you need to move or ship the chassis at a later time.
Chassis lifting guidelines for BigIron RX-4 switches

DANGER
A fully-populated BigIron RX-4, chassis is heavy. TWO OR MORE PEOPLE ARE REQUIRED WHEN LIFTING, HANDLING, OR MOUNTING THESE DEVICES.
Follow these guidelines for lifting and moving a BigIron RX-4 chassis:
- Before lifting or moving the switch, disconnect all external cables.
Installing a Biglron RX-4 chassis in a rack
This section describes the following tasks:
- “Preparing to mount a BigIron RX-4 chassis in a rack”
- “Removing BigIron RX-4 extra shipment screws”
- "Mounting a BigIron RX-4 chassis in a rack"
- “Removing the slot blanks”
Preparing to mount a BigIron RX-4 chassis in a rack
Because of the weight of a fully loaded BigIron RX-4 chassis, Brocade recommends mounting a chassis in a rack before installing the modules and AC power supplies if necessary.
In a standard 19-inch (EIA310-D) rack, you can install up to ten BigIron RX-4 chassis.
For each BigIron RX-4 chassis that you install in a rack, you must provide four standard #12-24 pan-head screws with which to mount and secure the chassis. Before performing this task, you should have an assembled rack and a #2 Phillips-head screwdriver.
Removing BigIron RX-4 extra shipment screws
The BigIron RX-4 ships with two extra screws installed in the right side of the chassis. These screws secure the fan tray, protecting it from damage during shipment. You must remove these screws before installing the chassis. Figure 17 shows the location of the screws.
To perform this task, you need a #2 Phillips-head screwdriver.
FIGURE 17 Removing the extra screws used for shipment

1 Chassis front 3 Chassis rear
2 S h i p p i n g s c r e w s
Mounting a BigIron RX-4 chassis in a rack
Follow the steps given below to mount a BigIron RX-4 chassis in a rack.
-
Determine the position of each chassis in the rack, for example, a chassis with the fewest modules on top, a chassis with more modules than the top chassis in the middle, and a fully populated chassis on the bottom.
-
Position two of the four screws for each chassis according to the spacings of the keyhole slots on the mounting brackets as shown in Figure 18. Do not secure the screws completely; leave approximately 1/4 inch of clearance between the back of the screw head and the rack.
FIGURE 18 Positioning the screws in a rack

1 Unequal flange equipment rack 2 Network equipment rack
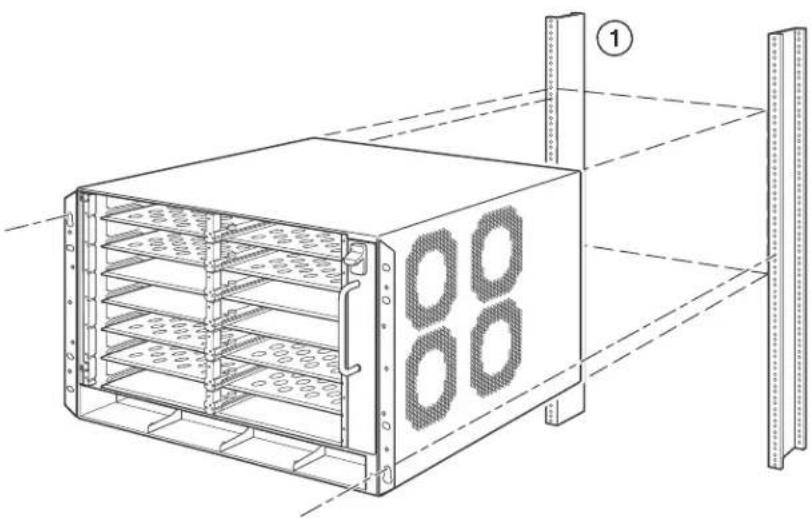
- Starting with the chassis that you want to mount in the lowest position in the rack, mount the chassis in the rack as shown in Figure 19. With two or more people lifting the chassis, slip the wide portion of each keyhole slot over the corresponding screw in the rack.
FIGURE 19 Mounting the BigIron RX-4 or BigIron RX-8 chassis in a rack
natural_image
Technical line drawing of a rack-mounted server unit with cooling fins and ventilation grilles (no text or symbols)1 Standard 19 inch rack
- Slide the chassis down so that the screw heads are in the narrow portion of the keyhole slots.
- Tighten the screws to secure the chassis in place.
NOTE
To provide better grounding of the chassis to the rack, attach the chassis to the rack using star washers. Additionally, if any single hole grounding lugs are used star washers shall be used as a means to prevent rotation of the lug.
- Add additional screws as required.
- Repeat step 2 through step 6 to mount each subsequent chassis in the same rack.
Removing the slot blanks
The BigIron RX-4 chassis ships with slot blanks installed in all module slots. The slot blank covers a slot that does not currently have a module installed in it, ensuring proper airflow within the chassis. If you plan to install a module in a particular slot, you must remove the slot blank.

CAUTION
If you do not install a module in a slot, you must keep the slot blank in place. If you run the chassis with an uncovered slot, the system may overheat. Tighten the screws that secure the slot blanks so that they remain in place when removing adjacent panels or modules.
Although the slot blanks are different in size, the procedure for removing them from the BigIron RX-4 chassis is the same. Therefore, this section provides one procedure that applies to all slot blanks.
You will need a flat-head screwdriver to perform this task.
Follow the steps given below to remove a slot blank.
- Loosen the screws on either end of the slot blank by hand or with a flat-head screwdriver.
- Pull the slot blank out of the chassis, and store it in a safe place for future use.
Installing BigIron RX-4 modules
This section provides one procedure that applies to all modules. The sequence for installing more than one module is important to ensure proper fit. The recommended sequence for the BigIron RX-4 chassis is to start with the lowest row, moving upwards, from right-to-left.
NOTE
The BigIron RX Series modules are dedicated, which means that you must install them in the BigIron RX Series chassis only. For example, if you attempt to install the BigIron RX Series management module in another Brocade chassis or a management module intended for another Brocade chassis in the BigIron RX Series chassis, the chassis and module will not function properly.
Table 10 provides the chassis slot numbers into which you must install the modules. Markings for the chassis slots appear at the base of the slots.
The BigIron RX-4 chassis ships with the required switch fabric modules installed.
TABLE 10 BigIron RX-4 module installation
| BigIron RX-4 module Chassis slot number |
| Management modules Active module - M1 (left).Redundant module - M2 (right). |
| Interface modules 1 - 4 |
| Switch fabric modules SF1 - SF3 |

CAUTION
If you do not install a module in a slot, you must leave the slot blank installed in the slot. If you run the BigIron RX-4 chassis with an uncovered slot, the system may overheat.
If you are installing a redundant management module, refer to the Using a Redundant Management Module chapter in the BigIron RX Configuration Guide for information about how the redundant module works, optional software configurations that you can perform, and how to manage the redundancy feature.
Before installing a module in the BigIron RX-4 chassis, have the following on hand:
• An ESD wrist strap with a plug for connection to the ESD connector on the BigIron RX-4 chassis.

DANGER
For safety reasons, the ESD wrist strap should contain a 1 meg ohm series resistor.
• A large flat-head screwdriver.
Follow the steps given below to install a module in the BigIron RX-4 chassis.
- Put on the ESD wrist strap and ground yourself by inserting the plug into the ESD connector on the chassis front.
- Remove the module from its packaging.
- With the ejectors in the outward position, insert the module into the appropriate chassis slot and slide the card along the card guide until the ejectors on either side of the module move close to the module front panel.
FIGURE 20 Installing a module in a BigIron RX-4 chassis

natural_image
Diagram of an internal server rack with drive bays and a cable connector (no text or labels)1 l n t e r f a c e m o d u l e
NOTE
When inserting the module into the chassis, make sure that the faceplate does not overlap with the faceplate of an adjacent interface module.
- Push the ejectors in until they are flush with the module front panel. This action will fully seat the module in the backplane. Modules have a snug fit for maximum EMI protection.
NOTE
The installation instructions for installing modules shown in the following illustrations are exactly the same for interface, management, and switch fabric modules.
- Tighten the two screws at either end of the module front panel by pushing them in and turning them clockwise. Then, tighten the screws further using the flat-head screwdriver.
Installing power supplies in a BigIron RX-4 chassis
The BigIron RX-4 accommodates three power supplies (AC or DC) with one required and two redundant. It is shipped with one power supply. You must purchase one or two additional power supplies if you want your BigIron RX-4 equipped for redundancy. You need a small Phillips or flat-head screwdriver to perform this task.
Follow the steps given below to install a power supply in the BigIron RX-4 chassis.
- Remove the blank power supply faceplate, and expose the empty power supply slot.
- Remove the power supply from its packaging.
- Insert the power supply into the empty power supply slot, using the guides provided on either side of the slot and slide the card along the card guide until the ejectors on either side of the module move close to the module front panel.
NOTE
Empty power supply slots should be covered with slot blanks.

CAUTION
Carefully follow the mechanical guides on each side of the power supply slot and make sure the power supply is properly inserted in the guides. Never insert the power supply upside down.
FIGURE 21 Installing a power supply in a BigIron RX-4 chassis

natural_image
Technical line drawing of a server rack with ventilation slots and an attached drive (no text or symbols)1 Power supply
-
After the power supply is fully inserted, push the power supply front panel toward the back of the chassis. This action causes the power supply connector to seat into the backplane connector.
-
Push the ejectors in until they are flush with the face of the power supply. This action will fully latch the power supply in the backplane.
-
Tighten the two screws at either end of the power supply front panel by pushing them in and turning them clockwise. If desired, tighten the screws further using the flat-head screwdriver.
-
For information about connecting power to the chassis, refer to "Connecting AC power to a BigIron RX-4 chassis" on page 36 or "Connecting DC power to a BigIron RX-4 chassis" on page 36.
Connecting AC power to a BigIron RX-4 chassis
AC power is supplied through an AC power cord that is installed at the rear of the BigIron RX-4 chassis.
- At the rear of the BigIron RX-4 chassis locate the power receptacle on the left side of the AC power supply.
- Lift the cord-retainer and connect a Brocade-supplied AC power cord to the power supply.
- Snap the cord-retainer over the power plug to hold it in place.
FIGURE 22 Connecting a power cord to the power supply in a BigIron RX-4 chassis
1 Ground point 3 Cord retainer
2 P o w e r c o r d

DANGER
If the installation requires a different power cord than the one supplied with the device, make sure you use a power cord displaying the mark of the safety agency that defines the regulations for power cords in your country. The mark is your assurance that the power cord can be used safely with the device.
- For information about powering on the system, refer to "Powering-on the power source" on page 79.
Connecting DC power to a BigIron RX-4 chassis
You can provide your own DC power source for the BigIron RX-4 chassis. This is supported through use of a DC-to-DC power supply. DC power must be supplied at 48 V and 30 A. The DC-to-DC supply provides the DC power to the chassis at 12 V and 100 A.

DANGER
The procedure in this section is for qualified service personnel.
Follow the steps given below to connect a DC power source.
NOTE
The layout of the LEDs on your BigIron RX-4 DC power supply may be different from what is shown in Figure 23, due to multiple vendors; but the function is the same.
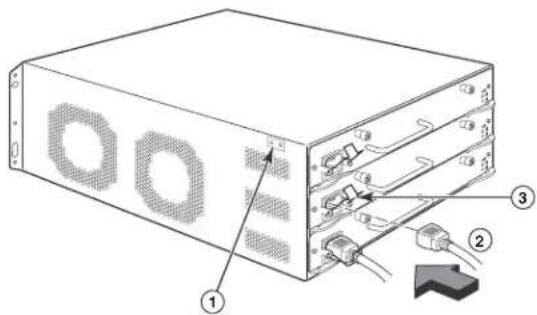
- Use a flat-blade screwdriver to remove the two screws holding the transparent cover over the power supply lugs.
FIGURE 23 The BigIron RX-4 DC power supply
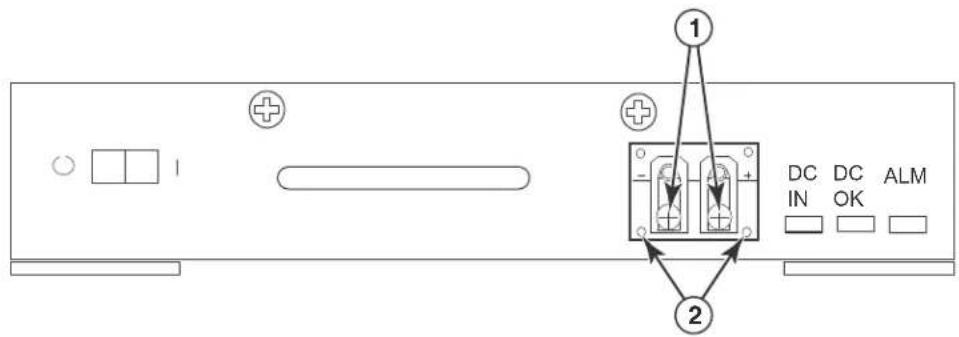
1 Screws holding power lugs 2 Screws holding transparent cover
2. Use a Phillips head screwdriver to remove each of the power lugs.
3. Crimp #8 AWG power supply wire into the power lugs and reconnect the power lugs to the power supply unit.
FIGURE 24 Crimping the power supply wire in the lug
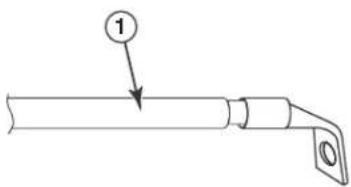
1 #8 AWG power supply wire
4. Re-attach the transparent cover over the power supply lugs that was removed in Step 1.
5. Connect the wire to your DC power source making sure to connect the -48V cable to the negative terminal on the power supply and the 0V cable to the positive terminal.
Final steps
Follow the steps listed below to complete the installation:
- "Attaching a management station"
• "Powering-on the power source" - "Verifying proper operation"
Installing a BigIron RX-8 switch
This section describes the following tasks:
- “Preparing the installation site”
- "Unpacking a BigIron RX-8 switch"
- “Chassis lifting guidelines for BigIron RX-8 switches”
- "Installing the BigIron RX-8 chassis in a rack"
- "Installing BigIron RX-8 modules"
- "Installing power supplies in the BigIron RX-8 chassis"
- "Connecting AC power to a BigIron RX-8 chassis"
- "Connecting DC power to a BigIron RX-8 chassis"
- "Final steps"
Preparing the installation site
Cabling infrastructure
Ensure that the proper cabling is installed in the site.
For information on cabling, refer to “Installing power supplies in the BigIron RX-8 chassis” on page 44, “Attaching a management station” on page 77, and “Connecting a BigIron RX Series switch” on page 105.
Installation location
Before installing the switch, plan its location and orientation relative to other devices and equipment. For cooling purposes, allow a minimum of six inches of space between the sides, front, and the back of the chassis and walls or other obstructions. If a chassis is installed within a perforated enclosure, the perforations must have openings of at least 60 percent of the surface.
Unpacking a BigIron RX-8 switch
The BigIron RX-8 switch ships with several items. Review the list below, and verify the contents. If any items are missing, contact the place of purchase:
- BigIron RX-8 chassis with the appropriate number of switch fabric modules already installed in the slot marked SF and a slot blank installed in all other module slots.
NOTE
You must provide standard #12-24 pan-head screws for mounting the BigIron RX Series chassis into a rack.
- CD-ROM containing software images and the user documentation (including this guide).
- Warranty card.
- A 115V AC power cable for each AC power supply you purchase from Brocade.
Follow the steps given below to unpack a BigIron RX-8 chassis.
- Move the pallet to a staging area as close to the installation site as possible.
- Position the shipping carton with the arrows pointing up.
- Remove the strap that secures the shipping carton to the pallet.
- Remove the plastic cover and shipping carton.
- Save the shipping carton, pallet, and packing materials in case you need to move or ship the chassis at a later time.
Chassis lifting guidelines for BigIron RX-8 switches

DANGER
A fully-populated BigIron RX-8, chassis is heavy. TWO OR MORE PEOPLE ARE REQUIRED WHEN LIFTING, HANDLING, OR MOUNTING THESE DEVICES.
Follow these guidelines for lifting and moving a BigIron RX-8 chassis:
- Before lifting or moving the switch, disconnect all external cables.
- Do not attempt to lift a fully configured switch by yourself. Using a mechanical lift to maneuver the switch into a rack is recommended. If a lift cannot be used, a minimum of four people must lift the switch, and you must remove components from the chassis before lifting.
Installing the BigIron RX-8 chassis in a rack
This section describes the following tasks:
- “Preparing to mount a BigIron RX-8 chassis in a rack”
- “Removing BigIron RX-8 extra shipment screws”
- "Mounting a BigIron RX-8 chassis in a rack"
- "Removing the slot blanks"
Preparing to mount a BigIron RX-8 chassis in a rack
Because of the weight of a fully loaded BigIron RX-8 chassis, Brocade recommends mounting a chassis in a rack before installing the modules and AC power supplies if necessary.
In a standard 19-inch (EIA310-D) rack, you can install up to six BigIron RX-8 chassis.
For each BigIron RX-8 chassis that you install in a rack, you must provide four standard #12-24 pan-head screws with which to mount and secure the chassis. Before performing this task, you should have an assembled rack and a #2 Phillips-head screwdriver.
Removing BigIron RX-8 extra shipment screws
The BigIron RX-8 ships with two extra screws installed in the right side of the chassis. These screws secure the fan tray, protecting it from damage during shipment. You must remove these screws before installing the chassis. Figure 25 shows the location of the screws.
To perform this task, you need a #2 Phillips-head screwdriver.
FIGURE 25 Removing the extra screws used for shipment
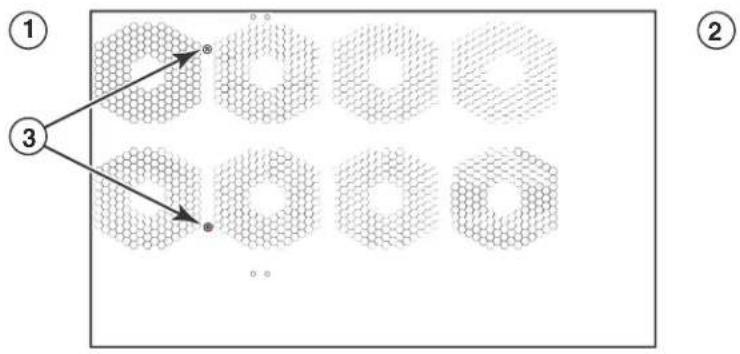
1 Chassis front 3 Shipping screws
2 C h a s s i s r e a r
Mounting a BigIron RX-8 chassis in a rack
Follow the steps given below to mount a BigIron RX-8, chassis in a rack.
- Determine the position of each chassis in the rack, for example, a chassis with the fewest modules on top, a chassis with more modules than the top chassis in the middle, and a fully populated chassis on the bottom.
- Position two of the four screws for each chassis according to the spacings of the keyhole slots on the mounting brackets as shown in Figure 26. Do not secure the screws completely; leave approximately 1/4 inch of clearance between the back of the screw head and the rack.
FIGURE 26 Positioning the screws in a rack

natural_image
Technical line drawing of two structural panels with bolt holes, one showing a 5-inch width and the other a close-up with a 1-inch base (no text or symbols)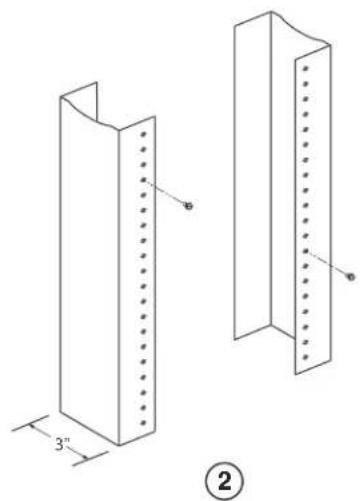
natural_image
Technical line drawing of two structural panels with dotted lines and dimension annotations (no text or symbols)1 Unequal flange equipment rack 2 Network equipment rack
- Starting with the chassis that you want to mount in the lowest position in the rack, mount the chassis in the rack as shown in Figure 27. With two or more people lifting the chassis, slip the wide portion of each keyhole slot over the corresponding screw in the rack.
FIGURE 27 Mounting the BigIron RX-4 or BigIron RX-8 chassis in a rack
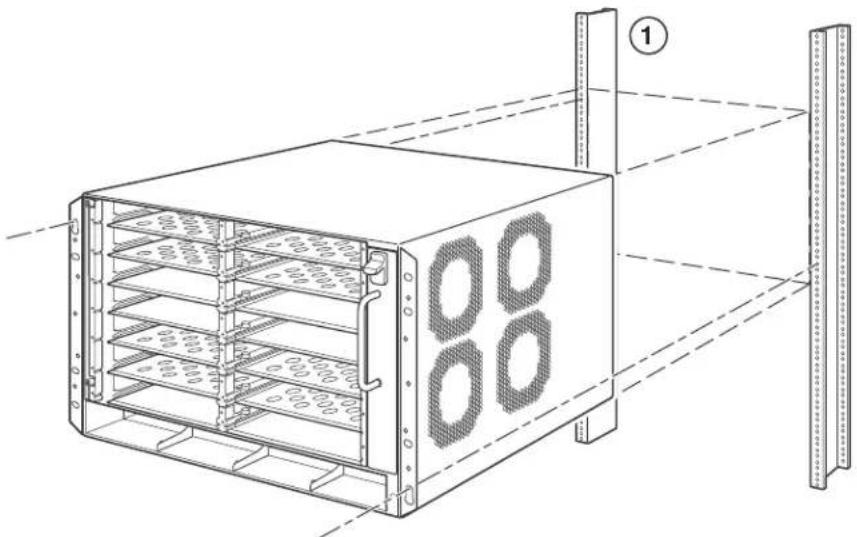
natural_image
Technical line drawing of a rack-mounted server unit with multiple shelves and mounting brackets (no text or symbols)1 S t a n d a r d 1 9 - i n c h r a c
- Slide the chassis down so that the screw heads are in the narrow portion of the keyhole slots.
- Tighten the screws to secure the chassis in place.
NOTE
To provide better grounding of the chassis to the rack, attach the chassis to the rack using star washers. Additionally, if any single hole grounding lugs are used star washers shall be used as a means to prevent rotation of the lug.
- Add additional screws as required.
- Repeat step 2 through step 6 to mounteach subsequent chassis in the same rack.
Removing the slot blanks
The BigIron RX-8 chassis ships with slot blanks installed in all module slots. The slot blank covers a slot that does not currently have a module installed in it, ensuring proper airflow within the chassis. If you plan to install a module in a particular slot, you must remove the slot blank.

CAUTION
If you do not install a module in a slot, you must keep the slot blank in place. If you run the chassis with an uncovered slot, the system may overheat. Tighten the screws that secure the slot blanks so that they remain in place when removing adjacent panels or modules.
Although the slot blanks are different in size, the procedure for removing them from the BigIron RX-8 chassis is the same. Therefore, this section provides one procedure that applies to all slot blanks.
You will need a flat-head screwdriver to perform this task.
Follow the steps given below to remove a slot blank.
- Loosen the screws on either end of the slot blank by hand or with a flat-head screwdriver.
- Pull the slot blank out of the chassis, and store it in a safe place for future use.
Installing BigIron RX-8 modules
This section provides one procedure that applies to all modules. The sequence for installing more than one module is important to ensure proper fit. For the BigIron RX-8 chassis, starting from the lowest row and moving upwards, install the modules right-to-left.
In the BigIron RX-8, install the modules right-to-left.
NOTE
The BigIron RX Series modules are dedicated, which means that you must install them in the BigIron RX Series chassis only. For example, if you attempt to install the BigIron RX Series management module in another Brocade chassis or a management module intended for another Brocade chassis in the BigIron RX Series chassis, the chassis and module will not function properly.
Table 11 provides the chassis slot numbers into which you must install the modules. Markings for the chassis slots appear at the base of the slots.
TABLE 11 BigIron RX-8 module installation
| BigIron RX-8 module Chassis slot number |
| Management modules Active module - M1 (left).Redundant module - M2 (right). |
| Interface modules 1 - 8 |
| Switch fabric modules SF1 - SF3 |
The BigIron RX-8 chassis ships with the required switch fabric modules installed.

CAUTION
If you do not install a module in a slot, you must leave the slot blank installed in the slot. If you run the BigIron RX-8 chassis with an uncovered slot, the system may overheat.
If you are installing a redundant management module, refer to the Using a Redundant Management Module chapter in the BigIron RX Series Configuration Guide for information about how the redundant module works, optional software configurations that you can perform, and how to manage the redundancy feature.
Before installing a module in the BigIron RX-8 chassis, have the following on hand:
• An ESD wrist strap with a plug for connection to the ESD connector on the BigIron RX-8 chassis.

DANGER
For safety reasons, the ESD wrist strap should contain a 1 meg ohm series resistor.
• A large flat-head screwdriver.
Follow the steps given below to install a module in the BigIron RX-8 chassis.
- Put on the ESD wrist strap and ground yourself by inserting the plug into the ESD connector on the chassis front.
- Remove the module from its packaging.
- With the ejectors in the outward position, insert the module into the appropriate chassis slot and slide the card along the card guide until the ejectors on either side of the module move close to the module front panel.
FIGURE 28 Installing a module in a BigIron RX-8 chassis
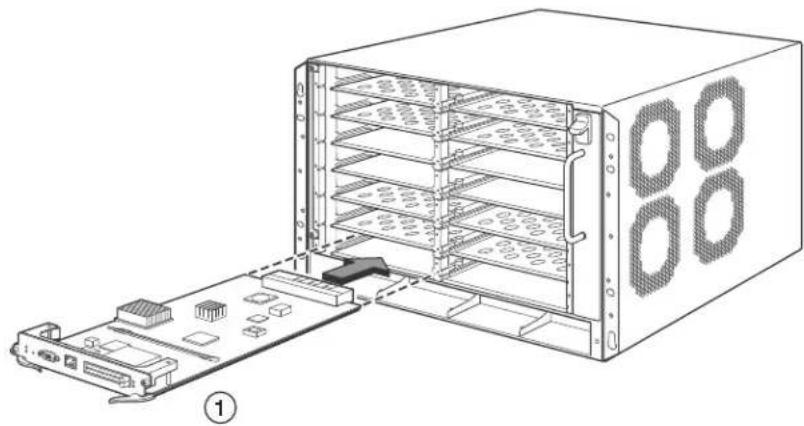
natural_image
Technical line drawing of an internal server rack unit with a connector and drive module (no text or symbols)1 Management module
NOTE
When inserting the module into the chassis, make sure that the faceplate does not overlap with the faceplate of an adjacent interface module.
- Push the ejectors in until they are flush with the module front panel. This action will fully seat the module in the backplane. Modules have a snug fit for maximum EMI protection.
NOTE
The installation instructions for installing modules shown in the following illustrations are exactly the same for interface, management, and switch fabric modules.
- Tighten the two screws at either end of the module front panel by pushing them in and turning them clockwise. Then, tighten the screws further using the flat-head screwdriver.
Installing power supplies in the BigIron RX-8 chassis
The BigIron RX-8 accommodates three power supplies (AC or DC) with one required and two redundant. It is shipped with one power supply. You must purchase one or two additional power supplies if you want your BigIron RX-8 equipped for redundancy.
Follow the steps given below to install a power supply in the BigIron RX-8 chassis.
-
Remove the blank power supply faceplate, and expose the empty power supply slot.
-
Remove the power supply from its packaging.
-
Insert the power supply into the empty power supply slot, using the guides provided on either side of the slot.

CAUTION
Carefully follow the mechanical guides on each side of the power supply slot and make sure the power supply is properly inserted in the guides. Never insert the power supply upside down.
FIGURE 29 Installing a power supply in a BigIron RX-8 chassis

natural_image
Technical line drawing of an internal rack-mounted server unit with ventilation grilles and a base panel, showing no text or symbols.-
For the BigIron RX-8 chassis, install a blank power supply faceplate into each slot that is empty after all of the power supplies have been installed.
-
After the power supply is fully inserted, push the power supply front panel toward the back of the chassis. This action causes the power supply connector to latch into the backplane connector.
-
For the BigIron RX-8, gently pull the handle on the power supply front panel upward and toward the top of the power supply front panel. This action locks the power supply in place.
-
For information about connecting power to the chassis, refer to "Connecting AC power to a BigIron RX-8 chassis" on page 45, or "Connecting DC power to a BigIron RX-8 chassis" on page 46.
Connecting AC power to a BigIron RX-8 chassis
AC power is supplied through an AC power cord that is installed at the rear of the Biglron RX-8 chassis.
- At the rear of the BigIron RX-8 chassis, locate the power receptacle where the power supplies have been installed.
- Lift the cord-retainer and connect a Brocade-supplied AC power cord to the power supply.
- Snap the cord-retainer over the power plug to hold it in place.
FIGURE 30 Connecting a power cord to the power supply in a BigIron RX-8 chassis
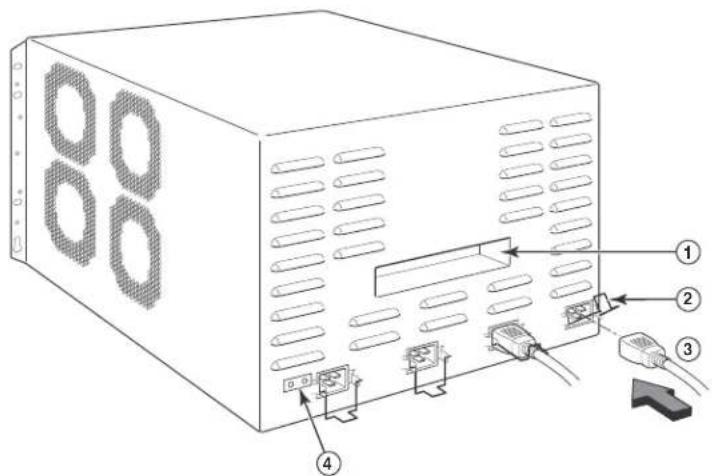
1 Lift handle 3 Power cord
2 Cord retainer 4 Ground point

DANGER
If the installation requires a different power cord than the one supplied with the device, make sure you use a power cord displaying the mark of the safety agency that defines the regulations for power cords in your country. The mark is your assurance that the power cord can be used safely with the device.
- For information about powering on the system, refer to "Powering-on the power source" on page 79.
Connecting DC power to a BigIron RX-8 chassis
You can use a DC power source for the BigIron RX-8 chassis. This is supported through use of a DC-to-DC power supply. DC power must be supplied at 48 V and 30 A. The DC-to-DC supply provides the DC power to the chassis at 12 V and 100 A.

DANGER
The procedure in this section is for qualified service personnel.
Follow the steps given below to connect a DC power source.
- Use a flat-blade screwdriver to remove the two screws holding the transparent cover over the power supply lugs.
FIGURE 31 The BigIron RX-8 and BigIron RX-16 DC power supply

1 Screws holding power lugs 2 Screws holding transparent cover
2. Use a Phillips head screwdriver to remove each of the power lugs.
3. Crimp #8 AWG power supply wire into the power lugs and reconnect the power lugs to the power supply unit.
FIGURE 32 Crimping the power supply wire in the lug
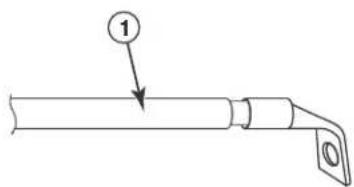
1 #8 AWG power supply wire
4. Re-attach the transparent cover over the power supply lugs that was removed in Step 1.
5. Connect the wire to your DC power source, making sure to connect the -48V cable to the negative terminal on the power supply and the 0V cable to the positive terminal as marked on the power supply.
Final steps
Follow the steps listed below to complete the installation:
- “Attaching a management station”
- "Powering-on the power source"
- "Verifying proper operation"
Installing a BigIron RX-16 switch
This section describes the following tasks:
- “Preparing the installation site”
- "Unpacking a BigIron RX-16 switch"
- “Chassis lifting guidelines for BigIron RX-16 switches”
- "Installing a BigIron RX-16 chassis in a rack"
- "Installing BigIron RX-16 modules"
- "Installing power supplies in a BigIron RX-16 chassis"
- “Connecting AC power to a BigIron RX-16 chassis”
- “Connecting DC power to a BigIron RX-16 chassis”
- "Final steps"
Preparing the installation site
Cabling infrastructure
Ensure that the proper cabling is installed in the site.
For information on cabling, refer to “Installing power supplies in a BigIron RX-16 chassis” on page 54, “Attaching a management station” on page 77, and “Connecting a BigIron RX Series switch” on page 105.
Installation location
Before installing the switch, plan its location and orientation relative to other devices and equipment. For cooling purposes, allow a minimum of six inches of space between the sides, front, and the back of the chassis and walls or other obstructions. If a chassis is installed within a perforated enclosure, the perforations must have openings of at least 60 percent of the surface.
If you will be using a mechanical lift to move and install the chassis, make sure you allow enough working room.
Unpacking a BigIron RX-16 switch
The BigIron RX-16 switch ships with several items. Review the list below, and verify the contents. If any items are missing, contact the place of purchase:
- BigIron RX-16 chassis with the appropriate number of switch fabric modules already installed in the slot marked SF and a slot blank installed in all other module slots.
- Rack mount kit, including two L-shaped brackets and mounting screws.
NOTE
You must provide standard #12-24 pan-head screws for mounting the BigIron RX Series chassis into a rack.
- CD-ROM containing software images and the user documentation (including this guide).
- Warranty card.
- A 115V AC power cable for each AC power supply you purchase from Brocade.
Follow the steps given below to unpack a BigIron RX-16 chassis.
- Move the pallet to a staging area as close to the installation site as possible.
- Position the shipping carton with the arrows pointing up.
- Remove the strap that secures the shipping carton to the pallet.
- Remove the plastic cover and shipping carton.
- Save the shipping carton, pallet, and packing materials in case you need to move or ship the chassis at a later time.
Chassis lifting guidelines for BigIron RX-16 switches

DANGER
A fully-populated BigIron RX-16 chassis is heavy. TWO OR MORE PEOPLE ARE REQUIRED WHEN LIFTING, HANDLING, OR MOUNTING THESE DEVICES.
Follow these guidelines for lifting and moving a BigIron RX-16 chassis switch:
- Before lifting or moving the switch, disconnect all external cables.
- Do not attempt to lift a fully configured switch by yourself. Using a mechanical lift to maneuver the switch into a rack is recommended. If a lift cannot be used, a minimum of four people must lift the switch, and you must remove components from the chassis before lifting.
Installing a BigIron RX-16 chassis in a rack
Preparing to mount a BigIron RX-16 chassis in a rack
Keep the following in mind when mounting a BigIron RX-16 chassis in a rack:

DANGER
A fully-populated BigIron RX-16 chassis is heavy. TWO OR MORE PEOPLE ARE REQUIRED WHEN LIFTING, HANDLING, OR MOUNTING THESE DEVICES. Do not use the handles on the power supply units to lift or carry chassis devices.

DANGER
Make sure the rack or cabinet housing the device is adequately secured to prevent it from becoming unstable or falling over.

DANGER
Mount the devices you install in a rack or cabinet as low as possible. Place the heaviest device at the bottom and progressively place lighter devices above.
Because of the weight of a fully loaded BigIron RX-16 chassis, Brocade recommends mounting a chassis in a rack before installing the modules and AC power supplies.
In a standard 19-inch (EIA310-D) rack, you can install up to three BigIron RX-16 chassis.
For each BigIron RX-16 chassis that you install in a rack, you must provide four standard #12-24 pan-head screws with which to mount and secure the chassis. Before performing this task, you should have an assembled rack and a #2 Phillips-head screwdriver.
This section describes the following tasks:
- "Attaching mounting brackets to a BigIron RX-16 chassis"
- “Mounting a BigIron RX-16 chassis in a rack”
- “Removing the slot blanks”
Attaching mounting brackets to a BigIron RX-16 chassis
The BigIron RX-16 chassis ships with a rack mount kit. The kit includes two L-shaped mounting brackets and mounting screws.
The chassis sides have two sets of screw holes: one set for attaching the mounting brackets close to the chassis front and another set for attaching the brackets toward the chassis center.
Attach the mounting brackets to the sides of the chassis as illustrated in Figure 33.
NOTE
The diagram shows locations for attaching the mounting brackets for either front-mount or mid-mount of the BigIron RX-16 chassis.
Mounting a BigIron RX-16 chassis in a rack
Follow the steps given below to mount a BigIron RX-16 chassis in a rack.
- Determine the position of each chassis in the rack, for example, a chassis with the fewest modules on top, a chassis with more modules than the top chassis in the middle, and a fully populated chassis on the bottom.
- Position the four screws for each chassis according to the spacings of the keyhole slots (the ones with the narrow portion pointing upwards) on the mounting brackets as shown in Figure 34. Do not secure the screws completely; leave approximately 1/4 inch of clearance between the back of the screw head and the rack.
FIGURE 33 Positioning the screws in a rack
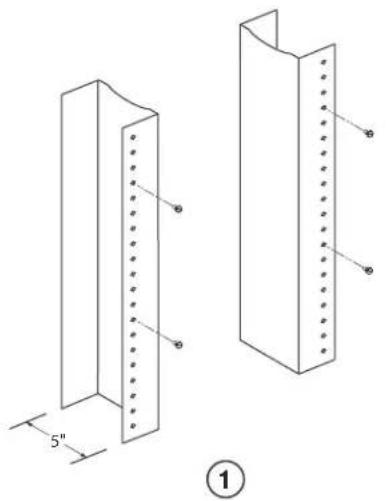
natural_image
Technical line drawing of two structural panels with bolt holes and dimension annotations (no text or symbols)
natural_image
Technical line drawing of two structural panels with bolt holes and dimension annotations (no text or symbols)1 Unequal flange equipment rack 2 Network equipment rack
- Starting with the chassis that you want to mount in the lowest position in the rack, mount the chassis in the rack as shown in Figure 34. With two or more people lifting the chassis, slip the wide portion of each keyhole slot over the corresponding screw in the rack.
FIGURE 34 Mounting the BigIron RX-16 or BigIron RX-32 chassis in a rack
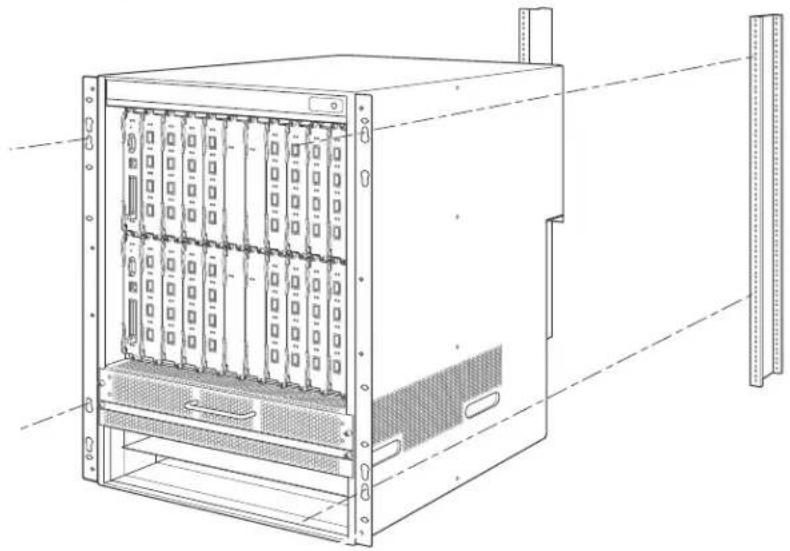
natural_image
Technical line drawing of a server rack cabinet with multiple drive bays and mounting brackets (no text or labels)- Slide the chassis down so that the screw heads are in the narrow portion of the keyhole slots.
- Tighten the screws to secure the chassis in place.
NOTE
To provide better grounding of the chassis to the rack, attach the chassis to the rack using star washers. Additionally, if any single hole grounding lugs are used star washers shall be used as a means to prevent rotation of the lug.
- Repeat step 2 through step 5 to mount each subsequent chassis in the same rack.
Removing the slot blanks
The BigIron RX-16 chassis ships with slot blanks installed in all module slots. The slot blank covers a slot that does not currently have a module installed in it, ensuring proper airflow within the chassis. If you plan to install a module in a particular slot, you must remove the slot blank.

CAUTION
If you do not install a module in a slot, you must keep the slot blank in place. If you run the chassis with an uncovered slot, the system may overheat. Tighten the screws that secure the slot blanks so that they remain in place when removing adjacent panels or modules.
Although the slot blanks are different in size, the procedure for removing them from the BigIron RX Series chassis is the same. Therefore, this section provides one procedure that applies to all slot blanks.
You will need a flat-head screwdriver to perform this task.
Follow the steps given below to remove a slot blank.
- Loosen the screws on either end of the slot blank by hand or with a flat-head screwdriver.
- Pull the slot blank out of the chassis, and store it in a safe place for future use.
Installing BigIron RX-16 modules
This section provides one procedure that applies to all modules. The sequence for installing more than one module is important to ensure proper fit. For the BigIron RX-16 chassis, starting with the lowest row, and moving upwards, install the modules left-to-right starting with the bottom row
NOTE
The BigIron RX Series modules are dedicated, which means that you must install them in the BigIron RX Series chassis only. For example, if you attempt to install the BigIron RX Series management module in another Brocade chassis or a management module intended for another Brocade chassis in the BigIron RX Series chassis, the chassis and module will not function properly.
Table 12 provides the chassis slot numbers into which you must install the modules. Markings for the chassis slots appear at the base of the slots.
TABLE 12 BigIron RX-16 module installation
| BigIron RX-16 module Chassis slot number |
| Management modules Active module - M1 (upper).Redundant module - M2 (lower). |
| Interface modules 1 - 16 |
| Switch Fabric modules SF1 - SF4 |
The BigIron RX-16 chassis ships with the required switch fabric modules installed.

CAUTION
If you do not install a module in a slot, you must leave the slot blank installed in the slot. If you run the BigIron RX-16 chassis with an uncovered slot, the system may overheat.
If you are installing a redundant management module, refer to the Using a Redundant Management Module chapter in the BigIron RX Series Configuration Guide for information about how the redundant module works, optional software configurations that you can perform, and how to manage the redundancy feature.
Before installing a module in the BigIron RX-16 chassis, have the following on hand:
- An ESD wrist strap with a plug for connection to the ESD connector on the BigIron RX Series chassis.

DANGER
For safety reasons, the ESD wrist strap should contain a 1 meg ohm series resistor.
- A large flat-head screwdriver.
Follow the steps given below to install a module in the BigIron RX-16 chassis.
-
Put on the ESD wrist strap and ground yourself by inserting the plug into the ESD connector on the chassis front.
-
Remove the module from its packaging.
-
With the ejectors in the outward position, insert the module into the appropriate chassis slot and slide the card along the card guide until the ejectors on either side of the module move close to the module front panel. Refer to special instructions, "Populating a BigIron RX-16 chassis" on page 53.
NOTE
When inserting the module into the chassis, make sure that the faceplate does not overlap with the faceplate of an adjacent interface module.
- Push the ejectors in until they are flush with the module front panel. This action will fully seat the module in the backplane. Modules have a snug fit for maximum EMI protection.
FIGURE 35 Installing a module in a BigIron RX-16 chassis

natural_image
Diagram of a server rack with an open door, showing internal rack seating and ventilation slots (no text or labels)1 l n t e r f a c e m o d u l e
NOTE
The installation instructions for installing modules shown in the following illustrations are exactly the same for interface, management, and switch fabric modules.
- Tighten the two screws at either end of the module front panel by pushing them in and turning them clockwise. Then, tighten the screws further using the flat-head screwdriver.
Populating a BigIron RX-16 chassis
The sequence for installing more than one card is important to ensure proper fit in the BigIron RX-16 chassis. Always fill the bottom slots in the BigIron RX-16 first. Begin by filling the slots from the left side of the chassis, and working your way towards the right. Refer to "BigIron RX-16 chassis" on page 4 for slot locations.
NOTE
Any empty slots must contain slot blanks to ensure proper air flow within the chassis.
Rules for populating a BigIron RX-16 chassis
- Install a management module in management slot 2.
- Install interface modules in interface slots 2, 4, 6, and 8.
- Install switch fabric modules in the switch fabric slots 2 and 4.
- Install interface modules in interface slots 10, 12, 14, and 16.
- Install a management module in management slot 1.
- Install interface modules in interface slots 1, 3, 5, and 7.
- Install switch fabric modules in the switch fabric slots 1 and 3.
- Install interface modules in interface slots 9,11,13, and 15.
Installing power supplies in a BigIron RX-16 chassis
Follow the steps given below to install a power supply in a BigIron RX-16 chassis.
- Remove the blank power supply faceplate, and expose the empty power supply slot.
- Remove the power supply from its packaging.
- Insert the power supply into the empty power supply slot, using the guides provided on either side of the slot.
FIGURE 36 Installing a power supply in a BigIron RX-16 chassis
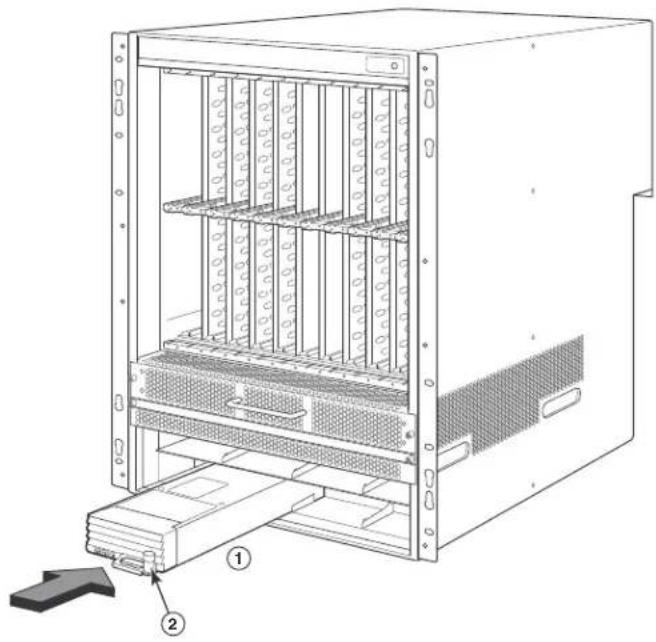
natural_image
Technical line drawing of a server rack unit with labeled components (no text or symbols beyond labels)1 Power supply 2 Release latch

CAUTION
Carefully follow the mechanical guides on each side of the power supply slot and make sure the power supply is properly inserted in the guides. Never insert the power supply upside down.
- After the power supply is fully inserted, push the power supply front panel toward the back of the chassis. This action causes the power supply connector to latch into the backplane connector.
- For information about connecting power to the chassis, refer to "Connecting AC power to a BigIron RX-16 chassis" below.
- For information about powering on the system, refer to "Powering-on the power source" on page 79.
Connecting AC power to a BigIron RX-16 chassis
AC power is supplied through an AC power cord that is installed at the rear of the BigIron RX-16 chassis.
- At the rear of the BigIron RX-16 chassis, locate the power receptacle where the power supplies have been installed.
- Lift the cord-retainer and connect a Brocade-supplied AC power cord to the power supply.
- Snap the cord-retainer over the power plug to hold it in place.
FIGURE 37 Connecting a power cord to the power supply in a BigIron RX-16 chassis

1 Lift handle 4 Ground point
2 Cord retainer 5 Lift handles
3 P o w e r c o r d

DANGER
If the installation requires a different power cord than the one supplied with the device, make sure you use a power cord displaying the mark of the safety agency that defines the regulations for power cords in your country. The mark is your assurance that the power cord can be used safely with the device.
- For information about powering on the system, refer to "Powering-on the power source" on page 79.
Connecting DC power to a BigIron RX-16 chassis
You can use a DC power source for the BigIron RX-16 chassis. This is supported through use of a DC-to-DC power supply. DC power must be supplied at 48 V and 30 A. The DC-to-DC supply provides the DC power to the chassis at 12 V and 100 A.

DANGER
The procedure in this section is for qualified service personnel.
Follow the steps given below to connect a DC power source.
- Use a flat-blade screwdriver to remove the two screws holding the transparent cover over the power supply lugs.
FIGURE 38 The BigIron RX-8 and BigIron RX-16 DC power supply

1 Screws holding power lugs 2 Screws holding transparent cover
-
Use a Phillips head screwdriver to remove each of the power lugs.
-
Crimp #8 AWG power supply wire into the power lugs and reconnect the power lugs to the power supply unit.
FIGURE 39 Crimping the power supply wire in the lug
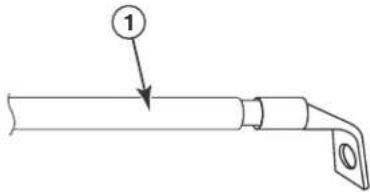
1 #8 AWG power supply wire
-
Re-attach the transparent cover over the power supply lugs that was removed in Step 1.
-
Connect the wire to your DC power source, making sure to connect the -48V cable to the negative terminal on the power supply and the 0V cable to the positive terminal as marked on the power supply.
Final steps
Follow the steps listed below to complete the installation:
- "Attaching a management station"
• "Powering-on the power source" - "Verifying proper operation"
Installing a BigIron RX-32 switch
This section describes the following tasks:
- "Preparing the installation site"
- "Unpacking a BigIron RX-32 switch"
- "Installing a BigIron RX-32 chassis in a rack"
• "Installing BigIron RX-32 modules" - "BigIron RX-32 cable routing"
- "Installing power supplies in a BigIron RX-32 chassis"
- "Connecting AC power to a BigIron RX-32 chassis"
- "Final steps"
Preparing the installation site
Cabling infrastructure
Ensure that the proper cabling is installed in the site.
For information on cabling, refer to "BigIron RX-32 cable routing" on page 67, "Installing power supplies in a BigIron RX-32 chassis" on page 75, "Attaching a management station" on page 77, and "Connecting a BigIron RX Series switch" on page 105.
Installation location
Before installing the switch, plan its location and orientation relative to other devices and equipment. For cooling purposes, allow a minimum of six inches of space between the sides, front, and the back of the chassis and walls or other obstructions. If a chassis is installed within a perforated enclosure, the perforations must have openings of at least 60 percent of the surface.
Since you will be using a mechanical lift to move and install the chassis, make sure you allow enough working room.
NOTE
Make sure your site provides 200-240 AC power.
Unpacking a BigIron RX-32 switch
The BigIron RX-32 switch ships with several items. Review the list below, and verify the contents. If any items are missing, contact the place of purchase:
- BigIron RX-32 chassis with the card slots empty, and covered with upper and lower shipping panels (refer to uncrating instructions next)
- The appropriate number of interface modules, switch fabric modules, management modules, and power supplies shipped separately
- A total of 32 slot blanks shipped separately
- Rack mount kit, including two L-shaped brackets and mounting screws
NOTE
You must provide standard #12-24 pan-head screws for mounting the BigIron RX Series chassis into a rack.
- Insertion or extraction tool for use with RJ-45 and fiber-optic connectors
• CD-ROM containing software images and the user documentation (including this guide) - Warranty card
• A 220-240V AC power cable for each AC power supply you purchase from Brocade
Uncrating the BigIron RX-32 chassis
Before uncrating the chassis, the site should be prepared as described in “Preparing the installation site” on page 57. You will need the following tools:
- A forklift or pallet jack to move the chassis while still on the pallet (at least 550-lb limit)
- A mechanical lift (at least 350-lb limit) for moving the chassis off the pallet. The ideal configuration is a counterweight base material lift with a metal lift plate installed in place of the forks. The metal plate should be no wider than 17 inches, so that it will fit between the rack mount rails.
- A strap to stabilize the chassis while being moved on the mechanical lift
- A power drill
• A large Phillips screwdriver attachment
• A 7/16-inch socket wrench attachment
The BigIron RX-32 chassis ships in a wooden crate, bolted to an inner pallet, and resting on an outer pallet. Follow the steps given below to uncrate the chassis.
NOTE
To uncrate the BigIron RX-32 chassis, the crate must be in the upright (vertical) position.
- Position the crate so that you have access to the front and the rear. There must be enough space to the rear of the pallet to slide and remove the crate.
- Use a power drill with Phillips and large blade screwdriver attachments to remove the bolts and screws that hold the front shipping panel in place, as shown in Figure 40. Remove the front shipping panel and set it aside.
FIGURE 40 Removing bolts and screws on the BigIron RX-32 chassis
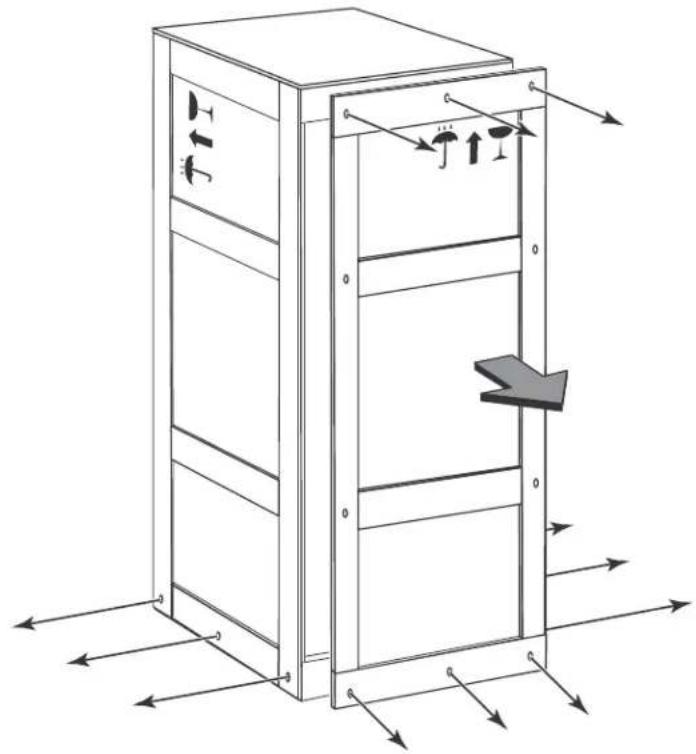
natural_image
Technical line drawing of a cabinet with directional arrows indicating force or movement (no text or symbols present)- Remove the remaining bolts and screws along the bottom of the crate that attach the crate to the pallet.
- Slide the sides, top, and back of the crate backwards as one unit until it clears the pallet.
- Save the crate (including the shipping panel) in case the chassis needs to be shipped again.
Installing a Biglron RX-32 chassis in a rack
This section describes the following tasks:
• Preparing to Mount a BigIron RX-32 chassis in a Rack
- Attaching mounting brackets to a chassis
- Mounting a BigIron RX-32 chassis in a rack
Preparing to mount a BigIron RX-32 chassis in a rack
Keep the following in mind when mounting a BigIron RX-32 chassis in a rack:

DANGER
Make sure the rack or cabinet housing the device is adequately secured to prevent it from becoming unstable or falling over.

DANGER
Mount the devices you install in a rack or cabinet as low as possible. Place the heaviest device at the bottom and progressively place lighter devices above.
Because of the weight of a fully loaded BigIron RX-32 chassis, Brocade recommends mounting the chassis in a rack before installing the modules and AC power supplies.
In a standard 19-inch (EIA310-D) rack, you can install one BigIron RX-32 chassis.
For each BigIron RX-32 chassis that you install in a rack, you must provide eight standard #12-24 pan-head screws with which to mount and secure the chassis. Before performing this task, you should have an assembled rack and a #2 Phillips-head screwdriver.
Attaching mounting brackets to a BigIron RX-16 or BigIron RX-32 chassis
The BigIron RX-16 and BigIron RX-32 chassis ship with a rack mount kit that contains two L-shaped mounting brackets and mounting screws.
The chassis sides have two sets of screw holes: one set for attaching the mounting brackets close to the chassis front, and another set for attaching the brackets toward the chassis center.
Attach the mounting brackets to the sides of the chassis as illustrated in "Mounting the BigIron RX-16 or BigIron RX-32 chassis in a rack" on page 51.
NOTE
The diagram shows locations for attaching the mounting brackets for either front-mount or mid-mount of the BigIron RX-16 chassis. Mounting brackets for the BigIron RX-32 chassis are attached in the same manner.
Mounting a BigIron RX-32 chassis in a rack
Due to its larger size, the BigIron RX-32 chassis has some requirements different from the other BigIron RX Series chassis. Use the following procedural changes when installing a BigIron RX-32 chassis:
- Only one BigIron RX-32 chassis can be mounted in a rack, positioned a low as possible.
- The empty BigIron RX-32 chassis weighs approximately 325 lbs. You must use a mechanical device (such as a material lift or work positioner), and four people are required to guide the chassis into place.
Follow the steps given below to install a BigIron RX-32 chassis.
- Ensure the rack is in its permanent location and is secured to the building. Ensure that the installation site allows adequate clearance for both airflow, installation, and maintenance.
- Move the pallet and chassis as close to the installation site as possible.
- Use a power drill with a large Phillips screwdriver attachment to remove the four L-brackets that attach the base of the chassis to the inner pallet. Refer to Figure 41.
FIGURE 41 Location of L-Brackets holding the BigIron RX-32 chassis
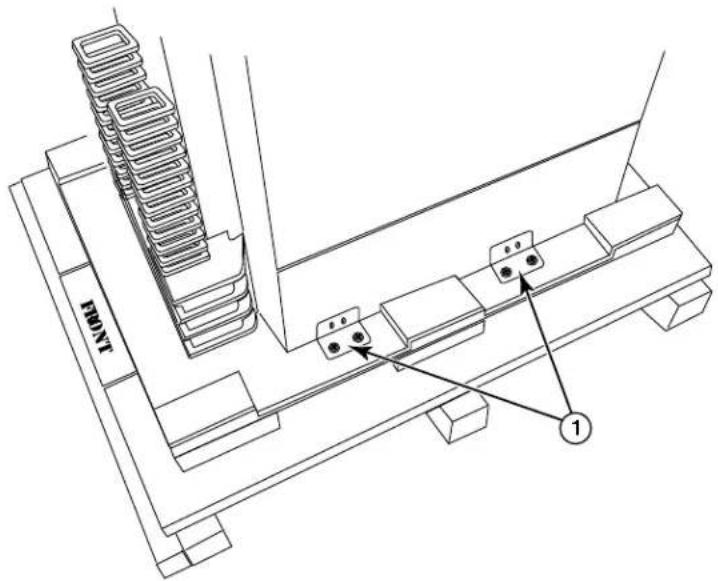
1 Remove brackets that hold chassis to base (two brackets on either side of chassis)
4. Using a mechanical lift equipped with a lift plate, position the lift plate as close to the front of the chassis as possible. Adjust the lift plate height to be even with the bottom of the chassis.
5. Slide the chassis onto the lift plate.

DANGER
Four or more people are required to position the unpopulated chassis into the rack.

DANGER
Do not use the handles on the power supply units or fan modules to position the chassis.
- Secure the chassis to the mechanical lift with a strap to prevent tipping.
- Carefully move the chassis and position it in front of the rack where it is to be installed.
- Remove the strap securing the chassis to the lift.
-
With two people in front and two people in back, slide the chassis into the rack.
-
If you are installing the chassis in a four-post rack or cabinet, install a mounting screw and a cage nut into each of the holes aligned with the threaded holes in the spacer bars. If you are installing the chassis in an open-frame rack, install four standard #12-24 pan-head screws into the keyhole mounting holes aligned with the rack.
- Visually inspect the alignment of the chassis. If the chassis is installed properly in the rack, all the mounting screws on one side of the rack should be aligned with the mounting screws on the opposite side and the switch should be level.
- Add all additional screws.
Installing BigIron RX-32 modules
The BigIron RX-32 ships with empty module slots, and upper and lower shipping panels installed.

CAUTION
If you do not install a module in a slot, you must leave the slot blank installed in the slot. If you run the BigIron RX-32 chassis with an uncovered slot, the system may overheat.
NOTE
The BigIron RX Series modules are dedicated, which means that you must install them in the BigIron RX Series chassis only. For example, if you attempt to install the BigIron RX Series management module in another Brocade chassis or a management module intended for another Brocade chassis in the BigIron RX Series chassis, the chassis and module will not function properly.
If you are installing a redundant management module, refer to Using a Redundant Management Module chapter in the BigIron RX Series Configuration Guide for information about how the redundant module works, optional software configurations that you can perform, and how to manage the redundancy feature.
Before installing a module in the BigIron RX-32 chassis, have the following on hand:
- An ESD wrist strap with a plug for connection to the ESD connector on the BigIron RX-32 chassis.

DANGER
For safety reasons, the ESD wrist strap should contain a 1 meg ohm series resistor.
- A large flat-head screwdriver.
Follow the steps given below to install a module in the BigIron RX-32 chassis. - Put on the ESD wrist strap and ground yourself by inserting the plug into the ESD connector on the chassis front.
- Remove the module from its packaging.
- Remove the two shipping panels by unscrewing the six captive screws holding each panel.
- With the ejectors in the outward position, insert the module into the appropriate chassis slot and slide the card along the card guide until the ejectors on either side of the module move close to the module front panel. Refer to special instructions, "BigIron RX-32 cable routing" on page 67.
NOTE
When inserting the module into the chassis, make sure that the faceplate does not overlap with the faceplate of an adjacent interface module.
- Push the ejectors in until they are flush with the module front panel. This action will fully seat the module in the backplane. Modules have a snug fit for maximum EMI protection.
FIGURE 42 Installing a module in a BigIron RX-32 chassis
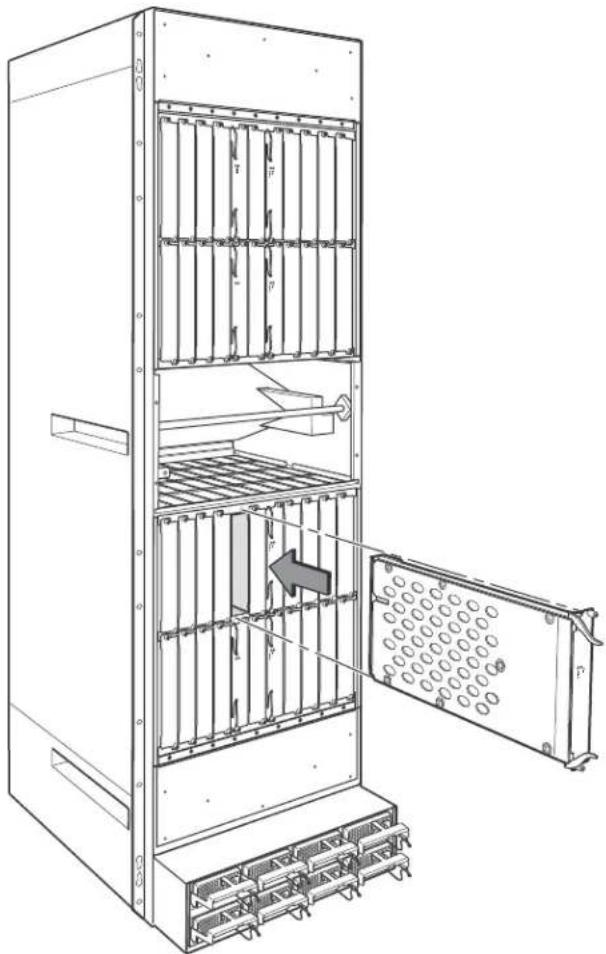
natural_image
Technical line drawing of a server rack cabinet with internal components and an open door (no text or symbols)NOTE
The installation instructions for installing modules shown in the following illustrations are exactly the same for interface, management, and switch fabric modules.
- Tighten the two screws at either end of the module front panel by pushing them in and turning them clockwise. Then, tighten the screws further using the flat-head screwdriver.
BigIron RX-32 module installation details
NOTE
Do not insert interface modules running releases below 02.3.00 into slots 17 to 32 of a BigIron RX-32 chassis. They should only be inserted into slots 1 to 16.
NOTE
Any empty slots must contain slot blanks to ensure proper air flow within the chassis.
NOTE
During the initially installation of the modules into a BigIron RX-32, Brocade recommends inserting all the modules into the appropriate chassis slots before tightening the screws into the chassis.
When Populating the BigIron RX-32 chassis, the modules must be installed in the appropriate slots as shown in Figure 43 as follows:
- Management Modules: management slots 1 and 2
- Switch Fabric Modules: switch fabric slots 1-8
• Interface Modules: Interface slots 1-32
FIGURE 43 BigIron RX-32 chassis

1 Interface slot 1 27 Interface slot 27
2 Interface slot 2 28 Interface slot 28
3 Interface slot 3 29 Interface slot 29
4 Interface slot 4 30 Interface slot 30
5 Interface slot 5 31 nterface slot 31
6 Interface slot 6 32 nterface slot 32
7 Interface slot 7 33 Switch fabric slot 1
8 Interface slot 8 34 Switch fabric slot 2
9 Interface slot 9 35 Switch fabric slot 3
10 Interface slot 10 36 Switch fabric slot 4
11 Interface slot 11 37 Switch fabric slot 5
12 Interface slot 12 38 Switch fabric slot 6
13 Interface slot 13 39 Switch fabric slot 7
14 Interface slot 14 40 Switch fabric slot 8
15 Interface slot 15 41 Management slot 1
16 Interface slot 16 42 Management slot 2
17 Interface slot 17 43 Captive screws
18 Interface slot 18 44 ESD strap connector
19 Interface slot 19 45 Power supply 1
20 Interface slot 20 46 Power supply 2
21 Interface slot 21 47 Power supply 3
22 Interface slot 22 48 Power supply 4
23 Interface slot 23 49 Power supply 5
24 Interface slot 24 50 Power supply 6
25 Interface slot 25 51 Power supply 7
26 Interface slot 26 52 Power supply 8
Using the Insertion or Extraction tool
Due to the high density of cables that the BigIron RX-32 chassis can support, it may be difficult to insert and remove the RJ-45 and optical connectors. An insertion or extraction tool has been provided in the BigIron RX-32 accessory kit to make this task easier. Refer to Figure 44.
FIGURE 44 Insertion or extraction tool
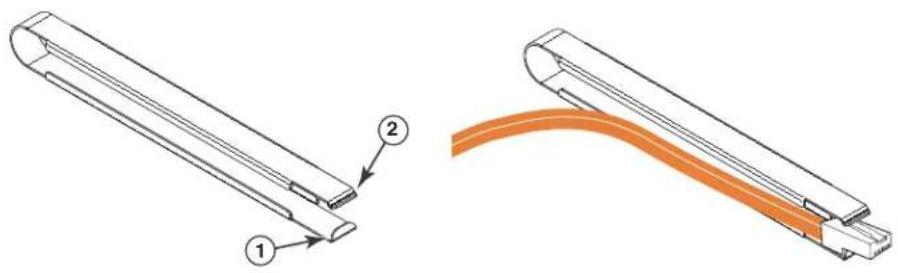
natural_image
Technical illustration of two mechanical components with labeled parts (1 and 2), showing assembly or assembly details without any text or symbols.1 Hooked tab
2 Stepped tab
Use the tool to grasp the boot or the plug of the modular connector at its narrow end (the end closest to the attached cable), and insert the connector into the proper interface module. Grasping the boot or plug at the wide end during insertion may cause the tool to be difficult to release and remove.
When using the tool to extract the boot or plug of a modular connector, cover the entire length of the boot or plug with the tool. Notice that one end of the tool has a "hook" side. Use this side to compress the locking tab while you remove the connector.
BigIron RX-32 cable routing
BigIron RX-32 cable management is designed to ensure access to the power supplies at the bottom of the chassis, and to keep the air inlet clear in the center of the chassis (this is essential for proper cooling). Cable management hardware at the top, bottom and sides of the chassis will assist you in channeling the cables in the proper direction.
In general, cables from the outer interface modules are routed horizontally and away from the chassis. With the cable management upper cover swung open, cables from the remaining modules in the upper half of the chassis are routed up, then outwards along the channels.
With the cable management lower cover swung open, the remaining modules in the lower half of the chassis follow a similar path downwards, above the power supplies. Figure 45 diagrams the cable routing, with the upper and lower covers removed for clarity.
FIGURE 45 BigIron RX-32 cable routing diagram
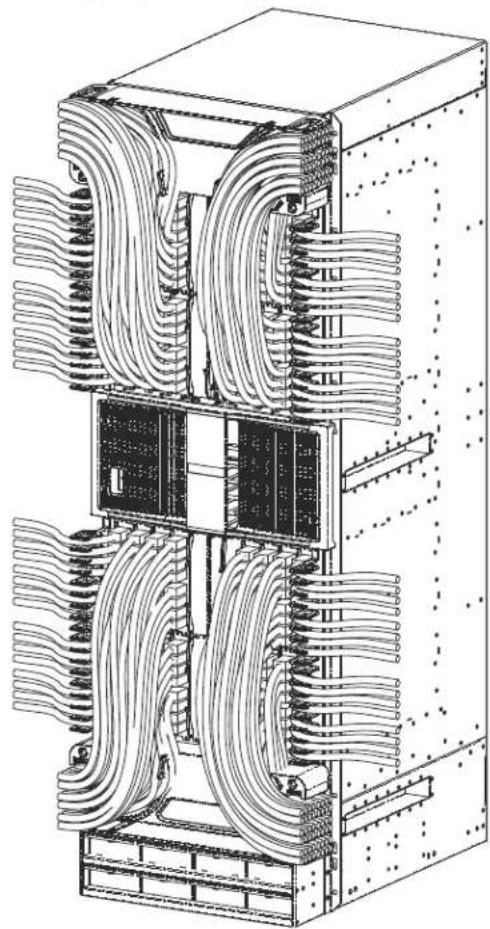
natural_image
Technical line drawing of a multi-chamber electrical or mechanical system with coiled wires and connectors (no text or symbols visible)Details of cable routing are as follows:

CAUTION
Be sure not to exceed the minimum recommended bend radius for the cables: 2 in. for MRJ-21 cables, and 1.5 in. for Category 5 (RJ-45) and fiber-optic cables.
Cable routing for the upper-left quadrant
Route slot cards in the numerical order starting with the cables of Slot Card #1.
- Route slot cards #1 and #2 cables directly to the left through the side comb. Refer to Figure 46.
FIGURE 46 Routing upper-left quadrant cables to the left

1 Upper left quadrant 3 Cables from slot #1
2 Side combs (18) 4 Cables from slot #2
FIGURE 47 Routing upper-left quadrant cables up

1 Upper left quadrant 3 Comb B (Slot #5 and #6 cables)
2 Comb C (Slot #7 and #8 cables) 4 Comb A (Slot #3 and #4 cables)
- Route slot card #3 and #4 cables up through Comb A. Refer to Figure 47.
- Route slot card #5 and #6 cables up through Comb B.
- Route slot card #7 and #8 cables up through Comb C.
Cable routing for the upper-right quadrant
Route slot cards in the numerical order starting with the cables of Slot Card #15.
- Route slot card #15 and #16 cables directly to the right through the side comb. Refer to Figure 48.
FIGURE 48 Routing upper-right quadrant cables to the right
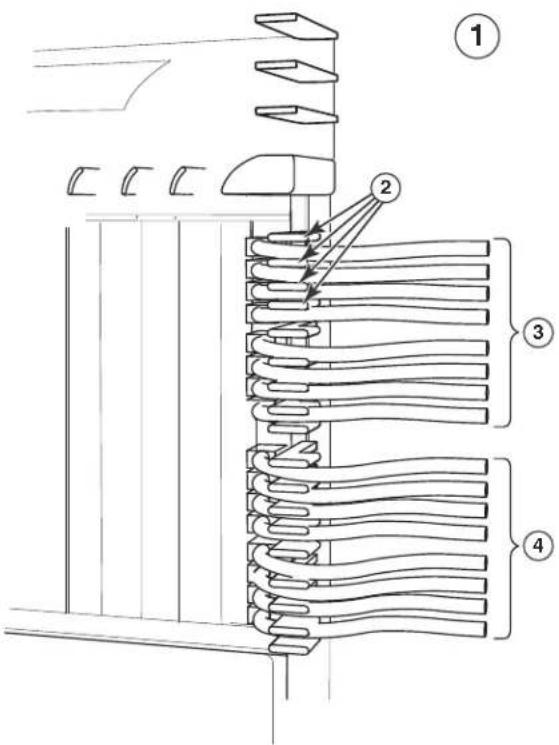
1 Upper right quadrant 3 Cables from slot #15
2 Side combs (18) 4 Cables from slot #16
FIGURE 49 Routing upper-right quadrant cables up

1 Upper right quadrant 3 Comb B (Slot #11 and #12 cables)
2 Comb C (Slot #9 and #10 cables) 4 Comb A (Slot #13 and #14 cables)
2. Route slot card #13 and #14 cables up through Comb A. Refer to Figure 49.
3. Route slot card #11 and #12 cables up through Comb B.
4. Route slot card #9 and #10 cables up through Comb C.
Cable routing for the lower-left quadrant
- Route slot card #18 and #17 cables directly to the left through the side comb. Refer to Figure 50.
FIGURE 50 Routing lower-left quadrant cables to the left

1 Lower left quadrant 3 Cables from slot #18
2 Cables from slot #17 4 Side combs (18)
FIGURE 51 Routing lower-left quadrant cables down

1 Lower left quadrant 3 Comb B (Slot #21 and #22 cables)
2 Comb A (Slot #19 and #20 cables) 4 Comb C (Slot #23 and #24 cables)
2. Route slot card #20 and #19 cables down through Comb A. Refer to Figure 51.
3. Route slot card #22 and #21 cables down through Comb B.
4. Route slot card #24 and #23 cables down through Comb C.
Cable routing for the lower-right quadrant
- Route slot card #32 and #31 cables directly to the right through the side comb. Refer to Figure 52.
FIGURE 52 Routing the lower-right quadrant cables to the right
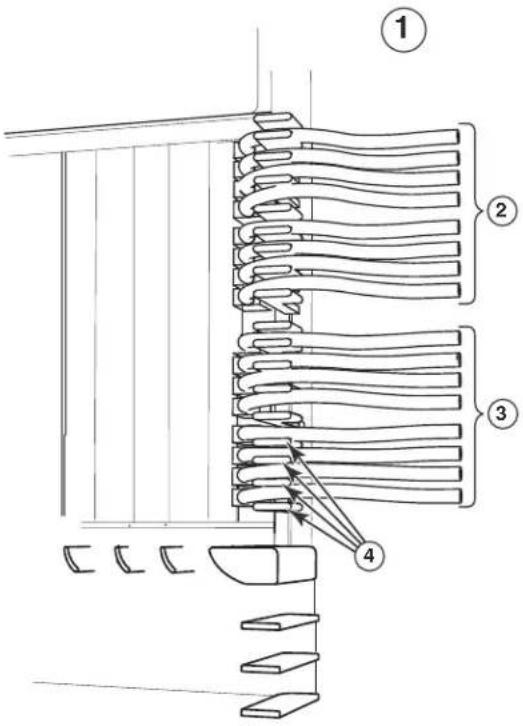
1 Lower right quadrant 3 Cables from slot #32
2 Cables from slot #31 4 Side combs (18)
FIGURE 53 Routing lower-right quadrant cables down
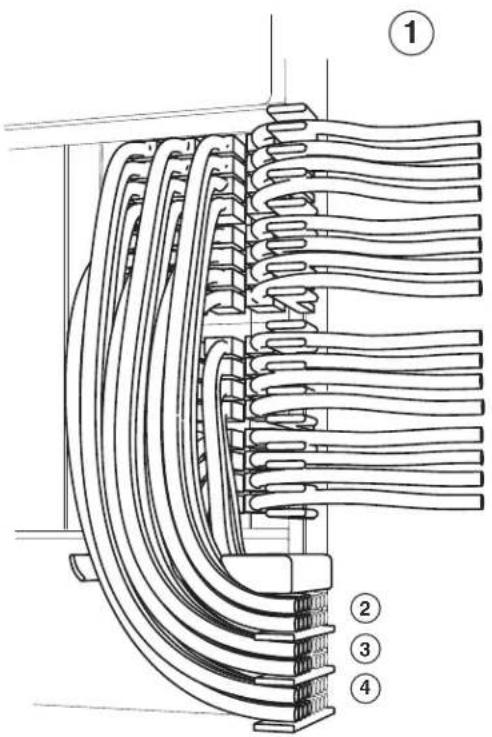
1 Lower right quadrant 3 Comb B (Slot #27 and #28 cables)
2 Comb A (Slot #29 and #30 cables) 4 Comb C (Slot #25 and #26 cables)
2. Route slot card #30 and #29 cables down through Comb A. Refer to Figure 53.
3. Route slot card #28 and #27 cables down Comb B.
4. Route slot card #26 and #25 cables down through Comb C.
Installing power supplies in a BigIron RX-32 chassis

DANGER
High Touch Current. Earth connection essential before connecting supply.
Follow the steps given below to install a power supply in a BigIron RX-32 chassis.
- Remove the blank power supply faceplate, and expose the empty power supply slot.
- Remove the power supply from its packaging.
- Insert the power supply into the empty power supply slot, using the guides provided on either side of the slot.
FIGURE 54 Installing a power supply in a BigIron RX-32 chassis

1 Power supply indicators 6 Latch handle locked
2 A C O K 7 P o w e r s u p p l y b l
3 DC OK 8 Pull down on plunger to remove
4 A L M 9 P o w e r s u p p l y
5 Latch handle open

CAUTION
Carefully follow the mechanical guides on each side of the power supply slot and make sure the power supply is properly inserted in the guides. Never insert the power supply upside down.
-
Install a blank power supply faceplate into each slot that is empty after all of the power supplies have been installed.
-
After the power supply is fully inserted, push the power supply front panel toward the back of the chassis. This action causes the power supply connector to seat into the backplane connector.
-
Gently pull the release latch on the power supply front panel upward and toward the top of the power supply front panel. This action locks the power supply in place.
- For information about connecting power to the chassis, refer to "Connecting AC power to a BigIron RX-32 chassis" on page 77.
- For information about powering on the system, refer to "Powering-on the power source" on page 79.
Connecting AC power to a BigIron RX-32 chassis
AC power is supplied through an AC power cord that is installed in the front of each power supply in the BigIron RX-32 chassis.
- At the front of the BigIron RX-32 chassis, locate the power receptacle on the front panel of each power supply that has been installed. Refer to Figure 55.
- Lift the cord retainer and connect a Brocade-supplied AC power cord to the power supply.
- Snap the cord retainer over the power plug to hold it in place.
FIGURE 55 BigIron RX-32 power supply receptacle and cord retainer
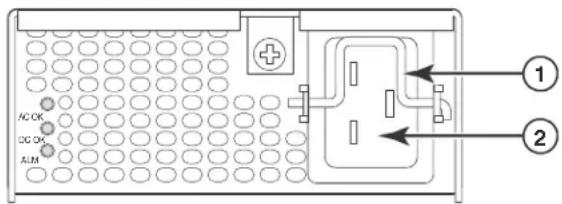
1 Cord retainer 2 Power receptacle
Final steps
You should complete the final step in the order in which they are listed:
- “Attaching a management station”
• "Powering-on the power source" - "Verifying proper operation"
Attaching a management station
You can manage the BigIron RX Series system in the following ways:
- You can connect a PC or terminal to the management module's serial (Console) port for a direct connection. From this interface, you can configure the 10BaseT/100BaseTX/1000BaseTX Ethernet (management) port with an IP address and either Telnet or SSH. This enables you to manage the device through the 10BaseT/100BaseTX/1000BaseTX Ethernet (management) port using either Telnet or SSH.
- You can connect the BigIron RX Series switch to your existing management network and manage the switch, along with other network devices, from a management station. To do this, you must connect the management module's 10BaseT/100BaseTX/1000BaseTX Ethernet (management) port to an Ethernet network.
NOTE
The existing management network into which you can connect the 10/100 Ethernet port must be separate and isolated from the network over which user packets are switched and routed. For information about the management port's functionality, refer to "Understanding how the management port functions" on page 105.
For information about connecting a PC or terminal to the management module's Console port or management port, refer to "Attaching a PC or terminal to the Console port or Ethernet port" on page 78. For information about connecting a management port to a network, refer to "Attaching the management module's Ethernet Port to a network" on page 79.
Attaching a PC or terminal to the Console port or Ethernet port
The management module's Console port (which has a male DB-9 serial connector), and 10BaseT/100Base TX Ethernet port (which has an RJ-45 UTP connector) allow you to attach a PC or terminal. From the Console port, you can access the BigIron RX Series switch's CLI directly from the PC or terminal or through a Telnet connection to the PC or terminal. From the Ethernet port, you can access the BigIron RX Series switch's CLI or Web management interface directly from the PC or terminal or through a Telnet connection to the PC or terminal.
Before performing this task, you need the following items:
• PC running a terminal emulation application or a terminal.
- If connecting the PC or terminal to the Console port, a straight-through EIA or TIA DB-9 serial cable with one end terminated in a female DB-9 connector and the other end terminated in a male or female DB-9 or DB-25 connector, depending on the specifications of your PC or terminal. You can order the serial cable separately from Brocade or build your own cable. If you prefer to build your own, refer to the pinout information in “Console port pin assignments” on page 205.
- If connecting the PC or terminal to the Ethernet port, a Category 5 UTP crossover cable, which you must supply. For information about the management port pin assignments, refer to "Management port pin assignments" on page 206.
Follow the steps given below to attach a PC or terminal to the Console port or Ethernet port.
-
Connect a PC or terminal to the Console port or Ethernet port using the appropriate cable.
-
Open the terminal emulation program, and set the session parameters as follows:
-
Baud: 9600 bps
- Data bits: 8
- Parity: None
- Stop bits: 1
- Flow control: None
Attaching the management module's Ethernet Port to a network
The management module's 10BaseT/100BaseTX/1000BaseTX Ethernet (management) port (RJ-45 UTP connector) allows you to connect the management port to a network. A management station in your existing management network can then access a BigIron RX Series switch using the IronView Network Manager.
To attach the management module's Ethernet port to a network, you need a Category 5 UTP straight-through cable (not supplied by Brocade). Connect one end of the straight-through cable to the management port and the other end to the network.
Powering-on the power source
After you complete the hardware installation, you can power-on your power source.
- Verify that all modules and power supplies are fully and properly installed and no module slots are uncovered.

CAUTION
If you do not install a module in a slot, you must keep the slot blank in place. If you run the chassis with an uncovered slot, the system may overheat.
-
If you are supplying a DC power source to a BigIron RX Series chassis, attach the power cables to the DC power supply as described in the appropriate section:
-
"Connecting DC power to a BigIron RX-4 chassis" on page 36
- “Connecting DC power to a BigIron RX-8 chassis” on page 46
- "Connecting DC power to a BigIron RX-16 chassis" on page 56
Connect the other end of the cables to the DC power source. Repeat this step for each installed DC power supply. Then switch on the power source.
-
If your power source is AC, attach one end of a Brocade-supplied AC power cord to the AC power supply as described in the appropriate section:
-
“Connecting AC power to a BigIron RX-4 chassis” on page 36
- "Connecting AC power to a BigIron RX-8 chassis" on page 45
- "Connecting AC power to a BigIron RX-16 chassis" on page 55
- “Connecting AC power to a BigIron RX-32 chassis” on page 77
Insert the other end into a 115V or 120V wall outlet. Repeat this step for each installed AC power supply.

DANGER
If the installation requires a different power cord than the one supplied with the device, make sure you use a power cord displaying the mark of the safety agency that defines the regulations for power cords in your country. The mark is your assurance that the power cord can be used safely with the device.

CAUTION
If the wall outlet is not rated 115/120V and 20A, you must have an electrician rewire the outlet and power source. Make sure you obtain a power cord displaying the mark of the safety agency that defines the regulations for power cords in your country. The mark is your assurance that the power cord can be used safely with the device.
NOTE
The BigIron RX Series switch is designed to provide uninterrupted service even when you insert or remove the management modules and the interface modules. Therefore, the system does not have a separate on/off power switch. To turn the system off, simply unplug the power cords.
NOTE
The wall outlet should be installed near the equipment and should be easily accessible.
- Verify that the BigIron RX Series switch has initialized successfully. For information, refer to "Verifying proper operation" on page 80.
Verifying proper operation
To verify the proper operation of the BigIron RX Series chassis after power on, you can do the following:
- Observe the LEDs
• Display the status of the modules using the CLI
Observing the LEDs
After a BigIron RX Series chassis powers on, you can observe its LEDs to verify that it initialized successfully. Table 13 outlines the LEDs, the desired state of each LED, possible abnormal states of each LED, and what to do if an LED indicates an abnormal state.
TABLE 13 Desired and abnormal LED states after system power on
| LED Desired state Meaning Abnormal | state | Meaning or action | ||
| Management module | ||||
| Active The Active LED on one of the installed management modules should be on. | The module is functioning as the active management module. | Off Neither of the management modules is managing the switch fabric and interface modules.A problem could have occurred during initialization. Check your attached PC or terminal for possible error messages. | ||
| Pwr On The module is | receiving power. | Off The module is not receiving power.You can do the following:Make certain that the module is installed properly.For more information, refer to “Installing BigIron RX-4 modules” on page 33, “Installing BigIron RX-8 modules” on page 42, “Installing BigIron RX-16 modules” on page 52, or “Installing BigIron RX-32 modules” on page 62.If using AC power supplies, see the entry for the AC power supply LED in this table for more information. | ||
| 10/100/1000 Ethernet Port | On (Green) A link is established with the remote port. | Off A link is not established with the remote port. You can do the following:Verify that the connection to the other device has been properly made. Also, make certain that the other device is powered on and operating correctly.Try using a different cable. | ||
| 10/100/1000 Ethernet Port | On or blinking (Yellow) | The port is transmitting and receiving packets. | Off for an extended period | The port is not transmitting or receiving packets.You can check the other 10/100/1000 Ethernet port LED to make sure a link is established with the remote port. If not, take the actions described in the Meaning or Action column for the other 10/100/1000 Ethernet port LED. |
TABLE 13 Desired and abnormal LED states after system power on (Continued)
| LED Desired state Meaning Abnormal | state | Meaning or action | |
| Interface module | |||
| Pwr On The module is | receiving power. | Off The module is not receiving power.You can do the following:Make certain that the module is installed properly.For more information, refer to "Installing BigIron RX-4 modules" on page 33,"Installing BigIron RX-8 modules" on page 42,"Installing BigIron RX-16 modules" on page 52, or "Installing BigIron RX-32 modules" on page 62.The module may not be receiving enough power.Brocade recommends installing power supplies in a fully redundant configuration as described in "Installing power supplies in a BigIron RX-4 chassis" on page 35,"Installing power supplies in the BigIron RX-8 chassis" on page 44, "Installing power supplies in a BigIron RX-16 chassis" on page 54, or "Installing power supplies in a BigIron RX-32 chassis" on page 75.Check the Pwr LED on the management module. If it is on, this module may be holding the power from the interface module.Enter the show chassis command at any level of the CLI to determine if the management module recognizes the presence of all power sources.If using AC power supplies, see the entry for the AC power supply LED in this table for more information. | |
| Mgmt Act Duringinitialization:steady blinking.After initialization:occasionalblinking. | The active management module's processor and the interface module's processor are communicating. | Off for an extended period. | The interface module may be in interactive mode. Check the status of the module by entering the show module command at any CLI prompt. |
TABLE 13 Desired and abnormal LED states after system power on (Continued)
| LED | Desired state | Meaning | Abnormal state | Meaning or action |
| Link On A link is established | with the remote port. | Off At this stage of the installation, you have not yet cabled the interface module ports, so this LED will be off.After cabling this port, if this LED is off, a link is not established with the remote port. For more information, refer to Table 16 on page 109. | ||
| Active On or blinking The port is | transmitting and receiving user packets. | Off for an extended period. | At this stage of the installation, you have not yet cabled the interface module ports, so this LED will be off.After cabling this port, if this LED is off, the port is not transmitting or receiving user packets. For information about action you can take to troubleshoot the problem, refer to Table 16 on page 109. | |
Switch fabric module
| Pwr On The module is receiving power. | Off The module is not receiving power.You can do the following:If using AC power supplies,see the entry for the ACPower supply LED in this table for more information. | ||
| Active On The switch fabric | module is active and ready to switch user packets. | Off for an extended period. | The switch fabric module is not active and user packets are not being switched from one interface module to another.You must replace the switch fabric module. For information about performing this task, refer to “Replacing a switch fabric module” on page 143. |
Power supplies AC
| AC OK Green (steady) The power supply is receiving AC power from an AC power source. | Off The power supply is not receiving power from an AC power sourceYou can do the following:Make sure that the power supply cord is connected securely to the wall outlet and the power supply.Make sure that the wall outlet is rated for 115/120V and 20A. If it is not, obtain a cable that is compatibly rated for the outlet.Make sure that the wall outlet has power. | |
| LED Desired state Meaning Abnormal | Meaning or actionstate | |
| DC OK Green (steady) The power supply is providing DC power to the BigIron RX Series chassis. | Off The power supply is not supplying power to the chassis. If the AC OK LED is lit Green, then there is a problem with the power supply and it must be replaced. | |
| ALM ALM The power supply is in normal operating condition. | Amber The power supply is malfunctioning. | |
| Power supplies DC | ||
| DC IN Green (steady) The power supply is receiving DC power from a DC power source. | Off The power supply is not receiving power from a DC power source You can do the following:Make sure that the power supply cables are connected securely to the power source and the power supply.Make sure that the DC power source is 48 VDC @ 30 A (Operating voltage range is 40-60VDC).Make sure that the power source has power. | |
| DC OUT Green (steady) The power supply is providing DC power to the BigIron RX Series chassis. | Off The power supply is not supplying power to the chassis. If the DC IN LED is lit Green, then there is a problem with the power supply and it must be replaced. | |
| ALM Off The power supply is in normal operating condition. | Amber The power supply is malfunctioning. | |
| Fan control module (two LEDs on rear panel of chassis) | ||
| Unlabeled Green (steady) The fans are workingand responding tocontrols from the fancontrol module. | Off or amber The fans are not receiving power(off), or the fans are not workingand not responding to controlsfrom the fan control module(amber). You can do the following:If the LED is off, check thepower LED on the othermodules to make sure theyare receiving power.If using a DC power source,check your power source forproblems.If using AC power supplies,take the actions described inthe Meaning or Actioncolumn for the AC powersupply LED. If these actionsdo not resolve the problem,check the LED on each powersupply or enter theshowchassiscommand at any CLIprompt to determine if apower supply has failed. If apower supply has failed, youneed to replace it. For moreinformation, refer to“Replacing a power supply”on page 147.If the LED is amber, you needto replace the fan module.For information aboutperforming these tasks, see. | |
If a problem persists after taking action described in this table, contact Brocade for technical support.
Displaying the module status
After you have attached a PC or terminal to the management module's Console port or Ethernet port and the BigIron RX Series switch has initialized successfully, press Enter to display the following CLI prompt in the terminal emulation window:
BigIron RX>
If you do not see this prompt, do the following.
- Make sure the cable is securely connected to your PC or terminal and the Console port or Ethernet port.
- Check the settings in your terminal emulation program. In addition to the session settings listed in "Attaching a PC or terminal to the Console port or Ethernet port" on page 78, make sure the terminal emulation session is running on the same serial port you attached to the Console port.
If you see this prompt (BigIron RX>), you are now connected to the system and can display the status of the modules using the CLI. Enter the following command at any CLI level:
BigIron RX# show module
Module Status Ports Starting MAC
M1 (upper): BigIron RX Mgmt Module Active
M2 (lower):
F0: BigIron RX Switch Fabric Module Active
S1:
S2:
S3:
S4: BigIron RX 4-Port 10Gig Module CARD_STATE_UP 4 000c.db80.0000
S5: BigIron RX 4-Port 10Gig Module CARD_STATE_UP 4 000c.db80.0000
S6: BigIron RX 4-Port 10Gig Module CARD_STATE_UP 4 000c.db80.0000
S7:
S8:
Syntax: show module
The Status column shows the module status. A management module can have one of the following statuses:
- ACTIVE – The module is currently the active management module.
- STANDBY – The module is currently the standby management module.
- COMING UP – The module is coming up as the standby module. This status occurs if the standby management module becomes the active module, which is called a switchover.
The switch fabric module can have one of the following statuses:
• ACTIVE – The module is up and running.
- BAD – The management module cannot initialize the switch fabric module.
An interface module can have one of the following statuses:
- CARD_STATE_INIT – The system detects the module but the module is not up and running yet.
- CARD_STATE_BOOT - The module is booting.
- CARD_STATE_INTERACTIVE – The module is booting from interactive mode.
- CARD_STATE_LP_SYNC - The module's IronWare images are synchronized between the management module and interface module.
- CARD_STATE_SYNC - The system is currently synchronizing the module's IronWare images between the management module and interface module.
- CARD_STATE_SOFTWARE_LOADED - The module has loaded its IronWare image.
- CARD_STATE_POWER_OFF - The module does not have power.
- CARD_STATE_UP - The module is up and operating normally.
- CARD_STATE_FAILED – The management module was unable to bring up an interface module properly. If you observe this status, make certain that the interface module is installed properly. For more information, refer to “Installing BigIron RX-4 modules” on page 33, “Installing BigIron RX-8 modules” on page 42, “Installing BigIron RX-16 modules” on page 52, or “Installing BigIron RX-32 modules” on page 62.
- CARD_DOWN_REASON_
In this chapter
- Cable Cinch overview 89
- mRJ-21 procedures....90
- RJ-45 procedures 94
Cable Cinch overview
Use the following guidelines when using the Brocade Cable Cinch Clips with mRJ-21 or RJ-45 cables. The following sections will provide detailed instructions:
• "mRJ-21 procedures" on page 90
• "RJ-45 procedures" on page 94
Position the cable cinch with the open end to the left (no slot) as shown in Figure 56.
FIGURE 56 Cable Clinch overview
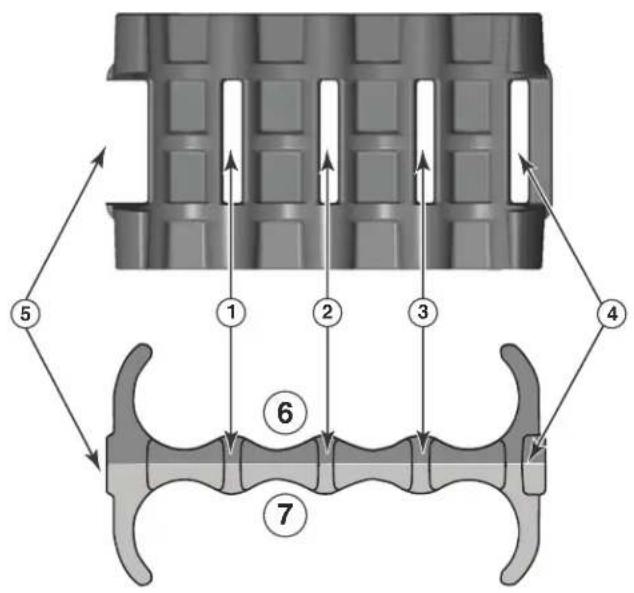
1 Slot 1 5 Open end
| 2 | S | I | o | t | 2 | 6 | R | e | a | r | |
| 3 | S | I | o | t | 3 | 7 | F | r | o | n | t |
| 4 | S | I | o | t | 4 |
mRJ-21 procedures
The following procedure demonstrates securing up to eight RJ-21 cables into the Cable Clnch. When securing fewer than the maximum cables, follow the procedure to secure the desired number of cables and simply wrap the remaining Velcro strap around the Cable Clnch. Use the additional slots in the clip to secure groups of cables as required.
Cable Cinch with two mRJ-21 cables
To secure two mRJ-21 cables, place the Velcro strap through slot one and use the front and rear left recesses as shown in Figure 57.
FIGURE 57 Two mRJ-21 cables

natural_image
Technical illustration of a mechanical component with a close-up inset showing internal components (no text or symbols)Cable Cinch with three mRJ-21 cables
Three mRJ-21 cables may be secured as shown in Figure 58.
FIGURE 58 Three mRJ-21 cables
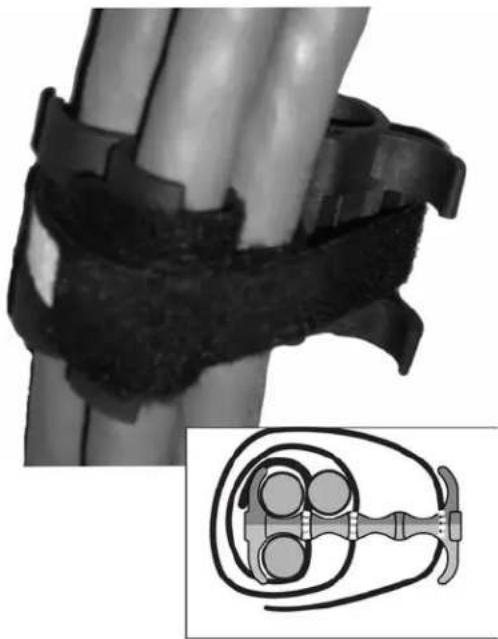
natural_image
Medical illustration showing a surgical sutured joint with an inset close-up of its internal structure (no text or symbols present)Cable Cinch with four mRJ-21 cables
Four mRJ-21 cables may be secured as shown in Figure 59.
FIGURE 59 Four mRJ-21 cables

natural_image
Close-up of a cable clamp securing a cylindrical object, with an inset showing a cross-sectional view of the same components (no text or symbols visible)Cable Cinch with five mRJ-21 cables
Five mRJ-21 cables may be secured as shown in Figure 60.
FIGURE 60 Five mRJ-21 cables

natural_image
Diagram of a cable connector with attached clamps and a magnified inset showing internal components (no text or symbols)Cable Cinch with six mRJ-21 cables
Six mRJ-21 cables may be secured as shown in Figure 61.
FIGURE 61 Six mRJ-21 cables

natural_image
Diagram showing cable and connector assembly with a magnified view of internal components (no text or labels)Cable Cinch with seven mRJ-21 cables
Seven mRJ-21 cables may be secured as shown in Figure 62.
FIGURE 62 Seven mRJ-21 cables

natural_image
Diagram showing cable and connector assembly with a magnified inset of the internal components (no text or symbols)Cable Cinch with eight mRJ-21 cables
Eight mRJ-21 cables may be secured as shown in Figure 63.
FIGURE 63 Eight mRJ-21 cables

natural_image
Diagram showing cable connections and a multi-core battery pack (no text or symbols)RJ-45 procedures
Use the following guidelines when using the cable cinch clips with RJ-45 cables.
Cable Cinch with one group of RJ-45 cables
RJ-45 cables may be secured in groups of six. To secure up to six RJ-45 cables in one group, place the Velcro strap through slot one and use the front left recesses as shown in Figure 64.
FIGURE 64 One group of RJ-45 cables

natural_image
Illustration of a mechanical device with blue components and a close-up view of its internal structure (no text or symbols)Cable Cinch with two groups of RJ-45 cables
12 RJ-45 cables, in two groups, may be secured as shown in Figure 65.
FIGURE 65 12 RJ-45 cables in two groups
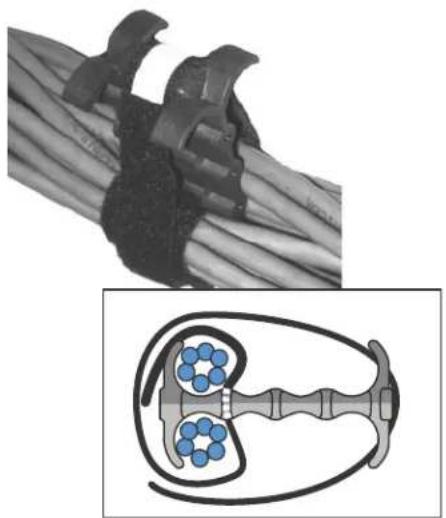
natural_image
Illustration of a cable connector with attached clamps and a magnified inset showing internal blue components (no text or symbols)Cable Cinch with three groups of RJ-45 cables
18 RJ-45 cables, in three groups, may be secured as shown in Figure 66.
FIGURE 66 18 RJ-45 cables in three groups
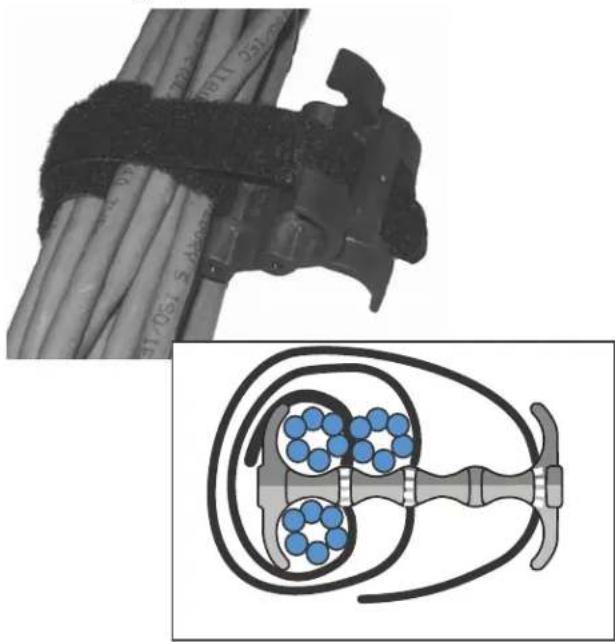
natural_image
Medical illustration showing a cable clamp and its corresponding anatomical diagram of a mechanical device (no text or labels present)Cable Cinch with four groups of RJ-45 cables
24 RJ-45 cables, in four groups, may be secured as shown in Figure 67.
FIGURE 67 24 RJ-45 cables in four groups
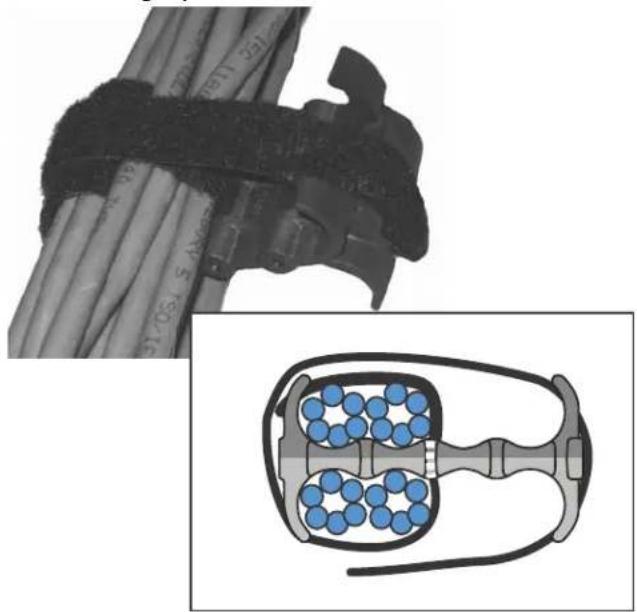
natural_image
Diagram showing cable clamping device with attached black cable and inset close-up of internal components (no text or symbols)Cable Cinch with five groups of RJ-45 cables
30 RJ-45 cables, in five groups, may be secured as shown in Figure 68.
FIGURE 68 30 RJ-45 cables in five groups
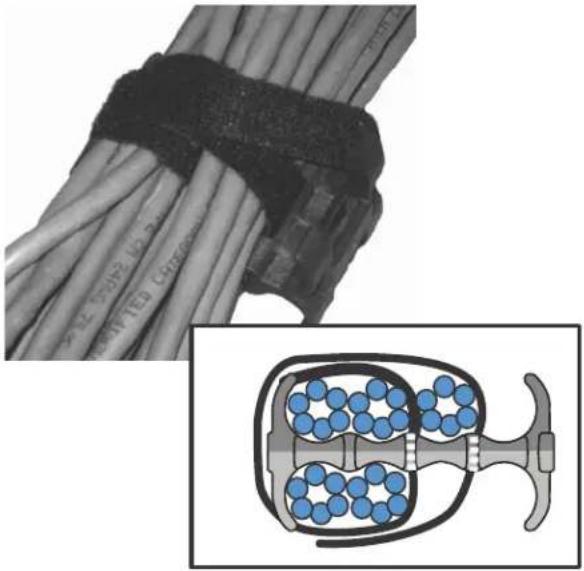
natural_image
Illustration of a cable with attached clamps and a magnified inset showing internal blue particles (no text or symbols)Cable Cinch with six groups of RJ-45 cables
36 RJ-45 cables, in six groups, may be secured as shown in Figure 69.
FIGURE 69 36 RJ-45 cables in six groups

natural_image
Illustration of cable connectors with a magnified inset showing internal blue particles (no text or symbols)Cable Cinch with seven groups of RJ-45 cables
42 RJ-45 cables, in seven groups, may be secured as shown in Figure 70.
FIGURE 70 42 RJ-45 cables in seven groups
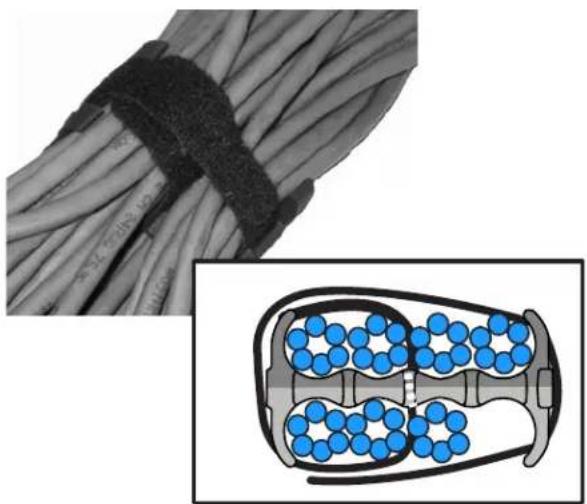
natural_image
Diagram showing cable structure with a black strap and inset of internal blue particles (no text or symbols)Cable Cinch with eight groups of RJ-45 cables
48 RJ-45 cables, in eight groups, may be secured as shown in Figure 71.
FIGURE 71 48 RJ-45 cables in eight groups

natural_image
Illustration of a cable with black straps and blue internal components, showing structural details (no text or symbols)Connecting a BigIron RX Series Switch to a Network Device
4
In this chapter
- Assigning passwords 99
- Configuring IP addresses 102
- Understanding how the management port functions.... 105
- Connecting a BigIron RX Series switch 105
- Testing network connectivity.... 110
Assigning passwords

DANGER
The procedures in this manual are for qualified service personnel.
When you create an enable and a user password, you must enter a minimum of eight characters containing the following combinations:
- At least two upper case characters
- At least two lower case characters
- At least two numeric characters
- At least two special characters
When you create a password, the characters you type are masked.
For example, to create a password for the enable login:
BigIron RX(config)#enable password TesT12\$!
Syntax: enable password
To assign a password for a user account:
BigIron RX(config)#username sandy password [Enter]
Enter password: *****
Syntax: username
Press the Enter key for [Enter]. Enter a password such as TesT12\$! that contains the required character combination.
NOTE
When you upgrade to Release 02.2.01 or later, the old passwords are still valid; however, users must change their passwords to follow the new format to take advantage of this password enhancement.
There are no new CLI commands for this feature.
Login lockout
The CLI provides up to three login attempts. If a user fails to login after three attempts, that user is locked out (disabled). To re-enable the user, do one of the following:
- Rebooting the BigIron RX to re-enable all disabled users.
- Enable the user by entering the following command:
BigIron RX(config)#username sandy enable [Enter]
For example:
| SSH@BigIron RX(config)#user sandy enable | ||||
| SSH@BigIron RX(config)#show user | ||||
| Username | Password | Encrypt | Priv Status | Expire Time |
| sandy | 1Gz...uX/$wQ44fVGtsqbKWkQknzAZ6. enabled | 0 | enabled | 90 days |
Syntax: username
Password history
The CLI will keep the last 15 passwords used by the user. A user will be prevented from changing their password to one that has already been used. This is for security purposes so that users do not use the same passwords multiple times.
Setting passwords to expire
You can set a user password to expire. Once a password expires, the administrator must assign a new password to the user. To configure a user password to expire, enter the following:
BigIron RX(config)#username sandy expires 20
Syntax: username
Enter 1 - 365 for number of days. The default is 90 days.
For example:
| SSH@BigIron RX(config)#username sandy expires 20 | |||
| SSH@BigIron RX(config)#show user | |||
| Username | Password | Encrypt | Priv Status Expire Time |
| -------- | |||
| sandy | 1Gz...uX/$wQ44fVGtsqbKWkQknzAZ6. enabled | 0 enabled | 20 days |
The CLI contains the following access levels:
- User EXEC – The level you enter when you first start a CLI session. At this level, you can view some system information but you cannot configure system or port parameters.
- Privileged EXEC – This level is also called the Enable level and can be secured by a password. You can perform tasks such as manage files on the management module's flash memory or a PCMCIA flash card in the management module's slots 1 or 2, save the system configuration to flash memory, and clear caches at this level.
- CONFIG – The configuration level. This level lets you configure the system's IP address and configure routing features. To access the CONFIG mode, you must already be logged into the Privileged level of the EXEC mode.
NOTE
You cannot assign a password using the Web management interface. You can assign passwords using the IronView Network Manager if an Enable password for a Super User is already configured on the device.
You can set the following levels of Enable passwords:
- Super User – Allows complete read-and-write access to the system. This is generally for system administrators and is the only password level that allows you to configure passwords.
NOTE
You must set a super user password before you can set other types of passwords.
- Port Configuration – Allows read-and-write access for specific ports but not for global (system-wide) parameters.
- Read Only – Allows access to the Privileged EXEC mode and CONFIG mode but only with read access.
To set passwords:
- At the opening CLI prompt, enter the following command to change to the Privileged level of the EXEC mode:
BigIron RX> enable
BigIron RX#
- Access the CONFIG level of the CLI by entering the following command:
BigIron RX# configure terminal
BigIron RX(config)#
- Enter the following command to set the super-user password:
BigIron RX(config)# enable super-user-password <text>
NOTE
You must set the super-user password before you can set other types of passwords.
- Enter the following commands to set the port configuration and read-only passwords:
BigIron RX(config)# enable port-config-password <text>
BigIron RX(config)# enable read-only-password <text>
Syntax: enable super-user-password | read-only-password | port-config-password
Passwords can be up to 48 characters long.
Configuring IP addresses
The BigIron RX Series switches implement separate data and control planes. This architecture affects how you assign IP addresses. Table 14 outlines the interfaces to which you can assign IP addresses.
In this table, “in band” refers to an interface over which user packets are routed, while “out of band” refers to an interface over which control packets related to system management are forwarded.
TABLE 14 Assigning IP addresses
| Interface Associated physical port Out of band or | in band | |
| Management interface Ethernet 10/100/1000 port on active or redundant management module | Out of band | |
| Any interface over which user packets are routed | Any interface module port In band | |
| Any virtual interface over which user packets are routed | Any interface port In band | |
| Loopback interface – In band | ||
This section describes the following:
• BigIron RX Series support of sub-net masks
- How to assign an IP address to a management interface
- How to assign an IP address to an interface or virtual interface over which user packets are routed
Support of sub-net masks
The BigIron RX Series switch supports both classical IP network masks (Class A, B, and C sub-net masks, and so on) and Classless Interdomain Routing (CIDR) network prefix masks.
- To enter a classical network mask, enter the mask in IP address format. For example, enter "209.157.22.99 255.255.255.0" for an IP address with a Class-C sub-net mask.
- To enter a prefix number for a network mask, enter a forward slash (/) and the number of bits in the mask immediately after the IP address. For example, enter "209.157.22.99/24" for an IP address that has a network mask with 24 significant ("mask") bits.
Assigning an IP address to a management interface
Instead of assigning a global IP address to the BigIron RX Series switch for system management purposes, you now assign an IP address to the management interface. The IP address is assigned to the active management module port. If the active management module becomes unavailable and the redundant module becomes the active module, the IP address is assigned to the new active management module port.
For example, to assign the IP address 10.0.1.1 to the management interface, do the following:
- At the opening CLI prompt, enter enable.
BigIron RX> enable
- Enter the following command at the Privileged EXEC level prompt (for example, BigIron RX#), then press Enter. This command erases the factory test configuration if still present:
BigIron RX# erase startup-config

CAUTION
Use the erase startup-config command only for new systems. If you enter this command on a system you have already configured, the command erases the configuration. If you accidentally erase the configuration on a configured system, enter the write memory command to save the running configuration to the startup-config file.
- Access the configuration level of the CLI by entering the following command:
BigIron RX# configure terminal Privileged EXEC Level
BigIron RX(config)# Global CONFIG Level
- Configure the IP address and mask for the management interface by entering the following commands:
BigIron RX(config)# interface management 1
BigIron RX(config-if-mgmt-1)# ip address 10.0.1.1 255.255.255.0
Syntax: enable [
Syntax: configure terminal
Syntax: interface management 1
Syntax: [no] ip address
Syntax: or
Syntax: [no] ip address
Assigning an IP address to an interface, virtual Interface, or loopback
As you have done with other Brocade devices, you must assign an IP address to each interface and virtual interface over which user packets are routed. You can also assign an IP address to a loopback interface, which is generally used for testing and diagnostic purposes.
You must use the serial connection to assign the first IP address. For subsequent addresses, you also can use the CLI through Telnet or the Web management interface. You can use IronView Network Manager Network Manager to assign IP addresses to virtual routing interfaces only.
By default, you can configure up to 24 IP interfaces on each interface, virtual interface, and loopback interface.
For example, to assign the IP address 192.22.3.44 and sub-net mask 255.255.255.0 to Ethernet interface 1/1, do the following.
- At the opening CLI prompt, enter enable.
BigIron RX> enable
- Enter the following command at the Privileged EXEC level prompt, then press Enter. This command erases the factory test configuration if still present:
BigIron RX# erase startup-config

CAUTION
Use the erase startup-config command only for new systems. If you enter this command on a system you have already configured, the command erases the configuration. If you accidentally erase the configuration on a configured system, enter the write memory command to save the running configuration to the startup-config file.
- Access the configuration level of the CLI by entering the following command:
BigIron RX# configure terminalPrivileged EXEC Level
BigIron RX(config)# Global CONFIG Level
- Configure the IP address and sub-net mask for Ethernet interface 1/1 by entering the following commands:
BigIron RX(config)# interface ethernet 1/1
BigIron RX(config-if-e10000-1/1)# ip address 192.22.3.44 255.255.255.0
Syntax: enable [
Syntax: configure terminal
Syntax: [no] ip address
Syntax: or
Syntax: [no] ip address
Use the secondary parameter if you have already configured an IP address within the same sub-net on the interface.
Enabling and disabling the interfaces
By default, all BigIron RX Series interfaces are disabled. To enable an interface, you must enter the enable command at the appropriate interface configuration level of the CLI. For example, to enable the management interface, enter the enable command at the management interface configuration level of the CLI:
BigIron RX(config-if-mgmt-1)# enable
Syntax: enable
You can disable each of these interfaces using the disable command at the appropriate interface configuration level of the CLI. For example, to disable the management port, enter the disable command at the management interface configuration level of the CLI:
BigIron RX(config-if-mgmt-1)# disable
Syntax: disable
Understanding how the management port functions
You must be aware of how the BigIron RX Series system's management port functions as described in the following:
- The management port allows you to configure, monitor, and manage the BigIron RX Series system only. As a result, this port has the same limited functionality as an IP host port.
- You cannot enable and run routing protocols on the management port.
- The management port supports static routes and directly connected routes, which are installed in the management module's routing table. However, these routes are not installed in the interface module's routing table. Therefore, the interface modules are not aware of the management port's static or directly connected routes.
- If you configure the redistribution of directly connected or static routes for a particular routing protocol, the routing protocol will redistribute directly connected or static routes associated with the interface module ports but not those associated with the management port.
- On a BigIron RX Series system running Layer 2 Switch code, the management port does not support a default gateway. However, if you configure a default gateway for the management port, the BigIron RX Series system will convert the default gateway into a static route.
- On a BigIron RX Series system running Layer 2 Switch code, the management port supports multiple static routes. However, you cannot configure multiple static routes to the same destination for a management port.
To display configuration information and statistics about the management port, you can enter the show interface management 1 command at any CLI level.
Connecting a BigIron RX Series switch
You can connect a BigIron RX Series switch to another 10 Gigabit Ethernet network device. The BigIron RX Series switch supports connections to other vendors' as well as Brocade devices.
The 10 Gigabit Ethernet interface module includes four ports, into which you can install fiber optic modules provided by Brocade. The SFP fiber optic modules provide an optical transceiver or a physical medium dependent (PMD) interface for fiber that can be used with the LAN physical layer (PHY).
Table 15 outlines the fiber optic modules (PMDs) provided by Brocade, the link distance associated with each, the cabling needed to connect the BigIron RX Series switch to another network device, and the part number associated with the module.
TABLE 15 Fiber optic modules and cabling
| Fiber optic modules (PMD) Distance Fiber optic cabling Brocade part | |||
| number | |||
| Short wavelength | 86 meters | 50/125 micron multimode fiber (500 Mhz km) | 10G-XFP-SR |
| 850 nm serial | 300 meters | 50/125 micron multimode fiber (2000 Mhz km) | |
TABLE 15 Fiber optic modules and cabling (Continued)
| Fiber optic modules (PMD) Distance Fiber optic cabling Brocade part | ||
| number | ||
| Long wavelength1310 nm serial | 10 km 9/125 micron single-mode fiber with LC connectors | 10G-XFP-LR |
| Extra long wavelength1550 nm serial | 40 km 9/125 micron single-mode fiber with LC connectors | 10G-XFP-ER |
NOTE
Cable installation and network configuration will affect overall transmission capability. The numbers provided above represent the accepted recommendations of the various standards. For network-specific recommendations, consult your local Brocade reseller or system engineer.
To connect a BigIron RX Series switch to another network device, you must do the following:
• Install the fiber optic modules
- Cable the fiber optic modules
The following sections provide information about performing these tasks as well as cleaning the fiber optic connectors and troubleshooting network connections.
Installing a fiber optic module
You connect a BigIron RX Series switch to another network device using a fiber port, you must do the following:
- Install a fiber optic module (SFP transceiver for Gigabit Ethernet ports or SFP-MSA transceiver for 10-Gigabit Ethernet ports)

DANGER
All fiber optic interfaces use Class 1 Lasers.
NOTE
Refer to “Installation precautions” on page 25 for other hardware installation precautions.
Before installing a fiber optic module, have on hand an ESD wrist strap with a plug for connection to the ESD connector on the BigIron RX Series chassis.

DANGER
For safety reasons, the ESD wrist strap should contain a 1 meg ohm series resistor.
To install a fiber optic module into an Ethernet port, do the following.
- Put on the ESD wrist strap and ground yourself by inserting the plug into the ESD connector located in the upper right corner of the chassis front.
- Remove the module from its protective packaging.
-
Remove the metal cover from the port on the interface module's control panel.
-
Gently insert the fiber optic module into the port until the module clicks into place. The fiber optic modules are keyed to prevent incorrect insertion.
Cabling a fiber optic module
To cable a fiber optic module, do the following.
- Remove the protective covering from the fiber optic port connectors and store the covering for future use.
- Before cabling a fiber optic module, Brocade strongly recommends cleaning the cable connectors and the port connectors. For more information, refer to "Cleaning fiber optic modules" on page 108.
- Gently insert the two cable connectors (a tab on each connector should face upward) into the port connectors until the tabs lock into place.
Enhanced Digital Optical Monitoring
You can configure your BigIron RX Series switch to monitor XFPs and SFPs in the system either globally or by specified port. If monitoring is enabled, console messages, syslog messages, and SNMP traps are sent when XFP or SFP operating conditions warrant it.
Beginning with release 0 2.6.00, Digital Optical Monitoring will only support newly qualified 1Gigabyte optics. Digital Optical Monitoring for previous 1Gigabyte optics that do not include "OM" after the model numbers will not be able to use this feature.
To configure all ports for optical monitoring, use the following command:
BigIron RX(config)# optical-monitor
To configure a specific port for optical monitoring, use the following command:
BigIron RX(config)# interface ethernet 1/1 BigIron RX(config-if-e10000-1/1)# optical-monitor
To configure a range of ports for optical monitoring, use the following command:
BigIron RX(config)# interface ethernet 1/1 to 1/2 BigIron RX(config-mif-e10000-1/1-1/2)# optical-monitor
Syntax: [no] optical-monitor
The optional
You can view the optical monitoring information using the show optic command as displayed in the following:
| BigIron RX#show optic 4 | ||||
| Port Temperature | Tx Power | Rx Power | Tx Bias Current Monitor | |
| +----+----+----+----+----+----+----+----+----+----+----+----+----+----+----+----+----+----+----+----+----+----+----+----+----+----+----+----+----+----+----+----+----+----+----+----+----+----+----+----+----+----+----+----+----+----+----+----+----+----+ | ||||
| 4/1 | 30.8242 C | -001.8822 dBm | -002.5908 dBm | 41.790 mA |
| Normal | Normal | Normal | Normal | |
| 4/2 | 31.7070 C | -001.4116 dBm | -006.4092 dBm | 41.976 mA |
| Normal | Normal | Normal | Normal | |
| 4/3 | 30.1835 C | -000.5794 dBm | 0.000 mA | |
| Normal | Low-Alarm | Normal | Low-Alarm | |
| 4/4 | 0.0000 C | 0.000 mA | ||
| Normal | Normal | Normal | Normal | |
Syntax: show optic
The
Cleaning fiber optic modules
To avoid problems with the connection between the fiber optic module port and the fiber cable connector, Brocade strongly recommends cleaning both connectors before making this connection. In particular, dust can accumulate in either connector and cause problems such as reducing the optic launch power.
To clean the fiber cable connectors, Brocade recommends using a fiber optic reel-type cleaner. You can purchase this type of cleaner from the following Website:
http://www.fisfiber.com/
When not using a fiber optic module port connector, make sure to keep the protective covering on.
Troubleshooting network connections
After you cable the fiber optic modules, you can observe certain LEDs to determine if the network connections are functioning properly. Table 16 outlines the LEDs related to the network connections, the desired state of each LED, possible abnormal states of each LED, and what to do if an LED indicates an abnormal state.
TABLE 16 Network connection-related LED states
| LED DesiredState | Meaning Abnormalstate | Meaning or action | |
| Interface module | |||
| Link On A link is establishedwith the remote port. | Off A link is not established with the remote port.You can do the following:Verify that the connection to the other network device has been properly made.Also, make certain that the other network device is powered on and operating correctly.Verify that the transmit port on a BigIron RX Series switch is connected to the receive port on the other network device, and that the receive port on the BigIron RX Series switch is connected to the transmit port on the other network device. If you are not certain, remove the two cable connectors from the port connector and reinsert them in the port connector, reversing their order.Dust may have accumulated in the cable connector or port connector. For information about cleaning the connectors, refer to “Cleaning fiber optic modules” on page 108.If the other actions do not resolve the problem, try using a different port or a different cable. | ||
| Active On or blinking | The port is transmitting and receiving user packets. | Off for an extended period. | The port is not transmitting or receiving user packets. You can do the following:Check the Link LED to make sure the link is still established with the remote port. If not, take the actions described in the Meaning or Action column for the Link LED.Verify that the port has not been disabled through a configuration change. You can use the CLI. If you have configured an IP address on the device, you also can use the Web management interface or IronView Network Manager. |
If a problem persists after taking these actions, contact Brocade's technical support.
Testing network connectivity
After you cable the fiber optic modules, you can test connectivity to other network devices by pinging those devices. You also can perform trace routes.
To resolve problems that may arise with network connections:
- For the indicated port, verify that both ends of the cabling (at the Brocade device and the connected device) are snug.
- Verify that the Brocade device and the connected device are both powered on and operating correctly.
-
Verify that you have used the correct cable type for the connection:
-
For twisted-pair connections to an end node, use straight-through cabling.
- For fiber optic connections, verify that the transmit port on the device is connected to the receive port on the connected device, and that the receive port on device is connected to the transmit port on the connected device.
- Verify that the port has not been disabled through a configuration change. You can use the CLI. If you have configured an IP address on the device, you also can use the Web management interface or IronView Network Manager.
- For copper ports, you can test the cable using Virtual Cable Testing. Refer to "Using virtual cable testing to diagnose a cable" on page 111.
- If the other procedures do not resolve the problem, try using a different port or a different cable.
Pinging an IP address
To verify that a BigIron RX Series switch can reach another device through the network, enter a command such as the following at any level of the CLI on the BigIron RX Series switch:
BigIron RX> ping 192.33.4.7
Syntax: ping
NOTE
If you address the ping to the IP broadcast address, the device lists the first four responses to the ping.
Tracing a route
To determine the path through which a BigIron RX Series switch can reach another network device, enter a command such as the following at any level of the CLI on the BigIron RX Series switch:
BigIron RX> traceroute 192.33.4.7
Syntax: traceroute
The CLI displays trace route information for each hop as soon as the information is received. Traceroute requests display all responses to a given TTL. In addition, if there are multiple equal-cost routes to the destination, the Brocade device displays up to three responses by default.
Refer to the BigIron RX Series Configuration Guide for information about the command syntax.
Using virtual cable testing to diagnose a cable
BigIron RX devices support Virtual Cable Test (VCT) technology. VCT technology enables you to diagnose a conductor (wire or cable) by sending a pulsed signal into the conductor, then examining the reflection of that pulse. This method of cable analysis is referred to as Time Domain Reflectometry (TDR). By examining the reflection, the Brocade device can detect and report cable statistics such as, local and remote link pair, cable length, and link status.
Configuration notes
- This feature is supported on copper ports only. It is not supported on fiber ports.
- The port to which the cable is connected must be enabled when you issue the command to diagnose the cable. If the port is disabled, the command is rejected.
- If the port is operating at 100 Mbps half-duplex, the TDR test on one pair will fail.
- If the remote pair is set to forced 100 Mbps, any change in MDI or MDIX may cause the device to interpret the Multilevel Threshold-3 (MLT-3) as a reflected pulse, in which case, the device will report a faulty condition. In this scenario, it is recommended that you run the TDR test a few times for accurate results.
Command syntax
To diagnose a cable using TDR, enter commands such as the following at the Privileged EXEC level of the CLI:
BigIron RX# phy cable-diag tdr 1
The above command diagnoses the cable attached to port 1.
Syntax: phy cable-diag tdr
Viewing the results of the cable analysis
To display the results of the cable analysis, enter a command such as the following at the Privileged EXEC level of the CLI:
| BigIron RX#sh cable-diag tdr 1 | |||||
| Port | Speed | Local pair | Pair Length | Remote pair | Pair status |
| 01 | 1000M | Pair A | <50M | Pair B | Terminated |
| Pair B | <50M | Pair A | Terminated | ||
| Pair C | <50M | Pair D | Terminated | ||
| Pair D | <50M | Pair C | Terminated | ||
Syntax: show cable-diag tdr
Table 17 defines the fields shown in the command output.
TABLE 17 Cable statistics
| This line... Displays... |
| Port The interface that was tested. |
| Speed The port's current line speed. |
| Local pair The local link name. |
| Pair Length The cable length when terminated, or the distance to the point of fault when the line is not up. |
| Remote pair The remote link name. |
| Pair status The status of the link. This field displays one of the following:Terminated: The link is upShorted: A short is detected in the cableOpen: An opening is detected in the cableImpedMis: The impedance is mismatchedFailed: The TDR test failed |
In this chapter
- Managing the BigIron RX Series chassis .... 113
- Managing the cooling system.... 117
- Managing the interface modules.... 123
- Enabling and disabling management module CPU usage calculations .. 131
- Displaying management module CPU usage.... 132
- Enabling and disabling packet logging for management and interface modules 133
- Removing MAC address entries 135
Managing the BigIron RX Series chassis

DANGER
The procedures in this manual are for qualified service personnel.
This chapter contains information about refining the configuration of, monitoring, and managing the BigIron RX Series hardware components
You can perform the following management tasks for the BigIron RX Series chassis:
• Display chassis status and temperatures of all hardware components
- Display the Syslog configuration and static and dynamic buffers
Displaying chassis status and temperature readings
You can display the following information related to the BigIron RX Series chassis:
- Slot power-on priority
- Status of the fans
- Temperature readings of the management, switch fabric, interface, and fan control modules and the interval at which the system reads the temperature of these modules
• The MAC address of the BigIron RX Series chassis
To display this information, enter the following command at any level of the CLI:
BigIron RX# show chassis
*** BigIron RX-4 CHASSIS ***
---POWERS ---
AC Powers Are Used.
Power 1: Installed (OK)
Power 2: not present
Power 3: not present
Slot Power-On Priority:
Slot1 (pri=1)
Slot2 (pri=1)
Slot3 (pri=1)
Slot4 (pri=1)
--- FANS ---
Right Fan Tray: Fan 5: Status = OK, Speed = LOW (50%) (RPM 3333)
Right Fan Tray: Fan 6: Status = OK, Speed = LOW (50%) (RPM 3409)
--- TEMPERATURE READINGS ---
Active Mgmt Module: 32.500C 54.625C (CPU)
SNM1: 27.5C
SNM2: 30.5C
SNM3: 30.5C
LP2 Sensor1: 41.0C
Temperature Monitoring Poll Period is 60 seconds
--- MISC INFO ---
Backplane EEPROM MAC Address: 000a.80a0.2000
The display shows the following information:
TABLE 18 Chassis status and temperature information
| This field... Displays... | |
| Powers | |
| Power | Indicates whether an AC power supply is installed in the specified power supply slot and the status of the power supply, which can be one of the following:Installed (OK) - The power supply is functioning properly and supplying power to the chassis and installed modules.Failure - The power supply is not functioning and is not supplying power to the chassis and installed modules.not present - There is no power supply installed in the slot. |
| BigIron RX-4: 1 - 3 | |
| BigIron RX-8: 1 - 4 | |
| BigIron RX-16: 1 - 8 | |
| BigIron RX-32: 1 - 8 | |
| Slot Power-On Priority The configured power-on priority of each interface modules installed in a chassis slot. | |
| Slot1 - Slot16 | The priority of each chassis slot as configured by the Ip-slot-priority command. The priority can be 1 - 8, where 1 is the lowest priority and 8 is the highest priority. (The default priority is 1.) If the supply of power to the chassis falls below a minimum threshold, the chassis slots with the lowest priority will likely lose power. For information about using the Ip-slot-priority command, refer to “Changing priority of chassis slots for interface modules” on page 129. |
| BigIron RX-4: Slot1 - Slot4 | |
| BigIron RX-8: Slot1 - Slot8 | |
| BigIron RX-16: Slot1 - Slot16 | |
| BigIron RX-32: Slot1 - Slot32 | |
| Fans | |
| This field... | Displays... |
| Status The status of a fan can be one of the following:OK - The fan is functioning properly and is keeping the temperature of each module within an acceptable temperature range.Failured - The fan is not functioning properly or the fan control module cannot control the fan. | |
| Speed The speed of a fan can be one of the following:Low - The fan is functioning at 50 percent of capacity.Medium - The fan is functioning at 75 percent of capacity.Medium-high - The fan is functioning at 90 percent of capacity.High - The fan is functioning at 100 percent of capacity. | |
| Temperature Readings | |
| Active and Standby Mgmt Module The temperature of the active and standby management modules. | |
| FanThe temperature of fan0 and fan1. | |
| SNMThe temperature of the switch fabric module. | |
| Temperature Monitoring Poll Period The interval at which the system reads the temperature sensor on the management, switch fabric, interface, and fan control modules. | |
| Misc Info | |
| Backplane EEPROM MAC Address The MAC address of the BigIron RX Series chassis. | |
Displaying the Syslog configuration and static and dynamic buffers
For information about configuring Syslog, refer to the BigIron RX Series Configuration Guide
To display the Syslog parameters currently in effect on a BigIron RX Series switch, enter the following command from any level of the CLI:
BigIron RX> show logging
Syslog logging: enabled (0 messages dropped, 0 flushes, 0 overruns)
Buffer logging: level ACDMEINW, 7 messages logged
level code: A=alert C=critical D=debugging M=emergency E=error
I=informational N=notification W=warning
...
Syntax: show logging
The Syslog display shows the following configuration information, in the rows above the log entries themselves.
TABLE 19 Syslog buffer configuration
| This field... Displays... | |
| Syslog logging The state (enabled or disabled) of the Syslog buffer. | |
| messages dropped The number of Syslog messages dropped due to user-configured filters.By default, the software logs messages for all Syslog levels. You can disable individual Syslog levels, in which case the software filters out messages at those levels. Each time the software filters out a Syslog message, this counter is incremented. | |
| flushes The number of times the Syslog buffer has been cleared by theclearlogging command. For information about clearing the Syslog buffer, refer to “Static and dynamic buffers” on page 116. | |
| overruns The number of times the dynamic log buffer has filled up and beencleared to hold new entries. For example, if the buffer is set for 100 entries, the 101st entry causes an overrun. After that, the 201st entry causes a second overrun. | |
| level The message levels that are enabled. Each letter represents a messagetype and is identified by the key (level code) below the value. If you disable logging of a message level, the code for that level is not listed. | |
| messages logged The total number of messages that have been logged since the software was loaded. | |
| level code The message levels represented by the one-letter codes. |
Static and dynamic buffers
The software provides two separate buffers:
- Static – logs power supply failures, fan failures, and temperature warning or shutdown messages
- Dynamic – logs all other message types
In the static log, new messages replace older ones, so only the most recent message is displayed. For example, only the most recent temperature warning message will be present in the log. If multiple temperature warning messages are sent to the log, the latest one replaces the previous one. The static buffer is not configurable.
The message types that appear in the static buffer do not appear in the dynamic buffer. The dynamic buffer contains up to the maximum number of messages configured for the buffer (50 by default), then begins removing the oldest messages (at the bottom of the log) to make room for new ones.
The static and dynamic buffers are both displayed when you display the log.
BigIron RX(config)# show logging
...
Static Log Buffer:
Aug 27 12:42:42:A:Power Supply 6, 1st right, failed
Dynamic Log Buffer (50 lines):
Aug 27 12:19:04:I:Interface ethernet3/4, state up
Aug 27 12:19:04:I:Interface ethernet6/3, state up
Aug 27 12:19:04:I:Interface ethernet3/2, state up
Aug 27 12:19:04:I:Interface ethernet6/1, state up
Aug 27 12:19:00:N:Module up in slot 6
Aug 27 12:19:00:N:Module up in slot 3
Aug 27 12:18:43:I:Warm start
When you clear log entries, you can selectively clear the static or dynamic buffer, or you can clear both. For example, to clear only the dynamic buffer, enter the following command at the Privileged EXEC level:
BigIron RX# clear logging dynamic-buffer
Syntax: clear logging [dynamic-buffer | static-buffer]
You can specify the dynamic-buffer keyword to clear the dynamic buffer or the static-buffer keyword to clear the static buffer. If you do not specify a buffer, both buffers are cleared.
Managing the cooling system
This section provides configuration, management, and monitoring information about the BigIron RX Series cooling system.
Configuring the cooling system
The BigIron RX Series switch provides default settings for all cooling system parameters. Therefore, no initial configuration of the cooling system is necessary. If desired, you can change the settings of the following cooling system parameters:
- Low and high temperature thresholds for modules and fan speeds
• Interval at which the system polls the temperature sensors on the module for a reading
Changing temperature thresholds for modules and fan speeds
The BigIron RX Series cooling system includes fans that operate at speeds of low, medium, medium-high, and high. In general, each fan speed, except for low, has a low and high temperature threshold associated with it as shown in Figure 72. The low fan speed has a high temperature threshold only.
FIGURE 72 Fan speeds and temperature thresholds
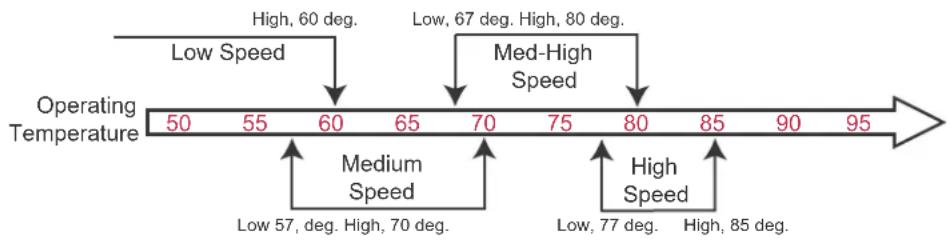
line
| Operating Temperature | Low Speed (deg.) | High Speed (deg.) | | :--- | :--- | :--- | | 50 | 60 | Low | | 55 | | Medium Speed | | 60 | | Low | | 65 | | Medium Speed | | 70 | 67 | Low | | 75 | 80 | Low | | 80 | | High | | 85 | | High | | 90 | | Low | | 95 | | High | Low 57, High 70 deg.The low and high temperature thresholds enable the BigIron RX Series system to determine at which speed the fans should operate. In general, the fans operate as follows:
- If the temperature of all modules falls between the low and high thresholds for a fan speed, the fan continues to operate at that fan speed.
- If the temperature of a management module or the switch fabric module or an interface modules exceeds the high threshold specified for a fan speed, the fan increases its speed to the next higher speed. On the cards with two sensors, each is monitored individually and if either exceeds the threshold limits, then the fan will increase. If the temperature of any of these modules exceeds the high threshold for the high speed for three minutes (the actual number of polls is determined by the setting of the temp-poll-period command), the system shuts down the modules to prevent damage. (For information about temp-poll-period command, refer to “Changing the temperature polling interval” on page 121.)
- If the temperature of a management module, the switch fabric module, and all interface modules falls below the low threshold for a fan speed, the fan decreases its speed to the next lower speed. If the temperature of all modules falls below the high threshold for the low speed, the fan operates at the low speed.
If the temperature of a management module or the switch fabric module or an interface modules exceeds the high temperature threshold for any of the fan speeds, the system sends a warning message to the system log and an SNMP trap. For information about viewing the warning messages, refer to “Displaying temperature warnings” on page 122.
Table 20 outlines the default low and high temperature thresholds for each module and fan speed.
TABLE 20 Default low and high temperature thresholds for modules and fan speeds
| Fan speed Low temperature threshold High temperature threshold | ||
| Management module (active and standby) | ||
| High | 77°C | 85°C |
| Medium-high | 67°C | 80°C |
| Medium | 57°C | 70°C |
| Low | -1°C | 60°C |
| Management module CPU (on active and standby modules) | ||
| High | 72°C | 85°C |
| Medium-high | 67°C | 80°C |
| Medium | 57°C | 70°C |
| Low | -1°C | 60°C |
| Interface modules | ||
| High | 56°C | 95°C |
| Medium-high | 51°C | 60°C |
| Medium | 46°C | 55°C |
| Low | -1°C | 50°C |
| Switch fabric module | ||
| High | 77°C | 85°C |
| Medium-high | 67°C | 80°C |
| Medium | 57°C | 70°C |
| Low | -1°C | 60°C |
For information about checking the current settings of the low and high temperature thresholds for modules and fan speeds, refer to “Displaying temperature thresholds for modules and fan speeds” on page 120.
If desired, you can change the default low and high temperature thresholds for a particular module and fan speed. For example, to change the low and high thresholds of the medium fan speed for the management modules to 56^ C and 72^ C, respectively, enter the following command at the global CONFIG level of the CLI:
BigIron RX(config)# fan-threshold mp med 56 72
Syntax: fan-threshold
For the
- Ip - Changes low and high temperature thresholds for the interface modules.
- mp – Changes low and high temperature thresholds for the active and standby management modules.
- mp-cpu – Changes low and high temperature thresholds for the active and standby management module's CPU.
- switch fabric – Changes low and high temperature thresholds for the switch fabric module.
For the
For example, if you are changing the temperature thresholds for a management module's high and medium-high fans speeds, the BigIron RX Series system will accept the following values because the low temperature threshold for the high speed (77°C) is lower than the high temperature threshold (79°C) for the medium-high speed.
BigIron RX(config)# fan-threshold mp med-hi 67 79 BigIron RX(config)# fan-threshold mp hi 77 85
However, the BigIron RX Series system will not accept the following values because the low temperature threshold being entered for the high speed (77× C) is higher than the high temperature threshold (76× C) for the medium-high speed.
BigIron RX(config)# fan-threshold mp med-hi 67 76 BigIron RX(config)# fan-threshold mp hi 77 85
Displaying temperature thresholds for modules and fan speeds
To check the current settings of the low and high temperature thresholds for modules and fan speeds, you can enter the following command at any level of the CLI:
BigIron RX# show fan-threshold
=== Thermal Sensor Control Block (THERMAL_SENSOR_TEST_RULE_MP) ===
Fan Speed Low: -1 - 60
Fan Speed Med: 57 - 70
Fan Speed Med-Hi: 67 - 80
Fan Speed Hi: 77 - 85
state = 0 (FAN_STATE_LOW)
max_ts_shut_off_count = 3
shut_off_count = 0 0 0 0 0 0 0 0 0 0 0 0 0 0 0
=== Thermal Sensor Control Block (THERMAL_SENSOR_TEST_RULE_SNM) ===
Fan Speed Low: -1 - 60
Fan Speed Med: 57 - 70
Fan Speed Med-Hi: 67 - 80
Fan Speed Hi: 72 - 85
state = 0 (FAN_STATE_LOW)
max_ts_shut_off_count = 3
shut_off_count = 0 0 0 0 0 0 0 0 0 0 0 0 0 0 0
=== Thermal Sensor Control Block (THERMAL_SENSOR_TEST_RULE_LP) ===
Fan Speed Low: -1 - 50
Fan Speed Med: 46 - 55
Fan Speed Med-Hi: 51 - 60
Fan Speed Hi: 56 - 85
state = 0 (FAN_STATE_LOW)
max_ts_shut_off_count = 3
shut_off_count = 0 0 0 0 0 0 0 0 0 0 0 0 0 0 0
=== Thermal Sensor Control Block (THERMAL_SENSOR_TEST_RULE_STANDBY_MP) ===
Fan Speed Low: -1 - 60
Fan Speed Med: 57 - 70
Fan Speed Med-Hi: 67 - 80
Fan Speed Hi: 77 - 85
state = 0 (FAN_STATE_LOW)
max_ts_shut_off_count = 3
shut_off_count = 0 0 0 0 0 0 0 0 0 0 1.0.0.0.0.0.0.0.0.0.0.0.0.0.0.0.0.0.0.0.0.0.0.0.0.0.0.0.0.0.0.0.0.0.0.0.0.0.0.0.0.0.0.0.0.0.0.
Syntax: show fan-threshold
The display shows the following information:
TABLE 21 Temperature threshold information for modules and fan speeds
| This field... Displays... | |
| Thermal Sensor Control Block(THERMAL_SENSOR_TEST_RULE_) | The temperature threshold information for the various modules. Theparameter indicates the following:MP - The active management moduleSTANDBY_MP - The standby management moduleSNM - The switch fabric moduleLP - An interface module |
| Fan Speed Low or Med or Med-Hi or Hi The current setting of the low and high temperature thresholds for the low, medium, medium-high, and high fan speeds.NOTE: As indicated in Table 20 on page 118, the low fan speed for each module does not have a default low temperature threshold value, nor can you configure this value. The "-1" value that appears in the Fan Speed Low field for each module is a Brocade internal value only. | |
| State = 0 (FAN_STATE_LOW) For Brocade internal use only. | |
| max_ts_shut_off_count | |
| shut_off_count = 0 0 0 0 0 0 0 0 For Brocade internal use only. | |
Changing the temperature polling interval
By default, the BigIron RX Series system reads the temperature sensor on each module every 60 seconds. To change the interval at which the system reads the temperature sensors on each module, enter a command such as the following at the global CONFIG level of the CLI:
BigIron RX(config)# temp-poll-period 120
Syntax: temp-poll-period
For the
Manually setting the fan speed
Typically, the management module, in conjunction with default settings of low and high temperature thresholds, determines the speed of the two four-speed fans. (For information about changing the low and high temperature thresholds, refer to “Changing temperature thresholds for modules and fan speeds” on page 117.) If desired, you can manually set the speed of the fans. The set-fan-speed command in the Privileged EXEC level of the CLI allows you to manually set the speed of the fans.
For example, to set the speed of fan 0 to medium-high, enter the following command:
BigIron RX(config)# set-fan-speed med-hi
Syntax: set-fan-speed
For the
auto - The system is adjusted by the monitoring system.
hi - The system sets the fan speed to high.
low - The system sets the fan speed to low.
med - The system sets the fan speed to medium.
med-high - The system sets the fan speed to medium-high.
Monitoring the cooling system
You can monitor the following aspects of the BigIron RX Series cooling system:
- The temperature of the fan control modules
• The status and speed of the fans
• The temperature warnings sent to the system log and that generate an SNMP trap
Displaying fan tray status and speed
The CLI provides two commands that allow you to display the status and speed of the four-speed fans in the BigIron RX Series chassis. To display this information, you can enter the following command at any level of the CLI:
BigIron RX# show chassis
...
--- FANS ---
Right Fan Tray: Fan 5: Status = OK, Speed = LOW (50%) (RPM 3333)
Right Fan Tray: Fan 6: Status = OK, Speed = LOW (50%) (RPM 3488)...
Syntax: show chassis
For information about all output generated by the show chassis command, refer to “Displaying chassis status and temperature readings” on page 113.
TABLE 22 Fan status and speed fields
| This field... Displays... |
| Status The status can be one of the following:OK - The fan is functioning properly and is keeping the temperature of each module within an acceptable temperature range.Failured - The fan is not functioning properly or the fan control module cannot control the fan. |
| Speed The speed can be one of the following:LOW - The fan is functioning at 50 percent of capacityMEDIUM - The fan is functioning at 75 percent of capacityMEDIUM-HIGH - The fan is functioning at 90 percent of capacityHIGH - The fan is functioning at 100 percent of capacity |
Displaying temperature warnings
If the temperature of a module exceeds the high temperature threshold for any of the fan speeds, the system sends a warning message to the system log and an SNMP trap. (For more information about the low and high temperature thresholds, refer to “Changing temperature thresholds for modules and fan speeds” on page 117.) This section describes how to view the system log. If you have configured the BigIron RX Series system to use a Syslog server or SNMP trap receiver, refer to the documentation for the server or receiver.
To display the system log, enter the following command at any CLI level:
BigIron RX# show log
Syntax: show log
Managing the interface modules
This section contains the following information:
- Configuring interface module boot parameters
- Changing the priority of chassis slots for interface modules
- Disabling and reenabling power to the interface modules
Configuring interface module boot parameters
The Ethernet interface module has its own system software and boots after the management module boots. By default, the following boot-related events occur:
- The BigIron RX Series system synchronizes or prompts you to synchronize the interface modules' IronWare images between the management module and the interface modules.
- The interface modules boot from a source specified by the management module (the default source is a primary IronWare image in the interface modules' flash memory).
If desired, you can change the following:
- Disable the synchronization of IronWare images between the management and all interface modules. You can also initiate an immediate synchronization.
- Change the boot source of one or all interface modules.
Synchronizing the interface module's IronWare images between management and interface modules
An interface module can have two IronWare images: primary and secondary. These images contain the layer 1 - 3 software that the interface modules run. These images reside in the interface module's flash memory. Either the primary or secondary image is run by the interface module from this location.
If you copy the primary or secondary IronWare image to all interface modules using the copy command with the all keyword, the management module makes a copy of the file and stores it in its code flash under the names lp-primary-0 or lp-secondary-0. The images are stored in this location only and are not run by the management module or the interface modules. If you copy the primary or secondary IronWare image to a specified chassis slot using the copy command with the
If the management module has a copy of the primary or secondary IronWare image in its code flash, by default, the BigIron RX Series system synchronizes or prompts you to synchronize the interface modules' IronWare images between the management module and the interface modules during bootup. When the BigIron RX Series system synchronizes the IronWare images, the management module copies the IronWare images from its code flash to the interface modules' code flash (the interface modules' default boot source).
The system allows you to manage synchronization of the IronWare images between management and interface modules in the following situations:
- You are prompted to synchronize the IronWare images during bootup.
- You want to initiate an immediate synchronization; for example, you want an immediate update of the IronWare images on one or all interface modules.
- You want to disable synchronization; for example, you have upgraded the IronWare image of one interface module but want to continue running the older image on all other interface modules.
The following section discuss how to manage the IronWare image synchronization in these situations.
Synchronizing the interface modules' IronWare images during bootup
By default, the BigIron RX Series system checks the IronWare images in the interface module's flash memory during boot to ensure they are the same as the IronWare images in the management module's flash memory. If an interface module does not have a IronWare image, the system automatically downloads the image from the management module's flash memory to the interface module's flash memory.
If an interface module has different IronWare images, the system prompts you to do the following:
- If you want to update the primary and secondary IronWare images in the interface module's flash memory with the images in the management module's flash memory, enter the lp cont-boot sync
command at the Privileged EXEC prompt. - If you want to retain the IronWare images in the interface module's flash memory, enter the lp cont-boot no-sync
command at the Privileged EXEC prompt.
Specifying an immediate synchronization
You can immediately synchronize the IronWare images between the management module and one or all interface modules. For example, to immediately synchronize the IronWare images between the management module and all interface modules, enter the following command at the Privileged EXEC level:
BigIron RX# lp sync all
Syntax: lp sync all |
The all keyword indicates that the immediate synchronization applies to all interface modules in the BigIron RX Series chassis.
The
Disabling or reenabling an automatic check and synchronization
By default, the BigIron RX Series system checks the IronWare images in the interface module's flash memory during bootup to ensure it is the same as the IronWare images in the management module's flash memory. For information about what the system does if the interface module does not currently have a IronWare image or if the image is different from that of the management module, refer to "Synchronizing the interface modules' IronWare images during bootup" on page 124.
To disable the automatic check and synchronization during bootup, enter the following command at the global CONFIG level:
BigIron RX(config)# lp disable-lp-sync-check
Syntax: lp disable-lp-sync-check
Provided that you save this configuration by entering the write memory command, the system will disable the automatic check and synchronization of the IronWare images starting with the next software reload or system reset and each reload or reset after that.
To re-enable the automatic check and synchronization of the IronWare images during bootup, enter the following command at the global CONFIG level:
BigIron RX(config)# no lp disable-lp-sync-check
Syntax: no lp disable-lp-sync-check
Changing the boot source
By default, the interface modules boot from the primary IronWare image located in the interface modules' flash memory. If desired, you can change the boot source of one or all interface modules to one of the following sources:
- Management module
• PCMCIA flash card in slot 1 or 2
- Primary or secondary IronWare image in the management module's flash memory
- Interface module
- Secondary IronWare image in interface module's flash memory
- TFTP server
You can also specify an interactive boot, which allows you to enter a separate command after the interface module comes up. The command specifies the source from which one or all interface modules should boot.
When changing the boot source for one or all interface modules, you can specify one of the following:
- An immediate boot for one interface module from a specified source.
- An automatic boot for one or all interface modules from a specified source starting with the next software reload or system reset and each reload or reset after that.
The CLI command for specifying an immediate boot for one interface module is the same as that for specifying an automatic boot for one or all modules. The only difference is the CLI level from which you specify the command. You must specify the command for an immediate boot in the Privileged EXEC level and the command for an automatic boot in the global CONFIG level.
The following sections explain how to specify an immediate boot and an automatic boot.
Specifying an immediate boot
You can specify an immediate boot for one interface module from a specified source by entering the lp boot system command in the Privileged EXEC level. The entered command will override the default or configured boot source one time only.
Specifying an immediate boot from the management module's PCMCIA slots
For example, to specify an immediate boot for the interface module installed in slot 1 from the management module's PCMCIA slot 1, enter the following command at the Privileged EXEC level of the CLI:
BigIron RX# lp boot system slot1 primary 1
Syntax: lp boot system slot1 | slot2
The slot1 and slot2 keywords indicate the management module's PCMCIA slot from which to boot the interface module.
The
The
Specifying an immediate boot from the management module's flash memory
For example, to specify an immediate boot from the primary IronWare image in the management module's flash memory for the interface module installed in slot 1, enter the following command at the Privileged EXEC level of the CLI:
BigIron RX# lp boot system mp primary 1
Syntax: lp boot system mp primary | secondary
The primary and secondary keywords specify the primary or secondary IronWare image in the management module's flash memory.
The
Specifying an immediate boot from the interface module's flash memory
For example, to specify an immediate boot from the primary IronWare image in the interface module's flash memory for the interface module installed in slot 1, enter the following command at the Privileged EXEC level of the CLI:
BigIron RX# lp boot system flash primary 1
Syntax: lp boot system flash primary | secondary
The primary and secondary keywords specify the primary or secondary IronWare image in the interface module's flash memory.
The
Specifying an immediate boot from a TFTP server
For example, to specify an immediate boot for the interface module installed in slot 1 from a TFTP server, enter the following command at the Privileged EXEC level of the CLI:
BigIron RX# lp boot system tftp 123.123.123.123 primary 1
Syntax: lp boot system tftp
The
The
The
Specifying an immediate interactive boot
To specify an immediate interactive boot for the interface module installed in slot 1, enter the following command at the Privileged EXEC level of the CLI:
BigIron RX# lp boot system interactive 1
Syntax: lp boot system interactive
The
After you enter this command, the system enters the interface module's monitor mode. For example, to boot from the primary IronWare image in the interface module's flash memory, enter the following command at the monitor prompt:
LP MONITOR> boot system flash primary
Configuring an automatic boot
You can configure an automatic boot for one or all interface modules from a specified source by entering the Ip boot system command in the global CONFIG level. Provided that you save this configuration by entering the write memory command, the system will implement the automatic boot starting with the next software reload or system reset and each reload or reset after that.
Configuring an automatic boot from the management module's PCMCIA slot
For example, to configure an automatic boot for all interface modules from the management module's PCMCIA slot 1, enter the following command at the global CONFIG level of the CLI:
BigIron RX(config)# lp boot system slot1 primary all
Syntax: lp boot system slot1 | slot2
The slot1 and slot2 keywords indicate the management module's PCMCIA slot from which to boot the interface modules.
The
The all |
Configuring an automatic boot from the management module's flash memory
For example, to configure an automatic boot from the primary IronWare image in the management module's flash memory for all interface modules, enter the following command at the global CONFIG level of the CLI:
BigIron RX(config)# lp boot system mp primary all
Syntax: lp boot system mp primary | secondary all |
The primary and secondary keywords specify the primary or secondary IronWare image in the management module's flash memory.
The all |
Configuring an automatic Bbot from the interface module's flash memory
For example, to configure an automatic boot from the primary IronWare image in the interface module's flash memory for all interface modules, enter the following command at the global CONFIG level of the CLI:
BigIron RX(config)# lp boot system flash primary all
Syntax: lp boot system flash primary | secondary all |
The primary and secondary keywords specify the primary or secondary IronWare image in the interface module's flash memory.
The all |
Configuring an automatic boot from a TFTP server
For example, to configure an automatic boot for all interface modules from a TFTP server, enter the following command at the global CONFIG level of the CLI:
BigIron RX(config)# lp boot system tftp 123.123.123.123 primary all
Syntax: Ip boot system tftp
The
The
The all |
Configuring an automatic interactive boot
For example, to configure an automatic interactive boot for all interface modules, enter the following command at the global CONFIG level of the CLI:
BigIron RX(config)# lp boot system interactive all
Syntax: lp boot system interactive all |
The all |
After you enter this command, the system enters the interface module's monitor mode. For example, to boot from the primary IronWare image in the interface module's flash memory, enter the following command at the monitor prompt:
LP MONITOR> boot system flash primary
Changing priority of chassis slots for interface modules
You can prioritize the BigIron RX Series chassis slots in which the interface modules are installed. The priority range is 1 – 8, where 1 is the lowest priority and 8 is the highest priority. You can set one, some, or all chassis slots to the same priority or each chassis slot to a different priority. If you assign the same priority to all slots, the lowest-number slot has the highest priority, while the highest-numbered slot has the lowest priority.
By default, the priority of all chassis slots is 1, which is the lowest priority. If the supply of power to the chassis falls below a minimum threshold, the chassis slots will likely lose power because of their low priority. In this scenario for an BigIron RX-8 chassis, slot 8 will lose power first, then slot 7, slot 6, and so on until slot 1 loses power.
For example, to set the priority of chassis slot 1 to the highest priority (8), enter the following command:
BigIron RX(config)# lp-slot-priority 1 8
Syntax: lp-slot-priority
The
The
Disabling and reenabling power to the interface modules
If needed, you can disable power to a specified interface module and then reenable it. For example, to disable power to the interface module in chassis slot 1, enter the following command at the Privileged EXEC level of the CLI:
BigIron RX# power-off lp 1
Syntax: power-off Ip
The
For example, to reenable power to the interface module in chassis slot 1, enter the following command at the Privileged EXEC level of the CLI:
BigIron RX# power-on lp 1
Syntax: power-on lp
The
Disabling and reenabling power to the switch fabric modules
If needed, you can disable power to a specified switch fabric module and then reenable it. For example, to disable power to the SFM, enter the following command at the Privileged EXEC level of the CLI:
BigIron RX# power-off snm 1
Syntax: power-off snm
The
For example, to reenable power to the switch fabric module, enter the following command at the Privileged EXEC level of the CLI:
BigIron RX# power-on snm 1
Syntax: power-on snm < number>
The < number> parameter indicates the SFM number for which you are reenabling the power. You can specify 0 - 4.
NOTE
If you remove a SFM without powering off the SFM with the power-off command, the data in transit is lost.
Enabling and disabling management module CPU usage calculations
You can enable the BigIron RX Series system to perform usage averaging calculations on tasks handled by the management module's CPU. If you enable the calculation performance, you can display usage averages for all tasks performed by the management module's CPU for an interval of up to 1 hour. You can display these statistics using the show cpu command. Typically, these statistics are used for debugging purposes.
By default, the performance of the calculations is disabled. When disabled, you can use the show cpu command without optional parameters to display usage averages for all tasks performed by the management module's CPU in the last 1 second.
To enable the performance of the usage averaging calculations, enter the following command at the global CONFIG level of the CLI:
BigIron RX(config)# cpu-usage on
Syntax: cpu-usage on
To disable the performance of the usage averaging calculations, enter the following command at the global CONFIG level of the CLI:
BigIron RX(config)# cpu-usage off
Syntax: cpu-usage off
NOTE
When finished gathering statistics for debugging purposes, Brocade recommends disabling the usage averaging calculations, which are CPU-intensive and can affect the performance of the management module.
Displaying management module CPU usage
You can display the tasks handled by the management module and the amount of the management module's CPU used by each task. To do so, enter the following command at any level of the CLI:
| BigIron RX# show tasks | ||||||||
| Task Name | Pri | State | PC | Stack | Size | CPU Usage(%) | task id | task vid |
| idle | 0 | run | 00001904 | 040560a0 | 256 | 66 | 0 | 0 |
| monitor | 20 | susp | 0000c658 | 0404bd80 | 8192 | 0 | 0 | 0 |
| int | 16 | susp | 0000c658 | 04051f90 | 16384 | 0 | 0 | 0 |
| timer | 15 | susp | 0000c658 | 04055f90 | 16384 | 0 | 0 | 0 |
| dbg | 30 | susp | 0000c658 | 0404df10 | 8192 | 0 | 0 | 0 |
| flash | 17 | susp | 0000c658 | 0409cf98 | 8192 | 0 | 0 | 0 |
| wd | 31 | susp | 0000c658 | 0409af80 | 8192 | 0 | 0 | 0 |
| boot | 17 | susp | 0000c658 | 041dbe30 | 65536 | 0 | 0 | 0 |
| main | 3 | susp | 0000c658 | 2060cf38 | 65536 | 0 | 0 | 1 |
| itc | 6 | susp | 0000c658 | 20610af0 | 16384 | 0 | 0 | 1 |
| tmr | 5 | susp | 0000c658 | 206a7638 | 16384 | 0 | 0 | 1 |
| ip_rx | 5 | susp | 0000c658 | 206aef48 | 16384 | 0 | 0 | 1 |
| scp | 5 | susp | 0000c658 | 206b3638 | 16384 | 0 | 0 | 1 |
| console | 5 | susp | 0000c658 | 206bf628 | 32768 | 0 | 0 | 1 |
| vlan | 5 | susp | 0000c658 | 206c6628 | 16384 | 0 | 0 | 1 |
| mac_mgr | 5 | susp | 0000c658 | 206d5638 | 16384 | 0 | 0 | 1 |
| mrp_mgr | 5 | susp | 0000c658 | 206db638 | 16384 | 0 | 0 | 1 |
| vsrp | 5 | susp | 0000c658 | 206e1630 | 16384 | 0 | 0 | 1 |
| snms | 5 | susp | 0000c658 | 206e5638 | 16384 | 0 | 0 | 1 |
| rtm | 5 | susp | 0000c658 | 20756638 | 16384 | 0 | 0 | 1 |
| ip_tx | 5 | run | 0000c658 | 20763638 | 16384 | 0 | 0 | 1 |
| mcast | 5 | susp | 0000c658 | 20767638 | 16384 | 0 | 0 | 1 |
| 14 | 5 | susp | 0000c658 | 2076b630 | 16384 | 0 | 0 | 1 |
| stp | 5 | susp | 0000c658 | 20970628 | 16384 | 0 | 0 | 1 |
| gvrp_mgr | 5 | susp | 0000c658 | 20979638 | 16384 | 0 | 0 | 1 |
| snmp | 5 | susp | 0000c658 | 20982638 | 32768 | 0 | 0 | 1 |
| web | 5 | susp | 0000c658 | 2098d638 | 32768 | 0 | 0 | 1 |
| lacp | 5 | susp | 0000c658 | 20991638 | 16384 | 0 | 0 | 1 |
| hw_access | 5 | susp | 0000c658 | 20996638 | 16384 | 0 | 0 | 1 |
| telnet_0 | 5 | run | 0000c658 | 209db638 | 32768 | 0 | 0 | 1 |
Syntax: show tasks
Examine the CPU Usage (%) field to determine the percentage of the management module's CPU used by each task.
NOTE
The total CPU usage may not add up to 100 percent. The total may not include resources used by the management processes.
A problem could exist If the CPU usage is distributed unevenly to one task, other than the idle task, for a prolonged period. If this situation occurs, contact Brocade's technical support for assistance.
Enabling and disabling packet logging for management and interface modules
You can enable the logging of packets transmitted, received, or both transmitted and received by a management or interface module in the BigIron RX Series chassis. If you enable packet logging, you can display the packet log using the show packet-logging command. (For information about displaying the contents of the packet log, refer to "Displaying a packet log" on page 134). Typically, the packet log is used for debugging purposes.
By default, packet logging is disabled for all management and interface modules. For example, to enable packet logging of packets transmitted and received by the interface module installed in chassis slot 1, enter the following command at the global CONFIG level of the CLI:
BigIron RX(config)# packet-logging 1 start 0
Syntax: packet-logging
For the
Specify the start keyword to start packet logging and write the log to the system's memory. You must also specify the direction of packets that you want logged by entering one of the following for the
- 0 - Logs packets transmitted and received by the specified module.
- 1 - Logs packets received by the specified module.
- 2 - Logs packets transmitted by the specified module.
After enabling packet logging using the start keyword, you can optionally specify the flash keyword to copy the packet log in the system's memory to the management module's flash memory. The name of the packet log in the management module's flash memory is pktlog.txt. For example, to copy a log of packets transmitted and received by the interface module installed in chassis slot 1 to the management module's flash memory, enter the following command at the global CONFIG level of the CLI:
BigIron RX(config)# packet-logging 1 flash 0
Syntax: packet-logging
For the
You must specify the direction of packets that you want logged:
- 0 – Logs packets transmitted and received by the specified module.
- 1 - Logs packets received by the specified module.
- 2 - Logs packets transmitted by the specified module.
For example, to disable packet logging for the interface module installed in chassis slot 1, enter the following command at the global CONFIG level of the CLI:
BigIron RX(config)# packet-logging 1 stop
Syntax: packet-logging
For the
Specify the stop keyword to stop packet logging.
NOTE
When finished gathering packet logging information for debugging purposes, Brocade recommends disabling the generation of a packet log, which is CPU-intensive and can affect the performance of the management module.
Displaying a packet log
You can use the following methods to display the contents of a packet log:
- You can use the show packet-logging command, which is discussed in this section.
- If you decided to write the log (pktlog.txt) to the management module flash memory, in addition to using the show packet-logging command, you can access and view the log using flash memory file management commands.
For example, to display a packet log for the interface module in chassis slot 1 that has been written to the system's memory, enter the following command at any CLI level:
BigIron RX# show packet-logging 1 memory ..Total 31 packet records...
--> TX
(Assist Header 0x11f: ver-0, priority-0, pkt_type-ARP packet)
(Foundry Header: fid-0x82, priority-3, sac-0, monitor-0, ipc_flag-0x1f, reserved-0, pri_tagged-0, multicast_vid-0, protocol_type-0x2, us-0, brd-0, dav-0, sav-0, dpv-0, sv-0, error-0, txa-0, sas-0, tagged-0, offset-16, vlan_prio-0, cfi-0, vlan_id-1)
011f0082 cf820010 000107c0 0060800b 020000e0 52ea1f00 000cdb80 32820806 00010800 06040002 000cdb80 32820101 010100e0 52ea1f00 01010102 5204ab10
--> RX
(Assist Header 0x0: ver-0, priority-0, pkt_type-IP packet)
(LP2MP_ALT_FDRY_HDR 10 bytes: data-8 bytes, source_port-130,
pkt_data_offset-30, virtual_src_int-130)
0000bfff cf808810 00012087 80824de9 4001000c db803282 00e052ea 1f000800
4500002c 28e40000 40014de9 01010102 01010101 08003916 abcd0001 61626364
==> TX
(Assist Header 0xf: ver-0, priority-0, pkt_type-IP packet)
(Foundry Header: fid-0x82, priority-3, sac-0, monitor-0, ipc_flag-0x1f, reserved-0, pri_tagged-0, multicast_vid-0, protocol_type-0x1, us-0, brd-0, dav-0, sav-0, dpv-0, sv-0, error-0, txa-0, sas-1, tagged-0, offset-16, vlan_prio-0, cfi-0, vlan_id-1)
000f0082 cf810090 000107c0 004c800b 020000e0 52ea1f00 000cdb80 32820800 4500002c 86a20000 4001f02a 01010101 01010102 00004116 abcd0001 61626364
Syntax: show packet-logging
For the
The memory | flash pktlog.txt keyword specifies that the packet log is written to the system's memory or to a file (pktlog.txt) written to the system's flash memory.
The display shows the following information:
TABLE 23 Packet log fields
| This field... Displays... | |
| ...Totalpacket records... | The total number of packets recorded in the packet log for a specified module. |
| TX or RX TX indicates the packet was transmitted by the module, while RX indicates the packet was received by the module. | |
| Assist HeaderA Brocade header associated with the packet | |
| pkt_type The packet type, which can be one of the following:IP – An IP packetARP – An ARP packetSTP – An STP packetTCP – A TCP packetUDP – A UDP packetIPC packet – An interprocessor communication packetITC packet – An intertask communication packet | |
Removing MAC address entries
You can remove learned MAC address entries from the BigIron RX Series system's MAC address table. You can remove the following:
- All MAC address entries
- All MAC address entries for a specified interface module
- All MAC address entries for a specified Ethernet port
- All MAC address entries for a specified VLAN
- A specified MAC address entry in all VLANs
For example, to remove entries for the MAC address 000d.cb80.00d in all VLANs, enter the following command at the Privileged EXEC level of the CLI:
BigIron RX# clear mac-address 000d.cb80.00d0
Syntax: clear mac-address
If you enter the clear mac-address command without any parameters, the software removes all MAC entries.
Use the
Use the ethernet
Use the module
Use the vlan
In this chapter
- Replacing a management module.... 137
- Replacing an interface module.... 139
- Replacing a switch fabric module.... 143
- Replacing a fiber-optic transceiver.... 145
- Replacing a power supply.... 147
- Replacing cooling system components .... 150
Replacing a management module

DANGER
The procedures in this manual are for qualified service personnel.
This chapter provides a recommended hardware maintenance schedule for a BigIron RX Series switch. Procedures on how to replace the modules, AC power supply, and fan are also covered.
NOTE
The BigIron RX Series management, interface, and switch fabric modules are dedicated, which means that you must install them in the BigIron RX Series chassis only. If you attempt to install the BigIron RX Series modules in another Brocade chassis or a module intended for another Brocade chassis in the BigIron RX Series chassis, the chassis and modules will not function properly.
You can remove a management module and replace it with a new one while the BigIron RX Series chassis is powered on and running.
NOTE
The BigIron RX Series management module is dedicated, which means that you must install it in the BigIron RX Series chassis only. If you attempt to install the BigIron RX Series management module in another Brocade chassis or a management module intended for another Brocade chassis in the BigIron RX Series chassis, the chassis and module will not function properly.

CAUTION
If hot removing or inserting a module, please allow a minimum of two seconds after a module (or power supply or fan tray) has been removed before inserting a module in the same slot.
NOTE
When a management switches over from active (remove active) to standby, it will send out the syslog messages or traps such as PSU failure or LP/SNM removal.
This section provides information about the following tasks:
- Removing a management module
• Installing a new management module
Removing a management module
You can remove a management module while the BigIron RX Series chassis is powered on and running.
NOTE
Before removing and replacing an active or standby management module, you need to understand how these actions affect management module redundancy.
Before removing a management module from the BigIron RX Series chassis, have the following on hand:
- An ESD wrist strap with a plug for connection to the ESD connector on the BigIron RX Series chassis.

DANGER
For safety reasons, the ESD wrist strap should contain a 1 meg ohm series resistor.
• A large flat-head screwdriver.
Follow the steps given below to remove a management module from the BigIron RX Series chassis.
1. Put on the ESD wrist strap and ground yourself by inserting the plug into the ESD connector located on the chassis front.
2. Using the flathead screwdriver if necessary, loosen the two screws on the ends of the module.
3. Pull the card ejectors towards you, and away from the module front panel. This action unseats the module from the backplane.
4. Pull the module out of the chassis, and place in an anti-static bag for storage if desired.
5. Install a new module in the slot. For information about performing this task, refer to "Installing a new management module".

CAUTION
If you do not install a module in a slot, you must keep the slot blank in place. If you run the chassis with an uncovered slot, the system may overheat.
Installing a new management module
You can install a management module while the BigIron RX Series chassis is powered on and running.
NOTE
The BigIron RX Series management module is dedicated, which means that you must install it in the BigIron RX Series chassis only. If you attempt to install the BigIron RX Series management module in another Brocade chassis or a management module intended for another Brocade chassis in the BigIron RX Series chassis, the chassis and module will not function properly.
Before installing a module into the BigIron RX Series chassis, have the following on hand:
- A new management module, which you can order from Brocade.
- An ESD wrist strap with a plug for connection to the ESD connector on the BigIron RX Series chassis.

DANGER
For safety reasons, the ESD wrist strap should contain a 1 meg ohm series resistor.
- A large flat-head screwdriver.
Follow the steps given below to install a new management module in the BigIron RX Series chassis. - Put on the ESD wrist strap and ground yourself by inserting the plug into the ESD connector located in the upper right corner of the chassis front.
- Remove the module from its packaging.
- Insert the module into the chassis slot, and slide the card along the card guide until the ejectors on either side of the module move close to the module front panel.
- Push the ejectors even closer until they are flush with the module front panel. This action will fully seat the module in the backplane.
- Tighten the two screws at either end of the module front panel by pushing them in and turning them clockwise. If desired, tighten the screws further using the flat-head screwdriver.
Replacing an interface module
You can remove an interface module and replace it with a new one while the BigIron RX Series chassis is powered on and running.
NOTE
A BigIron RX Series interface module is dedicated, which means that you must install it in the BigIron RX Series chassis only. If you attempt to install a BigIron RX Series interface module in another Brocade chassis or an interface module intended for another Brocade chassis in the BigIron RX Series chassis, the chassis and interface module may not function properly.

CAUTION
If hot removing or inserting a module, please allow a minimum of two seconds after a module (or power supply or fan tray) has been removed before inserting a module in the same slot.
This section provides information about the following tasks:
- Removing an interface module
• Installing a new interface module
Removing an interface module
You can remove an interface module while the BigIron RX Series chassis is powered on and running.
Before removing an interface module from the BigIron RX Series chassis, you must disable the module, which prevents the remaining interface modules in the chassis from dropping user packets.
To perform this task, you must have the following on hand:
- An ESD wrist strap with a plug for connection to the ESD connector on the BigIron RX Series chassis.

DANGER
For safety reasons, the ESD wrist strap should contain a 1 meg ohm series resistor.
- A large flat-head screwdriver. Follow the steps given below to remove an interface module from the BigIron RX Series chassis.
- Disable the module by entering the power-off lp
command at the Privileged EXEC level of the CLI. For the parameter, specify 1 - 4 for BigIron RX-4, 1 - 8 for BigIron RX-8 or 1 - 16 for BigIron RX-16. - Put on the ESD wrist strap and ground yourself by inserting the plug into the ESD connector located in the upper right corner of the chassis front.
- Using the flathead screwdriver if necessary, loosen the two screws on the ends of the module.
- Pull the card ejectors towards you, and away from the module front panel. This action unseats the module from the backplane.
- Pull the module out of the chassis, and place in an anti-static bag for storage if desired.
- Install a new module in the slot. For information about performing this task, refer to "Installing a new interface module".

CAUTION
If you do not install a module in a slot, you must keep the slot blank in place. If you run the chassis with an uncovered slot, the system may overheat.
Installing a new interface module
You can install a new interface module while the BigIron RX Series chassis is powered on and running.
NOTE
A BigIron RX Series interface module is dedicated, which means that you must install it in a BigIron RX Series chassis only. If you attempt to install a BigIron RX Series interface module in another Brocade chassis or an interface module intended for another Brocade chassis in a BigIron RX Series chassis, the chassis and interface module will not function properly.
Before installing one of these modules into the BigIron RX Series chassis, have the following on hand:
- A new interface module, which you can order from Brocade.
- An ESD wrist strap with a plug for connection to the ESD connector on the BigIron RX Series chassis.

DANGER
For safety reasons, the ESD wrist strap should contain a 1 meg ohm series resistor.
- A large flat-head screwdriver.
Follow the steps given below to install a new interface module in the BigIron RX Series chassis - Put on the ESD wrist strap and ground yourself by inserting the plug into the ESD connector located in the upper right corner of the chassis front.
- Remove the module from its packaging.
- Insert the module into the chassis slot, and slide the card along the card guide until the ejectors on either side of the module move close to the module front panel.
- Push the ejectors in the directions shown in Figure 74 until they are flush with the module front panel. This action will fully seat the module in the backplane.
- Tighten the two screws at either end of the module front panel by pushing them in and turning them clockwise. If desired, tighten the screws further using the flat-head screwdriver.
- Go to config mode and set the module for interactive mode
- BigIron RX(config)# Ip boot system interactive
- Insert the new module (module should boot to interactive mode)
- Load all required images for the line module that match the current version loaded on the chassis
For example:
copy tftp lp <ip-addr> rlb02200k.bin monitor copy-boot <slot number>
copy tftp lp <ip-addr> rlp02200k.bin primary <slot number>
- Go to config mode and turn off the module for interactive mode
BigIron RX(config)# no lp boot system interactive <slot number>
- Exit config mode and reboot the module
BigIron RX# power-off lp
FIGURE 73 Installing a module in a BigIron RX-4 chassis
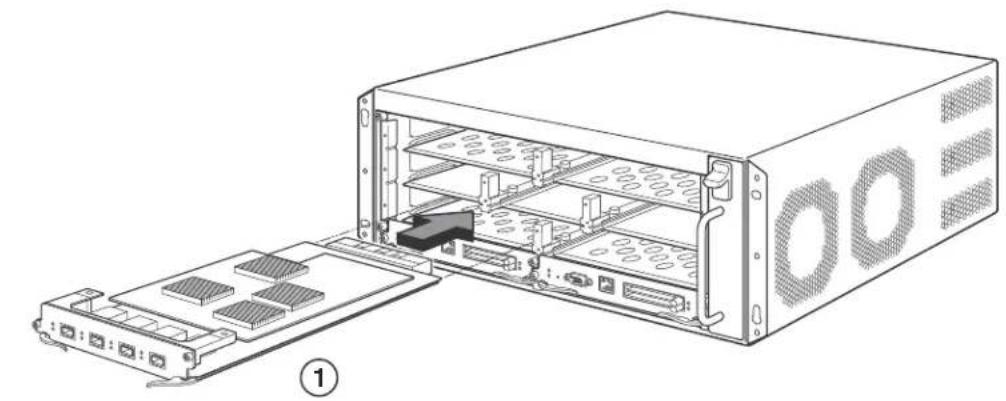
natural_image
Diagram of an internal server rack with a cable connector and drive module (no text or labels)1 l n t e r f a c e m o d u l e
FIGURE 74 Installing a module in a BigIron RX-8 chassis
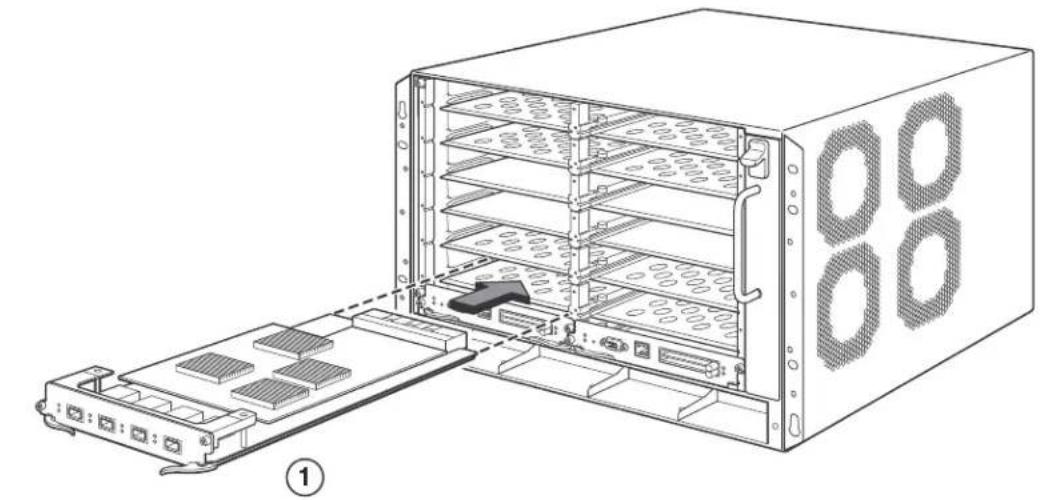
natural_image
Diagram of an internal rack-mounted server unit with a connector and drive module (no text or labels)1 l n t e r f a c e m o d u l e
FIGURE 75 Installing a module in a BigIron RX-16 chassis

natural_image
Diagram of a server rack with an open door, showing internal rack structure and ventilation slots (no text or labels)1 I n t e r f a c e m o d u l e
Replacing a switch fabric module
You can remove a switch fabric module while it is powered on and running and replace it with a new one.
NOTE
A BigIron RX Series switch fabric module is dedicated, which means that it functions properly in the BigIron RX Series chassis only. If you attempt to install a BigIron RX Series switch fabric module in another Brocade chassis or a switch fabric module intended for another Brocade chassis in a BigIron RX Series chassis, the chassis and switch fabric module will not function properly.

CAUTION
If hot removing or inserting a module, please allow a minimum of two seconds after a module (or power supply or fan tray) has been removed before inserting a module in the same slot.
This section provides information about the following tasks:
- Removing a switch fabric module
• Installing a new switch fabric module
Removing a switch fabric module
For a graceful shutdown of the links, Brocade recommends that you disable the switch fabric module before removing it from the BigIron RX Series chassis by following the instructions below.
Before removing a switch fabric module from the BigIron RX Series chassis, have the following on hand:
- An ESD wrist strap with a plug for connection to the ESD connector on the BigIron RX Series chassis

DANGER
For safety reasons, the ESD wrist strap should contain a 1 meg ohm series resistor.
• A large flat-head screwdriver
Follow the steps given below to remove a switch fabric module from the BigIron RX Series chassis.
- Disable the module by entering the power-off snm
command at the Privileged EXEC level of the CLI. For the parameter, specify 1 - 3 for BigIron RX-4, 1 - 3 for BigIron RX-8, 1 - 4 for BigIron RX-16, or 1 - 8 for BigIron RX-32. - Put on the ESD wrist strap and ground yourself by inserting the plug into the ESD connector located in the upper right corner of the chassis front.
- Using the flathead screwdriver if necessary, loosen the two screws on the ends of the module.
- Pull the card ejectors towards you, and away from the module front panel. This action unseats the module from the backplane.
- Pull the module out of the chassis, and place in an anti-static bag for storage if desired.
- Install a new switch fabric module in the slot. For information about performing this task, refer to "Installing a new switch fabric module" on page 144.
Installing a new switch fabric module
The switch fabric modules on the BigIron RX Series switches are hot-swappable. This means that you can install a new switch fabric module without powering off the BigIron RX Series chassis.
NOTE
A BigIron RX Series switch fabric module is dedicated, which means that it functions properly in the BigIron RX Series chassis only. If you attempt to install a BigIron RX Series switch fabric module in another Brocade chassis or a switch fabric module intended for another Brocade chassis in the BigIron RX Series chassis, the chassis and switch fabric module will not function properly.
Before installing a new switch fabric module into the BigIron RX Series chassis, have the following on hand:
- A new switch fabric module, which you can order from Brocade
- An ESD wrist strap with a plug for connection to the ESD connector on the BigIron RX Series chassis

DANGER
For safety reasons, the ESD wrist strap should contain a 1 meg ohm series resistor.
- A large flat-head screwdriver Follow the steps given below to install a new switch fabric module in a BigIron RX Series chassis.
-
Put on the ESD wrist strap and ground yourself by inserting the plug into an ESD connector located on the chassis front.
-
Remove the new module from its packaging.
-
Insert the module into the chassis slot, and slide the card along the card guide until the ejectors on either side of the module move close to the module front panel.
-
Push the ejectors even closer until they are flush with the module front panel. This action will fully seat the module in the backplane.
-
Tighten the two screws at either end of the module front panel by pushing them in and turning them clockwise. Then, tighten the screws further using the flat-head screwdriver.
Replacing a fiber-optic transceiver
You can remove an SFP or XFP transceiver from a port and replace it with a new one while the BigIron RX Series chassis is powered on and running.
This section provides information about the following tasks:
- Removing the fiber-optic transceiver
• Installing a new fiber-optic transceiver
• Cabling a fiber-optic transceiver
Removing a fiber-optic transceiver
You can remove a SFP (also called a mini-GBIC) or an XFP transceiver from a port while the BigIron RX Series chassis is powered on and running.
Before removing a fiber-optic transceiver, have the following on hand:
- An ESD wrist strap with a plug for connection to the ESD connector on the BigIron RX Series chassis

DANGER
For safety reasons, the ESD wrist strap should contain a 1 meg ohm series resistor.
- The protective covering that you removed from the fiber-optic transceiver port when you initially installed the module
• A small flathead screwdriver
Follow the steps given below to remove a fiber-optic transceiver from a 10 Gigabit Ethernet port.
- Put on the ESD wrist strap and ground yourself by inserting the plug into the ESD connector located in the upper right corner of the chassis front.
- Disconnect the two fiber cable connectors from the port connectors.
- Insert the protective covering into the port connectors.
- Pull down the latch on the front of the transceiver.
- Pull the transceiver out of the port, and place it in an anti-static bag for storage, if desired.
- Install a new fiber-optic transceiver in the port. For information about performing this task, refer to "Installing a new fiber-optic transceiver" next.
Installing a new fiber-optic transceiver
You can install a new fiber-optic module (SFP or XFP transceiver) in each Gigabit Ethernet and 10 Gigabit Ethernet port while the BigIron RX Series chassis is powered on and running.
Before installing one of these modules into the port, have the following on hand:
- A new fiber-optic module, which you can order from Brocade
- An ESD wrist strap with a plug for connection to the ESD connector on the BigIron RX Series chassis

DANGER
For safety reasons, the ESD wrist strap should contain a 1 meg ohm series resistor.
Follow the steps given below to install a fiber-optic module into a 10 Gigabit Ethernet port.
- Put on the ESD wrist strap and ground yourself by inserting the plug into the ESD connector located in the upper right corner of the chassis front.
- Remove the new module from its protective packaging.
- Gently insert the fiber-optic module into the port until the module clicks into place. The fiber-optic modules are keyed to prevent incorrect insertion.
Cabling a fiber-optic transceiver
Follow the steps given below to cable a fiber-optic module.
- Remove the protective covering from the fiber-optic port connectors and store the covering for future use.
- Before cabling a fiber-optic module, Brocade strongly recommends cleaning the cable connectors and the port connectors. For more information, refer to "Cleaning fiber optic modules" on page 108.
- Gently insert the two cable connectors (a tab on each connector should face upward) into the port connectors until the tabs lock into place.
- Observe the link and active LEDs to determine if the network connections are functioning properly. For more information about the LED indicators, refer to Table 16 on page 109.
Replacing a power supply
You can replace an power supply while the BigIron RX Series chassis is powered on and running. The power supplies are located in slots along the bottom of the BigIron RX Series chassis.

CAUTION
If hot removing or inserting a module, please allow a minimum of 2 seconds after a module (or power supply or fan tray) has been removed before inserting a module in the same slot.
This section provides information about the following topics:
- Determining which AC or DC power supply has failed, if necessary
- Replacing a AC or DC power supply
Determining which power supply failed
To determine which power supply has failed, enter the following command at any CLI command prompt:
BigIron RX# show chassis
This command displays status information for the fans and power supplies, and temperature readings for various components in the chassis. The power supplies are numbered in the display.
If the display indicates “Installed (Failed)” for any of the slots, the power supply installed in that particular slot has failed or is not properly installed.
Replacing a power supply
To replace a power supply, you need the following:
- A new power supply (AC or DC), which you can order from Brocade
• A small flathead or Phillips screwdriver (BigIron RX-4 only)

DANGER
The power supplies are hot swappable, which means they can be removed and replaced while the BigIron RX Series chassis is powered on and running. However, Brocade recommends that you disconnect the power supply from its power source before removing and replacing the
supply. The BigIron RX Series chassis can be running while a power supply is being removed and replaced, but the power supply itself should not be connected to a power source. Otherwise, you could be injured or the power supply or other parts of the device could be damaged.

DANGER
The front panel of an power supplies include a handle that locks the power supply in the chassis. This handle is a locking mechanism only and should not be used to lift and carry the power supply. You may sustain physical injury or harm if you attempt to lift and carry a power supply using the locking handle.
Follow the steps given below to replace a power supply.
- Disconnect the power supply from its power source.
- Disconnect the power cables from the power supply.
- In the BigIron RX-4 use the screwdriver to loosen the two screws on both sides of the power supply front panel. Then pull the ejectors forward until the power supply is pulled from its connection to the backplane.
-
In the BigIron RX-8, BigIron RX-16, pull up on the plunger in front of the face plate and pull on the handle toward you until the power supply is released.
-
On the BigIron RX-32, make sure the captured screw underneath the latch handle on the power supply faceplate is loose. Pull down on the latch handle and curl your fingers over the handle. Pull the handle straight out toward you to unlock the power supply from its position in the chassis. Refer to Figure 76
FIGURE 76 Removing and replacing a BigIron RX-32 power supply

1 Power supply indicators 6 Latch handle locked
2 A C O K 7 P o w e r s u p p l y b
3 DC OK 8 Pull down on plunger to remove
4 A L M 9 P o w e r s u p p l y
5 L a t c h h a n d l e o p e n
-
Continue to pull the power supply until it is removed from the chassis.
-
Insert the new power supply into the empty power supply slot, using the guides provided on either side of the slot.

CAUTION
Carefully follow the mechanical guides on each side of the power supply slot and make sure the power supply is properly inserted in the guides. Never insert the power supply upside down.
- After the power supply is fully inserted, push the power supply front panel toward the back of the chassis until the power supply is fully seated.
-
For the BigIron RX-32, gently pull the handle on the power supply front panel upward and toward the top of the power supply front panel. This action locks the power supply in place.
-
In the BigIron RX-4, use the screwdriver to secure the two screws on either side of the power supply front panel.
-
Connect the AC power cord or DC power lugs to the power supply front panel.
-
Connect the power to its AC or DC source.
-
Observe the LEDs on the power supply front panel:
-
For a DC Supply, the DC IN and DC OUT LEDs should be green which indicates the power supply is providing power to the chassis components.
- For an AC Supply, the AC OK and DC OK LEDs should be green which indicates the power supply is providing power to the chassis components.
- If the ALM LED is On (Amber) then the power supply has failed.
For information about troubleshooting this problem, refer to Table 13 on page 81.
Replacing cooling system components
The BigIron RX Series cooling systems are described in the following sections:
- “Replacing fan assemblies in the BigIron RX-32” on page 150
- “Replacing fan assemblies in the BigIron RX-16” on page 153
- "Replacing the fan assembly in the BigIron RX-4 and BigIron RX-8" on page 155
You can replace a fan or a fan control module while the BigIron RX Series chassis is powered on and running. The fans and fan control modules are located on rear panel of the BigIron RX Series chassis.

CAUTION
If hot removing or inserting a module, please allow a minimum of 2 seconds after a module (or power supply or fan tray) has been removed before inserting a module in the same slot.
The following sections provide more information about replacing these components.
Replacing fan assemblies in the BigIron RX- 32

CAUTION
Removal of rear fan modules allows access to buss bars and backplane. Avoid connect with these parts. There is hazardous energy level at these locations.
The BigIron RX-32 has ten fan assemblies that pull air out. They are accessible from the rear of the chassis. They are numbered as indicated in Figure 77.
You can remove and replace a fan assembly while the BigIron RX-32 chassis is powered on and running.

CAUTION
To avoid overheating of the BigIron RX-32 chassis, remove only one fan assembly at a time, and replace it promptly. Wait for the LED on the fan assembly being replaced to turn green before replacing another fan assembly. Do not remove all fans from the chassis at one time.
Before replacing a fan assembly, you need the following:
- A new fan assembly, which you can order from Brocade
• A small flathead screwdriver - An ESD wrist strap with a plug for connection to the ESD connector on the front of the chassis.

DANGER
For safety reasons, the ESD wrist strap should contain a 1 meg ohm series resistor.
Follow the steps given below to replace a fan assembly.
- Put on the ESD wrist strap and ground yourself by inserting the plug into the ESD connector on the chassis.
- Using the flathead screwdriver, remove the screws that secure the fan assembly face plate on the rear of the chassis.
- Remove the fan assembly from the chassis by grasping the handle on the face plate and pulling the fan assembly toward you as shown in Figure 78. Pulling the fan assembly unseats the fan connector from a chassis connector.

DANGER
The BigIron RX-32 fan assembly is heavy and will be off-balance as you remove it. Use both hands on the handle.

DANGER
Be careful not to insert your fingers into the fan while removing it from the chassis. The fan may still be spinning at a high speed.
FIGURE 77 Removing a BigIron RX-32 fan assembly

1 Fan module 1 6 Fan module 6
2 Fan module 2 7 Fan module 7
3 Fan module 3 8 Fan module 8
4 Fan module 4 9 Fan module 9
5 Fan module 5 10 Fan module 10
- Insert the new fan assembly into the fan slot and push the assembly in until the face plate is flush with the chassis. Pushing the fan assembly in seats the fan connector with the chassis connector.
- Secure the fan assembly to the chassis by replacing and tightening the four screws on the card cage fan assemblies and the two screws on the power supply fan assemblies.
-
Check the fan status LED in the lower left corner of the face plate. It will be red momentarily when power is applied, then change to green when the fan comes up to speed.
-
Access the CLI, and enter the show chassis command to verify that the fan is operating normally.
Replacing fan assemblies in the BigIron RX-16
The BigIron RX-16 has three fan assemblies: one accessible from the front of the chassis and two accessible from the rear. The front assembly pushes air into the chassis and the rear fans pull air out.
You can remove and replace a fan assembly while the BigIron RX-16 chassis is powered on and running.

CAUTION
To avoid overheating of the BigIron RX-16 chassis, remove only one fan assembly at a time, and replace it promptly. Do not remove all fans from the chassis at one time.
To replace a fan, you need the following:
- A new fan assembly, which you can order from Brocade
• A small flathead screwdriver - An ESD wrist strap with a plug for connection to the ESD connector on the BigIron RX Series chassis

DANGER
For safety reasons, the ESD wrist strap should contain a 1 meg ohm series resistor.
Replacing the rear fan assemblies in the BigIron RX-16
Follow the steps given below to replace a fan assembly.
- Put on the ESD wrist strap and ground yourself by inserting the plug into the ESD connector.
- Using the flathead screwdriver, loosen the four captive screws that secure the fan (marked "Fan A" or "Fan B") to the chassis rear.
- Remove the fan from the chassis by inserting your fingers underneath the fan enclosure and pulling the enclosure toward you as shown in Figure 78. Pulling the enclosure unseats the fan connector from a chassis connector.

DANGER
Be careful not to insert your fingers into the fan while removing it from the chassis. The fan may still be spinning at a high speed.
FIGURE 78 Removing a BigIron RX-16 rear fan assembly
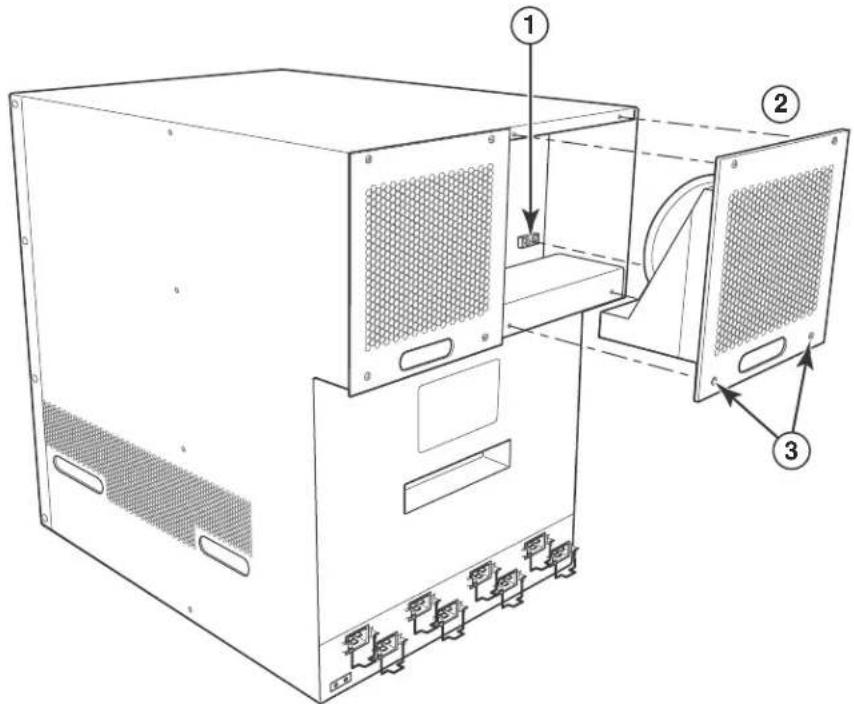
1 Power connector 3 Captive screws
2 Fan assembly
4. Insert the new fan into the fan slot and push the enclosure in until the face plate is flush with the chassis. Pushing the enclosure in seats the fan connector with the chassis connector.
5. Secure the fan to the chassis by tightening the four captive screws.
6. Access the CLI, and enter the show chassis command to verify that both fans are operating normally.
Replacing the front fan assembly in the BigIron RX-16
Follow the steps given below to replace a fan.
- Put on the ESD wrist strap and ground yourself by inserting the plug into the ESD connector located in the upper right corner of the chassis rear.
-
Using the flathead screwdriver, loosen the four captive screws that secure the fan assembly to the chassis front.
-
Remove the fan assembly from the chassis by grabbing the handle on the fan assembly and pulling it toward you as shown in Figure 79. Pulling the enclosure unseats the fan assembly connector from a chassis connector.

DANGER
Be careful not to insert your fingers into the fan while removing it from the chassis. The fan may still be spinning at a high speed.
FIGURE 79 Removing a BigIron RX-16 front fan assembly

natural_image
Technical line drawing of a server rack cabinet with multiple drive bays and ventilation grilles (no text or labels)1 Fan assembly
- Insert the new fan assembly into the fan slot and push the enclosure in until the face plate is flush with the chassis. Pushing the enclosure in seats the fan connector with the chassis connector.
- Secure the fan to the chassis by tightening the four captive screws.
- Access the CLI, and enter the show chassis command to verify that the fans are operating normally.
Replacing the fan assembly in the BigIron RX-4 and BigIron RX-8
The BigIron RX-4 and BigIron RX-8 have a fan assembly accessible from the front of the chassis. The fan assembly pulls air out of the chassis.
NOTE
If you did not remove the extra shipment screws from the BigIron RX-4 and BigIron RX-8 chassis during installation (refer to "Removing BigIron RX-4 extra shipment screws" on page 30), then you will not be able to remove the fan tray assembly. In this case, you will have to remove the BigIron RX-4 or BigIron RX-8 from the rack to remove the shipment screws.
You can remove and replace a fan assembly while the BigIron RX-4 and BigIron RX-8 chassis are powered on and running.
To replace a fan, you need the following:
- A new fan assembly, which you can order from Brocade
- An ESD wrist strap with a plug for connection to the ESD connector on the BigIron RX Series chassis

DANGER
For safety reasons, the ESD wrist strap should contain a 1 meg ohm series resistor.
Follow the steps given below to replace a fan assembly in the BigIron RX-4 and BigIron RX-8.
- Put on the ESD wrist strap and ground yourself by inserting the plug into the ESD connector located in the upper right corner of the chassis rear.
- Push down on the latch release with your thumb.
- Remove the fan assembly from the chassis by grabbing the handle on the fan assembly and pulling it toward you as shown in Figure 80 and Figure 81. Pulling the enclosure unseats the fan assembly connector from a chassis connector.

DANGER
Be careful not to insert your fingers into the fan while removing it from the chassis. The fan may still be spinning at a high speed.
FIGURE 80 Removing a fan from a BigIron RX-4 switch

1 Latch release 2 Fan tray assembly
FIGURE 81 Removing a fan from a BigIron RX-8 switch
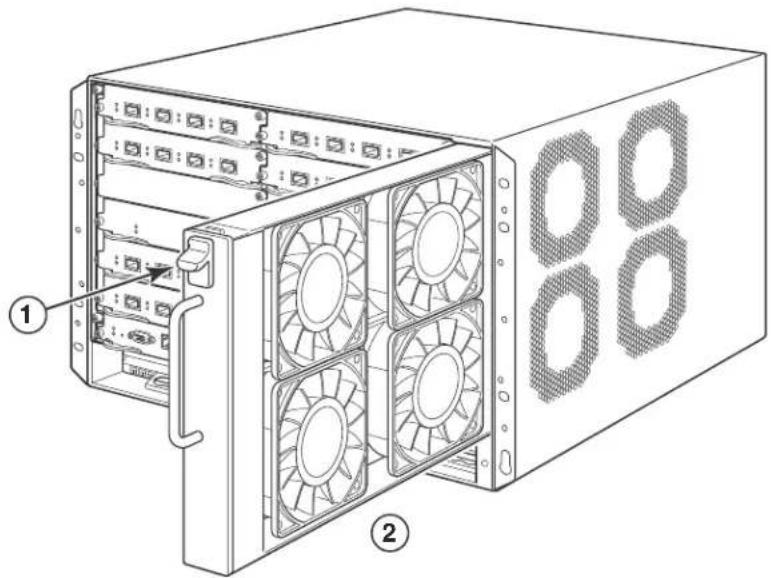
natural_image
Technical diagram of a server rack with four fans and ventilation slots, labeled with numbers 1 and 2 (no text or symbols beyond labels)1 Latch release 2 Fan tray assembly
- Insert the new fan assembly into the fan slot and push the enclosure in until the face plate is flush with the chassis. Pushing the enclosure in seats the fan connector with the chassis connector.
-
Secure the fan to the chassis by tightening the four captive screws.
-
Access the CLI, and enter the show chassis command to verify that the fans are operating normally.
Replacing the air filters in a BigIron RX Series switch
Brocade recommends replacing the air filters in BigIron RX Series switches quarterly. Replacing the filters regularly prevents the accumulation of dust on module components.
You can replace the air filters while the BigIron RX Series chassis is powered and running. To perform this task, you need the following:
- A small Allen wrench
- Replacement air filters, which you can order from Brocade
Procedures for replacing the air filters are described in the following sections:
- "Replacing the air filters in the BigIron RX-32"
- "Replacing the air filter in the BigIron RX-16"
- “Replacing the air filter in the BigIron RX-4 or BigIron RX-8”
Replacing the air filters in the BigIron RX-32
The two air filters in the BigIron RX-32 chassis are located between the upper and lower card cages. Follow the steps given below to replace the filters.
NOTE
The air filter for the BigIron RX-32 chassis is marked with a directional arrow to indicate proper alignment for the direction of airflow in the chassis. The upper filter should be inserted with the arrow pointing up, and the lower filter should be inserted with the arrow pointing down
- From the front of the chassis, remove the air inlet cover by unscrewing the four socket head screws with an Allen wrench, as shown in Figure 82.
FIGURE 82 BigIron RX-32 air inlet panel

1 C a p t i v e s c r e w s
- Remove the first filter by pulling it straight out, as shown in Figure 83.
- Insert a new filter, being careful that it aligns within the narrow channel.
- Repeat steps 2-3 with the second filter.
- Replace the air inlet cover and screw in the four captive screws until they are securely attached to the chassis.
FIGURE 83 Air filter removal and replacement for BigIron RX-32

natural_image
Technical line drawing of a server rack cabinet with internal compartments and an open lid, showing airflow direction (no text or symbols)1 Direction of airflow in chassis
Replacing the air filter in the BigIron RX-16
Follow the steps given below to replace the air filter in the BigIron RX-16.
- Loosen the two screws in the front of the filter retainer.
- Pull the filter retainer away from the chassis as shown in Figure 84.
There is a hook on the back of the retainer that is attached to the grab-strap. As you pull the retainer out, the filter is pulled along with it.
FIGURE 84 Air filter removal and replacement for BigIron RX-16

1 Fan tray 4 Filter grap strap
2 Filter 5 Direction of airflow in chassis
3 Filter retainer
3. Attach the hook on the back of the filter retainer to the filter grab-strap.
4. Push the filter retainer into the chassis and tighten the two screws.
Replacing the air filter in the BigIron RX-4 or BigIron RX-8
Follow the steps given below to replace the air filter in the BigIron RX-4 or BigIron RX-8.
- Loosen the two screws in the front of the filter retainer.
- Pull the filter retainer away from the chassis as shown in Figure 85 or Figure 86.
FIGURE 85 Air filter removal and replacement for BigIron RX-4

1 Direction of airflow in chassis 3 Filter retainer
2 F i l t e r 4 F a n t r a p
FIGURE 86 Air filter removal and replacement for BigIron RX-8
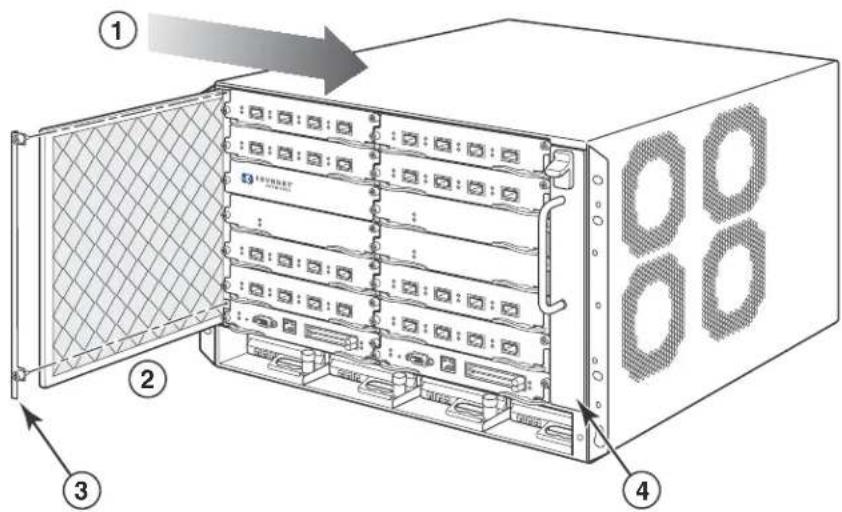
1 Direction of airflow in chassis 3 Filter retainer
2 F i l t e r 4 F a n t r a p
-
Pull the air filter out of the chassis and discard.
-
Insert the replacement air filter by sliding it along the metal guides.
The filter is marked with an arrow. The arrow indicates how the filter should be installed in regards to the direction of airflow in the chassis. Since air is pulled through the chassis, the arrow must point right towards the fan tray.
Push the filter retainer into the chassis and tighten the two screws.
In this chapter
- Software images required.... 163
- Software image naming conventions.... 165
- Displaying flash memory and version information 166
- Upgrading the BigIron RX Series software.... 174
- Loading and saving configuration files 189
- Dynamic configuration loading.... 191
- Using SNMP to save and load configuration information.... 194
- Erasing image and configuration files .... 195
- File synchronization.... 195
- Scheduling a system reload .... 198
- Diagnostic error codes and remedies for TFTP transfers .... 199
Software images required
This chapter describes the software images required to operate a BigIron RX Series switch and how to load them on the switch. The images required are described in Table 24.

DANGER
The procedures in this manual are for qualified service personnel
TABLE 24 Software image files
| Module Image type Image name | ||
| Management Module | Boot and Monitor | rmb |
| IronWare | rmpr | |
| FPGA | mbridge | |
| Interface Module | Boot and Monitor | rlb |
| IronWare | rlp | |
NOTE
This section describes each of the software images required to operate a BigIron RX Series switch as described in Table 24. Also, Figure 87 illustrates how each of the files are stored on the management and interface modules.
FIGURE 87 Management and interface modules flash images
Management Module
Flash Memory

Interface Module
Flash Memory
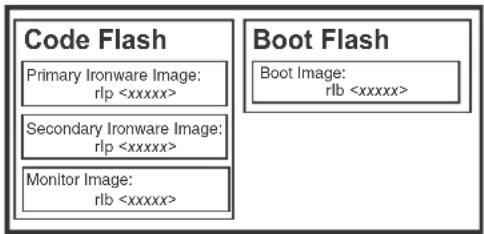
The software images are described in the following:
IronWare image
An IronWare image, also known as the software image, contains the application software, the network protocols and features that define the characteristics of the device. IronWare images can be loaded in the Primary or Secondary location of Code Flash on the modules. IronWare images are named as described in Table 24. There is one IronWare image for the management module and another for the interface module.
NOTE
The IronWare image for interface modules is loaded on both the interface and management modules. The reason for this redundancy is to verify that the same image is loaded on all the interface modules. The management module does not run the interface module code, it only compares the code with the code on the other interface modules. If the code is not the same, the files are synchronized and updated to match the interface code on the management module.
Monitor image
A Monitor image, also known as the real time operating system, allows hardware to run multiple, parallel, distributed functions. The Monitor Image delegates low-level functions to the smaller processor on each interface module. Monitor images are loaded in the Code Flash and Boot Flash on the interface and management modules. Monitor images are named as described in Table 24.
Boot image
The Boot image, which is packaged with the Monitor image, contains initialization instructions for the hardware startup. Boot images are named as described in Table 24.
FPGA image
The FPGA image is named "MBRIDGE" and serves as the interface between the management module and the backplane. It is loaded on the management module only.
Startup configuration file
The Startup Configuration file contains a default configuration that is loaded at the factory and appended with commands for the user. It is loaded on the management module only.
Software image naming conventions
This section describes the alpha-numeric scheme used to define the names of the image files used to operate a BigIron RX Series switch. Figure 88 illustrates the structure of the image names and the paragraphs that follow describe what each of the fields in the image name represents.
FIGURE 88 Software naming syntax
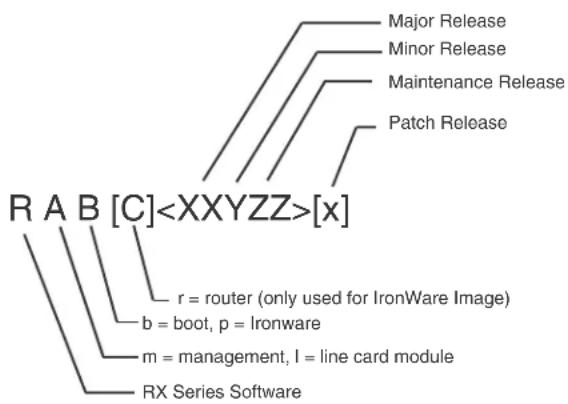
flowchart
graph TD
    A["R A B [C"]<XXYZZ>[x]] --> B["Major Release"]
    A --> C["Minor Release"]
    A --> D["Maintenance Release"]
    A --> E["Patch Release"]
    A --> F["r = router (only used for IronWare Image)"]
    A --> G["b = boot, p = Ironware"]
    A --> H["m = management, I = line card module"]
    A --> I["RX Series Software"]
To identify the software image, the naming conventions encode a specific meaning for each of the variables in the following syntax:
R indicates the software image is used on BigIron RX Series switches.
A indicates the module type:
- If the value of A is m, the image supports a management module.
- If the value of A is I, the image supports an interface module.
B indicates the software type:
- If the value of B is r, the image contains management IronWare application software.
- If the value of B is p, the image contains interface IronWare application software.
- If the value of B is b, the image contains Boot-Monitor system software.
C is only used with IronWare management Images. it indicates:
- If the value of C is r, the image contains IronWare management application software.
Release types
XX contains the major release number, for example, 01 or 02.
Y contains the minor release number, for example, 1 or 2.
ZZ contains the maintenance release number, for example, 00 or 01.
x = is an optional field; it indicates the patch release, for example, c.
Release number
To be supported, a BigIron RX Series chassis must have a software version number
- rmb023000—BigIron RX Series MP boot-monitor image
• rmr023000—BigIron RX Series MP image - rlb023000—BigIron RX Series LP boot-monitor image
- rlp023000—BigIron RX Series LP IronWare image
Displaying flash memory and version information
The IronWare image for the management module is loaded with the IronWare image for the interface module in the Primary location on the code flash.
The switch IronWare image for the management module is loaded with the IronWare image for the interface module in the Secondary location on the code flash.
The monitor image for the management module is loaded with the monitor image for the interface module in the Monitor file on the code flash.
The monitor image for the management module is also on the boot flash.
Displaying flash information
You can display information concerning the contents of an BigIron RX Series switch using the show flash command as shown in the following:
BigIron RX#show flash
Active Management Module (Top Slot)
Code Flash - Type MT28F128J3, Size 32 MB
- IronWare Image (Primary)
Version 2.5.0T143, Size 4141014 bytes, Check Sum a3c8
Compiled on Oct 19 2007 at 23:42:24 labeled as rmpr02500
- IronWare Image (Secondary)
Version 2.5.0T143, Size 4137876 bytes, Check Sum 662e
Compiled on Oct 15 2007 at 14:32:00 labeled as rmpr02500
o LP Kernel Image (Monitor for LP Image Type 0)
Version 2.5.0T155, Size 285248 bytes, Check Sum 5643
Compiled on Oct 19 2007 at 23:08:32 labeled as rlb02500
o LP IronWare Image (Primary for LP Image Type 0) Version 2.5.0T157, Size 2000853 bytes, Check Sum 1e45 Compiled on Oct 20 2007 at 00:05:04 labeled as rlp02500
o LP IronWare Image (Secondary for LP Image Type 0) Version 2.5.0T157, Size 1999406 bytes, Check Sum 04f4 Compiled on Oct 10 2007 at 17:15:40 labeled as rlp02500
- Boot-Monitor Image Version 2.5.0T145, Size 420184 bytes, Check Sum 5111 Compiled on Oct 19 2007 at 23:09:14 labeled as rmb02500
- Startup Configuration Size 4344 bytes, Check Sum 26b1 Modified on 00:15:48 GMT+00 Tue Oct 23 2007
Boot Flash - Type AM29LV040B, Size 512 KB o Boot-Monitor Image Version 2.5.0T145, Size 420184 bytes, Check Sum 5111 Compiled on Oct 19 2007 at 23:09:14 labeled as rmb02500
Standby Management Module (Bottom Slot) Code Flash: Type MT28F128J3, Size 32 MB o IronWare Image (Primary) Version 2.5.0T143, Size 4141014 bytes, Check Sum a3c8 Compiled on Oct 19 2007 at 23:42:24 labeled as rmpr02500
o IronWare Image (Secondary) Version 2.5.0T143, Size 4137876 bytes, Check Sum 662e Compiled on Oct 15 2007 at 14:32:00 labeled as rmpr02500
o LP Kernel Image (Monitor for LP Image Type 0) Version 2.5.0T155, Size 285248 bytes, Check Sum 5643 Compiled on Oct 19 2007 at 23:08:32 labeled as rlb02500
o LP IronWare Image (Primary for LP Image Type 0) Version 2.5.0T157, Size 2000853 bytes, Check Sum 1e45 Compiled on Oct 20 2007 at 00:05:04 labeled as rlp02500
o LP IronWare Image (Secondary for LP Image Type 0) Version 2.5.0T157, Size 1999406 bytes, Check Sum 04f4 Compiled on Oct 10 2007 at 17:15:40 labeled as rlp02500
- Boot-Monitor Image Version 2.5.0T145, Size 420184 bytes, Check Sum 5111 Compiled on Oct 19 2007 at 23:09:14 labeled as rmb02500
o Startup Configuration Size 4344 bytes, Check Sum 26b1 Modified on 00:15:48 GMT+00 Tue Oct 23 2007
Boot Flash: Type AM29LV040B, Size 512 KB o Boot-Monitor Image Version 2.5.0T145, Size 420184 bytes, Check Sum 5111 Compiled on Oct 19 2007 at 23:09:14 labeled as rmb02500
Line Card Slot 1 Code Flash: Type MT28F640J3, Size 16 MB o IronWare Image (Primary) Version 2.5.0T157, Size 2000853 bytes, Check Sum 1e45
Compiled on Oct 20 2007 at 00:05:04 labeled as rlp02500
o IronWare Image (Secondary)
Version 2.5.0T157, Size 1999406 bytes, Check Sum 04f4 Compiled on Oct 10 2007 at 17:15:40 labeled as rlp02500
o Boot-Monitor Image
Version 2.5.0T155, Size 285248 bytes, Check Sum 5643 Compiled on Oct 19 2007 at 23:08:32 labeled as rlb02500
Boot Flash: Type AM29LV040B, Size 512 KB
o Boot-Monitor Image
Version 2.5.0T155, Size 285248 bytes, Check Sum 5643 Compiled on Oct 19 2007 at 23:08:32 labeled as rlb02500
Line Card Slot 17
Code Flash: Type MT28F640J3, Size 16 MB
o IronWare Image (Primary)
Version 2.5.0T157, Size 2000853 bytes, Check Sum 1e45 Compiled on Oct 20 2007 at 00:05:04 labeled as rlp02500
o IronWare Image (Secondary)
Version 2.5.0T157, Size 1999406 bytes, Check Sum 04f4 Compiled on Oct 10 2007 at 17:15:40 labeled as rlp02500
o Boot-Monitor Image
Version 2.5.0T155, Size 285248 bytes, Check Sum 5643 Compiled on Oct 19 2007 at 23:08:32 labeled as rlb02500
Boot Flash: Type AM29LV040B, Size 512 KB
o Boot-Monitor Image
Version 2.5.0T155, Size 285248 bytes, Check Sum 5643 Compiled on Oct 19 2007 at 23:08:32 labeled as rlb02500
Line Card Slot 31
Code Flash: Type MT28F640J3, Size 16 MB
o IronWare Image (Primary)
Version 2.5.0T157, Size 2000853 bytes, Check Sum 1e45 Compiled on Oct 20 2007 at 00:05:04 labeled as rlp02500
o IronWare Image (Secondary)
Version 2.5.0T157, Size 1999406 bytes, Check Sum 04f4 Compiled on Oct 10 2007 at 17:15:40 labeled as rlp02500
o Boot-Monitor Image
Version 2.5.0T155, Size 285248 bytes, Check Sum 5643 Compiled on Oct 19 2007 at 23:08:32 labeled as rlb02500
Boot Flash: Type AM29LV040B, Size 512 KB
o Boot-Monitor Image
Version 2.5.0T155, Size 285248 bytes, Check Sum 5643 Compiled on Oct 19 2007 at 23:08:32 labeled as rlb02500
All show flash done
TABLE 25 Code flash and boot flash information
| This field... Displays... | |
| Management modules | |
| The management module for which flash information is displayed. Theparameter indicates an active or standby management module. Theparameter indicates the top or bottom slot (M1 or M2, respectively). | |
| Code Flash | The model number and size of the management module's code flash. |
| IronWare Image (Primary or Secondary) | Indicates the IronWare image installed in the primary or secondary location in the management module's code flash. The image name format is described in "Software image naming conventions" on page 165. The actual image name depends on the version of software you have running on your BigIron RX Series switch.The output displays the following information about the image:Version - "2.3.0Txy" indicates the image version number. The "Txxy" is used by Brocade for record keeping. The "xx" indicates the hardware type, while the "y" indicates the image type.Size - The size, in bytes, of the image.Check sum - A unique ID for the image. If the contents of the image change, the check sum changes also.Compilation date and time - The date and time that Brocade compiled the image. |
| LP Kernel Image (Monitor for LP Image Type 0) | Indicates the interface modules Boot-Monitor image stored in the management module's code flash. The management module stores these images only; it does not run the images. The image name format is described in "Software image naming conventions" on page 165. The output displays the following information about the image:Version - "2.3.0Txy" indicates the image version number. The "Txxy" is used by Brocade for record keeping. The "xx" indicates the hardware type, while the "y" indicates the image type.Size - The size, in bytes, of the image.Check sum - A unique ID for the image. If the contents of the image change, the check sum changes also.Compilation date and time - The data and time that Brocade compiled the image. |
| LP IronWare Image (Primary or Secondary for Module Type 0) | Indicates the interface modules' primary or secondary IronWare image stored in the management module's code flash if you copied the primary or secondary IronWare image to all interface modules using the copy command with the all keyword. The management module stores these images only; it does not run the images. The image name format is described in "Software image naming conventions" on page 165. The output displays the following information about the image:Version - "2.3.0Txy" indicates the image version number. The "Txxy" is used by Brocade for record keeping. The "xx" indicates the hardware type, while the "y" indicates the image type.Size - The size,in bytes,of the image.Check sum - A unique ID for the image. If the contents of the image change,the check sum changes also.Compilation date and time - The date and time that Brocade compiled the image. |
| Boot-Monitor Image Indicates the monitor image installed in the management module's code flash. The image name format is described in "Software image naming conventions" on page 165. The output displays the following information about the image:Version - "2.3.0Txy" indicates the image version number. The "Txxy" is used by Brocade for record keeping. The "xx" indicates the hardware type, while the "y" indicates the image type.Size - The size, in bytes, of the image.Check sum - A unique ID for the image. If the contents of the image change, the check sum changes also.Compilation date and time - The date and time that Brocade compiled the image. | |
| Startup Configuration The output displays the following information about the startup configuration, which is saved in the management module's code flash:Size - Size, in bytes, of the startup configuration.Check sum - A unique ID for the file. If the contents of the file change, the check sum changes also.Modification date and time - Date and time that the startup configuration was last saved. | |
| Boot Flash | The model number and size of the management module's boot flash. |
| Boot-Monitor Image Indicates the boot image installed in the management module's boot flash.The image name format is described in "Software image naming conventions" on page 165. The output displays the following information about the image:Version - "2.3.0Txy" indicates the image version number. The "Txxy" is used by Brocade for record keeping. The "xx" indicates the hardware type, while the "y" indicates the image type.Size - The size, in bytes, of the image.Check sum - A unique ID for the image. I if the contents of the image change, the check sum changes also.Compilation date and time - The date and time that Brocade compiled the image. | |
| Interface Modules | |
| Line Card Slot | The interface module for which flash information is displayed.Theparameter indicates the number of the chassis slot, 1 - 16, in which the interface module is installed. |
| Code Flash The model number and size of the interface module's code flash. | |
| IronWare Image (Primary or Secondary) | Indicates the IronWare image installed in the primary or secondary location in the interface module's code flash. The image name format is described in "Software image naming conventions" on page 165. The output displays the following information about the image:Version - "2.3.0Txy" indicates the image version number. The "Txxy" is used by Brocade for record keeping. The "xx" indicates the hardware type, while the "y" indicates the image type.Size - The size, in bytes, of the image.Check sum - AUnique ID for the image. If the contents of the image change, the check sum changes also.Compilation date and time - The date and time that Brocade compiled the image. |
| Boot Flash The model number and size of the interface module's boot flash. | |
| Boot-Monitor Image | Indicates the boot image installed in the interface module's boot flash. The image name format is described in “Software image naming conventions” on page 165. The output displays the following information about the image:Version - “2.3.0Txy” indicates the image version number. The “Txxy” is used by Brocade for record keeping. The “xx” indicates the hardware type, while the “y” indicates the image type.Size - The size, in bytes, of the image.Check sum - A unique ID for the image. If the contents of the image change, the check sum changes also.Compilation date and time - The date and time that Brocade compiled the image. |
Displaying version information
You can display version information for a BigIron RX Series switch using the show version command as shown in the following:
BigIron RX#show version
HW: BigIron RX Router
BI-RX-32-S Backplane (Serial #: Not Exist, Part #: Not Exist)
RX-BI-32-SFM Switch Fabric Module 1 (Serial #: PR40060023, Part #: Not Exist)
SBRIDGE Version: 6, CPLD Version: 2
FE 1: Type fe200, Version 2
FE 2: Type fe200, Version 2
FE 3: Type fe200, Version 2
FE 4: Type fe200, Version 2
FE 5: Type fe200, Version 2
FE 6: Type fe200, Version 2
RX-BI-32-SFM Switch Fabric Module 2 (Serial #: PR40060026, Part #: Not Exist)
SBRIDGE Version: 6, CPLD Version: 2
FE 1: Type fe200, Version 2
FE 2: Type fe200, Version 2
FE 3: Type fe200, Version 2
FE 4: Type fe200, Version 2
FE 5: Type fe200, Version 2
FE 6: Type fe20O, Version 2
RX-BI-32-SFM Switch Fabric Module 3 (Serial #: PR40060039, Part #: Not Exist)
SBRIDGE Version: 6, CPLD Version: 2
FE 1: Type fe200, Version 2
FE 2: Type fe200, Version 2
FE 3: Type fe200, Version 2
FE 4: Type fe200, Version 2
FE 5: Type fe200, Version 2
FE 6: Type fe20U, Version 2
RX-BI-32-SFM Switch Fabric Module 4 (Serial #: PR40060027, Part #: Not Exist)
SBRIDGE Version: 6, CPLD Version: 2
FE 1: Type fe200, Version 2
FE 2: Type fe200, Version 2
FE 3: Type fe200, Version 2
FE 4: Type fe200, Version 2
FE 5: Type fe200, Version 2
FE 6: Type fe200, Version 2
RX-BI-32-SFM Switch Fabric Module 5 (Serial #: PR40060009, Part #: Not Exist)
SBRIDGE Version: 6, CPLD Version: 2
FE 1: Type fe200, Version 2
FE 2: Type fe200, Version 2
FE 3: Type fe200, Version 2
FE 4: Type fe200, Version 2
FE 5: Type fe200, Version 2
FE 6: Type fe200, Version 2
RX-BI-32-SFM Switch Fabric Module 6 (Serial #: PR40060007, Part #: Not Exist)
SBRIDGE Version: 6, CPLD Version: 2
FE 1: Type fe200, Version 2
FE 2: Type fe200, Version 2
FE 3: Type fe200, Version 2
FE 4: Type fe200, Version 2
FE 5: Type fe200, Version 2
FE 6: Type fe20O, Version 2
RX-BI-32-SFM Switch Fabric Module 7 (Serial #: PR40060037, Part #: Not Exist)
SBRIDGE Version: 6, CPLD Version: 2
FE 1: Type fe200, Version 2
FE 2: Type fe200, Version 2
FE 3: Type fe200, Version 2
FE 4: Type fe200, Version 2
FE 5: Type fe200, Version 2
FE 6: Type fe2O, Version 2
RX-BI-32-SFM Switch Fabric Module 8 (Serial #: PR40060020, Part #: Not Exist)
SBRIDGE Version: 6, CPLD Version: 2
FE 1: Type fe200, Version 2
FE 2: Type fe200, Version 2
FE 3: Type fe200, Version 2
FE 4: Type fe200, Version 2
FE 5: Type fe200, Version 2
FE 6: Type fe2O. , Version 2
SL M1: RX-BI-32-MR Management Module Active (Serial #: Not Exist, Part #: Not Exist):
Boot : Version 2.5.0T145 Copyright (c) 1996-2007 Foundry Networks, Inc.
Compiled on Oct 19 2007 at 23:09:14 labeled as rmb02500
(420184 bytes) from boot flash
Monitor : Version 2.5.0T145 Copyright (c) 1996-2007 Foundry Networks, Inc.
Compiled on Oct 19 2007 at 23:09:14 labeled as rmb02500
(420184 bytes) from code flash
IronWare : Version 2.5.0T143 Copyright (c) 1996-2007 Foundry Networks, Inc.
Compiled on Oct 19 2007 at 23:42:24 labeled as rmpr02500
(4141014 bytes) from Primary
Board ID : 00 MBRIDGE32 Revision : 18
916 MHz Power PC processor (version 8003/0101) 166 MHz bus
512 KB Boot Flash (AM29LV040B), 32 MB Code Flash (MT28F128J3)
512 MB DRAM
Active Management uptime is 20 hours 53 minutes 45 seconds
SL M2: RX-BI-32-MR Management Module Standby (Serial #: Not Exist, Part #: Not Exist):
Boot : Version 2.5.0T145 Copyright (c) 1996-2007 Foundry Networks, Inc.
Compiled on Oct 19 2007 at 23:09:14 labeled as rmb02500
(420184 bytes) from boot flash
Monitor : Version 2.5.0T145 Copyright (c) 1996-2007 Foundry Networks, Inc.
Compiled on Oct 19 2007 at 23:09:14 labeled as rmb02500
(420184 bytes) from code flash IronWare : Version 2.5.0T143 Copyright (c) 1996-2007 Foundry Networks, Inc. Compiled on Oct 19 2007 at 23:42:24 labeled as rmpr02500
(4141014 bytes) from Primary Board ID : 00 MBRIDGE32 Revision : 18 916 MHz Power PC processor (version 8003/0101) 166 MHz bus 512 KB Boot Flash (AM29LV040B), 32 MB Code Flash (MT28F128J3) 512 MB DRAM Standby Management uptime is 20 hours 53 minutes 45 seconds
SL 1: RX-BI-24F 24-port 1 GbE Module (Serial #: SA40050108, Part #: 31520-000G) Boot : Version 2.5.0T155 Copyright (c) 1996-2007 Foundry Networks, Inc. Compiled on Oct 19 2007 at 23:08:32 labeled as rlb02500
(285248 bytes) from boot flash
Monitor : Version 2.5.0T155 Copyright (c) 1996-2007 Foundry Networks, Inc.
Compiled on Oct 19 2007 at 23:08:32 labeled as rlb02500
(285248 bytes) from code flash
IronWare : Version 2.5.0T157 Copyright (c) 1996-2007 Foundry Networks, Inc.
Compiled on Oct 20 2007 at 00:05:04 labeled as rlp02500
(2000853 bytes) from Primary FAP 1 version: 2 FAP 2 version: 2 FAP 3 version: 0 FAP 4 version: 0 660 MHz Power PC processor 440GP (version 8020/0020) 330 MHz bus 512 KB Boot Flash (AM29LV040B), 16 MB Code Flash (MT28F640J3) 512 MB DRAM, 8 KB SRAM, 0 Bytes BRAM LP Slot 1 uptime is 20 hours 53 minutes 45 seconds
SL 15: RX-BI-48T 48-port 1 GbE mini-RJ21 Telco Module (Serial #: PR46050004, Part #: Not Exist) Boot : Version 2.5.0T155 Copyright (c) 1996-2007 Foundry Networks, Inc. Compiled on Oct 12 2007 at 23:05:00 labeled as rlb02500 (285154 bytes) from boot flash Monitor : Version 2.5.0T155 Copyright (c) 1996-2007 Foundry Networks, Inc. Compiled on Oct 19 2007 at 23:08:32 labeled as rlb02500
(285248 bytes) from code flash IronWare : Version 2.5.0T157 Copyright (c) 1996-2007 Foundry Networks, Inc. Compiled on Oct 20 2007 at 00:05:04 labeled as rlp02500
(2000853 bytes) from Primary FAP 1 version: 2 FAP 2 version: 2 FAP 3 version: 2 FAP 4 version: 2 660 MHz Power PC processor 440GP (version 8020/0020) 330 MHz bus 512 KB Boot Flash (AM29LV040B), 16 MB Code Flash (MT28F640J3) 512 MB DRAM, 8 KB SRAM, 0 Bytes BRAM LP Slot 15 uptime is 20 hours 53 minutes 45 seconds
SL 32: RX-BI-24C 24-port 1 GbE Copper Module (Serial #: SA05061147, Part #: 31521-001C) Boot : Version 2.5.0T155 Copyright (c) 1996-2007 Foundry Networks, Inc. Compiled on Oct 19 2007 at 23:08:32 labeled as rlb02500
(285248 bytes) from boot flash
Monitor : Version 2.5.0T155 Copyright (c) 1996-2007 Foundry Networks, Inc.
Compiled on Oct 19 2007 at 23:08:32 labeled as rlb02500
(285248 bytes) from code flash
IronWare : Version 2.5.0T157 Copyright (c) 1996-2007 Foundry Networks, Inc.
Compiled on Oct 20 2007 at 00:05:04 labeled as rlp02500
(2000853 bytes) from Primary
FAP 1 version: 2
FAP 2 version: 2
FAP 3 version: 0
FAP 4 version: 0
660 MHz Power PC processor 440GP (version 8020/0020) 330 MHz bus
512 KB Boot Flash (AM29LV040B), 16 MB Code Flash (MT28F640J3)
512 MB DRAM, 8 KB SRAM, 0 Bytes BRAM
LP Slot 32 uptime is 20 hours 53 minutes 46 seconds
All show version done
Syntax: show version
Upgrading the BigIron RX Series software
This section describes the upgrade procedures required to operate a BigIron RX. Read this section before you upgrade the BigIron RX software. It contains the following information:
- "Changes to software images starting with version 02.5.00"
- “Unified software image upgrade to upgrade release 02.6.00 and later”
- “Upgrading software releases prior to release 02.2.01”
- "Hitless Layer 2 OS upgrade"
- “Basic tasks in the software upgrade process”
- "Upgrading the management module's monitor and boot images"
- “Upgrading the management module’s IronWare image”
- "Rebooting the management module"
- "Upgrading the MBRIDGE FPGA on the management module"
Changes to software images starting with version 02.5.00
Depending on the versions you are upgrading from or to, the procedures can be different. Follow the procedures described in the following sections:
- "Special instructions for using interface modules in a 32-Slot chassis"
- "For interface modules running versions earlier than 02.3.00"
- "Separation of boot and monitor images"
- "Upgrading to version 02.5.00 (or later) from a pre- 02.5.00 version"
- “Downgrading from version 02.5.00 (or later) to a pre-02.5.00 version”
Special instructions for using interface modules in a 32-Slot chassis
The BigIron RX-32 chassis introduced with this release can use interface modules in the BigIron RX series that have older versions of the Multi-Service IronWare software installed on them. There are however a couple of issues regarding older versions of the software that might be installed on interface modules that you already own. They can work properly but must be installed as described in the following:
For interface modules running versions earlier than 02.3.00
Under normal conditions, a back revision Interface module can be placed in a BigIron RX chassis and the Management module will automatically upgrade it to the Interface module software images that it has installed on the Management module. If you are running one of the versions of Multi-Service IronWare software prior to 02.3.00, the automatic upgrade will only occur if the Interface module is installed in slots 1 - 16 of the BigIron RX-32 chassis. If you install an Interface module with a software version earlier than 02.3.00 in slots 17 - 32, it will not download a new image and will cause instability in the BigIron RX system.
To avoid this problem, you must upgrade the software revision before installing an Interface module in slots 17 - 32 of a BigIron RX-32 chassis using one of the methods described in "Upgrading the interface module's IronWare image".
Separation of boot and monitor images
Beginning with version 02.5.00 and later of the Multi-Service IronWare software, the boot and monitor images no longer need to be upgraded with each release.
- The Boot images no longer need to be upgraded with each release and in fact will almost never need to be changed. This eliminates one extra step in the upgrade process, thus simplifying the upgrade procedure, reducing the chance of operator error and leading to a faster upgrade process.
- The Monitor image no longer needs to be upgraded with each release. In release 02.5.00, all OS functions have been moved out of the Monitor image into the IronWare image. This has simplified the Monitor image and it no longer needs to be upgraded every time, thus eliminating another step in the upgrade process.
- The first version of the boot and monitor image supporting this separation is 02.5.00
Upgrading to version 02.5.00 (or later) from a pre-02.5.00 version
The procedure for upgrading the software images to version 02.5.00 (or later) from a pre-02.5.00 version are the same as for previous versions. When performing this upgrade, you should upgrade the Boot, Monitor, and IronWare images in addition to any FPGA images that need to be upgraded.
Follow the steps given below for this upgrade.
- Determine the versions of the software images currently installed and running on the router.
Use the procedures described in "Displaying flash memory and version information" on page 166. Using this procedure you can determine the images currently installed. -
Upgrade the Management and Interface Modules IronWare Image with the Unified Image.
Use the procedures described in “Unified software image upgrade to upgrade release 02.6.00 and later”. -
Reboot the Management Module.
Use the procedures described in "Rebooting the management module" on page 183.
Downgrading from version 02.5.00 (or later) to a pre-02.5.00 version
The procedure for downgrading the software images from version 02.5.00 (or later) to a pre-02.5.00 version are the same as for previous versions. When performing this upgrade, you should upgrade the Boot, Monitor, and IronWare images in addition to any FPGA images that need to be upgraded.
Follow the steps given below for this upgrade..
- Determine the versions of the software images currently installed and running on the router. Use the procedures described in "Displaying flash memory and version information" on page 166.
- Upgrade the Management and Interface Modules IronWare Image with the Unified Image. Use the procedures described in “Unified software image upgrade to upgrade release 02.6.00 and later” on page 177.
- If required for this release, upgrade the Management module's MBRIDGE FPGA image. Use the procedures described in "Upgrading the MBRIDGE FPGA on the management module" on page 183.
- If required for this release, upgrade the Interface module's FPGA images. Use the procedures described in "Upgrading the MBRIDGE FPGA on the management module" on page 183.
- Reboot the Management Module. Use the procedures described in “Rebooting the management module” on page 183.
Command change
Beginning with version 02.5.00 and later of the Multi-Service IronWare software, the copy tftp image command has been changed to enable the user to upgrade the boot, monitor, and MBRIDGE only when needed.
NOTE
The changes to the copy tftp image command will appear when upgrading to any version after 02.5.00.
New default behavior
- Without any options selected, the unified image will copy the MP monitor, LP monitor, and the MP and LP applications to the primary location.
- The option to exclude copying the MBRIDGE and exclude copying the boot from the unified image was removed.
- Unified images will now include two MBRIDGES; one for BigIron RX-16/8/4 (mbridge18.xsvf) and one for the BigIron RX-32(mbridge32.xsvf).
New options added
New option have been added to the copy tftp image command to enable the user to upgrade the boot, monitor, and MBRIDGE only when needed.
Syntax: copy tftp image
The
The
The Ip-boot parameter specifies that you want to download the new interface module boot image.
The Ip-sec parameter specifies that interface image be copied to the secondary location in flash.
The mbridge parameter tells the BigIron RX to copy the MBRIDGE image. It will now include two MBRIDGES; one for BigIron RX-16/8/4 (mbridge18.xsvf) and one for the BigIron RX-32(mbridge32.xsvf).
The mp-boot parameter specifies that you want to download the new management module boot image.
The mp-sec parameter specifies that management image be copied to the secondary location in flash.
Unified software image upgrade to upgrade release 02.6.00 and later
BigIron RX software release 02.6.00 and later can be upgraded using the Unified Software Image Upgrade procedure. When copying the image, you must load the lp-boot and mp-boot. You can set parameters to limit the images being copied and to direct images to be copied to the secondary image location to a later release by doing the following.
NOTE
Failure to load the lp-boot and mp-boot when copying the unified image will cause the LP to become stuck in an interactive mode.
- Copy the unified software image (rx02700.bin) from a TFTP server to the switch.
For example, to copy the entire unified software image, the lp-boot and the mp-boot from a TFTP server at IP address 10.10.12.12, use the following command.
BigIron RX#copy tftp image 10.10.12.12 rx02500.bin lp-boot mp-boot
Syntax: copy tftp image
The
The
The
TABLE 26 Image name
| Device Image name Example | |
| BigIron RX rxxxxxx.bin | rx02700.bin |
The Ip-boot parameter specifies that you want to download the new interface module boot image.
The Ip-sec parameter specifies that interface image be copied to the secondary location in flash.
The mbridge parameter tells the BigIron RX to copy the MBRIDGE image. It will now include two MBRIDGES; one for BigIron RX-16/8/4 (mbridge21.xsvf) and one for the BigIron RX-32(mbridge32.xsvf).
The mp-boot parameter specifies that you want to download the new management module boot image. The mp-sec parameter specifies that management image be copied to the secondary location in flash.
- Reboot the management module using the reload command. (Refer to “Rebooting the management module” on page 183.)
- If you are using SSH v2, you must clear the crypto key using the crypto key zeroize command after you upgrade. Then, regenerate a new crypto key using the crypto key generate command.
Unified software image upgrade to upgrade release 02.2.01 to 02.5.00
BigIron RX software release 02.2.01 to 02.5.00 can be upgraded using the Unified Software Image Upgrade procedure. This new procedure removes the need to copy multiple images in separate steps. In addition, you can set parameters to limit the images being copied and to direct images to be copied to the secondary image location to a later release by doing the following.
- Copy the unified software image (rx02700.bin) from a TFTP server to the switch.
For example, to copy the entire unified software image from a TFTP server at IP address 10.10.12.12, use the following command.
BigIron RX#copy tftp image 10.10.12.12 rx02500.bin
Syntax: copy tftp image
The
The
TABLE 27 Image name
| Device Image name Example | |
| BigIron RX rxxxxxx.bin | rx02700.bin |
The Ip-no-boot parameter specifies that you do not want to download the interface module boot image.
The Ip-sec parameter specifies that interface image be copied to the secondary location in flash.
The mp-no-boot parameter specifies that you do not want to download the management module boot image.
The mp-sec parameter specifies that management image be copied to the secondary location in flash.
The no-mbridge parameter tells the BigIron RX not to copy the MBRIDGE image.
- Reboot the management module using the reload command. (Refer to "Rebooting the management module" on page 183.)
- If you are using SSH v2, you must clear the crypto key using the crypto key zeroize command after you upgrade to Release 02.2.01. Then, regenerate a new crypto key using the crypto key generate command.
Upgrading software releases prior to release 02.2.01
If your BigIron RX is running a release prior to Release 02.2.01, you must upgrade the management module and interface module images separately. Follow the steps given below for this upgrade.
-
Upgrade the monitor and boot images on the management and interface modules. See the following sections:
-
“Upgrading the management module’s monitor and boot images” on page 180
- “Upgrading the management module’s IronWare image” on page 180
- “Upgrading the interface module’s monitor and boot images” on page 181
-
“Upgrading the interface module’s IronWare image” on page 182
-
Upgrade the MBRIDGE FPGA. Refer to "Upgrading the MBRIDGE FPGA on the management module" on page 183.
- Reboot the management module. Refer to "Rebooting the management module" on page 183.
- If you are using SSH v2, clear and regenerate a new crypto key.
Basic tasks in the software upgrade process
Follow the steps given below to upgrade all or some of the BigIron RX Series software images.
- Determine the versions of the software images currently installed and running on the Biglron RX Series system.
- Copy the new software image from a source to a destination.
The source from which to copy the new image is usually a TFTP server to which the BigIron RX Series system has access or a PCMCIA flash card inserted in the management module's slot 1 or 2. The destination to which to copy the new image is either the management module's code flash or a flash card inserted in slot 1 or 2, or all or one specified interface module.
- Reboot the management module.
For information about performing this task, Refer to “Rebooting the management module” on page 183.
Upgrading the management module's monitor and boot images
You can upgrade the management module's monitor and boot images simultaneously.
NOTE
Brocade highly recommends that the interface monitor and boot images be upgraded at the same time as the management's module images to keep both code images synchronized on the same version. The procedure for doing this is described in "Upgrading the interface module's monitor and boot images" on page 181.
Follow the steps given below to upgrade the management module's monitor and boot images simultaneously.
- Place the new monitor and boot images on a TFTP server to which the BigIron RX Series system has access or on a PCMCIA flash card inserted in slot 1 or 2.
- Copy the new monitor and boot images to the BigIron RX Series. Enter one of the following commands at the Privileged EXEC level of the CLI (example: BigIron RX#):
TABLE 28 Command syntax for upgrading monitor and boot images on the management module
| Command syntax Description | |
| copy tftp flashmonitor copy-boot | Copies the latest monitor and boot images from the TFTP server to flash. |
| copy slot1 | slot2 flashmonitor copy-boot | Copies the latest monitor and boot images from a flash card in slot 1 or 2 to flash. |
For information about the image name to specify, refer to Table 24.
- Verify that the new monitor and boot images have been successfully copied to the flash or slot 1 or 2 by entering one of the following commands at the Privileged EXEC level of the CLI:
• show flash
- dir/
Check for the boot image, monitor image, and the date and time at which the new images were built.
- If you want to upgrade other software images, go to the appropriate upgrade section for information. If you have completed upgrading the software images, you must reboot the management module to complete the upgrade process. For more information, refer to "Rebooting the management module" on page 183.
Upgrading the management module's IronWare image
Perform the following steps to upgrade the management module's IronWare image (primary or secondary).
-
Place the new IronWare image on a TFTP server to which the BigIron RX Series system has access or on a PCMCIA flash card inserted in slot 1 or 2.
-
Copy the new IronWare image from the TFTP server or a flash card in slot 1 or 2 to the management module's code flash or a flash card in slot 1 or 2. To perform this step, enter one of the following commands at the Privileged EXEC level of the CLI:
-
copy tftp flash
primary | secondary - copy tftp slot1 | slot2
primary | secondary - copy slot1 | slot2 flash
primary | secondary - copy slot1 | slot2 slot1 | slot2
For information about the image name to specify, refer to Table 24.
- Verify that the new IronWare image has been successfully copied to the specified destination by entering one of the following commands at the Privileged EXEC level of the CLI:
• show flash (if the destination was code flash)
- dir/
Check for the primary or secondary image and the date and time that it was placed in the directory.
- If you want to upgrade other software images, go to the appropriate upgrade section for information. If you have completed upgrading the software images, you must reboot the management module to complete the upgrade process. For more information, refer to "Rebooting the management module" on page 183.
Upgrading the interface module's monitor and boot images
NOTE
We recommend that you perform this upgrade procedure from a PC or terminal that is directly connected to the management module's Console port. You can also perform this procedure through a Telnet or SSHv2 session.
Follow the steps given below to upgrade an interface's monitor and boot images simultaneously.
- Place the new monitor and boot images on a TFTP server to which the BigIron RX Series system has access or on a PCMCIA flash card inserted in slot 1 or 2.
- Copy the new monitor and boot images to the BigIron RX Series. Enter one of the following commands at the Privileged EXEC level of the CLI (example: BigIron RX#):
TABLE 29 Command syntax for upgrading the monitor and boot images on the interface module
| Command syntax Description | |
| copy tftp lpmonitor all | | Copies the latest monitor image from the TFTP server to all interface modules or to the specified interface module (slot-number). |
| copy tftp lpmonitor copy-boot all | | Copies the latest monitor and boot images from the TFTP server to all interface modules or to the specified interface module (slot-number). |
For information about the image name to specify, refer to Table 24.
- Verify that the new images were successfully copied to code flash by entering the following command at the Privileged EXEC level of the CLI:
• show flash
Check for the monitor image, boot image, and the date and time at which the new images were built.
- If you want to upgrade other software images, go to the appropriate upgrade section for information. If you have completed upgrading the software images, you must reboot the management module to complete the upgrade process. For more information, refer to "Rebooting the management module" on page 183.
Upgrading the interface module's IronWare image
Follow the steps given below to upgrade the IronWare image (primary or secondary) on all interface modules or an interface module in a specified chassis slot.
-
Place the new IronWare image on a TFTP server to which the BigIron RX Series system has access or on a PCMCIA flash card inserted in slot 1 or 2.
-
Copy the new IronWare image from the TFTP server or a flash card in slot 1 or 2 to all interface modules or an interface module in a specified chassis slot. To perform this step, enter one of the following commands at the Privileged EXEC level of the CLI (example: BigIron RX#):
-
copy tftp lp
primary | secondary all - copy tftp lp
primary | secondary - copy slot1 | slot2 lp
primary | secondary all - copy slot1 | slot2 lp
primary | secondary
For information about the image name to specify, refer to Table 24.
NOTE
If you copy the new IronWare image to all interface modules using the all keyword, the management module makes a copy of the image (called Ip-primary-0 or Ip-secondary-0) and stores it in its code flash, thereby synchronizing the new IronWare image on both the interface and management modules.
If you copy the new IronWare image to a specified chassis slot, the management module does not make a copy of the image or store it. In this case, the new IronWare image on the interface module is unsynchronized or different from the IronWare image on the management module.
For more information about synchronizing the new IronWare image or retaining unsynchronized versions of the IronWare image on the interface and management modules, refer to "Rebooting the management module" on page 183.
- Verify that the new IronWare image has been successfully copied by entering the following command at any level of the CLI:
• show flash
Check for the IronWare image and the date and time at which the image was built.
If you want to upgrade other software images, go to the appropriate upgrade section for information. If you have completed upgrading the software images, you must reboot the management module to complete the upgrade process. For more information, refer to “Rebooting the management module” on page 183.
Rebooting the management module
After upgrading one or more software images on the management or interface modules, you must reboot the management module. After the management module reboots, it in turn reboots the interface modules.
To reboot the management module, enter one of the following commands:
- reload (this command boots from the default boot source, which is the primary code flash)
- boot system flash primary | secondary
During the management module reboot, the following synchronization events occur:
- If you have a standby management module, the active management module compares the standby module's monitor, primary, and secondary images to its own. If you have updated these images on the active module, the active module automatically synchronizes the standby module's images with its own.
- If you copied the primary or secondary IronWare image to all interface modules using the copy command with the all keyword, the management module made a copy of the image and stored it in its code flash under the names Ip-primary-0 or Ip-secondary-0. By default, the BigIron RX Series system checks the interface modules' IronWare images, which reside in the code flash of the interface modules and the management module to make sure they are the same in both locations. (These IronWare images are stored on the management module only and are not run by the management or interface modules.) If the IronWare images on the interface and management modules are different, the system prompts you to do the following:
- If you want to update the IronWare images in the interface module's code flash with the images in the management module's code flash, enter the lp cont-boot sync
- If you want to retain the IronWare images in the interface module's code flash, enter the lp cont-boot no-sync
After the management module finishes booting, do the following:
- Enter the show module command at any CLI level, and verify that the status of all interface modules is CARD_STATE_UP.
- Enter the show version command at any CLI level, and verify that all management and interface modules are running the new software image version.
If you find that an interface module is in a waiting state or is running an older software image, then you may have forgotten to enter the lp cont-boot sync
Upgrading the MBRIDGE FPGA on the management module
BigIron RX Series management modules contain an upgradable FPGA image called MBRIDGE.
The MBRIDGE image installed must be compatible with the software version you are running on the BigIron RX Series. Refer to the Software Release Notes for compatibility information.
NOTE
You will not need to upgrade the MBRIDGE FPGA image with every Multi-Service software upgrade. Only upgrade this image if specified in the release notes.
Overview of tasks in the FPGA image upgrade process
Follow the steps given below to upgrade the MBRIDGE FPGA image on a BigIron RX Series management module.
- Determine the versions of the images currently installed on the BigIron RX Series management module.
For information about performing this task, refer to “Determining the MBRIDGE image versions” on page 184. - Copy the new image from a source to a destination.
The source from which to copy the new image is usually a TFTP server to which the BigIron RX Series system has access or a flash card in the management module's slot 1 or 2. The destination to which to copy the new image is all or one specified interface module.
For information about performing this task, refer to “Upgrading the MBRIDGE FPGA image” on page 185. - Reboot the interface module upon which you upgraded the MBRIDGE images.
Determining the MBRIDGE image versions
To display the versions of the MBRIDGE images currently installed on the Gigabit Ethernet modules, enter the show version command at any level of the CLI:
BigIron RX>show version
HW: BigIron RX Switch
BI-RX-16-S Backplane (Serial #: SERI_BACK, Part #: BACK_PART_KAO)
RX-SFM3 Switch Fabric Module 1 (Serial #: Not Exist, Part #: 000)
SL M2: BI-RX Management Module Active (Serial #: Not Exist, Part #: 31524-000A):
Boot : Version 2.2.0T145 Copyright (c) 1996-2003 Foundry Networks, Inc.
Compiled on Jul 18 2005 at 18:53:23 labeled as rmb02200
(342853 bytes) from boot flash
Monitor : Version 2.2.0T145 Copyright (c) 1996-2003 Foundry Networks, Inc.
Compiled on Jul 18 2005 at 18:53:23 labeled as rmb02200
(342853 bytes) from code flash
IronWare : Version 2.2.0T143 Copyright (c) 1996-2003 Foundry Networks, Inc.
Compiled on Jul 18 2005 at 19:36:07 labeled as rmpr02200
(5031659 bytes) from Primary
Board ID : 00 MBRIDGE Revision : 12
913 MHz Power PC processor (version 8003/0101) 166 MHz bus
512 KB Boot Flash (AM29LV040B), 32 MB Code Flash (MT28F128J3)
512 MB DRAM
Active Management uptime is 5 hours 12 minutes 39 seconds
The highlighted lines in the output indicate that the management module currently has MBRIDGE Revision: 12 installed.
Upgrading the MBRIDGE FPGA image
Follow the steps given below to upgrade one or more MBRIDGE FPGA images on a BigIron RX Series management module.
- Place the new MBRIDGE FPGA image on a TFTP server to which the BigIron RX Series system has access or on a PCMCIA flash card inserted in slot 1 or 2.
-
Copy the MBRIDGE FPGA image from the TFTP server or a flash card in slot 1 or 2 to all management modules or a management module in a specified chassis slot. To perform this step, enter one of the following commands at the Privileged EXEC level of the CLI (example: BigIron RX#):
-
copy tftp mbridge
MBRIDGE
• copy slot1 | slot2 mbridgeMBRIDGE -
After the MBRIDGE upgrade is complete, the management module must be power-cycled.
-
Verify that the MBRIDGE images have been successfully copied to the specified interface modules by entering the following command at any level of the CLI:
• show version
Check for the MBRIDGE image version numbers in the output.
Hitless Layer 2 OS upgrade
Version 02.3.00a and later of the Multi-Service IronWare software support hitless upgrade of the operating system on a BigIron RX switch.
The hitless OS upgrade is designed to allow for upgrading the software in a system between two patch releases of the OS, which support this functionality and have compatible data structures. A hitless Layer 2 OS downgrade may also be supported if the current and target code releases have compatible data structures.
NOTE
Hitess OS upgrade is not supported between major releases. It is supported only within a release. For example Hitless OS Upgrade is available when upgrading from software release 02.7.00a to 02.7.00b. It is not available when upgrading from software release 02.6.00 to 02.7.00.
From time to time, it may become necessary when enhancing the software or adding new features to change or add data structures making releases incompatible. In these cases, an upgrade or downgrade will not be hitless, and will fall back to using the regular Brocade upgrade process – relying on fast reboot.
The following guidance must be followed when performing a hitless OS upgrade or downgrade:
- Hitless upgrade or downgrade is not supported in 2.3.00.
- Hitless Layer 2 OS upgrade is supported between 2.3.00a and higher releases (unless indicated otherwise in the target software's release notes).
- Hitless upgrade maintains forwarding states and control plane functionality of the active software from which you are upgrading (i.e. 2.3.00a to 2.4.00 would only maintain the functionality supported by 2.3.00a).
- Hitless downgrades are recommended only between compatible patch releases of a feature release such as between 2.3.00b to 2.3.00a (to ensure the higher release has no functional enhancements that do not exist in the lower release).
Using this feature, you can upgrade the Multi-Service IronWare software without a loss of service or disruption in the following supported functions and protocols:
- TOS-based QoS
- Layer-2 Switching
- Layer-2 Protocols:
- All ports and links remain operational
- MRP
- STP
- VSRP
• RSTP
• MSTP
Considerations when using the feature
Consider the following when using this feature:
- You must have both active and standby management modules installed to use this feature.
- To avoid any disruptions of Layer-3 traffic to OSPF or BGP routes, the router must be configured with OSPF Graceful Restart and BGP Graceful Restart features. In addition, the device's OSFP neighbors must have OSPF Graceful Restart Helper enabled.
- The total time it takes for the hitless upgrade process to finish varies between approximately 1 and 10 minutes. This depends on the size of the MAC table, the number of OSPF and BGP neighbors and the size of the routing table. Router configuration is unavailable during the entire hitless upgrade process. The message "--SW Upgrade In Progress - Please Wait—" is printed at the console when configuration is attempted. Operational command of the router is allowed during the upgrade process.
- The active management module changes from the initial active management module to the standby management module during the hitless upgrade process. This makes it necessary to have a connection to the console interface on both management modules.
- Upon being reset, the management and interface module CPUs are unable to send and receive any packets. Once the management and interface modules are up and running, their CPUs are able to send and receive packets, even before the hitless upgrade process is complete.
- Router configuration is not allowed to be changed during the entire hitless upgrade process.
- System-max parameter changes or other configuration changes that require a system reload such as "cam-mode" and cam-profile" changes do not take effect upon hitless upgrade.
- FPGA images cannot be upgraded using the hitless upgrade process.
- This feature cannot be used to downgrade an image to an older major version than the version that the device is currently running.
- If there are protocol dependencies between neighboring nodes, it is recommended that only each node is upgraded: one node at a time.
- After hitless upgrade, the BigIron RX router will still have the same running configuration as it does before the upgrade. A configuration that is not saved before hitless reload is not removed and the existing startup configuration does not take effect. This behavior is the same as displayed by the management module switchover feature.
NOTES:
- Hitless upgrade is only supported from version 2600c or later 2600x patch releases and hitless downgrade to version 2600c or later 2600x patch releases.
- Due to Internal changes introduced in patch release version 02.6.00c, hitless upgrade is not supported on 02.6.00c and hitless downgrade is not supported from 02.6.00c.
- Due to Internal changes introduced in patch release version 02.3.00e, users cannot perform a hitless upgrade from earlier 02.3.00 versions to 2.3.00f or higher versions.
- Due to Internal changes introduced in patch release version 02.3.00f, users cannot perform a hitless upgrade from earlier 02.3.00 versions to 02.3.00g or higher versions.
- The hitless upgrade feature is not supported on release 02.5.00b to 02.5.00c for the BigIron RX-32 only. It is supported on all other BigIron RX devices.
The hitless OS software process
Follow the steps given below to perform hitless upgrade of Multi-Service IronWare software.
- Version 02.3.00 or later of the Multi-Service IronWare software is installed in flash memory to the primary and secondary image on the active and standby management modules and interface modules.
- The hitless-reload command is executed on the active management module.
- The hitless upgrade process is begun on the active management module which initiates the upgrade process on the standby management module.
- The standby management module is reset.
- The active management module is reset and the standby management module assumes control as the active module.
- Active console control is lost to the previously active management module as it becomes the standby management module.
- The active management module initiates the upgrade process on all interface modules.
- The router is now operating on the new Multi-Service IronWare software. The management module that was initially configured as the standby management module is now the active management module and the management module that was initially configured as the active management module is now the standby.
Figure 89 provides a detailed diagram of the Hitless reload process.
FIGURE 89 Management module (MP) and interface module (LP) hitless upgrade process
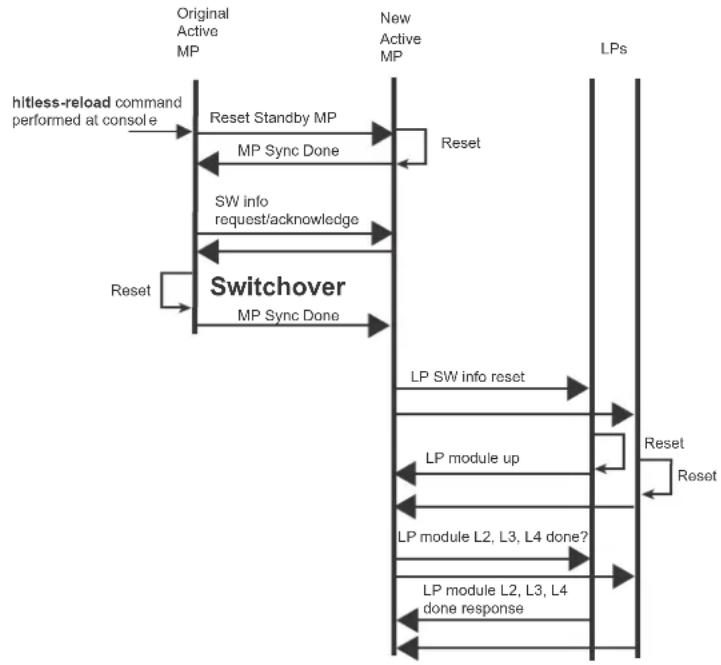
flowchart
graph TD
    A["Original Active MP"] --> B["Reset Standby MP"]
    B --> C["MP Sync Done"]
    C --> D["SW info request/acknowledge"]
    D --> E["Reset"]
    E --> F["Switchover MP Sync Done"]
    F --> G["LP module up"]
    G --> H["LP module L2, L3, L4 done?"]
    H --> I["LP module L2, L3, L4 done response"]
    I --> J["LP SW info reset"]
    J --> K["Reset"]
    K --> L["New Active MP"]
    L --> M["LPs"]
    style A fill:#f9f,stroke:#333
    style L fill:#f9f,stroke:#333
Performing a hitless OS software upgrade
To perform a hitlessLayer 2 OS software upgrade, you must perform the following tasks:
- Copy version 02.3.00 or later of the Multi-Service IronWare software to the primary and secondary image on both the active and standby management modules and interface modules.
- Setup a console connection to both the active and standby management modules. These connections can be through a telnet, SSH, or serial console session.
- Type the hitless-reload command at the console of the active management module.
Loading the Multi-Service IronWare software onto the router
Hitless Layer 2 OS upgrade loads from the primary and secondary images on the Management modules. The first step in performing a hitless Layer 2 OS upgrade is to copy the version 02.3.00 or later images into the flash memory of the active and standby management modules.
For instructions for copying these files, refer to “Upgrading the management module’s monitor and boot images” on page 180 and “Upgrading the management module’s monitor and boot images” on page 180.
Setting up consoles
Hitless Layer 2 OS upgrade is executed at the active management module. During the process of upgrading the image, control of the router shifts to the standby management module. For this reason, you need to have management sessions enabled on both the active and the standby management modules. When the reload is complete, the management module that was in the standby condition at the beginning will be in the active state. If you want the original management module to be active, you must manually fail-over control to it.
Executing the hitless upgrade command
To begin the process of a hitless upgrade, use the following command:
BigIron RX(config)# hitless-reload mp primary lp primary
Syntax: hitless-reload mp [primary | secondary] lp [primary | secondary]
The mp parameter specifies that the management module will be reloaded with either the primary or secondary image as directed.
The Ip parameter specifies that the interface module will be reloaded with either the primary or secondary image as directed.
Verify the new software image
Enter the show version command at any CLI level, and verify that all management and interface modules are running the new software image version.
Loading and saving configuration files
For easy configuration management, the BigIron RX Series switch supports both the download and upload of configuration files between the switch and a TFTP server on the network. You can also copy the startup configuration file locally between the management module's code flash and a PCMCIA flash card inserted in the management module's slot 1 or 2.
You can upload either the startup configuration file or the running configuration to the TFTP server, code flash, or a flash card for backup and use in booting the system.
- Startup configuration file – This file (startup-config) contains the configuration information that is currently saved in the management module's code flash. To display this file, enter the show configuration command at any CLI prompt.
- Running configuration – This active configuration is in the system RAM but not yet saved to code flash. These changes could represent a short-term requirement or general configuration change. To display this configuration, enter the show running-config or write terminal command at any CLI prompt.
Each device can have one startup configuration file and one running configuration. The startup configuration file is shared by both flash modules. The running configuration resides in DRAM.
Replacing the startup configuration with the running configuration
After you make configuration changes to the active system, you can save those changes by writing them to code flash. When you write configuration changes to code flash, you replace the startup configuration with the running configuration.
To replace the startup configuration with the running configuration, enter the following command at any Enable or CONFIG command prompt:
BigIron RX# write memory
Replacing the running configuration with the startup configuration
If you want to back out of the changes you have made to the running configuration and return to the startup configuration, enter the following command at the Privileged EXEC level of the CLI:
BigIron RX# reload
When the system detects differences between the running and startup configurations, it prompts you as follows:
Are you sure? (enter 'y' or 'n'):
Enter y, and press the Enter key.
Logging changes to the startup-config file
You can configure a BigIron RX Series to generate a Syslog message when the startup-config file is changed. The trap is enabled by default.
The following Syslog message is generated when the startup-config file is changed:
startup-config was changed
If the startup-config file was modified by a valid user, the following Syslog message is generated:
startup-config was changed by
To disable or re-enable Syslog messages when the startup-config file is changed, use the following command at the global CONFIG level of the CLI:
Syntax: [no] logging enable config-changed
Copying a configuration file to or from a TFTP server
To copy the startup-config or running-config file to or from a TFTP server, use one of the following methods.
NOTE
You can name the configuration file when you copy it to a TFTP server. However, when you copy a configuration file from the server to a BigIron RX Series, the file is always copied as "startup-config" or "running-config", depending on which type of file you saved to the server.
To initiate transfers of configuration files to or from a TFTP server, enter one of the following commands at the Privileged EXEC level of the CLI:
- copy startup-config tftp
- Use this command to upload a copy of startup-config from the BigIron RX Series to a TFTP server. - copy running-config tftp
– Use this command to upload a copy of the running configuration from the BigIron RX Series to a TFTP server. - copy tftp startup-config
- Use this command to download a copy of the startup-config from a TFTP server to a switch. - copy tftp running-config
[overwrite] - Use this command to download the running configuration from the system's runtime memory to a TFTP server. The running configuration is then appended to the current configuration of a BigIron RX Series.
Making local copies of the startup configuration file
You can copy the startup-config file in code flash to another location in code flash or to a PCMCIA flash card inserted in a the management module's slot 1 or 2.
For example, to make a backup copy of the startup-config file and save the backup file in code flash, enter a command such as the following at the Privileged EXEC level in the CLI:
BigIron RX# cp startup-config startup-config.bak
Syntax: cp
For example, to make a backup copy of the startup-config file and save the backup file on a flash card in slot 2, enter a command such as the following at the Privileged EXEC level in the CLI:
BigIron RX# cp startup-config /slot2/ backups/startup-config.bak
Syntax: cp [/
NOTE
These example assume that code flash has the current management focus.
Specify the
Specify the
Dynamic configuration loading
You can load dynamic configuration commands (commands that do not require a reload to take effect) from a file on a TFTP server into the BigIron RX Series switch's running-config. You can make configuration changes off-line, then load the changes directly into the device's running-config, without reloading the software.
Usage considerations
- Use this feature only to load configuration information that does not require a software reload to take effect. For example, you cannot use this feature to change statically configured memory (system-max command).
- Do not load port configuration information for secondary ports in a trunk group. Since all ports in a trunk group use the port configuration settings of the primary port in the group, the software cannot implement the changes to the secondary port.
Preparing the configuration file
A configuration file that you create must follow the same syntax rules as the startup-config file the device creates.
- The configuration file is a script containing CLI configuration commands. The CLI reacts to each command entered from the file in the same way the CLI reacts to the command if you enter it. For example, if the command results in an error message or a change to the CLI configuration level, the software responds by displaying the message or changing the CLI level.
- The software retains the running-config that is currently on the device, and changes the running-config only by adding new commands from the configuration file. If the running config already contains a command that is also in the configuration file you are loading, the CLI rejects the new command as a duplicate and displays an error message. For example, if the running-config already contains a command that configures ACL 1, the software rejects ACL 1 in the configuration file, and displays a message that ACL 1 is already configured.
- The file can contain global CONFIG commands or configuration commands for interfaces, routing protocols, and so on. You cannot enter User EXEC or Privileged EXEC commands.
- The default CLI configuration level in a configuration file is the global CONFIG level. Thus, the first command in the file must be a global CONFIG command or “!”. The ! (exclamation point) character means “return to the global CONFIG level”.
NOTE
You can enter text following “ ! “ as a comment. However, the “ ! ” is not a comment marker. It returns the CLI to the global configuration level.
NOTE
The CLI changes to the global CONFIG level if you load the configuration as a startup-config file instead of the running-config (using the copy tftp startup-config
NOTE
If you copy-and-paste a configuration into a management session, the CLI ignores the “!” instead of changing the CLI to the global CONFIG level. As a result, you might get different results if you copy-and-paste a configuration instead of loading the configuration using TFTP.
- Make sure you enter each command at the correct CLI level. Since some commands have identical forms at both the global CONFIG level and individual configuration levels, if the CLI's response to the configuration file results in the CLI entering a configuration level you did not intend, then you can get unexpected results.
For example, if a trunk group is active on the device, and the configuration file contains a command to disable STP on one of the secondary ports in the trunk group, the CLI rejects the
commands to enter the interface configuration level for the port and moves on to the next command in the file you are loading. If the next command is a spanning-tree command whose syntax is valid at the global CONFIG level as well as the interface configuration level, then the software applies the command globally. Here is an example:
The configuration file contains these commands:
interface ethernet 4/2
no spanning-tree
The CLI responds like this:
BigIron RX(config)# interface ethernet 4/2
Error - cannot configure secondary ports of a trunk
BigIron RX(config)# no spanning-tree
BigIron RX(config)#
- If the file contains commands that must be entered in a specific order, the commands must appear in the file in the required order. For example, if you want to use the file to replace an IP address on an interface, you must first remove the old address using "no" in front of the ip address command, then add the new address. Otherwise, the CLI displays an error message and does not implement the command. Here is an example:
The configuration file contains these commands:
interface ethernet 3/1
The running-config already has a command to add an address to 3/1, so the CLI responds like this:
BigIron RX(config)# interface ethernet 3/1
BigIron RX(config-if-e1000-3/1)# ip add 10.10.10.69/24
Error: can only assign one primary ip address per subnet
BigIron RX(config-if-e1000-3/1)#
To successfully replace the address, enter commands into the file as follows:
interface ethernet 3/1
This time, the CLI accepts the command, and no error message is displayed:
BigIron RX(config)# interface ethernet 3/1
BigIron RX(config-if-e1000-3/1)# no ip add 10.10.10.1/24
BigIron RX(config-if-e1000-3/1)# ip add 10.10.10.69/24
BigIron RX-if-e1000-3/1)
- Always use the end command at the end of the file. The end command must appear on the last line of the file, by itself.
Loading the configuration information into the running-config
You can load the configuration information from a TFTP server. To load the file from a TFTP server, use either of the following commands:
- copy tftp running-config
[overwrite] - ncopy tftp
running-config
Using SNMP to save and load configuration information
You can use a third-party SNMP management application such as HP OpenView to save and load a BigIron RX Series switch's configuration. Follow the steps given below to save and load configuration information using HP OpenView.
NOTE
The syntax shown in this section assumes that you have installed HP OpenView in the "/usr" directory.
- Configure a read-write community string on the Brocade device, if one is not already configured. To configure a read-write community string, enter the following command from the global CONFIG level of the CLI:
snmp-server community
where
- On the Brocade device, enter the following command from the global CONFIG level of the CLI:
no snmp-server pw-check
This command disables password checking for SNMP set requests. If a third-party SNMP management application does not add a password to the password field when it sends SNMP set requests to a Brocade device, by default the Brocade device rejects the request.
- From the command prompt in the UNIX shell, enter the following command:
20 - Upload the startup-config file from the Brocade device's code flash to the TFTP server.
21 - Download a startup-config file from a TFTP server to the Brocade device's code flash.
22 - Upload the running-config from the Brocade device's code flash to the TFTP server.
23 - Download a configuration file from a TFTP server into the Brocade device's running-config.
NOTE
Command option 23 adds configuration information to the running-config on the device, and does not replace commands. If you want to replace configuration information in the device, use "no" forms of the configuration commands to remove the configuration information, then use configuration commands to create the configuration information you want.
Erasing image and configuration files
To erase software images or configuration files, use the commands described below. These commands are valid at the Privileged EXEC level of the CLI:
- erase flash primary erases the image stored in primary flash of the system.
- erase flash secondary erases the image stored in secondary flash of the system.
- erase startup-config erases the configuration stored in the startup configuration file; however, the running configuration remains intact until system reboot.
File synchronization
This section provides details for synchronizing the files on the management and interface modules.
File synchronization between the active and standby management modules
Each active and standby management module contains the following files that can be synchronized between the two modules:
- Flash code – The flash code can include the following files:
- monitor, which contains the management module's Real Time Operating System (RTOS).
- primary, which contains the management module's primary IronWare image.
- secondary, which contains the management module's secondary IronWare image.
- monitor, which contains the management module's Real Time Operating System (RTOS).
- primary, which contains the management module's primary IronWare image.
- secondary, which contains the management module's secondary IronWare image.
(An IronWare image contains the layer 1 – 3 software run by the management module.) During startup or switchover, the active module compares the standby module's flash code to its own. If differences exist, the active module synchronizes the standby module's flash code with its own. If you update the flash code on the active module, the active module automatically synchronizes (without comparison) the standby module's flash code with its own.
- System-config file – The flash code also includes the system-config file. During startup or switchover, the active module compares the standby module's system-config file to its own. If differences exist, the active module synchronizes the standby module's system-config file with its own. When you save changes to the system-config file on the active module, the active module automatically synchronizes (without comparison) the standby module's system-config file with its own.
- Running-config – The running-config file resides in the BigIron RX Series system memory.
The BigIron RX Series switches allow you to do the following related to file synchronization:
- Compare files on the active module with files on the standby module and immediately synchronize any files that are different.
- Immediately synchronize all files between the active and standby modules.
- Change the default automatic synchronization interval for the running-config file.
The following sections explain how to perform these tasks.
Comparing and synchronizing files
You can initiate a comparison of the flash code, system-config file, and running-config file on the active management module with the same files on the standby module and synchronize the files immediately if differences exist. When you synchronize the files, the active module copies its files to the standby module, replacing the files on the standby module.
To compare and immediately synchronize files between the active and standby modules if differences exist, enter the following command at the Privileged EXEC level of the CLI:
BigIron RX# sync-standby
Syntax: sync-standby
Synchronizing files without comparison
You can synchronize the flash code, system-config file, and running-config file immediately without comparison. When you synchronize the files, the active module copies its files to the standby module, replacing the files on the standby module.
To immediately synchronize the files between the active and standby modules, enter the following command at the Privileged EXEC level of the CLI:
BigIron RX# force-sync-standby
Syntax: force-sync-standby
File synchronization between the management and interface modules
An interface module can have two IronWare images: primary and secondary. These images contain the layer 1 – 3 software that the interface modules run. These images reside in the interface module's flash memory. Either the primary or secondary image is run by the interface module from this location.
If you copy the primary or secondary IronWare image to all interface modules using the copy command with the all keyword, the management module makes a copy of the file and stores it in its code flash under the names lp-primary-0 or lp-secondary-0. The images are stored in this location only and are not run by the management module or the interface modules. If you copy the primary or secondary IronWare image to a specified chassis slot using the copy command with the
If the management module has a copy of the primary or secondary IronWare image in its code flash, by default, the BigIron RX Series system synchronizes or prompts you to synchronize the interface modules IronWare images between the management module and the interface modules during bootup. When the BigIron RX Series synchronizes the IronWare images, the management module copies the IronWare images from its code flash to the interface modules' code flash (the interface modules' default boot source).
The system allows you to manage synchronization of the IronWare images between management and interface modules in the following situations:
- You are prompted to synchronize the IronWare images during bootup.
- You want to initiate an immediate synchronization; for example, you want an immediate update of the IronWare images on one or all interface modules.
- You want to disable synchronization; for example, you have upgraded the IronWare image of one interface module but want to continue running the older image on all other interface modules.
The following section discuss how to manage the IronWare image synchronization in these situations.
Synchronizing the interface modules IronWare images during bootup
By default, the BigIron RX Series checks the IronWare images in the interface module's flash memory during boot to ensure they are is the same as the IronWare images in the management module's flash memory. If an interface module does not have an IronWare image, the system automatically downloads the image from the management module's flash memory to the interface module's flash memory.
If an interface module has different IronWare images, the system prompts you to do the following:
- If you want to update the primary and secondary IronWare images in the interface module's flash memory with the images in the management module's flash memory, enter the lp cont-boot sync
command at the Privileged EXEC prompt. - If you want to retain the IronWare images in the interface module's flash memory, enter the lp cont-boot no-sync
command at the Privileged EXEC prompt.
Specifying an immediate synchronization
You can immediately synchronize the IronWare images between the management module and one or all interface modules. For example, to immediately synchronize the IronWare images between the management module and all interface modules, enter the following command at the Privileged EXEC level:
BigIron RX# lp sync all
Syntax: lp sync all |
The all keyword indicates that the immediate synchronization applies to all interface modules in the BigIron RX Series.
The
Disabling or re-enabling an automatic check and synchronization
By default, the BigIron RX Series checks the IronWare images in the interface module's flash memory during bootup to ensure it is the same as the IronWare images in the management module's flash memory. For information about what the system does if the interface module does not currently have a IronWare image or if the image is different from that of the management module, refer to "Synchronizing the interface modules IronWare images during bootup" on page 197.
To disable the automatic check and synchronization during bootup, enter the following command at the global CONFIG level:
BigIron RX(config)# lp disable-lp-sync-check
Syntax: lp disable-lp-sync-check
Provided that you save this configuration by entering the write memory command, the system will disable the automatic check and synchronization of the IronWare images starting with the next software reload or system reset and each reload or reset after that.
To re-enable the automatic check and synchronization of the IronWare images during bootup, enter the following command at the global CONFIG level:
BigIron RX(config)# no lp disable-lp-sync-check
Syntax: no lp disable-lp-sync-check
Scheduling a system reload
In addition to reloading the BigIron RX Series system manually, you can configure the system to reload itself at a specific time or after a specific amount of time has passed.
NOTE
The scheduled reload feature requires the system clock. You can use a Simple Network Time Protocol (SNTP) server to set the clock or you can set the device clock manually.
Reloading at a specific time
To schedule a system reload for a specific time, use one of the following methods.
To schedule a system reload from the primary flash module for 6:00:00 AM, January 19, 2004, enter the following command at the Privileged EXEC level of the CLI:
BigIron RX# reload at 06:00:00 01-19-04
Syntax: reload at
primary | secondary specifies whether the reload is to occur from the primary code flash module or the secondary code flash module. The default is primary.
Reloading after a specific amount of time
To schedule a system reload to occur after a specific amount of time has passed on the system clock, use one of the following methods.
To schedule a system reload from the secondary flash one day and 12 hours later, enter the following command at the Privileged EXEC level of the CLI:
BigIron RX# reload after 01:12:00 secondary
Syntax: reload after
primary | secondary specifies whether the reload is to occur from the primary code flash module or the secondary code flash module.
Displaying the amount of time remaining before a scheduled reload
To display how much time is remaining before a scheduled system reload takes place, use one of the following methods.
To display how much time is remaining before a scheduled system reload, enter the following command from any level of the CLI:
BigIron RX# show reload
Canceling a scheduled reload
To cancel a scheduled system reload, enter the following command at the Privileged EXEC level of the CLI:
BigIron RX# reload cancel
Diagnostic error codes and remedies for TFTP transfers
If an error occurs with a TFTP transfer to or from a BigIron RX Series switch, one of the following error codes are displayed.
TABLE 30 Diagnostic error codes
| Error code | Message Explanation and action | |||||||
| 1 Flash read preparation failed. A flash error occurred during the download. | ||||||||
| 2 | F | I | a | s | h | Retry the download. If it fails again, contact customer support a d f a | ||
| 3 Flash write preparation failed. | ||||||||
| 4 Flash write failed. | ||||||||
| 5 TFTP session timeout. TFTP failed because of a time out. | Check IP connectivity and make sure the TFTP server is running. | |||||||
6 TFTP out of buffer space. The file is larger than the amount of space on the device or TFTP server. If you are copying an image file to flash, first copy the other image to your TFTP server, then delete it from flash. (Use the erase flash... CLI command at the Privileged EXEC level to erase the image in the flash.) If you are copying a configuration file to flash, edit the file to remove unneeded information, then try again.
TABLE 30 Diagnostic error codes (Continued)
| Error code | Message Explanation and action |
| 7 TFTP busy, only one TFTP session can be active. Another TFTP transfer is active on another CLI session, SNMP, or Web management session.Wait, then retry the transfer. | |
| 8 File type check failed. You accidentally attempted to copy the incorrect image code into the system.Retry the transfer using the correct image. | |
| 16 TFTP remote - general error. The TFTP configuration has an error. The specific error message describes the error.Correct the error, then retry the transfer. | |
| 17 TFTP remote - no such file. | |
| 18 TFTP remote - access violation. | |
| 19 TFTP remote - disk full. | |
| 20 TFTP remote - illegal operation. | |
| 21 TFTP remote - unknown transfer ID. | |
| 22 TFTP remote - file already exists. | |
| 23 TFTP remote - no such user. | |
In this chapter
- Hardware specifications .... 201
- Port specifications.... 205
Hardware specifications
This section contains hardware specifications for the BigIron RX Series chassis:
Power specifications
This section contains the power specifications for the BigIron RX Series chassis.
The power supply frequency requirements for the BigIron RX -4, -8, and -16 chassis are as follows:
• AC Input Rating: 100 -240V, 50/60 Hz, 16.0 A Max Per Power Supply
• AC Operating Voltage Range: 90 - 264V, 50/60 Hz
• DC Input Rating: -48V, 30.0 A Max Per Power Supply
• DC Operating Range: -40 to -60 vdc
The power supply frequency requirements for the BigIron RX -32 chassis are as follows:
• AC Input Rating: 200 -240V, 50/60 Hz, 16.0 A Max Per Power Supply
• DC Input Rating: -48V, 60.0 A Max Per Power Supply
• DC Operating Range: -40 to -60V
Table 31 and Table 32 provide the maximum power calculations for the BigIron RX Series chassis.
TABLE 31 Maximum power calculations @ 100 VAC
| BigIron RX Series chassis | Current Amps Watts BTU per hour | ||
| BigIron RX-4 | 12 | 1217 | 4155 |
| BigIron RX-8 | 24 | 2417 | 8249 |
| BigIron RX-16 | 49 | 4905 | 16741 |
| BigIron RX-32 | N/A | N/A | N/A |
TABLE 32 Maximum power calculations @ 200 VAC
| BigIron RX Series chassis | Current Amps Watts BTU per hour | ||
| BigIron RX-4 6 1217 4155 | |||
| BigIron RX-8 12 2417 8249 | |||
| BigIron RX-16 25 4905 16741 | |||
| BigIron RX-32 | 57 | 11353 | 38746 |
TABLE 33 Maximum power calculations at 48 VDC
| BigIron RX Series chassis | Amps | Watts BTUs per hour | |
| BigIron RX-4 25 1217 4155 | |||
| BigIron RX-8 50 2417 8249 | |||
| BigIron RX-16 102 | 4905 16741 | ||
| BigIron RX-32 | N/A | N/A | N/A |
Table 34 lists the maximum power consumption, in watts, for BigIron RX Series modules.
TABLE 34 Wattage consumed by individual components
| Component | Maximum power consumption, in Watts |
| Management modules | |
| Management (BigIron RX-4, -8, and -16) | 30W |
| Management (BigIron RX-32) | 35W |
| Switch fabric | |
| RX-BI-SFM1 (BigIron RX-4, -8, and -16) | 19W |
| RX-BI-SFM3 (BigIron RX-4, -8, and -16) | 53W |
| RX-BI-32-SFM (BigIron RX-32) | 200W |
| Interface modules | |
| 4-port 10 Gigabit Ethernet interface with fiber-optic modules installed | 191W |
| 2-port 10 Gigabit Ethernet interface with fiber-optic modules installed | 110W |
| 24-port Gigabit Ethernet Fiber Interface with fiber-optic modules installed | 101W |
| 24-port Gigabit Ethernet Copper Interface | 102W |
| 48-port Gigabit Ethernet Copper Interface | 210W |
| 16-port 10 Gigabit Ethernet Interface | 245W |
| Fans | |
| BigIron RX-4 Fan Tray 66W | |
| BigIron RX-8 Fan Tray 132W | |
| BigIron RX-16 Front Fan Tray 202W | |
| BigIron RX-16 Rear Fan Module (2 are required) | 144W |
| BigIron RX-32 Fan Modules (8 cooling interface fans, 2 power supply fans, all inclusive) | 1150W |
NOTE
The maximum power consumption table reflects the measured maximum power consumption of different line card types. The chassis, cooling system, power distribution, as well as the algorithm used in the system software for determining the power requirements are based on a conservative requirement of 245W per line card, regardless of the actual mix of line cards types in a given chassis.
NOTE
The DC input PSU has a -40VDC to -60VDC operating range with -48VDC as the nominal input voltage.
Physical dimensions
Table 35 provides the physical dimensions for the BigIron RX Series chassis.
TABLE 35 BigIron RX Series physical dimensions
| BigIron RX Series chassis | Height Width Depth Weight (fully loaded) | |||
| chassis | ||||
| BigIron RX-4 17.7 cm (6.96 in.) 44.3 cm (17.45 in.) 52.1 cm (20.53 in.) 35 kg (78 lbs) | ||||
| BigIron RX-8 | 31 cm (12.21 in.) | 44.3 cm (17.45 in.) | 53.3 cm (21 in.) | 60 kg (131 lbs) |
| BigIron RX-16 | 62.2 cm (24.47 in.) | 43.7 cm (17.2 in.) | 63.5 cm (25 in.) | 107 kg (236 lbs) |
| BigIron RX-32 | 146.4 cm (57.64 in.) | 44.3 cm (17.45 in.) | 71.7 cm (28.22 in.) | approx. 255 kg (561 lbs) * |
* 362 lbs (164 kg) for a chassis loaded with blanks, with no power supplies, management modules, switch fabric modules, nor interface modules.
Operating environment
Table 36 provides the operating environment specifications for the BigIron RX Series chassis.
TABLE 36 BigIron RX Series operating environment
| Operating temperature Relative humidity Operating altitude | ||
| 0^ - 40^ C (32^ - 104^ F) 5 to 90 %, at 40^ C (104^ F), non-condensing | 0 - 2012 meters (0 - 6600 ft) | |
Storage environment
Table 37 provides the storage environment specifications for the BigIron RX Series chassis.
TABLE 37 BigIron RX series storage environment
| Storage temperature Storage humidity Storage altitude | ||
| -25^ - 70^ ( -13^ - 158^ ) | 95% maximum relative humidity,non-condensing | (0 – 4500 meters (0 – 15,000 ft) |
Safety agency approvals
- CAN/CSA-C22.2 No. 60950-1-03/UL60950-1 – Third Edition, Safety of Information Technology Equipment
- EN 60825-1 Safety of Laser Products – Part 1: Equipment Classification, Requirements and User's Guide
- EN 60825-2 Safety of Laser Products – Part 2: Safety of Optical Fibre Communications Systems
• EN 60950-1:2001\IEC 60950-1 Safety of Information Technology Equipment
Electromagnetic approvals
• FCC Part 15, Subpart B (Class A)
• EN 55022 (CE mark) (Class A)
• EN55024 (CE mark) (Immunity) for Information Technology Equipment
- ICES-003 Emission Certification (Interference Causing Equipment Standard) (Canada) (Class A)
• AS/NZ 55022 (Australia) (Class A)
• VCCI (Japan) (Class A)
• EN 61000-3-2
• EN 61000-3-3
• EN 61000-6-1
Port specifications
This section provides pin assignments for the following ports:
- Management module's Console port (serial connector)
- Management module's management port (RJ-45 unshielded twisted pair (UTP) connector)
Console port pin assignments
The Console port is a standard male DB-9 connector, as shown in Figure 90. For information about how you can use this port, refer to “Console port” on page 9.
FIGURE 90 Console port pin and signalling details
| Pin Assignment | Pin Number | Switch Signal |
| 1DB-9 male5 | 1 | Reserved |
| 2 | TXD (out) | |
| 3 | RXD (inp) | |
| 4 | Reserved | |
| 5 | GND | |
| 6 | Reserved | |
| 7 | CTS (inp) | |
| 8 | RTS (out) | |
| 9 | Reserved |
Most PC serial ports require a cable with a female DB-9 connector. However, terminal connections will vary, requiring a cable with either a DB-9 or DB-25 connector, male or female.
Serial cable options between the BigIron RX Series chassis and a PC or terminal are shown in Figure 91.
NOTE
As indicated in Figure 90 and Figure 91, some of the wires should not be connected. If you do connect the wires that are labeled “Reserved”, you might get unexpected results with some terminals.
FIGURE 91 Console port pin assignments showing cable connection options to a terminal or PC
| DB-9 to DB-9Female Switch | Terminal or PC | DB-9 to DB-25Female Switch | Terminal or PC | ||
| 1 | Reserved | 1 | 1 | Reserved | 8 |
| 2 | → | 2 | 2 | → | 3 |
| 3 | ← | 3 | 3 | ← | 2 |
| 4 | Reserved | 4 | 4 | Reserved | 20 |
| 5 | → | 5 | 5 | → | 7 |
| 6 | Reserved | 6 | 6 | Reserved | 6 |
| 7 | ← | 7 | 7 | ← | 4 |
| 8 | → | 8 | 8 | → | 5 |
| 9 | Reserved | 9 | 9 | Reserved | 22 |
Management port pin assignments
The management port is an RJ-45 UTP connector. Table 38 describes the connector's pin assignments. For information about how you can use this port, refer to “10/100/1000 Ethernet port” on page 9.
TABLE 38 Management port pin assignments
| Pin number MDI-X ports | |
| 1 | TD+ |
| 2 | TD- |
| 3 | RD+ |
| 4 Not used (10BaseT)CMT (100BaseTX) | |
| 5 Not used (10BaseT)CMT (100BaseTX) | |
| 6 | RD- |
| 7 Not used (10BaseT)CMT (100BaseTX) | |
| 8 Not used (10BaseT)CMT (100BaseTX) | |
U.S.A.
This equipment has been tested and found to comply with the limits for a Class A digital device pursuant to Part 15 of the FCC Rules. These limits are designed to provide reasonable protection against harmful interference when the equipment is operated in a commercial environment. This equipment generates, uses, and can radiate radio frequency energy and, if not installed and used in accordance with the instruction manual, may cause harmful interference to radio communications. Operation of this equipment in a residential area is likely to cause harmful interference in which case the user will be required to correct the interference at his own expense.
Industry Canada statement
This Class A digital apparatus complies with Canadian ICES-003.
Europe and Australia
This is a Class A product. In a domestic environment this product may cause radio interference in which case the user may be required to take adequate measures.
Japan
English translation of above statement
This is Class A product based on the standard of the Voluntary Control Council For Interference by Information Technology Equipment (VCCI). If this equipment is used in a domestic environment, radio disturbance may arise. When such trouble occurs, the user may be required to take corrective actions.
Korea
English translation of above statement
This apparatus has radio wave acceptability registration as a Class A device, so sellers or users should be aware of this. If it is sold or purchased incorrectly, it should be exchanged with a home apparatus (Class B).
Caution statements
The cautions and danger notices that appear in this manual are listed below in English, German, French, and Spanish.
A caution calls your attention to a possible hazard that can damage equipment.
| CAUTION | Be sure not to exceed the minimum recommended bend radius for the cables: 2 in. for MRJ-21 cables, and 1.5 in. for Category 5 (RJ-45) and fiber-optic cables. |
| CAUTION Do not add or remove a flash card while a file operation involving the flash card's slot is in progress. Doing so can result in corruption of the flash card. If this occurs, you may need to reformat the flash card to make it usable again. Reformatting the card erases all data stored on the card. |
| VORSICHT Eine Flash-Karte darf nur dann eingesteckt oder herausgenommen werden, wenn keine Dateifunktion läuft, die der Flash-Karte bedarf. Wenn dies nicht beachtet wird, kann dies zur Korruption der Flash-Karte führen. Die Karte kann dann erst nach Neuformattierung wieder benutzt werden. Bei Neuformattietung gehen alle auf der Karte gespeicherten Daten verloren. |
| MISE EN GARDE N'ajoutez pas ou ne supprimez pas une carte mémoire au cours d'une opération de fichier dans laquelle le slot de carte mémoire est impliqué. Vous risquez sinon de corrompre la carte mémoire. Si cela se produit, vous devrez peut-être reformater la carte mémoire pour qu'elle soit à nouveau utilisable. Le reformatage de la carte efface toutes les données qui y sont stockées. |
| PRECAUCIÓN No añada ni quite una tarjeta flash mientras una operación de archivo que conlleve el uso de una ranura de tarjeta flash se encuentre en uso. De hacerlo así se podría dar lugar a la corrupción de la tarjeta flash. Si esto ocurriera, podría ser necesario que vuelva a formatear la tarjeta flash para hacer que vuelva sea utilizable. Cuando se formatea la tarjeta se borran todos los datos almacenados en la tarjeta. |
| CAUTION Do not install the device in an environment where the operating ambient temperature might exceed 40^ C ( 104^ F). | |
| VORSICHT Das Gerät darf nicht in einer Umgebung mit einer Umgebungsbetriebstemperatur von über 40^ C ( 104^ F) installiert werden. | |
| MISE EN GARDE N'installez pas le dispositif dans un environnement où la température d'exploitation ambiante risque de dépasser 40^ C ( 104^ F). | |
| PRECAUCIÓN No instaleel instrumento en un entorno en el que la temperatura ambiente de operación pueda exceder los 40^ C ( 104^ F). | |
| CAUTION Ensure that the device does not overload the power circuits, wiring, and over-current protection. To determine the possibility of overloading the supply circuits, add the ampere (amp) ratings of all devices installed on the same circuit as the device. Compare this total with the rating limit for the circuit. The maximum ampere ratings are usually printed on the devices near the input power connectors. | |
| VORSICHT Stromkreise | Verdrahtung und Überlastschutz dürfen nicht durch das Gerät überbelastet werden. Addieren Sie die Nennstromleistung (in Ampere) aller Geräte, die am selben Stromkreis wie das Gerät installiert sind. Somit können Sie feststellen, ob die Gefahr einer Überbelastung der Versorgungsstromkreise vorliegt. Vergleichen Sie diese Summe mit der Nennstromgrenze des Stromkreises. Die Höchstnennströme (in Ampere) stehen normalerweise auf der Geräterückseite neben den Eingangsstromanschlüssen. |
| MISE EN GARDE Assure | z-vous que le dispositif ne risque pas de surcharger les circuits d'alimentation, le câblage et la protection de surintensité. Pour déterminer le risque de surcharge des circuits d'alimentation, additionnez l'intensité nominale (ampères) de tous les dispositifs installés sur le même circuit que le dispositif en question. Comparez alors ce total avec la limite de charge du circuit. L'intensité nominale maximum en ampères est généralement imprimée sur chaque dispositif près des connecteurs d'entrée d'alimentation. |
| PRECAUCIÓN Verifique | que el instrumento no sobrecargue los circuitos de corriente, el cableado y la protección para sobrecargas. Para determinar la posibilidad de sobrecarga en los circuitos de suministros, añada las capacidades nominales de corriente (amp) de todos los instrumentos instalados en el mismo circuito que el instrumento. Compare esta suma con el límite nominal para el circuito. Las capacidades nominales de corriente máximas están generalmente impresas en los instrumentos, cerca de los conectores de corriente de entrada. |
| CAUTION Make sure the air flow around the front, sides, and back of the device is not restricted. |
| VORSICHT Stellen Sie sicher, dass an der Vorderseite, den Seiten und an der Rückseite der Luftstrom nicht behindert wird. |
| MISE EN GARDE Vérifiez que rien ne restreint la circulation d'air devant, derrière et sur les côtés du dispositif et qu'elle peut se faire librement. |
| PRECAUCIÓN Asegúrese de que el flujo de aire en las inmediaciones de las partes anterior, laterales y posterior del instrumento no esté restringido. |
| CAUTION | If hot removing or inserting a module, please allow a minimum of two seconds after a module (or power supply or fan tray) has been removed before inserting a module in the same slot. |
| CAUTION Use a separate | branch circuit for each AC power cord, which provides redundancy in case one of the circuits fails. |
| VORSICHT Es empfiehlt sich die Installation eines separaten Stromkreiszweiges für jede Wechselstrom-Elektroschnur als Redundanz im Fall des Ausfalls eines Stromkreises. | |
| MISE EN GARDE Utilisez | un circuit de dérivation différent pour chaque cordon d'alimentation C.A.Ainsi, il y aura un circuit redondant en cas de panne d'un des circuits. |
| PRECAUCIÓN Use un circuito derivado separado para cada cordón de alimentación de CA, con lo que se proporcionará redundancia en caso de que uno de los circuitos falle. | |
| CAUTION If you do not install a module in a slot, you must keep the slot blank in place. If you run the chassis with an uncovered slot, the system may overheat. Tighten the screws that secure the slot blanks so that they remain in place when removing adjacent panels or modules. |
| VORSICHT Falls kein Modul im Steckplatz installiert wird, muss die Steckplatztafel angebracht werden. Wenn ein Steckplatz nicht abgedeckt wird, läuft das System heiß. |
| MISE EN GARDE Si vous n'installez pas de module dans un slot, vous devez laisser le panneau du slot en place. Si vous faites fonctionner le châssis avec un slot découvert, le système surchauffera. |
| PRECAUCIÓN Si no instala un módulo en la ranura, deberá mantener el panel de ranuras en su lugar. Si pone en funcionamiento el chasis con una ranura descubierta, el sistema sufrirá sobrecalentamiento. |
A Danger notice calls your attention to a possible hazard that can cause injury or death. The following are the Danger notices used in this manual.
| Danger notice Four or more | people are required to position the unpopulated BigIron RX-32 chassis into the rack. |
| Danger notice The BigIron RX-32 fan assembly is heavy and will be off-balance as you remove it. Use both hands on the handle. |
| Gefahr Die BigIron RX-32-Ventilatoreinheit ist schwer und kommt aus dem Gleichgewicht, wenn sie entfernt wird. Den Griff mit beiden Händen anfassen. |
| Danger Le module de ventilation du BigIron RX-32 est lourd et peut déséquilibrer lors de la dépose. Tenir la poignée à l'aide des deux mains. |
| Peligro La unidad del ventilador del sistema BigIron RX-32 es pesada y quedará desequilibrada al desmontarla. Agarre el asa con las dos manos. |
| Danger notice Make sure to choose the appropriate circuit device depending on the number of AC power supplies installed in the chassis. |
| Gefahr Je nach Anzahl der Wechselstrom-Netzteile im Gehäuse muss das passende Stromgerät ausgewählt werden. |
| Danger Assurez-vous de choisir le dispositif de circuit approprié selon le nombre de blocs d'alimentation C.A. installés dans le châssis. |
| Peligro Asegúrese de que elige el dispositivo de circuitos apropiado dependiendo del número de suministros de corriente alterna instalados en el chasis. |
| Danger notice Be careful not to insert your fingers into the fan tray while removing it from the chassis. The fan may still be spinning at a high speed. |
| Gefahr Die Finger dürfen nicht versehentlich in das Ventilatorblech gesteckt werden, wenn dieses vom Gehäuse abgenommen wird. Der Ventilator kann sich unter Umständen noch mit hoher Geschwindigkeit drehen. |
| Danger Faites attention de ne pas accidentellement insérer vos doigts dans le boîtier du ventilateur lorsque vous l'enlevez du châssis. Il est possible que le ventilateur tourne encore à grande vitesse. |
| Peligro Procure no insertar los dedos accidentalmente en la bandeja del ventilador cuando esté desmontando el chasis. El ventilador podría estar girando a gran velocidad. |
| Danger notice To prevent damage to the chassis and components, never attempt to lift the chassis using the fan or power supply handles. These handles were not designed to support the weight of the chassis. |
| Gefahr Alle Geräte mit Wechselstromquellen sind nur zur Installation in Sperrbereichen bestimmt. Ein Sperrbereich ist ein Ort, zu dem nur Wartungspersonal mit einem Spezialwerkzeug, Schloss und Schlüssel oder einer anderen Schutzvorrichtung Zugang hat. |
| Danger Pour éviter d'endommager le châssis et les composants, ne jamais tenter de soulever le châssis par les poignées du ventilateur ou de l'alimentation. Ces poignées n'ont pas été conçues pour supporter le poids du châssis. |
| Peligro Para prevenir daños al chasis y a los componentes, nunca intente levantar el chasis usando las asas de la fuente de alimentación o del ventilador. Tales asas no han sido diseñadas para soportar el peso del chasis. |
| Danger notice Do not attempt to lift a fully-populated BigIron RX-32 chassis. It is extremely heavy. REMOVE THE POWER SUPPLIES AND INTERFACE MODULES FIRST (management, switch fabric, and all line cards). Use a mechanical lifting device to lift the chassis. Four or more people are required to position the unpopulated chassis into the rack. |
| Gefahr Nicht versuchen, ein vollständig beladenes BigIron RX-32 Chassis anzuheben. Es ist sehr schwer. ZUERST DIE STROMVERSORGUNGEN UND SCHNITTSTELLENMODULE ENTFERNEN (Management, Switch-Fabric und alle Line-Cards). Das Chassis mit Hilfe einer mechanischen Hebevorrichtung anheben. Mindestens vier Personen sind erforderlich, um das unbeladene Chassis im Rack zu positionieren. |
| Danger Ne jamais tenter de soulever un châssis BigIron RX-32 entièrement équipé, car il est alors extrêmement lourd. DÉPOSER AU PRÉALABLE LES ALIMENTATIONS ÉLECTRIQUES ET LES MODULES D'INTERFACE (supervision, matrice de commutation et cartes de lignes). Pour soulever le châssis, utiliser un appareil élévateur. Quatre personnes au moins sont nécessaires pour positionner dans le rack le châssis vidé de ses éléments. |
| Peligro No trate de levantar un chasis BigIron RX-32 totalmente poblado. Es extremadamente pesado. QUITE PRIMERO LOS MÓDULOS DE INTERFAZ Y DE ALIMENTACIÓN (administración, matriz de conmutación, y todas las tarjetas de línea). Utilice un elevador mecánico para levantar el chasis. Hacen falta cuatro personas o más para colocar el chasis no poblado en el interior del armazón. |
| Danger notice High Touch Current. Earth connection essential before connecting supply (BigIron RX-32). |
| Gefahr Hoher Ableitstrom. Vor Anschluss ans Netz Schutzerdung herstellen. |
| Danger Courant de fuite élevé. Mise à la terre obligatoire avant la connexion de l'alimentation (BigIron RX-32). |
| Peligro Alta tensión al tacto. La conexión a tierra es esencial antes de conectar la alimentación (BigIron RX-32). |
| Danger notice The ports labeled BITS1, BITS2 are safety extra low voltage (SELV) circuits. SELV circuits should only be connected to other SELV circuits. All interconnected equipment should be located in the same building as the unit. |
| Gefahr Die Anschlüsse BITS1, BITS2 sind SELV (Safety Extra Low Voltage)- Stromkreise.SELV-Stromkreise sollten nur an andere SELV-Stromkreise angeschlossen werden. Alle mit einander verbundenen Geräte sollten sich im gleichen Gebäude wie die Einheit befinden. |
| Danger Les ports marqués BITS1, BITS2 sont des circuits de sécurité à très basse tension (SELV). Ces circuits doivent uniquement être connectés à d'autres circuits SELV. Tous les équipements interconnectés via ces ports doivent se trouver dans le même bâtiment que l'unité. |
| Peligro Los puertos que llevan las marcas BITS1, BITS2 son circuitos de bajo voltaje de seguridad extra (SELV, por sus siglas en inglés). Los circuitos SELV sólo deben conectarse a otros circuitos SELV. Todos los equipos interconectados deben estar situados en el mismo edificio que la unidad. |
IEEE compliance
The BigIron RX Series switch supports the following standards:
- 802.1d Bridging
• 802.1q VLAN Tagging
• 802.1w Rapid Spanning Tree (RSTP)
• 802.1x User Authentication - 802.3, 10BaseT
• 802.3ad Link Aggregation - 802.3ae 10000BaseX
• 802.3u, 100BaseTX, 100BaseFX
• 802.3z 1000BaseSX, 1000BaseLX - 802.3x Flow Control
RFC support
The following sections list the RFCs supported by the BigIron RX Series switch.
General protocols
• 791 – Internet Protocol (IP)
• 792 - Internet Control Message Protocol (ICMP)
• 793 – Transmission Control Protocol (TCP)
• 783 - Trivial File Transfer Protocol (TFTP)
• 768 - User Datagram Protocol (UDP)
• 826 - Ethernet Address Resolution Protocol (ARP)
• 854, 855, and 857 - TELNET
• 894 - IP over Ethernet
- 903 - RARP
• 906 – Bootstrap loading using TFTP
• 919 - Broadcast Internet datagrams
• 920 - Domain requirements
- 922 – Broadcast Internet datagrams in the presence of subnets
- 950 – Internet standard subnetting procedure
• 951 – Bootstrap Protocol (BootP)
• 1027 - Proxy ARP
• 1042 - IP datagrams over IEEE 802 networks (for Ethernet)
• 1122 and 1123 - Requirements for Internet Hosts (switches)
• 1141 - Incremental updating of the Internet checksum
• 1256 – ICMP Router Discovery Protocol (IRDP)
• 1267 - Border Gateway Protocol version 3
• 1321 – The MD5 Message-Digest Algorithm
• 1340 - Assigned numbers (where applicable)
• 1377 – The PPP OSI Network Layer Control Protocol (OSINLCP)
- 1519 – Classless Inter-Domain Routing (CIDR): an Address Assignment and Aggregation Strategy
• 1541 and 1542 – Dynamic Host Configuration Protocol (DHCP)
• 1591 – Domain Name System Structure and Delegation
• 1812 - Requirements for IP version 4 switches
• 2131 - Dynamic Host Configuration Protocol (BootP/DHCP Helper)
• 2338 – Virtual Routing Redundancy Protocol (VRRP)
BGP
• 1269 - Definitions of Managed Objects for the Border Gateway Protocol: Version 3
• 1745 - OSPF interactions
• 1771 - Border Gateway Protocol version 4 (BGPv4)
• 1997 – BGP Communities Attributes
• 2283 - Multiprotocol Extensions for BGP-4
• 2385 - TCP MD5 Signature Option (for BGP4)
• 2439 - BGP Route Flap Dampening
• 2796 - BGP Route Reflection
• 2842 – BGP Capability Advertisement
• 2918 - Route Refresh Capability for BGP4
• 3065 - BGP Confederations
OSPF
• 1583 – Open Shortest Path First (OSPF)
• 1587 - OSPF Not-So-Stubby Areas (NSSAs)
• 1745 - OSPF Interactions
• 1765 - OSPF Database Overflow
• 1850 – Open Shortest Path First (OSPF) version2 MIB
• 2154 - OSPF with Digital Signatures (Password, MD-5)
• 2178 - Open shortest Path First (OSPF)
• 2328 – Open Shortest Path First (OSPF) version 2
• 2370 - OSPF Opaque LSA Option
RIP
• 1058 – Routing Information Protocol (RIP) version 1
• 1723 - RIP version 2
• 1812 – Requirements for IP version 4 switchess
IP Multicast
• 1075 – Distance Vector Multicast Routing Protocol
• 1112 – Internet Gateway Management Protocol (IGMP)
• 2236 – Internet Group Management Protocol (IGMP) version 2
• 2362 - IP Multicast PIM Sparse
- 2336 - IGMP v2
Management
• 1155 – Structure and Identification of Management Information (SMI)
• 1157 – Simple Network Management Protocol (SNMP) version 1
• 1212 – Concise MIB Definitions
• 1215 - SNMP generic traps
• 1398 - Ethernet-Like MIB
• 1492 – An Access Control Protocol, Sometimes Called TACACS
• 1493 – Bridge MIB (excluding filtering of objects)
- 1657 - Definitions of Managed Objects for the Fourth Version of the Border Gateway Protocol (BGP-4) using SMlv2
• 1724 - RIP Version 2 MIB Extension
• 1757 - Remote Monitoring (RMON) Groups 1,2,3,9
• 1850 - OSPF Version 2 Management Information Base
- 1905 – Protocol Operations for Version 2 of the Simple Network Management Protocol (SNMPv2)
- 1906 - Transport Mappings for Version 2 of the Simple Network Management Protocol (SNMPv2)
• 1966 - BGP Route Reflection
• 2011 - SNMPv2 Management Information Base for the Internet Protocol using SMIv2
- 2012 – SNMPv2 Management Information Base for the Transmission Control Protocol using SMlv2
• 2013 – SNMPv2 Management Information Base for the User Datagram Protocol using SMlv2
• 2030 – Simple Network Time Protocol (SNTP)
• 2068 - HTTP
• 2096 - IP Forwarding MIB
• 2138 - Remote Authentication Dial In User Server (RADIUS)
• 2139 – RADIUS Accounting
• 2233 - The Interfaces Group MIB using SMlv2
• 2529 – Transmission of IPv6 over IPv4 Domains without Explicit Tunnels
• 2570 – Introduction to Version 3 of the Internet-standard Network Management Framework
• 2571 – An Architecture of Describing SNMP Management Frameworks
- 2572 – Message Processing and Dispatching for the Simple Network Management Protocol (SNMP)
- 2574 - User-based Security (USM) for version 3 of the Simple Network Management Protocol (SNMPv3)
- 2575 – View-based Access Control Model (VACM) for the Simple Network Management Protocol (SNMP)
• 2578 – Structure of Management Information Version 2 (SMIv2)
• 2580 - Conformance Statements for SMlv2
• 2665 – Ethernet Like MIB (incorporates RFC 1398)
- 2674– Definitions of Managed Objects for Bridges with Traffic Classes, Multicast Filtering and Virtual LAN Extensions
• 2787 - Definitions of Managed Objects for the Virtual Router Redundancy Protocol
• 2869 - RADIUS Extensions
• 2932 - IPv4 Multicast Routing MIB
• 2933 - Internet Group Management Protocol MIB
• 2934 - Protocol Independent Multicast MIB for IPv4
- 3176 – InMon Corporation's sFlow: A Method for Monitoring Traffic in Switched and Routed Networks
• 3411 - Simple Network Management Protocol (SNMP) Management Frameworks
- 3412 – Message Processing and Dispatching for the Simple Network Management Protocol (SNMP)
- 3414 - User-based Security Model (USM) for version 3 of the Simple Network Management Protocol (SNMPv3)
- 3415 - View-based Access Control Model (VACM) for the Simple Network Management Protocol (SNMP)
- 3418 – Management Information Base (MIB) for the Simple Network Management Protocol (SNMP)
Internet drafts
In addition to the RFCs listed in “RFC support” on page 223, the BigIron RX Series switch supports the following Internet drafts:
- ietf-idmr-dvmrp version 3.05, obsolete RFC 1075
- draft-ietf-pim-dm-05 (V1)
- draft-ietf-pim-v2-dm-03 (V2)
• The TACACS+ Protocol version 1.78
C
Internet drafts
- NOTE
- CAUTION
- DANGER
- About This Document
- Chapter 1 Product Overview
- Chapter 2 Installing a BigIron RX Series Switch
- Chapter 3 Using the Brocade Structured Cabling Components
- Chapter 4 Connecting a BigIron RX Series Switch to a Network Device
- Chapter 5 Managing the BigIron RX Series Chassis and Modules
- Chapter 6 Maintaining a BigIron RX Series Switch
- Chapter 7 Upgrading Software Images and Configuration Files
- Chapter 8 Hardware Specifications
- Appendix A Regulatory Statements
- Appendix B Caution and Danger Notices
- Appendix C Software Specifications
- In this chapter
- Audience
- Supported hardware and software
- Document conventions
- Text formatting
- Notes, cautions, and danger notices
- Notice to the reader
- Related publications
- Getting technical help or reporting errors
- Web access
- E-mail access
- Telephone access
- Product overview
- Hardware features
- Chassis
- BigIron RX-4
- BigIron RX-8
- BigIron RX-16
- BigIron RX-32
- Management modules
- PCMCIA slots
- Console port
- 10/100/1000 Ethernet port
- LEDs
- Interface modules
- 2-port 10 Gigabit Ethernet module
- Gigabit Ethernet ports
- 16-port 10 Gigabit Ethernet oversubscribed module
- BigIron RX -16
- Hardware limitations
- Gigabit Ethernet interface module (SFP)
- Gigabit Ethernet interface module (RJ-45)
- 48-port 1 Gigabit Ethernet interface module (Mini RJ 21 Copper)
- Switch fabric module
- Power supplies
- Cooling system
- Rack mount kit
- Supported software features
- Supported software features
- Installation precautions
- General precautions
- Power precautions
- Installing a BigIron RX-4 switch
- Preparing the installation site
- Cabling infrastructure
- Installation location
- Unpacking a BigIron RX-4 switch
- Chassis lifting guidelines for BigIron RX-4 switches
- Installing a Biglron RX-4 chassis in a rack
- Preparing to mount a BigIron RX-4 chassis in a rack
- Removing BigIron RX-4 extra shipment screws
- Mounting a BigIron RX-4 chassis in a rack
- Removing the slot blanks
- Installing BigIron RX-4 modules
- Installing power supplies in a BigIron RX-4 chassis
- Connecting AC power to a BigIron RX-4 chassis
- Connecting DC power to a BigIron RX-4 chassis
- Final steps
- Installing a BigIron RX-8 switch
- Unpacking a BigIron RX-8 switch
- Chassis lifting guidelines for BigIron RX-8 switches
- Installing the BigIron RX-8 chassis in a rack
- Preparing to mount a BigIron RX-8 chassis in a rack
- Removing BigIron RX-8 extra shipment screws
- Mounting a BigIron RX-8 chassis in a rack
- Installing BigIron RX-8 modules
- Installing power supplies in the BigIron RX-8 chassis
- Connecting AC power to a BigIron RX-8 chassis
- Connecting DC power to a BigIron RX-8 chassis
- Installing a BigIron RX-16 switch
- Unpacking a BigIron RX-16 switch
- Chassis lifting guidelines for BigIron RX-16 switches
- Installing a BigIron RX-16 chassis in a rack
- Preparing to mount a BigIron RX-16 chassis in a rack
- Attaching mounting brackets to a BigIron RX-16 chassis
- Mounting a BigIron RX-16 chassis in a rack
- Installing BigIron RX-16 modules
- Populating a BigIron RX-16 chassis
- Rules for populating a BigIron RX-16 chassis
- Installing power supplies in a BigIron RX-16 chassis
- Connecting AC power to a BigIron RX-16 chassis
- Connecting DC power to a BigIron RX-16 chassis
- Installing a BigIron RX-32 switch
- Unpacking a BigIron RX-32 switch
- Uncrating the BigIron RX-32 chassis
- Installing a Biglron RX-32 chassis in a rack
- Preparing to mount a BigIron RX-32 chassis in a rack
- Attaching mounting brackets to a BigIron RX-16 or BigIron RX-32 chassis
- Mounting a BigIron RX-32 chassis in a rack
- Installing BigIron RX-32 modules
- BigIron RX-32 module installation details
- Using the Insertion or Extraction tool
- BigIron RX-32 cable routing
- Cable routing for the upper-left quadrant
- Cable routing for the upper-right quadrant
- Cable routing for the lower-left quadrant
- Cable routing for the lower-right quadrant
- Installing power supplies in a BigIron RX-32 chassis
- Connecting AC power to a BigIron RX-32 chassis
- Attaching a management station
- Attaching a PC or terminal to the Console port or Ethernet port
- Attaching the management module's Ethernet Port to a network
- Powering-on the power source
- Verifying proper operation
- Observing the LEDs
- Displaying the module status
- Syntax: show module
- Cable Cinch overview
- mRJ-21 procedures
- Cable Cinch with two mRJ-21 cables
- Cable Cinch with three mRJ-21 cables
- Cable Cinch with four mRJ-21 cables
- Cable Cinch with five mRJ-21 cables
- Cable Cinch with six mRJ-21 cables
- Cable Cinch with seven mRJ-21 cables
- Cable Cinch with eight mRJ-21 cables
- RJ-45 procedures
- Cable Cinch with one group of RJ-45 cables
- Cable Cinch with two groups of RJ-45 cables
- Cable Cinch with three groups of RJ-45 cables
- Cable Cinch with four groups of RJ-45 cables
- Cable Cinch with five groups of RJ-45 cables
- Cable Cinch with six groups of RJ-45 cables
- Cable Cinch with seven groups of RJ-45 cables
- Cable Cinch with eight groups of RJ-45 cables
- Connecting a BigIron RX Series Switch to a Network Device
- 4
- Assigning passwords
- Login lockout
- Password history
- Setting passwords to expire
- Configuring IP addresses
- Support of sub-net masks
- Assigning an IP address to a management interface
- Assigning an IP address to an interface, virtual Interface, or loopback
- Enabling and disabling the interfaces
- Understanding how the management port functions
- Connecting a BigIron RX Series switch
- Installing a fiber optic module
- Cabling a fiber optic module
- Enhanced Digital Optical Monitoring
- Cleaning fiber optic modules
- Troubleshooting network connections
- Testing network connectivity
- Pinging an IP address
- Tracing a route
- Using virtual cable testing to diagnose a cable
- Configuration notes
- Command syntax
- Viewing the results of the cable analysis
- Managing the BigIron RX Series chassis
- Displaying chassis status and temperature readings
- Displaying the Syslog configuration and static and dynamic buffers
- Static and dynamic buffers
- Managing the cooling system
- Configuring the cooling system
- Changing temperature thresholds for modules and fan speeds
- Displaying temperature thresholds for modules and fan speeds
- Changing the temperature polling interval
- Manually setting the fan speed
- Monitoring the cooling system
- Displaying fan tray status and speed
- Syntax: show chassis
- Displaying temperature warnings
- Managing the interface modules
- Configuring interface module boot parameters
- Synchronizing the interface module's IronWare images between management and interface modules
- Synchronizing the interface modules' IronWare images during bootup
- Specifying an immediate synchronization
- Disabling or reenabling an automatic check and synchronization
- Changing the boot source
- Specifying an immediate boot
- Specifying an immediate boot from the management module's PCMCIA slots
- Specifying an immediate boot from the management module's flash memory
- Specifying an immediate boot from the interface module's flash memory
- Specifying an immediate boot from a TFTP server
- Specifying an immediate interactive boot
- Configuring an automatic boot
- Configuring an automatic boot from the management module's PCMCIA slot
- Configuring an automatic boot from the management module's flash memory
- Configuring an automatic Bbot from the interface module's flash memory
- Configuring an automatic boot from a TFTP server
- Configuring an automatic interactive boot
- Changing priority of chassis slots for interface modules
- Disabling and reenabling power to the interface modules
- Disabling and reenabling power to the switch fabric modules
- Enabling and disabling management module CPU usage calculations
- Displaying management module CPU usage
- Syntax: show tasks
- Enabling and disabling packet logging for management and interface modules
- Displaying a packet log
- Removing MAC address entries
- Replacing a management module
- Removing a management module
- Installing a new management module
- Replacing an interface module
- Removing an interface module
- Installing a new interface module
- Replacing a switch fabric module
- Removing a switch fabric module
- Installing a new switch fabric module
- Replacing a fiber-optic transceiver
- Removing a fiber-optic transceiver
- Installing a new fiber-optic transceiver
- Cabling a fiber-optic transceiver
- Replacing a power supply
- Determining which power supply failed
- Replacing cooling system components
- Replacing fan assemblies in the BigIron RX- 32
- Replacing fan assemblies in the BigIron RX-16
- Replacing the rear fan assemblies in the BigIron RX-16
- Replacing the front fan assembly in the BigIron RX-16
- Replacing the fan assembly in the BigIron RX-4 and BigIron RX-8
- Replacing the air filters in a BigIron RX Series switch
- Replacing the air filters in the BigIron RX-32
- Replacing the air filter in the BigIron RX-16
- Replacing the air filter in the BigIron RX-4 or BigIron RX-8
- Software images required
- IronWare image
- Monitor image
- Boot image
- FPGA image
- Startup configuration file
- Software image naming conventions
- Release types
- Release number
- Displaying flash memory and version information
- Displaying flash information
- Displaying version information
- Upgrading the BigIron RX Series software
- Changes to software images starting with version 02.5.00
- Special instructions for using interface modules in a 32-Slot chassis
- For interface modules running versions earlier than 02.3.00
- Separation of boot and monitor images
- Upgrading to version 02.5.00 (or later) from a pre-02.5.00 version
- Downgrading from version 02.5.00 (or later) to a pre-02.5.00 version
- Command change
- New default behavior
- New options added
- Unified software image upgrade to upgrade release 02.6.00 and later
- Unified software image upgrade to upgrade release 02.2.01 to 02.5.00
- Upgrading software releases prior to release 02.2.01
- Basic tasks in the software upgrade process
- Upgrading the management module's monitor and boot images
- Upgrading the management module's IronWare image
- Upgrading the interface module's monitor and boot images
- Upgrading the interface module's IronWare image
- Rebooting the management module
- Upgrading the MBRIDGE FPGA on the management module
- Overview of tasks in the FPGA image upgrade process
- Determining the MBRIDGE image versions
- Upgrading the MBRIDGE FPGA image
- Hitless Layer 2 OS upgrade
- Considerations when using the feature
- NOTES:
- The hitless OS software process
- Performing a hitless OS software upgrade
- Loading the Multi-Service IronWare software onto the router
- Setting up consoles
- Executing the hitless upgrade command
- Verify the new software image
- Loading and saving configuration files
- Replacing the startup configuration with the running configuration
- Replacing the running configuration with the startup configuration
- Logging changes to the startup-config file
- Copying a configuration file to or from a TFTP server
- Making local copies of the startup configuration file
- Dynamic configuration loading
- Usage considerations
- Preparing the configuration file
- Loading the configuration information into the running-config
- Using SNMP to save and load configuration information
- Erasing image and configuration files
- File synchronization
- File synchronization between the active and standby management modules
- Comparing and synchronizing files
- Synchronizing files without comparison
- File synchronization between the management and interface modules
- Synchronizing the interface modules IronWare images during bootup
- Disabling or re-enabling an automatic check and synchronization
- Scheduling a system reload
- Reloading at a specific time
- Reloading after a specific amount of time
- Displaying the amount of time remaining before a scheduled reload
- Canceling a scheduled reload
- Diagnostic error codes and remedies for TFTP transfers
- Hardware specifications
- Power specifications
- Physical dimensions
- Operating environment
- Storage environment
- Safety agency approvals
- Electromagnetic approvals
- Port specifications
- Console port pin assignments
- Management port pin assignments
- U.S.A.
- Industry Canada statement
- Europe and Australia
- Japan
- English translation of above statement
- Korea
- Caution statements
- IEEE compliance
- RFC support
- General protocols
- BGP
- OSPF
- RIP
- IP Multicast
- Management
- Internet drafts
Brand : DELL
Model : PowerConnect B-RX8
Category : Network switch