GABD 2 - Freezer Equator - Free user manual and instructions
Find the device manual for free GABD 2 Equator in PDF.

User questions about GABD 2 Equator
0 question about this device. Answer the ones you know or ask your own.
Ask a new question about this device
Download the instructions for your Freezer in PDF format for free! Find your manual GABD 2 - Equator and take your electronic device back in hand. On this page are published all the documents necessary for the use of your device. GABD 2 by Equator.
USER MANUAL GABD 2 Equator
natural_image
Line drawing of a simple refrigerator with lid and side-mounted legs (no text or symbols)OWNER'S MANUAL
Your appliance is protected by this warranty under normal, personal, family or household use (1 Year), and limited commercial use (90 days), in the USA and Canada.
Conserv Appliances undertakes to the consumer-owner to repair or, at our option, to replace any part of this product which proves to be defective in workmanship or material under normal personal, family or household use, in the USA and Canada, for a period of one year from the date of original purchase. For commercial use, the product is warranted for a period of 90 days. During this period, we will provide all labor and parts necessary to correct such defect, free of charge, if the appliance has been installed and operated in accordance with the written instructions with the appliance. Ready access to the appliance, for service, is the responsibility of the consumer-owner. Service would be provided from Monday to Friday between normal business hours.
Exclusions
In no event shall Conserv Appliances be liable for incidental or consequential damages or for damages resulting from external causes such as abuse, misuse, incorrect voltage or acts of God. This warranty does not cover service calls which do not involve defective workmanship or materials covered by this warranty. Accordingly, diagnosis and repair costs for a service call which does not involve defective workmanship or materials will be the responsibility of the consumer-owner.
Specifically, the following work is not covered under warranty and does not constitute warranty work:
Installation – e.g. installing as built-in
Maintenance – e.g. cleaning appliance using solvents
Mishandling – e.g. breakage of door handle or shelves
Most work is covered. The defining factor is, has the machine malfunctioned (Conserv Appliances is responsible) or has the customer omitted or done something to cause machine to malfunction (customer is responsible). Some States do not allow the exclusion or limitation of incidental or consequential damages, so the above limitation or exclusion may not apply to you.
WARRANTY SERVICE
This warranty is given by:
ConServ Appliances
10222 Georgibelle Drive, Suite 200
Houston, TX 77043-5249
For Service:
Call 1-800-490-8018
Email: Service@ApplianceDesk.com
Web: www.ApplianceDesk.com
Business hours: (9:00 a.m. to 5:00 p.m.
weekdays).
You can register your Warranty by either of the following methods:
- Scan the QR Code
a. Open Smart Phone
b. Open Photo
c. Scan QR Code

- Register online at ApplianceDesk.com/Warranty
GENERAL
Since it is responsibility of the consumer-owner to establish the warranty period by verifying the original purchase date, Conserv Appliances recommends that a receipt, delivery slip or some other appropriate payment record be kept for that purpose.
This warranty gives you specific legal rights, and you may also have other rights which vary from State to State.
All rights reserved. Manual subject to change without notice.
Please always follow the safety precautions listed below:
- Do not put acid or flammable or volatile materials inside the appliance.
- Do not puncture or damage refrigerant tubing.
- Unplug the unit immediately if you find any abnormal smell or smoke, and contact Customer Service.
- This appliance is not intended for use by children or persons with reduced physical, sensory or mental capabilities, or lack of experience and knowledge, unless they have been given supervision or instruction concerning use of the appliance by a person responsible for their safety. Children should be supervised to ensure that they do not play with the appliance.
- Use a dedicated power outlet and a three prong power socket, that is properly grounded.
- Do not use extension cords or ungrounded two prong adapters.
- Do not use the power cord or plug if it is damaged.
- When removing the power plug, do not pull on the cord. Grasp the plug firmly and pull it out from the socket.
- Unplug the unit first when doing maintenance or repair and when replacing the light bulb.
- Keep ventilation openings free of obstructions.
Safe Disposal
- Before discarding the refrigerator, remove doors and shelves in order to prevent risk of child entrapment.
- Dispose off this appliance in accordance with local regulations.
State of California Proposition 65 Warnings:
WARNING: This product contains one or more chemicals known to the State of California to cause cancer. WARNING: This product contains one or more chemicals known to the State of California to cause birth defects or other reproductive harm.
Placement
- This unit is designed to be free standing and not built-in.
- The unit should be placed in a ventilated and dry environment.
- Do not put the unit in direct sunlight, and keep it as far as possible from heat sources.
- Don't put the unit in a cold area.
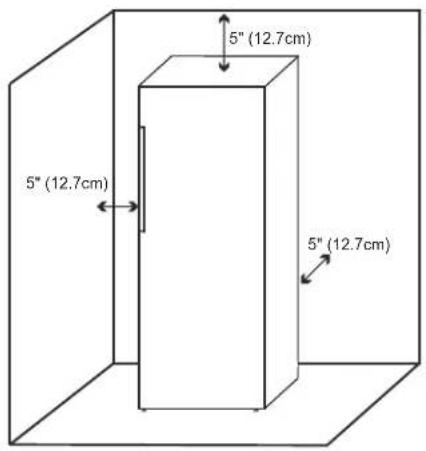
- There should be 5" (12.7cm) space around the top, sides and back of the unit as shown, to allow proper ventilation.
- The unit should be placed on flat and stable ground. Keep the unit level by adjusting the 2 front leg levelers.
text_image
5" (12.7cm) 5" (12.7cm) 5" (12.7cm)-
Turn the leveling leg counter-clockwise as far as it will go, until the top of the foot is touching the bottom of the chassis.
-
Slowly turn the leveling leg clockwise until the appliance is level.
Before Use
- Before initially plugging in the refrigerator, keep the unit standing upright and stable for 6 hours. The refrigerator should be on for up to 4 hours and adequately cold, before putting food in it.
- It is recommended that you clean the interior of the unit before placing food inside.
Handle Installation
The appliance ships with the handle inside the cabinet to protect it from damage.
The appliance should be unplugged before installing the handle.
-
Position the handle over the exposed door handle posts.
-
Remove the two screws from the side of door with a screwdriver, insert screws into the handle bracket and fix it to the side of door and tighten it until firmly attached.
Operation
This appliance is intended for household use.
Control Panel

text_image
888 °F °C °F/°C ① ② ③ ④- Up and Down arrows to select temperature
- Temperature display
- Selection button for °F or °C
- Fast Freeze button
Setting the Temperature
This appliance can be used as either a refrigerator or a freezer. The table below shows the temperature ranges. You can set the desired temperature by pressing the Up and Down arrows on the control panel. The display window will show the selection.
| Temperature Range | ||
| Refrigerator | 0°C to 8°C | 32°F to 46°F |
| Freezer | -24°C to -14°C | -11.2°F to 6.8°F |
To switch between °C and °F, press the °F/°C button and the corresponding indicator light will illuminate.
Fast Freeze Function
This function should be used when the appliance is first turned on or when you want to reach the coldest temperature as quickly as possible. Press and hold the fast freeze button for three seconds until the LED indicator illuminates. To cancel the fast freeze function press and hold the fast freeze button until the LED indicator turns off. When the fast freeze cycle is completed or is canceled, the appliance reverts back to the last set temperature.
Open Door Alarm
This appliance is equipped with a door alarm that will sound if the door is left open for more than 3 minutes. The alarm will beep and the display will flash continuously until the door is closed.
If the appliance is placed on its back or side for any length of time during this process, it must be allowed to remain upright for 6 hours before plugging it in to avoid damage to the internal components.
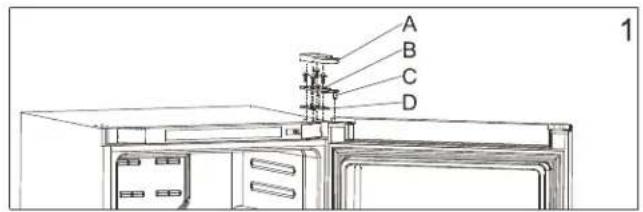
- Remove one screw from top hinge cover (A) and then remove top hinge cover.
- Remove four screws from top hinge (B) and then remove top hinge, top door spindle (C) and top hinge spacer (D).
- Remove door from unit and set aside. Ensure that you do not damage the bottom door spindles (F).
- Remove roller caps at bottom of unit (E).
- Remove four screws each from both bottom hinges and then swap the bottom hinges (J). Ensure that the C-shaped hinge is on the side of the unit opposite the handle.
- Reinstall four screws each in both bottom hinges (F).
- Reinstall the bottom door spindles (F and G).
- Reinstall the roller caps (E) at the bottom of the unit.
- Reinstall the door and ensure that the bottom door spindle (F) is placed in the hole in bottom hinge that is closest to the outside of the unit.
- Replace hinge spacer (D), replace top door spindle (C), reinstall top hinge with four screws (B). Ensure that you flip the top hinge to its opposite side so that the top door spindle is in the correct position.
- Reinstall the top hinge cover (A) with one screw. A top hinge cover for the opposite side of the unit can be found in the accessory bag inside the unit.
Note: When installing the door, ensure that the top of the door is level with the top of the cabinet. If the door is not level, the rubber gasket will not make a good seal with the cabinet which can cause the appliance to malfunction.
text_image
A B C D 1
text_image
A B C D 2
text_image
M F G K 3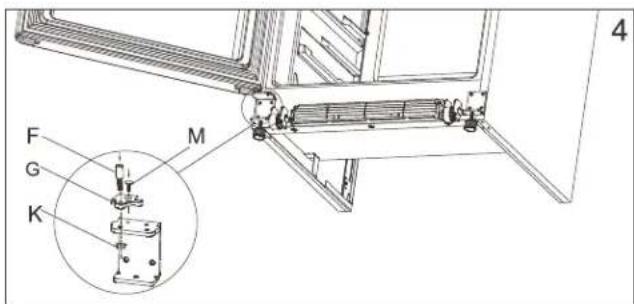
text_image
F G K M 4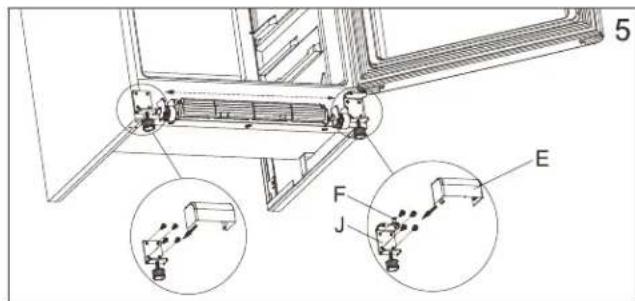
text_image
5 F J ECleaning
• Always unplug the unit before cleaning.
- Clean inside, behind and around the refrigerator regularly, using water and mild detergent, and a damp cloth (not wet).
- Never use boiling water, harsh cleaning chemicals or abrasive materials.
- Check and clean the door gasket regularly to ensure that the door closes and seals properly.
Defrost
This unit is equipped with an automatic defrost function and does not require manual defrosting. Do not use mechanical devices to defrost the appliance. Defrost water from the appliance is channeled into a drip tray located above the compressor. Heat transfer from the compressor causes the defrost water to evaporate.
Extended Absence or Vacation
- If the unit will be switched off for a long time, the plug should be pulled out, and the unit cleaned thoroughly.
- The door must be left open and the unit must be placed in a well ventilated area to avoid build up of odor.
The following phenomenon is normal
- The sound like a rivulet is caused by the refrigerant flowing inside of the system pipe.
- While the unit runs, heat is emitted from both sides of the cabinet.
- When the environment is too humid, the edges around door may have a little moisture. Simply wipe it with a dry cloth.
Before calling for service, please check the following issues first
| POSSIBLE CAUSEPROBLEM | |
| The unit does not work | Power is not on or the unit is not connected to powerLow voltageA fuse may be blown or the circuit breaker trippedPlug not fully inserted into the wall outlet |
| Internal temperature not cold enough | Temperature setting is too warmDoor is not shut properly or opened frequentlyExhaust vent is obstructedA large quantity of warm food has been placed in the unitClose proximity to heat source or direct sunlightAmbient temperature or humidity is very high |
| Appliance runs continuously • Temperature setting is too cold | Door not shut properly or opened frequentlyExhaust vent is obstructedA large quantity of warm food has been placed in the unitClose proximity to heat source or direct sunlightAmbient temperature or humidity is very high |
| Internal temperature is too cold • Temperature setting is too cold | |
| Noises • Parts are expanding and / or the refrigerant is circulating; this is normalFloor is not flat, and the unit is not placed in a stable position. | |
| Doors cannot be closed properly | The door is obstructed by items inside the unit.The door gasket is not providing a good seal. Heat the gasket with a hair dryer. |
ERROR CODES - Shown on control panel display
E1: Sensor failure
E2: Defrosting sensor failure
E3: Sensor failure and defrosting sensor failure
H: High temperature
Technical Parameters
| Model No. | FR 1700SS-N |
| Category | Upright - Freezer |
| Refrigerating Mode | No Frost |
| Rated Voltage/Frequency | 110V~60Hz |
| Rated Power | 180 W |
| Rated Current | 3.5 A |
| Refrigerant, Amount | R600a (72g / 2.57oz) |
| Foaming Agent | CyclopentaneCyclopentane |
| Energy Class | DOE |
| Weight | 189 lbs / 85.7 kg |
| Dimensions (H*W*D) inches | 67.3x30x28.5 / 171x76x72.4 cm |
| Overall Space Required In Use (H*W*D) inches | 72.3x35x33.5 / 183.6x88.8x85 cm |
Electrical Diagram
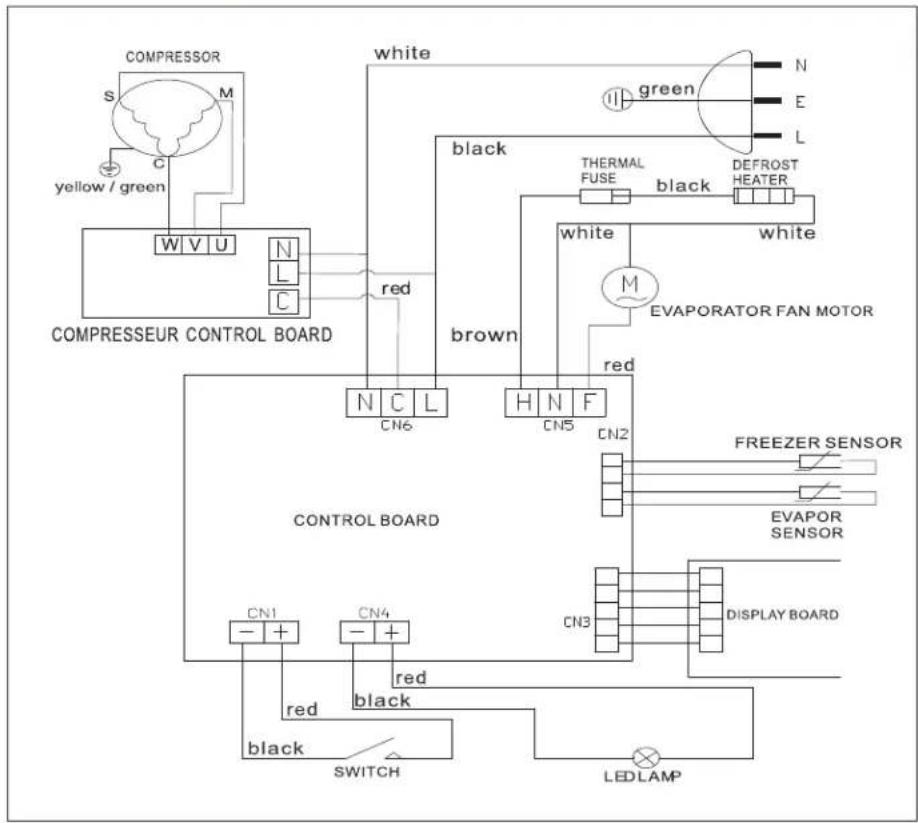
flowchart
graph TD
    A["COMPRESSOR"] --> B["COMPRESSEUR CONTROL BOARD"]
    B --> C["CONTROL BOARD"]
    C --> D["SWITCH"]
    D --> E["LED LAMP"]
    C --> F["BLACK"]
    F --> G["THERMAL FUSE"]
    G --> H["black"]
    H --> I["DEFROST HEATER"]
    C --> J["WHITE"]
    C --> K["Brown"]
    K --> L["EVAPORATOR FAN MOTOR"]
    C --> M["RED"]
    M --> N["SWITCH"]
    N --> O["LED LAMP"]
    style A fill:#f9f,stroke:#333
    style B fill:#ccf,stroke:#333
    style C fill:#cfc,stroke:#333
    style D fill:#fcc,stroke:#333
    style E fill:#ffc,stroke:#333
    style F fill:#fcc,stroke:#333
    style G fill:#cff,stroke:#333
    style H fill:#ffc,stroke:#333
    style I fill:#fcc,stroke:#333
    style J fill:#ffc,stroke:#333
    style K fill:#fcc,stroke:#333
    style L fill:#ffc,stroke:#333
    style M fill:#fcc,stroke:#333
    style N fill:#cff,stroke:#333
    style O fill:#ffc,stroke:#333
OUTDOOR AIR CONDITIONER
Model - OAC 2000
natural_image
Line drawing of a portable air conditioner unit with a conical nozzle and ventilation slots (no text or symbols)OWNER'S MANUAL
Warranty
Equator Appliances undertakes to the consumer-owner to repair or, at our option, to replace any part of this product which proves to be defective in workmanship or material under normal personal, family or household use, in USA and Canada, for a period of one year from the date of original purchase. During this period, we will provide all labor and parts necessary to correct such defect, free of charge, if the appliance has been assembled and operated in accordance with the written instructions with the appliance.
Exclusions
In no event shall Equator Appliances be liable for incidental or consequential damages or for damages resulting from external causes such as abuse, misuse, incorrect voltage or acts of God. This warranty does not cover service calls which do not involve defective workmanship or materials covered by this warranty. Accordingly, diagnosis and repair costs for a service call which does not involve defective workmanship or materials will be the responsibility of the consumer-owner.
Specifically, the following work is not covered under warranty and does not constitute warranty work:
Installation - e.g. installing as built-in Maintenance - e.g. cleaning appliance using solvents Mishandling - e.g. breakage of hose and casters
Most work is covered. The defining factor is, has the machine malfunctioned (Equator Appliances is responsible) or has the customer omitted or done something to cause the appliance to malfunction (customer is responsible). Some States do not allow the exclusion or limitation of incidental or consequential damages, so the above limitation or exclusion may not apply to you.
This warranty is given by:
Equator Appliances
10222 Georgibelle Drive, Suite 200
Houston, TX 77043-5249
For Customer Service:
Appliance Desk
Business hours: 9:00 am to 5:00 pm weekdays
You can register your Warranty by ANY ONE of the following methods:
- Scan the QR Code

text_image
QR code image containing encoded data, no visible human-readable text-
Register online at ApplianceDesk.com/Warranty
-
Mail in the Warranty Card, which is the last page of this manual.
GENERAL
Since it is a responsibility of the consumer-owner to establish the warranty period by verifying the original purchase date, Equator Appliances recommends that a receipt, delivery slip or some other appropriate payment record be kept for that purpose.
This warranty gives you specific legal rights, and you may also have other rights which vary from State to State.
All rights reserved. Manual subject to change without notice.
Safety
Keep the appliance away from volatile and flammable substances.
Keep ventilation openings clear of obstructions.
When positioning the appliance, ensure the electrical cord is not trapped or damaged.
Do not place multiple portable socket-outlets at the rear of the appliance.
Never unplug the appliance by pulling on the power cord. Grip the plug firmly and pull straight out to remove from wall socket.
Do not use a damaged power cord.
Do not use an extension cord.
Do not operate the unit with wet hands, to prevent electric shock.
Children should be supervised to ensure that they do not climb on or play with the appliance.
This appliance is not intended for use by persons (including children) with reduced physical, sensory or mental capabilities, or lack of experience and knowledge, unless they have been given supervision or instruction.
Please dispose of this appliance in accordance with local regulations.
California Proposition 65
WARNING: This product contains chemical known to the State of California to cause cancer and birth defects or other reproductive harm.
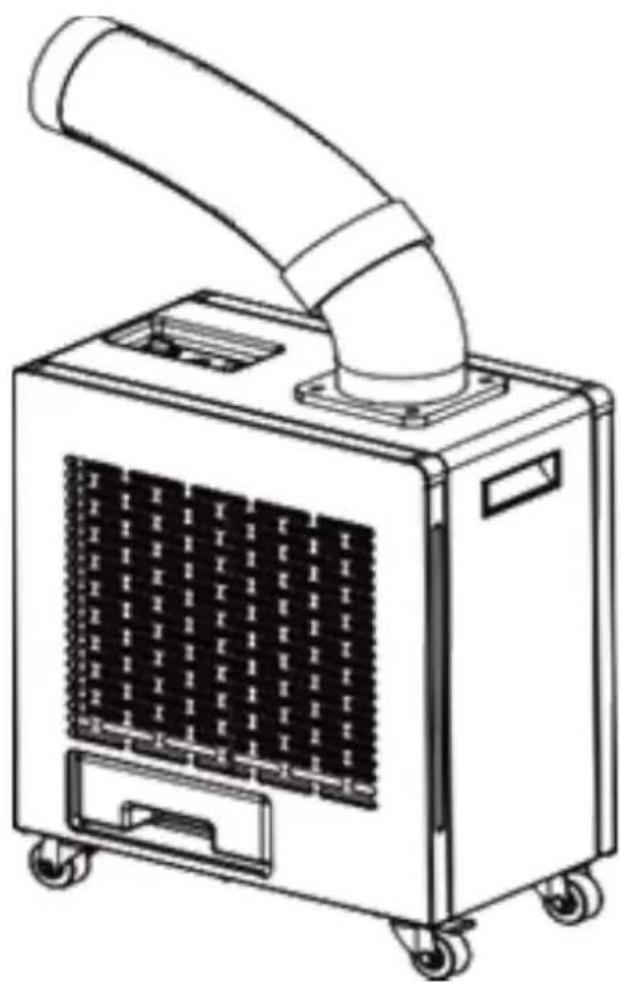
Description
The Outdoor Air Conditioner (OAC) is a portable appliance that can be used outdoors. The OAC pulls ambient air through the Air Intake Screen, circulates it through the compressor and blows out cool air through the Cooling Air Hose. The Cooling Air Hose is flexible, can be rotated 360 degrees and can be positioned to blow to a desired area. The Control Panel at the top of the OAC is used to select low or high fan speed to regulate the cool air flow.
Hot air is exhausted through the back of the unit. Condensate is collected in a Water Tank below the unit or can be discharged directly to a designated area.
For ease of moving the portable OAC, there is a convenient Recessed Handle and four Casters.
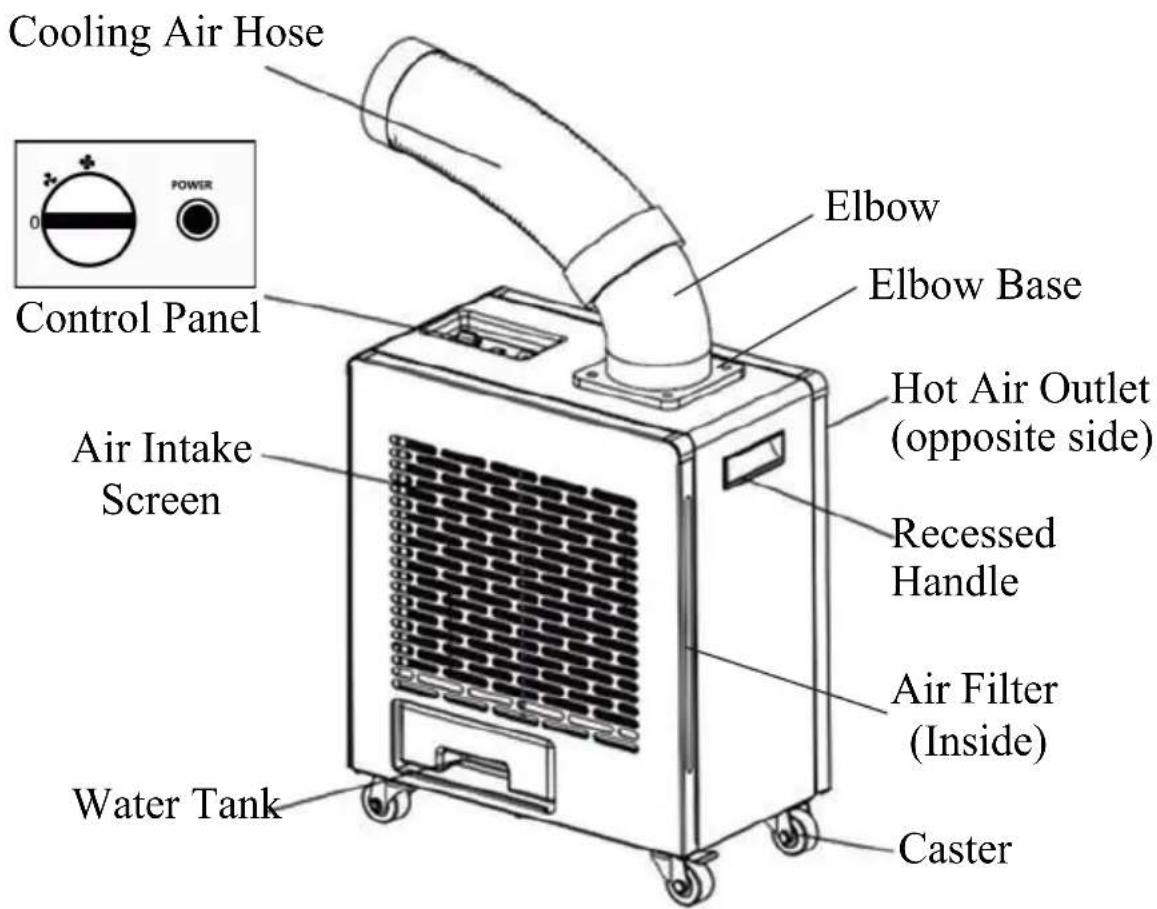
text_image
Cooling Air Hose Control Panel Air Intake Screen Water Tank Elbow Elbow Base Hot Air Outlet (opposite side) Recessed Handle Air Filter (Inside) CasterAssembly
The Outdoor Air Conditioner (OAC) is easy to use and requires only a few quick steps to assemble the parts. Most of the appliance is already assembled and only requires the Air Cooling Hose to be attached to the main unit.

text_image
Cooling Hose Elbow Elbow BaseAttach the Elbow to the Elbow Base by turning counter-clockwise. When firmly installed there will be a click.
Attach the Cooling Air Hose to the other end of the Elbow by turning counter-clockwise.
Placement
The OAC is designed for outdoor use and is portable. The compact size and casters enable it to be moved easily.
When moving the OAC do not tilt it more than 45 degrees.
Place the appliance away from sources of heat and high humidity.
Place the OAC in a covered area to protect from direct sunlight and heavy rainfall for greater longevity.
Ensure there is adequate ventilation around the OAC. The Air Intake Screen and Cooling Air Hose should be more than 1 foot (30 cm) away from walls or other obstructions. The vent exhausting the hot air should be 3 feet (80 cm) from any object or structure.
Place the OAC on a flat level surface and lock the casters.
Operation
Check the plug and cable before connecting the power and ensure it is 110 voltage.
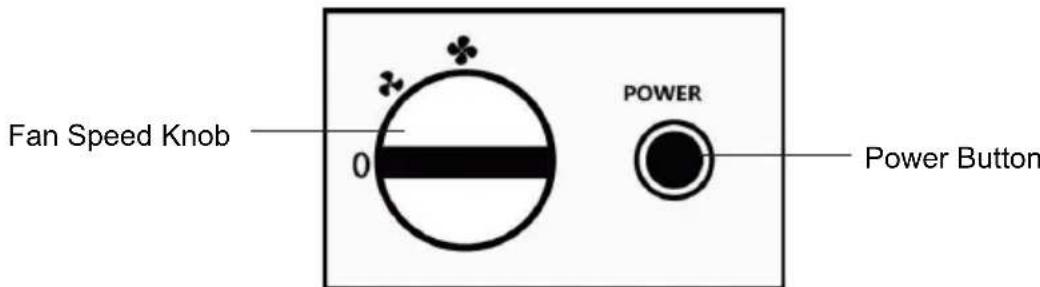
text_image
Fan Speed Knob 0 POWER Power ButtonPress the Power Button to turn the OAC on.
Rotate the Fan Speed Knob from the 0 (Off) position to either low or high cool setting.
The Cooling Air Hose can be rotated 360 degrees, allowing for maximum flexibility in positioning the flow and direction of cool air.
After turning off the OAC, wait 5 minutes before turning it on again. It cannot be turned on immediately.
The OAC is equipped with overheat and overload protection for the compressor. If the compressor overheats because of voltage fluctuations or high ambient temperature, the compressor power supply shuts off and the OAC will blow only ambient air.
Water Tank and Drainage Hose
In the course of operating the OAC, condensate water is produced. The water can either be collected in the Water Tank or can be discharged directly outdoors through a Drainage Hose included with the unit.
Water Tank
The Water Tank is located at the bottom of the OAC. It is important to empty the tank in a timely manner. Check the water level every 2-3 days.
Turn the power off before emptying the Water Tank.
Remove the Water Tank, discard the water and then replace it again before turning the OAC on. Do not move the OAC when it is full of water.
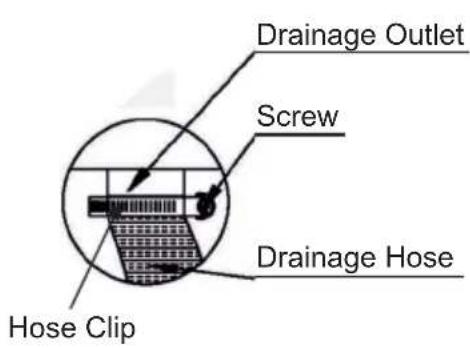
Drainage Hose
Remove the Water Tank.
Attach the Drainage Hose directly onto the outlet where it enters the Water Tank cavity. The Hose can be held in place with the Hose Clip provided.
Use a Phillips screwdriver to screw on the Hose Clip. This will keep the Drainage Hose secured.

natural_image
Diagram of a vehicle rear view showing a ramp, vent, and side-mounted wheels (no text or symbols)Drainage Hose
text_image
Drainage Outlet Screw Drainage Hose Hose ClipMaintenance
Make sure the power cord is unplugged before moving or cleaning the OAC.
Clean the outside and inside of the appliance regularly, using water and mild detergent.
Remove the filter by pulling straight out from the slot. Clean/wash the filter. Before reinstalling, should be completely dry.
Before storing for an extended time:
• Empty the Water Tank and let it dry completely.
- Once dry, cover the OAC and store in an upright position.
Troubleshooting
| Possible Cause and SolutionPr | |
| Not Working | Check the fuse.Check if it is plugged in correctly to the power source. |
| Not Cooling | Heat exchanger surface is blocked.Clean and remove blockage.Filter needs cleaning.Ambient temperature is very high (above 113°F).Cooling line clogged. Remove obstruction.Move it if near a heat source or in direct sunlight.Check for proper ventilation and that air inlet or outlet is not blocked.Voltage is not correct.Compressor overheating. Shut down and restart after some time. |
| Water Leak | Drain is blocked. Needs to be cleared.Water Tank is not placed correctly.Water Tank is full and needs to be emptied. |
Technical Specifications for OAC 2000
| Model | OAC 2000 |
| Capacity | 2000W / 6800BTU |
| Air Flow 135.4 cu.ft / min | |
| Voltage | 110V 60Hz |
| Current | 6.4 Amps |
| Power | 700 W |
| Refrigerant | R410A |
| Working Temperature | 64.4°F - 113°F |
| Weight Net / Gross | 56.2 / 66 lbs |
| Product Dimensions (HxWxD) | 22.4 x 18.9 x 11 (inch) |
| Packaging Dimensions (HxWxD) | 25 x 22 x 15 (inch) |
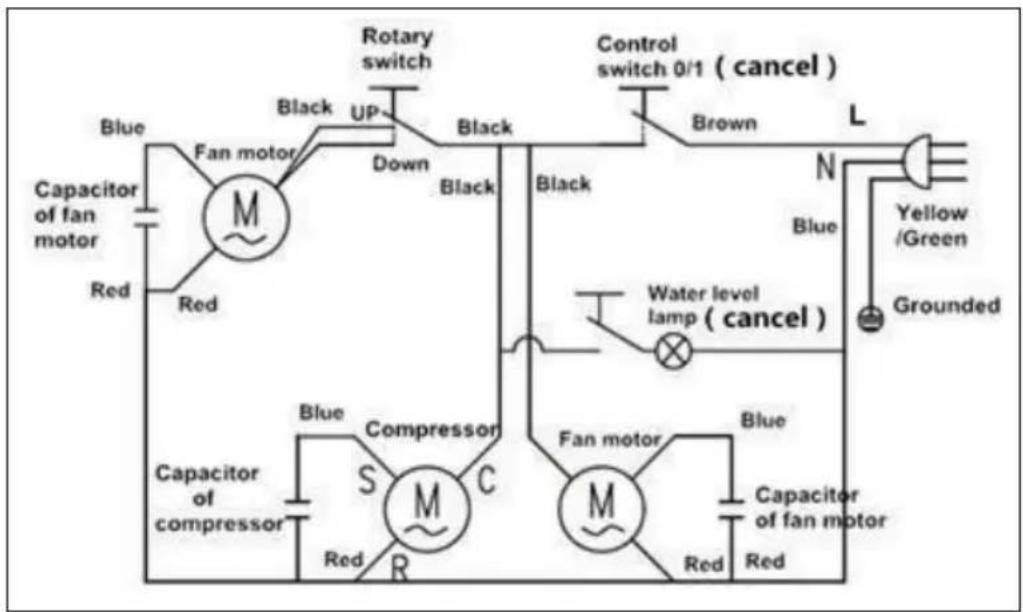
Electrical Diagram
flowchart
graph TD
    A["Capacitor of fan motor"] --> B["Fan motor"]
    B --> C["Black UP"]
    C --> D["Rotary switch"]
    D --> E["Control switch 0/1 (cancel)"]
    E --> F["Brown"]
    F --> G["L"]
    G --> H["Yellow /Green"]
    G --> I["Grounded"]
    J["Capacitor of compressor"] --> K["Compressor"]
    K --> L["Fan motor"]
    L --> M["Capacitor of fan motor"]
    M --> N["Red"]
    N --> O["Grounded"]
    P["Water level lamp (cancel)"] --> Q["Black"]
    Q --> R["Control switch 0/1 (cancel)"]
    S["Blue"] --> T["Capacitor of fan motor"]
    U["Black"] --> V["Control switch 0/1 (cancel)"]
    W["N"] --> X["Blue"]
    Y["S"] --> Z["Compressor"]
    AA["R"] --> AB["Capacitor of compressor"]
Warranty Registration Card
| Name (Mr/Mrs/Ms): | ||
| Address: | Apt# | |
| City: | State: | Zip: |
| Phone 1: | Phone 2: | |
| Email*: | ||
| Product: | Model#: | |
| Purchased At: | Purchase Date: | |
| Used in: □House □Apt/Condo □Office □Vacation Home □RV/Boat □Other | ||
| SERIAL# | ||
Place Stamp Here
To: Warranty Registration 10222 Georgibelle Drive, Suite 200 Houston, TX 77043-5249