PG253W - Generator Draper - Free user manual and instructions
Find the device manual for free PG253W Draper in PDF.

User questions about PG253W Draper
0 question about this device. Answer the ones you know or ask your own.
Ask a new question about this device
Download the instructions for your Generator in PDF format for free! Find your manual PG253W - Draper and take your electronic device back in hand. On this page are published all the documents necessary for the use of your device. PG253W by Draper.
USER MANUAL PG253W Draper
Stock No.16066 Part No.PG253W
IMPORTANT: PLEASE READ THESE INSTRUCTIONS CAREFULLY TO ENSURE THE SAFE AND EFFECTIVE USE OF THIS PRODUCT.

natural_image
Exterior view of a CRISPR Gasoline gas generator with attached motor and wheels (no visible text or symbols)CE

GENERAL INFORMATION
These instructions accompanying the product are the original instructions. This document is part of the product, keep it for the life of the product passing it on to any subsequent holder of the product. Read all these instructions before assembling, operating or maintaining this product.
This manual has been compiled by Draper Tools describing the purpose for which the product has been designed, and contains all the necessary information to ensure its correct and safe use. By following all the general safety instructions contained in this manual, it will ensure both product and operator safety, together with longer life of the product itself. All photographs and drawings in this manual are supplied by Draper Tools to help illustrate the operation of the product. Whilst every effort has been made to ensure the accuracy of information contained in this manual, the Draper Tools policy of continuous improvement determines the right to make modifications without prior warning.
1. TITLE PAGE
1.1 INTRODUCTION:
USER MANUAL FOR:
2.2KVA/2.0KW PETROL GENERATOR
Stock no. 16066
Part no. PG253W
1.2 REVISIONS:
Date first published May 2016.
As our user manuals are continually updated, users should make sure that they use the very latest version.
Downloads are available from: http://www.drapertools.com/manuals
DRAPER TOOLS LIMITED WEBSITE: draper.co.uk
HURSLEY ROAD PRODUCT HELPLINE: +44 (0) 23 8049 4344
CHANDLER'S FORD GENERAL FAX: +44 (0) 23 8026 0784
EASTLEIGH
HAMPSHIRE
SO53 1YF
UK
1.3 UNDERSTANDING THIS MANUALS SAFETY CONTENT:
WARNING! Information that draws attention to the risk of injury or death.
CAUTION! Information that draws attention to the risk of damage to the product or surroundings.
NOTE! Important information.
1.4 COPYRIGHT © NOTICE:
Copyright © Draper Tools Limited.
Permission is granted to reproduce this publication for personal & educational use only.
Commercial copying, redistribution, hiring or lending is prohibited.
No part of this publication may be stored in a retrieval system or transmitted in any other form or means without written permission from Draper Tools Limited.
In all cases this copyright notice must remain intact.
2.1 CONTENTS
Page content Page
1 TITLE PAGE
1.1 INTRODUCTION
1.2 REVISION HISTORY......
1.3 UNDERSTANDING THIS MANUAL 2
1.4 COPYRIGHT NOTICE......
2 CONTENTS
2.1 CONTENTS 3
3 GUARANTEE
3.1 GUARANTEE
4 INTRODUCTION
4.1 SCOPE 5
4.2 SPECIFICATION
4.3 HANDLING & STORAGE 5
5 HEALTH & SAFETY INFORMATION
5.1 GENERAL SAFETY INSTRUCTIONS FOR GENERATOR USE 6-7
6 TECHNICAL DESCRIPTION
6.1 IDENTIFICATION
6.2 MAIN COMPONENT DESCRIPTIONS 9
7 UNPACKING & CHECKING
7.1 PACKAGING....
7.2 WHAT'S IN THE BOX 10
8 PREPARING THE GENERATOR
8.1 CONNECTING WHEELS......
8.2 CONNECTING HANDLES....
9 SETTING THE GENERATOR
9.1 AUTOMATIC VOLTAGE REGULATOR (AVR).... 12
9.2 PREPARING THE GENERATOR.... 12
9.3 FUELLING 12
9.4 CHECKING THE ENGINE OIL.... 13
9.5 STARTING THE GENERATOR
9.6 STOPPING THE GENERATOR.... 14
9.7 CONNECTING APPARATUS TO THE GENERATOR 14
9.8 AC CIRCUIT BREAKERS.... 15
9.9 SAFETY SWITCH TRIPPING 16
9.10 OPERATION LOAD AND RATINGS 16
10 MAINTENANCE
10.1 OIL REPLACEMENT 17
10.2 SPARK PLUG INSPECTION 17
10.3 AIR FILTER CLEANING 17
10.4 PERIODIC MAINTENANCE 18
10.5 RISK OF ELECTROCUTION AND FIRE 19
10.6 RISK OF FIRE 20
10.7RISK OF INJURY AND PROPERTY DAMAGE WHEN TRANSPORTING GENERATOR .... 20
10.8 RISK OF BREATHING - INHALATION HAZARD 20
10.9 RISK OF UNSAFE OPERATION.... 21
10.10 RISK OF HOT SURFACES 21
10.11 RISK OF MOVING PARTS 21
10.12 RISK FROM LIFTING 21
11 TROUBLESHOOTING....22
12 EXPLANATION OF SYMBOLS/PICTOGRAMS 23
13 DISPOSAL 24
DECLARATION OF CONFORMITY ....ENCLOSED
3. GUARANTEE
3.1 GUARANTEE
Draper tools have been carefully tested and inspected before shipment and are guaranteed to be free from defective materials and workmanship.
Should the tool develop a fault, please return the complete tool to your nearest distributor or contact Draper Tools Limited, Chandler's Ford, Eastleigh, Hampshire, SO53 1YF. England. Telephone Sales Desk: (023) 8049 4333 or Product Helpline (023) 8049 4344.
A proof of purchase must be provided with the tool.
If upon inspection it is found that the fault occurring is due to defective materials or workmanship, repairs will be carried out free of charge. This guarantee period covering parts/labour is 12 months from the date of purchase except where tools are hired out when the guarantee period is 90 days from the date of purchase. The guarantee is extended to 24 months for parts only. This guarantee does not apply to normal wear and tear, nor does it cover any damage caused by misuse, careless or unsafe handling, alterations, accidents, or repairs attempted or made by any personnel other than the authorised Draper warranty repair agent.
Note: If the tool is found not to be within the terms of warranty, repairs and carriage charges will be quoted and made accordingly.
This guarantee applies in lieu of any other guarantee expressed or implied and variations of its terms are not authorised.
Your Draper guarantee is not effective unless you can produce upon request a dated receipt or invoice to verify your proof of purchase within the guarantee period.
Please note that this guarantee is an additional benefit and does not affect your statutory rights.
Draper Tools Limited.
4.1 SCOPE
This manual is intended to give an overview of the functioning and controls of this machine to aid in it's safe use.
4.2 SPECIFICATION
Stock no 16066
Part no ...... PG253W
Engine type.... 4 stroke overhead valve single cylinder (7HP)
Displacement....210cc
Rated power 2.0kW
Peak power.... 2.2kW
Cooling system .... Forced air
Regulation AVR (Automatic Voltage Regulation)
Phase......single
Output sockets 1 x 230V AC, 1 x 110V AC, 1 x 12V DC
DC output 12V
Motor....210cc/7HP 4 stroke
Oil capacity 0.6L
Fuel......Unleaded
Engine oil.... SAE 10W 40
Fuel tank capacity 15L
Noise level 4M 95dB(A)
Dimensions 600 x 450 x 470mm
Weight (gross) 41kg
4.3 HANDLING & STORAGE
CAUTION: Always use and store this generator correctly, never use or store this generator on it's side as oil or fuel may leak and damage the generator or your property.
If the generator has been used always allow it to cool for at least 30 minutes before transporting the generator and ensure that the generator has fully cooled before returning it to storage as a hot engine and exhaust system could cause personal injury or ignite some materials.
To prevent fuel/oil spillage when transporting, the generator should be secured upright in it's normal operating position with the engine switch in the off position.
Take care not to drop or strike the generator when transporting. Never cover the generator when in use.
Before storing the generator for a long period:-
-
Be sure that the storage area is free of excessive humidity and dust.
-
Drain the fuel, storage procedure below.
A. Unscrew the fuel tank cap, remove the filter screen and empty the fuel tank into an approved petrol container using a commercially available hand siphon (Draper Stock No.43650), re-install the filter screen and fuel tank cap.
B. Loosen the carburettor drain screw and drain the carburettor into a suitable container.
C. Remove the spark plug maintenance cover and remove the spark plug cap.
D. Turn the engine switch to the OFF position.
E. Pull the starter cord 3 or 4 times to empty the fuel pump of petrol, into a suitable container.
F. Tighten the carburettor drain screw.
5. HEALTH & SAFETY INFORMATION
5.1 GENERAL SAFETY INSTRUCTIONS FOR GENERATOR USE
NOTE: Generators are designed to give safe and dependable service if operated according to instructions. Read and understand this owners manual fully before operating this generator. You can help prevent accidents by being familiar with the generators controls and by observing safe operating procedures.
OPERATOR RESPONSIBILITY
- Know how to stop the generator quickly in case of emergency.
- Understand the use of all the generators controls, output sockets and connections.
- Be sure that anyone who operates the generator receives proper instruction in it's safe use.
WARNING!:
CARBON MONOXIDE HAZARDS
- Exhaust gases contain poisonous carbon monoxide, a colourless and odourless gas. Breathing carbon monoxide can cause loss of consciousness and may lead to death.
NEVER run this generator in an enclosed space or partly enclosed space.
ALWAYS ensure a high level of ventilation in the area that you intend to use the generator to avoid the potential build up of carbon monoxide.
WARNING!:
ELECTRIC SHOCK HAZARDS
- The generator produces enough electric power to cause a serious shock or electrocution if misused.
- Using a generator or electrical appliance in wet conditions, such as rain or snow, or near a pool or sprinkler system, or when your hands are wet, could result in electrocution. Keep the generator dry.
- If the generator is stored outdoors, unprotected from the weather, check all of the electrical components on the control panel before each use. Moisture or ice can cause a malfunction or short circuit in electrical components which could result in electrocution.
- Do not connect to a building electrical system unless an isolation switch has been installed by a qualified electrician.
- Never connect different generator models and types.
WARNING!:
FIRE AND BURN HAZARDS
- The exhaust system gets hot enough to ignite some materials.
- Keep the generator at least 3 feet (1 metre) away from buildings and other equipment during operation.
- Do not enclose the generator in any structure.
- Keep flammable materials away from the generator.
- The muffler becomes very hot during operation and remains hot for a while after stopping the engine. Be careful not to touch the muffler while it is hot. Let the engine cool before storing the generator indoors.
- Petrol is extremely flammable and is explosive under certain conditions. Do not smoke or allow flames or sparks where the generator is refuelled or where petrol is stored. Refuel in a well-ventilated area with the engine stopped.
- Fuel vapours are extremely flammable and may ignite after the engine has started. Make sure that any spilled fuel has been wiped up before starting the generator.
5. HEALTH & SAFETY INFORMATION
WARNING!:
DO NOT OPERATE THIS MACHINE IN ANY HAZARDOUS LOCATION
Such areas include when there is a risk of an explosion of petrol fumes, leaking gas or explosive dust.
CAUTION:
ENGINE SPEED HAS BEEN FACTORY SET TO PROVIDE SAFE OPERATION
Tampering with the engine speed adjustment could result in overheating of attachments and could cause a fire. Never attempt to "speed up" the engine to gain more performance as this will result in the output voltage and frequency being thrown out of their standard values, endangering the user and any attachments plugged into the generator.
YOU MUST UNPLUG ANY LOAD FROM THE GENERATOR BEFORE STARTING/STOPPING THE GENERATOR TO PREVENT PERMANENT DAMAGE TO APPLIANCES.
Ground (Earth) your generator. Ensure that the generator has been grounded by wiring an earth lead, connect one end of the earth lead to the earth terminal on the generator and the other end should be pressed into the ground or used in conjunction with an earth spike.
NOTE:
PROTECT YOUR GENERATOR
This generator is NOT WEATHERPROOF and should not be exposed to direct sunlight, high ambient temperatures and damp, wet or high humidity conditions.
6. TECHNICAL DESCRIPTION
6.1 IDENTIFICATION

text_image
Technical diagram of a portable gas generator with numbered components and close-up views of the engine compartment① Fuel tank.
② Fuel tank cap.
③ Voltmeter.
④ AC circuit breakers.
⑤ Earth terminal.
⑥ 110V socket.
⑦ 230V socket.
⑧ Main engine switch.
⑨ Recoil starter.
⑩ Air filter.
⑪ Exhaust/muffler.
⑫ Oil filler cap.
⑬ Wheels.
⑭ Transport handles.
⑮ Petrol gauge.
⑯ 12V DC outlet.
⑰ Choke lever.
⑱ Spark plug cover.
⑲ Fuel tap.
6. TECHNICAL DESCRIPTION
6.2 MAIN COMPONENT DESCRIPTIONS
- Used to fill the fuel tank, also covers the fuel filter/strainer.
- Earth point for connecting earth cable to earth/ground spike.
- 230V and 110V outlets to power domestic and industrial equipment.
- Pull to start engine, several pulls may be required.
- Air filter housing, remove to access air filter.
- Exhaust gases are emitted here.
- Engine oil filler cap with built in dipstick.
- 12V DC outlet to power 12V devices, charge 12V batteries etc.
- Choke lever, used to aid cold starting.
- Remove this cover to access the spark plug.
7. UNPACKING & CHECKING
7.1 PACKAGING
Carefully remove the machine from the packaging and examine it for any sign of damage that may have happened during shipping. Lay the contents out and check them against the parts shown below. If any part is damaged or missing; please contact the Draper Helpline (the telephone number appears on the Title page) and do not attempt to use the machine.
The packaging material should be retained at least during the guarantee period: in case the machine needs to be returned for repair.
Warning! Some of the packaging materials used may be harmful to children. Do not leave any of these materials in the reach of children.
If any of the packaging is to be thrown away, make sure they are disposed of correctly; according to local regulations.
7.2 WHAT'S IN THE BOX?

natural_image
Black-and-white photo of various wrenches and pliers with numbered labels (20 and 21), no visible text or symbols on the main objects.⑳ Tools.
②1 12V DC battery charging lead.
8. PREPARING THE GENERATOR
Carefully remove everything from the packaging and compare it against the identification guide. If anything appears to be missing please contact the place of purchase.
8.1 CONNECTING WHEELS - FIGS. 1 - 2
Place axle through wheel and then through shaft on generator frame using washers and nyloc's to tighten.
Line up rubber feet with holes in base of frame using hex bolts, washer and nuts assemble feet to frame.

natural_image
Close-up of a car wheel and suspension bracket (no visible text or symbols)
natural_image
Close-up of aircraft landing gear components with no visible text or symbols8.2 CONNECTING HANDLES - FIG 3
Attach bracket to frame, noting correct way up. Connect handle to bracket using nut and bolt provided.

natural_image
Close-up of a hand adjusting mechanical components on a vehicle chassis (no visible text or symbols)9. SETTING THE GENERATOR
9.1 AUTOMATIC VOLTAGE REGULATOR (AVR)
This generator has been equipped with AVR technology which provides automatic voltage regulated power for continuous uninterrupted stable power supply.
The AVR maintains a regulated AC output and reacts substantially quicker to rapid surges in voltage, therefore, preventing the possibility of damage to the generator and attached equipment.
For sensitive equipment please ensure you protect with relevant surge protection equipment.
9.2 PREPARING THE GENERATOR - FIGS. 4 - 7
It is important to check the generator before you commence operating the unit.
IMPORTANT: Ensure that the engine has oil. When leaving the factory, this generator has NO OIL in the engine.
NOTE: The generator has a low oil sensor and will not start if the generator has no oil (Fig.4).
9.3 FUELLING
Use unleaded petrol only.
- Remove the petrol cap ②.
- Ensure the fuel filter is in place - Do not pour fuel into the tank without the fuel filter ⑥ in place.
- Do not over fill - leave air gap at top of fuel level.
- Always screw down fuel cap.
- Clean up any spilled fuel immediately.
- Move generator at least 12 feet (4M) away from the fuelling area before starting.
WARNING:
- Do not refill fuel tank while engine is running or is hot.
- Check to ensure that the fuel drain has been tightened and that fuel is not leaking.
- Be careful not to admit dust, dirt, water or other foreign objects into the fuel.
- Wipe off spilt fuel thoroughly before starting engine.
- Ensure you DO NOT fuel the generator in close proximity to any open flames.

natural_image
Close-up of a hand adjusting a mechanical component with a pipe fitting (no visible text or symbols)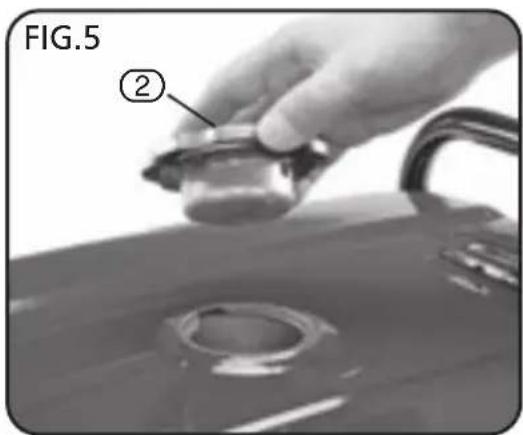
text_image
FIG.5 ②
text_image
FIG.6 ⑥
text_image
FIG.7 159. SETTING THE GENERATOR
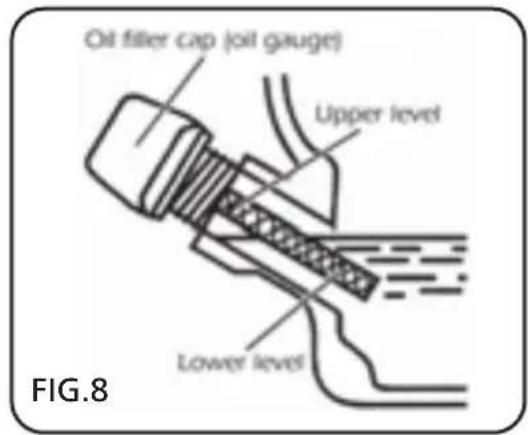
9.4 CHECKING THE ENGINE OIL - FIGS. 8 - 9
The motor of this generator is not filled with oil.
Prior to starting the motor ensure the crank case is filled with SAE 30/10W-40 stroke oil.
Damage to the motor is not covered under warranty if the motor is run without oil.
- Before checking or refilling oil, be sure the generator is put on a stable and level surface, ensuring the engine has been switched OFF.
- Remove the oil filter cap ⑫ by rotating the cap anti-clockwise and inspect to see the oil level (Fig.9).
- If the oil level is below the lower level line, refill with SAE 30/10W-40 stroke oil to the upper level line.
NOTE: Do not screw in the oil filler cap (12) when checking oil level, simply insert and pull the cap straight out.
- If the oil is contaminated or has discoloured, ensure you change the oil. Refer to the 'Engine oil replacement' section for instructions.
NOTE: This motor is fitted with a low oil sensor. If the oil level is too low the motor will stop operating or the motor will not start. It is advised to check the oil level each time the generator is used.
NEVER START THE GENERATOR WITH ANY LOAD CONNECTED.
PLEASE: The first 25 hours of operation is considered the break in period for the engine. During this time operate at less than 75% of the load limit.
text_image
Oil filler cap (oil gauge) Upper level Lower level FIG.8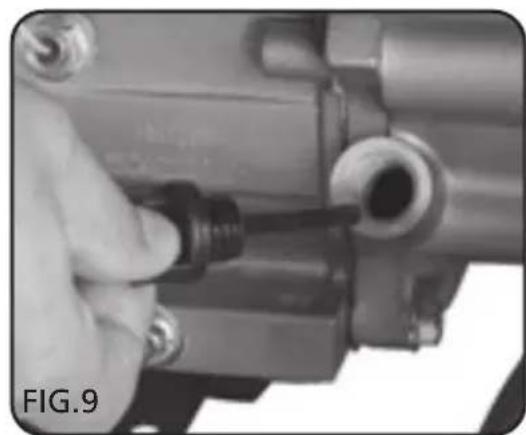
natural_image
Close-up of a hand adjusting a mechanical component with a threaded bolt (no visible text or symbols)9. SETTING THE GENERATOR
9.5 STARTING THE GENERATOR - FIGS. 10 - 13
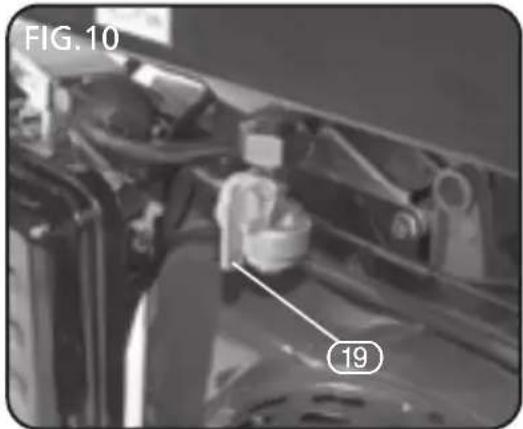
Step1: Turn on the fuel tap ⑲ (Fig.10).
Step 2: Turn on the engine switch ⑧ (Fig.11).
Step 3: PULL choke lever 17 to the start (closed || ) position. The choke may not be needed if the engine is warm.
Step 4: Pull slowly on the starter cord ⑨ until it engages. Then pull sharply to start the engine (Fig.12).
Step 5: If starting from cold allow the engine to run with no load for a few minutes to allow the engine to warm up.
Step 6: PUSH the choke lever to the open | ♦ | position.
9.6 STOPPING THE GENERATOR
Step 1: Turn off main engine switch.
Step 2: Unplug all appliance power cords.
Step 3: Turn the fuel tap ⑲ to the off position.
9.7 CONNECTING APPARATUS TO THE GENERATOR
-
Start the engine. Allow the motor to run for a couple of minutes to warm up prior to connecting any apparatus to the generator.
-
For AC current ensure the AC circuit breakers are in the "OFF" position.
-
Ensure correct voltage is selected, then plug power cord into AC output socket.
-
Switch the AC circuit breakers to the "ON" position.
NOTE: There are 2 voltages - please ensure correct voltage is selected.
CAUTION: Ensure the electric apparatus is turned off before plugging in.
Check to ensure that the total load is within the generator rated output.
Ensure circuit breaker is in 'ON' position.
For DC current plug into the DC outlet socket. Only use a DC plug to charge lead acid type batteries. Do not charge Ni-cad or any other type of batteries.
text_image
FIG.10 19
text_image
ENG.SW. ON OFF 8 FIG.11
text_image
FIG.12 17
natural_image
Close-up of a mechanical device with a hand adjusting its internal components, labeled with number 9 (no text or symbols on the device itself)9. SETTING THE GENERATOR
NOTE: In most cases, operating the generator with both the 230V AC, 110V and the 12V DC at the same time, the DC Circuit breaker may open circuit.
When charging batteries, only use the 12V DC outlet and leave the plug removed from the 230V AC outlet.
WARNING: Prior to connecting any appliance to the generator, check the rating label of the appliance. The generator is rated at 2500W so if the appliance being connected is higher than 2500W, the protective cut out on the generator may operate to prevent over load damage to the generator. The generator will withstand short operation and spikes up to 2500W or the generator may stop.
NOTE: Motorised products will require more energy upon start up and products which are rated below 2500W may not start if the starting current is excessive.
It should also be very clearly understood that output voltage fluctuations will occur when various loads are connected and disconnected. It is NOT recommended to connect any electronic equipment to the generator without a voltage or surge protector. Computers, televisions, and stereo equipment can be very sensitive to the input supply and could be damaged if protective equipment is not used in conjunction with this generator. This also includes caravans where electronic equipment is incorporated as part of the wiring.
9.8 AC CIRCUIT BREAKERS
This generator has been equipped with AC circuit breakers, designed to protect people against an electric shock.
9. SETTING THE GENERATOR
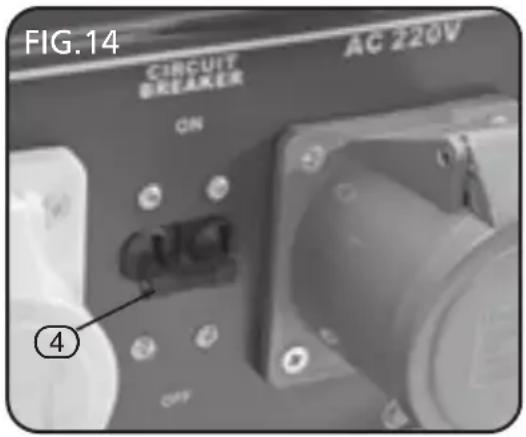
9.9 SAFETY SWITCH TRIPPING - FIG.14
If the safety switch ④ has tripped and cuts off the power, it may be due to substantial overloading. Marginal overloading may not switch off the safety switch but it will shorten the service life of the generator.
Be sure that all appliances are in good working order before connecting them to the generator. If an appliance begins to operate abnormally, becomes sluggish, or stops suddenly, turn "OFF" both the AC circuit breakers and the generator engine switch immediately. Then disconnect the appliance and examine it for signs of malfunction.
Resetting the safety switch should restore the power and should be conducted as follows:
- Unplug all electrical apparatus from the generator.
- Lift the safety switch up to the "ON" position.
- Commence to start your generator accordingly.
- When re connecting appliances, reduce the load to that which previously overloaded the generator.
If the safety switch ④ does not reset due to a faulty electrical appliance or wiring, switch off and unplug the appliance which may be faulty. Any faulty electrical appliances will need to be repaired by a suitably qualified person. If the safety switch does not reset after unplugging the appliance, call a licensed electrician to find the fault.
Immediately switch off the generator in case of:
* Excessive engine noise - knocking or rattling.
* Broken switches.
* Smoke or smell caused by scorched insulation other than that through the exhaust.
9.10 OPERATION LOAD AND RATINGS
Please ensure that the load on the generator falls within its capacity as specified in the table before plugging in any power cords.
text_image
FIG.14 CIRCUIT AC 220V 图型及电源 CN ④10. MAINTENANCE
Make sure that the generator is not running when carrying out maintenance work.
The 'Draper' generator has been designed to operate over a long period of time. Continuous satisfactory operation depends upon proper machine care, regular cleaning and by following the periodic maintenance schedule. If the generator is operating in unusually dusty or hot conditions the time between servicing the generator must be decreased.
Inspect the generator and extension cables periodically and if damaged have them repaired by a qualified person or authorised service body. Do not use the generator with damaged parts.
10.1 OIL REPLACEMENT
- Warm up engine on level ground.
- Turn engine off.
- Remove oil filler cap.
- Open drain plug and let oil drain completely into a pan placed under the engine.
- Check gaskets and if required. Refit drain plug and refill engine with clean oil.
- Replace filler cap.
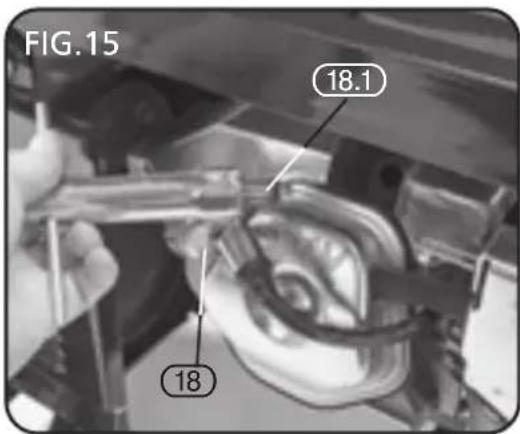
10.2 SPARK PLUG INSPECTION - FIG. 15
- Remove spark plug connection ⑱ by hand.
- Remove spark plug (18.1) with plug spanner provided.
- Inspect the spark plug. It should be a tan colour.
- Adjust the gap 0.7 - 0.8mm.
- Replace the spark plug with correct torque: 20Nm (2m.kg 14 ftlb).
- Replace spark plug if required.
text_image
FIG.15 18.1 1810.3 AIR FILTER CLEANING
CAUTION: Do not run the engine without the air filter element in place.
- Unscrew the air filter cover.
- Remove filter element and wash well in solvent.
- Pour a small amount of oil (SAE 20) onto the filter element and gently squeeze out any excess oil.
- Replace the filter element and air filter cover.
- Be sure the filter cover seats properly all around.
10. MAINTENANCE
10.4 PERIODIC MAINTENANCE
| Item Remarks | Pre-operation check (daily) | Initial 1 months or 20Hr | Every 3 months or 50Hr | Every 6 months or 100Hr | Every 12 months or 300Hr | |
| Spark plug | Check condition, adjust gap and clean. Replace if necessary. | ● | ||||
| Engine oil | Check oil level. | ● | ||||
| Replace. | ● | ● | ||||
| Air filter Clean. Replace if necessary. | ● | |||||
| Fuel filter | Clean fuel drain filter. Replace if necessary. | ● | ||||
| Valve clearance | Check and adjust when engine is cold. | ● | ||||
| Fuel line | Check fuel hose for crack or damage. Replace if necessary. | ● | ||||
| Exhaust system | Check for leakage. Retighten or replace gasket if necessary. | ● | ||||
| Check muffler screen. Clean/replace if necessary. | ● | |||||
| Carburettor Check choke operation. | ● | |||||
| Starting system | Check key start ignition operation. | ● | ||||
| Decarbonisation More frequently if necessary. | ● | |||||
| Fittings/fasteners | Check all fittings and fasteners correct if necessary. | ● | ||||
Regular maintenance is most important for the best performance and safe operation.
10.5 RISK OF ELECTROCUTION AND FIRE
| HAZARD | WHAT COULD HAPPEN HOW TO PREVENT IT | |
| Improper storage of extension cord. | Extension cord can come into contact with hot engine parts resulting in damage. Using a damaged extension cord can result in electrocution of death. | Remove extension cord from the generator and store separately away from generator. |
| Operation of generator in rain, wet, icy, or flooded conditions. | Water is an excellent conductor of electricity! Water which comes in contact with electrically charged components can transmit electricity to the frame and other surfaces, resulting in electrical shock to anyone contacting them. | Operate generator in a clean, dry, well ventilated area. Make sure hands are dry before touching unit. |
| Placing generator on or against highly conductive surface, such as a steel walkway or metal roof. | Accidental leakage of electrical current could charge conductive surfaces in contact with the generator. | Place generator on low conductivity surface such as a concrete slab.ALWAYS operate generator a minimum of 2 meters from any conductive surface. |
| Use of worm, damaged or ungrounded extension cords. | Contact with worn of damaged extension cords could result in electrocution.Use of ungrounded cordsets could prevent operation of circuit breakers and result in electrical shock. | Inspect extension cords before use and replace with new cord if required.Always use a cordset having a grounding wire with an appropriate grounding plug.DO NOT use an ungrounded plug. |
| Operation of unit when damaged, or with guards or panels removed. | Attempting to use the unit when it has been damaged, or when it is not functioning normally could result in fire or electrocution.Removal of guarding could expose electrically charged components and result in electrocution. | Do not operate generator with mechanical or electrical problem. Have unit repaired by an Authorised Service Centre.Do not operate generator with protective guarding removed. |
10.6 RISK OF FIRE
| HAZARD | WHAT COULD HAPPEN HOW TO PREVENT IT | |
| Attempting to fill the fuel tank while the engine is running. | Fuel and fuel vapours can become ignited by coming in contact with hot components such as the muffler, engine exhaust gases, or from an electrical spark. | Turn engine off and allow it to cool before adding fuel to the tank. Equip area of operation with a fire extinguisher certified to handle gasoline or fuel fires. |
| Sparks, fire, hot objects | Cigarettes, sparks, fires, or other hot objects can cause fuel or fuel vapours to ignite. | Add fuel to tank in well ventilated area. Make sure there are no sources of ignition near the generator. |
| Improper storage of fuel | Improperly stored fuel could lead to accidental ignition. Fuel improperly secured could get into the hands of children or other unqualified persons. | Store fuel in an approved container designed to hold fuel. Store container in secure location to prevent use by others. |
| Tampering with factory set engine speed settings. | Engine speed has been factory set to provide safe operation. Tampering with the engine speed adjustment could result in overheating of attachments and could cause a fire. | Never attempt to “speed-up” the engine to obtain more performance. Both the output voltage and frequency will be thrown out of standard by this practice, endangering attachments and the user. |
| Inadequate ventilation for generator | Materials placed against or near the generator or operating the generator in areas where the temperature exceeds 40°C. ambient (such as storage rooms or garages) can interfere with its proper ventilation features causing overheating and possible ignition of the materials or buildings. | Operate generator in a clean, dry, well ventilated area.DO NOT OPERATE UNIT INDOORS OR IN ANY CONFINED AREA. |
| Overfilling the fuel tank – fuel spillage. | Spilled fuel and its vapours can become ignited from hot surfaces or sparks. | Use care in filling the tank to avoid spilling fuel. Make sure fuel cap is secured tightly and check engine for fuel leaks before starting engine. Move generator away from refuelling area or any spillage before starting engine. Allow for fuel expansion. Never refuel with the engine running. |
10.7 RISK OF INJURY AND PROPERTY DAMAGE WHEN TRANSPORTING GENERATOR
| HAZARD | WHAT COULD HAPPEN HOW TO PREVENT IT | |
| Fire, inhalation, damage to vehicle surfaces | Fuel or oil can leak or spill and could result in fire or breathing hazard, serious injury or death can result. Fuel or oil leaks can damage carpet, paint or other surfaces in vehicles or trailers. | The generator is equipped with a fuel drain valve, turn the valve to the off position before transporting to avoid fuel leaks. Transport fuel only in an approved fuel container. Always place generator on a protective mat when transporting to protect against damage to vehicle from leaks. Remove generator from vehicle immediately upon arrival at your destination. |
10.8 RISK OF BREATHING - INHALATION HAZARD
| HAZARD | WHAT COULD HAPPEN HOW TO PREVENT IT | |
| Gasoline engines produce toxic carbon monoxide exhaust fumes. | Breathing exhaust fumes will cause serious injury or death. | Operate generator in clean, dry, well ventilated area.Never operate unit in enclosed areas such as garages, basements, storage, sheds, or in any location occupied by humans or animals. Keep children, pets and others away from area of operating unit. |
10. MAINTENANCE
10.9 RISK OF UNSAFE OPERATION
| HAZARD | WHAT COULD HAPPEN HOW TO PREVENT IT | |
| Operation of generator in careless manner. | All sources of energy include the potential for injury. Unsafe operation or maintenance of your generator could lead to serious injury or death to you or others. | · Review and understand all of the operating instructions and warnings in this manual.· Become familiar with the operation and controls of the generator. Know how to shut it off quickly.· Equip area of operation with a fire extinguisher certified to handle gasoline or fuel fires.· Keep children of others away from the generator at all times. |
| Operating generator while suspended | Generator will not operate properly and will cause damage to the generator and could cause serious injury or death to you or others. | Never operate generator while suspended or in an unlevel position. Always operate generate on a flat, level surface. |
10.10 RISK OF HOT SURFACES
| HAZARD | WHAT COULD HAPPEN HOW TO PREVENT IT | |
| Contact with hot engine and generator components. | Contact with hot surfaces, such as engines exhaust components, could result in serious burns. | During operation, touch only the control surfaces of the generator. Keep children away from the generator at all times. They may not be able to recognize the hazards of this product. |
10.11 RISK OF MOVING PARTS
| HAZARD | WHAT COULD HAPPEN HOW TO PREVENT IT | |
| Contact with moving parts can result in serious injury. | The generator contains parts which rotate at high speed during operation. These parts are covered by guarding to prevent injury. | Never operate generator with guarding or cover plates removed. Avoid wearing loose fitting clothing or jewellery which could be caught by moving parts. |
10.12 RISK FROM LIFTING
| HAZARD | WHAT COULD HAPPEN HOW TO PREVENT IT | |
| Lifting a very heavy object. | Serious injury can result from attempting to lift too heavy an object. | When lifting, always keep the object you are lifting near the vertical axis of your body. DO NOT use you back to lift heavy loads. Both people should crouch down, grab the underside of unit and use your legs to carry the weight. Keep the object as near the centre of your body's gravity as possible. Avoid twisting your bodies when carrying the unit; instead, turn your whole body using your feet. |
11. TROUBLESHOOTING
| TROUBLE | POSSIBLE CAUSE SUGGESTED REMEDY | |
| Contact with moving parts can result in serious injury. | 1. Low on fuel or oil content | 1. Add fuel or oil |
| 2. Ignition switch in “Off” position | 2. Turn the ignition to the ‘START’ position if using key start, or ‘ON’ position if manually starting. | |
| 3. Faulty spark plug | 3. Replace spark plug | |
| 4. Choke in wrong position | 4. Adjust choke accordingly | |
| 5. Fuel shut-off valve in closed position | 5. Open fuel shut-off valve | |
| 6. Unit loaded during start-up | 6. Remove load from unit | |
| 7. Spark plug wire loose | 7. Attach wire to spark plug | |
| No electrical output | 1. Faulty receptacle | 1. Have service centre replace receptacle |
| 2. Circuit breaker kicked out | 2. Depress and reset | |
| 3. Worn brushes | 3. Have service centre replace brushes | |
| 4. Faulty power cord | 4. Replace cord | |
| Repeated circuit breaker tripping | 1. Overload | 1. Reduce load |
| 2. Faulty cords or equipment | 2. Check for damaged, bare, or frayed wires on equipment. Replace. | |
| Generator overheating | 1. Generator overloaded | 1. Reduce load |
| 2. Insufficient ventilation | 2. Move to adequate supply of fresh air | |
12. EXPLANATION OF SYMBOLS
12.1 EXPLANATION OF SYMBOLS

Do not use in the wet.

Warning! Read the instruction manual

Caution!

For outdoor use only. Do not expose to rain.

Danger! Highly flammable liquid

Engine and exhaust become hot during use; do not touch.

WEEE Do not dispose of Waste Electrical & Electronic Equipment in with domestic rubbish
Caution! Risk of electric shock

Warning! Wear ear defenders.
13. DISPOSAL
13.1 DISPOSAL
- At the end of the machine's working life, or when it can no longer be repaired, ensure that it is disposed of according to national regulations.
- Contact your local authority for details of collection schemes in your area.
In all circumstances:
- Do not dispose of power tools with domestic waste.
- Do not incinerate.
- Do not abandon in the environment.
- Do not dispose of WEEE* as unsorted municipal waste.

* Waste Electrical & Electronic Equipment.
- DRAPER TOOLS LIMITED,
Hursley Road, Chandler's Ford, Eastleigh, Hampshire. SO53 1YF. U.K.
- Helpline: (023) 8049 4344
- Sales Desk: (023) 8049 4333
- General Enquiries: (023) 8026 6355
- Service/Warranty Repair Agent
For aftersales servicing or warranty repairs, please contact the Draper Tools Helpline for details of an agent in your local area.
YOUR DRAPER STOCKIST
KCMC0516