AW58800HTA - Access Point AvaLAN - Free user manual and instructions
Find the device manual for free AW58800HTA AvaLAN in PDF.

User questions about AW58800HTA AvaLAN
0 question about this device. Answer the ones you know or ask your own.
Ask a new question about this device
Download the instructions for your Access Point in PDF format for free! Find your manual AW58800HTA - AvaLAN and take your electronic device back in hand. On this page are published all the documents necessary for the use of your device. AW58800HTA by AvaLAN.
USER MANUAL AW58800HTA AvaLAN
natural_image
Two white wireless antenna devices mounted on vertical posts, one with a diamond-shaped base and the other with two tall towers (no visible text or symbols)AW58800HTA
AW58800HTS
USER'S MANUAL
5.8 GHz Outdoor 800 Mbps Wireless Ethernet Access Point and Subscriber Unit Radios
Industrial-grade, long-range wireless Ethernet systems
The AW58800HTA is a radio with dual omnidirectional antennas. It serves as an Access Point (master) in a point-to-multipoint network. The AW58800HTS is a radio with a dual flat panel high gain directional antenna. Multiple AW58800HTS radios can serve as a Subscriber Units (clients) in conjunction with an AW58800HTA.
The AW58800HTA includes: The AW58800HTS includes:
(1) AW58800HTA Access Point Radio
(1) AW58800HTS Subscriber Unit Radio
(1) Heavy Duty Pole-mount Bracket
(1) Heavy Duty Pole-mount Bracket
(1) Power Over Ethernet Injector
(1) Power Over Ethernet Injector
(1) 24 VDC power supply
(1) 24 VDC power supply
WARNING: The use of any antenna other than those provided with the product is forbidden in accordance to FCC rules CFR47 part 15.204. Professional installation is required for radio equipment with N-Type antenna connectors to ensure compliance with radio frequency output power. For compliance with health safety for radio energy exposure regulations, a minimum distance of 63 cm must be maintained between the antennae and the general public.
Table of Contents
| Quick Start Guide | 3 |
| LED Status Guide | 4 |
| Digital Configuration | 5 |
| Connecting To The Radio | 5 |
| Changing the Configuration - Step By Step | 6 |
| Viewing Status Information | 8 |
| Physical Setup | 9 |
| Technical Specifications | 12 |
| Frequency Channels | 13 |
| Warranty and FCC Information | 13 |
If you have any questions when configuring your AvaLAN system, the best place to get answers is to visit www.avalanwireless.com. You will also find the latest updates there. If more assistance is needed, send email to support@avalanwireless.com.
To speak to a live technician, please call technical support at the number below during normal business hours.
© by AvaLAN Wireless Systems Inc. All rights reserved.
Revision 10.21.2014
125A Castle Drive
Madison, AL 35758
Phone: (650) 384-0000
Fax: (650) 249-3591
Quick Start Guide
Step 1. Radios are Preconfigured out of the Box
Step 2. Mount Radios
Step 3. Align Radios
Step 4. Attach Cables
System Default:
IP Address: 192.168.88.10 (Subscriber Unit)
192.168.88.12 (Access Point)
Username: admin
Password: password
Best Practices:
- Ensure clear visual path between radios before deployment
- Test on bench before deployment
-
Networking Cable:
-
CAT 6 Shielded Outdoor Grade
- For AW58800 - maximum length 60 ft/20 meters
Tools Needed:
- 12 inch wrench
- Large Phillips head screwdriver
- Small flat screwdriver

text_image
Multipoint-to-Point AW58800HTA Access Point Up to 5 miles Line-of-Sight Supported POE *Networking cable* POE *Networking cable not provided AW58800HTS Subscriber UnitsLED Status Information

natural_image
Close-up of a metallic connector with a glowing yellow indicator light on its surface (no text or symbols visible)Access Point LED Guide

text_image
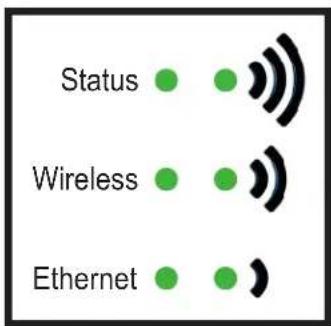
Ethernet Rx Tx Status Wireless— This light will blink when receiving data
— This light will blink when transmitting data
The wireless status light blinks slowly when the product is powered and is lit solid when it has a successful wireless connection.
Subscriber Unit LED Guide
text_image
Status Wireless EthernetThe wireless status light blinks slowly when the product is powered and is lit solid when it has a successful wireless connection.
— The wireless activity light blinks when receiving data.
— The Ethernet activity light blinks when receiving data.
Digital Configuration
Connecting to the radio
- Digital configuration is done by means of the radio's built in browser interface. The unit should be powered on and connected at least temporarily to a network containing a computer that can run a conventional web browser.
- Using your web browser, connect to the radio as described in the Quick Start Guide found earlier in this manual.
- The initial page after a successful login is "Quick Set." The content of this page is somewhat different for the AW58800HTA Access Point and for the AW58800HTS Subscriber Unit.
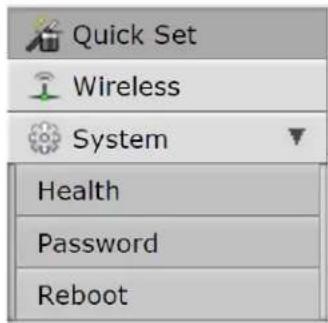
- Each page provides a menu on the left to navigate from section to section. The menu looks like this when its sections are expanded:
text_image
Quick Set Wireless System Health Password RebootBeware that certain actions may cause the web page to freeze. In most cases, this is because you are viewing a browser-cached version of the page and not the live one from the radio. Clear your browser cache and/or logout and log back in to recover. You are cautioned not to use the “back” button on your browser to attempt to move back to earlier pages. If you do, you will be logged out and will need to login again.
In the upper right of the page is a label that tells you the version of the web interface. If the version number is not the same as shown below, you might want to visit www.avalanwireless.com (the Downloads page under the Support menu) to see if a newer version of this manual exists before proceeding further.
WebFig v6.20
Changing The Configuration - Step by Step
Please be aware that if you change the IP Address or User Password and forget their new values, you have locked yourself out of the browser interface. The AW58800 runs self-diagnostics at boot-up and will auto-correct most system configuration errors. Prior to calling technical support, it is recommended to power cycle the radio and confirm that the problem remains.
In the event of a lost IP address, reboot the AW58800 to create a temporary IP address of 192.168.88.88 that can be used to access the radio to reset the user-defined IP address. This IP address expires after 3 minutes from reboot. In the event of a lost password, please contact AvaLAN technical support for assistance.
If you are changing parameters over the RF link (we do not recommend this), be sure to make the remote changes first because the link will be broken if the network name or Security Keys do not agree.

text_image
Network Settings IP Address 192.168.88.12 Netmask 255.0.0.0 (/8) Gateway ▲ 0.0.0.0 System Configuration-
Setting the IP Address and Subnet Mask, Gateway and Device Name:
-
In the upper right area of the Quick Set page are the data entry boxes for these parameters. They contain the current values.
- A special notation is used for the IP Address and Subnet Mask: Use /x at the end of the IP Address to specify the subnet mask: /8 for 255.0.0.0, /16 for 255.255.0.0 and /24 for 255.255.255.0. Enter a new IP Address and subnet making sure you will be able to browse to the new address with your computer. Also, make sure that the new IP address is unique on your LAN.
- The Gateway address should be specified if it is necessary to communicate with the radio through the Gateway. Your system administrator should have this value.
- The Device Name is an arbitrary string and simply allows you to attach a human-friendly name to this specific radio.
-
Click “Apply Configuration” when you have entered new values. Nothing appears to happen, but you have been disconnected and will need to browse to the new IP Address to login again.
-
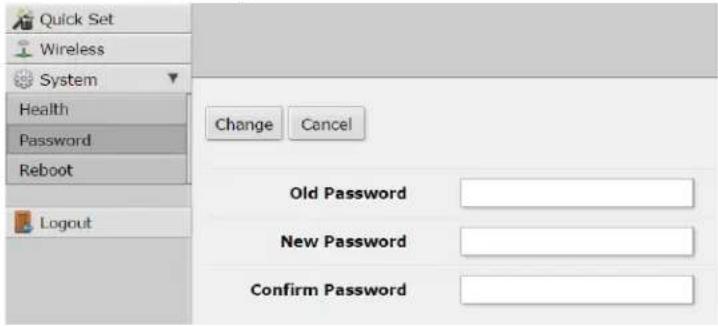
Setting the User Password:
AW58800HTA, HTS User's Manual
- On the Main Menu at the left side of the browser window, click "System", then click "Password."
- Enter the old password and the new password twice in the boxes indicated.
text_image
Quick Set Wireless System Health Password Reboot Logout Change Cancel Old Password New Password Confirm Password- Click the "Change" button.
-
Log out and log back in to test.
-
Setting the Frequency, Network name and Encryption Key:
- To set the Frequency, log in to the Access Point and on the quick start page a selection can be made.

text_image
AvaLAN Wireless AW58800HTA 800Mbps Access Point v3.0 Network Name ▲ AW58800 Frequency auto MHz- The Network name is an arbitrary character string that must be set alike in all linked radios.
- The encryption key is a user specified character string.

text_image
Network Name ▲ AW58800 Encryption Enabled ✓ Encryption Key ……Viewing Status Information
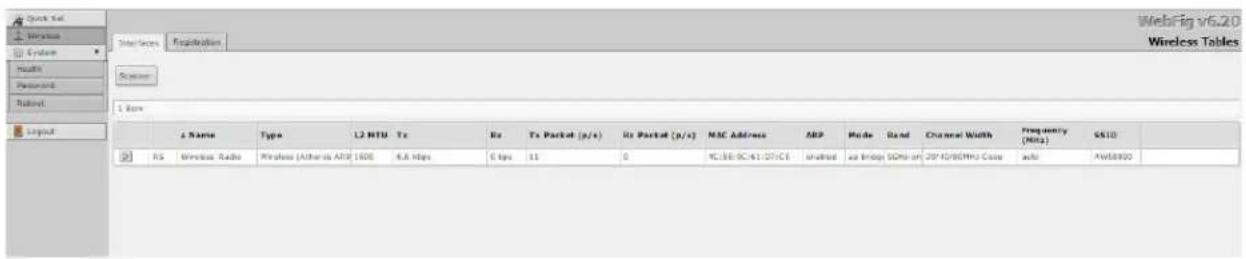
After configuring your AvaLAN radios and establishing links among them, you can use the browser interface to view status and troubleshooting Information. The initial “Quick Set” page will show whether the wireless link is operating and the current signal strength. For more comprehensive information, choose “Wireless” from the Main Menu at the left side of the window. The “Wireless” page leads to most of the useful status information.
text_image
WebFig v6.20 Wireless Tables Interface Registration Network Cycles Hosts Password Rubber 1 Box Layout Δ Name Type L3 MTU Tx Rx Tx Packet (p/s) Rx Packet (p/s) MAC Address ARP Mode Band Channel Width Frequency (MHz) SS10 RS Wireless Radio Wireless (Atheria ARP) 1600 6.8 Mbps 0 fps 11 0 PC:5E-SC:61:27/CE Instruct ax Inlog SGPs on 20*40/90MH Case auto MW5800The table on the Interfaces tab provides a list of the interface processes running in this radio. If it is a Subscriber Unit, there will be only one, “Wireless_Radio.” If it is an Access Point, there will also be a WDS process running for each Subscriber Unit that is connected. These very long rows summarize the configuration details and current running status of the radio. You can click and drag in the heading row of the table to change the column width if part of the data is not visible.

text_image
WebFig v6.20 InterfacePhysical Setup
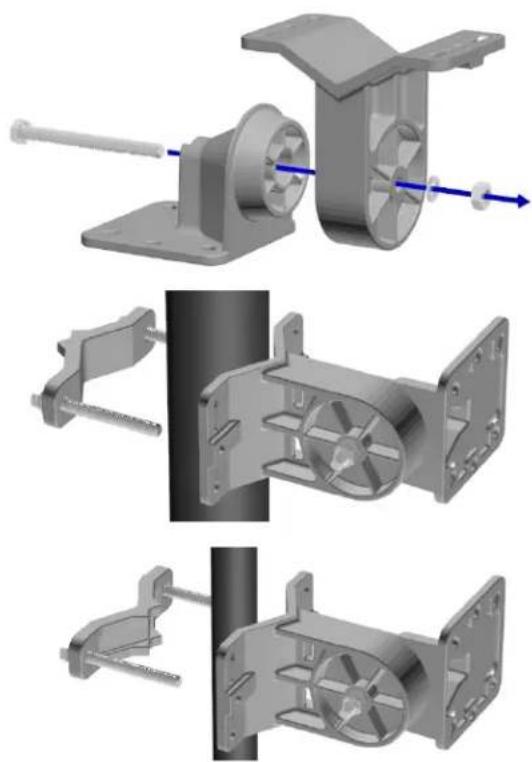
- Mount each unit securely using the mounting brackets provided or other means as necessary. Maximize lightning resistance by providing a strong DC ground connection to the metal housing.
natural_image
Three technical illustrations of mechanical components with arrows indicating motion, showing different assembly states (no text or symbols present)A. Assemble both bracket arms using the Rotator Bolt, a Large Lock Washer and the Hex Nut. Leave the bracket loose enough to rotate.
B. Use one of the following methods, or other methods necessary to secure the bracket.
Wide Pole Mounting: Place the pole between the two large wedges of Bracket Arm A and the Pole Clamp Bar. Use the two Clamp Bolts to bind the bar and bracket to the pole. Use Large Washers and Lock Washers if needed. Leave the clamp loose enough to rotate.
Narrow Pole Mounting: Place the pole between the large wedge of the Bracket Arm A and the small wedge on the reversed side of the Pole Clamp Bar. Use the two Clamp Bolts to bind the bar and bracket to the pole. Use Large Washers and Lock Washers if needed. Leave the clamp loose enough to rotate.

natural_image
3D mechanical assembly diagram showing a motor or fan component with mounting holes and shafts (no text or symbols visible)Wall Mounting: Hold Bracket Arm A flush against the wall then drill four holes of roughly 3/16 inch diameter using the four corner holes of bracket as a measuring guide. If mounting on wood, simply use the Wall Mounting Screws to secure the bracket through its four corner holes and those that you have drilled. If mounting on drywall press Drywall Anchors into the drill-holes then do the same but instead screw into the anchors.

natural_image
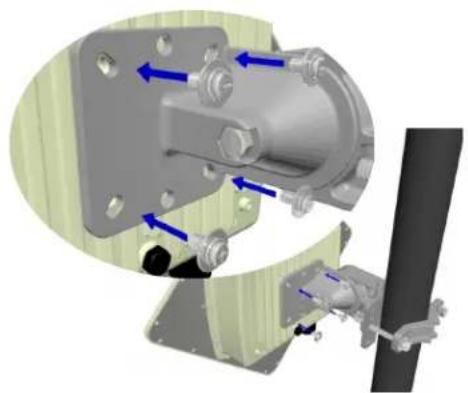
Mechanical assembly diagram showing a rotating component with blue motion arrows (no text or symbols)C. Adjust the bracket apparatus so the square face of Bracket Arm B faces the direction of the device your radio will be communicating with. Then using a 12 inch wrench fully tighten all applicable components.
natural_image
Mechanical assembly diagram showing a motor and housing with blue directional arrows indicating motion (no text or symbols present)D. Use a large Phillips head screwdriver to mount your radio to Bracket Arm B using the four Radio Mounting Screws. Use small washers and lock washers if necessary. Make sure that the orientation arrow on the back of the panel antenna faces upward so that the drainage hole is at the bottom of the radio.

natural_image
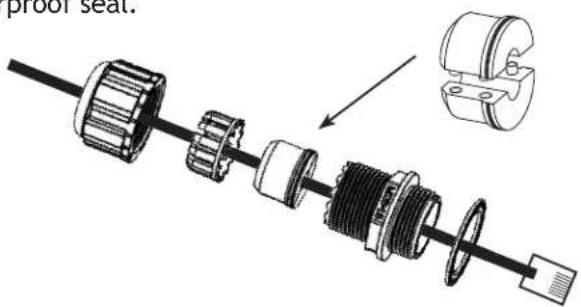
3D mechanical assembly diagram showing components like a housing, valve, and sensor device (no text or labels)E. Assemble the cable gland on the end of your RJ45 Ethernet cable(not provided). Then connect the cable to your radio's Ethernet port, and fasten the gland. The gland must be fully tightened to provide a waterproof seal.
- The AW58800HTS units have dual directional flat panel antennas. It is important that the AW58800HTS antennas be pointed toward their Access Point AW58800HTA. Care should be taken to align the AW58800HTS panel antenna to provide the best performance. The HTS antenna performs best when the panel's face is aligned toward its partner. By browsing to the Access Point radio, you can see a graphical representation of signal strength received from each linked Subscriber Unit. Click the row in the table to display the graph for that particular unit. This information can be used to facilitate the aiming process.
- Power is provided to the units by means of their Ethernet cables, allowing the power supplies to be located at convenient locations. The included power-over-Ethernet injectors (POE) provide the means for adding DC power to unused wires in the cable. Each radio is provided with a cable clamping device that allows an RJ45 plug on the cable to pass through and can be tightened down around the cable to provide a weatherproof seal.
text_image
proof seat.AW58800HTA, HTS User's Manual
text_image
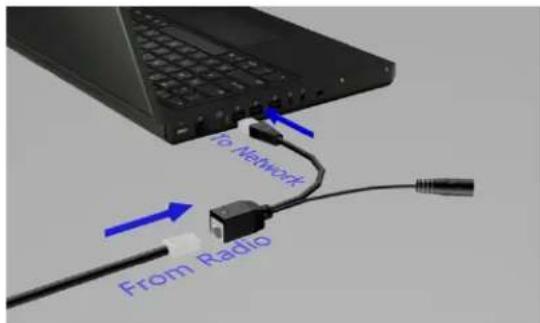
To Network From RadioA. Connect the opposite end of your Ethernet cable to the Power over Ethernet Injector, and the RJ45 tail of the PoE to your network.

text_image
From Power Source To PoEB. Connect the PoE to your 24VDC Power Supply and it to a standard 120VAC outlet.
Troubleshooting:
Power:
- Check that the POE cabling matches illustration
- Check network connection on your switch and verify all RJ45 cables are plugged in properly
- Only use the POE injector supplied
- Ensure the 120VAC is providing clean and consistent AC power to the 24VDC power supply
Signal Quality:
- Ensure line of sight (LOS)
- Check signal strength in web interface (-40dB is excellent strength and -80dB is weak)
Web Interface:
- Plug RJ45 male side of POE directly in to computer and verify network status shows connected
- Verify the local computer's network settings are in the same IP subnet range as the radio
Technical specifications
CHARACTERISTIC SPECIFICATION/DESCRIPTION
| RF transmission rate 866 Mbps | |
| Ethernet data rate Up to 540 Mbps | |
| Output power AW58800HTA Access Point | 4 Watts EIRP with 9 dBi omnidirectional antenna |
| Output power AW58800HTS Subscriber Unit | 4 Watts EIRP with 23 dBi directional antenna |
| Power Consumption 17 Watts Maximum | |
| Receiver Sensitivity -115 dBm for HTS configurations, -101 dBm for the HTA | |
| Frequency Range 5.150 - 5.250 and 5.725 - 5.850 GHz | |
| Channel Bandwidth 80 MHz | |
| RF channels 2 Non-Overlapping with 80 MHz Channel Bandwidth | |
| Modulation OFDM (BPSK, QPSK, 16-QAM, 64-QAM, 256-QAM) | |
| Range Line-of-sight range up to 5 miles for HTA/HTS point-to-point | |
| Browser Management Tools QoS Statistics, Network Settings, Channel Selection | |
| Data Security 256-bit AES-CCM | |
| Operating Environment -40°C to +70°C, IP66, sealed for outdoor operation: die cast aluminum package with rubber gasket seals | |
| Mounting Heavy Duty Pole-Mount Bracket included | |
| Connector | 10/100/1000 Ethernet RJ-45 with weatherproof sealing gland |
| Power System | Power Over Ethernet 24 VDC Injectors included: 100-240 VAC 50/60Hz primary source |
| AW58800HTA Antennas | Omnidirectional, 9 dBi gain in horizontal plane, 16" long |
| AW58800HTA Size | 8.75" Square by 3.25" case plus 16" tall antenna, weight 7 lbs |
| AW58800HTS Antenna | Integrated 23 dBi flat panel, 13" square, 10° Beamwidth |
| AW58800HTS Size | 13" by 13" by 3.25", not including pole-mount bracket, weight 7 lbs |
| Warranty | 1 Year Parts & Labor, XTRa-Care extended warranty available |
| Certification | FCC, IC |
Frequency Channels
| Frequency MHz |
| *Auto - auto scans for unused requency |
| 5180 |
| 5745** |
| 5825** |
**NOTE: These channels overlap. Use one or the other in the event of access point co-location.
Limited Warranty
This product is warranted to the original purchaser for normal use for a period of 360 days from the date of purchase. If a defect covered under this warranty occurs, AvaLAN will repair or replace the defective part, at its option, at no cost. This warranty does not cover defects resulting from misuse or modification of the product.
If you wish, you may purchase extended warranty for this product. AvaLAN's XTRa-Care Extended Warranty provides a two-year extension plus free overnight (Continental USA only) product replacement. Visit our website for more details.
Regulatory Compliance
Compliance Statement ( Part 15.19 )
This device complies with Part 15 of the FCC Rules.
Operation is subject to the following two conditions
-
This device may not cause harmful interference, and
-
This device must accept any interference received, including interference that may cause undesired operation.
Warning ( Part 15.21 )
Changes or modifications not expressly approved by the party responsible for compliance could void the user's authority to operate the equipment.
RF Exposure (OET Bulletin 65)
To comply with FCC RF exposure requirements for mobile transmitting devices, this transmitter should only be used or installed at locations where there is at least 20cm separation distance between the antenna and all persons.
Information to the User - Part 15.105 (b)
This equipment has been tested and found to comply with the limits for a Class B digital device, pursuant to part 15 of the FCC Rules. These limits are designed to provide reasonable protection against harmful interference in a residential installation. This equipment generates, uses and can radiate radio frequency energy and, if not installed and used in accordance with the instructions, may cause harmful interference to radio communications. However, there is no guarantee that interference will not occur in a particular installation. If this equipment does cause harmful interference to radio or television reception, which can be determined by turning the equipment off and on, the user is encouraged to try to correct the interference by one or more of the following measures:
--Reorient or relocate the receiving antenna.
--Increase the separation between the equipment and receiver
--Connect the equipment into an outlet on a circuit different from that to which the receiver is connected.
--Consult the dealer or an experienced radio/TV technician for help.