
UPLMR15BW - Car Radio Pyle - Free user manual and instructions
Find the device manual for free UPLMR15BW Pyle in PDF.

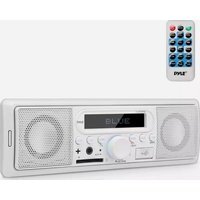
| Product Type | Marine Stereo Radio Receiver |
| Brand | Pyle |
| Model | UPLMR15BW |
| Chassis Dimensions (L x W x H) | 3.93" x 3.93" x 2.75" inches |
| Power Supply | DC 12V, 10 Amp |
| Peak Output Power | 200 Watt |
| Marine Grade Rating | IP-X5 (Water-Resistant/Weatherproof) |
| Display | 3" Full Color LCD |
| Bluetooth Version | 2.0 + EDR (Network name: 'CAR KIT', Password: '0000') |
| Wireless Range | 32+ ft. |
| Tuning Range FM | USA: 87.5~107.9 MHz |
| Tuning Range AM | USA: 530~1710 kHz |
| Tuning Range Weather Band | 162.400~162.550 MHz |
| Digital Audio File Support | MP3, WMA, MPG, AVI, WMV, MOV, MP4 |
| Signal-to-Noise Ratio (FM) | 50 dB |
| Stereo Separation (FM) | >25 dB |
| Preset Stations | 30 (AM/FM memory presets) |
| Equalizer Modes | Classic, Rock, Jazz, Pop, Off |
| Audio Controls | Bass, Treble, Balance, Fader, Loudness |
| Inputs/Outputs | RCA Audio L/R, RCA Video, USB, AV IN |
| Mounting Type | Single DIN Universal |
| Included Accessories | Wireless Remote Control, Power & Wiring Harness Adapters |
Frequently Asked Questions - UPLMR15BW Pyle
User questions about UPLMR15BW Pyle
0 question about this device. Answer the ones you know or ask your own.
Ask a new question about this device
Download the instructions for your Car Radio in PDF format for free! Find your manual UPLMR15BW - Pyle and take your electronic device back in hand. On this page are published all the documents necessary for the use of your device. UPLMR15BW by Pyle.
USER MANUAL UPLMR15BW Pyle
natural_image
Two people smiling while sitting on a boat deck, with a white car in the background (no visible text or symbols)
PLMR15BW
User's Manual
Universal Bluetooth Marine Stereo Radio Receiver
Water-Resistant/Weatherproof, 3" Color LCD Display, MP3/USB Reader, AM/FM Radio, Weatherband
CONTENTS
Installation....3
Mounting....4
Wiring Connection....5
Operation......6
Location of the keys......6
Power on/off the unit....7
Main menu....7
Setup....7
Reset function....9
Radio operation ......9
Switching to the radio mode .....9
Selecting the frequency band......9
Selecting frequency......9
Automatic storing program scanning....9
Manually store station and recall Preset station....10
Stereo on/off 10
Loc on/off....10
USB operation....10
Playing USB 10
Pause playback....10
Select chapter/track....10
Stop playback 10
Back to the playing list....11
Select chapter/track with number buttons....11
Playback with speed....11
Playback in scan mode....11
Playback in random....12
Playback in RPT....12
Playback in image mode......12
AV IN operation ....12
Other function....12
Equalization....12
Mute 12
Loud 12
Sel menu 13
Scan 13
OSD....13
BT operation....13
Pre-pair for bluetooth operation......13
Paring....13
Bluetooth audio(A2DP function)......13
Remote control....14
Performance....16
Notes:
- Choose the mounting location where the unit will not interfere with the normal driving function of the driver.
■ Before finally installing the unit, connect the wiring temporarily and make sure it is all connected up properly and the unit and the system work properly.
■ Use only the parts included with the unit to ensure proper installation. The use of unauthorized parts can cause malfunctions. - Consult with your nearest dealer if installation requires the drilling of holes or other modifications of the vehicle.
- Install the unit where it does not get in the driver's way and cannot injure the passenger if there is a sudden stop, like an emergency stop.
■ Avoid installing the unit where it would be subject to high temperature, such as from direct sunlight, or from hot air, from the heater, or where it would be subject to dust, dirt or excessive vibration.
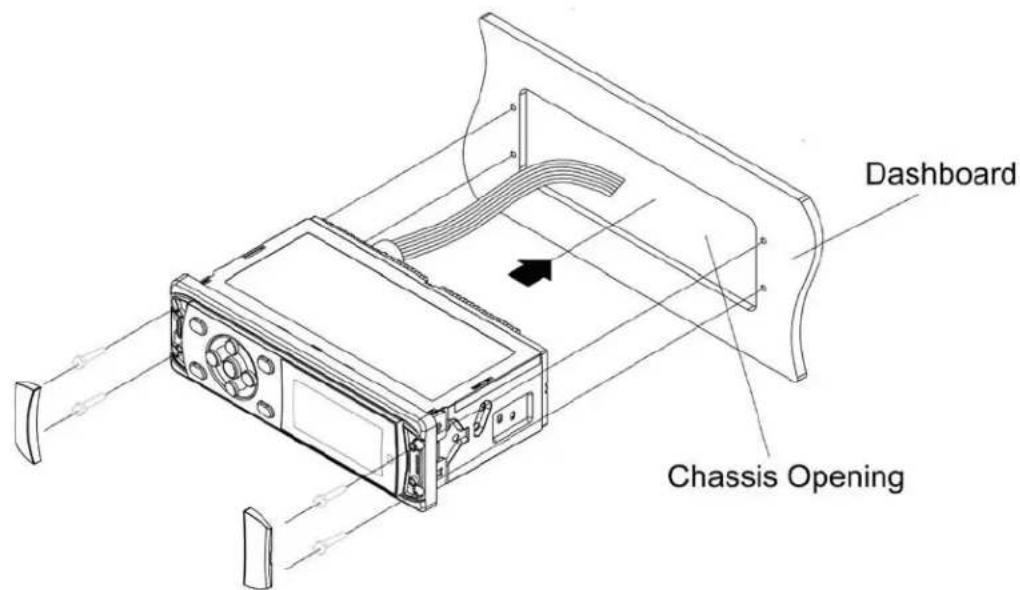
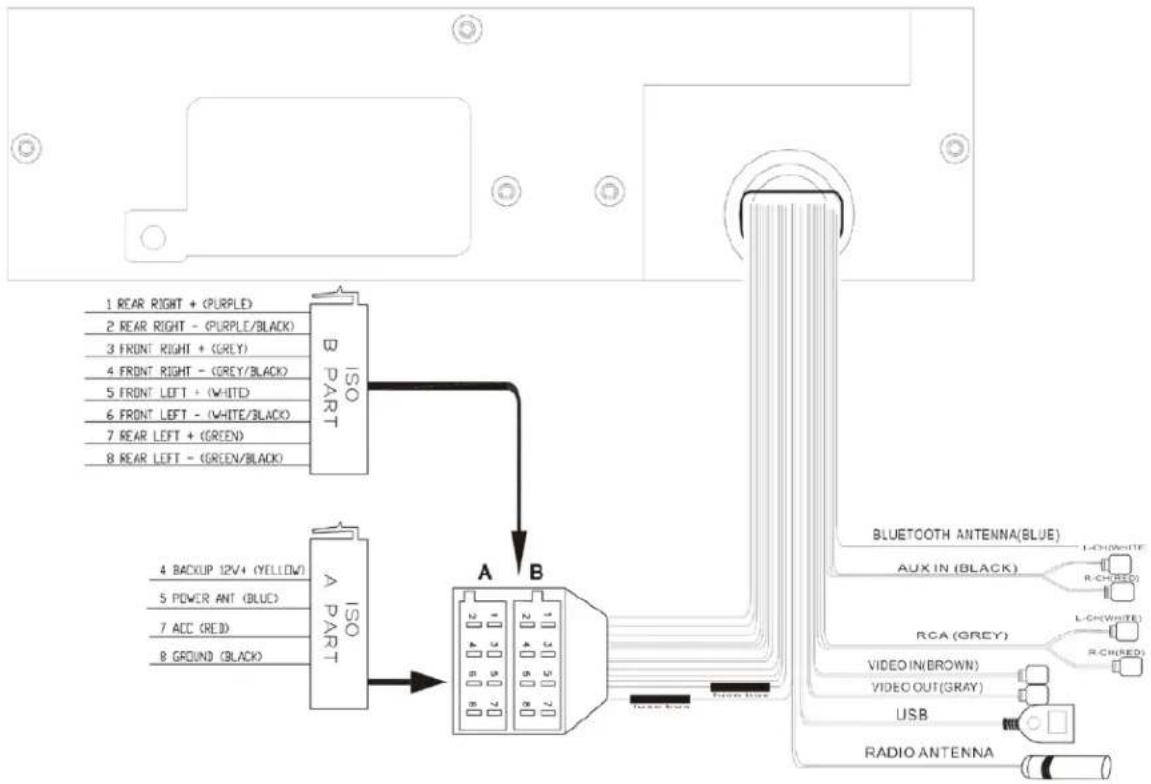
Mounting

- Once a suitable location has been determined, drill the hole and secure the,
- Place the radio in front of the dashboard opening so the wiring can be brought through the opening,
3.Follow the wiring diagram carefully and make certain all connections are secure to ensure.
ISO CONNECTION
flowchart
graph TD
    A["ISO PART"] -->|B REAR RIGHT + (PURPLE)| B["B"]
    A -->|A BACKUP 12V+ (YELLOW)| C["A"]
    A -->|A REAR LEFT - (GREEN/BLACK)| D["B"]
    B --> E["BLUETOOTH ANTENNA(BLUE)"]
    C --> F["AUX IN (BLACK)"]
    C --> G["RCA (GREY)"]
    C --> H["VIDEO OUT(GRAY)"]
    C --> I["USB"]
    C --> J["RADIO ANTENNA"]
    style A fill:#f9f,stroke:#333
    style B fill:#ccf,stroke:#333
    style C fill:#cfc,stroke:#333
    style D fill:#fcc,stroke:#333
    style E fill:#ffc,stroke:#333
    style F fill:#cfc,stroke:#333
    style G fill:#fcc,stroke:#333
    style H fill:#cfc,stroke:#333
    style I fill:#fcc,stroke:#333
    style J fill:#cfc,stroke:#333
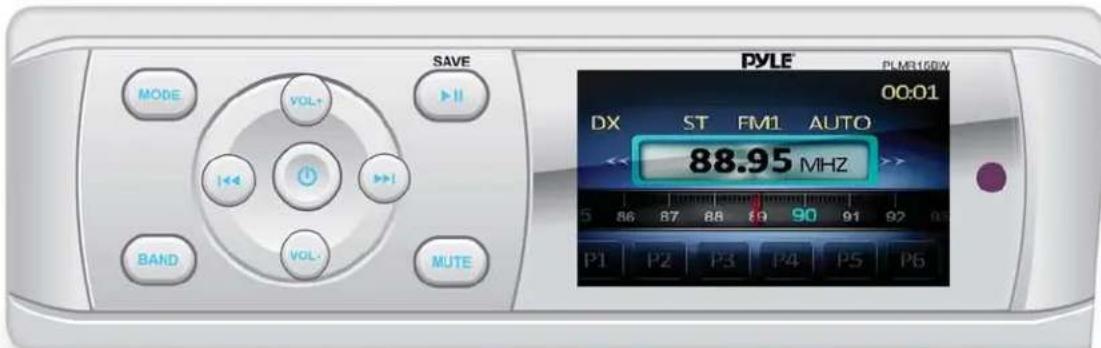
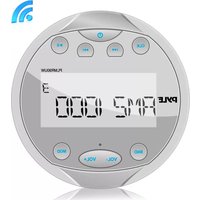
LOCATION OF KEYS
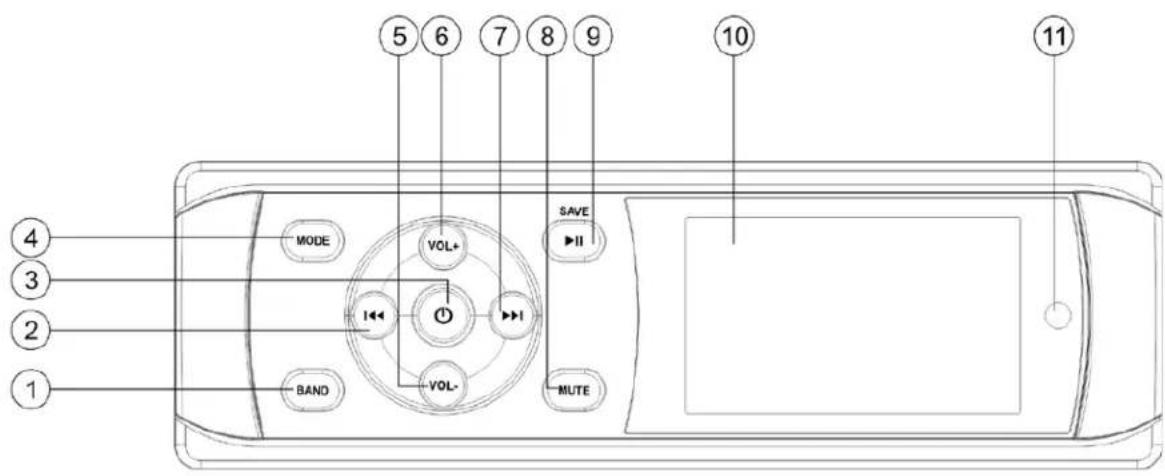
- BAND button
- Seek down button
- Ⓐ Power button
- MODE button
-
VOL -
-
VOL +
- ▶▶ Seek up button
- MUTE button
- ▶Play/pause button/SAVE
- TFT
- IR SENSOR
OPERATION
Press the button to turn on/off the unit.
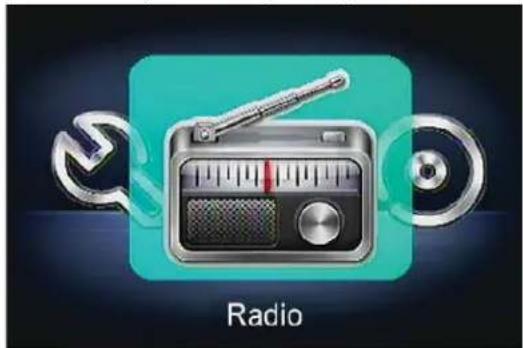
- MAIN MENU
Press and hold SETUP/ENTER button on the remote control for 2 seconds, Then Press "◀" button on the remote control will enter this MAIN menu(see below picture).
natural_image
Illustration of a radio with musical notes and wrench, no text or symbols presentThen Press "A" button on the remote control or "I<</▶bn the front panel to select desired item then press ENTER/SETUP button or ▶II button of the front panel to setting corresponding item.
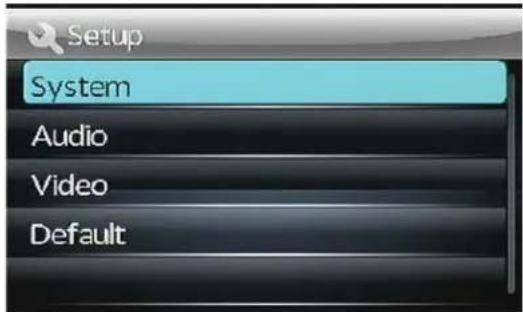
- SETUP
Press and hold ENTER/SETUP button on the remote control for 2 seconds will show the SETTUP menu. See below:
Press "▲" button on the remote control or " ◀◀/▶▶▶▶▶▶▶▶▶▶▶▶▶▶▶▶▶▶▶▶▶▶▶▶▶▶▶▶▶▶▶▶▶▶▶▶▶▶▶▶▶▶▶▶▶▶▶▶▶▶▶▶▶▶▶▶▶▶▶▶▶▶▶▶▶▶▶▶▶▶▶▶▶▶▶▶▶▶▶▶▶▶▶▶▶▶▶▶▶▶▶▶▶▶▶▶▶▶▶▶>
previous menu.)
- SYSTEM SETTINGS
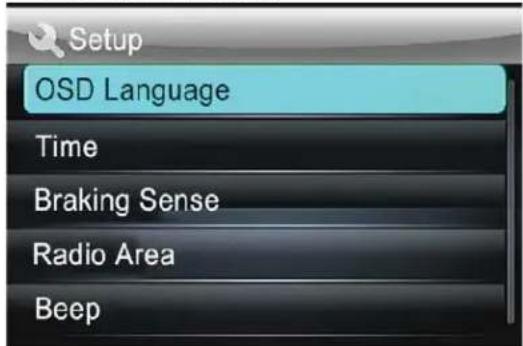
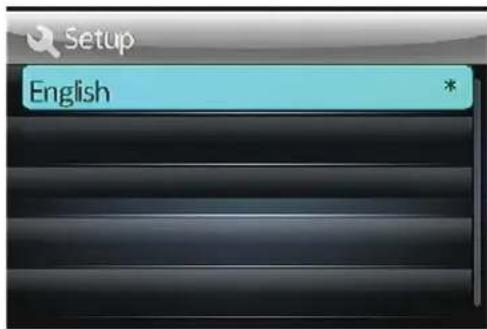
Press "▲/▼button on the remote control or" ◄◄/►►bn the front panel to select OSD Language/Time/Radio Area/Beep. Then press ENTER/SETUP button ►II button of the front panel to enter corresponding item.
1).OSD Language: Now It has English only.
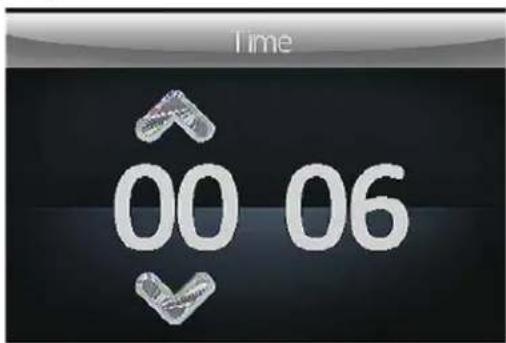
2).Time Press "◀/▼button on the remote control to select adjusting hour or minute. Then press "▲/▼button on the remote control to adjust correct time. Press ENTER/SETUP button exit this item.
OPERATION
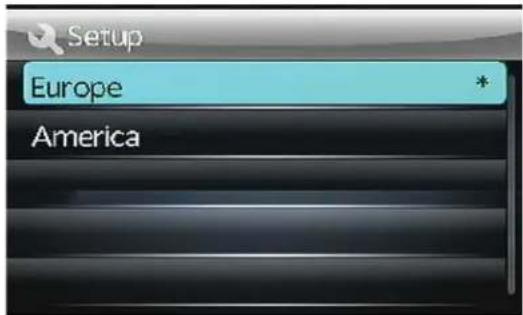
3). Radio Area
Press "▲/▼button on the remote control to select Europe/America.
4).Beep
Press “▲/▼button on the remote control to select on/off.

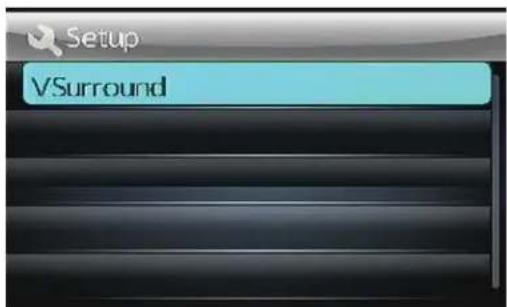
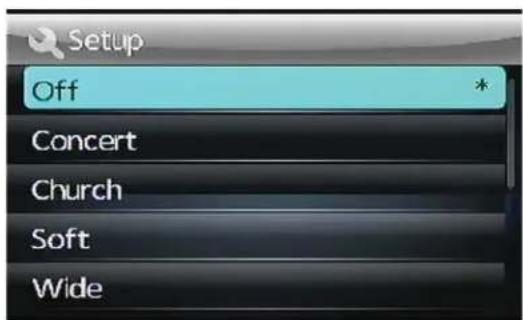
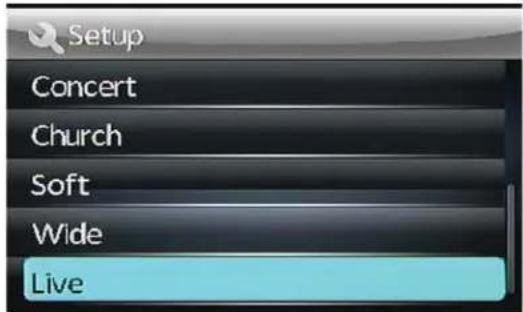
• AUDIO SETTINGS
1).V surround
Press “▲/▼button on the remote control to select Off/Concert/Church/Passive/Wide/Live.
Press “◀” button on the remote control or BND button on the front panel to exit to previous menu.
• VIDEO SETTINGS

Press "▲/▼button on the remote control or " ◀◀/▶▶bn the front panel to select Aspect ratio/Adjust. Then press ENTER/SETUP button to enter corresponding item.
1).Aspect ratio
Press “▲/” button on the remote control to select 4:3 pan scan/16:9.
2).Adjust
Press “▲/▼button on the remote control to select Brightness/Contrast/Hue/Saturation/Sharpness.
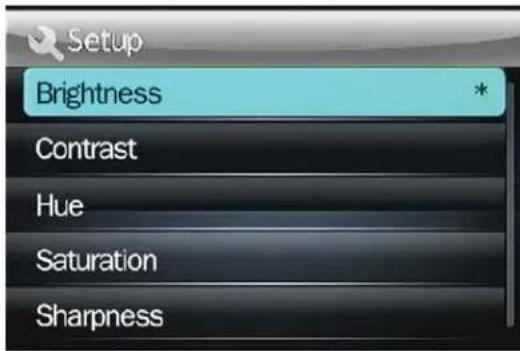
In every item using “ ▲ / ” button to adjust and press ENTER/SETUP button to exit.
- Default SETTINGS
When selecting default function, Press ENTER/SETUP button will reset to default (Same as below RESET function).
■ RESET FUNCTION
Press and hold button for 6 seconds to active the RESET function. The RESET function is to be activated for the following reasons:
Initial installation of the unit when all wiring is completed.
OPERATION Error symbol on the display.
Once the reset button is pressed. All the memory's information will be lost!
■ RADIO OPERATION
1. SWITCHING TO THE RADIO MODE
Press MODE button or in the main menu to select RADIO mode. The following information will appear on the display
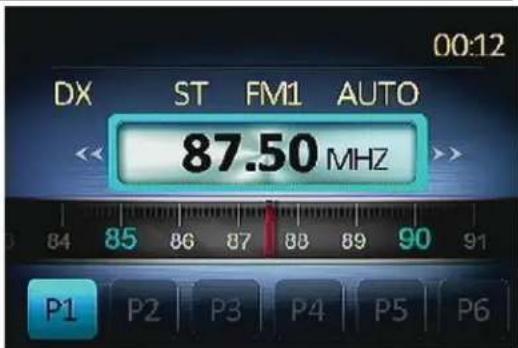
2. SELECTING THE FREQUENCY BAND
Shortly press BAND button to select desired band. The reception band will change in the following order:

You can select Europe or American Band in Radio Area item of the SETUP menu.
3. Selecting Frequency
During radio mode. Shortly press ▶▶/◀◀ button will activate automatic seek function. It will search up/down a station automatically. Press and hold ▶▶/◀◀ button for 2 seconds till “MANUAL” appear on the display. The manual tuning mode is selected. In this mode you can turn up/down a step frequency one by one till searched a station. If both buttons have not been pressed for 5 seconds, it will return to seek tuning mode and “AUTO” appears on the display.
4. Automatic Story & Program Scanning:
- Program scanning
Shortly press AMS button on the remote control to scan preset station which is stored in number 1\~6 buttons. And it will hold at each station for about 5 seconds.
- Automatic storing
Press and hold AMS button on the remote control for 2 seconds. The radio searches from
OPERATION
the 87.5 MHz frequency and checks the signal strength until one cycle search is finished. And then some strong stations are stored into the corresponding preset button. In the first cycle it will in LOCAL mode to receive the stronger station. If it stored stations is not full the preset button. It will searching stations in 2^nd cycle in DX mode.
In WEATHER BAND.
1 button(20): 162.550MHz
2 button(21): 162.400MHz
3 button(22): 162.475MHz
4 button(23): 162.425MHz
5 button(24): 162.450MHz
6 button(25): 162.500MHz
The next station is 162.525 MHz.
Press ▶▶/button to change these stations.
5. Manually store station and recall preset station
1) Remote control operation: Received a station, Press one of the preset button (1\~6) for 2 seconds. The current station will be stored into the number button. Shortly press preset button (1\~6) you can listen to the corresponding station.
2) Front panel operation: Received a station, Press and hold the ▶ button till show SAVE P1 on the display. Press ▶ I/ to change the preset number then press ▶ II button. The current station will be stored into the number button. Shortly press ▶ II button you can listen to the preset station 1\~6. (From preset station 1 to preset station 6).
6. Stereo on/off:
Press ST button on remote control to select mono or stereo mode. Sometimes when the signal is not good. If you change it to MONO mode the noise will be reduced. Also you can turn it on/off in SEL menu.
7. Local on/off:
Press LOC button on the remote control to select LOC or DX mode. In LOC mode the unit will reduce the receiving sensitivity when you search station. That means you can receive the station that sound is good. It will ignore the station that sound is not good. In DX mode
it will increase the receiving sensitivity when you search the station. That means you can receive more stations. Also you can turn it on/off in SEL menu.
USB OPERATION
1) Playing USB
When insert an USB into the USB jack. The unit will search the MP3/ WMA files and start to play.
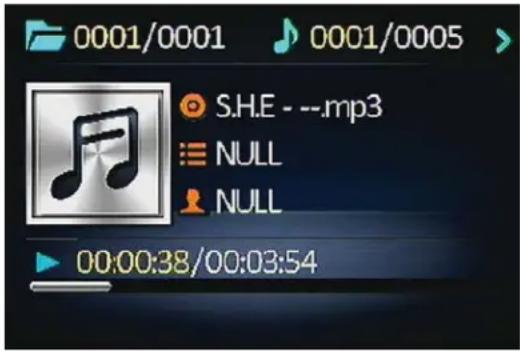
2) Pause playback
When playing audio/video content, press the ▶ button to pause the playback, press again to resume normal playback.
3) Select Chapter/Track
Press the ◀◀◀ button during playback to select the last or next chapter/track to playback.
4) Stop playback
When playing audio/video content, press the

OPERATION
button on the remote controller or BND button of the panel to stop the playing.
5) Back to the playing list
a) Remote control operation:
When playing audio/video content, press the button on the remote controller to stop the playing and back to the playing list.

Press “▲/▼button to select desired song then press ENTER/SETUP button to play.
(note: Press ◀◀ ▶▶ button will change the page of the list).
Press and hold ■ button will back to the previous folder.
Press the ◀ button to select the

and 🎨 press the ▶ button to change to
right side. Then Press " ▲/▼ button to select desired folder and Press ENTER/
SETUP button to enter the folder. Press "▲
/▼"button to select desired song then press ENTER/SETUP button to play.
b) Front panel operation:
When playing audio/video content. Press BND button will back to the playing list. Press BND button again will back to the previous folder. In root press BND button will enter the left side.
Press vol+/- to select the


Press ▶ back to the right side. Press ◀◀ ▶ button to change the page of the playing list. Press VOL+/- to select the folder or file. Press
▶II button to enter the folder or start the playing.
Remark: The musical icon is for audio files; the
icon is for image files; the icon is for video files.
▶II: Tap it to pause playback
: Tap it to stop playback
◀◀ ▶▶: Tapping one of them can switch on between the speed levels of fast backward or forward.(Except image mode.)
▶▶: Tapping one of them can select next or previous chapter/track.
6) Select Chapter/Track with number buttons
When playing audio/video content, press the 0\~9 buttons on the remote controller to directly select and play the track/chapter. Press 10-/10+ button will backward/fast forward to 10 files to play.
7) Playback with speed
During normal playback, press the ◀◀ ▶▶ button on the remote controller continuously to fast forwards or backwards. During speed playback, press ▶▶ button to resume normal playback.
Also press and hold the ◀◀ ▶▶ button of the panel will active the reverse fast / forward fast function.
8) Playback in Scan mode.
a. When playing audio, press the INT button to play the previous 10 seconds part of each
OPERATION
track. Press the INT button again to resume normal playback.
b. When playing video/image sources, the INT button is not available.
9) Playback in Random
When playing video/audio content, press the RDM button to turn on/off random function.
10) Playback in RPT
When playing video/audio content, press the RPT button to select RPTONE/RPT DIR/RPT ALL.
RPTONE: Repeat the same file.
RPT DIR: Repeat all the file of the folder.
RPT ALL: Repeat all file of the USB.
11) Playback in Image mode
When displaying the root menu,
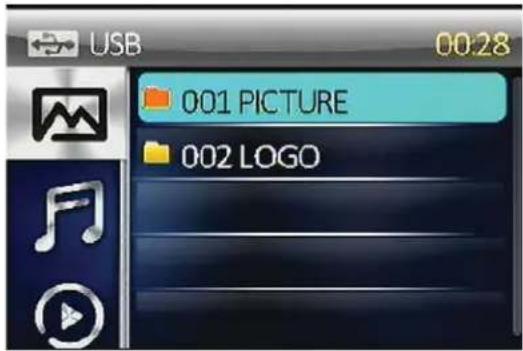
Press the direction buttons to select your desired FOLDER, then press the ENT or button to open the FOLDER, or play the selected file. When displaying the root menu, you can also use the number buttons to select the serial number of the file and play the file.
During IMAGE playback, press one of the
/▶ buttons to change the angle of viewing picture that is displaying as follows:
▶:90 degree cw; :90 degree ccw; During IMAGE playback, press the ▶II
button to Pause playing, Press ■ button return to the folder.
*During IMAGE playback, the following buttons are not available: RDM, INT.
■ AV IN OPERATION
Switching to AV IN mode
The AV INPUT jacks is on the back side. When you connect an audio/video signal through the AV input. Press MODE button or
you can choose from the main menu to select AV in mode.
The main menu of the AV IN mode:
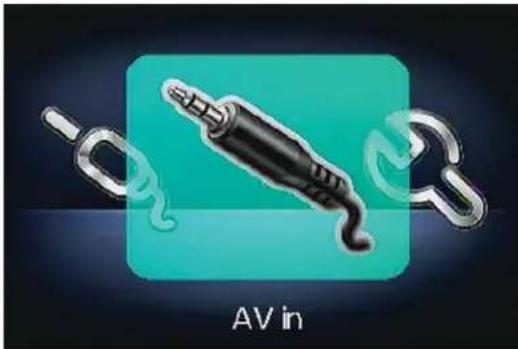
natural_image
Illustration of a black audio jack with metallic chains, labeled 'AV in' below (no other text or symbols)■ OTHER FUNCTION
1. Equalization
Repeatedly press EQ button on the remote control to select the equalization mode. There are four kinds of mode as below:
→CLASSIC→ROCK→JAZZ→POP→EQ OFF
2. MUTE
Press MUTE button to muting the audio output. Press it again to recover output.
3. LOUD
Press and hold LOUD button on the remote control to turn on/off the LOUD function.
4. SEL menu
Repeatedly press SEL button on the remote control will show the SEL menu as below: Bass---Treble---Balance---Fader---EQ---Loud---Brightness---Contrast---Hue---Saturation---Sharpness---Vol
In every item you can use ◀/▶/ button
to adjust the desired value.
5. SCAN
In RADIO mode. Press SCAN button on the remote control to enter scan mode, the unit will scan to higher frequency station and keep on each station for 5 seconds around.
6. OSD
In USB playing press OSD button on the remote control it will turn on/off some information.
(i) When use Bluetooth, please make sure the mobile phone supports Bluetooth function.
(ii) For the different kind of mobile phone, Bluetooth emissive power has some difference. To get the best conversation quality, it is commended that the distance between the mobile phone and the unit is within 3m. And please don't put any metal object or any obstacle between the path of the mobile phone and the unit.
- PAIRING
1) On the mobile phone, select the Bluetooth set up. (Please refer to the
instruction manual of your mobile phone on how to operate Bluetooth.)
2) "CAR KIT" should appear in the list on your mobile phone, please select "Car KIT". and then input "0000", If it needs a password.
3) When successful paired, the BT mark will be displayed on LCD.
- Bluetooth audio (A2DP function)
Press MOD key to switch to PHONE mode. Then turn on the music player of your mobile phone and playing a song. The sound will come out from the speaker of the unit. Press PAU key of the front panel to pause/play the song. Press ▶ button or ◀ button to select next/previous song.
Note: When there is a phone is coming in. The music will be muted. When the phone call is hanged. The music will be resumed.

flowchart
graph TD
    A["1"] --> B["POW"]
    C["2"] --> D["BAND"]
    E["3"] --> F["MODE"]
    G["4"] --> H["ENTER SETUP"]
    I["5"] --> H
    J["6"] --> K["EQ"]
    L["7"] --> M["SEL"]
    N["8"] --> O["INT"]
    P["9"] --> Q["PREV"]
    R["10"] --> S["NEXT"]
    T["11"] --> U["REV"]
    V["12"] --> W["SCAN"]
    X["13"] --> Y["OSD"]
    Z["14"] --> AA["14"]
    AB["15"] --> AC["15"]
    AD["16"] --> AE["16"]
    AF["17"] --> AG["17"]
    AH["18"] --> AI["18"]
    AJ["19"] --> AK["19"]
    AL["20"] --> AM["20"]
    AN["21"] --> AO["21"]
    AP["22"] --> AQ["22"]
    AR["23"] --> AS["23"]
    AT["24"] --> AU["24"]
    AV["25"] --> AW["25"]
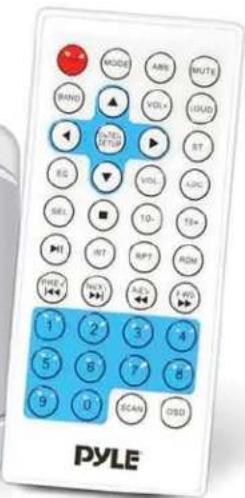
| 1. MODE | Press to change the source. |
| 2. POWER Press it to turn the unit ON or OFF | |
| 3. BAND: | To select FM1, FM2, FM3, MW1, MW2 radio bands. |
| 4. ENTER/SETUP Long press to return to previous menu, short press to enter next menu; | |
| 5. ◀/▶, ▲/▼ | In case of MENU mode, ◀/▶,▲/▼ buttons serves as cursor buttons to select item left/right, ahead/back. |
| 6. EQ Press it to select desired audio equalization | |
| 7. ■ | Stop |
| 8. SEL | Access the Bass, Treble, Balance and Fader setting |
| 9. INT | Press INT to INTRO each file. Press again to stop intro function. |
| 10.▶II | Press to pause the playing. Press it again to resume to play |
| 11. ◀◀/▶◀ | Press ▶◀ to skip to the next track & press ◀◀ to skip back one track in navigation mode. |
| 12. 0-9 | Inputs the corresponding number. |
| 13. OSD | turn on/off some information in USB mode. |
| 14. SCAN Scanning Button | |
| 15. ◀◀/▶▶ | In MP3 mode. Press ◀◀/▶▶ to search forward rapidly & to search reverse rapidly. In radio mode, use ◀◀/▶▶ for manual tuning. |
| 16 RDM | Press it to play all tracks in random order |
| 17.RPT | Repeat play. |
| 18.10+/10- | Digital selecting button, cooperatively used with numeric buttons |
| 19. LOC: | to choose LOCAL or DISTANCE setting. |
| 20. VOL- | decrease (-) the volume level. |
| 21. ST: | In radio mode press the button to set the reception between MONO and STEREO mode |
| 22. LOUD | Press and hold to turn on/off Loudness function. |
| 23. VOL+ | decrease (+) the volume level. |
| 24. MUTE | Press to mute the sound. Press it again to recover the sound. |
| 25. AMS | In radio mode, press it to activate Automatic Memory Storing/Program Scanning function. |
• In-Dash Console Marine Stereo System
• Universal Receiver with Front Panel Mounting Screws
• Perfect for Custom Installations & Applications
• Water-Resistant & Weatherproof Construction
- Bluetooth Wireless Music Streaming
• 3" Full Color LCD Digital Display Panel
• User Friendly Control Interface
• AM/FM Radio - 30 Station Memory Presets
• Rear Panel USB Flash Drive Reader
• MP3 Digital Audio File Compatibility
• RCA Audio (L/R) Input/Output Connector Jacks
• RCA Video Input/Output Connector Jacks
- Ability to Connect Additional External Devices
• Integrated Weather Band System
- Illuminated Button Controls
• ID3 Tag Song Readout Information: Name, Title & Artist
• Bass, Treble, Balance, Fader Adjustment
• EQ Audio Configuration
Bluetooth Connectivity:
• Built-in Bluetooth Wireless Music Streaming Receiver
• Compatible with All of Your Favorite Bluetooth Devices
- (iPhone, Androids, Smartphones, iPad, Tablets, etc.)
- Bluetooth Version: 2.0 +EDR
- Bluetooth Network Name: 'CAR KIT'
- Bluetooth Network Password: '0000'
• Wireless Range: 32'+ft.
What's in the Box:
• Marine Stereo Receiver
• Wireless Remote Control
• Power & Wiring Harness Adapters
Receiver Technical Specs:
• Single DIN Universal Standard Size
• Peak Output Power: 200 Watt
• Marine Grade Rating: IP-X5
• MPX/PLL Tuning Radio System
• Random/Repeat Audio File Functions
- Weather Band Freq. Range: 162.400 - 162.550MHz
• S/N Ratio: >55dB
• Tone Controls: +/-10dB
• Stereo Separation: >25dB
• Current Drain: 10 Amp
• Power: DC 12V
• Digital Audio File Support: MP3, WMA, MPG, AVI, WMV
MOV, MP4 (Video)
- Chassis Dimensions (L x W x H): 3.93" x 3.93" x 2.75"-inches
Performance:
| FM | AM | WB | MP3/WMA | |
| Tuning range | USA:87.5~107.9 MHz | USA:530~1710KHz | 162.400~162.550MHz | --- |
| Sensitivity | 4uV(S/N=30dB) | 63uV(S/N=20dB) | 18 dBu (S/N=30dB) | --- |
| S/N ratio | 50 dB | 45 dB | 60 dB | |
| Stereo separation | >25 dB | --- | 50dB | |
| Freq. Response | 40Hz~12KHz | 100Hz~2KHz | 20Hz~20KHz |

natural_image
Abstract geometric pattern with light blue and green triangular shapes forming a triangular shape (no text or symbols)PYLE®
PyleUSA.com
- PLMR15BW
- User's Manual
- Universal Bluetooth Marine Stereo Radio Receiver
- CONTENTS
- Installation....3
- Wiring Connection....5
- Operation......6
- Radio operation ......9
- USB operation....10
- AV IN operation ....12
- Other function....12
- BT operation....13
- Remote control....14
- Performance....16
- Notes:
- Mounting
- ISO CONNECTION
- LOCATION OF KEYS
- OPERATION
- - MAIN MENU
- - SETUP
- 3). Radio Area
- 4).Beep
- • AUDIO SETTINGS
- 1).V surround
- • VIDEO SETTINGS
- 1).Aspect ratio
- 2).Adjust
- - Default SETTINGS
- ■ RESET FUNCTION
- ■ RADIO OPERATION
- SWITCHING TO THE RADIO MODE
- SELECTING THE FREQUENCY BAND
- Selecting Frequency
- Automatic Story & Program Scanning:
- Manually store station and recall preset station
- Stereo on/off:
- Local on/off:
- USB OPERATION
- 1) Playing USB
- 2) Pause playback
- 3) Select Chapter/Track
- 4) Stop playback
- 5) Back to the playing list
- a) Remote control operation:
- b) Front panel operation:
- 6) Select Chapter/Track with number buttons
- 7) Playback with speed
- 8) Playback in Scan mode.
- 9) Playback in Random
- 10) Playback in RPT
- 11) Playback in Image mode
- ■ AV IN OPERATION
- Switching to AV IN mode
- ■ OTHER FUNCTION
- Equalization
- MUTE
- LOUD
- SEL menu
- SCAN
- OSD
- - PAIRING
- - Bluetooth audio (A2DP function)
- Bluetooth Connectivity:
- What's in the Box:
- Receiver Technical Specs:
- PYLE®
Brand : Pyle
Model : UPLMR15BW
Category : Car Radio