UPLMR90UW - Car Radio Pyle - Free user manual and instructions
Find the device manual for free UPLMR90UW Pyle in PDF.

User questions about UPLMR90UW Pyle
0 question about this device. Answer the ones you know or ask your own.
Ask a new question about this device
Download the instructions for your Car Radio in PDF format for free! Find your manual UPLMR90UW - Pyle and take your electronic device back in hand. On this page are published all the documents necessary for the use of your device. UPLMR90UW by Pyle.
USER MANUAL UPLMR90UW Pyle
Waterproof Bluetooth Marine Digital Media Receivers
The round-style headunit receiver radio features Bluetooth technology allowing music to wirelessly stream from your compatible Bluetooth-enabled device. Control the audio from a distance -- all from your handheld device. Marine grade waterproof construction makes this unit perfect for upgrading your marine audio system. The input and output connectors allow you to connect external devices and speaker systems for a more convenient and selective listening experience.
Warning:
It is recommended you seek the assistance of a professional upon installation.
Be sure to provide adequate clearance behind the receiver where mounting. Be sure as to avoid obstruction of any existing wires, fuel lines, electronic circuitry or vehicle safety features prior to installation. Make sure to safely and securely prepare the area of installation as to avoid any disruption of your vehicle's mechanical, electrical or safety systems.
Choose a mounting location with a flat surface to ensure a flush and water-tight fit.
To prevent any interference, distortion or accidental operation -- due to radio frequency waves or extreme temperature, choose a mounting and installation location farthest from the engine compartment.
Disconnect the battery to ensure there will be no shorted wires during the installation procedure.
Do not submerge the unit in water.
Installation of Marine audio components requires experience and expertise with a variety of mechanical and electrical knowledges and practices. This user manual provides basic and general installation and operation instructions for your new marine receiver, it may not show the exact installation methods which may be required for your particular installation. Always consult a professional prior to installation and mounting.
Care and Maintenance:
Clean the player with a slightly damp, soft cloth using a mild household cleaner. Do not use solvents such as benzene, thinner, or other commercially hazardous chemical cleaners. Be sure to regularly inspect the connections on the rear of the unit for corrosion and correct as needed.
Mounting:
Choose a mounting location on the dash / instrument panel that will allow room for proper connecting to the power source. Take into consideration how you will use the input connectors, output connectors, USB connector and the antenna jack if necessary. Prepare the area for installation by carefully removing any interior trim panels and obtrusive materials as necessary. Route wire harnesses away from sharp edges, and ensure that no harnesses wire/connector will be pinched or pierced during reassembly.
Once a suitable location has been determined, drill the hole and secure the stereo using the included screws and metal mounting U-shape bracket.
Cut a hole in the designated area with a diameter of 3.0" and depth of at least 3.9" (to accommodate for the bracket mounting hardware and cables/wiring.) Make sure the receiver fits snug into the drilled opening.
Insert the screw bolts into the back of the receiver. The "U" bracket then slides over the screw bolts and secures the receiver to the dash opening, using hex nuts to tighten the fit. The hex nuts can continue to be tightened against the bracket for secure and stable fitting against your dash / console panel.
Before cutting any panel, ALWAYS ensure that there is sufficient clearance behind the panel, and that no wire harnesses, fuel lines, moving linkages, or any other critical components are exposed to damage by your choice of location. NEVER risk damage to the hull while cutting your opening.
CONTENTS
Installation 3
Wiring Connection 5
Operation 6
Location of keys 6
Turn on/off the unit 7
Display time 7
Auxiliary input 7
Reset function 7
Radio operation 7
Switching to radio mode 7
Selecting the frequency band ..... 7
Selecting station 7
Preset stations selecting 7
Automatic memory storing 8
USB play operation 8
Selecting tracks in single step ..... 8
Pausing playing 8
Selecting songs by BND button ..... 8
BT operation 8
Specification 10
Trouble shooting....11
Notes:
- Choose the mounting location where the unit will not interfere with the normal driving function of the driver.
- Before finally installing the unit, connect the wiring temporarily and make sure it is all connected up properly and the unit and the system work properly.
- Use only the parts included with the unit to ensure proper installation. The use of unauthorized parts can cause malfunctions.
- Consult with your nearest dealer if installation requires the drilling of holes or other modifications of the vehicle.
- Install the unit where it does not get in the driver's way and cannot injure the passenger if there is a sudden stop, like an emergency stop.
- If installation angel exceeds 30^ from horizontal, the unit might not give its optimum performance.

- Avoid installing the unit where it would be subject to high temperature, such as from direct sunlight, or from hot air, from the heater, or where it would be subject to dust, dirt or excessive vibration.

natural_image
Diagram of an optical system with a lens, objective lens, and light path (no text or symbols)Be sure to install the U-shaped bracket so it fits flush to the interior of the mounting wall. The receiver face should sit flush on your dash / console panel.
The two threaded bolts screw into the rear of the receiver housing. The bolts then slide through the U-shaped bracket and are tightened from the other ends by nuts. Be sure as to avoid pinching any cables/wiring, and not too over-tighten the nuts.
Ensure a water tight seal is created between your receiver and the dash / console panel, as to not allow moisture into the opening compartment.
Installation:
Once a suitable location has been determined, drill the hole and secure the stereo using the metal mounting bracket. If the bracket needs to be shortened, remove the appropriate number of breakaway segments using a pair of pliers.

text_image
Dashboard Mounting Bracket Break Lines
natural_image
Electrical wiring harness with black, white, and red connectors attached to a motor housing (no text or symbols visible)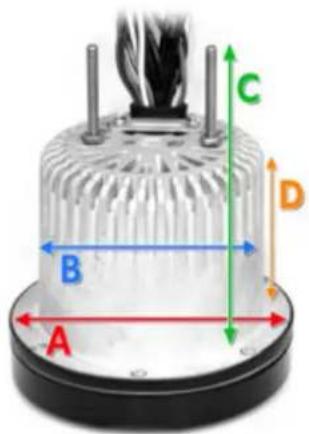
text_image
A B C DA. Overall Diameter: 4.0"
B. Cut-Out Diameter: 3.0"
C. Total Depth: 3.9"
D. Cut-Out Depth: 2.5"
ISO CONNECTION

flowchart
graph TD
    A["ISO PART"] --> B["Component A"]
    A --> C["Component B"]
    D["Radio Antenna"] --> E["USB"]
    F["AUX IN (BLACK)"] --> G["RCA (GRAY)"]
    H["Radio Antenna"] --> I["USB"]
    J["Radio Antenna"] --> K["RCA (GRAY)"]
    L["Radio Antenna"] --> M["RCA (GRAY)"]
    N["Radio Antenna"] --> O["RCA (GRAY)"]
    P["Radio Antenna"] --> Q["RCA (GRAY)"]
    R["Radio Antenna"] --> S["RCA (GRAY)"]
    T["Radio Antenna"] --> U["RCA (GRAY)"]
    V["Radio Antenna"] --> W["RCA (GRAY)"]
    X["Radio Antenna"] --> Y["RCA (GRAY)"]
    Z["Radio Antenna"] --> AA["RCA (GRAY)"]
    AB["1 REAR RIGHT + (PURPLE)"] --> AC["ISO PART"]
    AD["2 REAR RIGHT - (PURPLE/BLADD)"] --> AE["ISO PART"]
    AF["3 FRONT RIGHT + (GREY)"] --> AG["ISO PART"]
    AH["4 FRONT RIGHT - (GREY/BLACK)"] --> AI["ISO PART"]
    AJ["5 FRONT LEFT + (WHITE)"] --> AK["ISO PART"]
    AL["6 FRONT LEFT - (WHITE/BLACK)"] --> AM["ISO PART"]
    AN["7 REAR LEFT + (GREEN)"] --> AO["ISO PART"]
    AP["8 REAR LEFT - (GREEN/BLACK)"] --> AQ["ISO PART"]
Colored Wires
| A | White / Black Stripe | Front Left SPK - |
| B | White | Front Right SPK + |
| C | Gray / Black Stripe | Front Right SPK - |
| D | Gray | Front Right SPK + |
| E | Green / Black Stripe | Rear Left SPK - |
| F | Green | Rear Left SPK + |
| G | Purple / Black Stripe | Rear Right SPK - |
| H | Purple | Rear Right SPK + |
| I | Blue | Auto Antenna |
| J | Black | GND |
Wires / Connectors
| K | USB | USB Flash |
| L | Antenna | Radio Antenna |
| M | RCA (Gray) | R Ch. Output |
| N | RCA (Gray) | L Ch. Output |
| P | RCA (Black) | R Ch. Input |
| Q | RCA (Black) | L Ch. Input |
| S | Red | Acc |
| T | Yellow | B+ 12V |
LOCATION OF KEYS

text_image
1 2 3 4 5 BT 6 7 8 9 10 11| Button Layout | |
| 1 | Clock |
| 2 | Previous |
| 3 | Power |
| 4 | Next |
| 5 | Play / Pause |
| 6 | LCD |
| 7 | Mode |
| 8 | Vol + |
| 9 | Reset |
| 10 | Vol - |
| 11 | BND |
| 1 | Clock | Press the button to display the time. Hold in the button until the digits begin to blink. Once the digits are blinking you can set the time, use the previous and next buttons to adjust the numbers, then press the clock button again, while blinking, to move between hours and minutes. |
| 2 | Previous | Scan to the previous radio station or, when in USB or Bluetooth mode, jump to the previous track. |
| 3 | Power | Power ON / OFF - The unit is powered ON once the LCD backlight display is blue. |
| 4 | Next | Scan to the next radio station or, when in USB or Bluetooth mode, jump to the next track. |
| 5 | Play / Pause | Play or pause your streaming audio (USB - Bluetooth) |
| 6 | LCD | Digital display |
| 7 | Mode | Press this button to navigate between audio modes: Radio, Aux, BT: Bluetooth. Please note: to enter Bluetooth mode, your device must be firstly paired to the receiver via Bluetooth connection. Once a successful Bluetooth connection is established, the Bluetooth icon will appear lit on the LCD display. |
| 8 | Vol + | Volume adjustment |
| 9 | Reset | Reset button |
| 10 | Vol - | Volume adjustment |
| 11 | Band | Press the button to jump between radio bands (AM 1, AM 2, FM 1, FM 2, FM 3). You can save up to a total of 30 radio stations (12 AM, 18 FM).To set a station, tune to your desired station, then press and hold the Play / Pause button. The screen will then display 'SAVE CH 1' - you can press the Play / Pause button to assign a different save channel. Pressing the Play / Pause button again, will ask you to save to: 'SAVE CH 1', 'SAVE CH 2', 'SAVE CH 3', etc. Please note: the station will save the channel in the designated 'band' you are currently in. |
TURN ON/OFF THE UNIT
Press button (3) to turn on/off the unit.
DISPLAY TIME
Press CLK button (1) to show the time. After 5 seconds it will return to show the information.
SET THE CLOCK
Press and hold CLK button for 2 seconds.
The "HH" will flash. Using the knob(2)
▶▶ (4) to change the hour. After that press
CLK button the "MM" will flash. Press the knob (2) (4) to change the minute.
After that press CLK button to confirm. If you don't press CLK button to confirm. It will writing here for your confirm.
AUXILIARY INPUT
The unit can be connected a portable audio player through the AUX IN interface.
LOW BATTERY DISPLAY
When the battery of the car is lower below 10V around. It will show "LOW BAT".
MEMORY FUNCTION
When B+ wire and Acc wire is off. It can memory the radio's preset stations.
RESET FUNCTION
RESET button (9) must be activated with either a ballpoint pen or thin metal object.
The RESET button is to be activated for the following reasons:
- Initial installation of the unit when all wiring is completed.
- All the function buttons do not operate.
- Error symbol on the display.
Note: if press RESET button (9), the unit can't work yet, please use a cotton swab soaked in isopropyl alcohol to clean the socket on the front panel.
RADIO OPERATION
• SWITCHING TO RADIO MODE
Press MODE button (7) to select radio mode, the radio mode appears on the display together with the memory band and frequency.
At radio mode, press BND button (11) shortly to select the desired band.
The reception band will change in the following order:

- SELECTING STATION
Press ➤ button (4) or ◀ button (2) shortly to activate automatic seek function. It will search up/down a station automatically. Press for 2 seconds until "MANUAL" appears on the display, the manual tuning mode is selected. In this mode you can turn up/down a step frequency one by one till searched a station. If both buttons have not been pressed for several seconds, they will return to seek tuning mode and "AUTO" appears on the display.
• MANUALLY STATION STORING
To receive a station, Press and hold the ▶ button (5) for 2 seconds. It will show "SAVE CH1". If you want to store the station to CH2. Shortly press it again it will show "SAVE CH2". In this moment press and hold the ▶ button (5) for 2 seconds. The current station is stored into the CH2.
- PRESET STATIONS SELECTING
Press the ▶ button (7) shortly. You can select the preset station (CH1\~6).
• AUTOMATIC MEMORY STORING
Press BND button (11) for 2 seconds, the radio searches from the 87.5MHz frequency and checks the signal strength until one cycle search is finished. And then some stations are stored into the corresponding preset number button. In the first cycle it will in LOCAL mode to receive the stronger station. If it is less than 18 pcs station it will searching stations in 2^nd cycle in DX (distance) mode.
USB PLAY OPERATION
On the back side of the unit, there is a USB interface. You can connect an USB driver through this interface. When you connect an USB driver through the interface, the unit will search the MP3 /WMA files in the USB driver and start to play automatically. If in other mode, you can also press MODE button to select USB mode.
It supports the MP3/WMA file in the device.
SELECTING SONGS IN SINGLE STEP
Press ▶ button (4) or ◀ button (2) to move to the following song or the previous song. File number shows on display.
Press and hold ▶▶ button (4) or ◀◀ button (2) for 2 seconds to fast forward or fast reverse. Song playing starts from when you release the button.
PAUSING PLAYING
Press ▶ button (5) to pause playing. Press it again to resume playing.
SELECTING SONGS BY BND BUTTON
In USB mode. Press BND button (11) to active the file search mode. It will show "NUM ***". In this moment press VOL+ or VOL- knob to select the song number's 1'st number. 3 seconds later to select the 2'nd number... (Such as when you want to select the 32'th song. In "NUM ***" you press VOL+ 3 times. It shows "NUM 3**" And 3
seconds later the 2^nd “*” flash. You can press VOL+ 2 times. It shows “NUM 32*”. Then press ▶ button (5) to confirm. It will start to play the 32'th song. But if you don't press ▶ button (5) to confirm. It will not play the song you selected.
FOLDER+/- FUNCTION
When MP3/WMA playing. Press and hold BND button it will back to the previous folder. Press and hold MOD button it will to the next folder.
CAUTION:
When there are important files in the USB Device, do not connect it to the main unit to play, because any wrong operation may cause files loss. And our company assumes no responsibility for this.
BLUETOOTH OPERATION
(i) When use Bluetooth, please make sure the mobile phone supports Bluetooth function.
(ii) For the different kind of mobile phone, Bluetooth emissive power has some difference. To get the best conversation quality, it is commended that the distance between the mobile phone and the unit is within 3m. And please don't put any metal object or any obstacle between the path of the mobile phone and the unit.
- PAIRING
1) On the mobile phone, select the Bluetooth set up. (Please refer to the instruction manual of your mobile phone on how to operate Bluetooth.)
2) "CAR KIT" should appear in the list
on your mobile phone, please select
"CAR KIT" and then input password "0000" if necessary.
When successful paired the BT mark will be displayed on LCD.
- Bluetooth audio (A2DP function)
Press MOD key (7) it will show “BT” on the display. Then turn on the music player of the mobile phone and playing a song. The sound will come out from the speaker of the unit.
Press ▶key to pause/play the song.
Press ▶ button (4) or button (2)
to select next/previous song.
Waterproof Bluetooth Marine Digital Media Receiver Stereo Radio
Marine Stereo Receiver Radio System
Bluetooth Wireless Music Streaming
Digital Media Audio File Playback
USB Flash Drive Reader
Marine Grade Waterproof Construction
AM/FM Radio with Station Preset Memory
RCA (L/R) Audio Input Connector Jacks
Ability to Connect Additional Audio Devices
RCA (L/R) Audio Output Connector Jacks
Ability to Connect to External Speaker Systems
LCD Digital Display, Button Illumination
ID3 Tag Song Information Readout
Digital Audio Media File Support
Front Panel Button Controls
Audio Input Source Selectable
For Marine/Boat In-Console Dashboard Panels
Includes Mounting Bracket, Power/Wiring Harness
Models:
PLMR90UW - White
PLMR91UB - Black
PLMR91US - Silver
Bluetooth Streaming:
Built-in Bluetooth for Wireless Audio Ability
Works with All of Your Favorite Devices
(iPhone, Android, Smartphone, iPad, Tablet, etc.)
Bluetooth Version: 2.1
Bluetooth Wireless Range: 10' Feet
Technical Specs:
Peak Power Output: 4 x 28 Watt
RMS Power Output: 4 x 14 Watt
Frequency Response: 20Hz-20kHz (+/-3dB)
Marine Grade Rating: IPX5
Impedance: 4 Ohm
S/N Ratio: 55dB
Stereo Separation: >30dB, @ 1kHz
AM/FM-MPX PPL Tuning
Radio Tuner Presets: 18FM, 12AM
AM Frequency Range: 530-1710MHz
FM Frequency Range: 87.5-107.9MHz
Maximum USB Flash Support: 32GB
Digital Media File Support: MP3, WMA
Dimensions:
Receiver Diameter: 4.0"
Cut-Out Diameter: 3.5"
Mounting Depth: 2.5"
TROUBLE SHOOTING
Before going through the checklist, check wiring connection. If any of the problems persist after checklist has been made, consult your nearest service dealer.
| Troubleshooting | ||
| Problem | Possible Cause | Possible Solution |
| No power | 1. Incorrect wiring2. Blown fuse3. Low battery voltage | 1. Double-check wiring connections2. Replace fuse3. Check the voltage of the vehicle battery with a multimeter. Voltage must be at least 11V |
| No Sound | 1. Loose speaker connection2. Bad speaker3. Output blown4. Volume too low on the connected external device | 1. Double check connections2. Replace bad speaker with known good speaker and connect3. Send unit in for repair4. Increase volume of media device*Be sure to check all connections and make sure the unit is properly ground |
| No Reception | 1. Antenna not firmly connected | 1. Insert antenna firmly |
| USB Memory Not Being 'Read' | 1. File types must be compatible | 1. Convert the file types to an appropriate and compatible format |
| No Bluetooth Connection | 1. You are not paired to the receiver from your device2. Out of range3. The connection is already in use | 1. Choose the correct Bluetooth network from your device2. Bring your compatible Bluetooth device closer to the receiver3. The receiver may be paired to another device. Be sure to disconnect the Bluetooth pairing connection from all other devices, and attempt Bluetooth pairing again. |
Visit www.PyleUSA.com for more detailed product-specific information

PyleUSA.com