
PLDN79U - Car Radio Pyle - Free user manual and instructions
Find the device manual for free PLDN79U Pyle in PDF.

| Product Type | Car Multimedia Receiver with 7" Touch Screen |
| Display Size | 7" TFT LCD |
| Power Supply | 12V DC |
| Fuse Rating | 15A |
| Radio Bands | FM (USA: 87.5-107.9MHz, EUR: 87.5-108MHz, OIRT: 64.5-73MHz), AM (USA: 530-1710kHz, EUR: 522-1620kHz) |
| Supported Audio Formats | MP3, WMA, WAV, AAC, FLAC, APE, AMR |
| Supported Video Formats | MPEG-1/2/4, H.264, DivX, RMVB, WMV, FLV up to 1280x720 |
| Max Photo Resolution | JPG 4096x4096 |
| Remote Control | Yes, included |
| Touch Screen | Yes, resistive touch with calibration |
| Front Panel USB/SD | USB port and TF card slot |
| AV Inputs | Front AV-IN (3.5mm), Rear RCA AV-IN |
| Subwoofer Output | Yes, RCA |
| Speaker Impedance | 4-8 ohms |
| Audio EQ Presets | Rock, Pop, Classic, Flat, EQ Off |
| Installation Angle | Up to 30° from horizontal |
| Safety Features | Volume limit for driving, protection against short circuit |
Frequently Asked Questions - PLDN79U Pyle
User questions about PLDN79U Pyle
0 question about this device. Answer the ones you know or ask your own.
Ask a new question about this device
Download the instructions for your Car Radio in PDF format for free! Find your manual PLDN79U - Pyle and take your electronic device back in hand. On this page are published all the documents necessary for the use of your device. PLDN79U by Pyle.
USER MANUAL PLDN79U Pyle
natural_image
Line drawing of a rectangular electronic device with control buttons and a USB symbol (no text or labels)CE
www.pyleaudio.com
SAFETY INFORMATION .... 3
INSTALLATION....4-5
ELECTRICAL CONNECTION....6
THE PLAYER....7
OPERATION 8
SETTINGS 8
RADIO 9
USB/SD 9
AV-IN 10
CALENDAR 10
REMOTE CONTROL....12-13
PERFORMANCE 14-15
SAFETY INFORMATION
Use This Product Safely
This set has been designed and manufactured to assure personal safety. Improper use can result in electric shock or fire hazard. The safeguards incorporated in this unit protect you if you observe the following procedures for installation, use and servicing. This unit doesn't contain any parts that can be repaired by the user.
When Driving
Keep the volume level low enough to be aware of road and traffic conditions.
When Car Washing
Do not expose the product to water or excessive moisture. This could cause electrical shorts, fire or other damage.
When Parked
Parking in direct sunlight can produce very high temperatures inside your vehicle. Give the interior a chance to cool down before starting playback.
Use the Proper Power Supply
This product is designed to operate with a 12 volt DC
Use Authorized Service Centers
Do not attempt to disassemble or adjust this precision product. Please refer to the Service Center list included with this product for service assistance.
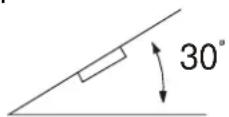
For Installation
The unit should be installed in a horizontal position with the front end up at a convenient angle, but not more than 30^ .
Notes:
- Choose the mounting location where the unit will not interfere with the normal driving function of the driver.
- Before finally installing the unit, connect the wiring temporarily and make sure it is all connected up properly and the unit and the system work properly.
- Use only the parts included with the unit to ensure proper installation. The use of unauthorized parts can cause malfunctions.
- Consult with your nearest dealer if installation requires the drilling of holes or other modifications of the vehicle.
- Install the unit where it does not get in the driver's way and cannot injure the passenger if there is an emergency stop.
- If installation angel exceeds 30° from horizontal, the unit might not give its optimum performance.
- Avoid installing the unit where it would be subject to high temperature, such as from direct sunlight, or from hot air, from the heater, or where it would be subject to dust, dirt or excessive vibration.
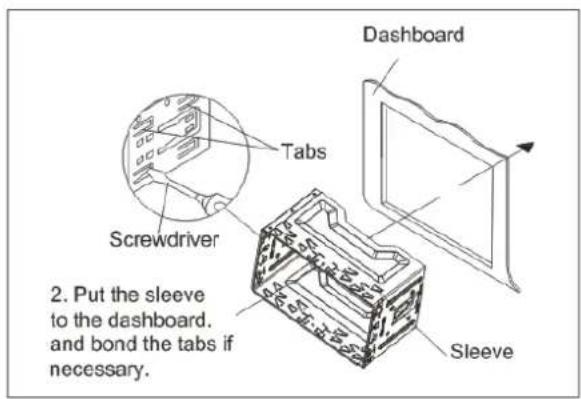
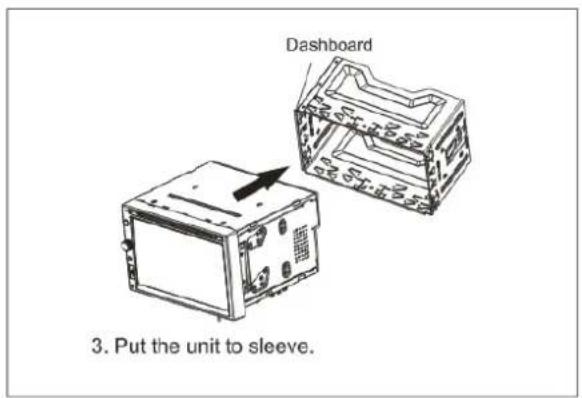
DIN FRONT/REAR-MOUNT
This unit can be properly installed either from "Front"(conventional DIN
Front-mount) or "Rear"(DIN Rear-mount installation, utilizing threaded screw holes at the sides of the unit chassis). For details, refer to the following illustrated installation methods.
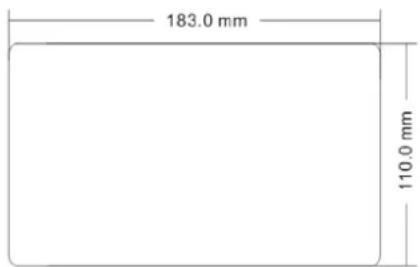
Installation Opening
This unit can be installed in any dashboard having an opening as shown below:
ATTENTIONS OF INSTALLATION
- This player should be installed by professional technician.
- please read the instruction and operation of equipment carefully before installing.
- Make sure to connect other wires before power connection.
- To avoid short circuit. Please make sure all the exposed wire are insulating.
- Please fix all the wires after installation.
- Please make connection to the player accordingly to this instruction manual. Wrong connection may cause damage.
- This player only fit for 12V DC device and please make sure your car belongs to this kind of cathode grounding electrical system.
- Please connect the wires rightly. Wrong connection will cause malfunction or damage the electrical system.


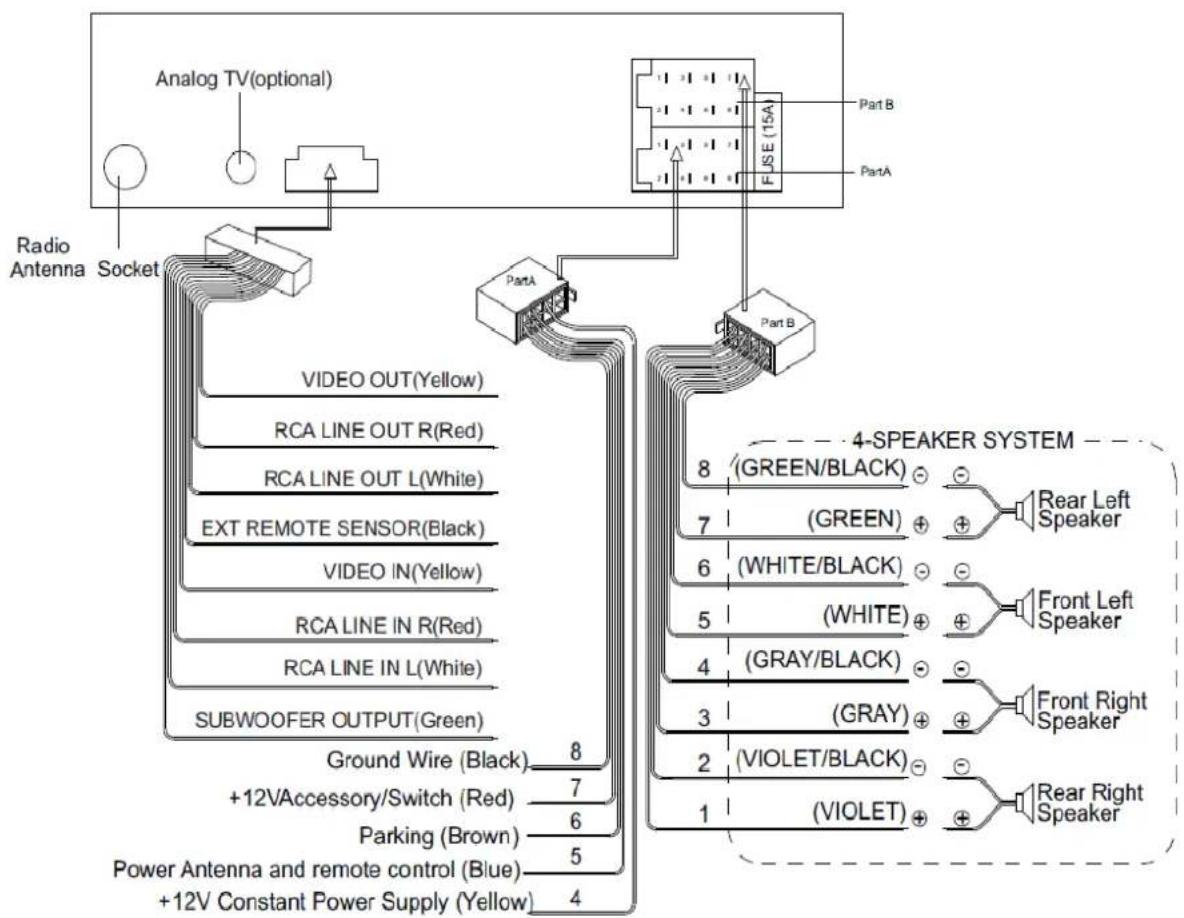
flowchart
graph TD
    A["Radio Antenna Socket"] --> B["Analog TV(optional)"]
    B --> C["PartA"]
    C --> D["FUSE (15A)"]
    D --> E["Part B"]
    C --> F["Subwoofer OUTPUT(Green)"]
    F --> G["Ground Wire (Black) 8"]
    F --> H["+12V Accessory/Switch (Red) 7"]
    F --> I["Parking (Brown) 6"]
    F --> J["Power Antenna and remote control (Blue) 5"]
    F --> K["+12V Constant Power Supply (Yellow) 4"]

    L["Video OUT(Yellow)"] --> M["RAI LINE OUT R(Red)"]
    M --> N["RCA LINE OUT L(White)"]
    N --> O["EXT REMOTE SENSOR(Black)"]
    O --> P["VIDEO IN(Yellow)"]
    P --> Q["RCA LINE IN R(Red)"]
    Q --> R["RCA LINE IN L(White)"]

    S["4-SPEAKER SYSTEM"] --> T["(GREEN/BLACK) ⊕"]
    S --> U["(GREEN) ⊕"]
    S --> V["(WHITE/BLACK) ⊕"]
    S --> W["(WHITE) ⊕"]
    S --> X["(GRAY/BLACK) ⊕"]
    S --> Y["(GRAY) ⊕"]
    S --> Z["(VIOLET/BLACK) ⊕"]
    S --> AA["(VIOLET) ⊕"]

    style A fill:#f9f,stroke:#333
    style L fill:#f9f,stroke:#333
    style S fill:#f9f,stroke:#333
    style T fill:#ccf,stroke:#333
    style U fill:#ccf,stroke:#333
    style V fill:#ccf,stroke:#333
    style W fill:#ccf,stroke:#333
    style X fill:#ccf,stroke:#333
    style Y fill:#ccf,stroke:#333
    style Z fill:#ccf,stroke:#333
    style AA fill:#ccf,stroke:#333
Attention:
- Please make sure "B+" and "ACC" pin location are correct before making connection. These two pins may be different in different cars, wrong connections of these two pins will burn the fuse outside.
2." Parking "wire must be connected to "ground" in order to active the video function - This player can only be used by the 12V DC cathode grounding electrical system.
- Don't connect the terminals of the car battery until the player is absolutely with well erecti joint.
- Please make sure to connect the yellow wire to the positive of the battery(+).
- When change the fuse. Please make sure the specifications are same.
- Using good quality speaker with 4-8 ohm can result in the best effect of the equipment.

- IR Sensor .
- VOL /Power on/off /Mute button.
- AV IN1 jack.
- USB port.
- RESET
- 7" TFT LCD display.
- Multi-media TF card slot
Click the correspond icon to select the different function Radio, USB, SD, Calendar, AVIN1, AVIN2 and SETTINGS. If no USB or TF-card found, it will enter into the radio mode automatically. In any mode, press and hold PWR button for 2 seconds will turn off the unit.
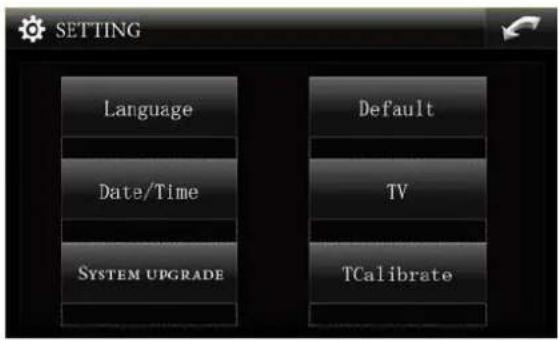
SETTINGS
Tap Icon will enter the
setting interface as followed:
Tap Language Icon will enter the
Languages interface as followed:

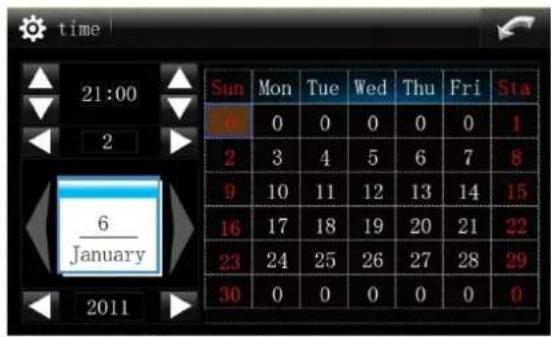
Tap Date/Time Icon will enter the
Date/Time interface as followed:
Tap SYSTEM UPGRADE Icon will enter the
System upgrade interface as below:

The upgrading is via SD, when it's done, please reset the unit for use.
Caution: Don't power off while updating.
Tap Default Icon will enter the
Default interface as followed:
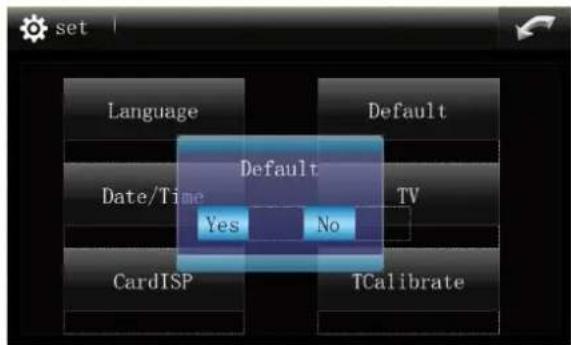
Caution: All the settings will be defaulted to the factory settings if done..
OPERATION.
Tap TV I can will enter the
TV format setup interface as followed:

You can choose the different video format according to the AVIN1/2 and other video type.
Tap TCalibrate er the
TCA libration interface as followed:

You can adjust the touch screen precision until the calibration is OK.
RADIO OPERATION
Tap will enter the
RADIO interface as followed:

LOUD --- LOUD ON/OFF
EQ--ROCK/POP/CLASS/FLAT/EQ OFF
ST --- FM Stereo ON/OFF
SEL ---Choose the VOL, Balance, Fader, Treble and EQ setting
BAND---Choose the band among AM1/AM2/FM1/FM2/FM3
---Manual step seek up ---Long press for Auto seeking, Short press can stop it while auto Seeking.
Short press for overview the station
---Manual step seek down

volume up and down
USB/SD OPERATION
In the front panel of the unit, you will find the USB /SD interface.
When you insert a USB /SD device, the unit will search the MP3/ WMA files in the USB driver and start to play MP3/WMA files automatically. If in other
mode, Tap / icon to enter USB/SD mode as below picture:
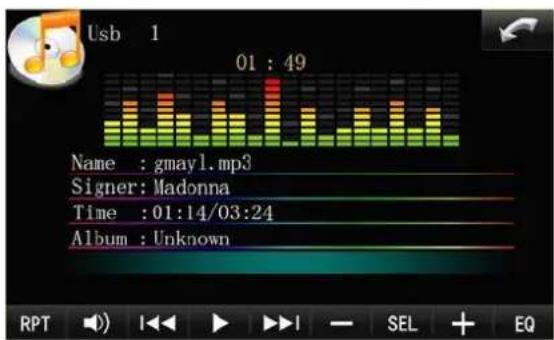
RPT ----Repeat 1/Repeat all/Repeat all
--- Mute ON/OFF
/ --- Previous / Next
Play/Pause
-/+ increase(+) or decrease(-)
the selection items in the SEL
SEL --- Choose the VOL, Balance, Fader, Treble and EQ setting
EQ ---Rock/POP/CLASS/FLAT/EQ
OFF

Tap Icon will return to previous menu.
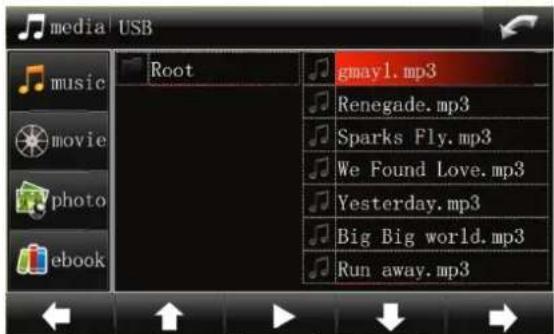
← / ↑ / → ↓ ---Up / down / left /
right /Play
--- Select the current file and play
Tap Icon will enter the
Movie interface as followed.

natural_image
Woman holding a green fruit, captured in a studio setting with color scale and RPT button (no text or symbols on the main subject)I/ ▶ I--- Previous / Next
Play/Pause
RPT ----Repeat one/Repeat all/Repeat all
--- Volume down
--- Volume up
Tap photo icon will enter the photo interface as followed.

natural_image
Illustration of a female anime character in purple costume with flowing hair, surrounded by flying birds (no text or symbols)/ ---- Previous / Next.
---Zoom in and out

---- Auto play

----Normal or random play.
Tips: Also you can draw your finger on the touch screen left or right to view the pictures.

Tap Icon will enter the
E-book interface as followed.
The Old Man and the Sea
He was an old man who fished alone in a skiff in the Gulf Stream and he had gone eighty-four days now without taking a fish In the first forty days a boy had been with him. But after forty days without a fish the boy's parents had told him that the old man was now definitely and finally salao, which is the worst form of unlucky, and the boy had gone at their orders in another boat which caught three good fish the first week. It made the boy sad to see the old man come in each day with his skiff empty and he always went down to help him carry either the coiled lines or the gaff and harpoon and the sail that was furled around the mast. The sail was patched with flour sacks and, furled, it looked like the flag of permanent defeat.

AV-IN OPERATION
Tap

to

AV1/AV2 mode
There is a RCA AVIN2 INPUT on the back of the unit, and a stereo headphone AVIN1 interface on the front panel of the unit.
When you connect an AV into these jacks, click AVIN1/AVIN2 on the main menu to select them.
CALENDAR OPERATION

Tap
Icon will enter the

Tips: Overview the month by drawing with your fingers on the touch screen from left to right or right to left Overview the month by drawing with your fingers on the touch screen from Up to down or down to up

REMOTE CONTROL
| 1. AS/PS | In radio mode, press it to activate Automatic Memory Storing/Program Scanning function. |
| 2. POWER ⏻ | Press it to turn the unit ON or OFF |
| 3. 0-9 | Inputs the corresponding number. |
| 4. LOUD/EQ | Loudness and EQ ON/OFF |
| 5. SEL | Access the Bass, Treble, Balance and Fader setting.. |
| 6. EQ | Press it to select desired audio equalization |
| 7. OK | Confirm the current operation |
| 8. ◀/▶, ▲/▼ | Left/Right, Up/Down |
| 9. TIME | Display the current time |
| 10. ◀◀/▶▶ | Previous/Next. |
| 11. MUSIC | enter into the Music play mode |
| 12. MOVIE | enter into the Video play mode |
| 13. EBOOK | enter into the EBook mode |
| 14. PHOTO | enter into the Photo mode |
| 15. MO/ST | In radio mode press the button to set the reception between mono and stereo mode. |
| 16. BACK | Back to the top menu |
| 17. SETUP | enter into the setup menu |
| 18. MODE | Press to change the different sources. |
| 19. MUTE | Press to Mute the sound. Press again to recover the sound. |
| 20. ▶II | Play/Pause |
| 21. VOL+/- | increase(+) or decrease(-) the volume level. |
| 22. BAND: | To select FM1,FM2,FM3,AM1,AM2 radio bands. |
Appendix 1
Radio and Audio parameters:
| FM MW(AM) | MP3/WMA | ||
| Tuning range | USA:87.5~107.9MHzEUR:87.5~108MHzOIRT: 64.5~73 MHz | USA:530~1710KHzEUR:522~1620KHzOIRT: :531~1620KHz | --- |
| Sensitivity | 4uV(S/N=30dB) | 63uV(S/N=20dB) | --- |
| S/N ratio | 50 dB 45 dB | 60 dB | |
| Stereo separation | >25 dB | --- | 50dB |
| Freq. Response | 40Hz~12KHz 40Hz~2KHz | 20Hz~16KHz | |
Appendix 2
Audio and Video decoder ability:
| Photo | Max resolution | |||
| JPG | 4096x4096 | |||
| GIF | Not support | |||
| Audio | Sampling rate | bit rate | ||
| AMR | AMR-NB:8KHz, AMR-WB:16KHz | AMR-NB: 4.75K ~ 2.2K bps AMR-WB: 6.6K ~ 23.85K bps | ||
| AAC 8K ~ | 48KHz | AAC-LC:32K ~ 320K bps AAC+:64K ~ 128K bps | ||
| MP3 | 8K ~ 48KHz | 32K ~ 320K bps | ||
| WAV | 4K ~ 96KHz | Don't care | ||
| WMA | 8K ~ 48KHz | 5K ~ 320k bps | ||
| APE | 8K ~ 48KHz | Don't care | ||
| FLAC | 8K ~ 48KHz | Don't care | ||
| Video | Sampling rate | Decoder resolution | bit rate | fps |
| FLV (h.263) | flv | 1280x720 | 3Mbps | 30f |
| MPEG-1 | mpg, dat | 720x480 | 10Mbps | 30f |
| MPEG-2 | mpg, vob, ts | 720x480 | 10Mbps | 30f |
| MPEG-4 SP | 3gp, mp4, avi, mov | 1280x720 | 4Mbps | 30f |
| MPEG-4 ASP | mp4, avi, mov | 1280x720 | 2Mbps | 30f |
| H.264 BP | 3gp, mp4, avi, mov | 720x480 | 2Mbps | 30f |
| DivX3 | avi | 720x480 | 4Mbps | 30f |
| DivX4/5/6 | avi, mov | 1280x720 | 2Mbps | 30f |
| RM8 | ram / rm | 1280x720 | 3Mbps | 30f |
| RM9 / RM10 | rm / rmvb | 1280x720 | 3Mbps | 30f |
| MS MP41/42/43 | avi / asf | 720x480 | 4Mbps | 30f |
| VC-1/WMV9 MP | asf / wmv | 720x480 | 1Mbps | 30f |
| WMV7 / 8 | asf / wmv | 720x480 | 4Mbps | 30f |

- SAFETY INFORMATION
- Use This Product Safely
- When Driving
- When Car Washing
- When Parked
- Use the Proper Power Supply
- Use Authorized Service Centers
- For Installation
- Notes:
- DIN FRONT/REAR-MOUNT
- Installation Opening
- ATTENTIONS OF INSTALLATION
- Attention:
- SETTINGS
- OPERATION.
- RADIO OPERATION
- USB/SD OPERATION
- The Old Man and the Sea
- AV-IN OPERATION
- CALENDAR OPERATION
- Appendix 1
Brand : Pyle
Model : PLDN79U
Category : Car Radio