NA82M - Radio NavAtlas - Free user manual and instructions
Find the device manual for free NA82M NavAtlas in PDF.

User questions about NA82M NavAtlas
0 question about this device. Answer the ones you know or ask your own.
Ask a new question about this device
Download the instructions for your Radio in PDF format for free! Find your manual NA82M - NavAtlas and take your electronic device back in hand. On this page are published all the documents necessary for the use of your device. NA82M by NavAtlas.
USER MANUAL NA82M NavAtlas
text_image
NavAtlas 24 12:46 AM Music Video SD Card SettingsNA82M
QUICK START GUIDE
8.1" Mirror Type Universal Command Center Built-in Off Road Navigation/Bluetooth
Safety Information
Please read all instructions carefully before attempting to install or operate.
Due to its technical nature, it is highly recommended that your Navatlas NA82M is installed by a professional installer or an authorized dealer. This product is only for use in vehicles with 12VDC negative ground only.
To prevent damage or injury:
- Make sure to ground the unit securely to the vehicle chassis ground.
- Do not remove the top or bottom covers of the unit.
- Do not install the unit in a spot exposed to direct sunlight or excessive heat or the possibility of water splashing.
- Do not subject the unit to excessive shock.
- When replacing a fuse, only use a new one with the prescribed rating. Using a fuse with the wrong rating may cause the unit to malfunction.
• To prevent short circuits when replacing a fuse, disconnect the wiring harness first.
- Use only the provided hardware and wire harness.
- You cannot view video while the vehicle is moving. Find a safe place to park and engage the parking brake.
• If you experience problems during installation, consult your nearest authorized dealer.
- If the unit malfunctions, reset the unit as described on page 10 first. If the problem still persists, consult your nearest dealer or call tech assistance @ (407)446-3799.
- To clean the monitor, wipe only with a dry silicone cloth or soft cloth. Do not use a stiff cloth, or volatile solvents such as paint thinner and alcohol. They can scratch the surface of the panel and/or remove the printing.
- When the temperature of the unit falls (as in winter), the liquid crystal inside the
FCC Compliance
This device complies with Part 15 of the FCC Rules. Operation is subject to the following two conditions:
(1) this device may not cause harmful interference, and
(2) this device must accept any interference received, including interference that may cause undesired operation.
Warning: Changes or modifications to this unit not expressly approved by the party responsible for compliance could void the user's authority to operate the equipment. This equipment complies with FCC radiation exposure limits set forth for an uncontrolled environment.
This equipment should be installed and operated with a minimum distance of 20cm between the radiator & your body.
This transmitter must not be co-located or operating in conjunction with any other antenna or transmitter.
Note: This equipment has been tested and found to comply with the limits for a Class B digital device, pursuant to Part 15 of the FCC Rules. These limits are designed to provide reasonable protection against harmful interference in a residential installation. This equipment generates, uses and can radiate radio frequency energy and, if not installed and used in accordance with the instructions, may cause harmful interference to radio communications.
However, there is no guarantee that interference will not occur in a particular installation. If this equipment does cause harmful interference to radio or television
Installation
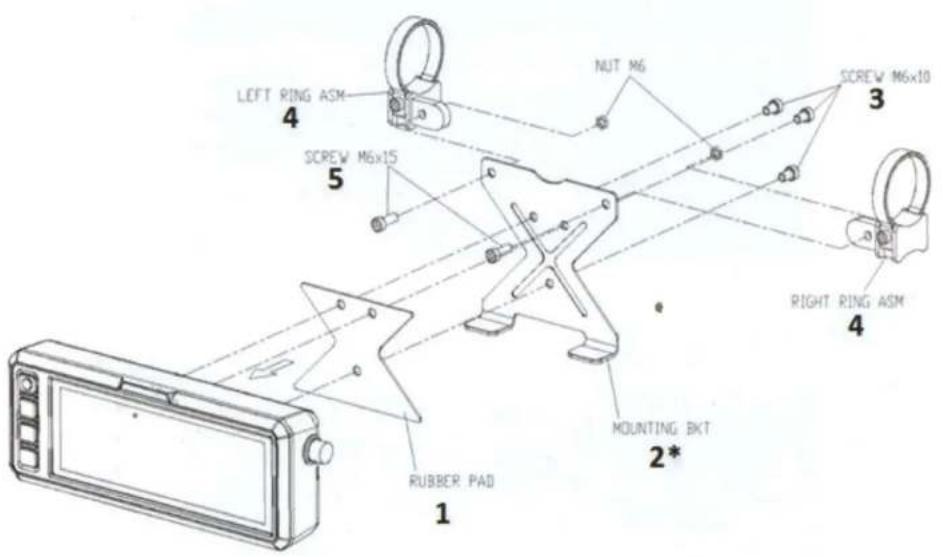
text_image
LEFT RING ASM 4 SCREW M6x15 5 NUT M6 3 SCREW M6x10 4 RIGHT RING ASM 4 MOUNTING BKT 2* RUBBER PAD 1Wiring Diagram

text_image
USB-BLACK DVR-BLACK ACC(B)-RED GROUND(B)-BLACK GPS RX VIOLET TX-GREEN AMP-BLUE LEFT SPEAKER-WHITE RIGHT SPEAKER-RED GROUNDB(B)-BLACK DIGITAL OUT-BLACK/BLUEConnections :
| USB – | AUDIO/VIDEO PLAYBACK |
| DVR – | N/A (FUTURE OPTION) |
| ACC(B+) RED – | IGNITION POWER 12V+ |
| GROUND BLACK – | NEGATIVE POWER 12V- |
| TX GREEN – | N/A (FUTURE OPTION) |
| RXVIOLET - | N/A (FUTURE OPTION) |
| RX/TX GROUND - | N/A (FUTURE OPTION) |
| AMP BLUE – | REMOTE TURN-ON FOR AMPLIFIER |
| DIGITAL OUT (GREY) – | DIGITAL COAX AUDIO LINE-OUT |
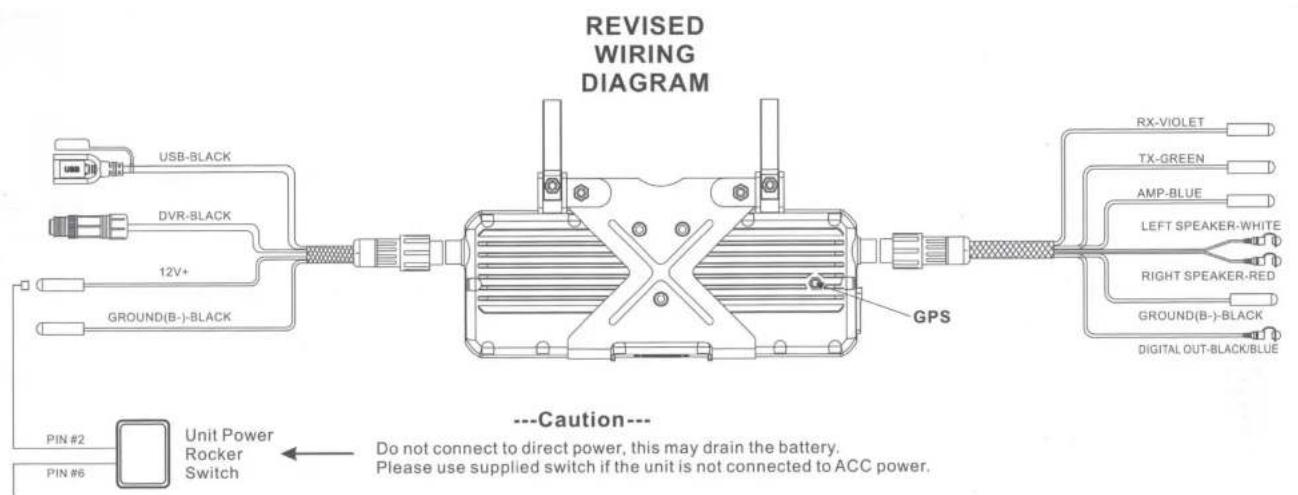
text_image
REVISED WIRING DIAGRAM USB-BLACK DVR-BLACK 12V+ GROUND(B-)BLACK GPS ---Caution--- DO NOT connect to direct power, this may drain the battery. Please use supplied switch if the unit is not connected to ACC power.12V+ BATTERY
Main Control Locations

text_image
Navifitas 1 24 12:46 AM Music Video SD Card Settings 02:15 Navigation DVR Bt Music Home 5 6 7 8 09:04 12Audio Settings

text_image
1 2 3 4 5 09:06 User Standard Rock Classic Jazz Soft Pop Hall Cinema 10 10 10 Sound effect Low Mid High General Sounds Factory GPS Signal 8 9 10 11 12 13 14 15 16-
User
-
Standard
-
Rock
-
Classic
E loss
-
Tone Control
-
Return
-
General
-
Soft
10 Don
-
Hall
-
Cinema
-
Sound
-
Factory
15 CDC Signal
Bluetooth Music
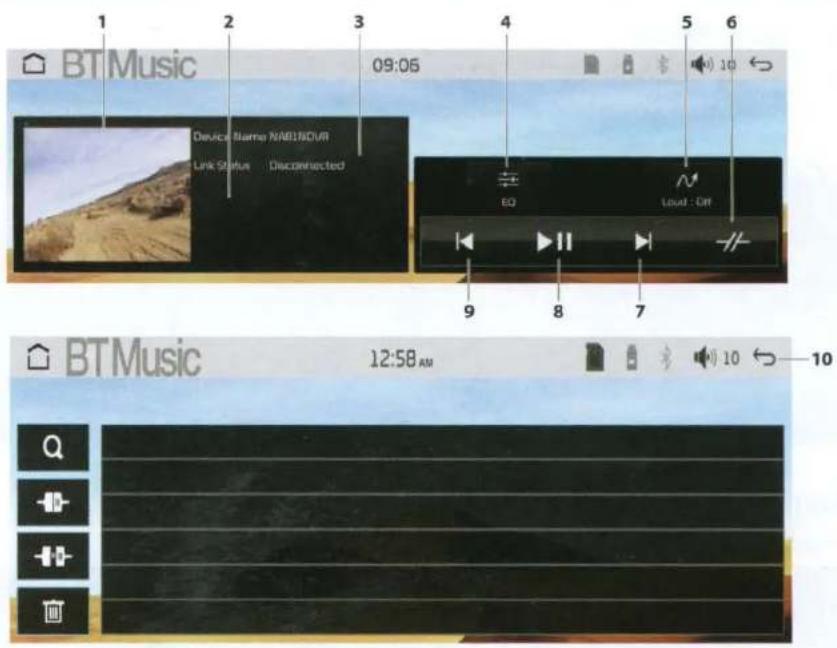
text_image
BT Music 09:05 Device Name NABINDUR Link Status Disconnected EQ Loud : Off 9 8 7 BT Music 12:58 AM 10- Album Art
- Loudness On/Off
- Track Down
Music
text_image
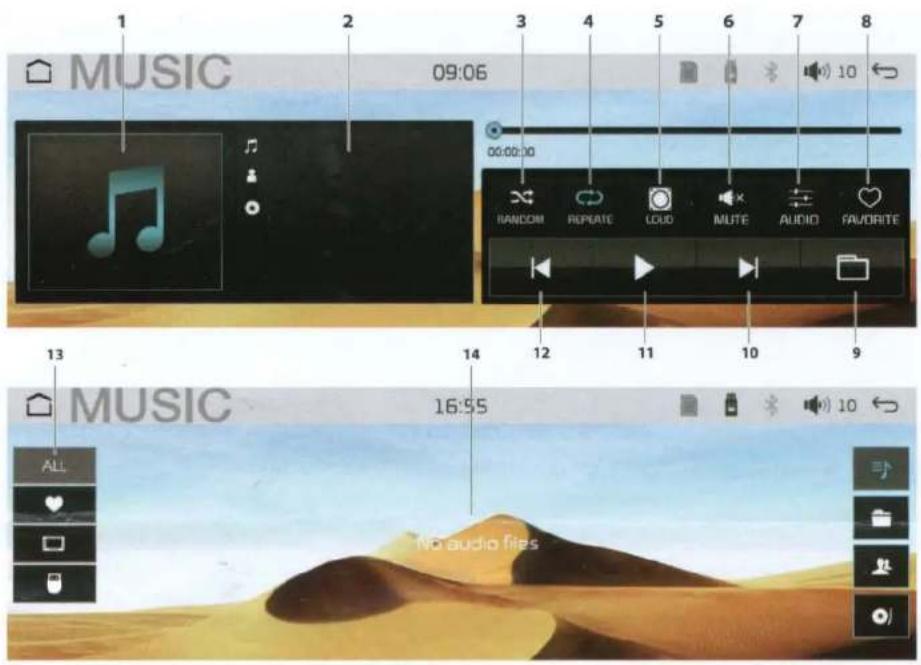
1 MUSIC 09:06 3 4 5 6 7 8 00:00:00 RANDOM REPEAT LOUD IMUTE AUDIO FAVORITE 12 11 10 9 13 MUSIC 16:55 ALL NO audio files4 AIL.... A.
F1-1
10. T--s-11
General Settings
text_image
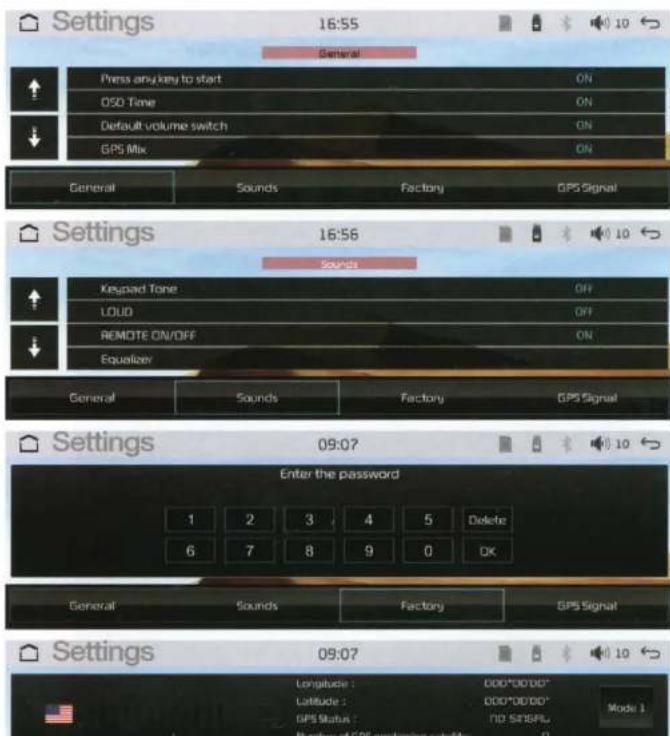
Settings 16:55 General Press any key to start ON OSO Time ON Default volume switch ON GPS Mix ON General Sounds Factory GPS Signal Settings 16:56 Sounds Keypad Tone OFF LOUD OFF REMOTE ON/OFF ON Equalizer General Sounds Factory GPS Signal Settings 09:07 Enter the password 1 2 3 4 5 Delete 6 7 8 9 0 OK General Sounds Factory GPS Signal Settings 09:07 Longitude : DDD*DD*DD* Latitude : DDD*DD*DD* GPS Status : TID SETBPL Mode 1In Setting Mode, you can set the following items.
- General
- Sounds
- Factory (MANUFACTURE USE ONLY)
- GPS Signal
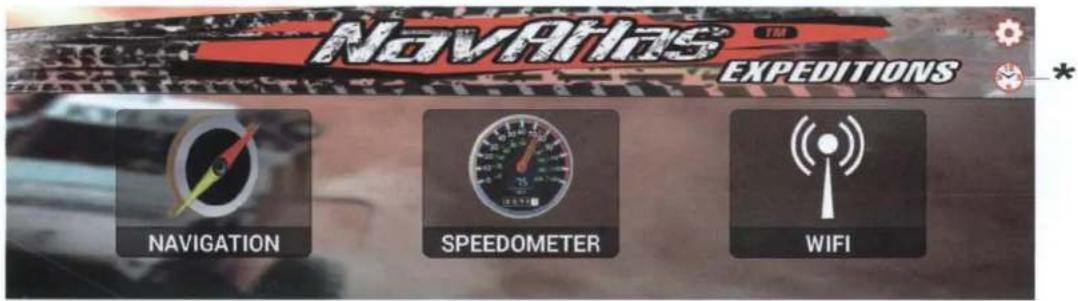
Navigation
Navigation Main Menu:
Navigation
Speedometer
Language
WiFi
Time Zone*
text_image
NavAtlas EXPEDITIONS NAVIGATION SPEEDOMETER WIFISpeedometer:
Shows current speed and keeps track of total distance traveled.

text_image
Menu ResetWiFi:
Shows all WiFi access points in the area for internet connection.

text_image
WiFi Off WiFi On Available Networks SCAN Scanning Connect to Wifi Hotspot UPDATE APP Case & line settings Automatic date & time Use network to access time Automatic time zone Use network to access time zone Use time zone Use time zone Use time zone Use time zone Use time zone Use time zone Use time zone Use time zone Use time zone Use time zone Use time zone Use time zone Use time zone Use time zone Use time zone Use time zone Use time zone Use time zone Use time zone Use time zone Use time zone Use time zone Use time zone Use time zone Use time zone C:\Users\Safe format*Time Zone
1

text_image
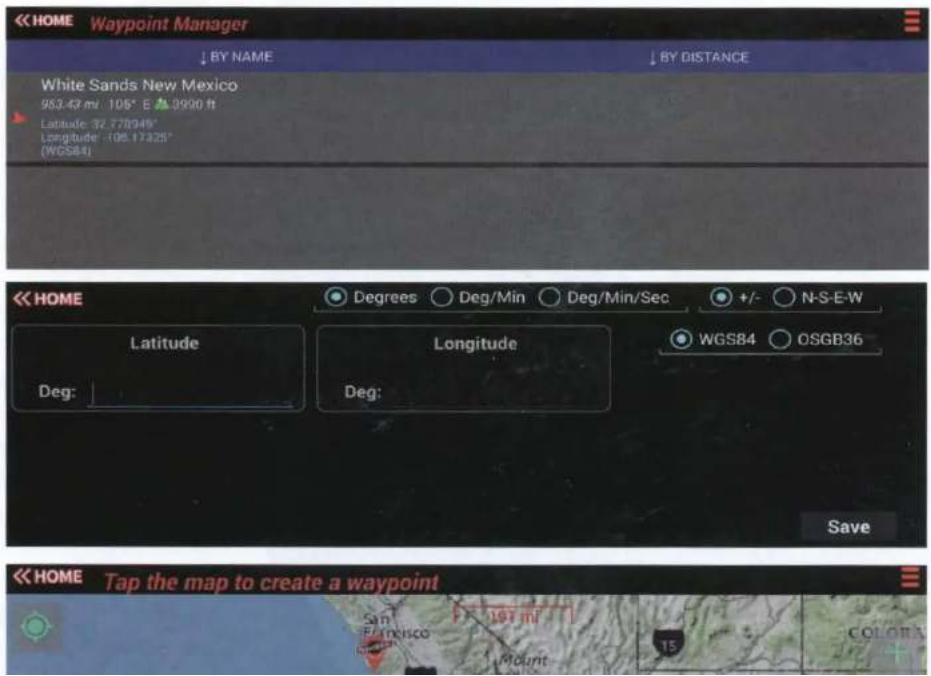
Navrias EXPEDITIONS << HOME 2 *Waypoints:
Lets you mark and save waypoints into the navigation for later use. Waypoints can be Saved from current location, from LAT & LONG coordinates, and from the map drop pin.
text_image
<< HOME Waypoint Manager ↓ BY NAME ↓ BY DISTANCE White Sands New Mexico 953.43 mi 106° E ▲3900 ft Latitude 32.778949° Longitude 108.17325° (WGS84) << HOME Latitude Deg: Degrees ○ Deg/Min ○ Deg/Min/Sec +/- ○ N-S-E-W Longitude Deg: WGS84 ○ OSGB36 Save << HOME Tap the map to create a waypoint San Francisco Mount 15 COLORANavigation
Compass:
This will show all GPS info in a compass format.

text_image
HOME Latitude 37.421998° Longitude -122.084° +/- 66 ft Altitude 0 ft Speed 0 mi/hr Distance 0 mi Δ Time 00:00:08Sunrise and Sunset:
This will show the exact time the sun will rise and set for your location.
(Please be sure the correct Time-Zone is set for your location.)

text_image
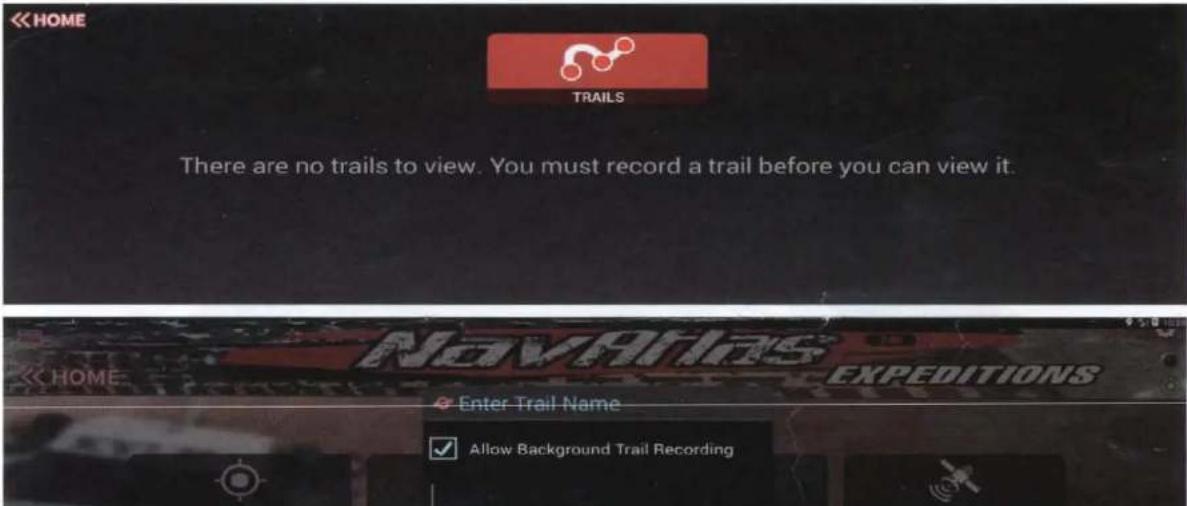
<< HOME Sunrise: Jun 10, 2021 5:47:00 AMTrails:
Pressing the "Record Trail" tab will automatically record the route driven and save it into the navigation for later use. The "Trails" tab will show all recorded trails. Recording can be in the background of any source, once the ride is finished press the "Stop" button to finalize the recording.
*Note: The blinking RED dot on the top right corner shows the recording status.