PSWHRL34 - Radio Pyle - Free user manual and instructions
Find the device manual for free PSWHRL34 Pyle in PDF.

| Product Type | Heart Rate Monitor Watch with Chest Belt |
| Model | PSWHRL34 |
| Brand | Pyle |
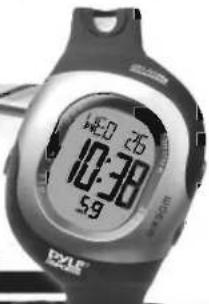
| Display | LCD Digital Display |
| Heart Rate Measurement | Wireless via Chest Belt (2.4GHz) |
| Main Functions | Heart Rate Zone Training, Stopwatch, Lap Time, Alarm, SOS, Dual Time, Scan Mode, Birthday Reminder |
| Watch Battery | 1 x CR2025 (replaceable) |
| Chest Belt Battery | 1 x CB2025 (replaceable) |
| Water Resistance | Not specified; avoid diving or underwater use |
| Weight | Approx. 50 g (watch only) |
| Dimensions | Approx. 45 mm diameter (watch face) |
| Material | Plastic case, silicone strap, elastic chest belt |
| Safety Notes | Not a medical device; consult physician before use; may interfere with pacemakers |
| Cleaning | Wipe with soft, damp cloth; avoid chemicals |
| Pairing | Automatic pairing with chest belt (must wear belt); manual pairing possible |
| Language Support | Multiple languages (selectable) |
| Backlight | Yes (hold button 2 sec) |
| Memory | Stores last training data (lap time, calories, fat burn, HR zones) |
| Accessories Included | Chest belt with elastic band, user manual |
| Warranty | Refer to packaging or contact retailer |
Frequently Asked Questions - PSWHRL34 Pyle
User questions about PSWHRL34 Pyle
0 question about this device. Answer the ones you know or ask your own.
Ask a new question about this device
Download the instructions for your Radio in PDF format for free! Find your manual PSWHRL34 - Pyle and take your electronic device back in hand. On this page are published all the documents necessary for the use of your device. PSWHRL34 by Pyle.
USER MANUAL PSWHRL34 Pyle
"Recreational Gear For The Great Outdoors"
IMPORTANT: Pack carefully in original package impossible. We are not responsible for damage received in returning note for repair. A letter stating you exact sent address, daytime phone number, and the problem you are experiencing should be included. You must also receive a copy of the original receipt a print of mail or purchase

"Recreational Gear For The Great Outdoors"

natural_image
Group of people performing yoga or stretching exercises on mats in a studio (no visible text or symbols)PSWHRL34 USER'S MANUAL
Brooklyn, NY 11204 1 800-143-1621 Monday Through Thursday, 9AM to 5PM Friday 9AM to 1PM Latent.
www.pyleaudio.com
www-pyleaudio.com
DYLE® SPORTS 24GHz TRANSMISSION
Table of Content Page
1.0 Welcome
2.0 Functions of Operating Keys 2
3.0 Functions of the chest 4.1) Wear the Chest Belt
5.0 Functions Mode 4
6.0 Activate or Deactivate the Key tone and Heart rate zone alert 5
7.0 Language, Clock, Date and Pairing with chest belt 5
7.1 Set Language 5
7.2 Set Clock and Date 5 - 6
7.3 Pairing the Watch with chest belt 6
8.0 Dual Time 6
8.1 Set Dual Time 6
8.2 View Dual Time
9.0 Stopwatch 7
9.1 Use the Stopwatch 7
9.2 Take Lap Time 8
9.3 Review Lap Time 8
9.4 Reset Stopwatch and Lap Time 9
10.0 Set Your Personal Data for Your Personal Heart Rate Mode 9
10.1 Set Gender, Birthday and Height
10.2 Set Weight and Sport Type
10.3 Set Target Heart Rate Zone Setting Type 1
11.0 View Target Heart Rate Zone Indications 1
11.1 Use Heart rate and Revise the Training Record 1
12.0 Alarm
12.1 Select Alarm 1 or Alarm 2
12.2 Set Daily Alarm
12.3 Activate or Deactivate the Alarm 1
13.0 SOS Mode
13.1 Set Name for SOS
13.2 Set bidon type for SUS
13.3 Set Phone number for SOS
13.4 View Name, Bidou type, Phone Number for SUS
14.0 View Scan Mode 45.2 Pitching Pattern
15.0 birthday reminder
16.0 Low battery indication 17.2 Break the Watch and Power Saving Marks
17.0 Reset the Watch and Power Saving Mode 17.0 Potential Gowers for U2 Heart Rate Readings and Low Powerover Time
10.0 Potential Causes for NO heart rate reading of Long Response time 10.0 Short Belt Battery Replacement
7.0 Watch Battery Breakdown
2.0.3 - 16-bit battery replacement
1.0 Welcome
Congratulations on your purchase of a heart rate monitor from Pro Touch. It is designed for ease of use during following sport activities: jogging, walking, cycling, fitness training and cross training. In order to learn and apply the various functions of your new heart rate monitor, please read this user manual carefully.
1.1 General
It's important that you know your maximum heart rate (MHR), training zone, upper heart rate limit and lower heart rate limit before you begin. This information helps you to achieve the maximum health benefits out of your workout. We recommend consulting a medical practitioner or registered physician before setting your personal training-schedule and target. Or you can set your own upper and lower limit using the following as a reference guide. You may estimate your MHR using the following formula:
220 - age = MHR.
WARNING!
- This product set, like most electronic or magnetic devices, may interfere with pacemakers. We recommend patients with pacemakers to consult with their doctor before using this product set.
• Make sure that you fully understand the functions and limitations of this product set before using it.
- This product set is a supplementary device for measuring heart rate, it is NOT a substitute for any medical devices. You should periodically compare the heart rate reading provided by this product set with the reading from a doctor.
Care and Maintenance
- Avoid rough usage or severe impacts to this product set.
- Store this product set in a dry place when it is not in use.
- Clean your product set occasionally with a soft moistened cloth.
• DO NOT expose this product set to chemicals such as gasoline and alcohol; these chemicals will damage this product set.
2.0 Functions of the Operating Keys
{+}
• To increase the value in
setting mode
setting mode:
- To shift from DUAL Clock to
Home Time in Time mode.
(-)
• To decrease the value in
setting mod
• To tri grow the key tree
• 16 th o
ON/OFF
• To trigger the stopwatch
START/STOP
a To action the Alarm
10 t f
ON/OFF
- Press and Held for 2 sec. to
- Press and Hold for 2 set turn ON the Backlight

M
(MODE)
• To change modes among
the different main function
the off modes
HOLDS.
• To change modes among
different setting sub-
and
(1)
[Non-Text]
[Non-Text]
(1 SOS)
(2017) 3.25
• In enter (hold for 2
seconds) or quit the setting
mode
mode.
- To take lap
stopwatch.
T. 605
• To enter SOS mode.
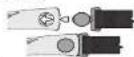
3.0 Functions of the chest belt

4.0 Wear the Chest Belt
4 Connect pre connector
with the chest belt. Ensure
that the connector is completely lodged into the chest belt.

Extend the elastic band for
allowing a loose fitting the chest bell on your chest.

Fit the chest belt on your
chest with one hand
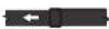

4 Connect the oppos
connector to the chest with the another hand.

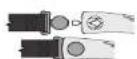
Fasten the elastic band
until it is fitted on your chest comfortably.

Move the chest belt until
the two contacts are firmly contacted with the skin of your chest.


IMPORTANT: This Chest Belt must be worn directly on your skin. DO NOT wear the chest belt on the top of your clothes, otherwise the chest belt CANNOT get the heart rate signal.
NOTE: In dry seasons, wet the contacts with water to make the signal transmission normal.
Precautions / Tips
■There are two contacts located on the back of the Chest Belt. These two contacts must make firm contact with the user's skin during measurement.
■DO NOT take heart rate measurement when diving or under water.
■ Clean the contacts occasionally by applying a few drops of water, and wipe it dry with a paper towel to remove any residual grease.
■DO NOT use hand cream; it will insulate the signal between the skin and the contacts.
■ Clean your skin with soap and water for a better signal transmission.
■For those with extremely dry skin, apply some conductive gel or water to increase conductivity.
■Adjust the Chest Belt with the supplied elastic band until it holds on your chest firmly to avoid loosening when exercising.
■ Avoid doing any awkward motion during measurement, it will create an inaccurate heart rate reading.
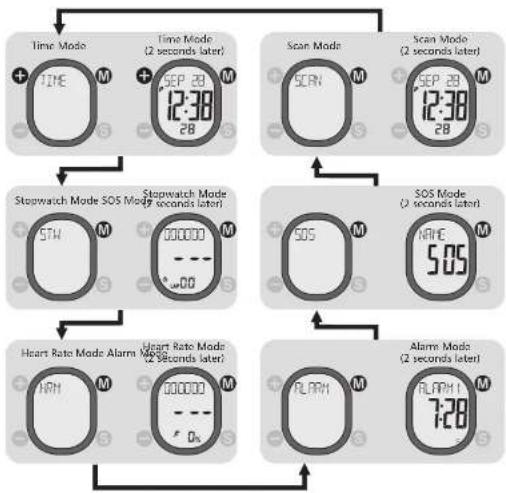
5.0 Functions Mode
• Press any button to resume the display if PostarradingBookdisplay
- Press M to next menu.
flowchart
graph TD
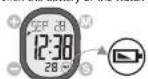
A["Time Mode + TIME M"] --> B["Time Mode (2 seconds later) + SEP 29 M 12:38 28"]
C["Scan Mode SCREEN M"] --> D["Scan Mode (2 seconds later) SEP 29 M 12:38 28"]
E["Stopwatch Mode STW M"] --> F["Stopwatch Mode SOS Mode (2 seconds later) 000000 M"]
G["SOS M"] --> H["SOS Mode (2 seconds later) HAVE 5:05 M"]
I["Heart Rate Mode Alarm NRH M"] --> J["Heart Rate Mode Alarm SOS (2 seconds later) 000000 M"]
K["Alarm Mode RLARM M"] --> L["Alarm Mode (2 seconds later) RLARM 7:28 M"]
B --> E
D --> G
F --> I
H --> J
L --> K
6.0 Activate or Deactivate the Key Tone and Heart Rate Zone Alert
- Press to activate ( (appears) or deactivate the key tone and Heart rate Zone Alert. I disappears)
7.0 Language, Clock, Date, and Pairing with the chest belt
7.1 Set Language
- Press M until "TIME" appears and hold S for 2 seconds. Press + / - to select a language and confirm with M.

flowchart
graph LR
    A["TIME M"] --> B["SEP 28 12:30 28 S"]
    B --> C["ENGLI"]
    C --> D["FRPM EPPM ITR IOUT"]
    D --> E["+ ENGLI M"]
7.2 Set Clock and Date
- Press + / - to select '12" or '24" and confirm with Ⓜ

- Press / to reset second, and confirm with press / to elect hour and minute, and confirm each with


7.3 Pairing the Watch with the Chest Belt


flowchart
graph LR
    A["Patient Injection"] --> B["Place with Follow-up"]
    B --> C["Hand Placement"]
    C --> D["Follow-up with Display"]
    D --> E["End of Display"]
8.0 Dual Time
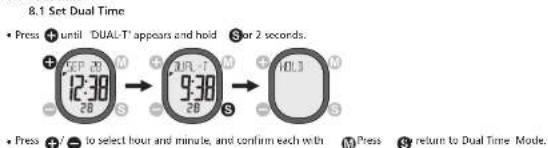

8.2 View Dual Time
- Press 📂 until TIME appears and press

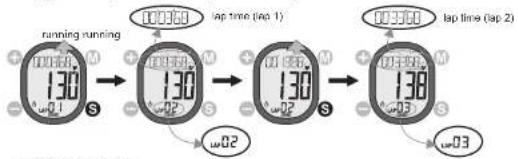
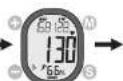
9.0 Stopwatch
9.1 Use the Stopwatch
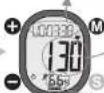
- Press Ⓜ until STW appears. The heart rate function will be activated automatically.
- Press → to start or stop the stopwatch
NOTE
- Please wear the chest belt in advance before using the Stopwatch with heart rate function, otherwise it
functions as a normal stopwatch.
- The Total Lap Time, Maximum (MAX) and Average (AVG) heart rate. Up (U), In (I) and Below(L) Zone Exercise Time, Calorie (KCAI), and Fat Burn (FAIB) are recorded if the chest belt is worn. These records can be reviewed on Heart Rate Mode.
- Press + to resume the connection if the watch loses connection with chest belt during running,
- Check the chapter 11.0 for the implications of Heart Rate Zone Indicator.

flowchart
graph TD
    A["Start"] --> B["00:00:00"]
    B --> C["..."]
    C --> D["130"]
    D --> E["Current Heart Rate"]
    F["Current lag time"] --> G["00:00:68"]
    G --> H["running running"]
    H --> I["130"]
    I --> J["Heart Rate Zone Indicator"]
    J --> K["130"]
    K --> L["Current Heart Rate"]
7
9.2 Take Lap time
- Press Ⓐ to take a lap time when the stopwatch is running.
flowchart
graph LR
    A["running running"] --> B["lap time (lap 1)"]
    B --> C["lap time (lap 2)"]
    C --> D["130s"]
    D --> E["lap time (lap 3)"]
    E --> F["130s"]
    F --> G["lap time (lap 4)"]
    G --> H["130s"]
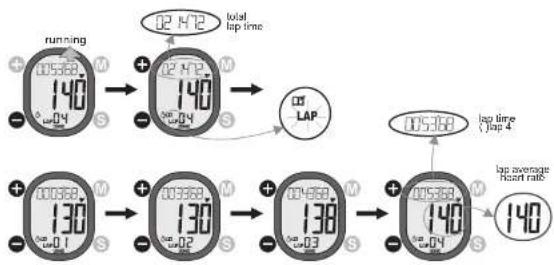
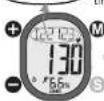
9.3 Review Lap time
- Press - to stop the stopwatch and press +to review total lap time, lap time of each lap and the average lap heart rate of each lap. Press -to quit the review.
flowchart
graph LR
    A["running"] --> B["02 H2"]
    B --> C["total lap time"]
    D["140"] --> E["02 H2"]
    E --> F["lap time (top 4)"]
    G["130"] --> H["03 H2"]
    H --> I["lap average heart rate"]
    J["138"] --> K["04 H2"]
    K --> L["lap time (top 4)"]
    M["140"] --> N["05 H2"]
    N --> O["lap average heart rate"]
9.4 Reset Stopwatch and Lap time
-
old S to reset the stopwatch and lap time. Press
to stop the stopwatch and h

flowchart
graph LR
    A["130"] --> B["0.2"]
    B --> C["0.1"]
    C --> D["0.0"]
10.0 Set Your Personal Data for Your Personal Heart Rate Mode.
- Press Muntil 'HRM' appears and hold S for 2 seconds. Any Heart Rate sub-mode can enter the Heart Rate Setting mode too by holding S for 2 seconds.

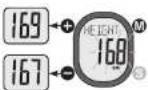
- Press + / - to set gender, birthday, height, weight, sport type, heart rate zone setting type (auto/manual) and your upper and lower heart rate (for manual heart rate zone setting). Confirm each with M.
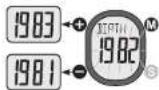
10.1 Set Gender, Birthday And Height


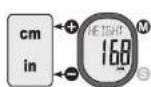
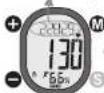
10.2 Set Weight and Sport Type.
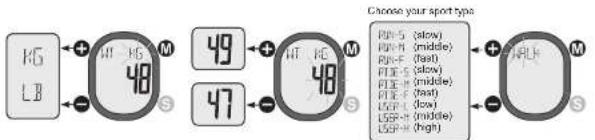
10.3 Set Target Heart Rate Zone Setting Type

11.0 View the Target Heart Rate Zone Indications

Heart Rate Zone Indication
NOTE:
- When the heart rate exceeds the upper or lower limits, the audible signal warning will go ON if key-tone is ON.
11.1 Use Heart Rate and Review the Training Record
Use the Heart Rate function
- Press (M) until "HRM" appears.
• The heart rate function will be activated automatically when Heart Rate Mode is selected.
NOTE
- Please wear the chest belt in advance before using the Heart Rate function.
Review the Training Record
• Press + / - On see t. he Total Lap Time. Maximum (MAX) and Average (AVG) heart rate. II to (II), in (I) and
Below(1) Zone Exercise Time, Calorie (KCAL), and Fat Burn (FATE). Press ① to move to Alarm Mode
NOTE
• The Total Lap Time, Maximum (MAX) and Average (AVG) heart rate, Up (U), In (I) and Below(L) Zone Exercise
Time, Calone (KCAL), and Fat Burn (FATB) are recorded in Stopwatch Mode only.

1. Put on the
Watch

2. Put on the
ch

3. Get your
b
(1) 2017年1月1日

(

→

total lap time (stopwatch)

Max. & Avg heart rate

Up-zone exercise time

(


In-zone exercise time

Below-zero exercise time

Calorie Expenditure


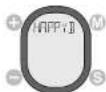
12.0 Alarm
12.1 Select Alarm 1 or Alarm 2
• M
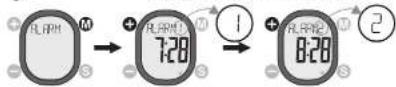
12.2 Set Daily Alarm
- Press M until 'ALARM' appears and hold S for 2 seconds.

- Press +/→ to select hour and minute, and confirm each with Ⓜ. Press Ⓗ to return to Alarm Mode.
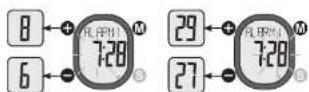
12.3 Activate or Deactivate the Alarm
- Press ⬤ to activate ( 📋 appears) or deactivate (= - appears) the alarm.

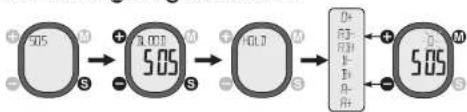
13.0 50S Mode
• User's personal information for emergency.
13.1 Set Name for SOS.
- Press Ⓧ once. Press +/— until "NAME" appears and hold Ⓧ for 2 seconds.

- Press + / - to select the alphabet, and confirm each with MPress S o return to SOS Mode.

flowchart
graph LR
    A[" "] --> B["+"]
    C[" "] --> D["-"]
    B --> E["M"]
    D --> F["S"]
    E --> G[" "]
    F --> H["-"]
    G --> I["+"]
    H --> J["-"]
    I --> K["M"]
    J --> L["S"]
    K --> M[" "]
    L --> N["-"]
    M --> O["+"]
    N --> P["-"]
→ ABCDEFGHIJKLMNOPORSTUPWXYZ
13.2 Set Blood type for SOS.
- Press S once. Press +/- until "BLOOD" appears and hold S for 2 seconds. Press +/- to select a blood type and confirm with M. Press S to return to SOS Mode.
flowchart
graph LR
    A["5:05"] --> B["5:05"]
    B --> C["6:17"]
    C --> D["5:05"]
13.3 Set Phone number for SOS.
- Press S once. Press + / - until "PHONE" appears and hold S for 2 seconds.

- Press + / - to select the digit, and confirm each with M. Press S to return to 50S Mode.

flowchart
graph LR
    A["Input"] --> B["Process"]
    B --> C["Output"]
    subgraph Stage1
        D["+"] --> E["M"]
        F["-"] --> G["S"]
    end
    subgraph Stage2
        H["+"] --> I["M"]
        J["-"] --> K["S"]
    end
    subgraph Stage3
        L["+"] --> M["M"]
        N["-"] --> O["S"]
    end
0123456789+-
13.4 View Name, Blood type, Phone number for 505
- Press Since. Press +/ - to view the Name, Blood type, and phone number. Press M to return to SCAN Made.

flowchart
graph TD
    A["Time Signal: 5.05"] --> B["Phone: PETER"]
    B --> C["Time Signal: 5.05"]
    C --> D["Phone: 12345678"]
    D --> E["Time Signal: 5.05"]
    E --> F["Blood type: O+"]
    style A fill:#f9f,stroke:#333
    style B fill:#ccf,stroke:#333
    style C fill:#cfc,stroke:#333
    style D fill:#fcc,stroke:#333
    style E fill:#cff,stroke:#333
    style F fill:#ffc,stroke:#333
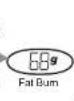
14.0 View Scan mode: Current Time Mode, Stopwatch Mode and Heart Rate Mode cyclically.
The Scan Mode shows all training results after a training.
- Press M until SCAN" appear.


- Without pressing any key the watch starts to show the following displays one by one cyclically: TIME, STW, AVGHR, KCAL and FATB.


Stopwatch Display
Average Heart Rate
Time Display


Fat Burnt Display
15.0 Birthday Reminder
- When the date is the same as the birthday set by the user, the watch will beep for 1 minute to remind the user, after the watch is being woke up from sleep mode.
16.0 Low Battery Indication
- When the battery of the watch drops to a low level, the Low Battery Indicator will be ON to remind user.
17.0 Reset the Watch and Power Saving Mode
- In any Modes, hold all the 4 buttons for more than 5 seconds will reset all the settings of the watch. After reset, all parameters and pairing of chest belt need to be set again.
- In Time Mode, press and hold - for 5 seconds to go into Power Saving Mode (turning off the LCD).
Timekeeping function is still running under Power Saving Mode. Press any key to resume from this mode.

Power Saving ModeReset Display (Full Segment 0 (5 seconds later)5 seconds later)
18.0 Potential Causes for NO Heart Rate Reading or Long Response Time
1) Cause: Dry Skin.
Solution: Apply conductive gel or saliva thoroughly to chest area. (Even water will help if conductive gel is not available).
2) Cause: Chest belt is not placed firmly over the chest.
Solution: Make sure the Chest belt is placed firmly over the chest by tightening elastic band.
3) Cause: Muscle tremors caused by holding the Chest belt too hard on your chest.
Solution: The contacts must make firm contact (NOT too hard) with the user's skin during measurement. This will ensure good and consistent readings even while walking or jogging with arms swinging naturally.
41 Cause: Dead skin on chest
Solution: Usually rubbing your chest with a towel will help.
5) Cause: A thin layer of body grease can insulate the ECG signal-basically prevents the back sensor on
the Chest belt from picking up one's ECG.
Solution: Wipe chest and the contacts on the back of Chest belt with a tissue or soft towel.
6) Cause: Hairy chest.
Solution: Apply conductive gel to chest area.
7) Cause: Irregular heartbeats.
Solution: N/A. It is difficult to consistently pick up a reading for those with irregular heart beats.
Inconsistent response times are expected for those with arrhythmia.
B) Cause: Low Battery.
Solution: It might be due to the battery level of the Chest bolt is low. Replace the battery of the Chest bolt
19.0 Chest Belt Battery Replacement
- Turn the battery cover with a coin counterclockwise until the arrow pointing to arrow.
2.Turn the cover further gently to pop
-
Put aside the battery cover.
-
Remove the empty battery.
- Insert a new CB2025 battery with the L11 side.
of the battery touch with the 1' shape metal
contact.
E. IMPORTANT: Make sure that the sealing rubber
o ring is placed correctly in its slot before the
battery cover is closed.
cover printing to the arrow, and then press the
cover down gently until it is on the same level
with the surface
B.Turn the cover with the coin clockwise until the
arrow pointing to dot

20.0 Watch Battery Replacement
- insert the tip of a flathead screw-driver into the
rotch of the spring bar.
- Push the notch and lift the wrist strap to dislodge
the spring bar. Disludge the lower strap similarly.
-
DIRECTOR THE LAB-LACK AND IT CRISTIAN/ANAL
-
2014
-
insert one end of the numbers into the match of the
battery contact plate.
-
Push the notch outward GENTLY.
-
Put aside the empty battery.
B. Insert a NEW CR2025 battery with (+) upward.
-
A click will sound when the buckle is locked.
-
IMPORTANT: Make sure that the TABLE only is
sitting in the slot properly insole screw the case-back, otherwise you will live into the Watch.
- Put the case-back, back to its original position.
12 Screw the case back to the case.
12 insert one end of the spring bar into the lodge on
the watch
- Insert the tip of a flathead screw driver into the
notch of the spring bar. Push the notch and lower
the wrist strap onto the watch until the spring bar
is COMPLETELY lodged. Lodge the lower strap
similarly


- "Recreational Gear For The Great Outdoors"
- Table of Content Page
- Welcome
- General
- WARNING!
- Care and Maintenance
- Functions of the Operating Keys
- {+}
- (-)
- (MODE)
- (1 SOS)
- Functions of the chest belt
- Wear the Chest Belt
- Precautions / Tips
- Use Heart Rate and Review the Training Record
- Chest Belt Battery Replacement
- Watch Battery Replacement
Brand : Pyle
Model : PSWHRL34
Category : Radio