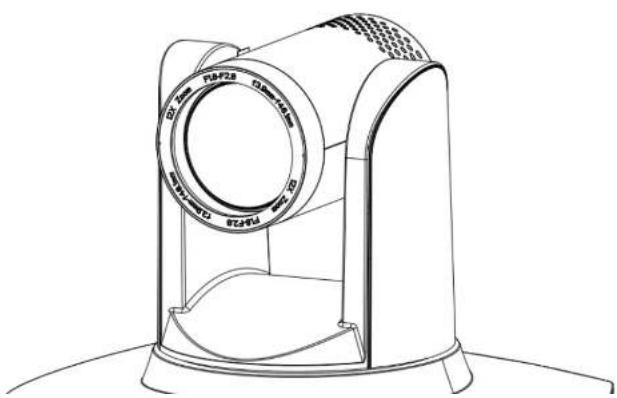
BG-LVUPTZ-20XHUS - Security Camera BZBGear - Free user manual and instructions
Find the device manual for free BG-LVUPTZ-20XHUS BZBGear in PDF.

User questions about BG-LVUPTZ-20XHUS BZBGear
0 question about this device. Answer the ones you know or ask your own.
Ask a new question about this device
Download the instructions for your Security Camera in PDF format for free! Find your manual BG-LVUPTZ-20XHUS - BZBGear and take your electronic device back in hand. On this page are published all the documents necessary for the use of your device. BG-LVUPTZ-20XHUS by BZBGear.
USER MANUAL BG-LVUPTZ-20XHUS BZBGear
Operation Manual for Teacher Tracking Camera
natural_image
Line drawing of a portable air purifier device with no text or symbolsPrecautions
This manual details functions, installation, operation principles and methods of teacher tracking camera. Please read this manual carefully before installation and use.
1. How to use
In order to prevent this product or products connected to it from being damaged, please use it within its prescribed scope of use.
1) Keep the device from rain or moisture;
2) To prevent electric shock, do not open the main case; only qualified technicians are allowed to install or maintain the device;
3) Do not use the device beyond scope of its temperature, humidity or power supply specification;
4) When cleaning the camera lens, swipe it with dry soft cloth. If dirt is hard to be removed, please swipe clean gently with mild detergent. Do not use strong or corrosive detergent, for it may scratch the lens and thus affect image result;
2. Electrical safety
Installation and use of this product shall be in strict accordance with safety standards for electricity.
3. Careful handing
Avoid damage to product caused by heavy pressure, strong vibration or immersion during transportation, storage and installation.
4. Power supply polarity
This product applies DC 12V power supply. Power plug polarity is shown as follows:
6. Do not dismantle the product without permission
This product contains no parts which can be maintained by users. Any damage arising from dismantling the product by user without permission will not be included in warranty.
7. Magnetic field interference
Magnetic field under specific frequency may affect this product image; this is Class A product. Application in domestic environment may cause radio interference. Therefore, user should take corresponding measures.

注意

natural_image
Line drawing of a portable electrical device with coiled wires and two labeled connectors (no text or symbols present)If it is needed to extend power line of the camera, extend it from terminal 1 (220V/110V) rather than terminal 2 (DC12V), otherwise it will prevent the device from functioning!
Table of Contents
Precautions....2
1 System overview....5
1.1 System introduction....5
1.2 Product advantages....5
1.3 Product features....6
2 Port introduction....6
3 Dimensions....8
4 System connection....9
4.1 Installation layout....9
4.2 System wiring....10
5 Configuration tools....10
5.1 Set IP address of the tracking machine.... 10
5.2 Configure tracking parameters....11
5.3 Network update....17
6 Description of recording and broadcasting host 18
6.1 Auto tracking control.... 18
6.2 Action code docking....19
7 Description of remote control....21
7.1. Description of keys 21
7.2 Use remote control.... 22
8 Set menu....23
Teaching tracking camera system solution is a dedicated smart camera solution leading in international education information industry.
Teaching tracking camera products feature built-in high speed processor and advanced image processing and analytical algorithm, which allows it to track and detect teachers, students and blackboard-writing accurately and quickly. It fully satisfies all scenario demand by recorded broadcasting of teaching and remote interactive teaching.
Teaching tracking camera products adopt advanced ISP processing technique and algorithm, producing vivid images which feature balanced brightness, distinct layering, high definition and color reducibility.
Teaching tracking camera products are characterized by improved function, high performance, reliable operation, simple use and easy maintenance.
1.2 Product advantages
Full-scene solution: Different product combinations satisfy different scenario demands;
- Networked control Interface: Control information of all products will be transmitted via network, and it is suitable for product layout for all scenarios;
- Recognition algorithm unrelated to location: Status detection and recognition of teachers and students adopt unique smart partitioning algorithm to ensure that the result of detection and recognition is unrelated to location:
● Free installation: It supports both front installation and upside down installation;
1.3 Product features
Full HD image: With 1/2.8 inch high quality image sensor, its maximum resolution ratio reaches 1920x1080;
- Multiple optical zoom lens: 12X and 20X optical zoom lens are available. The lens features 72.5^ distortionless wide viewing angle;
- Advanced focusing technique: The advanced automatic focusing algorithm allows automatic focusing be done quickly, accurately and steadily;
- Low noise high signal to noise ratio: Low noise CMOS ensures super high signal to noise ratio of video taken by the camera. With advanced 2D and 3D noise reduction technology, noise is reduced and image resolution is guaranteed.
- Audio input port: It supports 16000, 32000, 44100, 48000 sampling frequency and AAC, MP3 and G.711A audio coding;
- Super quiet holder: High precision stepping motor and precision motor driven controller ensure the holder operate at low and stable speed without noise;
● Multiple video compression standards: It supports II.265/II.264 video compression:
● Multiple networking protocol: It supports ONVIF, GB/T28181, RTSP, RTMP protocol and RTMP push mode;
- Sleep mode: It supports low-power consumption sleep/wake up mode. Power consumption in sleep mode is lower than 400mW;
- Multiple control protocol: It supports VISCA, PELCO-D, PELCO-P protocol, automatic recognition protocol and all command VISCA control protocol;
2 Port introduction
Front view
| No. | Port | Definition |
| 1 | DTR | Data Terminal Ready |
| 2 | DSR | Data Set Ready |
| 3 | TXD | Transmit Data |
| 4 | GND | Signal ground |
| 5 | RXD | Receive Data |
| 6 | GND | Signal ground |
| 7 | IR OUT | IR Commander Signal IR |
| 8 | NC | No Connection |
3 Dimensions

text_image
3-Ø5 Depth 5mm 150 80 14 14 1/4-20UNC Tripod hole Depth 6.5mm 272 1815 1.8 124.2 2544 System connection
4.1 Installation layout
text_image
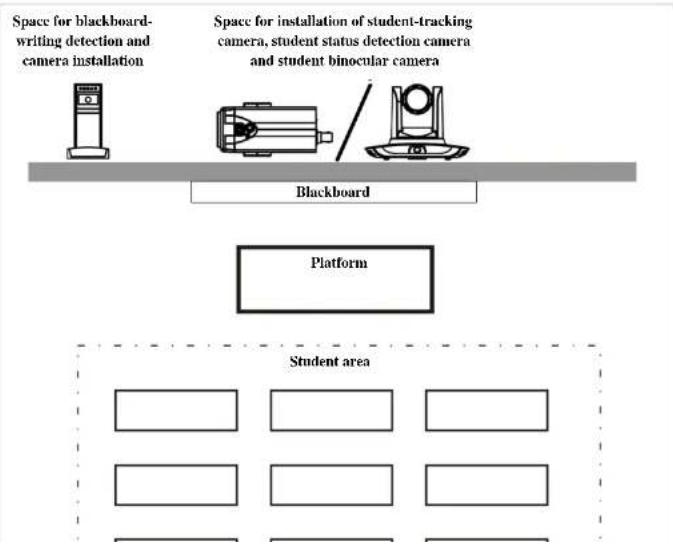
Space for blackboard-writing detection and camera installation Space for installation of student-tracking camera, student status detection camera and student binocular camera Blackboard Platform Student areaTeacher tracking camera is installed at place 1.8-2.5m from ground (distance from panoramic lens to ground), 5-15m from blackboard (when the distance is 5-9m, 4mm panoramic lens is recommended; when distance is 9-15m, 6mm panoramic lens is recommended). Teacher tracking camera should be installed near central axis of the classroom as much as possible to get the best result of tracking camera shooting.
5 Configuration tools
5.1 Set IP address of the tracking machine
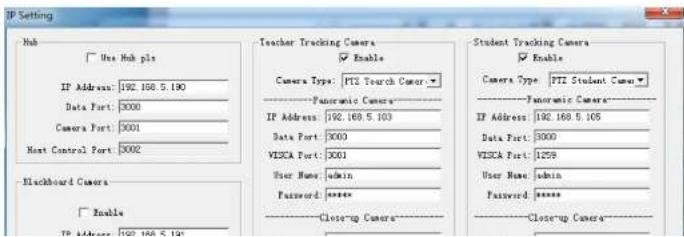
Open IVESmart configuration tool, click Settings -> IP address -> Search successively (refer to Figure 5.1-1 for details), the configuration interface will display all valid devices in the LAN, check type of device to be configured and click Confirm. Note: Computer for operating IVESmart tool should be in the same LAN with camera configured.
text_image
IP Setting Hub Use Hub plc IP Address: 192.168.5.190 Data Port: 3000 Camera Port: 3001 Host Control Port: 3002 Blackboard Camera Enable IP Address: 192.168.5.190 Data Port: 3000 VISCA Port: 3001 User Name: admin Password: **** Closing-up Camera Teacher Tracking Camera Enable Camera Type: PTL Search Camera Fanmonic Camera IP Address: 192.168.5.190 Data Port: 3000 VISCA Port: 3001 User Name: admin Password: **** Closing-up Camera Student Tracking Camera Enable Camera Type: PTL Student Camera Fanmonic Camera IP Address: 192.168.5.190 Data Port: 3000 VISCA Port: 1259 User Name: admin Password: **** Closing-up Camera5.2 Configure tracking parameters
Set the process

flowchart
graph TD
    A["Stop tracking"] --> B["Set Panoramic preset and close up"]
    B --> C["Set space for platform, tracking and shield"]
    C --> D["Set tracking parameters"]
    D --> E["Start tracking"]
Here, the following is a description of settings according to the process. The main interface of
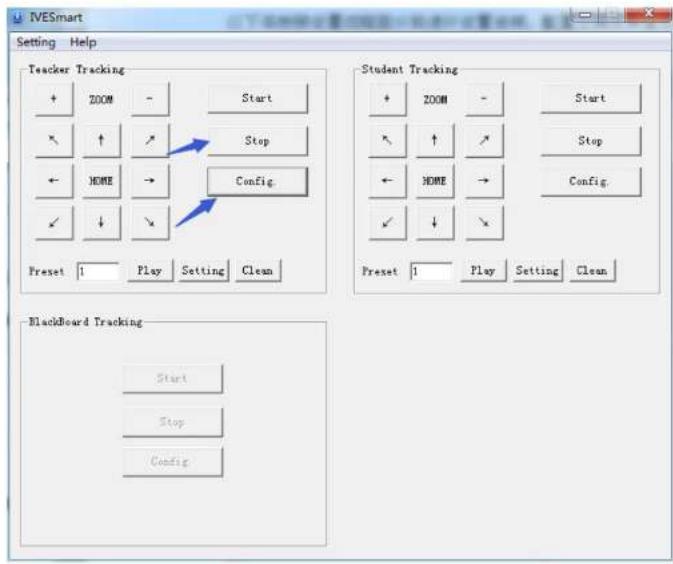
text_image
IVESmart Setting Help Teacher Tracking + ZOOM - Start ↑ ↑ Stop ← HOME → Config ✓ ↓ ✓ Preset 1 Play Setting Clean Student Tracking + ZOOM - Start ↑ ↑ Stop ← HOME → Config ✓ ↓ ✓ Preset 1 Play Setting Clean BlackBoard Tracking Start Stop ConfigFigure 5.2-1 Operation interface
- Set preset position for close up
Operation interface of setting preset position for close up is shown in Figure 5.2-2. Box indicated by arrow has a holder control button. By controlling holder position and zoom value, it will adjust
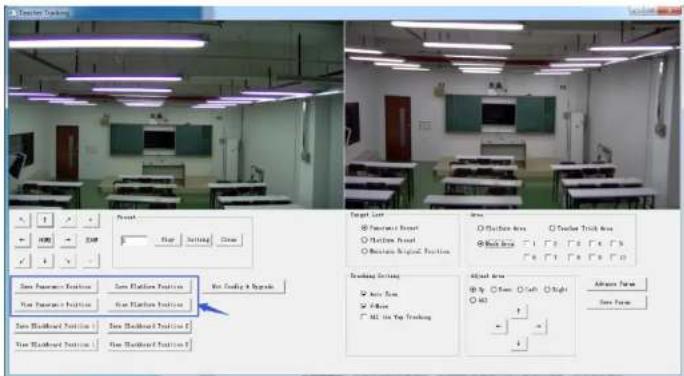
text_image
Teacher Tracking Start Reset OK Cancel Save Parameters Position Save Parameters Position Save Hardness Position Save Hardness Position Save Hardness Position Save Hardness Position Save Hardness Position Set Setup & Settings Set Setup & Settings Set Setup & Settings Set Setup & Settings Set Setup & Settings Set Setup & Settings Set Setup & Settings Set Setup & Settings Set Setup & Settings Set Setup & Settings Set Setup & Settings Set Setup & Settings Set Setup & Settings Set Setup & Settings Set Setup & Settings Set Setup & Settings Set Setup & Settings Set Setup & Settings Set Setup & Settings Set Setup & Settings Set Setup & Patterns Set Setup & Patterns Set Setup & Patterns Set Setup & Patterns Set Setup & Patterns Set Setup & Patterns Set Setup & Patterns Set Setup & Patterns Set Setup & Patterns Set Setup & Patterns Set Setup & Patterns Set Setup & Patterns Set Setup & Patterns Set Setup & Patterns Set Setup & Patterns Set Setup & Patterns Set Setup & Patterns Set Setup & Patterns Set Setup & Patterns Set Setup & Patterns Set Setup & Spaces Set Setup & Spaces Set Setup & Spaces Set Setup & Spaces Set Setup & Spaces Set Setup & Spaces Set Setup & Spaces Set Setup & Spaces Set Setup & Spaces Set Setup & Spaces Set Setup & Spaces Set Setup & Spaces Set Setup & Spaces Set Setup & Spaces Set Setup & Spaces Set Setup & Spaces Set Setup & Spaces Set Setup & Spaces Set Setup & SpacesFigure 5.2-2 Operation interface
Platform preset: Control teacher tracking camera to make platform (we suggest that teachers stand in the middle of platform, if any) get desired visual result in camera image, then click and save Platform preset. During normal tracking, size of teacher's image in the picture uses Platform preset as a reference. When tracking target disappears, it can select close-up lens to go back to Platform preset.
Panoramic preset: Control teacher tracking camera to allow camera to have almost a panoramic of the classroom (or any position). When tracking target disappears, it can select close-up lens to go back to panoramic position.
Preset for blackboard-writing: Refer to user manual for blackboard-writing for details.

text_image
Start Tracking Start Reset Run Setting Close Set Target @ Paramount Front @ Platform Front @ Paramount Original Position Show Area Show Area Show Trick Area Show Area Show Trick Area Show Trick Area Show Trick Area Show Trick Area Show Trick Area Show Trick Area Show Trick Area Show Trick Area Show Trick Area Show Trick Area Show Trick Area Show Trick Area Show Trick Area Show Trick Area Show Trick Area Show Trick Area Show Trick Area Show Trick Area Show Trick Area Show Trick Area Show Track Area Show Track Area Show Track Area Show Track Area Show Track Area Show Track Area Show Track Area Show Track Area Show Track Area Show Track Area Show Track Area Show Track Area Show Track Area Show Track Area Show Track Area Show Track Area Show Track Area Show Track Area Show Track Area Show Track Area Show Truck Area Show Truck Area Show Truck Area Show Truck Area Show Truck Area Show Truck Area Show Truck Area Show Truck Area Show Truck Area Show Truck Area Show Truck Area Show Truck Area Show Truck Area Show Truck Area Show Truck Area Show Truck Area Show Truck Area Show Truck Area Show Truck Area Show Truck Area Show Trck Area Show Trck Area Show Trck Area Show Trck Area Show Trck Area Show Trck Area Show Trck Area Show Trck Area Show Trck Area Show Trck Area Show Trck Area Show Trck Area Show Trck Area Show Trck Area Show Trck Area Show Trck Area Show Trck Area Show Trck Area Show Trck Area Show Trck Area Show Trk Area Show Trk Area Show Trk Area Show Trk Area Show Trk Area Show Trk Area Show Trk Area Show Trk Area Show Trk Area Show Trk Area Show Trk Area Show Trk Area Show Trk Area Show Trk Area Show Trk Area Show Trk Area Show Trk Area Show Trk Area Show Trk AreaFigure 5.2-3 Operation interface
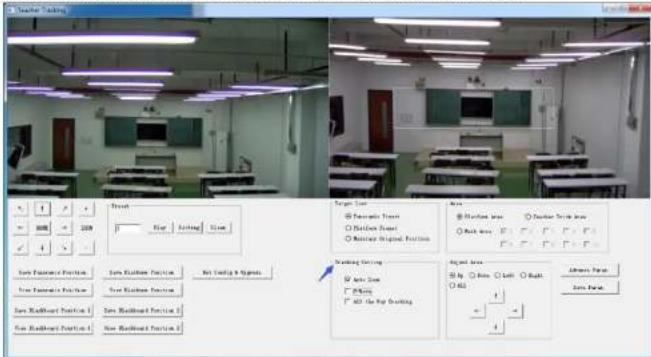
Tracking area: Tracking area means scope of tracking teacher. When the tracking target goes out of the tracking area, it will be considered tracking target losing. The tracking area can be set into polygon according to certain environment conditions, or set student area outside of tracking area. See Figure 5.2-4:
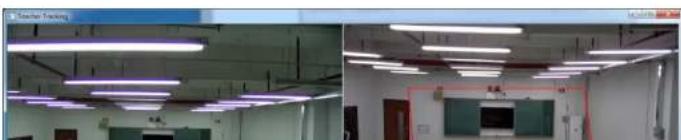
natural_image
Interior view of a modern office with ceiling lights and a central room (no visible text or symbols)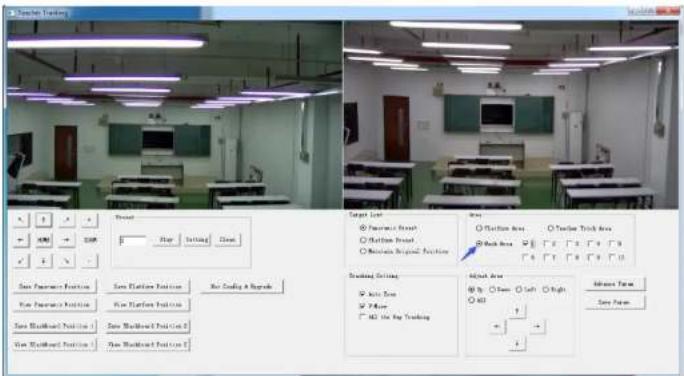
text_image
Teacher Training Start Reset Run Setting Close Save Parameters Position Save Platform Position Not Coding & Upgrade Save Parameters Position Save Platform Position Save Blackboard Position Save Blackboard Position Save Platform Position Save Blackboard Position Target Unit Reset ○ Paramount Front ○ Platform Front ○ Remote Original Position Training Drilling ○ Auto Span ○ Max ○ Max Use For Training Grid Area ● Top ○ Down ○ Left ○ Right ○ Max + - + - Remove Frame Save FrameFigure 5.2-5 Operation interface
3. Set tracking parameters
Target lost: when target loses, the close-up lens will return to designated preset position. This preset position can be panoramic preset, platform preset or maintain original position.

natural_image
Interior view of a classroom with ceiling lights and desks (no visible text or symbols)tracking, angle of elevation remains the value set during platform preset. If a teacher will not step down platform in class, we suggest turning off auto zoom and v-move.
text_image
Teacher Setting Reset Reset Setting Size Set Functional Position Set Functional Position Set Functional Position Set Redboard Position 1 Set Redboard Position 2 Set Redboard Position 3 Target Line Position Line Position Line Position Line Position Line Position Line Position Line Position Line Position Line Position Line Position Line Position Line Position Line Position Line Position Line Position Line Position Line Position Line Position Line Position Line Position Line Position Line Position Line Position Line Position Line Position Line Position Line Position Line Position Line Position Line Position Line Position Line Position Line Position Line Position Litter Position Litter Position Litter Position Litter Position Litter Position Litter Position Litter Position Litter Position Litter Position Litter Position Litter Position Litter Position Litter Position Litter Position Litter Position Litter Position Litter Position Litter Position Litter Position Litter Position Litter Position Litter Position Litter Position Litter Position Litter Position LInner Position LInner Position LInner Position LInner Position LInner Position LInner Position LInner Position LInner Position LInner Position LInner Position LInner Position LInner Position LInner Position LInner Position LInner Position LInner Position LInner Position LInner Position LInner Position LInner Position LInner Position LInner Position LInner Position LInner Position LInner Position LOuter Position Outer Position Outer Position Outer Position Outer Position Outer Position Outer Position Outer Position Outer Position Outer Position Outer Position Outer Position Outer Position Outer Position Outer Position Outer Position OuterFigure 5.2-7 Operation interface
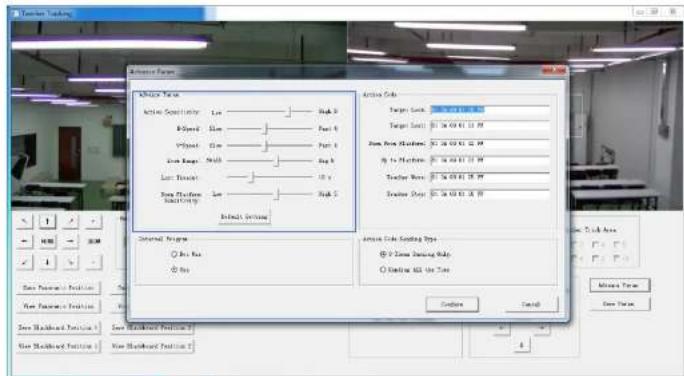
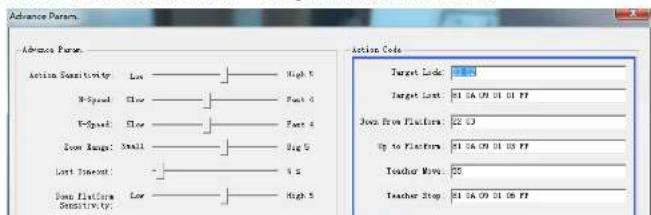
Advance parameters:
Action sensitivity: In teacher tracking mode, it is the action range required to trigger tracking camera when the tracking target changes from stationary state to motion state. The higher the action sensitivity, the smaller movement of tracking target that will trigger camera's tracking motion.
H-speed: It means speed of tracking camera for horizontal tracking.
V-speed: It means speed of tracking camera for vertical tracking.
Zoom range: The bigger the range, the higher zoom extent required for camera when tracking target steps down platform.
text_image
Active Frame Active Frame Active Sequence: Low High 0 High 1 Low 0 High 1 Low 2 High 2 High 3 High 4 High 5 High 6 High 7 High 8 High 9 High 10 High 11 High 12 High 13 High 14 High 15 High 16 High 17 High 18 High 19 High 20 High 21 High 22 High 23 High 24 High 25 High 26 High 27 High 28 High 29 High 30 High 31 High 32 High 33 High 34 High 35 High 36 High 37 High 38 High 39 High 40 High 41 High 42 High 43 High 44 High 45 High 46 High 47 High 48 High 49 High 50 High 51 High 52 High 53 High 54 High 55 High 56 High 57 High 58 High 59 High 60 High 61 High 62 High 63 High 64 High 65 High 66 High 67 High 68 High 69 High 70 High 71 High 72 High 73 High 74 High 75 High 76 High 77 High 78 High 79 High 80 High 81 High 82 High 83 High 84 High 85 High 86 High 87 High 88 High 89 High 90 High 91 High 92 High 93 High 94 High 95 High 96 High 97 High 98 High 99 High 100 Active Code: Target Lock: High (0,0,0,1,0,1,1) Target Set: D: D: D: D: D: D: D: D: D: D: D: D: D: D: D: D: D: D: D: D: D: D: D: D: D: D: D: D: D: D: D: D: D: D: D: D: D: D: D: D: D: D: D: D: D: D: D: D: D: D: C: Active Code Setting Type: D: Zone Direction Only: D: Interval BCL Use Time Active Type: New Type New Position: New Position: New Position: New Position: New Position: New Position: New Position: New Position: New Position: New Position: New Position: New Position: New Position: New Position: New Position: New Position: New Position: New Position: New Position: New Position: New Position: New Position: New Position: New Position: New Position: New Position: New Position: New Position: New Position: New Position: New Position: New Position: New Position: New Position: Next Step: Next Step:Figure 5.2-5 Operation interface
For settings of action code, refer to "7 Description of connecting recording and broadcasting host". After setting, click Save Parameter. It allows to entering advance parameter settings column to change configuration value to obtain the best result subject to specific scenes and customer demand.
5.3 Network update
When updating the version, it needs to update device via IVESmart configuration tools. Click Configuration -> Network configuration & update to enter update interface, as shown below:

text_image
Upgrading.... Upgrading ......After upgrading is completed, the camera will perform self-inspection.
Note: After grading, you can restore factory settings by combination key [*] [#] [6] on remote control or by remote control menu.
6 Description of recording and broadcasting host
6.1 Auto tracking control
The recording and broadcasting host sends command by LAN network port or concentrator RS232 serial port and controls automatic tracking motion of teacher tracking camera. In auto tracking mode, it does not allow control camera holder rotation or zoom by IVESmart configuration tool or remote control; in stop auto tracking mode, it allows control camera holder rotation or zoom by IVESmart configuration tool or remote control.
- Network receiving address

text_image
IP Setting Hub Use Hub pls IP Address: 192.168.5.190 Data Port: 3000 Camera Port: 3001 Host Control Port: 3002 Blackboard Camera Enable IP Address: 192.168.5.195 Data Port: 3000 VISCA Port: 1259 User Name: admin Password: ****** Teacher Tracking Camera Enable Camera Type: Teacher Camera Panoramic Camera IP Address: 192.168.5.197 Data Port: 3000 VISCA Port: 1259 User Name: admin Password: ****** Close-up Camera IP Address: 192.168.5.191 Data Port: 3000 VISCA Port: 1259 User Name: admin Password: ****** Student Tracking Camera Enable Camera Type: PTZ Student Camera Panoramic Camera IP Address: 192.168.5.105 Data Port: 3000 VISCA Port: 1259 User Name: admin Password: ****** Close-up Camera IP Address: 192.168.5.193 Data Port: 3000 VISCA Port: 1259 User Name: admin Password: ****** Device Type Panoramic IP Panoramic Port Panoramic V Close-up IP Close-up Port Close-up VI Teacher Tracking 192.168.5.200 3000 1259 192.168.5.201 3000 1259 Hub 192.168.5.190 3000 3001 0 0 Teacher Tracking 192.168.5.197 3000 1259 0 0 Hub 192.168.5.190 3000 3001 0 0 Hub 192.168.5.190 3000 3001 0 0 Hub 192.168.5.190 3000 3001 0 0 Teacher Tracking 192.168.4.163 3000 3001 192.168.4.192 3000 1259 IP Address: 192.168.0.31 Search Confirm CancelFigure 6.1-1 Operation interface
- Command
| Type | Command |
| Start teacher tracking | 0x810x0A 0x08 0x01 0x020xFF |

text_image
Net config &&Update Clearup Camera Camera Version: V2.3.1 2017-10-06 Force Version: V2.4.1 2018-12-28 JIM Version: V2.3.1 2017-10-05 JP Address: 190, 199, 5, 201 Subset Mode: 255, 256, 256, 0 Data Part: 2000 VSSA Part: 1159 Save Subcut Upgrade File: Upgrade Select File Passive Camera Camera Version: V2.3.1 2017-10-01 JP Address: 192, 203, 5, 200 Subset Mode: 255, 256, 256, 0 Data Part: 2000 VSSA Part: 256 User ID: 192, 203, 5, 190 User Part: 2001 Save Subcut Upgrade File: Upgrade Select FileFigure 6.2-1 Operation interface
2. Configure action code
Edit action code as needed via IVESmart configuration tool. Click Configuration -> advance parameters successively;
After modification, click Confirm -> save parameters, as shown below:
text_image
Advance Params Advance Parce Action Sensitivity: Low High 5 B-Speed: Slow Part 4 P-Speed: Slow Part 4 Zoom Range: Small Big 5 Lost Element: 1.2 Zoom Feature Sensitivity: Low High 5 Action Code Target Lock: 100 Target Lost: 01 04 09 01 01 FF Join From Features: 02 03 Up to Features: 01 04 09 01 03 FF Teacher Move: 00 Teacher Stop: 01 04 09 01 08 FF7 Description of remote control
7.1. Description of keys
Long press standby key for 3s, camera enters standby mode, long press this key again for 3s, camera will perform self-inspection again and return to HOME position. When setting #0 as preset, when there is no action within 12s, the holder will return to #0 preset.
2. Select camera
Select address number of camera to be controlled.
3. Number key
Set or call #0-9 preset.
4. \*key and #key
- Focusing control key: adjust focusing.
[Auto focusing]: Enter auto focusing mode
[Manual focusing]: shift camera focusing mode to manual; adjust focusing via [Focusing +] or [Focusing -]
6. Zoom key
[Zoom] +: zoom out lens; [Zoom -]: zoom in lens
7. Set and clear preset key
Set preset: Save a preset, set preset + number key (0-9), that is set preset of corresponding number key;
Cancel preset: Cancel a preset, cancel preset + number key (0-9), that is cancel preset of corresponding number key;
8. Holder control key
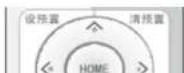
UDLR (Up, Down, Left, Right) arrow/l it controls UDLR movement of the holder.
7.2 Use remote control
After normal start of the camera, it receives infrared command and execute. Press down remote control key, receiving indicator of remote control flashes, release the key, the indicator stops flashing. User can set preset, read position, horizontal and vertical motion by infrared remote control. Description of keys:
-
Key press mentioned in this manual means press and release the key on remote control. For example, "press [HOME] key" means press down [HOME] key and release. If long press is needed, it will be specified specially.
-
Operation of combination keys mentioned in this manual means operating such keys in order. For example, "press [*] + [#] + [F1]" means press [*] first, then [#], and [F1] at last.
1) Select camera

Select address number of camera to be controlled.
2) Control holder

Rotate upward: Press [▲]; rotate downward: Press [▼]
Rotate to left: Press [ ]; rotate to right: Press [ ]
Center position: Press [HOME]
Long press UDLR key, it will rotate from low speed to high speed continuously, until it reaches the destination; release in the middle of the journey, it will stop movement.
3) Set, cancel, call preset
- Save preset: Press [Set preset], then press any number key from 0 to 9, it will reset a preset corresponding to the number key.
Note: with remote control, it can set 10 presets at most.
- Call preset: Press number key 0-9 directly, it will ca preset which has been saved.
Auto focusing: support Manual focusing: Support
7) Set infrared remote control address of camera

[^*] + [ 卄 ] + [ F 1 ] : S e t~ u p ~ # 1 ~ a d d r e s s
[^*] + [ ± ] + [F2]: Set up # 2 address
|^*| + | # | - |1^3| : Set # 3 address
[*] + [#] + [F4]: Set up #4 address
8 Set menu
8.1 Main menu
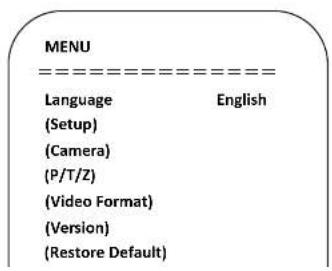
In normal image, press [MENU] key, the screen displays the menu content, use the arrow to point to the desired item.
text_image
MENU ==================== Language English (Setup) (Camera) (P/T/Z) (Video Format) (Version) (Restore Default)8.2 System parameter settings
On the main menu, move the cursor to (Settings), press [HOME] key to enter Settings page, as shown below.
| SETUP | |
| Protocol | Auto |
| Visca Address | 1 |
| Visca Address Fix | OFF |
| PELCO-P Address | 1 |
| PELCO-D Address | 1 |
| Baudrate | 9600 |
| [↑↓]Select [←→]Change Value[Menu]Back | |
Protocol: Protocol type VISCA/PELCO-P/PELCO-D/auto
Baud rate: Set item: 2400/4800/9600/115200
Communication address: VISCA-1\~7;PELCO-P = 1\~64;PELCO-D = 1\~64
VISCA address fix: Set item: On/off
8.3 Camera parameter settings
On the main menu, move the cursor to (CAMERA), press [HOME] key to enter
1) Exposure
On CAMERA menu, move the cursor to (EXPOSURE), press [HOME] key to enter exposure page, as shown below.
| EXPOSURE | |
| Mode | Auto |
| EV | OFF |
| BLC | OFF |
| Flicker | 50Hz |
| G.Limit | 3 |
| DRC | 2 |
| [↑↓]Select [←→]Change Value[Menu]Back | |
Mode: Options: Auto, manual, shutter priority, aperture priority, brightness priority
EV: Options: On/off (only valid in auto mode)
Compensation grade: Options: -7\~7 (only valid in auto mode when "EV" is on.)
BLC: Options: On/off (only valid in auto mode) DRC: Options: 1\~8, off
Flicker: Options: Off, 50Hz, 60Hz (valid in auto, shutter priority and brightness priority modes)
G. Limit: Options: 0\~15(valid in auto, shutter priority and brightness priority modes)
Shutter priority: Options: 1/25, 1/30, 1/50, 1/60, 1/90, 1/100, 1/120, 1/180, 1/250, 1/350, 1/500, 1/1,000, 1/2000, 1/3000, 1/4000, 1/6000, 1/10000 (valid in manual and shutter priority modes)
Aperture priority: Options: Off, F11.0, F9.6, F8.0, F6.8, F5.6, F4.8, F4.0, F3.4, F2.8, F2.4, F2.0, F1.8 (valid in manual and aperture priority modes) Brightness: Options: 0\~23 (only valid in brightness priority
| COLOR | |
| WB Mode | Auto |
| RG Tuning | 0 |
| BG Tuning | 0 |
| Saturation | 100% |
| Hue | 7 |
| AWB Sensitivity | Low |
| [↑↓]Select [←→]Change Value[Menu]Back | |
WB Mode: Options: auto, 3000K, 4000K, 5000K, 6500K, manual, one-key white balance.
RG Tuning: Options: -10\~10 (only valid in auto mode) BG Tuning: Options: -10\~10 (only valid in auto mode)
Red gain: Options: 0\~255 (only valid in manual mode) Blue gain: Options: 0\~255 (only valid in manual mode)
Saturation: Options: 60%, 70%, 80%, 90%, 100%, 110%, 120%, 130%, 140%, 150%, 160%, 170%,
180%, 190%, 200%
Hue: Options: 0\~14
AWB Sensitivity: Options: high, medium, low (only valid in auto mode)
3) Image
On CAMERA menu, move the cursor to (IMAGE), press [IHOME] to enter IMAGE page, as shown below.
| IMAGE | |
| Brightness | 7 |
4) Focus
On CAMER menu, move the cursor to (FOCUS), press [HOME] key to enter FOCUS page, as shown below.
FOCUS
Focus Mode
Auto
AF-Area
Center
AF-Sensitivity
Low
[↑↓]Select [←→]Change Value
[Menu]Back
Focus mode: Options: auto/manual
AF-Area: Options: up/center/low
AF-Sensitivity: Options: high/medium/low
5) Noise reduction
On CAMERA menu, move the cursor to (Noise reduction), press [HOME] key to enter Noise reduction page, as shown below.
NOISE REDUCTION
NR-2D 3
NR-3D 3
Dynamic Hot Pixel OFF
[↑↓]Select [←→]Change Value
[Menu]Back
rotate at lower speed.
Zoom speed: Set speed for remote control camera Image freezing; Options: On/off zoom, 1\~8
Acc Curve: Options: Quick/slow
8.5 Video format
On the main menu, move the cursor to (VIDEO FORMAT), press [HOME] key to enter VIDEO FORMAT page, as shown below.
| VIDEO FORMAT | ||
| 1080P60 | 1080P50 | |
| 1080I60 | 1080I50 | |
| 1080P30 | 1080P25 | |
| 720P60 | 720P50 | |
| 720P30 | 720P25 | |
| 1080P59.94 | 1080I59.94 | |
| 1080P29.97 | 720P59.94 | |
| 720P29.97 | ||
| [↑↓]Select | ||
| [Menu]Back | [Home]OK | |
Note: only when rotation dial-up is at F will ST model menu show this item. S version: 1080P60 downward compatibility; M version: 1080P30 downward compatibility Change parameter value in the menu. To save value when power off, exit menu.
RESTORE DEFAULT
Restore Default? NO
[↑↓] Select [←→] Change Value [Menu] Back [Home] OK
Restore default : Options : Yes/no (color style and video format can't be restored default).
Note: If remote address used before is not 1, but any one from 2, 3 and 4, after restoring all parameters or system parameters, device address corresponding to the remote control will be reset to 1. At this moment, it is needed to change remote control address to 1, that is, press Camera and select [1], control will function.
9 Technical parameters
| Parameter/model | Model-12 | Model-20 |
| Tracking camera, lens parameters | ||
| Image sensor | 1/2.8inch high quality CMOS sensor | |
| Effective pixels | 2,070,000 16:9 | |
| Video signal | 1080P60/50/30/25/59.94/29.971080f60/50/59.94?20P60/50/30/25 /59.94/29.97 | |
| Lens optics zoom | 12X optical zoom f-3.9~46.1mm | 20X optical zoom f-4.7~94mm |
| Visual angle | 6.3° (narrow angle) ~72.5° (wide angle) | 2.9° (narrow angle) ~55.4° (wide angle) |
| Aperture coefficient | F1.8~F2.4 | F1.6 ~ F3.5 |
| Digit zoom | X10 | |
| Minimum illumination | 0.5Lux(F1.8, AGC ON) | |
| code stream | ||
| Video compression format | II.265, II.264 | |
| Control signal port | RS-232/485 | |
| Control protocol | VISCA/Pelco-D/Pelco-P; Band rate: 115,200/9,600/4,800/2,400bps | |
| Audio input port | Dual track 3.5mm linear input | |
| Audio compression format | AAC, MP3, PCM | |
| Power port | IIEC3800 power socket (DC12V) | |
| Holder parameters | |
| Horizontal rotation | - 170^ + 170^ |
| Vertical rotation | - 30^ + 90^ |
| Horizontal control speed | 0.1~100°/s |
| Vertical control speed | 0.1~45°/s |
| Preset speed | Horizontal: 100^ /s ,vertical: 45^ /s |
| Preset quantity | User can set 255 presets at most (10 pes of mobile control) |
| Other parameters | |
| Power adapter | Input AC110V-AC220V output DC12V/2.5A |
| Input voltage | DC12V+10% |
| Input current | 1.5A (maximum) |
| Power consumption | 18W (maximum) |
| Storage temperature | -10°C~+60°C |
| Storage humidity | 20%-95% |
| Operating temperature | -10°C~+50°C |
| Operating humidity | 20%-80% |
| Dimension (WxIIxD) | 254mm X 144mm X 174mm |
| Weight (approx.) | 1.50kg |
| Operating environment | Indoor |
| Remote maintenance (network port) | Remote upgrade, restart and reset |
| Standard accessories | 12V/2.5A power, RS232 control line, remote control, operation manual, warranty card |
| Optional accessories | Installation support |
| Ack/Completion Message | ||
| Command package | Notes | |
| ACK | z0 41 FF | Returned when the command is accepted. |
| Comp letion | z0 51 FF | Returned when the command has been executed. |
z camera address+8
| Error Messages | ||
| Command package | Notes | |
| Syntax Error | z0 60 02 FF | Returned when the command format is different or when a command with illegal command parameters is accepted |
| Command Not Executable | z0 61 41 FF | Returned when a command cannot be executed due to current conditions. For example, when commands controlling the focus manually are received during auto focus. |
Control command
| Command | Function | Command package | Notes |
| AddressSet | Broadcast | 88 30 01 FF | Address setting |
| IF_Clear | Broadcast | 88 01 00 01 FF | I/F Clear |
| CommandCancel | 8x 21 FF | ||
| CAM_Power | On | 8x 01 04 00 02 FF | Power ON/OFF |
| Off | 8x 01 04 00 03 FF | ||
| CAM_Zoom | Stop | 8x 01 04 07 00 FF | |
| Tele (Standard) | 8x 01 04 07 02 FF | ||
| Wide (Standard) | 8x 01 04 07 03 FF | ||
| Tele (Variable) | 8x 01 04 07 2p FF | p = 0(low) - 7(high) | |
| Wide (Variable) | 8x 01 04 07 3p FF | ||
| Direct | 8x 01 04 47 0p 0q 0r 0s FF | pqrs: Zoom Position | |
| Stop | 8x 01 04 08 00 FF | ||
| Far(Standard) | 8x 01 04 08 02 FF | ||
| Near(Standard) | 8x 01 04 08 03 FF | ||
| Up | 8x 01 04 04 02 FF | Manual Control of B Gain | |
| Down | 8x 01 04 04 03 FF | ||
| Direct | 8x 01 04 44 00 00 0p 0q FF | pq: B Gain | |
| CAM_AE | Full Auto | 8x 01 04 39 00 FF | Automatic Exposure mode |
| Manual | 8x 01 04 39 03 FF | Manual Control mode | |
| Shutter priority | 8x 01 04 39 0A FF | Shutter Priority Automatic Exposure mode | |
| Iris priority | 8x 01 04 39 0B FF | Iris Priority Automatic Exposure mode | |
| Bright | 8x 01 04 39 0D FF | Bright mode | |
| CAM_Shutter | Reset | 8x 01 04 0A 00 FF | Shutter Setting |
| Up | 8x 01 04 0A 02 FF | ||
| Down | 8x 01 04 0A 03 FF | ||
| Direct | 8x 01 04 4A 00 00 0p 0q FF | pq: Shutter Position | |
| CAM_Iris | Reset | 8x 01 04 0B 00 FF | Iris Setting |
| Up | 8x 01 04 0B 02 FF | ||
| Down | 8x 01 04 0B 03 FF | ||
| Direct | 8x 01 04 4B 00 00 0p 0q FF | pq: Iris Position | |
| CAM_Gain | Reset | 8x 01 040C 00 FF | Gain Setting |
| Up | 8x 01 04 0C 02 FF | ||
| Down | 8x 01 04 0C 03 FF | ||
| Direct | 8x 01 04 0C 00 00 0p 0q FF | pq: Gain Position | |
| CAM_Bright | Reset | 8x 01 04 0D 00 FF | Bright Setting |
| Up | 8x 01 04 0D 02 FF | ||
| Down | 8x 01 04 0D 03 FF | ||
| Direct | 8x 01 04 4D 00 00 0p 0q FF | pq: Bright Position | |
| On | 8x 01 04 3E 02 FF | Exposure Compensation ON/OFF | |
| Off | 8x 01 04 3E 03 FF | ||
| CAM_Memory | Reset | 8x 01 04 3F 00 pq FF | pq: Memory Number(=0 to 254) Corresponds to 0 to 9 on the Remote Commander |
| Set | 8x 01 04 3F 01 pq FF | ||
| Rrecall | 8x 01 04 3F 02 pq FF | ||
| CAM_LR_Reverse | On | 8x 01 04 61 02 FF | Image Flip Horizontal ON/OFF |
| Off | 8x 01 04 61 03 FF | ||
| CAM_PictureFlip | On | 8x 01 04 66 02 FF | Image Flip Vertical ON/OFF |
| Off | 8x 01 04 66 03 FF | ||
| CAM_ColorSaturation | Direct | 8x 01 04 4900 00 00 0p FF | P=0-E 0:60% 1:70% 2:80% 3:90% 4:100% 5:110% 6:120% 7:130% 8:140% 9:150% 10:160% 11:160% 12:180% 13:190% 14:200% |
| CAM_IDWrite | 8x 01 04 22 0p 0q 0r 0s 1F | purs: Camera ID (=0000 to FFFF) | |
| SYS_Menu | ON | 8x 01 04 06 06 02 FF | Turn on the menu screen |
| OFF | 8x 01 04 06 06 03 FF | Turn off the menu screen | |
| IR_Receive | ON | 8x 01 0608 02 FF | IR(remote commander)receive On/Off |
| OFF | 8x 01 0608 03 FF | ||
| IR_ReceiveReturn | On | 8x 01 7D 01 03 00 00 FF | IR(remote commander)receive message via the VISCA communication ON/OFF |
| Off | 8x 01 7D 01 13 00 00 FF | ||
| Pan_tiltDrive | Up | 8x 01 06 01 VV WW 03 01 FF | VV: Pan speed 0x01(low speed) to 0x18(high speed)WW: Tilt speed 0x01(low speed) to 0x14(high speed)YYYY: Pan PositionZZLL: Tilt Position |
| Down | 8x 01 06 01 VV WW 03 02 FF | ||
| Left | 8x 01 06 01 VV WW 01 03 FF | ||
| Right | 8x 01 06 01 VV WW 02 03 FF | ||
| Upleft | 8x 01 06 01 VV WW 01 01 FF | ||
| Upright | 8x 01 06 01 VV WW 02 01 FF | ||
| DownLeft | 8x 01 06 01 VV WW 01 02 FF | ||
| DownRight | 8x 01 06 01 VV WW 02 02 FF | ||
| Stop | 8x 01 06 01 VV WW 03 03 FF | ||
| AbsolutePosition | 8x 01 06 02 VV WW0Y 0Y 0Y 0Y 0Z.0Z.0Z.0F FF | ||
| RelativePosition | 8x 01 06 03 VV WW0Y 0Y 0Y 0Y 0Z.0Z.0Z.0F FF | ||
| Home | 8x 01 06 04 FT | ||
| Reset | 8x 01 06 05 FF | ||
| Pan-tiltLimitSet | Set | 8x 01 06 07000W0Y 0Y 0Y 0Y 0Z.0Z.0Z.0F FF | W:1 UpRight0:DownLeftYYYY: Pan Limit Position(TBD)ZZLL: Tilt Limit Position(TBD) |
| Clear | 8x 01 06 07010W07 0F 0F 0F 0F 07 0F 0F 0F 0F FF |
Search command
| Command | Command package | Return package | Notes |
| CAM_PowerInq | 8x 09 04 00 FF | y0 50 02 FF | On |
| y0 50 03 FF | Otf(Standby) | ||
| CAM_ZoomPosInq | 8x 09 04 47 FF | y0 50 0p 0q 0r 0s FF | pqrs: Zoom Position |
| CAM_FocusAFModelInq | 8x 09 04 38 FF | y0 50 02 FF | Auto Focus |
| y0 50 03 FF | Manual Focus | ||
| CAM_FocusPosInq | 8x 09 04 48 FF | y0 50 0p 0q 0r 0s FF | pqrs: Focus Position |
| CAM_WBModelInq | 8x 09 04 35 FF | y0 50 00 FF | Auto |
| y0 50 01 FF | 3000K | ||
| y0 50 02 FF | 4000K | ||
| y0 50 03 FF | One Push Mode | ||
| y0 50 04 FF | 5000K | ||
| y0 50 05 FF | Manual | ||
| y0 50 00 FF | 6500Klast operated. | ||
| SYS MenuModelInq | 8x 09 0606 FF | y0 50 02 FF | On |
| y0 50 03 FF | Off | ||
| CAM_LR_Reverselnq | 8x 09 04 61 FF | y0 50 02 FF | On |
| y0 50 03 FF | Off | ||
| CAM_PictureFlipInq | 8x 09 04 66 FF | y0 50 02 FF | On |
| y0 50 03 FF | Off | ||
| CAM_ColorSaturationInq | 8x 09 04 49 FF | y0 50 00 00 00 0p FF | p: Color Gain setting 0h (60%) to Eh (200%) |
| CAM_IDInq | 8x 09 04 22 FF | y0 50 0p FF | p: Gamma ID |
| IR_ReceiveInq | 8x 09 0608 FF | y0 50 02 FF | On |
| y0 50 03 FF | Off | ||
| IR_ReceiveReturn | y0 077D 01 04 00 FF | Power ON/OFF | |
| y0 077D 01 04 07 FF | Zoom tele/wide | ||
| y0 077D 01 04 38 FF | AF ON/OFF | ||
| y0 077D 01 04 33 FF | Camera Backlight | ||
| y0 077D 01 04 3F FF | Camera _Memory | ||
| y0 077D 01 06 01 FF | Pan_titleDriver | ||
| CAM_BrightnessInq | 8x 09 04A1 FF | y0 50 00 00 0p 0q FF | pq: Brightness Position |
| CAM_ContrastInq | 8x 09 04A2 FF | y0 50 00 00 0p 0q FF | pq: Contrast Position |
| CAM_FlipInq | 8x 09 04A4 FF | y0 50 00 FF | Off |
| y0 50 01 FF | Flip-II | ||
| y0 50 02 FF | Flip-V | ||
| y0 50 03 FF | Flip-IIV | ||
| CAM_GammaInq | 8x 09 04 5B FF | y0 50 0p FF | p: Gamma setting |
| CAM_VersionInq | 8x 09 00 02 FF | y0 50 ab cd mn pq rs tu vw FF | ab cd: vender ID (0220)mn pq : model ID ST (0951)U3 (3950)rs tu : ARMVersionvw : reserve |
| P: 0-E Vidco format 0:1080P608:720P301:1080P509:720P252:1080h60 |
11 Pelco-D protocol command list
| Function | Byte1 | Byte2 | Byte3 | Byte4 | Byte5 | Byte6 | Byte7 |
| Up | 0xFF | Address | 0x00 | 0x08 | Pan Speed | Tilt Speed | SUM |
| Down | 0xFF | Address | 0x00 | 0x10 | Pan Speed | Tilt Speed | SUM |
| Left | 0xFF | Address | 0x00 | 0x04 | Pan Speed | Tilt Speed | SUM |
| Right | 0xFF | Address | 0x00 | 0x02 | Pan Speed | Tilt Speed | SUM |
| Uplcft | 0xFF | Address | 0x00 | 0x0C | Pan Speed | Tilt Speed | SUM |
| Upright | 0xFF | Address | 0x00 | 0x0A | Pan Speed | Tilt Speed | SUM |
| DownLeft | 0xFF | Address | 0x00 | 0x14 | Pan Speed | Tilt Speed | SUM |
| DownRight | 0xFF | Address | 0x00 | 0x12 | Pan Speed | Tilt Speed | SUM |
| Zoom In | 0xFF | Address | 0x00 | 0x20 | 0x00 | 0x00 | SUM |
| Zoom Out | 0xFF | Address | 0x00 | 0x40 | 0x00 | 0x00 | SUM |
| Focus Far | 0xFF | Address | 0x00 | 0x80 | 0x00 | 0x00 | SUM |
| Focus Near | 0xFF | Address | 0x01 | 0x00 | 0x00 | 0x00 | SUM |
| Stop | 0xFF | Address | 0x00 | 0x00 | 0x00 | 0x00 | SUM |
| Set Preset | 0xFF | Address | 0x00 | 0x03 | 0x00 | Preset ID | SUM |
| Clear Preset | 0xFF | Address | 0x00 | 0x05 | 0x00 | Preset ID | SUM |
| Call Preset | 0xFF | Address | 0x00 | 0x07 | 0x00 | Preset ID | SUM |
| Query Pan Position | 0xFF | Address | 0x00 | 0x51 | 0x00 | 0x00 | SUM |
| Query Pan | Value High | Value Low |
12 Pelco-P protocol command list
| Function | Byte1 | Byte2 | Byte3 | Byte4 | Byte5 | Byte6 | Byte7 | Byte8 |
| Up | 0xA0 | Address | 0x00 | 0x08 | Pan Speed | Tilt Speed | 0xAF | XOR |
| Down | 0xA0 | Address | 0x00 | 0x10 | Pan Speed | Tilt Speed | 0xAF | XOR |
| Left | 0xA0 | Address | 0x00 | 0x04 | Pan Speed | Tilt Speed | 0xAF | XOR |
| Right | 0xA0 | Address | 0x00 | 0x02 | Pan Speed | Tilt Speed | 0xAF | XOR |
| Upleft | 0xA0 | Address | 0x00 | 0x0C | Pan Speed | Tilt Speed | 0xAF | XOR |
| Upright | 0xA0 | Address | 0x00 | 0x0A | Pan Speed | Tilt Speed | 0xAF | XOR |
| DownLeft | 0xA0 | Address | 0x00 | 0x14 | Pan Speed | Tilt Speed | 0xAF | XOR |
| DownRight | 0xA0 | Address | 0x00 | 0x12 | Pan Speed | Tilt Speed | 0xAF | XOR |
| Zoom In | 0xA0 | Address | 0x00 | 0x20 | 0x00 | 0x00 | 0xAF | XOR |
| Zoom Out | 0xA0 | Address | 0x00 | 0x40 | 0x00 | 0x00 | 0xAF | XOR |
| Stop | 0xA0 | Address | 0x00 | 0x00 | 0x00 | 0x00 | 0xAF | XOR |
| Focus Far | 0xA0 | Address | 0x01 | 0x00 | 0x00 | 0x00 | 0xAF | XOR |
| Focus Near | 0xA0 | Address | 0x02 | 0x00 | 0x00 | 0x00 | 0xAF | XOR |
| Set Preset | 0xA0 | Address | 0x00 | 0x03 | 0x00 | Preset ID | 0xAF | XOR |
| Clear Preset | 0xA0 | Address | 0x00 | 0x05 | 0x00 | Preset ID | 0xAF | XOR |
| Call Preset | 0xA0 | Address | 0x00 | 0x07 | 0x00 | Preset ID | 0xAF | XOR |
| Query Pan Position | 0xA0 | Address | 0x00 | 0x51 | 0x00 | 0x00 | 0xAF | XOR |
| Query Pan | Value Right | Value Right |
13 Maintenance and troubleshooting
13.1 Maintenance
1) Please disconnect power of camera if it is not in long-term use. Meanwhile, disconnect AC power adapter from AC socket.
2) To avoid scratch, use soft cloth or cotton to wipe off dust on camera case and
3) Please clean camera lens with dry soft cloth. If stain persists, use mild detergent to wipe gently.
Do not use strong or corrosive detergent which may scratch the lens and affect image result.
13.2 Troubleshooting
1) No image displayed by video output
Solution: a. Check camera power for connection, and check if power indicator is lit.
b. Power off, restart the device and check if it performs self inspection normally.
c. Check if dial switch at the bottom is in normal operating mode (refer to Table 2.2 and
Table 2.3).
d. Check if connection line of video output and video display functions.
2) Image is unstable
Solution: a. Check if connection line of video output and video display functions.
3) Lens zoom image dithering
Solution: a. Check if camera is installed securely.
b. Check if there is vibrating machine or object nearby the camera.
4) Remote control is out of service
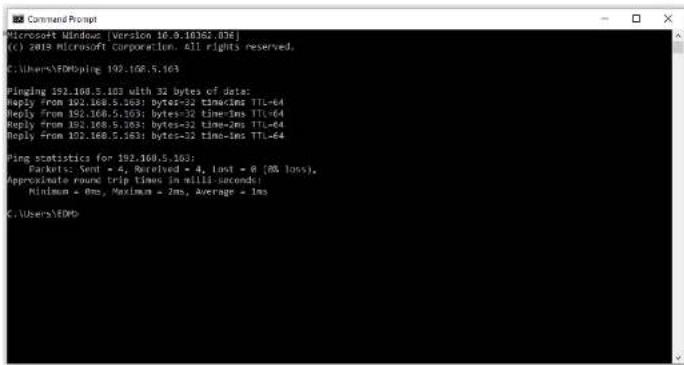
information below means network connection functions well.
text_image
Microsoft Windows [Version 16.9.1036.103E] (c) 2018 Microsoft Corporation: All rights reserved. C:\Users\EDMping 192.108.5.163 Pinging 192.108.5.103 with 32 bytes of data: Reply from 102.108.5.103: bytes=32 time=ms TTL=64 Reply from 102.108.5.103: bytes=32 time=ms TTL=64 Reply from 102.108.5.103: bytes=32 time=ms TTL=64 Reply from 102.108.5.103: bytes=32 time=ms TTL=64 Ping statistics for 192.108.5.103: Parkets: Sent = 4, Received = 4, Lost = 0 (%% loss). Approximate round trip times in milli-seconds! Minimum = 0ms, Maximum = 2ms, Average = 1ms C:\Users\EDM14 Warranty
BZBGEAR wants to assure you peace of mind. We're so confident in the quality of our products we are offering a three-year warranty.
For complete warranty information, please visit BZBGEAR.com/warranty.
For questions, please call 1.888.499.9906 or email support@bzbgear.com.
15 Mission Statement
BZBGEAR manifests from the competitive nature of the audiovisual industry to innovate while keeping the customer in mind. AV solutions can cost a pretty penny, and new technology only adds to it. We believe everyone deserves to see, hear, and feel the advancements made in today's AV world without having to break the bank. BZBGEAR is the solution for small to medium-sized applications requiring the latest professional products in AV.
We live in a DIY era where resources are abundant on the internet. With that in mind, our team offers system design consultation and expert tech support seven days a week for the products in our BZBGEAR catalog. You'll notice comparably lower prices with BZBGEAR solutions, but the quality of the products is on par with the top brands in the industry. The unparalleled support from our team is our way of showing we care for every one of our customers. Whether you're an integrator, home theater enthusiast, or a do-it-yourselfer, BZBGEAR offers the solutions to allow you to focus on your project and not your budget.