
SimplTrack Lite - Security Camera HuddleCamHD - Free user manual and instructions
Find the device manual for free SimplTrack Lite HuddleCamHD in PDF.

| Product Type | HD PTZ Security Camera with Auto-Tracking |
| Model | SimplTrack Lite (HC20X-SIMPLTRACKLITE) |
| Brand | HuddleCamHD |
| Image Sensor | 1/2.8" CMOS, 2.14 Megapixels |
| Optical Zoom | 20x |
| Digital Zoom | 12x |
| Video Outputs | NDI|HX, USB 2.0, 3G-SDI, HDMI 1.4, IP Streaming (RTSP, RTMP, RTMPS) |
| Max Resolution | 1920x1080p at 60 fps |
| Horizontal Field of View | 2.9° to 59.5° |
| Pan Range | ±170° |
| Tilt Range | -30° to +90° |
| Pan Speed | 0.2° to 100°/s |
| Tilt Speed | 0.2° to 60°/s |
| Presets | 64, with 0.1° accuracy |
| Auto-Tracking | Plug-and-play with preset zones |
| Dimensions (W x D x H) | 8.31" x 5.47" x 8.19" (211 x 139 x 208 mm) |
| Weight | 2.43 lbs (1.1 kg) |
| Power Supply | DC 12V (2A) with JEITA connector or PoE+ (802.3at) |
| Power Consumption | < 15W |
| Operating Temperature | 32°F to 104°F (0°C to +40°C) |
| Warranty | Limited parts & labor warranty |
| Accessories Included | Camera, AC Power Supply, RS232C Cable, IR Remote, Quick Start Guide, AAA Batteries |
| Cleaning | Use soft dry cloth; for heavy dirt, use diluted neutral detergent. Avoid solvents. |
| Safety Certifications | FCC Class A, electrical safety per national standards |
Frequently Asked Questions - SimplTrack Lite HuddleCamHD
User questions about SimplTrack Lite HuddleCamHD
0 question about this device. Answer the ones you know or ask your own.
Ask a new question about this device
Download the instructions for your Security Camera in PDF format for free! Find your manual SimplTrack Lite - HuddleCamHD and take your electronic device back in hand. On this page are published all the documents necessary for the use of your device. SimplTrack Lite by HuddleCamHD.
USER MANUAL SimplTrack Lite HuddleCamHD
natural_image
Exterior view of a modern video camera with a lens and antenna, mounted on a base (no visible text or symbols)
HuddleCamHD
Table of Contents
Preface 3
Precautions 3
Warning 3
Warranty 4
Supplied Accessories 4
FCC Statement 4
Connection Guide 5
Dimensional Drawings (mm) 6
Features 7
Technical Specifications 8
NDI®|HX with NDI® 4 Connection 10
Tracking Software 11
Device Management Interface 11
Configuring the Camera 12
Tracking Software 15
Main View Interface 15
Controlling the Camera 16
Tracking Settings 16
Preset Zones 16
Video Recording & Screenshot 18
RS232 Interface. 20
Serial Communication Control.... 21
HuddleCamHD VISCA Command List. 22
On Screen Display Menu 27
Network Connection 30
Using the Upgrade Tool 31
Maintenance and Troubleshooting 36
Unqualified Applications 36
Troubleshooting 20

HuddleCamHD
Preface
Thank you for using the HD Professional Video Conferencing Camera. This manual introduces the function, installation, and operation of the HD camera. Prior to installation and usage, please read the manual thoroughly.
Precautions
This product can only be used in the specified conditions in order to avoid any damage to the unit itself.
- Don't subject the camera to rain or moisture.
- Don't remove the cover. Removal of the cover may result in an electric shock. In addition to voiding the warranty. In case of abnormal operation, contact support@huddlecamhd.com.
- Never operate outside of the specified operating temperature range, humidity, or with any other power supply than the one originally provided with the unit.
- Please use a soft dry cloth to clean the unit. If the unit is very dirty, clean it with diluted neutral detergent; do not use any type of solvents, which may damage the surface.
Warning
- Electrical Safety
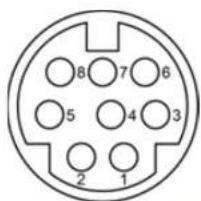
Installation an operation must be in accordance with national and local electric safety standards. Do not use any power supply other than the one originally supplied with this camera. - Polarity of Power Supply
The power supply output for this product is 12V DC with a maximum current supply of 2A. Polarity of the power supply plug is critical and is as follows:


HuddleCamHD
Warranty
HuddleCamHD includes a limited parts & labor warranty for all HuddleCamHD manufactured cameras. The warranty is valid only if HuddleCamHD receives proper notice of such defects during the warranty period. HuddleCamHD, at its option, will repair or replace products that prove to be defective. HuddleCamHD manufacturers its hardware products from parts and components that are new or equivalent to new in accordance with industry standard practices.
Supplied Accessories
When you unpack your camera, check that all the supplied accessories are included:
- Camera 1
• AC Power Supply 1 - S-232C Cable 1
- IR Remote Controller 1
- Quick Start Guide 1
- AAA Batteries 2

FCC Statement
This equipment has been tested and found to comply with the limits for a Class A digital device, pursuant to part 15 of the FCC Rules. These limits are designed to provide reasonable protection against harmful interference when the equipment is operated in a commercial environment. This equipment generates, uses, and can radiate radiofrequency energy and, if not installed and used in accordance with the instruction manual, may cause harmful interference to radio communications. FCC Caution: Any changes or modifications not expressly approved by the party responsible for compliance could void the user's authority to operate this equipment. Operation is subject to the following two conditions: This device may not cause harmful interference, and (2) this device must accept any interference received, including interference that may cause undesired operation.

HuddleCamHD
Connection Guide

- USB 2.0 USB 2.0 type B female connection
- HDMI HDMI ver. 1.4 connection
- Line In 3.5mm audio connection
- Network RJ45 port for NDI®|HX & network streaming / control 5. SDI 3G-SDI connection
- RS-232 In 8-pin mini din connection for joystick controller
- RS-232 Out 8-pin mini din connection for daisy chaining
- DC12V DC 12V power connection

HuddleCamHD
Dimensional Drawings (mm)
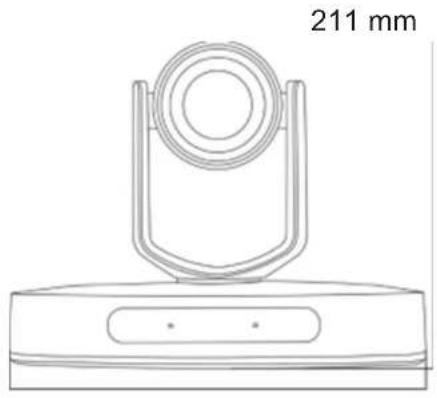
natural_image
Technical line drawing of a mechanical component with a circular top and base (no text or symbols)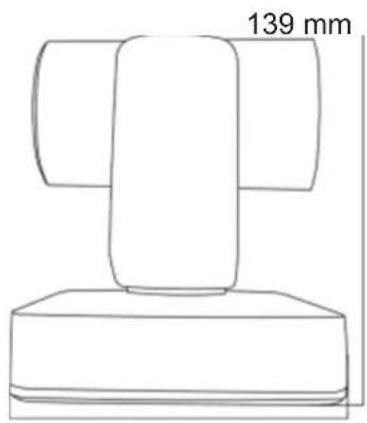

HuddleCamHD
Features
- All-in-One Solution - The SimplTrack Lite does not require a dedicated computer to operate. This simplifies deployment and provides a more seamless less-complicated solution you can rely on for the long term. No need to manage dedicated auto-tracking software, this camera can be tuned to your room and set to operate trouble-free and independent from additional hardware.
- Dedicated Management Software - The SimplTrack Lite features dedicated camera management software that can be controlled from any Windows computer on the network. You don't need a dedicated computer to run the system You can use any Windows PC running the Management Software to remotely manage the cameras when necessary.
- Image Sensor
• 1/2.8", 2.14 million effective pixels, HD CMOS sensor.
• High quality telephoto lens supporting 20X optical zoom and optional 12X digital zoom.
• Full HD 1920x1080p resolution up to 60 frames per second.
- 2D & 3D noise reduction with our latest "low noise CMOS sensor".
- Wide angle 59.5^ horizontal field of view.
- Dynamic Range Control (DRC) for higher image quality and detail across simultaneously well-lit and shadowed scenes.
- High SNR (signal to noise ratio) of the CMOS sensor (≥55dB), combined with 2D & 3D noise reduction algorithms, effectively reduces noise, even under low illuminated conditions.
- Video Outputs
- Simultaneous NDI®|HX using NDI® 4 / IP network streaming, USB 2.0, 3G-SDI, & HDMI 1.4 o USB 2.0 Full HD video output up to 1080p 30 frames per second.
- 3G-SDI Full HD video output up to 1080p 60 frames per second.
- HDMI 1.4 Full HD video output up to 1080p 60 frames per second.
• RTSP RTMP & RTMPS streaming using H 264 or M.IPEG

HuddleCamHD
Technical Specifications
| Model HC20X-SIMPLTRACKLITE | |
| Type HuddleCamHD SimplTrack Lite HD 1080p Color Video Camera Camera | |
| Video System 1080p-60/50/30/25, 1080i-60/50, 720p-60/50 | |
| Sensor 1/2.8" CMOS, 2.14 megapixel | |
| Lens 20X | |
| Digital Zoom 12X Digital Zoom | |
| Shutter 1/1 ~ 1/10000 | |
| White Balance Auto, ATW, One Push, Indoor, Outdoor, Manual, Sodium Lamp, Fluo Lamp | |
| Backlight Compensation Supported | |
| Digital Noise Reduction 2D & 3D Digital Noise Reduction | |
| Video S/N ≥55dB | |
| Horizontal Field of View 2.9° ~ 59.5° | |
| Vertical Field of View 2° ~ 36° | |
| Horizontal Rotation Range ±170° | |
| Vertical Rotation Range -30° ~ +90° | |
| Pan Speed Range 0.2° ~ 100°/s | |
| Tilt Speed Range | 0.2° ~ 60°/s |
| Image Flip / Mirror | Supported |
| Image Freeze Not supported | |
| PoE+ | Supports PoE+ (802.3af) |
| Face Detection | Not supported |
| Local Storage Not supported | |
| Number of Presets | 64 |
| Preset Accuracy | 0.1° |

HuddleCamHD
| IR 4 x IR addresses, Max Distance 9m (30ft) | |
| Power Jack JEITA type (DC IN 12V) | |
| IP Video Features | |
| Video Compression H.264 / H.265 | |
| Video Stream Two (2) IP video output streams available | |
| First Stream Resolutions 1080p / 720p / 704x480 | (D1) / 320x240(QVGA) - 60/50/30/25 |
| Second Stream Resolutions 704x480(D1) / 320x240(QVGA) - 60/50/30/25 | |
| Video Bit Rate 0Kbps ~ 16383 Kbps | |
| Bit Rate Type Constant or Variable bit rate | |
| Frame Rate 50Hz: 1 ~ 50 FPS, 60Hz: 1 ~ 60 FPS | |
| Audio Compression AAC | |
| Audio Bit Rate 16Kbps, 32Kbps, 48Kbps | |
| Supported Protocols TCP/IP, HTTP, RTSP, RTMP, DHCP, Multicast, NDI®|HX etc. | |
| Generic Specifications | |
| Input Voltage DC 12V / PoE+ (802.3at)(optional) | |
| Current Consumption <15W | |
| Operating Temperature 32°F ~ 104° (0°C ~ +40°C) | |
| Storage Temperature | -4°F ~ 140° (-20°C ~ +60°C) |
| Humidity Range | 10% RH ~ 90% RH |
| Size in. (W x D x H) 8.31" x 5.47" x 8.19" | 211mm x 139mm x 208mm | |
| Camera Weight | 2.43lbs | 1.1kg |

HuddleCamHD
NDI®|HX with NDI® 4 Connection
The NDI®|HX connection allows you to connect and control your camera through any NDI compatible hardware or software on your Local Area Network. Once your camera is setup on a LAN, you can utilize the NDI®|HX connection.
Three Easy Steps:
- Download and install the latest NDI®|HX Tools.
- Select your camera within the NDI®HX compatible device.
-
- Select your camera. The NDI feed will utilize the camera's device friendly name.
NewTek®, NDI®, NDI® 4 & NDI®|HX are all registered trademarks by NewTek®.
Please note that your NDI License key is non-transferrable.

HuddleCamHD
Tracking Software
Device Management Interface
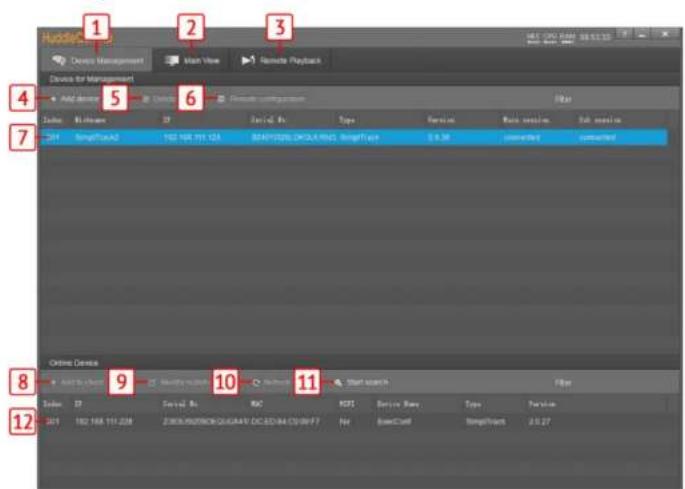
| 1 | Device Management interface | 7 | Selected* device within Device Man-agement |
| 2 | Video Configuration interface 8 Add selected | d camera from Online Device section | |
| 3 | View & Download video and / or photos. 9 Modify network settings of selected | ||

HuddleCamHD
Configuring the Camera
To configure a camera, you will need to connect it to the Device Management section using the methods above. From there, select the camera you wish to configure, then select "Remote Configuration".
Streaming – The Streaming tab allows you to adjust the camera's Real Time Streaming Protocol settings.
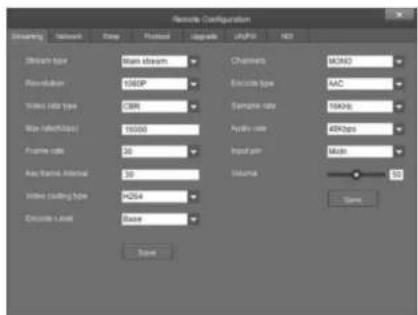
- Stream Type – RTSP stream dropdown
- selector.
- Options include: Main Stream, Sub Stream, Stream 3, & Stream 4
- Resolution – RTSP resolution. o Main Stream resolutions: 1080p. 720p.
- Options include: H.264 & MJPEG
- Encode Level – Adjust the level at which the video is encoded.
- Options include: Base, Main, & High
- Channels – Adjust the audio channel of the embedded audio.
- Options include: Mono & Stereo
- Encode Type – Adjust the Audio Encoding type of the embedded audio.
- Options include: AAC
- Sample Rate – Adjust the audio sample rate of the embedded audio.
- Options include: 16KHz, 44.1KHz, & 48KHz
- Audio Rate – Adjust the audio rate of the embedded audio.
- Options include: 1 \~ 16383
- Input Pin – Adjust the embedded audio connection type.
- Options include: Lineln & MicIn
• Volume Slider – Adjust the audio level of the embedded audio. o Range: 0 \~ 100
- Options include: Lineln & MicIn
Network – The Network tab allows you to adjust the camera's network settings.


HuddleCamHD
- Gateway – Adjust the camera's gateway. o Default value: 192.168.1.1
- DNS 1 – Adjust the camera's DNS 1. o Default value: 0.0.0.0
- DNS 2 – Adjust the camera's DNS 2. o Default value: 0.0.0.0
- RTSP Port – Adjust the camera's RTSP port number.
o Default value: 554 - App Port – Adjust the camera's App Port number. o Default value: 5000
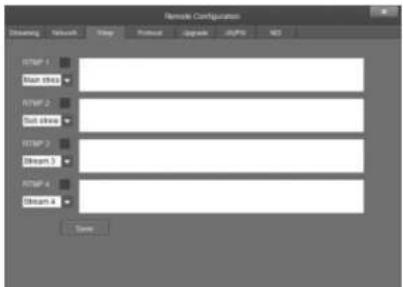
RTMP – The RTMP tab allows you to adjust the camera's Real Time Multimedia Protocol settings for up to 4 streams.
Protocol – The Protocol tab allows you to adjust the camera's control settings
- Enable – Enable / Disable 3rd party control to the camera.
- Options include: Enable & Disable
- Protocol – Adjust the control protocol method.
- Options include: TCP & UDP
- Camera As – Adjust whether the camera acts as a server or a controllable device (Client).
- Options include: Server & Client
- IP – Adjust the IP address to which the camera sends commands to (Server Mode).
- Default value: 0.0.0.0
- Port – Adjust the control port of the device the camera sends commands to (Server mode). ○ Default value: 5678
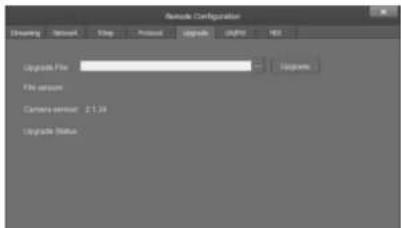
Upgrade – The Upgrade tab allows you to apply firmware updates to the camera.

HuddleCamHD
UN / PW – The UN / PW tab allows you to adjust the camera's name & password, as well as adjust the NTP settings

- Old Password – Type the old password into this field in order to change the camera password. o Default value: "admin" - New Password – Type the new password into this field in order to change the camera password.
Note: Passwords must contain only letters and numbers. Special characters are not applicable. Max length: 15 characters.
- Confirm – Type the new password into this field again in order to change the camera password.
NDI – The NDI tab allows you to adjust the NDI protocol settings.

- NDI Receive Group – The NDI® Receive Group allows you to limit which users on your LAN can see the NDI® source o Default value: Public
For best results, the Receive Group should remain "Public". Once the Receive Group is changed, you will need to join the Receive Group through NDI® Access Manager.
- NDI Local Device Name – The friendly name the camera will show up as within NDI® devices. o Default value: SimplTrack Lite For best results, give all 'like' cameras the

HuddleCamHD
Tracking Software
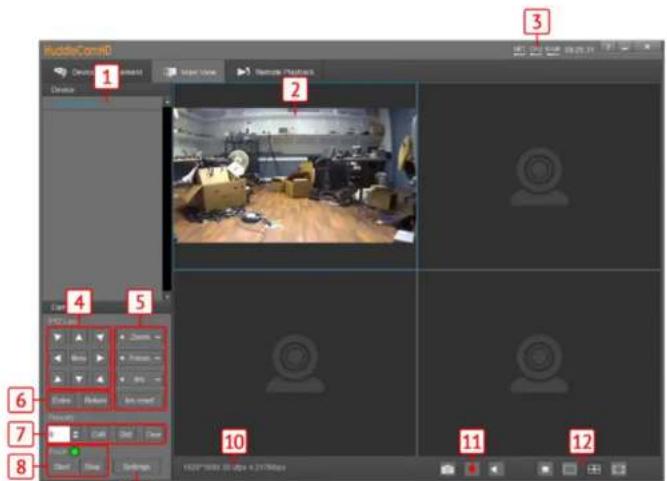
Main View Interface
9
| 1 | Cameras connected to Device Management | 7 Preset control |
| 2 | Camera video feed 8 Enable / Disable tracking & Tracking Status | |
| 3 | PC performance & time 9 Open Tracking Settings | |

HuddleCamHD
Controlling the Camera
The Main View can connect and control up to 4 cameras simultaneously. Right-click a camera from the Device Management section and select the RTSP feed you wish to view. From there, you have full control over Pan, Tilt, Zoom, Focus, Iris, Presets, the On-Screen Display Menu & Tracking Settings. To further cater the camera to your environment, click the Settings button.
Tracking Settings
The SimplTrack Lite is truly plug and play tracking camera that does not require much set up before use. The camera only requires the Preset 0 & Preset 1 positions set, and the Face Height positioned properly.


TIP: Zoom your camera out to set a preset that will frame your entire stage.
TIP: Zoom your camera in to frame your subject and their presentation space.
Preset Zones
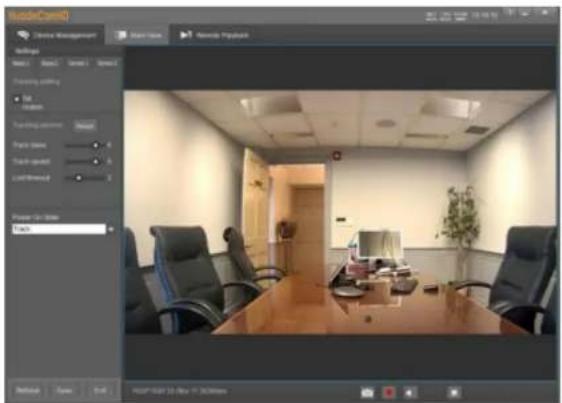
Preset Zones allow the camera to temporarily halt tracking once the subject enters a defined area. Once they enter that area, the camera will call a preset to frame the subject in that Preset Zone. This allows the subject to move around the stage and be framed when they enter the Preset Zone. Once the subject leaves that Preset Zone, the camera resumes tracking the subject normally.

HuddleCamHD


NOTE: When motion is detected within the Preset Zone, the camera will frame that zone
TIP: Add a Preset Zone to an area you would like to specifically highlight during production

natural_image
Interior view of a modern office meeting room with wooden table and chairs (no visible text or signage)Basic 1 -
- Lower bound is the level it will track in (the camera will not track anything below the green line).
- Debug: shows what the camera is trying to track in the video image.

HuddleCamHD
Senior 1 & Senior 2 tabs are not usable on the SimplTrack Lite.
Remote Playback
Remote Playback is not usable on the SimplTrack Lite.
Video Recording & Screenshot

HuddleCamHD

To take a screenshot, click the "Screenshot" button. Once the screenshot is finished being taken, you'll be greeted with a "Screenshot Successful" notification.
To record a short video to the camera, click the "Export" button. Once the video is finished being recorded, a new File Explorer window will open under a new "USB Drive" directory. This USB Drive is the camera's memory. While accessing the camera's memory, you will be unable to use its video capabilities. To return the SimplTrack Lite to a usable state, power it off and back on.


HuddleCamHD
RS232 Interface
| No. Function | |
| 1 | DTR |
| 2 | DSR |
| 3 | TXD |
| 4 | GND |
| 5 | RXD |
| 6 | GND |
| 7 | IR OUT |
| 8 | NC |
The correspondence between the camera and Windows DB-9 pin:

| Camera Windows DB-9 | |
| 6.GND 6.DSR | |
| 7.IR OUT 7.RTO | |
| 8.NC 8.CTS | |
| 9.RI | |
The correspondence between the camera and the Mini DIN pin:
| Camera Mini DIN | |
| 1.DTR 1.DTR | |
| 2 DSR 2 DSR | |
| 3.TXD 3 TXD | |
| 4 GND 4 GND | |
| 5 RXD 5 RXD | |
| 6.GND 6.GND | |
| 7.IR OUT | 7.NC |

HuddleCamHD
Serial Communication Control
In default working mode, the camera is able to connect to a VISCA controller with an RS-232.
RS-232 Communication Control
Baud rate: 2400/4800/9600/38400;
Starting Position: 1 bit
Data bit: 8 bits
Stop bit: 1 bit
Check digit: None
After power on, the camera goes to the upper right limit and then back to the middle position. The zoom lens is pulled to the farthest position, auto focus, and the aperture is adjusted to the default value. If the camera has preset 0 saved, the camera will be set to position 0 after the initialization is completed. At this point, the user can use the serial port command to control the camera.20

HuddleCamHD
HuddleCamHD VISCA Command List
| ACK / Completion Messages | |||
| Command Messages Comments | |||
| ACK z0 4y FF (y:Socket No.) Returned when the command is accepted. | |||
| Completion z0 5y FF (y:Socket No.) Returned when the command has been executed. | |||
| Error Messages | |||
| Command Messages Comments | |||
| Syntax Error z0 60 02 FF | Returned when the command format is different or when a command with | ||
| Command Buffer Full | z0 60 03 FF | Indicates that two sockets are already being used (executing two commands) | |
| Command Canceled z0 6y | 04 FF (y:Socket No.) | Returned when a command which is being executed in a socket specified by the cancel command is canceled. The completion message for the command is not returned. | |
| Command Not Executable | z0 6y 41 FF(y:Execution command Socket No. Inquiry com- | Returned when a command cannot be executed due to current conditions. For example, when commands controlling the focus manually are this Setting auto focus | |
| Commands | |||
| Command Set Command | Command Packet Comments | ||
| AddressSet Broadcast 88 | 30 01 FF Address setting | ||
| IF_Clear Broadcast 88 01 | 00 01 FF I/F Clear | ||
| CommandCancel 81 2p FF | p: Sockel No.(=1or2) | ||
| CAM_Power | On | 81 01 04 00 02 FF | Power ON/OFF |
| Off | 81 01 04 00 03 FF | ||
| CAM_Zoom Stop 81 01 04 | 07 00 FF | ||
| Tele(Standard) | 81 01 04 07 02 FF | ||

HuddleCamHD
| CAM_ZoomFocus Direct 81 01 04 47 0p 0q 0r 0s | 0t 0u 0v 0w FF | pqrs: Zoom Position tuvw: Focus Position | |
| CAM_WB Auto 81 01 04 35 00 FF Normal Auto | |||
| Indoor 81 01 04 35 01 FF Indoor mode | |||
| Outdoor 81 01 04 35 02 FF Outdoor mode | |||
| One Push WB 81 01 04 35 03 FF One Push WB mode | |||
| Manual 81 01 04 35 05 FF Manual Control mode | |||
| One push trigger 81 01 04 10 05 FF One Push WB Trigger | |||
| CAM_RGain Reset 81 01 04 03 00 FF Manual Control of R Gain | |||
| Up 81 01 04 03 02 FF | |||
| Down 81 01 04 03 03 FF | |||
| Direct 81 01 04 43 00 00 0p 0q FF pq: R Gain | |||
| CAM_BGain | Reset 81 01 04 04 00 FF Manual Control of B Gain | ||
| Up 81 01 04 04 02 FF | |||
| Down 81 01 04 04 03 FF | |||
| Direct 81 01 04 44 00 00 0p 0q FF pq: B Gain | |||
| CAM_AE | Full Auto | 81 01 04 39 00 FF | Automatic Exposure mode |
| Manual 81 01 04 39 03 FF Manual Control mode | |||
| Shutter Priority | 81 01 04 39 03 FF Shutter Priority Automatic Exposure | ||
| Iris Priority | 81 01 04 39 0B FF | Iris Priority Automatic Exposure mode | |
| Bright 81 01 04 39 0D FF Bright Mode (Manual control) | |||
| CAM_Shutter | Reset 81 01 04 0A 00 FF Shutter Setting | ||
| Up 81 01 04 0A 02 FF | |||
| Down 81 01 04 0A 03 FF | |||
| Direct 81 01 04 4A 00 00 0p 0q FF pq: Shutter Position | |||
| CAM_Iris | Reset 81 01 04 0B 00 FF Iris Setting | ||
| Up 81 01 04 0B 02 FF | |||

HuddleCamHD
| CAM_ExpComp On 81 01 | 04 3E 02 FF Exposure Compensation ON/OFF | ||
| Off 81 01 04 3E 03 FF | |||
| Reset 81 01 04 0E 00 FF Exposure Compensation Amount Setting | |||
| Up 81 01 04 0E 02 FF | |||
| Down 81 01 04 0E 03 FF | |||
| Direct 81 01 04 4E 00 00 0p 0q FF pq: ExpComp Position | |||
| CAM_Backlight On 81 01 | 04 33 02 FF Back Light Compensation ON/OFF | ||
| Off 81 01 04 33 03 FF | |||
| CAM_Aperture Reset 81 01 | 01 04 02 00 FF Aperture Control | ||
| Up 81 01 04 02 02 FF | |||
| Down 81 01 04 02 03 FF | |||
| Direct 81 01 04 42 00 00 0p 0q FF pq: Aperture Gain | |||
| CAM_PictureEffect Off 81 | 01 04 63 00 FF Picture Effect Setting | ||
| Neg.Art 81 01 04 63 02 FF | |||
| B&W | 81 01 04 63 04 FF | ||
| CAM_Memory | Reset | 81 01 04 3F 00 pp FF | pp: Memory Number (=0 to 255)Corresponds to 0 to 255 on the Remote Commander. |
| Set | 81 01 04 3F 01 pp FF | ||
| Recall | 81 01 04 3F 02 pp FF | ||
| SYS_Menu | Off | 81 01 06 06 03 FF | Turns off the menu screen |
| CAM_IDWrite | 81 01 04 22 0p 0q 0r 0s FF | pqrs: Camera ID (=0000 to FFFF) | |
| IR_Receive | On 81 01 06 08 02 FF IR(remote commander) receive ON/OFF | ||
| Off 81 01 06 08 03 FF | |||
| Information Display | On | 81 01 7E 01 18 02 FF | ON/OFF of the Operation status display |
| Off 81 01 7E 01 18 03 FF | |||
| Pan-tiltDrive | Up | 81 01 06 01 VV WW 03 01 FF | VV: Pan speed 0 x01 (low speed) to 0 x18 (high speed)WW: Tilt Speed 0 x 01 (low speed) to 0 x14 (high speed)YYYY: Pan PositionZZZZ: Tilt Position |
| Down 81 01 06 01 VV WW 03 02 FF | |||
| Left | 81 01 06 01 VV WW 01 03 FF | ||
| Right | 81 01 06 01 VV WW 02 03 FF | ||
| Up left | 81 01 06 01 VV WW 01 01 FF | ||

HuddleCamHD
| Pan-tiltLimitSe LimitSet 81 01 06 | 07 00 0W | 0Y 0Y 0Y 0Y 0Z 0Z 0Z FF | W: 1 UpRight 0: DownLeftYYYY: Pan Limit PositionZZZZ: Tilt Position |
| CAM_TrackingON Enable Tracking / Framing 81 01 04 3F 02 50 FF | |||
| CAM_TrackingOFF Disable Tracking / Framing 81 01 04 3F 02 51 FF | |||
| CAM_AutoFrameTrigger One Push Auto Frame 81 01 0E 24 6C 0p 0p FF P P: seconds (i.e. to enable | framing / tracking for 21 sec-onds would be 0p 0p = 02 01) | ||
| CAM_DynBlockZones On 81 0B 0D 00 0p 01 FF | |||
| Off 81 0B 0D 00 0p 02 FF | |||
| Inquiry Commands | |||
| Command Set Command Inquiry | Packet Comments | ||
| CAM_PowerInq 81 09 04 00 FF | y0 50 02 FF | On | |
| y0 50 03 FF | Off (Standby) | ||
| y0 50 04 FF | Internal power circuit error | ||
| CAM_ZoomPosInq | 81 09 04 47 FF | y0 50 0p 0q 0r 0s FF | pqrs: Zoom Position |
| CAM_FocusModelInq | 81 09 04 38 FF | y0 50 02 FF | Auto Focus |
| y0 50 03 FF | Manual Focus | ||
| CAM_FocusPosInq | 81 09 04 48 FF | y0 50 0p 0q 0r 0s FF | pqrs: Focus Position |
| CAM_WBModelInq | 81 09 04 35 FF | y0 50 00 FF | Auto |
| y0 50 01 FF | In Door | ||
| y0 50 02 FF | Out Door | ||
| y0 50 03 FF | One Push WB | ||
| y0 50 05 FF | Manual | ||
| CAM_RGainInq 81 09 04 43 FF | y0 50 00 00 0p 0q FF | pq: R Gain | |
| CAM_BGainInq | 81 09 04 44 FF | y0 50 00 00 0p 0q FF | pq: B Gain |
| CAM_AEModelInq | 81 09 04 39 FF | y0 50 00 FF | Full Auto |
| y0 50 03 FF | Manual | ||
| y0 50 0A FF | Shutter Priority | ||
| y0 50 0B FF | Ips Priority | ||

HuddleCamHD
| CAM_ApertureInq 81 09 04 42 FF y0 50 00 00 0p 0q FF pq: Aperture Gain | |||
| CAM_PictureEffectModelInq 81 09 04 63 FF y0 50 00 FF Off | |||
| y0 50 02 FF Neg.Art | |||
| y0 50 04 FF B&W | |||
| CAM_MemoryInq 81 09 04 3F FF y0 50 0p FF p: Memory number last operated | |||
| SYS_MenuModelInq 81 09 06 06 FF y0 50 02 FF On | |||
| y0 50 03 FF Off | |||
| CAM_IDInq 81 09 04 22 FF y0 50 0p 0q 0r 0s FF pqrs: Camera ID | |||
| CAM_VersionInq 81 09 00 02 FF y0 50 00 01 mn pq rs tu vw FF mnpq: Model Code (0504) rstu: ROM version vw: Socket Number (=02) | |||
| Information Display 81 09 7E 01 18 FF y0 50 02 FF On | |||
| y0 50 03 FF Off | |||
| VideoSystemInq 81 09 06 23 FF y0 50 00 FF 1920 x1080/60 60 Hz System | |||
| y0 50 01 FF 1920 x1080p/30 | |||
| y0 50 02 FF 1280 x720p/60 | |||
| y0 50 03 FF 1280 x720p/30 | |||
| y0 50 07 FF 1920 x1080p/60 | |||
| y0 50 08 FF | 1920 x1080i/50 | ||
| y0 50 09 FF 1920 x1080p/25 | |||
| y0 50 0A FF | 1280 x720p/50 | ||
| y0 50 0B FF | 1280 x 720p/25 | ||
| y0 50 0F FF | 1920 x1080p/50 | ||
| IR_Receive 81 09 06 08 FF y0 50 02 FF On | |||
| y0 50 03 FF Off | |||
| Pan-tiltMaxSpeedInq | 81 09 06 11 FF | y0 50 ww zz FF | ww = Pan Max Speed zz = Tilt Max Speed |
| Pan-lillPosInq | 81 09 06 12 FF y0 50 0w 0w 0w 0w | www = Pan Position zzzz = Till Position | |
| 0z 0z 0z 0z FF | |||
| Pan-lillModelInq | 81 09 06 10 FF | y0 50 pq rs FF | pqrs: Pan/Tilt Status |

HuddleCamHD
On Screen Display
Main Menu
There are many ways to adjust the camera's On-Screen Display (OSD) Menu. The following instructions will go over the OSD Menu while using the included IR remote.
Press the [Menu] button to display the OSD Menu. Use the arrow buttons to traverse the OSD menu, the [Enter] button to make selections, and the [Return] button to go back a sub menu.
| Menu |
| Video |
| Exposure |
| Color |
| Pan Tilt Zoom |
| System |
| Status |
| Restore Defaults |
| Select [Enter] Next [] Exit |
Video
Move the cursor to the "Video" option and press the [Enter] button to enter the Video page, as shown in the figure below.
| Video |
| Image Mode Stand |
Brightness: Adjust camera brightness value. Options include: 0 \~ 14
Contrast: Adjust camera contrast value. Options include: 0 \~ 14
Gamma Mode: Adjust camera gamma value. Options include: 0 \~ 4
2DNR: Adjust 2D noise reduction value. Options include: Off, 1 \~ 5
3DNR: adjust 3D noise reduction value. Options include: Off, 1 \~ 5
Wide Dynamic: Adjust wide dynamic range strength.
Options include: Off, 1 \~ 5
Exposure
Move the cursor to the "Exposure" option and press the [Enter] button to enter the Exposure page, as shown in the figure below.
| Exposure |
| e Full Auto |
| Comp On |
| I 0 |
| Off |
| Flicker 60Hz |
| ct [Enter] Next [ ] Exit |
(Exposure) Mode: Full Auto, Manual, Shutter Pri, Iris Pri, & Bright Pri

HuddleCamHD
Speed: Camera Shutter speed.
Options include: 1/1, 1/2, 1/4, 1/8,
1/15, 1/30, 1/60, 1/90, 1/100, 1/125,
1/180, 1/250, 1/350, 1/500, 1/725,
1/1000, 1/1500, 1/2000, 1/3000,
1/4000, 1/6000, 1/10000
(Only available in Manual & Shutter Pri modes).
Iris: Camera Iris position.
Options include: 0 \~ 14 (Only available in Manual & Iris Pri modes).
Bright: Camera Brightness value.
Options include: 0 \~ 27
(Only available in Bright mode).
Color
Move the cursor to the "Color" option and press the [Enter] button to enter the Color page, as shown in the figure below.
| Color |
| WB Mode Auto |
| Contrast 0 |
| Sharpness 0 |
| Flip-H 0 |
| Flip-V 7 |
| B&W Mode 7 |
| Select [Enter] Next [ ] Exit |
WB Mode: Auto, ATW, OnePush, Indoor, Outdoor Manual Sodium Lamp & Fluo Lamp
OnePush Trigger: OnePush trigger calculation
Options include: "Press OK"
(Only available in OnePush mode)
Pan Tilt Zoom
Move the cursor to the "Pan Tilt Zoom" option and press the [Enter] button to enter the Pan Tilt Zoom page, as shown in the figure below.
| Pan Tilt Zoom |
| Pan/Tilt Speed 5 |
| D-Zoom Limit X1 |
| FTZ Trig AF On |
| Ratio Speed On |
| Power Up Act Home |
| Select [Enter] Next [ ] Exit |
Pan/Tilt Speed: Pan / Tilt speed value. Options include: 1 \~ 8
D-Zoom Limit: Digital Zoom Limit Options include:X1 \~ X11
PTZ Trig AF: Enable auto focus when camera P/T/Z Options include: On, Off
Ratio Speed: P/T speed relates to Zoom speed
Options include: On, Off
Power Up Act: Position the camera calls on power up Options include: Home, Preset 1 \~ Preset 9
System

HuddleCamHD
Protocol: Camera control protocol.
Options include: VISCA, Pelco-D, Pelco-P
Baudrate: Camera control baudrate.
Options include: 2400, 4800, 9600, 38400
IR Address: Change camera IR address
Options include: 1 \~ 4
Video Format: Change camera resolution & framerate Options include: 720p60, 720p50, 1080p60, 1080p50, 1080p30, 1080p25, 1080i60, 1080
Mount Mode: Change mounting mode
Options include: Stand, Ceiling
Language: Change camera language
Options include: English, Chinese Status
Status
Move the cursor to the "Status" option and press the [Enter] button to enter the Status page, as shown in the figure below.
Status
Connections to LAN via CAT5 or CAT6 cable
Protocol
VISCA
Baudrate
9600
IR Address
1
Video Format 1080p30
Mount Mode Stand
Firmware Ver 1.0.35
Select [Enter] Next [] Exit
The Status tab shows the current settings of the camera.
You cannot change the values in this tab

HuddleCamHD
Operating Environment
- Restore Default
- Move the cursor to the "Restore Default" option and press the [Enter] button to enter the Restore Default page, as shown in the figure below.
| Restore Default | |
| Press | [Enter] Confirm |
| Press | [Back] Cancel |
| Select | [Enter] Next [ ] Exit |
Note: Press the [Enter] button to confirm. All camera parameters will return to default, including IR remote & VISCA addresses
Operating System: Windows 2000 / 2003 / XP / Vista / 7 / 8.1 / 10 / 11, Mac Catalina and later Network Protocol: TCP/IP Client PC: P4 / 128M RAM / 40GHD / support for scaled graphics card, support for DirectX8.0 or more advanced version.
Network Connection
Assigning an IP Address
By default, the camera is set to DHCP, meaning it will automatically obtain an IP address from your DHCP server, if available. If your network doesn't utilize a DHCP server, the camera will fallback to its static IP address of "192.168.1.180". To change this IP address to an IP address on your network range, follow the steps below.
DHCP

HuddleCamHD
Using the Upgrade Tool
You can use the Upgrade Tool to assign a dynamic IP address, static IP address, firmware upgrade the camera, backup core files, and lastly; restore core files. Please follow the instructions below for best use.
Search Tab

Use the Search Tab to find your camera on your network. The "Interface" dropdown allows you to select which network to search. After selecting the proper network type, click the "Search" button to begin your search.
Once you find the camera you wish to adjust, right click the corresponding IP address to reveal the control menu. From here, select the corresponding tab for the way you want to adjust your camera.
Upgrade Tab
The Upgrade Tab allows you to firmware upgrade the camera. To acquire the latest firmware for your

HuddleCamHD
To ensure you follow the proper firmware upgrade method, follow the PTZOptics SDI/NDI Firmware Upgrade Instructions.
Config Tab
The Config tab allows you to change the network parameters of a camera. To properly access this interface, right-click a camera from the Search tab, and select "Config" from the menu.
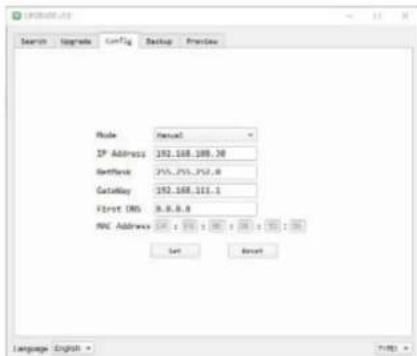
To assign a static IP address, you'll need to know of a free IP address in your network range, your subnet mask, Gateway, & First DNS. To find this information, check out the section Discovering your Network Info below.
Alternatively, you can click the "Mode" dropdown and select "DHCP" to have your network auto fill this information. In either case, once the network information is filled, click the "Set" button to apply these pa-
^1 Because the MAC Address is stored in this backup file, ensure you do not apply/restore it to a different camera, as that will change the
second camera's MAC address to the first camera's MAC address. Presets are not always saved properly and may need to be re-set.
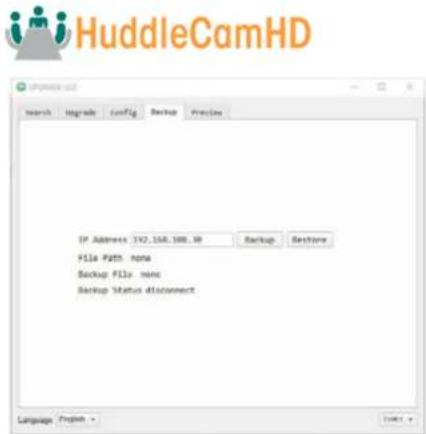
Preview Tab
The Preview tab allows you to view the RTSP feed of your camera. You can send the camera to the Preview tab from the Search tab, or simply type in the IP address into the field and click "Connect".


HuddleCamHD
The camera's fallback IP address is 192.168.1.180, making the network range 192.168.1. Alternatively, you can use an IR remote shortcut to change the IP address to 192.168.100.8(0\~9), making the network range 192.168.100. Change your computer's IP address to match the network range of the camera to begin discovering the camera.
Remote Configuration > Network Interface
The Remote Configuration tab allows you to modify the settings of a camera that is already connected to the software. Once you change the IP address of a camera through this method, you will need to re-add the camera to the Tracking Software.
Discovering your Network Info
To discover your IP address range/scheme, Subnet Mask, Gateway, & First DNS, follow the instructions below for Windows or Mac OS. You may need to talk with your IT department to obtain this information.
Windows
![Microsoft Windows [Version 10.8.10042.NET] (1) Microsoft Corporation. All rights reserved. C:\Users\PC\zipconfig Windows IP Configuration Ethernet adapter Ethernet: Connection-specific UNO Suffix . : localhost Link-Local IPv6 Address . . . . . . : feWR::eAdE:eAs:dOB3:f200A0 IPv6 Address . . . . . . . . . . : 102.168.15.17 Subnet Mask . . . . . . . . : 255.255.255.0 Default Gateway . . . . . . . . : 102.168.15.1](/content/2026/06/1215931/images/8f7372c913b8c225ce0bb2d446239f8fd22d8a5cf38d6dcefd7c905a12fb633b.jpg)
- Open the Start menu and type "CMD" into the search bar.
- Once the Command Prompt is open, type in "ipconfig" and press the Enter key.

HuddleCamHD
Mac
- Open a new Finder window and go to the Applications folder.
- Open the Utilities folder and select the Terminal program.
- Once the Terminal program is open, type in "ipconfig getifaddr en0" and press the Enter key.
![product - -ssh - 80×24 Last login: Fri May 14 15:34:45 on ttys800 product@[Mac.name] - % ipconfig getifaddr en0 103.68.17.187 product@[Mac.name] - %](/content/2026/06/1215931/images/22748ee14ddba9a680c3f0987db8eafc02ade7e6afc7ff370433d589285f0324.jpg)
- In the example above, the Mac's local address is 192.168.17.107", making the network range "192.168.17".

HuddleCamHD
Maintenance and Troubleshooting
Unqualified Applications
- Do not shoot extremely bright objects for a long period of time, such as sunlight, ultra-bright light sources, etc.
- Do not operate close to powerful electromagnetic radiation, such as TV or radio transmitters, etc.
Troubleshooting
- No image
Check whether the power cord is connected, voltage is OK, & Power LED is illuminated.
Check whether the camera can "self-test" after startup (camera will do a brief pan/tilt tour and return to the home position, or preset 0, if that preset is set).
- Check that the Check that the video cable is connected correctly.
- If SDI, make sure that the destination device is accessing the SDI port that you plugged into. If HDMI, make sure that the destination device is accessing the HDMI port that you plugged into. Check that the lens cap is not installed onto the camera lens.
- Check that the iris is not closed.
• Abnormal display of image
- Check the rotary dial on the back of the camera. Be sure to use a resolution and frame rate that is supported by your software / hardware.
• Image is shaky or vibrating
Check whether the camera is mounted solidly or sitting on a stead horizontal and level surface.
Check the building and any supporting furniture for vibration. Ceiling mounts are often affected by building vibration more than wall mounts.
o Any external vibration that is affecting the camera will be more apparent when in tele zoom (zoomed in) settings

- HuddleCamHD
- Table of Contents
- Preface
- Precautions
- Warning
- Warranty
- Supplied Accessories
- FCC Statement
- Connection Guide
- Dimensional Drawings (mm)
- Features
- - Image Sensor
- - Video Outputs
- NDI®|HX with NDI® 4 Connection
- Three Easy Steps:
- Tracking Software
- Device Management Interface
- Configuring the Camera
- Controlling the Camera
- Tracking Settings
- Preset Zones
- Basic 1 -
- Remote Playback
- RS232 Interface
- Serial Communication Control
- On Screen Display
- Main Menu
- Video
- Exposure
- Color
- Pan Tilt Zoom
- System
- Status
- Operating Environment
- Network Connection
- Assigning an IP Address
- Using the Upgrade Tool
- Upgrade Tab
- Config Tab
- Preview Tab
- Remote Configuration > Network Interface
- Discovering your Network Info
- Windows
- Mac
- Maintenance and Troubleshooting
- Unqualified Applications
- Troubleshooting
Brand : HuddleCamHD
Model : SimplTrack Lite
Category : Security Camera