DC5XE3 - Piano YAMAHA - Free user manual and instructions
Find the device manual for free DC5XE3 YAMAHA in PDF.

User questions about DC5XE3 YAMAHA
0 question about this device. Answer the ones you know or ask your own.
Ask a new question about this device
Download the instructions for your Piano in PDF format for free! Find your manual DC5XE3 - YAMAHA and take your electronic device back in hand. On this page are published all the documents necessary for the use of your device. DC5XE3 by YAMAHA.
USER MANUAL DC5XE3 YAMAHA
PRODUCT SAFETY MARKINGS: Yamaha electronic products may have either labels similar to the graphics shown below or molded/stamped facsimiles of these graphics on the enclosure. The explanation of these graphics appears on this page. Please observe all cautions indicated on this page and those indicated on the safety instruction section.

text_image
CAUTION RISK OF ELECTRIC SHOCK DO NOT OPEN ATTENTION -RISQUE DE CHOC ELECTRIQUE NE PAS OUVRIR. WARNING -TO REDUCE THE RISK OF FIRE OR ELECTRIC SHOCK, DO NOT EXPOSE THIS PRODUCT TO RAIN OR MOUSTRE. AVERTISSEMENT-AFIN DE REDUIRE LE RISQUE DE DECHARGE ELECTRIQUE, VEULLEZ NE PAS EXPOSER CET APPARE L.A LEAU NI A LHUMIDITE.SEE BOTTOM OF ENCLOSURE OR LOWER FRONT PANEL FOR GRAPHIC SYMBOL MARKINGS

The exclamation point within the equilateral triangle is intended to alert the user to the presence of important operating and maintenance (servicing) instructions in the literature accompanying the product.

The lightning flash with arrowhead symbol within the equilateral triangle is intended to alert the user to the presence of uninsulated "dangerous volt-
ENVIRONMENTAL ISSUES: Yamaha strives to produce products that are both user safe and environmentally friendly. We sincerely believe that our products and the production methods used to produce them, meet these goals. In keeping with both the letter and the spirit of the law, we want you to be aware of the following:
Battery Notice: This product MAY contain a small non-rechargeable battery which (if applicable) is soldered in place. The average life span of this type of battery is approximately five years. When replacement becomes necessary, contact a qualified service representative to perform the replacement.
Warning: Do not attempt to recharge, disassemble, or incinerate this type of battery. Keep all batteries away from children. Dispose of used batteries promptly and as regulated by applicable laws. Note: In some areas, the servicer is required by law to return the defective parts. However, you do have the option of having the servicer dispose of these parts for you.
Disposal Notice: Should this product become damaged beyond repair, or for some reason its useful life is considered to be at an end, please observe all local, state, and federal regulations that relate to the disposal of products that contain lead, batteries, plastics, etc.
NOTICE: Service charges incurred due to lack of knowledge relating to how a function or effect works (when the unit is operating as designed) are not covered by the manufacturer's warranty, and are therefore the owners responsibility. Please study this manual carefully and consult your dealer before requesting service.
NAME PLATE LOCATION: The graphic below indi-
SECTION DE MESSAGE SPÉCIAL
IMPORTANT SAFETY INSTRUCTIONS
WARNING — When using any electrical or electronic product, basic precautions should always be followed. These precautions include, but are not limited to, the following:
- Read these instructions.
- Keep these instructions.
- Heed all warnings.
- Follow all instructions.
- Do not use this apparatus near water.
- Clean only with dry cloth.
- Do not block any ventilation openings. Install in accordance with the manufacturer's instructions.
- Do not install near any heat sources such as radiators, heat registers, stoves, or other apparatus (including amplifiers) that produce heat.
- Do not defeat the safety purpose of the polarized or grounding-type plug. A polarized plug has two blades with one wider than the other. A grounding type plug has two blades and a third grounding prong. The wide blade or the third prong are provided for your safety. If the provided plug does not fit into your outlet, consult an electrician for replacement of the obsolete outlet.
- Protect the power cord from being walked on or pinched particularly at plugs, convenience receptacles, and the point where they exit from the apparatus.
-
Only use attachments/accessories specified by the manufacturer.
12 Use only with the cart, stand, tripod. -
Do not place this product or any other objects on the power cord or place it in a position where anyone could walk on, trip over, or roll anything over power or connecting cords of any kind. The use of an extension cord is not recommended! If you must use an extension cord, the minimum wire size for a 25' cord (or less) is 18 AWG. NOTE: The smaller the AWG number, the larger the current handling capacity. For longer extension cords, consult a local electrician.
- WARNING — To reduce the risk of fire or electric shock, do not expose this apparatus to rain or moisture.
- Care should be taken that objects do not fall and liquids are not spilled into the enclosure through any openings that may exist.
- This product, either alone or in combination with an amplifier and headphones or speaker/s, may be capable of producing sound levels that could cause permanent hearing loss. DO NOT operate for a long period of time at a high volume level or at a level that is uncomfortable. If you experience any hearing loss or ringing in the ears, you should consult an audiologist. IMPORTANT: The louder the sound, the shorter the time period before damage occurs.
- Some Yamaha products may have benches and/or accessory mounting fixtures that are either supplied as a part or the product or as optional accessories. Some of these items are designed to be dealer assembled or installed. Please make sure that benches are stable and any optional fixtures (where applicable) are well secured BEFORE using. Benches supplied by Yamaha are designed for seating only. No
INSTRUCTIONS DE SÉCURITÉ IMPORTANTES
The control unit is classified as a Class 1 laser product. One of the labels below is located on the inside of the CD drive unit.
* Wavelength: 783 nm
* Laser Output Power at the lens of the Laser Pickup Unit: max. 130.7 mW
CAUTION—Use of controls or adjustments or performance of procedures other than those specified herein may result in hazardous radiation exposure.
COMPLIANCE INFORMATION STATEMENT (DECLARATION OF CONFORMITY PROCEDURE)
Responsible Party : Yamaha Corporation of America
Address : 6600 Orangethorpe Avenue, Buena Park. CA 90620 USA
Telephone: 1-714-522-9011
Fax:1-714-522-9301
Type of Equipment : Player Piano
Model Name : DGB1KF3Classic
This device complies with Part 15 of the FCC Rules.
Operation is subject to the following two conditions.
1) this device may not cause harmful interference, and
2) this device must accept any interference received including interference that may cause undesired operation.
See user manual instructions if interference to radio reception is suspected.
The above statements apply ONLY to those products distributed by Yamaha Corporation of America or its subsidiaries.
FCC INFORMATION (U.S.A.)
- IMPORTANT NOTICE: DO NOT MODIFY THIS UNIT!
This product, when installed as indicated in the instructions contained in this manual, meets FCC requirements. Modifications not expressly approved by Yamaha may void your authority, granted by the FCC, to use the product.
-
IMPORTANT: When connecting this product to accessories and/or another product use only high quality shielded cables. Cable/s supplied with this product MUST be used. Follow all installation instructions. Failure to follow instructions could void your FCC authorization to use this product in the USA.
-
NOTE: This product has been tested and found to comply with the requirements listed in FCC Regulations, Part 15 for Class "B" digital devices. Compliance with these requirements provides a reasonable level of assurance that your use of this product in a residential environment will not result in harmful interference with other electronic devices. This equipment generates uses radio frequencies and, if not installed and used according to the instructions found in the users manual, may cause interference harmful to the operation of other electronic devices. Compliance with FCC regulations does not guarantee that interference will not occur in all installations. If this product is found to be the source of interference, which can be determined by turning the unit "OFF" and "ON", please try to eliminate the problem by using one of the following measures:
Relocate either this product or the device that is being affected by the interference.
Utilize power outlets that are on different branch (circuit breaker or fuse) circuits or install AC line filter's.
In the case of radio or TV interference, relocate/reorient the antenna. If the antenna lead-in is 300 ohm ribbon lead, change the lead-in to coaxial type cable.
If these corrective measures do not produce satisfactory results, please contact the local retailer authorized to distribute this type of product. If you can not locate the appropriate retailer, please contact Yamaha Corporation of America, Electronic Service Division, 6600 Orangethorpe Ave, Buena Park, CA 90620
The above statements apply ONLY to those products distributed by Yamaha Corporation of America or its subsidiaries.
(1) Remove the four screws from the sides of the control unit.
(2) Place the metal suspension bracket, supplied with the Disklavier grand model, over the control unit, then secure the metal suspension bracket to the control unit using the four screws (4 × 10) supplied with the Disklavier.
(3) Insert the three restraining screws (5 × 12) into the marked nuts underneath the bass side key bed, then tighten the screws, leaving a gap of about 5 mm between head of the screw and nine body.
natural_image
Technical line drawing of a mechanical bracket assembly (no text or symbols)
natural_image
Diagram of an electronic device rear panel with multiple ports and cables (no text or labels)(4) Fit the "slots" of the metal suspension bracket containing the control unit to the screws mentioned in step (3).
(5) After mounting the control unit, push the control unit back as far as it will go and then tighten the three screws to secure the bracket.
(6) Connect the cables extending from the piano to the appropriate connectors/jacks on the rear panel of the control unit.
- Coaxial cable: to the TO PIANO connectors
- Speaker cord: to the OUTPUT jacks
Mounting an Optional USB Floppy Disk Drive to the Grand Piano
(1) Remove the backing papers from the adhesive tape inside the case, and fit the floppy disk drive into the case.
(2) Attach the drive and case assembly to the bottom of the control unit, using the four screws (3 × 6) supplied with the Disklavier.
(3) Connect the USB cable extending from the drive to the USB port on the rear panel of the control unit.
The Disklavier is a fascinating instrument that integrates a classic Yamaha acoustic plano with Innovative electronics to suit your entertainment, educational, and creative needs, while retaining the tone, touch and long-term value that have long made Yamaha pianos the world's finest.
Before using your Disklavier piano, please read this manual thoroughly and retain it for future reference.
■Notes on Source Code Distribution
For three years after the factory shipment, you may request from Yamaha the source code for any portions of the product which are licensed under the GNU General Public License by writing to the following address:
10-1 Nakazawa-cho, Naka-ku, Hamamatsu, Shizuoka, 430-8650, JAPAN
Piano Development Department, Yamaha Corporation
The source code will be provided at no charge; however, we may require you to reimburse Yamaha for the cost of delivering the source code to you.
The source code download is also available on the following website:
http://download.yamaha.com/sourcecodes/disklavier_e3/
- Note that we shall bear no responsibility whatsoever for any damage arising from changes (additions/deletions) made to the software for this product by a third party other than Yamaha (or party authorized by Yamaha).
- Note that re-use of source code released to the public domain by Yamaha is unguaranteed, and Yamaha shall not bear any responsibility whatsoever for the source code.
■Trademarks & Copyrights
- The contents of this operation manual and the copyrights thereof are under exclusive ownership by

English

Important Precautions
Read the following before operating the Disklavier.
■Warnings
- Do not locate the Disklavier in a place subject to excessive heat, low temperatures, or direct sunlight. This could be a fire hazard and may damage the finish and internal parts.
- Excessive humidity or dust can lead to fire or electric shock.
- Connect the plug on the Disklavier power cable to a compatible AC outlet. Failure to do so will present a fire and electric shock hazard. If the power cable plug is not compatible with your AC outlet, consult your dealer.
- Do not plug several devices into the same AC outlet. This can overload the AC outlet, and lead to fire and electric shock hazard. It may also affect the performance of some devices.
- Do not place heavy objects on the power cable. A damaged power cable is a potential fire and electric shock hazard. If the power cable runs under a carpet, make sure heavy objects, including the Disklavier, are not placed on top of the cable.
- If the power cable is damaged (i.e. cut or a bare wire is exposed), ask your dealer for a replacement. Using the Disklavier in this condition is a fire and shock hazard.
■Cautions
- Turn off all audio devices when connecting to the Disklavier. Refer to the user's guide for each device. Use the correct cables and connect as specified.
- Set the volume level on all the devices to minimum before applying power.
- Do not play the Disklavier at a high volume for extended periods; you may damage your hearing. This is especially important when using headphones. If you think your hearing ability is impaired, consult your doctor.
- If the Disklavier is worked extremely hard—that is, prolonged playback of very "busy" songs—the Disklavier's thermal relay may trip. The thermal relay will automatically reset when the Disklavier has cooled down.
- If you notice any abnormality — such as smoke, odor, or noise — turn off the Disklavier immediately, and remove the power plug from the AC outlet. Consult your dealer for repair.
- If a foreign object or water gets inside the Disklavier turn it off immediately, and remove the power plug from the AC outlet. Consult your dealer.
- If you plan not to use the Disklavier for a long
■Interference
- The Disklavier uses high-frequency digital circuits that may cause interference to radios and TVs placed close to it. If interference does occur, relocate the affected equipment.
■Handling Batteries
The remote control of this unit is powered by dry batteries. Improper use or misuse of the dry batteries can cause the dry batteries to heat up, leak electrolyte or burst which in turn may result in a fire, damage to equipment and/or nearby objects or in burns, Injury or other bodily harm. Read through and familiarize yourself with the following safety precautions prior to use to ensure correct usage.
- Do not directly touch the chemicals (electrolyte) which have leaked from dry batteries.
- If electrolyte from dry batteries has made contact with your eyes, rinse your eyes thoroughly with clean water and seek medical treatment from a physician immediately.
- If electrolyte from dry batteries has touched your skin or clothing, rinse it off immediately with clean water.
- If electrolyte from dry batteries has found its way inside your mouth, gargle immediately and consult a physician.
- Do not install the dry batteries with the "+" and "-" poles reversed. Misaligning the poles of dry batteries can lead the dry batteries to be
- When the battery-powered unit is not going to be used for a prolonged period of time, remove the dry batteries from the unit. Otherwise the batteries will run down and their electrolyte may leak, resulting in damage to the unit.
- Remove spent batteries immediately from equipment. Otherwise, batteries will overdischarge, causing them to heat up, leak electrolyte or burst which in turn may result in damage to nearby objects or in burns, injury or other bodily harm.
- Dispose of batteries in accordance with the applicable regulations and ordinances.
- The batteries shall not be exposed to excessive heat such as sunshine, fire or the like.

English

Table of Contents
Quick Reference
Learning about the Control Unit ....1
Learning about Media 1
Turning Your Disklavier On....2
When You Finish....2
Listening to a CD included with the Disklavier .....3
Listening to a Free DisklavierRadio™ Channel .....4
Chapter 1 Introduction
Features......5
Items Supplied with the Disklavier ....5
Names of Parts and Their Functions ....6
Basic Disklavier Terminology....11
Chapter 2 Getting Started
Connecting the Control Unit....12
Connecting the AC Power Cable ....12
Using the Remote Control....13
Setting the Internal Calendar 15
Turning Off the Disklavier (Standby Mode)....18
Shutting Down the Disklavier 18
Compatible Media Format for the Removable
Media 18
A-convertible File Format 10
Playing Back Songs in a Different Key
(Transposition) 31
Repeating Song Playback.... 32
Repeating a Specific Section of a Song
(A-B Repeat) 33
Playing Back Only the Desired Piano Part...... 34
Adjusting the Volume Balance among the
Keyboard Playing, Ensemble Sound, and
Software Playback 35
Adjusting the Pitch of Audio 37
Adjusting the L/R Balance of Audio.... 38
Using the Timer Play.... 39
Skipping the Blank Part at the Beginning of a
Song 42
Video Synchronized Playback.... 43
Adding Disklavier Accompaniment to Commercial
CD Songs (PianoSmart™ Playback).... 44
SmartKey™ Playback 44
Chapter 5 Advanced Piano Playing
Playing the Disklavier along with the Internal
Metronome 46
Playing the Disklavier with an Ensemble Voice... 47
Chapter 6 Basic Recording
Rearranging the Order of Albums ....71
Managing Songs 72
Making Copies of Songs 73
Deleting Songs....74
Renaming a Song 75
Rearranging the Order of Songs....76
Converting Song Format....77
Changing the Counter Display ....78
Converting MIDI Data to a Standard Form
(Strip XP)....79
Managing Playlists ....80
Adding Songs/Albums to the Playlist ....81
Deleting a Playlist....82
Creating a New Playlist....83
Renaming a Playlist ....84
Managing Media....85
Making Copies of the Entire Contents in a
Medium 86
Deleting the Entire Contents in a Medium....87
Copying Song File from a Personal Computer to
Refreshing the Contents in [FromToPC] .....92
Formatting the Floppy Disk (Optional) 93
Making Backups of Songs....94
Restoring the Backups....95
Hooking Up MIDI Devices 108
Setting the Disklavier for MIDI Data
Reception 109
Setting the Disklavier for MIDI Data
Transmission.... 111
Setting the Disklavier for Keyboard Playing
Data Transmission 112
Chapter 11 Other Settings
Tuning the Tone Generator
(TG Master Tune).... 114
Assigning Frequently-used Functions to the
Number Keypad on the Remote Control ..... 115
Setting the Passcode to Prevent Unauthorized
Access.... 118
Adjusting the Brightness of the Display..... 120
Switching the Languages for the Screen.... 121
Resetting the Disklavier.... 122
Chapter 12 Internal Tone Generator
Voices
Internal GM/YG Tone Generator Basic Voice


Quick Reference: Starting

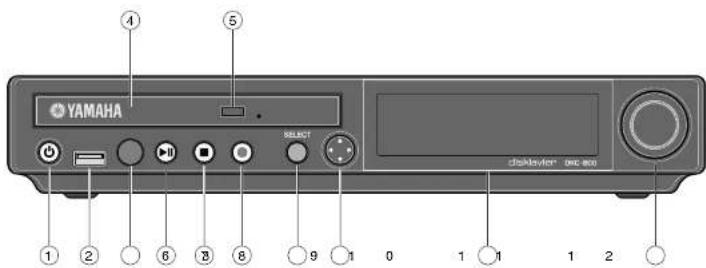
Learning about the Control Unit
Buttons that you will use for playback and recording.

text_image
ON/OFF Turns on or shuts down the Disklavier. EJECT Opens the CD tray. PLAY/PAUSE Starts and pauses playback/recording. STOP Stops playback/recording. ENTER (center) Executes the selection. CURSOR Selects the item. SELECT Opens the media selection screen. RECORD Gets the Disklavier ready to record.

Learn More? | ■ See page 6

Quick Reference: Starting

Your Disklavier is now ready for use!


Quick Reference: Listening to a Song

Listening to a CD included with the Disklavier
1
Load a CD.


2
Select "CD" as the playback source.
[SELECT]


3
Select an album.


4
Select a song.
CURSOR


Listening to a Free DisklavierRadio™ Channel
Before operating...
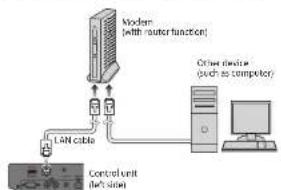
Connect the Disklavier to a router or a modem equipped with a router that is connected to the Internet.
flowchart
graph TD
    A["Modern (with master function)"] --> B["LAN cable"]
    B --> C["Control unit (net's slot)"]
    D["Other devices (such as computer)"] --> C
    C --> E["Computer"]
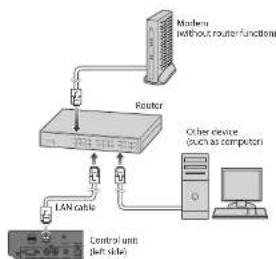
flowchart
graph TD
    A["Router"] --> B["LAN cable"]
    B --> C["Control unit (left side)"]
    D["Minions without router function"] --> A
    E["Other devices (such as computer)"] --> F["Computer"]
For more details on connections, see page 98.
1
Select "D-Radio" as the playback source.
[SELECT]


2
Select a free channel.
[CURSOR]

Introduction
Features
The Disklavier E3 Classic offers the valuable features that open up your musical possibility to explore. Here are brief explanations of such features:
Advanced Features for Your Listening Pleasure
- Special music CDs, contain over 17 hours of fantastic music, let you start listening on the day the Disklavier E3 Classic arrives at your home.
- DisklavlerRadio; you can listen to over 11 music channel by streaming broadcasts over the Internet.
Convenient Recording Features to Preserve Your Musical Memories
- Total 128 megabytes of internal memory comes with the Disklavier E3 Classic to preserve your valuable data.
- Connecting external USB devices to the Disklavier E3 Classic allows you to record your performance directly onto them, or even make backups of your valuable data in the internal memory.
- Video synchronization features offer great listening experience with sights. You can see as well as hear performances with perfectly synchronized audio and video.
- Your valuable music data on the floppy disk can be played back with the optional floppy disk drive (UD-FD01).
Simple and Easy-to-use Features Enhancing Your Performance
- The remote control, with clear and logical layout of buttons, lets you quickly enjoy the features of the Disklavier E3 Classic.
- The display on the front panel employs an organic electro-luminescent display which makes it brighter and more easily readable than ever.

Names of Parts and Their Functions
■Control Unit — Front Panel
text_image
YAMAHA SELECT dikksvier spec.au① [ON/OFF] button ⏻
Turns on or shuts down the Disklavier. Press once to turn it on, and once again to shut it down.
② USB port
Used to connect a USB flash memory, etc.
③ Remote control sensor
When using the remote control, point it toward this sensor.
④ CD drive
Insert a PianoSoft-PlusAudio or other audio or audio/MIDI CD here.
⑩ Cursor/[ENTER] buttons
Cursor: Used to select options and parameters.
![YAMAHA DC5XE3 - ⑩ Cursor/[ENTER] buttons - 1](/content/2026/06/1215703/images/ee421399946ce6a58177482da14be06a89a0d7d4513b12c116f0a8d43ed46932.jpg)
Press this button inclining slightly upward/downward/left/right.
[ENTER]: Used to execute the selection.
![YAMAHA DC5XE3 - ⑩ Cursor/[ENTER] buttons - 2](/content/2026/06/1215703/images/83ebae0102fb7ea11a1c4272795a78055f175e1f64884d747893e7eb4db4991d.jpg)
Press straight the center of this button.
Introduction
![YAMAHA DC5XE3 - ⑩ Cursor/[ENTER] buttons - 3](/content/2026/06/1215703/images/e4f9ef0773ea58151591b72b43360a022cc5d8d23222734801f4b075dcf59807.jpg)
■Control Unit — Rear Panel
![YAMAHA DC5XE3 - ⑩ Cursor/[ENTER] buttons - 4](/content/2026/06/1215703/images/54d8130a6b4e8fee110a7a3953a5acf479210728ed8931af8bcde226837e857d.jpg)
text_image
1 2 43 5 6 USB LAN + - USB OUTPUT OUTPUT MOSI TO DEVICE TD FANG DC IN 12V TD HOST R OUT IN R OUT IN 7 8 9 1 0① USB TO DEVICE port
Used to connect a USB flash memory, an optional USB floppy disk drive, etc.
② LAN port
Used to connect to the Internet.
③ OUTPUT jacks
Used to connect the speaker cord from the monitor speaker.
4 ANALOG MIDI IN jacks
Used to connect the audio equipment such as an external CD changer.
⑩ MIDI OUT terminal
Used to connect external MIDI equipment for outputting MIDI data.
⑪ MIDI IN terminal
Used to connect external MIDI equipment for inputting MIDI data.
Chapter
1
Introduction
■Remote Control
![YAMAHA DC5XE3 - ⑩ Cursor/[ENTER] buttons - 5](/content/2026/06/1215703/images/08960a501e7c1a204985b8235898b6c2923bc596125c81d7c228fdad395761fa.jpg)
text_image
ON/STANDBY INTERNET 1 13 2 3 4 5 6 7 8 9 0 SYSTEM SETUP METRDNOME VOICE REPEAT A-B PART SELECT ... L R II BACK FUNC VOLUME SELECT +/YES BALANCE +/NO TIMPO TRANSPONSE - - - - - - - - - - - - - - - - - - - - - - - - - - - - - - - - - - - - - - - - - - - - - - - - - - - - - - - - - - - - - - - - - - - - - - - - - - - - - - - - - - - - - - - - - - -Introduction

⑨ [BACK] button
Used to cancel the selection, and return to the previous screen.
⑩ [VOLUME] buttons ( √ page 30)
Used to adjust the volume.
[-] lowers the volume, [+] raises the volume.
⑪ [TEMPO] buttons
Used to change the playback tempo.
[-] decreases the tempo, [+] increases the tempo, and [0] resets the tempo to 00.
⑫ [TRANSPOSE] buttons
Used to transpose song playback.
[-] transposes down, [+] transposes up, and [0] resets the transposition value to 00.
⑬ [INTERNET] button
Used to access the Internet menu.
⑭ [SEARCH] button
Used to access the search function.
⑮ [SETUP] button
Used to access the setup menu.
⑯ [METRONOME] button
Used to access the metronome function.
⑰ [REPEAT] button
Used to select one of the repeat modes: ALL, RPT, RND, or OFF.
1R [A-B] button
⑳ [PAUSE] button ( page 25)
Used to pause playback.
②1 [STOP] button (page 25)
Used to stop playback and recording.
⑳ [ENTER] button
Used to execute the selection.
②3 [FUNC.] button
Used to access the function menu.
⑳ [SELECT] button
Used to select media.
25 [+/YES]/[-/NO] buttons
Used to select parameters, adjust setting values, and execute or cancel the selected functions.
26 [BALANCE] button
Used to adjust the TG, audio and voice balance.
27 Color buttons
Green: Used to execute the shortcut assigned to the number keypad.
Yellow: Used to switch character types when titling albums and songs.
Other: For future use.


text_image
YAMAHA ① ② ③① LOW/HIGH volume controls
Adjust the base/treble sound volume.
② Power indicator
Lights up while the speaker is turned on.
③ LINE1/2 volume controls
Adjust the sound volume for each line input.
Note: For normal use, turn down the LINE2 volume completely, and turn up the LINE1 volume at the three o'clock position.
Introduction
Basic Disklavier Terminology
The following is a list of several basic Disklavier words that you may need to know before proceeding with operational procedures in this manual. For additional Disklavier terminology, see the glossary provided in Chapter 15.
Ensemble Song
An ensemble song contains the same left- and right-hand parts as an L/R song, and extra tracks that are played by the internal XG tone generator. Accompanying tracks can include acoustic bass, drums, strings, vibes, etc.
Internal Flash Memory
The Disklavier has a total of 128 megabytes of internal flash memory that allow you to store song data without a floppy disk.
L/R Song
In a L/R song, the left-hand piano part is stored on track 1 (L) and the right-hand piano part is stored on track 2 (R). During playback you can cancel either part, and practice that part yourself. When recording an L/R song, you can record the two parts simultaneously or separately.
MIDI
An acronym for Musical Instrument Digital Interface. MIDI allows electronic musical
PianoSoft-Plus
PianoSoft-Plus software contains prerecorded ensemble songs featuring instrumental accompaniment that can be played back on the Disklavier. See your Disklavier dealer for a PianoSoft catalog.
PianoSoft-PlusAudio
CD software made by Yamaha containing audio and MIDI
signals for playing back on the Disklavier.


SmartPianoSoft
Software made by Yamaha
containing MIDI signals for
playing back along with standard audio CDs.
Song
A "song" usually means a short piece of music with lyrics. However, in the Disklavier manuals the term "song" is used to refer to any piece of music.
Tone Generator
An electronic device that generates instrument voices. The Disklavier has an internal XG tone generator that can produce nearly 700 instrumental and percussion voices.
Voice
Chapter


Getting Started
Connecting the Control Unit
Make sure that the cables extending from the piano is connected to the appropriate connectors or jacks on the rear panel of the control unit.

natural_image
Diagram of an electronic device rear panel with multiple ports and connectors (no text or labels)Note:
The cables should be connected to the control unit when the Disklavier is installed. If, however, it is not, carefully connect them to the appropriate connectors or jacks on the rear panel of the control unit.
Note:
Be sure to mount the control unit to the underside of the bass side key bed.
Connecting the AC Power Cable

Connect the power cord extending from the power supply unit of the piano to the DC-IN 12V connector of the control unit.

Getting Started

Using the Remote Control
The Disklavier is equipped with a remote control which allows convenient control from almost anywhere in the room. This chapter provides notes on handling the remote control.
■Installing Batteries in the Remote Control
Before the remote control can be used, the two batteries supplied with the Disklavier must be installed.
Remove the battery cover from the rear of the remote control, install the batteries, and then replace the cover.

natural_image
Diagram showing a device being open with a switch, then being placed on a battery pack (no text or symbols present)A diagram inside the battery compartment shows which way the batteries should be installed. Make sure you insert them correctly.
■Battery Replacement
When the remote control fails to work from a distance, replace the batteries.
- Replacement batteries should be UM-3, AA, R6P, or LR6 type.
- Do not use new and old dry batteries together.
Important:
Be sure to read the section on
"Handling Batteries" on page iii for details on the safe handling of dry batteries.

Getting Started
■Using the Remote Control
To use the remote control, point it at the remote control sensor on the control unit.
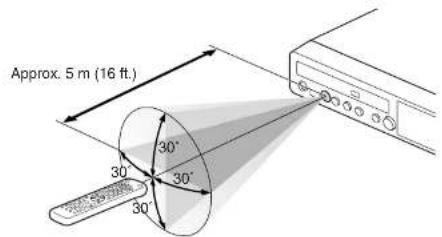
text_image
Approx. 5 m (16 ft.) 30° 30° 30°Make sure that the main switch on the power supply unit is turned on.

text_image
Power supply unit (located on the bottom)
Press [ON/OFF] on the control unit.

While the control unit is in the standby mode, you can also turn on the Disklavier by pressing [ON/STANDBY] on the remote control. ON/STANDBY

The following message appears on the display, and [ON/OFF] on the control unit lights green.

text_image
TINARE disklavier 3After several seconds, the loading screen will appear, and last selected song will be loaded.


Your Disklavier is now ready for use.
Setting the Internal Calendar
Getting Started
Chapter

7
See Chapter 2 "Getting Started Turning Off the Disklavier (Standby Mode)" on page 18.


Select "TimeZone" with the cursor buttons ([ ] [ ] [ ], then press [ENTER].

The time zone setup screen appears.


Press [+ / YES] and [- / NO] to change the time zone.
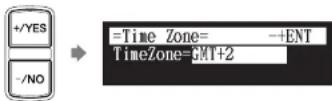
Examples of Time Zone
The chart below shows the correspondence between the time zone setting on the Disklavier and actual time zone used in the U.S. and Canada.
Setting AaAntaliHienZoZane
GMT-10 Havravia Ateutiania St. Stalada rörfiene
GMT-9 AlasAlasStaGlandarthe (AK(SK)ST)
GMT-8 AlasRasDavDaktidime (AKDT)
Note:
The time zone listed here should be
used only as a guide. For more
details, contact your local
observatories.
■Calendar

Select "Clock Adj." with the cursor buttons ( [ ] [ ] [ ], then press [ENTER].


The current date and time appear.


Press [ENTER].
The time setup screen appears with the cursor flashing on the hours display.

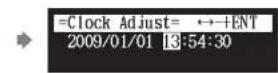

Select year, month, date, hours, minutes, and seconds with the cursor buttons ([]), then press [+/YES] and [-/NO] to set a value.
Getting Started
Chapter

English

Press [ON/STANDBY] on the remote control.
The ending screen appears, and [ON/OFF] on the control unit lights red.


Note:
Press [ON/STANDBY] on the remote control to turn the Disklavier back on.
Press [ON/OFF] on the control unit.
The ending screen appears, and [ON/OFF] on the control unit turns off.


Note:
Be sure to wait 5 seconds before turning the Disklavier back on.
Compatible Media Format for the Removable Media
Getting Started

Compatible File Format
The Disklavier can handle these three types of file format:
SMFO
Standard MIDI File format 0 for playback and recording. The name of the file should have an extension as ".MID" or ".mid."
SMF1
Standard MIDI File format 1 for playback only. The name of the file should have an extension as ".MID" or ".mid."
E-SEQ
Format developed by Yamaha, for playback only. The name of the file should have an extension as ".FIL" or ".fil."
Basic Precautions for Using CDs
■Handling CDs
In order to protect data stored on compact discs from damage or loss, handle them with care, and observe the following precautions.
- Do not touch the surface of a CD.
- Do not expose CDs to extreme temperatures or humidity. The working temperature range is between 4°C and 52°C (40°F and 125°F).
- Wipe CDs with a clean, dry cloth before playback.
- Remove the CD from the CD drive before turning off the Disklavier.
Chapter
3
Basic Song Playback
Types of Playable Software
PianoSoft and PianoSoft-Plus
When piano songs such as those contained in PianoSoft and PianoSoft-Plus software are played back on the Disklavier, the piano parts are actually played by the Disklavier keyboard, and the keys move up and down as though they were being played by an invisible performer. The ensemble parts (contained in PianoSoft-Plus software) are played by the internal tone generator and are heard from the monitor speaker.
PianoSoft-PlusAudio
PianoSoft-PlusAudio songs are recorded using two channels, an analog MIDI channel for the piano parts and an audio channel for instrumentals and vocals. When they are played back on the Disklavier, the piano parts area played by the Disklavier keyboard as with PianoSoft and PianoSoft-Plus songs, and all other instrumental and vocal parts are heard from the monitor speaker just like a normal audio system.
SmartPianoSoft
SmartPianoSoft contains a recorded piano accompaniment to the commercial CDs, and the acoustic accompaniment will play back matching with the commercial CD. You can also record your own accompaniment for your favorite commercial CDs at home; play your Disklavier as you listen to a CD, and SmartPianoSoft will
PianoSoft
PianoSoft-Plus
PianoSoft-Plus
audio
SMART
PianoSoft
Basic Song Playback
Chapter

Selecting Medium and Their Contents
[SELECT]

Insert a desired medium.

text_image
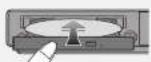
CD CD eject button USB flash memory USB port
Press [SELECT].
The media selection screen appears with the current selected medium highlighted.


Basic Song Playback

Press [ENTER] or []
The album selection screen appears.
![YAMAHA DC5XE3 - Press [ENTER] or [] - 1](/content/2026/06/1215703/images/456f231f91dd0c8e73978774abec05b57baea9f764b1dc9b1da76340e8a2443f.jpg)
![YAMAHA DC5XE3 - Press [ENTER] or [] - 2](/content/2026/06/1215703/images/d6335622b1936690b09f0cf03ff058f57cb05e4c180bd413f047ebf873e20207.jpg)
Select a desired album with the cursor buttons ([ ]◀]).▶
![YAMAHA DC5XE3 - Select a desired album with the cursor buttons ([ ]◀]).▶ - 1](/content/2026/06/1215703/images/2222bcd9d3af7be155312cbe7cd1a485a22f3d2d042766470c53097b66e8b81e.jpg)
text_image
=ALBUM SELECT= 01:50 Greats for t Album number Album titleTo return to the media selection screen, press [ ]
![YAMAHA DC5XE3 - Select a desired album with the cursor buttons ([ ]◀]).▶ - 2](/content/2026/06/1215703/images/c51d74c1bbde9b6de5d2b62edca6d78ab77fb86cfb735a66fa8779e0a2a97a7e.jpg)
Press [ENTER] or []
The song selection screen appears.
![YAMAHA DC5XE3 - Press [ENTER] or [] - 1](/content/2026/06/1215703/images/e8aa3efb9c3c372ba6d76c209c59185153821a10cf0b35445b3c7ac6604ab1fb.jpg)
![YAMAHA DC5XE3 - Press [ENTER] or [] - 2](/content/2026/06/1215703/images/dafc8c8f099097bba32e22bc7fad0124c71ed1fc4a6d1b1bdcef0c04359379c8.jpg)
Select a desired set with the square buttons (1.5%)
Note:
The maximum number of the
selectable albums in a medium is 99.
Note:
You can also select albums directly
using the number keypad on the remote control. See Chapter 3
"Basic Song Playback - Using the
Number Keypad" on page 24.
Note:
Basic Song Playback

■Song Playback Screen
Here are a few things that you will often see during playback.
text_image
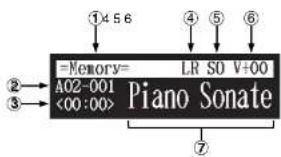
=Memory= LR SO V+00 A02-001 Piano Sonate <00:00>① Media
The selected medium is displayed here.
② Album/Song Number
The number of the selected album and song is displayed here.
Display Description
| Axx-yyyy | xx: album number (01 to 99)yyy: song number (001 to 999) |
| Pxx-yyyy | xx: playlist number (01 to 99)yyy: song number (001 to 999) |
③ Counter
Playing time is indicated in one of two formats.
Display Description
| xx:yy | Minutes (xx) and seconds (yy) |
| xxx-y | Measures (xxx) and beats (y) |
⑤ Song Format
The format of the selected song is displayed here.
Display Description
| S0 | SMF (Standard MIDI File) format 0 |
| S1 | SMF (Standard MIDI File) format 1 |
| ES | E-SEQ format |
⑥ Volume
The current volume setting is displayed here.
⑦ Song Title
The title of the selected song is displayed here. If the title is long, it scrolls across the display.
Using the Number Keypad
Album or song selection screen
mber button
You can also select albums or songs directly with the number keypad on the remote control.

Press the corresponding number button, then press [ENTER].
For example, to select album number 5, first press [0], then [5], then [ENTER].
![YAMAHA DC5XE3 - Press the corresponding number button, then press [ENTER]. - 1](/content/2026/06/1215703/images/f9da4d68984bddb3289151a75ba7a8ceaa96074a29a0c3ac9bf5901393dbfff2.jpg)
text_image
=ALBUM SELECT= 0-9/ENT 05:To select song number 36, first press [0], then [3], then [6], then [ENTER].
![YAMAHA DC5XE3 - Press the corresponding number button, then press [ENTER]. - 2](/content/2026/06/1215703/images/04cf37609ae7b86bc89d72e6395b8d85b7558b491dd0907472a4e39b9356f423.jpg)
text_image
=SONG SELECT= 0-9/ENT 036:Note:
If you enter a number higher than the existed, the last album or song appears.
Starting Playback
[PLAY]
Basic Song Playback

Stopping Playback
During playback [e-OP]
Press [STOP].
![YAMAHA DC5XE3 - Press [STOP]. - 1](/content/2026/06/1215703/images/b5410737a0ab1e1fb3516248c2ff01037e63a155723b0dca26acc74868be3f67.jpg)
Playback stops, and the song returns to the beginning.
[PLAY/PAUSE] on the control unit turns off, and the counter is reset to "00:00" or "001-1."
Pausing Playback
[PAUSE] ring playback
1 Press [PLAY/PAUSE] on the control unit, or [PAUSE] on the remote control.
![YAMAHA DC5XE3 - Press [PLAY/PAUSE] on the control unit, or [PAUSE] on the remote control. - 1](/content/2026/06/1215703/images/32e041677c7317d2c868ddcab63f04c5052e66e1ae969416861c5bafd96dee3b.jpg)
Playback pauses.
[PLAY/PAUSE] on the control unit flashes, and the counter stops counting.
Fast Preview & Review
[FORWARD] or [REVERSE] playing playback
During playback, fast preview and review allow you to quickly search through a song while listening to the sound. This is useful for locating a desired position within a song.
■Fast Preview
1 To preview, hold [] on the control unit or press [FORWARD] on the remote control.

Control unit
or

Remote control
2 Release [ ] on the control unit, or press [FORWARD] on the remote control again to return to normal playback.
If a song is previewed all the way to the end, it will be paused at the end of the song.
■Fast Review
1 To review, hold [] on the control unit or press [REVERSE] on the remote control.


Note:
No sound is produced by the piano when fast-previewing or reviewing PianoSoftPlusAudio CDs.
Basic Song Playback

Fast Forward & Reverse
Stop or pause mode [FORWARD] or [REVERSE]
In the stop or pause mode, fast forward and reverse allow you to quickly locate a desired position in a song.
Reverse can also be used to return a song to the beginning, ready to play again.
■Fast Forward
1 In the stop or pause mode, hold [ ] on the control unit or press [FORWARD] on the remote control.

Control unit Remote control
[PLAY/PAUSE] on the control unit flashes quickly and the counter shows the current position.
2 Release [ ] on the control unit, or press [FORWARD] on the remote control again to return to the pause mode.
If you fast forward a song all the way to the end, it will be paused at the end of the song.
■Fast Reverse
Basic Song Playback
Searching a Specific Section of a Song
During playback or stop/pause mode [SEARCH]
Playback can be started from a specified point in a song. Instead of using fast forward or preview, you can use this function to go directly to a desired point within a song.
If the current song uses the minutes and seconds time format, you specify the point in minutes and seconds. If it uses the measures and beats time format, you specify the point in measures and beats.

Press [SEARCH] on the remote control.
The song search screen appears with the counter flashing.
![YAMAHA DC5XE3 - Press [SEARCH] on the remote control. - 1](/content/2026/06/1215703/images/223c30ebcd2e14f6aff2570a7044bb40e13d5bfadf82a0b70450bcaad0d38324.jpg)
The song will be paused at the exact point as you press [SEARCH].
![YAMAHA DC5XE3 - Press [SEARCH] on the remote control. - 2](/content/2026/06/1215703/images/da0ad955ac0700cd7517f28505a174a94bcc5b819e47b6da13267da76ae285d1.jpg)
Enter the time that you want to search for with the number keypad.
For example, to search for 2:56 (minutes and seconds), first press [0], then [2], [5], and [6].

Note:
If you enter a value higher than the entire song time, the search goes to the end of the song.
Basic Song Playback
Chapter

Listening to the DisklavierRadio

You can listen to streaming broadcasts of music, with many channels of music contents.
1 Select "D-Radio" in the media selection screen.
The channel selection screen appears.

2 Press [ ] or [ ] or [+/YES] or [-/NO] to select a channel.
![YAMAHA DC5XE3 - Press [ ] or [ ] or [+/YES] or [-/NO] to select a channel. - 1](/content/2026/06/1215703/images/ec80397cb51735ba358552ab5a12ea5f8f4693f92497deae4263dc3b276a7587.jpg)
text_image
/YES -/NO =RADIO SELECT= 05:Classical and S3 Press [ENTER] or [] to begin the broadcast of the selected channel.
The DisklavierRadio screen appears.
Channel
Number
medium
Volume
![YAMAHA DC5XE3 - Press [ENTER] or [] to begin the broadcast of the selected channel. - 1](/content/2026/06/1215703/images/680f8a61f6aaf660939ca8cab75bbf36f11e69d73fdad6c7fcae2c0f57f6418f.jpg)
Basic Song Playback
■Muting the Sound

Press [PAUSE] or [STOP].
"MUTE" appears on the upper right of the screen.


Press [PAUSE] or [STOP] again to release muting.

Note:
Streaming broadcasts continue during muting. Therefore, the song broadcasted when releasing muting may differ from the one when muting.
Adjusting the Volume
[VOLUME+] or [VOLUME-
You can adjust volume with the control unit or with the remote control as described below. Since all piano songs are recorded at the maximum volume level of 0, volume can be decreased down to -10, the softest volume at which the piano can play.
For ensemble songs, the volume of the piano and internal XG tone generator are adjusted simultaneously, so it is a good idea to first balance the volume of the piano and XG tone generator.
For songs on PianoSoft-PlusAudio, you should first balance the volume of the MIDI piano and audio parts.
Note:
This setting does not affect manual playing.
Q
See Chapter 4 "Advanced Song Playback – Adjusting the Volume Balance among the Keyboard Playing, Ensemble Sound, and Software Playback" on page 35.

Advanced Song Playback
Changing the Playback Tempo
[TEMPO -] or [TEMPO +]
You can speed up or slow down the playback tempo. Slowing down the playback tempo can be useful when practicing a difficult piano part.
These tempo settings remain in effect until recording is started, another medium or album is selected, or the Disklavier is turned off.

Press [TEMPO -] or [TEMPO +] on the remote control.
The tempo setting screen appears.


Press [TEMPO -] or [TEMPO +] to adjust the tempo.

Playback tempo can be adjusted from -50% to +50% in 1% increments.
Press [TEMPO 0] to set to the original tempo.
Note:
You cannot change the playback tempo of songs on audio CDs.
[Unreadable]
Tempo changes to songs that you have recorded yourself can be made permanent. See Chapter 7
"Advanced Recording – Changing the Default Tempo" on page 59.
Note:
You can also use the dial on the control unit to adjust the tempo.

Advanced Song Playback
1 Press [TRANSPOSE -] or [TRANSPOSE +] on the remote control.
The transposition setting screen appears.

2 Press [TRANSPOSE -] or [TRANSPOSE +] to change the key.

Playback can be transposed in half-step increments up or down two octaves (-24 key to +24 key)
Press [TRANSPOSE 0] to set to the original key.

Note:
You can also use the dial on the control unit to adjust the key.
Repeating Song Playback
[REPEAT]
There are three repeat modes (ALL, RPT, RND) as described below. You can use these functions for entertainment or study purpose.
Repeat mode settings remain in effect until recording is started, another medium or album is selected, or the Disklavier is tuned off.
Advanced Song Playback
![YAMAHA DC5XE3 - [REPEAT] - 1](/content/2026/06/1215703/images/e8bd8c38f564000f8834f56f5a774ec616745e62fdfb8fcb66e36015c8de3ac2.jpg)
3 Press [PLAY] to start repeat playback.
![YAMAHA DC5XE3 - [REPEAT] - 2](/content/2026/06/1215703/images/b728af457b66a3452bf83a09404fe6818fb688a42a7a076463ab734df5bdba5b.jpg)
4 To cancel the repeat mode, press [REPEAT] until "OFF" appears on the screen.
![YAMAHA DC5XE3 - [REPEAT] - 3](/content/2026/06/1215703/images/9db94171409697fee4289bc7c4de1885c6f366de92df719c27c06174be4aec5a.jpg)
Repeating a Specific Section of a Song (A-B Repeat)

In the A-B repeat, playback is repeated between two specified points in a song: point A and point B. This function is useful when practicing or memorizing a difficult section of a song.
Once specified, points A and B are saved until another song is selected, recording is started, or the Disklavier is turned off.
1 To set point A, play back a song and press [A-B] on the remote control when the desired point is reached.
Point A is set.
The A-B repeat setting screen appears with the "B" flashing.


Advanced Song Playback

To cancel the A-B repeat, press [A-B] so that "OFF" flashes on the screen.

Pressing [BACK] also cancels the point setting, and returns to the song playback screen.
Note:
The A-B repeat is cancelled if you escape from the A-B repeat setting screen by other operations.
Playing Back Only the Desired Piano Part
[PART SELECT L] or [PART SELECT R]
This could be useful, for example, when listening carefully to one part, and also when you practice only the left- or right-hand part while the Disklavier plays the other.
■Cancelling the Piano Part

Select the desired song.

Press [PART SELECT L] or [PART SELECT R] on the remote control to cancel a part.
The part cancellation screen appears with the corresponding part canceled.

Notes of display:
C
To select a song, see Chapter 3 "Basic Song Playback – Selecting Medium and Their Contents" on page 21.
Note:
■Cancelling the Pedal Part
1 On the part cancellation screen, press [▶to select "P=."
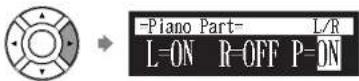
2 Press [-/NO] to cancel a pedal part.
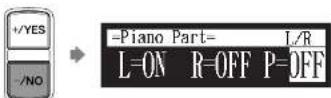
3 To replay the pedal part, press [+/YES] with the cursor is on "P=."

4 Press [BACK] to return to the song playback screen.
BACK
Advanced Song Playback
Chapter


Advanced Song Playback
■Adjusting the TG Balance

Press [BALANCE] on the remote control.
The TG balance setting screen appears.


Press [+/YES] and [-/NO] to adjust the volume of the tone generator.

Tone generator volume can be adjusted in a range of 10 to 127.
■Adjusting the Audio Balance

Press [BALANCE] twice on the remote control.
The audio balance setting screen appears.

Note:
You can also use the dial on the control unit to adjust the volume
■Adjusting the Voice Balance
1 Press [BALANCE] three times on the remote control.
The voice balance setting screen appears.
![YAMAHA DC5XE3 - Press [BALANCE] three times on the remote control. - 1](/content/2026/06/1215703/images/5fc13528646b71b1d0d097324072b814518467f99d40d4bcbcae42e0461dc52f.jpg)
×3
![YAMAHA DC5XE3 - Press [BALANCE] three times on the remote control. - 2](/content/2026/06/1215703/images/32907c9aa1d7ba3b876f7bf7211124f1005f069fdc9d0e31a59c88ba9359c4c6.jpg)
峰
![YAMAHA DC5XE3 - Press [BALANCE] three times on the remote control. - 3](/content/2026/06/1215703/images/c7cc882d29b8e1673b0ee7572a84a32e3706b39393c5f4d051d0a0db0694980f.jpg)
2 Press [+/YES] and [−/NO] to adjust the volume of the voice.
![YAMAHA DC5XE3 - Press [+/YES] and [−/NO] to adjust the volume of the voice. - 1](/content/2026/06/1215703/images/ff0229e706094eea846a9b8af3a556eff96c973e0f0cb78a861af3ecc91e6b78.jpg)
Voice volume can be adjusted in a range of 0 to 127.
Adjusting the Pitch of Audio
During playback [FUNC.]
You can temporarily adjust the pitch of the song contains audio (PianoSoft·PlusAudio, SmartPianoSoft) or an audio CD for your listening pleasure.
Pitch adjustments are effective until another medium or album is selected, recording is started, or the Disklavier is turned off.
Advanced Song Playback
Chapter

Note:
You can also use the dial on the control unit to adjust the volume.

Note:
This function cannot be used to adjust the pitch of external audio CDs connected to the OMNI IN jacks.
Advanced Song Playback
Adjusting the L/R Balance of Audio

You can temporarily adjust the L/R balance of an audio CD.
Balance adjustments are effective until another song is selected, recording is started, or the Disklavier is turned off.

During the song playback, press [FUNC.] several times.
The audio pan setting screen appears.


Press [+/YES] and [-/NO] to change the audio pan.

The following pan settings are available:
Option Description
| Left | Audio of the L channel is output to both of the L and R channels. |
| Center | Audio of the L channel is output to the L channel, and the |
Advanced Song Playback
Chapter

Using the Timer Play

You can program your Disklavier to start or stop playback of a song at various specified times. All you need to do is register up to a maximum of 99 timer settings, and your Disklavier will perform them unattended. This function is called "timer play."
The following describes how to play back the first album in the internal flash memory at 8:15 AM.
1 Press [SETUP] on the remote control.
The setup menu screen appears.
![YAMAHA DC5XE3 - Press [SETUP] on the remote control. - 1](/content/2026/06/1215703/images/660ed9f7f9b6eefff9efc2f275faa0b46b6a01c22597f159000d8842ee36baa1.jpg)
2 Select "TimerPlay" with the cursor buttons ([ ] [ ] [ ], then press [ENTER].
![YAMAHA DC5XE3 - Select "TimerPlay" with the cursor buttons ([ ] [ ] [ ], then press [ENTER]. - 1](/content/2026/06/1215703/images/accd263cbd0d9c9fdadc684f16891e586c1d66b6ccbe33eb3b260cab24a9b580.jpg)
The timer play setting screen appears.
Timer switch
![YAMAHA DC5XE3 - Select "TimerPlay" with the cursor buttons ([ ] [ ] [ ], then press [ENTER]. - 2](/content/2026/06/1215703/images/dc66e83ef7aaef88ac5faddceb1c274cd6eae0fce61b61914a635a680e7b8e73.jpg)
Advanced Song Playback
![YAMAHA DC5XE3 - Select "TimerPlay" with the cursor buttons ([ ] [ ] [ ], then press [ENTER]. - 3](/content/2026/06/1215703/images/43a6b3b23cb840f5fc83543a58c6856fee6579035be40fe91efa54cb057d4754.jpg)
Press [] and [] to select the desired program number.
![YAMAHA DC5XE3 - Select "TimerPlay" with the cursor buttons ([ ] [ ] [ ], then press [ENTER]. - 4](/content/2026/06/1215703/images/75246cfe2a147bf822f493cd298b705a73e71fb74f80001e7818cc01a79a5cb3.jpg)
The cursor moves to the function parameter.
![YAMAHA DC5XE3 - Select "TimerPlay" with the cursor buttons ([ ] [ ] [ ], then press [ENTER]. - 5](/content/2026/06/1215703/images/e2e876757424c4676a496e576f65f6f927019a394d3dc73e652133a5b9b9dac4.jpg)
Press [] and [] to move the cursor to the function parameter, then press [+/YES] and [-/NO] to select the desired function.
![YAMAHA DC5XE3 - Select "TimerPlay" with the cursor buttons ([ ] [ ] [ ], then press [ENTER]. - 6](/content/2026/06/1215703/images/21a6725553ad95d9d3b753f118531b5a063b884a9175cea9decf52a7755bbae5.jpg)
flowchart
graph LR
    A["Start"] --> B{+/YES}
    B --> C["+/-NO"]
    C --> D["TimerPlay="]
    D --> E["+→↑→+"]
    E --> F[">TimerPlay=ON"]
    F --> G["01[### ##:## PLAY ----"]]
The following functions are available:
| PLAY | Starts playback of songs. |
| STOP | Stops playback of songs. |
| RND | Starts playback of songs at random. |
| OFF | Turns off the Disklavier (standby mode). |
When "PLAY" or "RND" is selected, the album selection parameter appears.
![YAMAHA DC5XE3 - Select "TimerPlay" with the cursor buttons ([ ] [ ] [ ], then press [ENTER]. - 7](/content/2026/06/1215703/images/4756f1ad60b7b06e6654ac24ad1f0728ec4302afcae0e59e1b136a6aeb088b20.jpg)
Press [ ]to move the cursor to the album selection parameter, then press [+/YES] and [-/NO] to select the
![YAMAHA DC5XE3 - Select "TimerPlay" with the cursor buttons ([ ] [ ] [ ], then press [ENTER]. - 8](/content/2026/06/1215703/images/eec802f9d39ea3cf483cb29db6dbf91808151a4305d8bee8d8d0caa9a4328209.jpg)
Press []to move the cursor to the day parameter, then press [+/YES] and [-/NO] to select the desired day.
![YAMAHA DC5XE3 - Select "TimerPlay" with the cursor buttons ([ ] [ ] [ ], then press [ENTER]. - 9](/content/2026/06/1215703/images/49d3148e2b76025441a3d3a6dffcdef6ab542015af33aa5aa3d1da33ce6b7ea2.jpg)
flowchart
graph LR
    A["Circle Component"] --> B["+/YES"]
    A --> C["~/NO"]
    B --> D["TimerPlay= +↓↑→+"]
    C --> E[">TimerPlay=ON"]
    C --> F["01[X=F"] ##:## PLAY Mem01]
The following day settings are available:
| ALL | The timer play functions on every day of the week. |
| MON | The timer play functions only on Monday. |
| TUE | The timer play functions only on Tuesday. |
| WED | The timer play functions only on Wednesday. |
| THU | The timer play functions only on Thursday. |
| FRI | The timer play functions only on Friday. |
| SAT | The timer play functions only on Saturday. |
| SUN | The timer play functions only on Sunday. |
| M-F | The timer play functions on Monday thru Friday. |
| M-S | The timer play functions on Monday thru Saturday. |
![YAMAHA DC5XE3 - Select "TimerPlay" with the cursor buttons ([ ] [ ] [ ], then press [ENTER]. - 10](/content/2026/06/1215703/images/0bd3e3744e7c0ca6a0219db5e5f44a11622d363d708147bc7a75ab5b949bade3.jpg)
Press [→to move the cursor to the hour parameter, then press [+/YES] and [-/NO] to set hours.
![YAMAHA DC5XE3 - Select "TimerPlay" with the cursor buttons ([ ] [ ] [ ], then press [ENTER]. - 11](/content/2026/06/1215703/images/25a517eb052f80ff190142c4d2b4f24845c9034f253611de420c0fa882f7a605.jpg)
flowchart
graph LR
    A["Start"] --> B["+/YES"]
    A --> C["-/NO"]
    B --> D["=TimerPlay= <↓+→-1"]
    C --> E[">TimerPlay=ON"]
    C --> F["01[X-F 06:00 PLAY Mem01"]]
Advanced Song Playback
Chapter
![YAMAHA DC5XE3 - Select "TimerPlay" with the cursor buttons ([ ] [ ] [ ], then press [ENTER]. - 12](/content/2026/06/1215703/images/16c9b6c62ea7f5b54abad8e7ad901ddc3c4a32f56e2f3f2d04606944b00e4507.jpg)
![YAMAHA DC5XE3 - Select "TimerPlay" with the cursor buttons ([ ] [ ] [ ], then press [ENTER]. - 13](/content/2026/06/1215703/images/78f1dd6cb8c40b94285fe66f9838f35e6bc2abc4829e12990329f997178d949b.jpg)
Advanced Song Playback
■About Song Playback Screen
When the song playback is stopped — with the timer play function is set to ON and the current time is displayed — "T" flashes to the right side of the current time.

Skipping the Blank Part at the Beginning of a Song

When there is a blank part created at the beginning of the recorded song, turning on this function automatically skips the unwanted part and starts playback from the actual beginning of the song.

Press [SETUP] on the remote control.
The setup menu screen appears.
![YAMAHA DC5XE3 - Press [SETUP] on the remote control. - 1](/content/2026/06/1215703/images/36339f3dccf6dcfb07bba1805cd198feb8a8f759d25a41f1efcc9948d97bd772.jpg)
![YAMAHA DC5XE3 - Press [SETUP] on the remote control. - 2](/content/2026/06/1215703/images/068b7b28ec95b62ac248c7d38c363a13cb344759a92f3e1a293fe9c0aa2cc772.jpg)
Select "Blayhead" with the square buttons (F15113)
Advanced Song Playback
Chapter

4 Press [ENTER] to return to the setup menu screen.

Video Synchronized Playback
You can enjoy piano playback with the video recorded on the DVD recorder.
1 Perform the video synchronized recording in advance.
2 Make sure that the OMNI IN setting is set to "AutoDetect".
3 Turn down the volume completely on the TV if you connect the audio output of the DVD recorder to the TV.
Turn down the volume completely on the camcorder if you use the camcorder only.
4 Start playback on the DVD recorder.
Start playback on the camcorder if you use the camcorder only.
[Unreadable]
For details on video synchronized recording, see Chapter 7 "Advanced Recording - Video Synchronized Recording" on page 61.
Note:
Be sure to rewind the video cassette to locate the beginning of the recording. It may take some time before piano playback starts if you start playback halfway through the video.
Note:
When using the song copied to the USB flash memory, it may take some time until the Disklavier recognizes the information for synchronization.
动
See "Setting for Video Synchronized Recording" on page 61.

Advanced Song Playback
Adding Disklavier Accompaniment to Commercial CD Songs (PianoSmart™ Playback)
Insert a CD | PLAY Select a Smart PianoSoft song
You can add a Disklavier piano performance you recorded or on commercially available SmartPianoSoft software to the playback of songs on your favorite CDs.
1 Insert a desired CD that you want to synchronize with the SmartPianoSoft song.
2 Select a desired SmartPianoSoft song.
3 Press [PLAY].
Playback begins with the CD playback.

Q
To record the piano performance to add, see Chapter 7 "Advanced Recording – CD Synchronized Recording" on page 65.
①
To select a song, see Chapter 3 "Basic Song Playback - Selecting Medium and Their Contents" on page 21.
SmartKey™ Playback
Select a SmartKey song [P-AY]
Special SmartKey software uses all the "SmartKey" features to create an exciting way in which non-players can learn to play simple melodies, one
Q
To cancel the SmartKey playback.

Press [PLAY].

Playback stops, and the key to play next moves slightly.
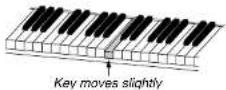
The key to play flashes in the counter.
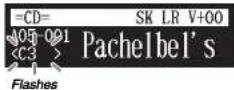

Play the key that the keyboard indicates.
This will continue until the song is finished. Notice that the Disklavier patiently waits for you to play the right key before proceeding to the next key. Also, notice that if you happen to miss the cue, it will gently remind you what the key is every few seconds until you play the right key.
■Key Notation
As a reference, "C3" is middle "C", which means "C4" is an octave above middle "C" and so on.
C12D12 F12G12A12 C13D13 F13G13A13 C14
Advanced Song Playback
Chapter


Chapter
5
Advanced Piano Playing
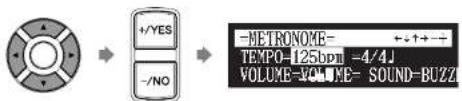
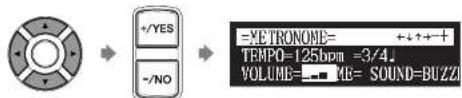
Playing the Disklavier along with the Internal Metronome
[METRONOME]
The internal metronome helps you playing along the meter (beat) and the tempo you set. Also the volume of the metronome can be adjusted.

Press [METRONOME] on the remote control.
The metronome setting screen appears and the metronome starts to click.


To change the tempo, move the cursor to the tempo parameter ("TEMPO") with the cursor buttons ([ ] [ ], then press [+/YES] and [-/NO].
text_image
+/YES -/NO -METRONOME- TEMP0-125bpm -4/4J VOLUME-VOLUME- SOUND-BUZZINote:
The tempo parameter displayed on the metronome setting screen indicates the number of beats in a minute, and one beat represents a quarter. When you play a song written in different measure unit from quarter note, change the setting (e.g. When playing a song in 3/2, set beat to 6/4).
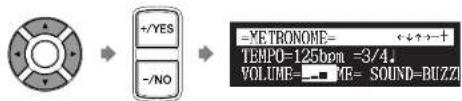
Advanced Piano Playing
Chapter

4 To change the volume, move the cursor to the volume parameter ("VOLUME") with the cursor buttons ([]▶[][]), then press [+/YES] and [-/NO].
text_image
+/-YES -/-NO =METRONOME= TEMPO=125bpm =3/4 VOLUME=□□MB= SOUND-BUZZIThe volume can be adjusted in 4 steps.
5 To change the sound, move the cursor to the sound parameter ("SOUND") with the cursor buttons ([ ] [ ] [ ]), then press [+/YES] and [-/NO].

text_image
+/-YES -/-NO - YETRONOME- +↓↑←1 TEMP0=125bpm =3/4J VOLUME-VOLUME-SOUThe following sound settings are available: BUZZER, TG
6 To cancel this function, press [METRONOME] again.


Advanced Piano Playing

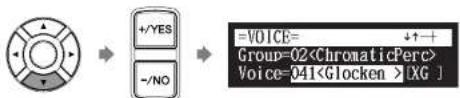
Press [+/YES] and [−/NO] to select a voice group.
Changing the voice group displays the top voice of that group in the voice parameters.


To change the voice, press []to move the cursor to the voice parameter ("Voice"), then press [+/YES] and [-/NO].
text_image
+✓YES -✓NO =VOICE= ↓↑+ Group=02If necessary, adjust the volume of the voice in the voice balance setting screen.

To inactivate this function, press [VOICE] again.

A
See Chapter 4 "Advanced Song Playback - Adjusting the Volume Balance among the Keyboard Playing, Ensemble Sound, and Software Playback" on page 35.
Note:
The voice function is inactivated if you escape from the voice selection screen by other operations.

Basic Recording
A song that you play on the Disklavier can be recorded and the recorded song can be easily saved for the selected medium. Furthermore, you can title your new recording for simple distinguish before recording.
Recording a New Song
[RECORD]
You can save a new song that you play for an album.

Select a destination medium and album.

Press [RECORD].
The recording standby screen appears, and [RECORD] on the control unit lights red and [PLAY/PAUSE] flashes in green.

The level appears in the format section as soon as you play a keyboard or press a pedal.

Press [PLAY].

[PI ΔV/PALISE] stone flachina
Note:
Up to 999 songs can be recorded in a medium.
[Unreadable]
To select a medium and album, see Chapter 3 "Basic Song Playback - Selecting Medium and Their Contents" on page 21.
Note:
You cannot select "CD" as the destination medium.

Basic Recording
Titling a Song at the Start of Recording

Title a new song before you start recording.
1 Select a destination medium and album.
2 Press [RECORD].
3 Press [FUNC.] twice in the recording standby screen.
The song title editing screen appears.

4 Enter a title to a new song.

You can enter up to 64 characters.
Follow the instructions in "Entering Characters" on next page.
0
To select a medium and album, see
Chapter 3 "Basic Song Playback -
Selecting Medium and Their
Contents" on page 21
C
To rename the existing song, see
Chapter 8 "Media Management –
Renaming a Song" on page 75.
Basic Recording
Chapter

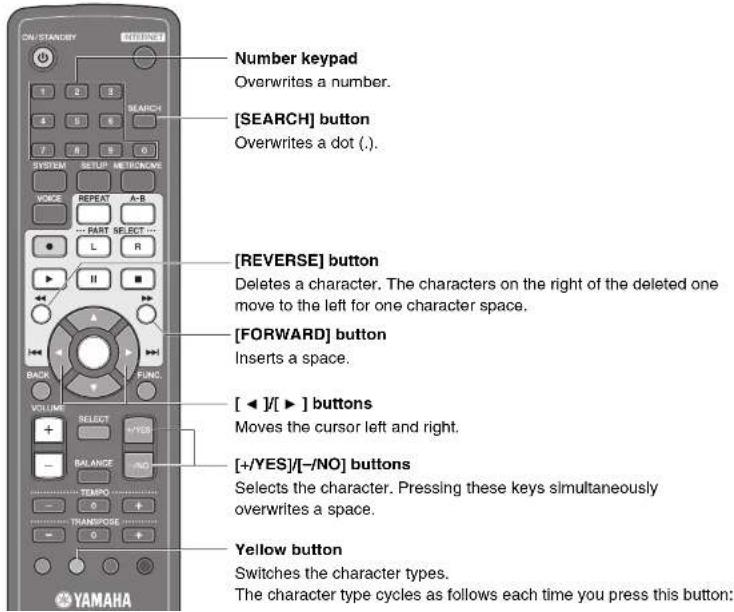
■Entering Characters
How to Enter Characters with the Remote Control
The following illustration shows how to enter characters with the remote control.
text_image
Number keypad Overwrites a number. [SEARCH] button Overwrites a dot (.). [REVERSE] button Deletes a character. The characters on the right of the deleted one move to the left for one character space. [FORWARD] button Inserts a space. [◀]/[▶] buttons Moves the cursor left and right. [+/YES]/[-/NO] buttons Selects the character. Pressing these keys simultaneously overwrites a space. Yellow button Switches the character types. The character type cycles as follows each time you press this button:
Advanced Recording
This chapter describes further functions for the advanced piano recording such as playing and measuring the current playing song tempo with the metronome, recording the left-hand part and the right-hand part separately.
Recording with the Internal Metronome
[METRONOME] [RECORD]
You can use the metronome to record songs.
Songs recorded with the metronome will be in the measures and beats format.
All metronome parameters are reset when the Disklavier is switched off.

Press [METRONOME] on the remote control.
The metronome setting screen appears.


To change the tempo, move the cursor to the tempo parameter ("TEMPO") with the cursor buttons ([ ] [ ] [ ]), then press [+/YES] and [-/NO].

Note:
The tempo parameter displayed on the metronome setting screen indicates the number of beats in a minute, and one beat represents a quarter. When you play a song written in different measure unit from quarter note, change the setting (e.g. When playing a song in 3/2, set beat to 6/4).
4 To change the volume, move the cursor to the volume parameter ("VOLUME") with the cursor buttons ([ ] [ ] [ ]), then press [+/YES] and [-/NO].
text_image
+YES -/NO =XETRONONE= +↓↑+ TEMP0=125bpm =3/4 VOLUME=■■MB= SOUND=BUZZIThe volume can be adjusted in 4 steps.
5 To change the sound, move the cursor to the sound parameter ("SOUND") with the cursor buttons ([ ] [ ] [ ]), then press [+/YES] and [-/NO].

text_image
+✓YES -✓NO =XETRONOME= +↓↑+←1 TEMP0-125bpm -3/4J VOLUME-VOLUME-SOUThe following sound settings are available: BUZZER, TG
6 Press [RECORD] in the metronome setting screen.
The metronome recording setting screen appears.

Advanced Recording


Advanced Recording
Recording the Left and Right Parts Separately

When recording an L/R song, the left- and right-hand parts can be recorded separately. Either part can be recorded first, and the pedals can be recorded with the first part.
While you record the second part, the first part will play back for monitoring.
If the left-hand or right-hand part is difficult to play at normal speed, the first part can be recorded at a slow tempo, and then the tempo changed afterwards to record the second part at the normal song speed.
This section describes how to record the left-hand part first then the right-hand part second.
1 Select a destination medium and album.
2 Press [RECORD].

3 Press [FUNC.] in the recording standby screen.
The part selection screen appears.

C
To select a medium and album, see Chapter 3 "Basic Song Playback - Selecting Medium and Their Contents" on page 21.
CP
In the case you want to title your new song before recording, see Chapter 6 "Basic Recording - Titling a Song at the Start of Recording" on page 50, to rename the title after recording, see Chapter 8 "Media Management - Renaming a Song" on page 75.
②
If you want to record your L/R song using the metronome, see Chapter 7
7 Press [RECORD].
![YAMAHA DC5XE3 - Press [RECORD]. - 1](/content/2026/06/1215703/images/347171937d5fcc7e90923fce69a5087ab818fa58128a39387b189932d9a2fb0c.jpg)
8 Press [] and [] to select the L/R song with the left-hand part that you have just recorded, then press [ENTER].
![YAMAHA DC5XE3 - Press [] and [] to select the L/R song with the left-hand part that you have just recorded, then press [ENTER]. - 1](/content/2026/06/1215703/images/7694095dcd1d73e158e03ecae7a5976581f7a5968a9d3efd24a1076a2a69f83b.jpg)
9 Press [FUNC.] in the recording standby screen.
The part selection screen appears.
![YAMAHA DC5XE3 - Press [FUNC.] in the recording standby screen. - 1](/content/2026/06/1215703/images/87a063a522629282a493bf7344ee4c44fe66570a38083080a15c699816de64f0.jpg)
The part that has already been recorded is displayed as "L=PLY."
10 Press [PART SELECT R] to record the right-hand part.
![YAMAHA DC5XE3 - Press [PART SELECT R] to record the right-hand part. - 1](/content/2026/06/1215703/images/c5994d7f0ae1a4e9c5326ce14a6cbe4c7b6190c60b136a871336640b9781eacf.jpg)
Advanced Recording
![YAMAHA DC5XE3 - Press [PART SELECT R] to record the right-hand part. - 2](/content/2026/06/1215703/images/b98e4580b77904c36dd7fe91f935cd4d7038d6c30df38d3583fd6b7e86792204.jpg)
![YAMAHA DC5XE3 - Press [PART SELECT R] to record the right-hand part. - 3](/content/2026/06/1215703/images/a3a0aa6d8b6735b1a2bf95036bd829afa70cba8adf3890458a156d936426b1d9.jpg)
![YAMAHA DC5XE3 - Press [PART SELECT R] to record the right-hand part. - 4](/content/2026/06/1215703/images/ecb85c237e10c4abd0194427894b799cd6d928e9b41911bcc50907386f71f672.jpg)
Press [STOP] when you finish playing your song.
The following screen appears.
![YAMAHA DC5XE3 - Press [PART SELECT R] to record the right-hand part. - 5](/content/2026/06/1215703/images/f3c5be12439e9e897db1246fb0ff6ef30d0b656dc4f624bb263b91232ddcaa6c.jpg)
![YAMAHA DC5XE3 - Press [PART SELECT R] to record the right-hand part. - 6](/content/2026/06/1215703/images/0bfda90a543a31e51b1f900ad503a42000547487ece037fa8473a49aec1b8f85.jpg)
![YAMAHA DC5XE3 - Press [PART SELECT R] to record the right-hand part. - 7](/content/2026/06/1215703/images/4fc46befe0cbcb35f3f637fad25d21e98bc2fb285f2b73104d7755ea08ddcd34.jpg)
The following table gives a description of each of the options.
Option Description
| SAVE | The second part is saved with the first part under the current song number, overwriting the previously saved first part. |
| NEW | The second part is saved under a new song number. The first part is kept under the previous song number. |
| CANCEL | The second part is discarded. The first part is kept under the previous song number. |
![YAMAHA DC5XE3 - Press [PART SELECT R] to record the right-hand part. - 8](/content/2026/06/1215703/images/1a78eaf2d57a5f13b71145710f40ba4d32a18cb75fe6798860cf1e43bdb5e084.jpg)
Press [ ] and [ ] to select an option, then press [ENTER].
![YAMAHA DC5XE3 - Press [PART SELECT R] to record the right-hand part. - 9](/content/2026/06/1215703/images/34fcec8a127f81036b39cf4b889af41314b229af19d02180533bee6bc9360b98.jpg)
![YAMAHA DC5XE3 - Press [PART SELECT R] to record the right-hand part. - 10](/content/2026/06/1215703/images/7c9c28dc9a720e37aba3bb5c6b302dc58d8f43ce1b3e9a84cf30b1c1808d2653.jpg)
The right-hand part is saved as indicated or canceled.
Recording the Left and Right Parts Together (Setting a Split Point)
![YAMAHA DC5XE3 - Press [PART SELECT R] to record the right-hand part. - 11](/content/2026/06/1215703/images/69dc74976923b97889d84355b1ef55add275d3db028e3638a30efdeb35b2f0de.jpg)
[FUNC.]
4 Press [PART SELECT R] to set both parts to record.
The split point setting screen appears.
![YAMAHA DC5XE3 - Press [PART SELECT R] to set both parts to record. - 1](/content/2026/06/1215703/images/63cb3318647f3e423d5ec64c18298ede5e85e6356d22af80302ca980858c6853.jpg)
The above display shows that the default keyboard split point is note C3, or middle C. In this case, note C3 and notes below are saved as the left-hand part and notes above C3 are saved as the right-hand part, as shown in the following figure.
![YAMAHA DC5XE3 - Press [PART SELECT R] to set both parts to record. - 2](/content/2026/06/1215703/images/14983862776cd6eb66706d82a74269eecfce92c75dffc07bfa8f3efeb14c134c.jpg)
text_image
Left-hand part Right-hand part5 To change the split point, press a key on the keyboard or [+/YES] and [-/NO] to select a different key.
![YAMAHA DC5XE3 - To change the split point, press a key on the keyboard or [+/YES] and [-/NO] to select a different key. - 1](/content/2026/06/1215703/images/124806c8193780c9aa15d7f2db5fa5ec196abdb80cdddcb2efddb46262925721.jpg)
The split point can be set from note A-1 to note C7.
6 Press [PLAY].
Advanced Recording
![YAMAHA DC5XE3 - Press [PLAY]. - 1](/content/2026/06/1215703/images/15bb241e5c117cd56b507f189ba55e4c71ea8d517f8535bf83545fffb1cfb769.jpg)
![YAMAHA DC5XE3 - Press [PLAY]. - 2](/content/2026/06/1215703/images/1ef9f2683980c1c363e3bb339c802754400ae1e1610c00f2413f7db77caaec08.jpg)
Advanced Recording
Re-Recording One Part
[RECORD] Select the L/R song [PART SELECT L] or [PART SELECT R]
You can re-record the only one part left-hand or the right-hand of the existing L/R song.
1 Select a desired medium and album.
2 Press [RECORD].

3 Press [ ] and [ ] to select the L/R song that you want to re-record, then press [ENTER].
4 Press [PART SELECT L] or [PART SELECT R] to select the part to re-record.

The part set to "REC" will be re-recorded.
Q
To select a medium and album, see Chapter 3 "Basic Song Playback - Selecting Medium and Their Contents" on page 21.
The following table gives a description of each of the options.
| Option Description | |
| SAVE | The re-recorded part is saved with the other existing part under the current song number, overwriting the selected part. |
| NEW | The re-recorded part is saved under a new song number. The existing parts are kept under the current song number. |
| CANCEL | The re-recorded part is discarded. The existing parts are kept under the current song number. |
7 Press [] and [] to select an option, then press [ENTER].
The re-recorded part is saved as indicated or canceled.
Changing the Default Tempo
Select the song|HE [FUNC
This function allows you to change the default tempo of a song and save the change. It should not be confused with the playback tempo function described in Chapter 4 "Advanced Song Playback – Changing the
Playback Tempo ^® in which tempo changes are lost when the Disklavier is
Advanced Recording
Chapter


Advanced Recording

Press [ ] and [ ] to select the song in which you want to change the tempo, then press [ENTER].

Press [FUNC.] three times.

For measures and beats, the current song tempo (bpm) is shown.

For minutes and seconds, the current song tempo is shown as "000%."


Press [+/YES] and [-/NO] to change the tempo.

[+/YES] increases the tempo, and [-/NO] decreases the tempo. For measure and beats, the tempo range is from 30 bpm to 400 bpm.
Note:
You cannot change the heat setting on the prerecorded songs.
Advanced Recording
Chapter


Press [ ] and [ ] to select an option, then press [ENTER].

To change the tempo again or to reset the original tempo, repeat steps 1 to 6.
Video Synchronized Recording

The image contains no text or characters.
Connect a camcorder and a DVD recorder
TUP] "Audicial"
By recording a song played on the Disklavier synchronized with the video recording, later on, you can enjoy piano playback with the video. First set up the camcorder, the DVD recorder, and the Disklavier, and then start recording by following the procedures below.
■Setting for Video Synchronized Recording

Press [SETUP] on the remote control.
The setup menu screen appears.


[Unreadable]
For details on video synchronized playback, see Chapter 4 "Advanced Song Playback – Video Synchronized Playback" on page 43.

Advanced Recording

Select "OMNI IN" with the cursor buttons ([ ][ ]), then press [+/YES] and [-/NO] to change setting to "Auto Detect".
text_image
+/-YES -/-NO =Audiol/0= +- >OMNI IN=AutoDetect >OMNI IN Vol=100
Select "OMNI OUT" with the cursor buttons ([ ]), then press [+/YES] and [-/NO] to change setting to "SYNC".
text_image
+/-YES -/NO =AudioI/0= >OMNI OUT=SYNC >OMNI OUT Vol=M-Volume
Press [ENTER] to complete the operation.

Connect a camcorder and a DVD recorder to the control unit.
Camcorder
(for shooting)

DVD recorder (for recording and playback)
Note:
Confirm the shape of input/output connectors on the camcorder and the DVD recorder, and prepare the cables fit to them.
Advanced Recording
Chapter

■Starting Video Synchronized Recording
1 Select a destination medium and album.
2 Press [RECORD].
The video synchronized recording standby screen appears, and [RECORD] on the control unit lights red, and [PLAY/PAUSE] flashed in green.

3 Set the camcorder to video shooting mode.
4 Select the video input on the DVD recorder which the camcorder is connected to, then start recording on the DVD recorder.
5 Press [PLAY].
[PLAY/PAUSE] stops flashing, and the counter starts to advance.

=Memory=(SYNC) SO LR 99%

■Using the Camcorder only
If your camcorder has both mic input and audio output, you can perform video synchronized recording using the camcorder only.
- Set the Disklavier following the procedures 1 to 5 on page 61.
- Connect a camcorder to the control unit.
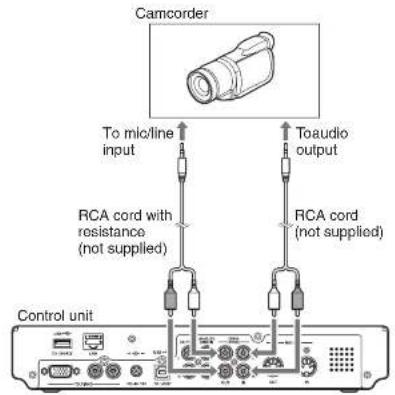
text_image
Camcorder To micro/line input RCA cord with resistance (not supplied) RCA cord (not supplied) To audio output Control unit- Select a destination medium and album.
- Press [RECORD].
- Start recording on the camcorder.
- Press [PLAY].
Advanced Recording
Chapter

CD Synchronized Recording
Insert an audio CD [RECORD]
You can record a Disklavier piano performance along with the playback of songs on commercial CDs.
1 Select a destination medium and album, then song in the selected album.
2 Insert an audio CD and select the song that you want to synchronize with.
3 Press [RECORD].
The SPS recording standby screen appears, and [RECORD] on the control unit lights red, and [PLAY/PAUSE] flashes in green.

4 Select the desired part of a song, then press [PLAY] to start synchronizing.

Recording begins with the CD playback.
Note:
The Disklavier recognizes the destination album by selecting the song in it. Note that the selected song is not overwritten by this procedure.
十
To select a medium and album, see Chapter 3 "Basic Song Playback - Selecting Medium and Their Contents" on page 21.

Media Management
This chapter describes how to manage contents inside the media, such as managing albums, songs and playlists.
Managing Albums

[FUNC.] drum selection screen
You can use the album function menu for creating, deleting and copying albums inside a medium.

Press [FUNC.] in the album selection screen.
The album function menu screen appears.


Select a desired function with the cursor buttons ([ ] [ ] [ ], then press [ENTER].

The following functions are available:
- CopyAlbum
5.1.32
C
To select a album, see Chapter 3 "Basic Song Playback - Selecting Medium and Their Contents" on page 21.
Note:
Available functions vary depending on the medium you selected.
2
About playlists, see Chapter 8 "Media Management – Managing Playlists" on page 80.

Select "CopyAlbum" in the album function menu, then press [ENTER].

The CopyAlbum screen appears.


Select a destination medium with [+/YES] and [-/NO].


To copy to the new album, press [ENTER].
"OK?" flashes in the first line of the screen.

Media Management
Chapter


Media Management

Press [+/YES] to make a copy, [-/NO] to cancel.

After a while, the completion message appears.
Press any button to return to the album selection screen.
Deleting Albums


"DeleteAlbum"
VNC. Album selection screen
You can delete the albums.
This function is available for albums on [Memory], [USB1], [USB2] and [FromToPC].

Select "DeleteAlbum" in the album function menu, then press [ENTER].
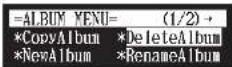
The DeleteAlbum screen appears.

→

Media Management
Chapter

Creating a New Album

You can create a new album into the selected medium.
This function is available for albums on [Memory], [USB1] and [USB2].
1 Select the "NewAlbum" in the album function menu, then press [ENTER].
![YAMAHA DC5XE3 - Select the "NewAlbum" in the album function menu, then press [ENTER]. - 1](/content/2026/06/1215703/images/f29e44bb6ccea02121458b3e6abac23cb6f1dc11a880da087bbb47e38083deee.jpg)
The NewAlbum screen appears.
![YAMAHA DC5XE3 - Select the "NewAlbum" in the album function menu, then press [ENTER]. - 2](/content/2026/06/1215703/images/34624372ea62e2f9607a1c4a55a442bbc846150a15727f3cbc751b979e37a591.jpg)
2 Press [ENTER].
The album title editing screen appears.
![YAMAHA DC5XE3 - Press [ENTER]. - 1](/content/2026/06/1215703/images/c0e21c46588488f7ecf1ac7d1af9fe94caccc0815c96be8a5c024980d2834267.jpg)
Note:
Up to 99 albums can be created in a medium.
Note:
If you enter the same title as the album already exists, the new album is titled in the form of "album title xx" ("xx" indicates the number).


Press [+/YES] to create a new album, [-/NO] to cancel.

After a while, the completion message appears. Press any button to return to the album selection screen.
Renaming an Album

You can rename the albums which already named. This function is available only for albums on [Memory].

Select "RenameAlbum" in the album function menu, then press [ENTER].

The RenameAlbum screen appears.


Press [ENTER].

Press [ENTER].
"OK?" flashes in the first line of the screen.

=RenameAlbum=OK? YES/NO
01: Jazz Selection

Press [+/YES] to rename, [-/NO] to cancel.


After a while, the completion message appears.
Press any button to return the album selection screen.
Rearranging the Order of Albums

"SortAlbum" UNC.) Album selection screen
You can rearrange the order of albums that you selected.
This function is available only for albums on [Memory].

Select "SortAlbum" in the album function menu, then press [ENTER].

Media Management
Chapter

English

Media Management

Press [ENTER].
"OK?" flashes in the first line of the screen.


=SortAlbum= OK? YES/NO 08:Mike Garson Trio-Live 06:Favorite Latin Select

Press [+/YES] to rearrange, [-/NO] to cancel.


=SortAlbum= ANY Completed. Press any button.
After a while, the completion message appears. Press any button to return to the album selection screen.
Managing Songs


ing selection screen
You can use the song function menu for managing the copy or the deletion songs inside the album.

Press [FUNC.] in the song selection screen.
The song function menu screen appears.
①
To select the song, see Chapter 3 "Basic Song Playback – Selecting Medium and Their Contents" on page 21.
Media Management

Making Copies of Songs

You can copy songs stored on an album to another.
This function is available for song in the album on [Memory], CD, [USB1], [USB2] and [FromToPC].
1 Select "CopySong" in the song function menu, then press [ENTER].
![YAMAHA DC5XE3 - Select "CopySong" in the song function menu, then press [ENTER]. - 1](/content/2026/06/1215703/images/4ffcccee102d824c1c09ca040bd00926d94ea210c61db6d76e16bafb280efec9.jpg)
The CopySong screen appears.
![YAMAHA DC5XE3 - Select "CopySong" in the song function menu, then press [ENTER]. - 2](/content/2026/06/1215703/images/d0cea334b096197cb4bffaeb6233dee74b37a5fdae3c807c0fb45feaad83ff67.jpg)
2 Select a destination medium with [+/YES] and [-/NO].
![YAMAHA DC5XE3 - Select a destination medium with [+/YES] and [-/NO]. - 1](/content/2026/06/1215703/images/e9e46bad117a5d142a9ae31659500f08ed009b8acfa56914006693ab48ca868f.jpg)
Note:
Copy-protected songs, such as
PianoSoft songs, cannot be copied to a removable medium.
Note:
Up to 999 songs can be saved in an album.


Press [+/YES] to make a copy, [-/NO] to cancel.

After a while, the completion message appears.
Press any button to return to the song selection screen.
Deleting Songs

You can delete songs stored on an album.
This function is available for songs in the album on [Memory], [USB1], [USB2], [Playlist] and [FromToPC].

Select "DeleteSong" in the song function menu, then press [ENTER].

The DeleteSong screen appears.

Media Management

Renaming a Song

You can rename the songs which already named.
This function is available for songs in the album on [Memory], [USB1], [USB2] and [FromToPC].
1 Select "RenameSong" in the song function menu, then press [ENTER].
![YAMAHA DC5XE3 - Select "RenameSong" in the song function menu, then press [ENTER]. - 1](/content/2026/06/1215703/images/1a9f37d0d0254626ef89bfdaac0c01f4cf1fcc743ba232efc8a3c409bf4e7de1.jpg)
The RenameSong screen appears.
![YAMAHA DC5XE3 - Select "RenameSong" in the song function menu, then press [ENTER]. - 2](/content/2026/06/1215703/images/12c5902cb1f73ec84b23d78ff71423a8545b83bb9efe69ef95346b22432f2150.jpg)
2 Press [ENTER].
The song title editing screen appears.
![YAMAHA DC5XE3 - Press [ENTER]. - 1](/content/2026/06/1215703/images/45f414ef9fe72df9ffdf8b446db28c19ac03596846dd010e55abcaaeea094030.jpg)
![YAMAHA DC5XE3 - Press [ENTER]. - 2](/content/2026/06/1215703/images/90d15640d08c403821ee4b6acd2076df65284981120437ed9e8b41ae1c21b7e6.jpg)
![YAMAHA DC5XE3 - Press [ENTER]. - 3](/content/2026/06/1215703/images/c0cc68a9f595022d51fd1dcc19717d84bae8db91dded0e52f759da26fb2d2f9a.jpg)
Press [+/YES] to rename, [-/NO] to cancel.
![YAMAHA DC5XE3 - Press [ENTER]. - 4](/content/2026/06/1215703/images/71c3cbda715927ec1504f1e8eabfeec91a21d15c47f548dbc3c459345b35eb1f.jpg)
After a while, the completion message appears.
Press any button to return to the song selection screen.
Rearranging the Order of Songs

You can rearrange the order of songs in an album.
This function is available only for songs in the album on [Memory] and [Playlist].

Select "SortSong" in the song function menu, then press [ENTER].

The SortSong screen appears.


Press [ENTER].
"OK?" flashes in the first line of the screen.

=SortSong= OK? YES/NO
008:Interaction
006:Toccata and Fusue

Press [+/YES] to rearrange, [-/NO] to cancel.


After a while, the completion message appears.
Press any button to return to the song selection screen.
Converting Song Format

[FUNC.]Sc

The song format can be converted to other format.
This function is available for songs in the album on [Memory], [USB1], [USB2] and [FromToPC].

Select "ConvertSong" in the song function menu, then press [ENTER].
Media Management
Chapter


Note:
The converted song will be newly added to the end of the album.

Press [+ / YES] and [- / NO] to select a song format.

This following options are available:
Option Song Format
| E-SEQ | E-SEQ format |
| SMF0 | SMF (Standard MIDI File) format 0 |
| SMF1 | SMF (Standard MIDI File) format 1 |
| Piano1 | E-SEQ format to play on all Disklavier in correct tempo |

Press [ENTER].
"OK?" flashes in the first line of the screen.


Press [+/YES] to convert, [-/NO] to cancel.

1 Select "Counter" in the song function menu, then press [ENTER].
![YAMAHA DC5XE3 - Select "Counter" in the song function menu, then press [ENTER]. - 1](/content/2026/06/1215703/images/750799a2b7135fd5aa3c96206aecd3fd5414782d11e5e8983a33bb068d39a2d2.jpg)
The CounterChange screen appears.
![YAMAHA DC5XE3 - Select "Counter" in the song function menu, then press [ENTER]. - 2](/content/2026/06/1215703/images/2592b50b8b33ddca998f218666ba8bace36154c880909f36de48c4b10c4d5c19.jpg)
=CounterChange= ENT 001:Songs For Students TIME →METRONOMETRONOME
TIME: minutes and seconds display METRONOME: measures and beats display
2 Press [ENTER].
"OK?" flashes in the first line of the screen.
![YAMAHA DC5XE3 - Press [ENTER]. - 1](/content/2026/06/1215703/images/8fcdd5d5d84f75e56f17de1327125ff9c67d2a0b16f695f983fd33cefe55ccdb.jpg)
=CounterChange=OK?YES/NO 001:Songs For Students TIME >METRONOME
3 Press [+/YES] to change, [-/NO] to cancel.
![YAMAHA DC5XE3 - Press [+/YES] to change, [-/NO] to cancel. - 1](/content/2026/06/1215703/images/a0a6afb5cf016ba14073daeffa0a3751f8970d3af2cbdfe770c9a86ab688e837.jpg)
![YAMAHA DC5XE3 - Press [+/YES] to change, [-/NO] to cancel. - 2](/content/2026/06/1215703/images/e1e6525e4480e4746a92a322f3c91d7f28518e1414d2d02a4e8463032d269cf1.jpg)
Media Management
![YAMAHA DC5XE3 - Press [+/YES] to change, [-/NO] to cancel. - 3](/content/2026/06/1215703/images/c062de628a77a6162a7a194a325d5ab40cd3de2a6849d8183c3a07ae2e80a809.jpg)
![YAMAHA DC5XE3 - Press [+/YES] to change, [-/NO] to cancel. - 4](/content/2026/06/1215703/images/377ed2554547fb93bb2fca49eaca8f864ba2303485897c73f5ef104806f6a28d.jpg)
1 Select "Strip XP" in the song function menu, then press [ENTER].
![YAMAHA DC5XE3 - Press [+/YES] to change, [-/NO] to cancel. - 5](/content/2026/06/1215703/images/d0d9c5ebc6c55e583f6f5fd9039fd4c15587996e139b3bd1a18593e89e20cca9.jpg)
The Strip XP screen appears.
![YAMAHA DC5XE3 - Press [+/YES] to change, [-/NO] to cancel. - 6](/content/2026/06/1215703/images/b3af13681e2bcec3da7cbd92602442ae37b5e470ec6d7b1aac055349f9307cb2.jpg)
2 Press [ENTER].
"OK?" flashes in the first line of the screen.
![YAMAHA DC5XE3 - Press [+/YES] to change, [-/NO] to cancel. - 7](/content/2026/06/1215703/images/7e5a5a8d74f2fd3f03800884a47f3fb7be48cefc858704851b09d3049bcc5569.jpg)
3 Press [+/YES] to execute, [-/NO] to cancel.
![YAMAHA DC5XE3 - Press [+/YES] to change, [-/NO] to cancel. - 8](/content/2026/06/1215703/images/c250c765774d50d225eb46a02992e7e53a92541ddb610d87277c11b856aa5843.jpg)
After a while, the completion message appears.
Media Management
Chapter

Adding Songs/Albums to the Playlist

This function is available only for songs/albums on [Memory].
1 Select "AddToPList" in the album or song function menu, then press [ENTER].
![YAMAHA DC5XE3 - Select "AddToPList" in the album or song function menu, then press [ENTER]. - 1](/content/2026/06/1215703/images/047db4914593f1b2a9b73f9b841b05cc58a3003798bb40e8aa26a1cb5c963ec6.jpg)
The AddToPList screen appears.
![YAMAHA DC5XE3 - Select "AddToPList" in the album or song function menu, then press [ENTER]. - 2](/content/2026/06/1215703/images/472ab546381dc6325f6a3ba5cfdb5a9518172f09890b4b4c14dcb0e3ebac0de3.jpg)
2 Select a destination playlist with [+/YES] and [-/NO].
![YAMAHA DC5XE3 - Select a destination playlist with [+/YES] and [-/NO]. - 1](/content/2026/06/1215703/images/f88fc3c596a66160b4210689bc2966480c2bc90c282782c5f52c99e1fd36ac09.jpg)
3 Press [ENTER].
Note:
Up to 999 songs can be added to a playlist.
Note:
You cannot add songs on media other than [Memory] directly to the playlist. First copy songs to the internal flash memory.
Note:
If "New Playlist" is selected in step 2, the title of added album is copied to that playlist.
Note:
If you select "New Playlist" and add songs to it, the playlist is titled as "My Playlist."
Note:
The new playlist created in this procedure can be selected from "Playlist" in the media selection screen.

Chapter
8
Media Management
Deleting a Playlist
Media selection screen "Playlist" Album selection screen [FUNC.] "DeleteList"
You can delete the playlists which already registered.

Select "DeleteList" in the album function menu for the playlist, then press [ENTER].

The DeleteList screen appears.

时
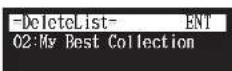

Press [ENTER].
"OK?" flashes in the first line of the screen.

[Unreadable]
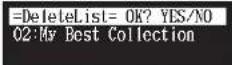

Brace [ : IVES] to delete the playlist [ /NO] to cancel
Note:
Even if you delete the playlist, songs or albums added to that playlist remain in the internal flash memory.
Media Management
Chapter

Creating a New Playlist
Media selection screen "Playlist" Album selection screen [FUNC] "NewList"
You can create a new playlist for playing back your favorite songs in your selected order.
1 Select "NewList" in the album function menu for the playlist, then press [ENTER].
![YAMAHA DC5XE3 - Select "NewList" in the album function menu for the playlist, then press [ENTER]. - 1](/content/2026/06/1215703/images/4f11275a1dccb1ef0c5b450ffe963bbe7328d9e7812f9a4d506adc7abf39a361.jpg)
The NewList screen appears.
![YAMAHA DC5XE3 - Select "NewList" in the album function menu for the playlist, then press [ENTER]. - 2](/content/2026/06/1215703/images/dd624a4677fd7d8cda08daf25da22c2eb28bfb42930e28124a3a5b00fcad3136.jpg)
2 Press [ENTER].
The playlist title editing screen appears.
![YAMAHA DC5XE3 - Press [ENTER]. - 1](/content/2026/06/1215703/images/6eef8b9167551c9edec97f75588d3dac7cef6b11bc2fc3217815e4c075e2e07b.jpg)
Note:
Up to 99 playlists can be created.
Note:
If you enter the same title as the playlist already exists, the new playlist is titled in the form of "playlist title [xx]" ("xx" indicates the number).

Media Management

Press [+/YES] to create a new playlist, [-/NO] to cancel.

After a while, the completion message appears.
Press any button to return to the album selection screen for the playlist.
Note:
The new playlist created in this procedure can be selected from "Playlist" in the media selection screen.
Renaming a Playlist

You can rename a playlist which already registered.

Select "RenameList" in the album function menu for the playlist, then press [ENTER].

The RenameList screen appears.


4 Press [ENTER].
"OK?" flashes in the first line of the screen.
![YAMAHA DC5XE3 - Press [ENTER]. - 1](/content/2026/06/1215703/images/d5907abe3fb9a13e2b0ff0d26cb93e53a16c4c0947924adab9b151fdb9c50a24.jpg)
=RenameList= OK? YES/NO My Best Hit Collection
5 Press [+/YES] to rename, [-/NO] to cancel.
![YAMAHA DC5XE3 - Press [+/YES] to rename, [-/NO] to cancel. - 1](/content/2026/06/1215703/images/1f77ba8e53328516e03462c70b54e7fb65820d0fa074a674fd074d399db875d4.jpg)
![YAMAHA DC5XE3 - Press [+/YES] to rename, [-/NO] to cancel. - 2](/content/2026/06/1215703/images/64022e35766010f13296eba352de6e75441ffbea71be675ac252bc8703cea22d.jpg)
After a while, the completion message appears. Press any button to return to the album selection screen for the playlist.
Managing Media
[FUNC.]
dia selection screen
You can use the media function menu for copying or deleting entire contents inside the media.
1 Press [FUNC.] in the media selection screen.
Media Management
Chapter
![YAMAHA DC5XE3 - Press [FUNC.] in the media selection screen. - 1](/content/2026/06/1215703/images/45595d38a3dba3d4f7551f92b35c5900cffaa5ccafa708a2dc196a746f4d45ad.jpg)
![YAMAHA DC5XE3 - Press [FUNC.] in the media selection screen. - 2](/content/2026/06/1215703/images/3cde18375f3f380ba6c98e4cd28bef6e6cf12c4c1e3d33d6fcee54bf634a8ff4.jpg)
To select a media, see Chapter 3 "Basic Song Playback – Selecting Medium and Their Contents" on page 21.
Chapter
8
Media Management
Making Copies of the Entire Contents in a Medium

You can copy the entire contents in a medium to the another medium. The function is available for [Memory], CD, [USB1], [USB2] and [FromToPC].
1 Select "CopyAll" in the media function menu, then press [ENTER].
![YAMAHA DC5XE3 - Select "CopyAll" in the media function menu, then press [ENTER]. - 1](/content/2026/06/1215703/images/45a9b329da38fa6ab22b67a364735f9bdd53c5aded76853d39ce3e989a0b325a.jpg)
The CopyAll screen appears.
![YAMAHA DC5XE3 - Select "CopyAll" in the media function menu, then press [ENTER]. - 2](/content/2026/06/1215703/images/763639dac161241a853aae6f12baf447f0c96f1c947032bf94b462b8291598f6.jpg)
2 Select a destination medium with [+/YES] and [-/NO].
![YAMAHA DC5XE3 - Select a destination medium with [+/YES] and [-/NO]. - 1](/content/2026/06/1215703/images/95e1e6a3dd7fa51bcd9d8454ede666e94c8711e6138daf0e5bbcf8bf9462ee39.jpg)
①
To select a medium, see Chapter 3 "Basic Song Playback – Selecting Medium and Their Contents" on page 21.
Note:
Confirm that the destination medium has enough space to store the contents.
Media Management
![YAMAHA DC5XE3 - Select a destination medium with [+/YES] and [-/NO]. - 2](/content/2026/06/1215703/images/9d3ccd3426bb05fdcda49269212c026e44645843cbbc6d2dbd9d10dc607b5fcc.jpg)
Deleting the Entire Contents in a Medium

You can delete the entire contents in a medium.
This function is available for [Memory], [USB1], [USB2] and [FromToPC].
1 Select "DeleteAll" in the media function menu, then press [ENTER].
![YAMAHA DC5XE3 - Select "DeleteAll" in the media function menu, then press [ENTER]. - 1](/content/2026/06/1215703/images/4f54c13447b2a380907d62b489c7ba0a0989de1b17dba3f64cc7d281a3230ba1.jpg)
The DeleteAll screen appears.
![YAMAHA DC5XE3 - Select "DeleteAll" in the media function menu, then press [ENTER]. - 2](/content/2026/06/1215703/images/ba16ceaec483ec195beffae273c0c2c8b9c05ad0f632db23668f24c9b6ab863f.jpg)
2 Press [ENTER].
"OK?" flashes in the first line of the screen.
![YAMAHA DC5XE3 - Press [ENTER]. - 1](/content/2026/06/1215703/images/9c3f1f514779264d5d0a5440f4885f7c9a1ecab43632fe2fa4fd9571eab4468a.jpg)
[Unreadable]
To select a medium, see Chapter 3
"Basic Song Playback – Selecting
Medium and Their Contents" on
page 21.
![YAMAHA DC5XE3 - Press [ENTER]. - 2](/content/2026/06/1215703/images/a9ff4803277236ac37f0f53ebb163bf3e1eccd541ea038a4bd5fb0533d7ee795.jpg)
Copying Song File from a Personal Computer to the Disklavier
You can copy song files from a Windows or Macintosh computer to a special folder on the Disklavier called [FromToPC] and then play them on the Disklavier.

Connect the control unit to a LAN (local area network) to which a personal computer with a song file is also connected.
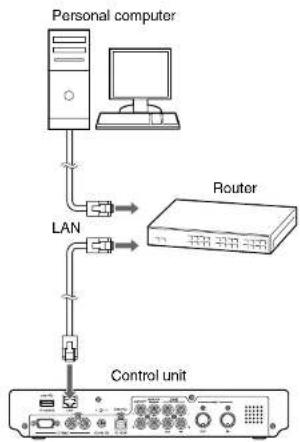
flowchart
graph TD
    A["Personal computer"] --> B["Router"]
    B --> C["LAN"]
    C --> D["Control unit"]
Note:
Copy-protected files, such as PianoSoft and PianoSoft-Plus songs, cannot be copied to the [FromToPC] folder.
Note:
Do not copy the files other than Disklavier song files.
Note:
Do not access the [FromToPC] folder while the Disklavier is engaged in another operation (such as file copying or deleting).
Note:
It is necessary to configure the Disklavier properly for network communications by enabling it to get a DHCP IP address automatically (recommended) or by assigning an appropriate address manually. The procedure is the same as the one used for setting up the Disklavier for Internet communications. Please follow the instructions in Chapter 9 "Internet Direct Connection (IDC)—Setting the Disklavier for the Internet Connection" on page 103.
Note:
Use an STP (shielded twisted pair) cable for connection. For details, see Chapter 9 "Internet Direct Connection (IDC) - Connecting the Disklavier to the Internet" on
Media Management
Chapter

■For Windows
2 On the computer screen, click [Start] and then select [My Network Places].
The [My Network Places] window appears. Confirm that the [Dkv^****] icon is shown in the [My Network Places] window.
3 Double-click the [Dkv*****] icon.
The [Dkv*****] folder opens. Confirm that the [FromToPC] icon is shown in the [Dkv*****] folder.
4 Double-click the [FromToPC] icon.
The [FromToPC] folder opens.
5 Copy the desired song files to the [FromToPC] folder.
6 Refresh the contents in the folder.
■For Windows: In case that you cannot find the [Dkv*****] icon
-
Press [SETUP] on the remote control.
-
Select "Network" in the setup menu screen.
Note:
[Div*****] differs depending on each Disklavier.
Note:
The folder or icon name differs depending on the version of your operating system.
[Unreadable]
See Chapter 8 "Media Management
- Refreshing the Contents in
[FromToPC]" on page 92.


Click the [Finder] icon in the dock, and then click the [Network] icon in the left side of the window.
The [Network] window appears. Confirm that the [Dkv] Icon is shown in the [Network] window.

Click the [Dkv] icon.
The [Dkv] folder opens. Confirm that the [Dkv*****] icon is shown in the [Dkv] folder.

Click the [Dkv*****] icon.

In the first dialog that appears, select [FromToPC] from the mini-menu and click [OK].

Click [OK] again in the next dialog that appears.
Connection process completes and the [FromToPC] icon appears in the left side of the window.

Click the [FromToPC] icon.
The [FromToPC] folder opens.
Media Management
Chapter

■For Mac OS X 10.5 or 10.6

Click the [Finder] icon in the dock, and then select [Go] and then [Network] from the menu bar.
The [Network] window appears. Confirm that the [Dkv*****] icon is shown in the [Network] window.

Click the [Dkv*****] icon.
The [Dkv*****] folder opens. Confirm that the [FromToPC] icon is shown in the [Dkv*****] folder.

Click the [FromToPC] icon.
The [FromToPC] folder opens.

Copy the desired song files to the [FromToPC] folder.

Refresh the contents in the folder.
■For Macintosh: In case that you cannot find the [Dkv\*\*\*\*\*] icon
- Press [SETUP] on the remote control.
Note:
[Div*****] differs depending on each Disklavier.
Note:
If the user ID and password are required during the process, enter any name for the ID and leave the space for the password blank.
[Unreadable]
See Chapter 8 "Media Management - Refreshing the Contents in [FromToPC]" on page 92.

Refreshing the Contents in [FromToPC]
![YAMAHA DC5XE3 - Refreshing the Contents in [FromToPC] - 1](/content/2026/06/1215703/images/a69cda801d1c83a481a3c3bdd5bf969c257bd5fd8bfdf185ca284012344266ec.jpg)
You must refresh the contents in the [FromToPC] folder after copying song files from a personal computer, in order to play them on the Disklavier.
1 Select "Refresh" in the media function menu, then press [ENTER].
![YAMAHA DC5XE3 - Select "Refresh" in the media function menu, then press [ENTER]. - 1](/content/2026/06/1215703/images/93aff90c215f0ff986c0e96414d1073692384e88c89c847f1c086d90224408b5.jpg)
The Refresh screen appears.
![YAMAHA DC5XE3 - Select "Refresh" in the media function menu, then press [ENTER]. - 2](/content/2026/06/1215703/images/e2834a4d0074e223e50899c24fb856d0bd7fc5607a1e6edcb2cb439b459668bb.jpg)
2 Press [ENTER].
"OK?" flashes in the first line of the screen.
![YAMAHA DC5XE3 - Press [ENTER]. - 1](/content/2026/06/1215703/images/df068144f743473929f4af3c1459c1ba338e5e7b9267029045d2ea198813774a.jpg)
Press [+/YES] to refresh [-/NO] to cancel
①
To select a medium, see Chapter 3 "Basic Song Playback – Selecting Medium and Their Contents" on page 21.
Media Management
Chapter

Formatting the Floppy Disk (Optional)

In the case of using the unformatted floppy disk on the floppy drive (optional) or deleting the entire contents on the floppy disk, format the floppy disk.
1 Connect the floppy drive (optional) to the USB port on the control unit.
2 Insert a floppy disk to the floppy drive.
3 Select "Format" in the media function menu, then press [ENTER].

The Format screen appears.

Important:
Formatting a floppy disk erases all data that stored in the disk, so make sure that the disk you are going to format does not contain the data you want to keep.
F
To select a medium, see Chapter 3 "Basic Song Playback - Selecting Medium and Their Contents" on page 21.
Note:
If you are formatting a floppy disk, make sure that the floppy disk's erasure protection tab is set to "unprotected."

D. [FUTER]
Media Management
■Floppy Disk Accidental Erasure Protection
Floppy disks have an erasure protection tab located on the reverse side of the disk in the bottom right-hand corner. When formatting a disk, make sure that its erasure protection tab is set to "unprotected."
Protected

When the tab window is open, formatting and recording are not possible.
Unprotected

When the tab window is closed, formatting and recording are possible.
Making Backups of Songs
3 Select "Backup" with the cursor buttons ( [ ] [ ] [ ], then press [ENTER].
![YAMAHA DC5XE3 - Select "Backup" with the cursor buttons ( [ ] [ ] [ ], then press [ENTER]. - 1](/content/2026/06/1215703/images/02ef3f893372d7ef9d4a15fd9fe594d7c148a2778aeb03698a1e0d1a313ee553.jpg)
The Backup screen appears.
![YAMAHA DC5XE3 - Select "Backup" with the cursor buttons ( [ ] [ ] [ ], then press [ENTER]. - 2](/content/2026/06/1215703/images/9485fccb3a92e1656e11ee8f419cf8312f8ae4399dae7a00fc01b07b1d6e57d9.jpg)
4 Press [ENTER].
"OK?" flashes in the first line of the screen.
![YAMAHA DC5XE3 - Press [ENTER]. - 1](/content/2026/06/1215703/images/21dae827f2818ca76eb7bcbf54546d10a22beb741f3d42b1e1b95ebe093412da.jpg)
5 Press [+/YES] to make a backup, [-/NO] to cancel.
![YAMAHA DC5XE3 - Press [+/YES] to make a backup, [-/NO] to cancel. - 1](/content/2026/06/1215703/images/69602011433018d83ea23220f55723e2a4cbb328b7ad50e9f056d0886acf2d7b.jpg)
After a while, the completion message appears.
Media Management
![YAMAHA DC5XE3 - Press [+/YES] to make a backup, [-/NO] to cancel. - 2](/content/2026/06/1215703/images/816bac0139facc4eba9d7624acb8966ae232eed6ffc725d0b029c4e0dc855d53.jpg)
![YAMAHA DC5XE3 - Press [+/YES] to make a backup, [-/NO] to cancel. - 3](/content/2026/06/1215703/images/82a8b8d1346eefc385837b475335b5218e1cd9a3f6f934e41823dd7d2b7e2f39.jpg)
![YAMAHA DC5XE3 - Press [+/YES] to make a backup, [-/NO] to cancel. - 4](/content/2026/06/1215703/images/fe73f46d7d005ca5ea40405839e559acdd214959de92c071eaa8dad327f1a8d0.jpg)
Select "Restore" with the cursor buttons ([ ] [ ] [ ], then press [ENTER].
![YAMAHA DC5XE3 - Press [+/YES] to make a backup, [-/NO] to cancel. - 5](/content/2026/06/1215703/images/780227cf3bc191b3980a6dd90f410411f12ef1d98ef528df2facec240e12afc3.jpg)
![YAMAHA DC5XE3 - Press [+/YES] to make a backup, [-/NO] to cancel. - 6](/content/2026/06/1215703/images/191e62d1f59487cd26a337655ea0b5d50299dc7aaf7a6f98554a2dd9526ae9f7.jpg)
![YAMAHA DC5XE3 - Press [+/YES] to make a backup, [-/NO] to cancel. - 7](/content/2026/06/1215703/images/69ee2a8c61d78d74decf1ab5e926b06a375bd543e533c484042faf2b4598e015.jpg)
The Restore screen appears.
![YAMAHA DC5XE3 - Press [+/YES] to make a backup, [-/NO] to cancel. - 8](/content/2026/06/1215703/images/c060cac6f9d6161f6af74e084d30bf0ed0f94a99d9447a274d79807b69b4f34c.jpg)
![YAMAHA DC5XE3 - Press [+/YES] to make a backup, [-/NO] to cancel. - 9](/content/2026/06/1215703/images/46e737e9c3bd7cc6e76603cddcdea40da1ab82eec2ab17dca027e249878ac95c.jpg)
![YAMAHA DC5XE3 - Press [+/YES] to make a backup, [-/NO] to cancel. - 10](/content/2026/06/1215703/images/d115439607f665f7329eb27696b749fc6ee97bfe0fd2aa403ef9b7e67a67e1a7.jpg)
![YAMAHA DC5XE3 - Press [+/YES] to make a backup, [-/NO] to cancel. - 11](/content/2026/06/1215703/images/c81b89150726dd0127e37258468f68950f389eb7463122358ca96d2d8acfa2cc.jpg)
Press [ENTER].
"OK?" flashes in the first line of the screen.
![YAMAHA DC5XE3 - Press [+/YES] to make a backup, [-/NO] to cancel. - 12](/content/2026/06/1215703/images/aba236a8a60cc3502d643a41620d05f5ef4993d5f939cf5159815d1e88eb2728.jpg)
![YAMAHA DC5XE3 - Press [+/YES] to make a backup, [-/NO] to cancel. - 13](/content/2026/06/1215703/images/86c2606296bd268b5f85440a55cc9c145d2a58fa22f0f3d1da43a2ee0c6bc31d.jpg)
![YAMAHA DC5XE3 - Press [+/YES] to make a backup, [-/NO] to cancel. - 14](/content/2026/06/1215703/images/a98ab4506016facc3a16d61a17955d073a7da4571668a9d960ceb4801b1fe3ab.jpg)
![YAMAHA DC5XE3 - Press [+/YES] to make a backup, [-/NO] to cancel. - 15](/content/2026/06/1215703/images/d1172c16358f8a8eee083f110f9db451cffa892d202f9090c278cbe729d85753.jpg)
Press [+/YES] to restore, [-/NO] to cancel.
![YAMAHA DC5XE3 - Press [+/YES] to make a backup, [-/NO] to cancel. - 16](/content/2026/06/1215703/images/645578c824a91696c66f813ba3d92d9da2d79bccc51d0edcb1ace509d88fbd27.jpg)
![YAMAHA DC5XE3 - Press [+/YES] to make a backup, [-/NO] to cancel. - 17](/content/2026/06/1215703/images/dfb928e6dcdddf183c0b09e49dec34ab516fd4912a2de8c9f28807765bb04f81.jpg)
![YAMAHA DC5XE3 - Press [+/YES] to make a backup, [-/NO] to cancel. - 18](/content/2026/06/1215703/images/965dfb4c97d6ae7689374f47858e07bcfa73ffc63b90a529a07bee2f8e4c889c.jpg)
![YAMAHA DC5XE3 - Press [+/YES] to make a backup, [-/NO] to cancel. - 19](/content/2026/06/1215703/images/98b4d26fb67f601a425cabd4cce0dc29e068e477ad847b3cdd50ec5d097b0e18.jpg)
Internet Direct Connection (IDC)
By connecting to the Internet, you can enjoy a streaming broadcast or download update programs directly.
What is Internet Direct Connection (IDC)?
Internet Direct Connection (IDC) is a feature that allows you to connect your Disklavier directly to the Internet. Internet Direct Connection users are able to listen to a streaming broadcast (DisklavierRadio), and receive valuable information such as product updates. Your Disklavier can be upgraded remotely as new technologies and services are developed through the IDC service.
Obtaining an ID and Password for the IDC Service (IDC Registration)
To use the IDC service, initial registration is required using an Internet-connected computer.
Please register at the following website:
https://member.yamaha.com/myproduct/regist/
Once you have an IDC account, you will interact with that account using the remote control. To use the full IDC service, you are required to enter your registered ID (e-mail address) and password with the remote control.
Note:
If you have already registered for the IDC service with any other instrument (such as the Clavinova), you do not need to register again. You can use your ID and password obtained through that registration.
Note:
Some IDC service functions do not require an ID and password.
Connecting the Disclosure to the Internet

Internet Direct Connection (IDC)
■Connecting the Control Unit to the Internet
Connection example 1:
Using a modem with router function
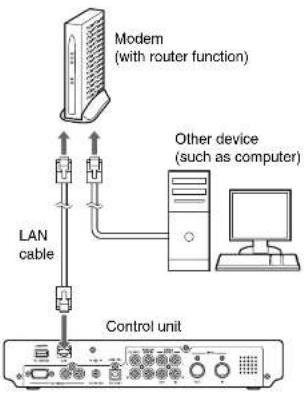
text_image
Modem (with router function) LAN cable Other device (such as computer) Control unitConnection example 2:
Using a modem without router function

Note:
Depending on the contract with your Internet provider, you may not be able to connect two or more devices (for example, a computer and the Disklavier) to the Internet. Please check your contract or contact your Internet provider for further information.
Note:
Some types of modems (such as ADSI, modems or cable modems) have multiple ports for connecting two or more devices (such as computer, musical instrument, etc.). If your modems have only one port, an optional router or hub is required in order to connect several devices simultaneously.
Note:
Use an STP (shielded twisted pair) cable for connection.
Internet Direct Connection (IDC)
For further information on the Internet connection (only a wired LAN connection is supported), visit the Yamaha Disklavier website:
http://services.music.yamaha.com/radio/
■Notes on Network Security
The Disklavier E3 Classic attempts to achieve a balance between security and usability in its network implementation. However, a determined hacker may be able to defeat these security measures and utilize the network of the purchaser in an unauthorized manner. Since each network is different, only the purchaser can determine whether the security measures discussed here will adequately protect their network.
The purchaser acknowledges that connection to the Internet and use of the Disklavier E3 Classic Internet features is done at the risk of the purchaser. In no event shall Yamaha, its subsidiaries or Yamaha's and/or its subsidiaries' directors, officers, or employees be responsible for unauthorized access, loss or alteration of the data of the purchaser or be liable for any damage from intrusions.
Accessing the Internet
[INTERNET]
Once you have established an IDC account and successfully connected your Disklavier to the Internet, you can access a special Disklavier website where you can access the DisklavierRadio, and download software updates.
D-Radio
Select this to listen to streaming broadcasts of music with menu channels
Note:
Free contents that do not require an ID and password are available.
Note:
The service contents are subject to change without prior notice.
2
Chapter


Internet Direct Connection (IDC)

Press [INTERNET] on the remote control.
The Internet menu screen appears.


Select a desired menu with the cursor buttons ([ ] [ ] [ ]), then press [ENTER].

Perform operations on the screen that appears.
Checking Your Account Information

“M”
Aco
oun
•
TERNET]
You can confirm your current account information of IDC service. You can also log out from the IDC service.
Login
Select this to log in to the IDC service. You need to enter your ID and password.
Note:
ID and password are not required for free contents (such as free channel of DisklavierRadio).
Internet Direct Connection (IDC)
Chapter

2 Select "MyAccount" with the cursor buttons ([ ] [ ] [ ]), then press [ENTER].

The MyAccount screen appears.

3 Select a desired option with the cursor buttons ( [ ]N[ ),▼ then press [ENTER].
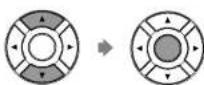
Perform operations on the screen that appears.

Updating the Disklavier Using the Internet

You can download the update program directly from the Internet and
• • • •
Internet Direct Connection (IDC)

Select "Update" with the cursor buttons ([ ] [ ] [ ], then press [ENTER].


The update screen appears if there is any update program available.


You can scroll the screen up or down with the cursor buttons ([ ▲ [ ▼ ]).

Following the instructions on the screen, select the option with the cursor buttons ( [ ] [ ] ), then press [ENTER].


The download process of the update program starts.


Internet Direct Connection (IDC)
Setting the Disklavier for the Internet Connection

You can change various settings related to the Internet connection. In most cases, you do not have to change the default factory settings.
Information
You can confirm the information of network settings.
Use DHCP
Select the method to determine several addresses. If your router has DHCP server function, we recommend that you to select "DHCP" or "DHCP+DNS."
DNS1/DNS2
Enter the address of the primary and secondary DNS server. These settings must be made when Use DHCP is set to "DHCP+DNS" or "MANUAL."
IPAddr./SubMask/Gateway
Enter the address of the control unit, subnet mask and gateway server. These settings must be made when Use DHCP is set to "MANUAL."
Proxy/Proxy Port
Enter the name and the port number for the proxy server. These settings are necessary only when a proxy server is located in your local network.

Press [SETUP] on the remote control.
The setup menu screen appears
Chapter


Internet Direct Connection (IDC)

Select a desired option with the cursor buttons ([]▶[][]), then press [+/YES] and [-/NO] to change setting.
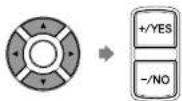
If you select "Information" on the network setting screen, the current network setting appears. To return to the network setting screen, press [ENTER] after confirming.

Press [ENTER] to complete the operation.

Initializing Internet Settings
[SETUP]
Jesel"
If you want to initialize the Internet settings, first you must reset the Disklavier to its initial factory setting. However, cookies are still remain after parameter resetting. To delete cookies, perform the appropriate operation on the reset screen.
Q
For details on cookies, see Chapter
15 "Glossary" on page 136.
1
See Chapter 11 "Other Settings -
Resetting the Disklavier" on
Enhancing the Disklavier by Hooking Up Other Devices
Hooking Up Audio Equipment
If you connect the Disklavier to an audio system, you can hear the sound played/played back on the Disklavier from the connected audio system, and the sound played back on the connected audio system from the Disklavier.
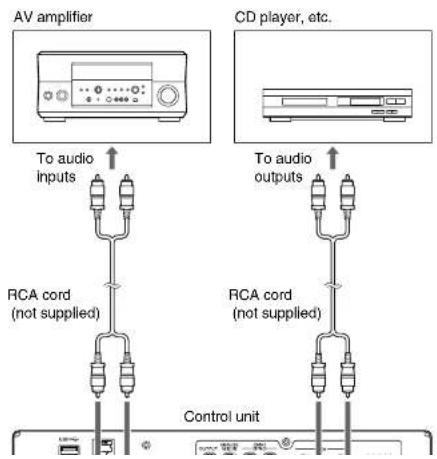
text_image
AV amplifier CD player, etc. To audio inputs RCA cord (not supplied) To audio outputs RCA cord (not supplied) Control unit
Chapter
10
Enhancing the Disklavier by Hooking Up Other Devices
Setting the Disklavier for Audio Data Reception/Transmission
[SETUP]
dialnO"
You can select the kind of the incoming/outgoing audio signals. The following options should be set up in advance.
OMNI IN
Selects the appropriate option to match the incoming data input to the OMNI (SYNC) IN jacks.
Auto Detect:
Select this to have the Disklavier detect the input signal automatically.
Audio: Select this when you play back audio from a connected CD player, etc. and reproduce the sound from the monitor speaker.
OFF: Select this when you cancel the data reception from the OMNI (SYNC) IN jacks.
OMNI IN Vol
Adjust the volume of the incoming audio signals to the OMNI (SYNC) IN jacks. The volume can be set in a range of 000 to 127.
OMNI OUT
Selects the desired data to be output from the OMNI (SYNC) OUT Jacks.
Output: Select this when you output the same audio signals as the ones for the monitor speaker.
SYNC: Select this when you output the SMPTE signal used for video synchronization playback.
OFF: Select this when you cancel the data transmission from the OMNI (SYNC) OUT jacks.
Enhancing the Disklavier by Hooking Up Other Devices
SYNC IN Offset
Adjusts the length of the offset time that leads the actual playback of the entire recording. The offset time can be set in a range of -500ms to +500ms . Decrease this value to delay the piano playing, and increase to advance the piano playing.
SYNC OUT Level
Adjusts the output level of the SMPTE signal. For normal use, the adjustment of this option is not required. If noises (synchronized signal) are output from the OUTPUT jacks during video synchronized playback, turn down the level and re-record.
OUTPUT Offset
For some speakers or digital amplifiers, the audio from the Disklavier may be output a little bit later than the acoustic piano playing. To eliminate this delay, you can adjust the offset time for the sound output. This settling is applied to the outgoing audio signal from the OUTPUT Jacks and OMNI (SYNC) OUT jacks. Decrease this value to advance the sound output. The offset time can be set in a range of -100ms to 0ms . Decrease this value to delay the piano playing, and increase to advance the piano playing.

Press [SETUP] on the remote control.
The setup menu screen appears.
![YAMAHA DC5XE3 - Press [SETUP] on the remote control. - 1](/content/2026/06/1215703/images/8806b3c7292e18faaa20e6dd60e73a30b2002dfaa943ef9b7eac3b58d11b6bcf.jpg)
![YAMAHA DC5XE3 - Press [SETUP] on the remote control. - 2](/content/2026/06/1215703/images/5e8a8cbccf9374a95ea1ea1ab754ec66dd7c33333b9548900f5f1ce407591494.jpg)
![YAMAHA DC5XE3 - Press [SETUP] on the remote control. - 3](/content/2026/06/1215703/images/222fd01cd58e37860811c58de1f5f9acfd20db48e44b6973c3db13abf5ee5545.jpg)
Select "AudioIO" with the square buttons (1.1.1.1)
Chapter
10
![YAMAHA DC5XE3 - Press [SETUP] on the remote control. - 4](/content/2026/06/1215703/images/9c8fcd62fdea682a609d0edfe1f62ed53f70b0770cb5fb2c22f473a637184381.jpg)
Enhancing the Disklavier by Hooking Up Other Devices
![YAMAHA DC5XE3 - Press [SETUP] on the remote control. - 5](/content/2026/06/1215703/images/c7e30c2b5ec10e4ceb7b1da9dc8563386ce47b2beab8300e091a223a62da5ba0.jpg)
Select a desired option with the cursor buttons ([ ]), then press [+/YES] and [-/NO] to change setting.
![YAMAHA DC5XE3 - Press [SETUP] on the remote control. - 6](/content/2026/06/1215703/images/2d06fffce13038b390ebf4e2db72078ac4059425ea1a66a5c7f2e121ac59d960.jpg)
![YAMAHA DC5XE3 - Press [SETUP] on the remote control. - 7](/content/2026/06/1215703/images/7e61062e494ebd7d69fbed058bce314d10394422d405fa359a46f1eaa01379a4.jpg)
Press [ENTER] to complete the operation.
![YAMAHA DC5XE3 - Press [SETUP] on the remote control. - 8](/content/2026/06/1215703/images/0636139af0da5495ea98da40961a6c7c00b285f7e68a870a9dac2f19e5154a34.jpg)
Hooking Up MIDI Devices
MIDI (an acronym for Musical Instrument Digital Interface) allows electronic device (synthesizers, etc.) to interact and work in synchronization with other MIDI compatible device. The Disklavier enables you to enjoy a variety of MIDI features by connecting a MIDI device or computer to the Disklavier's control unit.
MIDI device (sequencer, synthesizer, etc.) or computer

Note:
When you use the USB connection, it is required to install the USB driver to the connected device. In such a case, visit the following website and download the driver. http://download.yamaha.com/
Note:
Be sure to use the commercially available MIDI cable with the I-shaped connector on the control unit end.
Enhancing the Disklavier by Hooking Up Other Devices
Setting the Disklavier for MIDI Data Reception

The Disklavier can play back the MIDI data being received from the connected MIDI device as well as the software loaded or stored in the Disklavier itself. The following options should be set up in advance.
MIDI IN Port
Selects the terminal/port used for the data reception.
MIDI: Select this when the MIDI device is connected to MIDI IN terminal.
USB: Select this when the MIDI device is connected to USB port.
Piano Rcv Ch
The MIDI data consists of multi channels that are respectively assigned to a certain instrument's part. This option assigns the desired channel(s) to the piano part(s) that is (are) played back on the Disklavler's keyboard.
01 thru 16: Select the desired channel to which you assign the piano part.
1+2: Select this when the "01" and "02" channels are assigned to the piano parts.
Prg: Select the smallest number channel assigned to the piano group voice (see page 127) to be played on the Disklavier.
Prg(All): Select all channels assigned to the piano group voice (see page 127) to be played on the Disklavier.
MIDI IN Delay
When the Disklavier receives two kinds of data (strong and weak note) at the same time, the weak note sounds a little bit later than the strong one due to the characteristics of the Disklavier's mechanism. To eliminate this
Chapter
10

Enhancing the Disklavier by Hooking Up Other Devices

Press [SETUP] on the remote control.
The setup menu screen appears.


Select "MIDI" with the cursor buttons ([ ] [ ]), then press [ENTER].


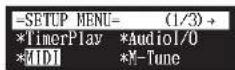
The MIDI setting screen appears.


Select a desired option with the cursor buttons ([]), then press [+/YES] and [-/NO] to change setting.


Enhancing the Disklavier by Hooking Up Other Devices
Setting the Disklavier for MIDI Data Transmission

The Disklavier can transmit the information of piano playing/ensemble part playback on the Disklavier as the MIDI data to the connected MIDI device to reproduce the sound with its sound generator, etc. or to record the MIDI data. The following options should be set up in advance.
MIDI OUT Port
Selects the terminal/port used for the data transmission.
MIDI: Select this when the MIDI device is connected to MIDI OUT terminal.
USB: Select this when the MIDI device is connected to USB port.
MIDI OUT
Selects one of the following parts to be transmitted to the connected MIDI device.
ESBL Out: Select this when you transmit the ensemble part played back on the Disklavier.
KBD Out: Select this when you transmit the piano part played on the Disklavier.

Press [SETUP] on the remote control.
The setup menu screen appears.

Chapter


Enhancing the Disklavier by Hooking Up Other Devices

Select a desired option with the cursor buttons ([]), then press [+/YES] and [-/NO] to change setting.

Press [ENTER] to complete the operation.

Setting the Disklavier for Keyboard Playing Data Transmission


Besides the MIDI OUT options, more detailed setups for the keyboard playing data transmission are available. The following options should be set up in advance.
KBD OUT CH
Assigns the piano part to the desired channels.
01 thru 16: Select the desired channel to which you assign the piano part.
Local
Enhancing the Disklavier by Hooking Up Other Devices
Chapter
10
1 Press [SETUP] on the remote control.
The setup menu screen appears.
![YAMAHA DC5XE3 - Press [SETUP] on the remote control. - 1](/content/2026/06/1215703/images/a9097dac0686865ddd6e9e5ed059fad429eb23ca430cc3abd626b8bc6728d5e3.jpg)
2 Select "MIDI" with the cursor buttons ([ ] [ ]), then press [ENTER].
![YAMAHA DC5XE3 - Select "MIDI" with the cursor buttons ([ ] [ ]), then press [ENTER]. - 1](/content/2026/06/1215703/images/1bb53cecda528b05eb8069c58c58f754d8b1aa1af3c5c8ec5c23207fce3e17e6.jpg)
The MIDI setting screen appears.
![YAMAHA DC5XE3 - Select "MIDI" with the cursor buttons ([ ] [ ]), then press [ENTER]. - 2](/content/2026/06/1215703/images/64a4802b0a75d450771bb099c1c7374ad5a7919e07e5e58ad9e002f37a8c6a13.jpg)
3 Select a desired option with the cursor buttons ([ ]), then press [+/YES] and [-/NO] to change setting.
![YAMAHA DC5XE3 - Select a desired option with the cursor buttons ([ ]), then press [+/YES] and [-/NO] to change setting. - 1](/content/2026/06/1215703/images/778b6cbc2d036132debb0f36b9073ecd88da9d5077c6a0ab01b04ade42599b90.jpg)
![YAMAHA DC5XE3 - Select a desired option with the cursor buttons ([ ]), then press [+/YES] and [-/NO] to change setting. - 2](/content/2026/06/1215703/images/bbca5dbfb56968e6322b9061be3b98214555314e764ae7db0f985e8eb4812129.jpg)
Chapter
11
Other Settings
Tuning the Tone Generator (TG Master Tune)


The internal XG tone generator has already been tuned to match the acoustic piano (A3=440 Hz). However, you can re-tune the internal XG tone generator in accordance with the pitch of the acoustic piano by following the procedure below.

Press [SETUP] on the remote control.
The setup menu screen appears.
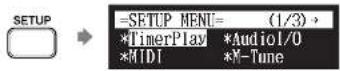

Select "M-Tune" with the cursor buttons ([ ] [ ] [ ], then press [ENTER].

The TG Master Tune setting screen appears.
Other Settings

Press [ENTER] to complete the operation.

Note:
To reset to the default factory pitch settings, see Chapter 11 "Other Settings - Resetting the Disklavier" on page 122.
Assigning Frequently-used Functions to the Number Keypad on the Remote Control
[SETUP]
oricut
You can assign the number keypad of the remote control ([1] thru [9] and [0]) a series of procedures for often used functions.
■Assigning Functions

Press [SETUP] on the remote control.
The setup menu screen appears.


Select "Shortcut" with the cursor buttons ( [ ] [ ] [ ], then press [ENTER].
▲
Chapter


Press [+ / YES] and [- / NO] to select the desired function.

The following functions are available:
Option Description
| PLAY | Starts playback of songs in the selected album or playlist. |
| RPT | Starts repeat playback of a song or songs in the selected album or playlist. |
| RND | Starts playback of songs in the selected album or playlist at random. |
| RADIO | Starts playback of the selected DisklavierRadio channel. |
| BLNC | Adjusts the volume balance among the different sound sources (tone generator or audio). |
| POWER | Turns on and off the Disklavier. |
When functions other than "POWER" are selected, the detailed setting parameter appears.

Press []to move the cursor to the detailed setting parameter, then press [+/YES] and [-/NO] to select the desired setting.
You can set two sets of parameter depending on the function you have selected.
When "RPT" is selected:
| Option 1 Option 2 Description | ||
| Mem01 - Mem99 | --- | Starts repeat playback of all songs in the album selected for option 1 from the first song. |
| 001 - 999 | Starts repeat playback of the song selected for option 2 in the album selected for option 1. | |
| Lst01 - Lst99 | --- | Starts repeat playback of all songs in the playlist selected for option 1 from the first song. |
| 001 - 999 | Starts repeat playback of the song selected for option 2 in the playlist selected for option 1. | |
When "RND" is selected:
| Option Description | |
| Mem01 - Mem99 | Starts playback of songs in the selected album at random. |
| Lst01 - Lst99 | Starts playback of songs in the selected playlist at random. |
When "RADIO" is selected:
| Option Description | |
| CH01 - CH99 | Starts playback of the selected DisklavierRadio channel. |
When "BLNC" is selected:
Other Settings
Chapter


Other Settings
■Using the Shortcut
Holding the green button on the remote control, press the corresponding number button on the number keypad to execute the assigned function.


Setting the Passcode to Prevent Unauthorized Access


You can enter the 4-digit passcode to prevent unauthorized access from the commercially available external remote controller, or you can also set the MAC address of the external remote controller to allow it to access your Disklavier without entering the passcode.
■Setting the Passcode

Press [SETUP] on the remote control.
The setup menu screen appears.


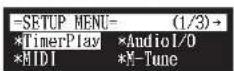
Note:
These settings are not required for the use of the remote control of this unit. In case of using an external remote controller, refer to the user's guide for that remote controller.
Note:
If changes are inappropriately made for these settings, the external remote controller may not function properly. In such cases, enter "####" to reset the passcode setting.
4 Enter the 4-digit code with the number keypad.

5 Press [ENTER] to complete the operation.
![YAMAHA DC5XE3 - Press [ENTER] to complete the operation. - 1](/content/2026/06/1215703/images/ece7cd53aa94e6375fed600ee8986579cfa646893a87fb29d0ca1a5d2687eff5.jpg)
■Setting the MAC Address
If you feel inconvenient to enter the passcode each time you access from the external remote controller, you can set the MAC address of the external remote controller. This will allow the external remote controller with the registered MAC address to access your Disklavier without entering the passcode.
1 With the passcode properly set, press [] to select "MAdr1."
![YAMAHA DC5XE3 - With the passcode properly set, press [] to select "MAdr1." - 1](/content/2026/06/1215703/images/ae08cb9370d7ebb62f957059b85720bbb63ef2b976a020760483c33eb5deef30.jpg)
Other Settings

Note:
You can also use [+/YES] and [-/NO] on the remote control, or the dial on the control unit to enter the code.

Other Settings
Adjusting the Brightness of the Display
[SETUP]
5
lan
You can adjust the brightness of the display. You can also set the display to dim after the elapse of a certain time if there is no operation.

Press [SYSTEM] on the remote control.
The system menu screen appears.


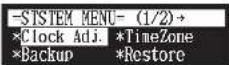

Select "Display" with the cursor buttons ([ ] [ ] [ ], then press [ENTER].
▲


The display setting screen appears.


Other Settings
Chapter

4 To set the time for the display to dim, press [ ]to move the cursor to the dim light parameter, then press [+/YES] and [-/NO].
![YAMAHA DC5XE3 - To set the time for the display to dim, press [ ]to move the cursor to the dim light parameter, then press [+/YES] and [-/NO]. - 1](/content/2026/06/1215703/images/357aa3baff7a5d51847b0ac96ab8dc64355806a46f6bba1a0521d6e0e6b6c07a.jpg)
text_image
+/-YES -/-NO =Display= +↑-+ENT *Brightness=100% *Dim light=0.0in.If there is no operation for the time set above, the display dims to half the brightness of its original setting.
5 Press [ENTER] to complete the operation.
![YAMAHA DC5XE3 - Press [ENTER] to complete the operation. - 1](/content/2026/06/1215703/images/ca4adf99a4759f7d1836e3f0d233e2a2227d63c3f0e17a3df093ea70505b4a45.jpg)
Switching the Languages for the Screen

1 Press [SYSTEM] on the remote control.
The system menu screen appears.
![YAMAHA DC5XE3 - Press [SYSTEM] on the remote control. - 1](/content/2026/06/1215703/images/5008fa079c69f17390fc41ca8a450ec6654650de0ba2de887d37a7b7a80507fc.jpg)
![YAMAHA DC5XE3 - Press [SYSTEM] on the remote control. - 2](/content/2026/06/1215703/images/12fc17145b229516a2cb55c98d899ca92209ca909f34db58ad5915aa98442c31.jpg)
Press [+/YES] and [-/NO] to select the language.
![YAMAHA DC5XE3 - Press [SYSTEM] on the remote control. - 3](/content/2026/06/1215703/images/e3a74949545382e35be6ec94687dd420005bc764b4fa1ac97f446fa9b5135bea.jpg)
![YAMAHA DC5XE3 - Press [SYSTEM] on the remote control. - 4](/content/2026/06/1215703/images/17aa71d480d813b722b68fc488c2ed12bb6f964fdae359dbdd92d3926ca61ed6.jpg)
Press [ENTER].
"OK?" flashes in the first line of the screen.
![YAMAHA DC5XE3 - Press [SYSTEM] on the remote control. - 5](/content/2026/06/1215703/images/26570dda227534efce9e0a84dd8405014af8e2092064c12c91d779daf6f94c93.jpg)
![YAMAHA DC5XE3 - Press [SYSTEM] on the remote control. - 6](/content/2026/06/1215703/images/45c88c8fc4e39b00dc7c13fda8c484bf826931b4761538d91ceaa1207bbcaa88.jpg)
![YAMAHA DC5XE3 - Press [SYSTEM] on the remote control. - 7](/content/2026/06/1215703/images/add3c0cc097bf974c5febba29f5e2e0ea17ab492915cadf2cc5496b920b9ccbb.jpg)
![YAMAHA DC5XE3 - Press [SYSTEM] on the remote control. - 8](/content/2026/06/1215703/images/4e2c3731e2148192b0a8788d8fe8d6dbbfd5f522ac24e53986ffc7e4f6cc7f46.jpg)
Press [+/YES] to set the language, and return to the system menu screen.
If you want to return your Disklavier to its initial factory settings, follow the procedure below.
![YAMAHA DC5XE3 - Press [SYSTEM] on the remote control. - 9](/content/2026/06/1215703/images/6142aade3ac703fc0a98310f29a7c5b193bfa0c39ff164776c8371f92ee7cc18.jpg)
Press [SETUP] on the remote control.
Important:
If you reset your Disklavier,
depending upon the option you
select, you may lose all parameters
or all data in the internal memory, or
3 Press [+/YES] and [−/NO] to select the option that you want to reset.
![YAMAHA DC5XE3 - Press [+/YES] and [−/NO] to select the option that you want to reset. - 1](/content/2026/06/1215703/images/4e0d6aa20a83b0c7c1077196d75de8841b3e0e523171277c7e9723d3504ab2b1.jpg)
Option Description
| Parameter | Reset all parameters, excluding the clock setting and the Internet setting. |
| Memory | Reset the internal memory. |
| Factory Init. | Reset the Disklavier to its initial factory setting. |
| DeleteCookies | Delete the contents of all saved cookies. |
4 Press [ENTER].
"OK?" flashes in the first line of the screen.
![YAMAHA DC5XE3 - Press [ENTER]. - 1](/content/2026/06/1215703/images/7187c9650025c8fe40f93d745bee28fe3055dc0090b9489b6cd10010b14199a0.jpg)
![YAMAHA DC5XE3 - Press [ENTER]. - 2](/content/2026/06/1215703/images/14b043d94385973f8d0b84c36831cb0c1dc9ff97a70b5ed0afff098400a8f8fc.jpg)
=Reset= OK? YES/NO
Reset=Factory Init.
5 Press [+/YES] to reset, [-/NO] to cancel.
![YAMAHA DC5XE3 - Press [+/YES] to reset, [-/NO] to cancel. - 1](/content/2026/06/1215703/images/e5e68c971a4900e318e0c28143b594448cc091de5eeb9fda322099e362b27d42.jpg)
![YAMAHA DC5XE3 - Press [+/YES] to reset, [-/NO] to cancel. - 2](/content/2026/06/1215703/images/624f933bd21aeb9d671bf2496f6352fc84bbd3366ba884fc9fffe9362939bae7.jpg)
Other Settings
![YAMAHA DC5XE3 - Press [+/YES] to reset, [-/NO] to cancel. - 3](/content/2026/06/1215703/images/d7a9aeff202c0381f7846ec3a01619748ad4fb53dce11d683eea6b5412ea2630.jpg)
![YAMAHA DC5XE3 - Press [+/YES] to reset, [-/NO] to cancel. - 4](/content/2026/06/1215703/images/08719d32a14587b5b193a9b7e94029c1c6b707025626a9251fc366bac45edc5d.jpg)
Other Settings
Diagnosing the Disklavier (Maintenance Mode)

The piano diagnostics may be required as the occasion demands. In such a case, follow the instructions of your Yamaha dealer and perform the following procedure.
1 Press [SYSTEM] on the remote control.
The system menu screen appears.
![YAMAHA DC5XE3 - Press [SYSTEM] on the remote control. - 1](/content/2026/06/1215703/images/48ce1cea69ae3e17ae9a9d1ea67e663ca828444f54ddf3b73d16ef032e0889a4.jpg)
2 Select "Maintenance" with the cursor buttons ([ ] [ ] ▶ [ ] [ ]), then press [ENTER].
![YAMAHA DC5XE3 - Select "Maintenance" with the cursor buttons ([ ] [ ] ▶ [ ] [ ]), then press [ENTER]. - 1](/content/2026/06/1215703/images/2b616edc4ab30a004dc59b3eb8983f5a123c35d6188f654f7e06bca409645130.jpg)
The maintenance screen appears.
![YAMAHA DC5XE3 - Select "Maintenance" with the cursor buttons ([ ] [ ] ▶ [ ] [ ]), then press [ENTER]. - 2](/content/2026/06/1215703/images/fd7d7797e3fcb289c4868531880ae99eb99452efbc192392cbb3372c740fb585.jpg)
Other Settings
Chapter

4 Select a desired option with the cursor buttons ([ ]), then press [ENTER].
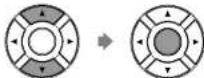
The selected option is executed.
5 Press [STOP] to complete the operation.

Shut down the Disk/lavor (PLAY/PAUSE) and [ON/OFF]
You can update the Disklavier firmware using update program (saved on the CD-ROM or USB flash memory, or downloaded via Internet).
You can download the update program from the following website: http://download.yamaha.com/
1 Make sure that Disklavier is shut down.
2 Holding [PLAY/PAUSE] on the control unit, press [ON/OFF].

Note:
Do not execute these options with no instructions from the service personnel.
Note:
For this operation you have to insert the CD-ROM or USB flash memory in which the update program is saved or download update program via Internet, and shut down the Disklavier.
Note:
Depending on the version or specification of the Disklavier, the actual indications for the version and module names may differ from ones depicted here.
Other Settings

Press [PLAY/PAUSE] to start the update.
The update process of the first module takes approximately 3 minutes.
![YAMAHA DC5XE3 - Press [PLAY/PAUSE] to start the update. - 1](/content/2026/06/1215703/images/ba3e3df07bd7e59237c024267cf794ca2b1aa9b40cadc0c2272ec88d92cec3f8.jpg)
When the update of the first module completes, the following confirmation message appears.
Confirmation message of the second module
![YAMAHA DC5XE3 - Press [PLAY/PAUSE] to start the update. - 2](/content/2026/06/1215703/images/8d3d41be630951ce0b0b3ec7b9706cd85b3e2ad956cf0d3ae3dfeea556ee01c4.jpg)
Press [PLAY/PAUSE] to start the update of the second module. The update process of the second module takes approximately 3 minutes.
A total of four modules needs to be updated. Repeat this step to complete the update.
Confirmation message of the third module
![YAMAHA DC5XE3 - Press [PLAY/PAUSE] to start the update. - 3](/content/2026/06/1215703/images/ad69794845981e0d646c9ac42972a7df9aba5703d268b8ed72034d0f96477df7.jpg)
The update process of the third module takes approximately 2 minutes.
Confirmation message of the fourth module
Important:
DO NOT turn off this unit during update.
Important:
Be sure to update all the modules.
Internal Tone Generator Voices
The following table lists the basic voices for the internal GM/XG and TG3 tone generator.
Internal GM/XG Tone Generator Basic Voice List
| Voice # Display Name | Voice # Display Name | Voice # Display Name |
| 01 Piano | 043 Orgel | 086 OrgFlute |
| 001 GrandPno | 044 Vibes | 087 TrmOrgFl |
| 002 GrndPnoK | 045 VibesK | 088 ReedOrgn |
| 003 MelloGrP | 046 HardVibe | 089 Puff Org |
| 004 PianoStr | 047 Marimba | 090 Acordion |
| 005 Dream | 048 MarimbaK | 091 AccordIt |
| 006 BritePno | 049 SineMmb | 092 Harmnica |
| 007 BritPnoK | 050 Balafon2 | 093 Harmo 2 |
| 008 E.Grand | 051 Log Drum | 094 TangoAcd |
| 009 ElGrPnoK | 052 Xylophon | 095 TngoAcd2 |
| 010 Det.CP80 | 053 TubulBel | 04 Guitar |
| 011 ElGrPno1 | 054 ChrchBel | 096 NylonGtr |
| 012 ElGrPno2 | 055 Carillon | 097 NylonGt2 |
| 013 HnkyTonk | 056 Dulclimer | 098 NylonGt3 |
| 014 HnkyTnkK | 057 Dulcimr2 | 099 VelGtHrm |
| 015 E.Piano1 | 058 Cimbalom | 100 Ukulele |
| 016 El.Pno1K | 059 Santur | 101 SteelGtr |
| 017 MelloEP1 | 03 Organ | 102 SteelGt2 |
| 018 Chor.EP1 | 060 DrawOrgn | 103 12StrGtr |
| 019 HardEl.P | 061 DetDrwOr | 104 Nyln&Stl |
| 020 VX El.P1 | 062 60sDrOr1 | 105 Stll&Body |
| 021 60sEl.P | 063 60sDrOr2 | 106 Mandolin |
| 022 E.Piano2 | 064 70sDrOr1 | 107 Jazz Gtr |
English

Internal Tone Generator Voices
| Voice # Display Name | Voice # Display Name | Voice # Display Name |
| 128 FngrBass | 178 Timpani | 227 Tp&TbSec |
| 129 FingrDrk | 07 Ensemble | 228 BrssSec2 |
| 130 FlangeBa | 179 Strings1 | 229 HiBrass |
| 131 Ba&DstEG | 180 S.Strngs | 230 MelloBrs |
| 132 FngrSlap | 181 SlowStr | 231 SynBras1 |
| 133 FngBass2 | 182 ArcoStr | 232 QuackBr |
| 134 ModAlem | 183 60sString | 233 RezSynBr |
| 135 PickBass | 184 Orchestr | 234 PolyBrss |
| 136 MutePkBa | 185 Orchstr2 | 235 SynBras3 |
| 137 Fretless | 186 TremOrch | 236 JumpBrss |
| 138 Fretles2 | 187 VeloStr | 237 AnaVelBr |
| 139 Fretles3 | 188 Strings2 | 238 AnaBrss1 |
| 140 Fretles4 | 189 S.SlwStr | 239 SynBras2 |
| 141 SynFretl | 190 LegatoSt | 240 Soft Brs |
| 142 Smooth | 191 Warm Str | 241 SynBras4 |
| 143 SlapBas1 | 192 Kingdom | 242 ChorBrss |
| 144 ResoSlap | 193 70s Str | 243 VelBras2 |
| 145 PunchThm | 194 Str Ens3 | 244 AnaBrss2 |
| 146 SlapBas2 | 195 Syn.Str1 | 09 Reed |
| 147 VeloSlap | 196 ResoStr | 245 SpmoSax |
| 148 SynBass1 | 197 Syn Str4 | 246 Alto Sax |
| 149 SynBa1Dk | 198 SS Str | 247 Sax Sect |
| 150 FastResB | 199 Syn.Str2 | 248 HyprAlto |
| 151 AcidBass | 200 ChoirAah | 249 TenorSax |
| 152 Civ Bass | 201 S.Choir | 250 BrthTnSx |
| 153 TeknoBa | 202 Ch.Aahs2 | 251 SoftTenr |
| 154 Oscar | 203 MelChoir | 252 TnrSax 2 |
| 155 SqrBass | 204 ChoirStr | 253 Bari.Sax |
| 156 RubberBa | 205 VoiceOoh | 254 Oboe |
| 157 Hammer | 206 SynVoice | 255 Eng.Horn |
Internal Tone Generator Voices
| Voice # Display Name | Voice # Display Name | Voice # Display Name |
| 275 Saw 2 | 325 Halo Pad | 375 BelChoir |
| 276 ThickSaw | 326 SweepPad | 376 Echoes |
| 277 DynaSaw | 327 Shwimmer | 377 EchoPad2 |
| 278 DigiSaw | 328 Converge | 378 Echo Pan |
| 279 Big Lead | 329 PolarPad | 379 EchoBell |
| 280 HeavySyn | 330 Celstial | 380 Big Pan |
| 281 WaspySyn | 13 Synth Effects | 381 SynPiano |
| 282 PulseSaw | 331 Rain | 382 Creation |
| 283 Dr. Lead | 332 ClaviPad | 383 Stardust |
| 284 VeloLead | 333 HrmoRain | 384 Reso Pan |
| 285 Seq Ana | 334 AfrcnWnd | 385 Sci-Fi |
| 286 CaliopLd | 335 Caribbean | 386 Starz |
| 287 Pure Pad | 336 SoundTrk | 14 Ethnic |
| 288 Chiff Ld | 337 Prologue | 387 Sitar |
| 289 Rubby | 338 Ancestrl | 388 DetSitar |
| 290 CharanLd | 339 Crystal | 389 Sitar 2 |
| 291 DistLead | 340 SynDrCmp | 390 Tambra |
| 292 WireLead | 341 Popcorn | 391 Tamboura |
| 293 Voice Ld | 342 TinyBell | 392 Banjo |
| 294 SynthAah | 343 RndGlock | 393 MuteBnjo |
| 295 VoxLead | 344 GlockChi | 394 Rabab |
| 296 Fifth Ld | 345 ClearBel | 395 Gopichnt |
| 297 Big Five | 346 ChorBell | 396 Oud |
| 298 Bass &Ld | 347 SynMalet | 397 Shamisen |
| 299 Big&Low | 348 SftCryst | 398 Koto |
| 300 Fat&Prky | 349 LoudGlok | 399 T.Koto |
| 301 SoftWurl | 350 XmasBell | 400 Kanoon |
| 12 Synth Pad | 351 VibeBell | 401 Kalimba |
| 302 NewAgePd | 352 DigiBell | 402 Bagpipe |
| 303 Fantasy2 | 353 AirBells | 403 Fiddle |
Chapter
12
English

Internal Tone Generator Voices
| Voice # Display Name | |
| 424 | Mel Tom2 |
| 425 | Real Tom |
| 426 | Rock Tom |
| 427 | Syn.Drum |
| 428 | Ana Tom |
| 429 | ElecPerc |
| 430 | RevCymbI |
| 16 Sound Effects | |
| 431 | FretNoiz |
| 432 | BrthNoiz |
| 433 | Seashore |
| 434 | Tweet |
| 435 | Telphone |
| 436 | Helicptr |
| 437 | Applause |
| 438 | Gunshot |
| 18 SFX Voice | |
| 450 | CutlngNz |
| 451 | CtlngNz2 |
| 452 | Str Slap |
| 453 | Fl.KClk |
| 454 | Rain |
| 455 | Thunder |
| 456 | Wind |
| 457 | Stream |
| 458 | Bubble |
| Voice # Display Name | |
| 459 | Feed |
| 460 | Dog |
| 461 | Horse |
| 462 | Bird 2 |
| 463 | Ghost |
| 464 | Maou |
| 465 | Tel.Dial |
| 466 | DoorSqek |
| 467 | DoorSlam |
| 468 | Scratch |
| 469 | Scratch2 |
| 470 | WindChm |
| 471 | Telphon2 |
| 472 | CarEngin |
| 473 | Car Stop |
| 474 | Car Pass |
| 475 | CarCrash |
| 476 | Siren |
| 477 | Train |
| 478 | Jetplane |
| 479 | Starship |
| 480 | Burst |
| 481 | Coaster |
| 482 | SbMarine |
| 483 | Laughing |
| 484 | Scream |
| Voice # Display Name | |
| 485 | Punch |
| 486 | Heart |
| 487 | FootStep |
| 488 | MchinGun |
| 489 | LaserGun |
| 490 | Xplosion |
| 491 | FireWork |
| Internal GM/XG Tone Generator Drum Voice List | |
| Voice # Display Name | |
| 17 Drum Kit | |
| 439 | StandKit |
| 440 | Stnd2Kit |
| 441 | Room Kit |
| 442 | Rock Kit |
| 443 | ElectKit |
| 444 | AnalgKit |
| 445 | Jazz Kit |
| 446 | BrushKit |
| 447 | ClascKit |
| 448 | SFX Kit1 |
| 449 | SFX Kit2 |
Internal Tone Generator Voices
| Voice # Display Name | |
| 046 | Pizz.Str |
| 047 | Harp |
| 048 | Timpanl |
| 07 Ensemble | |
| 049 | Strings1 |
| 050 | Strings2 |
| 051 | Syn.Str1 |
| 052 | Syn.Str2 |
| 053 | ChoirAah |
| 054 | VoiceOoh |
| 055 | SynVoice |
| 056 | Orch.Hit |
| 08 Brass | |
| 057 | Trumpet |
| 058 | Trombone |
| 059 | Tuba |
| 060 | Mute.Trp |
| 061 | Fr.Horn |
| 062 | BrasSect |
| 063 | SynBras1 |
| 064 | SynBras2 |
| 09 Reed | |
| 065 | SprnoSax |
| 066 | Alto Sax |
| 067 | TenorSax |
| 068 | Bari.Sax |
| 069 | Oboe |
| 070 | Eng.Horn |
| 071 | Bassoon |
| 072 | Clarinet |
Chapter
12
English

Troubleshooting
If you are having difficulty operating the Disklavier, see if any of the symptoms listed below apply to your problem and follow the recommended remedy.
Power
| Symptom Remedy | |
| The Diskalvier does not turn on. Make sure that the main switch on the power supply unit is turned on. | |
| Make sure that the AC power cable is securely connected to a suitable AC wall outlet. | |
| If the Disklavier still cannot be turned on, disconnect it from the AC wall outlet, and consult your Disklavier dealer. | |
Control Unit
| Symptom Remedy |
| The control unit does not appear to work correctly. Turn off the control unit, wait 5 seconds, then turn it back on. If the problem continues, consult your Disklavier dealer. |
| The control unit becomes hot. Although the chassis of the control unit may become hot while the Disklavier is turned on (also in the standby mode), this is not a malfunction. |
Remote Control
| Symptom Remedy | |
| You cannot control the Disklavier using the remote control. | Make sure that you are pointing the remote control at the control unit's remote control sensor. |
| Make sure that you are within the remote control's control unit's remote control sensor (see Fig. 5-10.4). | |
Troubleshooting
Chapter
13
Playback
| Symptom Remedy | |
| None of the playback functions can be used. Insert a medium that contains songs into the Disklavier. | |
| The Disklavier does not read a song file. The maximum number of the readable files in an album is 999. | |
| Songs are played back at the wrong tempo or in the wrong key. | Make sure that the name of the SMF song has an extension as ".MID" or ".mid" and the E-SEQ song has ".FIL" or ".fil." |
| Reset the tempo or transposition changes. Once the tempo or transposition have been changed, they will affect playback of all songs on an album, until another medium or album is selected, the recording standby mode is engaged, the Disklavier is turned off, or they are reset. | |
| Songs are not played back in the normal song order. Make sure that the random repeat mode is off. | |
| The playback order differs from the order on another device. | The playback order depends on the recording software or other factors. Naming the file starting from numbers such as 01, 02, etc. may solve the problem. |
| When selecting a song using the remote control's number keypad, but the last song on the album is selected. | If a song number higher than the last song number on the album is specified, the last song will be selected. |
| When specifying a search time using the remote control's number keypad, but the end of the song is selected. | If a time value higher than the total length of the song is specified, the end of the song will be selected. |
| Some notes drop out during playback. When a piano song is played back at a low volume, complex note trills and faint pianissimo passages sometimes drop out. In such case, increase the Disklavier's volume level. | |
| PianoSmartTM playback cannot be performed. Make sure that an appropriate SmartPianoSoft song, which is paired with the song on commercial CDs, is selected. | |
The damper does not operate during playback. Make sure that the pedal part is not canceled.
English

Media
| Symptom Remedy |
| The Disklavier does not read a CD-R/RW disc. The audio CD should be formatted in CD-DA, and the data CD in ISO 9660 Level1. The Disklavier may not read a CD-R/RW disc other than this format. |
Connection with External Devices
| Symptom Remedy | |
| The Disklavier cannot send or receive MIDI data with other MIDI instruments. | Make sure that the MIDI cables or USB cable are connected properly. |
| A MIDI loop was accidentally created when you connected a computer to the MIDI OUT terminal on your Disklavier, so that song data is sent back and forth between the computer and the Disklavier. | Configure the setting for the MIDI OUT terminal to “KBD OUT.” |
Video Synchronized Recording/Playback
| Symptom Remedy | |
| Synchronized songs are not played back. | Make sure that the audio channels of the DVD recorder are correctly connected to the Disklavier. |
| Make sure that the input and output of the DVD recorder are correctly connected to the Disklavier. | |
| Make sure that the "OMNI IN" option on the Disklavier is set to "AutoDetect." | |
| Make sure that the "OMNI OUT" option on the Disklavier is set to "SYNC." | |
| Noises are heard during recording. Turn down the volume of the TV connected to the DVD recorder. | |
Error Messages
While operating your Disklavier, an error message may appear in the display. If an error message appears, refer to the table below for an explanation of the message.
Media Selection / Playback
| Error Messages Situation Remedy | |
| NO MEDIA! You selected the medium that has not been inserted. | Insert the medium or select another medium. |
| DIFFERENT CD! Your CD is not paired with the selected SmartPianoSoft song. | Insert appropriate CD that is paired with the SmartPianoSoft song. |
File Operation
| Error Messages Situation Remedy | ||
| CANNOT EXECUTE. NOT ENOUGH DISK SPACE | You tried to copy a song to the medium that has no disk space. | Try another medium or delete songs on the media to make disk space. |
| CANNOT EXECUTE. NO DESTINATION MEDIUM | You selected the destination medium that has not been inserted when copying the album. | Insert the destination medium and select it. |
| DISK WRITE PROTECTED! You tried to copy songs or albums to the medium with the protection tab set to "protected". | Set the protection tab of the medium to "unprotected". | |
| CANNOT EXECUTE. PROTECTED FILE | You tried to copy the protected song file to the removable medium such as a USB flash memory. | You cannot copy the protected file to the removable medium. |
| Deleted all songs in this album You tried to delete the album with sub folders on the external medium. | ||
| CANNOT EXECUTE TO CREATE MORE THAN 99 ALBUMS | You tried to create a new album on the medium that already contains 99 albums. | No more than 99 albums can be created on the medium. |
| CANNOT EXECUTE TO CREATE MORE THAN 999 SONGS | You tried to create a new song in the album that already contains 999 songs. | No more than 999 songs can be created in the album. |
| CANNOT EXECUTE. | You tried to rename an album as same | Enter the different title to an album. |

Chapter
15
Glossary
This glossary provides basic definitions of terms used frequently in Disklavier manuals.
Continuous Pedal
See "Incremental Pedal."
Cookie
A computer data file that stores certain information for use when revisiting a website. In the case of the Disklavier, cookies are used to store ID and password for the IDC service.
DHCP
This is a standard or protocol by which IP addresses and other low-level network configuration information can be dynamically and automatically assigned each time a connection is made to the Internet.
DNS
A system that translates names of computers connected to a network to their corresponding IP addresses.
Ensemble Song
A song which contains piano parts and accompanying instrumental voices. An ensemble song contains the same left- and right-hand parts as an L/R song, and in addition, up to 13 accompanying instrument tracks. These extra
General MIDI (GM)
An addition to the MIDI standard that simplifies the transfer of MIDI song files between instruments of different manufacturers. A MIDI song recorded using a GM compatible tone generator should play back correctly when used with any GM compatible tone generator. The standard specifies that a GM compatible tone generator must support 24-note polyphony, 16 parts, and 128 standard voices.
Half Pedal
See "Incremental Pedal."
Incremental Pedal
Piano pedals are not always completely up or down and may be held somewhere in-between. Using incremental pedal data (also called continuous or half pedal data) the Disklavier precisely records the up and down movement of the piano pedals.
Internet
A huge network made up of networks, the Internet allows high-speed data transfer among computers, mobile phones and other devices.
IP Address
A string of numbers assigned to each computer
Glossary
Chapter
15
MIDI
An acronym for Musical Instrument Digital Interface. MIDI allows electronic musical instruments to communicate with each other.
Modem
A device which connects and allows data transfer between a conventional telephone line and a computer. It converts the digital signals from the computer to analog audio for sending over the phone line, and vice versa.
Piano Parts
Refer to the left- and right-hand piano parts of a song. The left-hand piano part is recorded onto track 1 and the right-hand piano part is recorded onto track 2.
PianoSoft™
The PianoSoft Disk Collection is a library of prerecorded song disks made by Yamaha specifically for use with the Disklavier.
PianoSoft-Plus™
PianoSoft-Plus disks contain Ensemble songs that can be played on the Disklavier.
Polyphony
The maximum number of voices (or sounds) that can be produced at a time from MIDI instruments.
Provider
Router
A device for connecting multiple computer networks. For example, a router is necessary when connecting several computers in a house or office, to allow all of them access the Internet and share data. A router is usually connected between a modem and a computer, although some modems have a built-in router.
Sequencer
A sequencer can be used with the Disklavier to play back and record MIDI data.
Server
A hardware system or computer used as a central point for a network, providing access to files and services.
SmartPianoSoft™
Software made by Yamaha containing MIDI signals for playing back along with standard audio CDs.
SMF
Abbreviation for Standard MIDI File.
SMF Song Format
A song file format supported by MIDI sequencers and music software.
Song
Normally, a short piece of music with lyrics.
English

Glossary
Tone Generator
An electronic device that can generate tones or instrument voices.
Transpose
Changing the key of a song. For example, a song in the key of C is transposed to the key of D when it is moved up two semitones.
USB
An interface for connecting an external device with plug and play. The Disklavier supplies with 2 TO DEVICE terminal with USB 1.1 standard and 1 TO HOST terminal. You can use as the external memory media if connected a USB flash memory or a USB hard disk to TO DEVICE terminal. Also the Disklavier enables you to enjoy a variety of MIDI features by connecting a computer to TO HOST terminal.
Voice
The sounds produced by a tone generator expressing various instruments.
Web Page
Refers to each individual page that makes up a website.
Website
This refers to the group of web pages that are opened together. For example, the collection of web pages whose addresses begin with "http://
Chapter
16
Specifications
General Specifications
| Sensor System | Key Sensors | Noncontact optical fiber/grayscale shutter sensing system for 88 keys (senses the key position, keying velocity, and key releasing velocity) |
| Pedal Sensors Damper pedal: Noncontact optical position-sensing system | ||
| Drive System | Keys DSP servo drive system (servocontrolled solenoids) | |
| Damper DSP servo drive system (servocontrolled solenoids) | ||
| Data Storage Internal | Memory 128 MB | |
| Removable Media | Compact Disc Audio CD (CD-DA), Data CD (ISO 9660 Level1-compliant) | |
| USB Flash Memory | FAT16 or FAT32 formatYamaha does not assure the operation of the commercially available USB flash memories. | |
| USB Hard Disk | FAT32 formatYamaha does not assure the operation of the commercially available USB hard disks. | |
| Floppy Disk 3.5" 2DD (720 KB) or 2HD (1.44 MB) floppy disk | ||
| File Format | Standard MIDI File (SMF) format 0, Standard MIDI File (SMF) format 1,E-SEQ format | |
| Song Format | PianoSoft (Solo), PianoSoft-Plus, PianoSoft-PlusAudio,SmartPianoSoft, SmartKey (CueTIME) | |
| Control Unit | Drive CD (read only) | |
| Dimensions (W x H x D) | 292 x 49 x 216 mm (11-1/2" x 1-15/16" x 8-1/2") | |
| Weight 2.7 kg (5.95 lb) | ||
| Monitor Speaker | Rated Power Output 20 W with tone and volume controls | |
| Drivers 10 cm (3-15/16") woofer, 2.2 cm (7/8") tweeter | ||
| Dimensions (W x H x D) 144 x 236 x 167 mm (5-11/16" x 9-5/16" x 6-9/16") | ||
| Weight 4.4 kg (9.70 lb) | ||

Chapter
16
Specifications
Function & Controls
| Playback Functions | Modia Select Internal memory, CD, USB media (including floppy disk) | |
| Song Select | Cursor buttons (control unit), cursor buttons/numeric section (remote control) | |
| Basic Functions Play, stop, pause | ||
| Song Search | Reverse/forward w/sound (MIDI songs), reverse/forward w/o sound (audio songs), directly by time or measure. | |
| Repeat | ALL (all songs in current album), RPT (current song), RND (all songs in current album in random order), A-B | |
| Part Cancel L (left), R (right), pedal | ||
| Timer Playback See page 39. | ||
| Video Synchronization See page 43. | ||
| SmartKeyTM Playback See page 44. | ||
| PianoSmartTM Playback See page 44. | ||
| Playback Controls | Volume 11 levels (-10 to 0) | |
| Tempo -50 to 50% in 1% increment | ||
| Transposition -24 to +24 semitones (2 octaves) in 1 semitone increment | ||
| Balance (TG, Audio) 10 to 127 | ||
| Recording Functions | Piano Part Recording L/R overwrite, split | |
| Matronome Mode Recording | See page 52. | |
| Tempo Changing See page 59. | ||
| Video Synchronization See page 61. | ||
| Audio CD Synchronization See page 65. | ||
| Piano Playing Functions | XG Voices Approx. 500 voices | |
| Metronome | Range | 30 to 400 beats per minute |
| Time Signatures | 1/4, 2/4, 3/4, 4/4, 5/4, 6/4, 7/4, 8/4, 9/4 | |
| Volume Controllable | ||
Copy delete rename sort add to playlist type convert time format
disklavier™ E³
Classic
Appendix

Software License Notice
GNU GENERAL PUBLIC LICENSE
Version 2, June 1991
Copyright © 1989, 1991 Free Software Foundation, Inc.
59 Temple Place, Suite 330, Boston, MA 02111-1307 USA
Everyone is permitted to copy and distribute verbatim copies of this license document, but changing it is not allowed.
Preamble
The licenses for most software are designed to take away your freedom to share and change it. By contrast, the GNU General Public License is intended to guarantee your freedom to share and change free software — to make sure the software is free for all its users. This General Public License applies to most of the Free Software Foundation's software and to any other program whose authors commit to using it. (Some other Free Software Foundation software is covered by the GNU Library General Public License instead.) You can apply it to your programs, too.
When we speak of free software, we are referring to freedom, not price. Our General Public Licenses are designed to make sure that you have the freedom to distribute copies of free software (and charge for this service if you wish), that you receive source code or can get it if you want it, that you can change the software or use pieces of it in new free programs; and that you know you can do these things.
To protect your rights, we need to make restrictions that forbid anyone to deny you these rights or to ask you to surrender the rights. These restrictions translate to certain responsibilities for you if you distribute copies of the software, or if you modify it.
For example, if you distribute copies of such a program, whether gratis or for a fee, you must give the recipients all the rights that you have. You must make sure that they, too, receive or can get
■TERMS AND CONDITIONS FOR COPYING, DISTRIBUTION AND MODIFICATION
0 This License applies to any program or other work which contains a notice placed by the copyright holder saying it may be distributed under the terms of this General Public License. The "Program", below, refers to any such program or work, and a "work based on the Program" means either the Program or any derivative work under copyright law: that is to say, a work containing the Program or a portion of it, either verbatim or with modifications and/or translated into another language. (Hereinafter, translation is included without limitation in the term modification.) Each licensee is addressed as "you".
Activities other than copying, distribution and modification are not covered by this License; they are outside its scope. The act of running the Program is not restricted, and the output from the Program is covered only if its contents constitute a work based on the Program (independent of having been made by running the Program). Whether that is true depends on what the Program does.
- You may copy and distribute verbatim copies of the Program's source code as you receive it, in any medium, provided that you conspicuously and appropriately publish on each copy an appropriate copyright notice and disclaimer of warranty; keep intact all the notices that refer to this License and to the absence of any warranty; and give any other recipients of the Program a copy of this License along with the Program.
You may charge a fee for the physical act of transferring a copy, and you may at your option offer warranty protection in exchange for a fee.
- You may modify your copy or copies of the Program or any portion of it, thus forming a work based on the Program, and copy and distribute such modifications or work under the terms of Section 1 above, provided that you also meet all of these conditions:
a) You must cause the modified files to carry prominent notices stating that you changed the files and the date of any change.
b) You must cause any work that you distribute or publish, that in whole or in part contains or is derived from the Program or any part thereof, to be licensed as a whole at no charge to all third parties under the terms of this License.
c) If the modified program normally reads commands interactively when run, you must cause

Software License Notice
- You may copy and distribute the Program (or a work based on it, under Section 2) in object code or executable form under the terms of Sections 1 and 2 above provided that you also do one of the following:
a) Accompany it with the complete corresponding machine-readable source code, which must be distributed under the terms of Sections 1 and 2 above on a medium customarily used for software interchange; or,
b) Accompany it with a written offer, valid for at least three years, to give any third party, for a charge no more than your cost of physically performing source distribution, a complete machine-readable copy of the corresponding source code, to be distributed under the terms of Sections 1 and 2 above on a medium customarily used for software interchange; or,
c) Accompany It with the Information you received as to the offer to distribute corresponding source code.
(This alternative is allowed only for noncommercial distribution and only if you received the program in object code or executable form with such an offer, in accord with Subsection b above.)
The source code for a work means the preferred form of the work for making modifications to it. For an executable work, complete source code means all the source code for all modules it contains, plus any associated interface definition files, plus the scripts used to control compilation and installation of the executable.
However, as a special exception, the source code distributed need not include anything that is normally distributed (in either source or binary form) with the major components (compiler, kernel, and so on) of the operating system on which the executable runs, unless that component itself accompanies the executable.
If distribution of executable or object code is made by offering access to copy from a designated place, then offering equivalent access to copy the source code from the same place counts as distribution of the source code, even though third parties are not compelled to copy the source along with the object code. - You may not copy, modify, sublicense, or distribute the Program except as expressly provided under this License. Any attempt otherwise to copy, modify, sublicense or distribute the Program is void, and will automatically terminate your rights under this License. However, parties who have received copies, or rights, from you under this License will not have their
Software License Notice
If any portion of this section is held invalid or unenforceable under any particular circumstance, the balance of the section is intended to apply and the section as a whole is intended to apply in other circumstances.
It is not the purpose of this section to induce you to infringe any patents or other property right claims or to contest validity of any such claims; this section has the sole purpose of protecting the integrity of the free software distribution system, which is implemented by public license practices. Many people have made generous contributions to the wide range of software distributed through that system in reliance on consistent application of that system; it is up to the author/donor to decide if he or she is willing to distribute software through any other system and a licensee cannot impose that choice.
This section is intended to make thoroughly clear what is believed to be a consequence of the rest of this License.
- If the distribution and/or use of the Program is restricted in certain countries either by patents or by copyrighted Interfaces, the original copyright holder who places the Program under this License may add an explicit geographical distribution limitation excluding those countries, so that distribution is permitted only in or among countries not thus excluded. In such case, this License incorporates the limitation as if written in the body of this License.
- The Free Software Foundation may publish revised and/or new versions of the General Public License from time to time. Such new versions will be similar in spirit to the present version, but may differ in detail to address new problems or concerns.
Each version is given a distinguishing version number. If the Program specifies a version number of this License which applies to it and "any later version", you have the option of following the terms and conditions either of that version or of any later version published by the Free Software Foundation. If the Program does not specify a version number of this License, you may choose any version ever published by the Free Software Foundation.
- If you wish to incorporate parts of the Program into other free programs whose distribution conditions are different, write to the author to ask for permission. For software which is copyrighted by the Free Software Foundation, write to the Free Software Foundation; we sometimes make exceptions for this. Our decision will be guided by the two goals of preserving the free status of all derivatives of our free software and of promoting the sharing and reuse of software generally.
GNU LESSER GENERAL PUBLIC LICENSE
Version 2.1, February 1999
Copyright © 1991, 1999 Free Software Foundation, Inc.
59 Temple Place, Suite 330, Boston, MA 02111-1307 USA
Everyone is permitted to copy and distribute verbatim copies of this license document, but changing it is not allowed.
[This is the first released version of the Lesser GPL. It also counts as the successor of the GNU Library Public License, version 2, hence the version number 2.1.]
Preamble
The licenses for most software are designed to take away your freedom to share and change it. By contrast, the GNU General Public Licenses are intended to guarantee your freedom to share and change free software — to make sure the software is free for all its users.
This license, the Lesser General Public License, applies to some specially designated software packages — typically libraries — of the Free Software Foundation and other authors who decide to use it. You can use it too, but we suggest you first think carefully about whether this license or the ordinary General Public License is the better strategy to use in any particular case, based on the explanations below.
When we speak of free software, we are referring to freedom of use, not price. Our General Public Licenses are designed to make sure that you have the freedom to distribute copies of free software (and charge for this service if you wish); that you receive source code or can get it if you want it; that you can change the software and use pieces of It in new free programs; and that you are informed that you can do these things.
To protect your rights, we need to make restrictions that forbid distributors to deny you these rights or to ask you to surrender these rights. These restrictions translate to certain responsibilities for you if you distribute copies of the library or if you modify it.
For example, if you distribute copies of the library, whether gratis or for a fee, you must give the recipients all the rights that we gave you. You must make sure that they, too, receive or can get the source code. If you link other codes with the library, you must provide complete brief files to
Software License Notice
When a program is linked with a library, whether statically or using a shared library, the combination of the two is legally speaking a combined work, a derivative of the original library. The ordinary General Public License therefore permits such linking only if the entire combination fits its criteria of freedom. The Lesser General Public License permits more lax criteria for linking other code with the library.
We call this license the "Lesser" General Public License because it does Less to protect the user's freedom than the ordinary General Public License. It also provides other free software developers. Less of an advantage over competing non-free programs. These disadvantages are the reason we use the ordinary General Public License for many libraries. However, the Lesser license provides advantages in certain special circumstances.
For example, on rare occasions, there may be a special need to encourage the widest possible use of a certain library, so that it becomes a de-facto standard. To achieve this, non-free programs must be allowed to use the library. A more frequent case is that a free library does the same job as widely used non-free libraries. In this case, there is little to gain by limiting the free library to free software only, so we use the Lesser General Public License.
In other cases, permission to use a particular library in non-free programs enables a greater number of people to use a large body of free software. For example, permission to use the GNU C Library in non-free programs enables many more people to use the whole GNU operating system, as well as its variant, the GNU/Linux operating system.
Although the Lesser General Public License is Less protective of the users' freedom, it does ensure that the user of a program that is linked with the Library has the freedom and the wherewithal to run that program using a modified version of the Library.
The precise terms and conditions for copying, distribution and modification follow. Pay close attention to the difference between a "work based on the library" and a "work that uses the library". The former contains code derived from the library, whereas the latter must be combined with the library in order to run.
■TERMS AND CONDITIONS FOR COPYING, DISTRIBUTION AND MODIFICATION
- This License Agreement applies to any software library or other program which contains a
Software License Notice
- You may copy and distribute verbatim copies of the Library's complete source code as you receive it, in any medium, provided that you conspicuously and appropriately publish on each copy an appropriate copyright notice and disclaimer of warranty; keep intact all the notices that refer to this License and to the absence of any warranty; and distribute a copy of this License along with the Library.
You may charge a fee for the physical act of transferring a copy, and you may at your option offer warranty protection in exchange for a fee.
- You may modify your copy or copies of the Library or any portion of it, thus forming a work based on the Library, and copy and distribute such modifications or work under the terms of Section 1 above, provided that you also meet all of these conditions:
a) The modified work must itself be a software library.
b) You must cause the files modified to carry prominent notices stating that you changed the files and the date of any change.
c) You must cause the whole of the work to be licensed at no charge to all third parties under the terms of this License.
d) If a facility in the modified Library refers to a function or a table of data to be supplied by an application program that uses the facility, other than as an argument passed when the facility is invoked, then you must make a good faith effort to ensure that, in the event an application does not supply such function or table, the facility still operates, and performs whatever part of its purpose remains meaningful.
(For example, a function in a library to compute square roots has a purpose that is entirely well-defined independent of the application. Therefore, Subsection 2d requires that any application-supplied function or table used by this function must be optional: if the application does not supply it, the square root function must still compute square roots.)
These requirements apply to the modified work as a whole. If identifiable sections of that work are not derived from the Library, and can be reasonably considered independent and separate works in themselves, then this License, and its terms, do not apply to those sections when you distribute them as separate works. But when you distribute the same sections as part of a whole which is a work based on the Library, the distribution of the whole must be on the terms of this License, whose permissions for other licensees extend to the entire whole, and thus to each and every part
Software License Notice
- You may copy and distribute the Library (or a portion or derivative of it, under Section 2) in object code or executable form under the terms of Sections 1 and 2 above provided that you accompany it with the complete corresponding machine-readable source code, which must be distributed under the terms of Sections 1 and 2 above on a medium customarily used for software interchange.
If distribution of object code is made by offering access to copy from a designated place, then offering equivalent access to copy the source code from the same place satisfies the requirement to distribute the source code, even though third parties are not compelled to copy the source along with the object code. - A program that contains no derivative of any portion of the Library, but is designed to work with the Library by being compiled or linked with it, is called a "work that uses the Library". Such a work, in isolation, is not a derivative work of the Library, and therefore falls outside the scope of this License.
However, linking a “work that uses the Library” with the Library creates an executable that is a derivative of the Library (because it contains portions of the Library), rather than a “work that uses the library”. The executable is therefore covered by this License. Section 6 states terms for distribution of such executables.
When a "work that uses the Library" uses material from a header file that is part of the Library, the object code for the work may be a derivative work of the Library even though the source code is not. Whether this is true is especially significant if the work can be linked without the Library, or if the work is itself a library. The threshold for this to be true is not precisely defined by law.
If such an object file uses only numerical parameters, data structure layouts and accessors, and small macros and small inline functions (ten lines or less in length), then the use of the object file is unrestricted, regardless of whether it is legally a derivative work. (Executables containing this object code plus portions of the Library will still fall under Section 6.)
Otherwise, if the work is a derivative of the Library, you may distribute the object code for the work under the terms of Section 6. Any executables containing that work also fall under Section 6, whether or not they are linked directly with the Library itself.
- As an exception to the Sections above, you may also combine or link a "work that uses the Library" with the Library to produce a work containing portions of the Library, and distribute that work under terms of your choice, provided that the terms permit modification of the work
Software License Notice
c) Accompany the work with a written offer, valid for at least three years, to give the same user the materials specified in Subsection 6a, above, for a charge no more than the cost of performing this distribution.
d) If distribution of the work is made by offering access to copy from a designated place, offer equivalent access to copy the above specified materials from the same place.
e) Verify that the user has already received a copy of these materials or that you have already sent this user a copy.
For an executable, the required form of the "work that uses the Library" must include any data and utility programs needed for reproducing the executable from it.
However, as a special exception, the materials to be distributed need not include anything that is normally distributed (In either source or binary form) with the major components (compiler, kernel, and so on) of the operating system on which the executable runs, unless that component itself accompanies the executable.
It may happen that this requirement contradicts the license restrictions of other proprietary libraries that do not normally accompany the operating system. Such a contradiction means you cannot use both them and the Library together in an executable that you distribute.
- You may place library facilities that are a work based on the Library side-by-side in a single library together with other library facilities not covered by this License, and distribute such a combined library, provided that the separate distribution of the work based on the Library and of the other library facilities is otherwise permitted, and provided that you do these two things:
a) Accompany the combined library with a copy of the same work based on the Library, uncombined with any other library facilities. This must be distributed under the terms of the Sections above.
b) Give prominent notice with the combined library of the fact that part of it is a work based on the Library, and explaining where to find the accompanying uncombined form of the same work.
- You may not copy, modify, sublicense, link with, or distribute the Library except as expressly provided under this License. Any attempt otherwise to copy, modify, sublicense, link with, or distribute the Library is void, and will automatically terminate your rights under this License. However, parties who have received copies, or rights, from you under this License will not
Software License Notice
If any portion of this section is held invalid or unenforceable under any particular circumstance, the balance of the section is intended to apply, and the section as a whole is intended to apply in other circumstances.
It is not the purpose of this section to induce you to infringe any patents or other property right claims or to contest validity of any such claims; this section has the sole purpose of protecting the integrity of the free software distribution system which is implemented by public license practices. Many people have made generous contributions to the wide range of software distributed through that system in reliance on consistent application of that system; it is up to the author/donor to decide if he or she is willing to distribute software through any other system and a licensee cannot impose that choice.
This section is intended to make thoroughly clear what is believed to be a consequence of the rest of this License.
- If the distribution and/or use of the Library is restricted in certain countries either by patents or by copyrighted Interfaces, the original copyright holder who places the Library under this License may add an explicit geographical distribution limitation excluding those countries, so that distribution is permitted only in or among countries not thus excluded. In such case, this License incorporates the limitation as if written in the body of this License.
- The Free Software Foundation may publish revised and/or new versions of the Lesser General Public License from time to time. Such new versions will be similar in spirit to the present version, but may differ in detail to address new problems or concerns.
Each version is given a distinguishing version number. If the Library specifies a version number of this License which applies to it and "any later version", you have the option of following the terms and conditions either of that version or of any later version published by the Free Software Foundation. If the Library does not specify a license version number, you may choose any version ever published by the Free Software Foundation.
- If you wish to incorporate parts of the Library into other free programs whose distribution conditions are incompatible with these, write to the author to ask for permission. For software which is copyrighted by the Free Software Foundation, write to the Free Software Foundation; we sometimes make exceptions for this. Our decision will be guided by the two goals of preserving the free status of all derivatives of our free software and of promoting the sharing and reuse of software generally.
Software License Notice
expat
Copyright © 1998, 1999, 2000 Thai Open Source Software Center Ltd and Clark Cooper Copyright © 2001, 2002, 2003 Expat maintainers.
Permission is hereby granted, free of charge, to any person obtaining a copy of this software and associated documentation files (the "Software"), to deal in the Software without restriction, including without limitation the rights to use, copy, modify, merge, publish, distribute, sublicense, and/or sell copies of the Software, and to permit persons to whom the Software is furnished to do so, subject to the following conditions:
The above copyright notice and this permission notice shall be included in all copies or substantial portions of the Software.
THE SOFTWARE IS PROVIDED "AS IS", WITHOUT WARRANTY OF ANY KIND, EXPRESS OR IMPLIED, INCLUDING BUT NOT LIMITED TO THE WARRANTIES OF MERCHANTABILITY, FITNESS FOR A PARTICULAR PURPOSE AND NONINFRINGEMENT. IN NO EVENT SHALL THE AUTHORS OR COPYRIGHT HOLDERS BE LIABLE FOR ANY CLAIM, DAMAGES OR OTHER LIABILITY, WHETHER IN AN ACTION OF CONTRACT, TORT OR OTHERWISE, ARISING FROM, OUT OF OR IN CONNECTION WITH THE SOFTWARE OR THE USE OR OTHER DEALINGS IN THE SOFTWARE.
glibc
This file contains the copying permission notices for various files in the GNU C Library distribution that have copyright owners other than the Free Software Foundation. These notices all require that a copy of the notice be included in the accompanying documentation and be distributed with binary distributions of the code, so be sure to include this file along with any binary distributions derived from the GNU C Library.
All code incorporated from 4.4 BSD is distributed under the following license:
Copyright © 1991 Regents of the University of California. All rights reserved.
Appendix
Software Lice
Software License Notice
THIS SOFTWARE IS PROVIDED BY THE REGENTS AND CONTRIBUTORS "AS IS" AND ANY EXPRESS OR IMPLIED WARRANTIES, INCLUDING, BUT NOT LIMITED TO, THE IMPLIED WARRANTIES OF MERCHANTABILITY AND FITNESS FOR A PARTICULAR PURPOSE ARE DISCLAIMED. IN NO EVENT SHALL THE REGENTS OR CONTRIBUTORS BE LIABLE FOR ANY DIRECT, INDIRECT, INCIDENTAL, SPECIAL, EXEMPLARY, OR CONSEQUENTIAL DAMAGES (INCLUDING, BUT NOT LIMITED TO, PROCUREMENT OF SUBSTITUTE GOODS OR SERVICES; LOSS OF USE, DATA, OR PROFITS; OR BUSINESS INTERRUPTION) HOWEVER CAUSED AND ON ANY THEORY OF LIABILITY, WHETHER IN CONTRACT, STRICT LIABILITY, OR TORT (INCLUDING NEGLIGENCE OR OTHERWISE) ARISING IN ANY WAY OUT OF THE USE OF THIS SOFTWARE, EVEN IF ADVISED OF THE POSSIBILITY OF SUCH DAMAGE.
The DNS resolver code, taken from BIND 4.9.5, is copyrighted both by UC Berkeley and by Digital Equipment Corporation. The DEC portions are under the following license:
Portions Copyright © 1993 by Digital Equipment Corporation.
Permission to use, copy, modify, and distribute this software for any purpose with or without fee is hereby granted, provided that the above copyright notice and this permission notice appear in all copies, and that the name of Digital Equipment Corporation not be used in advertising or publicity pertaining to distribution of the document or software without specific, written prior permission.
THE SOFTWARE IS PROVIDED "AS IS" AND DIGITAL EQUIPMENT CORP. DISCLAIMS ALL WARRANTIES WITH REGARD TO THIS SOFTWARE, INCLUDING ALL IMPLIED WARRANTIES OF MERCHANTABILITY AND FITNESS. IN NO EVENT SHALL DIGITAL EQUIPMENT CORPORATION BE LIABLE FOR ANY SPECIAL, DIRECT, INDIRECT, OR CONSEQUENTIAL DAMAGES OR ANY DAMAGES WHATSOEVER RESULTING FROM LOSS OF USE, DATA OR PROFITS, WHETHER IN AN ACTION OF CONTRACT, NEGLIGENCE OR OTHER TORTIOUS ACTION, ARISING OUT OF OR IN CONNECTION WITH THE USE OR PERFORMANCE OF THIS SOFTWARE.
The Sun RPC support (from rpcsrc-4.0) is covered by the following license:
Copyright © 1984, Sun Microsystems, Inc.
Sun RPC is a product of Sun Microsystems, Inc. and is provided for unrestricted use provided that this legend is included on all tape media and as a part of the software program in whole or part.
Leors may convey or modify Sun DPC without charge, but are not authorized to license or distribute
Software License Notice
CARNEGIE MELLON ALLOWS FREE USE OF THIS SOFTWARE IN ITS "AS IS" CONDITION. CARNEGIE MELLON DISCLAIMS ANY LIABILITY OF ANY KIND FOR ANY DAMAGES WHATSOEVER RESULTING FROM THE USE OF THIS SOFTWARE.
Carnegie Mellon requests users of this software to return to
Software Distribution Coordinator
School of Computer Science
Carnegie Mellon University
Pittsburgh PA 15213-3890
or Software.Distribution@CS.CMU.EDU any improvements or extensions that they make and grant Carnegie Mellon the rights to redistribute these changes.
The file if_ppp.h is under the following CMU license:
Redistribution and use in source and binary forms, with or without modification, are permitted provided that the following conditions are met:
- Redistributions of source code must retain the above copyright notice, this list of conditions and the following disclaimer.
- Redistributions in binary form must reproduce the above copyright notice, this list of conditions and the following disclaimer in the documentation and/or other materials provided with the distribution.
- Neither the name of the University nor the names of its contributors may be used to endorse or promote products derived from this software without specific prior written permission.
THIS SOFTWARE IS PROVIDED BY CARNEGIE MELLON UNIVERSITY AND CONTRIBUTORS "AS IS" AND ANY EXPRESS OR IMPLIED WARRANTIES, INCLUDING, BUT NOT LIMITED TO, THE IMPLIED WARRANTIES OF MERCHANTABILITY AND FITNESS FOR A PARTICULAR PURPOSE ARE DISCLAIMED. IN NO EVENT SHALL THE UNIVERSITY OR CONTRIBUTORS BE LIABLE FOR ANY DIRECT, INDIRECT, INCIDENTAL, SPECIAL, EXEMPLARY, OR CONSEQUENTIAL DAMAGES (INCLUDING, BUT NOT LIMITED TO, PROCUREMENT OF SUBSTITUTE GOODS OR SERVICES; LOSS OF USE, DATA, OR PROFITS; OR BUSINESS INTERRUPTION) HOWEVER CAUSED AND ON ANY THEORY OF LIABILITY, WHETHER IN CONTRACT, STRICT LIABILITY, OR TORT (INCLUDING NEGLIGENCE OR OTHERWISE) ARISING IN ANY WAY OUT OF THE USE OF THIS
Software License Notice
THIS SOFTWARE IS PROVIDED BY THE COPYRIGHT HOLDERS AND CONTRIBUTORS "AS IS" AND ANY EXPRESS OR IMPLIED WARRANTIES, INCLUDING, BUT NOT LIMITED TO, THE IMPLIED WARRANTIES OF MERCHANTABILITY AND FITNESS FOR A PARTICULAR PURPOSE ARE DISCLAIMED. IN NO EVENT SHALL INTEL OR CONTRIBUTORS BE LIABLE FOR ANY DIRECT, INDIRECT, INCIDENTAL, SPECIAL, EXEMPLARY, OR CONSEQUENTIAL DAMAGES (INCLUDING, BUT NOT LIMITED TO, PROCUREMENT OF SUBSTITUTE GOODS OR SERVICES; LOSS OF USE, DATA, OR PROFITS; OR BUSINESS INTERRUPTION) HOWEVER CAUSED AND ON ANY THEORY OF LIABILITY, WHETHER IN CONTRACT, STRICT LIABILITY, OR TORT (INCLUDING NEGLIGENCE OR OTHERWISE) ARISING IN ANY WAY OUT OF THE USE OF THIS SOFTWARE, EVEN IF ADVISED OF THE POSSIBILITY OF SUCH DAMAGE.
The files inet/getnameinfo.c and sysdeps/posix/getaddrinfo.c are copyright © by Craig Metz and are distributed under the following license:
The Inner Net License, Version 2.00
The author(s) grant permission for redistribution and use in source and binary forms, with or without modification, of the software and documentation provided that the following conditions are met:
-
If you receive a version of the software that is specifically labelled as not being for redistribution (check the version message and/or README), you are not permitted to redistribute that version of the software in any way or form.
-
All terms of the all other applicable copyrights and licenses must be followed.
- Redistributions of source code must retain the authors' copyright notice(s), this list of conditions, and the following disclaimer.
- Redistributions in binary form must reproduce the authors' copyright notice(s), this list of conditions, and the following disclaimer in the documentation and/or other materials provided with the distribution.
- [The copyright holder has authorized the removal of this clause.]
- Neither the name(s) of the author(s) nor the names of its contributors may be used to endorse or promote products derived from this software without specific prior written permission.
Software License Notice
- Redistributions of source code must retain any existing copyright notice, and this entire permission notice in its entirety, including the disclaimer of warranties.
- Redistributions in binary form must reproduce all prior and current copyright notices, this list of conditions, and the following disclaimer in the documentation and/or other materials provided with the distribution.
- The name of any author may not be used to endorse or promote products derived from this software without their specific prior written permission.
ALTERNATIVELY, this product may be distributed under the terms of the GNU General Public License, in which case the provisions of the GNU GPL are required INSTEAD OF the above restrictions. (This clause is necessary due to a potential conflict between the GNU GPL and the restrictions contained in a BSD-style copyright.)
THIS SOFTWARE IS PROVIDED "AS IS" AND ANY EXPRESS OR IMPLIED WARRANTIES, INCLUDING, BUT NOT LIMITED TO, THE IMPLIED WARRANTIES OF MERCHANTABILITY AND FITNESS FOR A PARTICULAR PURPOSE ARE DISCLAIMED.
IN NO EVENT SHALL THE AUTHOR(S) BE LIABLE FOR ANY DIRECT, INDIRECT, INCIDENTAL, SPECIAL, EXEMPLARY, OR CONSEQUENTIAL DAMAGES (INCLUDING, BUT NOT LIMITED TO, PROCUREMENT OF SUBSTITUTE GOODS OR SERVICES; LOSS OF USE, DATA, OR PROFITS; OR BUSINESS INTERRUPTION) HOWEVER CAUSED AND ON ANY THEORY OF LIABILITY, WHETHER IN CONTRACT, STRICT LIABILITY, OR TORT (INCLUDING NEGLIGENCE OR OTHERWISE) ARISING IN ANY WAY OUT OF THE USE OF THIS SOFTWARE, EVEN IF ADVISED OF THE POSSIBILITY OF SUCH DAMAGE.
libupnp
Copyright © 2000-2003 Intel Corporation All rights reserved.
Redistribution and use in source and binary forms, with or without modification, are permitted provided that the following conditions are met:
Appendix
Software Ltd
Software License Notice
ntp
Copyright Notice
jpg "Clone me," says Dolly sheepishly
Last update: 02:45 UTC Tuesday, June 27, 2006
The following copyright notice applies to all files collectively called the Network Time Protocol Version 4 Distribution. Unless specifically declared otherwise in an individual file, this notice applies as if the text was explicitly included in the file.
Copyright © David L. Mills 1992-2006
Permission to use, copy, modify, and distribute this software and its documentation for any purpose with or without fee is hereby granted, provided that the above copyright notice appears in all copies and that both the copyright notice and this permission notice appear in supporting documentation, and that the name University of Delaware not be used in advertising or publicity pertaining to distribution of the software without specific, written prior permission. The University of Delaware makes no representations about the suitability this software for any purpose. It is provided "as is" without express or implied warranty.
openldap
The OpenLDAP Public License
Version 2.8, 17 August 2003
Redistribution and use of this software and associated documentation ("Software"), with or without modification, are permitted provided that the following conditions are met:
-
Redistributions in source form must retain copyright statements and notices,
-
Redistributions in binary form must reproduce applicable copyright statements and notices, this list of conditions, and the following disclaimer in the documentation and/or other materials provided with the distribution, and
Software License Notice
OpenLDAP is a registered trademark of the OpenLDAP Foundation.
Copyright 1999-2003 The OpenLDAP Foundation, Redwood City, California, USA. All Rights Reserved. Permission to copy and distribute verbatim copies of this document is granted.
openssl
LICENSE ISSUES
The OpenSSL toolkit stays under a dual license, i.e. both the conditions of the OpenSSL License and the original SSLeay license apply to the toolkit.
See below for the actual license texts. Actually both licenses are BSD-style Open Source licenses. In case of any license issues related to OpenSSL please contact openssl-core@openssl.org.
OpenSSL License
Copyright © 1998-2006 The OpenSSL Project. All rights reserved.
Redistribution and use in source and binary forms, with or without modification, are permitted provided that the following conditions are met:
- Redistributions of source code must retain the above copyright notice, this list of conditions and the following disclaimer.
- Redistributions in binary form must reproduce the above copyright notice, this list of conditions and the following disclaimer in the documentation and/or other materials provided with the distribution.
- All advertising materials mentioning features or use of this software must display the following acknowledgment: "This product includes software developed by the OpenSSL Project for use in the OpenSSL Toolkit. (http://www.openssl.org/)
- The names "OpenSSL Toolkit" and "OpenSSL Project" must not be used to endorse or promote products derived from this software without prior written permission. For written permission, please contact openssl-core@openssl.org.
Appendix
Software Lice
Software License Notice
This package is an SSL implementation written by Eric Young (eay@cryptsoft.com).
The implementation was written so as to conform with Netscapes SSL.
This library is free for commercial and non-commercial use as long as the following conditions are ahaereed to. The following conditions apply to all code found in this distribution, be it the RC4, RSA, lhash, DES, etc., code; not just the SSL code. The SSL documentation included with this distribution is covered by the same copyright terms except that the holder is Tim Hudson (tjh@cryptsoft.com).
Copyright remains Eric Young's, and as such any Copyright notices in the code are not to be removed.
If this package is used in a product, Eric Young should be given attribution as the author of the parts of the library used.
This can be in the form of a textual message at program startup or in documentation (online or textual) provided with the package.
Redistribution and use in source and binary forms, with or without modification, are permitted provided that the following conditions are met:
-
Redistributions of source code must retain the copyright notice, this list of conditions and the following disclaimer.
-
Redistributions in binary form must reproduce the above copyright notice, this list of conditions and the following disclaimer in the documentation and/or other materials provided with the distribution.
-
All advertising materials mentioning features or use of this software must display the following acknowledgement:
"This product includes cryptographic software written by Eric Young (eay@cryptsoft.com)"
The word 'cryptographic' can be left out if the routines from the library being used are not cryptographic related :-).
- If you include any Windows specific code (or a derivative thereof) from the apps directory (application code) you must include an acknowledgement:
"This product includes software written by Tim Hudson (tjh@cryptsoft.com)"
THIS SOFTWARE IS PROVIDED BY ERIC YOUNG "AS IS" AND ANY EXPRESS OR IMPLIED WARRANTIES, INCLUDING, BUT NOT LIMITED TO, THE IMPLIED WARRANTIES OF
pam
Unless otherwise *explicitly* stated the following text describes the licensed conditions under which the contents of this Linux-PAM release may be distributed:
Redistribution and use in source and binary forms of Linux-PAM, with or without modification, are permitted provided that the following conditions are met:
- Redistributions of source code must retain any existing copyright notice, and this entire permission notice in its entirety, including the disclaimer of warranties.
- Redistributions in binary form must reproduce all prior and current copyright notices, this list of conditions, and the following disclaimer in the documentation and/or other materials provided with the distribution.
- The name of any author may not be used to endorse or promote products derived from this software without their specific prior written permission.
ALTERNATIVELY, this product may be distributed under the terms of the GNU General Public License, in which case the provisions of the GNU GPL are required INSTEAD OF the above restrictions. (This clause is necessary due to a potential conflict between the GNU GPL and the restrictions contained in a BSD-style copyright.)
THIS SOFTWARE IS PROVIDED "AS IS" AND ANY EXPRESS OR IMPLIED WARRANTIES, INCLUDING, BUT NOT LIMITED TO, THE IMPLIED WARRANTIES OF MERCHANTABILITY AND FITNESS FOR A PARTICULAR PURPOSE ARE DISCLAIMED.
IN NO EVENT SHALL THE AUTHOR(S) BE LIABLE FOR ANY DIRECT, INDIRECT, INCIDENTAL, SPECIAL, EXEMPLARY, OR CONSEQUENTIAL DAMAGES (INCLUDING, BUT NOT LIMITED TO, PROCUREMENT OF SUBSTITUTE GOODS OR SERVICES; LOSS OF USE, DATA, OR PROFITS; OR BUSINESS INTERRUPTION) HOWEVER CAUSED AND ON ANY THEORY OF LIABILITY, WHETHER IN CONTRACT, STRICT LIABILITY, OR TORT (INCLUDING NEGLIGENCE OR OTHERWISE) ARISING IN ANY WAY OUT OF THE USE OF THIS SOFTWARE, EVEN IF ADVISED OF THE POSSIBILITY OF SUCH DAMAGE.
Software License Notice
- Redistributions of source code must retain the above copyright notice, definition, disclaimer, and this list of conditions.
- Redistributions in binary form (compiled executables) must reproduce the above copyright notice, definition, disclaimer, and this list of conditions in documentation and/or other materials provided with the distribution. The sole exception to this condition is redistribution of a standard UnZipSFX binary (including SFXWiz) as part of a self-extracting archive; that is permitted without inclusion of this license, as long as the normal SFX banner has not been removed from the binary or disabled.
- Altered versions — including, but not limited to, ports to new operating systems, existing ports with new graphical interfaces, and dynamic, shared, or static library versions — must be plainly marked as such and must not be misrepresented as being the original source. Such altered versions also must not be misrepresented as being Info-ZIP releases — including, but not limited to, labeling of the altered versions with the names "Info-ZIP" (or any variation thereof, including, but not limited to, different capitalizations), "Pocket UnZip," "WiZ" or "MacZip" without the explicit permission of Info-ZIP. Such altered versions are further prohibited from misrepresentative use of the Zip-Bugs or Info-ZIP e-mail addresses or of the Info-ZIP URL(s).
- Info-ZIP retains the right to use the names "Info-ZIP," "Zip," "UnZip," "UnZipSFX," "WiZ," "Pocket UnZip," "Pocket Zip," and "MacZip" for its own source and binary releases.
zlib
© 1995-2004 Jean-loup Gailly and Mark Adler
This software is provided ‘as-is’, without any express or implied warranty. In no event will the authors be held liable for any damages arising from the use of this software.
Permission is granted to anyone to use this software for any purpose, including commercial applications, and to alter it and redistribute it freely, subject to the following restrictions:
- The origin of this software must not be misrepresented; you must not claim that you wrote the original software. If you use this software in a product, an acknowledgment in the product

MIDI Data Format
If you are familiar with MIDI, or are using a computer to control your music software with computer-generated MIDI messages, the data provided in this section can help you to control your Disklavier. Messages include those that can be received by the piano part and/or those that can be received by an ESBL part. Messages that can be transmitted as well as received are shown as "transmitted."
- CHANNEL MESSAGES
| 1.1 Key On / Key Off(Piano Part, ESBL Part) (transmitted)Piano Part reception note range = A-1-C7 : C3=60ESBL part reception note range = C-2-G8Velocity range = 1-127 (Only the Key On velocity is received) | 1.2.9 Portamento(USBPL Part)Cart# Parameter Data Range65 Portamento 0...127 | (0-63.off, 64-127.on) |
| 1.2 Control Change | (0-63.off, 64-127.on) | |
| 1.2.1 Bank Select(ESBL Part) (transmitted)Ctrl# Parameter Data Range0 Bank Select MSB 0: Normal,63: User voice,64: SFX,126: SFX kit,127: Drum32 Bank Select LSB 0...127You can select the Voice banks with MSB and LSB numbers.MSB and LSB functions differently depending on the play mode.In XG mode, MSB numbers select Voice type (Normal Voice or Drum Voice), and LSB number select Voice banks.In TG30DB mode, LSB is fixed, and MSB numbers select Voice banks.(See Normal Voice List Drum Voice List.)A new bank selection will not become effective until the next Program Change message is received. | 1.2.10 Sostenuto(Piano Part, ESBL Part)Cart# Parameter Data Range66 Sostenuto 0...127 | (0-63.off, 64-127.on) |
| 1.2.11 Soft Pedal(USBIL Part)Ctrl# Parameter Data Range67 Soft Pedal 0...127 | (0-63.off, 64-127.on) | |
| 1.2.12 Harmonic Content(USBIL Part)Messages which adjust the resonance set for each Voice.Ctrl# Parameter Data Range71 Harmonic Content 0...127 | (0-63.off, 64-127.on) | |
| 1.2.2 Modulation(USBIL Part)Ctrl# Parameter Data Range1 Modulation 0...127 | Higher values will result in a more characteristic, resonant sound.Depending on the Voice, the effective range may be narrower than the range available for adjustment. | |
| 1.2.3 Portamento Time(ESBL Part)Ctrl# Parameter Data Range5 Portamento Time 0...127 | 1.2.13 Release Time(ESBL Part)Messages which adjust the envelope release time set for each Voice.Ctrl# Parameter Data Range72 Release Time 0...127 | |
MIDI Data Format
1.2.18 Effect3 Depth (Chorus Send Level)
(ESBL Part)
Ctrl# Parameter Data Range
93 Effect3 Depth 0...127
1.2.19 Effect4 Depth (Variation Effect Send Level)
(FSBI. Part)
CtrlV Parameter Data Range
94 Effect4 Depth 0..127
1.2.20 Data Increment / Decrement (for RPN)
(ESBL Part)
Ctrl# Parameter Data Range
96 RPN Increment 0...127
97 RPN Decrement 0...127
1.2.21 NRPN (Non-Registered Parameter Number)
(ESBL Part)
Ctrl# Parameter Data Runge
98 NRPN LSB 0...127
99 NRPN MSB 0...127
First send the NRPN MSB and NRPN LSB to specify the
parameter which is to be controlled. Then use Data Entry to set the value of the specified parameter.
* Note that once the NRPN has been set for a channel subsequent
data entry will be recognized as the same NRPN's value change.
Therefore, after you use the NRPN, you should set a Null (7FH, 7FH) value to avoid an unexpected result.
The following NRPN number can be received
NRPN Data entry
MSB LSB MSB PARAMETER NAME and VALUE
| RANGE | |
| 01 SO8 Smart Vibrate Rate | mm:00 - 40 -7F (-64 - 0 - +63) |
| 01 SO9 Smart Vibrate Depth | mm:00 - 40 -7F (-64 - 0 - +63) |
| 01 SOA Smart Vibrate Delay | mm:00 - 40 -7F (-64 - 0 - +63) |
| 01 S20 Smart Filter Cutoff Frequency | mm:00 - 40 -7F (-64 - 0 - +63) |
| 01 S21 Smart Filter Resonance | mm:00 - 40 -7F (-64 - 0 - +63) |
| 01 S63 Smart EG Attack Time | mm:00 - 40 -7F (-64 - 0 - +63) |
\1D See \mm Drum Instrument Reverb Send Level
min: \00 - \7F (0 - max)
\1E - \2e - \$mn Drura Instrument Chorus Send Level
mm: 500, STE(0, max)
rr: drum instrument note number
\1F \rr \$mm Drum Instrument Variation Send
Level
mm: \00 - \71 (0 - max)
ir : drum instrument note number
MSB 14H-1FH (for Drum) is valid only if the Multi Part
parameter PART MODE = DRUMS 1 or DRUMS2 for that
channel. (IT PART MODE = DRUM, no values will be changed.)
1.2.22 RPN (Registered Parameter Number)
(ESBL Part)
Ctrl# Parameter Data Range
100 RPN LSB 0...127
101 RPN MSB 0..127
The following RPN numbers can be received.
RPN Data entry
MSB LSB MSB LSB PARAMETER NAME and VALUE
RANGE
| 00H | 00H | mmH | — | Pitch Bend Sensitivity: mm:00-18H (0-24 chromatic steps) Assignable in chromatic steps up to 2 octaves Default : 02H LSB value is ignored. |
| 00H | 01H | mmH | 11H | Fine Tuning mm: 00H-10H-7FH (-64-0-+63) |
| 00H | 02H | mmH | — | Coarse Tuning mm: 28H - 40H - 58H (-24 - +24 chromatic steps) LSB value is ignored. |
| 7FH | 7FH | — | — | RPN all Cancels RPN and NRPN numbers |
1.2.23 Channel Mode Messages
The following Channel Mode Messages can be received.
2nd byte 3rd byte
120 0 All Sound Off
121 0 Reset All Controllers
MIDI Data Format
Portamento Control cancels the Portamento Source Key
Number that was received
RPN number not specified; internal data
will not change
NRPN number not specified; internal data
will not change
1.2.23.3 All Note Off
(Piano Part, ESBL Part) (transmitted)
Terminates all notes currently on for the specified channel. However, if Hold 1 or Sostenuto is on, notes will continue sounding until these are turned off.
1.2.23.4 Omni Off
(Piano Part, ESBL Part)
Performs the same function as when an All Notes Off message is received.
1.2.23.5 Omni On
(Piano Part, ESBI. Part)
Performs the same function as when an All Notes OIT message is received.
1.2.23.6 Mono
(Piano Part, ESBL Part)
Performs the same function as when an All Sounds on message is received, and if the 3rd byte (mono number) is in the range of 0-16, sets the corresponding channel to Mono Mode (Mode 4: m = 1).
1.2.23.7 Poly
(Piano Part, ESBL Part)
Performs the same function as when an All Sounds Off message is received, and sets the corresponding channel to Poly Mode (Mode 3).
1.2.24 Local Control
(Piano Part, ESBL Part)
0:Off Disklavier keyboard does not play the internal voices. 127:On
1.3 Program Change
(ESBL Part) (transmitted)
Messages for Voice selection.
With a combination of Bank Select, you can select not only basic Voice numbers, but also variation Voice bank numbers.
OTHER
1) Master tuning
2) TG300 System Data Parameter change
3) TG300 Multi Effect Data parameter change
4) TG300 Multi Part Data parameter change
2.1.2 Universal Realtime Messages
2.1.2.1 Master Volume
(Piano Part, ESBL Part)
11110000 F0 = Exclusive status
01111117F = Universal Real Time
01111117F=ID of target device
(0000100) 04 = Sub-ID #1=Device Control Message
00000001 (D) = Sub-ID #2=Master Volume
Ussssss*SS = Volume LSB
Ottttt TT = Volume MSB
11110111 F7 = End of Exclusive
[Unreadable]
1111000140 = Exclusive status
01111117F=Universal Real Time
0xxxnnnn XN = Device Number, xxx = don't care
0000100 04 = Sub-ID #1=Device Control Message
0000001 01 = Sub-ID #2=Master Volume
0ssssss SS = Volume LSB
0000 TT = Volume MSB
11110111 F7 = End of Exclusive
When received, the Volume MSB will be effective for the
System Parameter MASTER VOLUME.
* "SS" is the hexadecimal expression of Ossssss; same as for
“1”, “aa”, etc
2.1.3 Universal Non-Realtime Messages
2.1.3.1 General MIDI Mode On
(ESBL Part)
1111000 FD = exclusive status
01111107E = Universal Non-Real Time
01111117F=ID of target device
00001001 09 = Sub-ID #1=General MIDI Message
00000001 01 = Sub-ID #2=General MIDI On
11110111 F7 = End of Exclusive
or
11110000 F0 = Exclusive status
011111107E = Universal Non-Real Time
0xxxxmmn XN = Device Number. xxx = don't care
MIDI Data Format
For parameters with data size of 2 or 4, transmit the appropriate number of data bytes.
When sending the parameter change messages consecutively, be sure to leave an appropriate interval (if the time base is 480, ca 5 unit) between the messages.
2.1.4.1 XG System On
(FSBL. Part)
11110000 FU Exclusive status
010001143YAMAHAID
0001nnn 1N Device Numbe
01001100 4C XG Model ID
(Kasanaa 10 Address High
Ouamaa 00 Address Mid
Ouauanoo 7E Address Low
0000000 00 Data
11110111 F7 End of Exclusive
When this data is received, the Disklaver will switch to XG mode and all the parameters will be initialized accordingly, and XG-compatible messages such as NRPN and Bank Select messages can be received. Since approximately 50ms is required to execute this message, be sure to leave an appropriate interval before the subsequent message
2.1.4.2 XG System Data parameter change
(ESBL Part)
See tables <1-1> and <1-2>.
2.1.4.3 Multi Effect1 Data parameter change
(ESBI. Part)
See tables <1-1> and <1-3>.
2.1.4.4 Multi Part Data parameter change (ESBL Part)
See tables <1-1> and <1-4>.
2.1.4.5 Drums Setup Data parameter change (ESBL Part)
See tables <1-1> and <1-5>.
If a Drum Setup Reset parameter change message is received, the Drum Setup parameter values will be initialized.
Selecting a Drum Set will cause the Drum Setup parameter values to be initialized.
2.2.1 XG Native Bulk Dump
11110001FU Exclusive status
01D0011 43 YAMAHA ID
0000mm on Device Number
01001100 4C XG Model II
Obbbbab bbbbab ByteCount
Ohhhhhh hhhhhhh ByteCount
Окаданам заланам Address High
Oaananna aananna Address Mid
Oaannana aannana Address Low
Oddadd da Data
|
0coocce coocce Checksum
11110111 F7 End of Exclusive
For the Address and Byte Count, refer to the supplementary
tables.
The Check sum is the value that results in a value of 0 for the
lower 7 bits when the Start Address, Byte Count, plus the
Checksum itself are added.
2.2.1.1 XG System Data bulk dump
(FSBI. Part)
See tables <1-1> and <1-2>.
2.2.1.2 Multi Effect1 Data bulk dump
(ESBL Port)
See tables <1-1> and <1-3>.
2.2.1.3 Multi Part Data bulk dump
(FSM, Part)
See tables <1-1> and <1-4>.
2.2.1.4 Drums Selun Data bulk dump
(ESBL Part)
See tables <1-1> and <1-5>.
2.2.2 QS300 Native Bulk Dump
11110000 F0 Exclusive status
0100011 43 YAMAHA ID
0000mm On Device Number
01001101 4B OS300 Model ID
Obbbbbb bbbbbb ByteCount
Obbbbbb bbbbbb ByteCount
Breviation Assumption Advisory Index
MIDI Data Format
3. SYSTEM REALTIME MESSAGES
3.1 Active Sensing
a) Transmission
Transmitted
bi Reception
Once FE has been received. if no MIDI data is subsequently
received for longer than an interval of approximately
300msec. the Disklavier will perform the same function as
when ALL SOUNDS OFF, ALL NOTES OFF, and RESET
ALL CONTROLLERS messages are received, and will then
return to a status in which FE is not monitored.
3.2 Start
a) Transmission
This message is transmitted only when the RUMOTE OUT parameter is set to On.
b) Reception
This message is received only when REMOTE IN Parameter is Set in On.
3.3 Stop
a) Transmission
This message is transmitted only when the REMOTE OUT
parameter is set to On.
b) Reception
This message is received only when REMOTE IN Parameter is Set to On.
| Parameter Change | ||||
| Address | ||||
| (H) | (M) | (L) | Description | |
| XG SYSTEM | 00 | 00 | 00 | System |
| 00 | 00 | 7D | Drum setup Reset | |
| 00 | 00 | 7E | XG System On | |
| 00 | 00 | 7F | All Parameter Reset | |
| EFFECT1 | 02 | 01 | 00 | Effect1 (Reverb, Chorus, Variation) |
| MULTI PART | 08 | 00 | 00 | Multi Part 1 |
| 08 | 0F | 00 | Multi Part 16 | |
| DRUM | 30 | 18 | 00 | Drum Setup 1 |
| 30 | 18 | 00 | Drum Setup 2 | |
| Address | Parameter | ||
| 3n | 0B | 00 | note number 13 |
| 3n | 0C | 00 | note number 14 |
| : | : | ||
| 3n | 5B | 00 | note number 91 |
| na 01 1 00 - 7F BANK SELECT MSB 0 - 127 part0=7F, other=0 | |||||
| na 02 1 00 - 7F BANK SELECT LSB 0 - 127 00 | |||||
| na | 03 | 1 | 00 - 7F | PROGRAM NUMBER | 1 - 128 |
| na | 04 | 1 | 00 - 01; 7F Rev CHANNEL | 1 - 16,OFF | |
| na 05 1 00 - 01 MONO/POLY MODE 0:MONO | 01 | ||||
| 1.POLY | ||||||
| nn | 06 | 1 | 00 - 02 | SAME NOTE NUMBER KEY ON ASSIGN | 0:SINGLE:1:MUL.TI2:INST (for DRUM)0:NORMAL1:DRUM2-3:DRUM.S1 - 2 | 1(all part)part10=2,othcr=0 |
| nn | 07 | 1 | 00 - 03 | PART MODE | ||
| nn 11 100 - 7F DRY LEVEL | 0 - 127 7F | |
| nn 12 100 - 7F CHORUS SEND | 0 - 127 00 | |
| nn 13 100 - 7F REVERB SEND | 0 - 127 40 | |
| nn 14 100 - 7F VARIATION SEND | 0 - 127 | 00 |
| nm 15 1 00 - 7F VIBRATO RATE | -64 = +63 | 40 |
| nm 16 1 00 - 7F VIBRATO DEPTH | -64 = +63 | 40 (drum part ignores) |
| nm 17 1 00 - 7F VIBRATO DELAY | -64 = +63 | 40 (drum part ignores) |
| na | 16 | 1 | 00 - 7F | FILTER CUTOFF FREQUENCY | -04 - +03 | 40 |
| nn | 19 | 1 | 00 - 7F | FILTER RESONANCE | -04 - +63 | 40 |
| nn | 1A | 1 | 00 - 7F | EG ATTACK TIME | -04 - +63 | 40 |
| nn | 1B | 1 | 00 - 7F | EG DECAY TIME | -04 - +63 | 40 |
| nn | 1C | 1 | 00 - 7F | EG RELEASE TIME | -01 - +63 | 40 |
| nn | 1D | 1 | 28 - 58 | MW PITCH CONTROL. | -24 →24 [scritones] | 40 |
| nn | 1E | 1 | 00 - 7F | MW FILTER CONTROL. | -9600 - +9450 [cent] | 40 |
| nn | 1F | 1 | 00 - 7F | MW AMPLITING CONTROL | 64 - 163 | 40 |
MIDI Data Format
nn 42 100 - 7F SCALE TUNING C# -64 - +63 [ccnt] 40 nn 43 100 - 7F SCALE TUNING D -64 - +63 [ccnt] 40 nn 44 100 - 7F SCALE TUNING D# -64 - +63 [cent] 40 an 45 1 00 - 7F SCALE TUNING E -64 - +63 [cent] 40 an 46 1 00 - 7F SCALE TUNING F -64 - +63 [cent] 40 nn 47 1 00 - 7F SCALE TUNING F0 -64 - +63 [cent] 40 nn 48 T 00 - 7F SCALE TUNING G -64 - +63 [ccnt] 40 nn 49 100 - 71 SCALE TUNING G# -64 - 453 [cent] 40 an 4A 100 - 7F SCALE TUNING A -54 - +63 [cent] 40 nn 4B 1 00 - 7F SCALE TUNING A# -64 - +63 [cent] 40 nn 4C 100 - 7F SCALE TUNING B -64 - +63 [cent] 40 nn 4D 1 28 - 58 CAT PITCH CONTROL -24 - +24 [semitones] 40| on 4E 1 00 - 7F CAT FILTER CONTROL | -9600 - +9450 [cent] | 40 | ||||
| on | 4F | 1 | 00 - 7F | CAT AMPLITUDE CONTROL | -64 - +63 | 40 |
| on | 50 | 1 | 00 - 7F | CAT LFO PMOD DEPTH | 0 - 127 | 00 |
| on | 51 | 1 | 00 - 7F | CAT LFO PMOD DEPTH | 0 - 127 | 00 |
| on | 52 | 1 | 00 - 7F | CAT LFO AMOD DEPTH | 0 - 127 | 00 |
| nm | 54 | 1 | 00 - 7F | PAT FILTER CONTROL. | -9600 ~ +9450 [ccnt] | 40 |
| nm | 55 | 1 | 00 - 7F | PAT AMPLITUDE CONTROL. | -64 ~ +63 | 40 |
| nm | 56 | 1 | 00 - 7F | PAT LFO PMOD DEPTH | 0 ~ 127 | 00 |
| nm | 57 | 1 | 00 - 7F | PAT LFO FMOD DEPTH | 0 ~ 127 | 00 |
| nm | 58 | 1 | 00 - 7F | PAT LFO AMOD DEPTH | 0 ~ 127 | 00 |
| un | 5B | 1 | 00 - 7F | ACI FILTER CONTROL | -9600 - +9450 (ceat) | 40 |
| un | 5C | 1 | 00 - 7F | ACI AMPLITUDE CONTROL | -64 - +63 | 40 |
| un | 5D | 1 | 00 - 7F | ACI LFO PMOD DEPTH | 0 - 127 | 00 |
| un | 5E | 1 | 00 - 7F | ACI LFO PMOD DEPTH | 0 - 127 | 00 |
| un | 5F | 1 | 00 - 7F | ACI LFO AMOD DEPTH | 0 - 127 | 00 |
MIDI Data Format
3n rr 08.1.00 - 01 KEY ASSIGN 0/SINGLE.F. 1/MULTI.00 3n rr 09 1 00 - 01 Rev NOTE OFF I/OFF, I/ON Depends on the note 3π π 0A | 100 - 01 Rev NOTE ON 0/OFF, 1/ON-01 3n r 0B 1 00 - 7F FILTER CUTOFF FREQUENCY -64 - +63 40 3π π 0C 1 00 - 7F FILTER RESONANCE -64 - +63 40 3n rr 0D 1 00 - 7F EG ATTACK RATE -64 - +63 40 3π ΩE 100 - 7F EG DECAY1 RATE -64 - +63 40 3π π 0F 1 00 - 7F EG DECAY2 RATE -64 - +63 40 TOTAL SIZE 10 [Note] n: Drum number (0 - 1) rr: note number (0D - 5B) When XG system on or GM mode on messages are received, all Drum Setup parameters are initialized. The Drum Setup Reset message can be used to initialized each Drum Setup parameter. Selecting a Drum Set will cause the Drum Setup parameter values to be initialized.| Bulk Dump | ||||
| Address | Description | |||
| (H) | (M) | (L.) | ||
| USERNORMAL. | 11 | 00 | 00 | User Normal Voice 1: |
| VOICE | 00 | 1F | 00 | User Normal Voice 32 |
| Address (H) | Size (H) | Data (H) | Parameter | Description | Default (H) |
| [Common] | |||||
| 11 in 00-17D | 20-7F | Voice Name | |||
| : | |||||
| 07 | |||||
| 08 | not used | ||||
| : | " | ||||
| 0A | " | ||||
| 0B | 01-03 | Element Switch | 1:Element 1 on, 2:Element 2 on, 3:Element 1 and 2 on | ||
| 0C | 00-7F Voice Level | ||||
| 0D | not used | ||||
MIDI Data Format
58 00-3F PEG Rate 4 5900-7F PEG Level D 5A 00-7F PEG Level 5B 00-7F PEG Level 2 5C 00-7F PEG Level 3 SD 00-7F PEG Level 4 SF.00-3F Filter Resonance 51°00-07 Velocity Sensitivity 50 00-7F Cutoff Frequency 6:00-7F Cutoff Scaling Break Point 1 62 00-7F Cutoff Scaling Break Point 2 63 0D-7F Cutoff Scaling Break Point 3 64 00-71 Cutoff Scaling Break Point 4 65 00-7F Cutoff Scaling Offset 1 66 00-7F Cutoff Scaling Offset 2 (1) OD-7F Cation Scaling Offsets (8) OD-7F Calorit Scaling Offset 4 69 39-47 Velocity TEG Level Sensitivity 6A 39-47 Velocity FEG Rate Sensitivity 6B 39-47 FEG Rate Scaling 6C 00-7F FEG Rate Sealing Center Note GD 00-3F FEG Rate 1 6E 00-3F TEG Rate 2 6F 00-3F FEG Rate 3 70 00-3F FEG Rate 4 710D-7F FEG Level 0 7200-7F FFGT Level 1 73 00-71 PEG Level 2 74 00-7F FEG Level 3 75 00-7F PEG Level 4 76 00-7F Element Level 7700-2F Level Scaling Break Point 78 00-7F Level Scaling Break Point 2 79 00-71 Level Scaling Break Point 3 7A 00-7F Level Scaling Break Point 4 7B 00-7F Level Scaling Offset 1 7C 00-7F Level Scaling Offset 2 7D 00-7F Level Scaling Offset 3 7E 00-7F Level Scaling Offset 4 7F 00-05 Velocity Curve 80 00-0F Pan 0 (Left)-14 (Right), 15: Scaling 81 39-47 AFG Rate Scaling 82 00-71 AEG Scaling Center Note \$3.00-0F AEG Key on Delay 84 00-7F AEG Attack Rate MIDI Data FormatXG Normal Voice List
Bank Select MSB = 000, LSB = Bank Number
Voice names in bold typeface are voices that can be selected in the Disklavier. The Disklavier can produce all the voices listed below, but can only display bank 0 voices.| Instrument Group | Page 2 | Back 3 | Voice Name | P_avg. | Instrument Course | Page 4 | Back 5 | Voice Name | H_avg. | Instrument Group | Page 6 | Back 7 | Voice Name | H_avg. | Instrument Group | Page 8 | Back 9 | Voice Name | P_avg. |
| Pears | 1 0 4 | HandPin 1 | Organ 17 D10 | ViewOrig 1 | 2 | Box | 35 0 | ViewOrig 1 | Electroke S | N Shirting 1 | |||||||||
| 1 CallPin 1 | 40 Dia1Run 2 | 58.5 Supra | 2 | ||||||||||||||||
| 1 MidPhi 1 | 45 V3Upcthe 2 | 830 Supra | 1 | ||||||||||||||||
| 10 PlsPost 1 | 34 0 | ViewOrig 1 | 24 Atr | 2 | |||||||||||||||
| 40 PlsPost 2 | 6 FlgPost 1 | 33 PlsSight 1 | |||||||||||||||||
| 11 Drsor 2 | 18 PlsPost 2 | 40 Atr | 2 | ||||||||||||||||
| 2 | 0 | BrillPhi 1 | 37 FlgPost 3 | 41 Ondra2 | 2 | ||||||||||||||
| 1 BrsPreK 2 | 37 FlgPost 3 | 42 TrmOch. | 2 | ||||||||||||||||
| 3 | 0 | K-Grand 2 | 40 EvelBtu | 45 VeckStr. | 2 | ||||||||||||||
| 1 UKkPhiK 2 | 40 16 | 2*23 2 | |||||||||||||||||
| 32 DelCYPK 2 | 64 Orgrn B1 | ||||||||||||||||||
| 10 FlgPrex 2 | 67 DrsPost 2 | ||||||||||||||||||
| 41 FlgPrex 2 | 67 DrsPost 2 | ||||||||||||||||||
| 4 | 0 | HddyTonk 2 | 35 0 | PickDunk 1 | |||||||||||||||
| 1 HddyDisk 2 | 38 MaceFKFtu 1 | ||||||||||||||||||
| 5 | 0 | K-Panei 2 | 18 0 | PerTrpnt 1 | 36 0 | PerTrdss | 1 | ||||||||||||
| 1 BlrPro 1K 2 | 32 Indea2 | 2 | |||||||||||||||||
| 18 MidPhi 1 | 32 Indea2 | 2 | |||||||||||||||||
| 32 OpTFP 2 | 34 Perfent 2 | ||||||||||||||||||
| 40 HallDLP 2 | 56 SyriProt 2 | ||||||||||||||||||
| 45 V3 LPL1 2 | 57 SyriProt 3 | ||||||||||||||||||
| 64 90ELP 2 | 37 Orpnt 2 | ||||||||||||||||||
| 6 | 0 | K-Panei 2 | 27 RoosLap 1 | ||||||||||||||||
| 1 BlrPro 1K 2 | 35 Prichlthm 2 | ||||||||||||||||||
| 32 OpTFP 2 | |||||||||||||||||||
| 33 DS Bus 2 | |||||||||||||||||||
| 34 DXLepend 2 | |||||||||||||||||||
| 40 DS Phase 2 | |||||||||||||||||||
| 41 DS+Atrig 2 | |||||||||||||||||||
| 32 DXRsaFP 2 | |||||||||||||||||||
| 45 V2 ELPD 2 | |||||||||||||||||||
| 7 | 0 | Harpon 1 | 20 0 | CheckOrig 2 | 35 0 | CheckOrig 2 | |||||||||||||
| 1 BsaJxL 1 | 45 VinaSep 2 | ||||||||||||||||||
| 25 Harps 2 | |||||||||||||||||||
| 32 Harps 2 | |||||||||||||||||||
| 8 | 0 | Clort 2 | 22 Aportbn 2 | ||||||||||||||||
| 1 Clst K 1 | |||||||||||||||||||
| 25 ClstWsh 1 | |||||||||||||||||||
| 64 PalstCty 1 | |||||||||||||||||||
| 62 PiereCt 2 | |||||||||||||||||||
| Chronious | 9 | 0 | Cleda 1 | 23 0 | Hammer 1 | 40 Swla 2 | |||||||||||||
| Percussion | 12 0 | Chicken 1 | 24 Tagnopt 2 | 6 VachSRb 1 | Juss | 57 Trumpel 1 | |||||||||||||
| 12 SajRosa 2 | 16 Tampes2 1 | ||||||||||||||||||
| Outer | 25 N | StoneGr 1 | 18 CSyBus 2 | 17 BrAtr 2 | |||||||||||||||
| 19 ShallyDL 1 | 22 WaspDig 2 | ||||||||||||||||||
| 32 Strhble 2 | |||||||||||||||||||
| 40 Metrolta 2 | |||||||||||||||||||
| 41 DS Res 2 | |||||||||||||||||||
| Instrument Class | Type 4 | Bank A | Name Name | Dr. n.a. |
| Read 65 Dayshamah | ||||
| 50-0 | A No Sun 1 | |||
| 40 See See 2 | ||||
| 43 Eye Sun 3 | ||||
| 50-0 | I'mersat 1 | |||
| 40 Bob'sn 2 | ||||
| 41 Soffro 2 | ||||
| 52 Tefox 2 1 | ||||
| 50-0 | Bori Sun 1 | |||
| 50-0 | Cock 2 | |||
| 50-0 | Eg Horn 1 | |||
| 51-0 | Imsen 1 | |||
| 52-0 | Gartel 1 | |||
| Pipe 75.0 Paedal 1 | ||||
| 50-0 | Pate 1 | |||
| 52-0 | Beoster 1 | |||
| 56-0 | Panbole 1 | |||
| 57-0 | Horse 2 | |||
| 58-0 | Machado 3 | |||
| 59-0 | Walski 1 | |||
| 50-0 | Coma 1 | |||
| Synth Lead | 51-0 | Spared 2 | ||
| 5 Square 2 1 | ||||
| 5 LMSquare 2 | ||||
| 18 Hollow 1 | ||||
| 19 Shitong 2 | ||||
| 60 Yellow 2 | ||||
| 63 Sack-Sira 2 | ||||
| 64 Snail-cut 1 | ||||
| 52-0 | New Leaf 2 | |||
| 5 Snow 2 | ||||
| 5 ThighBox 2 | ||||
| 18 DyceBox 1 | ||||
| 19 TagBox 2 | ||||
| 20 Big Leaf 1 | ||||
| 24 HealySys 2 | ||||
| 25 WalszySys 2 | ||||
| 40 PabloBox 2 | ||||
| 41 Dr. Leaf 2 | ||||
| 45 Vial Leaf 2 | ||||
| 50 Sag Ass 2 | ||||
| 53-0 | Dtop 4 | |||
| 55 Pull Pad 2 | ||||
| 54-0 | Att Ltd 2 | |||
| 57 Ruby 2 | ||||
| 55-0 | Chamada 2 | |||
| Instrument Group | Pages 2 | Back 1 | Voice Name | Lip level |
| Synix Pad | 93.0 | 1 | Intertal 2 | 2 |
| 64 | Homer2 | |||
| 66 Triple 2 | 2 | |||
| 67 Triple 1 | ||||
| 93.0 | 1 | BoweelPad 2 | ||
| 64 Glance 2 | 2 | |||
| 65 Glance 2 | ||||
| 94.0 | 1 | GallPad 2 | ||
| 64 Triple 1 | 2 | |||
| 65 Triple 1 | ||||
| 95.0 | 1 | Hain Pad 2 | ||
| 96.0 | 1 | SheepPad 3 | ||
| 20 Showtime 2 | 2 | |||
| 27 Converge 2 | 2 | |||
| 64 PolyRad 2 | 2 | |||
| 64 Cakulat 2 | ||||
| Synix Blocks | 91 | 0 | Ratio | |
| 45 CauPul 2 | 2 | |||
| 64 BaoRun 2 | 2 | |||
| 65 ActionWind 2 | 2 | |||
| 66 Cachran 2 | ||||
| 98.0 | 1 | SoundTech 4 | ||
| 27 ProAgust 2 | 2 | |||
| 64 Axacol 2 | ||||
| 99.0 | 1 | Crystal 3 | ||
| 12 SysDcKmp 2 | 2 | |||
| 14 Perform 2 | 2 | |||
| 18 TryBall 3 | 2 | |||
| 35 RunBlack 3 | 2 | |||
| 40 ClackLlci 2 | 2 | |||
| 41 Charclid 2 | 2 | |||
| 42 ChellBall 3 | 2 | |||
| 64 SysMover 1 | 2 | |||
| 65 Trcp 3 | 2 | |||
| 66 LaxelGlick 3 | 2 | |||
| 67 NaxallBall 2 | 2 | |||
| 68 Vittellz 2 | 2 | |||
| 69 DallBox 2 | 2 | |||
| 70 AnPills 2 | 2 | |||
| 71 BullTorp 3 | 2 | |||
| 72 ChinchinRt 2 | 2 | |||
| 100 | 1 | Atmosphere 2 | ||
| 18 Warticurus 2 | 2 | |||
| 19 HeliRcks 2 | 2 | |||
| 20 NyapFPP 2 | 2 | |||
| 21 SadaNord 2 | 2 |
| Investment Group | Forder 3 | Back 2 | Voice Name | Lg w kg |
| Fabric | 1/5 | 0 | Star | 1 |
| 52 Deutsor | 2 | |||
| 53 Stur 2 | 2 | |||
| 97 Tuer 3 | 2 | |||
| 97 Tin Haras | 2 | |||
| 1/6 | 0 | Ramo 1 | ||
| 28 Magdaqlo 1 | ||||
| 95 Rafa 2 | ||||
| 97 Geochre 2 | ||||
| 98 Ouel | 2 | |||
| 1/7 | 0 | Shahidsen | 1 | |
| 1/8 | 0 | Kato | 1 | |
| 96 T. Loo 2 | ||||
| 97 Kaocen | 2 | |||
| 1/9 | 0 | Kathabu 1 | ||
| 1/9 | 0 | Dinga 2 | ||
| 1/1 | 0 | Piddle | 1 | |
| 1/2 | 0 | Shanat | 1 | |
| 64 Shuara 2 | ||||
| 96 Piragi | 1 | |||
| 97 Elchiro | 2 | |||
| Passive | 1/1 | 0 | TakBell 2 | |
| 96 Borang 2 | ||||
| 97 Gedeo | 2 | |||
| 99 Guadhan 2 | ||||
| 99 S.Gamiar 2 | ||||
| 100 Ramy Cyn | 2 | |||
| 101 AcanRoll 2 | ||||
| 1/1 | 0 | Aspges | 2 | |
| 1/5 | 0 | Studem 1 | ||
| 97 Studem 2 | ||||
| 97 Uthell 2 | ||||
| 1/6 | 0 | WoodBlock | 1 | |
| 96 Cozara 1 | ||||
| 1/7 | 0 | Talohedron | 1 | |
| 96 Gc.Casa 1 | ||||
| 1/8 | 0 | Michelom Tom | 2 | |
| 64 Mr. Trmcl 1 | ||||
| 63 Rei Tom 2 | ||||
| 66 Rock Tom 2 | ||||
| 1/9 | 0 | Syn. Drum | 1 | |
| 64 Asn. Tou 1 | ||||
| 65 Elel. Peir 2 | ||||
| 1/10 | 0 | Ray. Camill | 1 | |
| Sound | 1/11 | 0 | EraBiose 2 | |
| Photo | 1/12 | 0 | Buenos | 1 |
| Brands | MST-044 LBS=10 | % vol | Brands | MST-294 1500 rpm | % vol |
| 1 | CnggNt 1 | 68 | De-Diol | 1 | |
| 2 | CnggNt 2 | 66 | De-Forgs 1 | ||
| 3 | 67 | Door Slot | |||
| 4 | Stir Step | 1 | 68 | Sintach | 1 |
| 5 | 69 | Sintach 2 | |||
| 6 | 70 | WashChat 1 | |||
| 7 | 71 | Deptors 1 | |||
| 8 | 72 | ||||
| 9 | 73 | ||||
| 10 | 74 | ||||
| 11 | 75 | ||||
| 12 | 76 | ||||
| 13 | 77 | ||||
| 14 | 78 | ||||
| 15 | 79 | ||||
| 16 | 80 | ||||
| 17 | ELK3ik 1 | 81 | Calcsgin 1 | ||
| 18 | 82 | Car Stop 1 | |||
| 19 | 83 | Car Pass 1 | |||
| 20 | 84 | CarPass 1 | |||
| 21 | 85 | Simus | 2 | ||
| 22 | 86 | Trains | 1 | ||
| 23 | 87 | Delphiue | 2 | ||
| 24 | 88 | Sturship | 2 | ||
| 25 | 89 | Borex | 2 | ||
| 26 | 90 | Coster | 3 | ||
| 27 | 91 | SIMRolo 2 | |||
| 28 | 92 | ||||
| 29 | 93 | ||||
| 30 | 94 | ||||
| 31 | 95 | ||||
| 32 | 96 | ||||
| 33 | Rain | 1 | 97 | Taughing 1 | |
| 34 | Thunder | 1 | 98 | Saman | 1 |
| 35 | Wind | 1 | 99 | Punch | 1 |
| 36 | Strum | 2 | 100 | Hertz | 1 |
| 37 | Juggle | 2 | 101 | FootScot 1 | |
| 38 | Red | 3 | 102 | ||
| 39 | 103 | ||||
| 40 | 104 | ||||
| 41 | 105 | ||||
| 42 | 106 | ||||
| 43 | 107 | ||||
| 44 | 108 | ||||
| 45 | 109 | ||||
| 46 | 110 |
TG300B Normal Voice List
Bank Select MSB = Bank Number, LSB = 000| Instrument Group | Pugran 4 | Bank 5 | Vince Name | Order | Instrument Group | Pugran 6 | Bank 7 | Voice Name | Order | Instrument Group | Pugran 8 | Bank 9 | Voice Name | Order |
| Pars | 10 GrndPro 1 | Organ 17-9 D | 200 Orgs 1 | 3 | Gazza 29-9 Mone Cr | 1 | Serings | |||||||
| 5 Fert Girl 2 | ||||||||||||||
| in TankCr3 2 | ||||||||||||||
| 126 - 8 Bus 2 | ||||||||||||||
| 127 - 4 Inboard 1 | ||||||||||||||
| 20 B. Refra 1 | 20 C. Inade 1 | 126 Chour 1 | ||||||||||||
| 127 - 4 Inboard 2 | ||||||||||||||
| 127 - 4 Inboard 1 | ||||||||||||||
| 126 Chour 2 | ||||||||||||||
| 127 Chour 1 | ||||||||||||||
| 126 Chour 2 | ||||||||||||||
| 127 Chour 2 | ||||||||||||||
| 126 Chour 1 | ||||||||||||||
| 127 Chour 2 | ||||||||||||||
| 126 Chour 2 | ||||||||||||||
| 127 Chour 2 | ||||||||||||||
| 126 Chour 2 | ||||||||||||||
| 127 Chour 2 | ||||||||||||||
| 126 Chour 2 | ||||||||||||||
| 127 Chour 2 | ||||||||||||||
| 126 Chour 2 | ||||||||||||||
| 127 Chour 2 | ||||||||||||||
| 126 Chour 2 | ||||||||||||||
| 30 E. Fanl 1 | 126 Chour 2 | |||||||||||||
| 127 Chour 2 | ||||||||||||||
| 126 Chour 2 | ||||||||||||||
| 127 Chour 2 | ||||||||||||||
| 126 Chour 2 | ||||||||||||||
| 127 Chour 2 | ||||||||||||||
| 126 Chour 2 | ||||||||||||||
| 127 Chour 2 | ||||||||||||||
| 40 Hily Turk 2 | 126 Chour 2 | |||||||||||||
| 127 Chour 2 | ||||||||||||||
| 126 Chour 2 | ||||||||||||||
| 127 Chour 2 | ||||||||||||||
| 126 Chour 2 | 126 Chour 2 | |||||||||||||
| 127 Chour 2 | ||||||||||||||
| 126 Chour 2 | ||||||||||||||
| 127 Chour 2 | ||||||||||||||
| 126 Chour 2 | ||||||||||||||
| 127 Chour 2 | ||||||||||||||
| 9 Chour 2 | ||||||||||||||
| 126 Chour 2 | ||||||||||||||
| 127 Chour 2 | ||||||||||||||
| 126 Chour 2 | ||||||||||||||
| 127 Chour 3 | ||||||||||||||
| 126 Chour 3 | ||||||||||||||
| 127 Chour 3 | ||||||||||||||
| 126 Chour 3 | ||||||||||||||
| 127 Chour 3 | ||||||||||||||
| 126 Chour 3 | ||||||||||||||
| 127 Chour 3 | ||||||||||||||
| 126 Chour 3 | ||||||||||||||
| 127 Chour 3 | ||||||||||||||
| 126 Chour 3 | ||||||||||||||
| 60 E. Fanl 2 | 126 Chour 2 | Base | 32 C. Bus 1 | 45 OY Strs 1 | ||||||||||
| 126 Chour 4 | ||||||||||||||
| 127 Chour 2 | ||||||||||||||
| 127 Chour 2 | ||||||||||||||
| 126 Chour 3 | ||||||||||||||
| 127 Chour 2 | ||||||||||||||
| 126 Chour 3 | ||||||||||||||
| 127 Chour 2 | ||||||||||||||
| 126 Chour 3 | ||||||||||||||
| 127 Chour 2 | ||||||||||||||
| 126 Chour 3 | ||||||||||||||
| 127 Chour 2 | ||||||||||||||
| 126 Chour 3 | ||||||||||||||
| 70 Hopel 1 | 20 C. Refra 2 | 30 C. Inade 1 | 1 | Framble 40 Strings 1 | ||||||||||
| 1 | ||||||||||||||
| 1 | ||||||||||||||
| 8 Chour 2 | ||||||||||||||
| 9 Chour 2 | ||||||||||||||
| 10 Tram Chtr 1 | ||||||||||||||
| 11 Chour 2 | ||||||||||||||
| 16 Sumps 2 | ||||||||||||||
| 24 VekStr 2 | ||||||||||||||
| 126 P.O.RS 1 | ||||||||||||||
| 127 Chour 2 | ||||||||||||||
| 127 Chour 2 | ||||||||||||||
| Instrument Group | Polar % | Biom % | Source Name | Link |
| Bras 57.0 Tempel 1 | ||||
| 1 | 1 Tempel2 1 | |||
| 24 | 24 Dose Trip 2 | |||
| 25 | 25 Warm Trip 2 | |||
| On Sacc-3 1 | ||||
| 127 | 127 Ampel 1 | |||
| 58.0 | Amuls 1 | |||
| 1 | 1 Timoam2 2 | |||
| 126 Ampel-2 2 | ||||
| 127 Ampel 1 | ||||
| 59.0 | Tuba 1 | |||
| 1 | Tuba 1 | |||
| 126 Ampel-1 1 | ||||
| 127 Ampel 2 1 | ||||
| 60.0 | Succ 1, Trip 1 | |||
| 126 Ampel-2 1 | ||||
| 127 Ampel 1 1 | ||||
| 61.0 | Flare 1 | |||
| 1 | Flare2 | 2 | ||
| 4 | 4 Hold Sco 1 | |||
| 16 | 16 Hold Sco 2 | |||
| 126 Ampel-3 1 | ||||
| 127 Ampel 1 | ||||
| 62.0 | Spec 1 | |||
| 1 | 1 Box Spec2 1 | |||
| 126 Ampel-2 2 | ||||
| 127 Ampel 2 | ||||
| 63.0 | Sulfonyl 1 | |||
| 1 | 1 Box Spec 2 | |||
| 8 | 8 System 3 | |||
| 9 | 9 Quad 1Kt | |||
| 16 | 16 Adducts1 2 | |||
| 126 Ampel-2 2 | ||||
| 127 Ampel 2 | ||||
| 64.0 | Pentin 1 | |||
| 1 | 1 Soft Spec | |||
| 8 | 8 System Spec 1 | |||
| 16 | 16 Adducts2 2 | |||
| 11 | 11 Vold Spec 2 | |||
| 126 Ampel-3 Kt | ||||
| 127 Ampel | ||||
| Basal 65.0 SpineSat | ||||
| 1 | ||||
| 127 | 127 Ampel 1 | |||
| 66.0 | Olo Size | |||
| 1 | 8 Hyp Alte 1 | |||
| 127 | 127 Ampel 1 | |||
| 67.0 | Trisox 1 | |||
| 1 | 8 Bru Trisx 2 | |||
| 127 | 127 Ampel 1 | |||
| 68.0 | Ural, Sun 1 | |||
| 127 | 127 Ampel 2 1 | |||
| 69.0 | Vital 1 | |||
| Instrument Groups | Symbol | Rank A | Voice Name | Link |
| Synch Lead | S10 Square | 1 | 2 | |
| 1 Square 2 | 1 | |||
| 2 Hollow | 1 | |||
| 3 MidBox | 2 | |||
| 4 Soft Box | 3 | |||
| 5 Stave-Box | 2 | |||
| 6 LMS Box | 2 | |||
| 7 Seed Load 1 | 1 | |||
| 127 speed | 1 | |||
| S20 Shoe Load 2 | ||||
| Landscape Group | Area ^a | Body ^b | Voice Name | Unit |
| Synth Effects | 97 | 0 | Rain | |
| 1 Hum-Rain 2 | ||||
| 2 Atra-Block 2 | ||||
| 6 Cuts-Block 2 | ||||
| 125 wcoct 2 | ||||
| 98.6 | Sawach 2 | |||
| 1 Zea-Bel 2 | ||||
| 2 Poinque 2 | ||||
| 125 Wbc-1 | ||||
| 99.0 | Crystal 2 | |||
| 1 Spy-Aldel 1 | ||||
| 3 SMG-Cryt 1 | ||||
| 3 Rux-Block 2 | ||||
| 4 Lou-Kirk 2 | ||||
| 2 Gloch-Chi 2 | ||||
| 6 Cerc-Bel 3 | ||||
| 7 Xne-Bel 3 | ||||
| 1 Vibe-Bel 3 | ||||
| 9 Dig-Bel 2 | ||||
| 16 Chol-Bel 1 | ||||
| 17 Ashtills 2 | ||||
| 8 Bilt-Belp 2 | ||||
| 9 CS-Ganobheds 2 | ||||
| 125 Sca-1 | ||||
| 102 | 0 Monopha 2 | |||
| 1 Wae-Anta 2 | ||||
| 2 Nyl-Harp 2 | ||||
| 1 Harp-Vex 2 | ||||
| 4 Hs-Salbks 2 | ||||
| 5 Nylar-FP 2 | ||||
| 6 Alma-Pul 2 | ||||
| 125 Smallet 1 | ||||
| 101 | 0 Betch 2 | |||
| 125 Engrason 2 | ||||
| 102 | 0 Ghaner 2 | |||
| 1 Tefeyn 1 | ||||
| 156 La-Li 1 | ||||
| 125 Etonson 2 | ||||
| 103 | 0 Echape 2 | |||
| 1 Echpe-Bell 2 | ||||
| 3 Fabe Par 2 | ||||
| 3 Fabe Pal 3 | ||||
| 4 Big Par 2 | ||||
| 6 Sun-Taro 2 | ||||
| 125 Muhbes 1 | ||||
| 104 | 0 Scr 1 | |||
| 1 Sium 2 | ||||
| 125 Sphther 1 | ||||
| Ethics | 105 | 0 Situ 1 | ||
| 1 Situ 2 | ||||
| 2 DetStar 2 | ||||
| Investment Group | Acquired | Backage | Voice Name | Debt |
| Eneraseone | 113 | 9 TrustBrd | 2 | |
| 8 Bolang | 2 | |||
| 9 Gengler | 2 | |||
| 10 Genglin | 2 | |||
| 11 S Gengler | 2 | |||
| 16 Rana Cyn | 2 | |||
| 127 Bagnari 1 | 1 | |||
| 114 | 9 Agedge | 2 | ||
| 12 Jeeccron | 1 | |||
| 115 | 9 StebTerm 2 | |||
| 13 Jeeccrara | 1 | |||
| 116 | 9 WaalBrd | 1 | ||
| 8 Cenact 1 | 1 | |||
| 12 Ejepezi | 1 | |||
| 117 | 9 TalegUm 1 | |||
| 8 Gr Cynco | 1 | |||
| 13 Ejepezi | 1 | |||
| 118 | 9 Mioftum 2 | |||
| 1 Real Tom | 2 | |||
| 8 Met Touni 1 | ||||
| 9 Rock Tom 2 | ||||
| 12 Mike | 1 | |||
| 119 | 9 SyngTrem 1 | |||
| 8 Am Tom 1 | ||||
| 9 EelPree | 2 | |||
| 12 Takolin 1 | ||||
| 120 | 9 RevCyncl | 1 | ||
| 12 Cynolci | 2 | |||
| Sound Effects | 121 | 9 TruNio | 2 | |
| 1 CatingNe | 1 | |||
| 2 Str Slap 1 | 1 | |||
| 3 CingNax2 | 2 | |||
| 12 d'arteset | 1 | |||
| 122 | 9 DornNour 2 | |||
| 1 FLMChik | 1 | |||
| 13 Handl. 1 | ||||
| 123 | 9 Skawnee | 2 | ||
| 1 Rail | 1 | |||
| 2 Dnoper 1 | ||||
| 3 Wind 1 | ||||
| 4 Sinus 2 | ||||
| 5 Bulife | 2 | |||
| 127 Vuelchki | 1 | |||
| 124 | 9 Twist 2 | |||
| 1 Dog | 1 | |||
| 2 Horse | 1 | |||
| 3 Ring 2 1 | ||||
| 127 Uphene 1 | ||||
| 125 | 9 Teljume 1 | |||
| 1 TruDul | 1 | |||
| 2 Dugage 1 | ||||
| 127 Uphene 1 |
XG Drum Voice List
Bank Select MSB = Bank Number, LSB = 000 Drum kit names in bold typeface are those that can be selected in the Disklavier.| Standard Kit | ||||||||||||||
| Sr. No. | Item | Order | Order Name | Standard Kit | Standard Kit | Room Kit | Room Kit | Floor Kit | Analog Kit | Jazz Kit | Brush Kit | Chandy Kit | SPX 1 | SPX 2 |
| 10 | C-1 | Santa Man | ||||||||||||
| 11 | D-1 | 2 | Santa Man | |||||||||||
| 12 | D-2 | Hua | ||||||||||||
| 13 | E-1 | Wak Dia | ||||||||||||
| 14 | F-1 | 6 | Santa Man | |||||||||||
| 15 | G-1 | 4 | Santa Man | |||||||||||
| 16 | G-2 | Layi Man | ||||||||||||
| 17 | H-1 | Coca Man | ||||||||||||
| 18 | I-1 | Dawson & Chis | ||||||||||||
| 19 | J-1 | Mowan Man | ||||||||||||
| 20 | K-1 | Suy Kish | ||||||||||||
| 21 | L-1 | Suy Kish | ||||||||||||
| 22 | M-1 | Suy Kish | ||||||||||||
| 23 | N-1 | Bhaka Man | ||||||||||||
| 24 | O-1 | Bhaka Man | ||||||||||||
| 25 | P-1 | Bhaka Man | ||||||||||||
| 26 | Q-1 | Bhaka Man | ||||||||||||
| 27 | R-1 | Bhaka Man | ||||||||||||
| 28 | S-1 | Bhaka Man | ||||||||||||
| 29 | T-1 | Bhaka Man | ||||||||||||
| 30 | U-1 | Bhaka Man | ||||||||||||
| 31 | V-1 | Bhaka Man | ||||||||||||
| 32 | W-1 | Bhaka Man | ||||||||||||
| 33 | X-1 | Bhaka Man | ||||||||||||
| 34 | Y-1 | Bhaka Man | ||||||||||||
| 35 | Z-1 | Bhaka Man | ||||||||||||
| 36 | A-1 | Bhaka Man | ||||||||||||
| 37 | B-1 | Bhaka Man | ||||||||||||
| 38 | C-1 | Bhaka Man | ||||||||||||
| 39 | D-1 | Bhaka Man | ||||||||||||
| 40 | E-1 | Bhaka Man | ||||||||||||
| 41 | F-1 | Bhaka Man | ||||||||||||
| 42 | G-1 | Bhaka Man | ||||||||||||
| 43 | H-1 | Bhaka Man | ||||||||||||
| 44 | I-1 | Bhaka Man | ||||||||||||
| 45 | J-1 | Bhaka Man | ||||||||||||
| 46 | K-1 | Bhaka Man | ||||||||||||
| 47 | L-1 | Bhaka Man | ||||||||||||
| 48 | M-1 | Bhaka Man | ||||||||||||
| 49 | N-1 | Bhaka Man | ||||||||||||
| 50 | O-1 | Bhaka Man | ||||||||||||
| 51 | P-1 | Bhaka Man | ||||||||||||
| 52 | Q-1 | Bhaka Man | ||||||||||||
| 53 | R-1 | Bhaka Man | ||||||||||||
| 54 | S-1 | Bhaka Man | ||||||||||||
| 55 | T-1 | Bhaka Man | ||||||||||||
| 56 | U-1 | Bhaka Man | ||||||||||||
| 57 | V-1 | Bhaka Man | ||||||||||||
| 58 | W-1 | Bhaka Man | ||||||||||||
| 59 | X-1 | Bhaka Man | ||||||||||||
| 60 | Y-1 | Bhaka Man | ||||||||||||
| 61 | Z-1 | Bhaka Man | ||||||||||||
| 62 | A-1 | Bhaka Man | ||||||||||||
| 63 | B-1 | Bhaka Man | ||||||||||||
| 64 | C-1 | Bhaka Man | ||||||||||||
| 65 | D-1 | Bhaka Man | ||||||||||||
| 66 | E-1 | Bhaka Man | ||||||||||||
| 67 | F-1 | Bhaka Man | ||||||||||||
| 68 | G-1 | Bhaka Man | ||||||||||||
| 69 | H-1 | Bhaka Man | ||||||||||||
| 70 | I-1 | Bhaka Man | ||||||||||||
| 71 | J-1 | Bhaka Man | ||||||||||||
| 72 | K-1 | Bhaka Man | ||||||||||||
| 73 | L-1 | Bhaka Man | ||||||||||||
| 74 | M-1 | Bhaka Man | ||||||||||||
| 75 | N-1 | Bhaka Man | ||||||||||||
| 76 | O-1 | Bhaka Man | ||||||||||||
| 77 | P-1 | Bhaka Man | ||||||||||||
| 78 | Q-1 | Bhaka Man | ||||||||||||
| 79 | R-1 | Bhaka Man | ||||||||||||
| 80 | S-1 | Bhaka Man | ||||||||||||
| 81 | T-1 | Bhaka Man | ||||||||||||
| 82 | U-1 | Bhaka Man | ||||||||||||
| 83 | V-1 | Bhaka Man | ||||||||||||
| 84 | W-1 | Bhaka Man | ||||||||||||
| 85 | X-1 | Bhaka Man | ||||||||||||
| 86 | Y-1 | Bhaka Man | ||||||||||||
| 87 | Z-1 | Bhaka Man | ||||||||||||
| 88 | A-1 | Bhaka Man | ||||||||||||
| 89 | B-1 | Bhaka Man | ||||||||||||
| 90 | C-1 | Bhaka Man | ||||||||||||
| 91 | D-1 | Bhaka Man | ||||||||||||
| 92 | E-1 | Bhaka Man | ||||||||||||
| 93 | F-1 | Bhaka Man | ||||||||||||
| 94 | G-1 | Bhaka Man | ||||||||||||
| 95 | H-1 | Bhaka Man | ||||||||||||
| 96 | I-1 | Bhaka Man | ||||||||||||
| 97 | J-1 | Bhaka Man | ||||||||||||
| 98 | K-1 | Bhaka Man | ||||||||||||
| 99 | L-1 | Bhaka Man | ||||||||||||
| 100 | O-1 | Bhaka Man | ||||||||||||
| Program 8.15.20.2027-43:30:12 | |||||||||||
| Sr# | Sr# | Sr# | Sr# | Sr# | Sr# | Sr# | Sr# | Sr# | Sr# | Sr# | Sr# |
| ### | ### | ### | ### | ### | ### | ### | ### | ### | ### | ### | |
| 1 | C1 | 3 | Tore Red | ||||||||
| 2 | C1 | 3 | Large Cap | ||||||||
| 3 | B4 | 4 | Eg | B4 (Red) | |||||||
| 4 | C2 | Young Sun | Young Sun | ||||||||
| 5 | F | 6 | 7 | Sousa Red | Sousa Red | ||||||
| 6 | F | 7 | Rough Red | Rough Red | |||||||
| 7 | G | 3 | Stable | ||||||||
| 8 | G4 | Chick Blue | |||||||||
| 9 | A | 3 | Worren White | ||||||||
| 10 | A4 | Sungsten Red | |||||||||
| 11 | B | 6 | Sham White M | Sham White | |||||||
| 12 | C | 1 | Sham White L | B4 Prime | B4 Extreme | B4 Daling II | B4 Light | B4 Light | Green Eye | ||
| 13 | D | 1 | Black Sea | Ave Ave Sive Salt | |||||||
| 14 | D | 3 | Tore M | B4 Prime | B4 Extreme | Ave Bate Salt L | Ave Bate Salt L | ||||
| 15 | E | Haw Cyan | Haw Cyan | Haw Cyan | Haw Cyan | ||||||
| 16 | E | 3 | Tore H | B4 Finger | Ave Bate Salt L | Ave Bate Salt L | Blue | ||||
| 17 | F | 1 | Fava Red | Base Ture | Base Ture | B4 Prime | Ave Bate Salt L | Ave Bate Salt L | Ave Bate Salt L | Yellow Sea | |
| 18 | F | 3 | 1 | Bathode Red | Ave Bate Salt Cred | Ave Bate Salt L | Ave Bate Salt L | Yellow Sea | |||
| 19 | G | 3 | 1 | Bathode Red | Base Ture | Base Ture | B4 Prime | Ave Bate Salt L | Ave Bate Salt L | Ave Bate Salt L | Black Sea |
| 20 | G4 | 1 | Bathode Red | Ave Bate Salt Cred | Ave Bate Salt L | Ave Bate Salt L | Ave Bate Salt L | Yellow Sea | |||
| 21 | G | 1 | Blue Sea | Base Ture | Base Ture | B4 Prime | Ave Bate Salt L | Ave Bate Salt L | Ave Bate Salt L | Yellow Sea | |
| 22 | G4 | 1 | Blue Sea | Base Ture | Base Ture | B4 Prime | Ave Bate Salt L | Ave Bate Salt L | Ave Bate Salt L | Yellow Sea | |
| 23 | H | 1 | White Red | Base Ture | Base Ture | B4 Prime | Ave Bate Salt L | Ave Bate Salt L | Ave Bate Salt L | Yellow Sea | |
| 24 | H | 2 | White Red | Base Ture | Base Ture | B4 Prime | Ave Bate Salt L | Ave Bate Salt L | Ave Bate Salt L | Yellow Sea | |
| 25 | G | 2 | Crash Red | Ave Bate Salt | Ave Bate Salt L | Ave Bate Salt L | Orange Sea | ||||
| 26 | G | 2 | Blue Red | Base Ture | Base Ture | B4 Prime | Ave Bate Salt L | Ave Bate Salt L | Ave Bate Salt L | Asian Sea | |
| 27 | G4 | 2 | Blue Red | Ave Bate Salt L | Asian Sea | ||||||
| 28 | G4 | 2 | Orange Red | Orange Red | Ave Bate Salt L | Orange Sea | |||||
| 29 | F | 2 | Blue Red | Ave Bate Salt L | Orange Sea | ||||||
| 30 | F | 2 | Orange Red | Ave Bate Salt L | Orange Sea | ||||||
| 31 | F | 2 | Orange Red | Ave Bate Salt L | Orange Sea | ||||||
| 32 | F | 2 | Orange Red | Ave Bate Salt L | Orange Sea | ||||||
| 33 | G | 2 | White Red | Ave Bate Salt L | White Sea | ||||||
| 34 | G4 | 2 | Crash Red | Ave Bate Salt L | Crash Red | ||||||
| 35 | A | 2 | Crash Red | Ave Bate Salt | Ave Bate Salt L | Crash Red | |||||
| 36 | A4 | 2 | Yellow Sea | Ave Bate Salt L | Yellow Sea | ||||||
| 37 | H | 2 | White Red | Ave Bate Salt L | White Sea | ||||||
| 38 | C | 2 (Red) | Ave Bate Salt L | Ave Black Sea | |||||||
| 39 | C1 | 1 | Blue Red | Blue Sea | |||||||
| 40 | C1 | 2 | Orange Red | Ave Bate Salt III | Orange Sea | ||||||
| 41 | C1 | 1 | Orange Red | Ave Bate Salt IV | Orange Sea | ||||||
| 42 | L | 2 | Orange Red | Ave Bate Salt L | Orange Sea | ||||||
| 43 | F | 1 | Orange Red | F, Orange Sea | |||||||
| 44 | F | 2 | Orange Red | Orange Sea | |||||||
| 45 | F | 1 | Orange Red | Orange Sea | |||||||
| 46 | G | 1 | Orange Red | Orange Sea | |||||||
| 47 | G4 | 3 | Orange Red | Orange Sea | |||||||
| 48 | A | 3 | Orange Red | Ave Bate Salt | Orange Sea | ||||||
| 49 | A4 | 3 | Orange Red | Orange Sea | |||||||
| 50 | H | 1 | 2 | Purple White H | Purple Sea | ||||||
| 51 | H | 2 | Purple White H | Purple Sea | |||||||
| 52 | C4 | 2 | Purple White H | Purple Sea | |||||||
| 53 | C1 | 1 | Blue Sea | Blue Sea | |||||||
| 54 | B4 | 2 | Blue Sea | Blue Sea | |||||||
| 55 | B4 | 1 | Blue Sea | Ave Bate Salt | Blue Sea | ||||||
| 56 | G4 | 4 | Wood White H | Wood Sea | |||||||
| 57 | F | 1 | Wood White H | Wood Sea | |||||||
| 58 | F4 | 4 | Blue Sea | Blue Sea | |||||||
| 59 | G | 1 | 2 | Orange Sea | Orange Sea | ||||||
| 60 | G4 | 2 | Orange Sea | Orange Sea | |||||||
| 61 | G4 | 2 | Orange Sea | Orange Sea | |||||||
| Exclusive Effect Type Description | ||
| MSB LS# | ||
| REVERB | ||
| 00 00 ND EFFECT Effect turned off. | ||
| 01 00 HALL1 Reverb stimulating the resonance of a hall. | ||
| 01 01 HALL2 Reverb stimulating the resonance of a hall. | ||
| 02 00 ROOM1 Reverb stimulating the resonance of a room. | ||
| 02 01 ROOM2 Reverb stimulating the resonance of a room. | ||
| 02 02 ROOM3 Reverb stimulating the resonance of a room. | ||
| 03 00 STAGE1 Reverb appropriate for a solo instrument. | ||
| 03 01 STAGE2 Reverb appropriate for a solo instrument. | ||
| 04 00 PLATE Reverb simulating a metal plate reverb unit. | ||
| 10 00 WHITE ROOM A unique short reverb with a bit of initial delay. | ||
| 11 00 TINNFI Simulation of a tunnel space expanding to left and right. | ||
| 13 00 BASEMENT A bit of initial delay followed by reverb with a unique resonance. | ||
| CHORUS | ||
| 00 00 ND EFFECT Effect turned off. | ||
| 41 00 CHORUS1 Conventional chorus program that adds natural specoursness. | ||
| 41 01 CHORUS2 Conventional chorus program that adds natural specoursness. | ||
| 41 02 CHORUS3 Conventional chorus program that adds natural specoursness. | ||
| 41 08 CHORUS4 Chorus with stereo input. The pan setting specified for the Part will also apply to the effect sound. | ||
| 12 00 CLESTE1 A 2 phase LFO acids modulation and spocciuassos to the sound. | ||
| 12 01 CLESTE2 A 3 phase LFO acids modulation and spocciuassos to the sound. | ||
| 12 02 CLESTE3 A 2 phase LFO acids modulation and spocciuassos to the sound. | ||
| 12 08 CLESTE4 Celeste with stereo input. The pan setting specified for the Part will also apply to the effect sound. | ||
| 43 00 FLANGTR1 Adda a jet-airplane effect to the sound. | ||
| 43 01 FLANGTR2 Adda a jet-airplane effect to the sound. | ||
| 43 08 FLANGTR3 Adda a jet-airplane effect to the sound. | ||
| VARIATION | ||
| 00 00 ND EFFECT Effect turned off. | ||
| 01 00 HALL1 Reverb stimulating the resonance of a hall. | ||
| 01 01 HALL2 Reverb stimulating the resonance of a hall. | ||
| 02 00 ROOM1 Reverb stimulating the resonance of a room. | ||
| 02 01 ROOM2 Reverb stimulating the resonance of an room. | ||
| 02 02 ROOM3 Reverb stimulating the resonance of a room. | ||
| 03 00 STAGE1 Reverb appropriate for a sole instrument. | ||
| 03 01 STAGE2 Reverb appropriate for a sole instrument. | ||
| 04 00 PLATE Reverb stimulating a metal plate reverb unit. | ||
| 05 00 DELAY L, C, R A program that creates three delay sounds; L, R, and C (center). | ||
| 06 00 DELAY L, R A program that creates two delay sounds; L and R. Two feedback delays are provided. | ||
| 07 00 ECIO TA two delays (L and R) and independent feedback delays for L and R. | ||
| 08 00 CROSS DELAY A program that crosses the feedback at two delays. | ||
| 09 00 EARLY REF1 An effect that produces only the early reflection component of reverb. | ||
| No | Parameter Range | Value Size | Table | Control | |
| HALL1, HALL2, ROOM 1, 2, 3, STAGE 1, 2, PLATE | |||||
| 1 | Reverb Time 0.3~30fs 0~69 table#4 | ||||
| 2 | Diffusion | 0~10 0-10 | |||
| 3 | Initial Delay 0~63 0-63 table#5 | ||||
| 4 | HPF Cutoff Thru~8.0kHz 0-52 table#3 | ||||
| 5 | LPT Cutoff 1.0k-Thru 34-60 table#3 | ||||
| 6 | |||||
| 7 | |||||
| 8 | |||||
| 9 | |||||
| 10 | Dry/Wet D63>W~D~W~D1-127 | table#5 | |||
| 11 | Rev Delay | 0~63 | 0-63 | ||
| 12 | Density | 0~3 | 0-3 | ||
| 13 | Ex/Rev Balance | +63>R ~ F=E~ F=E>R63 | 1-127 | ||
| 14 | |||||
| 15 | Feedback Level | +63~+63 | 1-127 | ||
| 16 | |||||
| WHITE ROOM, TUNNEL, BASEMENT | |||||
| 1 | Reverb Time 0.3~30fs 0~69 table#4 | ||||
| 2 | Diffusion | 0~10 0-10 | |||
| 3 | Initial Delay 0~63 0-63 table#5 | ||||
| 4 | HPF Cutoff Thru~8.0kHz 0-52 table #3 | ||||
| 5 | LPT Cutoff 1.0k-Thru 34-60 table#3 | ||||
| 6 | Width | 0.5~10.2m | 0-37 table#11 | ||
| 7 | Height | 0.5~20.2m | 0-23 table#11 | ||
| 8 | Depth | 0.5~30.2m | 0-104 table#11 | ||
| 9 | Wall Very | 0~30 0-30 | |||
| 10 | Dry/Wet D63>W~D=W~D1-127 | table#5 | |||
| 11 | Rev Delay | 0~63 | 0-63 | ||
| 12 | Density | 0~3 | 0-3 | ||
| 13 | Ex/Rev Balance | +63>R~E~R~E>R63 | 1-127 | ||
| 14 | |||||
| 15 | Feedback Level | +63~+63 | 1-127 | ||
| 16 | |||||
| DELAY L, C, R | |||||
| 1 | Lih Delay | 0.1~715.0ms | 1-7150 | ||
| 2 | Rah Delay | 0.1~715.0ms | 1-7150 | ||
| 3 | Cih Delay | 0.1~715.0ms | 1-7150 | ||
| 4 | Feedback Delay | 0.1~715.0ms | 1-7150 | ||
| 5 | Feedback Level | +63~+63 | 1-7150 | ||
| No | Parameter | Range | Value | Scc Table | Control |
| ECHO | |||||
| 1 | Lch Delay 1 0.1~355 | Dms | 1-3350 | ||
| 2 | Lch Feedback Level | -63~+63 | 1-127 | ||
| 3 | Rch Delay 1 | 0.~355.0ms | 1-3550 | ||
| 4 | Rch Feedback Level | -63~+63 | 1-127 | ||
| 5 | High Damp | 0.~1.0 | 1-10 | ||
| 6 | Lch Delay 2 0.1~355 | Dms | 1-3550 | ||
| 7 | Rch Delay 2 | 0.~355.0ms | 1-3550 | ||
| 8 | Delay 2 Level | 0~127 0-127 | |||
| 9 | |||||
| 10 | Dry/Wet D63>W-D-W-Dw63 1-127 • | ||||
| 11 | |||||
| 12 | |||||
| 13 | EQ Low Frequency | 50Hz~2.0kHz | 8-40 | table#3 | |
| 14 | EQ Low Gain | -12~+12dB | 52-76 | ||
| 15 | EQ High Frequency | 500Hz~16.0kHz | 28-58 | table#3 | |
| 16 | EQ High Gain | -12~+12dB | 52-76 | ||
| CROSS DELAY | |||||
| 11 | R>R Delay | 0.~355.0ms | 1-3550 | ||
| 2 | R>L Delay | 0.~355.0ms | 1-3550 | ||
| 3 | Feedback Level | -63~+63 | 1-27 | ||
| 4 | Input Select | L, R, L&R | 0-2 | ||
| 5 | High Damp | 0.~1.0 | 1-10 | ||
| 6 | |||||
| 7 | |||||
| 8 | |||||
| 9 | |||||
| 10 | Dry/Wet D63>W-D=W-Dw63 1-127 • | ||||
| 11 | |||||
| 12 | |||||
| 13 | EQ Low Frequency | 50Hz~2.0kHz | 8-40 | table#3 | |
| 14 | EQ Low Gain | -12~+12dB | 52-76 | ||
| 15 | EQ High Frequency | 500Hz 16.0kHz | 28-58 | table#3 | |
| 16 | EQ High Gain | -12~+12dB | 52-76 | ||
| EARLY REF1, EARLY REF2 | |||||
| 1 Type | $IL LII, Rdm, Rvs, Ph, Spr | 0-5 | |||
| 2 Room Size | 0.~7.0 | 0~4 | table#6 | ||
| 3 Diffusion | 0-10-0-10 | ||||
| 4 Initial Delay | 0-63 0-63 table#5 | ||||
| 5 Feedback Level | -63~+63 | 1-72 | |||
| No | Parameter | Range Value See | Table | Control | |
| KARAOKE 1, 2, 3 | |||||
| 1 | Delay Time 0~127 0~127 table#7 | ||||
| 2 | Feedback Level -63~+63 1-127 | ||||
| 3 | LPF Cutoff Thru-8.0kHz 0-52 | ||||
| 4 | LPF Cutoff 1.0k-Thru 34-60 | ||||
| 5 | |||||
| 6 | |||||
| 7 | |||||
| 8 | |||||
| 9 | |||||
| 10 | Dry/Wet D63>W~D=W~D | ||||
| 11 | |||||
| 12 | |||||
| 13 | |||||
| 14 | |||||
| 15 | |||||
| 16 | |||||
| CHORUS 1, 2, 3, 4. CELESTE 1, 2, 3, 4 | |||||
| 1 | LIO Frequency 0.00~39.7Hz 0-127 table#1 | ||||
| 2 | LIO PM Depth 0~127 0-127 | ||||
| 3 | Feedback Level -63~+63 1-127 | ||||
| 4 | Delay Offset 0~127 0-127 table#2 | ||||
| 5 | |||||
| 6 | EQ Low Frequency 50Hz~2.0kHz 8-40 table#3 | ||||
| 7 | EQ Low Gain -12~+12dB 52-76 | ||||
| 8 | EQ High Frequency 500Hz~16.0kHz 28-58 table#3 | ||||
| 9 | EQ High Gain -12~+12dB 52-76 | ||||
| 10 | Freq/Wet D63>X~I=W~D≤W63 1-127 | ||||
| 11 | |||||
| 12 | |||||
| 13 | |||||
| 14 | |||||
| 15 | Input Mode mm/screo 0-1 | ||||
| 16 | |||||
| FLANGER 1, 2, 3 | |||||
| 1 | LIO Frequency 0.00~39.7Hz 0-127 table#1 | ||||
| 2 | LIO Depth 0~127 0-127 | ||||
| 3 | Feedback Level -63~+63 1-127 | ||||
| 4 | Delay Offset 0~63 0-33 table#2 | ||||
| 5 | |||||
| 6 | EQ Low Frequency 50Hz~2.0kHz 8-40 table#3 | ||||
| 7 | EQ Low Gain -12~+12dB 52-76 | ||||
| 8 | EQ High Frequency 500Hz~16.0kHz 28-58 table#3 | ||||
| No | Parameter | Range Value See | Table | Control | |
| ROTARY SPEAKER | |||||
| 1 | LFO Frequency 0.00~39.7Hz | 0-127 table#1 | • | ||
| 2 | LFO Depth 0~127 0~127 | ||||
| 3 | |||||
| 4 | |||||
| 5 | |||||
| 6 | EQ Low Frequency 50Hz~2.0kHz | 8-40 | table#3 | ||
| 7 | EQ Low Gain -1~+12dB | 52-76 | |||
| 8 | EQ High Frequency 500Hz~16.0kHz | 28-58 table#3 | |||
| 9 | EQ High Gain -1~+12dB | 52-76 | |||
| 10 | Dry/Wet Dx3>W~D=W~D1-127 | ||||
| 11 | |||||
| 12 | |||||
| 13 | |||||
| 14 | |||||
| 15 | |||||
| 16 | |||||
| TREMOLO | |||||
| 1 | LFO Frequency 0.00~39.7Hz | 0-127 table#1 | • | ||
| 2 | AM Depth 0~127 0-127 | ||||
| 3 | PM Depth 0~127 0-127 | ||||
| 4 | |||||
| 5 | |||||
| 6 | EQ Low Frequency 50Hz~2.0kHz | 8-40 | table#3 | ||
| 7 | EQ Low Gain -1~+12dB | 52-76 | |||
| 8 | EQ High Frequency 500Hz~16.0kHz | 28-58 tables#3 | |||
| 9 | EQ High Gain -1~+12dB | 52-76 | |||
| 10 | |||||
| 11 | |||||
| 12 | |||||
| 13 | |||||
| 14 | 4-124 | ||||
| 15 | Input Mode monolscreto 0-1 | ||||
| 16 | |||||
| AUTO PAN | |||||
| 1 | LFO Frequency 0.00~39.7Hz | 0-127 table#1 | • | ||
| 2 | L/R Depth 0~127 0-127 | ||||
| 3 | F/R Depth 0~127 0-127 | ||||
| 4 | PAN Direction L<->R, L->R, L<->R, Lturn, Rturn, L/R | 0-5 | |||
| 5 | |||||
| 6 | EQ Low Frequency 50Hz~2.0kHz | 8-40 | table#3 | ||
| 7 | EQ Low Gain -1~+12dB | 52-76 | |||
MIDI Data Format
| No | Parameter | Range | Value See Table | Control | |
| DISTORTION, OVERDRIVE | |||||
| 1 | Drive 0~127 0-127 • | 5MHz~2.0kHz 8-40 table#3 | |||
| 2 | EQ Low Frequency | ||||
| 3 | EQ Low Gain -12~+1 | 12dB 52-76 | |||
| 4 | LPT Cutoff 1.0k~Thru 34-60 table#3 | ||||
| 5 | Output Level 0~127 0-127 | ||||
| 6 | |||||
| 7 | EQ Mid Frequency | 500Hz~10.0kHz 28-54 table#3 | |||
| 8 | EQ Mid Gain -12~+1 | 12dB 52-76 | |||
| 9 | EQ Mid Width 1.0~12 | 2.0 10-120 | |||
| 10 | Dry/Wet | D63~W~D=W~D1-127 | |||
| 11 | Edge (Clip Curve) | 0~127 | 0-127 | mild-sharp | |
| 12 | |||||
| 13 | |||||
| 14 | |||||
| 15 | |||||
| 16 | |||||
| GUITAR AMP SIMULATOR | |||||
| 1 | Drive 0~127 0-127 • | Off, Stack, Combo, Tube 0-3 | |||
| 2 | AMP Type | ||||
| 3 | LPT Cutoff 1.0k~Thru 34-60 table#3 | ||||
| 4 | Output Level 0~127 0-127 | ||||
| 5 | |||||
| 6 | |||||
| 7 | |||||
| 8 | |||||
| 9 | |||||
| 10 | Dry/Wet | D63~W~D=W~D1-127 | |||
| 11 | Edge (Clip Curve) | 0-127 | 0-127 | mild-sharp | |
| 12 | |||||
| 13 | |||||
| 14 | |||||
| 15 | |||||
| 16 | |||||
| 3-BAND EQ | |||||
| 1 | EQ Low Gain -12~+1 | 12dB 52-76 | |||
| 2 | EQ Mid Frequency | 500Hz~10.0kHz 28-54 table#3 | |||
| 3 | EQ Mid Gain -12~+1 | 2dB 52-76 | |||
| 4 | EQ Mid Width 1.0~12 | 2.0 10-120 | |||
| 5 | EQ High Gain -12~+1 | 2dB 52-76 | |||
| 6 | EQ Low Frequency | 50Hz~2.0kHz 8-40 table#3 | |||
| 7 | EQ High Frequency | 500Hz~16.0kHz 28-58 table#3 | |||
| No | Parameter | Range | Value See Table | Control |
| 2-BAND EQ | ||||
| 1 | EQ Low Frequency | 50Hz~2.0kHz | 8-10 table#3 | |
| 2 | EQ Low Gain -12~+12dB 52-76 | 12dB 52-76 | ||
| 3 | EQ High Frequency | 500Hz~16.0kHz 28-58 table#3 | ||
| 4 | EQ High Gain -12~+12dB 52-76 | |||
| 5 | ||||
| 6 | ||||
| 7 | ||||
| 8 | ||||
| 9 | ||||
| 10 | ||||
| 11 | EQ Mid Frequency | 100Hz~10.0kHz 14-54 table#3 | ||
| 12 | EQ Mid Gain -12~+12dB 52-76 | |||
| 13 | EQ Mid Width 1.0~12.0 10-120 | |||
| 14 | ||||
| 15 | ||||
| 16 | ||||
| AUTO WAH | ||||
| 1 | LFO Frequency | 0.00~39.7Hz | 0-127 | table#1 |
| 2 | LFO Depth 0~127 0~127 | |||
| 3 | Cutoff Frequency 0~127 0-127 * | |||
| 4 | Resonance 1.0~12.0 10-120 | |||
| 5 | ||||
| 6 | EQ Low Frequency | 50Hz~2.0kHz | 8-40 table#3 | |
| 7 | EQ Low Gain -12~+12dB 52-76 | |||
| 8 | EQ High Frequency | 500Hz~16.0kHz 28-58 table#3 | ||
| 9 | EQ High Gain -12~+12dB 52-76 | |||
| 10 | Dry/Wet | Dn3>W~0=W~01~Dw63 | 1-127 | |
| 11 | ||||
| 12 | ||||
| 13 | ||||
| 14 | ||||
| 15 | ||||
| 16 | ||||
| LFO Freq (Hz) | ||||
| Date | Value | Date | Value | Date |
| 06/08 | 431.91 | 953.38 | ||
| 11/08 | 417.95 | 872.55 | ||
| 20/08 | 451.89 | 988.72 | ||
| 30/09 | 461.94 | 999.06 | ||
| 40/09 | 471.98 | 906.59 | ||
| 50/09 | 482.02 | 910.73 | ||
| 60/09 | 492.05 | 922.07 | ||
| 70/09 | 502.10 | 937.46 | ||
| 80/09 | 512.14 | 946.74 | ||
| 90/09 | 522.19 | 955.08 | ||
| 100/09 | 532.23 | 965.41 | ||
| 110/09 | 542.27 | 976.75 | ||
| 120/09 | 552.31 | 989.08 | ||
| 130/09 | 562.35 | 999.42 | ||
| 140/09 | 572.40 | 1000.75 | ||
| 150/09 | 582.44 | 1010.10 | ||
| 160/09 | 592.48 | 1020.80 | ||
| 170/09 | 602.52 | 1031.40 | ||
| 180/09 | 612.57 | 1041.20 | ||
| 190/09 | 622.61 | 1052.80 | ||
| 200/09 | 632.65 | 1063.50 | ||
| 210/09 | 642.69 | 1074.10 | ||
| 220/09 | 652.78 | 1084.80 | ||
| 230/09 | 662.85 | 1095.60 | ||
| 240/09 | 672.94 | 1106.20 | ||
| 250/09 | 683.03 | 1116.60 | ||
| 260/09 | 693.11 | 1127.00 | ||
| 270/09 | 703.19 | 1138.20 | ||
| 280/09 | 713.28 | 1148.50 | ||
| 290/09 | 723.37 | 1158.90 | ||
| 300/09 | 733.45 | 1168.20 | ||
| 310/09 | 743.53 | 1178.60 | ||
| 320/09 | 753.62 | 1188.40 | ||
| 330/09 | 763.70 | 1198.20 | ||
| 340/09 | 773.87 | 1208.70 | ||
| 350/09 | 784.04 | 1218.50 | ||
| 360/09 | 794.21 | 1228.90 | ||
| 370/09 | 804.37 | 1238.10 | ||
| 380/09 | 814.54 | 1248.30 | ||
| 390/09 | 824.71 | 1258.50 | ||
| 400/09 | 834.89 | 1268.70 | ||
| 410/09 | 845.05 | 1278.90 | ||
| 420/09 | 855.32 | |||
| Table#2 Modulation Delay Offset (ms) | |||||
| Date | Value | Date | Value | Date | Value |
| 3:00 | 43.3 | 99.86 | |||
| 1:31 | 44.4 | 87.5 | |||
| 2:02 | 40.5 | 99.80 | |||
| 3:03 | 46.8 | 80.80 | |||
| 4:04 | 47.7 | 90.90 | |||
| 5:05 | 48.8 | 91.91 | |||
| 6:06 | 49.9 | 92.02 | |||
| 7:07 | 50.0 | 93.03 | |||
| 9:08 | 51.3 | 94.94 | |||
| 9:09 | 52.2 | 95.95 | |||
| 10:10 | 53.3 | 96.96 | |||
| 11:11 | 54.4 | 97.97 | |||
| 12:12 | 55.5 | 98.98 | |||
| 13:13 | 56.5 | 99.99 | |||
| 14:14 | 57.7 | 100.10 | |||
| 15:15 | 58.8 | 101.11 | |||
| 16:16 | 59.9 | 102.12 | |||
| 17:17 | 60.0 | 103.13 | |||
| 18:18 | 61.1 | 104.14 | |||
| 19:19 | 62.2 | 105.15 | |||
| 20:20 | 63.3 | 106.16 | |||
| 21:21 | 64.4 | 107.17 | |||
| 22:22 | 65.5 | 108.18 | |||
| 23:23 | 66.6 | 109.19 | |||
| 24:24 | 67.7 | 110.20 | |||
| 25:25 | 68.8 | 111.21 | |||
| 26:26 | 69.9 | 112.22 | |||
| 27:27 | 70.0 | 113.23 | |||
| 28:28 | 71.1 | 114.24 | |||
| 29:29 | 72.2 | 115.25 | |||
| 30:30 | 73.3 | 116.26 | |||
| 31:31 | 74.4 | 117.27 | |||
| 32:32 | 75.5 | 118.28 | |||
| 33:33 | 76.6 | 119.29 | |||
| 34:34 | 77.7 | 120.30 | |||
| 35:35 | 78.8 | 121.31 | |||
| 36:36 | 79.9 | 122.32 | |||
| 37:37 | 80.0 | 123.33 | |||
| 38:38 | 81.1 | 124.34 | |||
| 39:39 | 82.2 | 125.35 | |||
| 40:40 | 83.3 | 126.36 | |||
| 41:41 | 84.4 | 127.37 | |||
| 42:42 | 85.5 | ||||
| Date | Value | Date | Value |
| 9 | 11R0/20 | 43 | 2.6k |
| 1 | 22 | 44 | 1.9k |
| 2 | 25 | 45 | 3.6k |
| 3 | 28 | 46 | 4.0k |
| 4 | 32 | 47 | 4.5k |
| 5 | 36 | 48 | 5.0k |
| 6 | 40 | 49 | 5.6k |
| 7 | 45 | 50 | 6.5k |
| 8 | 50 | 51 | 7.0k |
| 9 | 56 | 52 | 8.0k |
| 10 | 63 | 53 | 9.0k |
| 11 | 70 | 54 | 10.0k |
| 12 | 83 | 55 | 11.0k |
| 13 | 90 | 56 | 12.0k |
| 14 | 100 | 57 | 13.0k |
| 15 | 110 | 58 | 14.0k |
| 16 | 125 | 59 | 15.0k |
| 17 | 140 | 60 | 16.0k |
| 18 | 160 | ||
| 19 | 180 | ||
| 20 | 200 | ||
| 21 | 205 | ||
| 22 | 250 | ||
| 23 | 290 | ||
| 24 | 315 | ||
| 25 | 355 | ||
| 26 | 400 | ||
| 27 | 450 | ||
| 28 | 500 | ||
| 29 | 580 | ||
| 30 | 630 | ||
| 31 | 700 | ||
| 32 | 800 | ||
| 33 | 900 | ||
| 34 | 1000 | ||
| 35 | 1100 | ||
| 36 | 1200 | ||
| 37 | 1300 | ||
| 38 | 1400 | ||
| 39 | 1500 | ||
| 40 | 2000 | ||
| 41 | 2200 | ||
| 42 | 2500 |
| Table#4 | |||
| Revers Time (ms) | |||
| Data | Value | Data | Value |
| 3 | 0.5 | 43 | 6.5 |
| 1 | 0.4 | 44 | 6.7 |
| 2 | 0.5 | 45 | 6.8 |
| 3 | 0.6 | 46 | 6.9 |
| 4 | 0.7 | 47 | 7.0 |
| 5 | 0.8 | 48 | 7.1 |
| 6 | 0.9 | 49 | 7.2 |
| 7 | 1.0 | 50 | 7.3 |
| 8 | 1.1 | 51 | 7.4 |
| 9 | 1.2 | 52 | 7.5 |
| 10 | 1.3 | 53 | 8.0 |
| 11 | 1.4 | 54 | 8.1 |
| 12 | 1.5 | 55 | 8.2 |
| 13 | 1.6 | 56 | 8.3 |
| 14 | 1.7 | 57 | 10.0 |
| 15 | 1.8 | 58 | 11.0 |
| 16 | 1.9 | 59 | 12.0 |
| 17 | 2.0 | 60 | 13.0 |
| 18 | 2.1 | 61 | 14.0 |
| 19 | 2.2 | 62 | 15.0 |
| 20 | 2.3 | 63 | 16.0 |
| 21 | 2.4 | 64 | 17.0 |
| 22 | 2.5 | 65 | 18.0 |
| 23 | 2.6 | 66 | 19.0 |
| 24 | 2.7 | 67 | 20.0 |
| 25 | 2.8 | 68 | 21.0 |
| 26 | 2.9 | 69 | 22.0 |
| 27 | 3.0 | 70 | 23.0 |
| 28 | 3.1 | ||
| 29 | 3.2 | ||
| 30 | 3.3 | ||
| 31 | 3.4 | ||
| 32 | 3.5 | ||
| 33 | 3.6 | ||
| 34 | 3.7 | ||
| 35 | 3.8 | ||
| 36 | 3.9 | ||
| 37 | 4.0 | ||
| 38 | 4.1 | ||
| 39 | 4.2 | ||
| 40 | 4.3 | ||
| 41 | 4.4 | ||
| 42 | 4.5 | ||
| Table#5Delay Time (ms) | |||||
| Data | Value | Data | Value | Data | Value |
| 0 | 0.1 | 43 | 87.6 | 88 | 135.5 |
| 1 | 1.7 | 44 | 59.4 | 87 | 137.0 |
| 2 | 0.2 | 45 | 70.9 | 89 | 130.6 |
| Data | Value | Data | Value |
| 0 | 0.1 | 43 | 8.8 |
| 1 | 0.3 | 44 | 7.0 |
| 2 | 0.4 |
| Table#7Delay Time (ms) | |||||
| Data | Value | Data | Value | Data | Value |
| 0 | 0.1 | 43 | 136.5 | 88 | 270.9 |
| 1 | 3.2 | 44 | 138.6 | 87 | 274.0 |
| 2 | 5.4 | 45 | 141.0 | 95 | 277.2 |
| Table#8 | |||||
| Reverb Width: Depth; Height | |||||
| Data | Value | Data | Value | Data | Value |
| 0 | 0.5 | 43 | 11.8 | 86 | 24.2 |
| 1 | 0.8 | 44 | 12.1 | 87 | 24.6 |
| 2 | 1.0 | 45 | 12.3 | 99 | 24.8 |
| Function... Transmitted Recognized Remarks | |||||
| Basic Default 1-16 1-16 Memorized Channel Changed 1-16 1-16 | |||||
| Default 3 3 Mode Messages x Altered********** | 3,4 (m=1) × | *2, *3 | |||
| Note Number : True voice | 0-127********** | 0-127 | |||
| 0-127 | |||||
| Velocity Note ON Note OFF | ○ 9nH, v=1-127 v=1-127○ 8nH, v=0-127 | ○ | |||
| ○ | |||||
| After Touch | Key s Ch s | ○ × | *4 | ○ | |
| ○ | *1, *2 | ||||
| Pitch Bend | × | ○ 0-24 semi | *1, *2 | ||
| Control Change | 0, 32 | ○ | ○ | *1, *2 | |
| 7, 11 | ○ | ○ | *1 | ||
| 1, 5, 10 | × | ○ | *1, *2 | ||
| 6, 38 | × | ○ | *2 | ||
| 64 | ○ | ○ | |||
| 65 × | ○ *2 | Portament | |||
| 66 × | ○ *2 | Sostenuto | |||
| 67 × | ○ *2 | Soft (Shift) Pedal | |||
| 71-74, 84 | × | ○ | *2 | ||
| 91, 93, 94 | × | ○ | *2 | ||
| 96-101 | × | ○ | *1,*2 | ||
| Prog Change : True # | ○ 0-127********** | ○ 0-127 | *2 | ||
| System Exclusive | ○ | ○ | |||