SSK-CAMRY4DR - Car accessory Soundskins - Free user manual and instructions
Find the device manual for free SSK-CAMRY4DR Soundskins in PDF.

User questions about SSK-CAMRY4DR Soundskins
0 question about this device. Answer the ones you know or ask your own.
Ask a new question about this device
Download the instructions for your Car accessory in PDF format for free! Find your manual SSK-CAMRY4DR - Soundskins and take your electronic device back in hand. On this page are published all the documents necessary for the use of your device. SSK-CAMRY4DR by Soundskins.
USER MANUAL SSK-CAMRY4DR Soundskins
Sedan Door Kit Instructions
Tools needed for installation:
- Panel/trim tool
- Roller
-
Screw driver
-
Microfiber cloth
• Acetone or cleaning solution - Razor blade

natural_image
Interior view of a car showing a hand adjusting the dashboard and seatbelt (no visible text or symbols)- Start by locating the fastening hardware on the door panel. Take the appropriate screw driver and remove. Once all the screws are removed you can take off the door panel gently using a panel tool, watching that you don't break any of the clips or mounting hardware.

natural_image
Close-up of a medical procedure showing gloved hands performing a procedure on a patient's arm (no visible text or symbols)- Pull the panel away slowly and unplug any electrical connections.

natural_image
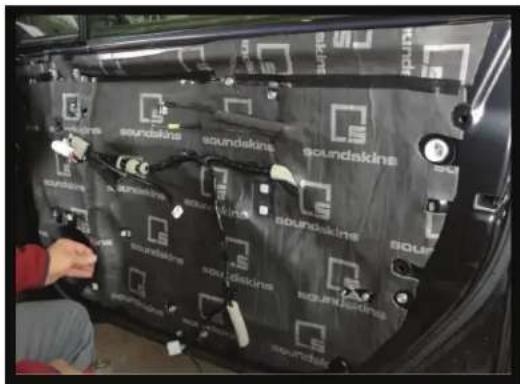
Worker in red uniform and gray cap inspecting a car interior with visible wiring and components (no text or symbols)- Now you are ready to prep the metal surface using a microfiber cloth and Acetone (or other cleaning solution). Wipe away any moisture, oil, debris, etc. Then, let it air dry for an appropriate time. The point is to get the surface clean to ensure material glue contact.
text_image
soundakins soundakins soundakins soundakins soundakins soundakins soundakins soundakins soundakins soundakins soundakins soundakins soundakins soundakins soundakins soundakins soundakins soundakins soundakins soundakins soundakins soundakins soundakins soundakins soundakins soundakins- Locate the piece of the kit with the label on the back that coincides with the door you're working on. Make sure it lines up and is correct before you pull the white cover paper off. After you confirm the right piece, pull off the white paper and use a roller to apply the material at the top and work your way down. Use a razor blade or household needle to release air. Repeat for all door panels.
natural_image
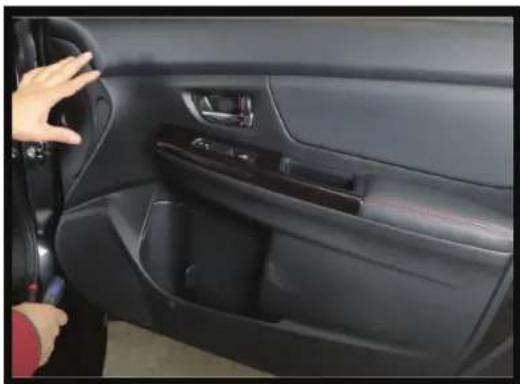
Interior view of a car showing the dashboard and steering wheel (no visible text or symbols)- Now you are ready to place the door panel back on your door. All necessary openings will be available after you have applied the SoundSkins material. Secure your door panels with all screws and enjoy your quiet new ride!
YOU'RE NOW READY TO HIT THE ROAD!
SoundSkins USA 13452 Alondra Blvd, Cerritos, Ca 90703 Phone: 877.211.5597 Email: team@soundskinsglobal.com www.SoundSkinsGlobal.com
Recommended Installation Instructions
A. Prepping the Surface
After removing interior door panels you are ready to clean the metal areas that will be insulated. If the metal has "new" look without imperfections then take a microfiber cloth and wipe away any dust and debris. If the metal is showing signs of age like rust then we recommend using Acetone with a breathing mask to wipe off debris and loose particles. A shop vacuum might be needed to remove loose debris on the floorboard.
B. Installing Panels
Now that you have a clean surface you are ready to start applying the sheets. We recommend a roller to release air pockets that might be lingering from trapped air. You want to make sure that you have rolled those out to the edge and all the material has a good seal to the metal surface. Make sure all pieces are installed and inspected before reinstalling the interior.

text_image
sound fire sound fire sound fire sound fire sound fire sound fire sound fire sound fire sound fire sound fire sound fire sound fire sound fire sound fire sound fire sound fire sound fire sound fire sound fire sound fire sound fire sound fire sound fire sound fire sound fire sound fire sound fire sound fire sound fire sound fire sound fire sound fire sound fire sound fire woodfire woodfire woodfire woodfire woodfire woodfire woodfire woodfire woodfire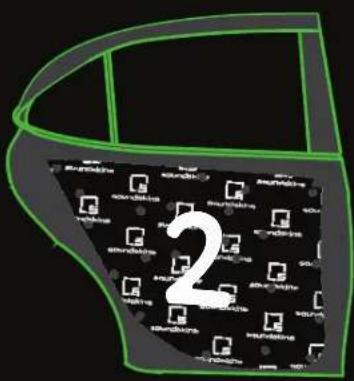
text_image
2
natural_image
Top-down line drawing of a car with green outline lines, no text or symbols present
text_image
soundshine soundshine soundline soundshine soundshine soundline soundshine soundline soundline soundshine soundline soundline soundshine soundline soundline soundshine soundline soundline soundshine soundline soundline soundshine soundline soundline soundshine soundline soundline soundshine soundline soundline 3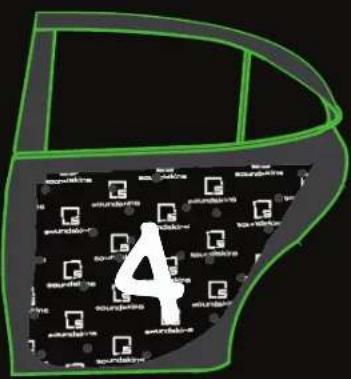
text_image
41) Driver Front Door Panel
2) Driver Rear Door Panel
3) Passenger Front Door Panel
4) Passenger Rear Door Panel