GOG100R - Cooker GEMINI - Free user manual and instructions
Find the device manual for free GOG100R GEMINI in PDF.

User questions about GOG100R GEMINI
0 question about this device. Answer the ones you know or ask your own.
Ask a new question about this device
Download the instructions for your Cooker in PDF format for free! Find your manual GOG100R - GEMINI and take your electronic device back in hand. On this page are published all the documents necessary for the use of your device. GOG100R by GEMINI.
USER MANUAL GOG100R GEMINI
READ ALL INSTRUCTIONS BEFORE USING THE APPLIANCE. UNPLUG THE APPLIANCE FROM POWER SOURCE BEFORE CLEANING OR WHEN NOT IN USE.
When using electrical appliances, especially when children are present, basic safety precautions should always be followed, including the following:
- This unit is not intended to be used by people (including children) with reduced physical, sensory or mental capabilities, or by persons who lack experience or knowledge, unless they are supervised or have been given instructions beforehand on the use of the unit by a person responsible of their safety.
- Children should be supervised to ensure that they do not play with the appliance.
- Cleaning and user maintenance shall not be made by children aged below 8 years or children without supervision.
- Never immerse the unit into water or any other liquid.
- ALWAYS place the unit on a heat-resistant glass, wood or stone surface. Do not place on any counter or table that may be affected by high heat.
- If the supply cord is damaged, stop using it in case of any accidents and please contact our after-sales service center for assistance.
- Unplug the unit immediately if you have problems when using it.
- Do not use any accessories other than those provided by manufacturer.
- Do not operate the unit outdoors.
- Do not touch the hot surfaces. Use oven mitts when handling the heated unit.
- When opening the Glass Lid while roasting or cooking, heat and steam may escape. Stand away from the Lid and use oven mitts to handle any hot surfaces of the Lid or unit.
- Extreme caution must be used when moving an appliance containing hot oil or other hot liquids.
- Allow the unit to completely cool off before storing.
- Use of an extension cord is not recommended.
- Never pull cord to disconnect form outlet, instead, grasp plug and pull to disconnect.
KEEP THESE INSTRUCTIONS FOR FUTURE REFERENCE.
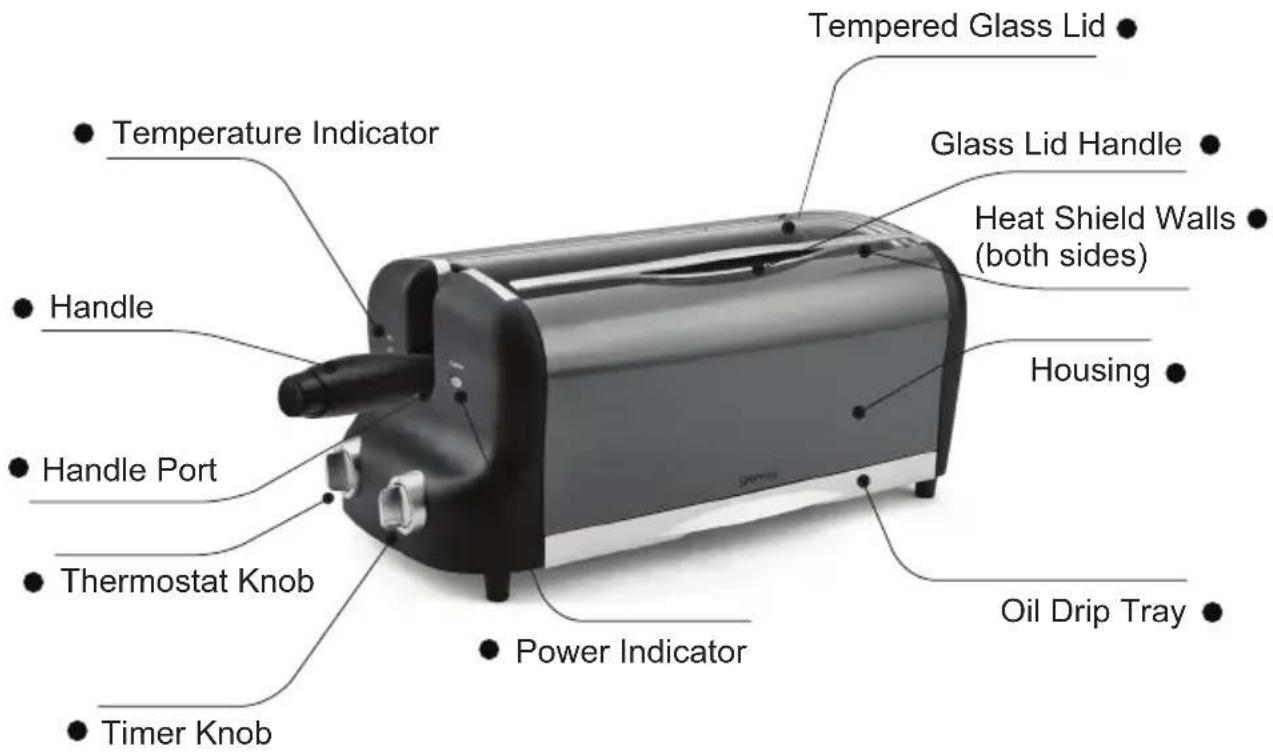
PARTS OF APPLIANCE
text_image
Tempered Glass Lid Glass Lid Handle Heat Shield Walls (both sides) Housing Oil Drip Tray Power Indicator Timer Knob Thermostat Knob Handle Port Handle Temperature IndicatorACCESSORIES

text_image
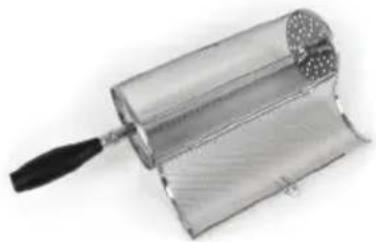
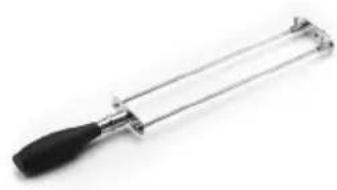
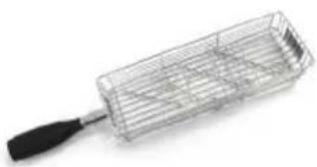
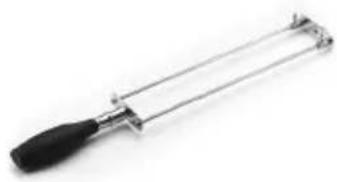
Round Cage Set Chicken Roaster Set Multi-purpose Basket Set Rack Skewers x 4pcs Screws for Chicken Roaster and Round Cage GloveROUND CAGE INSTALLATION

natural_image
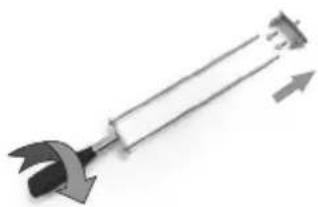
Close-up of a black-handled screwdriver with a metallic handle (no text or symbols visible)- Tighten the handle on the rod (see Image 1).
natural_image
Metallic cylindrical device with a textured top and black handle, resembling a mechanical or electronic component (no visible text or symbols)- Insert the rod into the round cage.

natural_image
Close-up of a metallic cylindrical object with internal grooves and a small protrusion (no visible text or symbols)- Fix the rod with a screw.
CHICKEN ROASTER INSTALLATION

natural_image
Illustration of a mechanical tool with directional arrows (no text or symbols)- Tighten the handle (see Image 1) and loose the fixer and screws..

natural_image
Close-up of a hand using a tool to adjust or install a metal component (no visible text or symbols)- Tighten the screws and fixer (after slide foods on the rod).
natural_image
Metal measuring tool with black handle and metal frame (no text or symbols visible)- Installation done.
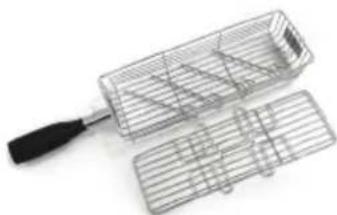
MULTI-PURPOSE BASKET INSTALLATION

natural_image
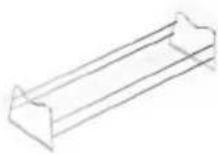
Metal wire cage with a black tool inserted into it, no text or symbols visible- Tighten the handle (see Image 1).

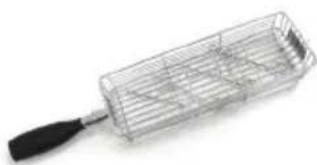
natural_image
Metal wire cage with a black handle, isolated on white background (no text or symbols)- The basket is fixed with handle.

natural_image
Metal grating with a black handle, shown in two different angles (no text or symbols visible)- Press the tabs together and remove the cover.

natural_image
Two wire mesh grating or filter units with a black handle, shown from different angles (no text or symbols visible)- Put foods inside the basket or insert the foods in each skewer, then place inside the basket.
natural_image
Metal wire cage with black handle, no visible text or symbols- Lock the cover to the appropriate position.

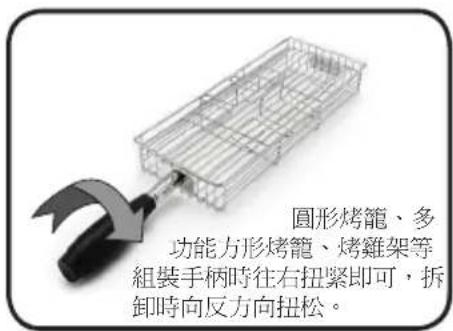
text_image
When assembling the handle (of cage, chicken roaster or basket), tighten it at clockwise direction and loose it at anti-clockwise direction.Image 1
HOW TO ASSEMBLE
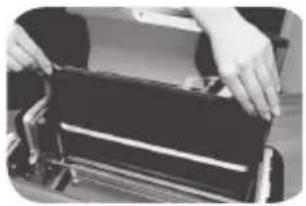
- Heat Shield Walls (two pieces)
natural_image
Close-up of hands operating a black electronic device with a white stripe (no visible text or symbols)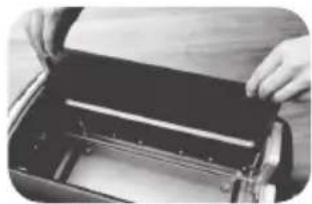
natural_image
Person handling a black rectangular object with a ruler inside, no visible text or symbols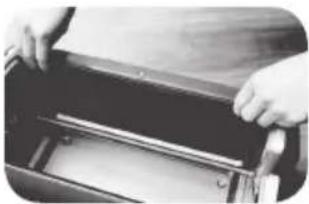
natural_image
Close-up of hands installing or adjusting a metal panel inside a container (no visible text or symbols)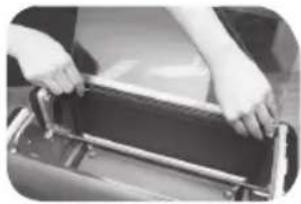
natural_image
Close-up of hands holding a black object with a handle, possibly part of a vehicle or machine (no visible text or symbols)It is easy to put both walls in or take them out from the machine.
- Oil Drip Tray

natural_image
Close-up of a hand pressing down on a surface with a rolled document or sheet in the background (no visible text or symbols)
natural_image
Hand holding a tablet device on a wooden surface (no visible text or symbols)Grab the handle to pull it out and push in.
- How to position chicken roaster (same method for round cage and basket)

natural_image
Close-up of a mechanical bracket or mounting bracket with metal fittings and bolts (no visible text or symbols)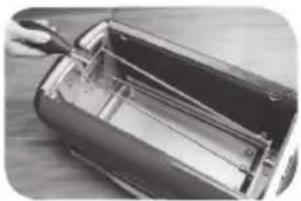
natural_image
Close-up of a mechanical component with internal structure and handle (no visible text or symbols)
natural_image
Close-up of a hand adjusting a mechanical component with wires (no visible text or symbols)
natural_image
Close-up of a hand using a tool to adjust or install a mechanical component (no visible text or symbols)Hold the handle and insert the front end into the Drive port then lower down the handle to the Handle port.
- How to take out chicken roaster (same method for round cage and basket)

natural_image
Close-up of a hand adjusting a metal component with wires (no visible text or symbols)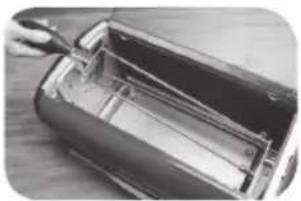
natural_image
Close-up of a cylindrical device with internal components, possibly battery or motor (no visible text or symbols)Hold and raise the handle, slightly pull, then take the chicken roaster out.
OPERATION INSTRUCTIONS
Before using for the first time
1) Remove all packing materials.
2) Assemble the product.
3) Position the product on a flat surface.
4) Add some water in the oil drip tray in order to easily remove the oil dripping during cooking.
5) Place the loaded roaster/cage/basket into the oven chamber with the square tip end towards the Drive port, resting the handle on the Handle port. Press down into place until it locks securely. Set the required temperature and time for the food and the rotisserie operation starts automatically.
6) Set the max temperature and timer at 5-10 minutes to start for the first time. (The above procedure is to remove the odor of the product. Odor occurrence is normal for the first use.)
7) Select correct accessories to start cooking.
Temperature/Timer settings
Temperature is adjustable from 125 to 250°C. And the cooking time is adjustable from 0 to 60 minutes.
Set suitable temperature and time depending on the type of food.
NOTE:
1) Light smoke or burning odor may be emitted during the first few uses. This is normal because the product is burning off the excess lubricants.
2) During cooking, the temperature indicator will switch on and off when it reaches the set temperature. This is normal. It does this to regulate the temperature inside and therefore evenly cook your food.
CLEANING AND MAINTENANCE
- After the heat shield walls have cooled down, remove them from the unit. Wash with a non-abrasive cleaner or place in the dishwasher.
- Wipe base unit with a warm sudsy cloth after it has cooled. Wipe clean with a dry cloth. Do not use abrasive cleaners or scouring pads. Do not immerse the machine in water or let water get into the machine as it could damage the electronics and motor.
- Before cleaning, be sure the machine is turned off, unplugged and completely cooled down. Disassemble each accessory, and wash in warm, sudsy water or place the removable accessories in the dishwasher. Do not use abrasive cleaners or scouring pads to clean with it.
NOTE: Always completely dry each component and assemble the machine properly before storing.
SPECIFICATIONS
Model: GOG100R Rated Voltage: 220V-240V\~ Rated Frequency: 50/60Hz Rated Power: 1000-1100W Temperature setting: 125-250°C Time Setting: 0-60 minutes Product dimension (mm): 523(W) x 230 (H) x 256 (D)
RECIPES
HERB COATED ROAST BEEF
Ingredients
- 1 TEASPOON CUMIN SEEDS
- 1 TEASPOON CORIANDER SEEDS
- 1/2 CUP PACKED FRESH PARSLEY LEAVES
- 2 TABLESPOONS OLIVE OIL
- 4 CLOVES GARLIC, CHOPPED
- 1 TABLESPOON GRATED PEELED FRESH GINGER
- 1 TEASPOON SEA SALT
- 1/2 TEASPOON FRESHLY GROUND PEPPER
- 1 (3-POUND) EYE ROUND BEEF ROAST, TRIMMED OF EXCESS FAT
Directions
In a small skillet, toast the cumin and coriander seeds over low heat until fragrant, 2 to 3 minutes. Cool. Transfer the seeds to a chopper and pulse until coarsely ground. Add the parsley, oil, garlic, ginger, salt and pepper and pulse to form a thick paste. Rub the roast all over with the herb paste. Slide the roast on the Rotisserie Rod, centering it in the middle of the Rod. With kitchen string, tie the roast firmly in 2-inchintervals into a cylindrical shape.
Add 2 to 3 tablespoons water to the Oil Drip Tray and slide back into place. Place the loaded Rod into the Oven chamber with the square tip end toward the Drive Port, resting the handle on the Handle Port. Press down into place until it locks securely. Close the Glass Lid. Set the Temperature to 175°C and the Timer to 1 hour and roast. Add 2 to 3 tablespoons water to the Oil Drip Tray and slide back into place. Reset the Timer to 20 minutes and roast until finished.
Place the roast on the Rack over a cutting board and let stand 10 minutes. Remove the Rod and cut off the kitchen string. Cut into thin slices.
SPANISH ROTISSERIE PORK TENDERLOIN WITH PEPPERS
Ingredients
- 2 1/2 TABLESPOONS EXTRA VIRGIN OLIVE OIL
- 2 TABLESPOONS MINCED RED ONION
- 1 TABLESPOON CHOPPED FRESH THYME
- 2 CLOVES GARLIC, CRUSHED WITH GARLIC PRESS
- 1 TABLESPOON SHERRY VINEGAR
- 1 TEASPOON GROUND CUMIN
- 1 TEASPOON SEA SALT
- 1/2 TEASPOON HOT PAPRIKA
- 1 MEDIUM RED BELL PEPPER, THICKLY SLICED
- 1 MEDIUM GREEN BELL PEPPER, THICKLY SLICED
Directions
Marinade: In a small bowl, whisk together 2 tablespoons oil, onion, thyme, vinegar, garlic, cumin, 3/4 teaspoon salt and paprika. Place the pork in a large plastic zip-close bag. Add the marinade, squeeze out the air and seal the bag, turn to coat the pork. Marinate the pork in the refrigerator, turning the bag occasionally, at least 4 hours or up to 8 hours.
Meanwhile, in a medium bowl, toss together the peppers, remaining 1/2 tablespoon oil and 1/4 teaspoon salt. Add 2 to 3 tablespoons water to the Oil Drip Tray and slide back into place. Press the top of the Basket tabs together to remove the lid and open the basket. Fill with the peppers and replace the Basket lid. Place the loaded Basket into the Oven chamber with the square tip end toward the Drive Port, resting the handle on the Handle Port. Press down into place until it locks securely. Close the Glass Lid. Set the Temperature to 250°C and the Timer to 30 minutes. Roast until the peppers are tender and evenly charred. Transfer the peppers to a plate.
Add 2 to 3 tablespoons water to the Oil Drip Tray and slide back into place. Slide the pork on the Rotisserie Rod, centering it in the middle of the Rod. Fold the narrow end underneath the pork. With kitchen string, tie the pork firmly in 11/2-inch intervals into a cylindrical shape. Place the loaded Rod into the Oven chamber with the square tip end toward the Drive Port, resting the handle on the Handle Port. Press down into place until it locks securely. Close the Glass Lid. Set the Temperature to 250^ C and the Timer to 35 minutes. Roast until time is up. Place the pork on the Rack over a cutting board. Let stand 5 minutes. Remove the Rod and slice the pork. Serve with the peppers.
SPICE RUBBED SMALL CHICKEN
Ingredients
- 1 TABLESPOON BROWN SUGAR
- 1 TEASPOON GROUND CUMIN
- 1 TEASPOON GROUND CORIANDER
- 1 TEASPOON SMOKED PAPRIKA
- 1 TEASPOON GROUND GINGER
- 3/4 TEASPOON SEA SALT
- 1/2 TEASPOON GARLIC POWDER
- 1/2 TEASPOON FRESHLY GROUND PEPPER
- 1/8 TEASPOON GROUND CINNAMON
- 2 (1 TO 11/4-POUND) SMALL CHICKENS
- LIME WEDGES
Directions
In a small bowl, combine the brown sugar, cumin, coriander, paprika, ginger, salt, garlic powder, pepper and cinnamon. Rub the chickens with the spice mixture. Remove the lock screws on the Drive end of the Chicken Roaster. Slide the chickens onto the Roaster, centering the chickens in the middle of the Roaster. Tie the legs together with kitchen string and once around the wings.
Add 2 to 3 tablespoons water to the Oil Drip Tray and slide back into place. Place the loaded Chicken Roaster into the Oven chamber with the square tip end toward the Drive Port, resting the handle on the Handle Port. Press down into place until it locks securely. Close the Glass Lid. Set the Temperature to 225^ C and the Timer to 1 hour. Roast until time is up. Place the chickens on the Rack over a cutting board and let stand 5 minutes. Remove the Roaster and cut off the kitchen string. Serve the chickens with lime wedges.
MUSTARD HERB SPRING CHICKEN
Ingredients
- 2 TABLESPOONS CHOPPED FRESH FLAT-LEAF PARSLEY
- 2 TABLESPOONS DIJON MUSTARD
- ZEST AND JUICE OF 1 SMALL LEMON
- 1 TABLESPOON EXTRA VIRGIN OLIVE OIL
- 2 TEASPOONS CHOPPED FRESH THYME
- 2 TEASPOONS CHOPPED FRESH ROSEMARY
- 2 CLOVES GARLIC, CRUSHED WITH GARLIC PRESS
- 2 (1 TO 11/4-POUND) SPRING CHICKENS
- 4 FRESH SAGE LEAVES
- 3/4 TEASPOON SEA SALT
- 1/4 TEASPOON FRESHLY GROUND PEPPER
Directions
In a small bowl, stir together the parsley, mustard, lemon zest and juice, thyme, rosemary and garlic. With fingertips, gently separate skin from meat on each chicken breast, being careful not to break skin. Tuck 2 sage leaves under the skin of each chicken. Place the chickens in a large plastic zip-close bag. Add the marinade, squeeze out the air and seal the bag. Marinate the chickens in the refrigerator at least 2 hours or up to 8 hours.
Add 2 to 3 tablespoons water to the Oil Drip Tray and slide back into place. Remove the lock screws on the Drive end of the Chicken Roaster. Slide the chickens onto the Roaster, centering the chickens in the middle of the Roaster. Tie the legs together with kitchen string and once around the wings. Sprinkle the chickens with the salt and pepper. Place the loaded Roaster into the Oven chamber with the square tip end toward the Drive Port, resting the handle on the Handle Port. Press down into place until it locks securely.
Close the Glass Lid. Set the Temperature to 250^ C and the Timer to 50 minutes. Roast until time is up. Place the chickens on the Rack over a cutting board and let stand 5 minutes. Remove the Roaster and cut off the kitchen string.
TEX MEX ROASTED SHRIMP
Ingredients
- 2/3 CUP CHILI SAUCE
- 1/3 CUP KETCHUP
- 1/4 CHOPPED FRESH CILANTRO
- 2 TABLESPOONS PREPARED DRAINED HORSERADISH
- 1 SMALL JALAPENO CHILE, MINCED
- 1/2 TEASPOON LIME ZEST
- 1 TABLESPOON FRESH LIME JUICE
- 16 JUMBO SHRIMP
- 1 TABLESPOON OLIVE OIL
- 1/2 TEASPOON SEA SALT
- 1/4 TEASPOON FRESHLY GROUND PEPPER
Directions
Cocktail Sauce: In a medium bowl, stir together the chili sauce, ketchup, cilantro, horseradish, jalapeño and lime zest and juice. Refrigerate.
Shell and devein the shrimp, leaving the tails on. In a large bowl, toss together the shrimp, oil, salt and pepper.
Add 2 to 3 tablespoons water to the Oil Drip Tray and slide back into place. Press the top of the Basket tabs together to remove the lid and open the basket. Fill with the shrimp in one layer and replace the Basket lid so the bundles fit snugly. Place the loaded Basket into the Oven chamber with the square tip end toward the Drive Port, resting the handle on the Handle Port. Press down into place until it locks securely. Close the Glass Lid. Set the Temperature to 250^ C and the Timer to 10 minutes. Roast until time is up. Serve with the cocktail sauce.
ROASTED ASPARAGUS PANCETTA BUNDLES
Ingredients
- 32 THIN ASPARAGUS SPEARS
- 8 VERY THIN SLICES PANCETTA, HALVED
- LEMON WEDGES
Directions
Trim the asparagus spears to 6-inch lengths. For each bundle, wrap half a pancetta slice around the middle of 2 asparagus spears.
Add 2 to 3 tablespoons water to the Oil Drip Tray and slide back into place. Press the top of the Basket tabs together to remove the lid and open the basket. Arrange 8 bundles on an angle in one layer and replace the Basket lid so the bundles fit snugly.
Place the loaded Basket into the Oven chamber with the square tip end toward the Drive Port, resting the handle on the Handle Port. Press down into place until it locks securely. Close the Glass Lid. Set the Temperature to 250^ C and the Timer to 15 minutes. Roast until the asparagus are tender and the pancetta is crisp. Transfer to a platter. Repeat with the remaining bundles. Serve with lemon wedges.
ROASTED TINY POTATOES WITH SHALLOTS AND HERB SALT
Ingredients
- 3/4 TEASPOON SEA SALT
- 1 TEASPOON FINELY CHOPPED FRESH ROSEMARY
- 1/2 TEASPOON FINELY CHOPPED FRESH THYME
- 1/4 TEASPOON FRESHLY GROUND PEPPER
- 2 POUNDS ASSORTED TINY POTATOES
- 12 SMALL SHALLOTS, PEELED
- 11/2 TABLESPOONS EXTRA VIRGIN OLIVE OIL
Directions
In a small bowl, combine the salt, rosemary, thyme and pepper. Transfer 1 teaspoon herb salt to a cup and set aside. In a large bowl, toss the potatoes and shallots with the oil and remaining herb salt.
Add 2 to 3 tablespoons water to the Oil Drip Tray and slide back into place. Insert the square end tip of the Rod into the Rotisserie Cage to the opposite side as far as it will go. Fill with the potatoes and lock the Cage securely. Place the loaded Cage into the Oven chamber with the square tip end toward the Drive Port, resting the handle on the Handle Port. Press down into place until it locks securely. Close the Glass Lid. Set the Temperature to 225^ C and the Timer to 1 hour and roast. Reset the Timer to 15 minutes and roast until the potatoes are tender. Serve sprinkled with the reserved herb salt.
ROASTED PINEAPPLE WITH YOGURT AND PISTACHIOS
Ingredients
- 1 SMALL PINEAPPLE
- 1/2 CUP PLAIN GREEK YOGURT
- 4 TEASPOONS HONEY
- 1/4 CUP ROASTED PISTACHIOS, COARSELY CHOPPED
- 4 FRESH MINT SPRIGS
Directions
With a large knife, cut off the pineapple 1/2 inch below the leafy top. Slice off the bottom to remove the end of the core. Set the pineapple upright and using the curve of the fruit as a guide, slide downward to remove the tough rind and any "eyes."
Add 2 to 3 tablespoons water to the Oil Drip Tray and slide back into place. Slide the pineapple on the Rotisserie Rod, centering it in the middle of the Rod. Place the loaded Rod into the Oven chamber with the square tip end toward the Drive Port, resting the handle on the Handle Port. Press down into place until it locks securely. Close the Glass Lid. Set the Temperature to 250^ C and the Timer to 1 hour. Roast until the pineapple is tender and browned around the edges.
Place the pineapple on the Rack over a cutting board. Let stand until cool enough to handle. Remove the Rod cut crosswise into 12 slices. Place 3pineapple slices on each of 4 dessert plates. Top each serving with the 2 tablespoons yogurt, 1 teaspoon honey, 1 tablespoon pistachios and 1 mint sprig.
安全意事項
注
使用前請仔細閱讀本說明書。
電器在閑置或清潔前,必須拔出插頭。
natural_image
Close-up of a metallic cylindrical object with a black handle, possibly a tool or tool, against a white background (no text or symbols visible)● 圓形烤籠連手柄

natural_image
Metal tuning fork with black handle and metal frame (no text or symbols visible)- 烤雞架連手柄

natural_image
Metal wire cage with a black handle, isolated on white background (no text or symbols)● 多功能方形烤籠連手柄
- 盛烤籠托架

- 串燒叉 x4支
natural_image
Close-up of a black-handled screwdriver with a metallic handle (no text or symbols visible)- 轉軸套上手柄並扭緊(見圖 1)。

natural_image
Metallic cylindrical device with a black handle and textured top, resembling a mechanical or electronic component (no visible text or symbols)2.從軸孔插入烤籠並穿過另一端籠口。

natural_image
Close-up of a metallic cylindrical object with textured surface and central hole (no visible text or symbols)3.最後扭緊螺絲固定轉軸。
烤雞架安裝方法
natural_image
Illustration of a mechanical tool with directional arrows indicating motion (no text or symbols)- 柄頭套上手柄並扭緊(見圖 1)。

natural_image
Close-up of a hand holding a clipboard with a small object, no visible text or symbols- 裝上卡頭並扭緊螺絲(串上食物後)。
natural_image
Metal measuring tool with black handle and metal frame (no text or symbols visible)- 安装完畢。
多功能方形烤籠安裝方法

natural_image
Metal wire cage with a black tool and arrowhead, no visible text or symbols垂柄頭套上手柄並扭緊(見圖 1)。

natural_image
Metal wire grater with black handle, isolated on white background (no text or symbols)- 已套上手柄。

natural_image
Metal wire cage with a black handle, partially open to show internal grid patterns (no text or symbols visible)3.捏住卡扣揭開籠蓋。
natural_image
Two metal grating baskets with a black handle, one open and one closed, against a white background (no text or symbols visible)- 放入食物或者已串燒好的食物放入烤籠內。
natural_image
Metal wire grater with black handle, no visible text or symbols5.鎖上籠蓋到合適位置。
natural_image
Close-up of hands operating a black electronic device with a slide (no visible text or symbols)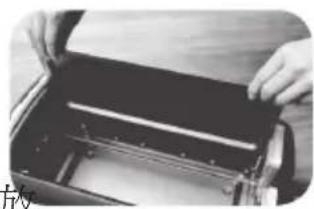
natural_image
Person handling a black rectangular object with a rod, possibly a device or machine component (no visible text or symbols)
natural_image
Close-up of hands handling a dark object with a small object on top (no visible text or symbols)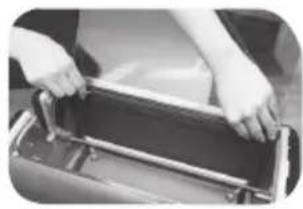
natural_image
Person holding a dark object in a wheelchair seat (no visible text or symbols)natural_image
Close-up of a hand pressing down on a piece of paper (no visible text or symbols)
natural_image
Close-up of a hand holding a tablet device (no visible text or symbols)natural_image
Close-up of a mechanical bracket or mounting bracket with no visible text or symbols
natural_image
Close-up of a mechanical device with internal components, possibly a battery or switch (no visible text or symbols)
natural_image
Close-up of a hand adjusting a mechanical component with wires (no visible text or symbols)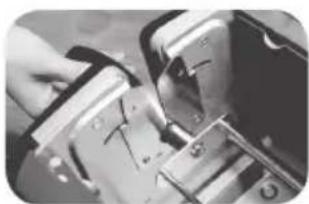
natural_image
Close-up of a hand using a tool to adjust or install a mechanical component (no visible text or symbols)natural_image
Close-up of a hand using a tool to adjust or install electronic components (no visible text or symbols)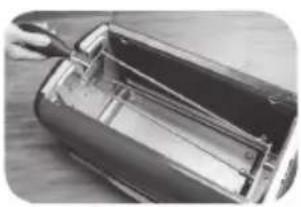
natural_image
Close-up of a mechanical component with internal structure and handle (no visible text or symbols)Proudly Serviced by:
ToolBox
a Gilman Group Company
太平家庭電器
2/F, Shing Dao Industrial Building, 232 Aberdeen Main Road, Hong Kong 香港香港仔大道232號城都工業大廈2樓