44641 - Lamp Maxsa - Free user manual and instructions
Find the device manual for free 44641 Maxsa in PDF.

User questions about 44641 Maxsa
0 question about this device. Answer the ones you know or ask your own.
Ask a new question about this device
Download the instructions for your Lamp in PDF format for free! Find your manual 44641 - Maxsa and take your electronic device back in hand. On this page are published all the documents necessary for the use of your device. 44641 by Maxsa.
USER MANUAL 44641 Maxsa
natural_image
Abstract graphic with a stylized sunburst shape and partial letter 'n' and 'S' (no readable text or symbols)motion-activated
SOLAR SECURITY LIGHT
Our Brightest Solar Motion Light!
Part #s 44640 & 44641
ASSEMBLY & OPERATING INSTRUCTIONS

natural_image
Exterior view of a smart security camera with a solar panel and illuminated lens (no text or symbols visible)IMPORTANT: Read all instructions carefully before use
ABOUT YOUR SOLAR SECURITY LIGHT
During the day, the solar panel included with this MAXSA Solar Security Light converts sunlight into electricity, recharging the pre-installed battery. Using this stored energy, the Surface Mount LED lights turn on automatically at night when motion is detected. This MAXSA Solar Security Light has an adjustable TIME dial that allows light duration of up to 60 seconds. When the battery is fully charged, this Solar Security Light can provide up to 200 thirty second cycles when the TIME dial is set to the middle (30s) position.
The unit includes a rechargeable 3.7V/4.4Ah Lithium ion battery pack that will need to be replaced when the charging ability is decreased.
INCLUDED PARTS
Carefully remove and identify all the parts from their protective packaging and lay them out in front of you.

text_image
4 screws and anchors for mounting solar panel 15 foot power cable Solar panel 2 screws and anchors for mounting Main Body Light cover Motion sensor Duration time adjusting knob Motion sensitivity adjusting knob Light sensitivity adjusting knob Solar panel angle pivot Solar panel mounting bracket Main battery unit AUTO/OFF switchOnce you have identified all parts, connect the solar panel to your Solar Security Light by plugging the 15 foot cord into the cord attached to the front of the Solar Security Light. Turn and twist the cords while pressing firmly together until they are attached tightly.

natural_image
Diagram of a cylindrical object with two opposing arrows indicating opposing flow or movement (no text or symbols)Adjustment dials are located on the underside of the motion sensor. Move the motion sensor to allow for easier access to the controls. Move sensor back into position upon completion.
CHOOSING A LOCATION FOR YOUR SOLAR SECURITY LIGHT
This Solar Security Light comes complete with a solar panel attached to a 15 foot power cord. For optimum sun exposure and longer light output, place the solar panel in a position that receives at least 6-8 hours of direct sunlight per day. Placing the solar panel in a shaded location will not allow the battery to charge fully, reducing the number of hours the light will operate per evening. Ensure that the security light is not placed near night time light sources such as porch lighting or street lighting.
This Solar Security Light is ideal for areas where electricity is not available — including driveways, carports, garages and entrance doors – for safety and security around your home.
When deciding where to mount the light, keep in mind that the motion sensor has a field of vision of 180^ (horizontal) at a distance of 40 feet when the surrounding temperature is 75F. The outside temperature will impact the detection distance.
HOW TO INSTALL YOUR SOLAR SECURITY LIGHT
Mount the Security Light onto a solid surface, using the two (2) wood/sheet metal screws supplied. You may mount the Security Light either vertically or horizontally.
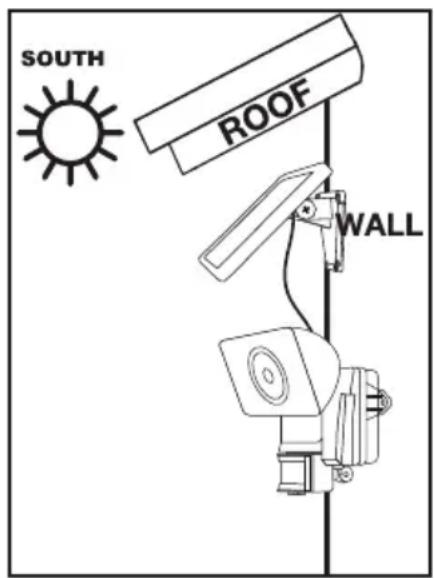
Use the four wood/sheet metal screws supplied to mount the solar panel onto a solid surface. You can adjust the angle of the solar panel by gently rotating the solar panel to a different locking position. Remember to face the panel south for direct sunlight exposure.
text_image
SOUTH ROOF WALL
text_image
SOUTH ROOF WALLTOOLS REQUIRED FOR INSTALL
If mounting on a wood or softer surface, you only need a Phillips-head screwdriver! If mounting on concrete, brick, or a harder surface, a drill should be used to create the mounting holes first
BEFORE FIRST USE OF YOUR SOLAR SECURITY LIGHT
Ensure the power switch on the main body of your Security Light is in the OFF position and the solar panel is connected to the light unit. In this position, the solar panel will charge the battery without activating the unit.
Leave the switch in the OFF position for 3 days with the solar panel placed in direct sunlight. This will ensure that the battery in your Solar Security Light has a full charge prior to motion sensor adjustment and normal operation.
After the initial 3 day charge of your Solar Security Light, move the switch on the main body to the AUTO position. The light should come on immediately, regardless of lighting or motion conditions. This is a test activation that happens every time the light is switched to AUTO. It should last for approximately 30 seconds. After the test activation, leave the switch on AUTO and your Solar Security Light is now ready for use.
Underneath the motion sensor, there are 3 adjustment dials: TIME/SENS/LUX. The light has been factory preset as follows:
TIME - Set at 30 seconds.
SENS - Set at a 15 - 20 foot range (when the surrounding temperature is 75 F).
LUX - Set for your Security Light to activate at dusk when motion is detected.
If the above settings are not suitable for your application, then these may be adjusted using the steps below.
TIME PERIOD ADJUSTMENT (TIME)
The time period control dial sets the duration of the light upon each activation that the Solar Security Light will remain illuminated after the last detected motion. The time period has an adjustable range of 10 seconds to 1 minute.
To decrease the time period, move the dial toward the (-) symbol.
To increase the time period, move the dial toward the (+) symbol.
To test the Time Period, trigger the motion sensor and measure the length of time the light remains activated. Adjust the TIME control until the desired illumination duration is reached.
A shorter TIME setting will conserve battery life. For best results, use the shortest TIME setting for your location as possible.
MOTION SENSOR ADJUSTMENT (SENS)
The motion sensor on this Solar Security Light is temperature-sensitive. The cooler the temperature, the more sensitive the motion sensor will become. Use the SENS dial to adjust the sensitivity of the motion sensor to compensate for environmental temperature changes. The motion sensor is most sensitive when the SENS dial is turned fully clockwise (+).
To decrease sensitivity, move the dial toward the (−) symbol.
To increase sensitivity, move the dial toward the (+) symbol.
To test the motion sensitivity, aim the sensor head toward the desired area. Set the TIME dial to minimum (−) position and the LUX dial to the bright setting (○).
Walk slowly around the area of detection, changing your walking pace until the light comes on. If light does not come on, you may need to adjust the angle of the sensor unit. Make adjustments as needed until the desired level of sensitivity is reached. Re-adjust the TIME and LUX dials when complete.
LIGHT LEVEL ADJUSTMENT (LUX)
The LUX dial controls the natural light level that triggers the Solar Security Light and prevents the light from operating during daylight hours.
Your Solar Security Light comes preset for activation at dusk. If you want your security light to activate when it is still light out, move the dial towards the sun (✗). If you only want your security light to work when it gets dark, move the dial towards the moo (✗).
REPLACING THE BATTERY
When the charging ability of the battery pack decreases, you can replace it with a new 3.7V/4.4 Ah Lithium-Ion battery pack. Follow the steps below when replacing the battery pack.

text_image
Battery Pack- First remove the main unit from its mounted surface and unplug the solar panel.
- Move the power switch on the main body to the OFF position.
- Remove the four (4) screws on the back of the main unit that hold the halves together.
- Once the unit is open, carefully remove the bracket holding the battery pack in place by unscrewing the two (2) screws as indicated in the diagram above.
- Carefully unplug the battery pack from the unit. Be sure to pull by the base of the plug. Do not pull the plug by the wires as this may damage the unit.
- Carefully remove the battery pack and replace with a new 3.7V / 4.4Ah Lithium Ion battery pack obtained from MAXSA Innovations. The plug will only fit in one orientation. Do not force the plug into place as this may damage the unit. If it does not fit, rotate the plug until it matches with the receiving end on the circuit board.
- Replace the bracket to hold the battery pack in place by using the two (2) screws removed in step 4, taking care not to damage any cables.
- Re-assemble the main unit by screwing the two (2) halves of the main body together securely.
- Once assembled, mount your Solar Security Light to its original surface location.
- Repeat the steps in the "Before first time use of your Solar Security Light" section on page 4 to ensure your new battery is fully charged.
NOTE: Do not dispose of battery pack in general household trash or into a fire as the battery pack may explode. Consult your local regulations for correct disposal of battery pack. The battery pack may also be returned to MAXSA Innovations at 8412 Cathedral Forest Dr., Fairfax Station, VA 22039. Do not take apart the battery pack since it contains corrosive chemicals.
MAINTENANCE TIPS
The LED lights in your Solar Security Light will last up to 30,000 hours and should never need replacement.
To keep your Solar Security Light looking new, keep the lens free of dust and deposits by wiping occasionally with a dry cloth or with warm soapy water.
It is important that the solar panel is kept free of dirt and debris at all times. A dirty solar panel will not allow the batteries to be fully charged. This will shorten the life of the battery and may cause the light to malfunction.
STORAGE
If you wish to store your light indoors for more than two or three days, turn the power switch to the OFF position to prevent damage to the batteries. Battery capacity may be reduced during prolonged storage. For optimal performance, we recommend that you do not store your Solar Security Light for prolonged periods of time.
EXTENSION CORDS
A 15-foot extension cord is available for this product for \$14.95. This extension cord allows the solar panel to be placed higher or further away from the security light to ensure maximum direct sunlight exposure.
For more information, please call 703-495-0661 or contact us at info@maxsainnovations.com.
TROUBLESHOOTING
| PROBLEM POSSIBLE SOLUTIONS | |
| Light will not switch on when there is movement in the detection area. | ·Ensure that the power switch on the main body has been turned to the AUTO position.·Ensure that the motion sensor has been positioned to face oncoming movement.·Ensure that the battery has been fully charged in direct sunlight for 3 sunny days. Refer to the “Before First Use of Your Solar Security Light” section on page 4.·Check to see that the solar panel is facing south so that it receives direct sunlight for most of the day, enabling the battery to fully charge.·Check to see that the LUX control has not been set too far towards ( ). Setting the LUX control too far towards ( )will cause the Solar Security Light to turn on only in complete darkness.·Check to see that the motion sensor is not near night time light sources such as street lights. |
| Light switches on during the day. | ·The LUX control may be set too far towards the ( ⚙ ) position.·Reposition the motion sensor. |
| Light switches on for no apparent reason. | ·The SENS control may be set too far towards the (+) position.·Moving trees, traffic, pets or birds may be getting in the area of detection. This may be unavoidable, however the sensor could be redirected to a height where this is less likely to occur.·If there are reflective objects in the detection area such as windows, water, or white walls, you may need to redirect or possibly reposition the motion sensor.·Test the motion sensor by covering it completely with cardboard and waiting several minutes to make sure it does not detect motion. If the light still switches on, please contact MAXSA for further assistance. |
| Light quickly flashes on and off. | ·Battery charge may be low. Turn the power switch to the OFF position and charge the battery for three (3) sunny days with the solar panel placed in direct sunlight.·Move the LUX control more to the ( ⚙ ) position. |
| Light is not as bright as normal. | ·Battery charge may be low. Turn the power switch to the OFF position and charge the battery for three (3) sunny days with the solar panel placed in direct sunlight. |
ONE YEAR LIMITED WARRANTY
1 YEAR LIMITED WARRANTY: MAXSA Innovations, LLC warrants to the original consumer/purchaser that this product shall be free of defects in material and workmanship under normal use and circumstances for a period of one (1) year from the date of original purchase for use. When the original consumer/purchaser returns the product pre-paid (consumer pays return shipping) to MAXSA Innovations, LLC, 8412 Cathedral Forest Dr; Fairfax Station, VA 22039; USA within the warranty period, and if the product is defective, MAXSA Innovations, LLC will at its option repair or replace such. This warranty shall constitute the sole liability of MAXSA Innovations, LLC concerning the product. MAXSA Innovations, LLC expressly disclaims all other warranties INCLUDING, WITHOUT LIMITATION, THE WARRANTIES OF MERCHANTABILITY AND FITNESS FOR A PARTICULAR PURPOSE. NO PERSON, FIRM, OR COPORATION IS AUTHORIZED TO ASSUME FOR MAXSA Innovations, LLC ANY OTHER LIABILITY IN CONNECTION WITH THE SALE AND USE OF THE PRODUCT. MAXSA Innovations, LLC and agents and distributors will bear no liability whatsoever for incidental or consequential damages or charges of any kind. Some states do not allow the reclusion or limitation of incidental or consequential damages, so the above disclaimer regarding incidental or consequential damages may not apply to you. This warranty is void if the product has been damaged or tampered with or if the product or any such parts have been opened. In all cases of damage during shipment, a claim must be filed with the shipping carrier and not with MAXSA Innovations, LLC. This warranty gives you specific legal rights; you may also have other rights which vary from state to state.
Please save these instructions for future reference.
SPECIFICATIONS
Power Source: Solar
Lumens: 878.6
Light Color: 6500K (Cool White or Daylight color)
Function: Motion-Activated
Power Storage: 3.7V/4.4Ah Lithium-ion battery pack
Light Duration: 10 - 60 seconds after motion stops
Maximum Runtime: up to 100 minutes on a full charge
Detection Angle: 180°
Maximum Detection Distance: 40 feet (12.2 meters)
Weatherproof Rating: IP44
MAXSA®
MAXSA Innovations
8412 Cathedral Forest Drive
Fairfax Station, VA 22039
Tel: 703-495-0661
www.maxsainnovations.com
info@maxsainnovations.com
MADE IN CHINA
natural_image
Exterior view of a modern LED light fixture with a solar panel attached (no text or symbols visible)IMPORTANTE: LEA TODAS LAS INSTRUCCIONES CUIDADOSAMENTE ANTES DE USAR.
natural_image
Diagram of a cylindrical object with two opposing arrows indicating bidirectional movement (no text or symbols)text_image
SOUTH ROOF WALL
text_image
SOUTH ROOF WALLMAXSA Innovations, LLC 8412 Cathedral Forest Drive Fairfax Station, VA 22039 Tel: 703-495-0661
www.maxsainnovations.com info@maxsainnovations.com