BrightSign MBS-1080C-OF - Monitor Mimo Monitors - Free user manual and instructions
Find the device manual for free BrightSign MBS-1080C-OF Mimo Monitors in PDF.

User questions about BrightSign MBS-1080C-OF Mimo Monitors
0 question about this device. Answer the ones you know or ask your own.
Ask a new question about this device
Download the instructions for your Monitor in PDF format for free! Find your manual BrightSign MBS-1080C-OF - Mimo Monitors and take your electronic device back in hand. On this page are published all the documents necessary for the use of your device. BrightSign MBS-1080C-OF by Mimo Monitors.
USER MANUAL BrightSign MBS-1080C-OF Mimo Monitors
Mimo Vue with BrightSign Built-in Manual and Specifications
MBS-1080C / MBS-1080C-POE
MBS-1080 / MBS-1080-POE
- Touch - MBS-1080C-OF / MBS-1080C-OF-POE
- Non-Touch - MBS-1080-OF / MBS-1080-OF-POE


Please keep this manual for future reference.

Table of Contents
Page
OVERVIEW....1
BRIGHTAUTHOR AND CONFIGURATION....2
BRIGHTAUTHOR SETUP....2
BRIGHTSIGN PLAYER SETUP....3
BRIGHTSIGN FIRMWARE UPDATE....15
SUPPORT......15
SOFTWARE SUPPORT......15
HARDWARE SUPPORT......15
PORTS....16
Overview
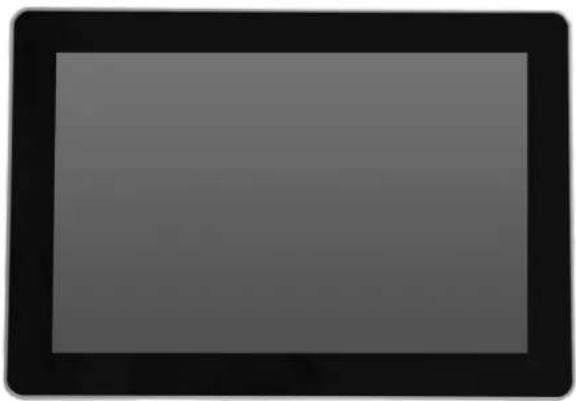
The BrightSign Built-Imseries of players offers the power of a BrightSign HS123 media player and the dependent ability to perform digital grade. CDS screen in a single unit built for convenience of BSB players are available sizes between 7" to 21.5", imdisplay format which requires fully rechodeshare ready toastart, and Frameless format designed for kikicks and redchosuse capacitive touch screens and Power over ethernet POE+ is available in all sizes of BSB players are compatible with all BrightSign services, including BSBAtAutho BrBrygAtApp, and the BrightSign Network, and include the full functionality of the BrightSign HS123 series of players.
natural_image
Blank gray rectangular image with black border (no text or symbols)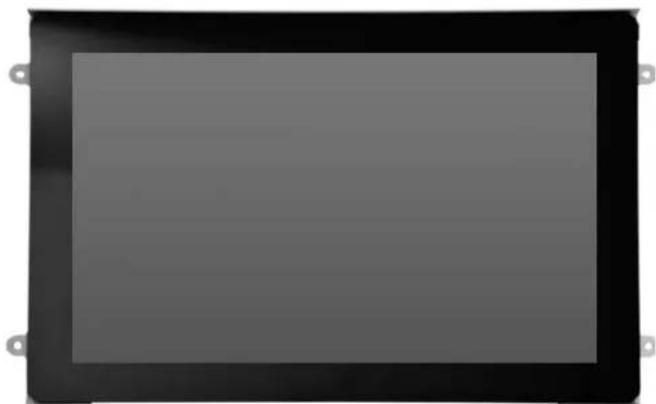
natural_image
Rectangular black frame with a white inner square, no text or symbols visibleBrightAuthor and Configuration
BrightAuthor Setup
BrightAuthor is a free content management and publishing desktop application which can be used to configure players and upload playlists of scheduled content to one, or a network, of players. To download Brightauthor, visit: https://www.brightsign.biz/downloads/dsm-series
And download the most recent official release.
When starting a project in BrightAuthor, ensure that HS123 from the BrightSign Model dropdown menu, and 1920x1080x60p from the screen resolution dropdown menu are selected. Selecting a different resolution may cause video to display incorrectly and selecting an interlaced resolution (i.e. 1920x1080x60i) will cause video to fail.
To learn more about creating BrightSign presentations, visit:
https://www.brightsign.biz/support/training/tutorial-videos
http://docs.brightsign.biz/
for tutorial videos, user guides, troubleshooting and documentation.
BrightSign Player Setup
- To set up a BSBI player, plug in microSD card and connect unit to power. Power on unit.
-
Arrive at BrightSign Device Setup Screen. Choose one of two options for setup:
-
Connect a USB keyboard to player directly
- Go to 192.168.99.117 using a web browser on the same local network as player
BrightSign®
Start
BrightSign Device Setup
Introduction
Welcome to BrightSign Device Setup! To begin the setup process, do one of the following:
- Connect a USB keyboard to configure the player directly.
- Navigate to 192.168.99.117 using a web browser on the same local network to configure the player remotely.
In 01:42, the device will exit Device Setup and attempt automated provisioning. If you need more time on this page, click Stop Timer or press the SVC button on the device.
- Click Next to go to the Network Setup page immediately.
- Click Stop Timer if you need more time.
STOP TIMER
NEXT
3. Press NEXT
-
You will be prompted with 4 options:
-
Ethernet – Connect to a wired network. Can connect remotely
- WIFI – Connect to a wireless network. Can connect remotely
- No Networking – Sets up standalone device with no network connectivity
- Play Media Files – Plays media files on the SD card with no further configuration
Start > Network Setup
BrightSign Device Setup
Network Setup
Select a networking option for your BrightSign device:
ETHERNET
Connect to a wired network. Choose this option if you plan to publish to the device remotely or use remote assets in your presentations.
WIFI
Connect to a wireless network. Choose this option if you plan to publish to the device remotely or use remote assets in your presentations.
NO NETWORKING
Configure the device without networking. If you choose this configuration, the device will be setup as a Standalone device (i.e. you will publish content directly using an SD card or other storage device).
PLAY MEDIA FILES
Play media files from the on-board storage (e.g. SD card) without further configuration.
BACK
Device Information
Model: HS123
Serial Number: 53E883001188
Firmware Version: 7.1.65
MAC Address: 90:ac:3f:12:11:8d
Current Settings
IP Address: 192.168.99.117
Connection Type: Wired
Address Type: DHCP
For Ethernet: To use current settings displayed, press USE CURRENT SETTINGS. To change the IP address, Proxy, or Time Server, select CHANGE SETTINGS. Press Next to proceed.
Start > Network Setup > Ethernet
BrightSign Device Setup
Ethernet Settings
The device has connected to the local network automatically. Select Use Current Settings to use the automated configuration, or select Change Settings to manually configure network settings.
Current Settings
| IP Address: | 192.168.99.117 |
| Connection Type: | Wired |
| Address Type: | DHCP |
| Subnet: | 255.255.255.0 |
| Broadcast: | 192.168.99.255 |
| Gateway: | 192.168.99.1 |
| DNS: | 192.168.99.1 |
| Host Name: | BrightSign-53E883001188 |
BACK
USE CURRENT SETTINGS
CHANGE SETTINGS
Start > Network Setup > Ethernet > Change Settings
BrightSign Device Setup
Change Ethernet Settings
IP Address ?
- Obtain an IP address automatically
Use the following IP address
Proxy?
Use proxy
Time Server ?
Set Time Server
BACK
NEXT-NETWORK DIAGNOSTICS
For WIFI: fill out the SSID and password if you want your player to communicate over a wireless network.
For a No Networking: Under "Device Name", select a name for your player. Select "Use name only" to display only the selected name during local network publishing, or "Append device serial" to insert the player's unique ID at the end of its name.
Start > Network Setup > Standalone - Device Info
BrightSign Device Setup
Standalone - Device Info


Further network settings, both Wired and Wireless, can be found under Advanced Network Setup.
- Once the option is chosen, network diagnostics will run. After completed press NEXT – PUBLISHING OPTIONS.
BrightSign Device Setup
Network Diagnostics
Tests complete
Ethernet: OK
Show details
Internet: OK
Show details
Time
http://time.brightsignnetwork.com, 2018/11/06 09:45:54.766

-
Under Publishing Options, you may select one of four publishing options.
-
Brightsign Network – Use the Brightsign Network cloud-based content-management system to use remotely
- Local File Networking - allows publishing directly from BrightAuthor over a network connection
- Simple File Networking - publish from a web server
- Standalone - only allow the player to be updated directly from an SD card or USB Drive. Does not require network connection
Start > Network Setup > Ethernet > Change Settings > Network Diagnostics > Publishing Options
BrightSign Device Setup
Publishing Options
There are four setup options, depending on how you want to publish presentations to your devices:
BRIGHTSIGN NETWORK
Use the BrightSign Network cloud-based content-management system (CMS) to remotely schedule presentations, distribute content, assign devices to groups, and monitor the health of devices.
Publish presentations and schedules to devices over your local network.
SIMPLE FILE NETWORKING
Publish presentations and schedules remotely using your own web server.
STANDALONE
Publish presentations directly to your player using an SD card or USB drive. Use this method if your player doesn't have a network connection or if you do not plan to update the presentation frequently.
BACK
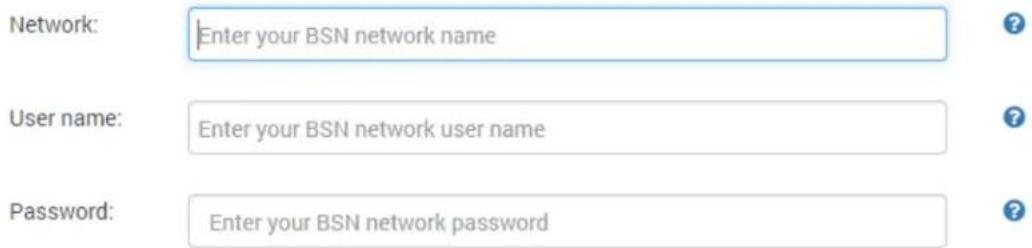
For Brightsign Network: Input Network name, User name, and Password, then SIGN IN.
Start > Network Setup > Ethernet > Change Settings > Network Diagnostics > Publishing Options > BSN Sign In
BrightSign Device Setup
BrightSign Network - Sign In

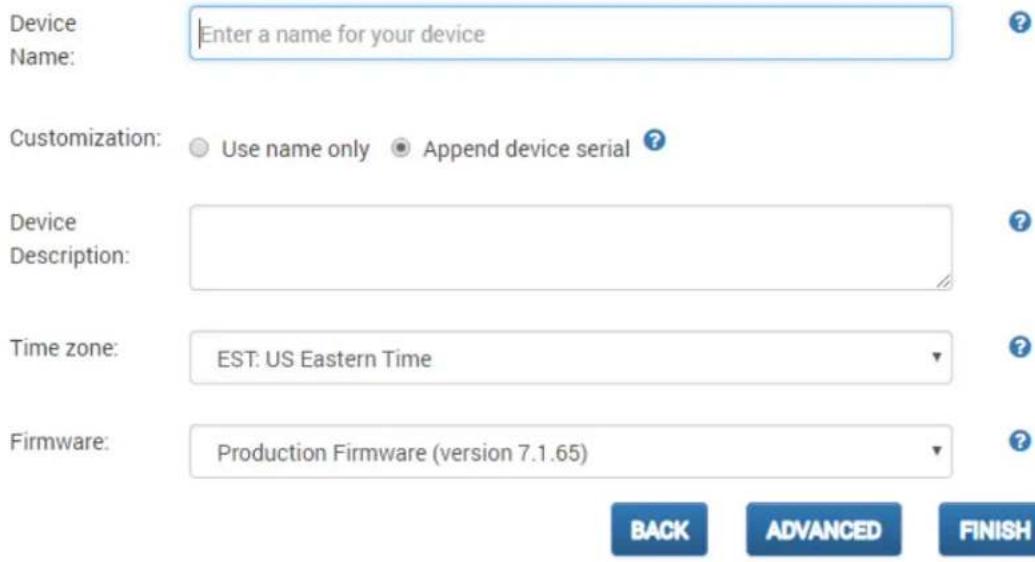
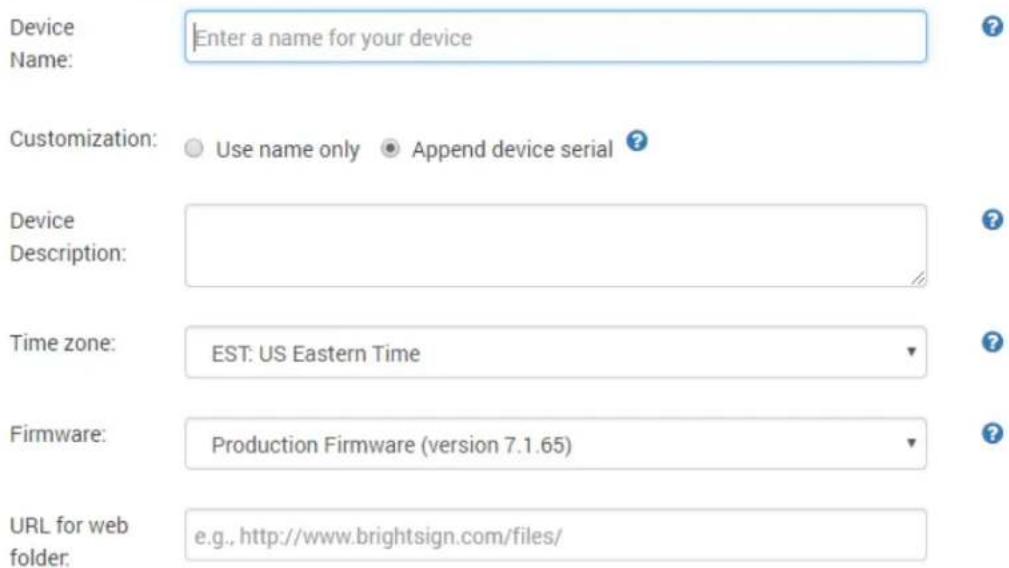
For Local Filing Network: Under "Device Name", select a name for your player. Select "Use name only" to display only the selected name during local network publishing, or "Append device serial" to insert the player's unique ID at the end of its name. Select desired firmware, use current firmware if up to date. Press FINISH.
Start > Network Setup > Ethernet > Change Settings > Network Diagnostics > Publishing Options > Local File Networking - Device Info
BrightSign Device Setup
Local File Networking - Device Info
For Simple Filing Network: Under "Device Name", select a name for your player. Select "Use name only" to display only the selected name during local network publishing, or "Append device serial" to insert the player's unique ID at the end of its name. Select desired firmware use current firmware if up to date. Select URL for web folder. Press FINISH.
Start > Network Setup > Ethernet > Change Settings > Network Diagnostics > Publishing Options > Simple File Networking - Device Info
BrightSign Device Setup
Simple File Networking - Device Info

For a Standalone: See No Networking above.
Start > Network Setup > Ethernet > Change Settings > Network Diagnostics > Publishing Options > Standalone - Device Info
BrightSign Device Setup
Standalone - Device Info
Device Name: Enter a name for your device
Customization: Use name only Append device serial
Device Description:
Time zone: EST: US Eastern Time
Firmware: Production Firmware (version 7.1.65)
BACK
ADVANCED
FINISH
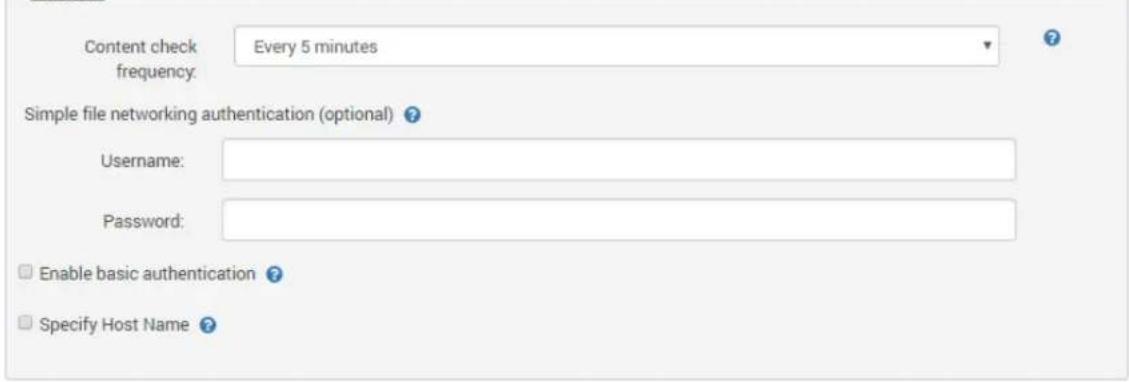
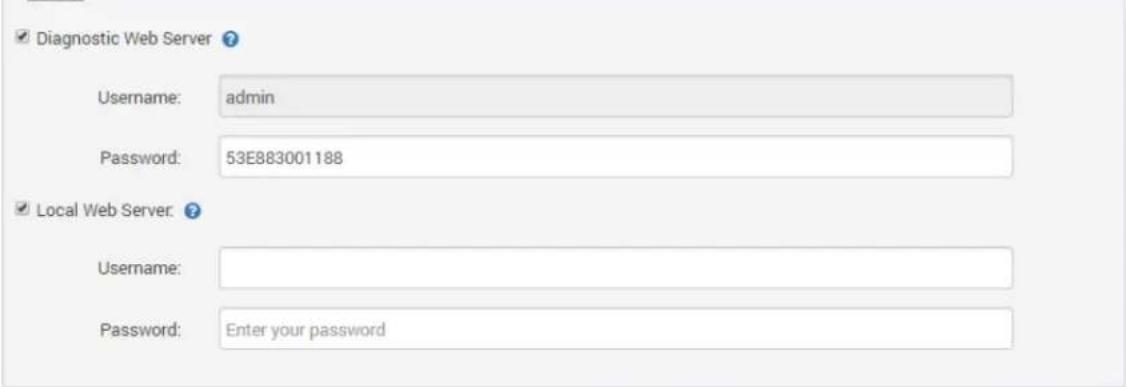
For Local Filing Network, Simple Filing Network, and Standalone advanced settings. Diagnostic Web Server Username/Password can be changed from admin/(Unit Serial Number). Additionally local web server Username/Password can be changed.
Start > Network Setup > Ethernet > Change Settings > Network Diagnostics > Publishing Options > Local File Networking - Device Info > Local File Networking - Networking & Server
BrightSign Device Setup
Local File Networking - Network & Server
Network
Specify Host Name ?
Server
Diagnostic Web Server
Username: admin
Password: 53E883001188
√ Local Web Server.
Username:
Password: Enter your password
BACK
NEXT
FINISH
Start > Network Setup > Ethernet > Change Settings > Network Diagnostics > Publishing Options > Simple File Networking - Device Info > Simple File Networking - Network & Server
BrightSign Device Setup
Simple File Networking - Network & Server
Network
Server

- Setup will now begin. A message will display informing you that setup is complete, and you may reboot the player and publish content to it.
BrightSign Player Publishing
To publish a BrightAuthor presentation, navigate to the Publish Tab. Select your publishing method from directly underneath the Publish tab, either Local Storage, Local Network, or Simple File Network Browse to the folder containing your project.
Select your project from the list. By default, the selected presentation will display always, indefinitely. You may schedule this presentation to only play during certain times via the schedule to the right or schedule the player to switch between multiple presentations.
For Local Storage:
Browse to an SD card, USB drive or folder you wish to write the published presentation to.
Select Standalone unit to only publish the presentation. Select Standalone unit with setup to include player setup with the presentation.
For Local Network:
Select the unit or multiple units you wish to publish to from the populated list. The units name and/or appended ID will appear if the player was set up for Local Network publishing and is on the same network as your computer. If your unit does not appear in the list, turn on the player without its micro SD card inserted. At the start-up screen, note the players IP address. Select the + icon under the Networked Units list in BrightAuthor and type the player's IP address.
For Simple File Network:
Select "Set Parameters"
Type the URL for the web folder to which you are publishing
Set the frequency at which the player will check for updates to that folder.
Browse to the SD card or folder you wish to publish to and place the published files in your web folder.
BrightSign Firmware Update
For players which have not been published to before, or if you have
downloaded a new version of BrightAuthor, select "Specify Firmware Update"
below your publishing options.
Ensure the Update type at the top is set to "Standard"
Navigate to the top left-hand section labeled LS423, HD223, HD1023, HS123,
HO523, HD1423
Select "Production Release"
Select "Okay" to finalize your settings.
The firmware update will be included with your published presentation.
BrightSign Firmware Update
For players which have not been published to before, or if you have downloaded a new version of BrightAuthor, select "Specify Firmware Update"
below your publishing options.
Ensure the Update type at the top is set to "Standard"
Navigate to the top left-hand section labeled LS423, HS223, HS1023, HS123, HO523, HS1423
Select "Production Release"
Select "Okay" to finalize your settings.
The firmware update will be included with your published presentation.
Support
Software Support
For more information, troubleshooting, or support regarding BrightSign, BrightAuthor, presentations, or content management, visit https://www.brightsign.biz/about/contact-us
Hardware Support
For information and support regarding Mimo product, contact info@mimomonitors.com
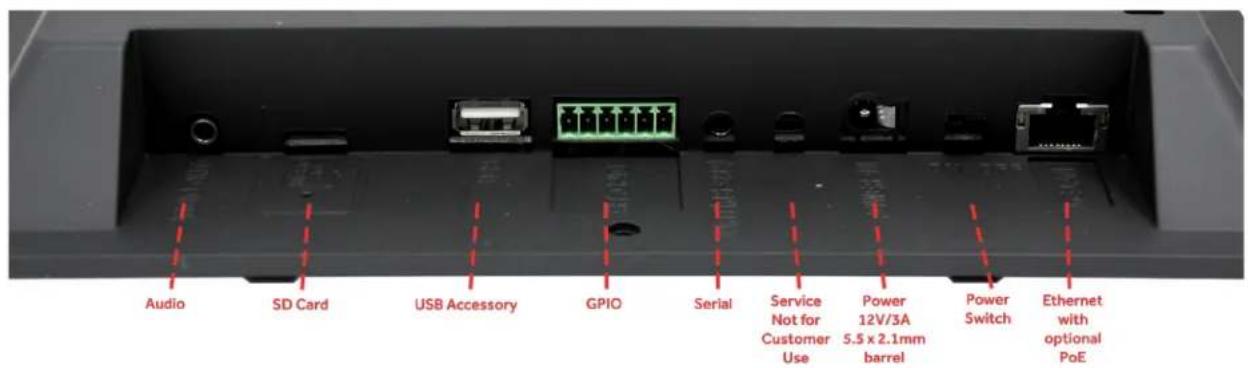
Ports
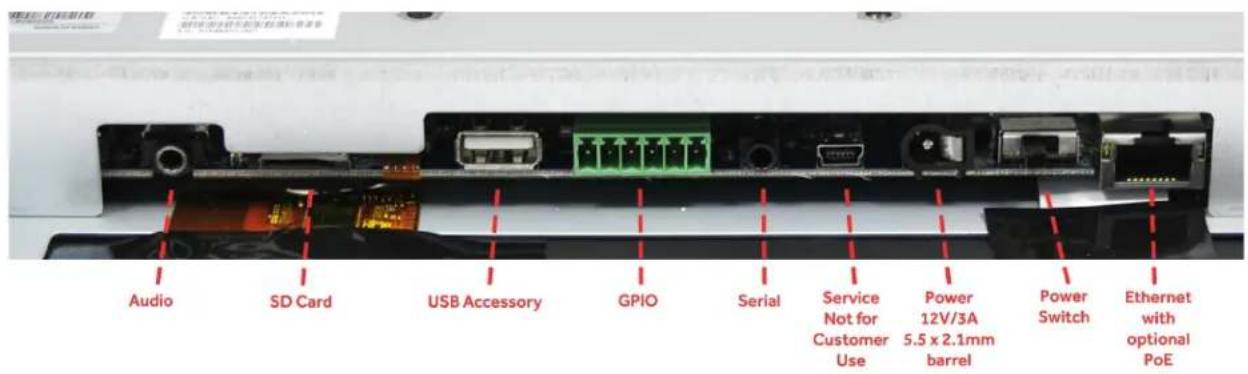
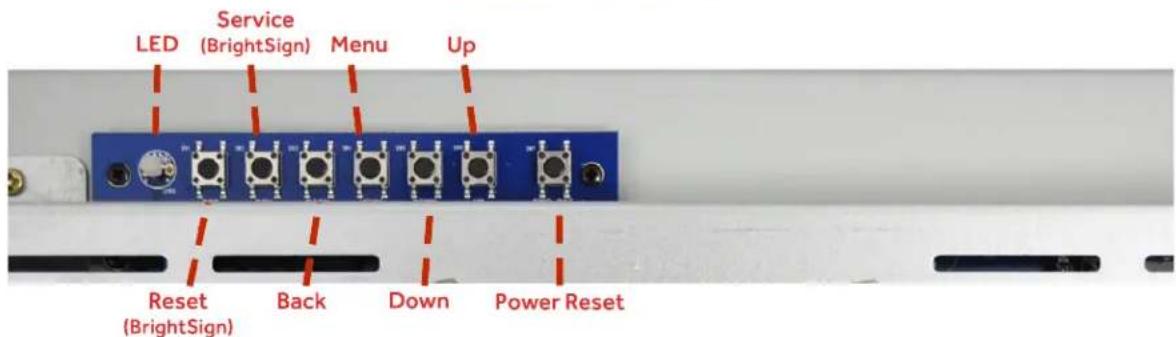
Button Board

Mimo Monitors
743 Alexander Rd. Suite 15
Princeton, NJ 08540
info@mimomonitors.com
Sales: 1-855-YES-MIMO (937-6466)