IDP-31101W - Suivi Advantech - Free user manual and instructions
Find the device manual for free IDP-31101W Advantech in PDF.

User questions about IDP-31101W Advantech
0 question about this device. Answer the ones you know or ask your own.
Ask a new question about this device
Download the instructions for your Suivi in PDF format for free! Find your manual IDP-31101W - Advantech and take your electronic device back in hand. On this page are published all the documents necessary for the use of your device. IDP-31101W by Advantech.
USER MANUAL IDP-31101W Advantech
ProFlat Touch Monitor User Manual : IDP-31101W

natural_image
Hand holding a photo frame surrounded by various photos and images, including a soccer ball, heart, and tennis ball (no text or symbols visible)10.1" Projected Capacitive Touch Monitor
Version 0.1
Advantech Co., Ltd.
All Rights Reserved
No part of this publication may be reproduced, transmitted, transcribed, stored in a retrieval system, or translated into any language or computer language, in any form or by any means, including, but not limited to, electronic, magnetic, optical, chemical, manual, or otherwise without prior written permission of Advantech Co., Ltd.
Disclaimer
The information in this document is subject to change without notice. Advantech Co., Ltd. makes no representations or warranties with respect to the contents hereof and specifically disclaim any implied warranties of merchantability or fitness for a particular purpose. Advantech Co., Ltd. reserves the right to revise this publication and to make changes from time to time in the content hereof without obligation of Advantech Co., Ltd. to notify any person of such revisions or changes.
Trademark Acknowledgments
All other product names mentioned herein that are trademarks or registered trademarks are the property of their respective companies.
All rights of these documents are reserved by Advantech Co., Ltd.
FCC Notice
This device complies with Part 15 of the FCC Rules. Operation is subject to the following two conditions:
(1) This device may not cause harmful interference
(2) This device must accept any interference received, including interference that may cause undesired operation.
Table of Contents
Disclaimer .... 1
Trademark Acknowledgments....1
FCC Notice .... 1
Important safety notice....3
1....5
Introduction ......Error! Bookmark not defined.
About this Manual 5
The features....6
Physical Specifications....6
2....7
Unpacking 7
Shipping Damage/Unpacking....7
Packing list....7
3....8
Hardware Installation 8
3.1 VESA standard installation....8
3.2 OSD Functions....8
A. MAIN MANU....8
B. OSD STRUCTURE....9
3.3 OSD Key Information 9
A. OSD BOARD 9
B. Key Events 10
4......Error! Bookmark not defined.
Warranty....11
5......Error! Bookmark not defined.
Troubleshooting 12
No picture....12
Power Button does not respond.... 12
Image is unstable, unfocused 12
LED on monitor is not lit (no green or amber color can be seen).... 13
Display image is not properly sized....13
Selected resolution is not displayed properly 13
No touch function....13
Important safety notice
Please read this manual carefully and save to use in the future.

Make sure to unplug the power lead before cleaning the product. Unplug the power lead from the power outlet and wipe the product using a soft, dry cloth.

Do not use components except those recommended by the manufacturer, failure to do so may cause damage.

Do not try to move the monitor by pulling only the cord nor touch the plug with wet hands.

Do not excessively bend the plug and wire nor place heavy objects upon them, which could cause damage.

Keep the product away from places exposed to oil, smoke or moisture; do not install inside a vehicle, this may cause malfunction, an electric shock or fire. Especially avoid operating the monitor near water or outdoors where it could be exposed to snow or rain.

Do not cover the vents on the monitor case, do not place the monitor or power adapter on the bed, sofa, carpet etc., as bad ventilation may cause a breakdown or fire.

When installing the product, make sure to keep it away from the wall (more than 76mm (3 inch) for ventilation purposes.

Only the type of power listed in the label of the LCD can be used. If you have questions of power type, please contact local dealer or power supply department.

Use only a properly grounded plug and receptacle. An improper ground may cause electric shock or equipment damage. If you can't insert the plug into
outlet, please change the outlet.

Make sure the outlet can support total electricity of products be plug into it, do not connect too many extension cords or plugs to an outlet. Otherwise it may cause fire.

Do not place the product on an unstable or small surface area. Place the product on an even, stable surface, as the product may fall and cause harm to someone walking by, specifically children.

Do not try to extend the power wire, otherwise it may cause fire.

Do not open the monitor cabinet by yourself, if monitor needs to be examined or repaired, please contact the professional service.

Firstly pull out the power plug and connect the professional service when it happens following:
a. power wire or power cable is damaged.
b. monitor fall into ground or monitor cabinet is damaged.
c. monitor displays obviously out of the way, needs to be repaired.

Unplug the power cord from the power outlet when monitor is not used.

Do not install the product in places with poor ventilation, high light, high temperature or moisture.
1
Introduction
About this Manual
This manual is intended as a reference guide for the Advantech ProFlat Touch Monitors.
This Manual provides the information needed to install, set up and maintain the Advantech ProFlat Touch Monitors. In addition, this manual describes basic technical information about the touch sensor, troubleshooting and contact information.
This manual is organised as follows;
Chapter 1 Introduction and general information.
Chapter 2 Unpacking care and maintenance
Chapter 3 Hardware Installation guide
Chapter 4 Warranty information
Chapter 5 Troubleshooting
The features
Mode name
IDP-31101W
Description
10.1" TFT ProFlat Touch Monitor
Native Resolution
1280 x 800 @ 60Hz
Contrast Ratio
800:1 Typ.
Colours
16.2 million
Response Time (LCD Panel)
25ms Typ.
Luminance(LCD Panel)
500 cd/m² Typ.
Viewing Angle
Horizontal (left/right) 170° (85° /85° )
(From Centre, CR>=10)
Vertical (up/down) 170° (85° /85° )
Touch Technology
Projected Capacitive Touch (P-Cap)
Touchscreen Interface
USB
Physical Specifications
| Model Parameter | IDP-31101W |
| Length | 261.3mm |
| Width | 179.3mm |
| Thickness | 36.2mm |
| Active area | 218.0x136.0mm |

2
Unpacking
Shipping Damage/Unpacking

Advantech takes every precaution in testing and packing its products prior to shipment.
On delivery of the products, check the shipping carton for damage. If any damage is seen that could have caused damage to the contents, keep all packing materials for later inspection by Advantech or the carrier who are responsible for any shipping damage.
Handle the monitor with care. Take care not to mark or scratch the glass when removing it from its packing.
Packing list
Please open the package carefully and check the items below are in the package:
- Touch monitor
- Power supply (110V-240V),
- UK/EU/US 3 power cord,
- VGA/DVI 2 cable,
- USB touch cable
If any items are missing, please contact your local dealer or the Advantech Service Department.
Note: please save the original package in order to ship the monitor in the future.
3
Hardware Installation
3.1 VESA standard installation
The IDP-31 touch monitor's mounting functions include ProFlat, removable base VESA and wall mount.
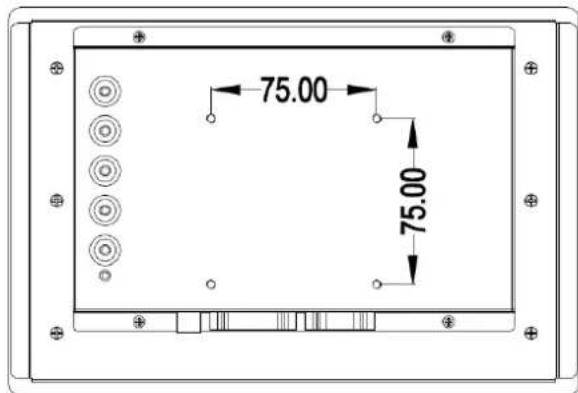
text_image
75.00 75.00VESA installation holes
3.2 OSD Functions
A. MAIN MANU
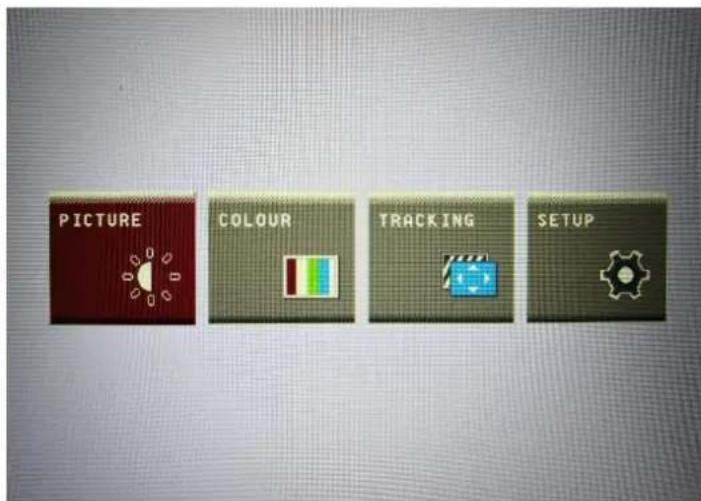
text_image
PICTURE COLOUR TRACKING SETUPB. OSD STRUCTURE
| 1st Sub Menu | 2nd Sub Menu | 3rd Sub Menu | Default Value (Step) |
| PICTURE | BRIGHTNESS | 0-100 | 100 |
| CONTRAST | 0-100 | 60 | |
| GAMMA | 2.0/2.2/2.4 | 2.2 | |
| COLOUR | PRESET | sRGB/6500K/9300K | 6500K |
| RED | 0-100 | 70 | |
| GREEN | 0-100 | 70 | |
| BLUE | 0-100 | 70 | |
| TRACKING | HORIZONTAL | 0-100 | 50 |
| VERTICAL | 0-100 | 50 | |
| CLOCK | 0-100 | 50 | |
| PHASE | 0-100 | 17 | |
| SHARPNESS | 0-10 | 2 | |
| SETUP | LANGUAGE | 简中、繁中、English etc. | English |
| OSD POSITION | - | - | |
| HORIZONTAL | 0-100 | 50 | |
| VERTICAL | 0-100 | 50 | |
| WHITE BALANCE | YES/NO | NO | |
| LIGHT SENSOR | OFF | OFF | |
| INPUT SELECT | VGA/DVI | VGA | |
| FACTORY RESET | YES/NO | NO |
3.3 OSD Key Information
A. OSD BOARD

text_image
GENERAL Touch MODEL : MT-OSD PCB : V1.2_A K1 DOWN UP MDW AUTO K4 R5 POWER K01 R B 1 FULL UP DOWN FOR NON AUTO 8 GENERAL Touch MODEL : MT-OSD PCB : V1.2_A K2 R3 MDW AUTO K5 R6 POWERDOWN
UP
MENU
AUTO
POWER
MT-OSD
B. Key Events
| Button | Function | Status | Hot Key |
| LED | Indicates Operation status | Green: Normal OperationRed : Off Mode 、No signal、Sleep mode、Factory mode、Burn in mode | |
| POWER | Turn on or turn off the power | ||
| AUTO | 1、Adjust the Picture of Analog input2、Exit menu or Exit a menu of sub-menu | ||
| MENU | Display the OSD Menu or Select highlighted function | ||
| UP | Select Previous menu item or increase value | Select Brightness Adjust menu | |
| DOWN | Select next menu item or Decrease value | Select Contrast Adjust menu |
4
Warranty
Advantech is only under obligation to offer the following Warranty Repair and Services except those authorized formal documents in written form:
LCD & Screen repairable: 2 years
The above warranty period takes the front four places of the Serial Number label on the Advantech products as the starting date.
Warranty products cover panel, controller and communication cable. Accessories included with the products are not included in the warranty.
5
Troubleshooting
No picture
The signal cable should be fully connected to the graphics card/computer.
The graphics card should be completely seated in its PC slot.
Power Button and computer power switch should be in the ON position.
Check to make sure that a supported mode has been selected on the graphics card or system being used. (Please consult graphics card or system manual to change graphics mode).
Check the monitor and your graphics card with respect to compatibility and recommended settings.
Check the signal cable connector for bent or pushed-in pins.
Check that the BNC or D-SUB button is in the correct position.
Power Button does not respond
Unplug the power cord of the monitor from the AC outlet to turn off and reset the monitor, or simultaneously press the RESET and Power buttons.
Image is unstable, unfocused
Signal cable should be fully connected to the computer.
Use the OSM ^™ Image Adjust controls to focus and adjust display by increasing or decreasing the Fine control. When the display mode is changed, the OSM Image Adjust settings may need to be re-adjusted.
Check the monitor and your graphics card with respect to compatibility and recommended signal timings.
If your text is garbled, change the video mode to non-interlace and use 60Hz refresh rate.
LED on monitor is not lit (no green or amber color can be seen)
Power Button should be in the ON position and power lead should be connected. Make certain the computer is not in a power-saving mode (touch the keyboard or mouse if present).
Display image is not properly sized
Use the OSM Image Adjust controls to increase or decrease the H. Size.
Check to make sure that a supported mode and signal timing has been selected on the graphics card or system being used (Please consult the graphics card or system manual to change graphics mode or refresh rate).
Selected resolution is not displayed properly
Select the Display Resolution in the OSM Information menu to confirm that the appropriate resolution has been selected. If not, select corresponding option by pressing the control button.
No touch function
Check that the software driver is correctly installed. Or, try to uninstall the driver first, and then reinstall the driver and reboot the computer.
If there is no problem about the software driver, Please replace the Digitizer Pen to have a try.
If the problem persists, please contact our technical support engineer.