Sonicare Flexcare Platinum HX9122 - Electric toothbrush PHILIPS - Free user manual and instructions
Find the device manual for free Sonicare Flexcare Platinum HX9122 PHILIPS in PDF.

User questions about Sonicare Flexcare Platinum HX9122 PHILIPS
0 question about this device. Answer the ones you know or ask your own.
Ask a new question about this device
Download the instructions for your Electric toothbrush in PDF format for free! Find your manual Sonicare Flexcare Platinum HX9122 - PHILIPS and take your electronic device back in hand. On this page are published all the documents necessary for the use of your device. Sonicare Flexcare Platinum HX9122 by PHILIPS.
USER MANUAL Sonicare Flexcare Platinum HX9122 PHILIPS
natural_image
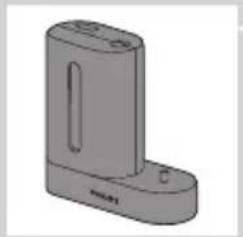
Exterior view of a Philips sonicare electric toothbrush (no text or symbols on the device body)FlexCare Platinum
Rechargeable sonic toothbrush
HX9112/27, HX9122/27, HX9172/28, HX9162/28
取扱説明書
保証書付
Guidance in English 23\~41
●英文解說
保証とアフターサービス 44
●保 証
仕様 45
無料修理規定 46
保証書 ...... 最終ページ
2
必ずお守り ください
ご使用の前に必ず取扱説明書をよくお読
natural_image
Simple line drawing of a wall-mounted power outlet connected to a plug, showing wiring (no text or symbols)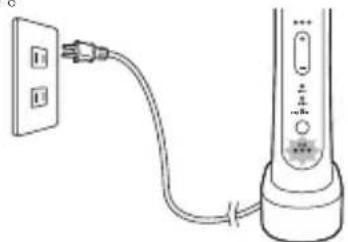
natural_image
Diagram of an electric toothbrush connecting a wall-mounted power outlet (no text or symbols)充電表示
充電催促表示
No plug adapter required.
Plug adapter required.
natural_image
Technical line drawing of a socket and plug assembly (no text or symbols)natural_image
Illustration of a tooth with surrounding bone structure (no text or symbols)12


natural_image
Line drawing of a medical or laboratory procedure showing a tool tip and a pipette inserted into tissue (no text or symbols)
natural_image
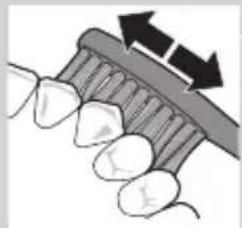
Illustration of dental arches with tooth structures and a toothbrush (no text or symbols)歯の表側
natural_image
Line drawing of a toothbrush brushing teeth with dental crowns (no text or symbols)奥歯の裏側
ヒント
natural_image
Technical line drawing of a cylindrical electronic device with a labeled base (PHILIPS), no text or symbols on the device itself.natural_image
Hand inserting a small object into a cylindrical device with an arrow indicating rotation (no text or symbols)natural_image
Simple line drawing of a mechanical component or tool with no visible text or symbols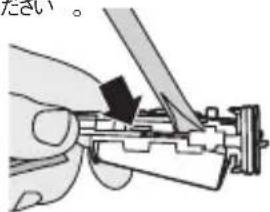
natural_image
Close-up of a hand holding a mechanical component with a black arrow pointing to a section (no visible text or symbols)Congratulations on your purchase and welcome to Philips! To fully benefit from the support that Philips offers, register your product at www.philips.com/welcome.
Important
Read this user manual carefully before you use the appliance and save it for future reference.
Danger
- Keep the charger and/or sanitiser away from water. Do not place or store it over or near water contained in a bathtub, washbasin, sink etc. Do not immerse the charger and/or sanitiser in water or any other liquid. After cleaning, make sure the charger and/or sanitiser is completely dry before you connect it to the mains.
Warning
- The mains cord cannot be replaced. If the mains cord is damaged, discard the charger and/or sanitiser.
- Always have the charger and/or sanitiser replaced with one of the original type in order to avoid a hazard.
- Do not use the charger and/or sanitiser outdoors or near heated surfaces. Do not operate the sanitiser where aerosol (spray) products are being used or where oxygen is being administered.
- The appliance is suitable for mains voltages ranging from 100 to 240 volts.
- If the appliance is damaged in any way (brush head, toothbrush handle, charger and/or sanitiser), stop using it. This appliance contains no serviceable parts. If the appliance is damaged, contact the
ENGLISH
Consumer Care Centre in your country (see chapter 'Guarantee and support').
- This appliance is not intended for use by persons (including children) with reduced physical, sensory or mental capabilities, or lack of experience and knowledge, unless they have been given supervision or instruction concerning use of the appliance by a person responsible for their safety.
- Children should be supervised to ensure that they do not play with the appliance.
- Discontinue use of the sanitiser if the UV light bulb remains on when the door is open. UV light can be harmful to the human eye and skin. Keep the sanitiser out of the reach of children at all times.
Caution
- Do not clean the brush head, the handle, the charger and/or the sanitiser in the dishwasher.
- If you have had oral or gum surgery in the previous 2 months, consult your dentist before you use the toothbrush.
- Consult your dentist if excessive bleeding occurs after using this toothbrush or if bleeding continues to occur after 1 week of use. Also consult your dentist if you experience discomfort or pain when you use the Sonicare.
- The Sonicare toothbrush complies with the safety standards for electromagnetic devices. If you have a pacemaker or other implanted device, contact your physician or the device manufacturer of the implanted device prior to use.
- If you have medical concerns, consult your doctor before you use the Sonicare.
- This appliance has only been designed for cleaning teeth, gums and tongue. Do not use it for any other purpose. Stop using the appliance
ENGLISH
and contact your doctor if you experience any discomfort or pain.
- The Sonicare toothbrush is a personal care device and is not intended for use on multiple patients in a dental practice or institution.
- Stop using a brush head with crushed or bent bristles. Replace the brush head every 3 months or sooner if signs of wear appear.
- Do not use other brush heads than the ones recommended by the manufacturer.
- If your toothpaste contains peroxide, baking soda or bicarbonate (common in whitening toothpastes), thoroughly clean the brush head with soap and water after each use. This prevents possible cracking of the plastic.
- Do not insert objects into the air openings of the sanitiser or block these air openings by placing it on a soft surface or in a position or location where objects will block these openings (examples of objects: magazine, tissue paper and hair).
- The UV light bulb is hot during and immediately after the sanitising cycle. Do not touch the UV light bulb when it is hot.
- Do not operate the sanitiser without the protective screen in place to avoid contact with a hot bulb.
- If the sanitiser has been used for 3 consecutive UV clean cycles (i.e. 3 times in a row), switch it off for at least 30 minutes before you start another UV clean cycle.
Electromagnetic fields (EMF)
This Philips appliance complies with all applicable standards and regulations regarding exposure to electromagnetic fields.
27
ENGLISH
General description (Fig. 1)
1 Hygienic travel cap
2 Brush head with unique identifier
3 Handle
4 Power on/off button
5 Intensity level indicator
6 Intensity level button (+ and -)
7 Brushing modes
8 Mode button
9 Battery level indicator
10 UV sanitiser and base with integrated charger and cord wrap (specific types only)
- Not shown: UV light bulb
- Not shown: Sanitiser drip tray
- Not shown: Protective screen for UV light bulb
11 Mains cord with plug
12 Deluxe charger (specific types only)
13 Charger cover with brush head holders and base with cord wrap
14 Travel charger
- Not shown: Travel case
Note: The contents of the box may vary based on the type purchased.
Preparing for use
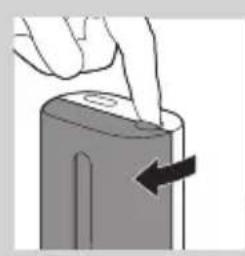
Attaching the brush head
natural_image
Illustration of a hand holding a pen and a secondhand electric toothbrush, both without any text or symbols.1 Align the brush head so the bristles face the front of the handle.
2 Firmly press the brush head down on the metal shaft until it stops.
Note: Sonicare Platinum brush heads come with easily identifiable icons to identify your brush head.
28
ENGLISH
Charging the appliance

natural_image
Line drawing of a hairbrush with star-shaped caliper (no text or symbols)1 Put the plug of the charger or sanitiser in a wall socket.
2 Place the handle on the charger.
▶The flashing light of the battery level indicator shows that the toothbrush is charging.
Note: It takes at least 24 hours to fully charge the battery.
Using the appliance
Brushing instructions
natural_image
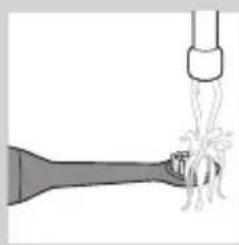
Diagram of a funnel pouring liquid into a narrow neck (no text or symbols)1 Wet the bristles.
natural_image
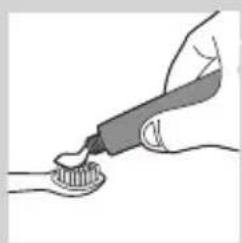
Illustration of a hand using a toothbrush to apply or brush (no text or symbols present)2 Apply a small amount of toothpaste on the bristles.
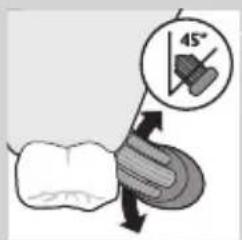
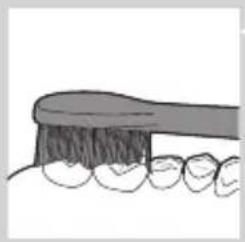
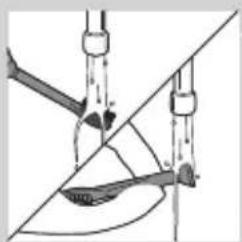
3 Place the toothbrush bristles against the teeth at a slight angle (45 degrees), pressing firmly to make the bristles reach the gumline or slightly beneath the gumline. A change in vibration (and a slight change in sound) alerts you when you apply too much pressure while brushing.
29
ENGLISH
natural_image
Illustration of a toothbrush with teeth and jawbone, showing tooth arrangement (no text or symbols)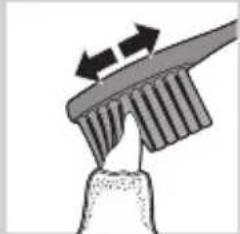
natural_image
Diagram of a toothbrush applying force to a tooth (no text or symbols)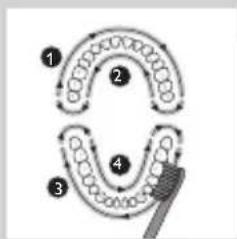
flowchart
graph TD
    A["Step 1"] --> B["Step 2"]
    B --> C["Step 3"]
    C --> D["Step 4"]
Note: Keep the centre of the brush in contact with the teeth at all times.
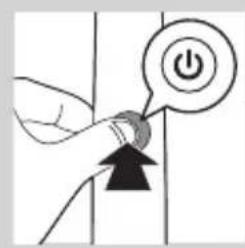
4 Press the power on/off button to switch on the Sonicare.
5 Gently keep the bristles placed on the teeth and in the gumline. Brush your teeth with small back and forth motions so the bristles reach between the teeth.
Note: The bristles should flare slightly. Do not scrub.
6 To clean the inside surfaces of the front teeth, tilt the brush handle semi-upright and make several vertical overlapping brushing strokes on each tooth.
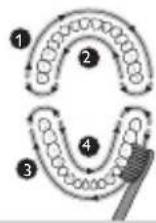
7 Begin brushing in section 1 (outside top teeth) and brush for 30 seconds (45 seconds in Deep Clean mode) before you move to section 2 (inside top teeth). Continue brushing in section 3 (outside bottom teeth) and brush for 30 seconds (45 seconds in Deep Clean mode) before you move to section 4 (inside bottom teeth). Brush section 4 for 30 seconds until the toothbrush switches off.
Note: To make sure you brush evenly throughout the mouth, divide the mouth into 4 sections using the Quadpacer feature (see chapter 'Features').
ENGLISH
natural_image
Simple line drawing of a toothbrush applying sealant to teeth (no text or symbols)Note: After you have completed the brushing cycle, you can spend additional time brushing the chewing surfaces of your teeth and areas where staining occurs. You may also brush your tongue, with the toothbrush switched on or off, as you prefer.
Your Sonicare is safe to use on:
- Braces (brush heads may wear out more quickly when used on braces).
- Dental restorations (fillings, crowns, veneers, implants).
Brushing modes
1 Clean: For an exceptional everyday clean (default mode).
2 White: 2 minutes to remove surface stains and 30 seconds to brighten and polish your front teeth.
3 Deep Clean: Provides an invigorating 3 minutes of alternating cleaning and massaging to deliver an exceptionally clean experience. Your Sonicare comes with the Clean mode activated.
Note: When the toothbrush is switched on, you cannot toggle between modes.
1 Before you switch on the Sonicare, press the mode button to toggle between modes.
The selected brushing mode lights up.
Once a brushing mode has been selected, it remains active until you select another brushing mode.
Note: When the Sonicare is used in clinical studies, it must be used in the default 2-minute Clean mode at high intensity or in the Deep Clean mode at high intensity.
31
ENGLISH
Intensity levels per mode
- Low: 1 LED indicator light.
- Medium: 2 LED indicator lights.
- High: 3 LED indicator lights.
Note: to adjust the intensity level to the next higher or lower level, you can press the + button to increase intensity or the - button to decrease intensity at any time during the brushing cycle.
Pressure Sensor
A change in vibration (and a slight change in sound) alerts you when you apply too much pressure while brushing. See chapter 'Features'.
Battery status (when handle is not on charger)
- 1 yellow LED indicates a low charge.
- 3 green LEDs indicate a full charge.
Note: If you hear a long beep and the yellow LED of the battery level indicator flashes, your toothbrush is completely empty and switches off. Place the toothbrush on the charger to recharge it.
Note: To keep the battery fully charged at all times, you may keep your Sonicare on the charger when not in use.
Features
Pressure Sensor
This Sonicare type comes with the Pressure Sensor feature activated. The Pressure Sensor works in all 3 modes and at all 3 intensity levels.
32
ENGLISH
To deactivate or reactivate the Pressure Sensor feature:
1 Place the handle with a brush head attached on the plugged-in charger or sanitiser.
2 Press and hold the power on/off button and the mode button for 2 seconds.
▶You hear 1 beep to indicate that the Pressure Sensor has been deactivated.
▶You hear 2 beeps to indicate that the Pressure Sensor has been activated.
Quadpacer
- The Quadpacer is an interval timer that has a short beep and pause to remind you to brush the 4 sections of your mouth. Depending on the brushing mode you have selected, the Quadpacer beeps at different intervals during the brushing cycle. The Quadpacer works in all 3 modes and at all 3 intensity levels.
The Quadpacer feature on this type has been activated. To deactivate or reactivate the Quadpacer feature:
1 Place the handle with a brush head attached on the plugged-in charger or sanitiser.
2 Press and hold the mode button for 2 seconds.
▶You hear 1 beep to indicate the Quadpacer has been deactivated.
▶You hear 2 beeps to indicate the Quadpacer has been activated.
Smartimer
The Smartimer indicates that your brushing cycle is complete when it automatically switches off the toothbrush at the end of the brushing cycle.
33
ENGLISH
Dental professionals recommend brushing at least 2 minutes twice a day.
Easy-start
The Easy-start feature gently increases power over the first 14 brushings to ease into the Sonicare experience. The Easy-start feature only works in the Clean mode and at the High intensity level.
This Sonicare type comes with the Easy-start feature deactivated. To activate or deactivate the Easy-start feature:
1 Attach your brush head to the handle.
2 Place the handle on the plugged-in charger or sanitiser.
3 Activate or deactivate Easy-start:
To activate Easy-start: Press and hold the power on/off button for 2 seconds. You hear 2 beeps to indicate that the Easy-start feature has been activated.
To deactivate Easy-start: Press and hold the power on/off button for 2 seconds. You hear 1 beep to indicate that the Easy-start feature has been deactivated.
Note: Each of the first 14 brushings must be at least 1 minute in length to properly move through the Easy-start ramp-up cycle.
Note: Using the Easy-start feature beyond the initial ramp-up period is not recommended and reduces Sonicare's effectiveness in removing plaque.
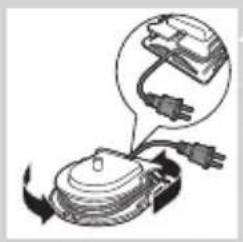
Cord wrap on charger (specific types only)
If your type includes the charger cover and base, the travel charger is pre-installed inside the cover.
ENGLISH
natural_image
Diagram of a device with plug and cable, showing internal components (no text or symbols)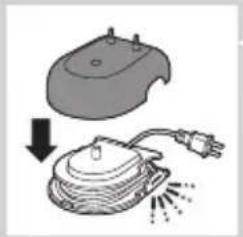
natural_image
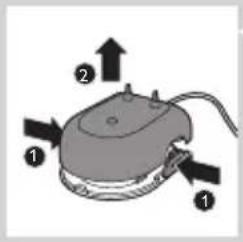
Illustration of a computer mouse with an open lid and connected to a plug, showing mechanical components (no text or symbols)1 To separate the charger cover from the charger base, press the two grey snap bars on the charger base and pull the white charger cover upwards.
2 Wrap excess mains cord around the grey charger base as shown in the picture. Be sure to wrap the cord on the inside of the two snap levers. Guide the mains cord through the small groove in the rear of the charger base.
3 To reattach the charger cover, press it down over the charger base until it snaps into place.
Tip: For extra convenience during travel, you can remove the travel charger and use it without the charger cover and charger base.
Sanitising (specific types only)
natural_image
3D rendered model of a mechanical bracket or housing (no text or symbols visible)- With the UV sanitiser you can clean your brush head after every use.
Unplug the sanitiser, discontinue use and call Consumer Care if:
- The UV light bulb remains on when the door is open.
- The window is broken or missing from the sanitiser.
- The sanitiser gives off smoke or a burning smell while it is operating.
Note: UV light can be harmful to the human eye and skin. Keep the sanitiser out of the reach of children at all times.
35
ENGLISH
natural_image
Hand holding a cylindrical device with a black arrow pointing to its side (no text or symbols visible)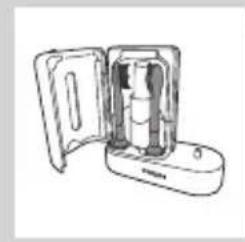
natural_image
Line drawing of an open medical device with internal components (no text or symbols)1 After brushing, rinse the brush head for 15 seconds and shake off excess water.
Do not place the travel cap on the brush head during sanitisation.
2 Let the brush head to dry in open air for 2 minutes.
3 Place your finger in the door recess on top of the sanitiser and pull open the door.
4 Place the brush head on one of the 2 pegs in the sanitiser with the bristles facing the light bulb.
Note: Only clean Sonicare snap-on brush heads in the sanitiser.
Note: Do not clean Sonicare for Kids brush heads in the sanitiser.
5 Put the plug of the sanitiser in the wall socket.
6 Close the door and press the green power on/off button once to select the UV clean cycle.
Note: You can only switch on the sanitiser if the door is closed properly.
Note: The sanitiser stops if you open the door during the sanitising cycle.
Note: The sanitiser cycle runs for 10 minutes and then shuts off automatically.
The sanitiser is in operation when the light glows through the window.
ENGLISH
Cleaning
Do not clean the brush head, the handle, the travel charger, the charger cover and the UV sanitiser in the dishwasher.
Toothbrush handle
natural_image
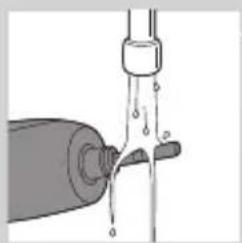
Illustration of a water spray bottle pouring liquid from a pipe (no text or symbols)1 Remove the brush head and rinse the metal shaft area with warm water.
Do not push on the rubber seal on the metal shaft with sharp objects, as this may cause damage.
2 Use a damp cloth to wipe the entire surface of the handle.
Do not use isopropyl rubbing alcohol, vinegar, or essential oil based products to clean the handle or the brush head.
Brush head
natural_image
Diagram of a mechanical or electrical component with no visible text, numbers, or symbols1 Rinse the brush head and bristles after each use.
2 Remove the brush head from the handle and rinse the brush head connection at least once a week with warm water.
Deluxe charger (specific types only)
1 Unplug the charger and remove the charger cover.
2 Use a damp cloth to wipe the surface of the charger and charger cover.
37
ENGLISH
UV sanitiser (specific types only)
Do not immerse the sanitiser in water or rinse it under the tap.
Do not clean the sanitiser when the UV light bulb is hot.
For optimal effectiveness, it is recommended to clean your sanitiser weekly.
natural_image
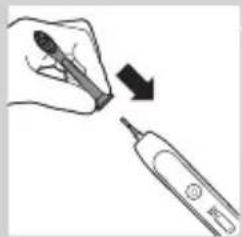
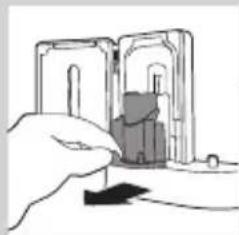
Illustration of a hand holding an open device with a dark component inside (no text or symbols visible)1 Unplug the sanitiser.
2 Pull the drip tray straight out of the sanitiser. Rinse the drip tray and wipe it clean with a damp cloth.
3 Clean all interior surfaces with a damp cloth.
4 Remove the protective screen in front of the UV light bulb.
To remove the screen, grasp the edges next to the snaps, gently squeeze and pull out the protective screen.
natural_image
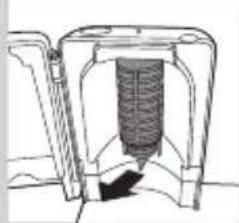
Technical line drawing of a mechanical component with a central cylindrical assembly and base mount (no text or symbols)5 Remove the UV light bulb. To remove the light bulb, grasp it and pull it out of the metal clasp.
6 Clean the protective screen and the UV light bulb with a damp cloth.
7 Reinsert the UV light bulb. To reinsert the light bulb, align the bottom of the light bulb with the metal clasp and push the bulb into the clasp.
8 Reinsert the protective screen. To reinsert the screen, align the pegs on the screen with the slots on the reflective surface near the UV light bulb. Push the screen straight into the slots on the sanitiser.
ENGLISH
Storage
If you are not going to use the appliance for an extended period of time, remove the mains plug from the wall socket. Then clean the appliance and store it in a cool and dry place away from direct sunlight. You can use the cord wrap feature to store the mains cord neatly.
Replacement
Brush head
Replace Sonicare brush heads every 3 months to achieve optimal results. Only use genuine Philips Sonicare replacement brush heads.
Ordering accessories
To buy accessories or spare parts, visit www.shop.philips.com/service or go to your Philips dealer. You can also contact the Philips Consumer Care Centre in your country (see the worldwide guarantee leaflet for contact details).
Recycling
Do not throw away the appliance with the normal household waste at the end of its life, but hand it in at an official collection point for recycling. By doing this, you help to preserve the environment.
Removing the rechargeable battery
This process is not reversible.
To remove the rechargeable battery, you need a flat-head (standard) screwdriver. Observe basic
ENGLISH
natural_image
Illustration of a hand holding a cylindrical object with a curved arrow indicating motion or force (no text or symbols)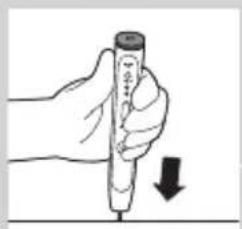
natural_image
Hand holding a test tube with a downward arrow, no text or symbols present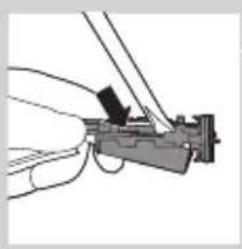
natural_image
Hand holding a mechanical component with wires, no visible text or symbolssafety precautions when you follow the procedure described below. Be sure to protect your eyes, hands, fingers, and the surface on which you work.
1 Remove the toothbrush from the charger, switch it on and let it operate until it stops. Continue to switch on the Sonicare until the battery is completely empty.
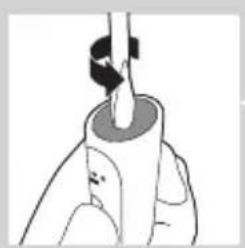
2 Insert a flathead (standard) screwdriver into the slot located at the bottom of the handle. Turn the screwdriver anticlockwise to release the bottom cap.
3 Place the handle on a solid surface with the buttons facing up and lightly tap the housing 2.5cm from the bottom edge with a hammer.
4 Hold the handle upside down and push down on the shaft to release the internal components of the handle.
5 Insert the screwdriver under the circuit board, next to the battery connections, and twist to break the connections. Remove the circuit board and pry the battery from the plastic carrier.
Guarantee and support
If you need information or support, please visit www.philips.com/support or read the separate worldwide guarantee leaflet.
Guarantee restrictions
The terms of the international guarantee do not cover the following: - Brush heads.
40
ENGLISH
- Damage caused by use of unauthorised replacement parts.
- Damage caused by misuse, abuse, neglect, alterations or unauthorised repair.
- Normal wear and tear, including chips, scratches, abrasions, discolouration or fading.
- UV light bulb.


Philips Oral Healthcare, Inc.
22100 Bothell Everett Hwy Bothell, WA 98021 U.S.A.
Phone:+1 (800) 682-7664
Philips Oral Healthcare, Inc.
22100 Bothell Everett Hwy
Bothell, WA 98021 U.S.A.
日本販売代理店製造元
小泉成器株式会社