QC5572 - Lawn mower PHILIPS - Free user manual and instructions
Find the device manual for free QC5572 PHILIPS in PDF.

User questions about QC5572 PHILIPS
0 question about this device. Answer the ones you know or ask your own.
Ask a new question about this device
Download the instructions for your Lawn mower in PDF format for free! Find your manual QC5572 - PHILIPS and take your electronic device back in hand. On this page are published all the documents necessary for the use of your device. QC5572 by PHILIPS.
USER MANUAL QC5572 PHILIPS
natural_image
Black Philips Headgroom brand hairbrush with a circular dial and textured grip (no visible text or symbols on the device itself)フィリップ スセルフヘアーカッター
品番
QC5572/15
取扱説明書
保証書付
natural_image
Line drawing of a connected electrical plug and cord (no text or symbols)Guidance in English 20\~34
●保証
保証とアフターサービス 35
仕様 36
無料修理規定 …38 ……
保証書 ...... 最終ページ
必ずお守り ください
安全上のご注意
natural_image
Abstract diagram with curved lines and a star-like shape, no text or symbols presentnatural_image
Close-up of a medical or surgical tool tip with a black arrow pointing to a component (no text or symbols visible)ポイント
natural_image
Line drawing of a pair of electric shunters with a button and label (no text or symbols on the device itself)natural_image
Line drawing of a hairbrush with a black arrow pointing to the blade (no text or symbols)natural_image
Close-up of a hairdryer tip with a black arrow pointing to the tip area (no text or symbols visible)基本的な使い方
電源 スイッチOFF
natural_image
Line drawing of a hairbrush with a circular button and a black arrow pointing to the handle (no text or symbols)ヘッドの使い方
ヘアートリミングヘッドの取り付け
コームの使い方
レギュラーコームの取り付け
レギュラーコームを本体に差し込みます。
レギュラーコームの取り外し
natural_image
Hand holding a hairdryer with a brush applying material, showing an upward arrow (no text or symbols)細部コームの取り付け
細部コームを本体に差し込みます。
細部コームの取り外し
natural_image
Hand holding a cylindrical device with a striped pattern, being adjusted by an arrow (no text or symbols visible)
注意
natural_image
Line drawing of a pair of electric shunters (no text or symbols)natural_image
Illustration of a person's head with a comb and arrow indicating direction (no text or symbols)
注意
natural_image
Illustration of a person using a hairbrush to clean teeth, with an upward arrow indicating growth (no text or symbols)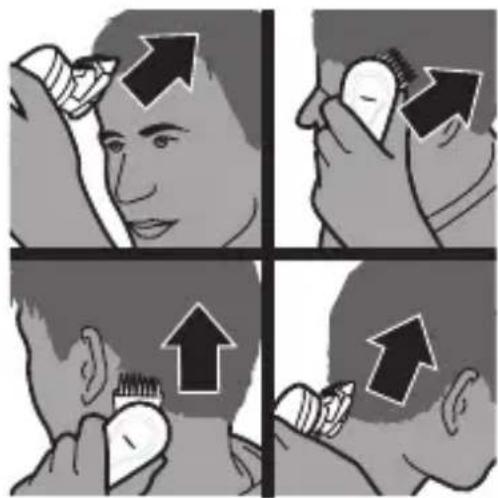
natural_image
Illustration of a hand using a tool to press or install a mechanical component, with an upward arrow indicating motion (no text or symbols present)natural_image
Illustration of a person applying a product to their face (no text or symbols visible)natural_image
Side profile illustration of a person's head and neck with a downward arrow indicating pressure or movement (no text or symbols)natural_image
Three-step illustration showing a hand holding a small object, with no visible text or symbols.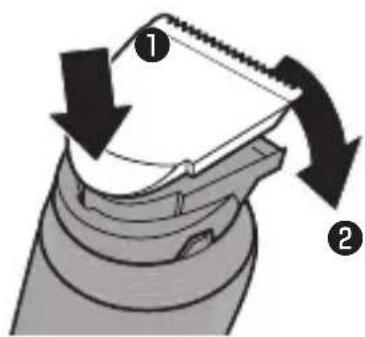
ニッケル水素電池のリサイクルについて
natural_image
Illustration of a hand holding a stack of coins with an upward arrow (no text or symbols)natural_image
Top-down schematic of a boat hull with structural components and directional arrows indicating flow or movement (no text or labels)natural_image
Top-down schematic of a boat hull with directional arrows indicating flow or movement (no text or symbols)natural_image
Illustration of a hand holding a small object with an upward arrow, no text or symbols presentCongratulations on your purchase and welcome to Philips! To fully benefit from the support that Philips offers, register your product at www.philips.com/welcome.
Your new Philips hair clipper with new ergonomic design and 180° adjustable cutting element allows you to clip your own hair easily. You can move the clipper over all areas of your head as easily as running your fingers through your hair. To enjoy using the hair clipper, we advise you to read the following information.
General description (Fig. 1)
1 Cutting element
2 Swivel head
3 Length setting adjustment ring
4 On/off button
5 Socket for small plug
6 Charging lights
7 Regular comb attachment
8 Length setting indicator
9 Precision comb attachment
10 Adapter
11 Cleaning brush
Important
Read this user manual carefully before you use the appliance and save it for future reference.
Danger
- Make sure the adapter does not get wet.
Warning
- The adapter contains a transformer. Do not cut off the adapter to replace it with another plug, as this causes a hazardous situation.
- This appliance is not intended for use by persons (including children) with reduced physical, sensory or mental capabilities, or lack of experience and knowledge, unless they have been given supervision or instruction concerning use of the appliance by a person responsible for their safety.
- Keep the appliance and its cord out of the reach of children.
Caution
- Do not use the appliance in the bath or in the shower.
- Use, charge and store the appliance at a temperature between 5^ C and 35^ C.
- Only use the adapter supplied to charge the appliance.
- If the adapter is damaged, always have it replaced with one of the original type in order to avoid a hazard.
- Do not use the appliance when the shaving head, the cutting element or one of the comb attachments is damaged or broken, as this may cause injury.
- This appliance is only intended for clipping human scalp hair. Do not use it for any other purpose.
- If the appliance is subjected to a major change in temperature, pressure or humidity, let the appliance acclimatise for 30 minutes before you use it.
ENGLISH
natural_image
Simple black-and-white icon of a faucet with a showerhead, enclosed in a square frame (no text or symbols)Compliance with standards
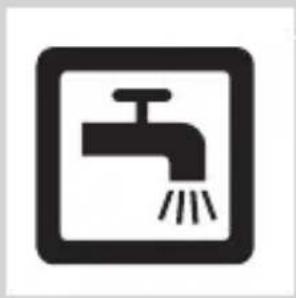
- The appliance complies with the internationally approved IEC safety regulations and can be safely cleaned under the tap.
- This Philips appliance complies with all standards regarding electromagnetic fields (EMF). If handled properly and according to the instructions in this user manual, the appliance is safe to use based on scientific evidence available today.
Charging
natural_image
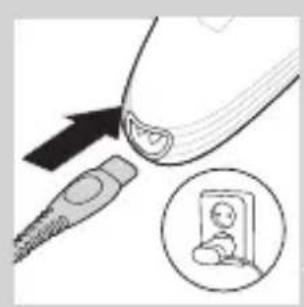
Illustration of a medical device with an arrow pointing to a connector and a magnified inset showing a child inside a room (no text or symbols)Charge the appliance for at least 1 hour before you use it for the first time or after a long period of non-use.
When the appliance is fully charged, it has a cordless clipping time of up to 1 hour.
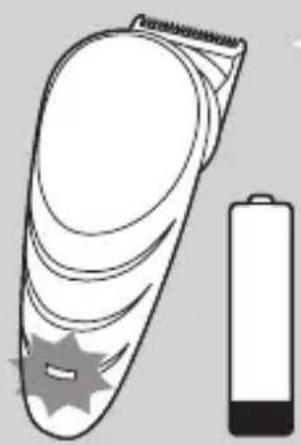
When the charging light flashes orange, the battery is running low (approx. 10 minutes of operating time left) and you need to charge the appliance.
natural_image
Illustration of a handheld device next to a battery (no text or symbols)1 Make sure the appliance is switched off.
2 Insert the appliance plug into the appliance and insert the adapter into the wall socket.
The charging light starts to flash white to indicate that the appliance is charging.
When the battery is fully charged, the charging light lights up white continuously.
After approx. 30 minutes the charging light goes out to save energy.
Optimising the lifetime of the rechargeable battery
Discharge the rechargeable battery completely twice a year by letting the motor run until it stops. Then fully recharge the battery.
Corded clipping
1 Switch off the appliance.
2 Connect the appliance to the mains and wait a few seconds before you switch it on.
Note: If the battery is completely empty, wait a few minutes before you switch on the appliance.
Using the appliance
Make sure your hair is clean and dry. Do not use the appliance on freshly washed hair.
Preparing for hair clipping
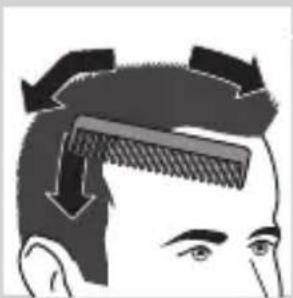
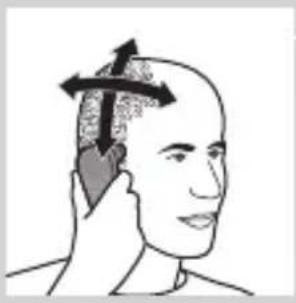
natural_image
Illustration of a person's head with a comb and arrows indicating hair direction (no text or symbols)1 Comb your hair with a styling comb in the direction of hair growth.
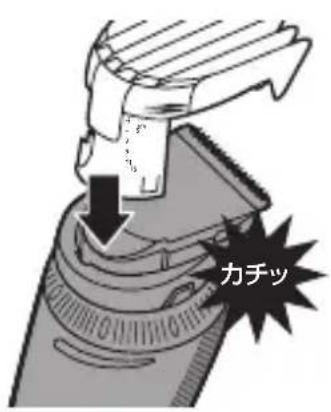
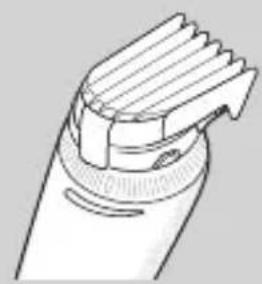
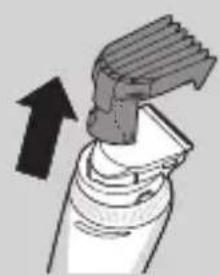
Clipping with comb attachment
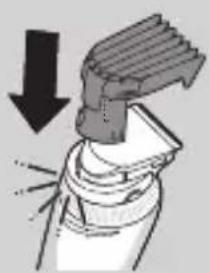
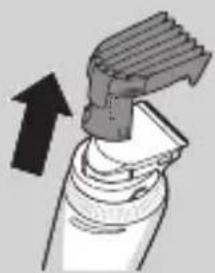
natural_image
Diagram showing a mechanical component with a downward arrow indicating force or direction (no text or symbols present)1 Insert the edge of the comb attachment into the swivel head.
Make sure the comb attachment locks into position properly
Note: The length settings are indicated on the comb attachment.
ENGLISH
natural_image
Diagram of a mechanical component with directional arrows indicating movement or force (no text or symbols)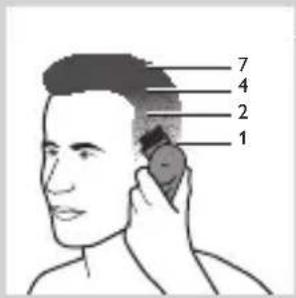
natural_image
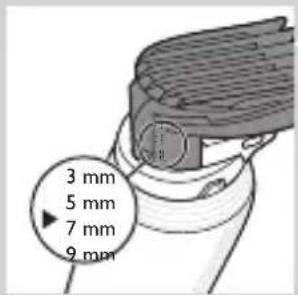
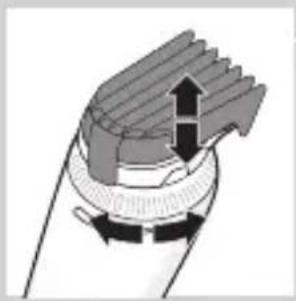
Diagram of a mechanical device with rotating blades and clamping bands (no text or symbols)2 Turn the length setting adjustment ring to set the comb attachment to the desired setting. , The arrowhead on the appliance indicates which setting you have selected.
Tip: Use different settings to create a natural and smooth transition between the various hair lengths from your neckline to the top of your head.
Do not turn the length setting adjustment ring beyond the highest setting.
3 Turn the swivel head to the position that is most comfortable for your arm when you clip the different parts of your head.
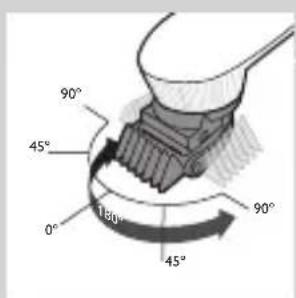
Using the swivel head
- From its starting position of 0^ (pointing forwards), you can turn the swivel head 45^ or 90^ to the left or right. This enables you to adjust the position of the cutting element to the part of your head that you are clipping. This makes it much easier to clip your own hair. - To set the cutting element to the desired position, turn the swivel head ('click').
Note: Always adjust the position of the cutting element by turning the swivel head. Do not turn the cutting element or the comb attachment.
Note: Do not turn the swivel head more than 90^ to the left or right.
natural_image
Illustration of a person neck with hands near the ear (no text or symbols)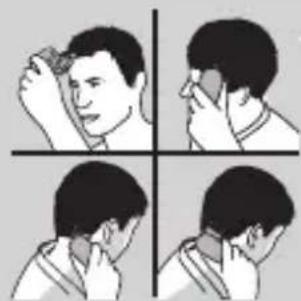
natural_image
Four-panel illustration showing a person performing a neck massage or facial technique (no text or symbols)- The swivel head allows you to hold and use the appliance like a styling comb.
4 Press the on/off button to switch on the appliance.
Press the button briefly.
5 Move the clipper through the hair slowly.
6 Regularly remove cut hair from the comb attachment.
If a lot of hair has accumulated in the comb attachment, remove the comb attachment from the appliance and blow and/or shake the hair out of it. When you remove the comb attachment, the selected setting does not change.
Tips
- We advise you to start clipping at the highest setting of the regular comb attachment and to reduce the setting gradually.
- To clip most effectively, move the appliance against the hair growth direction.
- Since all hair does not grow in the same direction, you need to move the appliance in different directions (upwards, downwards and across).
- Make sure that the flat part of the comb attachment is always fully in contact with the scalp to obtain an even result
- Write down the settings you use to create a certain hairstyle as a reminder for future clipping sessions.
natural_image
Line drawing of a handheld electric toothbrush (no text or symbols)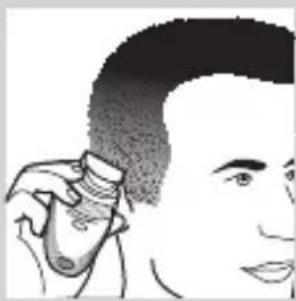
natural_image
Illustration of a person using a hairdryer (no text or symbols visible)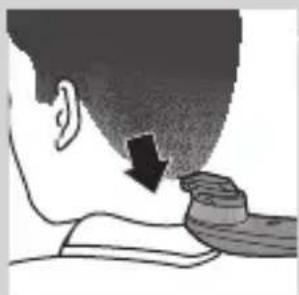
natural_image
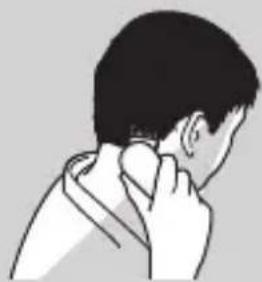
Side profile illustration of a person's neck and shoulder with a downward arrow indicating pressure or movement (no text or symbols)Contouring without comb attachment
You can use the appliance without comb attachment to clip your hair very close to the skin (0,5mm) or to contour the neckline and the area around the ears.
Be careful when you clip without comb attachment because the cutting element removes every hair it touches.
1 Pull the comb attachment off the swivel head.
Never pull at the flexible top of the comb attachment. Always pull at the bottom part.
2 Comb the hair ends over the ears before you start to contour the hairline.
3 Press the on/off button to switch on the appliance.
4 When you shape the contours around the ears, tilt the appliance in such a way that only one edge of the cutting element touches the hair ends.
5 To contour the neckline and the sideburns, turn the appliance and make downward strokes.
Note: Move the appliance slowly and smoothly. Just follow the natural hairline.
6 Adjust the position of the swivel head to make contouring easier.
Shaving
Tip: Shaving is easier when the hairs are shorter than 1mm. If the hairs are longer than 1mm, we recommend that you use the cutting element without
natural_image
Illustration of a hairdryer being inserted into a tube, with an arrow indicating the insertion direction (no text or symbols present)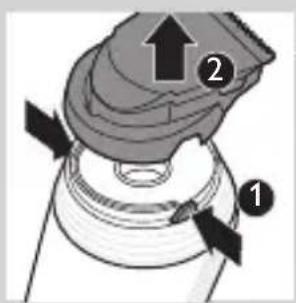
natural_image
Illustration of a hairdryer with a downward arrow indicating compression (no text or symbols)
natural_image
Illustration of a hairbrush applying powder to a brush (no text or symbols)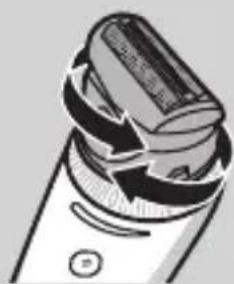
natural_image
Illustration of a handheld electric shaver with a circular button (no text or symbols)the comb attachment to pre-cut hairs to the shortest setting.
1 Switch off the appliance.
2 Pull the comb attachment off the swivel head.
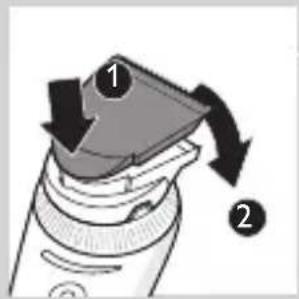
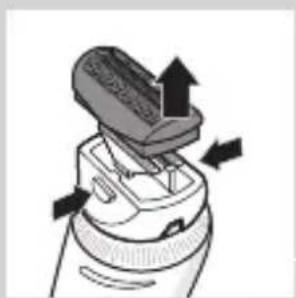
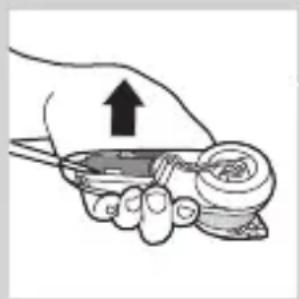
3 Press the release buttons (1) and remove the cutting unit from the handle (2).
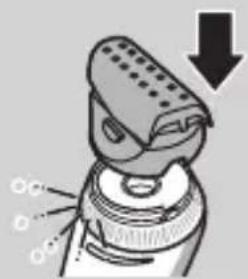
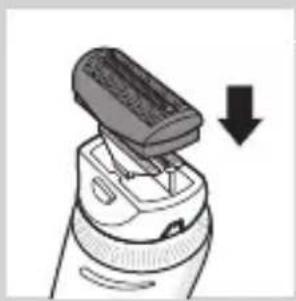
4 Attach the shaving head by pressing it onto the appliance ('click').
Make sure that the shaving head locks into position properly.
5 Remove the protection cap from the shaving head.
6 Adjust the position of the swivel head to make shaving easier. You can do this before and/or during use.
ENGLISH
natural_image
Illustration of a person holding a phone with a hand pointing to the head (no text or symbols)7 Place the shaving head on your scalp and start shaving.
Press the shaving head onto your scalp lightly.
Note: Make sure that the shaving foil is always in full contact with your scalp.
Cleaning and maintenance
Clean the appliance every time you have used it by rinsing it under the tap or with the cleaning brush supplied.
Never use compressed air, scouring pads, abrasive cleaning agents or aggressive liquids such as petrol, acetone or ethereal oils to clean the appliance.
Be careful that the cutting element does not fall on the floor.
Cleaning the cutting element and comb attachments
natural_image
Illustration of a hairbrush applying material to a small object, with an upward arrow indicating motion (no text or symbols)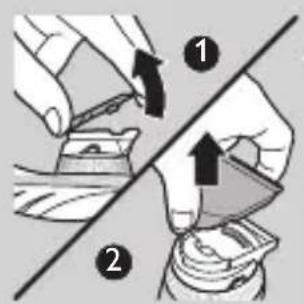
1 Switch off the appliance and disconnect it from the mains.
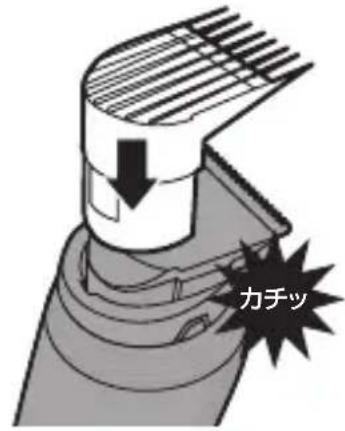
2 Remove the comb attachment.
3 Rinse the comb attachment under the tap or clean it with the cleaning brush supplied.
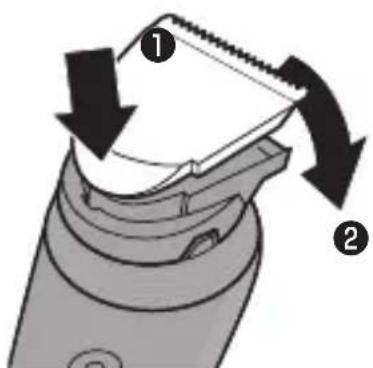
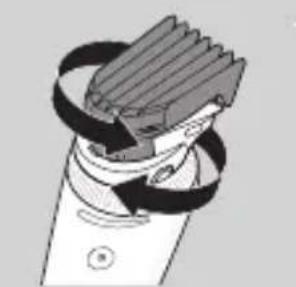
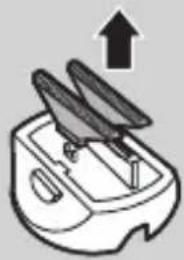
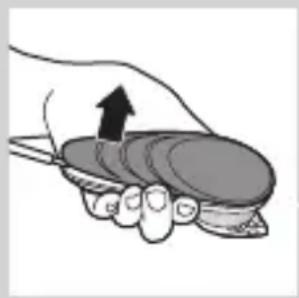
4 Place your thumb in the center of the round side of the cutting element and your index finger on the teeth of the cutting element (1). Use your index finger to lift the cutting element from the swivel head (2).
natural_image
Two hands holding objects above a diagonal line, one with a bag and the other with a bag (no text or symbols)5 Rinse the cutting element under the tap or clean it with the cleaning brush supplied.
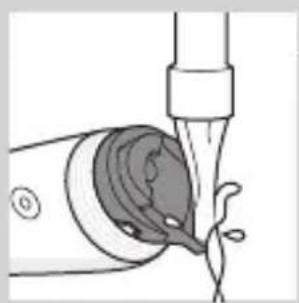
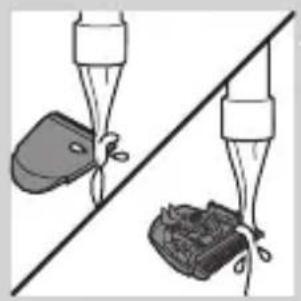
natural_image
Illustration of a medical procedure showing a tube inserted into a container with liquid, no text or symbols present6 Rinse the inside of the appliance under the tap or clean it with the cleaning brush supplied.
natural_image
Diagram of a hairbrush with two arrows indicating direction (no text or symbols)7 Insert the lug of the cutting element into the slot (1) and push the cutting element back onto the swivel head (2).
Cleaning the shaving head

natural_image
Diagram of a device with arrows indicating motion or force, no text or symbols presentNote: Regular check the shaving foil for cracks.
1 Switch off the appliance and disconnect it from the mains.
2 Press the release buttons on the shaving head (1) and remove the shaving foil from the shaving head (2).
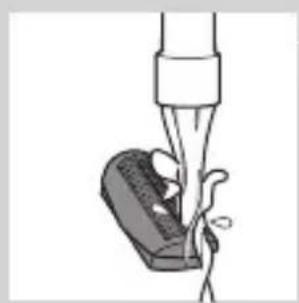
3 Rinse the shaving head and shaving foil under the tap.
Note: To clean the shaving head with the cleaning brush, brush the inside and outside of the shaving head and the outside of the shaving foil. To remove cut hairs
natural_image
Illustration of a medical procedure involving a tool and a device (no text or symbols visible)ENGLISH
natural_image
Illustration of a hairbrush applying material to a device, with a downward arrow indicating compression (no text or symbols present)from the inside of the shaving foil, tap the bottom of the shaving foil gently on a flat surface.
4 Press the shaving foil back into the shaving head.
Storage
1 Switch off the appliance and disconnect it from the mains.
2 Put the protection cap on the shaving head.
3 Store the appliance and its accessories in the storage pouch supplied.
Replacement
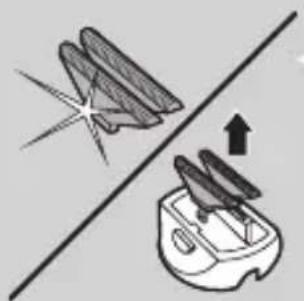
Only replace a worn or damaged cutting element with an original Philips cutting element, available from authorised Philips service centres.
For an optimal shaving result, replace the shaving foil and shaving cutter once a year.
To replace the shaving foil and shaving cutter:
natural_image
Illustration of a brush applying material to a cylindrical object, showing arrows indicating direction (no text or symbols)1 Switch off the appliance and disconnect it from the mains.
2 Press the release buttons on the shaving head and remove the shaving foil from the shaving head.
3 Remove the retaining frame from the old shaving foil.

natural_image
Illustration of a stapler with an upward arrow indicating compression (no text or symbols)
natural_image
Diagram showing two mechanical components with a starburst effect and a downward arrow, no text or symbols present.4 Place the retaining frame on the new shaving foil.
natural_image
Simple line drawing of a kitchen appliance with an upward arrow indicating growth (no text or symbols)5 Remove the old shaving cutters.
natural_image
Diagram showing a pair of kitchen utensils on a grater, with an arrow indicating upward motion (no text or symbols)6 Place the new cutters on the shaving head ('click').

natural_image
Illustration of a hairbrush applying material to a device, showing a downward arrow (no text or symbols)7 Press the shaving foil back into the shaving head.
Environment
natural_image
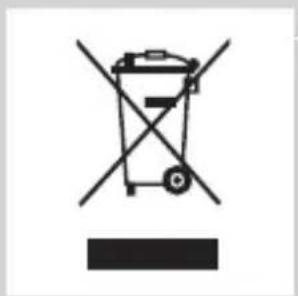
Symbol of a trash bin crossed with two crossed arms, no text or labels present- Do not throw away the appliance with the normal household waste at the end of its life, but hand it in at an official collection point for recycling. By doing this, you help to preserve the environment.
ENGLISH
- The built-in rechargeable battery contains substances that may pollute the environment. Always remove the battery before you discard and hand in the appliance at an official collection point. Dispose of the battery at an official collection point for batteries. If you have trouble removing the battery, you can also take the appliance to a Philips service centre. The staff of this centre will remove the battery for you and will dispose of them in an environmentally safe way.
Removing the rechargeable battery
natural_image
Illustration of a hand holding a small bowl with an upward arrow indicating motion (no text or symbols)Only remove the rechargeable battery when you discard the appliance. Make sure the battery is completely empty when you remove it.
Do not connect the appliance to the mains again after you have removed the rechargeable battery.
1 Disconnect the appliance from the mains and let the appliance run until the motor stops.
2 Remove the upper housing part of the appliance.
3 Open the inner body with a screwdriver.
4 Use a screwdriver to remove the rechargeable battery from the appliance.
5 Cut the wires with a pair of household scissors.
natural_image
Illustration of a hand holding a small object with an upward arrow, no text or symbols presentGuarantee and service
If you need service or information or if you have a problem, please visit the Philips website at www.
philips.com/support or contact the Philips
Consumer Care Centre in your country. You find its phone number in the worldwide guarantee leaflet. If there is no Consumer Care Centre in your country, go to your local Philips dealer.