VN-X235U - Surveillance Camera JVC - Free user manual and instructions
Find the device manual for free VN-X235U JVC in PDF.

User questions about VN-X235U JVC
0 question about this device. Answer the ones you know or ask your own.
Ask a new question about this device
Download the instructions for your Surveillance Camera in PDF format for free! Find your manual VN-X235U - JVC and take your electronic device back in hand. On this page are published all the documents necessary for the use of your device. VN-X235U by JVC.
USER MANUAL VN-X235U JVC
Thank you for purchasing this JVC product. Before operating this unit, please read the instructions carefully to ensure the best possible performance.
Contents
Getting Started
Contents 2
Network Settings
Network Requirements 3
IP Address Settings 6
IP address setting procedure...... 6
IP address setting at the computer..... 7
Internet Explorer Setting...... 8
Connecting the camera to the computer.... 10
IP address setting for the camera..... 12
Enter user name and password...... 14
Setting Using Internet Explorer
Setting 16
How to open the setting page.... 16
Basic Settings1.... 17
Basic Settings2.... 18
Camera Page 21
Encoding Page 26
Audio Page 28
Alarm Page.... 30
Alarm Environment Page.... 34
PTZ Page 38
Auto Patrol Page 39
Privacy Mask Page...... 41
Motion Detection Page 43
Network Basic Page 45
Network Details Page 46
Protocol Page 47
Streaming Page 48
Access Restrictions Page.... 50
Time Page 52
Password Page 53
Maintenance Page 54
LED State Page 55
List of Factory Settings of Each Page ... 56
Miscellaneous Page 59
Operation Page 60
Settings Page 61
Position List 64
Patrol Settings 65
Operation
Operation of Built-in Viewer.... 66
Screen Configuration.... 66
Image Settings.... 68
PTZ Settings.... 70
PTZ Control 72
JPEG Viewer Settings 74
MPEG4 Viewer Settings.... 76
Audio Monitor Settings 78
Operator Password 80
Exiting the Viewer.... 81
Others
Troubleshooting.... 82
How to Read this Manual
■ Symbols used in this manual
Note
:States precautions to be taken during operation.
Memo
:States restrictions on the functions or use of this equipment. For reference purposes.
D
:Indicates the page numbers or items to refer to.
■ Contents of this manual
- This manual contains instructions for setting the network and Internet Explorer, and operating the Built-in Viewer.
- JVC holds the copyright to this manual. Any part or all of this manual may not be reproduced without prior consent from the company.
- Windows is a registered trademark of Microsoft Corporation in the U.S.
- Product names of other companies described in this manual are trademarks or registered trademarks of the respective companies. Symbols such as ^TM , ^® and ^© are omitted in this manual.
- Design, specifications and other contents described in this manual are subject to change for improvements without prior notice.
- Screen displays in this manual may differ from the actual ones.
- For details on mounting the camera, please refer to the attached [READ ME FIRST] and the [INSTRUCTIONS (Installation)] (pdf) in the bundled CD-ROM.
- The model name and series name are stated for functions or setting values that are unique to the model.
- This manual corresponds to firmware V2.00 or later. (VN-V25U, VN-V26U and VN-X35U only)
Network Requirements
- Ensure that there is sufficient network bandwidth for the data volume to be sent out by camera. Do not send multicast stream that exceeds the bandwidth. If the entire bandwidth is used by the multicast stream, control of this camera via the network may fail.
● Data volume to be sent by camera varies with the settings and number of distributions. - The maximum bit rate for transmission is about 20 Mbps.
Estimation of Total Bit Rate
The total JPEG bit rate from camera is determined by the camera settings, number of clients, and the client's requested number of frames. The total MPEG4 bit rate from camera is determined by the number of distributions. Develop a design upon taking the above into consideration.
Bit Rate of JPEG Stream
The JPEG file size per frame varies with the encoding settings as well as input video signals. The following table shows typical sizes. When VFS is selected, the quantization table during JPEG encoding will be maintained, and the file size will increase/decrease according to the input signals. When AFS is selected, encoding will be performed such that the target file size is the average size of multiple JPEG images.
■AFS (Average File Size)
(*X) is applicable to VN-X series only.
| Selectable Range for Distribution File Size | ||
| Quad VGA(※X) | VGA QVGA | |
| 40 KB to 200 KB | 10 KB to 100 KB | 3 KB to 33 KB |
■VFS(Variable File Size)
(*X) is applicable to VN-X series only.
The maximum number of distributions varies with the bit rate settings as well as the client's requested frame rate. Up to 20 streams can be distributed (including multicast). The total frame rate refers to the sum of these frame rates.
For example, when 10 fps is requested by two clients, and in addition, multicast is transmitted at a rate of 10 fps, the total frame rate will be:
$$ 1 0 + 1 0 + 1 0 = 3 0 \mathrm{fps} $$
For example, when 5 fps is requested by two clients, and in addition, multicast is transmitted at a rate of 5 fps, the total frame rate will be:
$$ 5 + 5 + 5 = 1 5 \mathrm{fps} $$
If JPEG file size per piece is 120KB, total bit rate will be:
$$ 1 2 0 \mathrm{KB} \times 1 5 \mathrm{fps} = 1 8 0 0 \mathrm{KB/s} = 1 4. 4 \mathrm{Mbps} $$
Bit Rate of MPEG4 Stream
You can select either the Variable Bit Rate (VBR) or Constant Bit Rate (CBR) system for MPEG4 stream.
When the VBR system is selected, the bit rate varies according to the condition of the input video signals. The VBR system delivers a stable picture quality, but forecast of the bit rate is difficult. When the CBR system is selected, encoding is performed at a fixed bit rate regardless of the condition of the input video signals. The picture quality varies under the CBR system, but the bit rate can be easily forecasted.
You can specify an estimated bit rate for both VBR and CBR. (64 kbps to 8000 kbps)
Network Requirements (continued)
Bit Rate of Audio
Only 1 audio data stream can be received. Data volume for 1 audio stream is 64 kbps. Audio data volume may be calculated using the following formula.
64 kbps x no. of streams
The number of streams is the total number of streams sent via TCP (number of clients), streams sent via multicast, and stream received by camera (Example) When camera sends out 2 audio streams and receives 1 audio stream, data volume will be as follows. 64 kbps x 3 = 192 kbps
Restrictions on the Number of Distributions for camera
The maximum number of distributions for camera is determined by the settings as well as requirements from the client.
For JPEG distribution, you can select either "Frame Rate Priority" mode or "Client number Priority" mode. "Frame Rate Priority" mode distributes JPEG images according to the frame rate requested by the client. The maximum number of distributions is determined based on the highest bit rate within the distribution streams. For "Client number Priority" mode, if there are requests from multiple clients, JPEG images are distributed in a lower frame rate than that requested to cater to multiple clients. It can accept 20 distribution requests as the maximum number of clients.
■ When Frame Rate Priority Mode is Selected
JPEG images are distributed at the frame rate requested by the client.
When a distribution request that exceeds the maximum number of distributions is received, this request is denied.
- When only JPEG images are distributed
For example, if Client A requests for JPEG at 1 Mbps, while Client B requests for JPEG at 5 Mbps, additional 2 streams (total 4 streams) of distribution are possible for request below 5 Mbps.
Maximum number of distributions when only JPEG data is distributed
| Distribution at maximum bit rate | Maximum number of distributions | Total maximum bit rate |
| 1 Mbps and below | 20 20 Mbps | |
| 5 Mbps and below | 4 20 Mbps | |
| 10 Mbps and below | 2 20 Mbps | |
| Larger than 10 Mbps | 1 Maximum | configurable value (24 Mbps) |
●W hen both JPEG and MPEG4 images are distributed
When both JPEG and MPEG4 images are distributed simultaneously, distribution up to two clients for JPEG and three clients for MPEG4 respectively is possible. However, distribution requests that exceed a total bit rate of 20 Mbps will be denied.
Maximum number of distributions when JPEG and MPEG4 data is distributed
| Maximum number of distributions for JPEG | Maximum number of distributions for MPEG4 | Total bit rate |
| 2 3 20 Mbps and | below |
- When only MPEG4 images are distributed
The maximum number of distributions is determined by the preset bit rate. When a distribution request that exceeds the maximum number of distributions is received, this request is denied.
When distributing only MPEG4 data
| Preset bit rate | Maximum number of distributions | Total maximum bit rate |
| 0.6 Mbps and below | 20 12 Mbps | |
| 3 Mbps and below | 4 12 Mbps | |
| 4 Mbps and below | 3 12 Mbps | |
| 6 Mbps and below | 2 12 Mbps | |
| Larger than 6 Mbps | 1 Maximum | configurable value (8 Mbps) |
■ When Client number Priority Mode is Selected
- When only JPEG images are distributed If the distribution request would be accepted in the frame rate priority mode, distribution works in the same way as frame rate priority mode, where JPEG images are distributed at the frame rate requested by the client. If the distribution request would be denied in the frame rate priority mode, the frame rate is controlled such that the maximum bit rate is as shown in the following table, to accept distribution requests from up to 20 clients. For example, if Client A and B request for JPEG at 10 Mbps, and Client C requests for JPEG at 5 Mbps, the frame rate will be reduced such that the distribution bit rate to each client is less than 5 Mbps.
Maximum bit rate when only JPEG data is distributed
| Current number of distributions | Maximum bit rate | Total maximum bit rate |
| 2 and below 10 Mbps | 20 Mbps | |
| 3 to 4 5 Mbps | 20 Mbps | |
| 5 to 20 1 Mbps | 20 Mbps |
- When both JPEG and MPEG4 images are distributed. When both JPEG and MPEG4 images are distributed, distribution works in the same way as frame rate priority mode if the distribution request would be accepted in the frame rate priority mode. If the distribution request would be denied in the frame rate priority mode, the frame rate is controlled such that the maximum bit rate is as shown in the following table, to accept distribution requests for up to a total number of 20 JPEG and MPEG distributions. However, distribution requests for which the total bit rate of the MPEG4 distribution stream exceeds 10 Mbps will be denied.
Maximum JPEG bit rate when only JPEG and MPEG4 data is distributed
| Current number of distributions | Maximum bit rate | Total maximum bit rate |
| 2 and below 5 | Mbps 10 Mbps | |
| 3 to 4 2.5 Mbps | 10 Mbps | |
| 5 to 20 0.5 Mbps | 10 Mbps |
When only MPEG4 images are distributed, the maximum number of distributions is determined by the preset bit rate. When a distribution request that exceeds the maximum number of distributions is received, this request is denied.
When distributing only MPEG4 data (Page 4)
Memo:
- If the bit rate is changed when image distribution is in progress, the restriction on distribution may not work correctly.
Insufficient network bandwidth
When there is insufficient bandwidth, the number of JPEG frames (frame rate) that the client can acquire will decrease. Delay will also occur in the distribution of images. In the case of MPEG4, noise interference may occur and playback may fail. There may be a longer delay or interruption in the audio.
Network Delay
When the client acquires JPEG via TCP, camera will send out data while checking the ACK from the client at the same time. For networks with considerable delay, data cannot be sent out until ACK is received, and therefore the frame rate will drop. In the case of MPEG4, noise interference may occur and playback may fail.
Audio may be interrupted.
Decrease in the frame rate due to network delays can be eliminated by receiving data via multicast.
Network Jitter
When there is considerable network jitter, delay time may be prolonged and the image frame rate may drop. In the case of MPEG4, noise interference may occur and playback may fail.
Audio may be interrupted.
Packet Loss
When acquiring images from camera via TCP, packet loss may be recovered by TCP transmission. When there is considerable delay in the network, however, missing data may occur and the image frame rate may drop. In the case of MPEG4, noise interference may occur and playback may fail.
Audio may be interrupted.
When packet loss occurs during multicast sending from camera, the image frame rate may drop. In the case of MPEG4, noise interference may occur and playback may fail.
Audio may be interrupted.
List of Protocols and Port Numbers Used by camera
camera uses the protocols and port numbers listed below. Ensure that these ports are allowed through the firewall when a firewall is to be installed.
| Protocol/Port No. | Purpose of Use |
| Source | |
| TCP/80 JPEG/MPEG4 | acquisition, Web Settings page, API, Sending/Acquisition of sound |
| TCP/5510 VSIP | |
| UDP/5510 VSIP | |
| UDP/9541 VSIP discovery protocol | |
| TCP/10020 TCP/10021 TCP/10023 | (Reserved for adjustment) |
| TCP/32040 Alarm server | |
| TCP/49298 Sound data reception | |
| Destination | |
| TCP/20, 21 FTP | |
| TCP/25 Mail delivery | |
| TCP/110 POP (Mail Delivery) | |
| TCP/User Setting No. | Sending alarm |
| UDP/123 | SNTP |
| UDP/User Setting No. | Sending alarm |
IP Address Settings
IP address setting procedure
Follow the procedure below to configure the IP address of the camera.
Step1 IP address setting at the computer (Page 7)
Set the IP address of the computer for configuring the camera settings.

Step2 Internet Explorer Setting (Page 8)
Configure the Internet Explorer settings in order to establish connection between the computer and the camera.

Step3 Connecting the camera to the computer (Page 10)
Connect the computer and the camera.

Step4 IP address setting for the camera (Page 12)
Set the [IP Setting] item on the [Basic Settings1] screen to "DHCP Disable" or "DHCP Enable".
- Set up the computer for setting the IP address.
●Minimum computer specifications for setting
OS : Windows XP (Professional or Home Edition) (SP2)
Web browser
: Internet Explorer Version 6.0
XP : Version 6.0
Vista : Version 7.0
Note:
- When setting the IP address of the camera, do so by using a network that is made up of only the camera, the computer for setting and the switching hub.
- Using a hub connected to other network devices or networks via a LAN cable for setting can cause problems.
●System configuration required for setting IP address
Camera at factory default is set to “DHCP Disable” (DHCP client function is Off), it will activate under the following IP address after startup. Set the computer to an IP address that enables communication with the following. (For example, set the IP address to 192.168.0.100 and subnet mask to 255.255.255.0.)
IP address : 192.168.0.2
Subnet mask : 255.255.255.0
Default gateway : None
Memo:
- To set a static IP address for the camera, connect the camera, the switching hub and the computer for setting using a straight LAN cable of Category 5 and above.
IP address setting at the computer
Set the computer to an IP address that enables communication with the camera.
Procedures described in this item are intended for Windows XP users.
1. Click [Start]
- Select in the sequence of [Control Panel]–[Network Connection]–[Local Area].
Windows Vista :
- Select in the sequence of [Settings]-[Control Panel]-[Network and Sharing Center]-[Manage network connections].
2. The computer on which Internet Explorer is launched automatically selects the connected network
●Right-click and select [Properties].
- Check to ensure that the [Client for Microsoft Networks] and [Internet Protocol(TCP/IP)] check boxes are selected.
Windows Vista :
- Check to ensure that the [Microsoft Network Client] and [Internet Protocol Version 4 (TCP/IPv4)] checkboxes are selected.
3. Select [Internet Protocol(TCP/IP)] and click [Properties]
Windows Vista : Select [Internet Protocol Version 4 (TCP/IPv4)], and click [Properties]
4. Set the IP address
![Internet Protocol (TCP/IP) Properties General You can get IP settings assigned automatically if your network supports this capability. Otherwise, you need to ask your network administrator for the appropriate IP settings. Obtain an IP address automatically Use the following IP address IP address: 192.168.0.100 Subnet mask: 255.255.255.0 Default gateway: 192.168.0.254 Obtain DNS server address automatically Use the following DNS server addresses: Preferred DNS server Alternate DNS server Advanced... OK Cancel ① Select [Use the following IP address]. ② Specify the [IP address]. (For example, use 192.168.0.100) Memo: Make sure that you take note of the original IP address before altering. Note: Ensure that a duplicate IP address is not specified within the same network environment. ③ Set [Subnet Mask] to a value that is appropriate for the setting operation. Consult the network administrator if you have any queries. (Use 255.255.255.0 when the camera is in its default settings.) ④ When a [Default Gateway] is present, make use of the corresponding IP address (e.g., 192.168.0.254). ⑤ Click](/content/2026/06/1199026/images/d517c6ae987ba9d9b219e53b4c6260b0845b6b1e42c90035bec42b37b52d9f67.jpg)
5. Click [OK] on the "Local Area Connection Properties" screen
IP Address Settings (continued)
Internet Explorer Setting
- Launch the Internet Explorer on the computer
- When proxy settings are enabled in the Internet Explorer, follow the steps below to disable the proxy of the Internet Explorer
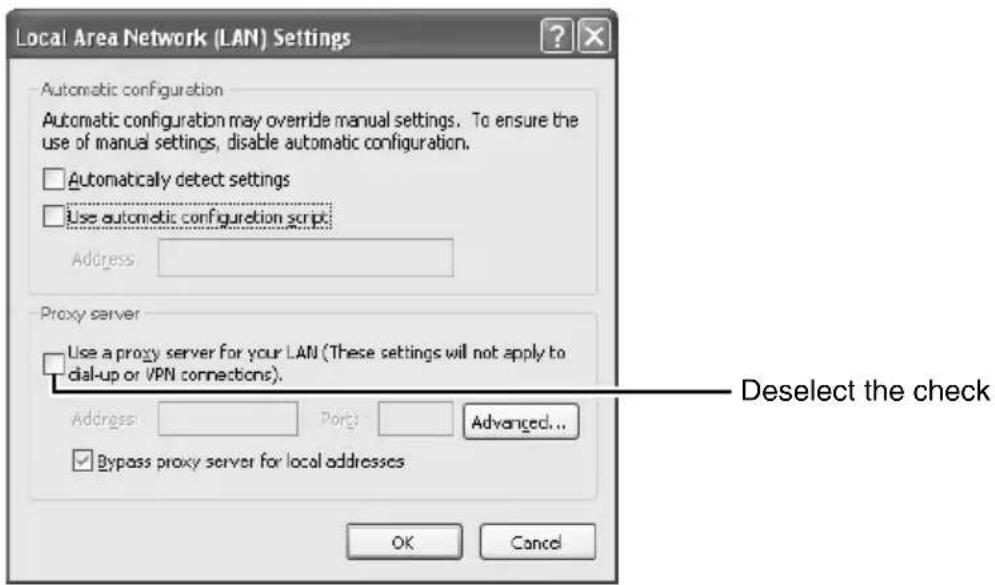
- Select in the order of [Tool]—[Internet Options]—[Connections]—[LAN Setting], followed by deselecting the check for [Use a proxy server for your LAN] under [Proxy Server] of the [Local Area Network (LAN) Settings] window.
-
If the active script of the Internet Explorer is disabled, follow the steps below to enable it
-
Select [Trusted sites] under [Tool]–[Internet Options]–[Security]. Upon doing so, the [Sites...] button directly below becomes active. Click this button and deselect the check in the displayed window, and add the following web site to the zone. http://192.168.0.2
- Next, select [Trusted sites] under [Tool]–[Internet Options]–[Security], and press the [Custom Level] button. Select [Enable] under [Scripting]–[Alarm] of the [Security Settings] window that has been opened.
![Security Settings Settings: Scripting Active scripting Disable Enable Prompt Allow paste operations via script Disable Enable Prompt Scripting of Java aplets Disable Enable Prompt User Active settings Reset custom settings Reset to: Medium Reset OK Cancel Select [Enable]](/content/2026/06/1199026/images/2a3efb1c6334670c4c390b5373c3aaa8e5c9e61110a999b07433b9e8443345b1.jpg)
4. If ActiveX controls and plug-ins of the Internet Explorer is disabled, follow the steps below to enable it
- Click [Trusted sites] under [Tool]–[Internet Options]–[Security]. Select the [Custom Level] button and open the [Security Settings] window. Set all items under [ActiveX controls and plug-ins] in the opened window to [Enable]. Enable also [Allow Script-initiated window without size or position constraints.] under [Miscellaneous].
![Security Settings Settings: ActiveX controls and plug-ins Automatic prompting for ActiveX controls Disable Enable Binary and script behaviors Administrator approved Enable Enable Download signed ActiveX controls Disable Enable Prompt Download unsigned ActiveX controls Enable Reset custom settings Reset to: Medium-low Reset OK Cancel Select [Enable]](/content/2026/06/1199026/images/14f0cf2f5f09397995af8693452d2fd39c676016f036459721c970dc7c06179d.jpg)
5. Disable pop-up block
Connection of camera cannot be established when pop-up block in the Internet Explorer is set to "Enable".
Follow the steps below to set the pop-up block to "disable".
- Selecting [Tool]-[Pop-up Blocker]-[Turn Off Pop-up Blocker] permits all sites.
- To allow only specific sites such as camera, select [Tool]-[Pop-up Blocker]-[Turn On Pop-up Blocker], followed by selecting [Tool]-[Pop-up Blocker]-[Pop-up Blocker Settings] that becomes active to open the [Pop-up Blocker Settings] window.
In the opened window, add the address of camera as a permitted web site address.
6. When plug-in tools such as the Yahoo or Google toolbar are included in the Internet Explorer, disable the pop-up block function of these plug-in tools as well
IP Address Settings (continued)
Connecting the camera to the computer
1. Launch the Internet Explorer
![Enter the following IP address into the address field. http://192.168.0.2 Click [Go]. http://192.168.0.2/ Opening page http://192.168.0.2/...](/content/2026/06/1199026/images/0ebda94e1121fca22a0c181de57ab5748a7c6aa7a44b0f8187a61d761d603ab5.jpg)
Memo:
- If the proxy server settings for access to the Internet via the Internet Explorer is enabled, you may not be able to specify the IP address directly. In this case, change the proxy settings of the Internet Explorer.
■When the IP address of the camera is unknown
IP address settings cannot be changed by accessing via a computer when the IP address of the camera is unknown. You can use the following method to identify the IP address.
- Search for the camera in the LAN using [Search tool] inside [Tool_E] folder of the supplied CD-ROM.
※ For details on [Search tool], please refer to the "Readme" file in the CD-ROM supplied with this product.
2. Enter the user name and password (login as administrator) (Page 14)
![Connect to 192.168.0.2 User name: Password: Enter the user name. This is set to "admin" by default. Enter the password. This is set to "jvc" by default. Remember my password OK Cancel Click [OK].](/content/2026/06/1199026/images/dad322d347cc487fb6de125538f6fdb4fd12184d2f661aa3f7fed75f8228d716.jpg)
Memo:
- After the [Security Settings] screen appears, press the [OK] button to proceed.
3. Built-in Viewer of camera is displayed
4. The operator password entry screen appears
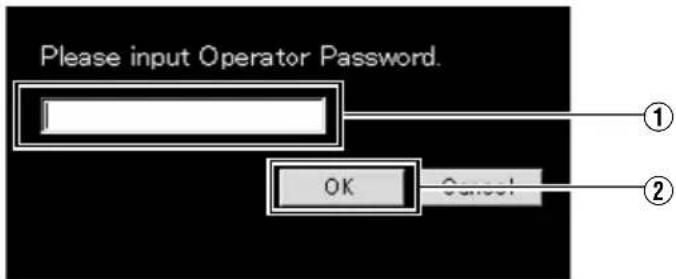
① Enter the password (default is "jvc") of "operator" authority.
②Click [OK].
Memo:
- The operator password entry screen does not appear if the password is stored on the computer. Proceed to configure the IP address setting for the camera. (Page 12)
IP Address Settings (continued)
IP address setting for the camera
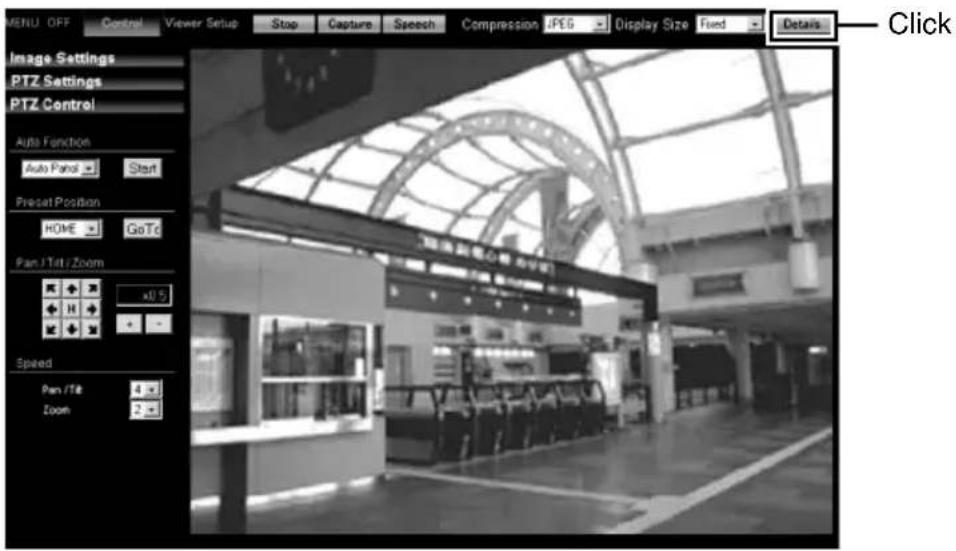
1 Click [Details] of the camera Built-in viewer
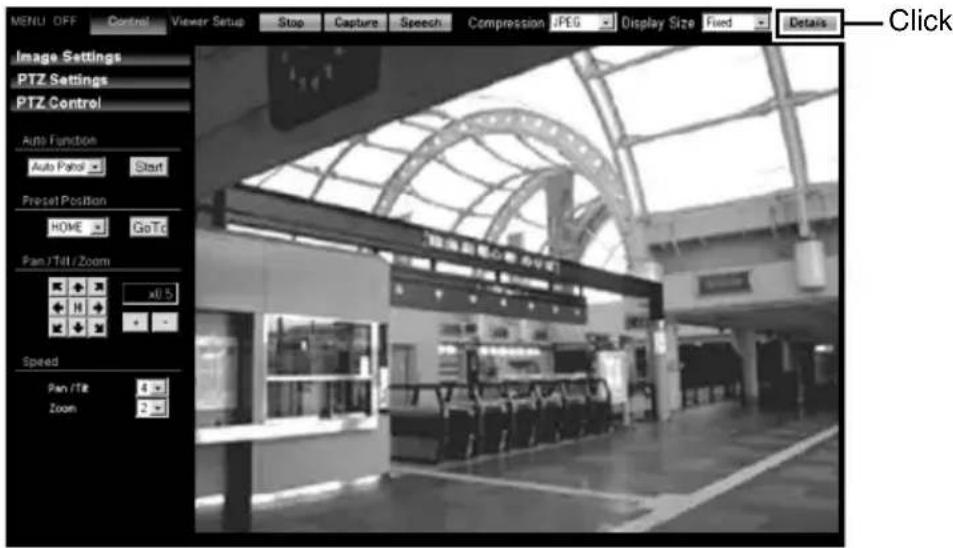
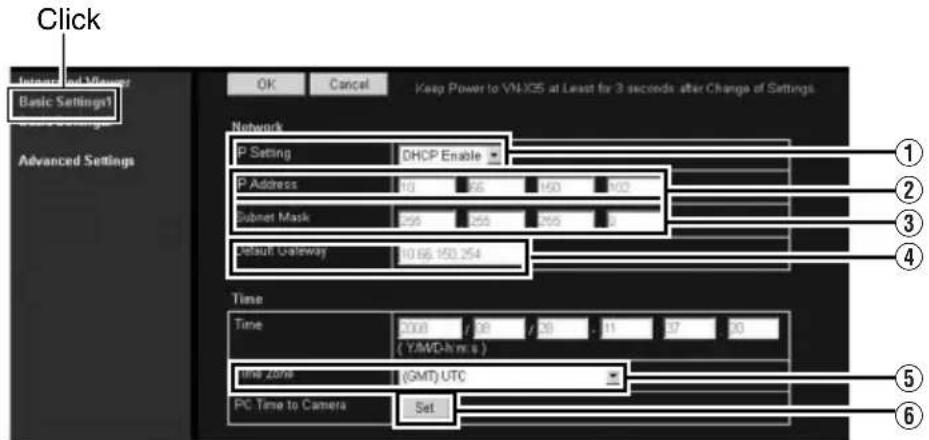
2The [Basic Settings1] screen appears
![③Click OK Cancel Keep Power to VN-035 at Least for 3 seconds after Change of Settings. Advanced Settings Network IP Setting DHCP Disable IP Address 192 168 0 2 Subnet Mask 265 256 256 0 Default Gateway 0.0.0.0 Time Time 0.0.0 / 0.0 / 25 - 12 14 50 ( Y/MO-h m.s ) Time Zone (CMT+0.0) Japan PC Time to Camera Set © Copyright 2008 Viewer Company of Japan, Limited All Rights Reserved. ① Set the [IP Setting] item to [DHCP Disable]. Enter the values you wish to specify in the [IP Address], [Subnet Mask] and [Default Gateway] fields. ② Select the [Time Zone].](/content/2026/06/1199026/images/4e23976298c1bfecc92497be43288d823efcfc6b76ea69b08367cbaa006d990a.jpg)
①Set the [IP Setting].
- When selecting "DHCP Disable":
Select "DHCP Disable", and specify a value in the [IP Address], [Subnet Mask] and [Default Gateway] fields. - When selecting "DHCP Enable":
The default setting is “DHCP Disable” (DHCP client function is Disabled). To assign an IP address from the DHCP server, connect the DHCP server to the LAN, set the “IP Setting” of the camera to “DHCP Enable”, and click the [OK] button. For details on IP addresses assigned to the camera, consult your network administrator.
Note:
- Set the DHCP server such that the same IP address is always assigned to the MAC address of the camera by the DHCP server. Connection may fail if the above setting is not performed.
②Select the [Time Zone].
③Click [OK].
3 A confirmation screen appears
Click [OK].
Camera restarts using the new IP address. It takes about one minute for the camera to reboot.
Memo:
- Access from the connected computer may fail when the IP address of the camera is changed. To enable access to camera from the same computer, alter the IP address at the computer accordingly.
When the display or configuration of the opened screen appears strange, check using the following procedures.
① Click [Start]–[Control Panel]–[Display] and open the [Display Properties] window
② Click the [Settings] tab in the [Display Properties] windows and click the [Advanced] button
③ Check that [DPI setting] in the [General] tab has become [Normal size (96DPI)]
④ Otherwise, change the setting to [Normal size (96DPI)] and reboot windows
Enter user name and password
User name and password entry will be required at the beginning.
There are three access authorization levels to camera. The factory settings are as follows.
| User Name | Default Password | Authorization levels |
| admin jvc | All operations | and setting changes are allowed |
| operator jvc | Change of settings | other than those related to network and maintenance are allowed |
| user jvc | Viewing of images | is allowed |
●Pages that users have access to
Restrictions are placed on the pages that users have access to. In addition, links on the web pages are also displayed according to the access authority of the user.
- admin
(*X) is applicable to VN-X series only.
| Basic Settings1 [Network][Time] |
| Basic Settings2 [Camera][Encoding][JPEG][MPEG4] |
| Details [Camera] |
- operator
(*X) is applicable to VN-X series only.
| Basic Settings2 [Camera] [Encoding] [JPEG] [MPEG4] |
| Details [Camera] [Encoding] [Audio] (This feature is not available in VN-V25U) [Alarm] [Alarm Environment] [PTZ] (※X) [Auto Patrol] (※X) [Privacy Mask] [Motion detection] [Streaming] [LED Settings] [Miscellaneous] [Operation] [Settings] [Position List] (※X) [Patrol Settings] (※X) |
- user
| Details [Miscellaneous] |
Memo:
●The [Security Settings] screen appears before the top page is displayed. Press the [Yes] button to proceed. If you do not want this warning screen to be displayed, change the Internet Explorer settings as follows.
- Open [Tool]-[Internet Options]-[Security] and select the [Trusted sites] icon.
- Next, press the [Custom Level] button, followed by selecting “Enable” for [Miscellaneous]-[Display mixed content].
Note:
- Do not reset or turn off the power of camera immediately after the settings are changed. Otherwise, changes may not be saved, and camera may be restored to the factory settings.
Setting
How to open the setting page
1. Enter IP address of camera in the address bar of Internet Explorer (Page 10)
A unified viewer is opened.
2.Click [Details].
- [Basic Settings1] page will be opened if accessed by user name "admin". (Page 17)
- [Basic Settings2] page will be opened if accessed by user name "operator". (Page 18)
● [Miscellaneous] page will be opened if accessed by user name "user". (Page 59)
Basic Settings1
This page is for performing basic setting related to the network.
This page can be used during access using "admin".
- Click [Basic Settings1].
- Press the [OK] button to enable the new settings.
- If the [OK] button is pressed upon entering an invalid value, a warning message will appear and the entry will be denied. Press the [Cancel] button to restore the invalid entry to the current value.
Memo:
- You can open the [Basic Settings1] screen without going through the built-in viewer by entering the following URL address ( contains model name) in the address field of Internet Explorer.
- Enter the model name in lowercase letters.
(Example) VN- V225U series is displayed :
http://192.168.0.2/cgi-bin/ v225 display.cgi? v225 basicmenu1.html
| Network | ||
| 1IP Setting For setting the DHCP client function. Connect camera to a network environment with a DHCP server when DHCP is to be enabled. If the DHCP server does not exist when [IP Setting] is set to “DHCP Enable”, camera will start running with the 192.168.0.2 IP address and 255.255.255.0 subnet mask in about 2 minutes after startup.(Page 6) | ||
| 2IP Address For setting the IP address of camera. | ||
| 3Subnet Mask For setting the subnet mask of camera. | ||
| 4Default Gateway For setting the default gateway of camera. Enter 0.0.0.0 if you do not want to set a default gateway. | ||
| Time | ||
| 5Time Displays the clock time of camera. The time transmitted by camera is recorded in the JPEG header. Discontinuity may occur in the JPEG header's time immediately before and after changing the time. | ||
| 6Time Zone For setting the time zone. | ||
| 7PC Time to Camera Click the [Set] button to set the time of the computer on camera. | ||
Setting (continued)
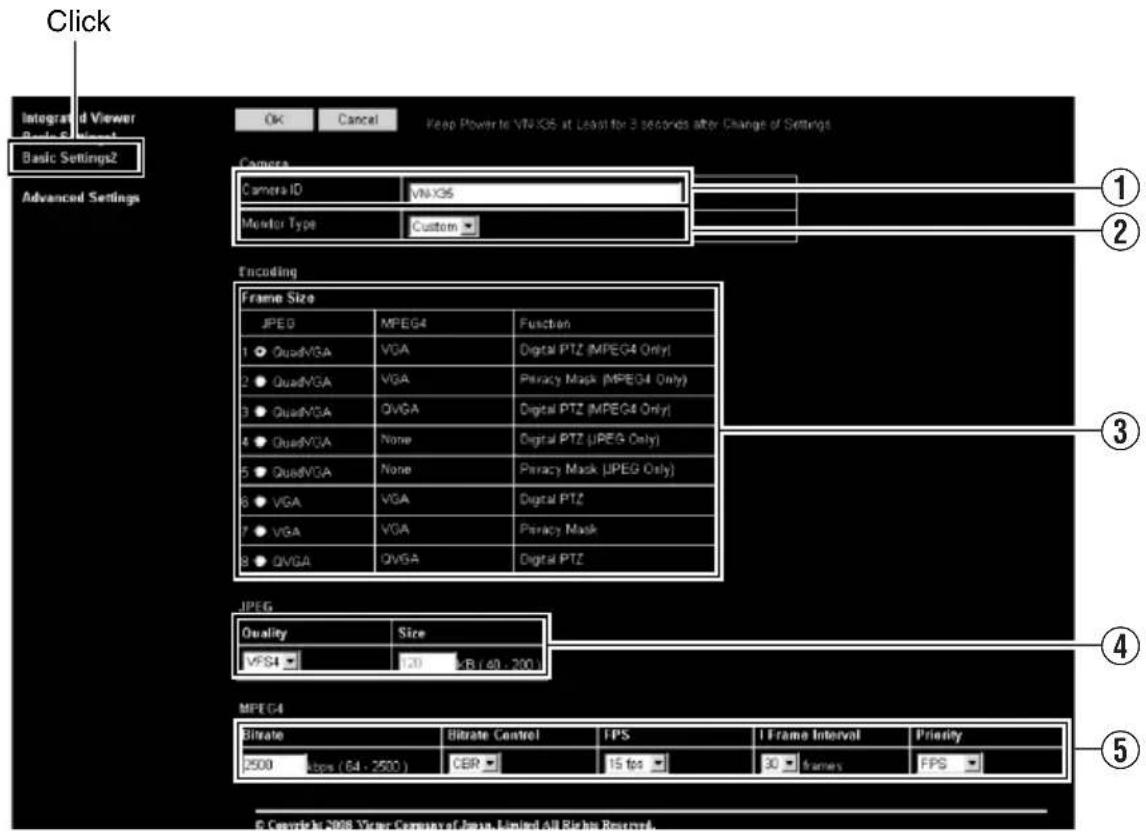
Basic Settings2
Page for setting fundamental parameters of "Camera", "JPEG" and "MPEG4".
This page can be used during access using "admin" or "operator".
- Click [Basic Settings2].
- Press the [OK] button to enable the new settings.
- If the [OK] button is pressed upon entering an invalid value, a warning message will appear and the entry will be denied. Press the [Cancel] button to restore the invalid entry to the current value.
Memo:
- You can open the [Basic Settings2] screen without going through the built-in viewer by entering the following URL address ( contains model name) in the address field of Internet Explorer.
- Enter the model name in lowercase letters.
![(Example) VN-[V225U] series is displayed : http://192.168.0.2/cgi-bin/ v225 display.cgi? v225 basicmenu2.html](/content/2026/06/1199026/images/0b59dd751efeda335ef527da6e84ae74ec12900ee127c86f83807a7bad4dc677.jpg)
(*V) is applicable to VN-V series only. (*X) is applicable to VN-X series only.
| 1 Camera ID | Character strings entered here will be written to the JPEG comment segment (item name: camera). Refer to the API Guide on the file formats of JPEG. | |||
| 2 Monitor Type | For selecting the monitor type according to the monitor used to display the video images. The picture quality varies according to the type of monitor selected.Custom : Enables setting of picture quality according to the user's preference. Detailed settings are configured on the detailed settings page of the camera. (Page 21)LCD1,LCD2 : Picture quality setting for LCD monitors. Two types are available for selection according to the user's preference.CRT : Picture quality setting for CRT (cathode-ray tube) monitors.[Set values: Custom, LCD1, LCD2,CRT] | |||
| 3Encoding | For selecting the frame size for each of the JPEG and MPEG4 screens from “Quad VGA” (1280 x 960)(※X), “VGA”(640 x 480), and “QVGA” (320 x 240). Select one of the four (※V) or eight (※X) different patterns.Memo:Refer to the API Guide on the file formats of JPEG. | |||
| Distribution Size Feature | ||||
| JPEG MPEG4 | Privacy Mask | |||
| 1 | Q V | GVGA A | JPEG/MPEG4 | |
| 2 | Q V | G/GA A | JPEG only | |
| 3 | V GA | QVGA | MPEG4 only | |
| 4 | V GA | VGA | JPEG/MPEG4 | |
| Combination of distribution sizes and available features of VN-V series | ||||
| Distribution Size Feature | ||||
| JPEG MPEG4 Digital PTZ Privacy Mask | ||||
| 1 | QuadVGA | VGA | MPEG4 only | |
| 2 | QuadVGA | VGA | - | |
| 3 | QuadVGA | QVGA | MPEG4 only | |
| 4 | QuadVGA | -※ | JPEG only | |
| 5 | QuadVGA | -※ | - | |
| 6 | V GA | V | JPEG/MPEG4 | |
| 7 | V GA | V | GA - | |
| 8 | QVGA | QVGA | JPEG/MPEG4 | |
| Images are not distributed. It is displayed in white on viewer. | ||||
Setting (continued)
Basic Settings2 (continued)
(*V) is applicable to VN-V series only. (*X) is applicable to VN-X series only.
| 4JPEG | |
| Frame Size | For specifying the JPEG picture quality (rate control mode) and size (target file size). When “VFS1” to “VFS7” is selected, the quantization table during JPEG encoding will be maintained and the file size will increase/decrease according to the input signals.Typical sizes will be displayed in the Size field. When recording JPEG data to a recorder with a limited storage capacity, the maximum recording time may vary as the file size fluctuates under this setting.When “AFS” is selected, encoding is performed such that the target file size is the average size of multiple JPEG images.You can enter the target size in the Size field.[Picture quality values : VFS1 to VFS7, AFS]Memo: The picture size can be specified only when the picture quality value is set to AFS.[Size setting range in Quad VGA mode : 40 KB to 200 KB ] (※X)[Size setting range in VGA mode : 10 KB to 100 KB ][Size setting range in QVGA mode : 3 KB to 33 KB ] |
| 5MPEG4 | |
| Bitrate | For setting the MPEG4 encoding bit rate.[Set values : 64 kbps to 8000 kbps] |
| Bitrate Control | For selecting whether to set the MPEG4 rate control mode to CBR (Constant Bit Rate) or VBR (Variable Bit Rate).CBR : Encoding is performed at a fixed bit rate regardless of the condition of the input video signals. Enables easy forecast of the bit rate.VBR : Changes the bit rate according to the condition of the input video signals. Picture quality is stable, but forecast of the bit rate is difficult. |
| FPS | For setting the MPEG4 frame rate.[Set values : 1 fps, 7.5 fps, 10 fps, 15 fps, 30 fps (※V)] |
| I Frame Interval | For setting the I-frame interval. MPEG4 starts encoding from the I-frame.Shortening the interval stabilizes the picture quality even when there are rapid changes in the video image. However, the picture quality for images with little change will deteriorate. In addition, when multicast packet loss occurs, the time interval required to restore the image is shorter.[Set values : 15, 30, 45, 60, 75] |
| Priority | For selecting whether to assign priority to the frame rate or picture quality during MPEG4 encoding.FPS : Assigns priority to frame rate. Select this setting to enable smooth monitoring of motion images.Quality : Assigns priority to picture quality. |
Camera Page
This page is for setting the camera's parameters.
This page can be used during access using "admin" or "operator".
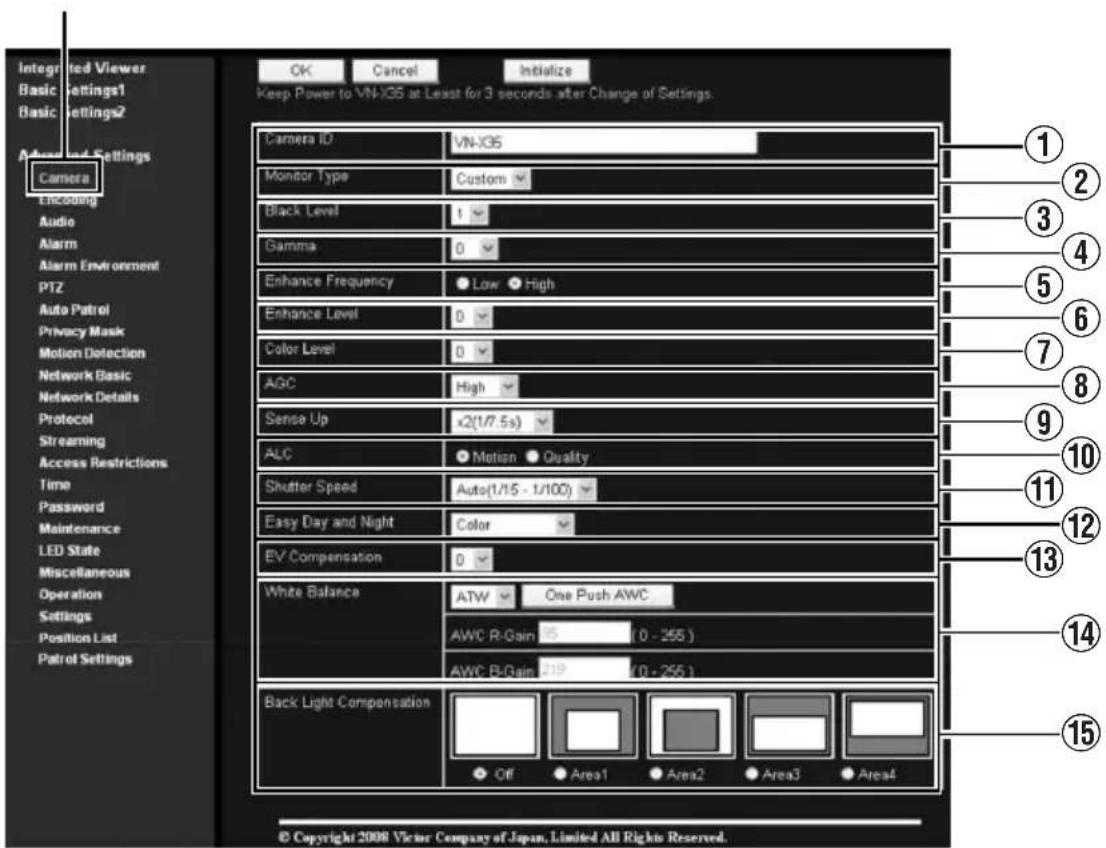
- Click [Advanced Settings] to display setting menu.
-Click [Camera]. - Press the [OK] button to enable the new settings.
- If the [OK] button is pressed upon entering an invalid value, a warning message will appear and the entry will be denied. Press the [Cancel] button to restore the invalid entry to the current value. To restore the settings of this page to the factory settings, press [Initialize] button.
Click
Setting (continued)
(*V) is applicable to VN-V series only. (*X) is applicable to VN-X series only.
| 1 Camera ID | Character strings entered here will be written to the JPEG comment segment (item name: camera). Refer to the API Guide on the file formats of JPEG. |
| 2 Monitor Type | For selecting the monitor type according to the monitor used to display the video images. The picture quality varies according to the type of monitor selected.Custom : Enables setting of picture quality according to the user's preference.LCD1, LCD2 : Picture quality setting for LCD monitors. Two types are available for selection according to the user's preference.CRT : Picture quality setting for CRT (cathode-ray tube) monitors.[Set values: Custom, LCD1, LCD2, CRT]Memo:Select "Custom" if you want to set the Gamma and Enhance frequency values. |
| 3 Black Level | For adjusting the black level. Lowering the value darkens the video image. Increasing the value brightens the image.[Setting range: 0 to 2]Memo:If the black level is set to "0", this may be too low depending on the monitoring device, or dark area will become complete black.When using MPEG4 images, set to either "1" or "2". |
| 4 Gamma | To alter the appearance of dark areas in a video image, adjust the gamma curve.Off : Do not perform gamma correction. The entire image appears dull.-3 to 3 : Perform gamma correction. When this is set to "0", standard gamma correction is performed. Setting to a smaller value darkens the image, while increasing the value brightens the image.[Set values: Off, -3 to 0 to 3]Memo:The set value is fixed when the monitor type is set to "LCD1", "LCD2", or "CRT". |
| 5Enhance Frequency | For setting the type of edge enhancement.Low : Enhances both thick and thin edges.High : Enhances thin edges.[Set values: Low, High]Memo:The set value is fixed when the monitor type is set to "LCD1", "LCD2", or "CRT". |
| 6 Enhance Level | For setting the intensity of edge enhancement. Larger value : Increases the intensity of edge enhancement. Smaller value : Decreases the intensity of edge enhancement.[Setting values: -5 to 0 to 5] |
(*V) is applicable to VN-V series only. (*X) is applicable to VN-X series only.
| 7Color Level For adjusting the color level. Larger value: Increases the color level. Smaller value: Decreases the color level. [Setting values: -5 to 0 to 5] | |
| 8 AGC | For setting the AGC (automatic gain control) level. Off: Disables the AGC feature Mid: When the amount of light is insufficient High: When the amount of light is particularly insufficient Super: When the brightness level is insufficient even upon setting to High. [Set values: Off, Mid, High, Super] Memo:This feature cannot be configured when the 12 Easy Day/Night feature is set to “Black and White” or “Auto”.The AGC cannot be set when the 12 “B&W Mode” is set to “Black and White” or “Auto Low, Auto Mid or Auto High”.The screen appears grainy at dark locations when the AGC feature is in use. |
| 9 Sense Up | This feature is used to raise the sensitivity level by lengthening the exposure time. You can specify the number of times by which the sensitivity level is to be increased automatically when the object becomes dark. When “x16” is selected, the sensitivity level will automatically increases continuously until it is 16 times of the level when “Off” is selected. When the sensitivity level increases, the shutter speed slows down and motion becomes unnatural. When set to “Off”, [Sense Up] is disabled. [Set values: Off, x2(1/15s), x4(1/7.5s), x8(1/3.75s), x16(0.5s), x32(1.1s), x62(2.1s)] (※V) [Set values: Off, x2(1/7.5s), x4(1/3.75s), x8(0.5s), x16(1.1s), x22(1.5s)] (※X) Memo:Upon raising the sensitivity level, the screen may appear grainy or white, or white defects may occur. However, this is not a malfunction.When Sense Up is set to a value other than “Off”, flickers occur under the light of fluorescent or mercury lamps. This is not a malfunction of the camera, but is due to principles related to Sense Up.When the shutter is set to a value between 1/250 to 1/10000, set Sense Up to “Off”. |
| 10 ALC Priority | For setting the priority of ALC (feature for maintaining the video level according to the brightness of the object). You can select whether to assign priority to the motion or picture quality when the object becomes dark.Motion: Assigns priority to motion.When the object becomes dark, priority is given to AGC (automatic gain control), and therefore this is suitable for shooting fast-moving objects.Quality: Assigns priority to picture quality.When the object becomes dark, priority is given to the Sense Up feature, and therefore this is suitable for shooting objects requiring a high picture quality. [Set values: Motion, Quality] |
Setting (continued)
Camera Page (continued)
(*V) is applicable to VN-V series only. (*X) is applicable to VN-X series only.
| 11Shutter Speed | For setting the shutter speed.Auto, Auto(1/15 - 1/100) : Varies the shutter speed automatically according to the brightness.1/15 to 1/10000 : Fixed shutter speed.Flickerless : Reduces flickers due to fluorescent lamps.[Set values : Auto, Auto(1/15 - 1/100) (※X), 1/15 (※X), 1/25 (※X), 1/30, 1/50, 1/60, 1/100,1/250, 1/500,1/1000, 1/2000, 1/4000, 1/10000, Flickerless]Memo:“Auto” is only recommended when using a manual iris lens.Flickers may occur when this is set to a value other than “ 1/50”, “ 1/100”, or “ Flickerless”. When “ Flickerless ” is selected, flickers may occur when the Sense Up feature is used.When Sense Up is set to a value other than “ Off”, the shutter speed cannot be set to a value between 1/250 to 1/10000. |
| 12Easy Day and NightVN-V25UVN-X35U only | For setting the Easy Day and Night feature.Color : Sets to the color mode at all times.Black and White : Sets to the black-and-white mode at all times.Auto : Image color switches to black-and-white when the luminance level is low.[Set values : Color, Black and White, Auto]Memo:The threshold of the Auto switching cannot be changed. |
| 12B&W ModeVN-V26UVN-V225U seriesVN-X235U series only | For specifying whether to switch the image to the B&W mode.Auto mode can be specified for switching automatically to the black-and white mode when the luminance level is low. In auto mode one of three levels can be selected according to the luminance level.Color : Switches to the color mode at all times.Black and White : Switches to the black-and-white mode at all times.Auto Low : Switches to the black-and-white mode when the luminance of the signal level of the object is low.Auto Mid : Switches to the black-and-white mode when the luminance of the signal level of the object is medium.Auto High : Switches to the black-and-white mode when the luminance of the signal level of the object is high.[Set values : Color, Black and White, Auto Low, Auto Mid, Auto High ]Memo:The infrared filter engages and disengages when switching between modes, which causes mechanism noise.During the occurrence of mechanism noise, the distribution sound from the camera will be muted. (VN-V26U only)When “ Auto Low”, “ Auto Mid ” or “ Auto High ” has been selected, the camera will change the mode immediately according to the luminance level. |
(*V) is applicable to VN-V series only. (*X) is applicable to VN-X series only.
| 13EVCompensation | For setting EV (Exposure Value) correction. Enables setting between -9(-3EV) to 6(+2EV). You can specify settings in each 1/3 EV step. Decreasing the value darkens the images, while increasing the value brightens the image.[Set values: -9 to 0 to 6] | |||||
| 14White Balance | For selecting the white balance control feature. White balance can be adjusted for a light source with a color temperature range of 2800K to 9500K. | |||||
| ATW | Switches to the Auto-Tracking White Balance (automatic color temperature tracking) mode. Adjusts the white balance automatically according to the color temperature of the light. | |||||
| AWC | Switches to the Auto-White Balance Control mode. In the AWC mode, values entered for the [AWC R-GAIN] and [AWC B-GAIN] items are applied to white balance. | |||||
| One Push AWC | Executes AWC (automatic white balance control).Execute by placing a white object around the center of the screen in a location with a lighting condition that is similar to the object to be shot.Memo:Pressing the [One Push] button replaces the [AWC R-GAIN] and [AWC B-GAIN] values with the values of the AWC execution results.Even when white balance is set to ATW, pressing the [One Push] button switches the mode automatically to AWC. | |||||
| AWC R-Gain For setting the gain of R (red) when in the AWC mode.Larger value : Increases the redness Smaller value : Decreases the redness.[Set values: 0 to 85 to 255] | ||||||
| AWC B-Gain For setting the gain of B (blue) when in the AWC modeLarger value : Increases the blueness Smaller value : Decreases the blueness.[Set values: 0 to 219 to 255] | ||||||
| 15Back Light Compensation | For selecting the backlight compensation feature. Set this feature when there is a bright light source in the same direction as the object. Enables unwanted light sources to be excluded from the photometry area.Off : Disables backlight compensation.Area1 to 4 : For selecting a photometry area from the four available types.[Set values: Off, Area1, Area2, Area3, Area4] | |||||
Photometry Area | Photometry Area | Photometry Area | Photometry Area | Photometry Area | ||
| Off Area1 | Area2 | Area3 | Area4 | |||
| Memo:The backlight compensation area is not linked to digital PTZ (※X). | ||||||
Setting (continued)
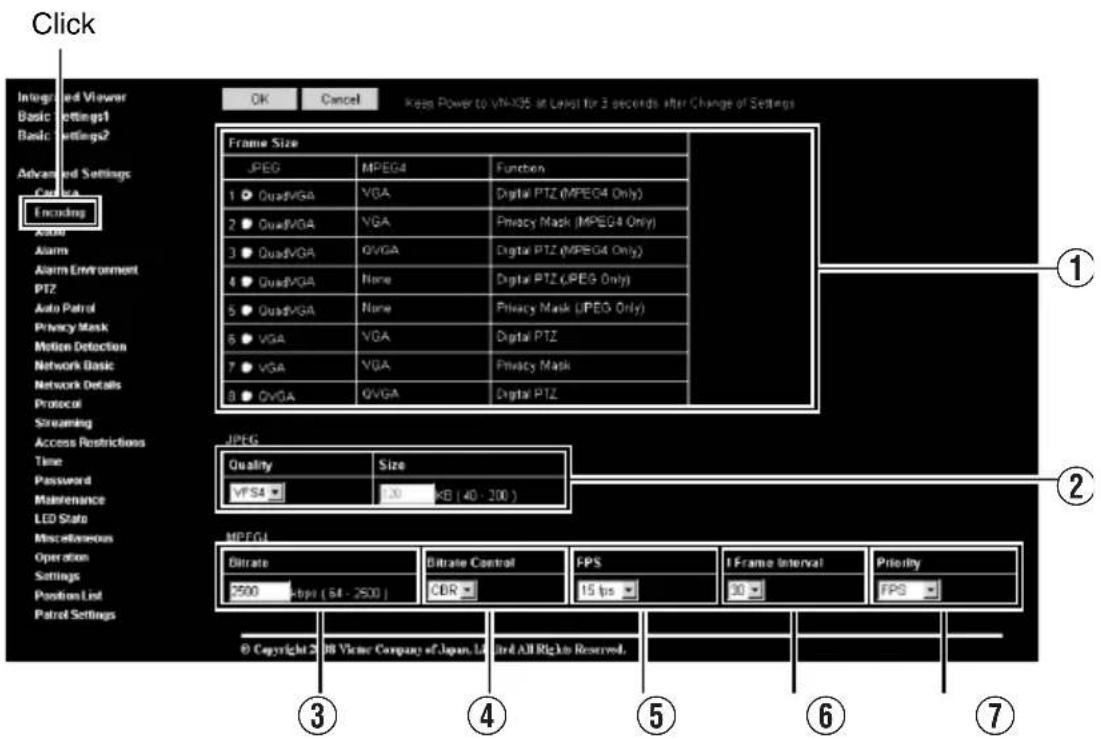
Encoding Page
This page is for setting JPEG and MPEG4 encoding parameters. This page can be used during access using "admin" or "operator".
- Click [Advanced Settings] to display setting menu.
- Click [Encoding].
- Press the [OK] button to enable the new settings.
- If the [OK] button is pressed upon entering an invalid value, a warning message will appear and the entry will be denied. Press the [Cancel] button to restore the invalid entry to the current value.
- When settings on this page are altered during playback using the built-in viewer, reboot the viewer.
- There is upper limit to transmission bit rate from the camera. If a bit rate that exceeds upper limit is specified, this new setting will not be applied. For details on the maximum transmission limit, refer to the section on “Network Requirements” (Page 3).
(*V) is applicable to VN-V series only. (*X) is applicable to VN-X series only.
| 1Frame Size | For selecting the frame size of each JPEG or MPEG4 screen to Quad VGA (1280 × 960) (*X), VGA (640 × 480) or QVGA (320 × 240). Select one of the four (*V) or eight (*X) different patterns. (Page 19) | |
| JPEG | ||
| 2Quality/Size | For specifying the JPEG picture quality (rate control mode) and size (target file size).When “VFS1” to “VFS7” is selected, the quantization table during JPEG encoding will be maintained and the file size will increase/decrease according to the input signals. Typical sizes will be displayed in the Size field. . When recording JPEG data to a recorder with a limited storage capacity, note that the maximum recording time may vary as the file size fluctuates under this setting.When “AFS” is selected, encoding is performed such that the target file size is the average size of multiple JPEG images. You can enter the target size in the Size field.[Quality field set values: VFS1 to VFS7, AFS]Memo:The picture size can be specified only when the picture quality value is set to AFS.[Size setting range in Quad VGA mode:40 KB to 200 KB ](*X)[Size field setting range for VGA:10 KB to 100 KB ][Size field setting range for QVGA:3 KB to 33 KB ] | |
| MPEG4 | ||
| 3Bitrate For setting the MPEG4 encoding bit rate.[Setting range: 64 kbps to 8000 kbps] | ||
| 4 Bitrate Control | For selecting whether to set the MPEG4 rate control mode to CBR (Constant Bit Rate) or VBR (Variable Bit Rate).CBR : Encoding is performed at a fixed bit rate regardless of the condition of the input video signals. Enables easy forecast of the bit rate.VBR : Changes the bit rate according to the condition of the input video signals. Picture quality is stable, but forecast of the bit rate is difficult. | |
| 5Frame Rate For setting the MPEG4 frame rate.[Setting range: 1 fps, 7.5 fps, 10 fps, 15 fps, 30 fps (*V)] | ||
| 6 I Frame Interval | For setting the I-frame interval. MPEG4 starts encoding from the I-frame. Shortening the interval stabilizes the picture quality even when there are rapid changes in the video image. However, the picture quality for images with little change will deteriorate. In addition, when multicast packet loss occurs, the time interval required to restore the image is shorter.[Set values: 15, 30, 45, 60, 75] | |
| 7 Priority | For selecting whether to assign priority to the frame rate or picture quality during MPEG4 encoding.FPS : Assigns priority to frame rate. Select this setting to enable smooth monitoring of motion images.Quality : Assigns priority to picture quality. | |
Setting (continued)
Audio Page
(This feature is not available in VN-V25U)
This page is for setting the audio parameters.
This page can be used during access using "admin" or "operator"
- Click [Advanced Settings] to display setting menu.
- Click [Audio].
- To enable the new settings, press the [OK] button.
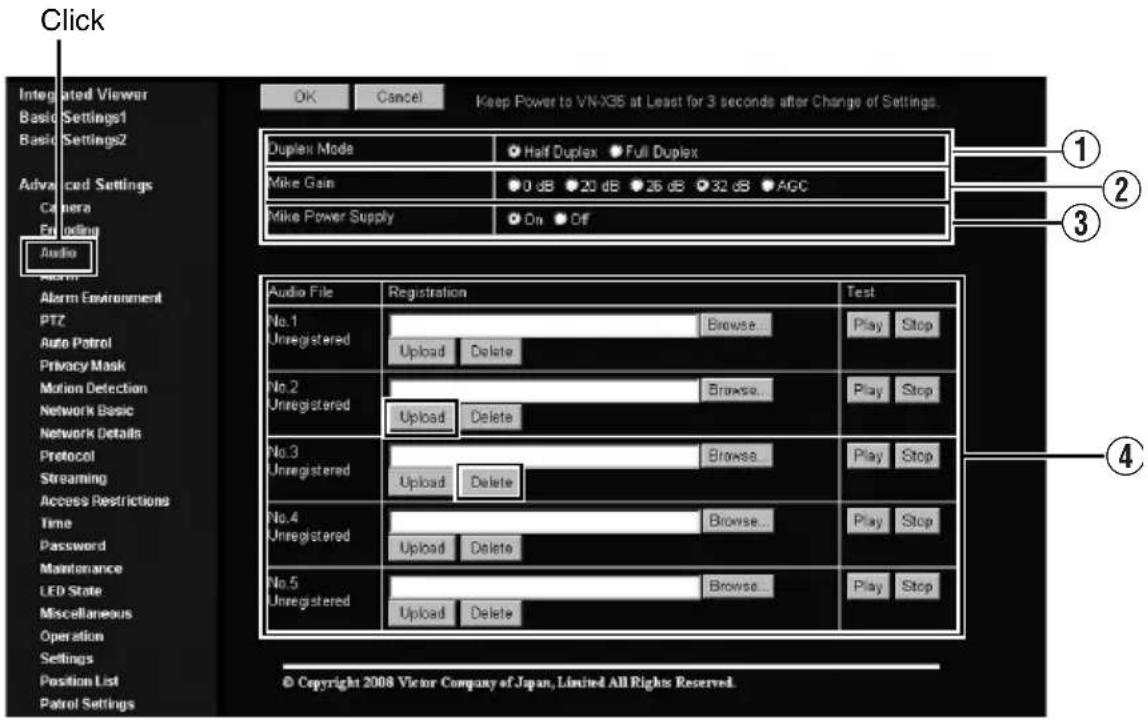
| 1 Duplex Mode | For setting the audio transmission method.When half duplex is selected, audio sent to computers from the camera is muted when audio is transmitted from a computer to the camera.When full duplex is selected, you can send audio to the camera from a computer while listening to audio sent to computers from the camera.[Set values: Half Duplex, Full Duplex]Memo:●When this is set to Full Duplex, audio sound sent to the camera can be returned trough built-in or external microphone to the computer as echo. |
| 2Mike Gain | For setting the gain value for the external microphone connected to the camera.[Set values: 0 dB, 20 dB, 26 dB, 32 dB, AGC]For setting the gain value for the camera's built-in microphone.(VN-V26U only)[Set values: 0 dB, 20 dB, 26 dB, 32 dB] |
| 3Mike Power Supply(This feature is not available in VN-V26U) | For specifying the power supply for the external microphone connected to the camera.[Set values : On, Off] |
| 4Audio File No.1 to No.5 | For registering audio files that can be outputted from the audio output terminal of camera when an alarm is triggered. |
| ■To output the registered audio file:●Get ready an audio file on the computer with the following specifications, and register it to the camera.Audio file specifications◆File format : WAV file◆Encoding format : linear PCM◆Sampling frequency : 8 kHz◆Quantization bit : 16 bit◆Monaural◆Maximum size : 30 seconds (total of playback files 1 to 5)●Configure the action item on the Alarm page to [Play Audio](Page 30)Note:●Playback of the audio file stops if the audio transmission feature of Built-in Viewer is enabled during playback of the file.●When the audio transmission feature of Built-in Viewer is running, audio files cannot be played back. | |
| Press the [Register] button to register the selected audio file on the camera.Press the [Delete] button to delete an audio file registered on the camera.Press the [Browse] button to show the file selection screen and make a selection from the available audio files.Press the [Play] button to play back an audio file registered on the camera, and send output to the Audio signal output terminal of the camera.Press the [Stop] button to stop playing an audio file.Memo:●WAV file can be recorded or created using Windows Sound Recorder or general sound editing software. |
Setting (continued)
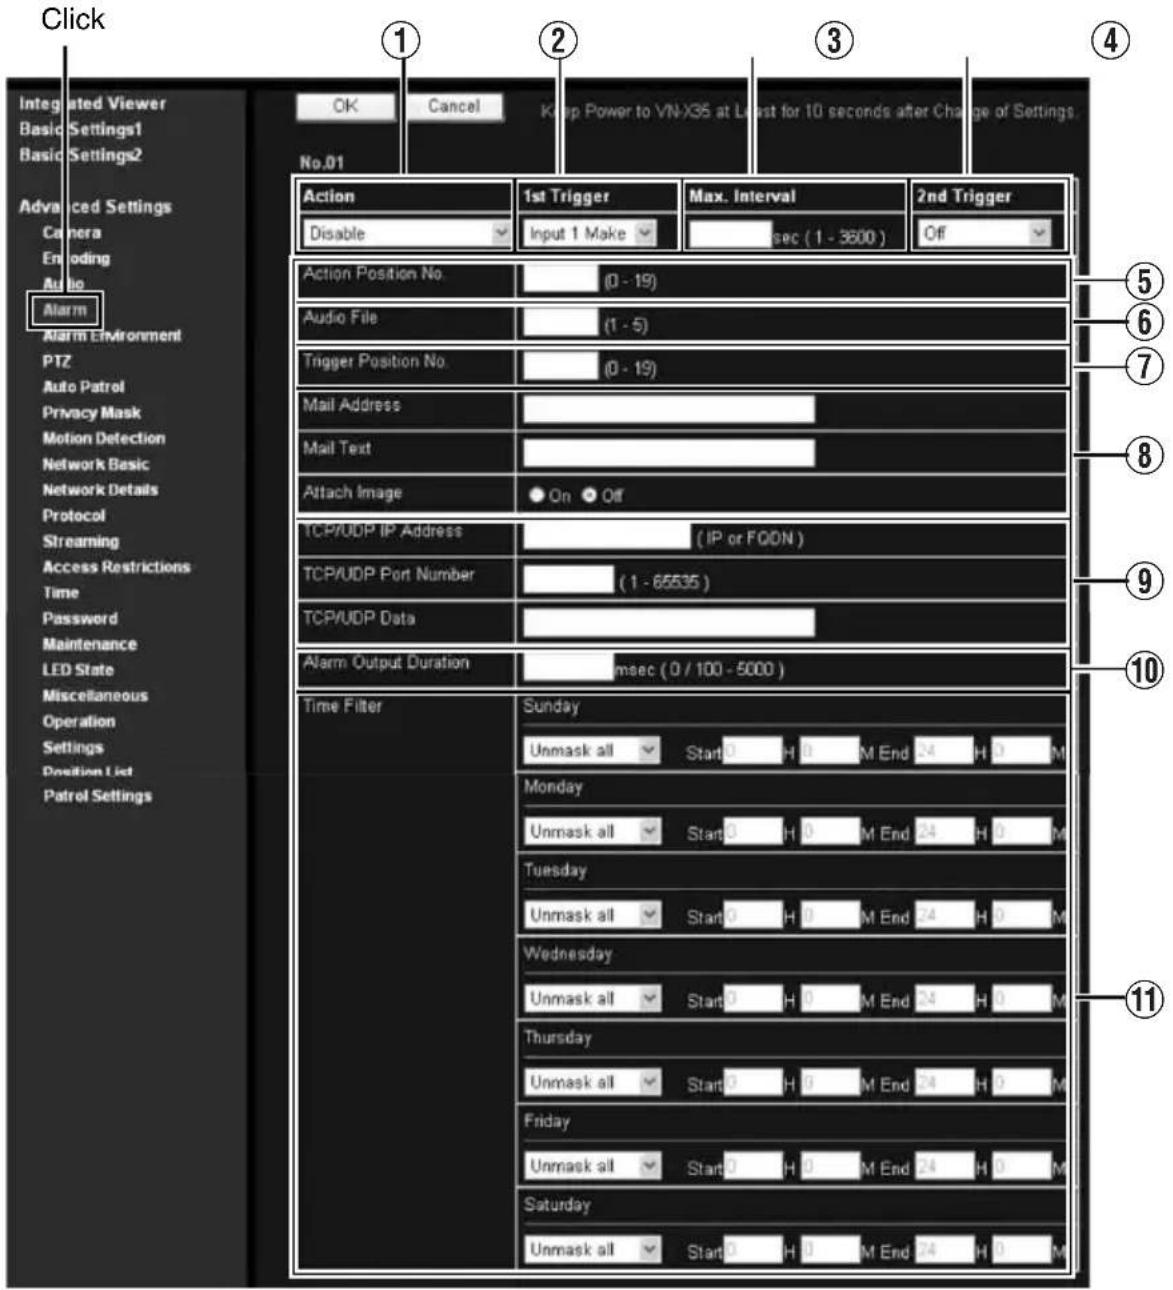
Alarm Page
This page is for setting actions when there is an alarm.
Up to 5 actions (No. 01 to No. 05) may be set.
This page can be used during access using "admin" or "operator".
- Click [Advanced Settings] to display setting menu.
- Click [Alarm]
- Press the [OK] button to enable the new settings. Only items that are valid under the selected action will be saved. When Disable is selected for the action, all settings will be restored to their default values.
- If the [OK] button is pressed upon entering an invalid value, a warning message will appear and the entry will be denied. Press the [Cancel] button to restore the invalid entry to the current value.
(*V) is applicable to VN-V series only. (*X) is applicable to VN-X series only.
| 1Action For specifying the type of action.Disable : Does not trigger any action.Mail : Sends out e-mail. Specify the recipient's mail address. The title of the mail will appear as [Alarm from “model name”] (E.g., “VN-V225” is displayed for VN-V225VPU) and the sender as [Camera ID]. Enter the message to send in [Mail Text]. Input up to 127 alphanumeric characters. To attach the latest image to the mail, set [Attach Image] to “On”.FTP : Sends out pre-/post-recorded JPEG files via FTP. See the page on Alarm Environment for details on pre-/post-recording and FTP server settings. (Page 34)The maximum transmission rate of FTP is 1 Mbps. If a new FTP trigger occurs during post-recording, the recorded portion is treated as pre-recording and a new post-recording starts.During FTP transmission after completing the post-recording, a new post-recording starts if a new FTP trigger occurs.TCP : Sends out the character string entered in the [TCP/UDP Data] field to the destinations specified in [TCP/UDP IP Address] and [TCP/UDP Port Number] via TCP.UDP : Sends out the character string entered in the [TCP/UDP Data] field to the destinations specified in [TCP/UDP IP Address] and [TCP/UDP Port Number] via UDP.Output 1 Make : Changes Alarm Output 1 to Make.Output 1 Break : Changes Alarm Output 1 to Break.Output 2 Make : Changes Alarm Output 2 to Make.Output 2 Break : Changes Alarm Output 2 to Break.Set the alarm output time in the [Alarm Output Duration] field.Position (*X) : Moves to the preset position specified in the Action Position No. item 5.(Page 32)Play Audio (This feature is not available in VN-V25U) : Play back an Audio File registered on the camera. (Page 29)(The following setting values are for VN-V26U, VN-V225U series and VN-X235U series.)BlackWhite → Color: Changes the [B&W Mode] setting from “Black and White” to “Color”.Color → BlackWhite: Changes the [B&W Mode] setting from “Color” to “Black and White”.DayNight:Auto Low: Changes the [B&W Mode]setting to “Auto Low”.DayNight:Auto Mid: Changes the [B&W Mode] setting to “Auto Mid”.DayNight:Auto High: Changes the [B&W Mode] setting to “Auto High”. |
Setting (continued)
Alarm Page (continued)
(*V) is applicable to VN-V series only. (*X) is applicable to VN-X series only.
| 21st Trigger | For specifying the first trigger to be activated.[Set values : Input 1 Make, Input 2 Make, Input 1 Break, Input 2 Break, Motion detection, Position (※X), BlackWhite → Color (VN-V26U, VN-V225U series and VN-X235U series only), Color → BlackWhite (VN-V26U, VN-V225U series and VN-X235U series only)]Memo: ·When the second trigger is turned off, the action will be invoked only by the first trigger.·If [Motion detection] or [Position] (※X) is selected as the first trigger, [Max.Interval] and [2nd Trigger] cannot be selected. |
| 3 Max. Interval | Enabled when both the first and second triggers are specified.Specify the maximum interval between the first and second triggers. An action will be invoked only if the interval between the first and second triggers is within the maximum interval.[Setting range : 1 msec to 3600 msec] |
| 4 2nd Trigger | For specifying the second trigger for invoking an action.Either alarm input (make) or alarm input (break) can be selected.[Set values:Input 1 Make, Input 2 Make, Input 1 Break, Input 2 Break] |
| 5Action Position No (※X) | For setting the position number to move to when the [Action] item 1 is set to “Position”.[Setting range : 0 to 19] |
| 6 Audio File | For setting the file number to play back when the [Action] item 1 is set to “Play Audio”.[Setting range : 0 to 5] |
| 7Trigger Position No (※X) | For setting the file number to move when the [1st Trigger] item 2 is set to “Position”.[Setting range : 0 to 19] |
| 8 Mail | Mail Address : For entering the recipient's mail address.Mail Text : For entering the mail transmission data. Input up to 127 alphanumeric characters.Attach Image : For specifying whether to attach images to the mail. |
| 9 TCP/UDP | TCP/UDP IP Address : For entering the address when alarm action notification is to be sent via TCP or UDP.(IP or FQDN)TCP/UDP Port Number : For entering the port number when alarm action notification is to be sent via TCP or UDP.(1 to 65535)TCP/UDP Data : For entering the data to send during TCP or UDP notification. Input up to 127 alphanumeric characters. |
| 10 Alarm Output Duration | For setting the alarm output time from the alarm output terminal.When this is set to “0”, it is not possible to revert back to break (or make) after changing to make (or break).[Setting range: 0, 100 msec to 5000 msec] |
| 11 Time Filter | For specifying the alarm action with respect to each day of the week and setting the corresponding time of the day.Applicable day of week : Sunday, Monday, Tuesday, Wednesday,Thursday, Friday, SaturdayAlarm actionUnmask Span : For specifying the time period for invoking the actionMask Span : For specifying the time period to stop the actionUnmask All : Activated at all timesMask All : Stopped at all timesApplicable time period : For specifying the start and end time in hours and minutes. |
Setting (continued)
Alarm Environment Page
This page is for setting alarm-related environments.
This page can be used during access using "admin" or "operator".
- Click [Advanced Settings] to display setting menu.
- Click [Alarm Environment].
- Press the [OK] button to enable the new settings.
- If the [OK] button is pressed upon entering an invalid value, a warning message will appear and the entry will be denied. Press the [Cancel] button to restore the invalid entry to the current value.
Click
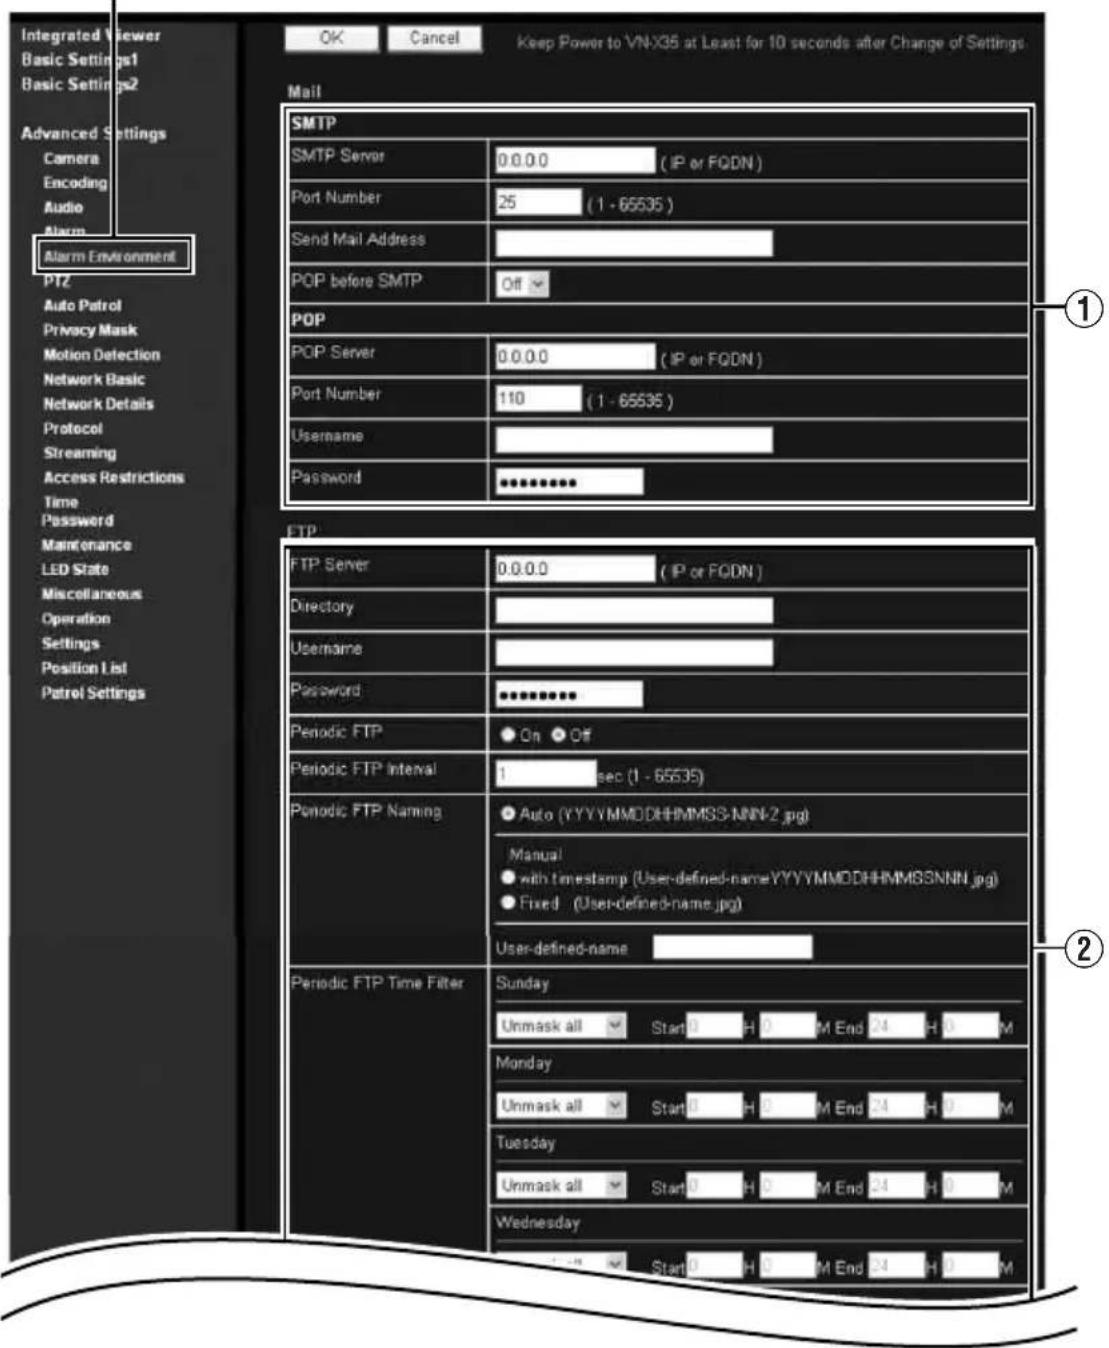
| 1 Mail | For setting the mail environment when [Mail] is specified as an action on the Alarm page.[SMTP] and [POP] can be used. Configure only the [SMTP] settings under usual circumstances.Enter the camera's mail address as the recipient's mail address.Configure the [POP] settings as well if [POP before SMTP] is enabled. In addition, if FQDN is set for [SMTP Server], configure also the DNS server settings on the [Network Basic] page. (Page 45)Memo:What is FQDN (Fully Qualified Domain Name)?This is a fully qualified domain name that indicates a notation method of describing the entire host or domain name on the TCP/IP network without abbreviating.For example, if the host name is www and the domain name is victor.co.jp, this will be denoted as “www.victor.co.jp” in FQDN. |
| 2 FTP | For setting the FTP environment when [FTP] is specified as an action on the Alarm page. This is common with the FTP environment when using the periodic FTP on this page.When [Directory] is left blank, FTP transfer will be performed to the home directory of the FTP server. To enable FTP transfer to a directory below the home directory, set the corresponding directory name in [Directory].Delimit the directory using “/”.Example: subdir1/subdir2Destination directory of FTP transfer will be dependent on the FTP server if “/” is added at the beginning.Setting [Periodic FTP] to “On” enables transfer of the latest JPEG images to the FTP server at regular intervals. Specify the interval in seconds for [Periodic FTP Interval].File name: Select a type from the two types of periodic FTP file names.When “Auto” is selected, images are generated from the year, month, day, hour, minute, second, and number.Example: 20071114161032-001-2.jpgWhen “Manual” is selected, you can select a file name generation method from the following.• File name containing only the character string entered in [User-defined-name]Example: Camera1.jpg•File name with the year, month, day, hour, minute, and second added to [User-defined-name]Example: Camera1_20071114161032001.jpgThe name of the file to be transmitted via FTP is made up of the action number, year, month, day, hour, minute, second, number and trigger flag.Example: 01-20070711152904-001-0.jpgThe first two digits are the action number, and the following 14 digits denote the year, month, day, hour, minute and second.The three digits after the first hyphen is the number of the series of JPEG files to be sent via the FTP. The number starts from “000”. The last digit denotes the trigger flag. This is displayed as “1” only for the JPEG file during a trigger input, and as “0” if otherwise. |
Setting (continued)
Alarm Environment Page (continued)
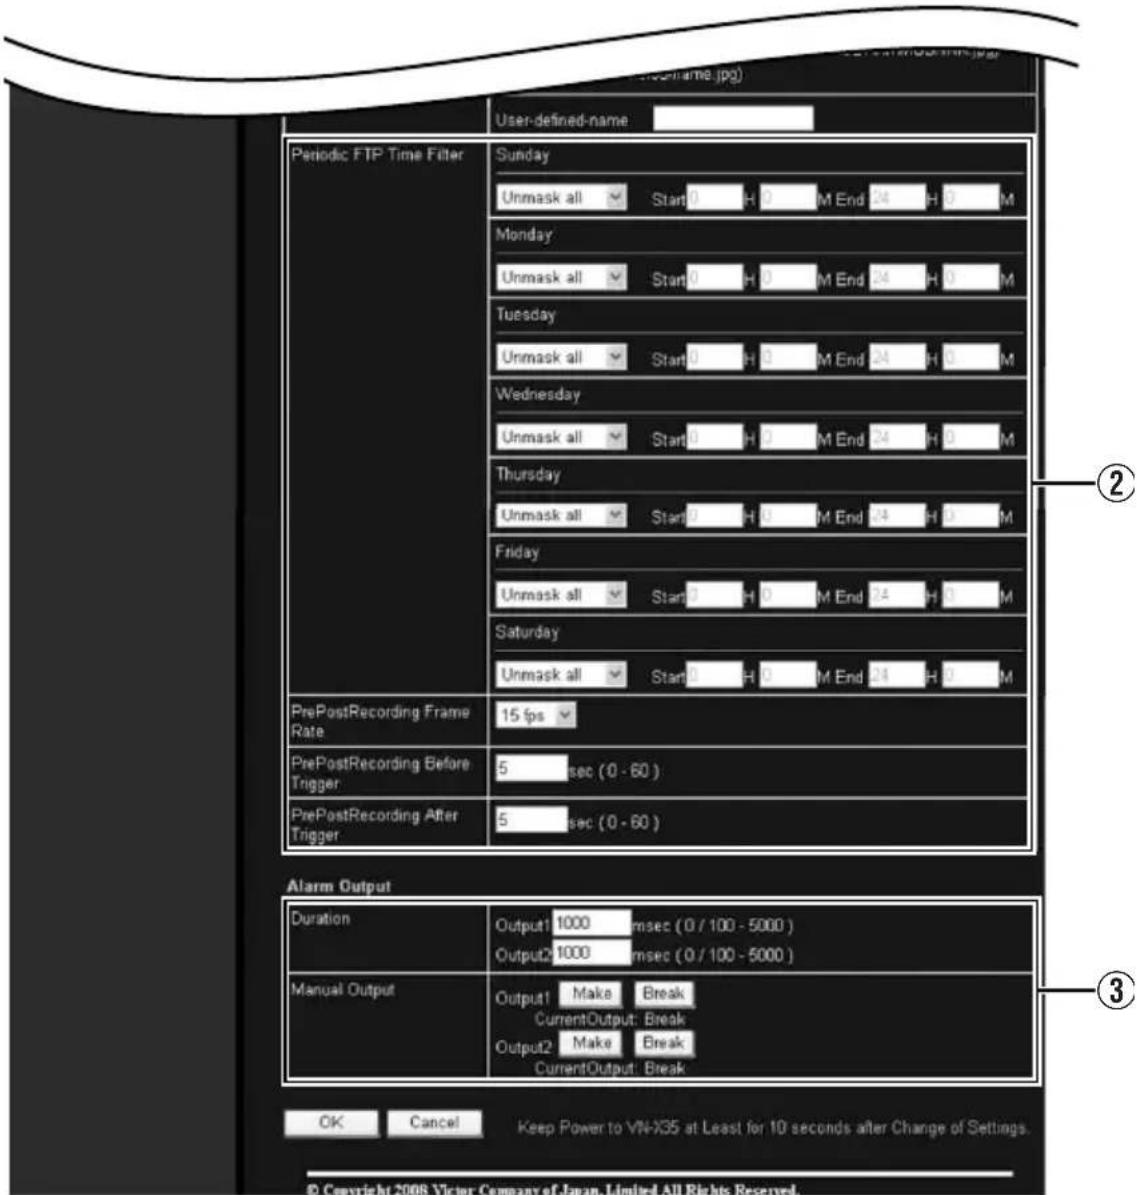
(*V) is applicable to VN-V series only. (*X) is applicable to VN-X series only.
| 2FTP (continued) Time Filter:For specifying the periodic FTP transfer action with respect to each day of the week and setting the corresponding time of the day.Applicable day of week : Sunday, Monday, Tuesday, Wednesday, Thursday, Friday, SaturdayAlarm actionUnmask Span : For specifying the time period for invoking the actionMask Span : For specifying the time period to stop the actionUnmask All : Activated at all timesMask All : Stopped at all timesApplicable time period : For specifying the start and end time in hours and minutes.Pre-/Post-recording parameter:[PrePostRecording Frame Rate] : For specifying the JPEG frame rate for FTP pre-/post-recording.[Set values : 1 fps, 2 fps, 3 fps, 5 fps, 6 fps, 7.5 fps, 10 fps, 15 fps, 30 fps ( × V)][PrePostRecording Before Trigger] : For setting the FTP pre-recording trigger time (recording time before alarm input) in seconds.[Setting range: 0 to 60 seconds][PrePostRecording After Trigger] : For setting the FTP post-recording trigger time (recording time after alarm input) in seconds.[Setting range: 0 to 60 seconds]The maximum time intervals for [PrePostRecording Before Trigger] and [PrePostRecording After Trigger] are determined by the JPEG size on the Encoding page as well as the set values for [PrePostRecording Frame Rate]. A message appears if the combination of the entered values are not feasible. | |
| 3Alarm Output For setting the alarm output. | |
| Duration For setting the output time of [Manual Output].[Setting range : 0, 100 msec to 5000 msec] | |
| Manual Output | For operating alarm output manually.The current output status appears on the right. When [Duration] is set to “0”, pressing the [Make] button switches the alarm to Make output, while pressing the [Break] button switches the alarm to Break output.When [Duration] is set to a value other than “0”, pressing the [Make] button switches the alarm to Make output only during the duration of the output, upon which it switches to Break output.When the output duration is set to a value other than “0”, pressing the [Break] button switches the alarm to Break output only during the duration of the output, upon which it switches to Make output. |
Setting (continued)
PTZ Page
(VN-X series only)
Set the movement for “Auto Return”, “Zoom Limit” and “Preset Position”.
This page can be used during access using “admin” or “operator”.
- First of all, configure the encoding settings. (Page 19)
- Click [Advanced Settings] to display setting menu.
- Click [PTZ].
- Press the [OK] button to enable the new settings.
- If the [OK] button is pressed upon entering an invalid value, a warning message will appear and the entry will be denied. Press the [Cancel] button to restore the invalid entry to the current value.
Note:
- This feature does not work for some combinations of distribution sizes on the Encoding page. (Page 19)
Click
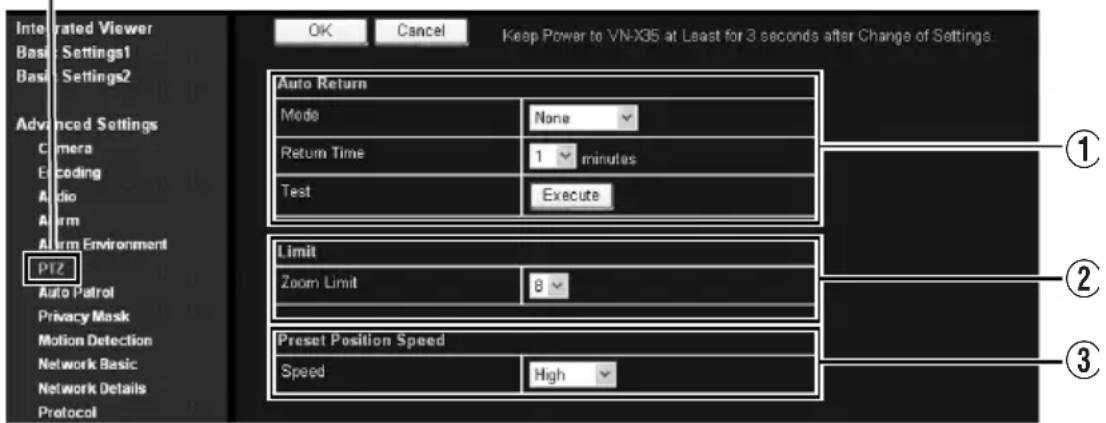
| 1 Auto Return | Restores automatically to the state specified under [Mode] when action is not performed on the manually operated camera over the interval specified in [Return Time]. | |
| Mode For setting the action after Auto Return.None: Auto Return disabled.HOME: Returns to the home position.Auto Patrol: Restores the auto patrol action. | ||
| Return Time For setting the time interval before restoring the action via Auto return.[Set values: 1 minute, 2 minutes, 3 minutes, 5 minutes, 10 minutes, 20 minutes, 30 minutes, 60 minutes] | ||
| Test | Click [Execute] to perform a test execution of the preset Auto Return action. | |
| 2Limit | ||
| Zoom Limit Set maximum value of electronic zoom feature.[Set values: 1, 2, 4, 8] | ||
| 3Preset Position Speed | For adjusting the speed of movement to the Preset Position.This is also applicable to movement to the Preset Position in the Auto Patrol mode. | |
| Speed [Set values: Moment, Low, Mid, High] | ||
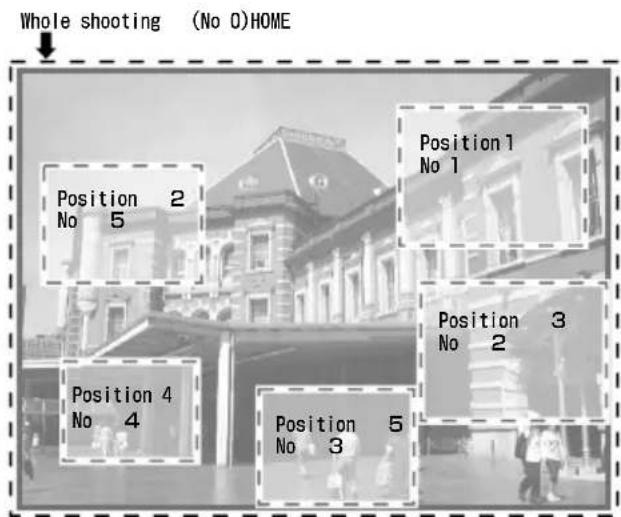
Auto Patrol Page
(VN-X series only)
Perform Auto Patrol setting to switch image display between multiple positions according to the interval that has been set. Set when viewing registered positions in order.
This page can be used during access using "admin" or "operator".
- First of all, configure the encoding settings. (Page 19)
- Click [Advanced Settings] to display setting menu.
- Click [Auto Patrol].
- Register position using PTZ feature. (Page 70)
- Press the [OK] button to enable the new settings.
- If the [OK] button is pressed upon entering an invalid value, a warning message will appear and the entry will be denied. Press the [Cancel] button to restore the invalid entry to the current value.
Note:
- This feature is available for images that work with digital PTZ. (Page 19)
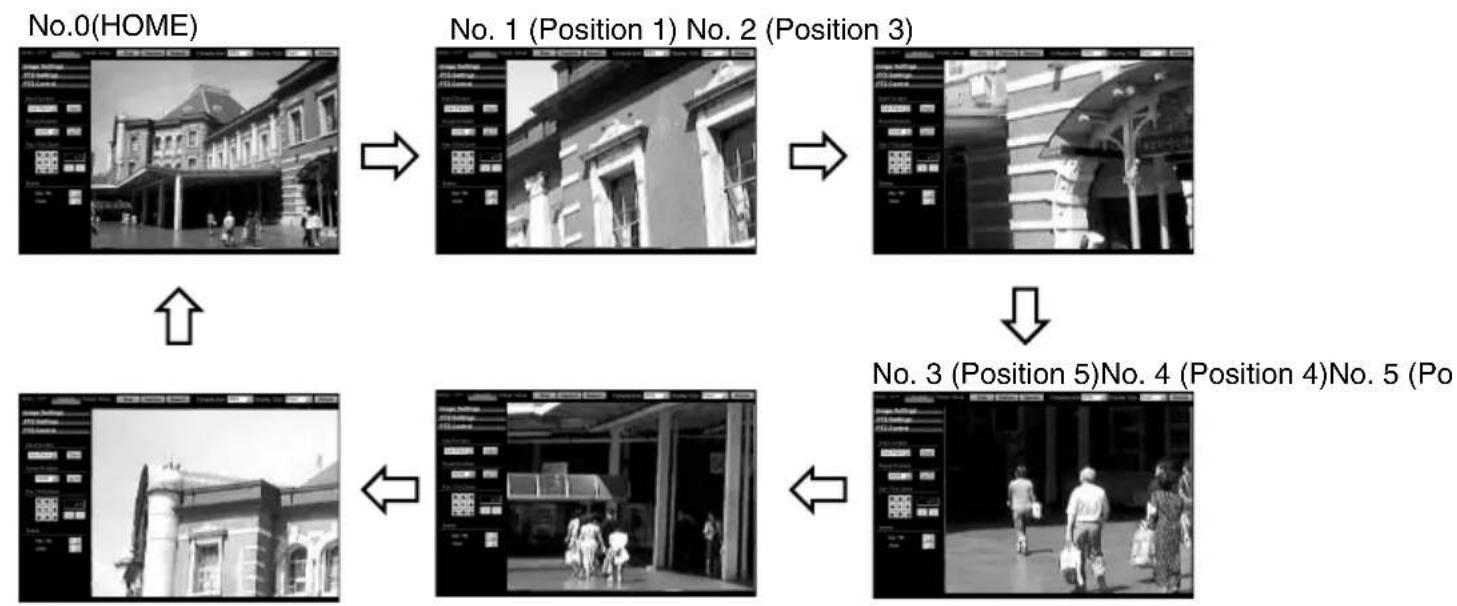
flowchart
graph TD
    A["No.0(HOME)"] --> B["No.1 (Position 1) No.2 (Position 3)"]
    B --> C["No.3 (Position 5) No.4 (Position 4) No.5 (Po)"]
    C --> D["End"]
Setting (continued)
Auto Patrol Page (continued)
(VN-X series only)
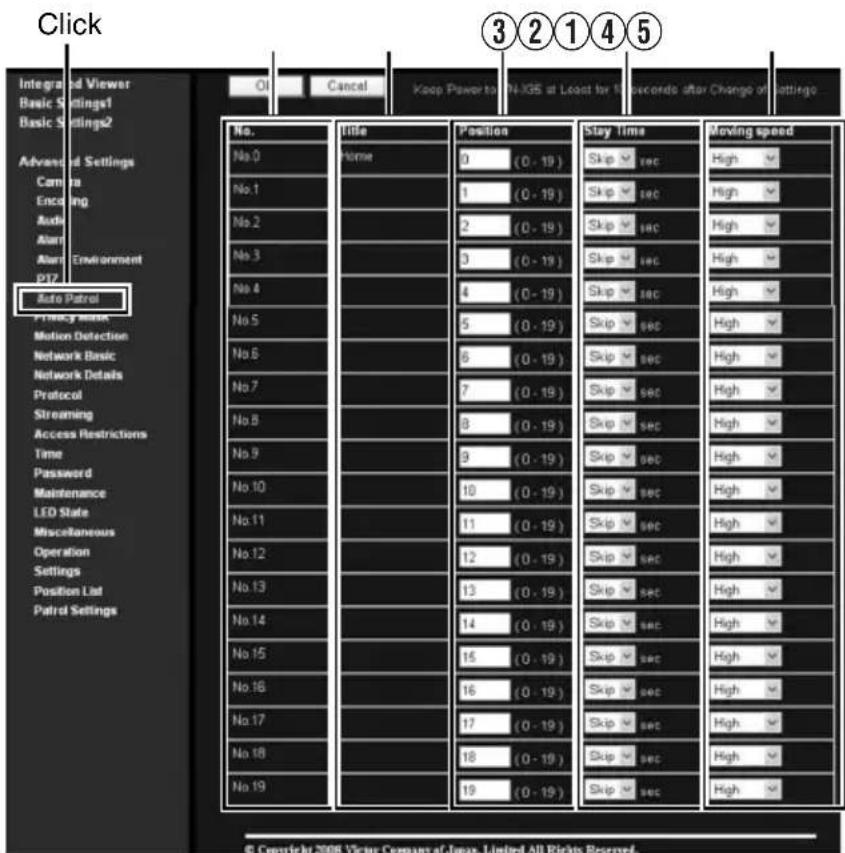
| 1 No. | Switches the camera images in sequence from No. 0 to No. 19. |
| 2Title Shows the title of the position. | |
| 3 Position | For setting the sequence of position numbers in which the camera moves.[Set values : 0 to 19] |
| 4 Stay Time | For setting the time interval for displaying the image of the respective positions.(Unit: seconds)Select Skip for positions that you do not want to display during Auto Patrol.[Set values : Skip, 10, 20, 30, 45, 60, 120] |
| 5 Moving speed | For setting the speed of movement to the said position.[Set values : Moment, Low, Mid, High] |
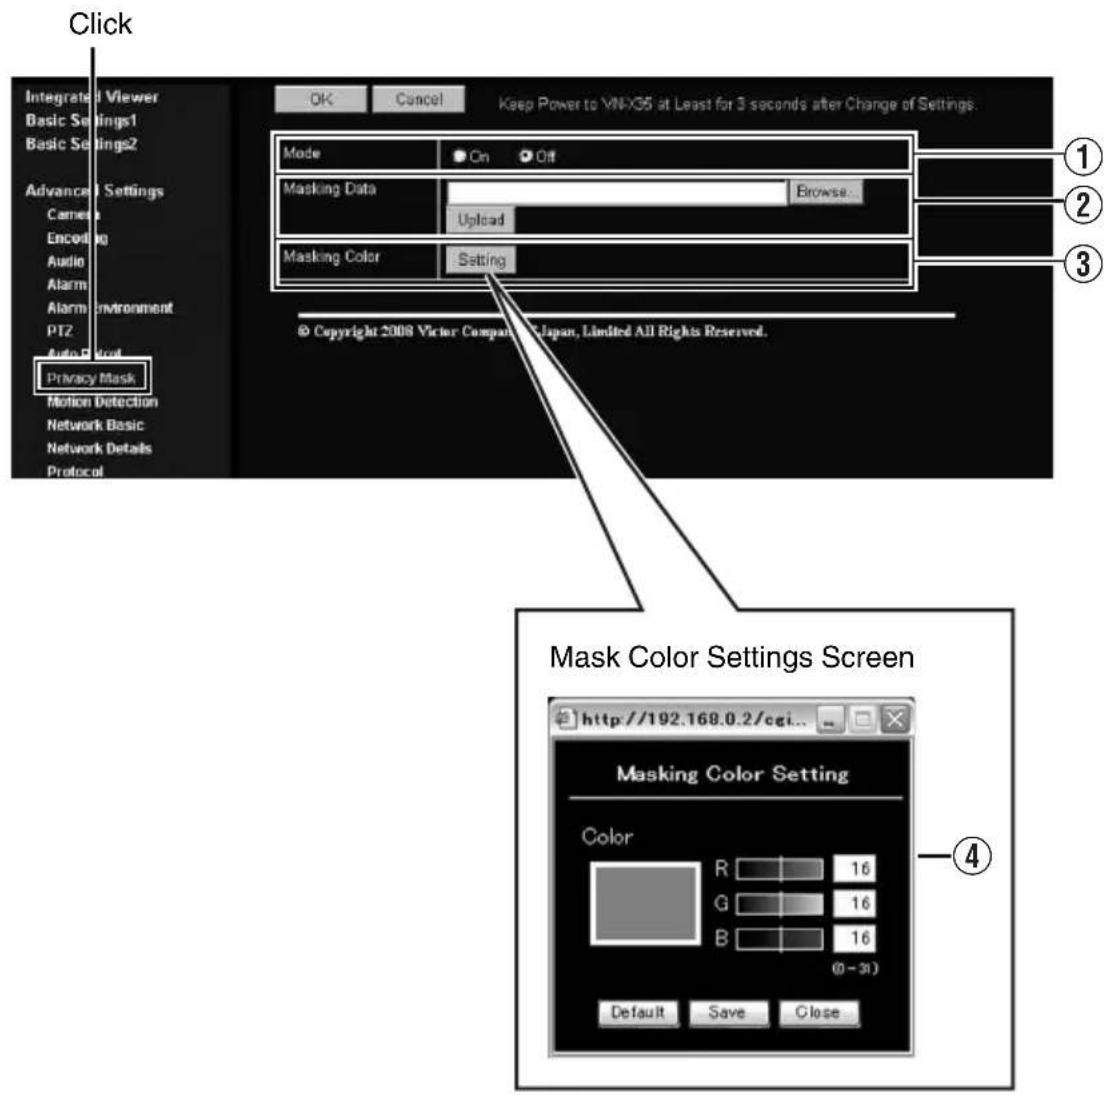
Privacy Mask Page
Privacy Mask is a feature that enables masking of a portion of the image.
The camera enables unlimited privacy masks to be specified in different shapes at your favorite locations. The Privacy Mask masks area by uploading a BMP file painted in red (created separately). The displayed color is determined by the color specified on this page.
This page can be used during access using "admin" or "operator".
- First of all, configure the encoding settings. (Page 19)
- Click [Advanced Settings] to display setting menu.
- Click [Privacy Mask].
- Press the [OK] button to enable the new settings.
- If the [OK] button is pressed upon entering an invalid value, a warning message will appear and the entry will be denied. Press the [Cancel] button to restore the invalid entry to the current value.
- This feature does not work for some combinations of distribution sizes on the Encoding page. (Page 19)
- This feature does not work correctly on analog video signal.
Note:
Memo:
Setting (continued)
Privacy Mask Page (continued)
(*V) is applicable to VN-V series only. (*X) is applicable to VN-X series only.
| 1 Mode | For specifying whether to activate the Privacy Mask feature.When this is set to “On”, the privacy mask specified using the following items will appear on the image. |
| 2 Masking Data | Get ready the BMP file (Quad VGA (※X), VGA or QVGA size) for specifying the position and shape of the privacy mask on the computer in advance.(Refer to the following for procedures to create the BMP file.)Press the [Browse...] button to display the file selection screen. Select the BMP file in the PC.Press the [Upload] button to upload the selected BMP file to the camera.Creating the BMP fileUpon installing the camera, use JPEG Viewer to save the JPEG file on the computer. (JPEG Viewer: Page 74)Open the saved JPEG file on the computer using the Paint tool, and paint the area to be masked in red ((R, G, B) = (255, 0, 0)).Save this image as a BMP file (24 bits). |
| 3 Masking Color | Press the [Settings] button to display the Masking Color Setting screen.You can alter the color of the privacy mask. |
| 4Masking Color Setting | For specifying the color ratio in the red : green : blue format.Press the [Save] button to set the selected color as the mask color.Press the [Default] button to restore the default mask color settings. |
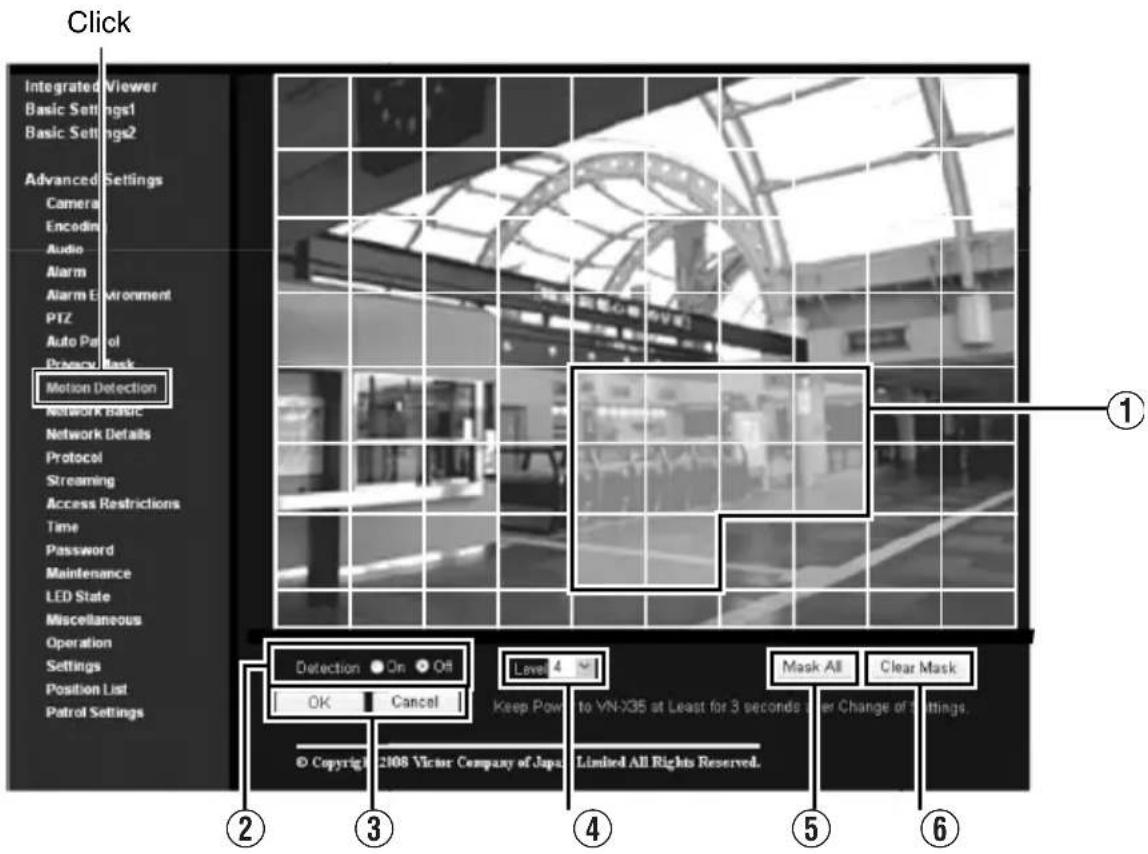
Motion Detection Page
This page is for setting motion detection.
This page can be used during access using "admin" or "operator".
Memo:
- When images on the camera are currently acquired by the built-in viewer or another client, video images may not appear on the [Motion detection] page if it is beyond the distribution capability of the camera.
- Click [Advanced Settings] to display setting menu.
- Click [Motion detection].
●The area valid for motion detection is displayed in blue. - When motion is detected, the frame of the built-in viewer turns red.
Setting (continued)
Motion Detection Page (continued)
| 1 Display Screen | The screen is divided into blocks of 10 (horizontal) x 8 (vertical). You can specify whether to enable motion detection in each block. Clicked block turns blue. Click again to return to the original natural color. When the block turns blue, it is unmasked and motion can be detected. Press the [OK] button to enable this setting. When the screen of the block is in its natural color, it is masked and motion cannot be detected in it. All blocks are masked in the default setting.Press the [OK] button to enable this setting.Use the [Mask All] button to mask all blocks.Use the [Clear Mask] button to unmask all blocks. |
| 2Detection For setting | motion detection to On/Off.Press the [OK] button to enable motion detection in the unmasked blocks.Memo:Even though motion detection is set to “On”, the motion of masked blocks cannot be detected. |
| 3 OK/Cancel | To apply the new parameters, press the [OK] button. Press the [Cancel] button to cancel the change. |
| 4 Level | For setting the sensitivity of motion detection.Increasing the number raises the detection sensitivity level, and hence it is more sensitive.Press the [OK] button to enable this setting.[Set values : 0, 1, 2, 3, 4, 5, 6, 7, 8, 9, 10] |
| 5Mask All Masks all blocks. | Press the [OK] button to enable this setting. |
| 6 Clear Mask | Unmasks all blocks and enables the current motion detection and detection sensitivity settings.Press the [OK] button to enable this setting. |
Memo:
- The area display position serves as a reference. Make sure to perform operation check.
- The screen is divided into blocks of 80 (10 horizontal x 8 vertical).
Set the angle of view such that the size of the object for which motion is to be detected is larger than the size of multiple blocks.
Note:
- This feature may not function properly depending on the conditions of the object and settings.
- Flickers of fluorescent lamps may cause motion detection.
●Changes in brightness due to the light source may be detected as motion.
●The motion detection feature is not intended to prevent theft or fire. - Our company shall not be liable for any accident or damage that occurs.
Network Basic Page
This page is for performing basic setting related to the network.
This page can be used during access using “admin”.
- Click [Advanced Settings] to display setting menu.
- Click [Network Basic].
- Press the [OK] button to enable the new settings.
- If the [OK] button is pressed upon entering an invalid value, a warning message will appear and the entry will be denied. Press the [Cancel] button to restore the invalid entry to the current value.
- When settings of the [Network Basic] page is changed, all services that are currently running will end immediately. For example, when changes are made to the [Network Basic] page during JPEG/MPEG4 distribution, distribution will be discontinued and TCP will be disconnected.
| 1IP Setting For setting | the DHCP client function. Connect the camera to a network environment with a DHCP server when DHCP is to be enabled. If the DHCP server does not exist when DHCP is set to “Enable”, Camera will start running with the 192.168.0.2 IP address and 255.255.255.0 subnet mask in about 2 minutes after startup. Refer to “IP Address Settings” (Page 6) for the IP address. |
| 2IP Address For setting | ng the IP address of the camera. |
| 3 Subnet Mask | For setting the subnet mask of the camera. |
| 4 Default Gateway | For setting the default gateway of the camera. Set as 0.0.0.0 when a default gateway is not set. |
| 5 Host Name | For setting the host name of the camera. Specify a name using alphanumeric characters, hyphen (-) or period (.) Underscores (_) cannot be used. |
| 6 DNS Server | For setting the address of the DNS server. |
| 7 MAC Address | The MAC address of the camera is displayed in a hexadecimal number. |
| 8 IP Protocol | For setting IPv6 to On or Off. (IPv4 is set to On at all times.) |
| 9 IPv6 Address | Two types of addresses, “link local” and “global”, are displayed when IPv6 settings are enabled. However, if the connected network does not support IPv6, “Disabled” appears in the “global” address field. |
Setting (continued)
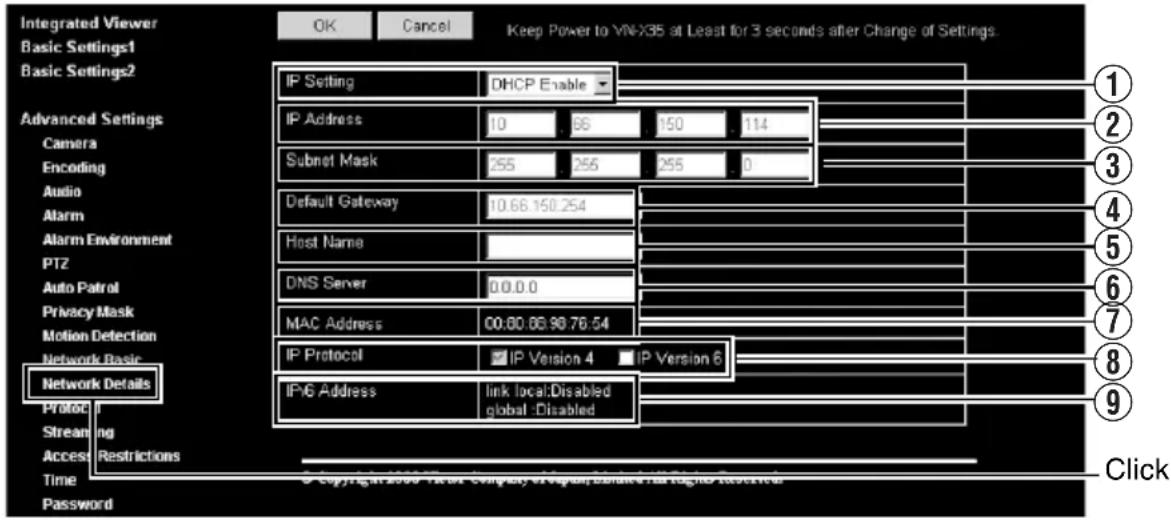
Network Details Page
This page is for performing detailed network setting.
This page can be used during access using "admin".
- Click [Advanced Settings] to display setting menu.
- Click [Network Details].
- Press the [OK] button to enable the new settings.
- If the [OK] button is pressed upon entering an invalid value, a warning message will appear and the entry will be denied. Press the [Cancel] button to restore the invalid entry to the current value.
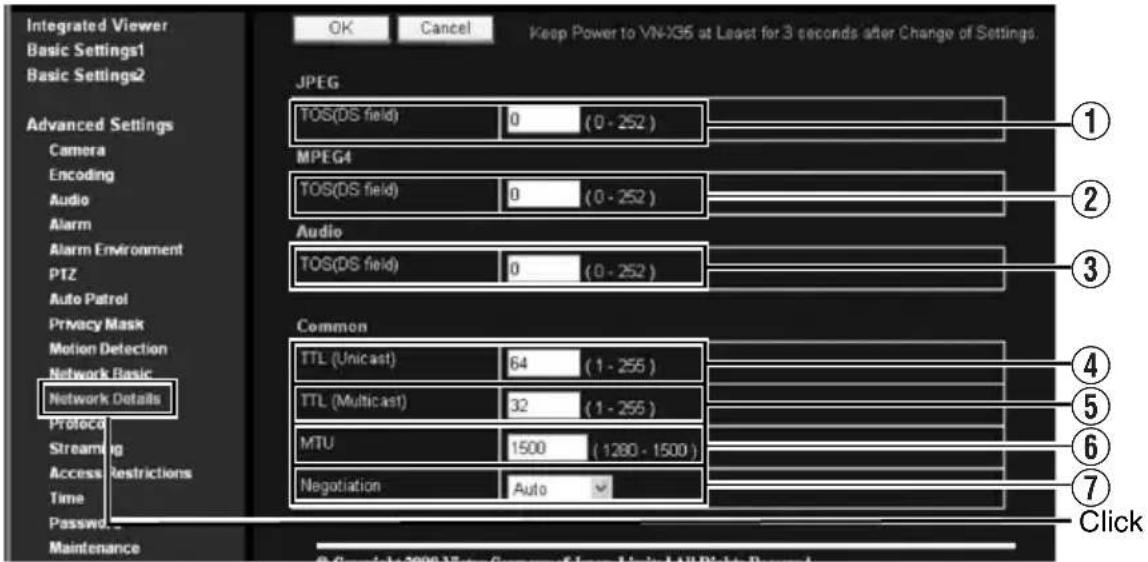
| 1 JPEG TOS(DS field) | For setting the TOS value of IP packets in which JPEG is stored. The upper six bits out of the eight bits that make up the TOS value belong to DSCP.This upper six bits can be set. The lower two bits are “0”. For example, upon setting to “250”, the lower two bits are converted to “0”, and the value becomes “248”.TOS values are used in networks that support QoS. By setting QoS for the network switch, routing can be done by giving priority to packets with a larger TOS value. |
| 2MPEG4 TOS(DS field) | For setting the TOS value of IP packets in which MPEG4 is stored.For details, refer to the [JPEG TOS(DS field)] item above. |
| 3Audio TOS(DS field)(This feature is not available in VN-V25U) | For setting the TOS value of IP packets in which Audio is stored.For details, refer to the [JPEG TOS(DS field)] item above. |
| 4TTL( Unicast) | For setting the TTL value of JPEG/MPEG4 packets that are to be sent via TCP. |
| 5TTL( Multicast) | For setting the TTL value of JPEG/MPEG4 packets that are to be sent via multicast. |
| 6MTU | For setting the maximum packet size for storing JPEG/MPEG4.[Setting range: 1280 to 1500] |
| 7 Negotiation | For setting the negotiation of the network. When a value other than “Auto” is selected, do not set the connected network device to “Auto”. Ensure that it is set to the same value as the camera. |
Protocol Page
This page is for changing the HTTP server port number.
This page can be used during access using "admin".
- Click [Advanced Settings] to display setting menu.
- Click [Protocol]
- Press the [OK] button to enable the new settings.
- After changing, you will need to re-establish the connection if you are using the Internet Explorer.
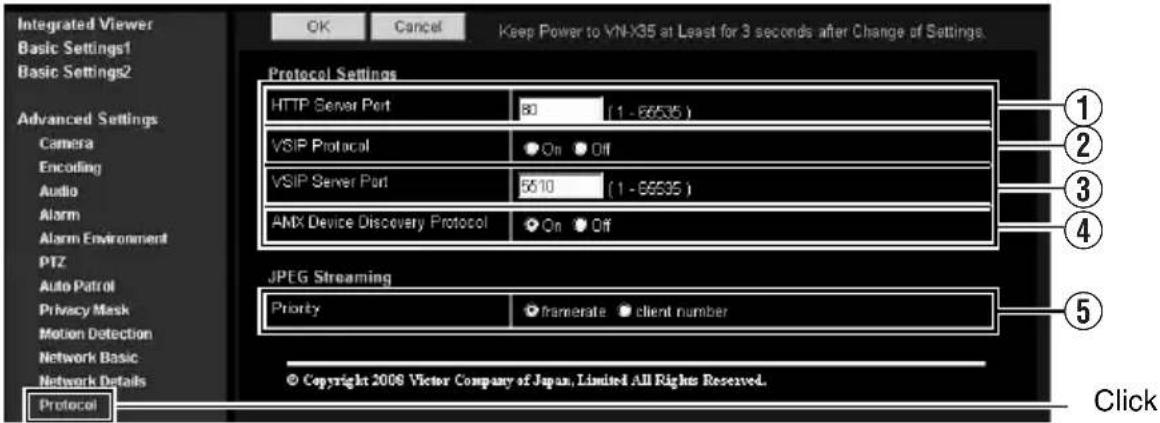
| Protocol Settings For setting the protocols. | |
| 1 HTTP Server Port | You can change the port number for the built-in web server of the camera.(1 to 65535: The default port number setting is 80.)The JPEG and MPEG4 HTTP port number for the web server will also be changed. During access to the camera from the Internet Explorer, enter the following in the Internet Explorer when the camera is in its default settings.http://192.168.0.2If the port number is changed to 8080, for example, enter the Internet Explorer as follows.http://192.168.0.2:8080 |
| 2VSIP Protocol For setting VSIP to On/Off.Set to “On” if you want to use this unit from Verint's Nextiva products. | |
| 3 VSIP Server Port | For changing the built-in VSIP number of the camera.(1 to 65535: Default value is 5510) |
| 4AMX Device Discovery Protocol | For setting AMX Device Discovery Protocol to On or Off.Set to “On” when you are using the camera on AMX's systems.[Set values : On, Off] |
| JPEG Streaming For selecting the priority for distributing JPEG images. | |
| 5 Priority | For selecting whether to assign priority to the number of clients or frame rate for distributing JPEG images.client number : Assigns priority to number of clients for distribution.(Page 4)When the distribution request increases, the frame rate for JPEG distribution is reduced to enable distributions up to 20, the maximum clients.frame rate : Assigns priority to frame rate. (Page 4)Set to this mode if you wish to maintain the JPEG frame rate as requested by the clients. When a distribution request that exceeds the maximum number of distributions is received, this request is denied. |
Memo:
- If the built-in viewer is used for playback, change the HTTP port number in the setting screen of the built-in viewer to the same value.
Setting (continued)
Streaming Page
This page is for setting manual multicast transmission.
This page can be used during access using "admin" or "operator".
- Click [Advanced Settings] to display setting menu.
- Click [Streaming].
- Press the [OK] button to enable the new settings.
- If the [OK] button is pressed upon entering an invalid value, a warning message will appear and the entry will be denied. Press the [Cancel] button to restore the invalid entry to the current value.
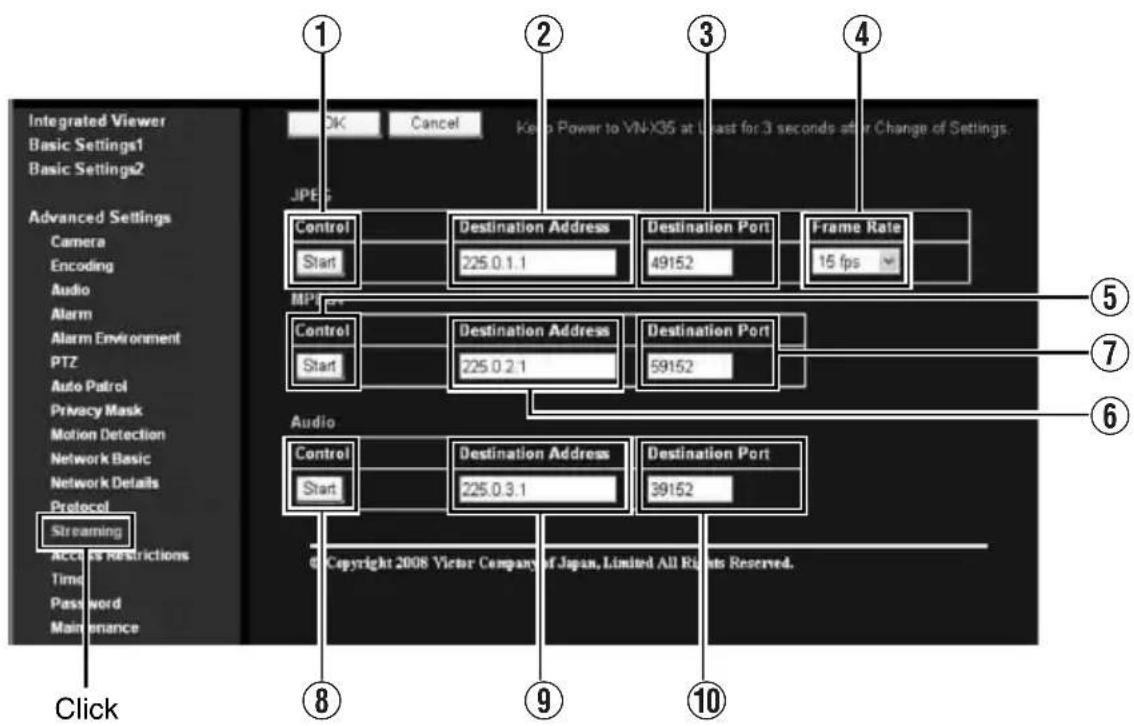
| JPEG | |
| 1 Control | For starting or stopping streaming of JPEG images.Parameters that are set on the [Streaming] page will be saved when transmission is started upon pressing the [Start] button. |
| 2 Destination Address | For specifying the destination address of JPEG streaming.Specify the multicast address. When other devices that make use of multicast transmission exist, ensure that each of them is set to a different multicast address. |
| 3 Destination Port | For specifying the destination port number of JPEG streaming.Specify an even number for RTP compliance.When other devices that make use of multicast transmission exist, it is recommended that each of them be set to a different port number.Multiple multicast streams cannot be received on a single computer when there are duplicate port numbers. |
| 4 Frame Rate | For specifying the frame rate when sending JPEG images via multicast. |
| MPEG4 | |
| 5 Control | For starting or stopping streaming of MPEG4 images.Parameters that are set on the [Streaming] page will be saved when transmission is started upon pressing the [Start] button. |
| 6 Destination Address | For specifying the destination address for MPEG4 streaming.Specify the multicast address. When other devices that make use of multicast transmission exist, ensure that each of them is set to a different multicast address. |
| 7 Destination Port | For specifying the destination port number for MPEG4 streaming.Specify an even number for RTP compliance.When other devices that make use of multicast transmission exist, it is recommended that each of them be set to a different port number.Multiple multicast streams cannot be received on a single computer when there are duplicate port numbers. |
| Audio (This feature is not available in VN-V25U.) | |
| 8 Control For starting | or stopping streaming of audio.Parameters that are set on the [Streaming] page will be saved when transmission is started upon pressing the [Start] button. |
| 9 Destination Address | For specifying the destination address of audio streaming.Specify the multicast address. When other devices that make use of multicast transmission exist, ensure that each of them is set to a different multicast address. |
| 10 Destination Port | For specifying the destination port number of audio streaming.Specify an even number for RTP compliance.When other devices that make use of multicast transmission exist, it is recommended that each of them be set to a different port number.Multiple multicast streams cannot be received on a single computer when there are duplicate port numbers. |
Memo:
- When the power of the camera shuts down accidentally during multicast transmission, multicast transmission will restart automatically after the camera is rebooted.
- When the setting on the Encoding page is set to a pattern where MPEG4 is not available, MPEG4 multicast transmission cannot start.
"Combination of distribution sizes and available features of VN-X series" (Page 19)
Setting (continued)
Access Restrictions Page
(VN-V25U does not have audio.)
This page is for setting client restrictions.
This page can be used during access using "admin".
- Click [Advanced Settings] to display setting menu.
- Click [Access Restrictions].
- Press the [OK] button to enable the new settings.
- If the [OK] button is pressed upon entering an invalid value, a warning message will appear and the entry will be denied. Press the [Cancel] button to restore the invalid entry to the current value.
- This feature is applied to JPEG / MPEG4 / Audio acquisition. It does not impose restrictions on access via a web browser or use of API.
Note:
- The Access Restriction feature determines whether to impose restrictions during TCP connection by the client. In the case when access restriction is set after TCP connection by a client has been established, TCP connection will not be disconnected.
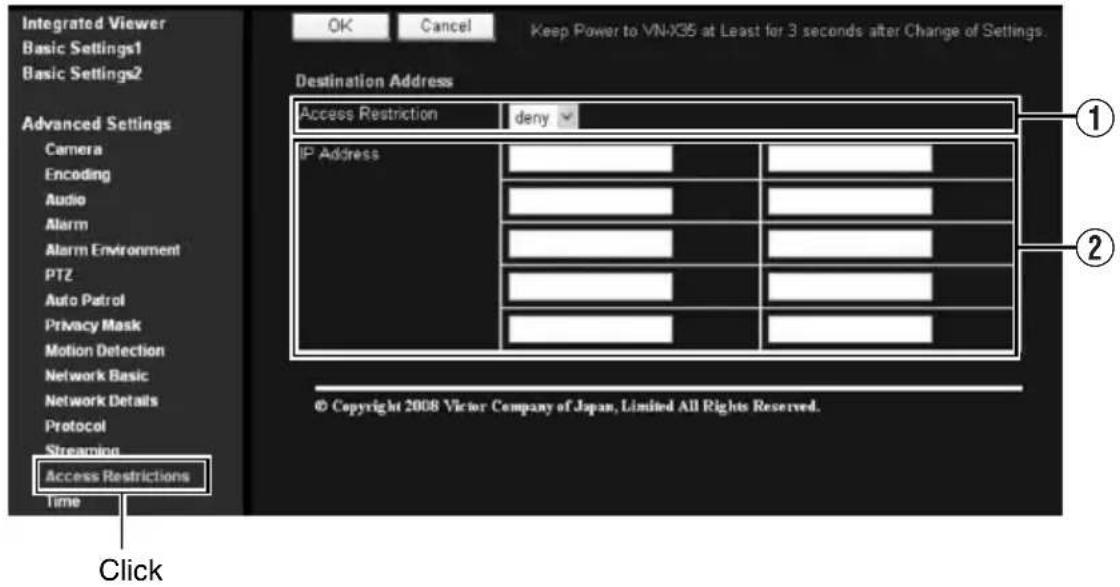
| Destination Address | Restrictions may be imposed on clients accessing the camera using the IP address. | |
| 1Access Restrictions | ||
| 2IP Address | ||
Note:
- Note that when “allow” is selected and all IP address fields are left blank, JPEG / MPEG4 / Audio acquisition by all IP addresses will be denied. Restrictions are not imposed on access to the Web Settings page.
Additionally, Camera will also deny access when instructions for transmission to the specified IP address are sent via API.
Memo:
- To specify a specific IP address range, enter a combination of the IP address and subnet mask in the [IP Address] field.
- Define the subnet mask using a length between 8 to 30 bits. For example, a range between 192.168.0.0 to 192.168.0.255 is denoted as 192.168.0.0/24 ([IP Address]/[bit length of subnet mask]).
Setting (continued)
Time Page
This page is for setting time.
This page can be used during access using “admin”.
- Click [Advanced Settings] to display setting menu.
- Click [Time].
- Press the [OK] button to enable the new settings.
- If the [OK] button is pressed upon entering an invalid value, a warning message will appear and the entry will be denied. Press the [Cancel] button to restore the invalid entry to the current value.
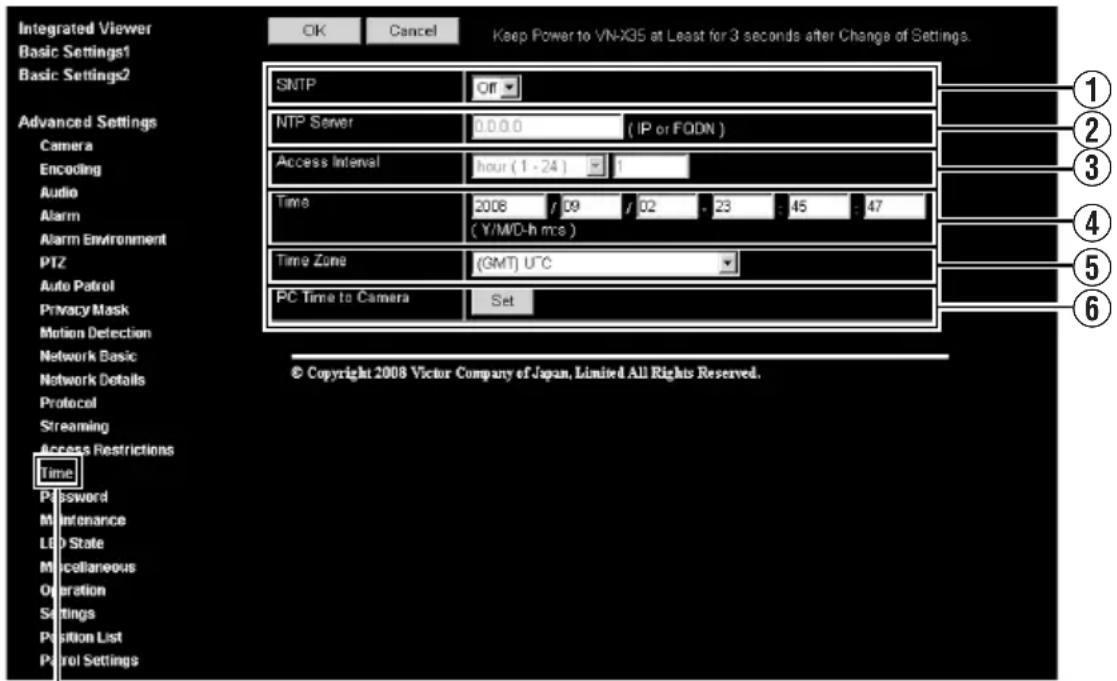
Click
| 1SNTP For setting the SNTP client feature.When this is set to “On”, the system accesses the specified NTP server at regular intervals to acquire the time.In addition, time will be recorded in the JPEG headers distributed by the camera. Discontinuity in JPEG header’s time may occur immediately before and after acquiring time from the NTP server. | |
| 2NTP Server | For setting the IP address of the NTP server. |
| 3Access Interval | For setting the time interval for access to the NTP server. |
| 4Time Displays the time on the clock of the camera.The clock time can be changed by entering an appropriate value. (Second value cannot be specified.)In addition, time will be recorded in the JPEG headers distributed by the camera. Discontinuity may occur in the JPEG header’s time immediately before and after changing the time. | |
| 5Time Zone For setting the time zone. | |
| 6Pc time to Camera | Click [Set] to load the clock time of the computer in use on the camera. |
Password Page
This page is for setting the password.
This page can be used during access using "admin".
- Click [Advanced Settings] to display setting menu.
- Click [Password]
- Press the [OK] button to enable the new settings.
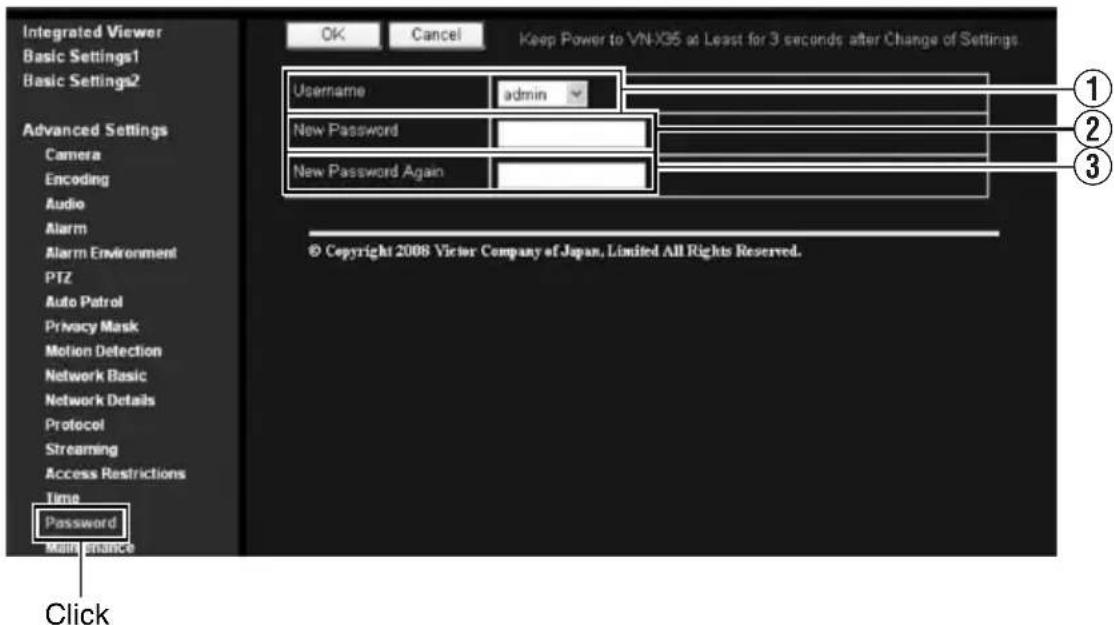
| 1Username Select a | user name. |
| 2New Password Enter | a new password.Password shall be at least 1 characters and not longer than 8 characters. Camera is case sensitive. |
| 3New Password Again | Enter again to confirm the new password. |
Note:
- Be sure to handle the password carefully in case you forget it.
- In the event that you forget the password, please consult JVC's servicing center.
Setting (continued)
Maintenance Page
This page is for maintenance purposes.
This page can be used during access using "admin".
- Click [Advanced Settings] to display setting menu.
- Click [Maintenance].
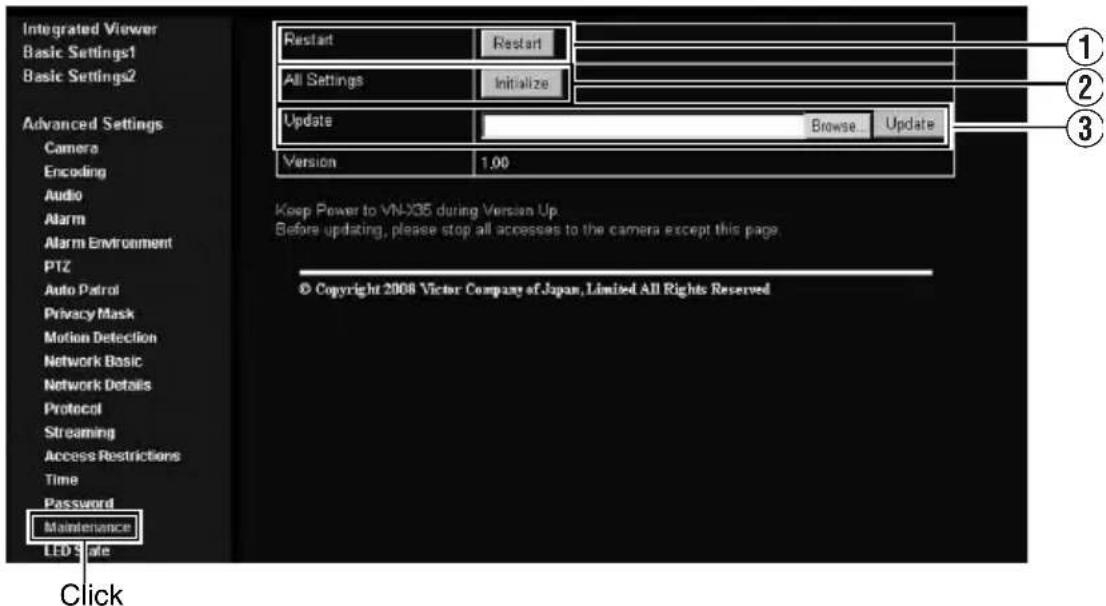
| 1 Restart | Restarts the camera. (It takes about one minute for the camera to restart.) |
| 2All Settings“ Initialize” | Restores all settings to their default values and reboots the unit. (It takes about one minute for the camera to initialize and reboot.)Passwords will also be initialized. The built-in clock of the camera will not be affected. JPEG/MPEG4 transmission and all others services that are running will be discontinued. |
| 3 Update | Upgrades the firmware version of the camera and reboots the unit.The settings of the camera will be saved. Copy the new firmware file to the computer on which Internet Explorer is used, and specify this file using the [Browse...] button. Press the [Update] button to start the update. JPEG/ MPEG4 transmission and all others services that are running will be discontinued. The update process may take several minutes.A message will be displayed on the Internet Explorer when update is successfully completed.Note:Do not turn off the power when update is in progress or during reboot after update is complete. Turning off the power of the camera may cause it to malfunction.Before update, end the accesses to the camera from pages other than this page (Built-in Viewer etc). If update is started while accesses other than this page are valid, access to this page might be cut off. In that case, end the accesses other than this page, access to this page again to redo the update. |
LED State Page
This page is for setting the method for lighting the [STATUS] indicator on this camera. This page can be used during access using “admin” or “operator”.
- Click [Advanced Settings] to display setting menu.
- Click [LED State].
- Press the [OK] button to enable the new settings.
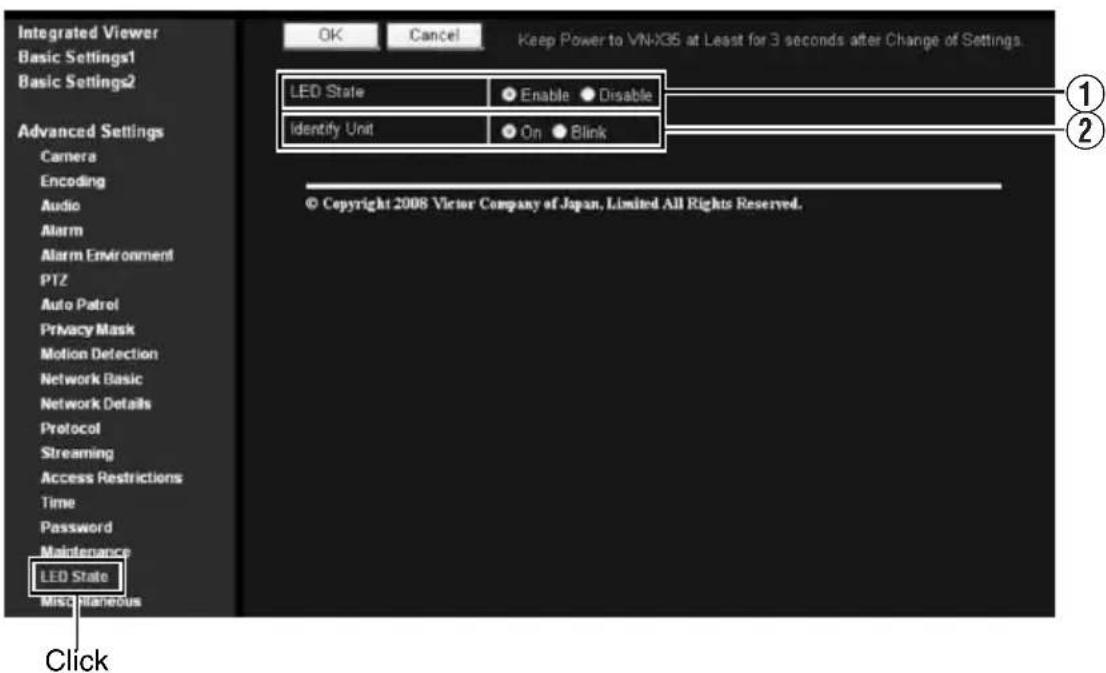
| 1 LED State | For selecting whether to light up the [STATUS] indicator on this camera when it is running.Enable : Lights up when unit is running.Disable : Turns off the indicator after startup is complete. |
| 2 Identify Unit | If you want the [STATUS] indicator on this camera to blink such as during visual check of the camera currently being configured from the computer, set this item to “Blink”.Memo:●The light of the indicator remains off when the LED State is set to “Disable” even if “Blink” is set. |
Setting (continued)
List of Factory Settings of Each Page
(*V) is applicable to VN-V series only. (*X) is applicable to VN-X series only.
■Camera Page (Page 21)
| Item Factory Settings | |
| Camera ID model name | (E.g., “VN-V225” is displayed for “VN-V225VPU”) |
| Monitor Type Custom | |
| Black Level 1 | |
| Gamma 0 | |
| Enhance Frequency High | |
| Enhance Level 0 | |
| Color Level 0 | |
| AGC High | |
| Sense Up x4(1/7.5s) (※V) | |
| x2(1/7.5s) (※X) | |
| ALC Priority Motion | |
| Shutter Speed | 1/30(※V) |
| Auto(1/15 - 1/100)(※X) | |
| Easy Day and Night VN-V25U,VN-X35U only | Color |
| B/W Mode VN-V26U, VN-V225U series, VN-X235U series only | Color |
| EV Compensation | 0 |
| White Balance | ATW |
| Back Light Compensation | Off |
■Encoding Page (Page 26)
| Item Factory Settings | |
| Frame Size VGA/VGA (※V) | |
| Quad VGA/VGA Digital PTZ (MPEG4 only)(※X) | |
| JPEG Quality | VFS4 |
| MPEG4 Bitrate | 2000 kbps |
| MPEG4 Bitrate Control | CBR |
| MPEG4 FPS | 15 fps |
| MPEG4 I Frame Interval | 30 |
| MPEG4 Priority | FPS |
■Audio Page (Page 28)
(This feature is not available in VN-V25U)
| Item Factory Settings | |
| Duplex Mode | Half Duplex |
| Mike Gain | 32 dB |
| Mike Power Supply(This feature is not available in VN-V26U) | On |
| Audio File 1 — | |
| Audio File 2 — | |
| Audio File 3 — | |
| Audio File 4 — | |
| Audio File 5 — | |
(*V) is applicable to VN-V series only. (*X) is applicable to VN-X series only.
■Alarm Page (Page 30)
| Item Factory Settings | |
| Action Disable | |
| 1st Trigger Input 1 Make | |
| Max. Interval — | |
| 2nd Trigger Disable | |
| Action Position No.(VN-X series only) | — |
| Audio File(This feature is not available in VN-V25U) | — |
| Trigger Position No.(VN-X series only) | — |
| Mail Address — | |
| Mail Text — | |
| Attach Image Off | |
| TCP/UDP IP Address — | |
| TCP/UDP Port Number — | |
| TCP/UDP Data | — |
| Alarm Output Duration | — |
| Time Filter | Unmask All |
■ Alarm Environment Page (Page 34)
| Item Factory Settings | |
| SMTP Server | 0.0.0.0 |
| Port Number | 25 |
| Send Mail Address | — |
| POP before SMTP | Off |
| POP Server | 0.0.0.0 |
| Port Number | 110 |
| Username | — |
| — | |
| FTP Server | 0.0.0.0 |
| Directory | — |
| Username | — |
| — | |
| Periodic FTP | Off |
| Periodic FTP Interval | 1 |
| Periodic FTP Naming | Auto |
| Periodic FTP Time Filter | Unmask All |
| PrePostRecording Frame Rate | 15 fps(※V) |
| 5 fps(※X) | |
| PrePostRecording Before Trigger | 5 sec |
| PrePostRecording After Trigger | 5 sec |
| Duration Output 1 | 1000 msec |
| Duration Output 2 | 1000 msec |
| Manual Output 1 | Break |
| Manual Output 2 | Break |
■ PTZ Page (※X) (Page 38)
| Item Factory Settings | |
| Mode | None |
| Return Time | 1 |
| Zoom Limit | 8 |
| Speed | Moment |
■ Auto Patrol Page (※X) (▶ Page 39)
| tem | Factory Settings |
| Position | 0 to 19 |
| Stay Time | Skip |
| Moving speed | Moment |
■ Privacy Mask Page (Page 41)
| Item Factory Settings | |
| Mode | Off |
| Masking Color Setting | 16 (R, G, B) |
■ Motion Detection Page (Page 43)
| Item Factory Settings | |
| Detection | Off |
| Level | 4 |
Setting (continued)
List of Factory Settings of Each Page (continued)
(*V) is applicable to VN-V series only. (*X) is applicable to VN-X series only.
■ Network Basic Page (Page 45)
| Item Factory Settings | |
| IP Setting DHCP Disable | |
| IP Address 192.168.0.2 | |
| Subnet Mask 255.255.255.0 | |
| Default Gateway 0.0.0.0 | |
| Host Name — | |
| DNS Server 0.0.0.0 | |
| IP Protocol IP version 4:On | IP version 6:Off |
| IPv6 Address Disable | |
■ Network Details Page (Page 46)
| Item Factory Settings | |
| JPEG TOS 0 | |
| MPEG4 TOS 0 | |
| Audio TOS(This feature is not available in VN-V25U) | 0 |
| TTL( Unicast) | 64 |
| TTL( Multicast) | 32 |
| MTU | 1500 |
| Negotiation Auto | |
■Protocol Page (Page 47)
| Item Factory Settings | |
| HTTP Server Port | 80 |
| VSIP Protocol | Off |
| VSIP Server Port | 5510 |
| AMX Device Discovery Protocol | On |
| Priority | client number |
■Streaming Page (Page 48)
| Item Factory Settings | |
| JPEG Destination Address | 225.0.1.1 |
| JPEG Destination Port | 49152 |
| JPEG Frame Rate | 15 fps |
| MPEG4 Destination Address | 225.0.2.1 |
| MPEG4 Destination Port | 59152 |
| Audio Destination Address (This feature is not available in VN-V25U) | 225.0.3.1 |
| Audio Destination Port (This feature is not available in VN-V25U) | 39152 |
■Access Restrictions Page (Page 50)
| Item Factory Settings | |
| Access Restrictions | deny |
| IP Address — | |
■Time Page (Page 52)
| Item Factory Settings | |
| SNTP | Off |
| NTP Server | 0.0.0.0 |
| Access Interval | hour, 1 |
| Time Zone | (GMT) UTC |
■Password Page (Page 53)
| Item Factory | Settings |
| Username | “admin” |
| New Password | BlankDefault passwords are:“admin”: jvc“operator”: jvc“user”: jvc |
■ LED Settings Page (Page 55)
| Item Factory | Settings |
| LED State | Enable |
| Identify Unit | On |
Miscellaneous Page
This page is for acquiring information.
This page can be used during access using "admin", "operator" and "user".
- Click [Advanced Settings] to display setting menu.
- Click [Miscellaneous].
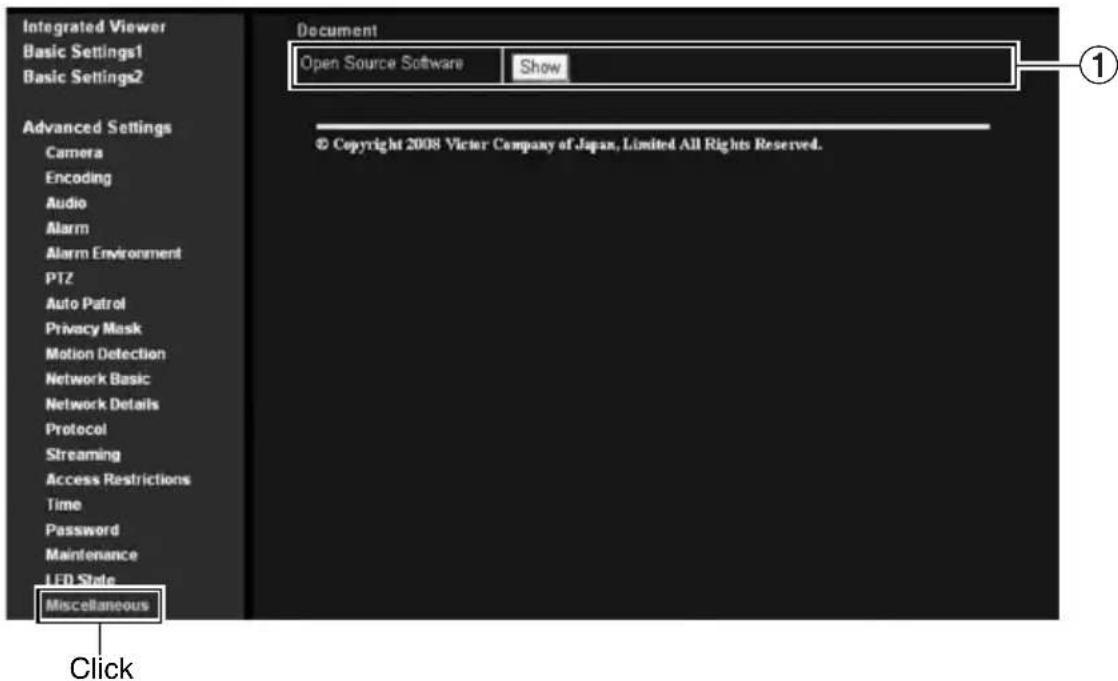
| 1Open Source Software | Press the [Show] button to display information of the software used by the camera. |
Setting (continued)
Operation Page
Displays the operating status of the camera.
This page can be used during access using "admin" or "operator".
- Click [Advanced Settings] to display setting menu.
- Click [Operation].
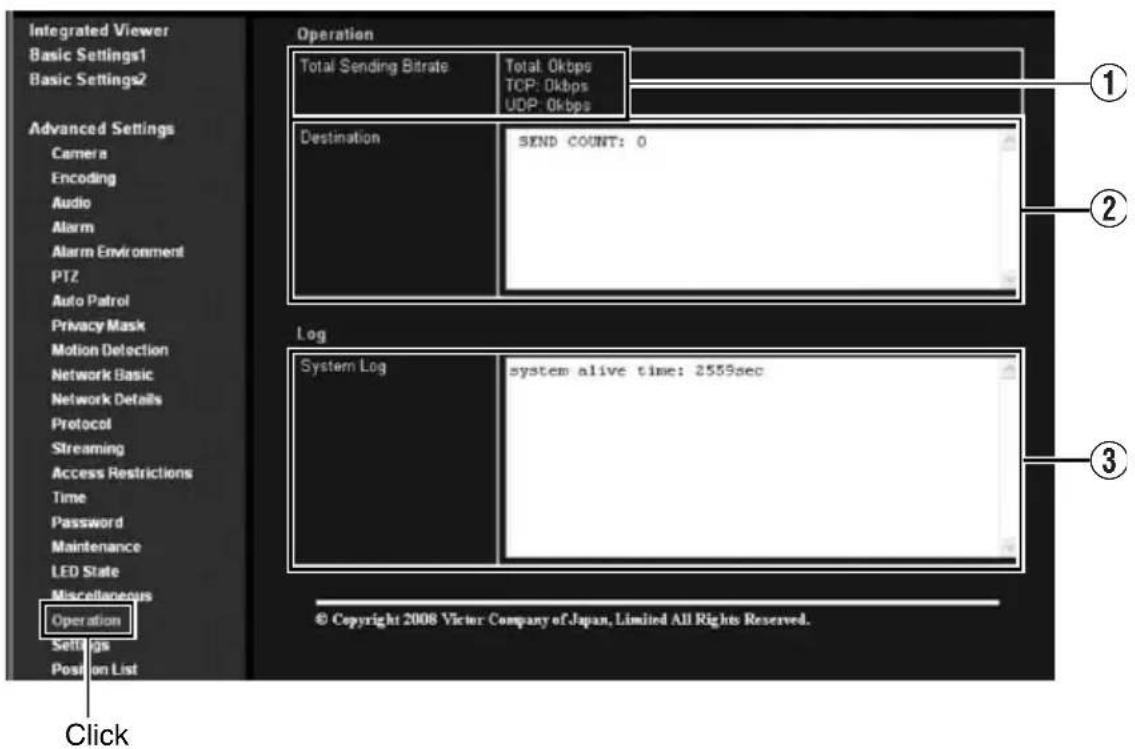
| 1Total Sending Bitrate | Displays the total TCP/UDP bit rate sent by the camera as well as the individual bit rates. |
| 2 Destination | Displays the destination that the camera is sending data to. |
| 3System Log Displays the following information.●Number of seconds after startup●Alarm information | |
Settings Page
Display the version information and current settings of the camera. This page can be used during access using "admin" or "operator".
- Click [Advanced Settings] to display setting menu.
- Click [Settings].
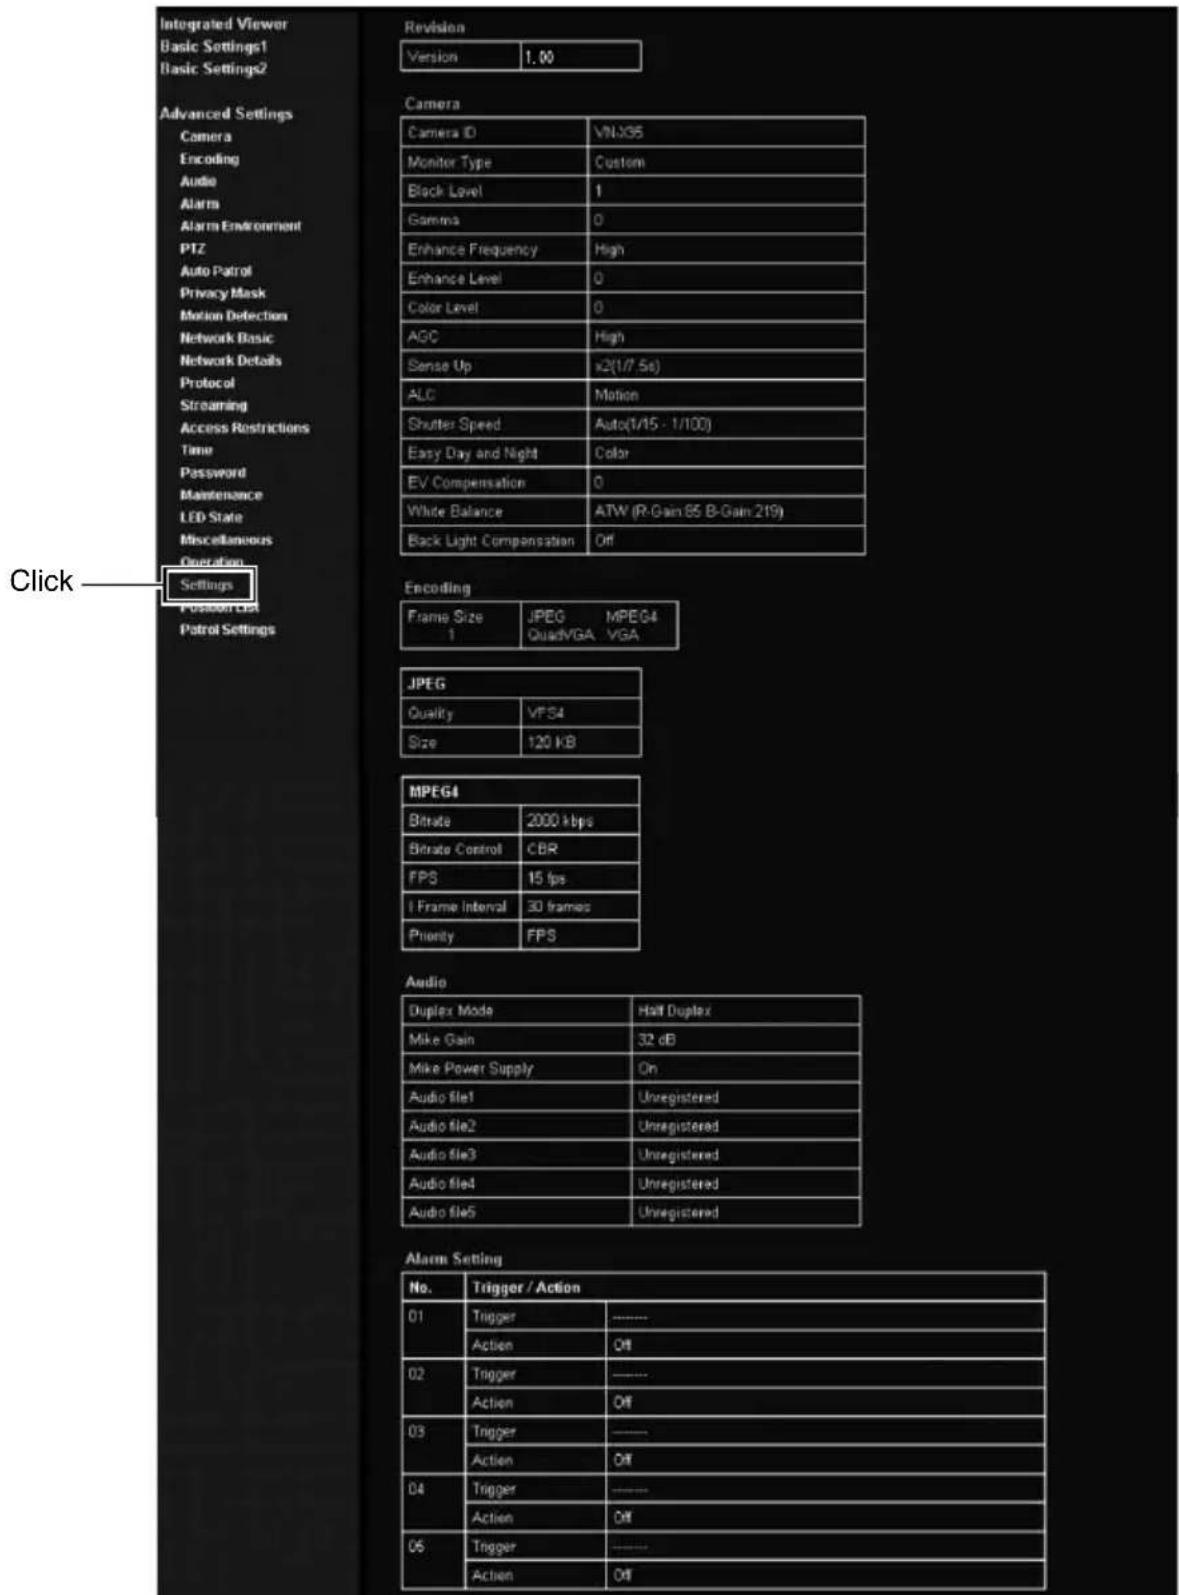
Setting (continued)
Settings Page (continued)
Alarm Environment
| SMTP ( SMTP Server 0.0.0.0 )SMTP ( Port Number: 25 )Send Mail Address :SMTP ( POP before SMTP, Off )POP ( POP Server 0.0.0.0 )POP ( Port Number: 110 )POP (Username :) | |
| FTP | FTP Server 0.0.0.0DirectoryUsernamePeriodic FTP OffPeriodic FTP Interval 1Periodic FTP Naming AutoPrePostRecording Frame Rate: 15 fpsPrePostRecording Before Trigger: 5 secPrePostRecording After Trigger: 5 sec |
| Alarm Output | Output1 Duration: 1000 msecOutput2 Duration: 1000 msec |
PTZ
| Auto Return | |
| Mode | None |
| Return Time | 1 minute |
Lionin
| Zoom Limit | 8 |
Preset Position Speed
| Speed | Moment |
Privacy Mask
| Privacy Mask | OF |
| Brightness | R 16 G 16 B 16 |
Motion Detection
| Detection | Off |
| Level | 4 |
| Mask Area | 000000000000000000 |
Network Basic
| IP Address | 10:66:150:102 |
| Subnet Mask | 255.255.255.0 |
| Default Gateway | 10:66:150:254 |
| Host Name | |
| DNS Server | 0.0.0.0 |
| MAC Address | 00:80:89:90:76:54 |
| IP Protocol | IP Version 4 IP Version 6 |
| IPv6 Address | link local Disabled global Disabled |
Network Details
| JPEG | |
| TOS(DS fields) | 0 |
MPEG4
| TOS(DS fields) | 0 |
Audio
| TOS(DS field) | 0 |
Common
| TTL (Unicast) | 64 |
| TTL (Multicast) | 32 |
| MTU | 1500 |
| Negatiation | Auto |
Network Details
| JPEG | |
| TOS(DS field) | 0 |
MPEG4
| TOS(DS field) | 0 |
Audio
| TOS(DS field) | 0 |
Common
| TTL (Unicast) | 64 |
| TTL (Multicast) | 32 |
| MTU | 1500 |
| Negotisation | Auto |
Protocol
| HTTP Server Port | 80 |
| VSIP Protocol | Off |
| VSIP Server Port | 5510 |
| AMX Device Discovery Protocol | On |
Streaming
| JPEG | |
| Status | |
| Address | 225.0.1.1 |
| Port | 49152 |
| Frame Rate | 15 |
MPEG4
| Status | ---- |
| Address | 225 0 2 1 |
| Port | 59152 |
Audio
| Status | ---- |
| Address | 225 0 3 1 |
| Port | 39152 |
Access Restriction
| Access Restriction | deny | |
| IP Address | ||
Time
| SNTP | SNTP: 06NTP Server: 0.0.0.0Access Interval: 1 hour |
| Time / Time Zone | Time: 2008/09/04 - 18 : 34 : 33 (Y/M/D-h.m.s)Time Zone: (GMT+9.00) Japan |
© Copyright 2006 Victor Company of Japan, Limited All Rights Reserved.
Setting (continued)
Position List
(VN-X series only)
The Position List displays information on the preset positions.
This page can be used during access using "admin" or "operator".
- Click [Advanced Settings] to display setting menu.
- Click [Position List].
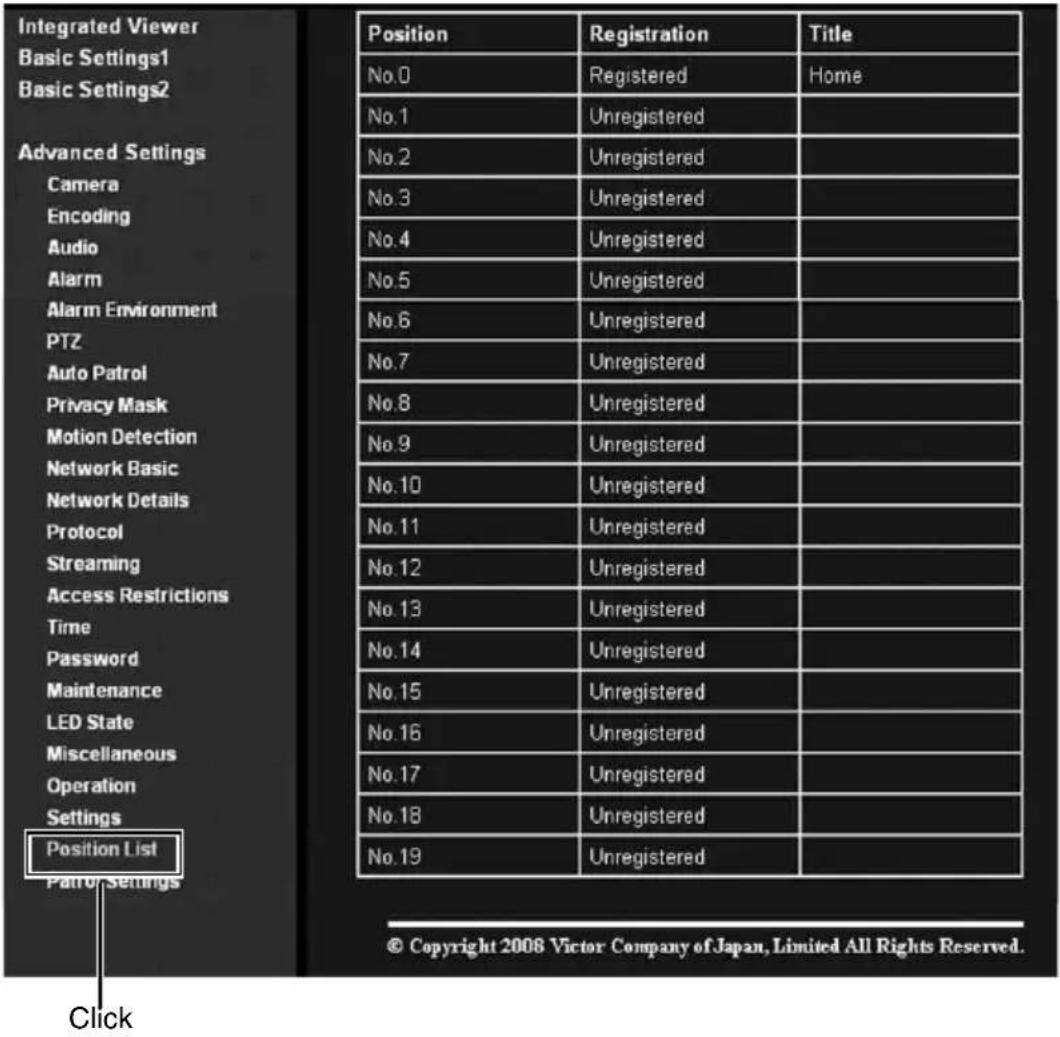
Patrol Settings
(VN-X series only)
Patrol Settings displays the Auto Patrol information and settings.
This page can be used during access using "admin" or "operator".
- Click [Advanced Settings] to display setting menu.
- Click [Patrol Settings].
| Integrated Viewer Basic Settings1 Basic Settings2 Advanced Settings Camera Encoding Audio Alarm Alarm Environment PTZ Auto Patrol Privacy Mask Motion Detection Network Basic Network Details Protocol Streaming Access Restrictions Time Password Maintenance LED State Miscellaneous Operation Settings Position List Patrol Settings | No. | Title | Position | Stay Time | Moving speed |
| No.0 | Home | 0 | Skip | Moment | |
| No.1 | 1 | Skip | Moment | ||
| No.2 | 2 | Skip | Moment | ||
| No.3 | 3 | Skip | Moment | ||
| No.4 | 4 | Skip | Moment | ||
| No.5 | 5 | Skip | Moment | ||
| No.6 | 6 | Skip | Moment | ||
| No.7 | 7 | Skip | Moment | ||
| No.8 | 8 | Skip | Moment | ||
| No.9 | 9 | Skip | Moment | ||
| No.10 | 10 | Skip | Moment | ||
| No.11 | 11 | Skip | Moment | ||
| No.12 | 12 | Skip | Moment | ||
| No.13 | 13 | Skip | Moment | ||
| No.14 | 14 | Skip | Moment | ||
| No.15 | 15 | Skip | Moment | ||
| No.16 | 16 | Skip | Moment | ||
| No.17 | 17 | Skip | Moment | ||
| No.18 | 18 | Skip | Moment | ||
| No.19 | 19 | Skip | Moment |
Operation of Built-in Viewer
This product comes equipped with built-in viewer.
(*V) is applicable to VN-V series only. (*X) is applicable to VN-X series only.
You can start up Built-in Viewer by entering the IP address in the Internet Explorer.
Built-in Viewer enables you to performing monitoring using JPEG or MPEG4 images, audio transmission (This feature is not available in VN-V25U), and PTZ operations (※X).
■ Using the compressed JPEG format enables display of a series of still images as well as one-shot recording of still images.
■Using the compressed MPEG4 format enables display of MPEG4-encoded motion images.
■You can send or receive audio using the JPEG/MPEG4 Viewer. (This feature is not available in VN-V25U)
◆ "Screen Configuration" (Page 66)
◆ “JPEG Viewer Settings” (Page 74)
◆ "Image Settings" (Page 68)
◆ “MPEG4 Viewer Settings” (Page 76)
◆ “PTZ Settings” (Page 70)
◆ "Audio Monitor Settings" (Page 78)
◆ "PTZ Control" (Page 72)
◆ "Exiting the Viewer" (Page 81)
When the display or configuration of the opened screen appears strange, check using the following procedures.
① Click [Start]—[Control Panel]—[Display] and open the [Display Properties] window
② Click the [Settings] tab in the [Display Properties] windows and click the [Advanced] button
③Check that [DPI setting] in the [General] tab has become [Normal size(96DPI)]
④ Otherwise, change the setting to [Normal size(96DPI)] and reboot windows
Screen Configuration
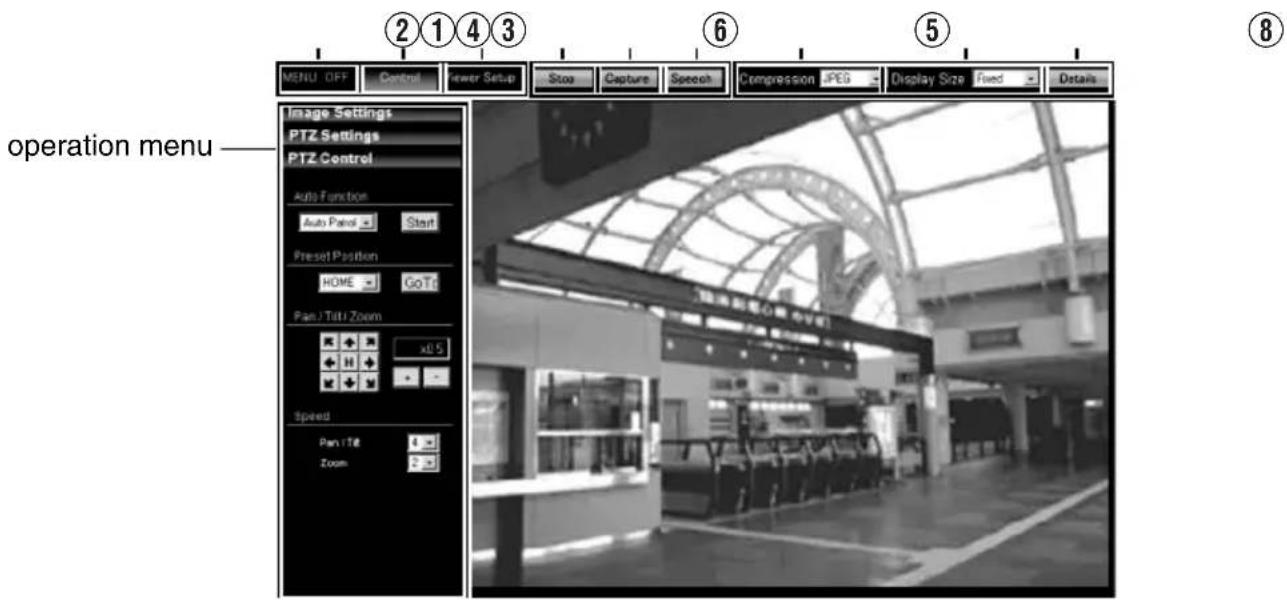
| 1MENU OFF/MENU ON | For showing/hiding the operation menu. |
| 2Control Switches to | the Control menu.Click this button when you want to perform “Image Settings” or “PTZ Settings” (※X) or “PTZ Control” (※X)(Page 74) |
| 3Viewer Setup | Switches to the Viewer Setup menu. Click this button when you want to configure the settings of “JPEG Viewer”, “MPEG4 Viewer”, “Audio Monitor” or “Operator Password”. |
| 4Stop/Play Pauses/Plays | back images. |
| 5 Capture | Captures the currently displayed image on the computer. The captured data is recorded as a JPEG file in the folder that is created under [My Document] of the computer. This is set to “model name” by default.(E.g., “VN-V225” folder is made for “VN-V225VPU”).The file name is made up of the year, month, day, hour, minute, second, and millisecond.Memo:In the case of “Windows Vista”, images are stored under [Documents].The folder name can be changed.(Page 75)Note:The time in the file name is based on the time on the PC clock, not the time on the camera’s clock.Motion images cannot be captured.MPEG4 images cannot be captured. |
| 6Speech(This feature is not available in VN-V25U) | Starts sending audio sound to the camera from the client PC. Only one stream of audio sound can be sent for one unit of the camera You cannot send audio sound from a client PC when transmission of audio sound from a different client PC is in progress.The [Speech] button lights up in red during audio sound transmission.The [Speech] button does not turn red when audio transmission is not possible.Memo:Audio sound cannot be sent out simultaneously from the JPEG and MPEG4 Viewers. |
| 7Compression Switches | the stream to acquire.You can specify either JPEG or MPEG4 |
| 8 Display Size | For specifying the display size of the image area.Fixed :Display according to the window size of the browser.Variable :Display according to the specified frame size.Memo:The window size of the browser does not change when [Fixed] or [Variable] is selected. |
| 9 Details | Starts up the page for configuring the various detailed settings. |
Memo:
- The settings of Built-in Viewer are stored in the file named Cookie.
This setting screen is used to set Built-in Viewer as a software on the computer, and does not apply to settings of the camera unit.
Searching and deleting cookie files
- Open [Tool]–[Internet Options]–[Advanced] of the Internet Explorer, and press the [Settings] button under [Temporary Internet Files]. A new [Settings] will appear. Press the [View Files] button in this window. The [Temporary Internet Files] window opens up and a list of files will be displayed. The file named “cgi-bin” in this list is the Cookie for the built-in viewer.
- Deleting this file deletes the viewer settings, and the viewer will be initialized during the next startup.
Operation of Built-in Viewer (continued)
Image Settings
Below are procedures for configuring the Image Settings.
- When a different menu is currently being displayed, click [Control] to switch the menu.
- Click each menu bar on the left of the screen to open the setting screen..
■Image Settings
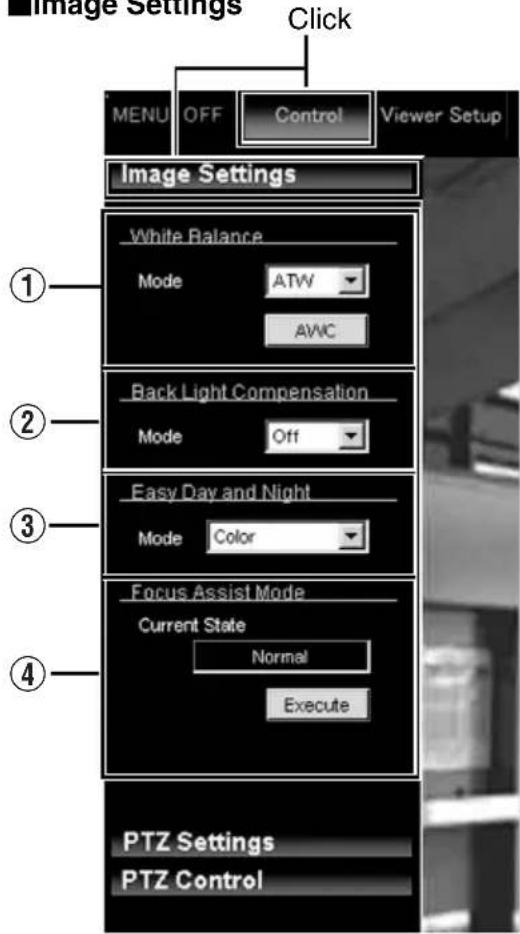
| 1 White Balance | For selecting the white balance control feature. |
| Mode ATW : | Switches to the Auto-Tracking White Balance (automatic color temperature tracking) mode. Adjusts the white balance automatically according to the color temperature of the light.AWC : Switches to the Auto-White Balance Control mode. In the AWC mode, values entered for the [AWC R-Gain] and [AWC B-Gain] items under White Balance of the Camera page are applied to white balance. |
| [AWC] Button | Executes AWC (automatic white balance control).Execute by placing a white object around the center of the screen in a location with a lighting condition that is similar to the object to be shot.Click [AWC] button to switch to AWC mode. |
(*V) is applicable to VN-V series only. (*X) is applicable to VN-X series only.
| 2Back LightCompensation | For selecting the backlight compensation feature. Set this feature when there is a bright light source in the same direction as the object. Enables unwanted light sources to be excluded from the photometry area. | |||||
Mode Off: Disablesbacklight compensation.Area1 to 4: For selecting a photometry area from the four available types.Photometry Area Photometry Area Photometry Area Photometry Area      Off Area1 Area2 Area3 Area4Memo: The backlight compensation area is not linked to digital PTZ (※X). Off Area1 Area2 Area3 Area4Memo: The backlight compensation area is not linked to digital PTZ (※X). | ||||||
| [Set values: Off, Area1, Area2, Area3, Area4] | ||||||
| 2 Easy Day and NightVN-V25U, VN-X35U only | For specifying Easy Day and Night. | |||||
| Mode Color: Sets to the color mode at all times.Black and White: Sets to the black-and-white mode at all times.Auto: Image color switches to black-and-white when the luminance level is low.Memo: The threshold of the Auto switching cannot be changed. | ||||||
| [Set values: Color, Black and White, Auto] | ||||||
| 3B&W ModeVN-V26U, VN-V225U series, VN-X235U series only | For specifying whether to switch the image to the B&W mode. Auto mode can be specified for switching automatically to the Black and White mode when the luminance level is low. In auto mode one of three levels can be selected according to the luminance level. | |||||
| Mode Color: Switches to the color mode at all times.Black and White: Switches to the black-and-white mode at all times.Auto Low: Switches to the black-and-white mode when the luminance of the signal level of the object is low.Auto Mid: Switches to the black-and-white mode when the luminance of the signal level of the object is medium.Auto High: Switches to the black-and-white mode when the luminance of the signal level of the object is high.[Set values: Color, Black and White, Auto Low, Auto Mid, Auto High]Memo:The infrared filter engages and disengages when switching between modes, which causes mechanism noise.During the occurrence of mechanism noise, the distribution sound from the camera will be muted. (VN-V26U only)When “Auto Low”, “Auto Mid” or “Auto High” has been selected the camera will change the mode immediately according to the luminance level. | ||||||
| 3Focus Assist Mode | If [Execute] button is clicked, [Current State] will change to [Focus Assist] and focus assist mode is enabled. If [Stop] button is clicked, [Current State] will change to [Normal] and focus assist mode is disabled.Memo: Focus assist mode will be disabled after 3 minutes if left unattended. | |||||
Operation of Built-in Viewer (continued)
PTZ Settings
(VN-X series only)
This page describes procedures for setting the preset positions.
- This page can be used during access using “admin” or “operator”
To access this setting, you need to set the password of "operator" authority. (Page 80) - When a different menu is currently being displayed, click [Control] to switch the menu.
- Click the menu bar on the left side of the screen to open the setting screen.
■PTZ Settings
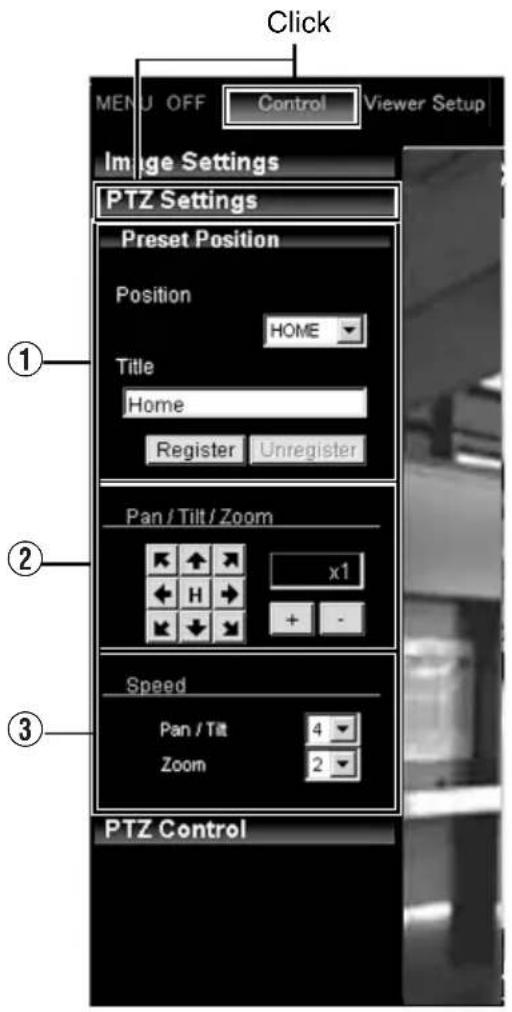
| 1 Preset Position | For setting the preset positions. |
| Position | For selecting a “Position”.[Set values :HOME , 1 to 19] |
| Title Displays the current title.Enter accordingly if you want to register or change a title.(You can enter up to 32 alphanumeric or 16 Japanese characters. “JPEG Viewer” displays up to only 16 alphanumeric or 8 Japanese characters.Press [Register] button to complete position registration.Memo:●Click the [Unregister] button to delete the selected position information.However, [HOME] cannot be deleted.●The display area of Home position is set to the full screen by default. | |
| 2 Pan /Tilt /Zoom | ■Pan/Tilt operationClick the arrow buttons to move the display area in the direction indicated by the arrow. Release the button to stop moving the area.Click the “H” button to move to the home position.■Zoom operationUse this function to perform digital zoom on the display area.[+ ] : Zooms toward the tele end, and display of the object is enlarged.[- ] : Zooms toward the wide end, and display of the object becomes smaller.■Ratio to Full AreaShows current ratio to full area.Memo:●You can restrict the magnification of the object using the [+] button by altering the [Zoom Limit] settings. (Page 38) |
| 3Speed For configuring | the operation speed settings.Pan/Tilt : For configuring the operation speed settings of the Pan/Tilt control button. The larger the value, the higher the operation speed.[Set values: 1 to 8]Zoom : For configuring the operation speed settings of the Zoom control button. The larger the value, the higher the operation speed.[Set values: 1 to 4] |
Operation of Built-in Viewer (continued)
PTZ Control
(VN-X series only)
Use this item to operate the PTZ feature. Settings can be configured on the PTZ Settings . (Page 70)
- This page can be used during access using "admin" or "operator".
To access this setting, you need to set the password of "operator" authority.
(Page 80) - When a different menu is currently being displayed, click [Control] to switch the menu.
- Click each menu bar on the left of the screen to open the setting screen.
■PTZ Control
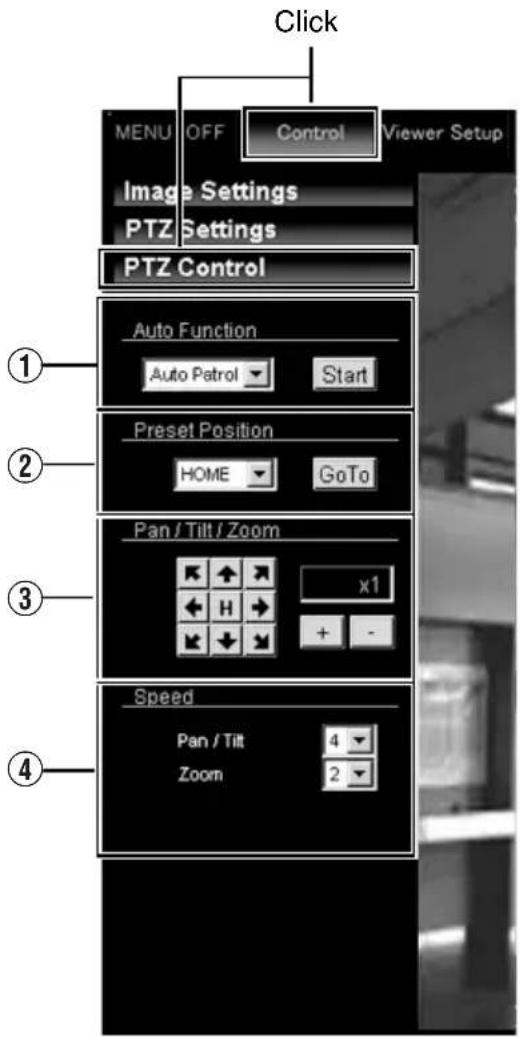
| 1AUTOFUNCTION | Start: Starts the Auto Patrol operation.Stop: Stops the Auto Patrol operation that is currently running. |
| 2Preset Position | For selecting a Preset Position, or move to the selected Position if that Position has already been registered.[Set values: HOME, 1 to 19] |
| 3Pan/Tilt/Zoom | ■Pan/Tilt operationClick the arrow buttons to move the display area in the direction indicated by the arrow. Release the button to stop moving the area.Click the [H] button to move to the home position.■Zoom operationUse this function to perform digital zoom on the display area.[+]: Zooms toward the tele end, and display of the object is enlarged.[-]: Zooms toward the wide end, and display of the object becomes smaller.■Ratio to Full AreaShows current ratio to full area.Memo:●You can restrict the magnification of the object using the [+] button by altering the [Zoom Limit] settings.(Page 38) |
| 4Speed For configuring the operation speed settings.Pan/Tilt: For configuring the operation speed settings of the “Pan/Tilt” control button. The larger the value, the higher the operation speed.[Set values: 1 to 8]Zoom: For configuring the operation speed settings of the “Zoom” control button. The larger the value, the higher the operation speed.[Set values: 1 to 4] | |
Operation of Built-in Viewer (continued)
JPEG Viewer Settings
(*V) is applicable to VN-V series only. (*X) is applicable to VN-X series only.
Using the compressed JPEG format enables display of a series of still images as well as one-shot recording of still images.
When the JPEG Viewer is first installed, it is set to play back at 15 fps ( V ) or 5 fps ( X ) by default.
- When a different menu is currently being displayed, click [Viewer Setup] to switch the menu.
- Click the menu bar on the left side of the screen to open the respective setting screens.
- Click the [Apply] button to activate the settings in the Viewer. The settings will be saved on the computer.
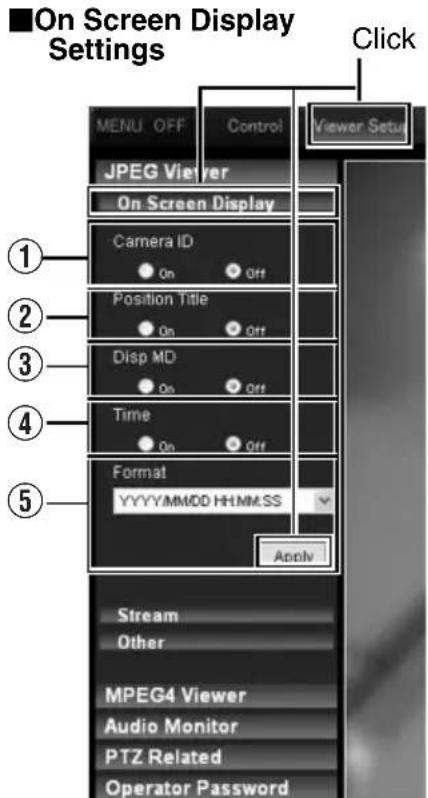
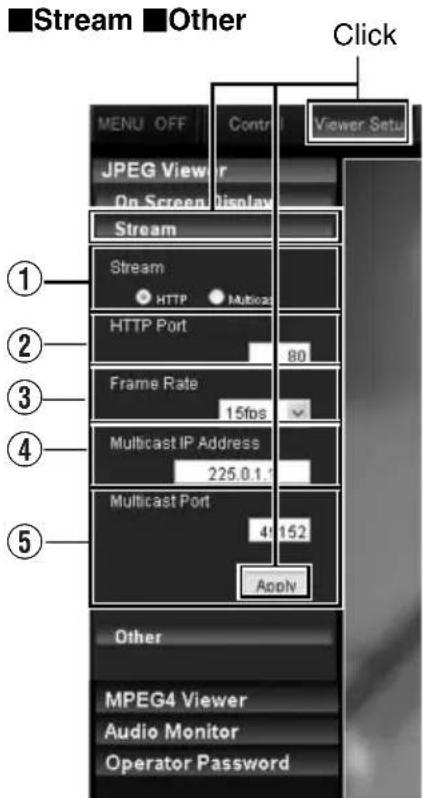
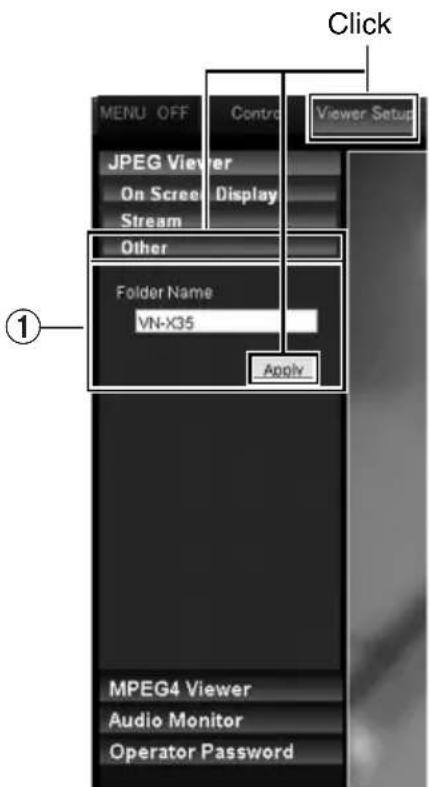
| ■On Screen Display Settings | For setting display items on the viewer screen.For the JPEG Viewer, characters are displayed as overlay on the video image. | |
| 1Camera IDSelect “ On” to display [Camera ID].[Camera ID] can be specified on the[Basic Settings2] or [Camera] page of the camera. (Page 21) | ||
| 2Position Title(※X)Selecting “On” displays the position title. | ||
| 3Disp MDWhen “On” is selected, the frame of the video image display area where motion is detected turns red. | ||
| 4TimeSelect “ On” to display the time.This indicates the time that is stored in the JPEG data. | ||
| 5Format Select the format for displaying time.YYYY, MM, and DD denote year, month and day respectively, while HH, MM, and SS denote hour, minute and second respectively. mm is equivalent to 1/100 seconds. | ||
(*V) is applicable to VN-V series only. (*X) is applicable to VN-X series only.
| Stream Settings | For specifying settings for receiving JPEG stream. | |
| 1 Stream | For selecting the protocol when the viewer acquires data from the camera. When “HTTP” is selected, lost packets are recovered via resending. Camera may be monitored using multiple viewers when “Multicast” is selected.When playing back via multicast, start multicast sending on the [Streaming] page. (Page 48)Note:When the built-in viewer is launched with “Multicast” specified, a Windows firewall warning may appear. In this case, select “unblock” and proceed.If “block” is selected, the Windows firewall will block the multicast stream and playback of multicast by the viewer will fail. | |
| 2 HTTP Port You can change the HTTP port number.The default port number setting is 80.Specify the same value as the parameter that is set on the Protocol page of the camera. (Page 47) | ||
| 3 Frame Rate | For selecting the acquisition frame rate of the viewer.Selecting a large frame rate will increase the processing load of the computer on which the viewer is running.[Set values : 30 (*V), 25(*V) , 15 , 10 , 7.5 , 6 , 5 , 3 , 2 , 1 , 1/2 , 1/3 , 1/5 , 1/10 , 1/15 , 1/20 , 1/30 , 1/60]Note:Set to a rate such that the CPU burden of the computer does not exceed 80 %. When the CPU is overloaded, the computer may not function properly. | |
| 4 Multicast IP Address | You can change the multicast IP address.The default address is 225.0.1.1. | |
| 5 Multicast Port | You can change the multicast port number.The default port number setting is 49152.This is enabled when “Start” is selected for the [JPEG Control] item on the[Control] page.Specify the same value as the parameter that is set on the [Streaming] page of the camera. (Page 48) | |
| ■Other | ||
| 1 Folder Name | For specifying the name of the folder in which the captured files are stored. (Default name when viewer is installed: “model name” (E.g., “VN-V225” folder is made for “VN-V225VPU”) | |
Operation of Built-in Viewer (continued)
MPEG4 Viewer Settings
Using the compressed MPEG4 format enables display of MPEG4-encoded motion images.
- When a different menu is currently being displayed, click [Viewer Setup] to switch the menu.
- Click the menu bar on the left side of the screen to open the respective setting screens.
- Click the [Apply] button to activate the settings in the Viewer. The settings will be saved on the computer.
Memo:
- To make use of the built-in MPEG4 Viewer of the camera, you will need to install the ffdshow open source codec. You can obtain ffdshow through the Internet.
■Title Bar ■Stream
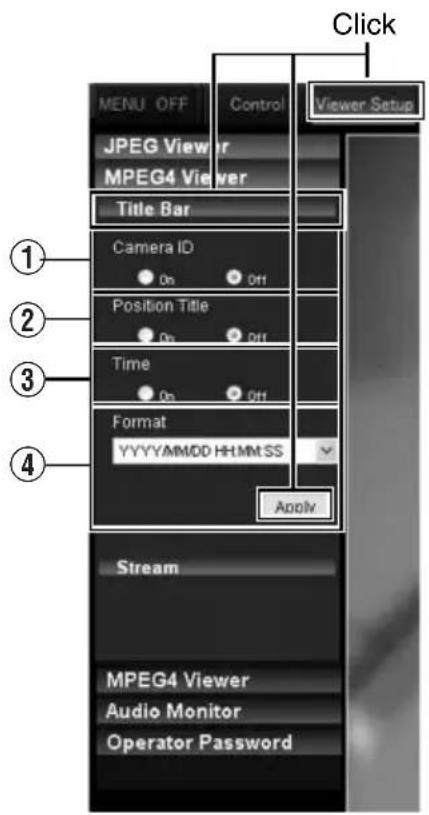
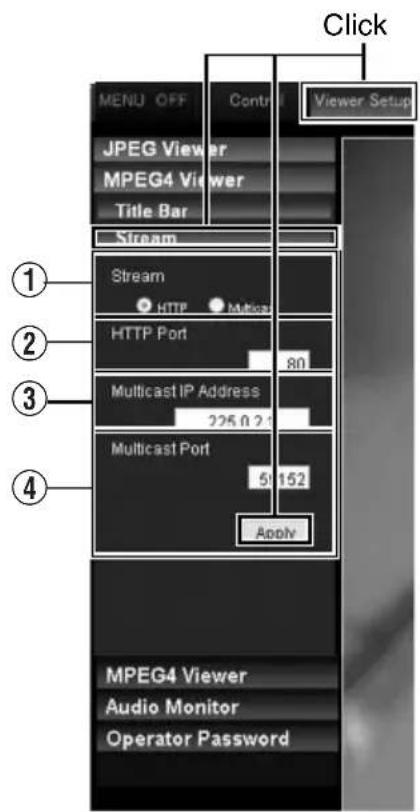
(*V) is applicable to VN-V series only. (*X) is applicable to VN-X series only.
| ■ Title Bar | For setting display items on the viewer screen.For the MPEG4 Viewer, characters are displayed in the title bar of the window. | |
| 1 Camera IDSelect “On” to display [Camera ID].[Camera ID] can be specified on the [Basic Settings1] or [Camera] page of the camera.(Page 21) | ||
| 2 Position Title(※X)Selecting “On” displays the Position Title. | ||
| 3 TimeSelect “On” to display the time. | ||
| 4 Format Select the format for displaying time.YYYY, MM, and DD denote year, month and day respectively, while HH, MM, and SS denote hour, minute and second respectively. mm is equivalent to 1/100 seconds. | ||
| ■ Stream Settings | For specifying settings for receiving MPEG4 stream. | |
| 1 StreamFor selecting the protocol when the viewer acquires data from the camera.When “HTTP” is selected, lost packets are recovered via resending. Camera may be monitored using multiple viewers when “Multicast” is selected.When playing back via multicast., start multicast sending on the [Streaming] page of the camera unit.Note:When the built-in viewer is launched with “Multicast” specified, a Windows firewall warning may appear. In this case, select “unblock” and proceed.If “block” is selected, the Windows firewall will block the multicast stream and playback of multicast by the viewer will fail. | ||
| 2 HTTP Port You can change the HTTP port number.The default port number setting is 80.Specify the same value as the parameter that is set on the [Protocol] page of the camera. (Page 47) | ||
| 3 Multicast IP AddressYou can change the multicast IP address.The default address is 225.0.2.1. | ||
| 4 Multicast PortYou can change the multicast port number.The default port number setting is 59152.This is enabled when [Start] is selected for the [MPEG4 Control] item on the [Streaming] page.Specify the same value as the parameter that is set on the [Streaming] page of the camera. (Page 48) | ||
Operation of Built-in Viewer (continued)
Audio Monitor Settings
(This feature is not available in VN-V25U)
This page describes procedures for configuring the settings to send/receive audio sound using the JPEG and MPEG4 Viewers.
- This page can be used during access using “admin” or “operator”.
To access this setting, you need to set the password of "operator" authority.
(Page 80) - When a different menu is currently being displayed, click [Viewer Setup] to switch the menu.
- Click the menu bar on the left side of the screen to open the respective setting screens.
- Click the [Apply] button to activate the settings in the Viewer. The settings will be saved on the computer.
Receive
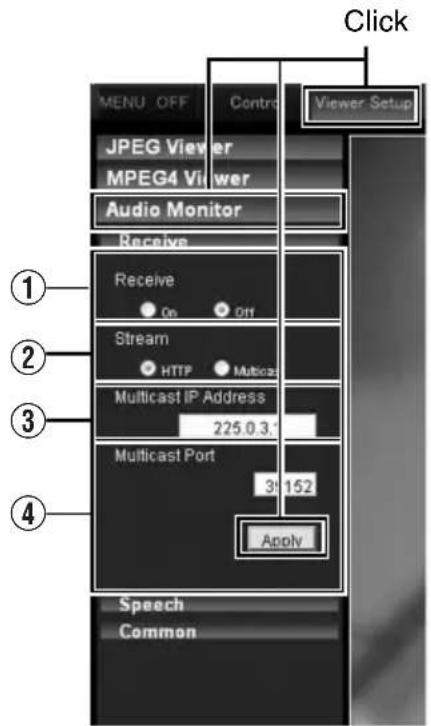
Speech Common
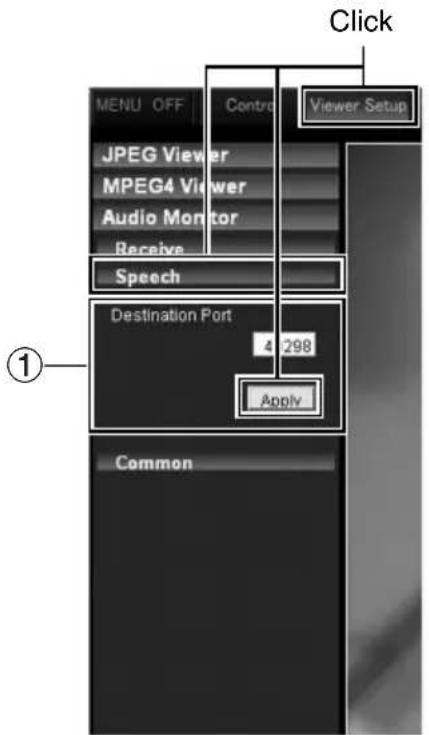
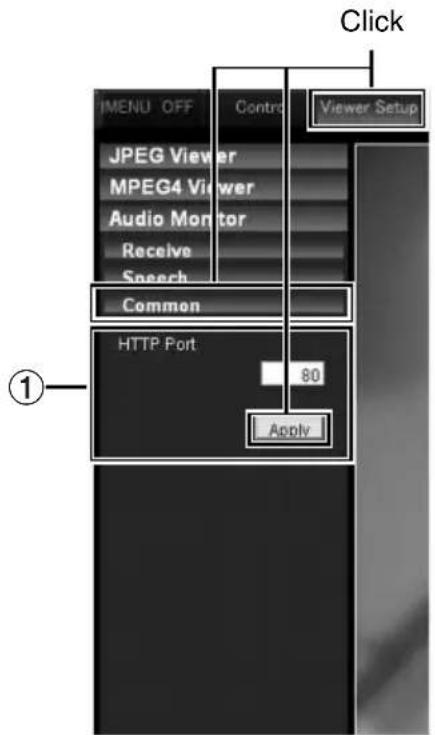
| ■Receive | For specifying settings related to receiving of audio sound sent from the camera. | |
| 1Receive | ||
| 2Stream | ||
| Note:●When the built-in viewer is launched with “Multicast” specified, a Windows firewall warning may appear. In this case, select “unblock” and proceed.●If “block” is selected, the Windows firewall will block the multicast stream and playback of multicast by the viewer will fail. | ||
| 3Multicast IP Address | ||
| 4Multicast Port | ||
| ■Speech | For specifying settings for sending audio sound to the camera from the computer. | |
| 1Destination Port | ||
| ■Common | For specifying the HTTP port settings | |
| 1HTTP Port | ||
Operation of Built-in Viewer (continued)
Operator Password
(*V) is applicable to VN-V series only. (*X) is applicable to VN-X series only.
Follow the procedures below to configure the operator password required for sending/receiving audio sound or PTZ operation.
- This page can be used during access using “admin” or “operator”.
- When a different menu is currently being displayed, click [Viewer Setup] to switch the menu.
- Click the menu bar on the left side of the screen to open the setting screen.
- Click the [Apply] button to activate the settings in the Viewer. The settings will be saved on the computer.
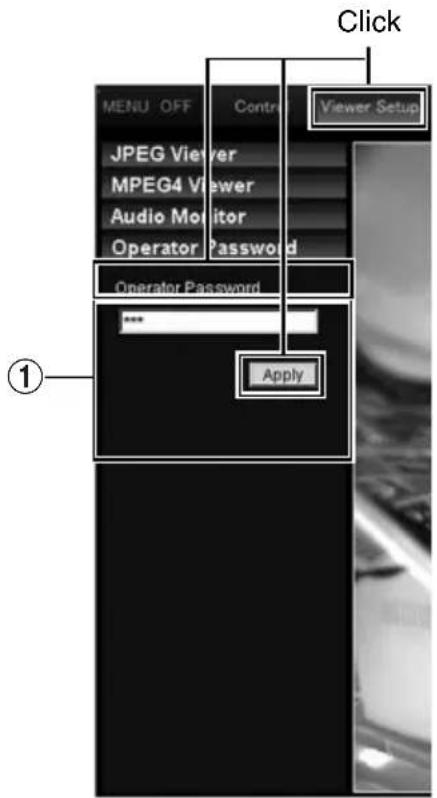
| 1 Operator Password | ■ Follow the procedures below to configure the operator password required for sending/receiving audio sound (This feature is not available in VN-V25U) or PTZ operation (※X). |
| Operator Password | Enter the password of “operator” authority. Enter the password that is set on the Password Page. (Page 53) |
Exiting the Viewer
To exit, press the [×] button at the top right of the window.
![http://192.168.0.2/cgi-bin/nc35viewing.cgi?c35ptrviewer.html - Microsoft Internet Explorer File Edit View Favorites Tools Help Back Search Favorites Address http://192.168.0.2/cgi-bin/nc35viewing.cgi?c35ptrviewer.html Go Links MENU OFF Control Viewer Setup Stop Capture Speech Compression JPEG Display Size Feed Details Image Settings PTZ Settings PTZ Control Auto Function Auto Panel Start Freset Position HOME GoTo Pan /Tilt /Zoom +0.5 Speed Pan /Tilt 6 Zoom 3 Done Local Intranet Click]](/content/2026/06/1199026/images/0df74cc2df6995d83450b9536d910eb0587d486177a3a3e63e3a8b4972206c84.jpg)
Memo:
- During the next startup of the built-in viewer, launch the Internet Explorer and enter the URL of the built-in viewer in the address field.
For example, if the IP address of the camera is 192.168.0.2, enter as follows:
http://192.168.0.2/
- After the [Security Settings] screen appears, press the [OK] button to proceed.
Troubleshooting
| Symptom Causes and Countermeasures | Reference Page | |
| IP address of the camera is unknown | The default IP address is 192.168.0.2, and the default subnet mask is 255.255.255.0.When [IP Setting] is set to “DHCP Enable” and there is no DHCP sever, the camera will run using the default IP address when it is started up.If there is a PC in the same LAN, you can search cameras from the PC using the search tool. | Page 17Page 10 |
| The web page of the camera cannot be displayed | Check the Internet Explorer settings. When a proxy server is in use, configure the proxy server settings of the Internet Explorer accordingly. | Page 8 |
| The built-in viewer cannot be installed | Check the Internet Explorer settings. The built-in viewer consists of a software component called ActiveX. The ActiveX is usually installed when the built-in viewer is used for the first time. However, installation may be rejected depending on the Anti-virus software settings. In this case, change the settings of the Anti-virus software before installing the built-in viewer. | Page 8 |
| Authentication by Verisign appears during installation of the built-in viewer | VeriSign’s electronic signature is stored in the built-in viewer.For computers with a network environment that is connected to the Internet, the authenticity of the viewer can be verified via authentication by VeriSign. | — |
| A warning message appears upon starting up the built-in viewer | The built-in viewer consists of a software component called ActiveX.The ActiveX is usually installed when the built-in viewer is used for the first time. However, installation may be rejected depending on the Anti-virus software settings. In this case, change the settings of the Anti-virus software before installing the built-in viewer. | — |
| TCP images cannot be played back | Number of streams is limited based on settings and client request. Multicast is available for more receivers. | Page 3Page 47 |
| Multicast images cannot be played back | ●Start multicast transmission manually from the [Streaming] page of the camera.●In the case of multicast reception at the built-in viewer, check that the multicast address and port number of the built-in viewer settings coincide with those on the [Streaming] page of the camera.Make use of a network that supports IGMPv2 for multicast transmission.●Multicast may be blocked by the Windows XP firewall. When this occurs, perform the following to allow it to pass through.Double-click [Windows Firewall] under [Start]-[Control Panel], click the [Add Port...] button under the Exception tab, and register the port number to be allowed through the firewall in the Port Number field. Enter an arbitrary character string in the name field. | Page 48Page 74Page 66 |
| The frame rate of the displayed image is low | ●Check the built-in viewer settings when a built-in viewer is in use.●Frame rate will be constrained when the network bandwidth is narrow.●When the image distribution setting is set to the “client number” mode and there is an increase in distribution request, images will be distributed at a frame rate lower than the specified frame rate. | Page 66Page 75Page 47 |
| A white zone appears in the built-in viewer | ●For some computers, a part of the Internet Explorer graphics may not appear and is left white when the following setting is performed on the Internet Explorer.If [Right-click on the Desktop screen]-[Properties]-[Settings]-[Advanced]-[DPI setting] is set to “Large size” or “Custom size”, select “Normal size” to resume normal drawing. | — |
| Unable to receive alarm notification using the computer via TCP/UDP | ●Data may be blocked by the WindowsXP firewall. When this occurs, perform the following to allow it to pass through.Double-click [Windows Firewall] under [Start]-[Control Panel], click the [Add Port...] button under the Exception tab, and register the port number to be allowed through the firewall in the Port Number field. Enter an arbitrary character string in the name field. | — |
| Images are not distributed to the network | ● Check whether the [MONITOR OUT] selector switch on this camera is set to “NTSC” or “PAL”, “N” or “P”. If either of the above is selected, change the [MONITOR OUT] selector switch setting to “OFF”. After changing the switch settings, press the [RESET] button to reboot. | INSTRUCTIONS (Installation) |
| The MPEG4 Viewer screen appears in black | When DirectX 9.x or Windows Media Player 9.x is installed on the computer, the video image screen appears in black.[Countermeasure]To make use of the built-in MPEG4 Viewer of the camera, install “ffdshow” that is open source codec. You can download “ffdshow” from the Internet. | — |
| No MONITOR OUT image output | ●Set the [MONITOR OUT] selector switch to “NTSC” or “PAL”, “N” or “P” and press the Reset button.●When using the [MONITOR OUT] output, set the privacy mask to “Off”. | INSTRUCTIONS (Installation)Page 41 |
| Zonal noise occurs at the bottom of the MONITOR OUT image | When using the [MONITOR OUT] output, set the privacy mask to “Off”. | Page 41 |
| Images from the network are distorted | Set the [MONITOR OUT] selector switch to “OFF”, and press the Reset button. | INSTRUCTIONS (Installation) |