
PHONEFAX 2312 - Fax SAGEM - Free user manual and instructions
Find the device manual for free PHONEFAX 2312 SAGEM in PDF.

| Brand | SAGEM |
| Model | PHONEFAX 2312 |
| Category | Fax |
| Device type | Multifunction fax (fax, phone, answering machine, copier) |
| Power supply | 230 V AC, 50 Hz |
| Dimensions (approx.) | 360 x 280 x 150 mm |
| Weight (approx.) | 3.5 kg |
| Main functions | Send and receive fax, local copy, built-in answering machine (models with TAD), directory, emergency call, hands-free function |
| Print resolution | Standard, Fine, Photo |
| Document feeder capacity | Up to 15 pages (depending on model) |
| Paper tray capacity | 30 or 100 sheets (depending on model), A4 format |
| Ink type | Ink ribbon TTR815 (approx. 230 pages) |
| Display | 16-character LCD screen |
| Telephone functions | Handset, speaker, speed dial, redial of last 10 numbers, hold, call transfer |
| Answering machine | Record and listen to messages, voicemail, remote interrogation, call filtering |
| Fax functions | Delayed send, memory transmission, relay fax, active/passive polling, transmission report |
| Copy | Simple local copy and multiple copies (up to 99 copies) |
| Advanced functions | Night mode, message lock, access code, document relay |
| Consumables | Ink ribbon TTR815 (ref. 23645699-4), SAGEM series 300 paper (ref. 23273604-9) |
| Maintenance | Clean the scanning device with a soft lint-free cloth moistened with alcohol; replace the ribbon and gauge |
| Safety | Grounded plug for models with ground; unplug the power cord to disconnect the device |
| General information | Compliant with CE standards; connection to the public telephone network; approved for pan-European connection |
Frequently Asked Questions - PHONEFAX 2312 SAGEM
User questions about PHONEFAX 2312 SAGEM
0 question about this device. Answer the ones you know or ask your own.
Ask a new question about this device
Download the instructions for your Fax in PDF format for free! Find your manual PHONEFAX 2312 - SAGEM and take your electronic device back in hand. On this page are published all the documents necessary for the use of your device. PHONEFAX 2312 by SAGEM.
USER MANUAL PHONEFAX 2312 SAGEM
1 key: to print documents received in the memory
2 key: to play back messages received on the answering machine
- blinking: presence of messages not played back
- steady: presence of played back messages
or to delete from memory the document currently printed (models without TAD)
3 LCD display screen composed of a 16-character lines
4 FF key: choice of fax transmission resolution or local copy (NORMAL, FINE or PHOTO)
5 key: choice of reception mode (TEL, FAX, TAD):
- TEL (T): telephone in service (for models with handset)
- FAX (F): automatic fax reception
TAD (A): TAD in service (for TAD-models)
6 (DIRECTORY) key: access to directory
7 i key: printing of the menus guide
8 R key: insertion of a dialling break (/), or flash feature (PABX)
9 (REDIAL) key: automatic call-back of one of the last 10 called numbers
10 Alphanumeric keypad
11 (START) key: fax transmission, or local copy
12 (STOP) key: stop of the operation in progress, or activation of the secret mode
13 (LOUDSPEAKER) key: use of line without unhooking, hands-free mode (depending on model) or amplified listening
14 key: move up in menus or to the left in an entry field - Volume up
15 OK key: confirmation of the displayed selection
16 (M) (MENU) key: access to the various functions
17 key: move down in menus or to the right in an entry field - Volume down
18 C key: return to previous displayed message or clearing of the last character entered in an entry field
19 Direct access keys to the first 10 directory memories
20 F1 F2 F3 keys: preprogrammed keys to access the following functions:
1 :list of callers
F2 : night mode
F3:access to the print menu
QUICK REFERENCE GUIDE,MENUGUIDE
DIRECTORY (MENU 1)
| Press | Function called | Function description | See page |
| M 11 OK | ADD NAME | Add a record into the directory | 11 |
| M 12 OK | MODIFY | Modify a record in the directory | 12 |
| M 13 OK | CANCEL | Delete a record from the directory | 13 |
| M 14 OK | Print the directory | 13 |
SETTINGS (MENU 2)
| Press | Function called | Function description | See page |
| M 21 OK | DATE/TIME | Enter the date and time | 15 |
| M 22 OK | NUMBER/NAME | Enter your fax number and name | 15 |
| M 23 OK | MELODIES/BEEPS | Choose the ring melody and key beeps | 15 |
| M 231 OK | MELODY | Choose the ring melody | |
| M 232 OK | BEEPS | Choose the key beeps | |
| M 233 OK | ALARM | Switch alarm On/Off | |
| M 24 OK | NETWORK | Set network parameters | 16 |
| M 241 OK | NETWORK TYPE | Select network type | |
| M 242 OK | PREFIX | Set the prefix | |
| M 25 OK | NIGHT MODE | Control the night mode | 16 |
| M 26 OK | NB OF RINGS | Set the number of rings | 17 |
| M 27 OK | CORDLESS | Cordless phone (depending on model) | 17 |
| M 271 OK | HANDSET REGIS | Register handset (depending on model) | |
| M 272 OK | HANDSET ERASE | De-register handset (depending on model) | |
| M 273 OK | HANDSET CODE | Radio encryption code (depending on model) | |
| M 28 OK | SECURITY | Protected access (depending on model) | 17 |
| M 281 OK | MEM ACCESS | Lock fax and voice messages (depending on model) | |
| M 282 OK | REMOTE CODE | Remote interrogation code (depending on model) | |
| M 29 OK | LANGUAGE | Choice of the language: English, French, German, Spanish or Italian | 18 |
FAX (MENU 3)
| Press | Function called | Function description | See page |
| M 31 OK | FCT TRANSM | Delayed transmission and broadcasting | 21 |
| M 32 OK | POLLING ACTV | Perform an active polling | 24 |
| M 33 OK | POLLING PASS | Perform a passive polling | 23 |
| M 34 OK | SEND REPORT | Print choice of the transmission report | 21 |
| M 35 OK | TX FROM MEM | Transmission from the memory or document feeder | 21 |
| M 36 OK | RX IN MEM | Reception of documents into the memory or on paper | 22 |
TAD (MENU 4) (TAD MODELS)
| Press | Function called | Function description | See page |
| M 41 OK | OGM RECORD | Record the outgoing greeting message | 25 |
| M 42 OK | OGM PLAYING | Play back the outgoing greeting message | 25 |
| M 43 OK | MEMO | Record a message (memo) | 26 |
| M 44 OK | DELETE MSG | Delete the voice messages | 26 |
| M 45 OK | TYPE | Select the type of TAD | 25 |
| M 46 OK | FILTERING | Select the call filtering feature | 28 |
| M 47 OK | PRIVIL ACCES | Select the privileged access mode | 28 |
| M 48 OK | PRIVIL CODE | Select the privileged access code | 28 |
| Press | Function called | Function description | See page |
| M 51 OK | GUIDE | Print the menus | 33 |
| M 52 OK | LOGS | Print the Tx and Rx logs | 33 |
| M 53 OK | DIRECTORY | Print the directory | 33 |
| M 54 OK | SETTINGS | Print the setting list | 33 |
| M 55 OK | SEND REPORT | Print the last comm. report | 33 |
| M 56 OK | LOCAL COPY | Choose the number of copies (depending on model) | 33 |
| M 57 OK | RIBBON GAUGE | Display the ribbon gauge status | 34 |
DOCUMENT CONTROL (MENU 6)
| Press | Function called | Function description | See page |
| M 61 OK | PERFORM | Perform a pending command | 35 |
| M 62 OK | MODIFY | Modify a pending command | 35 |
| M 63 OK | CANCEL | Cancel a pending command | 35 |
| M 64 OK | PRINTING DOC | Print a pending document | 35 |
| M 65 OK | PRINT LIST | Print the command list | 36 |
ADVANCED FUNCTIONS (MENU 7)
| Press | Function called | Function description | See page |
| M 72 OK | RELAY | New broadcast of vocal and fax messages (depending on model) | 37 |
| M 721 OK | ON | Activating the new broadcast (depending on model) | |
| M 722 OK | OFF | Deactivating the new broadcast (depending on model) | |
| M 723 OK | SETUP | Setting the new broadcast parameters (depending on model) | |
| M 79 OK | TECHNICAL | Modification of the technical parameters | 38 |
CONTENTS
INTRODUCTION 1
Unpacking. 1
Connections 1
Switching on 3
Loading the paper 3
Choosing the operating mode (TEL-FAX-TAD) 5
The menus. 7
TELEPHONING 9
Calling 9
Answering a call. 10
Functions available during a call 10
DIRECTORY (MENU 1). 11
Creating a record. 11
Making a call from the directory 12
Editing a record 12
Deletingarecord 13
Printing the directory. 13
SETTINGSMENU2) 15
Date/Time 15
Number/Name 15
Ringing melody and key beeps. 15
Network 16
Night mode. 16
Number of rings for the automatic mode 17
Cordless phone 17
Protection of your machine (depending on model) 17
Choice of the language 18
FAX (MENU 3) 19
Inserting the document into the feeder 19
Sending a fax. 20
Receiving a fax 22
During transmission 23
Advanced functions 23
TAD (MENU 4) 25
Models with tad (internal) 25
Models with vocal tad (external) 31
Printing 33
Local copy 33
Ribbon gauge display 34
DOCUMENT CONTROL (MENU 6). 35
Executing a pending command 35
Consulting or modifying the queue 35
Deleting a command from the queue. 35
Print a document waiting for transmission. 35
Printing out the list of pending operations 36
ADVANCED FUNCTIONS (MENU 7) 37
Relaying received documents (depending on model) 37
Technical parameters 38
Remote control from an extension set 38
OPTIONS 39
Display 39
APPENDIX 41
Replacement of consumables. 41
Troubleshooting 44
Codes of the transmission report 45
This equipment has been approved in accordance with Council Decision 98/482/EC for pan-European single terminal connection to the public switched telephone network (PSTN).
This equipment is in accordance to the following standards: I-CTR 37, CTR 38, ETSI EG 201 121.
In the event of problems, you should contact your equipment supplier in the first instance.

Before powering on your unit, make sure the mains outlet it is connected to meets the requirements printed on the warning label on your unit (Voltage, Current, Frequency of power network), or on the separate power supply (depending on the model). If your unit works with a separate Power Supply, use only the one delivered with your unit; never use another power supply.
The unit's mains plug is the only way to disconnect the unit from the power network. Therefore you must respect the following:
- Your unit must be connected to a mains outlet located nearby.
- The mains outlet must remain easily accessible.
Your unit is delivered with a power cord including a plug which, depending on the model, may be:
- without earth (the symbol on the warning label)
with earth (no symbol on the warning label).
It is imperative that a power plug with an earth be connected to a wall outlet with an earth.
In Europe, this unit includes the CE stamp, following the 73/23/CEE, 89/336/CEE and 93/68/CEE directives.
INTRODUCTION
UNPACKING
Check for the following items when unpacking your machine:
- Main unit,
Power cord, - Handset (depending on model),
Telephone line cord, - Paper,
- Paper holder ^(*) ,
- DECT kit (cordless phone, charger and base station)**.
An ink ribbon and its gauge card are pre-installed in the machine. You will have to replace them when they are worn (please refer to § Replacement of consumables on page 41).
CONNECTIONS
Caution - Please refer to the Safety Instructions at the beginning of this User's manual.
CONNECTION OF THE POWER CORD
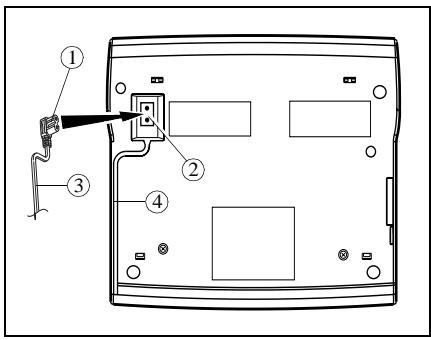
Turn your machine upside down.
Insert the plug (1) of the power cord into the connector (2) of the main unit.
Run the power cord (3) into the groove (4).
Replace your machine the right way round.
(^) Models with a fixed paper tray (100 sheets).
(^*) Depending on model.


CONNECTION OF THE HANDSET (MODELS WITH HANDSET)
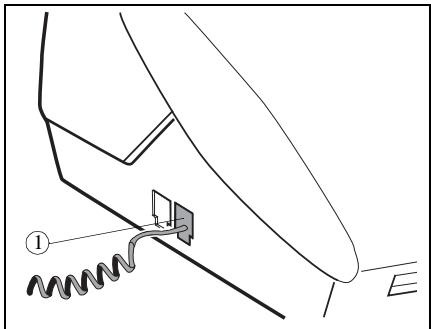
Connect the telephone handset cord to the appropriate connector (1) on the main unit.
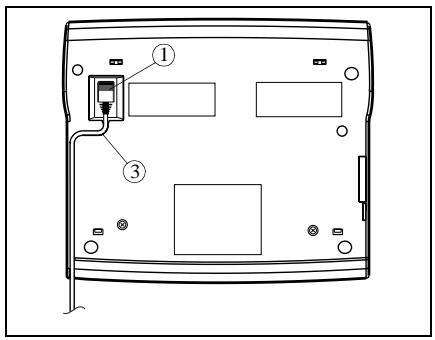
CONNECTION OF THE TELEPHONE LINE
For models with handset
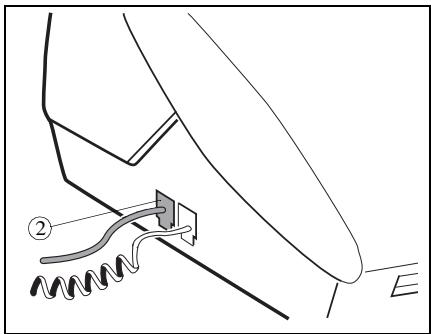
Connect the telephone line cord plug to the appropriate connector (2) on the main unit, and connect the other end to the wall telephone socket.
For the models without handset
Connect the telephone line cord plug to the appropriate connector (1) on the main unit, and connect the other end to the wall telephone socket.
SWITCHING ON
Connect the power plug to the mains wall socket. The unit displays SELECT LANGUAGE.
Press OK to display the list of available languages.
Choose the language using the or key and press OK to confirm.
The unit displays CHECK DATE (with the selected language).
Press OK and enter the date and time, using the alphanumeric keypad.
Press OK to confirm.
Then, you can select another language, using the MENU 29 (please refer to § Choice of the language on page 18).
LOADING THE PAPER
Paper feeders or trays may contain a varying number of pages (refer to the Description Table of the various models given at the beginning of the present User's Manual).
You may use any standard plain paper (A4 format photocopying paper, approx. 80g / m^2 ). However, for optimal print quality results, we suggest you to use the type of paper recommended by the manufacturer (please refer to the last page of this User's manual).
To avoid malfunctions and get optimal print quality, you should observe the following basic instructions:
- use perfectly new paper without folds or rolled edges,
- do not reload the paper tray while printing is in progress,
- always remove all the pages left in the tray before reloading paper.
The method for installing the paper is different according to the model.
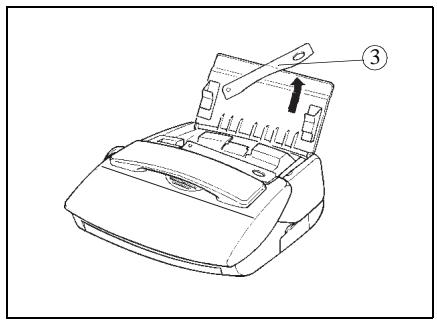
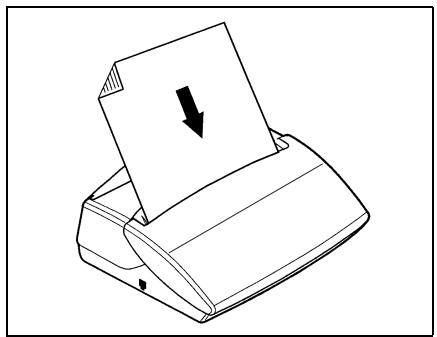
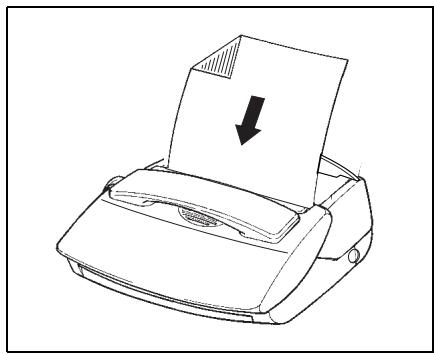
FOR MODELS WITH A FIXED PAPER TRAY (100 PAGES)
Snap the paper holder (1) in the two slots (2) provided at the top of the sheet feeder.
Open the feeder cover (3)
Prepare a stack of plain paper (100 sheets maximum)
Place the paper stack into the feeder (4).
Close the feeder cover (3).

Telephoning

Directory

Settings

Fax

TAD

Printing

Doc control

Advanced functions
Options
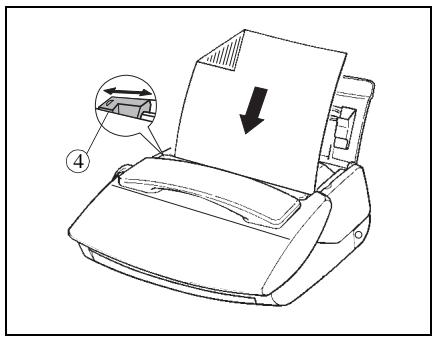
MODELS WITH A REMOVE PAPER TRAY (30 PAGES)
To open the cover (1), use notch (2) on the side.
Lift the paper support bracket (3).
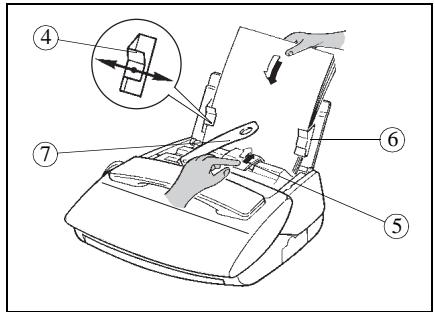
Prepare a stack of paper (30 sheets max.).
Insert it between the paper guides (4 and 6).
Press the clip (5) to insert the paper in the fax machine's paper store.
Adjust the left paper guide (4) to the width of the paper.
Caution - Lift the support bracket (7) to facilitate printout stacking.
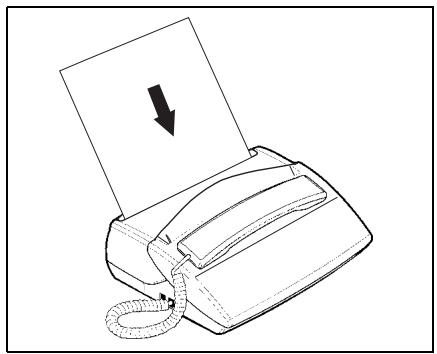
FOR MODELS WITH SHEET BY SHEET PAPER FEEDER (1 PAGE)
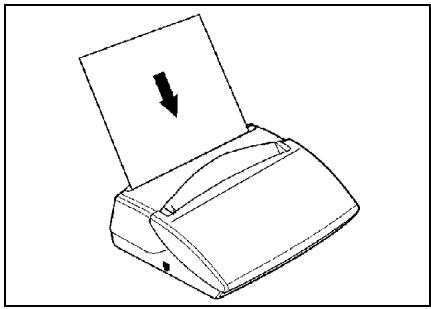
Insert the paper sheets one after the other into the paper feeder.
CHOOSING THE OPERATING MODE (TEL-FAX-TAD)
FOR MODELS WITH TAD
Your machine has three distinct operating modes, which are described below automatically switches to the fax reception mode:
- automatic mode with TAD: your machine answers all calls and records incoming messages,
- automatic mode without TAD: your machine sorts incoming calls before presenting them to you,
- manual mode: your fax machine never answers any calls automatically.
In each of these three modes, you may pick up the handset at any time:
- when receiving a fax call, you can switch your fax machine to the fax reception mode by pressing the key,
- when receiving a voice call, talk with the caller.
Press one or several times on the ( )-key to select the desired reception mode and press OK to confirm.
AUTOMATIC MODE WITH TAD (TEL-FAX-TAD)
Your unit works like a telephone answering device combined with a fax machine. Select that mode when you go out or if you do not want to lose any fax or voice calls.
When your machine rings, it answers after the programmed number of rings and plays the greeting message you have recorded on your TAD:
- if the call is a fax call, it automatically switches to the fax reception mode,
- if the call is a voice call, the caller will be able to leave a message.
□ You can set the number of rings before your machine automatically answers (please refer to § Number of rings for the automatic mode on page 17).
AUTOMATIC MODE WITHOUT TAD (TEL-FAX)
Your machine automatically sorts the calls before presenting them to you. Select that mode if you receive many faxes and you do not want to be disturbed by their reception.
When it receives a call, your machine automatically answers without ringing ^(*) , the caller can hear beeps inviting him/her to wait, then:
- if the call is a fax call, it switches to the fax reception mode,
- if the call is a voice call, it rings (warning ring) for 30 seconds ^(**) and the caller can hear a ringing tone. You can then pick up and talk. Otherwise, the caller will be able to leave a message on your TAD, which will answer after 30 seconds and play the greeting message.
MANUAL MODE (TEL)
Your machine mainly works like a telephone set: select that mode if you usually do not receive any faxes.
In that mode, your machine never answers automatically (except after 9 rings if remote interrogation is enabled. In that case, it will play the greeting message).
FOR MODELS WITHOUT TAD
Your machine has three distinct operating modes, which are described below:
- mode with fax: your machine automatically switches to the fax reception mode, you can connect an external answering machine to receive your voice messages,
- automatic mode: your machine sorts incoming calls before presenting them to you,
- manual mode: your fax machine never answers any calls automatically.
Press the () -key once or several times to select the operating mode required.

Telephoning

Directory

Settings

Fax

TAD

Printing

5
Doc control

Advanced functions
Options
Appendix
Fax mode (FAX)
Select this mode if you expect substantial fax traffic.
The unit is not connected to an external TAD
Upon receiving an incoming call, the unit will ring and answer the call after a pre-set number of rings:
- if the call is a fax, the unit automatically switches to fax receive mode.
- if the call is a voice call, the latter will be lost unless you pick up the receiver before the programmed number of rings (i.e. before the unit automatically answers in fax receive mode).
The unit is connected to an external TAD
Please refer to § Models with vocal tad (external) on page 31.
Upon receiving an incoming call, the unit will ring:
- if the call is a fax, the unit will automatically receive the fax.
- if the call is a voice call, the answering machine will automatically record the message left by the caller.
Automatic mode (TEL-FAX)
The unit will switch incoming calls automatically. Select this mode if you expect substantial fax traffic and do not wish to be inconvenienceed by incoming taxes.
Upon receiving an incoming call, the unit automatically and silently answers the call (^*) , plays a series of beeps prompting the caller to wait, then:
- if the call is a fax, the unit automatically switches to fax receive mode,
- if the call is a voice call, the unit will ring for 30 seconds ^(**) . If you fail to pick up the receiver, the unit will then automatically switch to fax receive mode.
The caller can therefore send you a fax.
Manual mode (TEL)
The unit will function like a standard phone terminal. Select this mode if you expect little fax traffic.
The unit is not connected to an external TAD
Upon receiving an incoming call, the unit will ring but will not automatically answer the call. To take the call manually, pick up the handset:
- if the call is a voice call, simply converse with the caller,
- if the call is a fax, press then hang up and your unit will automatically switch to fax receive mode.
The unit is connected to an external TAD
Please refer to § Models with vocal tad (external) on page 31.
Upon receiving an incoming call, the unit will ring:
- if the call is a voice call, your answering machine will answer the call automatically and record any message left by the caller,
- if the call is a fax, the unit will automatically switch to fax receive mode.
FOR THE MODELS WITHOUT HANDSET
Automatic mode
Your unit receives faxes automatically with no action on your part (automatic FAX mode).
Manual mode
Upon receiving an incoming call, the unit will ring but you can not answer to an incoming call.
If you've got a cordless phone kit, your machine has three distinct operating modes (with fax, automatic and manual). Please refer to § For models without TAD on page 5.
You have to use the cordless phone to answer a call (you can't use the -key of your machine to answer a call).
THE MENUS
ACCESSING THE MENUS
As described in the next sections, your machine features many functions accessible through the menus, which allow you to set and modify them: recording a directory of numbers, memorising received or sent faxes, setting the number of rings, etc.
As can be seen in the menu guide, all functions are numbered in a main menu (e.g.1. Directory), from which you can access the various settings for the selected function (e.g. 1.1 Add, 1.2 Modify, 1.3 Cancel or 1.4 Print a directory record).
Main menu: access to functions
Press the M key.
Sub-menus: access to function settings
Press the key to select the previous menu line.
Press the key to select the next menu line.
Press the OK key to confirm and go on to the next menu.
Press the C key to return to the previous menu.
Press the (START) key to confirm and exit from the main menu.
Press the (STOP) key to exit from the current menu.
Moving inside a data entry field
Press the C key to delete the last character.
Hold the C key down to delete all the characters entered.
Press the key to move the cursor to the left within a data entry field
Press the key to move the cursor to the right within a data entry field
Press the key to cancel entry and return to the initial value.
Press the OK key to confirm entry and go on to the next menu item.
Press the (START) key to confirm entry and exit from the current menu.

PRINTING THE MENU GUIDE
To print the menus and thus get an overview of menus, proceed as follows:
Insert paper.
Press the M, 5, 1 and OK keys (or press the i key).
The menus are classified in their order of function number. (See the section entitled QUICK REFERENCE GUIDE, MENU GUIDE). The functions are classified in their order of appearance in this manual. Tabs are provided for quick access to the required information.
TELEPHONING
Although it features advanced functions, your machine is also a telephone set providing a whole range of user-friendly functions.
CALLING
CALLING USING THE HANDSET
Pick up the handset.
Dial your party's number.
You can also dial the number before picking up the handset. In that case, you can correct any dialling error by means of the C key.
You can use the and keys to adjust the volume (2 levels available).
CALLING USING THE KEY
Loudspeaker listening
Dial your party's number. This is displayed on the screen.
Pick up the handset, the machine dials automatically.
When your party answers, press the key to activate loudspeaker listening.
You can use the and keys to adjust the volume.
Press the key again to de-activate loudspeaker listening.
Hands-free mode (TAD-Models)
Dial your party's number.
Press the key: the machine dials automatically.
You can use the and keys to adjust the volume..
At any time, you can pick up the handset and continue the call (in which case the speaker and microphone are automatically disabled).
CALLING USING THE DIRECTORY
Your machine can store phone numbers in a directory. To know the applicable procedure, please refer to the section entitled DIRECTORY (MENU 1).
REDIALLING ONE OF THE LAST TEN NUMBERS CALLED
Press the (REDIAL) key.
Select the required number using the and keys.
To call the number displayed press the key or pick up your handset.
At any time, you can delete the REDIAL number by pressing the C, (REDIAL) and OK keys.


Options
Appendix
ANSWERING A CALL
When someone calls you, your phone rings. Pick up your handset (or press the key for the TAD and Hands-free models) and speak. To end the call, hang up the handset (or press the key).
FUNCTIONS AVAILABLE DURING A CALL
KNOWING THE DURATION OF THE CALL
Ten seconds after dialling, a counter displays the approximate duration of the call.
ACTIVATING LOUDSPEAKER LISTENING
During the call, press the key. This will activate the loudspeaker, enabling another person to listen to the conversation.
SWITCHING FROM HANDSET TO HANDS-FREE MODE (TAD-MODELS)
Hold down the key.
Hang up the handset.
Release the key. Conversation then goes on in the hands-free mode.
ACTIVATING THE MUTE
During a call, if you want your party not to hear you for a while, press the key. Press that key again to resume your conversation.
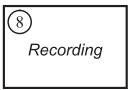
RECORDING A CALL (DEPENDING ON MODEL)
During a handset call, you can record the conversation.
Press the M and keys: recording starts.
To stop recording, press
To listen to the recording, press
To delete the recording, press M, 4, 4 and OK.
REROUTING A CALL
To reroute a call to another set (connected to the same telephone line):
Press the M and key.
Hang up the handset.
Go to the other set, pick up and continue the call.
You should hang up the handset within 4 seconds. You have about 25 isecods to pick up the other handset.
SWITCH TO FAX RECEPTION MODE
If you pick up a secondary handset or take the line from a cordless phone and you cannot hear anyone speaking, you can switch your machine remotely to fax reception mode by typing # then 7.
DIRECTORY (MENU 1)
The directory is a file in which you can store phone and fax numbers, especially those of the parties you call most frequently. So, instead of dialling a phone or fax number each time you want to communicate with one of your parties, you just have to select their names from the directory. Using the data you have stored, your machine will do it all automatically for you.
The records stored in the directory are classified in alphabetical order.
CREATING A RECORD
To fill in the directory, enter each party's phone number and name in a record. To create a new record and add it to the directory:
PRESS THE M, 1, 1, OK KEYS
You can cancel the process at any time by pressing
YOUR PARTY'S NAME
Enter your contact's name or a handle using the alphanumeric keypad.
By pressing a key once or several times, the corresponding letters are scrolled.
To enter "LONDON" for instance, perform the following sequence:

3 tim

3 times

2 times

1 time

3 times


L
0
N
D
0
N
You can move in the data entry field using the or key:
- you can delete the last character entered by briefly pressing the C key,
- you can delete all the characters entered by holding the C key down,
- you can insert a space by pressing twice the 0 key.
Press the OK key to confirm.
YOUR PARTY'S NUMBER
Then, enter your party's phone and/or fax number.
Press the OK key to confirm.
If your fax machine is in the premises of a company, it may be connected to a private automatic branch exchange (PABX). Some of these telephone exchanges require the insertion of a dialling prefix (e.g. 0). All numbers should be stored in the directory without that prefix. You can program the prefix automatically for all numbers (please refer to § Prefix on page 16). Some telephone exchanges also require the insertion of a post-dial delay. If such is the case, press the R key in order to insert the post-dial delay (the character / is inserted in the number displayed).
NUMBER ASSIGNED
Each new sheet created is assigned a two-digit number by which you can directly access the corresponding sheet.
The last ten records are associated to the ten one-touch dialling keys (00-09).
Validate the number assigned automatically or enter a number of your choice and press OK to confirm.

Telephoning

Directory

Settings

Fax

TAD

Printing

Doc control

Advanced functions
Options
Once you have stored all your parties' numbers and names in the directory, you can select one of them (to phone or send a fax) using either his name or abbreviated number as explained below.
SELECTION BY NAME
Press the key then use keys and to scroll through the records in alphabetical order.
Then you can:
- pick up the handset or press to call him,
or
- place a document in the document feeder and press to fax the document.
SELECTION BY ABBREVIATED NUMBER
Your fax machine has automatically associated a 2-digit abbreviated number to each newly created record: 00 for the 1st record, 04 for the 5th record, and so on.
Press twice the key then dial your party's abbreviated number. Then you can:
- pick up the handset or press to call him,
or
- place a document in the document feeder and press to fax the document.
If you do not remember which abbreviated number corresponds to a record, you can print out the directory for a copy of all the information it contains (please refer to Printing the directory on page 13).
Press one of the one-touch dialling keys (numbered 00 to 09). Then you can:
- pick up the handset or press to call him,
or
- place a document in the document feeder and press to fax the document.
EDITING A RECORD
PRESS M, 1, 2, OK
To select a record:
- Use keys and to scroll through the records in alphabetical order (or dial your party's abbreviated number).
- Press the OK key.
To correct the data in the record (name, phone/fax number, etc.), use the , and C keys: edit the relevant data using the alphanumeric keypad and press OK to confirm and go on to the next data.
DELETEING A RECORD
PRESS M, 1, 3, OK
Select the record you want to delete by using the or keys (or dial its abbreviated number) and press OK twice to confirm.
The record will be deleted.
PRINTING THE DIRECTORY
PRESS M,1,4,OK
The directory is printed automatically. This document contains all the information you have entered (name, phone/fax number, as well as the abbreviated numbers automatically associated to each record).
Telephoning

directory

Settings

Fax

TAD

Printing

Doc control

Advanced functions
Options
Appendix
SETTINGS (MENU 2)
The different settings enable you to customise calls and the operating mode of your machine (choosing a ringing melody, storing faxes, etc.), but also set technical and security parameters (choosing a type of network, locking, using an access code, etc.).
DATE/TIME
PRESS M, 2, 1, OK
Enter the date and time using the numeric keypad and press OK to confirm. Example: 7 May 2000, 9.15: press 0,7,0,5,0,0,0,9,1,5 and OK.
NUMBER/NAME
The data you enter in these fields will automatically be inserted in the headers of the faxes you will send, so that they will be printed on the faxes received by your contacts.
To do so, the TX HEADER setting should be enabled (please refer to § Technical parameters on page 38).
PRESS M, 2, 2, OK
Enter your fax number and press OK to confirm and go on to the next field.
Enter your name (please refer to Your party's name on page 11) and press OK to confirm.
RINGING MELODY AND KEY BEEPS
You can choose between 4 melodies or WITHOUT MELODY and adjust the volume of the selected melody. You can also program beeps that you will hear each time you press a key.
If you choose WITHOUT MELODY, only the message INCOMING CALL, which is displayed on the screen when you receive a call, will tell you someone is calling you.
RINGING MEODY
PRESS M, 2, 3, 1, OK
Select the required melody using the or key and press OK to confirm.
To adjust the volume, press the or key and press OK to confirm.
KEY BEEPS
PRESS M, 2, 3, 2, OK
Select WITH or WITHOUT and press OK to confirm.
ALARM
PRESS M, 2, 3, 3, OK
Select the required option using the or key and press OK to confirm.
START: alarm switch-on.
Enter the time at which you want the alarm to ring out, and press the OK key to confirm: to the right of the time, the screen displays a symbol indicating the alarm is in service.
- STOP: alarm switch-off.
The alarm rings for 30 seconds. Press any key on the keypad to stop it earlier.
NETWORK
TYPE OF NETWORK
The telephone line to which your machine is connected may be linked either to the public network or to a private network (e.g; in a company with a PABX).
PRESS M, 2, 4, 1, OK
Select the type of network, PABX (private) or PSTN (public), to which you are connected and press OK to confirm.
PREFIX
If your machine is connected to the private automatic branch exchange (PABX) of a company, you have to enter a prefix (generally 0) for outgoing calls before the number you want to call, provided that:
- the intercom numbers (for which no prefix is required) are short numbers not exceeding the minimum length from which the prefix should automatically be inserted (to be defined),
- the external numbers (for which a prefix is always required) are long numbers exceeding or equalling the minimum length from which the prefix should automatically be inserted (to be defined, for instance 10 digits in the UK).
IMPORTANT NOTE: Do not change anything in the numbers you have stored in the directory. Indeed, enabling or disabling the prefix will respectively switch your machine to PABX operation (WITH prefix) or PSTN operation (WITHOUT prefix).
To set the local prefix
PRESS M, 2, 4, 2, OK
Select the WITH option using the or key and press OK to confirm.
Enter the number used by your PABX to access the public telephone network (e.g. 0) followed by the / sign (or pause, access by pressing the R key), and press OK to confirm.
If necessary, enter the phone number length from which the prefix should automatically be added (e.g. 10 digits in the UK) and press OK to confirm.
NIGHT MODE
This mode enables you to switch off the ringing of your machine for a given period of time (during the night for instance), while still receiving your calls. The machine then switches to automatic reception/TAD mode and will answer after 5 rings. It will automatically receive all voice or fax messages. At the end of the NIGHT mode, the screen displays the number of messages or fax received and the 4 and 5 keys blink, and your machine automatically switches to the current reception mode. To activate the night mode:
PRESS M, 2, 5, OK
OR PRESS F2
Select START using the or key and press OK to confirm.
Select the night mode start time and press OK to confirm.
Select the night mode stop time and press OK to confirm.
To deactivate the night mode,
PRESS M, 2, 5, OK
OR PRESS F2
Select STOP using the or key and press OK to confirm.
NUMBER OF RINGS FOR THE AUTOMATIC MODE
This function enables you to set the number of rings before the automatic activation of your telephone answering device.
PRESS M, 2, 6, OK
Change the number of rings and press OK to confirm.
CORDLESSPHONE
The machine can be used together with one or more cordless phone sets, which require the installation of the cordless phone kit supplied with your machine or available from your supplier. Please refer to the instructions coming with the kit for more information. When fitted with that kit, your machine gives you access to the functions described below.
REGISTERING A CORDLESS PHONE
For each cordless phone you want to register on your machine:
PRESS M, 2, 7, 1, OK
On the cordless phone, press OK and 6. A number specific to each handset appears on its display screen.
DE-REGISTERING A CORDLESS PHONE
PRESS M, 2, 7, 2, OK
The main unit's screen displays the numbers for the registered handset.
Enter the number corresponding to the handset you want to de-register and press OK. Your machine emits a series of beeps telling you that de-registration is in progress.
BASE STATION REGISTRATION CODE
PRESS M, 2, 7, 3, OK
This function enables you to define a 4-digit registration code intended to protect your base station, e.g. from the registration of handset that do not belong to you but are in the same reception zone as your machine.
PROTECTION OF YOUR MACHINE (DEPENDING ON MODEL)
PROTECTION OF VOICE OR FAX MESSAGES
You can protect all your messages by a code, which you will have to enter prior to consulting them. To do so, you have to set a message access lock and choose an interrogation code other than 0000.
Message access lock
PRESS M, 2, 8, 1, OK
Select the required option using the or key:
- WITHOUT: no interrogation code for local access to the messages,
- WITH: local access to the messages is possible only after entering the interrogation code.
Press OK to confirm.

Telephoning

Directory

Settings

Fax

TAD

Printing

Doc control

Advanced functions
Options
Access to locked messages
If you have chosen WITH message access lock, the message access procedure is as follows:
Press the or, depending on the type of messages (fax or voice messages).
Enter the remote interrogation code.
REMOTE INTERROGATION CODE
This function is used to define the remote interrogation code for any voice or fax messages received.
PRESS M, 2, 8, 2, OK
Enter your code.
Press OK to confirm.
CHOICE OF THE LANGUAGE
You can choose the language displayed on the screen:
PRESS M,2,9,OK
Select the language (ENGLISH, FRANÇAIS, DEUTSCH, ESPÁNOL, ITALIANO) using the or key and press OK to confirm.
Press OK and choose the corresponding network (for the Display Caller Service) and press OK to confirm.
FAX (MENU 3)
INSERTING THE DOCUMENT INTO THE FEEDER
MODELS WITH A FIXED PAPER TRAY
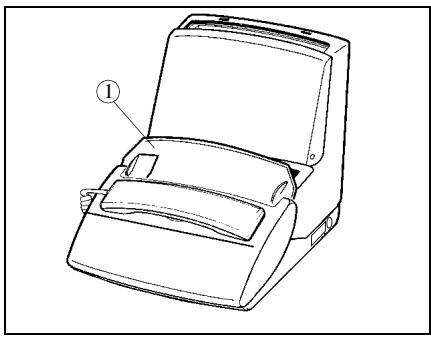
The document feeder (1) receives up to 15 pages.

Insert the document, printed face down, into the document feeder. If necessary, adjust the left paper guide (2) to the width of the document.
The machine displays READY.
Your machine has an automatic document feeder. The last sheet in the stack will be sent out first.
MODELS WITH A REMOVE PAPER TRAY
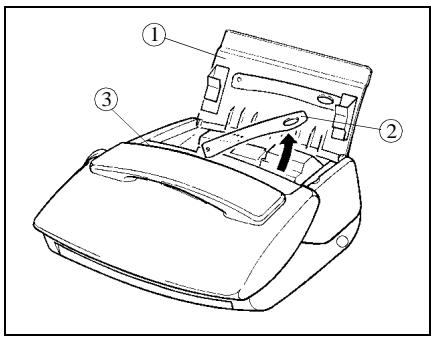
Lift the fax access door (1).
Lift the document support bracket (2).
The document feeder (3) receives up to 15 pages.
Insert the document, printed face down, into the document feeder. If necessary, adjust the left paper guide (4) to the width of the document.
The machine displays READY.
Your machine has an automatic document feeder. The last sheet in the stack will be sent out first.

Telephoning

Directory

Settings

Fax

TAD

Printing

Doc control

Advanced functions
Options
Appendix
MODELS WITH A SHEET BY SHEET PAPER FEEDER
The document feeder (1) receives up to 1 page.
Insert the document, printed face down, into the document feeder.
The machine displays READY.
Caution - To remove a sheet from the feeder or from the paper tray, press
SENDING A FAX
DOCUMENT RESOLUTION
Your machine has three resolution modes. You will select one of these modes according to the type and print quality of the document you want to fax.
- standard mode: for a good quality document without minute details.
- FF (FINE) mode: for a document with small characters or drawings.
- [O] (PHOTO) mode: when the document is a photograph.
Press the FFF key once or several times to change the resolution mode. The mode selected is displayed on the screen.
SENDING A FAX
Immediate transmission
Insert the document into the feeder, printed face down, first page last in the stack of sheets (for models whose feeder can accommodate several pages).
Dial the addressee's fax number and press to confirm.
Transmission from the directory
When all your parties' names and numbers are stored in the directory you can select one of them (to phone them or send them a fax), please refer to § Making a call from the directory on page 12, for further information.
Broadcast transmission
To send the same document to several addressees, proceed as follows:
Place the document into the feeder, dial the fax number of the first addressee, or select it from the directory. Press the OK key to confirm.
Dial the fax number of the next addressee or select it from the directory. Press the OK key to confirm.
Repeat this procedure for all the addressees you wish to include in this broadcast (maximum 6), making sure you validate the last addressee by pressing the key to start an immediate transmission.
Delayed transmission
To program delayed transmission for a document, proceed as follows:
Insert the document into the feeder.
PRESS M, 3, 1, OK
Dial the addressee's fax number.
Press OK if you want to enter another addressee.
or
Press twice OK and enter the time at which you want your fax to be sent and press OK to confirm.
Choose the required type of transmission (from the machine's MEMORY or from the document PAPER FEEDER) and press OK to confirm. (please refer to § Transmission from the machine's memory or the document feeder on page 21, for further information).
Enter the number of pages of the document and press OK to confirm.
CHOOSING THE TYPE OF TRANSMISSION REPORT
You can program your machine so that a transmission report is printed each time you send a fax. There are three types of report available:
PRESS M, 3, 4, OK
Select the required option using the or key:
- WITH: a transmission report is printed if there has been no transmission problem or if it is definitively aborted (i.e. after 6 unsuccessful attempts). So, there is only one report for each transmission request.
- WITHOUT: no report is printed following a fax transmission (consult the transmission log to keep track of all communications).
- IF ERROR: a transmission report is printed after each unsuccessful transmission attempt.
Press OK to confirm.
TRANSMISSION FROM THE MACHINE'S MEMORY OR THE DOCUMENT FEEDER
You can choose between two modes of transmission:
- from the machine's memory: the document to be faxed is stored in your machine's memory before it is sent. This mode enables you to pick up original copies more quickly and to send a fax to several addresses.
- from the document feeder: the document is faxed right after placing it in the feeder and dialling. This mode enables you to send voluminous documents whose size may exceed the memory capacity.
PRESS M, 3, 5, OK
Select the required option using the or key.
- MEMORY:
The document is first stored in the memory of your fax machine, then it is transmitted.
ADF:
Document scanning and transmission are performed at the same time. If the addressee's fax machine does not answer, the documents remains in the feeder.
Press OK to confirm.
RECEIVING A FAX
Your machine has a reception memory enabling it to receive your faxes even when out of paper. Depending on the settings made, your machine can print out your faxes as soon as these are received or store them in its memory.
When at least one fax is present in the memory, the key of your machine blinks. The key is off if there is no fax in the memory or if you have printed all the faxes received.
PRINTING FAXES RECEIVED IN THE MEMORY
To print out stored faxes, put paper in the paper tray, and press the key. If the machine runs out of paper, add some so that printing restarts automatically after the last printed page.
□ You can protect the access to your faxes by means of a code (please refer to § Protection of voice or fax messages on page 17, for more information).
RECEPTION FROM THE MEMORY (FAX ANSWERING MACHINE) OR DIRECT PRINTING
When activated, this function enables you to store all messages received in the memory, until you choose to print them out. When the function is de-activated, all documents are printed as soon as they are received.
PRESS M, 3, 6, OK
Select the required option using the or key:
- WITH: the documents you receive are stored in the memory,
- WITHOUT: the documents you receive are printed at once (if there is paper in the feeder),
Press OK to confirm.
REMOTE INTERROGATION OF THE FAX ANSWERING MACHINE (TAD-MODELS)
If you are away and have a fax machine where you are (set to the tone dialling mode), you can retrieve and print the faxes received on you own fax machine.
As delivered, the remote interrogation option is not available: to interrogate your fax answering machine remotely, you should first enter an interrogation code, which is shared with the TAD (so that you can also listen to your voice messages). Please refer to Remote interrogation code on page 18, for more information and set your machine to the "automatic reception with TAD" mode.
On a remote fax machine featuring a telephone set, dial your own number.
Press the * key during the greeting message, then enter the 4 digits of your interrogation code: the machine first delivers the voice messages (if there are any).
As you hear the beeps, press the 8 then 0 keys.
Switch on the fax machine by pressing the key as soon as you hear the fax tone: (if no fax has been memorised, your fax machine will deliver a series of beeps) your own fax machine will then forward all the faxes stored in its memory.
Caution - When you interrogate your fax answering machine remotely, the forwarded documents are automatically erased from its memory.
RECEPTION MEMORY SATURATION
When there are too many documents or voice messages in the memory, the machine is saturated and will not be able to take in any extra message: the MEMORY FULL message appears on the screen. Print the stored faxes and/ or erase all voice messages to get some spare memory.
DURING TRANSMISSION
STOPPING A TRANSMISSION
Press the key.
Press the key again to confirm you want to stop the current transmission.
PHONE CALLS
To call your party
You can call your party just after sending or receiving a fax. To do so, while the document is being transmitted (send or receive mode), you should:
Press the key while your fax machine displays TRANSMIS or RECEPTION. Your fax machine then displays PHONE:
- once the fax has been transmitted, your party's phone rings, if its machine is compatible,
- if he answers, your machine starts ringing: pick up the handset and speak.
Your party calls you
When your party calls you, your phone rings and you can pick up the handset and speak.
ADVANCED FUNCTIONS
POLLING A DOCUMENT
Polling a document consists in leaving it in your machine's memory or document feeder, thus making it available to one person (single polling), or several persons (multi polling), who can then perform "active polling" on it. This requires that your machine be set to the automatic or fax mode.
Insert the document into the feeder.
PRESS M, 3, 3, OK
Select one of these two options using the or key:
- SINGLE POLLING: the document will be deleted from the memory as soon as it has been retrieved.
- MULTI POLLING: the document can be retrieved by several persons.
Press OK to confirm.
If you have selected SINGLE POLLING, you can then select one of the two following options with keys or and press OK to confirm:
- MEMORY: the document is stored in your machine's memory. This solution frees your machine.
PAPER FEEDER.
Enter the number of pages of the document and press OK to confirm.
A message on the screen tells you if there is any document for polling. A single polling document will automatically be deleted from the memory as soon as retrieved, unlike multi polling, which you can cancel through menu 63 (please refer to § Deleting a command from the queue on page 35).


RETRIEVING A DOCUMENT
When a document has been polled on a remote fax, you can perform an "active polling" on it (i.e. print it out on your own fax machine), only if there is no document in your feeder.
PRESS M, 3, 2, OK
Dial the number of the fax machine containing the polled fax and press the OK key.
Press the key for immediate active polling.
or
Press twice OK for delayed active polling:
- Enter the time required for active polling, and press the key to confirm.
TAD (MENU 4)
MODELS WITH TAD (INTERNAL)
Your machine features a telephone answering device (TAD) whose simple and extensive functions provide a wide range of possibilities: leaving a message to persons calling you in your absence, letting them leave you a message, interrogating your machine remotely as done for fax machines, etc.
Your TAD features two options:
- ANSWERING MACHINE: callers cannot leave you a message after the greeting message, which only gives them some information.
- ANSWERING-RECORDING MACHINE: callers can leave you a message after the greeting message.
GREETING MESSAGES
The machine has 2 distinct greeting messages, corresponding to the two functions of the TAD (answering machine or answering-recording machine).
Answering-recording machine
Recording the greeting message
PRESS M, 4, 1, 1, OK
Pick up your handset and record your greeting message (20 seconds max.). The time in seconds is counted down as you record your message.
Hang up your handset to stop the recording. Your message is then played back, after which you can put your TAD into service.
Playing back the greeting message
PRESS M, 4, 2, 1, OK
Your machine plays back the greeting message you have recorded.
Answering machine
Recording the greeting message
PRESS M, 4, 1, 2, OK
Pick up your handset and record your greeting message (90 seconds max.). The time in seconds is counted down as you record your message.
Hang up your handset to stop the recording. Your message is then played back, after which you can put your TAD into service.
Playing back the greeting message
PRESS M, 4, 2, 2, OK
Your machine plays back the greeting message you have recorded.
SWITCHING ON
Selecting the type of TAD
PRESS M, 4, 5, OK
Select the required type of TAD (RECORD UNIT or ANSWER ONLY) using the or key and press OK to confirm.
Switching the TAD on / off
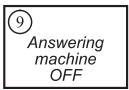
Switching on
Press the ( 合 )-key. When you are in mode TEL-FAX-TAD, your answering machine is on.
Press OK to confirm.
Switching off
Press the ( )-key. When you are in mode TEL or TEL-FAX, your answering machine is off.
Press OK to confirm.
MESSAGE
When you have received at least one message, the screen displays the total number of messages (except if there is a pending command) and the key on your machine blinks. This key is off if there are no pending messages, and is steady on when all received messages have already been listened to.
Listening to messages
Press the key. For each message being listened to, the screen displays the sequence number together with the date and time of reception.
While listening to the messages, you can press the following keys:
- or to adjust the audio volume,
- C twice to return to the beginning of the message,
- OK to skip to the next message,
for a pause. Press the same key again to resume listening, - you can also use the remote interrogation controls (please refer to § Remote interrogation on page 27).
Local message
You can record a local message on your TAD, which will be like a message left by a remote caller. This function is very useful when you have to go out of your office or home and you want to leave a message for anyone coming in after you.
Recording the local message
PRESS M AND ,OR
PRESS M, 4, 3, OK
Pick up the handset and record your message.
Hang up the handset to stop the recording.
Playing back the local message
Press the key.
Deleting messages
Deleting all messages
PRESS C AND ,OR
PRESS M, 4, 4, OK
All messages must have been played back to be erased this way.
Deleting a selected message
Individually, while listening to it, you can delete a message that has not been totally listened to.
Press the C key, then OK during the message you want to delete.
Saturation of the TAD's memory
When too many faxes have been received and too many messages have been recorded, your machine is saturated and cannot take in any other message: the message MEMORY FULL is displayed. Print out the faxes and/or delete the voice messages to get some spare memory.
REMOTE INTERROGATION
You can interrogate your TAD remotely and thus listen to the messages you have received, only if the telephone set you are calling from supports the tone dialling mode.
As delivered, this option is not available: to interrogate your TAD remotely, you should first enter a remote interrogation code, which is shared with the fax answering machine (so that you can also print out the faxes received). Please refer to § Remote interrogation code on page 18, for more information.
On a remote telephone set, dial your own number.
Press the * key during the greeting message, then enter the 4 digits of your interrogation code: the machine delivers all the voice messages you have received.
After the last message or if there is no message, the machine emits a series of beeps.
List of available remote operations:
| While listening: ·Pause or resume message listening by pressing 5. ·Go to the next message by pressing 6. ·Listen to the same message again by pressing 4. ·Go back to the previous message again by pressing 4. twice | ||
| ① Delete | ② | ③ Announce |
| ④ Last Message | ⑤ Pause/ Message | ⑥ Next Message |
| After listening: ·Delete received messages by pressing 1 then 5. ·Record your greeting message by pressing 8 then 3 and stop the recording by pressing any key. ·Listen to your greeting message by pressing 3. ·Switch on your TAD by pressing 7. ·Switch off your TAD by pressing 9. ·Resume message listening by pressing 5. | ||
ADVANCED FUNCTIONS
Call screening
This function enables you to listen to the caller leaving you a message on your TAD, before deciding on whether to pick up or not.
PRESS M, 4, 6, OK
Select the required option using the or key:
-
WITH: you can hear the messages as they are recorded on your TAD, and:
-
adjust the SPEAKER volume using the and keys,
-
pick up to answer the call.
-
WITHOUT: messages are recorded in silence, only a message on the screen tells you you are receiving a call and a message is being recorded:
-
you can pick up to answer the call.
Press OK to confirm.
The call screening feature is not available if you have activated the privileged access mode (see below).
Privileged access
This function enables you to choose a code, which you will give to those persons who may call you at a given moment (e.g. your collaborators during a meeting or your close relatives from a certain time).
Parameterisation of the privileged access code
PRESS M, 4, 8, OK
Enter a privileged access code other than 0000 and different from the remote interrogation code.
Press OK to confirm.
Putting the privileged access mode into service
PRESS M, 4, 7, OK
Choose WITH using the and keys.
Press OK to confirm.
Privileged calls
Only those privileged callers having your access code will be able to call you.
To do so, they should proceed as follows:
Dial your number.
Wait until your unit answers.
Press the * key during the greeting message, then enter the 4 digits of your privileged access code: your machine only starts ringing then.
If you do not answer, the caller will have the possibility to leave a message on your TAD.
DETACHABLE QUICK REFERENCE CARD


Quick reference card for operating your TAD featuring the remote interrogation function
Your TAD code: *
- Go to the next message by pressing 6 .
- Listen to the same message again by pressing (4).
- Go back to the previous message by pressing twice.
- Delete the received messages by pressing ① then ⑤ .
- Record your greeting message by pressing ⑧ then ③ and stop the recording by pressing any key.
- Listen to your greeting message by pressing 3.
- Switch on your TAD by pressing 7.
- Switch off your TAD by pressing 9.
- Resume message listening by pressing 5 .
From a fax machine:
- After listening to the message: 8, 0 then to retrieve the faxes stored in your machine's memory.


Options
MODELS WITH VOCAL TAD (EXTERNAL)
CONNECTION
You can connect a telephone answering machine to your machine using the same telephone. This makes your phonefax:
a fax,
- a telephone,
- a personal telephone answering machine.
Connect the telephone line cord of your external answering machine (TAM) to the piggy back connector of the telephone jack.
PUTTING INTO SERVICE
Make sure your TAD is permanently on (connected to the mains or in automatic mode).
USE
Please refer to § Choosing the operating mode (TEL-FAX-TAD) on page 5.
Caution - To ensure correct call sorting, the number of rings programmed in your unit must be greater than the number of rings after which the external answering machine picks up.
Prints the list of the numbered functions.
LOGS
PRESS M, 5, 2, OK
Prints the transmission and reception logs, which list the last 30 communications.
DIRECTORY
PRESS M, 5, 3, OK
Prints the directory.
SETTINGS
PRESS M, 5, 4, OK
Prints the list of your machine's settings.
LATEST TRANSMISSION REPORT
PRESS M, 5, 5, OK
LOCAL COPY
FOR MODELS WITH DOCUMENT FEEDER ACCOMMODATING 15 PAGES
Photocopy
The machine can be used as a photocopier.
Insert the document to be copied in the document feeder, as you would for a transmission.
Choose the resolution mode by pressing the FF key (by default, your copier uses the FINE mode during local copying).
Press the key.
Multicopy (models with fixed paper tray)
PRESS M, 5, 6, OK
Type in the number of copies you want to print on the numeric keypad (1 to 99).
Press the OK key: the document is stored and then printed.
The multicopy function cannot be used to print out a received fax; it applies only to a printed document of which you want one or more duplicates.

Telephoning

Directory

Settings

Fax

TAD

Printing

Doc control

Advanced functions
Options
FOR MODELS WITH DOCUMENT FEEDER ACCOMMODATING 1 PAGE
The machine can be used as a photocopier.
Insert the first page to be copied into the document feeder, as you would for a transmission.
Select the resolution mode by pressing on the key FF (by default, your copier uses the FINE mode during local copying).
Press on , the machine memorises your document. Once the memorisation is completed, the machine beeps and the screen displays INSERT DOCUMENT for a few seconds.
Insert the following page, then proceed similarly for the other pages of your document.
Press on , once all the pages have been memorised: the screen displays OUT OF PAPER.
Insert a sheet of paper into the print feeder. The machine prints automatically your document.
RIBBON GAUGE DISPLAY
PRESS M, 5, 7, OK
The ribbon gauge shows the available quantity of ribbon in percent.
DOCUMENT CONTROL (MENU 6)
A set of menus enables you to control all the pending commands (delayed transmission, passive polling, active polling), and enables you to run, modify, cancel or delete them.
EXECUTING A PENDING COMMAND
This function is used to immediately execute a pending command:
PRESS M, 6, 1, OK
The status of the pending documents is shown:
POL:ACTIVE POLLING
TX : DELAYED TRANSMISSION
Select the required command using the or key.
Press the OK key to execute it.
CONSULTING OR MODIFYING THE QUEUE
PRESS M, 6, 2, OK
Select the command you want to consult or modify using the or key.
Press the OK key and modify the parameters for the displayed transmission request.
Press the OK key to confirm your changes.
DELETING A COMMAND FROM THE QUEUE
PRESS M, 6, 3, OK
Select the command you want to delete using the or key.
Press the OK key to delete the request from the queue.
Press the OK key to confirm deletion.
PRINT A DOCUMENT WAITING FOR TRANSMISSION
This function enables you to know the content of a document waiting for transmission.
PRESS M, 6, 4, OK
Select the pending document using the or key.
Press the OK key to print out the selected document.
PRINTING OUT THE LIST OF PENDING OPERATIONS
This list shows, for each pending document: the sequence number of the pending operation, the addressee's name, the scheduled transmission time, the type of pending operation, the number of pages in the document and its size (percentage of memory taken up by the document).
To print out the list,
PRESS M, 6, 5, OK
ADVANCED FUNCTIONS (MENU 7)
RELAYING RECEIVED DOCUMENTS (DEPENDING ON MODEL)
ACTIVATING/DE-ACTIVATING THE RELAY FUNCTION
You can automatically relay all received messages (faxes or voice messages) to another telephone set or fax machine.
PRESS M, 7, 2, OK
Choose one of the following three options using the or key, and press OK to confirm:
ON
- Enter the destination phone/fax number. Press OK to confirm.
- Choose the type of messages to be forwarded (VOCAL, FAX or VOC/FAX RELAY) and press OK to confirm.
- If you have chosen VOCAL or VOC/FAX, enter the remote interrogation code of your answering machine (if not already done), and press OK to confirm.
- Choose SECURED RELAY or FREE RELAY and press OK to confirm.
- If you have chosen FAX and SECURED RELAY, enter the remote interrogation code of your answering machine (if not already done), and press OK to confirm.
OFF: all your messages will be kept in your fax machine.
SETUP: if you have already activated the relay function once, this menu enables you to change a number of parameters (addressee's phone/fax number, type of messages to be relayed, remote interrogation code, secured relay or free relay, etc.).
Once you have made the changes, validate menu 721>ON again by pressing the OK key in order to re-activate the relay function taking the changes into account.
RETRIEVING RELAYED DOCUMENTS
When receiving your relayed documents on the destination phone/fax, you should apply the following procedure:
Pick up the handset.
Enter the remote interrogation code as you hear the beeps.
Then, follow the same procedure as for remote interrogation to listen to the voice messages and/ or receive the fax messages.


Options
TECHNICAL PARAMETERS
The technical parameters are arranged into a list in which you move using the and keys. To access technical parameters:
PRESS M, 7, 9, OK
| 02 TX HEADER: | you can insert your name, your fax number, the date and time on the header of the fax received by the addressee. |
| 03 TX LOCK UP: | lock up the fax transmission speed. |
| 04 ANTI ECHO: | inhibit the satellite echo in case of fax problems in long-haul calls. |
| 10 RX HEADER: | print the sender's name and fax number as well as the date and time on the header of the fax you receive. |
| 11 RX LOCK UP: | lock up the fax reception speed. |
| 20 REDUCE MODE: | choose the printing reduction mode (received faxes, local copies): automatic or fixed. |
| 21 REDUCE RATE: | set the printing reduction rate. |
| 22 NB OF PAGES: | give the number of pages printed (received faxes and local copies) since machine switch-on. |
| 40 RECALL LENGTH: | choose the in-line interrupt time (long or short) of the R key "Flash" signal. |
| 50 SORTED PRINT: | print documents in reverse order of reception (or scanning for a local copy) depending on model. |
REMOTE CONTROL FROM AN EXTENSION SET
You can control your machine remotely from an extension tone dialling telephone set in your installation.
If the extension set is configured in pulse dialling mode, type * to switch it to tone dialling mode.
SWITCHING OFF THE TAD
If you take the line from an extension set and your machine did so before you and is playing your TAD's greeting message, press # then 0 to switch off the TAD.
SWITCHING TO FAX RECEPTION MODE
If you take the line from an extension set and you cannot hear anyone speaking, you can switch your machine remotely to fax reception mode by typing # then 7.
OPTIONS
DISPLAY
If you subscribe to a caller display service, the machine will show the caller information on its display and on the handset display.
| Machine display | Handset display | |
| Number | INCOMING CALL NUMBER/NAME | NUMBER ONLY |
| Number withheld | INCOMING CALL alternating with WITHHELD | -------- |
| Number unavailable | INCOMING CALL alternating with UNAVAILABLE | xxxxxxxxxx |
| Operator | INCOMING CALL alternating with UNAVAILABLE | xxxxxxxxxx |
| International | INCOMING CALL alternating with UNAVAILABLE | xxxxxxxxxx |
| Payphone | INCOMING CALL alternating with NUMBER | NUMBER |
| Ringback | INCOMING CALL alternating with NUMBER/NAME | NUMBER ONLY |
If the call is from a number stored in the machine's directory, the display will show the name it belongs to rather than the number. The handset display will only show the number.
The machine stores the date, time and number or name of up to 10 calls - after 10 calls have been stored it retains the last 10. If a new call is from the same number as an earlier call only the later call details will be stored. Number Withheld, Number Unavailable, Operator and International calls will not be stored.
The list of stored call details can be reviewed from the base station and from the handset.
To review the list from the base station
Press F1. The display shows details of the last call.
- Use the and keys to scroll through the list.
- To call a number from the stored list press the key or pick up the handset while the number is displayed.
- To fax to a number from the list press while the number is displayed.


Options
When displaying call details the display alternates between the name (or number) and the date and time of the call. It will also show a T to indicate a telephone call, a F for a fax call or a A if the caller has let you a message.
To review the list from the cordless handset
- Press i then . The display shows details of the last call.
- Use the and keys to scroll through the list.
- To call a number from the stored list press the key.
APPENDIX
REplacement OF CONSUMABLES
Consumables (ink ribbon and ribbon gauge card) are already installed in your machine, but you will eventually have to change them. To do so, please refer to the instructions given in the following paragraphs.
INK RIBBON
The ink ribbon enables the unit to print on normal paper.
Caution - Only use the ink ribbon matching the manufacturer's specifications. To use other types of ink ribbon could damage the unit and invalidate the guaranty. Documents printed by your unit can be read from the used portion of the worn ink ribbon. If these documents are considered as confidential, you may want to remove the ink ribbon whenever you leave the unit.
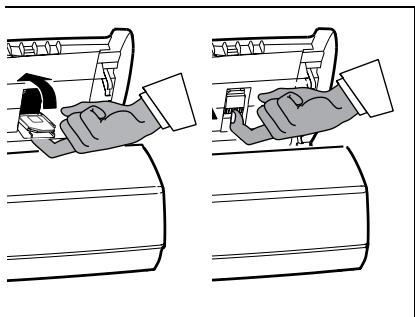
Pick up the handset (models with handset) and put it on the side.
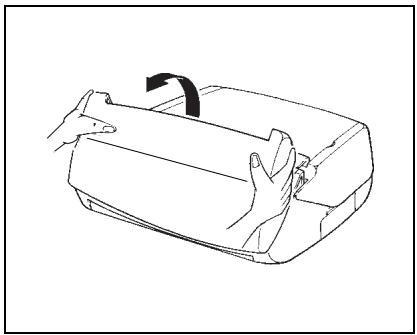

Open the front cover: lift it towards you until it remains open.
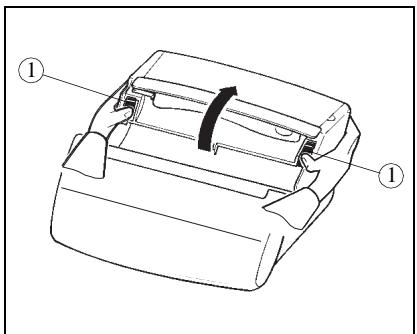
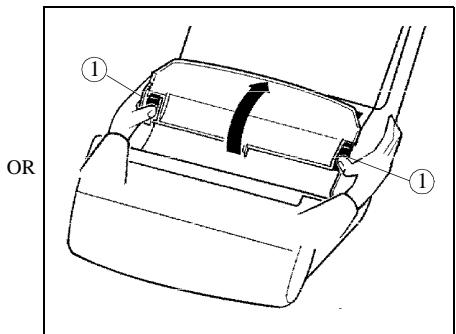
Open the rear cover: unlock the latches (1) before pushing the cover towards the rear.
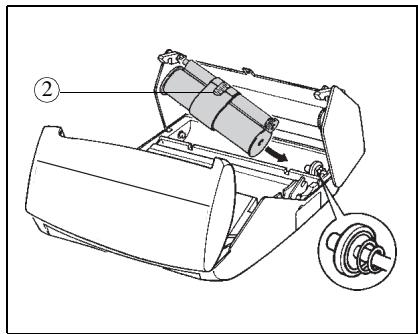
Remove the worn ink ribbon from its housing.
Position the ink ribbon above its housing under the rear cover.
Insert the ink ribbon into its housing without removing the adhesive strip (2):
- Position the right-hand (white) end of the main roller onto the retractable axis.
- Position the left-hand (green) end of the main roller onto the left axis.
Pull off the adhesive strip (2) from the ink ribbon.
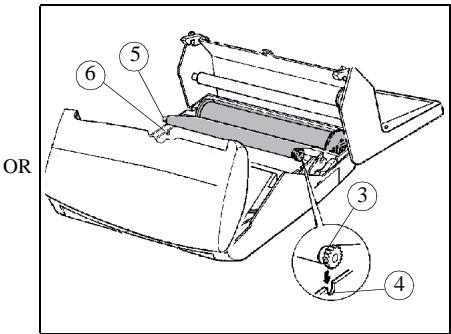
Insert the small roller into its housing:
Check that the gear axis (3) is correctly positioned in its slot (4) as is the other axis (5) in its corresponding slot (6).
Close the rear cover.
RIBBON GAUGE
The gauge card enables screen display, after printout, of the percentage of remaining ink ribbon.
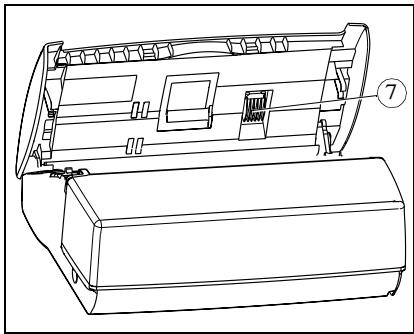
The front cover being open, locate the gauge card housing (7).
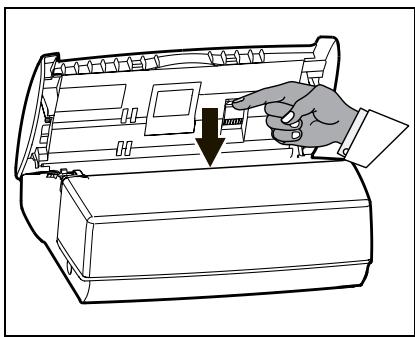
Push downward on the gauge card housing to unlock it: it opens automatically, letting you access the worn gauge card.
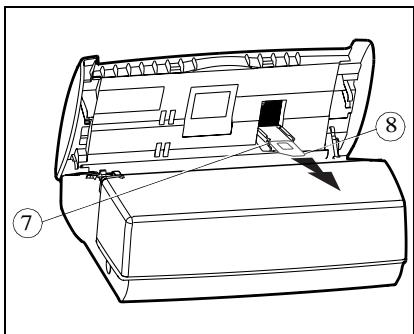
Remove the worn gauge card (8) from its housing.
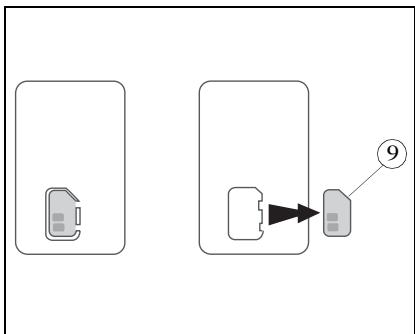
Remove the new (pre-cut) gauge (9) from the ribbon gauge card (8).
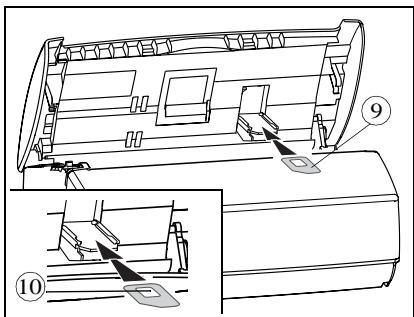
Insert the new gauge card (9) into its housing. Make sure the chip (10) of the gauge card (9) is upwards, bevelled corner to the top left side.
Close the flap of the gauge card housing by rotating it. Once into place, push it upward to block it. Close the cover and replace the handset.


Options
Caution - The gauge card displays on the screen, after each printing, the percentage of remaining ink ribbon. If the gauge is not installed or not properly installed, the unit displays: .
If you forgot to change the gauge at the same time as the ribbon, the unit displays:
GAUGE EMP
TROUBLESHOOTING
| Failures | Remedies |
| ·The screen remains blank. | ·Check that the power cord is correctly connected on both its sides. |
| ·The machine does not answer the call. | ·Check the reception mode. ·Check the number of rings (please refer to § Number of rings for the automatic mode on page 17). ·Configure the machine on "private network" (please refer to § Network on page 16). |
| ·The printed photocopy is blank. | ·The document was placed upside down in the document feeder. |
| ·The telephone exchange does not recognise the number you have called. | ·Check that the telephone line cord is correctly connected to the device. ·Check the telephone line and the phone outlet. |
| ·The machine does not ring. | ·Restore ringing (please refer to § Ringing melody and key beeps on page 15). |
| ·The telephone does not work. | ·Check that the power cord is correctly connected on both its sides. ·There may be a power failure. ·Check the telephone line and the phone outlet. |
| ·One or several vertical black strips appear on the documents copied or received by your party. | ·Open the front cover and clean the scanning device (analysis) located in front of the white roller with a soft lint-free rag soaked with alcohol. After cleaning, close the front cover and make a copy to check that the black strips have disappeared. |
| ·The gauge card housing has unclipPED. | ·You may easily put it back into place: approach the gauge card housing, striations downwards, and position both axes towards the slots of the housing lower part, then push until clipping (please refer to § Replacement of consumables on page 41). |
| The screen displays: OUT OF PAPER PRINTER COVER REMOVE PAGE OVERHEATING GAUGE EMPTY | ·Put paper into the paper feeder. ·Close the rear cover. ·Open the rear cover to access the paper path and remove the sheet of paper. Make sure the rear cover is properly closed afterwards. ·The last printed documents show a lot of black smears, the printer temperature is too high. Wait a few minutes for it to co-ol. ·You probably forgot to replace the gauge when you replaced the printer ribbon. |
| MISSING GAUGE | • Remove the gauge housing cover and make sure the gauge is present and correctly positioned. |
| CHANGE RIBBON | • The ink ribbon is completely used: install a new printer ribbon with its new gauge. |
| REMOVE DOCUMENT | • Open the front cover and check the document path. |
| MEMORY FULL | • Print the received faxes (and/or listen to the vocal messages received). |
| • Other cases | • Call your after-sales service. |
CODES OF THE TRANSMISSION REPORT
The result of each communication is given by the logs (transmission/reception) and the communication report. In case of failure, the result is a code, whose meaning is as follows:
FAILURE CODES
Code 01 - Your party does not answer
Please call later.
Code 02 - The called number is suspect, since no fax answers
Check the number of your party.
Code 03 - STOP
You pushed on STOP during the communication.
Code 04 - Invalid abbreviated number
Check the number.
Code 05 - Document feeder failure during the communication
Document jam or failure of the document feeder.
Code 07 - Failure in the operation of the remote terminal or line
Restart the communication.
Code 08 - The document you sent may not have been correctly received
Send it again and check with your party.
Code 0A - Active polling
You tried an active polling while the remote terminal had no document to be polled.
Code 0B - Difference between the number of pages forecast at transmission and the number of pages sent
Check the number of pages.
Code 13 - Full memory
Fax reception has become impossible.
Code 17 - Protected access
Your machine is in protected access; a party tried to call you while he/she did not have your password.
Code 23 - Unknown mailbox No
The number of the mailbox you entered is unknown by your party's machine.
TO ORDER RIBBON AND PAPER
Ink ribbon and gauge card
Your copier uses the TTR815 ribbon, which prints over 230 pages.
Please use the following references to order new ribbons:
TTR815 RIBBON, Reference: 23645699-4
Paper
Print quality will vary according to the kind of paper used.
To get the best results, use SAGEM "series 300" paper available in packets of 500 sheets.
SAGEM "series 300" paper, Reference: 23273604-9
Ribbon + paper lot
To simplify your orders, a lot grouping one TTR815 ribbon and 250 SAGEM "series 300" sheets of paper has been created and may be ordered under the reference:
TTR lot Reference: 23646882-4
USER'S MANUAL 23260057-5 IND A

DATA SUBJECT TO CHANGE WITHOUT NOTICE

6, avenue d'Iena - 75783 PARIS CEDEX 16 - FRANCE
- QUICK REFERENCE GUIDE,MENUGUIDE
- CONTENTS
- INTRODUCTION 1
- TELEPHONING 9
- DIRECTORY (MENU 1). 11
- SETTINGSMENU2) 15
- FAX (MENU 3) 19
- TAD (MENU 4) 25
- DOCUMENT CONTROL (MENU 6). 35
- ADVANCED FUNCTIONS (MENU 7) 37
- OPTIONS 39
- APPENDIX 41
- INTRODUCTION
- UNPACKING
- CONNECTIONS
- CONNECTION OF THE POWER CORD
- CONNECTION OF THE HANDSET (MODELS WITH HANDSET)
- CONNECTION OF THE TELEPHONE LINE
- For models with handset
- For the models without handset
- SWITCHING ON
- LOADING THE PAPER
- FOR MODELS WITH A FIXED PAPER TRAY (100 PAGES)
- MODELS WITH A REMOVE PAPER TRAY (30 PAGES)
- FOR MODELS WITH SHEET BY SHEET PAPER FEEDER (1 PAGE)
- CHOOSING THE OPERATING MODE (TEL-FAX-TAD)
- FOR MODELS WITH TAD
- AUTOMATIC MODE WITH TAD (TEL-FAX-TAD)
- AUTOMATIC MODE WITHOUT TAD (TEL-FAX)
- MANUAL MODE (TEL)
- FOR MODELS WITHOUT TAD
- Fax mode (FAX)
- The unit is not connected to an external TAD
- The unit is connected to an external TAD
- Automatic mode (TEL-FAX)
- Manual mode (TEL)
- Automatic mode
- Manual mode
- THE MENUS
- ACCESSING THE MENUS
- Main menu: access to functions
- Sub-menus: access to function settings
- Moving inside a data entry field
- PRINTING THE MENU GUIDE
- TELEPHONING
- CALLING
- CALLING USING THE HANDSET
- CALLING USING THE KEY
- Loudspeaker listening
- Hands-free mode (TAD-Models)
- CALLING USING THE DIRECTORY
- REDIALLING ONE OF THE LAST TEN NUMBERS CALLED
- ANSWERING A CALL
- FUNCTIONS AVAILABLE DURING A CALL
- KNOWING THE DURATION OF THE CALL
- ACTIVATING LOUDSPEAKER LISTENING
- SWITCHING FROM HANDSET TO HANDS-FREE MODE (TAD-MODELS)
- ACTIVATING THE MUTE
- RECORDING A CALL (DEPENDING ON MODEL)
- REROUTING A CALL
- SWITCH TO FAX RECEPTION MODE
- DIRECTORY (MENU 1)
- CREATING A RECORD
- YOUR PARTY'S NAME
- YOUR PARTY'S NUMBER
- NUMBER ASSIGNED
- SELECTION BY NAME
- SELECTION BY ABBREVIATED NUMBER
- EDITING A RECORD
- DELETEING A RECORD
- PRINTING THE DIRECTORY
- SETTINGS (MENU 2)
- DATE/TIME
- NUMBER/NAME
- RINGING MELODY AND KEY BEEPS
- RINGING MEODY
- KEY BEEPS
- ALARM
- NETWORK
- TYPE OF NETWORK
- PREFIX
- To set the local prefix
- NIGHT MODE
- To deactivate the night mode,
- NUMBER OF RINGS FOR THE AUTOMATIC MODE
- CORDLESSPHONE
- REGISTERING A CORDLESS PHONE
- DE-REGISTERING A CORDLESS PHONE
- BASE STATION REGISTRATION CODE
- PROTECTION OF YOUR MACHINE (DEPENDING ON MODEL)
- PROTECTION OF VOICE OR FAX MESSAGES
- Message access lock
- Access to locked messages
- REMOTE INTERROGATION CODE
- CHOICE OF THE LANGUAGE
- FAX (MENU 3)
- INSERTING THE DOCUMENT INTO THE FEEDER
- MODELS WITH A FIXED PAPER TRAY
- MODELS WITH A REMOVE PAPER TRAY
- MODELS WITH A SHEET BY SHEET PAPER FEEDER
- SENDING A FAX
- DOCUMENT RESOLUTION
- Immediate transmission
- Transmission from the directory
- Broadcast transmission
- Delayed transmission
- CHOOSING THE TYPE OF TRANSMISSION REPORT
- TRANSMISSION FROM THE MACHINE'S MEMORY OR THE DOCUMENT FEEDER
- RECEIVING A FAX
- PRINTING FAXES RECEIVED IN THE MEMORY
- RECEPTION FROM THE MEMORY (FAX ANSWERING MACHINE) OR DIRECT PRINTING
- REMOTE INTERROGATION OF THE FAX ANSWERING MACHINE (TAD-MODELS)
- RECEPTION MEMORY SATURATION
- DURING TRANSMISSION
- STOPPING A TRANSMISSION
- PHONE CALLS
- To call your party
- Your party calls you
- ADVANCED FUNCTIONS
- POLLING A DOCUMENT
- RETRIEVING A DOCUMENT
- TAD (MENU 4)
- MODELS WITH TAD (INTERNAL)
- GREETING MESSAGES
- Answering-recording machine
- Recording the greeting message
- Playing back the greeting message
- Answering machine
- Selecting the type of TAD
- Switching the TAD on / off
- Switching off
- MESSAGE
- Listening to messages
- Local message
- Recording the local message
- Playing back the local message
- Deleting messages
- Deleting all messages
- Deleting a selected message
- Saturation of the TAD's memory
- REMOTE INTERROGATION
- List of available remote operations:
- Call screening
- Privileged access
- Parameterisation of the privileged access code
- Putting the privileged access mode into service
- Privileged calls
- DETACHABLE QUICK REFERENCE CARD
- Quick reference card for operating your TAD featuring the remote interrogation function
- From a fax machine:
- MODELS WITH VOCAL TAD (EXTERNAL)
- CONNECTION
- PUTTING INTO SERVICE
- USE
- LOGS
- DIRECTORY
- SETTINGS
- LATEST TRANSMISSION REPORT
- LOCAL COPY
- FOR MODELS WITH DOCUMENT FEEDER ACCOMMODATING 15 PAGES
- Photocopy
- Multicopy (models with fixed paper tray)
- FOR MODELS WITH DOCUMENT FEEDER ACCOMMODATING 1 PAGE
- RIBBON GAUGE DISPLAY
- DOCUMENT CONTROL (MENU 6)
- EXECUTING A PENDING COMMAND
- CONSULTING OR MODIFYING THE QUEUE
- DELETING A COMMAND FROM THE QUEUE
- PRINT A DOCUMENT WAITING FOR TRANSMISSION
- PRINTING OUT THE LIST OF PENDING OPERATIONS
- ADVANCED FUNCTIONS (MENU 7)
- RELAYING RECEIVED DOCUMENTS (DEPENDING ON MODEL)
- ACTIVATING/DE-ACTIVATING THE RELAY FUNCTION
- ON
- RETRIEVING RELAYED DOCUMENTS
- TECHNICAL PARAMETERS
- REMOTE CONTROL FROM AN EXTENSION SET
- SWITCHING OFF THE TAD
- SWITCHING TO FAX RECEPTION MODE
- OPTIONS
- DISPLAY
- To review the list from the base station
- To review the list from the cordless handset
- APPENDIX
- REplacement OF CONSUMABLES
- INK RIBBON
- RIBBON GAUGE
- CODES OF THE TRANSMISSION REPORT
- FAILURE CODES
- TO ORDER RIBBON AND PAPER
- Ink ribbon and gauge card
- Paper
- Ribbon + paper lot
Brand : SAGEM
Model : PHONEFAX 2312
Category : Fax