
Phonefax 325 - Fax SAGEM - Free user manual and instructions
Find the device manual for free Phonefax 325 SAGEM in PDF.


| Product Type | Fax machine with integrated telephone answering device (TAD) and cordless telephone model 325 |
| Dimensions | Approximately 360 x 240 x 120 mm (estimated) |
| Weight | Approximately 3.5 kg (estimated) |
| Power Supply | Mains supply unit, input 230V AC, output 12V DC (as per manual) |
| Paper Type | A4 plain paper (approx. 80 g/m²), recommended SAGEM Série 300 |
| Ink Ribbon | TTR 815 ink ribbon, provides over 230 pages (sample ribbon provides about 50 pages) |
| Document Feeder | Single sheet feeder |
| Fax Speed | Up to 14400 bps modem |
| Resolution Modes | Normal, Fine, Photo |
| Telephone Features | Speakerphone, redial, speed dial (50 numbers), hold, mute, call transfer |
| TAD Features | Answer-record, answer-only, remote retrieval, privileged access, memo recording |
| Receive Modes | Telephone, Fax/Phone, TAD |
| Other Functions | Photocopy, scheduled transmission, broadcasting, polling, queue management, audible alarm, ink gauge |
| Security Warnings | Not designed for emergency calls during power failure; avoid moisture; use only approved consumables |
| Maintenance | Clean scanning glass with soft cloth and surgical spirit; replace ink ribbon and gauge as needed |
| Spare Parts | Ink ribbon (ref: 23327983-7), paper (ref: 23273604-9), combo pack (ref: 23295329-4) |
| General Information | Approved for pan-European PSTN connection; REN = 1; includes cordless phone in model 325 |
Frequently Asked Questions - Phonefax 325 SAGEM
User questions about Phonefax 325 SAGEM
0 question about this device. Answer the ones you know or ask your own.
Ask a new question about this device
Download the instructions for your Fax in PDF format for free! Find your manual Phonefax 325 - SAGEM and take your electronic device back in hand. On this page are published all the documents necessary for the use of your device. Phonefax 325 by SAGEM.
USER MANUAL Phonefax 325 SAGEM
FACSIMILE SAGEM PHONEFAX 320 / 325
User manual
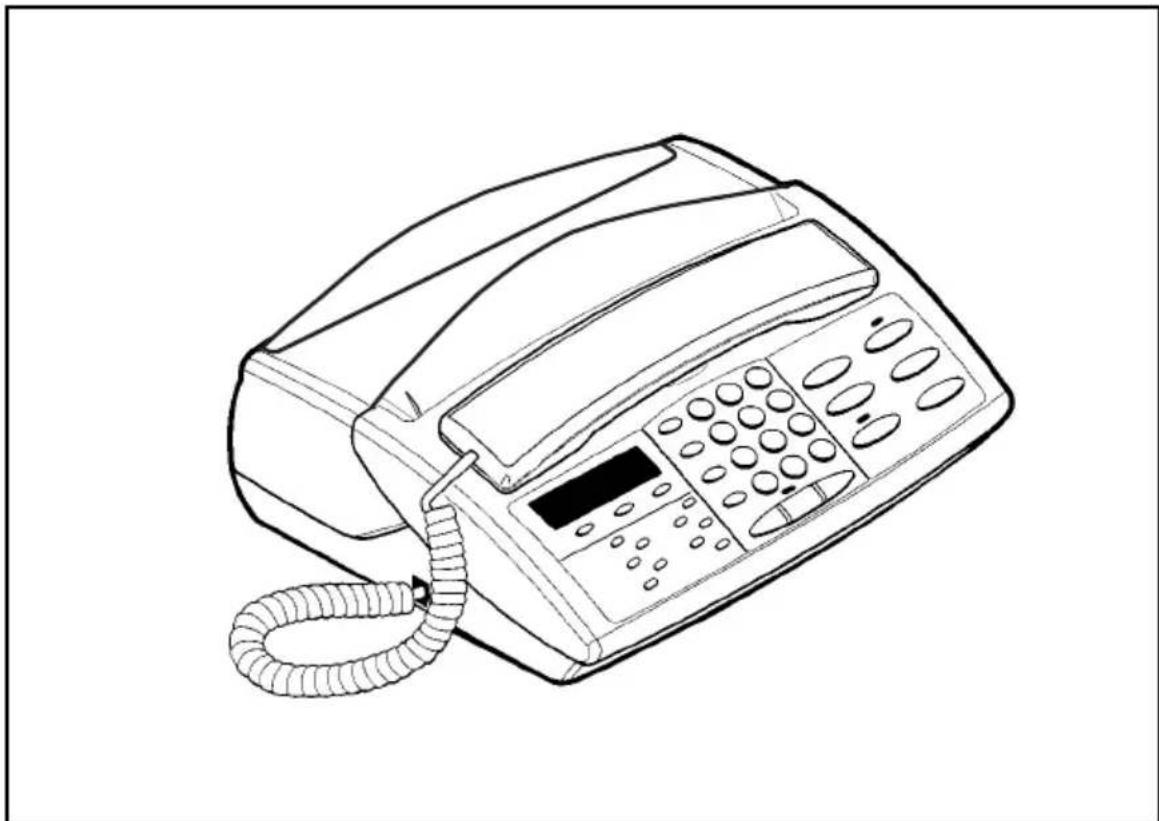
natural_image
Line drawing of a classic office telephone with a cord and keypad (no text or symbols)This product is not designed for making emergency telephone calls when the power fails. Alternative arrangements should be made for access to emergency service.
GENERAL VIEW
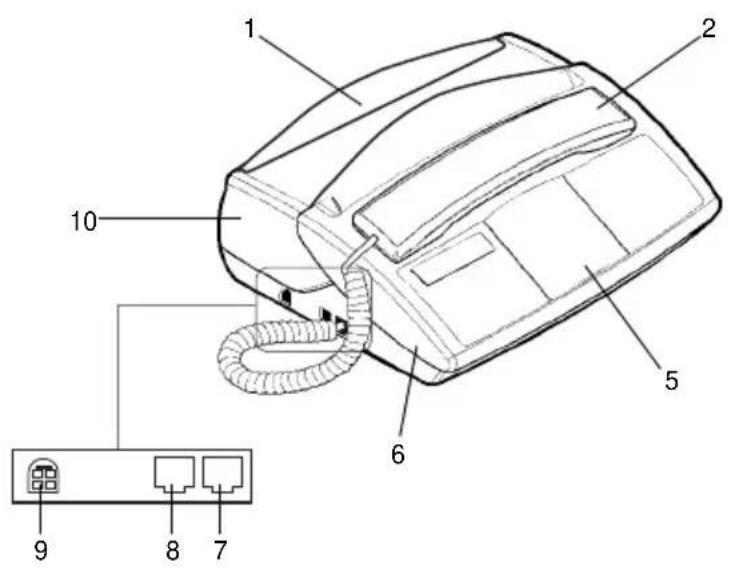
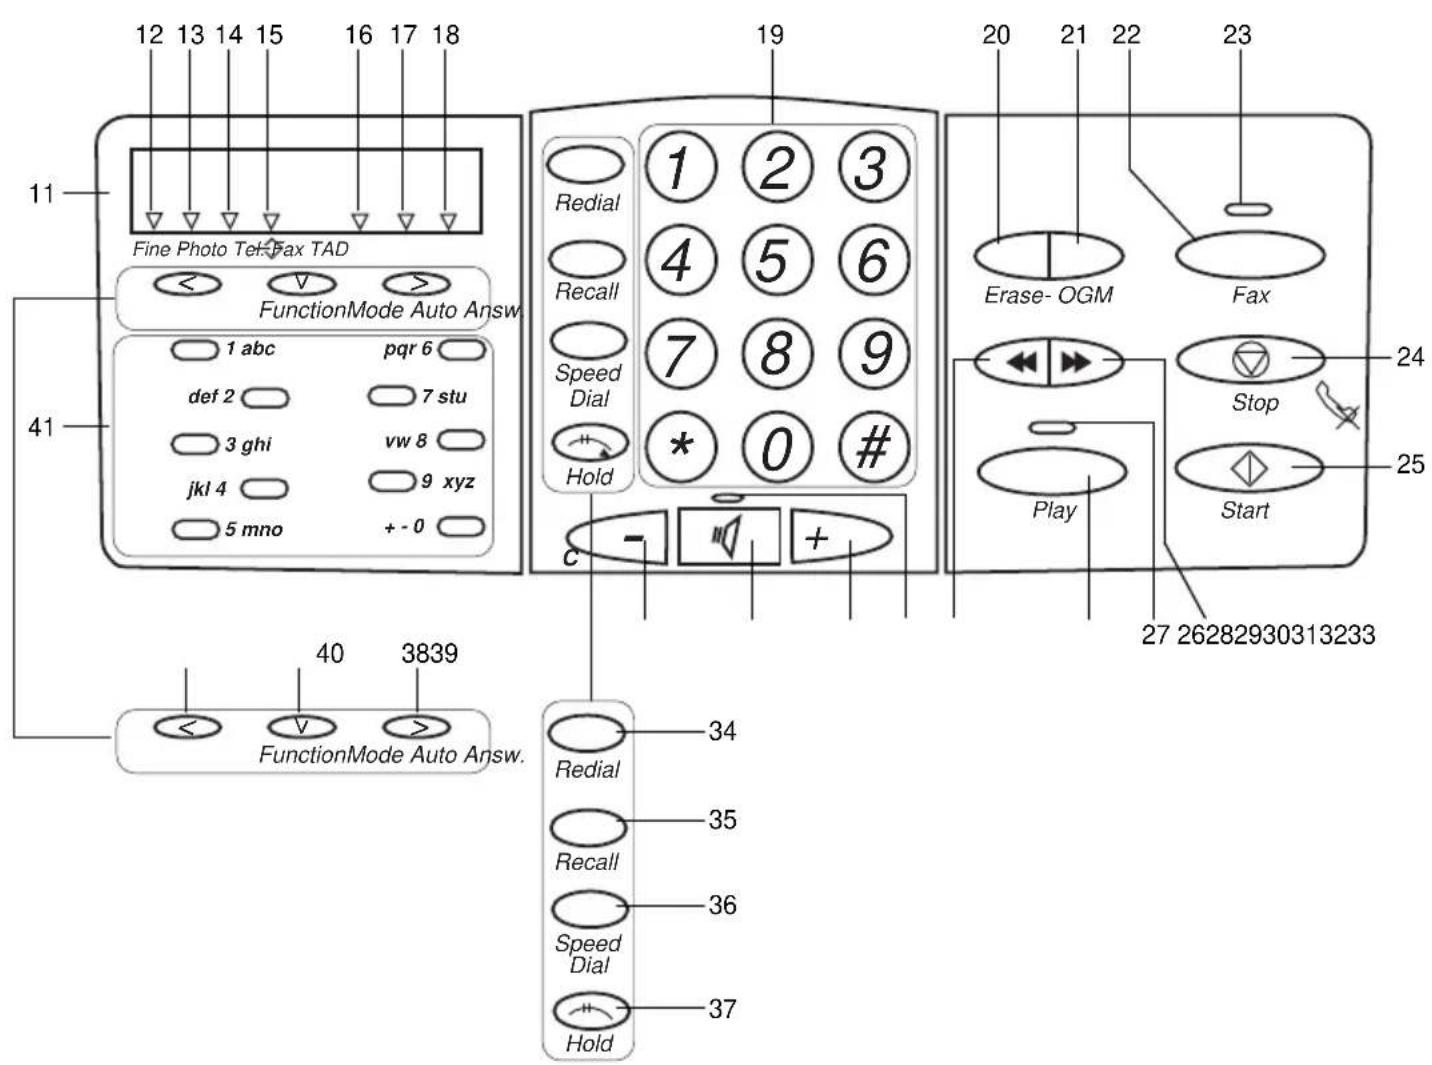
320 / 325 MODEL CONTROL PANEL
NOTE
This manual covers the following models:
- 320 : internal telephone answering device model.
- 325 : internal telephone answering device model, delivered with a cordless telephone.
1 Fax access panel.
2 Handset.
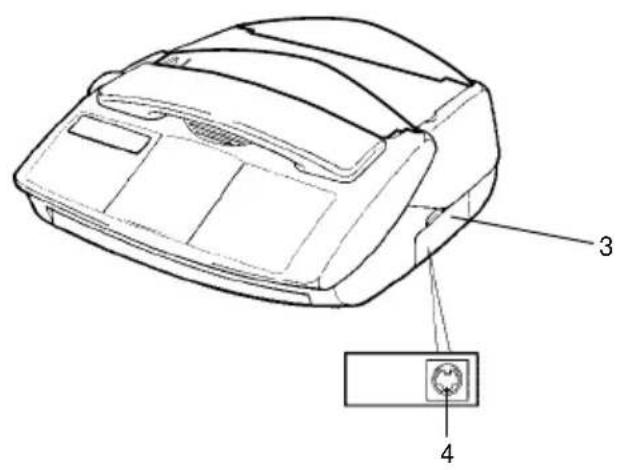
3 Cordless telephone socket access flap.
4 Cordless telephone socket.
5 Console.
6 Front cover.
7 Telephone handset socket.
8 Telephone line socket.
9 Mains socket.
10 Rear cover.
11 LCD display panel (characters and icons).
12 Fine icon: FINE resolution mode (high quality).
13 Photo icon: PHOTO resolution mode (photographs).
14 Error icon: appears in the event of an incident (e.g. open cover).
15 On-line icon: on during transmission; flashes while connecting.
16 Tel icon: on when the telephone is in use; flashes when ring is off.
17 Fax icon: on when receiving a document; flashes when the fax's memory is full.
18 TAD icon: on when internal telephone answering device (TAD) is operating; flashes when there are no messages or when the TAD is full.
19 Dial keypad.
20 Erase key: to erase messages on the TAD.
21 OGM key: to listen to or record messages on the TAD.
22 Fax key: to print out faxes stored in memory.
23 Fax indicator: presence of fax messages stored in memory, but not printed out.
24 (Stop) key: to stop the current operation or as a mute for the telephone.
25 (Start) key: to send a fax or activate photocopying.
26 key: used to fast forward through TAD message playback.
27 Play indicator: there are messages on the TAD.
28 Play key: to play back messages on the TAD.
29 key: used to skip back through TAD message play back.
30 Loudspeaker indicator: hands-free telephony or speaker mode.
31 key: loudspeaker volume up.
32 (Loudspeaker) key: hands-free telephony or speaker mode.
33 key: loudspeaker volume down.
34 Redial key: to automatically call the last numbers dialled.
35 Recall key: to insert a pause in the number being dialled or as a “FLASH” key (PABX).
36 Speed Dial key: to call or store an abbreviated number in the unit's memory.
37 Hold key: to transfer a telephone call to another handset on the same line.
38 Auto answ. key: to select the answer mode, to access the next option of the menu displayed, or to shift the cursor right.
39 Function key: to access the unit's various functions and as a confirmation key.
40 Modekey: to select the scan resolution, to access the previous option of the menu displayed or to shift the cursor left.
41 Direct dial / alphanumeric keypad.
TABLE OF CONTENTS
CHAPTER 1: INSTALLATION....1
- Unpacking the unit.... 1
- Output paper 1
- connections 1
- Use....2
CHAPTER 2: TELEPHONE FUNCTIONS....5
- Directory 5
- Loudspeaker key 6
- Other functions....6
CHAPTER 3: FACSIMILE....7
- Inserting a document ....7
- Transmitting documents....7
- Receiving faxes 9
- Making a telephone call during a fax transmission ....10
- Queue function 10
- Fax-back and polling....11
CHAPTER 4: TELEPHONE ANSWERING DEVICE....12
- Activating / de-activating the TAD....12
- Announcements 12
- Messages OGM....13
- Call screening 13
- Recording a memo....14
- Remote retrieval....14
- Privileged access....15
CHAPTER 5: RECEIVE MODES ......16
- Telephone mode....16
- Fax/phone mode 16
- TAD mode (*) 16
CHAPTER 6: OTHERS FUNCTIONS....17
- Photocopying .... 17
- Printing out 17
- Remote operation from another handset on the same line....18
- Audible alarm 18
- Ink gauge....18
- Operation in conjunction with a cordless telephone....18
- Distinctive ringing (for Australia only)....19
- Using a portable phone (depending on model)....19
CHAPTER 7: APPENDICES....20
- Consumables replacement....20
- Settings 22
- Transmission report codes 22
- Troubleshooting....23
- Notice for connection to the telecommunication system....24
This equipment has been approved in accordance with Council Decision 98/482/EC for pan-European single terminal connection to the public switched telephone network (PSTN).
In the event of problems, you should contact your equipment supplier.
NOTE POUR L'IMPRIMEUR : VOIR BAT
CHAPTER 1: INSTALLATION
1. UNPACKING THE UNIT
Check the presence of the following items:
Machine
Telephone cable
Mains supply unit
Paper
Telephone handset
User manual
2. OUTPUT PAPER

You may use any standard plain paper (A4 format photocopying paper, approx. 80 g/m ^-1 ). However, for optimal print quality results, we suggest you use the type of paper recommended by the manufacturer.
■ Introduce the paper one sheet by one sheet.
3. CONNECTIONS

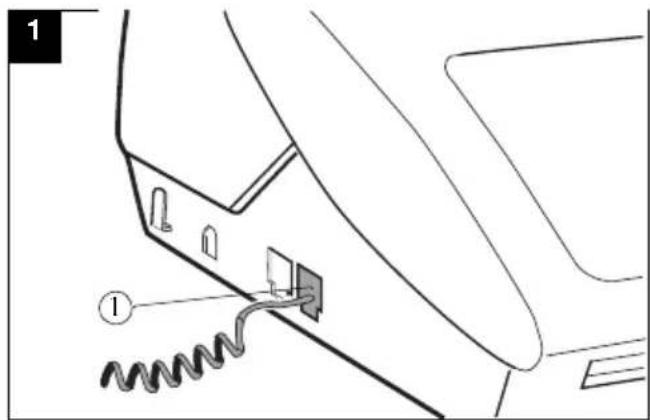
Connect the telephone handset cord to the appropriate connector (1) on the main unit.

Refer to the safety warnings at the beginning of this user manual.
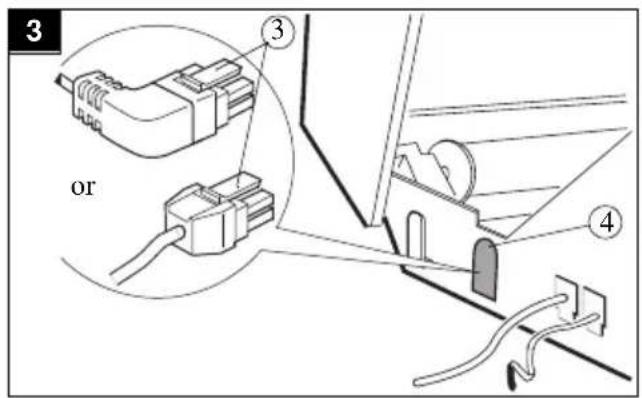
Connect the plug of the telephone cable into the appropriate connector (2) on the main unit, and connect the other end to your wall telephone socket.

Check if the wall socket to which you'll connect your machine complies with directives on the label under the mains supply unit.
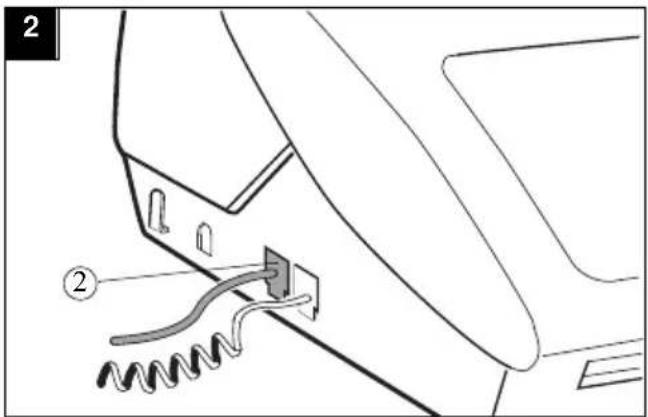
Connect the plug of the mains supply unit into connector (4) on the main unit. Ensure the strip (3) is facing upwards.
Connect the mains cable plug of the mains supply unit to the wall socket.
4. USE
When the unit is powered up for the first time, you will be prompted to set the date and time. Having entered the date and time, you may use all your unit's basic functions. You may program your "first setups" before sending a fax.
FUNCTIONS ACCESS
The following keys are used to program your unit:
| - FUNCTIONou √ key | enables you to enter FUNCTION mode or to confirm an entry or option. |
| - START key: | used to confirm an entry or option . |
| - STOP key: | enables you to exit the FUNCTION mode. Any changes which were not confirmed will be discarded. |
| ->key: | enables you to move to the next option or to shift the cursor right in an input field. |
| - < key: | enables you to return to the previous option or to shift the cursor left in an input field. |
| - C key: | enables you to exit a function or go back up one level in the menu structure. |




There are 2 ways to access functions:
• by invoking the appropriate function directly, e.g.:


(print out the listing of function codes press FUNCTION, 5, 1, ◊)
- by scrolling through the unit's menus using the V, > and <.. keys, e.g.:




(3 times)

FIRST SETUPS
ENTERING OR CHANGING THE DATE AND TIME
Press FUNCTION, 2, 1 and ◇
Enter the date and time using the numerical keypad, then press to confirm.
For example, to enter 7 May 1999, 9:15, enter 0 7 0 5 9 9 0 9 1 5 then press ◇.
STORING YOUR CSID
This is the number of the telephone line to which your unit is connected. This number will be printed on the header of the faxes you send.
Press FUNCTION, 2, 2 and
Enter your CSID using the numerical keypad, then press to confirm.
Notes: to erase the last character entered, press the < key.
You can insert spaces to make the number more legible, using the > key.
To insert a “+” sign, press the “*” key.
ENTERING YOUR NAME
This name will be printed on the header of the faxes you send.
You can enter any letter in the alphabet using the alphanumeric keys "abc", etc.
Press several times on the appropriate alphanumeric key to obtain the letter you require (e.g. for the def key, pressing the key repeatedly will scroll through characters D, E, F, 2, D, E, etc.). As soon as the appropriate character is displayed, you may proceed to select the next character by pressing another alphanumeric key or by pressing >.
Press FUNCTION, 2, 3 and
Enter your name using the alphanumeric keys, then press to confirm.
Notes: to erase the last character entered, press the < key.
You can insert spaces by pressing the > key.
To insert a “+” or “-” sign, press the “0” key.
TYPE OF NETWORK
Customise your unit to the particular type of network it is linked up to
- If you are linked directly to the public network (e.g. in a private home), you need not make any modifications since the unit is set to “public network” by default on leaving the factory.
- If you are not linked up to the public network (e.g. in a large company), you should set the unit to “private network”.
Proceed as follows:
Press FUNCTION, 2, 4 and
- Scroll through the options by pressing the > key, then press to confirm.
PULSE / TONE DIALLING
Your unit has been factory-programmed to operate on digital exchanges that support tone dialling.
If you are unable to connect and make a call, this may be because you are connected to an exchange that only supports pulse dialling.
Press FUNCTION, 2, 5 and ◊
The current dialling mode is displayed: TONE or PULSE
Press the > key to select the other mode, then press to confirm.
SETTING THE NUMBER OF RINGS BEFORE AUTOMATIC ANSWER
Press FUNCTION, 2, 6 and
Enter the new number of rings required, then press to confirm.
SELECTING THE RINGING TONE
Press FUNCTION, 2, 7 and ◇. You will hear the current ringing tone. Use the > key to select another tone.
To set the volume of the ringing tone, press the + and - keys (4 possible levels).
When you have set the appropriate ringing tone and volume, then press to confirm.
Note: select WITHOUT RING to eliminate the ringing tone outright; the TEL icon will flash instead.
REMOTE INQUIRY CODE
This function allows you to define the code necessary for locally or remotely accessing the vocal messages recorded or the faxes received by your machine and stored in memory.
To enter an inquiry code, press keys FUNCTION, 2, 8 and ◊
Enter your code, then press to confirm.
PREFIX
If your unit is connected to a private automatic branch exchange (PABX), you are advised to record the prefix number (generally 0) into your unit.
Press the FUNCTION, 8, 4 and
Select the WITH option using the > or < keys and press the key to validate.
Enter the number used by your PABX to access the telephone network (for instance 0) followed by a / and press the Key.
Enter if necessary the phone number length from which the prefix must be automatically added (in most cases the value is 10).
Press the key to validate.
Note: Check that the telephone numbers in the directory are not programmed with the prefix.
CHAPTER 2: TELEPHONE FUNCTIONS ^(*)
1. DIRECTORY
STORING A TELEPHONE NUMBER IN THE DIRECTORY
You may store up to 50 numbers (either phone or fax) which can then be speed dialled simply by entering their 2-digit reference code (00 to 49).
■ Press FUNCTION, then SPEED DIAL
Enter the 2-digit number of the desired memory location, then press to confirm.
Enter your contact's name or a handle using the alphanumeric keypad. To enter "LONDON" for instance, perform the following sequence:

Press to confirm your entry.
Now enter your contact's number using the keypad, and press to confirm.
Note: if you want to insert a dialling pause (e.g. to exit a private corporate PABX), press the RECALL key on the alphanumeric keypad.
A “/” character will be inserted in the number displayed.
MODIFYING/DELETING A STORED NUMBER
To modify or delete an entry in your directory, follow the same procedure as for entering a new entry:
Press FUNCTION, then SPEED DIAL.
Enter the 2-digit number of the desired memory location, then press to confirm.
Erase your contact's name using the < key.
Press to confirm.
Erase your contact's number using the < key.
Press ◇ to confirm.
CALLING A NUMBER STORED IN THE DIRECTORY
There are several ways to call a number stored in the directory:
Press SPEED DIAL, SPEED DIAL, 2, 0 (to call the number stored in memory location 20) and lift the handset to speak.
or
Press one of the one-touch dialling keys numbered 1 to 0. (The 0 key corresponds to SPEED DIAL 00, the 1 key to SPEED DIAL 01... the 9 key to SPEED DIAL 09) and lift the handset to speak.
or
Press SPEED DIAL, SPEED DIAL then > or < in order to scroll through the numbers in numerical order; lift your handset when the number you wish to dial is displayed on screen.
or
Press SPEED DIAL and then > or < to scroll through the contacts in alphabetical order and lift your handset when the name of the contact you wish to call is displayed on screen.
2. LOUDSPEAKER KEY

CALLING WITHOUT LIFTING THE RECEIVER
Dial your contact's number and press the key,
or
Press the Key and dial your contact's number (you may use one of the ten one-touch dialling keys).
When the person at the other end of the line answers the phone, pick up the receiver.
SPEAKERPHONE MODE
■ Press the key (the indicator comes on).
Press the + and - keys (located on either side of the key) as required in order to set the sound level.
Note: To de-activate speakerphone mode, press the key again (the indicator will go off).
3. OTHER FUNCTIONS
LAST NUMBER REDIAL
Press REDIAL, then < or > to access the last ten numbers dialled.
When the number required is displayed on screen:
- pick up the handset
or - press the key, and the unit will dial the number automatically
or - press to send by facsimile the page located inside the document loader.
MUTE
During a telephone conversation, if you want the person at the other end of the line not to hear you:
Press the key.
Press the key again to resume the conversation.
CALLING DURATION
A counter showing the duration of the current call comes on ten seconds after the last digit has been dialled.
TRANSFERRING CALLS TO ANOTHER HANDSET ON THE SAME LINE
This function is useful when you want to continue a conversation from another telephone terminal connected to the same line.
- Notify the person at the other end of the line.
Press the key - Hang up (instead of dropping the line, your unit will stay on the line).
Lift the receiver on the other terminal and continue your conversation.
Note: pressing will have no effect unless you hang up within 4 seconds.
You then have around 25 seconds to lift the receiver located in the other room.
CHAPTER 3: FACSIMILE
DO NOT INSERT IN THE UNIT DOCUMENTS WITH:
• paper clips, staples, or other similar objects,
- pins or glued-on inserts,
- sellotape,
- liquid correction fluid,
- wetink.
Do not insert documents that are glued together.
USE DOCUMENTS OF THE FOLLOWING SPECIFICATIONS ONLY:
• A4 format (21 x 29.7 cm),
• average thickness (such as photocopying paper),
• non-transparent,
• non-torn, crumpled or curled.
1. INSERTING A DOCUMENT
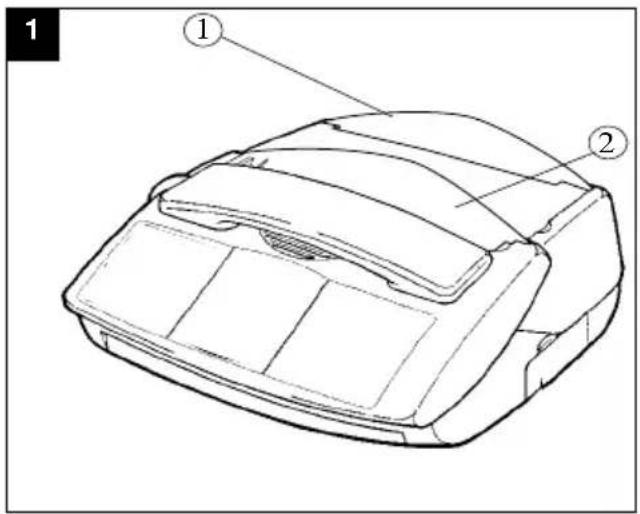
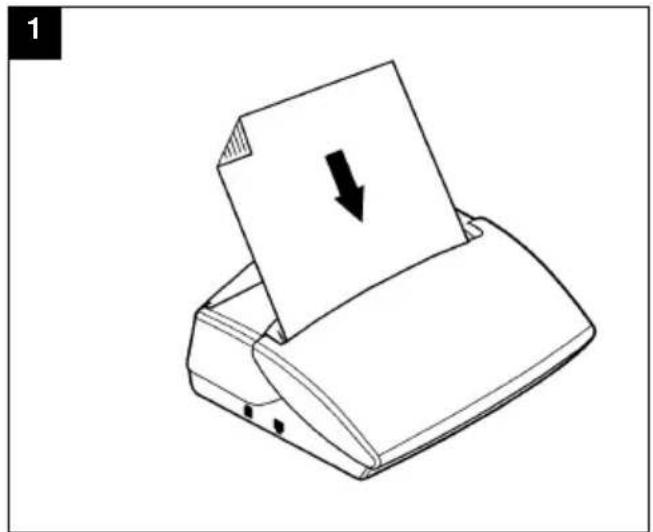
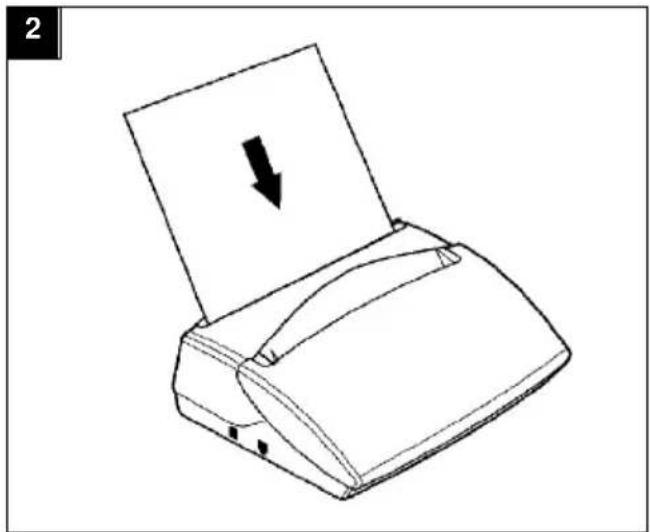
The printer loader (1) and document loader (2) can take only one sheet at a time.
natural_image
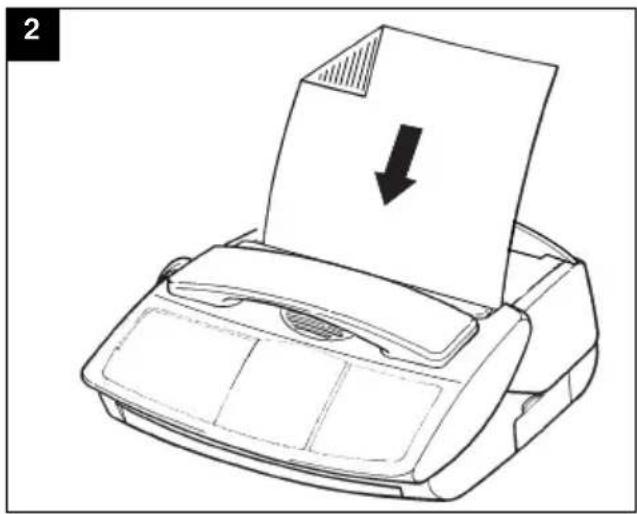
Line drawing of a printer with a paper roll and downward arrow indicating compression (no text or symbols)Insert the document printed face down in the document loader (one page at a time).
The unit displays: DOCUMENT READY
2. TRANSMITTING DOCUMENTS
SETTING THE RESOLUTION OR SCAN MODE
Press the MODE key to toggle the resolution setting:
- Use normal mode for good quality documents which do not include minute detailing.
- Use fine mode (the FINE icon comes on) for documents which include small characters or drawings.
- Use photographic mode (the PHOTO icon comes on) for documents which include photographs.
IMMEDIATE TRANSMISSION
The document is saved before transmitting.
Insert the first page of the document in the document loader
■ Dial the called party's fax number
Note: use the < key to delete the last character while dialling a number.
Press your unit will store the first page in memory.
When the first page has been memorised the unit displays INSERT DOCUMENT, together with audible bleeps
You have several seconds to insert the next page of the document to be sent
The unit assumes there are no further pages to be saved:
- If you insert no further sheets during the bleeps
- If you press the key during the bleeps
The unit will then start document transmission to the called party
TRANSMISSION WITH CALL MONITORING
Insert the first page of the document into the document feeder.
Press the key; you will then hear the dial tone.
Dial your contact's number (you will hear the unit go through the motions).
Press as soon as you hear the fax tone from the remote terminal.
Note: if the recipient lifts the receiver, tell them that you are trying to send a fax. He will activate their fax and put the receiver down.
You have several seconds to insert the next page after the first page has been sent.
SCHEDULED TRANSMISSION
The scheduled transmission facility enables you to specify the time when you want the unit to send out a fax.
Insert the document (one sheet by one sheet).
Press FUNCTION, 3, 1 and ◊
Enter your contact's fax number.
Press FUNCTION.
Enter the time when the fax is to be sent, e.g. 20:30.
You have two possibilities:
- press to send the document,
or
- scroll down the menu by pressing FUNCTION: enter the number of pages to be transmitted and press. The pending document is signalled by a flashing display.
Note: to cancel a scheduled transmission or to send the document right away, refer to the para "QUEUE FUNCTION".
BROADCASTING
You may send a document to multiple adressees. This option is available for both immediate and scheduled transmission.
■ Insert the document (one sheet by one sheet).
Press FUNCTION, 3, 1 and
Enter the recipient's number (either in full or using its speed dialling code if in the directory).
- Go on to the next recipient (CALLED PARTY2) by pressing >.
Enter the second recipient's number.
Repeat the procedure until you have entered your last recipient (maximum = 6).
You have two possibilities:
- send the document by pressing,
or
- access the next option by pressing FUNCTION: enter the number of pages to be transmitted and press ◇.
Note: use the < key to amend a recipient number, or return to a previous recipient number, if any.
SENDING TO A RECIPIENT IN THE DIRECTORY
Insert the document (page by page) to be sent, and, for example:
Press SPEED DIAL, SPEED DIAL, 2, 0 and ◆ to call the recipient whose number is stored under memory location 20.
or
Press a one-touch dialling key (e.g. 3 ghi to call the recipient whose number is stored in memory location 03).
or
Press SPEED DIAL, SPEED DIAL and use the < and > keys to scroll through the numbers stored in numerical order. When the desired recipient's number is displayed on the unit, press .
or
Press SPEED DIAL again and use the < and > keys to scroll through the numbers stored in alphabetical order. When the desired recipient's number is displayed on the unit, press .
TRANSMISSION REPORTS
CHOICE OF THE TRANSMISSION REPORT TYPE
Press FUNCTION, 3, 4 and
Press > to choose another option:
WITHOUT: The documents you send will not generate a report.
WITH: A transmission report is printed upon proper completion or failure of the transmission.
IF ERROR: A transmission report is printed out only upon failure of the transmission.
Press to confirm your choice.
PRINTING OUT THE PREVIOUS TRANSMISSION REPORT
- Insert a page inside the document loader.
Press FUNCTION, 5, 5 and
3. RECEIVING FAXES
The unit stores incoming faxes in its inbound memory.
PRESENCE OF FAXES IN MEMORY
The FAX indicator shows the presence of faxes in memory:
- when it is off, there are no faxes in memory,
- when it is flashing, one or more faxes are stored in memory.
PRINTING OUT RECEIVED FAXES
■ Install paper inside the document loader (one page by one page).
■ Press the FAX button to print the faxes.
The machine emits a beep asking you to insert another page into the printer loader as appropriate.
INBOUND MEMORY FULL
When there are too many faxes in memory, the unit can no longer record any additional faxes. The FAX icon will flash, and the unit will display the following message: "MEMORY FULL".
Print out the faxes stored in memory to free some space.
4. MAKING A TELEPHONE CALL DURING A FAX TRANSMISSION
You may, should you so desire, interrupt a fax transmission to speak to the person at the other end of the line.
TO CALL THE PERSON ON THE OTHER END OF THE LINE
During document transmission, press the 📄key, and your unit's display will alternate between TRANSMISSION or RECEPTION and PHONE.
As soon as the current page has gone through, your party's handset will ring to signal that you want to speak to them. If they acknowledge your request, your handset will ring in turn; all you need to do now is pick up the receiver.
TO ACCEPT AN INCOMING CALL
Should your party wish to interrupt the fax transmission to speak to you over the line.
Your telephone will ring: pick up the receiver to speak.
5. QUEUE FUNCTION
This function enables you to manage pending operations (scheduled transmission, deposit, polling).
IMMEDIATE EXECUTION OF A PENDING OPERATION
To immediately execute a pending operation:
Press FUNCTION, 6, 1 and ◇
■ Position yourself on the requisite pending operation using the > key.
Press to confirm.
MODIFYING AN OPERATION
To modify an pending operation:
Press FUNCTION, 6, 2 and ◆
■ Position yourself on the desired pending operation using the > key.
Press to confirm.
Change the recipient's number or the scheduled transmission time.
Press to confirm.
DELETING PENDING OPERATIONS
To delete a pending operation, proceed as follows:
Press FUNCTION, 6, 3 and ◇
You can scroll through all currently pending operations by pressing the > key or entering the number of the selected operation.
The different types of pending operations are:
- TX: Send.
- DOC: Deposit.
- POL: Polling.
Press to select the operation to be deleted.
Press to confirm deletion.
PRINTING OUT A PENDING DOCUMENT
In order to check the contents of a pending document, you can print it out:
Insert one sheet of paper in the printer loader.
Press FUNCTION, 6, 4 and ◊
Press the > key to scroll through the list of pending documents.
Press to print out the displayed document.
PRINTING OUT THE LIST OF PENDING OPERATIONS
This report lists the characteristics of each pending operation.
Press FUNCTION, 6, 5 and
6. FAX-BACK AND POLLING
POLLING
To poll a document from a remote fax terminal:
Press FUNCTION, 3, 2 and
Enter the fax number of the remote terminal from which you want to poll the document (you may use the directory).
For immediate polling, press
or
If you want specify a scheduled polling time:
- press FUNCTION,
- enter the polling time,
- press to confirm. The screen displays the time when the polling operation is to be carried.
DEPOSITING A FAX-BACK DOCUMENT
To set up a document in your unit for polling by another fax machine (the transmission of the document being initiated remotely by the recipient),
Check that your unit is in automatic receive mode (the FAX icon should be switched on).
Insert a document into the document feeder (one page by one page).
Press FUNCTION, 3, 3 and
The unit then prompts you to choose between SINGLE POLLING and MULTI POLLING.
Note: if you selected multi polling, the document will not be deleted automatically. It is up to the user to erase it manually by pressing FUNCTION, 6, 3.
CHAPTER 4: TELEPHONE ANSWERING DEVICE
1. ACTIVATING / DE-ACTIVATING THE TAD
ACTIVATING THE TAD
The TAD icon must be on:
■ Press AUTO. ANSWER to put the TAD icon on.
Press to confirm.
DE-ACTIVATING THE TAD
The TAD icon must be off:
■ Press AUTO. ANSWER to put the TAD icon off.
Press to confirm.
SELECTING THE TAD MODE
The unit's built-in TAD has two operating modes:
Answer-record: callers can leave a message after listening to the welcome message (the unit is set by default to answer-record, with a pre-recorded message).
Answer only: callers can listen to your announcement but cannot leave a voice message. To change the TAD mode, proceed as follows :
SELECTING THE ANSWER-RECORD MODE
Press FUNCTION, 4, 4 and ◊
Select OGM using the > key.
Press to confirm.
SELECTING THE ANSWER-ONLY MODE
Press FUNCTION, 4, 4 and
Select SIMPLE OGM using the > key.
Press to confirm.
2. ANNOUNCEMENTS
ANSWER-RECORD ANNOUNCEMENT
You may record two different announcements: one for the answer-record function and one for the answer-only function.
ANSWER-RECORD ANNOUNCEMENT RECORDING
Press FUNCTION, 4, 1 and ◇, select OGM using the > key then press ◇ to confirm.
Lift the receiver to start recording your announcement.
- Hang up to end the recording.
ANSWER-RECORD ANNOUNCEMENT LISTENING
Press FUNCTION, 4, 2 and select OGM then press.
ANSWER-ONLY ANNOUNCEMENT
ANSWER-ONLY ANNOUNCEMENT RECORDING
Press FUNCTION, 4, 1 and ◊, select SIMPLE OGM using the > key and press ◊ to confirm.
Lift the receiver to start recording your announcement.
- Hang up to end the recording.
ANSWER-ONLY ANNOUNCEMENT LISTENING
■ Press FUNCTION, 4, 2 and ◆ select SIMPLE OGM then press . ◇
Note: to listen to the announcement of the currently selected TAD mode, you can also press the OGM key. To erase the announcement of the currently selected TAD mode, press ERASE then OGM.
3. MESSAGES OGM
PRESENCE OF MESSAGES
The status of the PLAY indicator tells you of the presence of messages:
- "PLAY" indicator off: no messages.
- "PLAY" indicator flashing: at least one message not listened to.
- "PLAY" indicator lit: presence of messages. All the messages have been listened to.
Note: the number of messages is indicated on the screen.
LISTENING TO MESSAGES
Press the PLAY key.
The unit will display, while each message plays, its sequential number and the date and time when it was received.
During message playback:
- Press the to go on to the next message,
- Press the ◀ to return to the beginning of the current message.
- Press the twice to go back to the previous message.
- Press the PLAY key to pause playback; press PLAY again to resume playback
- Press the ERASE key to erase the message being listened to,
- Press the + and - to increase or decrease the volume during playback.
ERASING MESSAGES
ERASING ALL MESSAGES
After playback, press ERASE then PLAY.
ERASING A MESSAGE
During playback, press ERASE. The system skips to the next message, if any.
4. CALL SCREENING
The call screening facility enables you to listen to a voice message while it is being recorded:
- you may answer the call by picking up the receiver,
- you may set the loudspeaker volume using the + and - keys.
To select call screening:
Press FUNCTION, 4, 5 and ◊
Select the desired mode (WITH or WITHOUT call screening).
Press ◆ to confirm.
5. RECORDING A MEMO
A memo is a message you record locally on your TAD. It may be for relatives or colleagues. It may even be used as a reminder.
■ Press FUNCTION followed by PLAY.
- Pick up the receiver and start speaking.
- Hang up to stop recording the memo.
6. REMOTE RETRIEVAL
In order to retrieve messages on your TAD remotely, you must set up a four digit PIN code other than 0000 (refer to the para Remote inquiry code of the chapter INSTALLATION).
To retrieve messages on your TAD remotely:
Dial your terminal's number from a remote location.
Press the * key when you hear the recorded announcement, then enter your 4-digit PIN code. The unit automatically plays back all your voice messages.
You may pause playback by pressing 5, and resume by pressing 5 again.
The keys of the telephone you are using to retrieve your messages remotely provide the same functionality as those on your base unit.

You can only retrieve your messages remotely from a touch tone telephone.
You can carry out the following operations over a remote telephone:
Whilst listening:
- pause or resume message listening by pressing, ⑤
- go on to next message, by pressing, ⑥
- start listening to message again, by pressing , ④
- go back to previous message, by pressing twice.
After listening:
- delete received messages, by pressing and , ⑤
- record your announcement, by pressing and 3 and stop the recording of your announcement, by pressing any key,
- listen to your announcement, by pressing , ③
- switch on your answering machine, by pressing, ⑦
- switch off your answering machine, by pressing, ⑨
- resume message listening, by pressing . ⑤
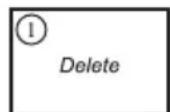
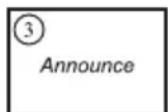
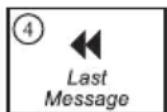
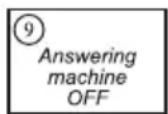
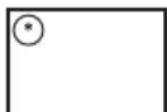
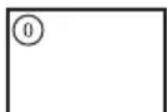
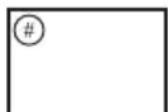
(See the detachable guide at the end of this user's guide)
7. PRIVILEGED ACCESS
PRIVILEGED ACCESS CALLS
If you do not want to be disturbed by anyone except privileged access callers (with a special access code), set the unit to TAD receive mode and input a privileged access code:
Press FUNCTION, 4, 6 and ◊
Input an access code other than 0000 and press to confirm.
Note: you must activate the privileged access facility using FUNCTION 47 (setting: WITH).
INCOMING CALLS
To call you, your privileged callers (knowing your privileged access code) will proceed as follows:
Dial your number.
- Wait for your terminal to answer the call.
Press the * key, then enter the 4-digit privileged access code.
Notes: if you do not answer the call, the caller will be prompted to leave a message on your TAD. The "remote message retrieval" and "privileged access" codes must be different. To de-activate the privileged access facility, simply set the code to 0000.
CHAPTER 5: RECEIVE MODES
Press AUTO ANSWER once or several times to select the requisite Receive mode and press to confirm.
1. TELEPHONE MODE
The TEL icon is on; the FAX and TAD icons are off.
Your terminal will behave like a telephone. Set the unit to this mode if you receive only the occasional fax.
Upon receiving an incoming call, the unit will ring, but will not answer the call automatically ^(*) ; you must lift the receiver to answer the call:
- if the incoming call is a voice call, simply converse with the caller;
- if the incoming call is a fax, you can press and hang up; the unit will automatically switch to fax receive mode.
(*) If you do not pick up the receiver after 9 rings, the unit diverts the call automatically to the TAD and plays the recorded announcement; this function enables you to remotely activate your TAD (switch to TAD mode) if you are away from the unit (see the section entitled Remote Retrieval in the TELEPHONE ANSWERING DEVICE chapter).
2. FAX/PHONE MODE
The TEL and FAX icons are on; the TAD icon is off.
The unit will switch incoming calls automaticall. Select to this mode if you expect substantial fax traffic and do not wish to be inconvenienced by incoming faxes.
Upon receiving an incoming call, the unit answers the call silently (*) , plays a pre-recorded announcement to the caller (e.g. “one moment, please”) prompting the caller to wait, then:
- if the call is a fax, the unit switches to fax receive mode;
- if the call is a voice call, the unit will ring intermittently (warning ring) for 30 seconds to notify you ^** . The caller will hear an intermittent ring at the other end of the line. If you fail to pick up, your caller is then given the opportunity to leave you a voice message.
(*) The unit will not play the ringing tone generated by the telephone network. However, if there are any other extensions on the line, these will ring as normal.
(**) If there are any other extensions on the line, these will not ring.
3. TAD MODE (\*)
The TEL, FAX and TAD icons are all on.
Your unit will behave like a telephone and TAD attached to a fax machine. You should set this mode when you have to leave your unit unattended or if you are determined not to miss any calls, be they voice or fax.
Upon receiving an incoming call, the unit will answer the call after a few rings, and play your TAD's recorded announcement.
- if the call is a fax, your unit will switch to fax receive mode;
- if the call is a voice call, your caller can leave you a message.
(*) We recommend using this mode when several handsets are connected to the same line (the unit rings at the same time as the other handsets).
CHAPTER 6: OTHERS FUNCTIONS
1. PHOTOCOPYING
Your unit can be used for photocopying:
natural_image
Line drawing of a printer with a paper roll and downward arrow indicating compression (no text or symbols)Insert the document to be photocopied in the document loader as for a transmission.
Press ◆The unit records your document in its memory. When recording has finished the unit gives two beeps and OUT OF PAPER appears on screen.
natural_image
Line drawing of a printer with a paper roll and arrow indicating compression (no text or symbols)Insert a sheet of paper in the print loader. The unit will automatically print your document.
The photocopy is printed in "fine" mode (or an "photo" mode if this mode has been selected).
2. PRINTING OUT
FUNCTION GUIDE
This guide lists the functions supported by your unit, together with their numerical access codes.
Insert paper into the feeder and press FUNCTION, 5, 1 and ◊.
LOGS
You can print out a log showing details of the last 30 faxes sent and received.
Press FUNCTION, 5, 2 and ◆
DIRECTORY
Press FUNCTION, 5, 3 and
SETTINGS
The list of settings reflects the unit's operating mode at any point in time.
Press FUNCTION, 5, 4 and
3. REMOTE OPERATION FROM ANOTHER HANDSET ON THE SAME LINE
Several functions can be remote-controlled from another touch-tone handset on the same line.
REMOTE STOP INSTRUCTION
If you lift the receiver to answer an incoming call from another phone terminal and your terminal has also answered the call (and is transmitting audible 'wait' beeps, a recorded announcement or welcome message), you can neutralise your terminal by dialling # 0 on your telephone's keypad.
REMOTE FAX RECEIVE INSTRUCTION
If you have lifted the receiver to answer an incoming call from another phone terminal, you can remotely instruct your terminal to switch into fax receive mode and pick up an incoming fax by dialling # ⑦ on your telephone's keypad.
4. AUDIBLE ALARM
The unit can sound an alarm at a pre-set time. You may use this facility as an alarm clock, a reminder, or not to forget a meeting. To activate the alarm:
Press FUNCTION, 8, 1 and ◇
You can toggle the mode (ON/OFF) by using the > key.
Confirm by pressing the key.
If you selected ON you may now set the time.
Enter the time when the alarm is to be activated and press to confirm.
The unit will display an hourglass symbol to the right of the time display indicating that the alarm has been set.
Note: the hourglass will not be displayed if some fax messages have not been printed.
To stop the alarm ringing, press the Ⓥ key. If you do not interrupt it, the alarm will stop after 30 seconds, and will de-activate automatically.
5. INK GAUGE
The ink gauge enables the unit to display the percentage of remaining ink ribbon:
Press FUNCTION, 5, 6 and
6. OPERATION IN CONJUNCTION WITH A CORDLESS TELEPHONE
The unit can be used in conjunction with one or more cordless telephones.
To do so, you must use the cordless telephone kit provided with your unit, or available from your dealer.
The cordless telephone kit contains a user guide. For more details, refer to this guide.
Your unit will provide you with access to the following functions:
REGISTERING A CORDLESS TELEPHONE INTO THE UNIT
Press FUNCTION, 8, 8 and ◆
Press OK, then 6 on the cordless telephone.
DE-REGISTERING A CORDLESS TELEPHONE HANDSET FROM THE UNIT
Press FUNCTION, 8, 9 and ◇. The unit will display the references (1 digit) of all registered cordless handsets.
Input the reference of the cordless handset to be de-registered and press. Your unit will give out a series of audible beeps.
SETTING A 4-DIGIT ACCESS CODE
Press FUNCTION, 8, 7 and ◊; you can then enter a 4-digit access code (see the section entitled Customised procedure in the Matching the Mobile with a Base chapter of the cordless telephone user's guide).
7. DISTINCTIVE RINGING (FOR AUSTRALIA ONLY)
If you subscribe to a distinctive ringing service from your telephone company, you will need to DUAL RING (FUNCTION 85) to turn on the Distinctive Ringing function. When this is done, your fax machine will signal voice calls by the normal ringing pattern, and fax transmissions by a special ringing pattern. In the case of a fax transmission, your fax machine will automatically answer the call after 2 rings and receive the fax.
Important: the Distinctive Ringing function can only be used if you subscribe to a distinctive ringing service from your telephone company. Do not set DUAL RING to WITH if you are on a normal line, as the fax machine will not operate properly.
8. USING A PORTABLE PHONE (DEPENDING ON MODEL)
You can connect a portable phone (GSM) to your machine. This will allow you to send or receive faxes through your portable phone.
To do so you have to purchase the Fax-Portable phone connection kit from your local retailer. The mobile kit includes an operating instructions handbook. Please refer to the handbook for further information.
CHAPTER 7: APPENDICES
1. CONSUMABLES REPLACEMENT
The consumables, ink ribbon and ribbon gauge card are already installed in the machine. You may need to change these consumables when they become worn. To do so, refer to the instructions in the following paragraphs.
INK RIBBON
The ink ribbon enables the unit to print on normal paper.

Only use an ink ribbon that matches the manufacturer's specifications. The use of other types of ink ribbons could result in damage to the main unit and invalidate the warranty. Documents printed by your unit may be read from the used portion of the ink ribbon. If these documents are confidential, you may want to remove the ink ribbon whenever you leave the unit.
natural_image
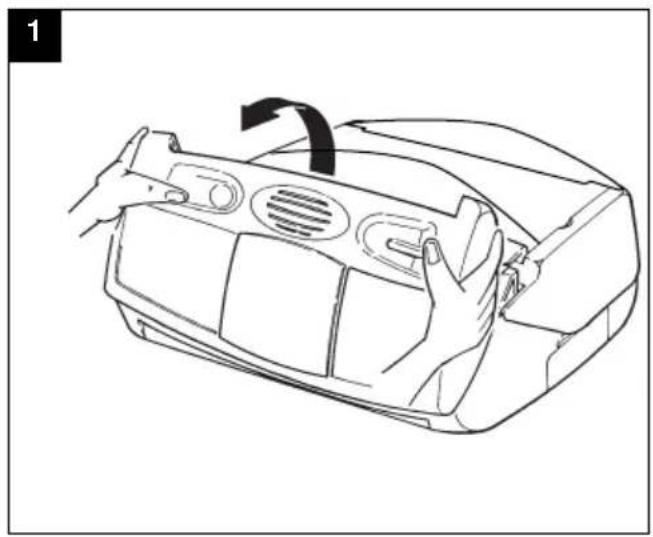
Line drawing of a car interior showing hands adjusting the hood and vent (no text or symbols)Open the front cover: let it swivel round to you until it remains open.
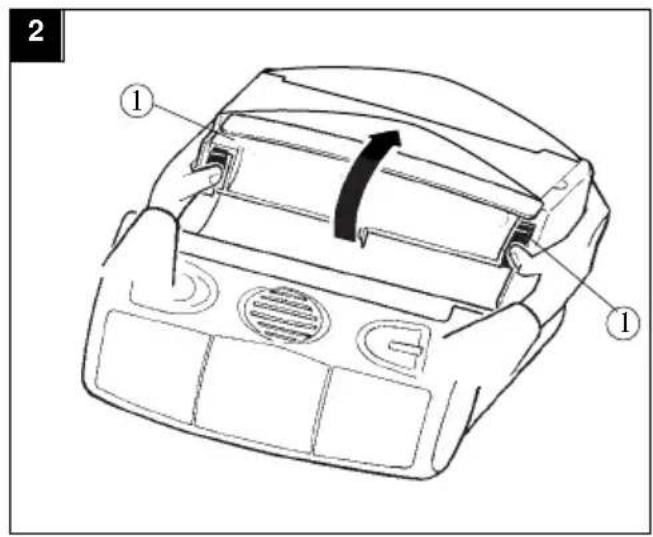
Open the back cover: unlock the latches (1) before swiveling the cover round to the back.
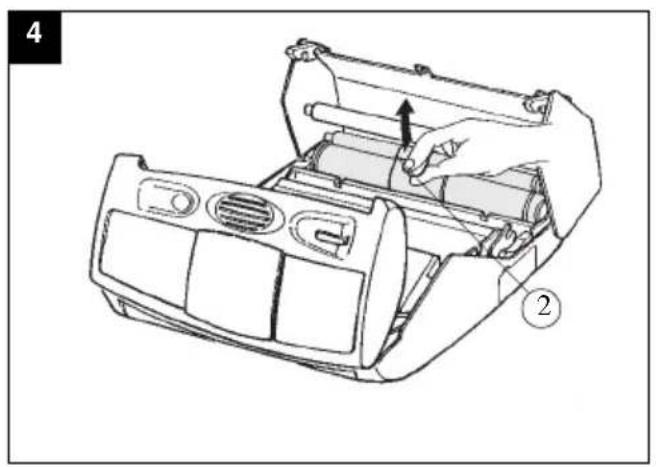
Remove the worn gauge from its housing.
Position the ink ribbon over its housing under the rear cover.
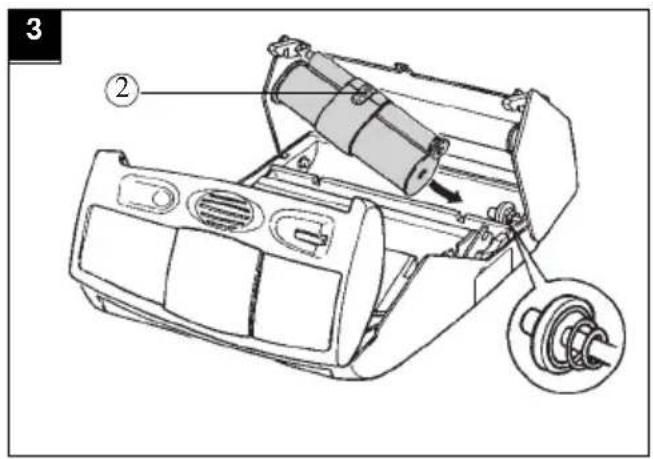
Insert the ink ribbon into its housing without removing the adhesive strip (2):
- position the right end of the main roller onto the retractable axe.
- position the left end of the main roller onto the left axe.
natural_image
Line drawing of a car air conditioner unit with handle and internal components, no text or symbols present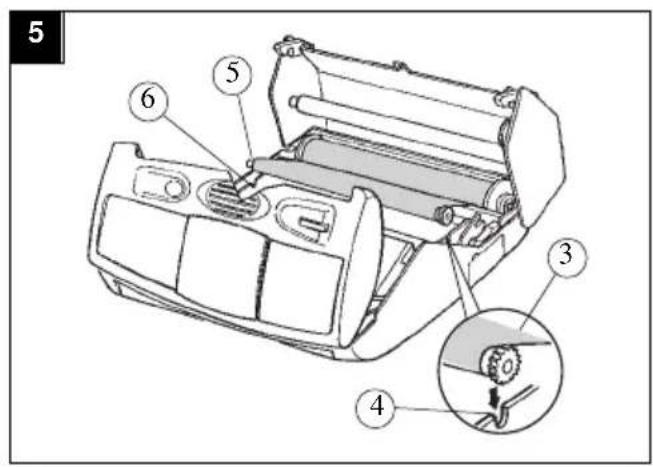
Pull of the adhesive strip (2) from the ink ribbon. Insert the small roller in its housing: check that the gear axe (3) is correctly positioned in its housing (4), and that the other axe (5) is also correctly positioned (6) in its housing.
INK RIBBON GAUGE
The gauge enables screen display, after printout, of remaining ink ribbon.
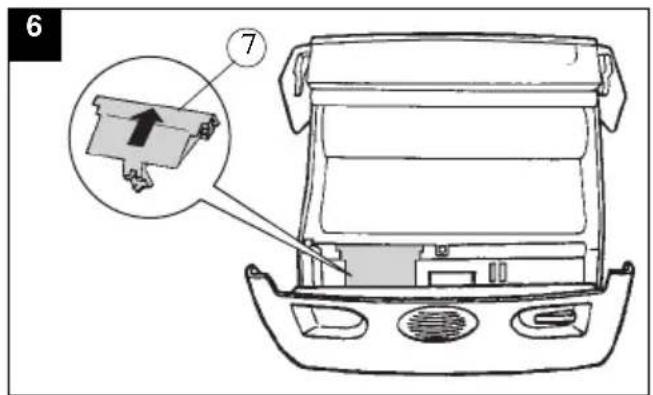
Remove the gauge housing flap (7):
- slip the flap backward, then
- lift the front part of the flap to remove it from the main unit.
Remove the worn gauge from its housing
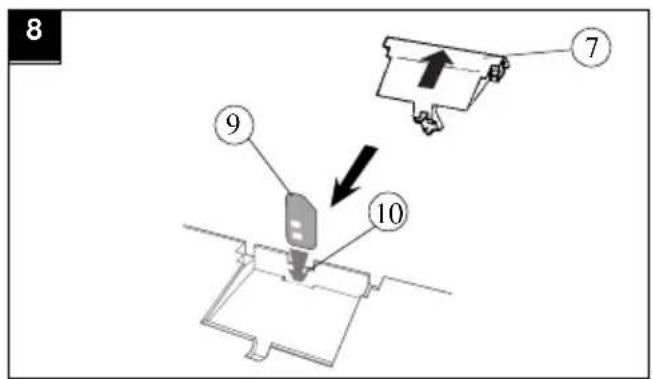
Insert the gauge (9) into the slit (10) of the gauge housing, ensuring that the chip faces you and the bevelled corner is positioned top right. Replace the flap (7).
flowchart
graph TD
    A["Device 1"] --> B[" connector"]
    C["Device 2"] --> D[" connector"]
    D --> E["Arrow ⑨"]
    style A fill:#f9f,stroke:#333
    style C fill:#f9f,stroke:#333
    style D fill:#f9f,stroke:#333
    style E fill:#ccf,stroke:#333
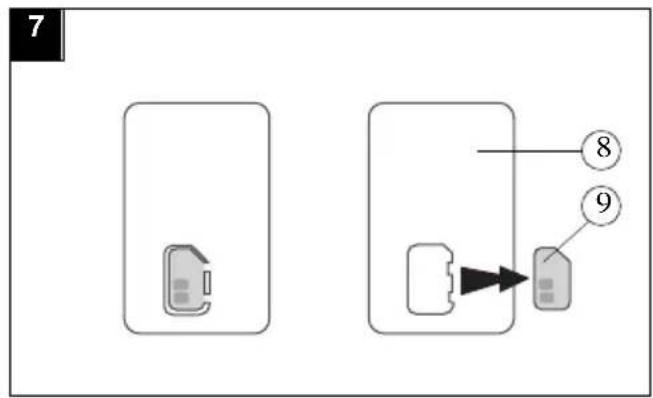
Remove the (pre-cut) gauge (9) from the ribbon gauge card (8).
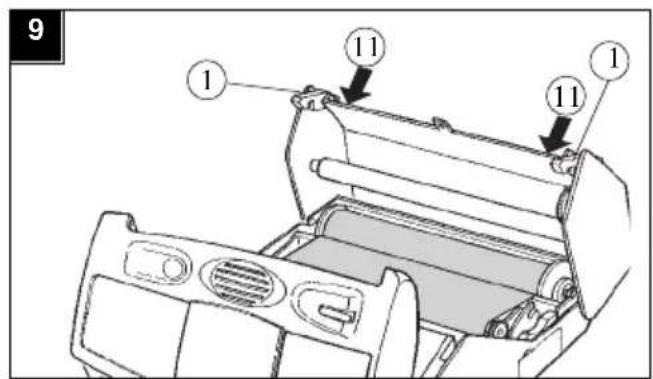
Close the rear cover: press down simultaneously on both sides of the cover (11) until the two latches (1) click into place.

If the gauge is not installed or not properly installed, the unit displays:
MISSING GAUGE
2. SETTINGS
To view the unit's settings, press FUNCTION, 9 and ◊
The user can scroll through the settings by using the > and < navigation keys.
IMP LIST: List of settings printing.
TX HEADER: Transmit your name, fax number, the date and time to the recipient; the data will be displayed in the header of the faxes they receive.
TX LOCK UP: Set a ceiling transmission speed for faxes sent to selected numbers in the directory
ANTI ECHO: This setting blocks the satellite echo in the event of quality problems with long-distance faxing.
RX HEADER: Print out the name and fax number of the sender as well as the current date and time on the headers of incoming faxes.
RX LOCK UP: Maximum receive speed for incoming faxes.
REDUCE MODE: Condensed printing mode (incoming faxes, local photocopies): automatic or manual.
REDUCE RATE: This parameter sets the condensed printing ratio (in automatic condensed mode).
NB OF PAGES: This parameter shows the number of pages printed out (incoming faxes and local copies) since the unit was plugged in.
PAUSE LENGTH: Duration of the line break induced by the “Pause” signal emitted by the R key: long or short.
3. TRANSMISSION REPORT CODES
The log (send/receive) and the transmission report detail the outcome of each transmission. In the event of an incident, they will use one of the following codes:
Code 01 - No answer
Try again later.
Code 03 - STOP
Call interrupted by user pressing STOP.
Code 04 - Invalid speed dial number
Check number.
Code 05 - Document feeder problem during the call
Paper jam or document feeder malfunction.
Code 07 - Bad line or remote terminal malfunction
Try again.
Code 08 - The document sent may not have been received in full
Send again and check with recipient.
Code 0A - Polling operation failed
No fax-back document on remote terminal.
Code 0B - There is a difference between the number of pages logged for sending and the number of pages actually sent out
Check the number of pages.
Code 13 - Memory full
Fax could not be received.
4. TROUBLESHOOTING
| PROBLEM SOLUTION | |
| Blank unit display. Check that the power cord and the power adapter cord are properly connected. | |
| The unit does not answer incoming calls after several rings. | The FAX icon may be off: check the receive mode (Manual/automatic).Check the number of rings.Configure the unit for “private network” (see the sections headed Setting the number of rings before automatic answer and Type of network in the INSTALLATION chapter). |
| Blank photocopies. | The document was positioned facing the wrong way round in the feeder. |
| The telephone exchange does not recognise the number dialled. | Check that the telephone cord is properly plugged in.Configure your unit for pulse dialling (see the section headed Pulse/tone dialling in the INSTALLATION chapter). |
| The terminal does not ring. The TEL icon is flashing: re-activate the ringing tone (see the section headed Selecting the ringing tone in the INSTALLATION chapter). | |
| The telephone does not work. The mains may be down.Check that the telephone line cord is properly connected. | |
| One or more vertical black lines on documents copied locally or sent. | Open the cover and clean the scanning sub-assembly located opposite the white roller using a soft but not fluffy cloth dipped in surgical spirit. After cleaning, close the front cover and make a local copy to check that the black lines have disappeared. |
| The unit displays the following messages:OUT OF PAPERPRINTER COVERPAPER JAMOVERHEATINGGAUGE EMPTYMISSING GAUGECHANGE RIBBON | Insert more paper in the paper feeder.Close the rear cover.Open the rear cover to access the paper circuit. Check that the rear cover is properly secured after closing it.The last documents printed out are blackened; the printer's temperature is too high. Wait a few minutes for it to cool down.You may have forgotten to replace the gauge smartcard when you put in the ink ribbon.Open the gauge housing flap and check that the gauge smartcard is inserted and correctly positioned.No ink ribbon left: install a new ribbon and gauge. |
| REMOVE DOCUMENT | • Open the front cover and check the document circuit. |
| MEMORY FULL | • Print out faxes received and/or listen to the voice messages on the TAD. |
| • Other • Disconnect your unit from the mains and reconnect it. If the problem persists, contact our maintenance department. | |
5. NOTICE FOR CONNECTION TO THE TELECOMMUNICATION SYSTEM
1. BABT Certificate Number/Approval Number for the
SAGEM PHONEFAX 320 N° 609099
SAGEM PHONEFAX 325 N° 609605
Approved for connection to telecommunication system specified in the instructions for use subject to the conditions set out in them.
2. This apparatus has been approved for the use of the following facilities:
Facsimile
Simple telephone
Terminal and subscriber identifier
■ Transmission status report (send report only)
■ Manual mode (RX and TX)
Auto-Answering
Auto calling
- Delayed transmission- Time recorder and logs
■ Automatic redial (5 times, 5 minutes intervals)
Fax switch
- Polling RX (To poll a document from on a distant fax)
Polling TX (prepare a document to be poll)
■ Automatic document feeder
Halftone 16 shades of grey
Modem Fax up to 14400 bps
Facsimile transmission and reception
Call progressing mode
Full Numeric Handsfree
Answering Recording Device
Fax Answering Device
Any other usage will invalidate the approval of the apparatus if as a result, it then ceases to conform to the standards against which approval was granted.
-
The connection to the telecommunication system must be unplugged before the earth is disconnected. The connection to the telecommunication system must be hardwired.
-
This apparatus may be used on the telecommunication employing loop disconnect or MF dialling.
-
This apparatus is suitable for connection to direct exchange lines on the PSTN directly or via a compatible PABX (selection done by parameter setting).
-
Ringing delay: the maximum number of ring before automatic answering is 5.
-
Ringer Equivalent Number (REN) = 1
The REN is a customer guide indicating approximately the maximum number of items of apparatus that should be connected simultaneously to the line.
The sum of the REN's of the individual items should be not exceed 4. The REN value of a BT telephone is assumed to be 1 unless otherwise marked.
- The voltage drop introduced by the apparatus between the PSTN and the associated telephone is 2.0 Volts dc therefore no additional series equipment may be connected. The introduction of this voltage drop may occasionally cause difficulties in making calls from the associated telephone or problems in telephone conversation being experienced by both parties to the call.
While operation may be possible initially, change to or modernization of the network taking place in the normal course of events may result in the apparatus being connected to be compatible. failure of the apparatus to wok under these circumstances may not be responsibility of the network operator.
In the unlikely event of such problems occurring, the user should contact the supplier or maintainer of the apparatus.
Difficulty may be experienced when making calls from other apparatus. such difficulties may include:
- Difficulties in making call
- Problems in telephone conversation being experienced by both parties to the call.
Note : The definition of RBS (Relevant branch system) for PSTN lines is given in BS6789 section 6.1 (1986) clause 2.4.
- Naive caller
"Callers are accustomed to being answered normally within 10s and that the majority abandon calls that are not answeed within 45 s".
It is "normal" to set the number of rings between 1 to 5 rings before the answering machine responds.
The machine is already preset for a plug and play mode.
"If the intention is to delay answer so that normal voice callers would abandon the call before the non-voice TE answered, then the delay should at least 45 s".
It is helpful to include the statement of the answering telephone number with the exchange name or international code and that the announcement must be suitable for the purpose for which it is intended. The announcement should also start within 3s of answering.
Paytone may be received after answering calls from some types of payphones and may persist forr up to 13 s and the answering announcement should be constructed so as to ensure that an answering announcement containing the identity of the called line and, where appropriate, the invitation to record, will be heard by the callers after paytone has ceased.
IMPORTANT! Compatible switchboards
Your terminal is approved only for use with the compatible switchboard including those which do not provide secondary proceed indication. If you would like a list suitable switchboards, contact BT on 0800 800 152.
If you do have a compatible switchboard it cannot be guaranteed that the apparatus will operate correctly under all possible conditions of connection. If you have any difficulties, contact BT on 0800 800 152.
Calling the Emergency services

This equipment is not designed for making emergency telephone call (999) when the power fails. Alternative arrangements should be made for access to emergency services.
10. SAFETY WARNING
Interconnection circuits should be such that the equipment continues to comply with the requirements of 4.2 of EN 41003 for TNV circuits and 2.3 of EN 60950 for SELV circuits, after making connections between circuits.
Interconnection directly, or by way of the other apparatus, of ports marked "SAFETY WARNING". SEE INSTRUCTION FOR USE, with ports marked or not so marked may produce hazardous conditions on the network. Advice should be obtained from a competent engineer before such a connection is made.

To prevent fire or shock hazard, do not exposethis product to rain or any type of moisture
How to connect the mains lead to a plug
Your apparatus comes complete with fitted plug. If however, it becomes necessary to fit an alternative main plug, the following instructions must be adhered to.
For apparatus connected by mains plug, the wall socket must be installed near the apparatus and must be easily accessible.
Note : The wires in the mais lead are colored in accordance with the following code:
Green-and-yellow: earth connected
Blue: Neutral
Brown: Live
Read the instruction carefully before connecting the mains lead to a plug. If in doubt, consult a qualified electrician.
As the colours of the wires in the mains lead of the apparatus may not correspond with the coloured markings identifying the terminals in your plug, proceed as follows:
- the wire which is coloured blue must be connected to the terminal which is marked with the letter N or coloured black,
- the wire which is coloured brown must be connected to the terminal which is marked with the letter L or coloured red,
- the wire which is coloured green and yellow must be connected to the terminal which is marked with the letter C or coloured green.
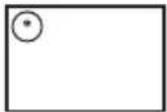
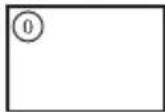
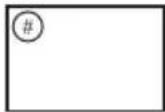
Guide to remote operation of your unit's built-in TAD
Your TAD security code: \*
- Go on to next message, by pressing . ⑥
- Start listening to message again, by pressing .④
- Go back to previous message, by pressing twice.
- Delete received messages, by pressing and ⑤.
- Record your announcement, by pressing and ③ and stop the recording of your announcement, by pressing any key.
- Listen to your announcement, by pressing . ③
- Switch on your answering machine, by pressing ⑦.
- Switch off your answering machine, by pressing ⑨.
- Resume message listening, by pressing .⑤

CONSUMABLES
INK RIBBONS
The TTR 815 ink ribbon used in your fax machine provides over 230 pages (*) without user intervention, whatever the contents of the documents printed.
Use the following references to order new ribbons:
TTR 815 INK RIBBON, ref: 23327983-7
PAPER
Print quality will vary according to the kind of paper used.
For best results, use SAGEM's "Série 300" paper, available in reams of 500 sheets.
SAGEM "Série 300" paper, ref: 23273604-9
INK RIBBON + PAPER PACKAGE
To simplify your consumables requirements, a package comprising a TTR 815 ink ribbon and 250 sheets of SAGEM "Série 300" paper is available under the following reference:
TTR package, ref: 23295329-4
* PLEASE NOTE: the free sample ink ribbon provided with your unit will allow you to print about 50 pages.
LU 23227794-1 IND A

DATA SUBJECT TO CHANGE WITHOUT NOTICE
SAGEM SA
- FACSIMILE SAGEM PHONEFAX 320 / 325
- GENERAL VIEW
- NOTE
- TABLE OF CONTENTS
- CHAPTER 1: INSTALLATION....1
- CHAPTER 2: TELEPHONE FUNCTIONS....5
- CHAPTER 3: FACSIMILE....7
- CHAPTER 4: TELEPHONE ANSWERING DEVICE....12
- CHAPTER 5: RECEIVE MODES ......16
- CHAPTER 6: OTHERS FUNCTIONS....17
- CHAPTER 7: APPENDICES....20
- NOTE POUR L'IMPRIMEUR : VOIR BAT
- CHAPTER 1: INSTALLATION
- UNPACKING THE UNIT
- OUTPUT PAPER
- CONNECTIONS
- USE
- FUNCTIONS ACCESS
- There are 2 ways to access functions:
- FIRST SETUPS
- ENTERING OR CHANGING THE DATE AND TIME
- STORING YOUR CSID
- ENTERING YOUR NAME
- TYPE OF NETWORK
- PULSE / TONE DIALLING
- SETTING THE NUMBER OF RINGS BEFORE AUTOMATIC ANSWER
- SELECTING THE RINGING TONE
- REMOTE INQUIRY CODE
- PREFIX
- CHAPTER 2: TELEPHONE FUNCTIONS (*)
- DIRECTORY
- STORING A TELEPHONE NUMBER IN THE DIRECTORY
- MODIFYING/DELETING A STORED NUMBER
- CALLING A NUMBER STORED IN THE DIRECTORY
- LOUDSPEAKER KEY
- CALLING WITHOUT LIFTING THE RECEIVER
- SPEAKERPHONE MODE
- OTHER FUNCTIONS
- LAST NUMBER REDIAL
- MUTE
- CALLING DURATION
- TRANSFERRING CALLS TO ANOTHER HANDSET ON THE SAME LINE
- CHAPTER 3: FACSIMILE
- DO NOT INSERT IN THE UNIT DOCUMENTS WITH:
- USE DOCUMENTS OF THE FOLLOWING SPECIFICATIONS ONLY:
- INSERTING A DOCUMENT
- TRANSMITTING DOCUMENTS
- SETTING THE RESOLUTION OR SCAN MODE
- IMMEDIATE TRANSMISSION
- TRANSMISSION WITH CALL MONITORING
- SCHEDULED TRANSMISSION
- BROADCASTING
- SENDING TO A RECIPIENT IN THE DIRECTORY
- TRANSMISSION REPORTS
- CHOICE OF THE TRANSMISSION REPORT TYPE
- PRINTING OUT THE PREVIOUS TRANSMISSION REPORT
- RECEIVING FAXES
- PRESENCE OF FAXES IN MEMORY
- PRINTING OUT RECEIVED FAXES
- INBOUND MEMORY FULL
- MAKING A TELEPHONE CALL DURING A FAX TRANSMISSION
- TO CALL THE PERSON ON THE OTHER END OF THE LINE
- TO ACCEPT AN INCOMING CALL
- QUEUE FUNCTION
- IMMEDIATE EXECUTION OF A PENDING OPERATION
- MODIFYING AN OPERATION
- DELETING PENDING OPERATIONS
- PRINTING OUT A PENDING DOCUMENT
- PRINTING OUT THE LIST OF PENDING OPERATIONS
- FAX-BACK AND POLLING
- POLLING
- DEPOSITING A FAX-BACK DOCUMENT
- CHAPTER 4: TELEPHONE ANSWERING DEVICE
- ACTIVATING / DE-ACTIVATING THE TAD
- ACTIVATING THE TAD
- DE-ACTIVATING THE TAD
- SELECTING THE TAD MODE
- SELECTING THE ANSWER-RECORD MODE
- SELECTING THE ANSWER-ONLY MODE
- ANNOUNCEMENTS
- ANSWER-RECORD ANNOUNCEMENT
- ANSWER-RECORD ANNOUNCEMENT RECORDING
- ANSWER-RECORD ANNOUNCEMENT LISTENING
- ANSWER-ONLY ANNOUNCEMENT
- ANSWER-ONLY ANNOUNCEMENT RECORDING
- ANSWER-ONLY ANNOUNCEMENT LISTENING
- MESSAGES OGM
- PRESENCE OF MESSAGES
- LISTENING TO MESSAGES
- ERASING MESSAGES
- ERASING ALL MESSAGES
- ERASING A MESSAGE
- CALL SCREENING
- RECORDING A MEMO
- REMOTE RETRIEVAL
- To retrieve messages on your TAD remotely:
- You can carry out the following operations over a remote telephone:
- Whilst listening:
- After listening:
- PRIVILEGED ACCESS
- PRIVILEGED ACCESS CALLS
- INCOMING CALLS
- CHAPTER 5: RECEIVE MODES
- TELEPHONE MODE
- FAX/PHONE MODE
- TAD MODE (\*)
- CHAPTER 6: OTHERS FUNCTIONS
- PHOTOCOPYING
- PRINTING OUT
- FUNCTION GUIDE
- LOGS
- DIRECTORY
- SETTINGS
- REMOTE OPERATION FROM ANOTHER HANDSET ON THE SAME LINE
- REMOTE STOP INSTRUCTION
- REMOTE FAX RECEIVE INSTRUCTION
- AUDIBLE ALARM
- INK GAUGE
- OPERATION IN CONJUNCTION WITH A CORDLESS TELEPHONE
- REGISTERING A CORDLESS TELEPHONE INTO THE UNIT
- DE-REGISTERING A CORDLESS TELEPHONE HANDSET FROM THE UNIT
- SETTING A 4-DIGIT ACCESS CODE
- DISTINCTIVE RINGING (FOR AUSTRALIA ONLY)
- USING A PORTABLE PHONE (DEPENDING ON MODEL)
- CHAPTER 7: APPENDICES
- CONSUMABLES REPLACEMENT
- INK RIBBON
- INK RIBBON GAUGE
- SETTINGS
- TRANSMISSION REPORT CODES
- TROUBLESHOOTING
- NOTICE FOR CONNECTION TO THE TELECOMMUNICATION SYSTEM
- BABT Certificate Number/Approval Number for the
- This apparatus has been approved for the use of the following facilities:
- IMPORTANT! Compatible switchboards
- Calling the Emergency services
- SAFETY WARNING
- How to connect the mains lead to a plug
- Guide to remote operation of your unit's built-in TAD
- Your TAD security code: \*
- CONSUMABLES
- INK RIBBONS
- PAPER
- INK RIBBON + PAPER PACKAGE
Brand : SAGEM
Model : Phonefax 325
Category : Fax