SD-MV-0901 - Audio/Video Electronics SEADA - Free user manual and instructions
Find the device manual for free SD-MV-0901 SEADA in PDF.

User questions about SD-MV-0901 SEADA
0 question about this device. Answer the ones you know or ask your own.
Ask a new question about this device
Download the instructions for your Audio/Video Electronics in PDF format for free! Find your manual SD-MV-0901 - SEADA and take your electronic device back in hand. On this page are published all the documents necessary for the use of your device. SD-MV-0901 by SEADA.
USER MANUAL SD-MV-0901 SEADA
SD-MV-0901 9x1 HDMI Seamless Switcher with Multi-view
SEADA
Showing the World
User Manual
VER 1.0
Thank you for purchasing this product
For optimum performance and safety, please read these instructions carefully before connecting, operating or adjusting this product. Please keep this manual for future reference.
Surge protection device recommended
This product contains sensitive electrical components that may be damaged by electrical spikes, surges, electric shook, lighting strikes, etc. Use of surge protection systems is highly recommended in order to protect and extend the life of your equipment.
Table of Contents
- Introduction...... 2
- Features.... 2
- Package Contents......2
- Specifications....3
- Operation Controls and Functions...... 4
5.1. Front Panel....4
5.2. Rear Panel.... 5 - Detail description of display mode...... 6
- Remote Control....8
- Web GUI User Guider......9
- Application Example....12
1. Introduction
The 9x1 seamless switcher supports 9 HDMI inputs and one HDMI output. It allows user can view up to 9 HD video contents on one display at the same time. Output resolution can be chosen for supporting legacy display. This switcher is a suitable solution for presentation purpose at classroom and conference room.
2. Features
☆ HDMI 1.4b, HDCP 1.4 compliant.
☆ Input video resolution up to 1080p@60Hz, Output up to 4K2K@30Hz
☆ 9x HDMI inputs, 1x HDMI and 1x de-embedded analog audio output
☆ Fast seamless switching with scaling up to 3840x2160p (4K)
☆ Supports 1/2/4/9 windows multi-view modes
☆ Display 4x full HD signals within one 4K display with pixel-to-pixel quality
☆ Control is via on-panel button, IR, RS-232, LAN or Web GUI
☆ 1U rack mounted design
3. Package Contents
① 1x 9×1 HDMI Seamless Switcher
② 1x 12V/1A Power Adaptor
③ 1x Remote Control
④ 1x User Manual
4. Specifications
| Technical | |
| HDMI Compliance | HDMI 1.4b |
| HDCP Compliance | HDCP 1.4 |
| Video Bandwidth 3 | Gbps |
| Video Resolutions | 4K2K@30Hz YUV4:4:4、RGB4:4:4 |
| Color Depth 8-bit | |
| Color Space RGB, | YUV4:4:4, YUV 4:2:2 |
| HDMI Audio Formats | LPCM 2.0 |
| ESD Protection | Human-body Model : ±8kV (Air-gap discharge) , ±4kV (Contact discharge) |
| Connections | |
| Inputs | 9x HDMI Type A [19-pin female]1x RJ45 [8-pin female]1x RS-232 [Phoenix jack]1x USB [USB-A]1x IR EXT [3.5mm Stereo Mini-jack] |
| Outputs | 1x HDMI Type A [19-pin female]1x Audio Out [3.5mm Stereo Mini-jack] |
| Mechanical | |
| Housing | Metal Enclosure |
| Color Black | |
| Dimensions | 440mm (W)×200mm (D)×44.5mm (H) |
| Weight | 2.26kg |
| Power Supply | Input: AC100~240V 50/60Hz, Output: DC12V/1A (US/EU standards, CE/FCC/UL certified) |
| Power Consumption | 7.8W (max) |
| Operating Temperature | 0°C ~ 40°C / 32°F ~ 104°F |
| Storage Temperature | -20°C ~ 60°C / -4°F ~ 140°F |
| Relative Humidity | 20~90% RH (non-condensing) |
5. Operation Controls and Functions
5.1 Front Panel

text_image
HOMI HDMI MULTI-VENUE 12 4 5 6| Number | Name Function descriptions | |
| 1 | RESET button and LED | Press this button up to 10s to reset to factory set, the indicator LED will blink 5 times. |
| 2 | LOCK button and LED | Press this button to lock all buttons on the panel, the indicator LED is on. Press this button again is unlock, the indicator LED is off. |
| 3 | IR | IR receiver window, it receive IR remote control signal. |
| 4 INPUT button | INPUT 1~9 button: Press this button to select HDMI input source from 1 to 9.AUDIO/IP button: a. Select output audio signal from HDMI input . For example, when user want to select input 1 port audio to output audio port, press AUDIO/IP button→INPUT 1 button. In this time, the AUDIO/IP indicator LED is blink 3 times.b. Long press this button up to 6s will output the unit IP address on screen display.IN/OUT button: When user need select multi-screen output, firstly user need select multi-screen mode button, then through operate IN→x→OUT→y to select output screen.Please see the below detail description. | |
| 5 | Multi-screen mode button | Press these button to select display mode. |
| 6 | RESOLUTION button | Press this button to select output resolution. |
5.2 Rear Panel

text_image
Diagram of a network device rear panel with labeled ports and connectors, showing numbered annotations for port identification.| Number | Name Function | descriptions |
| 1 | HDMI INPUT Area | Connect to the HDMI input source device, such as DVD player or Set top box. |
| 2 | HDMI OUTPUT Area | HDMI OUTPUT: Connect to the HDMI output device, such as TV or Monitor.AUDIO OUTPUT: Connect to audio amplifier. This audio volume can be adjust through Remote Control or Web GUI software. |
| 3 | CONTROL ports | RJ45: This port is the link for Web GUI or PC control, connect to an active Ethernet link with an RJ45 terminated cable.USB: Upgrade Fireware.IR EXT: IR extend receiver port, connect to IR receiver cable.RS-232: Connect to a PC or control system for transmission RS-232 commands or upgrade MCU firmware. |
| 4 DC | 12V | Plug the 12V/1A adaptor to AC wall outlet for power supply. |
6. Detail description of display mode
The 9×1 HDMI Seamless Switcher have 4 display modes.
MODE1: The 9x1 HDMI Seamless Switcher will display nine HDMI inputs separately. Switch to the front panel or remote control MODE button. Operating illustration: select MODE 1 button→select HDMI input source button [MODE 1 button(☐)→x].

natural_image
Empty white rectangle with a thin black border (no text or symbols)MODE1-9×1 Seamless Switcher
MODE2: The 9×1 HDMI Seamless Switcher devides two HD inputs and display on a screen. Select input signal source to different display screen. Operating illustration: press MODE 2 button (If you want to output the other display mode, please press this button two times continuously.)→press IN button→press HDMI input source button→press OUT button→press HDMI input source button (MODE 2 button→IN→x→OUT→y). For example, if user need the second screen from the third HDMI input port [MODE 2 button(□)→IN→3→OUT→2].
| The 1st screen The | 2nd screen |

text_image
The 1st screen The 2nd screenMODE2-2×1 Multi-Viewer
MODE3: The 9×1 HDMI Seamless Switcher devides four HD inputs and display on a screen. Select input signal source to different display screen. Operating illustration: press MODE 3 button (If you want to output another display mode, please press this button continuously.) → press IN button → press HDMI input source button → press OUT button → press HDMI input source button (MODE 3 button → IN → x → OUT → y). For example, if user need the fourth screen from the third HDMI input port [MODE 3 button (⊕) → IN → 3 → OUT → 4].
| The 1st screen The 2nd screen |
| The 3rd screen The 4th screen |
| The 1st screen | The 2nd screen |
| The 3rd screen | |
| The 4th screen |
| The 2nd screen | The 1st screen |
| The 3rd screen | |
| The 4th screen |
| The 1st screen | ||
| The 2nd screen | The 3rd screen | The 4th screen |
MODE3-4×1 Multi-Viewer
MODE4: The 9×1 HDMI Seamless Switcher devides nine HD inputs with same size and display on a screen. Select input signal source to different display screen. Operating illustration: press MODE 4 button→press IN button→press HDMI input source button→press OUT button→press HDMI input source button(MODE 4 button→IN→x→OUT→y). For example, if user need the sixth screen from the first HDMI input port [MODE 4 button (☐)→IN→1→OUT→6].
| The 1st screen | The 2nd screen | The 3rd screen |
| The 4th screen | The 5th screen | The 6th screen |
| The 7th screen | The 8th screen | The 9th screen |
MODE4-9×1 Multi-Viewer
7. Remote Control

text_image
Reset Input 1 2 3 In 4 5 6 Out 7 8 9 Audio Output RES IP Volume VOL- VOL+ Mute 9×1 MULTI-VIEWERReset: Long press this bottom up to 10s to reset to factory set. Input 1\~9: Press these button to select input source. In/Out: When user need select Output multi-screen, firstly user need select the remote control Output multi-screen mode button, then through operate In→x→Out→y to select output screen.
Please see the above detail description.
Audio: Select output audio signal from HDMI input port. For example, When user want to select input 1 port audio to output audio port, press Audio button→Input 1 button.
: Press these button to select display mode.
RES: Cycling select resolution output.
(1024×768/1360×768/720P/1080I/1080P/4K)
IP: Press this button, the output screen left top concer will display the unit IP address.
VOL-/VOL+: Adjust audio volume output.
Mute: No volume output.
8. Web GUI User Guide
The switcher can be controlled via Web GUI software through RJ45 port. You should know current switcher IP address. The static IP address is 192.168.1.100. You can connect PC Web GUI through dynamic IP adress. If you don't know dynamic IP address, Long press AUDIO/IP button up to 6s, the output screen left top concer will display dynamic IP address. Then you should set the IP address to your PC or laptop or mobile device is within the same IP address segment with the switcher. After above, you can enter the switcher IP address in the web browser to access Web GUI.
General mode

text_image
General Video Audio Network Advanced So1 Presentation Switcher Control In Out 1 2 3 4 5 6 7 8 9 1 2 3 4 5 6 7 8 9① Select output screen mode.
② When you have selected output screen mode, then you can select output screen corresponding input signal source. (The order is from left to right and from top to bottom.)
Video mode
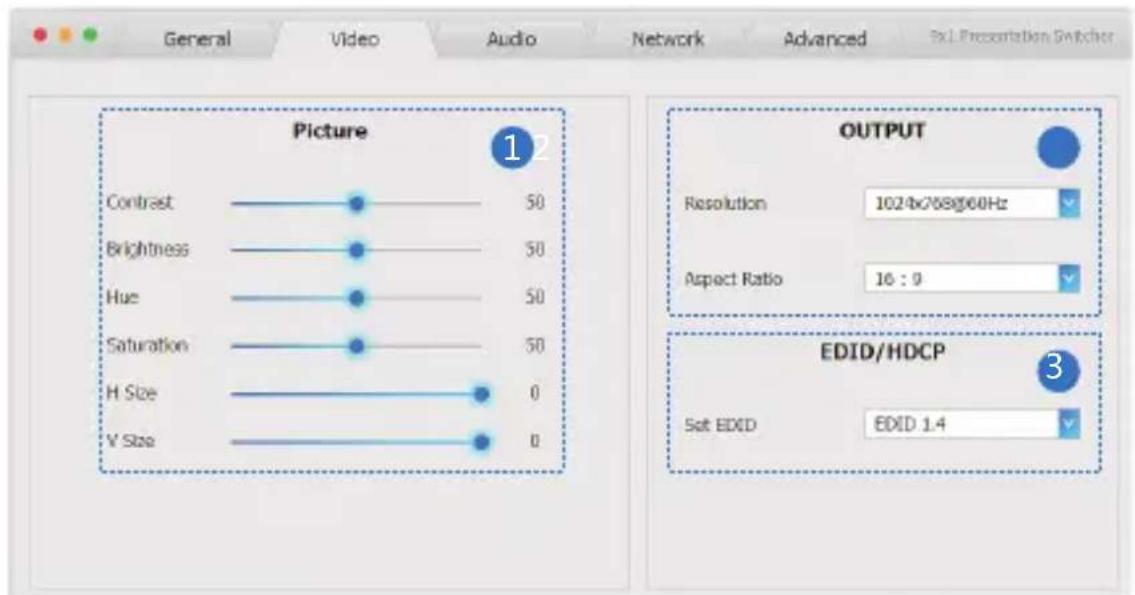
text_image
General Video Audio Network Advanced 5x1 Presentation Switcher Picture 1 2 OUTPUT Resolution 1024x768g60Hz Aspect Ratio 16 : 9 EDID/HDCP Set EVID EDID 1.4 Contrast 50 Brightness 50 Hue 50 Saturation 50 H Size 0 V Size 0① Set the video picture interface, it constrains Contrast set, Brightness set, Hue set, Saturation set, H Size set and V Size set.
② Select output Resolution and Aspect Ration.
③ Set EDID.
Audio mode

text_image
General Video Audio Network Advanced 3x1 Presentation Switcher Volume 12 Audio Volume 32 Mute Audio Delay(ms) 0 Audio Select HDMI 1 HDMI 2 HDMI 3 HDMI 4 HDMI 5 HDMI 6 HDMI 7 HDMI 8 HDMI 9① Set volume: Adjust the volume or select the audio delay(ms).
② Audio Select: Select the output audio corresponding HDMI input signal source.
Network mode
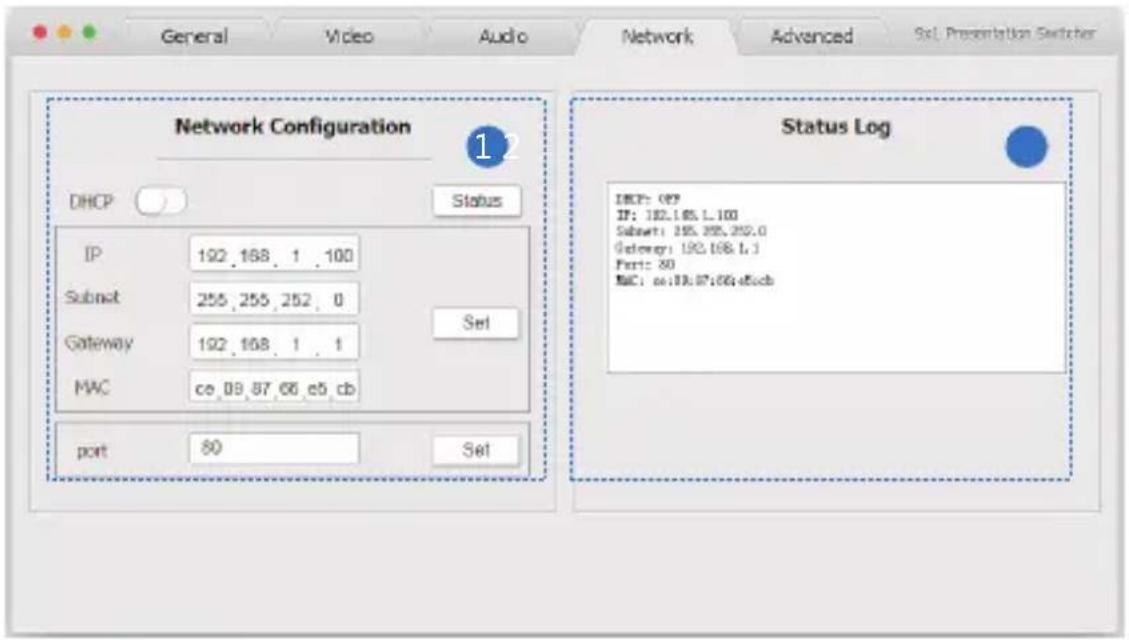
text_image
Network Configuration DHCP Status IP 192,168,1,100 Subnet 255,255,252,0 Gateway 192,168,1,1 MWC ce 09,87,66 e5 db port 80 Set Status Log DHCP: 09 IF: 192.168.1.100 Subnet: 195.295.292.0 Gateway: 192.168.1.1 Port: 30 MAC: cc:09.07:06.e5db① Network Configuration
DHCP switch, Status button: Obtian the network configuration information, including IP address, Subnet, Gateway and MAC address.
Set port: Set TCP/IP port.
② Status Log: Display the Network Configuration information.
Advanced mode
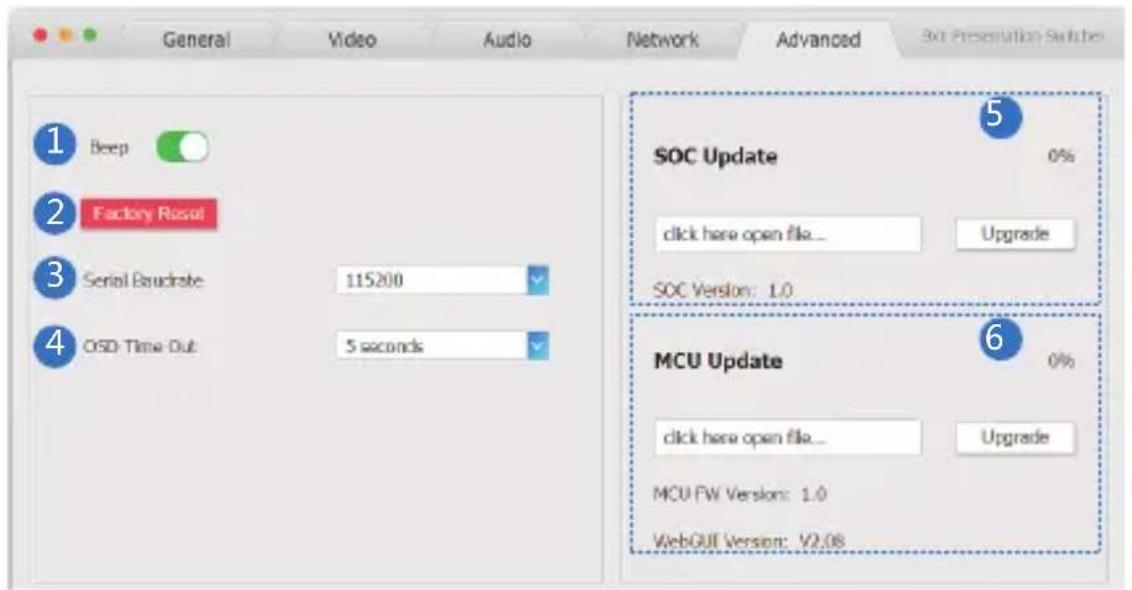
text_image
General Video Audio Network Advanced 3x4 Presentation Switches 1 Beep 2 Factory Reset 3 Serial Bandrate 115200 4 CSD Time Out 5 seconds SOC Update 0% click here open file... Upgrade SOC Version: 1.0 6 MCU Update 0% click here open file... Upgrade MCU FW Version: 1.0 WebGUI Version: V2.08① Beep: Buzzer switch.
② Factory Reset: Click this botton to reset to factory set.
③ Serial Baudrate: Select the serial baudrate.
④ OSD Time Out: Select the OSD display time.
⑤ SOC Update: SOC chip update.
⑥ MCU Update: MCU version update.
9. Application Example

flowchart
graph TD
    A["Audio amplifier"] --> B["PC"]
    A --> C["Power Supply"]
    A --> D["TV or Monitor"]
    B --> E["Power Supply"]
    C --> F["TV or Monitor"]
    D --> G["Power Supply"]
    H["DVD or Blu-ray Player"] --> I["Video/Blu-ray Player"]
    J["DVD or Blu-ray Player"] --> K["Video/Blu-ray Player"]
    L["..."] --> M["..."]
    N["..."] --> O["..."]