BPA-81-A - Mp3 player BRIGMTON - Free user manual and instructions
Find the device manual for free BPA-81-A BRIGMTON in PDF.

User questions about BPA-81-A BRIGMTON
0 question about this device. Answer the ones you know or ask your own.
Ask a new question about this device
Download the instructions for your Mp3 player in PDF format for free! Find your manual BPA-81-A - BRIGMTON and take your electronic device back in hand. On this page are published all the documents necessary for the use of your device. BPA-81-A by BRIGMTON.
USER MANUAL BPA-81-A BRIGMTON
natural_image
Abstract curved white shape on white background, no text or symbols presentBRIGMTON
surfing technology
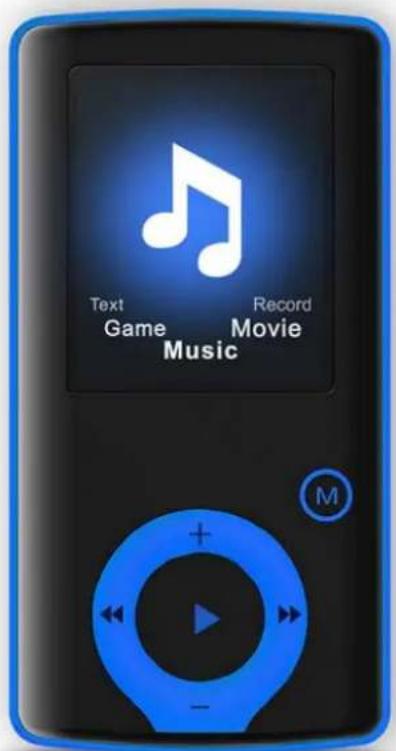
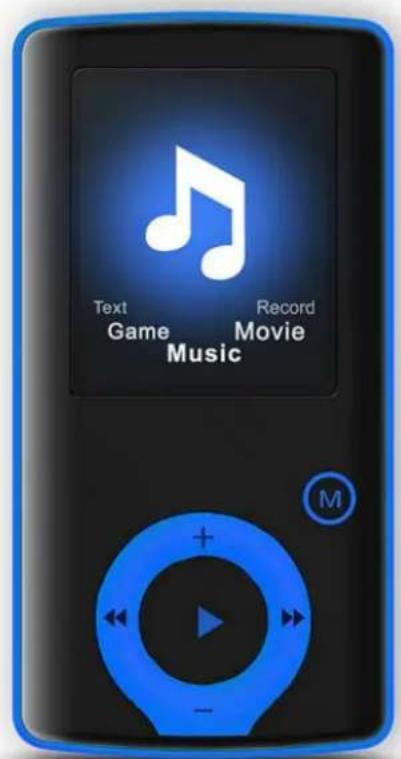
MODO DE MÚSICA
MODO DE PELÍCULA
natural_image
Abstract curved white shape on white background, no text or symbols presentBRIGMTON
INSTRUCTION MANUAL
BPA-81-A-R-Y
DIGITAL PLAYER
FEATURES
- 1.8-inch TFT display
- 128 x 160 pixels display resolution
- Color-matching earphone included
- Plays AVI (128x160), AMV video format files
- Plays MP3, WMA, WAV audio format files
- Picture browsing of JPEG format files
- Built in Micro-SD card slot, supports up to 8GB
- Built-in 390mAh Li-poly battery
- Built-in FM Radio (optional)
- Built-in game function
- Supports TXT E-book format
- Multi-language support
PRECAUTIONS
Follow these tips to preserve the operational lifespan of your Digital Media Player:
- It is recommended that you allow the battery to fully charge before using the device for the first time. Do not recharge unattended for longer than 4 hours.
- Do not hang the player by its earphones or cables
- Never force any cable connectors into the ports of your Digital Media Player or computer. Always make sure that your cable connectors are identical in shape and size before attempting to connect.
- When disconnecting your digital media player from a computer, use the Safely Remove Device function on your computer. Do not disconnect your digital media player while transmitting data.
WARNING
- Do not use this player in extreme temperatures. Keep away from extreme hot, cold, dry, or damp areas. Also keep away from water, fire, and radiation.
- Do not disassemble your digital media player.
- Do not allow young children to use your player unsupervised.
- Do not install foreign software onto your digital media player.
BUTTON & CONTROLS
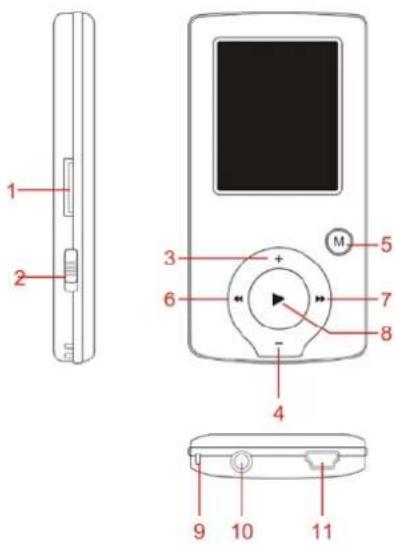
- TFT Card slot
- ON/OFF power switch
- VOL+
- VOL-
5.Enter menu and exit from sub-menu, confirm selection (under any status, hold [MENU] will enter main menu) - Last/ Backward
- Next/Forward
- Play/Pause、Power ON/OFF the player
- Hand strap Hole
- Earphone socket
- USB socket
BASIC OPERATION
POWER ON/POWER OFF
To switch on/off the device. Push [ON/OFF] button.
You can also Press ">II" and hold 3 seconds to switch on and switch off the device.
EXPANSION CARD:
Insert the TF card to the Micro SD card slot. You could see the Card folder in the menu. If not with the TF card, There is no card folder in the menu.
CHARGE/CONNECT/DISCONNECT FROM PC
Connect the device to PC via USB Cable to use it as a Removable Disk.
To charge the device or disconnect the device. Press "Menu button" under USB connected.
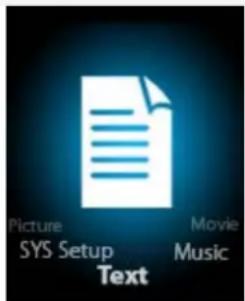
MAIN MENU
Hold [MENU] to enter main menu. Press [PRE] or [NEXT] to switch the modes.
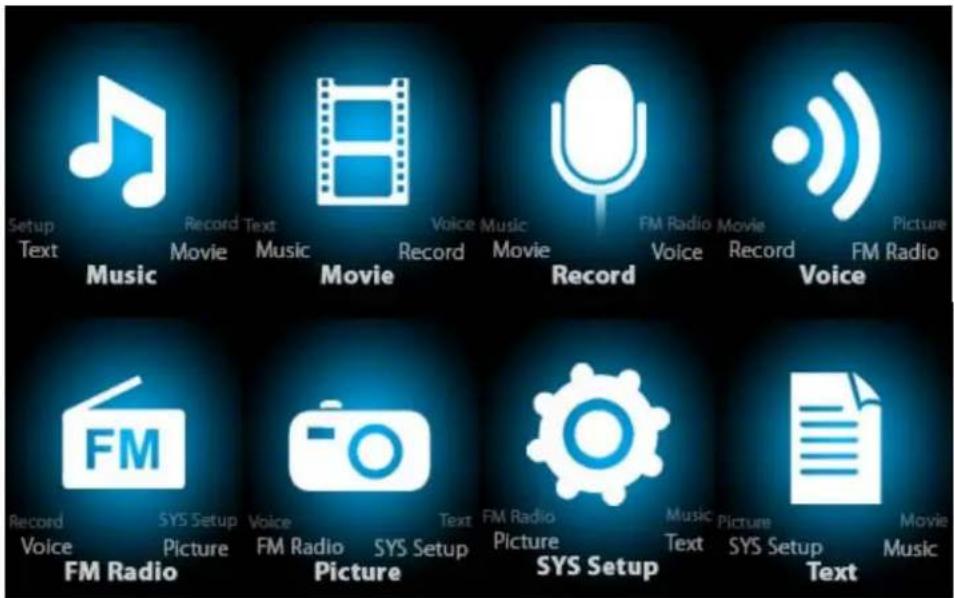
MUSIC
Select "Music" in the main menu

Press [MENU] to confirm selection and then press PLAY/STOP [>II] button to play the song. While music playing, press [MENU] button to enter sub-menu:

Select MUSIC mode in main menu, press [MENU] to confirm selection and then press PLAY/STOP [>II] button to play the song. While music playing, press [MENU] button to enter sub-menu:
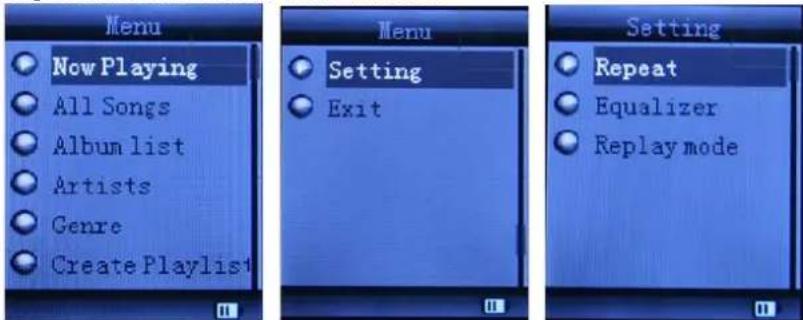
| All Songs Display all the songs | |||
| Album list Display the album | |||
| Artists Display the singer of the song | |||
| Genre Display the genre of the song | |||
| Create Playlist | Create the playlist | ||
| Setting | Repeat Normal, Repeat one; | Folder;Repeat Folder; Repeat All;Random; Intro. | |
| Equalizer NATURAL,ROCK,PO | P,CLASSIC,SOFT,JAZZ, DBB | ||
| Replay mode | Replay | A-B repeat, when “A” in the iconblinks, swing [NEXT] to confirmstart point, swing [NEXT] as “B”point . The player will replay fromA to B according to the setting inthe replay times. (Return to A-Breplay mode by swing [PRE]button in such status) | |
| Replay times | Set how many times the A-B pointreplay Maximum is 10 times (1-10) | ||
| Replay gap | set replay time gap betweenevery replay | ||
| Exit Exit from sub-menu | |||
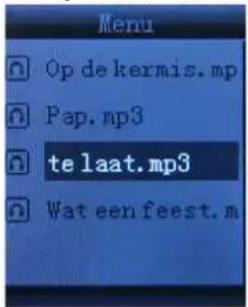
This device support Lyrics display. To fully display the contents of the song, you must make sure the name of the song under the music folder should be exactly the same one under LRC file.e.g
You put a "song.mp3" in music folder, a same name "song.lrc" should be placed under LRC file.
| Local folder Indicate the folder of present playing file |
| Delete file Delete the present playing song |
| Delete All Delete All songs |
If you want to delete a song while it is playing, press [>ll] to stop playing, then press Mode button). select "Delete file", choose the file you want to delete, confirm "Delete", then the screen shows below:
MOVIE
Select "Movie" in the main menu

Press [MENU] to confirm selection and then press PLAY/STOP [>II] button to play the video. While playing video. press [MENU] button to enter sub-menu.
All the operation is same as Music.
RECORD MODE

Press [MENU] button to select Record mode in main menu, then press [MENU] again enter into recording sub-menu.
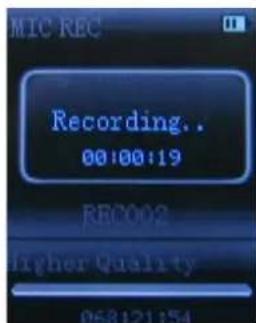
| Local folder | Indicate the folder of present recording file |
| REC type: | 32K BPS、64K BPS、128K BPS、256K BPS |
| Exit Exit form | sub-menu |
After setting, press [>II] to start recording. only [>II] (play/stop) and [MENU] can be used during recording. To start a new recording file, please press [>II] (play/stop) button shortly will save present recording file.
Noted that this device supports 99 voice recording files storage in each directory. If the screen displays “out of space”, which indicates the current directory has already saved 99 voice recording files, the user need to change to a new directory.
VOICE
Press [PRE] or [NEXT] to select the Voice mode, then press [MENU] to confirm the selection, press [>II] to play the recording file.

Press [>II] button to pause playback, swing [PRE] or [NEXT] button to select recording files.
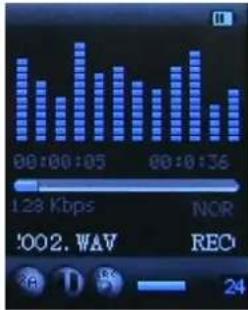
Sub-menu while playing status:
| Repeat | Refers to “repeat” in music mode |
| Replay mode Refers to “replay” in music mode | |
| Exit Exit from sub-menu | |
Sub-menu while stop status:
| Local folder | Indicate the folder of present recording file |
| Delete | Delete recording song |
| Delete All | Delete all recording files |
| exit Exit from | the sub-menu |
FM MODE
Select [PRE] or [NEXT] button to choose FM mode and press [MENU] to confirm.
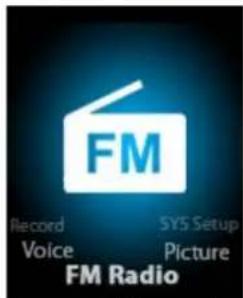
Press [>II] (play/stop) to save channel. If no channel is saved, you can look for channels by auto or manual searching. Press [MENU] again to get sub-
menu as below:
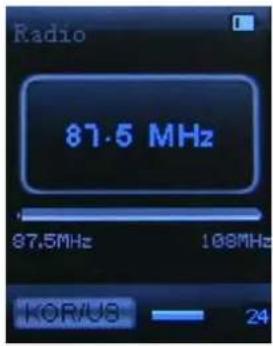
| Save Save currently tuned frequency; | |
| Record | Record current preset channel; |
| Delete delete current preset channel; | |
| Delete All delete all saved channels; | |
| Auto Search Auto search FM channel | |
| Normal Band | Frequencies from 87.5MHz---108MHz; |
| Japan Band | frequencies from76.5MHz---90MHz; |
| Exit exit from FM sub-menu | |
Auto search: Holding [PRE] button or [NEXT] button for two seconds will tune frequency upward or downward until a radio station is located then it stop automatically.
Manual search: swing [PRE] or [NEXT] button to search channel upward or downward one-step Notice: Normal band and Japan band can store 20 preset channels respectively.
PICTURE
Select [PRE] or [NEXT] button to select Picture mode, then press [MENU] to confirm,

Press [MENU] button again to enter sub-menu:
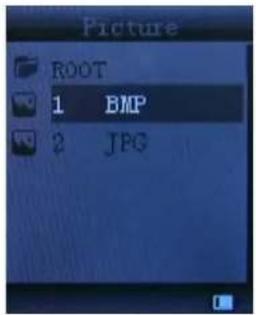
| local folder choose the folder where picture is saved; | |
| playback set | manual play or auto play (there is a time gap for auto play from 1-10 seconds) |
| Delete file Delete picture; | |
| Delete All | Delete all pictures |
| exit Exit from sub-menu | |
Press [>II] (play/stop) button to display the picture automatically or manually according to previous playing setting.
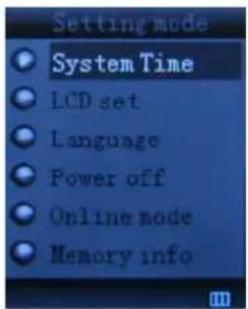
SYS SETUP
Select [PRE] or [NEXT] button to select SYS Setup, then press [MENU] to confirm,
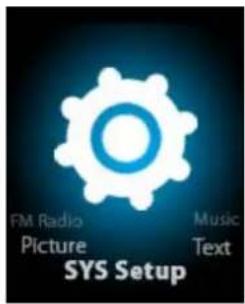
Press [MENU] button again to enter sub-menu:
| Record time | Press [MENU] to edit recording time. Swing [NEXT] button and the digit of year will increase; swing [VOL+] button to edit next digit, push [PRE] or [NEXT] button to adjust the digit. Press [MENU] to confirm the setting |
| Main Style | Blue、Green、Orange、Pink、Red、Yellow |
| LCD set | Always light10 Sec20 Sec30 Sec |
| Language | Simple Chinese, English, Trad Chinese, Japanese, French, German, Italian, Dutch, Portuguese, Spanish, Swedish, Czech, Denmark, Polish etc. |
| Power off | Off time: set self-power off time when the player is stopped and no button is pressed. The time unit is seconds. 0 means set off the function.Sleep time: set self-power off time after last key pressed, regardless of whether the player is active or stopped. The time unit is minutes. |
| Online mode | Multi Drive; Normal only; Encrypted only |
| Memory info. | Check the memory size and the remaining memory |
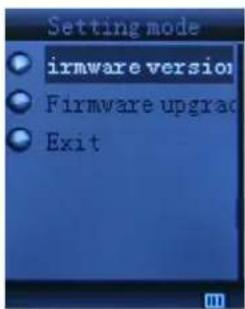
| Firmware version | Display the player's firmware version |
| Firmware upgrade | Firmware can be upgraded via connection to PC |
| Exit Exit from the sub-menu | |
TEXT
Select [PRE] or [NEXT] button to select Text, then press [MENU] to confirm, Seleccione [PRE] o [NEXT] para seleccionar texto, a continuación, presione [MENU] para confirmar,
Enter TEXT mode by pressing Mode button, then you can read and edit the article in the device. The device only can recognize the article in "txt."
Format.
Press [MENU] button again to enter sub-menu:
| local folder choose the | folder where picture is saved; |
| playback set | manual play or auto play (there is a time gap for auto play from 1-10 seconds) |
| Delete file Delete picture; | |
| Delete all Delete all pictures | |
| Exit Exit from sub-menu | |
Please follow the steps here below to install the video conversion tool.
Unzip the "Video Conversion Tool.rar" which is stored in internal memory, Click on Run Setup.exe to start the installation process, you may find a tool named "AMV/AVI convert tool", click and open it, there is a window appears, choose the file you want to convert, then choose the folder you want to put the new converted file, click "start converting" is ok.
Video Conversion Steps
1) Unzip the file, and double click to the Setup.exe and install it.
2) Double click to the Amvtransform.exe.
(folder - Program Files\Media Player Utilities 4.41\AMVConverter)
3) Then you could see the below:
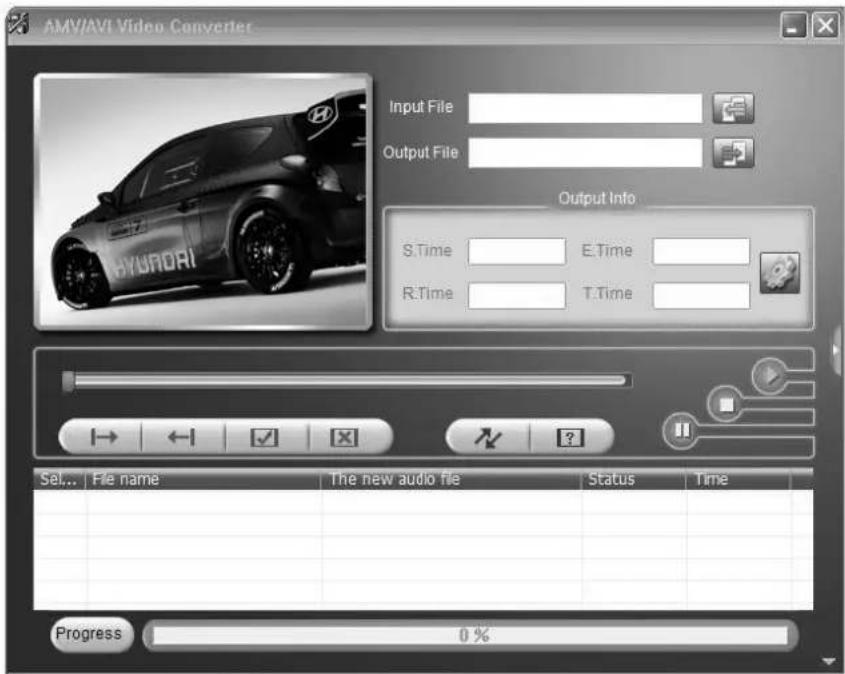
4) Click to the Input file and choose the video which you need to convert.
5) Click to the Input file and choose the video which you need to convert.
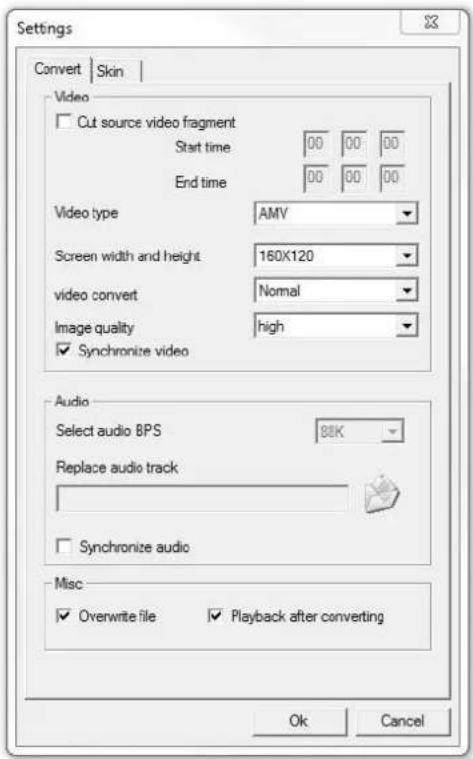
6) Click to for settings. Choose the AMV and the resolution 160x120.
6) Click to for conversion.
Trouble Shooting
| No power | Check battery level. |
| Recharge as per directions in User Manual | |
| Unable to locate or play files | Check that the file is in a compatible format |
| Check to see if the file is stored in a different directory. | |
| No music is heard in the earphones | Check the volume level |
| Check the connection (earphone to the earphone jack) | |
| Check if your music file is compatible with your MP3 player. | |
| Not charging | Check to make sure that your Digital Media Player is connected to a USB port on your computer. |
| Unable to download music. | Check if you have enough space on your Digital Media Player to download the music file. |

| Check to make sure that the USB cable is connected to the PC and to the Digital Media Player. | |
| Computer not recognizing Digital Media Player | Check that the USB cable is properly connected to your computer. |
| Try plugging the USB cable into one of the back ports of your computer. |
"Features can change without notice"
BRIGMTON
surfing technology
IMPORTED
FERSON ELECTRÓNICA, S.A.
CIF: A-41111881
SANTA CLARA DE CUBA 12
SEVILLA
ESPAÑA
DECLARATION OF CONFORMITY
Ferson Electrónica, S.A. declares under our responsibility that the equipment meets the requirements indicated in the following directives:
DIRECTIVAS EMC
EN55022: 2006+A1:2007
EN55024: 1998+A1 2001+A2 2003
EN55013: 2001+A1:2003+A2:2006
EN61000-3-2: 2006+A2:2009
EN61000-3-3:2008
EN55020:2007
Description of apparatus:
Model BRIGMTON BPA-81
Audio player
CE

BRIGMTON
surfing technology