P 160.2 X-TRA - Pressure washer NILFISK - Free user manual and instructions
Find the device manual for free P 160.2 X-TRA NILFISK in PDF.
| Product type | High pressure cleaner |
| Brand | NILFISK |
| Model | P 160.2 X-TRA |
| Nominal pressure | 150 bar / 15 MPa |
| Admissible pressure | 160 bar / 16 MPa |
| High pressure flow rate | 9.5 L/min |
| Low pressure flow rate | 10 L/min |
| Nominal power | 3.3 kW |
| Nominal voltage | 230 V ~ 50 Hz |
| Max. water temperature | 60 °C |
| Max. inlet pressure | 10 bar / 1.0 MPa |
| Weight | 28.1 kg |
| Sound pressure level | 79.7 dB(A) |
| Guaranteed sound power level | 94 dB(A) |
| Vibrations (ISO 5349) | < 2.5 m/s² |
| High pressure hose length | Not specified (model with reel or hook) |
| Electrical connection | Grounded outlet, GFCI breaker recommended |
| Pump type | Three-phase pump with safety valve |
| Safety devices | Gun lock, temperature sensor, pressure relief valve |
| Included accessories | Ergo 2000 gun, Flexopower Plus lance, Turbohammer Plus lance, detergent tank, nozzle cleaning tool |
| Usage | Domestic: vehicles, terraces, gardens |
| Maintenance | Monthly inlet filter cleaning, nozzle cleaning, fitting lubrication |
| Warranty | 1 year, subject to conditions |
Frequently Asked Questions - P 160.2 X-TRA NILFISK
Important: Point the nozzle towards the ground when starting.
Caution: Do not use beyond specifications to avoid damaging the machine or surface.
Note: Detergent cannot be used with the coiled high pressure hose.
Tip: Ensure the water inlet filter is clean.
Important: A clogged nozzle causes overpressure.
Caution: Frozen water can damage the machine.
Important: The filter is mandatory to preserve pump valves and warranty.
Reminder: Do not cover the machine during operation to allow cooling.
Caution: Never start a frozen machine.
Tip: All repairs must be carried out by an authorized technician.
User questions about P 160.2 X-TRA NILFISK
0 question about this device. Answer the ones you know or ask your own.
Ask a new question about this device
Download the instructions for your Pressure washer in PDF format for free! Find your manual P 160.2 X-TRA - NILFISK and take your electronic device back in hand. On this page are published all the documents necessary for the use of your device. P 160.2 X-TRA by NILFISK.
USER MANUAL P 160.2 X-TRA NILFISK
overholds for at undgå fare for personer.

Dette symbol bruges til at markere sikkerhedsinstruk-tioner, der skal verholds for at un-
Division of Nilfisk-Advance A/S
Industrivej 1
DK-9560 Hadsund
Anton Sorensen
General Manager, Technical Operations EAPC
Hadsund, 01.10.2010
Innholdsfortegnelse
NO
General Manager, Technical Operations EAPC
Nilfisk-ALTO
Division of Nilfisk-Advance A/S
Industrivej 1
DK-9560 Hadsund
Hadsund, 01.10.2010
Index
Division of Nilfisk-Advance A/S
Industrivej 1
DK-9560 Hadsund
Anton Sorensen
Hadsund, 01.10.2010
General Manager, Technical Operations EAPC
Hakemisto
Division of Nilfisk-Advance A/S
Industrivej 1
DK-9560 Hadsund
Anton Sorensen
General Manager, Technical Operations EAPC
Hadsund, 01.10.2010
Index
1 Safety precautions and warnings 62
2 Description 64
3 Before you start using your pressure washer. 65
4 Operating your pressure washer 66
5 Fields of application and working methods 70
6 After using your pressure washer. 71
7 Maintenance. 72
8Trouble Shooting 73
9 Further information. 74
10 Main Technical Data 75
11 EC Declaration of Conformity 75
1 Safety Precautions andWarnings
Symbols used to mark instructions

Before starting up your high-pressure washer for the first time, this instruction manual
must be read through carefully. Save the instructions for later use.

Safety instructions marked with this symbol must be observed to pre
vent danger to persons.

This symbol is used to mark safety instructions that must be observed to
prevent damage to the and its performance.

This symbol indicates tips and instructions
to simplify work and to ensure a safe operation.

Do not let children or people who have not read the instruction manual operate the machine.
This appliance is not intended for use by children or other persons without assistance or supervision if their physical, sensory or mental capabilities prevent them from using it safely. Children should be supervised to ensure that they do not play with the appliance.
Before starting up your machine please check it carefully for any defects. If you find any, do not start up your machine
and contact your Nilfisk-ALTO distributor.
Especially check:
- The insulation of the electric cable should be faultless and without any cracks. If the electric cable is damaged, an authorized Nilfisk-ALTO distributor should replace it.
WARNING!
- High pressure jets can be dangerous. Never direct the water jet at persons, pets, live electrical equipment or the machine itself.
- Never try to clean clothes or footwear on yourself or other
persons.
- Hold the spray lance firmly with both hands. The spray lance is affected by a thrust of up to 16.4 ~N during operation.
- The operator and anyone in the immediate vicinity of the site of cleaning should take action to protect themselves from being struck by debris dislodged during operation. Wear goggles during operation.
- This appliance has been designed for use with cleaning agents supplied or recommended by the manufacturer. The use of other cleaning
agents or chemicals may adversely affect the safety of the appliance.
- To ensure the appliance safety only use original spare parts from the manufacturer or approved by the manufacturer.
- High pressure hoses, fittings and couplings are important for the safety of the appliance. Only use hoses, fittings and couplings recommended by the manufacturer.
- Do not use the appliance if a supply cord or important parts of appliance are damaged, e.g. safety device, high pressure hose and trigger gun.
- Remove the plug from the socket outlet during cleaning or maintenance and when replacing parts or converting the machine to another function.
- Appropriate ear protection must be used.
- Never use the machine in an environment where there could be a danger of explosion. If any doubt arises, please contact the local authorities.
- It is not allowed to clean asbestos-containing surfaces with high pressure.
- Do not spray flammable liquids.
- Always switch off the mains disconnecting switch when leaving the machine unattended.
- This high pressure washer must not be used at temperatures below 0^ .
WARNING!
Inadequate extension cables can be dangerous. If an extension cord is used, it shall be suitable for outdoor use, and the connection has to be kept dry and off the ground. It is recommended that this is accomplished by means of a cable reel which keeps the socket at least 60~mm above the ground. Cables on reels should always be completely unwound
to prevent the cable from overheating.
Extension cables should comply with the below-mentioned requirements for length and cable dimensions.
1.0 mm² max. 12.5 m
1.5 mm² max. 20 m
2.5 mm² max. 30 m
Only POSEIDON 2-17 X:
2.0 mm² max. 12.5 m
2.5 mm² max. 20 m
- If the electric cable is damaged, it must be replaced by the manufacturer or his service agent or similarly qualified person in order to avoid a hazard.
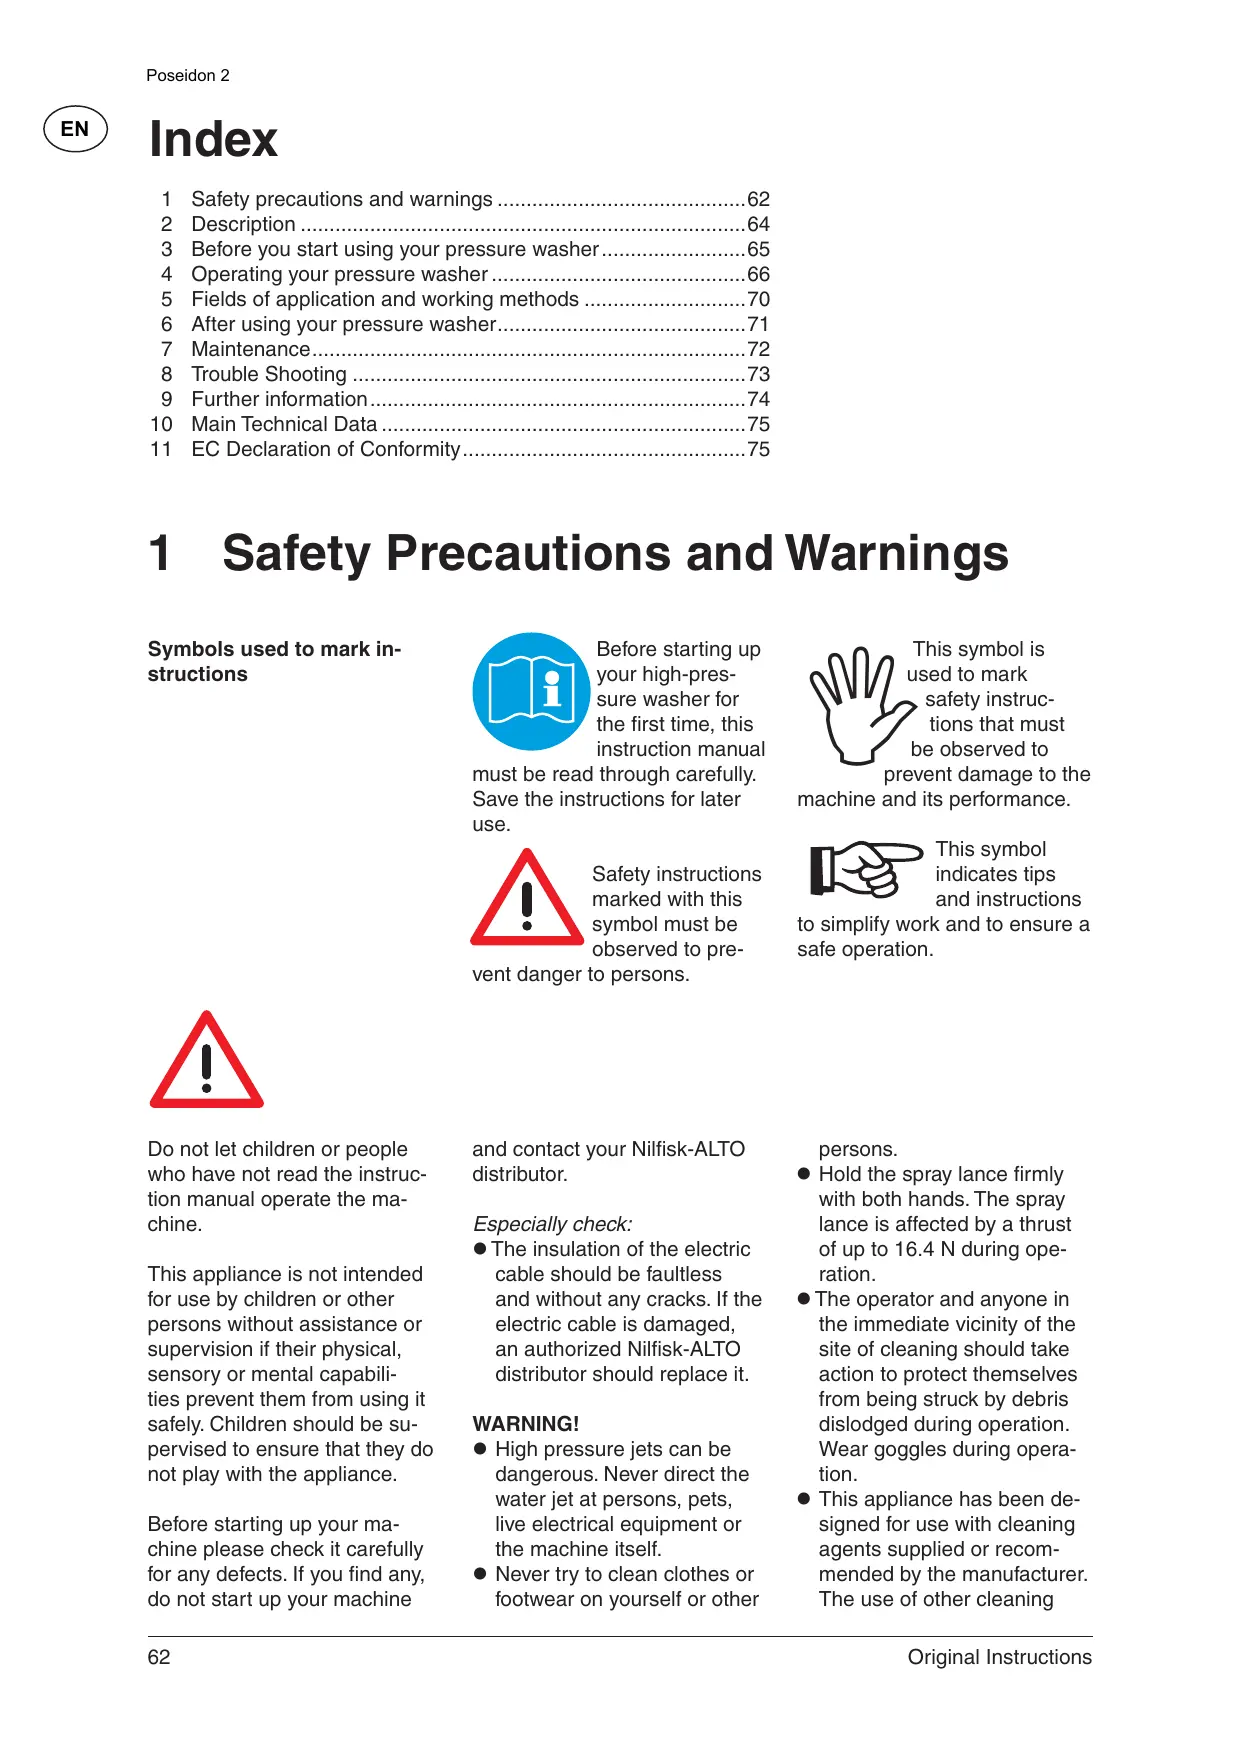
Mains power connection
The following should be observed when connecting the high pressure washer to the electric installation:
- Only connect the machine to an installation with earth connection.
- The electric installation shall be made by a certified electrician and comply with IEC 60364-1.
It is strongly recommended that the electric supply to this machine should include a residual current device (GFCI).
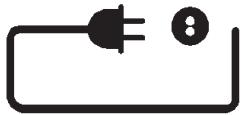
Water connection
Connection to the public mains according to regulations.
Machine not suitable for connection to the potable water mains.
This high pressure washer is only allowed to be connected with the drinking water mains, when an appropriate backflow preventer has been installed, Type BA according to EN 1717. The length of the hose between the backflow preventer and the
high pressure washer must be at least 10 metres to absorb possible pressure peaks (min diameter 12 inch).
Operation by suction (for example from a rainwater vessel) is carried out without backflow preventer.
As soon as water has flow through the BA valve, this water is not considered to be drinking water any more.
IMPORTANT! Only use water without any impurities. If
there is a risk of silt, sand or sediment in the inlet water (i.e. from your own well), an additional filter should be mounted.
Safety devices
Locking device on spray handle (7a) (see illustration at the end of this manual):
The spray handle features a locking device. When the button is activated, the spray handle cannot be operated.
Thermal sensor:
A thermal sensor protects the motor against overloading. The machine will restart after a few minutes when the thermal sensor has cooled.
Pressure safety device
An integrated hydraulic safety valve protects the system from excessive pressure.
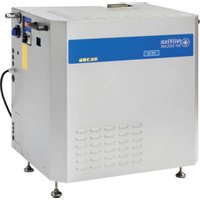
2 Description
2.1 Application
This high-pressure washer has been developed for domestic use for cleaning:
- Car, motorbike, boat, caravan, trailer, patio/drive/flagstones, woodwork, brickwork, barbecue, garden furniture, lawn mower
Section 5 describes the use of the high-pressure washer for various cleaning jobs.
Only use the high-pressure washer for purposes described in this manual.
The safety precautions must be observed to prevent damage to the machine, the surface to be cleaned or severe personal injuries.
2.2 Operation elements and model survey
See illustration at the end of this manual.
1 Start/stop switch
2 Water inlet (with filter)
3 High pressure connection (only machines without hose reel)
4 High pressure hose
5 Electric cable
6 Button for regulation of pressure and water volume
7 Ergo 2000 spray handle with lock (7a)
8 Flexopower Plus spray lance
9 Turbohammer Plus spray lance
10 Detachable detergent container
11 Nozzle cleaning tool
12 Dosing of detergents
13 Hose reel
14 Hose hook (only machines without hose reel)
15 Model tag
16 Button for telescopic handle
17 Telescopic handle
18 Turnable cable hook
Specifications: See model tag (15) of machine.
We reserve the right to alter the specifications.
3 Before you start using your pressure washer
EN
3.1 Mounting of holders for spray lance
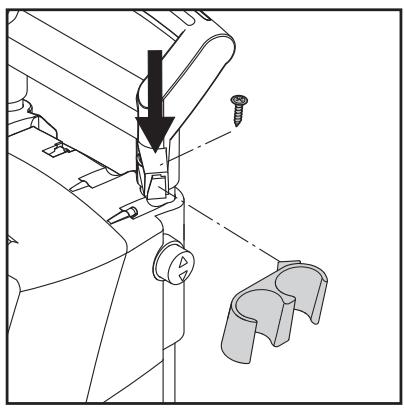
Mount the holders for spray lance on the machine.
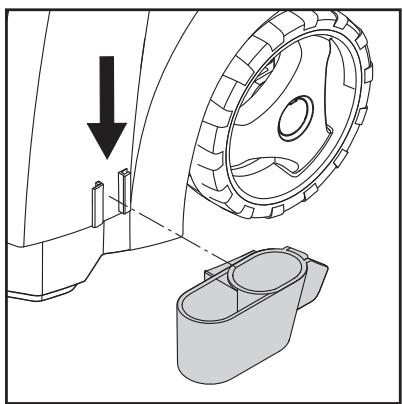
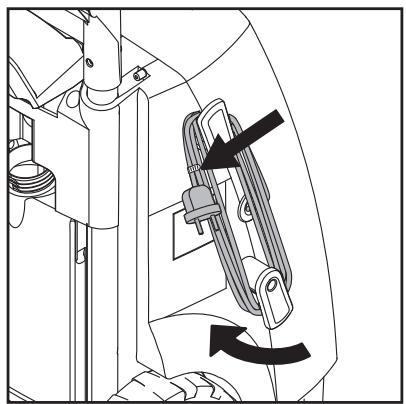
3.2 Mounting of hose hook (only models without hose reel)

Mount the hose hook (14) on the handle (2 screws).
Note: the hose hook can be mounted on the front as well as on the back. Front position is to be used if the product is used together with a special wall hook for wall storage.
3.3 Mounting of hose reel handle (only models with hose reel)
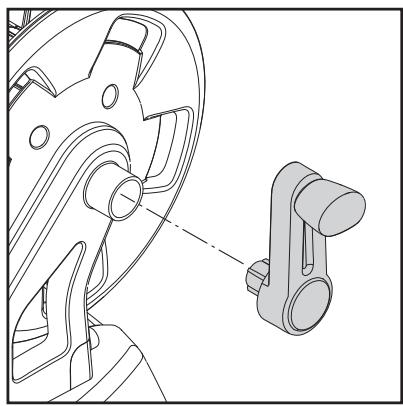
- Click the hose reel handle on to the trolley handle (no screws).

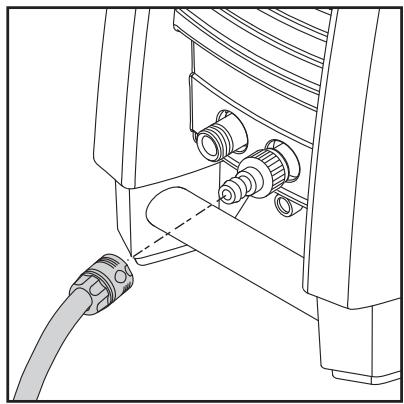
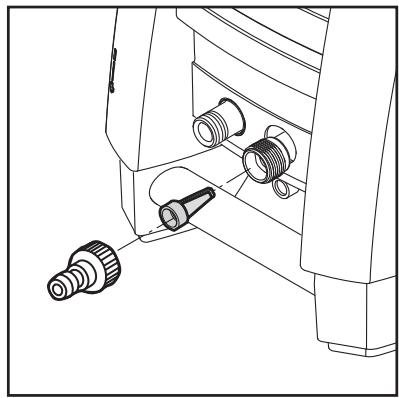
3.4 Mounting of quick coupling
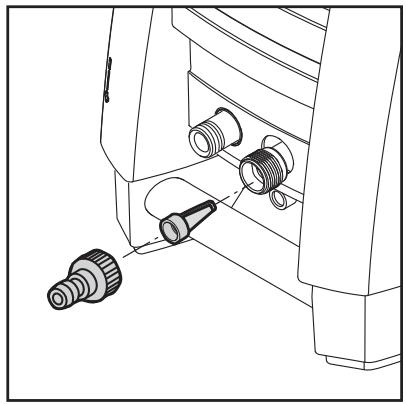
- Screw the quick coupling tight on to the water inlet (2).
Note: The inlet filter must always be fitted in the water inlet pipe to filter out sand, limestone and other impurities as these will damage the pump valves.

Caution: Failure to fit the filter will invalidate the guarantee.
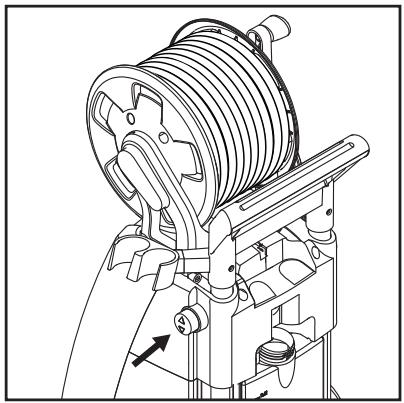
3.5 Mounting of high pressure hose
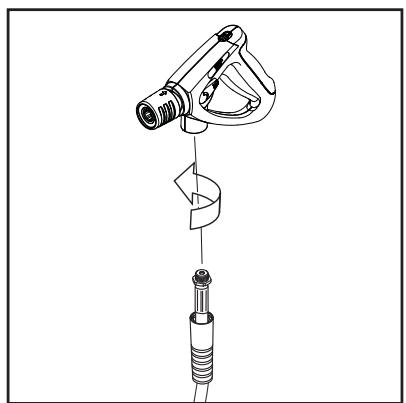
Attach the high pressure hose (4) to the spray handle (7).
4 Operating your pressure washer
4.1 Connection of high pressure hose
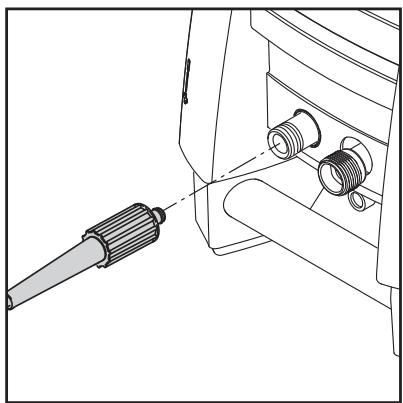
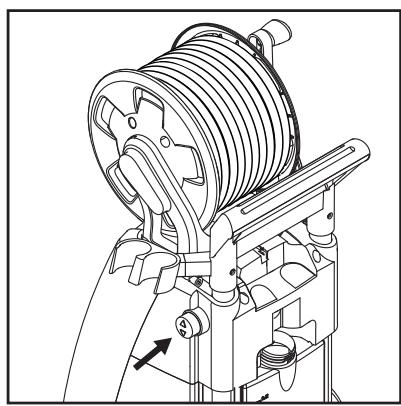
Machines without hose reel: Attach the high pressure hose (4) to the high pressure connection of the machine (3).
Only max. 7 m additional extension hose can be added.
Machines with hose reel: Unwind the high pressure hose completely.
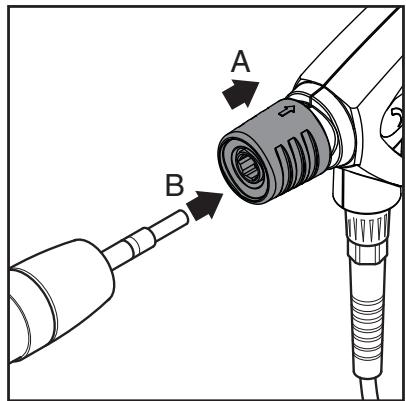
4.2 Mounting of spray lance
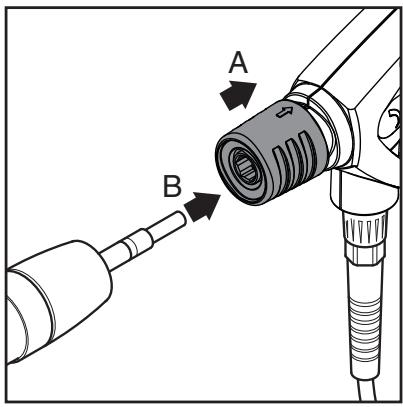
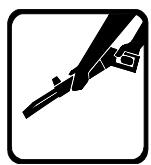
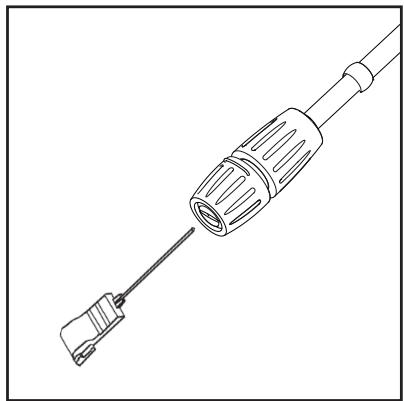
- Pull the blue quick-release grip (A) of the spray gun backwards.
- Insert the nipple of the spray lance (B) into the quick-release connection and release it.
- Pull the spray lance (or other accessory) forwards to check that it is securely attached to the spray gun.

NOTE!
Always remove any dirt from the nipple before connecting the spray lance to the spray handle.
4.3 Water connection
An ordinary 1 / 2'' garden hose of min. 10m and max. 25m will be suitable.
IMPORTANT! Only use water without any impurities. If there is a risk of silt, sand or sediment in the inlet water (i.e. from your own well), an additional filter should be mounted.
- Let the water run through the water hose before connecting it to the machine to prevent sand and dirt from penetrating the machine.

Note: Check that the filter is fitted in the water
inlet pipe and that it is clean and free from debris.
-
Connect the water hose to the water supply by means of the quick connector (inlet water, max. pressure: 10 bar, max. temperature: 60^ ).
-
Turn on the water.


NOTE: Connection to the public mains according to regulations.
4.4 Telescopic handle
The machine features a telescopic handle. To raise or lower the handle, press the button (16) and move the handle upwards or downwards. When a click is heard, the handle is in right position.
4.5 Start and stop of the machine (when connected to a water supply)
The spray lance is affected by a thrust during operation - therefore always hold it firmly with both hands. IMPOR-TANT: Point the nozzle at the ground.
- Check that the machine is in upright position.
NOTE: Do not place the machine in tall grass! - Release the trigger lock.
- Activate the trigger of the spray handle and let the water run until all air has escaped from the water hose.
- Turn the start/stop switch (1) to position "I".
- Activate the trigger of the spray handle.
Always adjust the distance and thus the pressure of the nozzle to the surface, which is to be cleaned.
4.6 Start the machine (when connected to open containers (suction mode))
The washer can take in water from a rain water tank as an example. The hose for the water supply must not be too long, approx. 5 m.
Make sure that the water tank is not placed on a lower level than the machine.
Use an external filter if the water contains impurities.
- Make sure that the water hose is filled completely with water before connecting to the machine. Place the entire
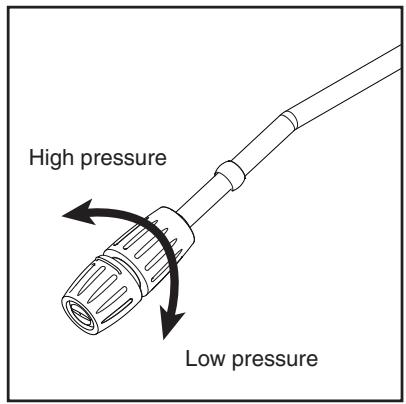
4.7 Pressure regulation on the Flexopower Plus-spray lance
Do not cover the machine during operation.

Note: If the machine is left or not used for 5 minutes, it must
be switched off on the start/stop switch "O" (1):
- Turn the start/stop switch to position "O".
- Disconnect the electrical plug from the socket.
- Shut off the water supply and activate the trigger to relieve the machine of pressure.
- Lock the spray handle.
When releasing the trigger of the spray handle, the machine automatically stops. The machine will start again when you re-activate the spray handle.
hose in a tank or bucket. To avoid water spillage, crimp the water inlet hose down in the water and then connect the hose to the machine with the quick coupling and finally uncrimp the water inlet hose.
- Dismount spray handle, lance and nozzle.
- Turn the start/stop switch to position "I" and let the water run, until the air has escaped from the water hose and the pump.
- Mount spray handle, lance and nozzle again.
The pressure can be regulated on the Flexopower Plus spray lance.
4.8 Operation with detergents
Application of detergents is NOT possible if an extension hose is applied.
- Fill the container with a detergent.
- Mount the Flexopower Plus spray lance and adjust it to low pressure (see section 4.7).
- Adjust the dosing regulator (12) to the required volume
of detergent (0 - 5%)
- Apply the detergent from below and upwards.
- Let the detergent act for the time stated on the packing of the detergent and flush with pure water.
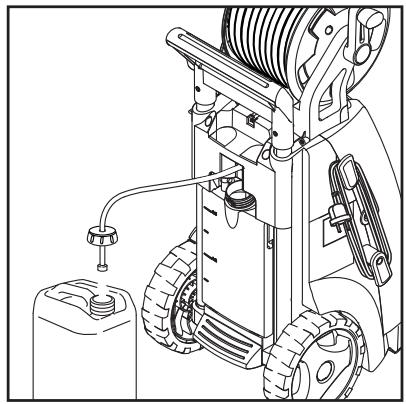
Separate detergent container
- Remove the cover with suction hose from the detergent container.
- Mount the cover with suction hose on the separate detergent container.
The cover has a standard thread and fits common detergent containers. If your container does not have a standard thread, detach the filter from the suction hose and remove the cover. Remount the filter in the suction hose.
Extra detergent hose can be pulled out of the machine.
4.9 Regulation of pressure / water volume
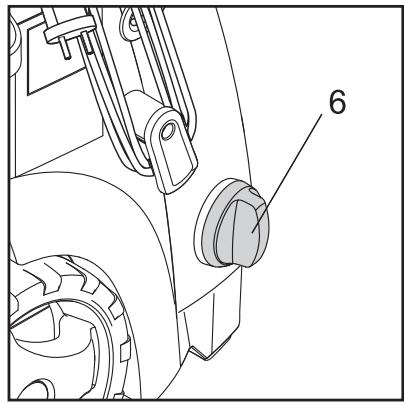
Working pressure and water volume can be regulated on the machine by turning the button for regulation of pressure / water volume (6).
5 Fields of application and working methods
5.1 General
Efficient high pressure cleaning is achieved by following a few guidelines, combined with your own personal experience of specific cleaning tasks. Accessories and detergents, when correctly chosen, can increase the efficiency of your pressure washer. Here is some basic information about cleaning.
5.1.1 Detergent and foam
Foam or detergent should be applied onto dry surfaces so that the chemical product is in direct contact with the dirt. Detergents are applied from bottom to top, for example on a car bodywork, in order to avoid "super clean" areas, where the detergent collects in higher concentration and streams downwards. Let the detergent work for several minutes before rinsing but never let it dry on the surface being cleaned. Note: It is important that the detergents do not dry up. Otherwise the surfac that has to be cleaned can be damaged.
5.1.2 Mechanical effect
In order to break down tough layers of dirt, additional mechanical effect may be required. Special wash brushes offer this supplementary effect that cuts through dirt (especially by car washing).
6 After using your pressure washer
EN
6.1 Storing the washer

The machine should be stored in a frost-free room!
Pump, hose and accessories should always be emptied of water prior to storing as follows:
- Stop the machine (turn the start/stop switch (1) to position "O" and detach water hose and accessory.
- Restart the machine and activate the trigger. Let the machine run until no more water runs through the spray handle.
- Stop the machine and unplug. Wind the electric cable round the hooks placed on the side of the machine.
-
Separate spray handle and high pressure hose.
-
Machines without hose reel: Detach high pressure hose, coil it up and place it on the hose storage.
Machines with hose reel: Coil the high pressure hose up on the hose reel. - Place spray handle, nozzles and other accessories in the holders of the machine.
Should the machine by mistake be frozen, it will be necessary to check it for damage.
NEVER START-UP A FROZEN MACHINE.
Frost damages are not covered by the guarantee!
6.2 Winding up of electric cable and high pressure hose
To avoid accidents, the electric cable and the high pressure hose should always be wound
up carefully.
- Wind up the electric cable on the appropriate hooks. Built-in clip for good holding. The lower hook can be turned to release the electric cable.
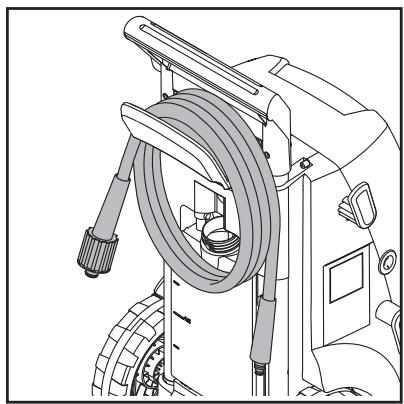
- The high pressure washer comes in two models: A) with hook for storage of high pressure hose (14) - B) with a hose reel (13).
6.3 Storage of accessories
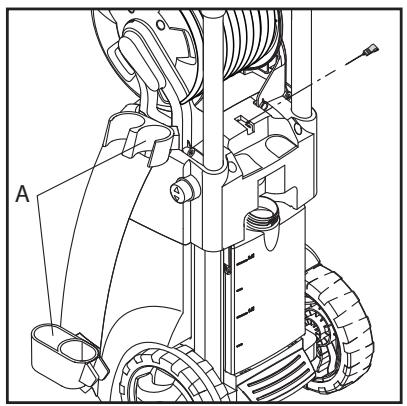
The standard accessories (spray handle, spray lance (A) and nozzle cleaning tool) can be stored on the pressure washer.
7 Maintenance

WARNING! Always disconnect the electrical plug from the socket prior to maintenance or cleaning.
To ensure a long and problem free working life, please take the following advice:
-
Wash off water hose, high pressure hose, spray lance and accessories before mounting.
-
Clean the connectors of dust and sand.
Clean the nozzles.
Any repair should always be made in an authorized workshop with original spare parts.
7.1 Cleaning of water inlet filter
Clean the water inlet filter regularly once a month or more frequently according to use. Carefully loosen the filter with a pair of pliers and clean it. Check that it is intact before re-mounting it.
The inlet filter must always be fitted inside the water inlet pipe to filter out sand, limestone and other impurities, as they will damage the pump valves.
CAUTION: Failure to fit the filter will invalidate the guarantee.
7.2 Cleaning of nozzle
A clogging up in the nozzle causes a pump pressure which is too high. This is why cleaning is required immediately.
- Stop the machine and disconnect the nozzle.
- Clean the nozzle. IMPOR-TANT: The cleaning tool (11) should only be used when the nozzle is detached!
- Flush the nozzle backwards with water.
7.3 Cleaning of machine vents
The machine should be kept clean so as to let cooling air
pass freely through the machine vents.
7.4 Greasing of couplings
To ensure easy connection and that o-rings do not dry up, the
couplings should be greased regularly.
8 Trouble-shooting
EN
Please ensure that you check the following before contacting the Nilfisk-ALTO service organization:
| Symptom | Cause | Recommended action |
| Machine refuses to start | Machine not plugged inDefective socketFuse has blownDefective extension cable | Plug in machine.Try another socket.Replace fuse. Switch off other machines.Try without the extension cable. |
| Fluctuating pressure | Pump sucking airValves dirty, worn out or stuckPump seals worn out | Check that hoses and connections are air-tight.Clean and replace or refer to local Nilfisk-ALTO distributorClean and replace or refer to local Nilfisk-ALTO distributor. |
| Motor busses | Low voltage or low temperature | Activate the trigger of the spray handle. |
| Machine stops | Fuse has blownIncorrect mains voltageThermal sensor activatedNozzle partially blocked | Replace fuse. Switch off other machines.Check that the mains voltage corresponds to specification on the model tag.Leave the washer for 5 minutes to cool down.Clean the nozzle (see section 7.2) |
| Fuse blows | Fuse too small | Change to an installation higher than the amp. consumption of the machine.You may try without the extension cable. |
| Machine pulsating | Air in inlet hose/pumpInadequate supply of mains waterNozzle partially blockedWater filter blockedHose kinked | Allow machine to run with open trigger until regular working pressure resumes.Check that the water supply corresponds to specifications required (see model tag)NB! Avoid using long, thin hoses (min. 1/2")Clean the nozzle (see section 7.2)Clean the filter (see section 7.1)Straighten out hose. |
| Machine often starts and stops by itself | Pump/spray handle is leaking | Contact your nearest Nilfisk-ALTO Service Centre. |
| Machine starts, but no water comes out | Pump/hoses or accessory frozenNo water supplyWater filter blockedNozzle blocked | Wait for pump/hoses or accessory to thawConnect inlet water Clean the filter (see section 7.1)Clean the nozzle (see section 7.2) |
| Pump pressure drops | Button for regulation of pressure / water volume not correctly adjusted | Adjust the button to correct working pressure. |
In case problems other than the above occur, please contact your local Nilfisk-ALTO distributor.
UK:
Customer Services at Penrith - 01768 868995
9 Further information
9.1 Recycling the washer

Make the old cleaner unusable immediately.
- Unplug the cleaner and cut the electric cable.
Do not discard electrical appliances with household waste.
As specified in European Direc
tive 2002/96/EC on old electrical and electronic appliances, used electrical goods must be collected separately and recycled ecologically.
Contact your local authorities or your nearest dealer for further information.
9.2 Warranty conditions
Nilfisk-ALTO guarantees this high pressure washer for 1 year. If your high pressure washer or accessories are handed in for repair, a copy of the receipt must be enclosed.
Guarantee repairs are being made on the following conditions:
- that defects are attributable to flaws or defects in materials or workmanship. (wear and tear as well as misuse are not covered by the guarantee).
- that the directions of this instruction manual have been thoroughly observed.
- that repair has not been carried out or attempted by other than Nilfisk-trained service staff.
- that only original accessories have been applied.
- that the product has not been exposed to abuse such as knocks, bumps or frost.
- that only water without any impurities has been used.
- that the high pressure washer has not been used for rental nor used commercially in any other way.
Repairs under this guarantee include replacement of defective parts, exclusive of packing and postage/carriage. Besides, we refer to your national law of sale.
The machine should be forwarded to one of the service centres of the Nilfisk-ALTO organisation with description/ specification of the fault.
Repairs not covered by the guarantee conditions will be invoiced. (I.e. malfunctions due to Causes mentioned in section Troubleshooting Chart of the instruction manual).
10 Main Technical Data
EN
11 EU Declaration of Conformity
| Type | Poseidon 2-20 | Poseidon 2-22 XT | Poseidon 2-25 XT | Poseidon 2-29 | Poseidon 2-29 XT | |
| Rated pressure | bar/MPa | 69/6.9 | 120/12 | 140/14 | 150/15 | 150/15 |
| Permissible pressure | bar/MPa | 76/7.6 | 130/13 | 150/15 | 160/16 | 160/16 |
| Water flow, low pressure | l/min | 2.4 | 8.7 | 10.2 | 10 | 10 |
| Water flow, high pressure | l/min. | 2.1 | 7.8 | 9 | 9.5 | 9.5 |
| Rated input | kW | 1.7 | 2.3 | 2.9 | 3.3 | 3.3 |
| Rated voltage | V | 120 | 230 | 230 | 230 | 230 |
| Max. water temperature | °C | 60 | 60 | 60 | 60 | 60 |
| Inlet pressure | bar/MPa | 10/1.0 | 10/1.0 | 10/1.0 | 10/1.0 | 10/1.0 |
| Sound pressure level | dB(A) | 77,4 | 76.1 | 77.4 | 73.5 | 79.7 |
| Guaranteed sound power level | dB(A) | 92 | 91 | 92 | 88 | 94 |
| Vibration according to ISO 5349-1 | m/s2 | < 2.5 | < 2.5 | < 2.5 | < 2.5 | < 2.5 |
| Weight | kg | 28.1 | 28.1 | 27.1 | 26.3 | 28.1 |
| CE EU Declaration of Conformity | |
| Product: | High Pressure Washer |
| Type: | Nilfisk-ALTO Poseidon 2-20, 2-29 Nilfisk-ALTO Poseidon 2-22 XT, 2-25 XT, 2-29 XT |
| Description: | 120 V, 230 V, 1~, 50 Hz - IP X5 |
| The design of the unit corresponds to the following pertinent regulations: | EC Machine Directive 2006/42/EC EC Low-voltage Directive 2006/95/EC EC EMV Directive 2004/108/EC |
| Applied harmonised standards: | EN ISO 12100-1 (2004), EN ISO 12100-2 (2004) EN 60335-2-79 (2006) EN 55014-1 (2006), EN 55014-2 (2001), EN 61000-3-2 (2006) |
| Applied national standards and technical specifications: | BS EN 60335-2-79 |
| Anton Sørensen | Nilfisk-ALTO Division of Nilfisk-Advance A/S Industrivej 1 DK-9560 Hadsund |
| General Manager, Technical Operations EAPC | Hadsund, 01.10.2010 |
Index
Support technique en France:
| Adresse | Tél. | Fax |
| Servitech Marseille503 rue Saint Pierre13012 MARSEILLE | 04.96.12.54.54 | 04.91.47.70.20 |
| Servitech Marseille49 bd de Thibaud - ZI de Thibaud31100 TOULOUSE | 05.61.43.66.50 | 05.61.43.66.51 |
| Servitech Bordeaux140 avenue de la République33073 BORDEAUX Cédex | 05.56.24.38.38 | 05.56.51.44.71 |
| Servitech Nantes18 rue du Bois Briand - BP 2347644334 NANTES CEDEX 3 | 02.40.52.02.02 | 02.40.52.20.18 |
| Servitech Reims88 rue de Neufchatel51100 REIMS | 03.26.40.58.29 | 03.26.97.79.88 |
| Servitech Nancy1 rue Jean Mermoz54500 VANDOEUVRE | 03.83.53.26.22 | 03.83.56.23.42 |
| Servitech Lille144 rue des Postes59000 LILLE | 03.20.57.07.45 | 03.20.40.21.00 |
| Servitech Clermont-Ferrand15 boulevard Jean Moulin63000 CLERMONT FERRAND | 04.73.91.92.43 | 04.73.92.61.33 |
| Servitech Strasbourg76 rue de la Plaine des Bouchers67100 STRASBOURG | 03.88.40.37.88 | 03.88.40.37.89 |
| Servitech LyonParc Bataille - Rue Thomas Blanchet69008 LYON | 04.78.75.22.05 | 04.78.75.22.11 |
| Servitech Rouen24 rue Malouet76100 ROUEN | 02.35.73.10.90 | 02.35.73.62.24 |
| Servitech Nanterre53 avenue Lénine92000 NANTERRE | 01.47.25.98.39 | 01.47.25.98.38 |
| Servitech Montreuil14 rue Marceau93100 MONTREUIL | 01.41.72.06.50 | 01.41.72.06.58 |
ing van het apparatae were prestaties te den.

Division of Nilfisk-Advance A/S
Industrivej 1
DK-9560 Hadsund
Anton Sorensen
General Manager, Technical Operations EAPC
Hadsund, 01.10.2010
Indice
A这其中, you can find a few other ways to get your hands on the art of writing.
7.4 Lubrificacao das unioes
Division of Nilfisk-Advance A/S
Industrivej 1
DK-9560 Hadsund
Anton Sorensen
General Manager, Technical Operations EAPC Hadsund, 01.10.2010
Eupετήριο
1 PpOpaIaEic aQaIaEiaC kI pOeIOToiOeIc 170
2 Iepiypaqn 173
3 Piv apxioe vXpnoiopoTIOeTe To uXavna pAnuS uynnC trioans 174
4 Λειουργία τοῦ μηχανήματος πλύσης υψηλής πίεσης 176
5 Πεδία Εφαρμούγής και Μέθοδοι Λειουργίας 180
6 MTea tyn xpnoiouoioiOn tou unxavmuos puaonu npna n 181
7 Euvtnpn 182
8 AvixvEuaBαβωv 184
9IepiooortepesTnnpopope 185
0 Kupia TeXVIKA XapaktnpiOTiKa 186
11 E.E. 186
EtuaiTe TEAEiwTo Aootio Uynnns Tneons.
4.2 ToTOnToEeTnOu Tou ova u

YINO△EIEH!
Division of Nilfisk-Advance A/S
Industrivej 1
DK - 9560 Hadsund
tel.: (+45) 7218 2100
www.nilfisk-alto.com
Nilfisk ALTO
Why Compromise