ST-FP1095 - Drill Saturn - Free user manual and instructions
Find the device manual for free ST-FP1095 Saturn in PDF.

User questions about ST-FP1095 Saturn
0 question about this device. Answer the ones you know or ask your own.
Ask a new question about this device
Download the instructions for your Drill in PDF format for free! Find your manual ST-FP1095 - Saturn and take your electronic device back in hand. On this page are published all the documents necessary for the use of your device. ST-FP1095 by Saturn.
USER MANUAL ST-FP1095 Saturn
natural_image
Electric Turkey feeder with a black and silver body, no visible text or symbols on the device itself.GB
MEAT GRINDER
D
We congratulate you on having bought the device under trade name «Saturn». We are sure that our de-
ble assistance in your housekeeping. Avoid extreme temperature changes. Rapid temperature change (e.g. when the unit is moved from freezing temperature to a warm room) may cause condensation inside the unit and a malfunction when it is switched on. In this case leave the unit at room temperature for at least 1.5 hours before switching it on. If the unit has been in transit, leave it indoors for at least 1.5 hours before starting operation.
A variety of new possibilities for delicious meals comes with your new mincer; even for vegetarian dishes. Effortless you mince and mix the ingredients for meatballs, vegetable burgers and minced meat. With great refinement you can prepare your own sausage specialities, or fillings for ravioli or tortellini—always really fresh!
These instructions for use will inform you about the various functions and features which makes it easy to take pleasure in your new mincer.
Knowing your Design Mincer
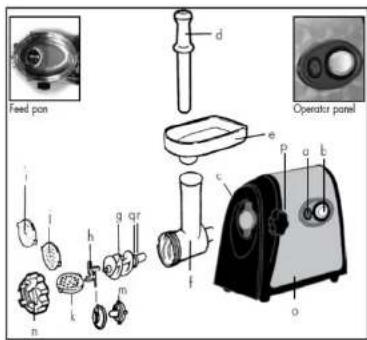
Designation of the parts
a. 0/I = ON/OFF switch
b. Reverse
c. Opening for the drive shaft
d. Feedstick
e. Feed pan
f. Worm housing
g. Worm
h. Crossed-blade knife
i. Grinding disc - 3 mm
j. Grinding disc - 5 mm
k. Grinding disc - 7 mm
- Chopper attachment A
m. Chopper attachment B
n. Closing ring
o. Motor housing
p. Screw plug
g. Sealing ring
r. Grommet
Important safeguards
Carefully read all instructions before operating this appliance, and save for further reference.
Do not attempt to use this appliance for any other than the intended use, described in these instructions. Any other use, especially misuse, can cause severe injuries or damage by electric shock, moving parts, heat or fire.
Any operation, repair and technical maintenance of the appliance or any part of it other.
than described in these instructions may only be performed at an authorized service centre.
Please contact your vendor.
The mincer is used for mincing meat (un-cooked or cooked) and soft vegetables. Please prepare the ingredients before filling them into the feed funnel. Using the feedstick you press the food slowly into the worm which pushes it against the spinning crossed-blades knife.
The appliance is maintenance-free, very insusceptible and easy to use. All parts that come into direct contact with the food are easily to remove and easy to clean. No extra tools are necessary for assembling or disassembling the appliance.
- This appliance is for household use only, and NOT intended for use in moving vehicles.
Do not operate or store the appliance in humid or wet areas or outdoors. Any use of accessories, attachments or spare parts not recommended by the manufacturer may result in damage and/or injuries to persons.
- Check the entire appliance regularly for proper operation—especially the power cord.
Do not operate the appliance, when the
appliance or any part of it is likely damaged, to avoid risk of shock or any other damage and/or injuries to persons. The appliance is likely to be damaged if the appliance subject to inadmissible strain (e.g. overheating, mechanical or electric shock), or if there are any cracks, excessively frayed or melted parts, or distortions, or if the appliance is not working properly. In this case, immediately unplug the appliance and return the entire appliance (including all parts and accessories) to an authorized service centre for examination and repair. • Repair and technical maintenance of the appliance or power cord are only allowed to be accomplished by an auto center. • During operation keep the appliance in an appropriate distance of at least 10 cm on each side and 50 cm in front and above to furniture, walls, boards, curtains, and any delicate objects. Before operation, always ensure that the appliance is assembled properly and completely. Solely use the appliance for processing edible food. Immediately unpliance, if there is any kind of malfunction or problem (e.g. the motor overheating). • Operate the appliance on a well accessible, stable, level, dry, water-resistant and suitable large table or counter. Always keep the appliance and the table or counter clean and dry, and wipe off spilled liquids immediately. Do not place any clothes or tissue or other objects under or on the appliance during operation, to avoid risk of fire, electric shock and overheating. Do not place the appliance over a power cord, or near the edge of the table or counter, or on wet or inclined surfaces, or where it can fall. • This appliance is NOT intended for use by persons (including child duced physical, sensory or mental or lack of experience and knowledge, unless they have been given supervision or instruction concerning use of the appliance by a person responsible for their safety. Children must be supervised to ensure that they do not play appliance or any parts of the appliance or the packaging. Always keep the appliance where it is dry and clean and where young children cannot reach it. Do not leave the appliance unattended, where at is in reach of young children or where the appliance is connected to the power supply. Do not place any and/or heavy objects on the appliance or any part of it take care that no one will pull the appliance by the power • Do not use any hard, sharp or edged objects (e.g. knives, forks) with the ap- pliance. Only use the provided feeding food into the feed tub handle the appliance or any part of it with violence. Do not let the motor work con- tinuously for more than 3 minutes. Always use only one matching tools to avoid damage (see: "Knowing Your Design Mincer"). For mincing, al- ways use only one of the provided grind- ing discs. Do not process bones, nuts, fo pizzend foordvi coer any other hard • Do not place the appliance or any part of it on or near hot surfaces (e.g. burner, heater or oven). Do not use any parts or tools of the appliance with any other device. • Do not grasp in the gear hole of the motor housing, with the appliance con- nected to the power supply. If you have forgotten to switch OFF the appliance, before disconnecting from the power supply, wait at least 10 seconds, before inserting the plug into the power socket again. • Do not leave the appliance unattended during operation. Always sw (ON/OFF switch) at first, then unplug the appli- ance, and wait until the motor comes to a standstill, before moving, or cleaning, or assembling or disassembling any parts, or when the appliance is not in use. Al- ways grasp the motor housing at both sides near the bottom for moving or lift- ing. Do not hold the appliance at the feed pan or worm housing, for movl appliance. • Do not use any abrasive cleaners, cleaning pads (e.g. metal scouring pads), or any corrosive chemicals (e.g. bleach) for cleaning. Do not immerse t housing or power cord in water or any not then liquid. Do not spill or drip any li- quids on the motor housing, or on the power poadto lavbiderisk of fire and elec- tric shock. Do not pour any liquids in the feed tube with the worm housi nected to the motor housing! When li- quids are spilled on the motor housing, immediately unplug the appliance, switch with the appliance completely (ON/OFF button), and wait for the appli- ance to cool down. Thereafter, clean and dry the appliance thoroughly (see: "Care and Cleaning"). • Do not place the appliance or any of its parts or tools in an auto
dishwasher.
- Do not leave any food dry on the appliance. Always clean the appliance after each use to prevent a build up of baked-on foods (see: "Care and Cleaning"). Always keep the appliance and the tools clean. - Only use spare parts and accessories which are provided and recommended by the manufacturer. Damaged or improper parts may break in use, damage the appliance or cause injury. - Never try to take the appliance to pieces so open it. - Never cover the air box on the back of the appliance. The air has to be able to circulate. - Never immerse the motor block in water slot-circuit danger! Do not put any cloth or napkins underneath the appliance to avoid endangering by fire and electric shocks. - Do not use the appliance in moist and wet areas. - Check the power cord regularly for wear and damage. - Never clean or operate the appliance or parts of the appliance with sharp-edged items. Never put the appliance or parts of the appliance in the dishwasher for cleaning! - Do not use the appliance if it is damaged or parts of the appliance are damaged. Do not use the appliance if it does not function properly or if it was excessively loaded. The appliance is likely damaged if the appliance or parts of the appliance show cracks, exorbitant wearing down, alterations or leaks. It is also likely damaged if the drive wheel of the motor housing moves slowly. Take the appliance for technical maintenance and repair to an authorized service centre. - Never use force assembling or disassembling the appliance. The single parts should be easily put together. Only operate the mincer after it has been carefully assembled. - Never use the crossed-blade knife and grinding disc in combining chopper attachments. Only use either the crossed-blade knife with the grinding disc or the chopper attachments at once. - For the case that the worm housing or the closing ring loosen while operating turn off the appliance immediately and pull the plug. Operate instructions "Troubleshooting" before turning the appliance on again. - Always turn the appliance off, wait for the motor to stop moving and then pull the plug before disassembling the mincer. - Never push the food into hand with your fingers. Always use the
feedstick
for this purpose! The mincer can not mince hard or stingily ingredients (for example: bones, nuts, ginger). If you use hard ingredients like onions or carrots, you have to steam them before adding them to the meet otherwise they can block the motor. If the motor is blocked turn off the appliance immediately and operate according to the instructions >Troubleshooting.
• Before the mincer is used for the first time, all parts – with the exception of the motor block – must be thoroughly cleaned in warm soapy water.
• To ensure that the mincer does not seize, never operate it under excessive pressure.
• Instantly switch off the mincer if the worm or knife get blocked by a hard object and wait for approx. 6 seconds to be certain that the motor is no longer running. Switch on the mincer after it has been cleaned.
• Never use force operating the appliance to avoid damage of the units of the appliance.
• Never hold your face or other body parts over the feed tube when the motor is running because little pieces of food could be thrown out of the feed tube.
• Take care handling the crossed-blade knife because it is very sharp.
• Never put foreign substances into the feed tube.
• Never repair the mincer yourself. If you discover or suspect a fault, send the mincer immediately to an authorised service centre for competent examination and repair.
• Store and use the appliance in a clean, frost free environment was tested from dampness, moistness and immoderate and extraordinary burden (such as: downfall, beat, overheating, moisture in the motor block).
Important safeguards for electrical appliances
The appliance is driven electrically. Place the appliance near a suitable wall power socket to connect the appliance directly to a protected mains power supply with protective conductor (earth/ground) connected properly. Ensure that the voltage rating of your main power supply corresponds to the voltage requirements of the appliance (220-230 V, 50 Hz, rated for at least 8 A).
The installation of a residual current operated circuit breaker (r.c.c.b.) with a maximum rated residual operating current of 30 mA in the supplying electrical
circuit is strongly recommended.
further information.
ay
cations for power supplies are subject to incompatible norms. Therefore it is possible that power supplies tries do not meet the requirements for safe operation of the appliance. Thus,
before operating the ap
- ensure that safe operation is possible. - Do not to use any extension cords or multi socket outlets.
• Always handle the power cord with care. Always completely unwind the power cord
before use. Do not place the power cord. The power cord may never be knotted, twisted, pulled, strained or squeezed. Do not let the plug or power cord hang over the edge of the table or counter. The power cord may not touch hot surfaces. Ensure that no one will pull the appliance by the power cord. Take care not to entangle in the power cord.
Always grasp the plug to disconnect the power cord. Do not touch the power plug with wet hands when the appliance is connected to the power supply.
- Do not place or immerse the motor housing or the power cord in water or any other liquid.
Do not spill or drip any liquids on the power cord or exterior of ing. When liquids are spilled on the motor housing or power cord, immediately unplug and switch off (ON/OFF button) the appliance.
Moving parts - risks of injuries
The mincer is suited for finely chopping food. Thus, moving parts can cause severe injuries, when used contrary to these instructions.
- Do not insert your hands, hair, clothes, brushes, or other foreign bones.
stalks of vegetables, cooking utensils) in the feed tube of the appliance or in the outlet of the worm housing, when the appliance is connected to the power supply. Before connecting the appliance to the power supply, always ensure that there are no foreign objects in the feed tube or worm housing, and the appliance is assembled completely and correctly. Only use the provided feedstick to push down the ingredients. D violence, to avoid that the mincer gets blocked.
- The edges of the crossed-blade knife are very sharp. Ensure not to get injured when handling the crossed-blade knife. - Do not hold your face over the feed
tube, while the motor is running, because splinters could escape from the feed tube, if you failed to see small pieces of bones or other hard parts (e.g. stalks, hard seeds, stones) while preparing the foods. DO NOT push the foods with your hands down and the feed tube, or poke in the feed tube!
Operationb road, Before first use
Rinse all the parts of the appliance that come into contact with food with water and clean them with dishwashing detergent. Operate according to the instructions "Care and cleaning".
IMPORTANT to lubricants, prevent rusting and prevent meat sticking to the to the attachments, apply a thin coating of food-grade oil to the crossed-blade knife, the grinding discs, the worm and the drive shaft prior to the first use and after each subsequent use. Improper use or lack of lubricant can lead to excessive friction and wear on meat
Assembling the appliance WARNING: Ensure that the appliance is switched off at the power outlet and the power cord is unplugged. 1. Place the mincer on a flat, dry surface such as a bench top.
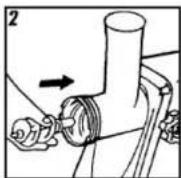
- Loosen the screw plug on the left side of the mincer turning it counterclockwise. Firmly insect the worm-housing in the opening for the drive shaft. The opening of the worm housing should be upright. Hold the worm housing with one hand and insert the screw plug into the side hole of the motor block. Turn the screw clockwise (see, fig. 1) for tightening. Do not use force and be careful to not overwind the screw thread.
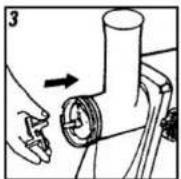
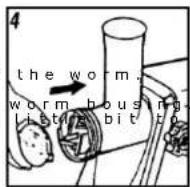
WARNING: The blades of the crossed-blade knife are very sharp. Pay attention when you handle the crossed-blade knife. 3. Insert the worm with the longer, narrower end into the worm housing and
turn slightly until it is securely seated in the worm housing (see fig. 2). The sealing ring and then the grommet should be placed at the narrow end of Make sure that the worm is placed completely in the inside of the If necessary turn the worm a make it fit.
grin WARNING: Never use the crossed-blade knife and the grinding disc together with the chopper attachment. How to work with the chopper attachment is explained within the recipe.
- Mount the knife on the worm in the illustrated manner: The rounded side of the knife must face the worm, the smooth side is in contact with the mincer plate (see fig. 3). Meat if the knife is mounted the wrong way round.
IMPORTANT: If the tools over edges of the worm housing the worm is not placed all the way inside of the worm housing. Turn the worm a little bit to make it fit inside but do not use force. 5. Mount the grinding disc on the knife. The two arresting pins must lock precisely into the corresponding recesses (see fig. 4).
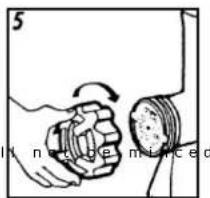
- Firmly screw on the closing ring. Do not over-tighten (see fig. 5).
WARNING: Do not use any tools, for tightening the screw and pay attention not to cant the screw. If the screw cans the screw thread gets damaged. If the screw does not turn easily put some sunflower oil (or other edible screw.
-
Press the feed pan firmly onto the mincer.
-
Place the mincer on a firm base.
The mincer is now ready for operation.
Operating - mincing meat
The mincer operates absolutely dependently and clean. If any should occur while operating act upon instructions "Troubleshooting".
WARNING: For the case that liquid runs over the mincer, while operating turn the mincer off immediately and pull the plug. Clean and dry the appliance according to the instructions "Care and cleaning".
TIP: If you use special mince-recipes you can mix the ingredients (for example steamed onions or spices) with the meat before mincing. This way the ingredients get mixed really well.
IMPORTANT: The mincer can not mince hard or stingily ingredients (for example: bones, nuts, ginger). If you use hard ingredients like onions or car
to steam them before adding them to the meet. Place a dry towel beside the mincer to dry off overrunning liquids. 1. Cut the meat into small pieces that will fit in the feed tube and parts like bones, shells of 2. Assemble the appliance as described and place a plate or dish in front of the worm housing. WARNING: Always make sure mincer is turned off before plugging in the power supply. 3. Plug the power supply cable into a mains socket and switch on the mincer.
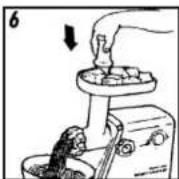
WARNING: Never hold your face or other body parts over the feed tube when the motor is running because little pieces of food could be thrown out of the feed tube. Never push the food into the feed tube with your fingers or put foreign substances (hair, towels, cutlery) into the feed tube. Always use the feedstick for this purpose! 4. Slowly feed the meat pieces into the feed tube and push down with the feed-stick (see fig. 6). Do not apply excessive force when pushing down Use only the feedstick to press down the meat. Never use the fingers! 5. Switch off the mincer after use and disconnect the power supply cable from the mains socket. The mincer will easily continuously mince up to 30 kg of meat (raw, cooked, different kinds of meat). 5 kg of raw meat are minced in 15 minutes max.
IMPORTANT: Operate in a slow and constant pace. Do not try to rush the procedure by pushing down the force. This way the worm might get blocked and stops operate the feedstick to slowly push down food through the feed tube. If no meet is coming out the worm housing even though there is still meat in the feed tube turn the mincer off and work according to the instructions "Troubleshooting".
- As soon as the last bit is minced turn the appliance off and pull the plug.
- Clean and disassemble the appliance right after use and make sure that no leftover food desiccate on the appliance. We take according to the instructions "Care and cleaning".
Sausage filler - Chopper attachments that the Ingredients for the filling: 100 g mutton, once or twice minced with the mincer 1 ½ tablespoon olive oil 1 ½ tablespoon fine chopped onions 1 1/3 teaspoon grounded pimento ½ teaspoon salt 1 ½ tablespoon flour
Ingredients for the wrapping: at least 450 g fatless meet of mutton, calf or beef the most 150-200 g flour* 1 teaspoon grounded pimento 1 teaspoon grounded nutmeg 1 pinch of chillipowder 1 pinch of pepper
*The consistency of the wrap is better if
- Prepare the filling: Steam the onions. Mince the meet once or twice with the mincer and then mix the ingredients.
-
Prepare the wrapping: Mince the meet for the wrapping 3 times in total. For the first mincing procedure use the grinding disc - 7 mm then use the grinding disc - 5mm. After mixing all the ingredients for the wrapping mince it one more time with the 5 mm grinding disc.
-
Unscrew the closing ring and take out the mincer plate and crossed-blade knife. Operate according to the instructions "Disassembling the appliance".
WARNING: Do not cut yourself removing the crossed-blade knife. - Assemble the appliance this time with the chopper attachments.
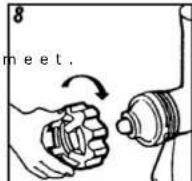
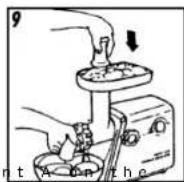
IMPORTANT: Never assemble the appliance with the chopper attachment and the crossed-blade knife with the grinding disc. a. Assemble the worm housing in the opening of the drive shaft. Place the worm stands at the worm housing (operate according to the instructions "Assembling the appliance"; use:fig. 1 and 2). b. Place the chopper at axis of the worm. The slim end has to face the front (see fig. 7). Turn the chopper attachment a little bit while pushing it into the worm housing.

c. Place the chopper attachment B on top of the chopper attachment A. The wide opening of the chopper attachment B should be facing the chopper attachment A. The chopper attachment B has a gap on the outside edge which should slide over the guiding pin on the inside of the worm housing (see fig. 8).
d. Attach the closing ring to the worm housing and screw it on tight with your hands. 5. Process the wrapping mixture in the mincer with the attached chopper attachments (see fig. 9). The finished product will be one long wrapping. Cut the wrapping into convenient seize.
- Freeze the wrapping shortly.
-
Fill the wrapping with the filling mixture.
-
Fry the wraps with some olive oil until it has the favored browning.
Care and cleaning
WARNING: Never hold your face or other body parts over the feed tube when the motor is running because little pieces of food could be thrown out of the feed tube. Never put foreign substan hard objects into the feed tube. Before the mincer is used for the first time, all parts - with the exception of the motor block - must be thoroughly cleaned in warm soapy water.
[Unreadable]
WARNING: To avoid injury and damages of the appliance turn the appliance off and then wait for approx. 6 seconds to be certain that the motor is no longer running. Always pull the plug before you start disassembling or cleaning the appliance.
- Switch off the mincer and disconnect the power supply cable from the mains. Check that the motor has completely stopped.
- Detach the worm housing from the motor block.
- Uncrew the closing ring turning it counterclockwise.
TIP: If the closing ring is sc tight you can use a screwdriver as shown in the fig. 10.
![Saturn ST-FP1095 - [Unreadable] - 1](/content/2026/06/1192298/images/30865373cb13cc681e9c525ba27a3d2f1734c48a1939d2072b2e45da4235efbd.jpg)
- Remove the grinding disc. If necessary insert a knife or screwdriver between the grinding disc and the worm housing to pry out the grinding disc.
- Remove the crossed-blade knife and pull out the worm or if you chopper attachments remove them. TIP: If the tools are stucked mincer carefully on a stable cutting board. The grinding disc should be facing up.
ATTENTION: Be careful not your bench top, the cutt mincer.
- Remove meat residues. Operate as described;
ATTENTION: Never put the or parts of the appliance i washer or use abrasive for cleaning!
washer of use abrasives for cleaning! This will cause discolo
[NO TEXT]
- Wash all parts thoroughly in hot soapy water. Do not use aggressive detergents. The
parts are not suitable for
Soak parts with desicca a few minutes in warm soapy water and use a nylon cleaning brush or cleaning sponge for cleaning.
Rinse all parts with running water and dry them accurately.
WARNING: Ensure that the switch and cable do not come into contact with water!
Should this inadvertently happen, all parts must be completely appliance is used again. Never let water or other liquids run into the motor housing. Never clean the power cord or the appliance in the dishwasher, poor liquids over the appliance or douse or dip it in water or other liquids. In case that water or other liquids ran into the appliance while operating turn off the appliance immediately, pull the plug and dry the appliance with a clean cloth.
-
The motor block must only be wiped clean with a moist cloth. Do not clean the motor block under flowing water, nor should it be immersed in water! Do not use alcohol, benzine, etc.!
-
Grease the grinding disc and crossed-blade knife with food-grade oil.
Storage
WARNING: Always switch off completely
(ON/OFF button), unplug and clean the appliance and all its parts before storing (see: "Care and Cleaning").
Ensure to store the appliance where it is clean, dry and safe from frost, direct sunlight and inadmissible strain (mechanical or electric shock, heat, moisture) and where it is out of the reach of young chil-
dren. Place the appliance on a clean and stable surface, where it are not fall. Do not place any hard or heavy objects on the appliance or any part of it.
Always handle the power cord with care.
Pavpep kinds grey never be knotted, twitthe pulled,strained or squeezed.
Do not use any parts or tools of the ap- planted for many other purpose-than oper- ating the appliance. It is a good advice to store the parts and accessories of the appliance with the appliance.
- Always clean the appliance and its
φlasn't w a sonee no. r e s t v Cleaming"d Leftovers
-
It is good advice to re-assemble the worm housing with worm and a grinding disc before storage (see: "Asse appliance") to avoid injuries by the crossed-blade knife.
-
Carefully roll up the power cord without knotting or bending it.
CAUTION: Do not carry the appliance by the food pan or cutter housing. To move the before the
motor housing, always grasp it at both sides near the bottom.
- Grasp the motor housing with both hands at its sides, and place it and all parts and tools on a su where it can not fall, and is out of reach of young children.
Troubleshooting
| Possible problem | Easy solution |
| The mince is not fine enough. | Use a smaller grinding disc and/or mince the ingredients more then once. |
| There are still ingredients in the feed tube but no mince is coming out of the mincer. | The mincer is blocked. Turn the appliance off immediately and operate according to the instructions >Clear a blocking. |
| The motor stops running while operating the | The overload protection might got activated. Turn the appliance off immediately and operate according to the instructions >Clear a blocking. |
| After cleaning the motor does not get started again when turning the appliance on. surface, | • Is the power cord plugged in? • The motor might be blocked with some hard substance (for example a bone). Turn the appliance off immediately and pull the plug. • Disassemble and clean the appliance. Operate according to the instructions >Care and cleaning. • If the problem is not solved after the cleaning, take the appliance for technical maintenance and repair to an authorised service centre. |
| The mincer blocks up permanently while operating. | • To ensure that the mincer does not seize, never operate it under excessive pressure. Operate in a slow and constant pace. Do not try to rush the procedure by pushing down the meat with force. • For mincing hard ingredients really fine start with the grinding disc with the bigger holes. Mincing the second time use the finer mincer plate. |
| The worm housing moves or loosened while operating. | The screw plug loosened. Turn the appliance off immediately. Press the worm housing with one hand against the motor housing using the other hand to tighten the screw plug turning it clockwise. |
| The mince leaks out at the side of the closing ring. | The closing ring is not screwed on tight enough. Turn the appliance off immediately and then pull the plug. Tighten the closing ring but do not overwind the winding. If the problem still occurs disassemble and clean the appliance. |
Clear a blocking
LAUNAM NO I TCURTSN
comes out of the mincer while operating or the motor stops moving automatically
because of the overload A#TiTKE#N#I#Q#NEI
the appliance immediately. Clear the problem before turning again.
-
Turn the appliance off and then take the feedstick out of the feed tube.
-
If the motor stopped running because the overload protection turned itself on you have to turn the a do the overload protect 3. Press the reverse button and hold I down for one or two seconds. The worm is moving backwards and this loosens the blocking.
seodA TrD EOM Teho Nf
moving backwards immediately turn off the
appliance and pull the plug. Disassemble and clean the appliance.
Notes for disposal
Dispose of the appliance and packaging must be effected in accordance with the corresponding local regulations and requirements for electrical appliances and packaging. Please contact your local disposal company.
Warranty
We guarantee that all our products are free of defects at the time of purchase. Any demonstrable manufacturing or material defects will be to the exclusion of any further claim and within warranty limits of the law free of charge repaired or substituted. There is no warranty claim of the purchaser if the damage or defect of the appliance is caused by inappropriate treatment, over loading or installation mistakes. The warranty claim expires if there is any technical interference of a third party without an written agreement. The purchaser has to present the sales slip in assertion-of-claim and has to bear all charges of costs and risk of the transport.
Technical Data:
Maximum Power:
Rated Power:
Rated Voltage:
Rated Frequency:
Rated Current:
1200 W
550 W
220-230 V
50 Hz
2.5 A
Accessories: Meat Attachment, To Juicer, Citrus Attachment, Vegetable Slic-
ers, Kebbe and Sausage F
Set
MEAT GRINDER
1
WITH WARRANTY BOOK 1 PACKAGE 1
protection Environment disposal

You can help protect the environment! Please remember to respect the local regulations: hand in the non-working electrical equipment appropriate waste disposal of centre, o un -
The manufacturer reserves the right to change the specification and design of goods.
RU
ЭЛЕКТРОМЯСОРУБКА
[Unreadable due to severe distortion and noise]
Демонтаж устройства
natural_image
Illustration of a hand using a tool to lift a cylindrical pipe (no text or symbols)The image is too blurry to recognize any text content.
The source image is illegible due to extreme pixelation and distortion. No characters, symbols, or punctuation can be reliably identified. Therefore, no valid OCR text can be generated that matches the visual content of the source image.
INTERNATIONAL MANUFACTURER'SWARI
The Warranty is provided for the period of User Right of the country where the appliance was bought provides for a greater minimum warranty period.
All terms of warranty comply with to the Law on Protection of the Consumer Rights and are governed by the legislation of the country where the product was bought.
The warranty and free of charge repair are provided in any country where the product is delivered to by Saturn Home Appliances or authorized representative thereof, and where no restriction of import or other legal provisions interfere with rendering of warranty services and free of charge repair.
Cases uncovered by the warranty and free of charge repair:
E 1. Guarantee coupon is filled in Improperity. 2. The product has become inoperable because of the buyer's non-observance of the service regulations indicated in the instruction.
-
The product was used for professional, commercial or industrial purposes (except for the models, specially intended for this purpose that is indicated in the instruction).
-
The product has external mechanical damage or damage caused by penetration of the liquid inside, dust, insects and other foreign objects.
-
The product has damages caused by non-observance of the rules of power supply from batteries, mains or accumulators.
-
The product was exposed to opening, repair or modification of design by the persons, unauthorized to repair; Independent cleaning of internal mechanisms Htc. was made. И Н I ЗОБОВ'ЯЗАННЯ
-
The product has natural wear of parts with limited service life, expendables etc.
-
The product has deposits of scale inside or outside of fire-bar elements, irrespective of used water quality.
-
The product has damages caused by effect of high (low) temperatures or fire on non-heat resistant parts of the product.
-
The product has damages of accessories and nozzles which are included into the complete set of product shipment (filters, grids, bags, flasks, cups, covers, knives, sealing rings, graters, disks, plates, tubes, hoses, brushes, and also power cords, headphone cords etc.).
On the warranty service and repair, please contact the authorized service centers of Saturn Home Appliances.
CZ
MEZINÁRODNÍ ZÁRUKA
When purchasing the product,
please require its checking before you;
BE SURE
that the goods sold to you, are functional and complete and that the warranty coupon is filled in correctly.
This warranty coupon confirms the absence of any defects in the product you purchased and provides for free of charge repair of the product failed through the fault of the manufacturer throughout the period of warranty service and free of charge repair.
Failing the presentation of this coupon, in case of its improper filling in, infringement of factory seals (if any), and also in cases indicated in the warranty obligations, the claims are not accepted, and no warranty service and free of charge repair is made! The warranty coupon is valid only in the original copy with the stamp of trading organization, signature of the seller, date of sale and signature of the buyer.
CZ
ZÁRUČNÍ LIST
Při koupi výrobku
Buyer's Signature confirming the acquaintance and consent with conditions of free of charge maintenance service of the product, and absence of the complaints on appearance and color of the product.