ST-CH7408 - Headphones Saturn - Free user manual and instructions
Find the device manual for free ST-CH7408 Saturn in PDF.

User questions about ST-CH7408 Saturn
0 question about this device. Answer the ones you know or ask your own.
Ask a new question about this device
Download the instructions for your Headphones in PDF format for free! Find your manual ST-CH7408 - Saturn and take your electronic device back in hand. On this page are published all the documents necessary for the use of your device. ST-CH7408 by Saturn.
USER MANUAL ST-CH7408 Saturn
natural_image
Exterior view of a stainless steel kitchen range hood with control panel and remote control (no text or symbols visible)GB
Contents
KITCHEN HOOD
I Structure description ..... 3
Dear Buyer!
II Matters need attention for 4
We congratulate you on having bought the device under trade name "Saturn". We are sure our devices will become faith and reliable assistance in your housekeeping.
Method of Installation ..... 5
eIV Use method 7
Directions for use
OUR Maintenance ....°
VII Malfunctions and treat
ments 9
VIII Electric principle scheme... 9
Avoid extreme temperature changes. Rapid temperature
change (e.g. when the unit is moved from freezing temperature to a warm room) may cause condensation inside the unit and a malfunction when it is switched on. In this case leave the uni room temperature for at least 1.5 hours before switching it on. If the unit has been in transit, leave it indoors for at least 1.5 hours before starting operation.
Thank you for the use of this type of decorative ventilator of the company. The western-style ventilator is luxuriously, artistic, and of great suction. It suits high-grade cabinets. Before the use please read the instruction.
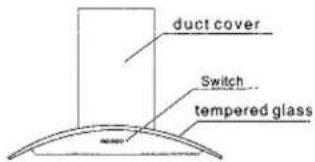
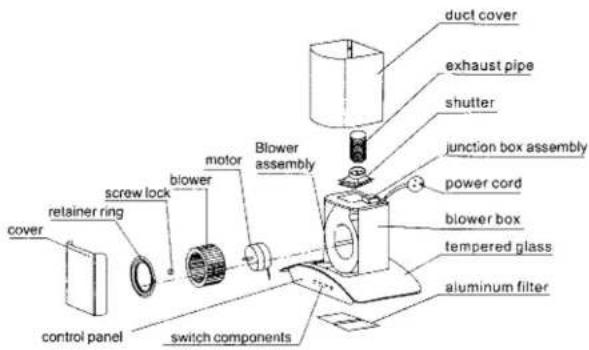
I. Structure description
II. Matters need attention for installation
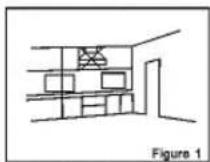
- Install surroundings (shown in figure 1)
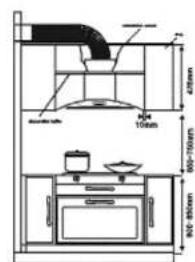
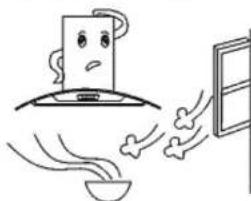
Excessive windows and doors should be avoided around it when the Kitchen hood is Installed, because when there are too many windows and doors, the air convection is oversized, which enable the lampblack rise to the 250mm effective attraction scope. The efficiency of the kitchen hood comes under the influence.
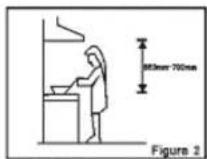
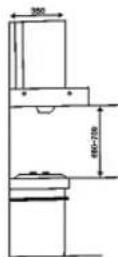
- Ideal location for the
installation (shown in figure 2)
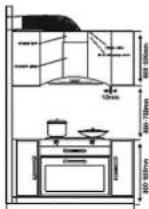
The kitchen hood is installed over the cooker hood, the range between the predestined affinity low end and the stove surface should be at least 650 mm. Us scope is better to be in 650-700mm.
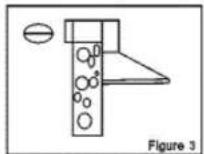
- Requests for the installation of
smoke pipe (shown in figure 3) (1) The distance from the exit of the smoke pipe to the organism should not be too long. Make the radius turn as large as possible. Make few curves, or the effect will not be so good.
(2) The exhaust duct should reach outdoor of the common smoke pipe, and the connector must be narrow. Please don't discharge the waste gas into hot flue.
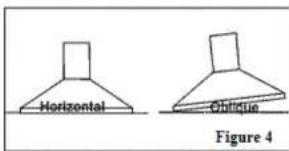
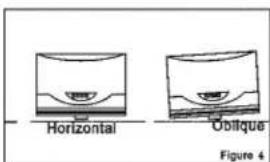
- Keeping the organism level (shown in figure 4)
After the installment, watch out if it's horizontal to avoid the spillover of the oil, caused by the oil cup being oblique.
-
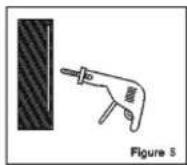
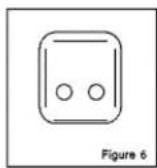
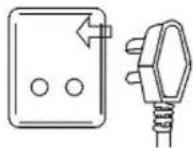
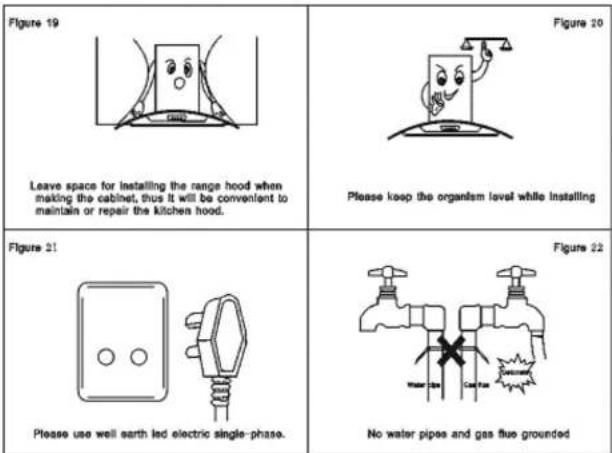
The waste gas should not be discharged into the hot flue, which is used to discharged the smoke of burning gas or other kinds of fuel. 2. When boring holes, avoid the power cords inside the wall, so as not to get an electric shock (shown in figure5). 3. The electric outlet must be earth lead and the plug can't be changed optionally (shown in figure 6).
-
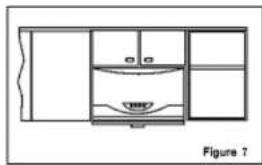
Proper space (usually about 10mm) should be left on both sides of the organism when making the cabinet. The boards that cover the organism should be turnable, so as to be convenient for maintenance and repair (shown in figure 7).
natural_image
Diagram of a kitchen appliance with labeled components and a caption 'Figure 7' (no text or symbols on the diagram itself)III. Method of installation
-
Determining the location: install the kitchen hood horizontally above the stove. The bottom of the range hood is about 650mm to 750mm high. The size the with drawable boards we refer to you is 430mm, which can be adjusted according to actual situation. The open holes must be vertical, centered and horizontal to the organism.
-
Installing the cladding: first bore three holes in the dry wall, whose diameters are 8mm and depths are 50mm to 60mm. Then put the expansion tube into the holes. At last use the lag wood screws of the size of ST4x50 in the packing box to set the cladding.
-
Adjusting the stretched tube (if there is): pull out the stretched tube remove the protective layer, put it into the gap between the decorated tube and organism and adjust to the appropriate height.
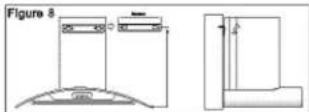
- Installing the organism (in figure 8): press and slide the pothook on the cladding into the holes at the back of the organism. Rock the organism with
the hand to see, if it is fastened. 5. Fixing the exhaust duct: insert the exhaust duct between the inside track and the outside track of the air outlet, set with ST3X6 bolt, and put the other end outdoor. 6. Fixing the exhaust duct: insert the exhaust duct into the inside track of the check valve's air outlet, set with ST3X6 tapping screw and connect the other end outdoor (the air outlet is at the top of the organism). 7. Fixing the other end of the exhaust duct (reference) (1) When the exhaust duct and the charging floor are just against the window: remove a pane of glass and fix a veneer with a hole. You can also make a hole on the glass. (2) When the charging floor is not near the window: Choose the nearest charging floor and the window, which can reach outdoor to fix the exhaust duct by going through the window; or choose the nearest charging floor and bore a hole in the wall, then make the exhaust duct go through the wall. (3) Bore a hole in the wall: Measure and draw a circle on the wall (the diameter is a little bigger, than that of the exhaust duct), and bore a hole with long drill, pay attention to the structure and metal of the wall. Don't destroy the wall surface beyond the hole. The diameter of the hole should be close to the diameter of the exhaust duct, or the smoke can not go out smoothly. The noise will be too much and the wind rate will also reduce.
demission bank plates with the installation methods
Asia style
1. Boring an air outlet hole;
Make the exhaust duct against the
wall, and draw a circle around it, then
bore a hole in the wall with a
percussion drilling, watch out the
structure and metal of the wall, so as
not to boil the surface of the wall
beyond the hole.
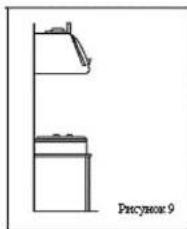
2. Installing the organism:
(1) According to the requests, shown
in figure 9, bore a 40-50mm deep hole
in the wall above the stove with
φ8mm drill bit, keep the organism
level. The distance between the
bottom of the organism and the stove
Is 700-750mm.
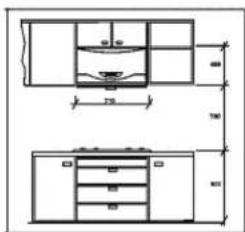
Figure 9
natural_image
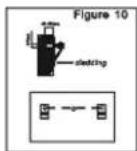
Simple line drawing of a two-tiered structure with no text or symbols, labeled 'Figure 9' at the bottom (no other text or symbols)(2) Knock two plug bolts slightly into the open holes (shown in figure 10), then fit two claddings into plug bolts and wind the nuts. Make sure, that the claddings are fastened to avoid that it may drop from the wall.
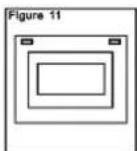
(3) Set the feet into the open holes at the back of the organism (shown in figure 11).
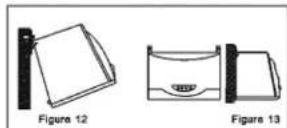
(4) Fit the organism into the claddings (shown in figure 12).
(5) Insert the exhaust duct into the inside and outside tracks of the air outlet and fix with tapping screw. Ensure, that the exhaust duct is neither convex nor concave, the corner piece is smoothly, the connector is narrow, and the blades in the air outlet can turn freely. Make a pylon of 170mm diameter at the exit of the exhaust duct, through which the exhaust duct can reach outdoor or the common smoke pipe. The connector must be narrow. The waste gas cannot be discharged into the hot flue, which is used to discharge the smoke of burning gas or other kinds of fuel.
IV. Use method

Insert the plug, and power is connected
When power is connected, press "slow", the lemp will be on, and the blades will turn slowly (that is turn in quickly). If "slow/fast" or "power" is pressed, it will be turned to low speed or cutting high speed.
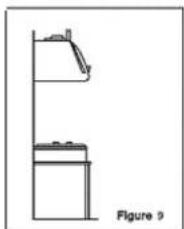
natural_image
Cartoon illustration of a steaming bowl with steam rising, next to a window (no text or symbols)Don't hang the ventilator too high, and make sure that it will not be influenced by exoteric airflow. Otherwise it will not be so effective.
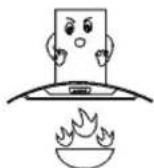
Warning: The distance between the bottom of the organism and the stove should be at least 650mm. Avoid the fire burning the kitchen hood. Don't let the wok catch fire so as not to burn the kitchen hood or have accidents.
V. Directions for use
- Clean the panel frequently with soft cloth and neutral detergent. Clean the oil filter at least once a month, and clean the oil stain and begrime often on the other parts of the organism.
Attention: Pull out the plug before cleaning, the motor and electric parts cannot be influent. In order to avoid the fire, flammable solvent such as alcohol, amyl, acetate, gasoline are not allowed to be used to clean the kitchen hood.
- The waste gas, discharged by the kitchen hood, shouldn't go into the hot flue for burning gas or other kinds of fuel.
- The room must be airy, if the kitchen hood when the stove is burning gas or other kinds of fuel.
- The kitchen hood cannot be burnt off by the fire of the stove, otherwise the oil cup, Lamp pand and electrical apparatus elements will be burnt.
- Credible earth lead jacks must be used.
- If the flexible wire is broken, please buy appropriate flexible wire from the manufactory or maintenance service.
-
If jacks are not earth-led, have them earth connected, or the kitchen hood cannot be used.
-
If it is not cleaned as the instructions, the range hood will be in clanger of fire.
- If it's necessary to change the bulbs, the amount of power cannot be over the rated power.
VI. Maintenance
To make the ventilator capably and last long, frequent maintenance should be given. Please pull out the plug while cleaning for security. 1. Keep the exterior of the organism clean, please wipe the exterior often with dry cloth and neutral detergent to keep it tidy and sanitary. 2. Clean the oil filter (1) Take down the gridding, pour off the waste oil in the inner oil cup, then make it clean and put it back. (2) The oil filter will look dirty because of the oil stain and begrime. So please clean it once about five days or replace with a new one. (3) Clean out the oil stain and begrime on the wind wheel and other parts of the organism. (4) Please don't clean the motor with water. (5) Pour the waste oil away in the exterior oil cup, then clean it and fix it back.
VII. Malfunctions and treatments
| No | Faults | Causes | |
| 1 | None key works (e.g. wind wheel doesn't turn or lamps are off). | The plug is not inserted or power cut. | Warning1. Please pull out the plug, while linking the inserter or changing bulbs.2. If the flexible wire is broken, please replace with appropriate flexible wire (contact with the company)3. Don't allow fire to get into the organism. |
| 2 | Lamps are off. | The lamps are broken or poor contact. | |
| 3 | Creepage | Jacks are not well earth led. | |
| 4 | Unusual noise when the impeller is turning | Loose Impeller, loose out cap. | |
| 5 | W/o oil can not flow into the oil cup | The organism is sloppy. |
If you are in trouble or you have suggestion, please, write to the company (the address is on the back cover). Leaving your telephone number. Thank you! If the ventilator has got any fault, please contact with the dealer, special engaged maintenance point or the service centre.
VIII. Electric principle scheme
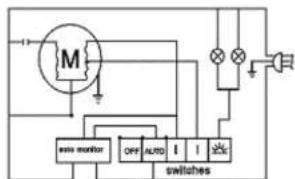
Powerful series
Technical Data:
Consumed Power: 210 W Rated Voltage: 220-230 V Rated Frequency: 50 Hz Rated Current: 0.9 A Body Width: 600 mm Outlet Air-Flow Rate: 700 m³/h Air-Flow Pressure: 310 Pa Lights: 2x15 W
Set KITCHEN HOOD 1 INSTRUCTION MANUAL WITH 1 WARRANTY BOOK PACKAGE 1
ENVIRONMENT FRIENDLY DISPOSAL
You can help protect the environment! Please remember to respect the local regulations: hand in the non-working electrical equipments to a appropriate waste disposal center.
The manufacturer reserves the right to change the specification and design of goods.
RU
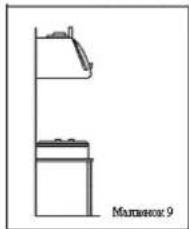
КУХОННАЯ ВЫТЯЖКА
natural_image
Simple line drawing of a kitchen appliance with a side shelf and side table (no text or symbols)Рисунок 9
natural_image
Simple line drawing of a kitchen sink with a shelf and door (no text or symbols)Mommer 640x
natural_image
Line drawing of a cabinet with a side panel and a water level indicator, labeled 'Маловонск 7' (no other text or symbols)Малюнок 9
natural_image
Simple line drawing of a kitchen sink with a shelf and counter (no text or symbols)INTERNATIONAL MANUFACTURER'S R A W
The Warranty is provided for the period of 2 years or more if the Law on User Right of the country where the appliance was bought provides for a greater minimum warranty period.
All terms of warranty comply with to the Law on Protection of the Consumer Rights and are governed by the legislation of the country where the product was bought.
The warranty and free of charge repair are provided in any country where the product is delivered to by Saturn Home Appliances or authorized representative thereof, and where no restriction of import or other legal provisions interfere with rendering of warranty services and free of charge repair.
Cases uncovered by the warranty and free of charge repair:
- Guarantee coupon is filled in improperly.
- The product has become inoperable because of the Buyer's nonobservance of the service regulations indicated in the instruction.
- The product was used for professional, commercial or industrial purposes (except for the models, specially intended for this purpose that is indicated in the instruction).
- The product has external mechanical damage or damage caused by penetration of the liquid inside, dust, insects and other foreign objects.
- The product has damages caused by non-observance of the rules of power supply from batteries, mains or accumulators.
- The product was exposed to opening, repair or modification of design by the persons, unauthorized to repair; independent cleaning of internal mechanisms etc. was made.
- The product has natural wear of parts with limited service life, expendables etc.
- The product has deposits of scale inside or outside of fire-bar elements, irrespective of used water quality.
- The product has damages caused by effect of high (low) temperatures or fire on non-heat resistant parts of the product.
- The product has damages of accessories and nozzles which are included into the complete set of product shipment (filters, grids, bags, flasks, cups, covers, knives, sealing rings, graters, disks, plates, tubes, hoses, brushes, and also power cords, headphone cords etc.).
On the warranty service and repair, please contact the authorized service centers of "Saturn Home Appliances".
CZ
MEZINÁRODNÍ ZÁRUKA
When purchasing the product, please require its checking before you;
BE SURE
that the goods sold to you, are functional and complete and that the warranty coupon is filled in correctly.
This warranty coupon confirms the absence of any defects in the product you purchased and provides for free of charge repair of the product failed through the fault of the manufacturer throughout the period of warranty service and free of charge repair.
Failing the presentation of this coupon, in case of its improper filling in, infringement of factory scans (if any), and also in cases indicated in the warranty obligations, the claims are not accepted, and no warranty service and free of charge repair is made! The warranty coupon is valid only in the original copy with the stamp of trading organization, signature of the seller, date of sale and signature of the buyer.
CZ
ZÁRUČNÍ LIST
Při koupi výrobku