
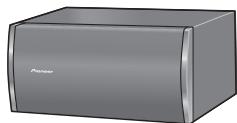
HTP-SB300 - Soundbar PIONEER - Free user manual and instructions
Find the device manual for free HTP-SB300 PIONEER in PDF.

| Product Type | Soundbar with wireless subwoofer |
| Brand | PIONEER |
| Model | HTP-SB300 |
| Dimensions (main unit) | 900 mm (W) x 108 mm (H) x 95 mm (D) |
| Weight (main unit) | 2.8 kg |
| Dimensions (subwoofer) | 411 mm (W) x 181 mm (H) x 215 mm (D) |
| Weight (subwoofer) | 4.3 kg |
| Power supply (main unit) | AC 220-240 V, 50/60 Hz (via AC adapter) |
| Power supply (subwoofer) | AC 220-240 V, 50/60 Hz |
| Power consumption (main unit) | 40 W (standby 1 W) |
| Power consumption (subwoofer) | 25 W (standby 1 W) |
| Output power (front) | 50 W per channel (1 kHz, 6 Ω, 10%) |
| Output power (subwoofer) | 100 W (100 Hz, 4 Ω, 10%) |
| Front speakers | 1-way 7.7 cm (magnetic shielding) |
| Center speaker | 1-way 7.7 cm x2 (magnetic shielding) |
| Subwoofer | 1-way 16 cm (bass-reflex) |
| Inputs | HDMI (x2 inputs, x1 output), optical, coaxial |
| Supported audio formats | Dolby Digital, Dolby TrueHD, DTS, DTS-HD Master Audio, PCM |
| Audio functions | Auto Surround, Advanced Surround modes, Stream Direct, Sound Retriever, Front Stage Surround Advance |
| Wireless connectivity | Wireless subwoofer (2.4 GHz) |
| Included accessories | Remote control, batteries, AC adapter, power cords (x4), mounting template, anti-slip pads |
| Cleaning | Dry or slightly damp cloth (diluted neutral solution) |
| Safety | Do not open, avoid water, leave ventilation space, do not block openings |
Frequently Asked Questions - HTP-SB300 PIONEER
User questions about HTP-SB300 PIONEER
0 question about this device. Answer the ones you know or ask your own.
Ask a new question about this device
Download the instructions for your Soundbar in PDF format for free! Find your manual HTP-SB300 - PIONEER and take your electronic device back in hand. On this page are published all the documents necessary for the use of your device. HTP-SB300 by PIONEER.
USER MANUAL HTP-SB300 PIONEER
Discover the benefits of registering your product online at http://www.pioneer.co.uk (or http://www.pioneer.eu).
Operating Instructions
Mode d'emploi
Инстукции по заци
Indoor Use Only
The lightning flash with arrowhead symbol, within an equilateral triangle, is intended to alert the user to the presence of uninsulated "dangerous voltage" within the product's enclosure that may be of sufficient magnitude to constitute a risk of electric shock to persons.
CAUTION
RISK OF ELECTRIC SHOCK
DO NOT OPEN
CAUTION:
TO PREVENT THE RISK OF ELECTRIC SHOCK,DO NOT REMOVE COVER (OR BACK).NO USER-SERVICEABLE PARTS INSIDE.REFER SERVICING TO QUALIFIED SERVICE PERSONNEL.

The exclamation point within an equilateral triangle is intended to alert the user to the presence of important operating and maintenance (servicing) instructions in the literature accompanying the appliance.
D3-4-2-1-1_A1_En
WARNING
This equipment is not waterproof. To prevent a fire or shock hazard, do not place any container filled with liquid near this equipment (such as a vase or flower pot) or expose it to dripping, splashing, rain or moisture.
D3-4-2-1-3_A1_En
WARNING
Before plugging in for the first time, read the following section carefully.
The voltage of the available power supply differs according to country or region. Be sure that the power supply voltage of the area where this unit will be used meets the required voltage (e.g., 230 V or 120 V) written on the rear panel.
D3-4-2-1-4*A1En
WARNING
To prevent a fire hazard, do not place any naked flame sources (such as a lighted candle) on the equipment.
D3-4-2-1-7a_A1_En
Operating Environment
Operating environment temperature and humidity: +5^ to +35^ (+41^ to +95^) less than 85% RH (cooling vents not blocked)
Do not install this unit in a poorly ventilated area, or in locations exposed to high humidity or direct sunlight (or strong artificial light)
D3-4-2-1-7c*A1_EN
POWER-CORD CAUTION
Handle the power cord by the plug. Do not pull out the plug by tugging the cord and never touch the power cord when your hands are wet as this could cause a short circuit or electric shock. Do not place the unit, a piece of furniture, etc., on the power cord, or pinch the cord. Never make a knot in the cord or tie it with other cords. The power cords should be routed such that they are not likely to be stepped on. A damaged power cord can cause a fire or give you an electrical shock. Check the power cord once in a while. When you find it damaged, ask your nearest PIONEER authorized service center or your dealer for a replacement.
VENTILATION CAUTION
When installing this unit, make sure to leave space around the unit for ventilation to improve heat radiation (at least 10cm at top, 10cm at rear, and 10cm at each side).
WARNING
Slots and openings in the cabinet are provided for ventilation to ensure reliable operation of the product, and to protect it from overheating. To prevent fire hazard, the openings should never be blocked or covered with items (such as newspapers, table-cloths, curtains) or by operating the equipment on thick carpet or a bed.
D3-4-2-1-7b*A1_EN
If the AC plug of this unit does not match the AC outlet you want to use, the plug must be removed and appropriate one fitted. Replacement and mounting of an AC plug on the power supply cord of this unit should be performed only by qualified service personnel. If connected to an AC outlet, the cut-off plug can cause severe electrical shock. Make sure it is properly disposed of after removal. The equipment should be disconnected by removing the mains plug from the wall socket when left unused for a long period of time (for example, when on vacation).
D3-4-2-2-1a_A1_En
CAUTION
The OSTANDBY/ON switch on this unit will not completely shut off all power from the AC outlet. Since the power cord serves as the main disconnect device for the unit, you will need to unplug it from the AC outlet to shut down all power. Therefore, make sure the unit has been installed so that the power cord can be easily unplugged from the AC outlet in case of an accident. To avoid fire hazard, the power cord should also be unplugged from the AC outlet when left unused for a long period of time (for example, when on vacation).
D3-4-2-2-2a*A1En
Information for users on collection and disposal of old equipment and used batteries
(Symbol for equipment)

Symbol examples) for batteries


Pb
These symbols on the products, packaging, and/or accompanying documents mean that used electrical and electronic products and batteries should not be mixed with general household waste.
For proper treatment, recovery and recycling of old products and used batteries, please take them to applicable collection points in accordance with your national legislation.
By disposing of these products and batteries correctly, you will help to save valuable resources and prevent any potential negative effects on human health and the environment which could otherwise arise from inappropriate waste handling.
For more information about collection and recycling of old products and batteries, please contact your local municipality, your waste disposal service or the point of sale where you purchased the items.
These symbols are only valid in the European Union.
For countries outside the European Union:
If you wish to discard these items, please contact your local authorities or dealer and ask for the correct method of disposal.
K058a_A1_En
Replacement and mounting of an AC plug on the power supply cord of this unit should be performed only by qualified service personnel.
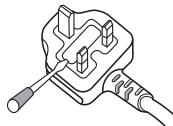
IMPORTANT: THE MOULDED PLUG
This appliance is supplied with a moulded three pin mains plug for your safety and convenience. A 5 amp fuse is fitted in this plug. Should the fuse need to be replaced, please ensure that the replacement fuse has a rating of 5 amps and that it is approved by ASTA or BSI to BS1362.
Check for the ASTA mark or the BSI mark on the body of the fuse.
If the plug contains a removable fuse cover, you must ensure that it is refitted when the fuse is replaced. If you lose the fuse cover the plug must not be used until a replacement cover is obtained. A replacement fuse cover can be obtained from your local dealer.
If the fitted moulded plug is unsuitable for your socket outlet, then the fuse shall be removed and the plug cut off and disposed of safely. There is a danger of severe electrical shock if the cut off plug is inserted into any 13 amp socket.
If a new plug is to be fitted, please observe the wiring code as shown below. If in any doubt, please consult a qualified electrician.
IMPORTANT: The wires in this mains lead are coloured in accordance with the following code:
Blue: Neutral Brown:Live
As the colours of the wires in the mains lead of this appliance may not correspond with the coloured markings identifying the terminals in your plug, proceed as follows:
The wire which is coloured BLUE must be connected to the terminal which is marked with the letter N or coloured BLACK.
The wire which is coloured BROWN must be connected to the terminal which is marked with the letter L or coloured RED.
How to replace the fuse: Open the fuse compartment with a screwdriver and replace the fuse.
D3-4-2-1-2-2*A1_En
This product is for general household purposes. Any failure due to use for other than household purposes (such as long-term use for business purposes in a restaurant or use in a car or ship) and which requires repair will be charged for even during the warranty period.
K041_A1_En
Manufactured under license from Dolby Laboratories. "Dolby", "Pro Logic", and the double-D symbol are trademarks of Dolby Laboratories.
Manufactured under license under U.S. Patent #s: 5,451,942; 5,956,674; 5,974,380; 5,978,762; 6,487,535 & other U.S. and worldwide patents issued & pending. DTS and DTS Digital Surround are registered trademarks and the DTS logos and Symbol are trademarks of DTS, Inc. © 1996-2008 DTS, Inc. All Rights Reserved.
Setup Guide
What's in the box
Please confirm that the following items are all supplied.

Main unit
Wireless subwoofer
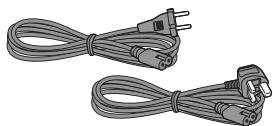
Power cords (for subwoofer) x2

Dry cell batteries (AAA size IEC R03) x2

Brackets (for main unit) x2

Non-skid pads (for subwoofer) x4

AC adapter
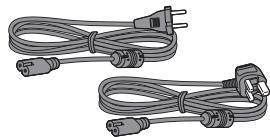
Power cords (for AC adapter) x2

Wall mounting template
Warranty card
Operating instructions (This document)
Installation


Connection
Basic operation
Thank you for buying this Pioneer product.
Please read through these operating instructions so that you will know how to operate your model properly. After you have finished reading the instructions, put them in a safe place for future reference.
Contents
Setup Guide
What's in the box. 4
Installation. 4
Connection 5
Basic operation 5
01 Installation
Before you start 7
Pairing main unit and subwoofer 7
Concerning the placement of this system. 8
Preparing the subwoofer. 9
Wall mounting the main unit. 9
Additional notes on the system placement 10
02 Connecting up
Making cable connections. 11
HDMI cables. 11
Digital audio cables. 12
Connect your TV (For TV audio) 12
Connecting your TV and playback components 13
Connecting using HDMI 13
Connecting your component with no HDMI terminal 13
Plugging in the system 14
03 Controls and displays
Front panel 15
Display 15
Subwoofer 16
Remote control 17
Putting the batteries in the remote control. 19
Using the remote control. 19
04 Listening to your system
Basic operation 20
Auto playback 20
Listening in surround sound 21
Using the Advanced surround effects... 21
Listening in stereo. 21
Using Front Stage Surround Advance.... 22
Using Stream Direct 22
Setting the Audio options 23
05 Controlling the rest of your system
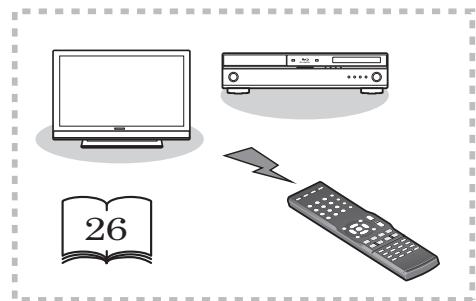
Setting the remote to control other components 26
Select preset codes for TVs 26
Select preset codes for other components 27
Clearing all the remote control settings . . 27
Controls for TVs. 28
Controls for other components 29
Preset Code List 30
06 Additional information
Troubleshooting 35
HDMI 36
Important information regarding the HDMI connection 37
Precautions when using a wireless subwoofer 38
Precautions regarding wavelength.... 38
Usable range 39
Signal reflection 39
For safe use 39
Resetting the main unit. 40
Specifications 40
Main unit 40
Wireless subwoofer 40
Cleaning the unit. 41
Chapter 1 Installation
Before you start
Before installing the unit and performing connections with other components, confirm that the main unit and subwoofer properly support wireless communication.
- Place the main unit and subwoofer near together.
- The power cords are furnished with different connectors for the subwoofer and AC adapter. Note that the power cord for the AC adapter is contained in the same box as the AC adapter.

For subwoofer
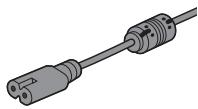
For AC adapter
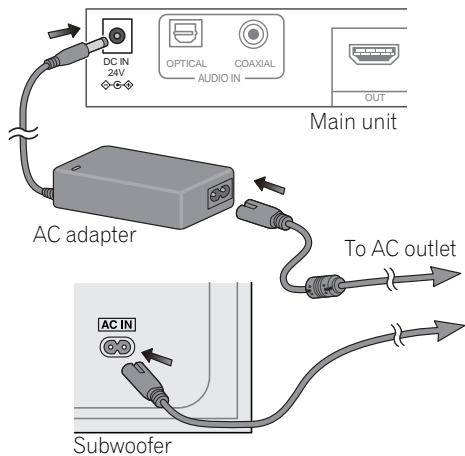
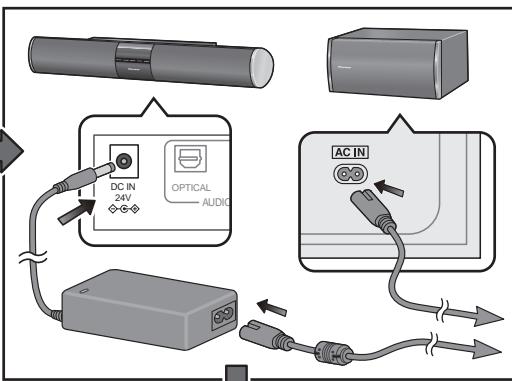
1 Plug the supplied AC adapter into the DC IN socket on the back of the unit.
2 Plug the supplied power cord into the AC adapter then plug the other end into a power outlet.
3 Plug the supplied power cord into the AC IN socket on the back of the subwoofer then plug the other end into a power outlet.
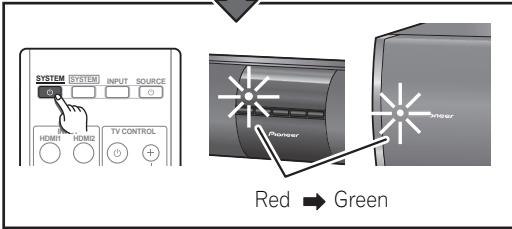
4 Press STANDBY/ON on the main unit.
Confirm that the indicators of the main unit and subwoofer both light green.
- If either of the indicators does not light green, perform pairing (see below).
- After confirming communication between the two units, unplug the power cords and perform installation and connections.
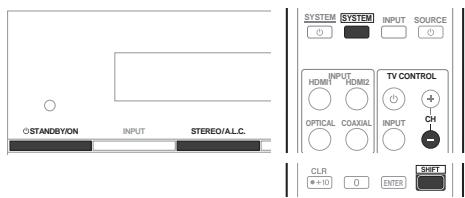
Pairing main unit and subwoofer
1 After you've finished making the AC adapter and power cord connections, press STANDBY/ON on the main unit (see above).
2 Press SYSTEM on remote control.
3 While holding the main unit's STEREO/A.L.C. button depressed, simultaneously press the remote control's SHIFT and TV CONTROL CH- buttons.
The indicator of the subwoofer light green, and the pairing of main unit and subwoofer is completed.
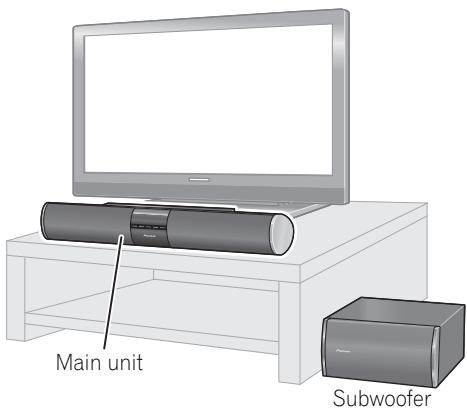
Concerning the placement of this system

Caution
- When assembling the system, lay them down flat on their side to avoid accidents or injury. Make sure to use a stable surface when assembling, setting up, and placing the system.
This system allows you to enjoy 3.1 channel surround sound merely by installing the main unit and subwoofer.
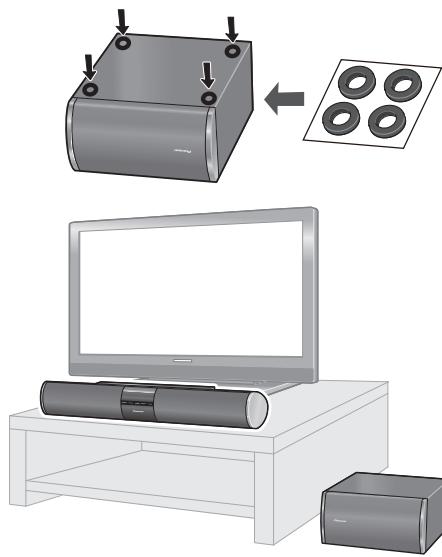
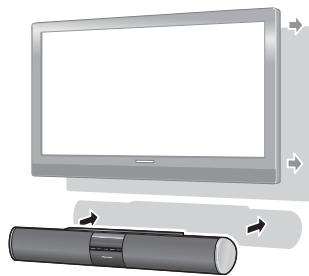
To achieve optimum audio performance, place the main unit beneath the television monitor.
The subwoofer receives its audio signals wirelessly from the main unit, so it requires no speaker cables, allowing you to place it in the most convenient location (a power cord connection is required, however).

Important
Precautions regarding subwoofer installation:
- Do not place objects behind the subwoofer and occlude the ventilation ports.
- Sound from the subwoofer may be interrupted due to poor signal conditions, but this is not a malfunction. If it occurs, rearrange the position and orientation of the main unit and/or subwoofer as required.
- The subwoofer is designed to be used within a distance of 10m from the main unit. The actual distance within which it can be used, however, may be less, depending on the environment and design of the room where it is used.
- Signal reception by the subwoofer may be unstable if it is placed too close to the main unit. In this case, separate the subwoofer at least 1 m from the main unit.
- Signal reception by the subwoofer may be interrupted if an obstruction (metal door or concrete wall, aluminum covered insulation, etc.) is placed between it and the main unit. In this case, install the subwoofer in an uninterrupted line-of-sight orientation from the main unit.
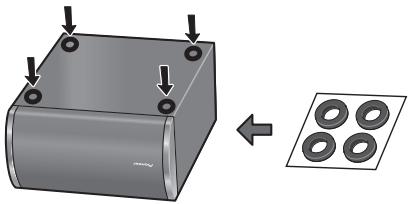
Preparing the subwoofer
- Attach the non-skid pads to the base of subwoofer.
Use the supplied adhesive to attach four pads to the base of subwoofer.
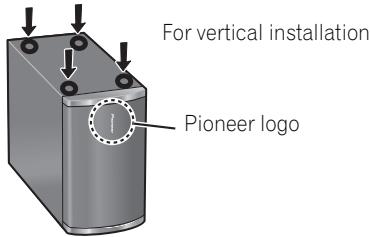
- The subwoofer has been designed for normal use when placed on its side as shown. If installing the subwoofer vertically, affix the non-skid pads to the side of the subwoofer as indicated in the accompanying illustration.
Wall mounting the main unit
The main unit can be mounted on a wall if desired. Before performing a wall mounting, consult page 11 and complete the wiring connections.

Caution
- Remember that the main unit is heavy and that its weight could cause the screws to work loose, or the wall material to fail to support it, resulting in the unit falling. Make sure that the wall you intend to mount the unit on is strong enough to support them. Do not mount on plywood or soft surface walls. If you are unsure of the qualities, consult a professional for advice.
- Pioneer is not responsible for any accidents or damage that result from improper installation, misuse or modification of the product, or natural disasters.
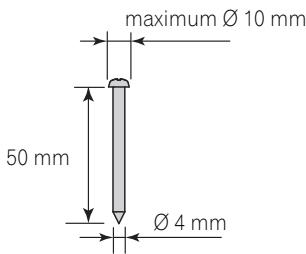
- Mounting screws and washers are not supplied. Use screws suitable for the wall material and support the weight of the unit. Recommended dimensions are for a screw 4mm in diameter and 50mm long, with a washer 10mm in diameter.
Screw (not supplied):
Washer (not supplied):

1 Paste the supplied wall mounting template on the area of installation.
Attach the template level to the ground using an adhesive such as tape. Make sure the template is straight to avoid mounting the unit crookedly. Pasting the template too close to the TV may cause the TV to get in the way of the unit when installing. Make sure the template and TV do not overlap.
2 Attach the bracket to the specified location on the template.
Align the brackets to the specified locations on the template, and attach with two screws as shown.
Adjust the attachment position of the bracket so that it is aligned with the template.
- After attach the right and left brackets, take down the template.

3 Hang the main unit on the brackets.
Align the two mounting holes on the rear of the main unit with the bracket's exposed top mounting screws, and hang the main unit on the screws as shown.
- Confirm that the screws come fully to the top of the mounting holes.
Additional notes on the system placement
Precautions:
- When installing the main unit on top of the TV, be sure to secure it with tape or some other suitable means. Otherwise, the main unit may fall from the TV due to external shocks such as earthquakes, endangering those nearby or damaging the main unit.
- The main unit is magnetically shielded. However, depending on the installation location, color distortion may occur if the main unit is installed extremely close to the screen of a television set. If this case happens, turn the power switch of the television set OFF, and turn it ON after 15 min. to 30 min. If the problem persists, place the main unit away from the television set.
- The subwoofer is not magnetically shielded and so should not be placed near a TV or monitor. Magnetic storage media (such as floppy discs and tape or video cassettes) should also not be kept close to the subwoofer.
- Do not attach the subwoofer to a wall or ceiling. They may fall off and cause injury.
Chapter 2 Connecting up
Making cable connections
Make sure not to bend the cables over the top of this unit. If this happens, the magnetic field produced by the transformers in this unit may cause a humming noise from the speakers.

Caution
- When connecting this system or changing connections, be sure to switch power off and disconnect the power cord from the wall socket.
After completing all connections, connect the power cords to the wall socket.
HDMI cables
The HDMI cables transfers uncompressed digital video, as well as almost every kind of digital audio that the connected component is compatible with, including DVD-video, DVD-Audio, Dolby Digital Plus, Dolby TrueHD, DTS-HD Master Audio (see below for limitations), Video CD/Super VCD, CD and 192 kHz/8 ch (Max. number of channel inputs) PCM.
Be careful to connect the terminal in the proper direction.
About HDMI
HDMI (High Definition Multimedia Interface) supports both video and audio on a single digital connection for use with DVD players, DTV, set-top boxes, and other AV devices. HDMI was developed to provide the technologies of High Bandwidth Digital Content Protection (HDCP) as well as Digital Visual Interface (DVI) in one specification. HDCP is used to protect digital content transmitted and received by DVI-compliant displays.
HDMI has the capability to support standard, enhanced, or high-definition video plus standard to multi-channel surround-sound audio. HDMI features include uncompressed digital video, a bandwidth of up to 2.2 gigabytes per second (with HDTV signals), one connector (instead of several cables and connectors), and communication between the AV source and AV devices such as DTVs.
This system is also compatible with the DeepColor and x.v.Color feature (x.v.Color is trademarks of Sony Corporation).
HDMI, the HDMI logo and High-Definition Multimedia Interface are trademarks or registered trademarks of HDMI Licensing, LLC.
Note
1 - Set the HDMI parameter in Setting the Audio options on page 23 to THRU (THROUGH), if you want to hear HDMI audio output from your TV or flat screen TV (no sound will be heard from this system).
- If the video signal does not appear on your TV or flat screen TV, try adjusting the resolution settings on your component or display. Note that some components (such as video game units) have resolutions that may not be displayed. In this case, use a method other than HDMI to connect your television to the other component.
- When the video signal from the HDMI is 480i, 480p, 576i or 576p, Multi Ch PCM sound and HD sound cannot be received.

Important
- Compared to existing digital audio transmission formats (optical and coaxial), HDMI format digital audio transmissions requires a longer time to be recognized. Due to this, interruption in the audio may occur when switching between formats or beginning playback.
Additionally, turning on/off the component connected to this unit's HDMI OUT terminal or disconnecting/connecting the HDMI cable may cause noise or interrupted audio.
Digital audio cables
Commercially available coaxial digital audio cables or optical cables should be used to connect digital components to this system.
Coaxial digital audio cable


Optical cable


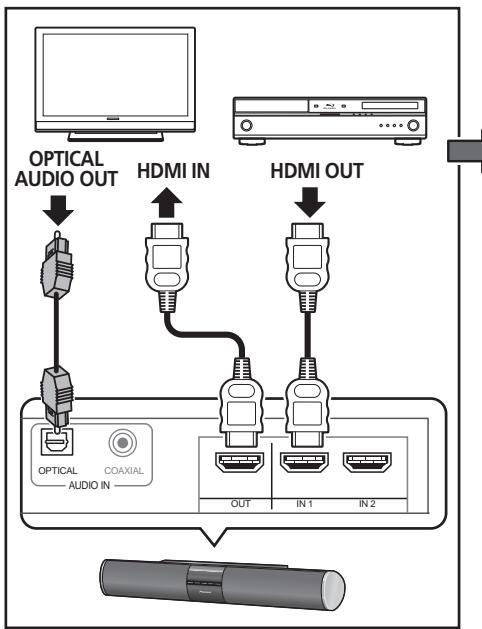
Connect your TV (For TV audio)
This will allow you to play the sound from the TV's built-in tuner.
- Televisions without digital audio output connectors cannot be connected to this unit.
- Connect the optical digital output on your TV to the OPTICAL AUDIO IN on this system.2
Use an optical cable.
- If your TV has a coaxial digital output, you can also use a coaxial digital audio cable for the connection.
Note
1 - When connecting optical cables, be careful when inserting the plug not to damage the shutter protecting the optical socket.
- When storing optical cable, coil loosely. The cable may be damaged if bent around sharp corners.
- You can also use a standard RCA video cable for coaxial digital connections.
2 When connecting this system to a playback component through a television set, in some cases sound may not be produced from the televisions digital audio output. In this case, connect this system directly to the playback component.
Connecting your TV and playback components
Connecting using HDMI
If you have an HDMI or DVI (with HDCP) equipped component (Blu-ray disc player, etc.), you can connect it to this system using a commercially available HDMI cable.
1 Connect the HDMI output on your BD/DVD player to the HDMI IN1 on this system. Use an HDMI cable for the connection.
2 Connect the HDMI OUT on this system to an HDMI input on your TV.
Connecting your component with no HDMI terminal
This diagram shows connections of a TV and DVD player (or other playback component) with no HDMI terminal to the system.
1 Connect the coaxial digital output from your DVD player to the COAXIAL AUDIO IN on this system.
Use a coaxial digital audio cable.
- If your DVD player has an optical digital output, you can also use an optical digital audio cable for the connection.
2 Connect the video output on your DVD player to the video input on your TV.
Plugging in the system
Only plug in after you have connected all your components to this system.
Main unit:
1 Plug the supplied AC adapter into the DC IN socket on the back of the unit.
2 Plug the supplied power cord into the AC adapter then plug the other end into a power outlet.
Subwoofer:
- Plug the supplied power cord into the AC IN socket on the back of the subwoofer then plug the other end into a power outlet.

CAUTION
-
Handle the power cord by the plug part. Do not pull out the plug by tugging the cord, and never touch the power cord when your hands are wet, as this could cause a short circuit or electric shock. Do not place the unit, a piece of furniture, or other object on the power cord or pinch the cord in any other way. Never make a knot in the cord or tie it with other cables. The power cords should be routed so that they are not likely to be stepped on. A damaged power cord can cause a fire or give you an electric shock. Check the power cord once in a while. If you find it damaged, ask your nearest Pioneer authorized independent service company for a replacement.
-
Do not use any power cord other than the one supplied with this unit.
- Do not use the supplied power cord for any purpose other than that described below.
- The system should be disconnected by removing the mains plug from the wall socket when not in regular use, e.g., when on vacation.
- Do not use any AC adapter other than the recommended unit, since fire or shock may occur.
- The supplied AC adapter is designed exclusively for use with this unit. Never attempt to use it with any device for which it was not expressly designed, since fires or shocks may occur.
Chapter 3
Controls and displays
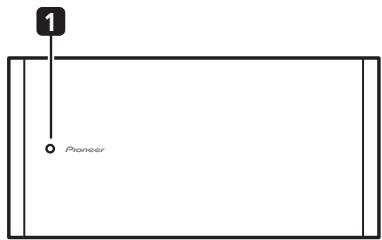
Front panel

1 Wireless indicator
Lights red or green, depending on status of unit.
Standby mode: Lights red
Power on, without wireless transmission (subwoofer operation): Lights red
Power on, with wireless transmission (subwoofer operation): Lights green
2 IR remote sensor
3 Front panel display
See Display below for details.
4 STANDBY/ON
Switches the system on or into standby.
5 INPUT
Selects an input source.
6 STEREO/A.L.C.
Switches between stereo playback, Auto level control stereo mode (page 21) and Front Stage Surround Advance modes (page 22).
7 VOLUME + / -
Adjusts the volume.
Display
1 AUTO
Lights when the Auto Surround feature is switched on (page 20).
2 Character display
Displays various system information.
3 Sound Delay indicator
Displays the Audio Parameter sound delay status.
4 DTS indicator
Lights when a source with DTS encoded audio signals is detected.
5 Dolby Digital indicators
D D
Lights when a Dolby Digital encoded signal is detected.
D+
Lights when a source with Dolby Digital Plus encoded audio signals is detected.
DOHD
Lights when a source with Dolby TrueHD encoded audio signals is detected.
DOPLII
Lights to indicate Pro Logic II decoding (see Listening in surround sound on page 21 for more on this).
6 ADV.S.
Lights when one of the Advanced Surround modes has been selected (see Using the Advanced surround effects on page 21 for more on this).
7 SIGNAL SELECT indicators
DIGITAL
Lights when a digital audio signal is selected.
Blinks when a digital audio signal is not selected.
HDMI
Lights when an HDMI signal is selected.
Blinks when an HDMI signal is not selected.
8 Dimmer indicator
Lights when DIMMER is set to off.
9 DIR.
Lights when the DIRECT or PURE DIRECT mode is switched on (page 22).
Subwoofer
1 Wireless indicator
Standby mode: Lights red During subwoofer operation: Lights green
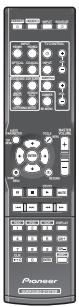
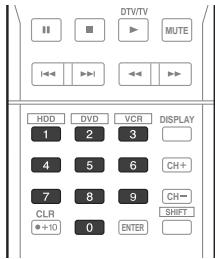
Remote control
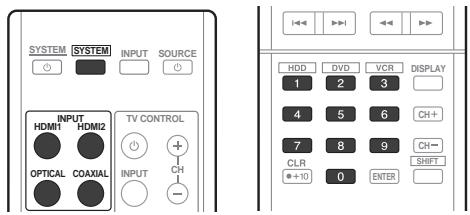
1 SYSTEM
Switches the system between standby and on.
2 SYSTEM
Switches the remote to control the system. Also use to adjust the Audio parameters (page 23).
3 INPUT SELECT
Use to select the input source.
4 SOURCE
Press to turn on/off other components connected to the system (see page 29 for more on this).
5 INPUT SELECT buttons
Use to select the input source. Switch the remote control to operate any other components allocated to the selected buttons (see Controlling the rest of your system on page 26).
6 TV CONTROL buttons
These buttons are dedicated to control the TV assigned to the TV CODE button. Thus if you only have one TV to hook up to this system assign it to the TV CODE button (see page 28 for more on this).
Use to turn on/off the power of the TV.
INPUT
Use to select the TV input signal.
TV CODE
Press to select control of TV. Also use to input a preset code allocated to the TV CONTROL button.
CH+/-
Use to select channels.
VOL + / -
Use to adjust the volume on your TV.
7 Listening mode buttons
AUTO/DIRECT
Switches between Auto surround mode (Auto playback on page 20) and Stream Direct playback. Stream Direct playback bypasses the tone controls for the most accurate reproduction of a source (page 22).
STEREO/A.L.C.
Switches between stereo playback, Auto level control stereo mode (page 21) and Front Stage Surround Advance modes (page 22).
STANDARD
Press for Standard decoding and to switch between Pro Logic II options (page 21).
ADV SURR
Switches between the various surround modes (page 21).
8 DIMMER
Dims or brightens the display. The brightness can be controlled in four steps.
First use INPUT SELECT button to select the input for the desired connected Blu-ray disc player, then access the following:
BD MENU
Displays the disc menu of Blu-ray Discs.
9 System and component control buttons
Press SYSTEM first to access:
AUDIO PARAMETER
Use to access the Audio options (page 23).
RETURN
Confirm and exit the current menu screen.
First use INPUT SELECT button to select the input for the desired connected component, then access the following:
TOP MENU
Displays the disc 'top' menu of a BD/DVD.
HOME MENU
Displays the HOME MENU screen.
RETURN
Confirm and exit the current menu screen.
MENU
Displays the TOOLS menu screen of Blu-ray Disc player.
10 ,ENTER
Use the arrow buttons when setting up your surround sound system (page 23). Also used to control BD/DVD menus/options.
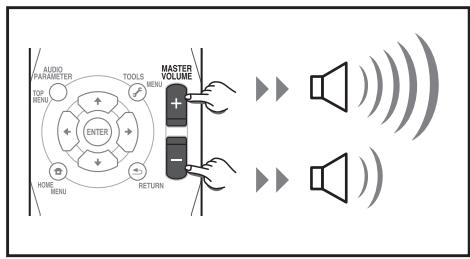
11 MASTER VOLUME + / -
Use to set the listening volume.
12 Component control buttons
The main buttons ( , , etc.) are used to control a component after you have selected it using the input source buttons.
The controls above these buttons can be accessed after you have selected the corresponding input source button. These buttons also function as described below.
Press TV CODE first to access:
DTV/TV
Switches between the DTV and analog TV input modes for Pioneer flat screen TVs.
13 MUTE
Mutes/unmates the sound.
14 Number buttons and other component controls
Use the number buttons to directly select the tracks on a CD, DVD, etc.
HDD*, DVD*, VCR*
These buttons switch between the hard disk, DVD and VCR controls for HDD/DVD/ VCR recorders.
15 DISPLAY
Switches the display of this unit. The input name, listening mode or sound volume can be checked by selecting an input source.
16 SHIFT
Press to access the 'boxed' commands (above the buttons) on the remote. These buttons are marked with an asterisk (^*) in this section.
Putting the batteries in the remote control
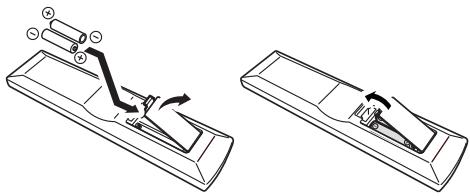

Caution
Incorrect use of batteries can result in hazards such as leakage and bursting. Please observe the following:
- Don't mix new and old batteries together.
- Don't use different kinds of battery together — although they may look similar, different batteries may have different voltages.
- Make sure that the plus and minus ends of each battery match the indications in the battery compartment.
- Remove batteries from equipment that isn't going to be used for a month or more.
- When disposing of used batteries, please comply with governmental regulations or environmental public instruction's rules that apply in your country/area.
- Do not use or store batteries in direct sunlight or other excessively hot place, such as inside a car or near a heater. This can cause batteries to leak, overheat, explode or catch fire. It can also reduce the life or performance of batteries.
Using the remote control
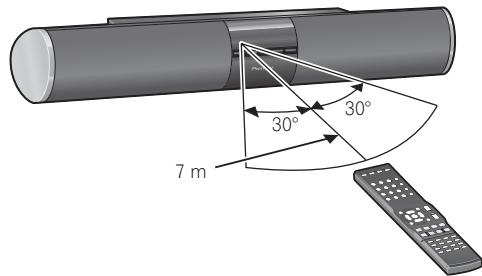
Please keep in mind the following when using the remote control:
- Make sure that there are no obstacles between the remote and the remote sensor on the unit.
- Remote operation may become unreliable if strong sunlight or fluorescent light is shining on the unit's remote sensor.
- Remote controllers for different devices can interfere with each other. Avoid using remotes for other equipment located close to this unit.
- Replace the batteries when you notice a fall off in the operating range of the remote.
- Use within the operating range in front of the remote control sensor on the unit, as shown.
Chapter 4
Listening to your system

Important
- The listening modes and many features described in this section may not be available depending on the current source, settings and status of the system.
Basic operation
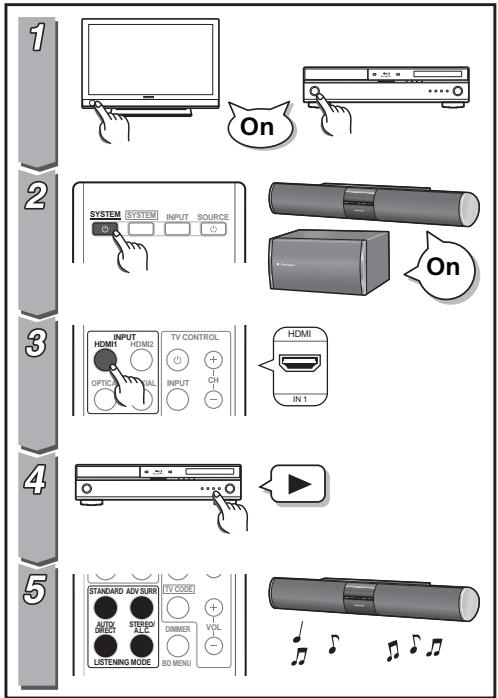
Procedures for listening to audio from the connected component.
1 Turn on the power of the playback component.
2 Press SYSTEM to turn on the power of this system.
3 Select the source you want to playback.
Use INPUT SELECT (or front panel INPUT) buttons.
4 Start playback of the component you selected in step 1.
5 Select the listening mode.
Use the listening mode buttons.
6 Press MASTER VOLUME + / - to adjust the volume.
Auto playback
The simplest, most direct listening option is the Auto Surround feature. With this, the system automatically detects what kind of source you're playing and selects multichannel or stereo playback as necessary.
- While listening to a source, press AUTO/DIRECT² for auto playback of a source.
Press repeatedly until AUTO SURROUND shows briefly in the display (it will then show the decoding or playback format). Check the digital format indicators in the display to see how the source is being processed.
Note
1 Stereo surround (matrix) formats are decoded accordingly using DOLBY PLII MOVIE (see Listening in surround sound above for more on these decoding formats).
2 For more options using this button, see Using Stream Direct on page 22.
Listening in surround sound
Using this system, you can listen to any source in surround sound. However, the options available will depend on your speaker setup and the type of source you're listening to.
The following modes provide basic surround sound for stereo and multichannel sources.
While listening to a source, press STANDARD.
If the source is Dolby Digital, DTS, or Dolby Surround encoded, the proper decoding format will automatically be selected and shows in the display.
With two channel sources, you can select from:
DOLBY PLII MOVIE - Suitable for movie sources
- DOLBY PLII MUSIC ^1 - Suitable for music sources
DOLBY PLIII GAME - Suitable for video games
DOLBY PRO LOGIC - Effective for stereo audio sources encoded with Dolby Surround.
Using the Advanced surround effects
The Advanced surround feature creates a variety of surround effects. Try different modes with various soundtracks to see which you like.
-
Press ADV SURR repeatedly to select a listening mode.
-
ACTION - Designed for action movies with dynamic soundtracks.
- DRAMA - Designed for movies with lots of dialog.
- ENT.SHOW - Suitable for musical sources.
ADVANCED GAME -Suitable for video games. - SPORTS - Suitable for sports programs.
CLASSICAL - Gives a large concert hall-type sound. - ROCK/POP - Creates a live concert sound for rock and/or pop music.
- UNPLUGGED - Suitable for acoustic music sources.
- EXT.STEREO - Gives multichannel sound to a stereo source, using all of your speakers.
Listening in stereo
When you select STEREO you will hear the source through just the front left and right speakers (and possibly your subwoofer depending on your speaker settings). Dolby Digital and DTS multichannel sources are downmixed to stereo.
Note
1 When listening to 2-channel sources in DOLBY PLII MUSIC mode, there are three further parameters you can adjust: C.WIDTH, DIMEN., and PNRM.. See Setting the Audio options on page 23 to adjust them.
In the Auto level control stereo mode (A.L.C.), this unit equalizes playback sound levels if each sound level varies with the music source recorded in a portable audio player.
While listening to a source, press STEREO/A.L.C. for stereo playback.
Press repeatedly to switch between:
STEREO - The audio is heard with your surround settings and you can still use the Midnight, Loudness, Phase Control and Sound Retriever functions.
A.L.C. - Listening in Auto level control stereo mode.
F.S.S.ADVANCE - See Using Front Stage Surround Advance below for more on this.
Using Front Stage Surround Advance
The Front Stage Surround Advance function allows you to create natural surround sound effects using just the front speakers and the subwoofer.
While listening to a source, press STEREO/A.L.C. to select Front Stage Surround Advance modes.
STEREO - See Listening in stereo above for more on this.
A.L.C. - See Listening in stereo above for more on this.
- F.S.S.ADVANCE - Use to provide a rich surround sound effect directed to the center of where the front left and right speakers sound projection area converges.
F.S.S.ADVANCE position
Using Stream Direct
Use the Stream Direct modes when you want to hear the truest possible reproduction of a source. All unnecessary signal processing is bypassed.
While listening to a source, press AUTO/DIRECT to select Stream Direct mode.
- AUTO SURROUND - See Auto playback on page 20.
- DIRECT - Sources are heard in accordance with the settings made in dual mono mode. You will hear sources according to the number of channels in the signal.
- PURE DIRECT - PCM sources are heard without any digital processing.2
Note
1 In the DIRECT mode, Sound Delay, Auto Delay, LFE Attenuate and Center image functions are available. 2 There are cases where a brief noise is heard before playback of sources other than PCM. Please select AUTO SURROUND or DIRECT if this is a problem.
Setting the Audio options
There are a number of additional sound settings you can make using the AUDIO PARAMETER menu. The defaults, if not stated, are listed in bold.

Important
Note that if a setting doesn't appear in the AUDIO PARAMETER menu, it is unavailable due to the current source, settings and status of the system.
1 Press SYSTEM on the remote control, then press AUDIO PARAMETER button.
2 Use / to select the setting you want to adjust.
Depending on the current status/mode of the system, certain options may not be able to be selected. Check the table below for notes on this.
3 Use / to set it as necessary.
See the table below for the options available for each setting.
4 Press RETURN to confirm and exit the menu.
| Setting | What it does | Option(s) |
| S.DELAY (Sound Delay) | Some monitors have a slight delay when showing video, so the soundtrack will be slightly out of sync with the picture. By adding a bit of delay, you can adjust the sound to match the presentation of the video. | 0.0 to 9.0 (frames) 1 second = 25 frames (PAL) Default: 0.0 |
| MIDNIGHT | Allows you to hear effective surround sound of movies at low volumes. | M/L OFF |
| LOUDNESS | Used to get good bass and treble from music sources at low volumes. | MIDNIGHT LOUDNESS |
| S.RTV (Sound Retriever) | When audio data is removed during the WMA/MP3 compression process, sound quality often suffers from an uneven sound image. The Sound Retriever feature employs new DSP technology that helps bring CD quality sound back to compressed 2-channel audio by restoring sound pressure and smoothing jagged artifacts left over after compression. | OFF |
| ON | ||
| DUAL MONOa | Specifies how dual mono encoded Dolby Digital soundtracks should be played. | CH1 – Channel 1 is heard only |
| CH2 – Channel 2 is heard only | ||
| CH1 CH2 – Both channels heard from front speakers | ||
| DRC (Dynamic Range Control) | Adjusts the level of dynamic range for movie soundtracks optimized for Dolby Digital, DTS, Dolby Digital Plus and Dolby TrueHD (you may need to use this feature when listening to surround sound at low volumes). | AUTOb |
| MAX | ||
| MID | ||
| OFF | ||
| LFE ATT (LFE Attenuate) | Some Dolby Digital and DTS audio sources include ultra-low bass tones. Set the LFE attenuator as necessary to prevent the ultra-low bass tones from distorting the sound from the speakers. The LFE is not limited when set to 0 dB, which is the recommended value. When set to -10 dB, the LFE is limited by the respective degree. When OFF is selected, no sound is output from the LFE channel. | LFEATT 0 (0 dB) |
| LFEATT 10 (-10 dB)/LFEATT ** (OFF) | ||
| HDMI (HDMI Audio) | Specifies the routing of the HDMI audio signal out of this system (amp) or through to a TV or flat screen TV. When THRU is selected, no sound is output from this system. | AMP |
| THRU | ||
| A.DLY (Auto Delay) | This feature automatically corrects the audio-to-video delay between components connected with an HDMI cable. The audio delay time is set depending on the operational status of the display connected with an HDMI cable. The video delay time is automatically adjusted according to the audio delay time.c | OFF |
| ON | ||
| C.WIDTHd (Center Width) | Spreads the center channel between the front right and left speakers, making it sound wider (higher settings) or narrower (lower settings). | 0 to 7 Default: 3 |
| DIMEN.d (Dimension) | Adjusts the surround sound balance from front to back, making the sound more distant (minus settings), or more forward (positive settings). | -3 to +3 Default: 0 |
| PNRM.d (Panorama) | Extends the front stereo image to include surround speakers for a ‘wraparound’ effect. | OFF |
| ON |
a. This setting works only with dual mono encoded Dolby Digital and DTS soundtracks.
b. The initial set AUTO is only available for Dolby TrueHD signals. Select MAX or MID for signals other than Dolby TrueHD.
c. This feature is only available when the connected display supports the automatic audio/video synchronizing capability ('lip-sync') for HDMI. If you find the automatically set delay time unsuitable, set A.DLY to OFF and adjust the delay time manually. For more details about the lip-sync feature of your display, contact the manufacturer directly.
d. Only available with 2-channel sources in DOLBY PLII MUSIC mode.
Chapter 5
Controlling the rest of your system
Setting the remote to control other components
Most components can be assigned to one of the TV CODE or INPUT SELECT buttons using the component's manufacturer preset code stored in the remote.
However, please note that there are cases where only certain functions may be controllable after assigning the proper preset code, or the codes for the manufacturer in the remote control will not work for the model that you are using.

Note
- You can cancel or exit any of the steps by pressing SYSTEM.
After one minute of inactivity, the remote automatically exits the operation.
Select preset codes for TVs
1 While pressing the SYSTEM button, press and hold the '1' button for three seconds.
2 Press the TV CODE button.
3 Use the number buttons to enter the preset code.
You can find the preset codes on page 30.
If the correct code has been input the power of the TV being input will turn on or off.
The power of the TV being input will only turn on or off if that TV is able to be turned on directly by remote control.
4 Repeat steps 2 through 3 to try a different code.
5 When you're done, press SYSTEM.
Select preset codes for other components
1 While pressing the SYSTEM button, press and hold the '1' button for three seconds.
2 Press the INPUT SELECT button for the component you want to control.
3 Use the number buttons to enter the preset code.
You can find the preset codes on page 30.
If the correct code has been input the power of the component being input will turn on or off.
The power of the component being input will only turn on or off if that component is able to be turned on directly by remote control.
4 Repeat steps 2 through 3 to try a different code, or to enter a code for another component you want to control.
5 When you're done, press SYSTEM.
Clearing all the remote control settings
You can clear all presets and restore the factory default settings.
- While pressing the SYSTEM button, press and hold the '0' button for three seconds.
Default preset codes
| INPUT SELECT button | Preset code |
| HDMI1 | 2126 (BD) |
| HDMI2 | 2122 (DVD) |
| OPTICAL | 2121 (DVR) |
| COAXIAL | 1120 (VCR) |
| TV CODE | 0120 |
Controls for TVs
This remote control can control TV after entering the proper code (see Select preset codes for TVs on page 26). To operate a TV, press INPUT SELECT button for the input to which the TV is connected.
- The TV CONTROL buttons on the remote control are dedicated to control the TV assigned to the TV CODE button.
| Button(s) | Function | Components |
| TV CONTROL a | Switches the DTV on or off. | DTV |
| Switches the TV or CATV between standby and on. | Cable TV/Satellite TV/TV | |
| TV CONTROL INPUTa | Switches the TV input. (Not possible with all models.) | TV |
| TV CONTROL CH +/-a | Selects channels. | Cable TV/Satellite TV/TV/ DTV |
| TV CONTROL VOL +/-a | Adjust the TV volume. | Cable TV/Satellite TV/TV/ DTV |
| SOURCE | Press to switch the component assigned to the TV button on or off. | Cable TV/Satellite TV/TV/ DTV |
| DTV/TV | Switches between the DTV and analog TV input modes for Pioneer flat screen TVs. | DTV/TV |
| TOP MENU | Switches TEXT ON/OFF for TVs. | TV |
| HOME MENU | Use as the GUIDE button for navigating. | Cable TV/Satellite TV/TV/ DTV |
| RETURN | Use to select closed captioning with DTV. | DTV |
| Number buttons | Use to select a specific TV channel. | Cable TV/Satellite TV/TV/ DTV |
| +10 button | Use to add a decimal points when selecting TV channels. | DTV |
| ENTER | Use to enter a channel. | Cable TV/Satellite TV/TV/ DTV |
| MENU | Press to display the DTV menu. | DTV |
| Select the menu screen. | Cable TV/Satellite TV/TV | |
| ←→↓↑& ENTER | Press to select or adjust and navigate items on the menu screen. | Cable TV/Satellite TV/TV/ DTV |
| CH +/- | Selects channels. | Cable TV/Satellite TV/TV/ DTV |
a.When an input for a component other than a TV is selected, a TV assigned to TV CODE can be operated.
Controls for other components
This remote control can control these components after entering the proper codes (see Select preset codes for other components on page 27). To operate another component, press INPUT SELECT button for the component to which a preset code has been input.
| Button(s) | Function | Components |
| SOURCE | Press to switch the component between standby and on. | BD/DVD player, DVR, VCR |
| ← | Press to return to the start of the current track. | BD/DVD player, DVR, VCR |
| Repeated presses skips to the start of previous tracks. | ||
| → | Press to advance to the start of the next track. | BD/DVD player, DVR, VCR |
| Repeated presses skips to the start of following tracks. | ||
| II | Pause playback or recording. | BD/DVD player, DVR, VCR |
| ▶ | Start playback. | BD/DVD player, DVR, VCR |
| ▶ | Hold down for fast forward playback. | BD/DVD player, DVR, VCR |
| ▲ | Hold down for fast reverse playback. | BD/DVD player, DVR, VCR |
| ■ | Stops playback (on some models, pressing this when the disc is already stopped will cause the disc tray to open). | BD/DVD player, DVR, VCR |
| Number buttons | Directly access tracks on a program source. | VCR |
| Use to enter a title/chapter/track number. | BD/DVD player, DVR | |
| +10 button | Selects tracks higher than 10. (For example, press +10 then 3 to select track 13.) | BD/DVD player, DVR |
| ENTER | Use as the ENTER button. | BD/DVD player |
| Displays the DISC NAVI screen for DVD recorder. | DVR | |
| DISPLAY | Press to display information. | BD/DVD player, DVR |
| TOP MENU | Displays the disc 'top' menu of a BD/DVD player. | BD/DVD player, DVR |
| MENU | Displays menus for the current BD/DVD player or DVD recorder you are using. | BD/DVD player, DVR |
| ←→↓↑, ENTER & RETURN | Navigates BD/DVD menu/options. | BD/DVD player, DVR |
| HOME MENU | Displays the HOME MENU. | BD/DVD player, DVR |
| CH +/- | Selects channels. | DVR, VCR |
| HDD (SHIFT + 1) | Switches to the hard disk controls when using an HDD/DVD recorder. | HDD/DVD/VCRRender |
| DVD (SHIFT + 2) | Switches to the DVD controls when using an HDD/DVD recorder. | HDD/DVD/VCRRender |
| VCR (SHIFT + 3) | Switches to the VCR controls when using an HDD/DVD/ VCR recorder. | HDD/DVD/VCRRender |
Preset Code List
You should have no problem controlling a component if you find the manufacturer in this list, but please note that there are cases where codes for the manufacturer in the list will not work for the model that you are using. There are also cases where only certain functions may be controllable after assigning the proper preset code.
BD/DVD/DVR
Manufacturer Code
AEG 2093
Aiwa 2054
Akai 2001
Akura 2091
Alba 2027, 2038, 2048
Amitech 2093
AMW 2094
Awa 2094
Bang & Olufsen 2096
Bellagio 2094
Best Buy 2090
Brainwave 2093
Brandt 2017, 2044
Bush 2027, 2048, 2082, 2089
Cambridge Audio 2085
CAT 2087, 2088
Centrum 2088
CGV 2085, 2093
Cinetec 2094
Clatronic 2089
Coby 2095
Conia 2082
Continental Edison 2094
Crown 2093
C-Tech 2086
CyberHome 2008, 2037
Daenyx 2094
Daewoo 2035, 2059, 2093, 2094
Daewoo International 2094
Dalton 2092
Dansai 2084, 2093
Daytek 2010, 2033, 2094
Dayton 2094
DEC 2089
Decca 2093
Denon 2066, 2068
Denver 2069, 2089, 2091, 2095
Denzel 2083
Diamond 2085, 2086
DK Digital 2034
Dmtech 2000
Dual 2083
DVX 2086
Easy Home 2090
Eclipse 2085
Electrohome 2093
Elin 2093
Elta 2047, 2093
Enzer 2083
Finlux 2085, 2093
Gericom 2050
Global Solutions 2086
Global Sphere 2086
Goodmans 2027, 2070, 2089
Graetz 2083
Grundig 2053
Grunkel 2093
H&B 2089
Haaz 2085, 2086
HiMAX 2090
Hitachi 2015, 2083, 2090
Innovation 2002
JVC 2024, 2041, 2057
Kansai 2095
Kennex 2093
Kenwood 2051
KeyPlug 2093
Kiiro 2093
Kingavon 2089
Kiss 2083
Koda 2089
KXD 2090
Lawson 2086
Lecson 2084
Lenco 2089, 2093
LG 2016, 2020, 2040, 2043, 2065, 2076
Life 2002
Lifetec 2002
Limit 2086
Loewe 2056
LogicLab 2086
Magnavox 2089
Majestic 2095
Marantz 2062
Marquant 2093
Matsui 2044
Mecotec 2093
Medion 2002
MiCO 2085
Micromaxx 2002
Microstar 2002
Minoka 2093
Mizuda 2089, 2090
Monyka 2083
Mustek 2006
Mx Onda 2085
Naiko 2093
Neufunk 2083
Nevir 2093
NU-TEC 2082
Onkyo 2072
Optim 2084
Optimus 2004
Orava 2089
Orbit 2094
Orion 2061
P&B 2089
Pacific 2086
Panasonic 2018, 2019, 2026, 2032, 2036, 2075
Philips 2005, 2011, 2022, 2023, 2031, 2039, 2062
Pioneer 2004, 2012, 2014, 2049, 2120, 2121, 2122, 2123, 2124, 2125, 2126
Pointer 2093
Portland 2093
Powerpoint 2094
Prosonic 2095
Provision 2089
Raite 2083
RedStar 2091, 2093, 2095
Reoc 2086
Roadstar 2021, 2089
Ronin 2094
Rowa 2082
Rownsonic 2088
Saba 2017, 2044
Sabaki 2086
Saivod 2093
Samsung 2015, 2042, 2063, 2078, 2081
Sansui 2085, 2086, 2093
Sanyo 2045, 2071
ScanMagic 2006
Schaub Lorenz 2093
Schneider 2000
Scientific Labs 2086
Scott 2025, 2092
SEG 2021, 2083, 2086, 2094
Sharp 2002, 2046, 2079
Sigmatek 2090
Silva 2091
Singer 2085, 2086
Skymaster 2058, 2086
Skyworth 2091
Slim Art 2093
SM Electronic 2086
Sony 2009, 2013, 2028, 2029, 2030, 2055, 2080
Soundmaster 2086
Soundmax 2086
Spectra 2094
Standard 2086
Star Cluster 2086
Starmedia 2089
Sunkai 2093
Supervision 2086
Synn 2086
Tatung 2035, 2093
TCM 2002
Teac 2067, 2082, 2086
Tec 2091
Technika 2093
Telefunken 2088
Tensai 2093
Tevion 2002, 2086, 2092
Thomson 2003, 2017, 2060, 2064
Tokai 2083, 2091
Toshiba 2007, 2061, 2073, 2074, 2077
TRANScontinentals 2094
Trio 2093
TruVision 2090
Wharfedale 2085, 2086
Xbox 2003
Xlogic 2086, 2093
XMS 2093
Yamada 2094
Yamaha 2011
Yamakawa 2083, 2094
Yukai 2006, 2052
TV
Manufacturer Code
A.R. Systems 0040
Acme 0026
Acura 0027, 0039
ADC 0025
Admiral 0023, 0024, 0025, 0030, 0031
Adyson 0026, 0113, 0114
Agashi 0113, 0114
Agazi 0025
Aiko 0026, 0027, 0039, 0040, 0113, 0114
Aim 0040
Aiwa 0084
Akai 0027,0028,0034, 0037,0039,0040,0113, 0114
Akiba 0028, 0040
Akura 0025,0028,0039, 0040
Alaron 0113
Alba 0010, 0026, 0027, 0028, 0032, 0035, 0037, 0039, 0040, 0075, 0078, 0088, 0113
Alcyon 0017
Allorgan 0114
Allstar 0034, 0040
AMOi 0109
Amplivision 0010, 0026, 0041, 0114
Amstrad 0025,0027,0028, 0039,0040
Anam 0027
Anglo 0027, 0039
Anitech 0017,0025,0027, 0039,0040
Ansonic 0010, 0018, 0027, 0029, 0039, 0040
Arcam 0113, 0114
Arcam Delta 0026
Aristona 0034, 0037, 0040
Arthur Martin 0041
ASA 0023, 0031
Asberg 0017, 0034, 0040
Astra 0027
Asuka 0025,0026,0028, 0113,0114
Atlantic 0026,0034,0037 0040,0113
Atori 0027, 0039
Auchan 0041
Audiosonic 0010,0026, 0027,0028,0034,0037, 0040,0114
AudioTon 0010, 0026, 0114
Ausind 0017
Autovox 0017, 0023, 0025, 0026, 0114
Awa 0113,0114
Baird 0114
Bang & Olufsen 0023, 0115
Basic Line 0027,0028, 0034,0039,0040,0114
Bastide 0026, 0114
Baur 0037, 0040
Bazin 0114
Beko 0010,0035,0040 0060
Benq 0104
Beon 0034, 0037, 0040
Best 0010
Bestar 0010, 0034, 0040
Binatone 0026, 0114
Blue Sky 0028, 0040
Blue Star 0036
Boots 0026, 0114
BPL 0036,0040
Brandt 0033,0038,0042, 0044
Brinkmann 0040
Brionvega 0023,0034, 0037,0040
Britannia 0026, 0113, 0114
Bruns 0023
BTC 0028
Bush 0027, 0028, 0030, 0032, 0034, 0036, 0037, 0039, 0040, 0065, 0078, 0114
Capsonic 0025
Carena 0040
Carrefour 0032
Cascade 0027, 0039, 0040
Casio 0106
Cathay 0034, 0037, 0040
CCE 0114
Centurion 0034, 0037, 0040
Century 0023
CGE 0010, 0017
Cimline 0027, 0039
City 0027, 0039
Clarivox 0037
Clatronic 0010, 0017, 0025, 0026, 0027, 0028, 0034, 0035, 0039, 0040, 0114
CMS 0113
CMS Hightec 0114
Concorde 0027, 0039
Condor 0010, 0026, 0034, 0035, 0039, 0040, 0113
Contec 0026, 0027, 0032, 0039, 0113
Continental Edison 0033
Cosmel 0027, 0039
Crosley 0017, 0023
Crown 0010, 0017, 0027, 0034, 0035, 0037, 0039, 0040
CS Electronics 0026, 0028, 0113
CTC Clatronic 0029
Cybertron 0028
Daewoo 0013,0026,0027, 0034,0039,0040,0054, 0064,0091,0113,0114
Dainichi 0028, 0113
Dansai 0025,0034,0037 0040,0113,0114
Dantax 0010, 0037
Dawa 0040
Daytron 0027, 0039
De Graaf 0030
Decca 0026,0034,0037 0040,0114
Denver 0098, 0103
Desmet 0034, 0037, 0040
Diamant 0040
Diamond 0113
Dixi 0027,0034,0037,0039, 0040,0114
DTS 0027, 0039
Dual 0026, 0040, 0114
Dual-Tec 0026, 0027
Dumont 0023, 0026, 0029, 0114
Dux 0037
Dynatron 0034, 0037, 0040
Elbe 0010, 0018, 0040, 0114
Elcit 0023
Electa 0036
ELECTRO TECH 0027
Elin 0026,0034,0037,0039 0040,0113
Elite 0028, 0034, 0040
Elman 0029
Elta 0027, 0039, 0113
Emerson 0010, 0023, 0040
Epson 0101
Erres 0034, 0037, 0040
ESC 0114
Etron 0027
Eurofeel 0025, 0114
Euroline 0037
Euroman 0010,0025,0026, 0034,0040,0113,0114
Europhon 0026, 0029, 0034, 0040, 0113, 0114
Expert 0041
Exquisit 0040
Fenner 0027, 0039
Ferguson 0033,0037,0038, 0042
Fidelity 0026,0030,0040 0113
Filsai 0114
Finlandia 0030
Finlux 0017 0023, 0026, 0029, 0034, 0037, 0040, 0114
Firstline 0026, 0027, 0034, 0039, 0040, 0113, 0114
Fisher 0010,0023,0026, 0032,0035,0114
Flint 0034, 0040
Formenti 0017,0023,0024, 0026,0037,0113
Formenti/Phoenix 0113
Fortress 0023, 0024
Fraba 0010, 0040
Friac 0010
Frontech 0025,0027,0030, 0031,0039,0114
Fujitsu 0114
Fujitsu General 0114
Funai 0025
Galaxi 0035, 0040
Galaxis 0010, 0040
GBC 0027, 0032, 0039
Geant Casino 0041
GEC 0026,0031,0034, 0037,0040,0114
Geloso 0027, 0030, 0039
General Technic 0027, 0039
Genexxa 0028,0031,0034, 0040
Giant 0114
GoldHand 0113
Goldline 0040
GoldStar 0010,0026,0027, 0030,0034,0037,0039, 0040,0113,0114
Goodmans 0025,0027, 0032,0034,0037,0039, 0040,0107,0114
Gorenje 0010, 0035
GPM 0028
Graetz 0031
Granada 0017,0026,0030, 0032,0034,0037,0040, 0041,0114
Grandin 0027,0028,0036, 0037
Gronic 0114
Grundig 0009,0010,0017, 0040,0047
Halifax 0025, 0026, 0113, 0114
Hampton 0026, 0113, 0114
Hanseatic 0010,0018, 0026,0027,0032,0034, 0037,0039,0040,0114
Hantarex 0027, 0039, 0040
Hantor 0040
Harwood 0039, 0040
HCM 0025, 0026, 0027, 0036, 0039, 0040, 0114
Hema 0039, 0114
Higashi 0113
HiLine 0040
Hinari 0027, 0028, 0032, 0034, 0037, 0039, 0040
Hisawa 0028, 0036, 0041
Hitachi 0022, 0026, 0030, 0031, 0032, 0040, 0076, 0111, 0114
Hornyphon 0034, 0040
Hoshai 0028
Huanyu 0026, 0113
Hygashi 0026, 0113, 0114
Hyper 0026,0027,0039 0113,0114
Hypson 0025,0026,0034, 0036,0037,0040,0041, 0114
Iberia 0040
ICE 0025,0026,0027,0028, 0034,0039,0040,0113, 0114
ICeS 0113
Imperial 0010, 0017, 0031, 0034, 0035, 0040
Indiana 0034, 0037, 0040
Ingelen 0031
Ingersol 0027, 0039
Inno Hit 0017,0026,0027, 0028,0034,0037,0039, 0040,0114
Innovation 0025, 0027
Interactive 0010
Interbuy 0027, 0039
Interfunk 0010,0023,0031, 0034,0037,0040
International 0113
Intervention 0010,0025, 0026,0029,0040,0114
Irradio 0017,0027,0028, 0034,0037,0039,0040
Isukai 0028, 0040
ITC 0026, 0114
ITS 0028,0034,0036,0040, 0113
ITT 0027, 0031
ITV 0027,0037,0040
JVC 0019,0020,0032,0034, 0077
Kaisui 0026, 0027, 0028, 0036, 0039, 0040, 0113, 0114
Kamosonic 0026
Kamp 0026, 0113
Kapsch 0031
Karcher 0010,0026,0027 0037,0040
Kawasho 0113
Kendo 0010,0029,0030 0040
KIC 0114
Kingsley 0026, 0113
Kneissel 0010, 0018, 0040
Kolster 0034, 0040
Konka 0028
Roadstar 0025,0027,0028, 0039
Robotron 0023
Rowa 0113, 0114
Royal Lux 0010
RTF 0023
Saba 0023, 0031, 0033, 0038, 0042, 0044
Saisho 0025,0026,0027 0039,0114
Salora 0030, 0031
Sambers 0017, 0029
Samsung 0004, 0005, 0010, 0025, 0026, 0027, 0034, 0035, 0037, 0039, 0040, 0062, 0063, 0066, 0089, 0093, 0113, 0114
Sandra 0026, 0113, 0114
Sansui 0034, 0040
Sanyo 0010, 0018, 0026, 0032, 0039, 0072, 0113, 0114
SBR 0037,0040
SCHAUB LORENTZ 0031
Schneider 0026, 0028, 0034, 0037, 0040, 0075, 0114
SEG0025,0026,0029,0032 0037,0039,0040,0075 0113,0114
SEI 0040
SEI-Sinudyne 0023, 0029, 0031
Seleco 0030, 0031, 0032
Sencora 0027, 0039
Sentra 0039
Serino 0113
Sharp 0015, 0016, 0024, 0032, 0069, 0092
Siarem 0023, 0029, 0040
Sierra 0034, 0040
Siesta 0010
Silva 0113
Silver 0032
Singer 0023, 0029, 0041
Sinudyne 0023,0029,0037 0040
Skantic 0031
Solavox 0031
Sonitron 0010, 0114
Sonoko 0025,0026,0027, 0034,0037,0039,0040, 0114
Sonolor 0031, 0041
Sontec 0010,0034,0037, 0040
Sony 0001, 0003, 0027, 0032, 0046, 0053, 0057, 0070, 0073, 0082, 0086, 0096, 0110, 0112
Sound & Vision 0028, 0029
Soundwave 0034,0037, 0040
Standard 0026, 0027, 0028, 0034, 0039, 0040, 0114
Starlight 0037
Starlite 0039, 0040
Stenway 0036
Stern 0030, 0031
Strato 0039, 0040
Stylandia 0114
Sunkai 0027
Sunstar 0039, 0040
Sunwood 0027, 0034, 0039, 0040
Superla 0026, 0113, 0114
SuperTech 0039, 0040, 0113
Supra 0027, 0039
Susumu 0028
Sutron 0027, 0039
Sydney 0026, 0113, 0114
Sysline 0037
Sytong 0113
Tandy 0024, 0026, 0028, 0031, 0114
Tashiko 0026,0030,0032 0113,0114
Tatung 0026,0034,0037 0040,0114
TCM 0025, 0027
Teac 0040, 0114
Tec 0026, 0027, 0039, 0114
TEDELEX 0114
Teleavia 0033
Telecor 0040, 0114
Telefunken 0033,0034, 0040,0042
Telegazi 0040
Telemeister 0040
Telesonic 0040
Telestar 0040
Teletech 0027,0037,0039 0040
Teleton 0026, 0114
Televideon 0113
Televiso 0041
Tensai 0027,0028,0034 0039,0040,0114
Tesmet 0034
Tevion 0025, 0027
Texet 0026,0039,0113, 0114
Thomson 0006,0007,0026, 0033,0034,0038,0040, 0042,0044,0095
Thorn 0037, 0040
Tokai 0034, 0040, 0114
Tokyo 0026, 0113
Tomashi 0036
Toshiba 0011, 0012, 0032, 0061, 0094, 0114
Towada 0031, 0114
Trakton 0114
Trans Continens 0040, 0114
Transtec 0113
Trident 0114
Triumph 0040
Uher 0010, 0017, 0031, 0034, 0040
Ultravox 0023, 0026, 0029, 0040, 0113
Unic Line 0040
United 0037
Universum 0010, 0017, 0025, 0034, 0035, 0037, 0040, 0114
Univox 0040
Vestel 0030, 0031, 0034, 0035, 0037, 0040, 0114
Vexa 0027,0037,0039, 0040
Victor 0032, 0034
VIDEOLOGIC 0113
Videologique 0026,0028, 0113,0114
VideoSystem 0034, 0040
Videotechnic 0113, 0114
Viewsonic 0108
Visiola 0026, 0113
Vision 0034, 0040, 0114
Additional information
Troubleshooting
Incorrect operations are often mistaken for trouble and malfunctions. If you think that there is something wrong with this component, check the points below. Take a look at the other components and electrical appliances being used, because sometimes the problem may lie there. If the trouble isn't sorted out even after going through the checks below, ask your nearest Pioneer authorized independent service company to carry out repair work.
- If the unit does not operate normally due to external effects such as static electricity disconnect the power plug from the outlet and insert again to return to normal operating conditions.
| Problem | Remedy |
| The power does not turn on. | ·Disconnect the power plug from the outlet, and insert again. |
| The system suddenly switches off. | ·After about a minute (you won't be able to switch the unit on during this time), switch the system back on. If the message persists, call a Pioneer authorized independent service company. |
| No sound is output when a function is selected. | ·Make sure the component is connected correctly (refer to Connecting up on page 11). ·Press MUTE on the remote control to turn muted off. |
| No image is output when a function is selected. | ·Make sure the component is connected correctly (refer to Connecting up on page 11). ·Select the correct component (use the INPUT SELECT buttons). ·The video input selected on the TV monitor is incorrect. Refer to the instruction manual supplied with the TV. |
| Subwoofer sound is intermittent. | ·If another electronic device (cordless phone, Bluetooth wireless technology device, wireless LAN, microwave oven, etc.) using the same frequency (2.4 GHz) is operating nearby, change its location. ·The high frequency range utilized by this device for signal transmission possesses the same characteristics of straight-line transmission, reflection, refraction, defraction, and interference as ordinary light waves. As a result, the efficiency of signal transmission may vary depending on the location, resulting in broken or interrupted sound. In such cases, try changing the installation location or conditions. ·If signal transmission is ineffective due to excessive distance between the main unit and subwoofer, try placing the subwoofer closer to the main unit. ·When using the system in an area subject to frequent static or electrical noise, try changing the subwoofer's installation location. |
| No sound from subwoofer. | ·The Dolby Digital or DTS source you are listening to may not have an LFE channel. ·Switch the LFE ATT (LFE Attenuate) on page 24 to LFEATT 0 or LFEATT 10. ·Transmission qualities may vary due to the presence of obstacles or reflective objects in the signal path. Try changing the position or orientation of the subwoofer. ·The main unit and the subwoofer in this set act as a pair, and are designed to recognize each other specifically. Signal transmission is not possible when a main unit or subwoofer from another set is used. ·The subwoofer may not emit sound when playing music that lacks a continuing low bass range. ·Perform pairing of the main unit and subwoofer (refer to page 7). |
| Noise during playback of a cassette deck. | ·Move the cassette deck away from your system, until the noise disappears. |
| No sound is output or a noise is output when software with DTS is played back. | ·Set the digital volume level of the player to full, or to the neutral position. ·Make sure the player's settings are correct and/or the DTS signal out is on. Refer to the instruction manual supplied with the DVD player. |
| During a playback search, noise is output from a DTS compatible CD player. | ·This is not a malfunction, but be sure to turn the volume down to prevent the output of loud noise from your speakers. |
| Can't operate the remote control. | ·Replace the batteries (refer to page 19). ·Operate within 7 m, 30° of the remote sensor (refer to page 19). ·Remove the obstacle or operate from another position. ·Avoid exposing the remote sensor on the front panel to direct light. |
| The display is dark or off. | ·Press DIMMER on the control repeatedly to return to the default. |
HDMI
| Symptom | Remedy |
| No picture or sound. | ·If the problem still persists when connecting your HDMI component directly to your monitor, please consult the component or monitor manual or contact the manufacturer for support. |
| No picture. | Depending in the output settings of the source component, it may be outputting a video format that can't be displayed. Change the output settings of the source, or connect your source component directly to TV using the component or composite video jacks. This system is HDCP-compatible. Check that the components you are connecting are also HDCP-compatible. If they are not, please connect your source component directly to TV using the component or composite video jacks. Depending on the connected source component, it's possible that it will not work with this system (even if it is HDCP-compatible). In this case, connect your source component directly to TV using the component or composite video jacks. If video images do not appear on your TV or flat screen TV, try adjusting the resolution, DeepColor or other setting for your component. To output signals in DeepColor, use an HDMI cable (High Speed HDMI™ Cable) to connect this system to a component or TV with the DeepColor feature. |
| No sound, or sound suddenly ceases. | If you've made separate connections for audio, make sure you have assigned the analog/digital jack(s) to the corresponding HDMI input for the component. Check the audio output settings of the source component. Check that the Audio Parameter setting is set to HDMI AMP/THRU (refer to page 24). If the component is a DVI device, use a separate connection for the audio. |
Important information regarding the HDMI connection
There are cases where you may not be able to route HDMI signals through this system (this depends on the HDMI equipped component you are connecting-check with the manufacturer for HDMI compatibility information).
If you aren't receiving HDMI signals properly through this system (from your component), please try the following configuration when connecting up.
Configuration
Connect your HDMI-equipped component directly to the display using an HDMI cable. Then use the most convenient connection (digital is recommended) for sending audio to the system. See the operating instructions for more on audio connections. Set the display volume to minimum when using this configuration.
Note
1 If your display only has one HDMI terminal, you can only receive HDMI video from the connected component.
- Depending on the component, audio output may be limited to the number of channels available from the connected display unit (for example audio output is reduced to 2 channels for a monitor with stereo audio limitations).
- If you want to switch the input source, you'll have to switch functions on both the system and your display unit.
- Since the sound is muted on the display when using the HDMI connection, you must adjust the volume on the display every time you switch input sources.
Precautions when using a wireless subwoofer
Precautions regarding wavelength
- This unit is designed to prevent other persons from eavesdropping on the transmitted signals, but precautions should nonetheless be taken against the chance that other persons' could intercept and listen to the signals transmitted. Given that this unit produces radio wave transmissions, another person could deliberately use a receiver to attempt to intercept such transmissions. As a result, this device should not be used to play important transmissions demanding privacy.
This unit utilizes the 2.4 GHz frequency band. This band is also used by a variety of other devices as noted below. In particular, devices not often cognizant to the user are listed in item 2.
1 Examples of common devices utilizing the 2.4 GHz band:
- Cordless phone
- Cordless facsimile
- Microwave oven
- Wireless LAN router
- Wireless AV device (including Pioneer wireless subwoofoers)
- Wireless controllers for games
- Microwave therapeutic devices
- Bluetooth wireless technology devices
2 Other devices using 2.4 GHz:
- Shoplifting-prevention systems
- Amateur wireless radio
Distribution control systems at factories and warehouses - Railway and emergency vehicle wireless identification systems
When such devices are used simultaneously with this speaker system, signal interference may occur, resulting in signal dropouts, noise, or interrupted sound. In such cases, the main unit's indicator will light red. This condition is a result of signal interference, and is not a malfunction of the unit.
To improve reception quality, try the following:
- Turn off the other device emitting radio waves.
- Place the interfering device farther away.
Do not use this system in the following locations, since noise or transmission interruption may result:
- Locations where another device using the same 2.4 GHz frequency is being used, such as a Bluetooth wireless technology device or wireless LAN, or in the vicinity where the magnetic field, static electricity, or radio wave interference from another device may occur (depending on the environment, radio waves may not transmit effectively).
- Move the radio farther away (noise may result).
- If visual noise appears on the television screen, it is possible that this unit is producing adverse influence on the antenna input of the television, video device, BS tuner, or CS tuner. Move this unit farther away from the antenna input of the affected device.
Usable range
- Designed for use only within private homes (signal transmission distance may be reduced due to room design or conditions).
In the following cases, sound may experience dropouts or be interrupted due to poor or erratic radio wave transmission.
- When signal transmission is blocked by a wall or floor constructed of ferro-concrete or metal.
- Nearby large metal furniture objects
- In large crowds of people, or near obstructive buildings.
- Locations where another device using the same 2.4 GHz frequency is being used, such as a Bluetooth wireless technology device or wireless LAN, or in the vicinity where the magnetic field, static electricity, or radio wave interference from another device may occur.
- When living in a housing complex (apartment, condominium, etc.) where the next-door unit has a microwave oven located near to this unit. Note that even a microwave oven will not interfere with this unit when not in use.
- When using multiple Pioneer wireless subwoofoers in the same location.
Signal reflection
- The signals reaching the wireless subwoofer include those transmitted in a straight line from the main unit (direct waves), and those that are received after being bounced off of walls, furniture, and other buildings (reflected waves). As a result, reflected waves can be generated by obstacles and other reflective objects, causing variations in the signal quality and resulting sound. In such cases, try slightly changing the position of the
wireless subwoofer. Sound may also experience dropouts or interruptions due to being blocked by someone in the room, or when someone approaches the unit.

Caution
- With the exception of cases determined by law to be the subject of legal liability, Pioneer refuses all responsibility for any harm resulting to the customer or other person as a result of the use of this unit.
For safe use
- Do not use near electronic devices utilizing high-precision or very delicate radio waves, since the other device may operate incorrectly, resulting in malfunction.
Examples of devices requiring particular caution:
- Hearing aids, pacemakers and other medical or therapeutic electronic devices, fire/smoke detectors, automatic door openers, other automatic devices.
- Persons using pacemakers or other medical or therapeutic electronic devices should consult the manufacturer or dealer of their device regarding the potential effects of radio waves from this unit.
- Do not use in aircraft, hospitals, or other locations where the use of radio-wave-generating devices is prohibited, since adverse affects may be caused to flight communications equipment or medical devices. Follow all precautions and directives given by medical institutions.
Resetting the main unit
Use this procedure to reset all the system's settings to the factory default. Use the front panel controls to do this.
1 Switch the system on.
2 While holding down the STEREO/A.L.C. button on the front panel, press and hold the HDMI1 button on remote control for about two seconds.
3 Unplug the power cord.
The system has been reset to the factory settings.
Specifications
Main unit
- Amplifier section
Rated power output
Front. . . . . . 50 W per channel (1 kHz, 6 Ω, 10%)
Center 50 W (1 kHz, 6 Ω, 10%)
Input/Output section
HDMI terminal:
Input. 19-pin x2
Output 19-pin (5 V, 100 mA)
Audio input . . . . . Coaxial x1, Optical x1 (Digital)
Speaker section
Front speakers
Enclosure. Closed-box type
(magnetically shielded)
System. .7.7 cm 1-way system
Speakers 7.7 cm cone type
Impedance 6Ω
Frequency range 200 Hz to 20 kHz
Maximum input power. 100 W
Center speaker
Enclosure............Closed-box type
(magnetically shielded)
System. 7.7 cm 1-way system
Speakers 7.7 cm cone type x2
Impedance 12Ω
Frequency range 200 Hz to 20 kHz
Maximum input power. 100 W
Miscellaneous
Power Requirements AC 220 V to 240 V, 50 Hz/60 Hz
Power Consumption 40 W
In standby. 1 W
Dimensions
900 mm (W) x 108 mm (H) x 95 mm (D)
Weight (without package). 2.8 kg
- Accessories
Remote control 1
Dry cell batteries (AAA size IEC R03). 2
AC adapter 1
Power cords 4
Brackets (for main unit) 2
Wall mounting template 1
Non-skid pads (for subwoofer) 4
Warranty card 1
Operating instructions (This document)
Wireless subwoofer
- Amplifier section
Rated power output
Subwoofer .100 W (100 Hz, 4 Ω, 10%)
Speaker section
Enclosure . Bass-reflex type
System 16 cm 1-way system
Speakers. 16 cm cone type x1
Impedance 4Ω
Frequency range . . . . . . . . . . . . . . . . . . . . . . . . . . . . . . . . . . . . . . . . . . . . . . . . . . . . . . . . . . . . . . . . . . . . . . . . . . . . . - 40 Hz to 1 000 Hz
Maximum input power 100 W
Miscellaneous
Power Requirements
AC 220 V to 240 V, 50 Hz/60 Hz
Power Consumption 25 W
In standby. 1 W
Dimensions
411 mm (W) x 181 mm (H) x 215 mm (D)
Weight (without package). 4.3 kg

Note
-
The specifications are applicable when the power supply is 230V .
-
Specifications and the design are subject to possible modifications without notice, due to improvements.
Cleaning the unit
- Use a polishing cloth or dry cloth to wipe off dust and dirt.
- When the surface is dirty, wipe with a soft cloth dipped in some neutral cleanser diluted five or six times with water, and wrung out well, and then wipe again with a dry cloth. Do not use furniture wax or cleansers.
- Never use thinners, benzine, insecticide sprays or other chemicals on or near this unit, since these will corrode the surface.
Published by Pioneer Corporation. Copyright © 2009 Pioneer Corporation. All rights reserved.
IMPORTANT

Amstrad 0025,0027,0028, 0039,0040
Anam 0027
Anglo 0027, 0039
Anitech 0017,0025,0027 0039,0040
Ansonic 0010, 0018, 0027, 0029, 0039, 0040
Arcam 0113, 0114
Arcam Delta 0026
Aristona 0034, 0037, 0040
Arthur Martin 0041
ASA 0023, 0031
Asberg 0017, 0034, 0040
Astra 0027
Asuka 0025,0026,0028, 0113,0114
Atlantic 0026,0034,0037, 0040,0113
Atori 0027, 0039
Auchan 0041
Audiosonic 0010,0026, 0027,0028,0034,0037, 0040,0114
AudioTon 0010, 0026, 0114
Ausind 0017
Autovox 0017,0023,0025, 0026,0114
Awa 0113, 0114
Baird 0114
Bang & Olufsen 0023, 0115
Basic Line 0027,0028, 0034,0039,0040,0114
Bastide 0026, 0114
Baur 0037, 0040
Bazin 0114
Beko 0010,0035,0040, 0060
Benq 0104
Beon 0034, 0037, 0040
Best 0010
Bestar 0010, 0034, 0040
Binatone 0026, 0114
Blue Sky 0028, 0040
Blue Star 0036
Boots 0026, 0114
BPL 0036, 0040
Brandt 0033,0038,0042, 0044
Brinkmann 0040
Brionvega 0023,0034, 0037,0040
Britannia 0026, 0113, 0114
Bruns 0023
BTC 0028
Bush 0027, 0028, 0030, 0032, 0034, 0036, 0037, 0039, 0040, 0065, 0078, 0114
Capsonic 0025
Carena 0040
Carrefour 0032
Cascade 0027, 0039, 0040
Casio 0106
Cathay 0034, 0037, 0040
CCE 0114
Centurion 0034,0037,0040
Century 0023
CGE 0010, 0017
Cimline 0027, 0039
City 0027,0039
Clarivox 0037
Clatronic 0010, 0017, 0025, 0026, 0027, 0028, 0034, 0035, 0039, 0040, 0114
CMS 0113
CMS Hightec 0114
Concorde 0027, 0039
Condor 0010, 0026, 0034, 0035, 0039, 0040, 0113
Contec 0026, 0027, 0032, 0039, 0113
Continental Edison 0033
Cosmel 0027, 0039
Crosley 0017, 0023
Crown 0010, 0017, 0027, 0034, 0035, 0037, 0039, 0040
CS Electronics 0026, 0028, 0113
CTC Clatronic 0029
Cybertron 0028
Daewoo 0013,0026,0027, 0034,0039,0040,0054, 0064,0091,0113,0114
Dainichi 0028, 0113
Dansai 0025,0034,0037 0040,0113,0114
Dantax 0010, 0037
Dawa 0040
Daytron 0027, 0039
De Graaf 0030
Decca 0026,0034,0037 0040,0114
Denver 0098, 0103
Desmet 0034, 0037, 0040
Diamant 0040
Diamond 0113
Dixi 0027,0034,0037,0039, 0040,0114
DTS 0027, 0039
Dual 0026, 0040, 0114
Dual-Tec 0026, 0027
Dumont 0023, 0026, 0029, 0114
Dux 0037
Dynatron 0034, 0037, 0040
Elbe 0010, 0018, 0040, 0114
Elcit 0023
Electa 0036
ELECTROTECH 0027
Elin 0026,0034,0037,0039 0040,0113
Elite 0028, 0034, 0040
Elman 0029
Elta 0027, 0039, 0113
Emerson 0010, 0023, 0040
Epson 0101
Erres 0034, 0037, 0040
ESC 0114
Etron 0027
Eurofeel 0025, 0114
Euroline 0037
Euroman 0010,0025,0026, 0034,0040,0113,0114
Europhon 0026, 0029, 0034, 0040, 0113, 0114
Expert 0041
Exquisit 0040
Fenner 0027, 0039
Ferguson 0033,0037,0038, 0042
Fidelity 0026,0030,0040 0113
Filsai 0114
Finlandia 0030
Finlux 0017 0023, 0026, 0029, 0034, 0037, 0040, 0114
Firstline 0026,0027,0034, 0039,0040,0113,0114
Fisher 0010,0023,0026, 0032,0035,0114
Flint 0034, 0040
Formenti 0017,0023,0024, 0026,0037,0113
Formenti/Phoenix 0113
Fortress 0023, 0024
Fraba 0010, 0040
Friac 0010
Frontech 0025,0027,0030 0031,0039,0114
Fujitsu 0114
Fujitsu General 0114
Funai 0025
Galaxi 0035, 0040
Galaxis 0010, 0040
GBC 0027, 0032, 0039
Geant Casino 0041
GEC 0026,0031,0034, 0037,0040,0114
Geloso 0027, 0030, 0039
General Technic 0027, 0039
Genexxa 0028,0031,0034, 0040
Giant 0114
GoldHand 0113
Goldline 0040
GoldStar 0010,0026,0027, 0030,0034,0037,0039, 0040,0113,0114
Goodmans 0025,0027, 0032,0034,0037,0039, 0040,0107,0114
Gorenje 0010, 0035
GPM 0028
Graetz 0031
Granada 0017,0026,0030, 0032,0034,0037,0040, 0041,0114
Grandin 0027,0028,0036, 0037
Gronic 0114
Grundig 0009,0010,0017, 0040,0047
Halifax 0025, 0026, 0113, 0114
Hampton 0026, 0113, 0114
Hanseatic 0010,0018, 0026,0027,0032,0034, 0037,0039,0040,0114
Hantarex 0027, 0039, 0040
Hantor 0040
Harwood 0039, 0040
HCM 0025, 0026, 0027, 0036, 0039, 0040, 0114
Hema 0039, 0114
Higashi 0113
HiLine 0040
Hinari 0027, 0028, 0032, 0034, 0037, 0039, 0040
Hisawa 0028, 0036, 0041
Hitachi 0022, 0026, 0030, 0031, 0032, 0040, 0076, 0111, 0114
Hornyphon 0034, 0040
Hoshai 0028
Huanyu 0026, 0113
Hygashi 0026, 0113, 0114
Hyper 0026,0027,0039 0113,0114
Hypson 0025,0026,0034, 0036,0037,0040,0041, 0114
Iberia 0040
ICE 0025,0026,0027,0028, 0034,0039,0040,0113, 0114
ICeS 0113
Imperial 0010, 0017, 0031, 0034, 0035, 0040
Indiana 0034, 0037, 0040
Ingelen 0031
Ingersol 0027, 0039
Inno Hit 0017,0026,0027, 0028,0034,0037,0039, 0040,0114
Innovation 0025, 0027
Interactive 0010
Interbuy 0027, 0039
Interfunk 0010,0023,0031, 0034,0037,0040
International 0113
Intervention 0010,0025, 0026,0029,0040,0114
Irradio 0017,0027,0028, 0034,0037,0039,0040
Isukai 0028, 0040
ITC 0026, 0114
ITS 0028,0034,0036,0040, 0113
ITT 0027, 0031
ITV 0027,0037,0040
JVC 0019,0020,0032,0034, 0077
Kaisui 0026, 0027, 0028, 0036, 0039, 0040, 0113, 0114
Kamosonic 0026
Kamp 0026, 0113
Kapsch 0031
Karcher 0010,0026,0027 0037,0040
Kawasho 0113
Kendo 0010,0029,0030 0040
KIC 0114
Kingsley 0026, 0113
Kneissel 0010, 0018, 0040
Kolster 0034, 0040
Konka 0028
Roadstar 0025,0027,0028, 0039
Robotron 0023
Rowa 0113, 0114
Royal Lux 0010
RTF 0023
Saba 0023, 0031, 0033, 0038, 0042, 0044
Saisho 0025,0026,0027 0039,0114
Salora 0030, 0031
Sambers 0017, 0029
Samsung 0004, 0005, 0010, 0025, 0026, 0027, 0034, 0035, 0037, 0039, 0040, 0062, 0063, 0066, 0089, 0093, 0113, 0114
Sandra 0026, 0113, 0114
Sansui 0034, 0040
Sanyo 0010, 0018, 0026, 0032, 0039, 0072, 0113, 0114
SBR 0037,0040
SCHAUB LORENTZ 0031
Schneider 0026, 0028, 0034, 0037, 0040, 0075, 0114
SEG0025,0026,0029,0032 0037,0039,0040,0075 0113,0114
SEI 0040
SEI-Sinudyne 0023, 0029, 0031
Seleco 0030, 0031, 0032
Sencora 0027, 0039
Sentra 0039
Serino 0113
Sharp 0015, 0016, 0024, 0032, 0069, 0092
Siarem 0023, 0029, 0040
Sierra 0034, 0040
Siesta 0010
Silva 0113
Silver 0032
Singer 0023, 0029, 0041
Sinudyne 0023,0029,0037 0040
Skantic 0031
Solavox 0031
Sonitron 0010, 0114
Sonoko 0025,0026,0027, 0034,0037,0039,0040, 0114
Sonolor 0031, 0041
Sontec 0010,0034,0037, 0040
Sony 0001, 0003, 0027, 0032, 0046, 0053, 0057, 0070, 0073, 0082, 0086, 0096, 0110, 0112
Sound & Vision 0028, 0029
Soundwave 0034,0037, 0040
Standard 0026, 0027, 0028, 0034, 0039, 0040, 0114
Starlight 0037
Starlite 0039, 0040
Stenway 0036
Stern 0030, 0031
Strato 0039, 0040
Stylandia 0114
Sunkai 0027
Sunstar 0039, 0040
Sunwood 0027, 0034, 0039, 0040
Superla 0026, 0113, 0114
SuperTech 0039, 0040, 0113
Supra 0027, 0039
Susumu 0028
Sutron 0027, 0039
Sydney 0026, 0113, 0114
Sysline 0037
Sytong 0113
Tandy 0024, 0026, 0028, 0031, 0114
Tashiko 0026,0030,0032, 0113,0114
Tatung 0026,0034,0037 0040,0114
TCM 0025, 0027
Teac 0040, 0114
Tec 0026, 0027, 0039, 0114
TEDELEX 0114
Teleavia 0033
Telecor 0040, 0114
Telefunken 0033,0034, 0040,0042
Telegazi 0040
Telemeister 0040
Telesonic 0040
Telestar 0040
Teletech 0027,0037,0039 0040
Teleton 0026, 0114
Televideon 0113
Televiso 0041
Tensai 0027,0028,0034 0039,0040,0114
Tesmet 0034
Tevion 0025, 0027
Texet 0026,0039,0113, 0114
Thomson 0006, 0007, 0026, 0033, 0034, 0038, 0040, 0042, 0044, 0095
Thorn 0037, 0040
Tokai 0034, 0040, 0114
Tokyo 0026, 0113
Tomashi 0036
Toshiba 0011, 0012, 0032, 0061, 0094, 0114
Towada 0031, 0114
Trakton 0114
Trans Continens 0040, 0114
Transtec 0113
Trident 0114
Triumph 0040
Uher 0010,0017,0031, 0034,0040
Ultravox 0023, 0026, 0029, 0040, 0113
Unic Line 0040
United 0037
Universum 0010, 0017, 0025, 0034, 0035, 0037, 0040, 0114
Univox 0040
Vestel 0030, 0031, 0034, 0035, 0037, 0040, 0114
Vexa 0027,0037,0039, 0040
Victor 0032, 0034
VIDEOLOGIC 0113
Videologique 0026,0028, 0113,0114
VideoSystem 0034, 0040
Videotechnic 0113, 0114
Viewsonic 0108
Visiola 0026, 0113
Vision 0034, 0040, 0114
Centre 50 W (1 kHz, 6 Ω, 10%)
Entree. 19 broches x2
Sortie . 19 broches (5 V, 100 mA)
Entree audio
Publication de Pioneer Corporation.
© 2009 Pioneer Corporation.

Cuyhe 6aTaapeiKN (IEC R03 pa3mepa AAA) x2
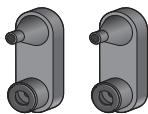
KpOHIIteHbI(JIa OCHOBHOrO 6JIOka)x2

Heckol33IaIIe npoklaIaKn (JIa ca6bVepa) x4

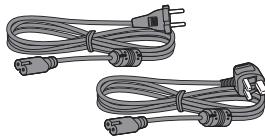
Ka6eJIINIITaHINNA (JIYcTeBOrO aJAnTepa) x2

Ⅲa6JIOH JIJI KpeJIJIeHnHa CTHe
TapaHTHbI TaIOH
HnctpykunHIOKcIyatauHH (JaHHbI JOKymeHT)
YctaHOBka


ImeetcB npodaKe
PoiocoeiHene
OchOBhble onepaun

3 NObecbTe OCHOBHoi 6JOK Ha KpOHHTeHbl.
CObMeCTHTe IBa MOHTaXbIbX OTBepCTHb B 3aJIHei
YacTH OCHOBHOrO 6JIoka C BbICTyIaIOIIHM
BepXHHM MoHTaXbIMn BNHTaMH B
KPOHIITeIHax.
Y6eIHTecbBTOM,TTOBHTbIIOJIHOCTbBOIIINB BepXHIO YoCTb MOHTaKHBIXOTBepcTHI.
BkIIOUaET cHCTeMy HIN IpeKJIIOuAeT ee BpeKHM OxNJaHH.
5 INPUT
BbIbHaerBXoHOn HcToUHNK.
6 STEREO/A.L.C.
IpeekHnoaet MeJy cTepeofoHNueckHM BocIIpOHN3BveJeHHem, cTepeofoHNueckHM peKHMOM cABTOMaTHueCKoI perYJInPobKO npOBHra (ctp. 21) npeKHMamPi pacIHnpeHHoro pOHtaJIbHOro o6bemHOro 3ByuHaHHa (ctp. 22).
7 VOLUME +/-
PeryJnHypeT rPOMKocTb.
Ducnnei
1 AUTO
FopHT, KOrIa BKJIOUeHa yHKnIa ABTomaTHueCKoH NaCTpOKN O6bEmHO 3ByuHaIIra (ctp.20).
2 CnmbolbHbI DIncPJIeI
OTo6paKaet pa3Hoo6pa3HyIO cnCTeMHyIO HHΦopMaIIIO.
3 INdkaTOp 3aepKKn 3Byka
OTo6paKaertctatyc3aIepKKn 3ByKa B hacTpoiKaX Audio Parameter.
4 INHnKaToPbDTS
3aropaeTc npH o6hApyKeHH HcToUHHKa c ayDIOCHrHaJIAMN B KOINpOBKe DTS.
5 INdikKaTOpbl Dolby Digital
DD
3aIopaeTc npn O6hApyKeHH cHHaJIa B KoINpOBKe Dolby Digital.
D+
3aropaeTc npn 6bHapyKeHHN HcToHHKa c ayINoCHrHaJIaMn B KOINpOBke Dolby Digital Plus.
DOHD
3aropaeTc npH o6hApyKeHH HcToHnKa c ayDIOCHrHaJAMN B KOINpOBKe Dolby TrueHD.
DOPLII
3aropaeTcIJI INHINKauHH NKeOINpOBAHn c IIOMOIIbIO Pro Logic II (IOJPO6Hee cm. IIpoclyuuaBaanue 6peXcume o6bEmHO2O 36yuaHa ha ctp. 21).
6 ADV.S.
3aropaetcI pH Bb6ope OJHO r peKHMOB
pacHHpeHHOrO o6bEMHOrO IPOCJIyHHBaHH
(IIIOpO6Hee 06 3TOM cm. HcnoIb3ObaHue
3fpekmo6 pacuupepHHo2o 6bEmHo2o 38yauHua
Ha cTp.21).
7 INdkaTopbI SIGNAL SELECT
DIGITAL
Tognt, KOrIa BbI6paH IINΦpOBoi ayIIOcHrHaI.
MnraT, KOrIa IuΦpOBoA ayDIOCHrHaJI He BbI6paH.
HDMI
FopHT, KOrJa BbI6paH cnHnJI HDMI.
Mnraet, KOrJa cHraJI HDMI He BbI6paH.
8 INDnkaTop 3aTeMHeHnA
TOpHT, KOrJa BbIKJIIOHeO 3aTeMHeHHe DIMMER.
9 DIR.
FopHT, KOrIa BkJIIOueH peKHM DIRECT IJIN PURE DIRECT (cTp. 22).
Ca6ByΦep

1 Hndnkatop 6ecnpoBOHOBcBra3N
PeJcUM OJcuDAnu: TOpHT KpaChbIM ZBETOM Bo epempaobomcbacbyfepa: TOpHT 3eJIeHbIM ZBETOM
IpeKJIIOUaET cHcTeMy MeJy peKHMOM OKNJaHHI IN BKJIIOUeHHem.
2 SYSTEM
Ipeeknoaet nyIbT nHcTaHnOHnOу npabJIeHHN Iy npabJIeHH cHcTeMo. TaKke HcNoJIb3yeTcI IpyepyJInpOBKn aydHnOHaCTpoek (ctp.23).
3 INPUT SELECT
HcnoJIb3yIte IJIa Bbl6opaba BXoIHoro HcToUHnKa.
4 SOURCE
HaKHMaIteJIY BKJIIOUeHn/ BYIKJIIOUeHnIpyTHX KOMIIIOHEHTOB, IIOJKIIOUeHHbIX K CnCTEme (IOJIOp6Hee 06 3TOM cm. cTp. 28).
5 KhoNkIN INPUT SELECT
HcIOJIb3yIte IJIy BbI60pa BXOJHO rHCTOHHKa.
IpeKJIIOHaET IIyIbT IINCTaHUNOHORO yIpaBJIeHHra IJIyIpaBJIeHHrIpyHM KOMIOHeHTaMH,
HA3NaYeHHbIM IJIy BbIbPaEMbIX KHOIIOK (CM.
YnpaJIeHue dpyzmu KOMnoHeHmam cucmembl
Ha cTp.26).
6 KhoNkTV CONTROL
3TN KHOIIKN cIeIIHaJIbHo IpeIHa3NaueHbI IJIy UIIpaBJIeHnIaTeJIeBH3OpOM, Ha3HaueHHbIM KHOIIKe TV CODE. EcIIHN HeMeTcra ToJIbKO OJINH TeJIeBH3Op, IOJIKJIIOHaEMyI K JdaHHOH cNCTeMe, Ha3HaUbTeero KHOIIke TV CODE (IOJIOp6Hee o6 3Tom cM. cTp.27).
HcIOJIb3yIte IJIY BKJIIOUeHHN/BBIKJIIOUeHHN IIHTaHH TeJIeBn3opa.
INPUT
HcIOJIb3yIe TJI BbI6Opa BXoIHOrO cHHaJa TeJIeBn3Opa.
TV CODE
HaKMMTe, YTO6bI BbI6paTb yIIpaBJIeHne TeJIeBn3Opom. TaKKe HcIIIOJIb3yEtCЯДЯ BBOJa IIpeIycTaHOBJIEHHORO KOJa, Ha3NaueHHORO KHOIIke TV CONTROL.
CH+/-
HcnoJIb3yIte IJIg BbIbOpa KaHaJIob.
VOL +/-
HcIOJIb3yIteIJIpeRyJIINpOBKN yPObHNrpoMkOCTHa TeJIeBn3ope.
7 Khoŋkπ pexmam npocnyuBauHn AUTO/DIRECT
IpeKJIIOUaET MeKJy peKHMOM
ABTOMATNUeCKO HAcTPOIKN O6bEMHORO
3ByuHaIIA (Abmamuueeckoe
6ocnpou3BedeHue Ha cTp. 20) I NIOTOKOBIM
IPrMbIM BOCnPOn3BeDeEHem Stream Direct.
PekHM BOCIIPOH3BVeHnIaStreamDirect BOCIIPOH3BOJNT 3ByK B O6XoJ HAcTpoEyIpaBJIeHHN3ByuAHHeM IJIa HAn6OJIee TOHOrO BOCIIPOH3BVeHnI HcToUHnKa (ctp.22).
STEREO/A.L.C.
IpeKJIIOHuaeT MeKJy cTepeofoHHueCKHM BOCIIPOH3BVEdeHHem, cTepeofoHHueCKHM peKHMM c aBTOMaTHUeCKo peRyJIINpOBKO yPOBHA (ctp. 21) npeKHMaMH pacIIINpeHHoro fpoHTaJIbHO rO obEmHO r3ByuHaHHa (ctp. 22).
STANDARD
HaxMMTe IIJI cTaHJapTHOro IeKOJnPoBAHHI H IpeKJIIOUeHHaMeKJy OIIINaMn Pro Logic II (cTp. 21).
ADV SURR
IpeKJIIOUaET MeKJy pa3JIINHbIMN peKMamn 06bemHO rBvuaHNr (ctp.21).
8 DIMMER
3aTeMHraeHJINOCBETJIeTINCIIJIe. JApKoCTb MOKHO peYJInPoBaT B YeTbIpe IIIaIa.
Cchayla BOCIOJIb3yItecB KHOIIKOIN INPUT SELECT, YTO6bI BbI6paTB BXOJ C JKeJaEMORIOIOKIIIOHHeHOrIO IPOHrPbIBaTeJIaNcKOB Blu-ray, 3aTEM BOIINTE B CJIeDyIOUe MeHIO:
BD MENU
OTo6paKaet MeHIO IINcKa IINr IINcKOB Bluray.
9 KhoNkynypaBneHnCnCTeMoN KOMNoHErTOM
Сачaja нажмITE SYSTEM),TOбI ПОЛучNTb IOCTYII K:
AUDIO PARAMETER
HcIOJIb3yIte IJIa IOCTUHa K OIIINaM ayIHOHaCTpoEK (ctp.23).
RETURN
ПоберъЕ И ВБИДиTe ИЗ эКраНa TeKушero MeHIO.
Сачадь ВослJB3уTecь кHОПКОIN INPUT SELECT,ЧТобИ ВБбpaTB BXOД сжЕЛаEMOTOДКЛЮЧEHNO KOMПОHEHTA,ЗАТМВОДNTE BCJIeIyUIOIIe MeHIO:
TOP MENU
OTo6paKaet 'TJIaBHOe'MEHIO INcKa BD/DVD.
HOME MENU
OTo6paKaet3KpaH HOME MENU.
RETURN
ПоберъЕ И ВьйДИТЕ ИЗ Экрана Текушero MEHIO.
MENU
OTo6paKaaeT 3KpaH MeHIO TOOLS npOnrPbIbAteJIg IINCKOB Blu-ray.
10 ,ENTER
HcIOJIb3yIte KHOIIKN cO cTpeJIaKMn IIHN HAcTPOJIke CnCTeMbI O6BeMHOrO 3ByuAHN (ctp.23).TaKKe HcIOJIb3yIOTc IJIyUIIpaBJIeHNr MEHIO/ONIIHMAH BD/DVD.
11 MASTER VOLUME +/-
HcnoJIb3yIte IJIa HacTpoiKN yPoBnI rPoMKoCTN IIPOCSUYIIIBaHHI.
12 Khonkn ynpableneHn KOMnoHeHToM
OchOBHbIe KHOIIKN (▶, ■ H T. I.) HcIIIOJIb3yIOTcIДЯ yIIPAJIeHnI KOMIIHOHeTOM IOCJIe eIro BbI6opac IIMOIIbIO KHOIIOK BXOJHORO HCTOHHKa.
OprhaHbIyipabJIeHHa,paIOJIIOKeHHbIeHaI 3THMn KHOIIKAMH,MOrYT HcIOJIb3OBaTbCra IocJIe BbI6Opa COOTBETCTByIOIIe KHOIIKN BXoIHORo HcTOHnKa. 3TH KHOIIKN TaKke fYHKUINOHpyIOT cJeDyUOIM M o6pa3OM.
СачаянжмITE TV CODE,ТTOбI ПОЛучNTьdoCTYПК:
DTV/TV
IpeKJIIOUaET MeKJTy peKHMamH BXOJa
IIHΦpOBOTO H aHaJIIOFOBOTO TeJIeBHJeHHN IJI
TeJIeBH3OPOB C IILOCKHM 3KpaHOM
IIPOH3BOJCTBA KOMIIaHHN Pioneerer.
13 MUTE
BkIIOaet/BbIKIOaET IIpHJIyIeHHe 3Byka.
14 LcnpobBie KhoNKn n opraHbI ynpabJIeHnI dpyrIMKOMNoHEHTAMN
HcnoJIb3yIte IuΦpObIe KHOIIKn IJIpyIprMoTO BbI6pa IopOJek Ha IIINCKax CD, DVD nT. II.
HDD*, DVD*, VCR*
3TN KHOIIKN IIpeKJIIOHuaeT MEJkyo praHaMn yIpaBJIeHnJ KecTKHM IINCKOM, DVD IN VCR IJIy peKOpIepOB (BUNJeOMaHHTOfoHOHB) HDD/DVD/VCR.
15 DISPLAY
Ipeeknoaet IncnIe JdAnHOro yctpoiCTBa. PekHM IpocJyIHHBaHN HIN yPOBeHb rPOMKoCTN 3ByKa MOJHO IIPOBepHTb, Bbl6paB BXOJHOI NCTOCHNK.
16 SHIFT
HaKMHTe IJII IOJUyeHnIIOCTyIIa K KOMaHdAm'B paMKkax' (HaI KHOIIKaMn) Ha IIyIbTe IINCTaHIIHOHHOrO yIpaBJIeHnI. 3TN KHOIIKN B DaHHom pa3JeIe OTMeueHbI 3Be3IOuKoI (^*)
YctaHOBka 6aTapeB nIyIbT dNCTaHcUHOHHoro ynpabJIeHnA

PpeDynpexdHne
He npabHbHoe HcnoJIb3ObaHne 6aTaape MoKeT Bb3BaTb TaKHe ONaChbIe CHTyaIIHH, KaK yTeKY H B3pbIB. IooKaJIyIcTa, co6JIHOaIte CJIeNyIOIhne npabHla:
He HcnoJIb3yIte BmecTe cTapbIe H HOBbIe 6aTapeH.
He HcIOJIb3yIte BmecTe 6aTapeH pa3HbIX TnIOB HIN MapOK: XOTa OHN MOrYt 6bITb IIOXoKHMn Ha BnD, pa3HbIe 6aTapeH MOrYt HMeTb pa3HOe HAnpJKeHne.
- Y6eJHTecb B TOM, YTO IOLOXHTeJIbHbI H OtrpHuaTeJIbHbI IIOJIoca KaKDoI 6aTapeH paCIOJIaIaIOTcB COOTBeTCTBnC 06O3HaueHHMaMH BHyTpH 6aTaapeHOrO OTceKa.
BbHMaIte 6aTapeH n3 o6OpyIOBaHH, KOtOpoe He IIaHpyeTc HcIOJIb3OBaTb B TeueHHe MecaIIa HJIN DoJIbIe.
- YTHIN3Hpy HcNOJIb3OBaHHbIe 6aTapeH, IIOKaJyHcTa, co6JIHOJaTe TocSyIapCTBeHHbIe HopMaTHBBI HJN IIpaBNIJa IO OxpaHE OKpykaIOIIe cpebl, KOToPbIE JeIcTByOT B BaIIe CTpaHe HIN peHone.
- He nIIOJIb3yIte H He xpaHITe 6aTapeH IIOI IIpIIMbIM COJIHeuHbIM CBeTOM HIN BIpYTHX Ype3MepHO JkapKHX MecTax, HAnPmEPEBHTn MaIIHHbI HIN BO3JIe O6OgPeBaTeJIe. 3TO MoKET IPNBcETN K yTeUe KJIeKtPOJIHTa H3 6aTapeI, IpeIgpeBy, IIOkApY H B3pBiY. 3TO TAKKe OTPiUaTeJIbHO BJIIneT Ha cPoK cIyJb6bl HIN pa6OOh XapaKTePncTHKn 6aTapeI.
NcnoJb3OBAHnne npJbTa nCTaHcUHOHHoro ynpaBNeHnra
IcnoJIb3yIte KHOIIKN INPUT SELECT (ININ INPUT Ha IpeJeHne IaHeJI).
4 Haunthe Bocnpoun3BedeHne KOMNOHENTa, BB6paHHoro B ware 1.
5 BbI6epnte pexm npocnyuBaHna.
HcIOJIb3yIte KHOIIKN peJKIMa BOCIIPOH3BeJeHHA.
6 HaxMMTe MASTER VOLUME + / - ,YTo6bl Otpereynipobatb ypOBeHb rPOMKoCTn.
ABTOMaTHUeCKoe BOCpON3BedeHne
CamoI IpoctO HJIeKoIOcTOH OIIHeI
IPOCSUINBAHNRAIBIAETcYHKIN
aBTOMATNUeCKHX HAcTPOEK ObJEMHO 3ByuAHN.
C IIOMOIbBO 3TOIyHKINCHCTema
aBTOMATNUeCKN OIPpeJeJIaET TNI
BOCIOPH3BOIDMOHO HCTOUYHKA H COOTBeTCTBEHHO
BbIbHpAET MHOROKaHaJIbHOE HJIN
CTepeoOHnueckoe BocipOn3BeDeHHe.1
Bo Bpem npocnyuBAHn nCTOCHNka haxmTe AUTO/DIRECT² nla BkIIOUeHn aBTOMaTHueCKOro BOCnpOn3BeDeHn nCTOCHNka.
IocJIeIOBaTeJIbHO NaKHMaIte, Ioka Ha IINcIIJIe KpaTKOBpeMeHNO He OTO6pa3HTcA AUTO SURROUND (3aTeM OH OTO6pa3HT fOpMaT DeKOINPOBAHn HIN BOCIIPOHN3BeDeHn).
- O6paTHTe BHHMaHHe, YTO ecJII IapAMeTp He OTo6paJkaeTcB MeHIO AUDIOPARAMETER, TO OH HeIOCTUIIe IJIaI DAHHOrI HCTOHHKa, HAcTPOEK HJIIN COCTOAHII CNCTeMbI.
1 Haxmnte SYSTEM Ha nyIbTe DnCTaHcUHOHHoro ynpabJIeHn, 3aTe Haxmnte KhONky AUDIOPARAMETER.
2 NcnoJb3yIte ↑/↓ДЯ BBi6opa napametpa, KOTOpB i HEO6xOIMo OtperynnpoBaTb.
B 3aBnHMoCTN OT TeKUIIero COCTOHHa/peKHM aChCTeMbI OIIpeJeJIeHHbIe OIIHH MOyT 6bITb HeIOCTUYHbI JIIA Bb6Opa. 3aMeaHHa IIO Hm IIpNBEdHeBtBa7JIInCe BHN3y.
3 NcnoJIb3yIte / ,YTO6bl BBINOJHHTb Heo6xOdmyo perynipOBky.
OIIHIN,IOCTUIIHbIeJIJIaKaJIOrOIIpaAMeTpa, IIpNBEdHbIB TaBJIe BHN3y.
4 HaxmTe RETURN, yTo6bI noDTBepnTb N BbIITN3 MeH0.
KaJbIIMaMOxHOOTMeHHTbHINBbITnH3 HeO,HaKab SYSTEM
UHepe3 OndHy MHHyTu 6e3JeIcTBHn IyJIbT HnCTaHnHOHHoYo yIpaBJIeHNaABTomaTHueCKN BbIXOHT H3 peKHMa HaCTpoiKN.
BbI6op npedyuctaHOBJIeHHbIX KOIOB dJa TeJIeBN3OpOB
1 HaxkIma KhoNkY SYSTEM, HaxMnte N ydepxnBaIte HaxkToB TeueHne Tpex cekynd KhoNky '1'.
2 HaxmTe KhONky TV CODE.
3ДЯВOda npedyctaHOJIeHHORo KOJa NcNoJIb3yIte cHpOBoBIE KONKn.
IpeyctaHOBJIeHHbIE KOJIbI IIpHBeJeHbI Ha cTp.30.
IIph BBOJe IIpaBUNbHOrO KOJa IITaHHe TeJIeBn3Opa,IJIa KOTOpORO 6blI BblIOJIHeH BBOJ, BKJIHOHTcI H BYKJIHOHTcI.
Питанне TeJIeBn3opa,ДЯ KOTOPOFO BbIIOJIHЯETcR BBOJ, BKIIIOHTcR H bIKIIIOHTcR B TOM cIyae,ecJIH TeJIeBn3Op MOKTe BKIIIOUaTbcR HeIIOpeIcTBeHHO C IIYJIbTa NICTaHIIOOHHO YIpaBJIeHHN.
4 NOBTOPnTe 3aHc 2 no 3, npo6yBBeCTn dpyroKoJ.
5 Korda onepaun6ydt 3aBepseHa, HaxMMTe SYSTEM.
BbI6op npeYucTaHOBJIeHHbIX KOIOB dJa dpyrNX KOMNOHEHTOB
1 Haxmam KhoNk Ky SYSTEM, HaxmTe uyeKmbaTe HaxaToB TeueHne Tpex ckynd KhoNky 1'.
2 Haxmnte KhONky INPUT SELECT nIy KOMnoHEHa, KOTOpbIM Bbl XOTnTe ynpabJIrTb.
3ДЯ BBOda npedyctaHOBJIeHHORO KODa HcNoJIb3yIte cHpOBoBIE KhONKn.
IpeNyctaHOBJeHHbE KoDbI IIpHBeJeHbHa cTp.30.
IIpH BBOJe IpaBnJIbHOr KOJa IIHTaHHe KOMIOHEHTa,IIJ KOTOPORO 6blI BblIOJIHeH BBOD, BKJIOHTcN H BbIKIOHTcN.
UnpaBneHne npurn KOMnoHeHTamn CnCTembl
Питанне KMПОЕНТа,ДИЯ KOTOPORO BБПОЛHЯETСВВОД,ВКПIOHHTСИ NBKПIOHHTСВТOM CJIYаe,ecJIINKOMПОЕНТ мОКET BKПIOUЧьс HeIIOCEДCTBEHHOCIIYJBTa NICTAHINOHHO YIpaBJIeHHN.
4 Nobtopte warn c 2 no 3, npo6y BBeCTn dpyroKoD, INN BBeNTe KoD nIa DpyrOTo KOMNoHEHTa, KOTOpbIM Bbl XOTNe ynpabJIbTb.
5 Korda onepaun6ydt3abepweha, HaxMMTE SYSTEM
Ouuctka Bcex Hactpoek nylbTa DnctahunHO ynpaBHeHna
Bb moKTe OuHCTHTB BCE IpeJyctaHOBJeHHbIe HacTPOJIKN HBOcTaHOBNtB 3aBOJcKHe HAcTPOKI INO yMOJIyauHHo.
- HaxkIma KHONky SYSTEM, HaxMnte u ydepknBaIte HaxkToB TeueHne Tpex cekynd KhONky '0'.
PpeynctahOBnHbIe KOblno yMOnuHaHIO
OprahluynpaBneHnIyTeJeBu3OpOB
Anitech 0017,0025,0027, 0039,0040
Ansonic 0010, 0018, 0027, 0029, 0039, 0040
Arcam 0113, 0114
Arcam Delta 0026
Aristona 0034, 0037, 0040
Arthur Martin 0041
ASA 0023, 0031
Asberg 0017, 0034, 0040
Astra 0027
Asuka 0025,0026,0028, 0113,0114
Atlantic 0026,0034,0037 0040,0113
Atori 0027, 0039
Auchan 0041
Audiosonic 0010,0026, 0027,0028,0034,0037, 0040,0114
AudioTon 0010, 0026, 0114
Ausind 0017
Autovox 0017, 0023, 0025, 0026, 0114
Awa 0113, 0114
Baird 0114
Bang & Olufsen 0023, 0115
Basic Line 0027,0028, 0034,0039,0040,0114
Bastide 0026, 0114
Baur 0037, 0040
Bazin 0114
Beko 0010,0035,0040 0060
Benq 0104
Beon 0034, 0037, 0040
Best 0010
Bestar 0010, 0034, 0040
Binatone 0026, 0114
Blue Sky 0028, 0040
Blue Star 0036
Boots 0026, 0114
BPL 0036,0040
Brandt 0033,0038,0042, 0044
Brinkmann 0040
Brionvega 0023,0034, 0037,0040
Britannia 0026, 0113, 0114
Bruns 0023
BTC 0028
Bush 0027, 0028, 0030, 0032, 0034, 0036, 0037, 0039, 0040, 0065, 0078, 0114
Capsonic 0025
Carena 0040
Carrefour 0032
Cascade 0027, 0039, 0040
Casio 0106
Cathay 0034, 0037, 0040
CCE 0114
Centurion 0034, 0037, 0040
Century 0023
CGE 0010, 0017
Cimline 0027, 0039
City 0027, 0039
Clarivox 0037
Clatronic 0010, 0017, 0025, 0026, 0027, 0028, 0034, 0035, 0039, 0040, 0114
CMS 0113
CMS Hightec 0114
Concorde 0027, 0039
Condor 0010, 0026, 0034, 0035, 0039, 0040, 0113
Contec 0026, 0027, 0032, 0039, 0113
Continental Edison 0033
Cosmel 0027, 0039
Crosley 0017, 0023
Crown 0010, 0017, 0027, 0034, 0035, 0037, 0039, 0040
CS Electronics 0026, 0028, 0113
CTC Clatronic 0029
Cybertron 0028
Daewoo 0013,0026,0027, 0034,0039,0040,0054, 0064,0091,0113,0114
Dainichi 0028, 0113
Dansai 0025,0034,0037 0040,0113,0114
Dantax 0010, 0037
Dawa 0040
Daytron 0027, 0039
De Graaf 0030
Decca 0026,0034,0037 0040,0114
Denver 0098, 0103
Desmet 0034, 0037, 0040
Diamant 0040
Diamond 0113
Dixi 0027,0034,0037,0039, 0040,0114
DTS 0027, 0039
Dual 0026, 0040, 0114
Dual-Tec 0026, 0027
Dumont 0023, 0026, 0029, 0114
Dux 0037
Dynatron 0034, 0037, 0040
Elbe 0010, 0018, 0040, 0114
Elcit 0023
Electa 0036
ELECTROTECH 0027
Elin 0026,0034,0037,0039 0040,0113
Elite 0028, 0034, 0040
Elman 0029
Elta 0027, 0039, 0113
Emerson 0010, 0023, 0040
Epson 0101
Erres 0034, 0037, 0040
ESC 0114
Etron 0027
Eurofeel 0025, 0114
Euroline 0037
Euroman 0010,0025,0026, 0034,0040,0113,0114
Europhon 0026, 0029, 0034, 0040, 0113, 0114
Expert 0041
Exquisit 0040
Fenner 0027, 0039
Ferguson 0033,0037,0038, 0042
Fidelity 0026,0030,0040 0113
Filsai 0114
Finlandia 0030
Finlux 0017 0023, 0026, 0029, 0034, 0037, 0040, 0114
Firstline 0026,0027,0034, 0039,0040,0113,0114
Fisher 0010, 0023, 0026, 0032, 0035, 0114
Flint 0034, 0040
Formenti 0017,0023,0024, 0026,0037,0113
Formenti/Phoenix 0113
Fortress 0023, 0024
Fraba 0010, 0040
Friac 0010
Frontech 0025,0027,0030, 0031,0039,0114
Fujitsu 0114
Fujitsu General 0114
Funai 0025
Galaxi 0035, 0040
Galaxis 0010, 0040
GBC 0027, 0032, 0039
Geant Casino 0041
GEC0026,0031,0034,0037 0040,0114
Geloso 0027, 0030, 0039
General Technic 0027, 0039
Genexxa 0028,0031,0034, 0040
Giant 0114
GoldHand 0113
Goldline 0040
GoldStar 0010,0026,0027, 0030,0034,0037,0039, 0040,0113,0114
Goodmans 0025,0027, 0032,0034,0037,0039, 0040,0107,0114
Gorenje 0010, 0035
GPM 0028
Graetz 0031
Granada 0017,0026,0030, 0032,0034,0037,0040, 0041,0114
Grandin 0027,0028,0036, 0037
Gronic 0114
Grundig 0009,0010,0017, 0040,0047
Halifax 0025, 0026, 0113, 0114
Hampton 0026, 0113, 0114
Hanseatic 0010,0018, 0026,0027,0032,0034, 0037,0039,0040,0114
Hantarex 0027, 0039, 0040
Hantor 0040
Harwood 0039, 0040
HCM 0025, 0026, 0027, 0036, 0039, 0040, 0114
Hema 0039, 0114
Higashi 0113
HiLine 0040
Hinari 0027, 0028, 0032, 0034, 0037, 0039, 0040
Hisawa 0028, 0036, 0041
Hitachi 0022, 0026, 0030, 0031, 0032, 0040, 0076, 0111, 0114
Hornyphon 0034, 0040
Hoshai 0028
Huanyu 0026, 0113
Hygashi 0026, 0113, 0114
Hyper 0026,0027,0039 0113,0114
Hypson 0025,0026,0034, 0036,0037,0040,0041, 0114
Iberia 0040
ICE 0025,0026,0027,0028, 0034,0039,0040,0113, 0114
ICeS 0113
Imperial 0010, 0017, 0031, 0034, 0035, 0040
Indiana 0034, 0037, 0040
Ingelen 0031
Ingersol 0027, 0039
Inno Hit 0017,0026,0027, 0028,0034,0037,0039, 0040,0114
Innovation 0025, 0027
Interactive 0010
Interbuy 0027, 0039
Interfunk 0010,0023,0031, 0034,0037,0040
International 0113
Intervention 0010,0025, 0026,0029,0040,0114
Irradio 0017,0027,0028, 0034,0037,0039,0040
Isukai 0028, 0040
ITC 0026, 0114
ITS 0028,0034,0036,0040, 0113
ITT 0027, 0031
ITV 0027,0037,0040
JVC 0019,0020,0032,0034, 0077
Kaisui 0026, 0027, 0028, 0036, 0039, 0040, 0113, 0114
Kamosonic 0026
Kamp 0026, 0113
Kapsch 0031
Karcher 0010,0026,0027 0037,0040
Kawasho 0113
Kendo 0010,0029,0030 0040
KIC 0114
Kingsley 0026, 0113
Kneissel 0010, 0018, 0040
Kolster 0034, 0040
Konka 0028
Roadstar 0025,0027,0028, 0039
Robotron 0023
Rowa 0113, 0114
Royal Lux 0010
RTF 0023
Saba 0023, 0031, 0033, 0038, 0042, 0044
Saisho 0025,0026,0027 0039,0114
Salora 0030, 0031
Sambers 0017, 0029
Samsung 0004, 0005, 0010, 0025, 0026, 0027, 0034, 0035, 0037, 0039, 0040, 0062, 0063, 0066, 0089, 0093, 0113, 0114
Sandra 0026, 0113, 0114
Sansui 0034, 0040
Sanyo 0010, 0018, 0026, 0032, 0039, 0072, 0113, 0114
SBR 0037,0040
SCHAUB LORENTZ 0031
Schneider 0026, 0028, 0034, 0037, 0040, 0075, 0114
SEG0025,0026,0029,0032 0037,0039,0040,0075 0113,0114
SEI 0040
SEI-Sinudyne 0023,0029, 0031
Seleco 0030, 0031, 0032
Sencora 0027, 0039
Sentra 0039
Serino 0113
Sharp 0015, 0016, 0024, 0032, 0069, 0092
Siarem 0023, 0029, 0040
Sierra 0034, 0040
Siesta 0010
Silva 0113
Silver 0032
Singer 0023, 0029, 0041
Sinudyne 0023,0029,0037 0040
Skantic 0031
Solavox 0031
Sonitron 0010, 0114
Sonoko 0025,0026,0027, 0034,0037,0039,0040, 0114
Sonolor 0031, 0041
Sontec 0010,0034,0037, 0040
Sony 0001, 0003, 0027, 0032, 0046, 0053, 0057, 0070, 0073, 0082, 0086, 0096, 0110, 0112
Sound & Vision 0028, 0029
Soundwave 0034,0037, 0040
Standard 0026, 0027, 0028, 0034, 0039, 0040, 0114
Starlight 0037
Starlite 0039, 0040
Stenway 0036
Stern 0030, 0031
Strato 0039, 0040
Stylandia 0114
Sunkai 0027
Sunstar 0039, 0040
Sunwood 0027, 0034, 0039, 0040
Superla 0026, 0113, 0114
SuperTech 0039, 0040, 0113
Supra 0027, 0039
Susumu 0028
Sutron 0027, 0039
Sydney 0026, 0113, 0114
Sysline 0037
Sytong 0113
Tandy 0024, 0026, 0028, 0031, 0114
Tashiko 0026,0030,0032, 0113,0114
Tatung 0026,0034,0037 0040,0114
TCM 0025, 0027
Teac 0040, 0114
Tec 0026, 0027, 0039, 0114
TEDELEX 0114
Teleavia 0033
Telecor 0040, 0114
1 BkHIOuHTe cIcTeMy.
2 YdepxNBaB HaxaTOM NOJoxeHnKhONkySTEREO/A.L.C. Ha nepeDHeNaHeHn, HaxMMTe N ydepxNBaTe B HaxaTOM NOJoxeHn B TeueHne OKOOnDbByx cekyHd KhoNkY HDMI1 Ha nyIbTe DInCTAHUONHO npabLeHn.
3 OToeHNHTe CNIOBOI Ka6JIb OT pO3eTKn.
HactpoiKNCHcTeMb6bJINc6pOHeHbHa 3NaueHHIpeDyuctaHOBJeHHBe H3ROTOBtTeJIem.
TexHnueckne xapaKTepeNcTnKn
OCHOBHOI6IOK
- YcHJNTeNb
HOMHaJIbHaB BIXOJHaMoIIOCTb
ΦροHTaJIbHbI
50BtHaKaHaJI(1KΓu,6Ω,10%)
IeHTpaJIbHbIy 50Bt(1KΓu,6Ω,10%)
BxobblbXoBbl
Pa3bEM HDMI:
BxoI. 19-KoHT.x2
BbIXoI 19-KoHT. (5 B, 100 mA)
AyINOBXoI ... KoakchahbHbI x1, OInTHueckn x1
(IuΦpoBbIe)
- FrpomkorobopnteH
ΦροHTaJIbHbIe ΓρOMKOrOBoPιTeJIH
KopIyc. 3aKpbIToro TnIIa (MaHHTHOe 3KpaHHPOBaHHe)
ChTeMa. .7,7 cm, OJHOHaIIpaBJIeHHa ChCTema
Динhamнkn .7,7cm,KOHyCHO TIIa
CoipotnBJIeHne. 6Ω
Kopnyc 3aKpyTOrTO TnIIa (MaHHTHOe 3kpaHHPOBaHHe)
CnCTema .7,7cm,OJHOHaIIpaBJIeHHa CHCTema
Динhamнkn.7,7cm,KOHychoTO THIIaX2
CoIpoTHBJIeHHe 12Ω
ДианэзунчacrT... ...Or 200Iudo 2KIT
MaKcHMaJIbHaB XoDHa MaOuHocTb .100BT
- Ppoyee
Tpe6obAHnK 3JekTroPOnItaHnO
.....Or 220 Bdo 240 B nepem. Toka, 50 T/60 T
Iotppe6JIaEma MoIOHocTb 40Bt
BpeKHe OxHuaHHa 1Bt
Pa3Mepbl
900 MM (III) x 108 MM (B) x 95 MM (Γ)
Bec (6e3 yIIaKOBKN) 2,8 K
- PpHnAdIeXHoCTN
IyIbT IINCTaHUNHOY npAIBeHHra. 1
Cyxhe 6aTapeiKN (IEC R03 pa3mepa AAA) .2
Ceteboi aiaantrep 1
Ka6eJIH IHTaHnI 4
KpOHIIteHbI (JIIA OCHOBHOrO 6JIOka) 2
IIa6IOH IJIa KpeIJIeHnHa cTeHe 1
HeckoJIb3aIe HePOKJIaIKN (JIЯ ca6Byepa).... 4
TapaHTHnHbI TaIOH. 1
Hnctpykuiu nO kcnayataun (daHHbI JOKyMeHT)
BecnpoBOHO ca6Byep
- YcHJIHTeJIb
HOMHaJIbHaB BIXOJHa MoIHOCTb
Ca6ByΦep .100Bt(100Γι,4Ω,10%)
- FrpOMKOrOBOpuTeH
KopIyc .Φa3oHHBepTropHOro THIIa
ChTeMa .16 cm, OJHOHaIpaBJIeHHa ChCTema
Динhamнkn. 16cm, KOHYCHOTo TIIaX1
CoipotnbJIeHne 4Ω
EU Representative's:
Pioneer Europe NV
Haven 1087, Keetberglaan 1, 9120 Melsele, Belgium
http://www.pioneer.eu
C∈①
English:
Hereby, Pioneer, declares that this HTP-SB300 is in compliance with the essential requirements and other relevant provisions of Directive 1999/5/EC.
Suomi:
http://www.pioneer.co.uk
http://www.pioneer.fr
http://www.pioneer-rus.ru
http://www.pioneer.eu
Published by Pioneer Corporation.
Copyright © 2009 Pioneer Corporation.
All rights reserved.
Publication de Pioneer Corporation.
© 2009 Pioneer Corporation.
PIONEER ELECTRONICS (USA) INC.
P.O. BOX 1540, Long Beach, California 90801-1540, U.S.A. TEL: (800) 421-1404
PIONEER ELECTRONICS OF CANADA, INC.
300 Allstate Parkway, Markham, Ontario L3R 0P2, Canada TEL: 1-877-283-5901, 905-479-4411
PIONEER EUROPE NV
Haven 1087, Keetberglaan 1, B-9120 Melsele, Belgium TEL: 03/570.05.11
PIONEER ELECTRONICS ASIACENTRE PTE. LTD.
253 Alexandra Road, #04-01, Singapore 159936 TEL: 65-6472-7555
PIONEER ELECTRONICS AUSTRALIA PTY. LTD.
178-184 Boundary Road, Braeside, Victoria 3195, Australia, TEL: (03) 9586-6300
PIONEER ELECTRONICS DE MEXICO S.A. DE C.V.
Blvd.Manuel Avila Camacho 138 10 piso Col.Lomas de Chapultepec, Mexico, D.F. 11000 TEL: 55-9178-4270
K002_A1_Ru