
X-HM36D - Hi-Fi System PIONEER - Free user manual and instructions
Find the device manual for free X-HM36D PIONEER in PDF.


| Product type | Micro Hi-Fi system |
| Brand | Pioneer |
| Model | X-HM36D |
| Dimensions (W x H x D) | 215 x 100 x 260 mm |
| Weight | 2.5 kg |
| Power supply | 220–240 V, 50/60 Hz |
| Power consumption | 30 W (operation), less than 0.5 W (standby) |
| Output power | 2 x 15 W RMS |
| Supported audio formats | CD, MP3, WMA (CD/USB), Bluetooth, auxiliary input |
| Tuner | FM (87.5–108 MHz) with RDS |
| Bluetooth connectivity | Version 2.1 + EDR, A2DP profile |
| USB port | USB Type A, compatible up to 32 GB |
| Speakers | 2-way, bass-reflex (speakers included) |
| Remote control | Yes, with CR2025 battery included |
| Care and cleaning | Clean with a soft, dry cloth. Do not use abrasive products. |
| Safety | Do not expose to moisture, heat sources, or liquids. |
| Spare parts and repairability | Remote control battery (CR2025) replaceable. Speakers not disassemblable. Repairability index not available. |
Frequently Asked Questions - X-HM36D PIONEER
User questions about X-HM36D PIONEER
0 question about this device. Answer the ones you know or ask your own.
Ask a new question about this device
Download the instructions for your Hi-Fi System in PDF format for free! Find your manual X-HM36D - PIONEER and take your electronic device back in hand. On this page are published all the documents necessary for the use of your device. X-HM36D by PIONEER.
USER MANUAL X-HM36D PIONEER
Operating Instructions
Mode d'emploi
Thank you for buying this Pioneer product.
Please read through these operating instructions so that you will know how to operate your model properly. After you have finished reading the instructions, put them in a safe place for future reference.
Contents
01 Before you start
What's in the box 3
Loading the batteries in the remote control .....3
Using the remote control 3
02 Part names and functions
Remote control 4
Front panel 5
Display 6
Speaker system....6
03 Connections
Speaker connection 7
Connecting antennas ....8
Using external antennas 8
Connect the Ethernet cable 8
Plugging in 9
04 Getting started
To turn the power on 10
Setting the clock 10
Connecting to the network via Wi-Fi .....10
Manual Setup....10
Auto Setup 11
General control 11
Input function 11
Display brightness control 11
Volume auto set-in. 11
Volume control.... 11
Muting 11
Sound controls 12
Equalizer 12
P.BASS control 12
BASS/TREBLE control.... 12
Setting the wake-up timer .....12
Calling the wake-up timer 13
Cancelling the wake-up timer.... 13
Using the wake-up timer 13
Using the sleep timer 13
Using Headphones 13
05 Disc playback
Playing discs or files 14
Load the disc 14
Play tracks on a CD 14
Play MP3 music files 14
Advanced CD or MP3 disc playback 15
Repeat play 15
Random play 15
Programmed play (CD) 16
About downloading MP3 16
Switch the display contents 16
06 Using network functions
Tuneln 17
Registering to Favorites.... 17
Registering from a Tuneln Radio account ..... 17
Playing music with Spotify 17
Playback 17
Network Standby setting 18
07 USB playback
Playing USB storage devices 19
Repeat play....20
Random play....20
Switch the display contents. 20
08 Using the tuner
Listening to FM 21
Tuning....21
Saving station presets. 21
Using the Radio Data System (RDS) 22
Listening to the DAB+ 24
About DAB+ (Digital Audio Broadcasting) ..... 24
Tuning....24
Changing the information display 25
Memorising a station. 25
DAB Frequency table (BAND III) 25
09 Other connections
Connecting auxiliary components ..... 26
10 Bluetooth ^® Audio playback
Music playback using Bluetooth wireless technology . . . 27
Remote control operation 27
Pairing with the unit (Initial registration) 27
Listen to music on the unit
from a Bluetooth capable device....28
Starting by Bluetooth 28
Radio wave caution 29
Scope of operation 29
Radio wave reflections 29
Precautions regarding connections
to products supported by this unit. 29
11 Additional information
Troubleshooting 30
Playable discs and formats 33
Regarding copy protected CDs. 34
Supported audio file formats. 34
Cautions on use 34
When moving this unit. 34
Place of installation....34
Do not place objects on this unit. 34
About condensation 34
Cleaning the product. 35
Cleaning the lens 35
Handling discs 35
Storing. 35
Cleaning discs. 35
About specially shaped discs 35
Auto power off setting 36
Advanced network settings 36
Checking network information. 36
Switching Wi-Fi on and off 36
Firmware Update 36
Checking the current software version ..... 36
Updating the software....36
Restoring all the settings to the defaults ..... 36
Specifications 37
Chapter 1:
Before you start
What's in the box
Please confirm that the following accessories are in the box when you open it.
- Remote Control
• AAA batteries (R03) x 2 - Power cord
• DAB/FM wire antenna - Warranty card
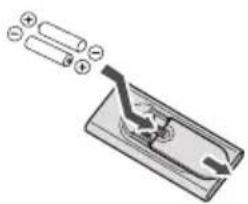
Loading the batteries in the remote control
1 Open the rear lid and load the batteries as illustrated below.
natural_image
Diagram of a mechanical device with battery and pin connections (no text or symbols)2 Close the rear lid.


CAUTION
- Do not use any batteries other than the ones specified. Also, do not use a new battery together with an old one.
- When inserting the batteries, make sure not to damage the springs on the battery's terminals. This can cause batteries to leak or over heat.
- When loading the batteries into the remote control, set them in the proper direction, as indicated by the polarity marks (⊕ and ⊖).
- Do not heat batteries, disassemble them, or throw them into flames or water.
- Batteries may have different voltages, even if they are the same size and shape. Do not use different types of batteries together.
- To prevent leakage of battery fluid, remove the batteries if you do not plan to use the remote control for a long period of time (1 month or more). If the fluid should leak, wipe it carefully off the inside of the case, then insert new batteries. If a battery should leak and the fluid should get on your skin, flush it off with large quantities of water. - When disposing of used batteries, please comply with governmental regulations or environmental public institution's rules that apply in your country/area.

WARNING
- Do not use or store batteries in direct sunlight or other excessively hot place, such as inside a car or near a heater. This can cause batteries to leak, overheat, explode or catch fire. It can also reduce the life or performance of batteries.
Using the remote control
The remote has a range of about 7 m at an angle of about 30° from the remote sensor.
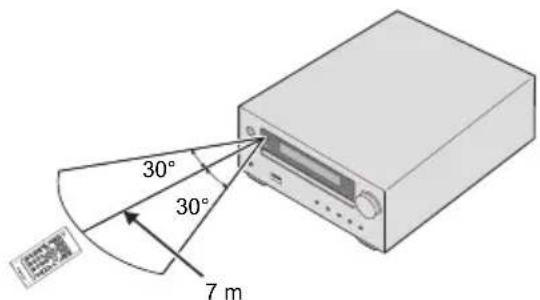
Keep in mind the following when using the remote control:
- Make sure that there are no obstacles between the remote and the remote sensor on the unit.
- Remote operation may become unreliable if strong sunlight or fluorescent light is shining on the unit's remote sensor.
- Remote controllers for different devices can interfere with each other. Avoid using remotes for other equipment located close to this unit.
- Replace the batteries when you notice a fall off in the operating range of the remote.
Chapter 2:
Part names and functions
Remote control

1
Switches the receiver between standby and on (page 10).
2 Input function buttons
Use to select the input source to this receiver (page 11).

Use to set up or play the audio file using the Bluetooth network (page 27).
3 M E N U
Use to access the menu.
4 ↑/↓/←/→, ENTER
Use to select/switch system settings and modes, and to confirm actions.
5 PGM/MEMORY
- Use to memory or program the CD (page 16).
- Use to store FM (page 21) or DAB (page 25) stations in memory.
6 Playback control buttons
Use to control each function after you have selected it using the input function buttons (page 15).
TUNE +/-
Use to find radio frequencies (page 21).
PRESET +/-
Use to select preset radio stations (page 21).
7 Sound control buttons
Adjust the sound quality (page 12).
8 S L E E P
See Using the sleep timer on page 13.
9 TIMER
Use for setting the clock, as well as for setting and checking the timers (page 10).
10
Press to change the repeat play setting from a CD (page 15) or USB (page 20).
11 RANDOM
Press to randomize order play setting from a CD (page 15) or USB (page 20).
12 DISPLAY
Press to change the display for MP3 (page 16), RDS (page 22) or DAB (page 25) information.
13
Press to return to the previous display.
14 Volume control buttons
Use to set the listening volume (page 11).
15
Mutes/unmutes the sound (page 11).
16 DIMMER
Dims or brightens the display. The brightness can be controlled in four steps (page 11).
Front panel
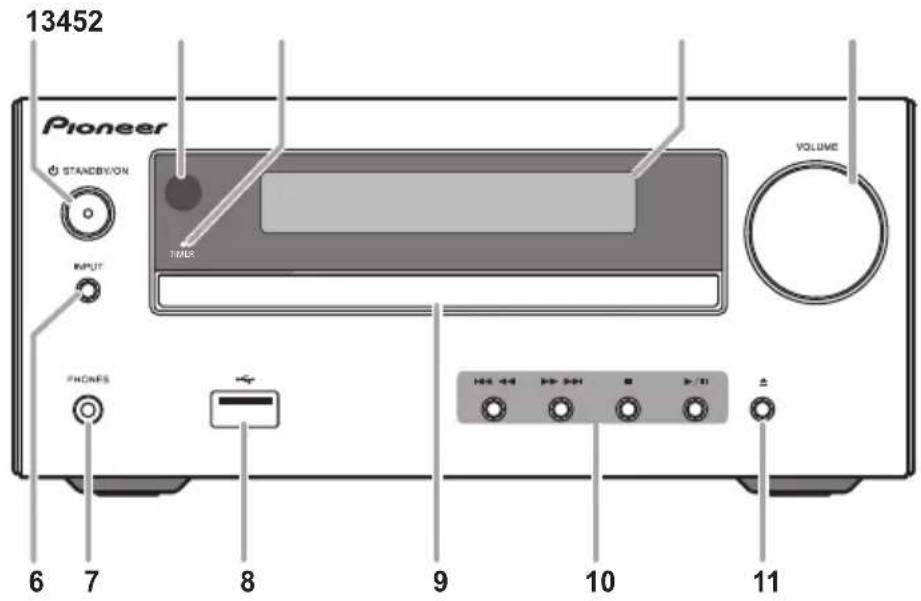
1 ⏻ STANDBY/ON
Switches the receiver between standby and on (page 10).
2 Remote sensor
Receives the signals from the remote control.
3 TIMER indicator
Lights when the receiver is power off with timer setting.
4 Main display
See Display on page 6.
5 Volume control
Use to set the listening volume (page 11).
6 INPUT
Selects the input source.
7 Headphone socket
Use to connect headphones. When the headphones are connected, there is no sound output from the speakers.
8 USB terminal
Use to connect your USB mass storage device as an audio source (page 19).
9 Disc tray
Place the disc, label side up (page 14).
10 Playback control buttons
Selects the desired track or file to be played back. Use to stop the playback. Stops playback or resumes playback from the pause point.
11 Disc tray open/close button
Use to open or close the disc tray (page 14).
Display

1

Lights when the sound is muted.

Note
- The mute icon will be displayed in red.
2

Start playback.
3

Pause playback.
4

Timer function is set.
5 Character display
Displays various system information.
Speaker system

1 Tweeter
2 Woofer
3 Bass Reflex Duct

Important
- Speaker grille cannot be removed.
- Both speakers can be used on either the right or the left side.
Chapter 3:
Connections
CAUTION
- Be sure to turn off the power and unplug the power cord from the power outlet whenever making or changing connections.
- Connect the power cord after all the connections between devices have been completed.
Speaker connection
- Push open the tabs and insert exposed wire.
- Connect the black wire to (−) terminal, and the red wire to the (+) terminal.
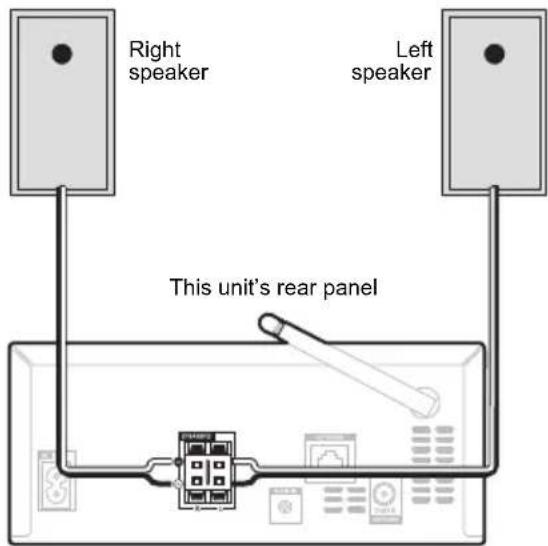

CAUTION
• These speaker terminals carry HAZARDOUS LIVE voltage. To prevent the risk of electric shock when connecting or disconnecting the speaker cables, disconnect the power cord before touching any uninsulated parts.
- Do not connect any speakers other than those supplied to this system.
- Do not connect the supplied speakers to any amplifier other than the one supplied with this system. Connection to any other amplifier may result in malfunction or fire.
- Do not attach these speakers to the wall or ceiling. They may fall off and cause injury.
• These speakers are magnetically shielded. However, depending on the installation location, color distortion may occur if the speaker system is installed extremely close to the screen of a television set. If this happens, turn off the television set, and then turn it on after 15 to 30 minutes. If the problem persists, move the speaker system away from the television set.
- Make sure that the speaker cable cores do not become exposed and make contact with other cable cores. This may cause malfunction of the product.
- Do not allow the speaker cable core to come into contact with the receiver body.

- If the speaker cable core comes into contact with any metal portion of the receiver's body, it may damage the speakers and cause smoke and fire. Insert speaker cables securely into the terminals and check that the cable does not come out of easily.
Note
- There is no difference between L and R speakers.
Connecting antennas
- Connect the DAB/FM wire antenna as shown below.
• To improve reception and sound quality, connect external antennas (see Using external antennas).

1 Connect the DAB/FM wire antenna into the DAB/FM antenna socket.
For best results, extend the DAB/FM antenna fully and fix to a wall or door frame. Don't drape loosely or leave coiled up.
Using external antennas
To improve signal reception
Use a PAL connector (not supplied) to connect an external DAB/FM antenna.

Connect the Ethernet cable
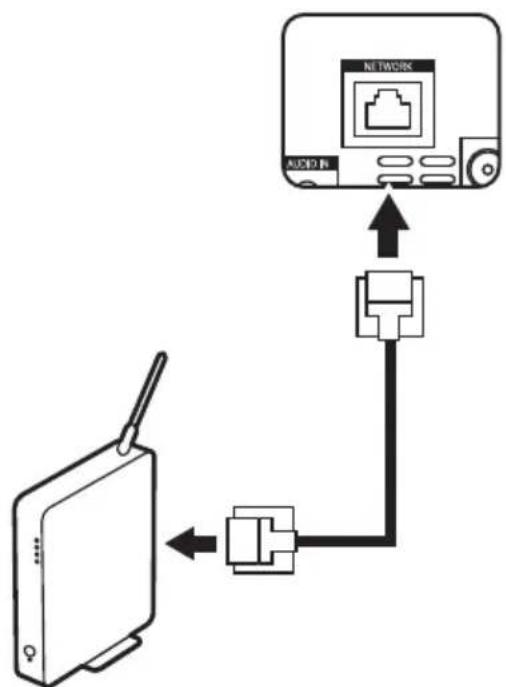
Connect this unit to the network using wired LAN or Wi-Fi (wireless LAN). You can enjoy features such as Tuneln and Spotify by connecting to the network. If you connect by wired LAN, connect with an Ethernet cable to the NETWORK port as shown in the illustration. To connect by Wi-Fi, refer to "Connecting to the network via Wi-Fi" (page 10).
flowchart
graph TD
    A["RF Device"] -->|Wireless Link| B["Audio Switch"]
    B --> C["Network Switch"]
    C --> D["Audio System"]
- Use a shielded CAT5 Ethernet cable (straight-type).
Plugging in
Before making or changing the connections, switch off the power and disconnect the power cord from the AC outlet. After you've finished making all connections, plug the unit into an AC outlet.


CAUTION
- Do not use any power cord other than the one supplied with this unit.
- Do not use the supplied power cord for any purpose other than that described above.
Chapter 4:
Getting started
To turn the power on
Press the ⏻ to turn the power on.
After use:
Press the ⏻ to enter the power stand-by mode.
Setting the clock

1 Press ⏻ to turn the power on.
2 Press TIMER on the remote control.
"CLOCK" is shown on the main display.
3 Press ENTER.
4 Press ← / → to set the day, then press ENTER.
5 Press ← / → to set the hour, then press ENTER.
6 Press ← / → to set the minute, then press ENTER to confirm.
7 Press ENTER.
To confirm the time display:
Press the TIMER. The time display will appear for about 10 seconds.
To readjust the clock:
Perform "Setting the clock" from step 1.

Note
- When power supply is restored after unit is plugged in again or after a power failure, reset the clock.
Connecting to the network via Wi-Fi
You can enjoy features such as TuneIn and Spotify by connecting to the network.
- Adjust the angle of the wireless antenna according to the connection status.
- Do not connect the Ethernet cable.

natural_image
Diagram showing a device with a scroll and a pencil, enclosed in a circle (no text or symbols)Manual Setup
Enter the password (key) of the access point to establish connection.
• Take a note of the SSID and password (key) which is on the main unit of the access point.
1 Press MENU on the remote control.
2 Press ↑/↓ to select "Wi-Fi Setting", and press ENTER.
3 Press ↑/↓ to select "Manual Setup", then press ENTER.
4 Press ↑/↓ to select the SSID of the access point to be connected, then press ENTER.
5 Press ENTER.
6 Enter the password.
▲/▼: Switch the type of text to enter.
abc...xyzABC...XYZ123...789!"...|}\~
←/→: Move the position to enter the characters.
7 Press ENTER.
"Connected" is displayed when the connection is established and lights.
Auto Setup
If the access point has an automatic connection button, you can connect without entering a password.
1 Press MENU on the remote control.
2 Press ↑/↓ to select "Wi-Fi Setting", and press ENTER.
3 Press ↑/↓ to select "Auto Setup", then press ENTER.
4 Press the automatic setting button of the access point to be connected.
"Connected" is displayed when the connection is established and lights.
General control
Input function
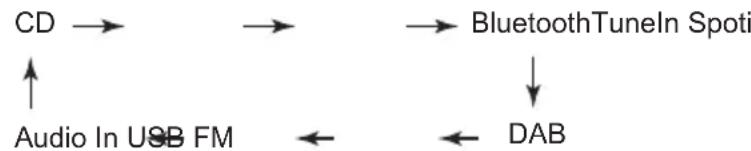
When the INPUT on main unit is pressed, the current function will change to different mode. Press the INPUT repeatedly to select desired function.
flowchart
graph TD
    CD --> A
    A --> B
    B --> C["BluetoothTuneIn Spot"]
    C --> D["DAB"]
    D --> E["Audio In USB FM"]
    E --> A
Display brightness control
Press DIMMER to dims the display brightness. The brightness can be controlled in four steps.
Volume auto set-in
If you turn off and on the main unit with the volume set to 31 or higher, the volume starts at 30 and sets in to the last set level.
Volume control
Turn the volume knob towards VOLUME (on main unit) or press VOL +/- (on remote control) to increase or decrease the volume.
CAUTION
- The sound level at a given volume setting depends on speaker efficiency, location, and various other factors. It is advisable to avoid exposure to high volume levels. Do not turn the volume on to full at switch on. Listen to music at moderate levels. Excessive sound pressure from earphones and headphones can cause hearing loss.
Muting
The volume is muted temporarily when pressing the □ on the remote control. Press again to restore the volume.
Sound controls
Equalizer
When the EQ is pressed, the current mode setting will be displayed. To change to a different mode, press the EQ repeatedly until the desired sound mode appears.

flowchart
graph TD
    A["FLAT A flat and basic sound"] --> B["ACTIVE"]
    B --> C["DIALOGUE"]
    C --> D["NIGHT"]
    B --> E["A powerful sound that emphasizes low and high tones"]
    C --> F["A sound that allows the radio or vocals to be heard more easily"]
    D --> G["A sound that can be enjoyed at night even with lower volume"]
P.BASS control
When the power is first turned on, the unit will enter the P.bass mode which emphasises the bass frequencies. To cancel the P.bass mode, press the P.BASS on the remote control.
BASS/TREBLE control
Press the SOUND to select "BASS" or "TREBLE", then press / to adjust the bass or treble.

Note
- The EQ and P.BASS cannot operate simultaneously. The most recently selected of these two functions will be the one used.
- SOUND can operate alongside either the EQ or P.BASS.
When one of the above two functions is selected, the function that is not selected will be displayed as follows.
1 When P.BASS setting (ON/OFF) is changed
• EQ : FLAT
2 When EQ setting is changed
• P.BASS : OFF
Setting the wake-up timer
Used to change the existing timer setting, or to set a new timer.
1 Press ⏻ to turn the power on.
2 Press and hold TIMER on the remote control.
3 Press ← / → to select "ONCE" or "DAILY", then press ENTER.
ONCE – Once timer play works for one time only at a preset time. DAILY – Daily timer play works at the same preset time and days of week.
4 Press ← / → to select "TIMER SET", then press ENTER.
5 Press ← / → to select the timer playback source, then press ENTER.
CD, DAB, FM and USB can be selected as the playback source.
6 Press ← / → to select the timer day, then press ENTER.
7 Press ← / → to set the hour, then press ENTER.
8 Press ← / → to set the minute, then press ENTER.
Set the time to finish as in steps 7 and 8 above.
9 Adjust the volume press VOL +/- , then press ENTER.
“”appears on the display.
10 Press ⏻ to enter the power standby mode.
The TIMER indicator lights up.
Calling the wake-up timer
It can be used to re-use an existing timer setting.
1 As well as steps 1 through 3 in "Setting the wake-up timer".
2 Press ← /→ to select "TIMER ON", then press ENTER.
Cancelling the wake-up timer
It can be used to turn off the timer setting.
1 As well as steps 1 through 3 in "Setting the wake-up timer".
2 Press ← / → to select "TIMER OFF", then press ENTER.
Using the wake-up timer
1 Press ⏻ to turn the power off.
2 At the wake-up time, this unit will turn on automatically and play the selected input function.

Note
- If at the wake-up time the USB storage device is not connected to this unit or a disc is not inserted, this unit will be turned to on and not play back the track.
- Some discs may not be played automatically at the wake-up time.
- If you set the timer, take one minute or more between the start and end time.
Using the sleep timer
The sleep timer switches off the unit after a specified time so you can fall asleep without worrying about it.
1 Press SLEEP repeatedly to select a switch off time.
Choose between 10 min, 20 min, 30 min, 60 min, 90 min, 120 min, 150 min, 180 min or OFF. The newly set value displays for 3 seconds, and then the setting is completed.

Note
- The sleep timer can be set by pressing SLEEP while the remaining time is displayed.
Using Headphones
Connect to the jack plug of the headphones.
When the headphones are connected, there is no sound output from the speakers.
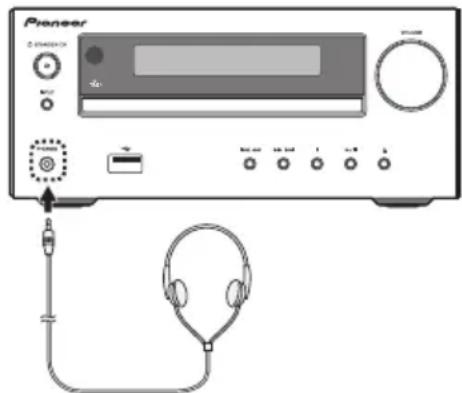
- Do not turn the volume on to full at switch on and listen to music at moderate levels. Excessive sound pressure from earphones and headphones can cause hearing loss.
- Before plugging in or unplugging the headphone, reduce the volume.
- Be sure your headphone has a 3.5 mm diameter plug and impedance between 16 Ω and 50 Ω. The recommended impedance is 32 Ω.
Chapter 5:
Disc playback
This system can play back a standard CD, CD-R/RW in the CD format and CD-R/RW with MP3 files, but cannot record on them. Some audio CD-R and CD-RW discs may not be playable due to the state of the disc or the device that was used for recording.
- For details about MP3, see page 33.
Playing discs or files
Load the disc
1 Press ⏻ to turn the power on.
2 Press CD on the remote control or INPUT repeatedly on the main unit to select CD input.
3 Press ▲ on the main unit to open the disc tray.
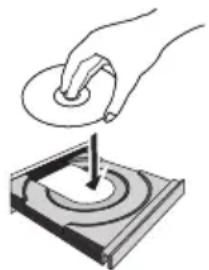
4 Place the disc on the disc tray, label side up.
natural_image
Illustration of a hand holding a circular object above a square base with concentric rings (no text or symbols)5 Press ▲ on the main unit to close the disc tray.
Play tracks on a CD
1 When the recognition is completed, press

After the last track is played, the unit will stop automatically.
Play MP3 music files
MP3 track data is called "music file" and the location they are stored is called a "folder" in this document.
e.g.,

flowchart
graph TD
    A["Root"] --> B[" "]
    A --> C[" "]
    A --> D[" "]
    A --> E[" "]
    B --> F["j"]
    C --> G["j"]
    D --> H["j"]
    E --> I["j"]
1 When the recognition is completed, press / to select the folder where the music file is stored ([], then press or ENTER.
- Repeat this step if there are other folders inside the selected folder.
- To return to the previous folder, press or
2 Press / to select the music file ([]), and then press or ENTER.
- Once play starts, only music files inside the same folder can be played continuously.
CAUTION
- Do not place two discs in one disc tray.
- Do not play discs of special shapes (heart, octagon, etc). It may cause malfunctions.
- Do not push the disc tray whilst it is moving.
- If the power fails whilst the tray is open, wait until the power is restored.
- Be sure to place 8 cm disc in the middle of the disc tray.
Note
- Due to the structure of the disc information, it takes longer to read an MP3 disc than a normal CD (approximately 20 to 90 seconds).
- When the beginning of the first track is reached during fast reverse, the unit will enter the playback mode (only for CD).
- If TV or radio interference occurs during CD operation, move the unit away from the TV or radio.
Tip
- When no operation has done in CD mode and the audio file is not played for more than 20 minutes, the power will automatically turn off. In this case it is required that the Auto power off is switched to ON.
• Auto power off can be switched to ON/OFF (page 36).
Basic operations
| Function Main unit Remote control | Operation | ||
| Play |  | Press in the stop mode. | |
| Stop |  | Press in the playback mode.(when playing a CD) “RESUME” is displayed and the place where you stopped play is memorized. Press again and the memorized position is cleared. | |
| Pause | [YT55] | Press in the playback mode. Press ▶■ to resume playback from the paused point. | |
| Track up/ down |  | Press in the playback or stop mode.If you press the button in the stop mode, press ▶■ to start the desired track.(when playing MP3) You can only skip forward or back to music files inside the same folder. | |
| Fast forward/ reverse |  | Press and hold down in the playback mode.Release the button to resume playback. | |
Advanced CD or MP3 disc playback

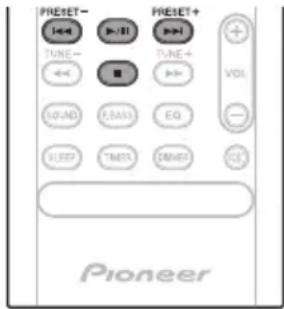
Repeat play
Repeat play can play one track, all tracks or a programmed sequence continuously.
To repeat one track:
Press repeatedly until "REPEAT ONE" appears. Press ENTER.
To repeat all tracks:
Press repeatedly until "REPEAT ALL" appears. Press ENTER.
To repeat desired tracks:
Perform steps 1 - 5 in "Programmed play (CD)" section (page 16) and then press repeatedly until "REPEAT ALL" appears. Press ENTER.
To cancel repeat play:
Press repeatedly until "REPEAT OFF" appears. Press ENTER.

Note
- After performing repeat play, be sure to press ■. Otherwise, the disc will play continuously.
- During repeat play, random play is not possible.
Random play
The tracks on the disc can be played in random order automatically.
To random play all tracks:
Press RANDOM repeatedly until "RANDOM ON" appears. Press ENTER.
To cancel random play:
Press RANDOM repeatedly until "RANDOM OFF" appears. Press ENTER.

Note
- If you press the ▶▶ during random play, you can move to the track selected next by the random operation.
- In random play, the unit will select and play tracks automatically. (You cannot select the order of the tracks.)
- During random play, repeat play is not possible.
Programmed play (CD)
You can choose up to 24 selections for playback in the order you like.
1 Whilst in the stop mode, press PGM/MEMORY on the remote control to enter the programming save mode.
2 Press |◀◀ ▶▶▶ to select the desired tracks.
3 Press ENTER to save track number.
4 Repeat steps 2 - 3 for other tracks. Up to 24 tracks can be programmed.
- If you want to check the programmed tracks, press PGM/MEMORY.
- If you make a mistake, the last programmed tracks will be canceled by pressing
5 Press ▶II to start playback.
To cancel the programmed play mode:
To cancel the programmed play, press twice ■ on the remote control. The display will show "PRG CLEAR" and all the programmed contents will be cleared.
Adding tracks to the program:
Press the PGM/MEMORY. Then follow steps 2 - 3 to add tracks.

Note
- When a disc is ejected, the program is automatically cancelled.
- If you press the ⏻ to enter the standby mode or change the function from CD to another, the programmed selections will be cleared.
- During the program operation, random play is not possible.
About downloading MP3
There are many music sites on the internet that you can download MP3 music files. Follow the instructions from the website on how to download the music files. You can then play back these downloaded music files by burning them to a CD-R/RW disc.
- Your downloaded song/files are for personal use only. Any other usage of the song without owner's permission, is against the law.
Switch the display contents
1 Press DISPLAY during playback.
If the title, artist and album name has been written to the file, that information will be displayed. (You can view this unit is only alphanumeric characters. Non-alphanumeric character are displayed in the "■".)

flowchart
graph TD
    A["Number of the track, title display"] --> B["Number of the track in a folder, remaining time display"]
    B --> C["Number of the track in a folder, playback time display"]
    D["Title display"] --> E["Artist display"]
    F["Album display"] --> G["Album display"]

Note
- "Not supported playback file" can not be playback. In this case, will be skipped automatically.
- There may be cases where no information can be displayed.
- Displaying title, artist, and albums is only supported with ID3 Version 1 (1.0 or 1.1).
Chapter 6:
Using network functions
Tuneln
With more than 70,000 radio stations and 2 million on-demand programs registered, TuneIn Radio is a service where you can enjoy music, sports and news from all over the world.
- Connect this unit to the network. (page 8, 10)
1 Press ⏻ to turn the power on.
2 Press NET on the remote control or INPUT repeatedly on the main unit to select Tuneln.
3 Press ↑/↓ to select a folder ([■]), then press ENTER.
4 Press / to select a radio station or program ([]), then press ENTER.
Registering to Favorites
You can register the radio station or program being broadcast in a "Favorites" folder. To play, select the program from "Favorites".
To register a program in Favorites
1 Press ENTER while listening to a program. 2 Press ♠/↓ to select "Add to My Presets", then press ENTER.
To delete a program from Favorites
1 Press ENTER while listening to a program. 2 Press ↑/↓ to select "Remove from Presets", then press ENTER.
Registering from a TuneIn Radio account
Creating an account on the TuneIn Radio website (tunein.com) and associating the device from My Page on the TuneIn Radio website allows you to automatically add radio stations and programs you have followed on the website to "Favorites" on the unit.
Use the registration code displayed on this unit to associate the device.
1 Press ♠/↓ to select "Settings" and press ENTER. 2 While "Registration Code" is being displayed, press ENTER.
Playing music with Spotify
This unit supports Spotify Connect. To enable Spotify Connect, install the Spotify application on your smartphone or tablet and create a Spotify premium account.
- This unit needs to be connected to the same router as the smartphone or tablet.
• Refer to the following for Spotify settings: www.spotify.com/connect/ - The Spotify software is subject to third party licenses found here: www.spotify.com/connect/third-party-licenses
Playback
1 Connect the smartphone to the network that this unit is connected to.
2 When the power of this unit is on, click the Connect icon in the track play screen of the Spotify app.

natural_image
Illustration of a finger pressing a sound speaker icon on a screen, with no text or symbols present.3 Select this unit (Pioneer X-HM36).
4 The input selector of this unit automatically changes to Spotify and streaming of Spotify starts.
- When “Network Standby” (page 18) is set to “Net STBY ON”, by clicking the Connect icon and selecting this unit, then even if this unit is in standby mode, the power will come on automatically and streaming starts.
- If the volume setting on the Spotify enabled device is low, the sound will not be output from this unit, so adjust the volume to an appropriate level.
Network Standby setting
You can turn on the power of the unit via the network using an application that can control this unit.
1 Press MENU on the remote control.
2 Press ♦/▼ until "Network Standby" is displayed, then press ENTER.
3 Press ↑/↓ to switch auto power off setting ON/OFF.
- Initial setting is set to ON.

Note
- Power consumption in the standby mode increases when this function is ON.
Chapter 7:
USB playback
Playing USB storage devices
It is possible to listen to two-channel audio using the USB interface with MP3 files on the front of this receiver.
- Pioneer does not guarantee that any file recorded on a USB storage device will play or that power will be supplied to a USB storage device. Also note that Pioneer will accept no responsibility whatsoever for loss of files on USB storage devices caused by connection to this unit.
- For details about MP3, see page 33.
1 Press USB as the input source.
"USB" is shown on the main display.
2 Connect the USB storage device.
- This receiver does not support a USB hub.

3 When the recognition is completed, press / to select the folder where the music file is stored ([], then press or ENTER.
- MP3 track data is called "music file" and the location they are stored is called a "folder" in this document.
- Repeat this step if there are other folders inside the selected folder.
- To return to the previous folder, press ← or ↩
4 Press ↑/↓ to select the music file ([J]), and then press ▶II or ENTER.
- Once play starts, only music files inside the same folder can be played continuously.
- For details about the basic operations, see page 15.
- When changing to a different input source, stop the USB memory playback first, before changing.
- Turn the power off before removing the USB storage device.
![PIONEER X-HM36D - Press ↑/↓ to select the music file ([J]), and then press ▶II or ENTER. - 1](/content/2026/06/1274654/images/468578bc90039e5a0225b9ec1ca8ac900457e70fdfece07b59f01eb8ed227d6a.jpg)
Note
- This unit may not recognize a USB storage device, play files or supply power to a USB storage device. For details, see When a USB storage device is connected on page 32.
- When a USB storage device is not playing and the unit has not been operated for 20 minutes or more, the power will automatically turn off. In this case it is required that the Auto power off is switched to ON (page 36).
Repeat play
Repeat play can play one track, all tracks or a programmed sequence continuously.
To repeat one track:
Press repeatedly until "REPEAT ONE" appears. Press ENTER.
To repeat all tracks:
Press repeatedly until "REPEAT ALL" appears. Press ENTER.
To cancel repeat play:
Press repeatedly until "REPEAT OFF" appears. Press ENTER.

Note
- After performing repeat play, be sure to press ■. Otherwise, the file of USB storage device will play continuously.
- During repeat play, random play is not possible.
Random play
The file of USB storage device can be played in random order automatically.
To random play all tracks:
Press RANDOM repeatedly until "RANDOM ON" appears. Press ENTER.
To cancel random play:
Press RANDOM repeatedly until "RANDOM OFF" appears. Press ENTER.

Note
- If you press the ▶▶ during random play, you can move to the track selected next by the random operation.
- In random play, the unit will select and play tracks automatically. (You cannot select the order of the tracks.)
- During random play, repeat play is not possible.
Switch the display contents
This unit can switch the information recorded in the USB storage device. For details, see Switch the display contents on page 16.
Chapter 8:
Using the tuner
Listening to FM
The following steps show you how to tune in to FM radio broadcasts using the automatic (search) and manual (step) tuning functions. Once you are tuned to a station you can memorize the frequency for recall later. See Saving station presets below for more on how to do this.

Tuning
1 Press the ⏻ to turn the power on.
2 Press TUNER until "FM" appears on the display.
3 Press TUNE +/- on the remote control to tune in to the desired station.
Automatic tuning:
Press and hold TUNE +/−, scanning will start automatically and the tuner will stop at the first receivable broadcast station.
Manual tuning:
Press the TUNE +/- repeatedly to tune in to the desired station.

Note
- When radio interference occurs, automatic tuning may stop automatically at that point.
• Automatic tuning will skip weak signal stations. - To stop the automatic tuning, press ■
- When an RDS (Radio Data System) station is tuned in, the frequency will be displayed first. Finally, the station name will appear.
- Full auto tuning can be achieved for RDS stations using Auto Station Program Memory (ASPM) mode, see page 23.
To receive an FM stereo transmission:
1 P r e s s 2 P r e s s
MONO" appears on the display.
3 P r e s s
appears on the display.
TUNER until "FM" appears on the disp
MENUNDIRMESTERSO/
ENTERainedAbleToPress
Improving poor FM reception:
After performing the above steps 1 - 2, press ENTER and then press / until "MONO" appears on the display.
This will change the tuner from stereo to mono and usually improve the reception.
Saving station presets
If you often listen to a particular radio station, it's convenient to have the receiver store the frequency for easy recall whenever you want to listen to that station (Preset tuning). This saves the effort of manually tuning in each time. This unit can memorize up to 30 stations.

1 Tune to a station you want to memorize.
See Tuning above for more on this.
2 Press PGM/MEMORY.
The preset number will flash.
3 Press PRESET +/- to select the preset channel number.
4 Press PGM/MEMORY to store that station in memory.
If the preset number has changed from flashing to lighting, before the station is memorised, repeat the operation from step 2.
- Repeat steps 1 - 4 to set other stations, or to change a preset station. When a new station is stored in the memory, the station previously memorised for that preset channel number will be erased.

Note
- The backup function protects the memorised stations for a few hours should there be a power failure or the AC power cord become disconnected.
To recall a memorised station
Press PRESET +/- to select the desired station.
To scan the preset stations
The stations saved in the memory can be scanned automatically. (Preset memory scan)
1 Press and hold PRESET +/-
The preset number will appear and the programmed stations will be tuned in sequentially, for 5 seconds each.
2 Press PRESET +/- again when the desired station is located.
To erase entire preset memory
1 Press TUNER on the remote control.
2 Press and hold until "MEMORY CLEAR" appears.

Note
- All stations will be erased.
Using the Radio Data System (RDS)
Radio Data System (RDS) is a system used by most FM radio stations to provide listeners with various kinds of information—the name of the station and the kind of show they're broadcasting, for example.
One feature of RDS is that you can search by type of program. For example, you can search for a station that's broadcasting a show with the program type, Jazz Music.
Information provided by RDS
1 Press TUNER until "FM" appears on the display.
2 Press DISPLAY repeatedly.
Each time the DISPLAY is pressed, the display will switch as follows:

flowchart
graph TD
    A["Station name (PS) Programme type (PTY)"] --> B["Frequency Radio text (RT)"]
    B --> C["Arrow"]
    C --> A
- When tuning in to a station other than an RDS station or to an RDS station which sends weak signal, the display will change in the following order:

flowchart
graph LR
    A["NO RDS"] --> B["FM 98.80 MHz"]
    B --> A
Search for stations by Program Type
1 Press TUNER until "FM" appears on the display.
2 Press MENU and then press / until "FM RDS" appears on the display.
3 Press ENTER and then press ↗/↓ until "PTY" appears on the display.
4 Press ENTER.
"SELECT" will appear for about 5 seconds.
5 Press ◀/▶ to select the program type you want to hear. Each time the button is pressed, the program type will appear. If the button is held down, the program type will appear continuously.
6 Whilst the selected program type is displayed (within 5 seconds), press ENTER.
After the selected program type has been lit for 2 seconds, "SEARCH" will appear, and the search operation will start.
The Program Types displayed are as follows:
News – News
Current Affairs – Current Affairs
Information – General Information
Sport – Sport
Education – Educational
Drama – Radio plays, etc.
Cultures – National or regional culture, theater, etc.
Science – Science and technology
Varied Speech – Usually talk-based material, such as quiz shows or interviews.
Pop Music – Pop music
Rock Music – Rock music
Easy Listening – Easy listening
Light Classics M – 'Light' classical music
Serious Classics – 'Serious' classical music
Other Music – Music not fitting above categories
Weather & Metr – Weather reports
Finance – Stock market reports, commerce, trading, etc.
Children's Progs – Programs for children
Social Affairs – Social affairs
Religion – Programs concerning religion
Phone In – Public expressing their views by Phone
Travel & Touring – Holiday-type travel rather than traffic announcements
Leisure & Hobby – Leisure interests and hobbies
Jazz Music – Jazz
Country Music – Country music
National Music – Popular music in a language other than English
Oldies Music – Popular music from the '50s and' 60s
Folk Music – Folk music
Documentary – Documentary
Alarm Test – Broadcasting when testing emergency broadcast equipment or receivers.
Alarm - Alarm! – Emergency announcement made under exceptional circumstances to give warning of events causing danger of a general nature.
- If the display has stopped flashing, start again from step 2. If the unit finds a desired program type, the corresponding channel number will lit for about 8 seconds, and then the station name will remain it.
- If you want to listen to the same program type of another station, repeat steps 2 - 6. The unit will look for the next station.
- If no station can be found, "NOT FOUND" will appear for 4 seconds.
Using the Auto Station program Memory (ASPM)
Whilst in the ASPM operation mode, the tuner will automatically search for new RDS stations. Up to 30 stations can be stored.
If you have already stored some stations in memory, the number of new stations you can store will be less.
1 Press TUNER until "FM" appears on the display.
2 Press MENU and then press / until "FM RDS" appears on the display.
3 Press ENTER and then press ♦/▼ until "ASPM"
appears on the display.
4 Press ENTER
After "ASPM" has flashed for about 4 seconds, scanning will start (87.5 - 108 MHz).
After scanning, the number of stations stored in memory will be displayed for 4 seconds, and then “END” will appear for 4 seconds.
- To stop the ASPM operation before it is complete: Press ■ whilst it is scanning for stations. The stations which are already stored in memory will be kept there.
- If the same station is broadcasting on different frequencies, the strongest frequency will be stored in memory.
- Any station which has the same frequency as the one stored in memory will not be stored.
- If 30 stations have already been stored in memory, the scan will be aborted. If you want to redo the ASPM operation, erase the preset memory.
- If no station have been stored in memory, "NOT FOUND" will appear for about 5 seconds.
- If the RDS signals are very weak, station names may not be stored in memory.
- The same station name can be stored in different channels.
- In a certain area or during certain time periods, the station names may temporarily be different.

Note
- If any of the following events occur, it does not mean that the unit is faulty:
- "PS", "NO PS" and a station name appear alternately, and properly.
- If a particular station is not broadcasting properly or a station is conducting tests, the RDS reception function may not work properly.
- When you receive an RDS station whose signal is too weak, information like the station name may not be displayed.
- "NO PS", "NO PTY" or "NO RT" will flash for about 5 seconds, and then the frequency will be displayed.
- Notes for radio text:
- The first 8 characters of the radio text will appear and then they will scroll across the display.
- If you tune in to an RDS station which is not broadcasting any radio text, "NO RT" will be displayed when you switch to the radio text position.
- Whilst radio text data is received or when the text contents change, "RT" will be displayed.
Listening to the DAB+
About DAB+ (Digital Audio Broadcasting)
Digital Audio Broadcasting is a digital transmission system where audio signals are converted to digital signals for broadcasting. DAB+ is broadcast as a group of data called multiplex (ensemble) which may contain one or more stations (services). Each station contains a primary service and there may be one or more secondary services. This allows several programmes or services to be transmitted on a single frequency.

flowchart
graph TD
    A["DAB + SIGNAL"] --> B["MULTIPLEX (ENSEMBLE)"]
    B --> C["SERVICES"]
    B --> D["SERVICES COMPONENTS (STATIONS)"]
    C --> E[" "]
    D --> F[" "]
    E --> G[" "]
    F --> H[" "]
    G --> I[" "]
    H --> J[" "]
Tuning
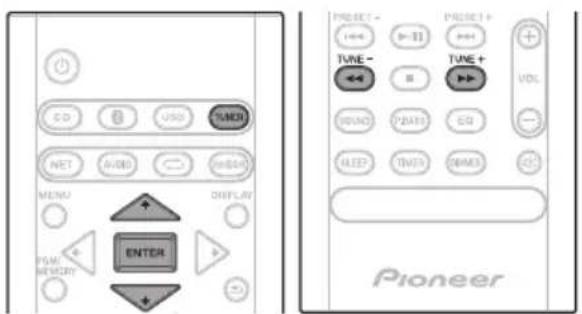
1 Press the TUNER until "DAB" appears on the display.
When turned on for the first time, the unit scans radio stations automatically to create a station list.
The stations will be stored in alphanumeric order and the first station on the list will be selected and you will hear it through the speakers.
2 Press the TUNE +/- to select the desired station.
3 Within 10 seconds, press the ENTER on the remote control to tune into the desired station.
- If no station is found, "NO SIGNAL" appears.
- Up to 100 appears for total received stations.
Auto Scan
You can make the auto scan again when you move the unit to other areas or add multiplex channels to the station list.
1 Press the TUNER until "DAB" appears on the display.
2 Press MENU and then press / until "DAB SCAN" appears on the display.
3 Press ENTER and then press / until "AUTO" appears on the display.
4 Press ENTER
Auto Scan scanning begins.
After the scanning process is complete, the first station that was detected is selected.
Manual tune
You can manually store stations which Auto Scan cannot find. If reception is poor, you can adjust the sensitivity. Manual tune is only available after Auto tune. Perform Auto Scan first.
1 Press the TUNER until "DAB" appears on the display.
2 Press MENU and then press ♦/▼ until "DAB SCAN" appears on the display.
3 Press ENTER and then press ↑/↓ until "MANUAL" appears on the display.
4 Press ENTER.
5 Within 10 seconds, press the TUNE +/- to select the DAB+ frequency.
6 Within 10 seconds, press the ENTER.
- If the level is too low, move the aerial or unit to improve reception.
Changing the information display
You can switch DAB+ display information.
Press the DISPLAY button.
Each time the button is pressed, the information display changes in the following order.
When "NO SIGNAL" appears, the DISPLAY button does not allow you to change the display.
[Programme Name]
Station name is displayed. (set by default)
[Scrolling text]
Information scrolls across the display when sent from the station.
[Programe type]
A description of the type of content being broadcast by the station.
[Multiplex name]
The name of the multiplex (ensemble) which provides the current service.
[Frequency]
The DAB+ frequency for the station.
[Stereo mode]
Display stereo mode.
[Transfer speed]
The data transfer speed.
[Signal quality]
The signal quality is displayed as a number (0 - 100).
[85-100: Good, 70-84: Fair, 0-69: Poor]
Memorising a station
You can store 10 DAB stations in memory and recall them at the push of a button. (Preset tuning)
1 Tune to the desired DAB station.
2 Press the PGM/MEMORY.
The preset number will flash.
3 Within 10 seconds, press the PRESET +/- to select the preset channel number.
Store the stations in memory, in order, starting with preset channel 1.
4 Within 10 seconds, press the PGM/MEMORY to store that station in memory.
If the preset number indicators disappear before the station is memorised, repeat the operation from step 2.
5 Repeat steps 1 - 4 to set other stations, or to change a preset station.
When a new station is stored in the memory, the station previously memorised for that preset channel number will be erased.
DAB Frequency table (BAND III)
| Frequency Label Frequency Label | |||
| 174.928 MHz | 5A 208.064 | MHz 9D | |
| 176.640 MHz | 5B 209.936 | MHz 10A | |
| 178.352 MHz | 5C 211.648 | MHz 10B | |
| 180.064 MHz | 5D 213.360 | MHz 10C | |
| 181.936 MHz | 6A 215.072 | MHz 10D | |
| 183.648 MHz | 6B 216.928 | MHz 11A | |
| 185.360 MHz | 6C 218.640 | MHz 11B | |
| 187.072 MHz | 6D 220.352 | MHz 11C | |
| 188.928 MHz | 7A 222.064 | MHz 11D | |
| 190.640 MHz | 7B 223.936 | MHz 12A | |
| 192.352 MHz | 7C 225.648 | MHz 12B | |
| 194.064 MHz | 7D 227.360 | MHz 12C | |
| 195.936 MHz | 8A 229.072 | MHz 12D | |
| 197.648 MHz | 8B 230.784 | MHz 13A | |
| 199.360 MHz | 8C 232.496 | MHz 13B | |
| 201.072 MHz | 8D 234.208 | MHz 13C | |
| 202.928 MHz | 9A 235.776 | MHz 13D | |
| 204.640 MHz | 9B 237.488 | MHz 13E | |
| 206.352 MHz | 9C 239.200 | MHz 13F | |
Chapter 9:
Other connections

CAUTION
- Before making or changing the connections, switch off the power and disconnect the power cord from the AC outlet.
- We will not accept responsibility for damage arising from the connection of equipment manufactured by other companies.
Connecting auxiliary components
Connect your auxiliary playback component using the AUDIO IN input on the rear panel.
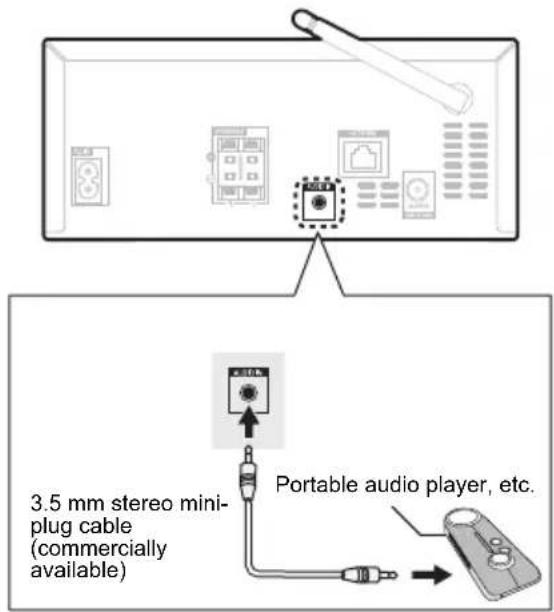
1 Press AUDIO as the input source.
When AUDIO IN is selected, "Audio In" is displayed on the main display.

Note
- If the AUDIO IN mini-plug jack is connected to auxiliary phones jack, the volume of the unit will be adjusted by the volume on the playback component. If the sound is distorted after you lower the volume of the unit, try lowering the volume on the auxiliary playback component.
Chapter 10:
Bluetooth® Audio playback
Music playback using Bluetooth wireless technology

flowchart
graph TD
    A["Bluetooth wireless technology enabled device: Cell phone"] --> B["Device not equipped with Bluetooth wireless technology: Digital music player + Bluetooth® audio transmitter (commercially available)"]
    C["Bluetooth wireless technology enabled device: Digital music player"] --> B
    D["+"] --> B
    E["Music data"] --> F["Antenna"]
    F --> G["Mobile Device"]
The unit is capable of playing back music stored on Bluetooth capable devices (cell phones, digital music players etc.) wirelessly. You can also use a Bluetooth audio transmitter (sold separately) to enjoy music from devices that do not have Bluetooth functionality. Please refer to the user's manual for your Bluetooth capable device for more details.

Note
- The Bluetooth ^ word mark and logos are registered trademarks owned by the Bluetooth SIG, Inc.
- The Bluetooth wireless technology enabled device must support A2DP profiles.
- Connection is not always guaranteed with all Bluetooth-enabled devices.
Remote control operation
The remote control supplied with this unit allows you to play and stop media, and perform other operations.

Note
- The Bluetooth wireless technology enabled device must support AVRCP profiles.
- Remote control operations cannot be guaranteed for all Bluetooth wireless technology enabled devices.
Pairing with the unit (Initial registration)
In order for the unit to playback music stored on a Bluetooth capable device, pairing must first be performed. Pairing should be performed when first using the unit with the Bluetooth capable device, or when the pairing data on the device has been erased for any reason. Pairing is a step required to allow communication using Bluetooth wireless technology to be carried out.
- Pairing is only performed the first time that you use the unit and the Bluetooth capable device together.
- In order to allow communication using Bluetooth wireless technology to take place, pairing must be performed on both the unit and the Bluetooth capable device.
- After pressing the and switching to Bluetooth input, perform the pairing procedure on the Bluetooth capable device. If pairing has been performed correctly, you will not need to perform the pairing procedures for the unit as shown below.
Please refer to the user's manual for your Bluetooth capable device for more details.
1 Press the ⏻ and turn the power to the unit on.
2 Press the ✉.
The unit switches to Bluetooth and "Pairing" will be displayed.
3 Turn on the power to the Bluetooth capable device that you wish to pair with, and perform pairing procedure on it.

Note
- This unit will be displayed as "Pioneer X-HM36" on all Bluetooth capable devices that you have.
Pairing will start.
- Place the Bluetooth capable device close to the unit.
- Please refer to the user's manual for your Bluetooth capable device for details on when pairing can be performed and the procedures required for pairing.
- When PIN code entry is requested, enter "0000." (This unit does not accept any PIN code setting other than "0000.")
4 Confirm on the Bluetooth capable device that pairing has been completed.
If pairing with the Bluetooth capable device has been completed correctly, the name of the Bluetooth capable device will be displayed on the front panel of the unit. (Only single-byte alphanumeric characters can be displayed. Any character that cannot be displayed will be indicated by a "■".)
Listen to music on the unit from a Bluetooth capable device
1 Press the .
The unit will switch to Bluetooth input.
2 A Bluetooth connection will be created between the Bluetooth capable device and the unit.
Procedures for connecting to the unit should be performed from the Bluetooth capable device.
- Please refer to the user's manual for your Bluetooth capable device for details of the connection procedures.
3 Playback music from the Bluetooth capable device.

Note
- When Bluetooth capable devise is not connected and no operations have been performed for more than 20 minutes, the unit will automatically power off. In this case it is required that the Auto power off is switched to ON.
• Auto power off can be switched to ON/OFF (page 36).
Starting by Bluetooth
When this unit is in standby mode and operations to connect with this unit are made from a device with Bluetooth that has been paired with this unit, this unit turns on automatically with Bluetooth input selected.
1 Press MENU on the remote control.
2 Press ↑/↓ until "Network Standby" is displayed, then press ENTER.
3 Press ↑/↓ to switch auto power off setting ON/OFF.
- Initial setting is set to ON.

Note
- Power consumption in the standby mode increases when this function is ON.
Connection while inNetwork Standby mode with Bluetooth capable device
When connection history (pairing has already been conducted) with a Bluetooth capable device exists for the unit during Network Standby, the unit can receive a connection request directly from the connection history.
The unit will start using the Bluetooth function, and connect with a Bluetooth capable device.
Even devices that have already been paired with this unit will not connect during Network Standby in the following cases.
In such cases, delete pairing history from the Bluetooth wireless technology device and perform pairing again.
- This unit can store a maximum of 8 units in the pairing history.
- If the settings are reset to the factory setting, all pairing history will be deleted.
Radio wave caution
This unit uses a 2.4 GHz radio wave frequency, which is a band used by other wireless systems (see list below). To prevent noise or interrupted communication, do not use this unit nearby such devices, or make sure these devices are switched off during use.
- Cordless phones
- Cordless facsimiles
- Microwave ovens
- Wireless LAN devices (IEEE802.11b/g)
- Wireless AV equipment
- Wireless controllers for game systems
- Microwave-based health aids
- Some baby monitors
Other, less common, equipment that may operate on the same frequency:
- Anti-theft systems
• Amateur radio stations (HAM) - Warehouse logistic management systems
• Discrimination systems for train or emergency vehicles

Note
- In the event noise appears in your television image, there is the possibility that a Bluetooth wireless technology enabled device or this unit (including products supported by this unit) are causing signal interference with the antenna input connector of your television, video, satellite tuner, etc. In this event, increase the distance between the antenna input connector and the Bluetooth wireless technology enabled device or this unit (including products supported by this unit).
- If there is something obstructing the path between this unit (including devices supported by this unit) and the device equipped with Bluetooth wireless technology (such as a metal door, concrete wall, or insulation containing tinfoil), you may need to change the location of your system to prevent signal noise and interruptions.
Scope of operation
Use of this unit is limited to home use. (Transmission distances may be reduced depending on communication environment).
In the following locations, poor condition or inability to receive radio waves may cause the audio to be interrupted or stopped:
- In reinforced concrete buildings or steel framed or iron-framed buildings.
• Near large metallic furniture. - In a crowd of people or near a building or obstacle.
- In a location exposed to the magnetic field, static electricity or radio wave interference from radio communication equipment using the same frequency band (2.4 GHz) as this unit, such as a 2.4 GHz wireless LAN device (IEEE802.11b/g) or microwave oven.
- If you live in a heavily populated residential area (apartment, townhouse, etc.) and if your neighbor's microwave is placed near your system, you may experience radio wave interference. If this occurs, move your unit to a different place. When the microwave is not in use, there will be no radio wave interference.
Radio wave reflections
The radio waves received by this unit include the radio wave coming directly from the device equipped with Bluetooth wireless technology (direct wave) and waves coming from various directions due to reflections by walls, furniture and building (reflected waves). The reflected waves (due to obstacles and reflecting objects) further produce a variety of reflected waves as well as variation in reception condition depending on locations. If the audio cannot be received properly due to this phenomenon, try moving the location of the device equipped with Bluetooth wireless technology a little. Also note that audio may be interrupted due to the reflected waves when a person crosses or approaches the space between this unit and the device equipped with Bluetooth wireless technology.
Precautions regarding connections to products supported by this unit
- Complete connections for all devices supported by this unit, including all audio cords and power cables before connecting them to this unit.
- After completing connections to this unit, check the audio and power cables to confirm that they not twisted together.
- When disconnecting this unit, confirm that you have sufficient working space in the surrounding area.
- When changing connections of audio or other cables for products supported by this unit, confirm that you have sufficient working space in the surrounding area.
Chapter 11:
Additional information
Troubleshooting
Incorrect operations are often mistaken for trouble and malfunctions. If you think that there is something wrong with this component, check the points below. Sometimes the trouble may lie in another component. Investigate the other components and electrical appliances being used. If the trouble cannot be rectified even after exercising the checks listed below, ask your nearest Pioneer authorized service center or your dealer to carry out repair work.
- If the unit does not operate normally due to external effects such as static electricity disconnect the power plug from the outlet and insert again to return to normal operating conditions.
General problem
| Problem Check Remedy | ||
| Settings you have made have been cleared. | Was the power cord unplugged? When power cord is unplugged, the settings you have made is cleared. Please set the clock again. If you do not want to clear the settings, do not unplug the power cord. | |
| Difference in volume between CDs, MP3, Tuner, Spotify, Tuneln and AUDIO IN. | This is not a problem with this unit. | The volume may sound differently depending on the input source and recording format. |
| When using an analogue player with this unit, connect a device equipped with phono equalizer. | ||
| This unit cannot be operated with the remote control. | Are you operating from far away? | Operate within 7 m, 30° of the remote sensor on the front panel (page 3). |
| Is the remote control sensor exposed to direct sunlight or strong artificial light from a fluorescent bulb, etc.? | The remote control signals may not be received properly if the remote control sensor is exposed to direct sunlight or strong artificial light from a fluorescent bulb, etc. | |
| Are the batteries dead? Replace the batteries (page 3). | ||
| Disc cannot be played or disc is ejected automatically. | Is the disc scratched? Scratched discs may not play. | |
| Is the disc dirty? Wipe the dirt off the disc (page 35). | ||
| Is this unit placed in a humid location? | There could be condensation inside. Wait a while for the condensation to evaporate. Do not place this unit near an air-conditioner, etc. (page 34). | |
| Folder or file names are not recognized. | Have you exceeded the maximum number of folder or file names this unit can recognize? | The unit can recognize up to 999 files on a single disc or on a single USB memory device.The number of folders is up to 255. Depending on the folder structure, there may be folders or files that the unit cannot recognize. |
| The unit turns off automatically. | If no play back and no operation has done for 20 minutes or more, the unit turns off automatically.In this case it is required that the Auto power off is switched to ON (page 36). | |
Wi-Fi Connection
| Problem Remedy | |
| Cannot connect to the access point | Try plugging/unplugging the power supply of wireless LAN router and the unit, check the wireless LAN router power-on status, and try reboot of the wireless LAN router. |
| Check that the setting of SSID and encryption (WPA2, etc.) is correct. Make sure the network settings of the unit is properly set. Note: “WEP” encryption is not supported. | |
| Connection to an SSID that includes multi-byte characters is not supported. Name the SSID of the wireless LAN router using single-byte alphanumeric characters only and try again. | |
| When the wireless LAN router setting is at stealth mode (mode to hide the SSID key) or when ANY connection is off, the SSID is not displayed. Change the setting and try again. | |
| Connected to an SSID different to the SSID selected | Some access points allow you to set multiple SSIDs for one unit. If you use the automatic setting button on such a router, you may end up connecting with a different SSID from the SSID you wanted to connect to. Use the connection method requiring you to enter a password if this happens. |
| Playback is interrupted and communication does not work | Shorten the distance from the access point or remove obstacles to improve visibility, and try again. Place the unit away from microwave ovens or other access points. It is recommended to place the access point and the unit in the same room. |
| If there is a metallic object near the unit, wireless LAN connection may not be possible as the metal can effect on the radio wave. | |
| When other access point are used near the unit, several issues such as interrupted playback and communication may occur. You can avoid these issues by changing the channel of the access point. For instructions on changing channels, see the instruction manual provided with the access point. | |
Network function
| Problem Remedy | |
| Cannot access the Internet radio Try plugging/unplugging the power supply of this unit and the router, and try rebooting the router. | |
| Certain network service or contents available through the unit may not be accessible in case the service provider terminates its service. | |
| Make sure that your modem and router are properly connected, and make sure they are both turned on. | |
| Depending on ISP, setting the proxy server is necessary. | |
| Make sure that the used router and/or modem is supported by your ISP. | |
When a USB storage device is connected
| Problem Check Remedy | ||
| USB storage device is not recognized. | Is the USB storage device properly connected? | Connect the device securely (all the way in). |
| Is the USB storage device connected via a USB hub? | This unit does not support USB hubs. Connect the USB storage device directly. | |
| This unit only supports USB mass storage class devices. | ||
| This unit supports portable flash memory and digital audio playback devices. | ||
| Only the FAT16 and FAT32 file systems are supported. Other file systems (exFAT, NTFS, HFS etc.) are not supported. | ||
| This device does not support the use of external hard disc drives. | ||
| This is not a problem with this unit. Turn the power off then back on. | ||
| File cannot be played. Is the file copyright-protected (by DRM)? | Copyright-protected files cannot be played. | |
| This is not a problem with this unit. Files stored on a computer cannot be played. | ||
| It may not be possible to play some files. | ||
| Folder or file names are not displayed or are not properly displayed. | Do the folder of file names contain more than 30 characters? | The maximum number of characters displayable for the folder and file names is 30. |
| Folder or file names are not displayed in alphabetical order. | This is not a problem with this unit. | The order of the folder and file names displayed depends on the order in which the folders or files were recorded on the USB storage device. |
| Much time is required to recognize the USB storage device. | What is the USB storage devices capacity? | Some time may be required to load the data when large capacity USB storage devices are connected (this could take several minutes). |
When the Bluetooth wireless technology device is connected or operated
Problem Remedy
| TheBluetoothwireless technology device cannot be connected or operated.Sound from theBluetoothwireless technology device is not emitted or the sound is interrupted. | Check that no object that emits electromagnetic waves in the 2.4 GHz band (microwave oven, wireless LAN device orBluetoothwireless technology apparatus) is near the unit. If such an object is near the unit, set the unit far from it. Or, stop using the object emitting the electromagnetic waves. |
| Check that theBluetoothwireless technology device is not too far from the unit and that obstructions are not set between theBluetoothwireless technology device and the unit. Set theBluetoothwireless technology device and the unit so that the distance between them is less than about 10 m* and no obstructions exist between them.* The distance given is to be used as a rough guide. The actual allowable distance between devices may vary depending on conditions in the surrounding environment. | |
| TheBluetoothwireless technology device may not be set to the communication mode supporting theBluetoothwireless technology. Check the setting of theBluetoothwireless technology device. | |
| Check if this unit is connected with aBluetoothwireless technology device with an input source other thanBluetoothselected. Perform paring procedure after selectingBluetoothas the input source. |
playable discs and formats
| Audio CD | • Commercially available audio CDs• CD-R/ -RW/ -ROM discs containing music recorded in the CD-DA format |
| MP3 | MP3 files recorded on CD-R/ -RW/ -ROM discs or USB storage devices |
- Only the discs that have been finalized can be played.
- Discs recorded in packet write mode (UDF format) are not compatible with this unit.
- Corporation and product names mentioned herein are trademarks or registered trademarks of the respective corporations.
- Only discs recorded in ISO9660 Level 1, Level 2 and Joliet can be played.
- Files protected by DRM (Digital Rights Management) cannot be played.
MP3:
MP3 is a form of compression. It is an acronym which stands for MPEG Audio Layer 3. MP3 is a type of audio code which is processed by significant compression from the original audio source with very little loss in sound quality.
- This system supports MPEG-1/2 Audio Layer 3 (Sampling rates: 32 kHz to 48 kHz; Bit rates: 8 kbps to 320 kbps).
-
During VBR file playback, time counter in the display may differ from its actual playback time.
-
The folder and file order information which is recorded on the media depends on the writing software. There maybe possibilities that this unit will playback the files not according to our expected playback order.
- From a media with MP3 files up to 255 folders and 999 files (including non playable files) can be read.

Note
- This unit does not support multisession discs or multiborder recording.
- Multisession/multiborder recording is a method in which data is recorded on a single disc in two or more sessions/borders. A “session” or “border” is one recording unit, consisting of a complete set of data from lead-in to lead-out.
Regarding copy protected CDs
This unit is designed to conform to the specifications of the audio CD format. This unit does not support the playback or function of discs that do not conform to these specifications.
Supported audio file formats
This unit does not support lossless encoding.
Cautions on use
When moving this unit
When moving this unit, be sure to first check that there is no disc loaded and disconnect the USB storage device. Then press ⏻, wait for "STAND BY" disappears on main display to turn off, then unplug the power cord. Damage may occur if the unit is transported or moved with a disc inserted, or when another device is connected to the USB terminal, or AUDIO IN mini-plug jack.
Place of installation
- Choose a stable place near the TV or stereo system being used with this unit.
- Do not place this unit on top of a TV or color monitor. Also install it away from cassette decks and other devices easily affected by magnetic forces.
Avoid the following locations:
- Places exposed to direct sunlight
• Humid or poorly ventilated places - Extremely hot places
- Places exposed to vibrations
- Places in which there is much dust or cigarette smoke
- Places exposed to soot, steam or heat (kitchens, etc.)
Do not place objects on this unit
Do not place any objects on top of this unit.
Do not obstruct the ventilation holes.
Do not use this unit on shaggy rugs, beds, sofas, etc., or wrapped in cloth, etc. Doing so will prevent the heat from dispersing, leading to damage.
Do not expose to heat.
Do not place this unit on top of an amplifier or other component that generates heat. When rack mounting it, to avoid the heat given off by the amplifier or other audio component, place it on a shelf below the amplifier.
- Turn off the unit's power when not using it.
- Depending on signal conditions, striped patterns may appear on a TV screen and noise may enter the sound of radio broadcasts when the unit's power is on. If this happens, turn the unit's power off.
About condensation
If this unit is moved suddenly from a cold place into a warm room (in winter, for example) or if the temperature in the room in which this unit is installed rises suddenly due to heater operation, etc., water droplets (condensation) may form inside (on operating parts and the lens). When condensation is present, this unit will not operate properly and playback is not possible. Let this unit stand at room temperature for 1 or 2 hours with the power turned on (the time depends on the extent of condensation). The water droplets will dissipate and playback will become possible. Condensation can also occur in the summer if this unit is directly exposed to the air flow from an air-conditioner. If this happens, move this unit to a different place.
Cleaning the product
- Unplug the power cord from the power outlet when cleaning this unit.
- Clean this unit using a soft cloth. For tough dirt, apply some neutral detergent diluted in 5 to 6 parts water to a soft cloth, wring out thoroughly, wipe off the dirt, then wipe again with a soft, dry cloth.
- Alcohol, thinner, benzene, insecticides, etc., could cause the print or paint to peel off. Also, leaving rubber or vinyl products in contact with this unit for long periods of time could mar the cabinet.
- When using chemical-impregnated wipes, etc., read the cautions included with the wipes carefully.
Cleaning the lens
This unit's lens should not become dirty in normal use, but if for some reason it should malfunction due to dust or dirt, consult your nearest Pioneer authorized service center. Although lens cleaners for players are commercially available, we advise against using them since some may damage the lens.
Handling discs
Storing
• Always place discs in their cases and store them vertically, avoiding hot, humid places, places exposed to direct sunlight and extremely cold places.
- Be sure to read the cautions included with the disc.
Cleaning discs
- Discs may not play if there are fingerprints or dust on them. In this case, use a cleaning cloth, etc., to gently wipe the disc from the inside towards the outside. Do not use dirty cleaning cloths.
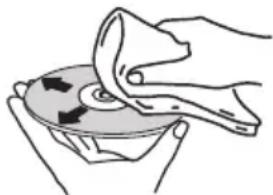
natural_image
Illustration of hands using a tool to clean or restore a fish (no text or symbols visible)- Do not use benzene, thinner or other volatile chemicals. Also do not use record spray or antistatic agents.
- For tough dirt, apply some water to a soft cloth, wring out thoroughly, wipe off the dirt, then wipe off the moisture with a dry cloth.
- Do not use damaged (cracked or warped) discs.
- Do not let the signal surface of discs get scratched or dirty.
- Do not attach pieces of paper or stickers to discs. Doing so could warp discs, making it impossible to play them. Also note that rental discs often have labels attached to them, and the label's glue may have oozed out. Check that there is no glue around the edges of such labels before using rented discs.


natural_image
Two circular objects with a diagonal line and a circle, no text or symbols present.About specially shaped discs
Specially shaped discs (heart-shaped, hexagonal, etc.) cannot be played on this unit. Do not attempt to play such discs, as they could damage this unit.

Auto power off setting
1 Press MENU on the remote control.
"Auto Power Down" will be displayed on the main display.
2 Press ENTER on the remote control.
3 Press ↑/↓ to switch auto power off setting ON/OFF.
- Initial setting is set to ON.

Note
- When the auto power off is set to ON, "APD ON" will be displayed on the main display.
- When the auto power off is set to OFF, "APD OFF" will be displayed on the main display.
Advanced network settings
Checking network information
1 Press MENU on the remote control.
2 Press ↑/↓ until "Network INFO" is displayed, then press ENTER.
3 Press ♦/▼ to select the item you want to check and press ENTER.
Signal Strength
You can check the stability of the wireless connection.
More means a more stable connection.
- Adjust the angle of the wireless antenna according to the connection status.
IP Address
The IP address of this unit is displayed.
MAC Address
The MAC address of this unit is displayed.
Network Type
Either wired LAN (Wired) or Wi-Fi (Wireless) is displayed.
SSID
The SSID of the connected access point will be displayed.
Switching Wi-Fi on and off
1 Press MENU on the remote control.
2 Press ↑/↓ until "Network Type Set" is displayed, then press ENTER.
3 Press ↑/↓ to switch Wi-Fi setting ON/OFF.
Firmware Update
Checking the current software version
1 Press MENU on the remote control.
2 Press ↑/↓ until "Software Version" is displayed, then press ENTER.
Updating the software
You can update the software of this unit via the network.
- Connect this unit to the network. (page 8, 10)
1 Press MENU on the remote control.
2 Press ↑/↓ until "Software Update" is displayed, then press ENTER.
3 While "Network Update" is displayed, press ENTER.
Restoring all the settings to the defaults
Use the steps below to restore the all settings to their defaults.
1 Press ⏻ to turn the power on.
2 Press MENU and then press ↑/↓ until "Factory Reset" appears on the display.
3 Press ENTER.
"OK?" will appear.
4 Press ENTER.
- "Resetting" is displayed while the settings are being restored. Power is turned off.
Specifications
- Amplifier section
RMS Power Output:....15 W + 15 W (1 kHz, 10 %, T.H.D., 8 Ω)
- Tuner section
Frequency Range (FM) ..... 87.5 MHz to 108.0 MHz Antenna Input (FM) ..... 75 Ω unbalanced
• Network Section
Ethernet LAN .... 10BASE-T/100BASE-TX Wireless LAN .... IEEE 802.11 b/g/n standard (Wi-Fi® standard) 2.4 GHz band
- Bluetooth
Version. Bluetooth Specification Ver. 4.1 Output. Bluetooth Specification Class 2 Estimated line-of-sight transmission distance* .....About 10 m Frequency range ..... 2.4 GHz Modulation .....FH-SS (Frequency Hopping Spread Spectrum) Supported Bluetooth profiles ..... A2DP, AVRCP Supported Codec..... SBC (Subband Codec) Supported contents protection..... SCMS-T PIN code ..... 0000
* The line-of-sight transmission distance is an estimate. Actual transmission distances supported may differ depending on surrounding conditions.
- Miscellaneous
USB terminal .... 5 V, 500 mA Power source .... AC 220 V to 240 V, 50 Hz/60 Hz
Power consumption Power on. 20 W Power stand-by .0.5 W or less Power stand-by (Network Standby ON) .2.0 W or less Dimensions . . . . 215 mm (W) x 95 mm (H) x 318 mm (D) Weight (without package) . . . . . . . . . . . . . . . . . . . . . . . . . . . . . . . . . . . . . . . . . . . . . . 2.0 kg
- Speaker
Enclosure.... Bass-reflex, book-shelf type (Magnetically shielded) Configuration.... 2-way Tweeter.... 2 cm dome Woofer.... 10 cm cone Maximum input power.... 15 W Impedance.... 8 Ω Dimensions ... 130 mm (W) x 212 mm (H) x 228.5 mm (D) Weight.... 2.0 kg/each
- Accessories
Remote control ....1 AAA batteries (R03) ....2 DAB/FM wire antenna....1 Power cord ....1 Warranty card ....1

Note
- The specifications are applicable when the power supply is 230 V.
- Specifications and the design are subject to possible modifications without notice, due to improvements.
"Pioneer" is a trademark of Pioneer Corporation, and is used under license. The Wi-Fi CERTIFIED Logo is a certification mark of Wi-Fi Alliance®.
© 2016 Onkyo & Pioneer Corporation.
All rights reserved
ATTENTION
natural_image
Diagram showing a device with a pen and a circular arrow, no text or symbols presentConfiguration manuelle
natural_image
Illustration of a hand holding a circular object above a square base with concentric rings (no text or symbols)natural_image
Illustration of a finger pressing a sound block with a speaker icon (no text or symbols)Station name (PS) Programme type (PTY)
Frequency Radio text (RT)
Education – Éducation
Drama – Pièces radiophoniques, etc.
natural_image
Illustration of hands using a tool to clean or restore a fish (no text or symbols visible)natural_image
Two circular objects with a diagonal line and a circle, no text or symbols presentnatural_image
Diagram of a battery with two batteries and a switch, no text or symbols presentflowchart
graph TD
    A["RF Device"] -->|Wireless Link| B["Audio Inverter"]
    B --> C["Network Interface"]
natural_image
Diagram showing a device with a pen and a button, enclosed in a circular arrow (no text or symbols)natural_image
Illustration of a hand holding a circular object above a square base with concentric rings (no text or symbols)natural_image
Illustration of a finger pressing a button on a screen with a speaker icon (no text or symbols)flowchart
graph LR
    A["NO RDS"] --> B["FM 98.80 MHz"]
    B --> A
Education – Material educativo Drama – Radionovelas, etc.
Cultures – Cultura nacional o regional, teatro, etc.
Children's Progs – Programas infantiles
Social Affairs – Asuntos sociales
natural_image
Illustration of hands using a tool to cut a CD or DVD disc (no text or symbols visible)natural_image
Two circular objects with a diagonal line and a circle, no text or symbols present.© 2016 Onkyo & Pioneer Corporation.
natural_image
Diagram of a battery with two batteries and a switch inside a circuit board (no text or symbols)ATTENZIONE
flowchart
graph TD
    A["RF Device"] -->|Wireless Link| B["Switch"]
    B --> C["Audio Interface"]
    C --> D["Network Switch"]
- Usare un cavo Ethernet CAT5 schermato (tipo dritto).
Inserire la spina
natural_image
Diagram showing a device with a scroll and a pencil, enclosed in a circle (no text or symbols)Setup del sistema
natural_image
Illustration of a hand holding a circular object above a square base with concentric rings (no text or symbols)natural_image
Illustration of a finger pressing down on a sound block with a speaker icon (no text or symbols)flowchart
graph TD
    A["Station name (PS) Programme type (PTY)"] --> B["Frequency Radio text (RT)"]
    B --> C["Arrow Left"]
    C --> D["Arrow Right"]
flowchart
graph LR
    A["NO RDS"] --> B["FM 98.80 MHz"]
    B --> A
Varied Speech – Talk show, quali quiz o interviste.
Pop Music – Musica pop
Rock Music – Musica rock
Easy Listening – Musica leggera
Light Classics M – Musica classica ‘leggera’
Serious Classics – Musica classica 'seria'
[85–100: buono, 70–84: discreto, 0–69: scadente]
natural_image
Illustration of hands using a tool to cut or spread a piece of food into a bowl (no text or symbols visible)natural_image
Two diagrams showing a CD or DVD disc with no prohibition symbols, no text or labels present.natural_image
Diagram of a battery with two batteries and a switch, no text or symbols presentnatural_image
Diagram of a device with a scroll wheel and battery, enclosed in a circular frame (no text or symbols)natural_image
Illustration of a hand holding a circular object above a square base with concentric rings (no text or symbols)natural_image
Illustration of a finger pressing a sound block with a speaker icon (no text or symbols)flowchart
graph TD
    A["Station name (PS) Programme type (PTY)"] --> B["Frequency Radio-text (RT)"]
    B --> C["Arrow"]
    C --> A
flowchart
graph LR
    A["NO RDS"] --> B["FM 98.80 MHz"]
    B --> A
Children's Progs – Kindersendungen
Social Affairs – Soziale
Themen
natural_image
Illustration of hands using a tool to clean or restore a CD or DVD (no text or symbols visible)natural_image
Two circular objects with a diagonal line and a circle, no text or symbols present.Auto Power Off-instelling 36
natural_image
Diagram of a battery with two batteries and a switch inside a circuit board (no text or symbols)natural_image
Diagram showing a device with a scroll and a battery, enclosed in a circle (no text or symbols)Handmatige Setup
natural_image
Illustration of a hand holding a circular object above a square base with concentric rings (no text or symbols)natural_image
Illustration of a finger pressing a sound block with a speaker icon (no text or symbols)flowchart
graph TD
    A["Station name (PS) Programme type (PTY)"] --> B["Frequency Radio text (RT)"]
    B --> C["←"]
flowchart
graph LR
    A["NO RDS"] --> B["FM 98.80 MHz"]
Children's Progs – Kinderprogramma's
Social affairs – ‘Human interest’, programma’s over sociale aangelegenheden
Religion – Religieuze programma's
natural_image
Illustration of hands using a tool to clean or restore a fish (no text or symbols visible)natural_image
Two diagrams showing a computer monitor with a prohibition symbol, next to a CD or DVD disc (no text or labels present)Auto Power Off-instelling
3 D r u k o p E N T E R
"OK?" zal getoond worden.
4 D r u k o p E N T E R
Anteros Building, Odyssey Business Park, West End Road, South Ruislip, Middlesex, HA4 6QQ United Kingdom
Tel: +44(0)208 836 3612
6, Avenue de Marais F - 95816 Argenteuil Cedex FRANCE
Tel :+33(0)969 368 050
Корпорация О энд Пи
© 2016 Onkyo & Pioneer Corporation. All rights reserved.
Onkyo group has established its Privacy Policy, available at [http://www.pioneer-audiovisual.com/privacy].



- Contents
- Before you start
- Part names and functions
- Connections
- Getting started
- Disc playback
- Using network functions
- USB playback
- Using the tuner
- Other connections
- Bluetooth ® Audio playback
- Additional information
- Chapter 1:
- Before you start
- What's in the box
- Loading the batteries in the remote control
- CAUTION
- WARNING
- Using the remote control
- Chapter 2:
- Part names and functions
- 1
- Input function buttons
- M E N U
- ↑/↓/←/→, ENTER
- PGM/MEMORY
- Playback control buttons
- Sound control buttons
- S L E E P
- TIMER
- 10
- RANDOM
- DISPLAY
- 13
- Volume control buttons
- 15
- DIMMER
- Front panel
- ⏻ STANDBY/ON
- Remote sensor
- TIMER indicator
- Main display
- Volume control
- INPUT
- Headphone socket
- USB terminal
- Disc tray
- Playback control buttons
- Disc tray open/close button
- Display
- Character display
- Speaker system
- Important
- Chapter 3:
- Connections
- Speaker connection
- Note
- Connecting antennas
- Connect the DAB/FM wire antenna into the DAB/FM antenna socket.
- Using external antennas
- To improve signal reception
- Connect the Ethernet cable
- Plugging in
- Chapter 4:
- Getting started
- To turn the power on
- Connecting to the network via Wi-Fi
- Manual Setup
- Auto Setup
- General control
- Input function
- Display brightness control
- Volume auto set-in
- Volume control
- Muting
- Sound controls
- Equalizer
- P.BASS control
- BASS/TREBLE control
- Setting the wake-up timer
- Calling the wake-up timer
- Cancelling the wake-up timer
- Using the wake-up timer
- Using the sleep timer
- Press SLEEP repeatedly to select a switch off time.
- Using Headphones
- Chapter 5:
- Disc playback
- Playing discs or files
- Load the disc
- Play tracks on a CD
- Play MP3 music files
- Tip
- Repeat play
- To repeat one track:
- To repeat all tracks:
- To repeat desired tracks:
- To cancel repeat play:
- Random play
- To random play all tracks:
- To cancel random play:
- Programmed play (CD)
- About downloading MP3
- Switch the display contents
- Chapter 6:
- Using network functions
- Tuneln
- Registering to Favorites
- To register a program in Favorites
- To delete a program from Favorites
- Registering from a TuneIn Radio account
- Playing music with Spotify
- Playback
- Select this unit (Pioneer X-HM36).
- The input selector of this unit automatically changes to Spotify and streaming of Spotify starts.
- Network Standby setting
- Chapter 7:
- USB playback
- Playing USB storage devices
- Press USB as the input source.
- Connect the USB storage device.
- When the recognition is completed, press / to select the folder where the music file is stored ([], then press → or ENTER.
- Press ↑/↓ to select the music file ([J]), and then press ▶II or ENTER.
- Chapter 8:
- Using the tuner
- Listening to FM
- Tuning
- Automatic tuning:
- Manual tuning:
- To receive an FM stereo transmission:
- Improving poor FM reception:
- Saving station presets
- To recall a memorised station
- To scan the preset stations
- To erase entire preset memory
- Using the Radio Data System (RDS)
- Information provided by RDS
- Search for stations by Program Type
- Using the Auto Station program Memory (ASPM)
- Listening to the DAB+
- About DAB+ (Digital Audio Broadcasting)
- Press the TUNER until "DAB" appears on the display.
- Press the TUNE +/- to select the desired station.
- Within 10 seconds, press the ENTER on the remote control to tune into the desired station.
- Auto Scan
- Manual tune
- Changing the information display
- [Programme Name]
- [Scrolling text]
- [Programe type]
- [Multiplex name]
- [Frequency]
- [Stereo mode]
- [Transfer speed]
- [Signal quality]
- Memorising a station
- Tune to the desired DAB station.
- Press the PGM/MEMORY.
- Within 10 seconds, press the PRESET +/- to select the preset channel number.
- Within 10 seconds, press the PGM/MEMORY to store that station in memory.
- Repeat steps 1 - 4 to set other stations, or to change a preset station.
- Chapter 9:
- Other connections
- Connecting auxiliary components
- Press AUDIO as the input source.
- Chapter 10:
- Bluetooth® Audio playback
- Music playback using Bluetooth wireless technology
- Remote control operation
- Pairing with the unit (Initial registration)
- Press the ⏻ and turn the power to the unit on.
- Press the ✉.
- Turn on the power to the Bluetooth capable device that you wish to pair with, and perform pairing procedure on it.
- Confirm on the Bluetooth capable device that pairing has been completed.
- Listen to music on the unit from a Bluetooth capable device
- Press the .
- A Bluetooth connection will be created between the Bluetooth capable device and the unit.
- Playback music from the Bluetooth capable device.
- Starting by Bluetooth
- Press MENU on the remote control.
- Press ↑/↓ until "Network Standby" is displayed, then press ENTER.
- Press ↑/↓ to switch auto power off setting ON/OFF.
- Connection while inNetwork Standby mode with Bluetooth capable device
- Radio wave caution
- Scope of operation
- Radio wave reflections
- Precautions regarding connections to products supported by this unit
- Chapter 11:
- Additional information
- Troubleshooting
- When the Bluetooth wireless technology device is connected or operated
- playable discs and formats
- MP3:
- Regarding copy protected CDs
- Supported audio file formats
- Cautions on use
- When moving this unit
- Place of installation
- Avoid the following locations:
- Do not place objects on this unit
- Do not obstruct the ventilation holes.
- Do not expose to heat.
- About condensation
- Cleaning the product
- Cleaning the lens
- Handling discs
- Storing
- Cleaning discs
- About specially shaped discs
- Auto power off setting
- Advanced network settings
- Checking network information
- Signal Strength
- IP Address
- MAC Address
- Network Type
- SSID
- Switching Wi-Fi on and off
- Firmware Update
- Checking the current software version
- Updating the software
- Restoring all the settings to the defaults
- Specifications
- - Amplifier section
- - Tuner section
- • Network Section
- - Bluetooth
- - Miscellaneous
- - Speaker
- - Accessories
- ATTENTION
- Configuration manuelle
- ATTENZIONE
- Inserire la spina
- Setup del sistema
- Handmatige Setup
- Auto Power Off-instelling
Brand : PIONEER
Model : X-HM36D
Category : Hi-Fi System