MiTab Sky - Tablet Wolder - Free user manual and instructions
Find the device manual for free MiTab Sky Wolder in PDF.

User questions about MiTab Sky Wolder
0 question about this device. Answer the ones you know or ask your own.
Ask a new question about this device
Download the instructions for your Tablet in PDF format for free! Find your manual MiTab Sky - Wolder and take your electronic device back in hand. On this page are published all the documents necessary for the use of your device. MiTab Sky by Wolder.
USER MANUAL MiTab Sky Wolder
- Toca el icono

- Instalar: Toca Instalar para acceder a la interfaz del instalador de APK.
- Memoria interna se refiere a la memoria flash integrada, tarjeta SD se refiere a la tarjeta T-Flash insertada.
• Salir: Volver a la interfaz principal.
Make sure to fully-charge the battery for first time usage.
Please do not use Tablet PC while charging. Disconnect the charger before use.
Do not use the device if the screen is cracked or broken. Cracked and/or broken screens could cause injury.
To reduce the risk of motion injuries:
- While using your Tablet PC, hold it with a relaxed grip and hold with two hands.
- Do not handle the Tablet PC with wet hands.
- Use hands-free accessories.
- Switch off the Tablet PC before cleaning it.
- Keep your Tablet PC and all accessories out of reach of children and animals.
Careful handling:
Avoid potential damage to your Tablet PC as under:
- Keep away from liquids.
- Avoid using and/or storing in dusty and/or dirty places/environments.
- Do not drop, knock, throw or otherwise handle the Tablet PC roughly.
- Avoid exposing your Tablet PC to extreme temperatures. Extreme temperatures reduce the charging capacity and life of batteries and Tablet PC.
- Never use damaged chargers. Use only approved CD-R King chargers.
- Do not use chemicals or other cleaning solutions to clean the Tablet PC.
- Use fiber cloth provided with Tablet PC.
Turn Off In Restricted Areas:
Use of Tablet PC in certain areas / places / conditions can be hazardous.
Switch off your Tablet PC:
Inside aircrafts;
Areas where chemicals are used and / or stored;
In and around areas having electrical / electronic equipments;
Areas where any kind of blasting activity is being carried out.
Drive Safety:
Avoid using your Tablet PC while driving, and respect and obey all regulations that restrict the use of devices while driving. Primary consideration while driving should be safety.
In order to use the device correctly, please read the following statement of the user manual carefully before using the Tablet PC.
\Index
\ Using this Guide....3
\ Introducing Tablet PC .... 3
\ Specification of Tablet PC .... 3
\ Know your device....4
\ Announcements....4
\ Introduction....6
\ Quick Guides ......6
\ Network Access....9
\Storage File Copy 9
\ Main Functions Introduction....10
\ System Settings:....18
\ FAQ 21
\ USB 3G Dongle Connectivity....21
\ Using this Guide
This guide has been specially designed to guide you through the basics of your device, such as getting started with the device. Please read this guide carefully before using your device to ensure safe and correct use.
The descriptions in this guide are based on the default settings of your device.
Please keep this guide for future reference.
\ Introducing Tablet PC
Congratulations on your purchase of the Tablet PC. Built-in with the Google Android™ operating system, the device gives you access to thousands of useful and entertaining applications to enrich your mobile web experience. This powerful device puts the best of the web and mobile computing at your fingertips in a lightweight, highly versatile platform the fits your active lifestyle.
With integrated wireless access and a responsive capacitive touch screen, you can keep in touch with versatile messaging, read books and newspaper on the go; stay up to date on the latest news, weather and sports, manage your multimedia and business files.
\ Specification of Tablet PC
| Screen 7 | inch capacitive 5 points multi touch screen |
| CPU | ARM Cortex A9 Dual Core up to 1.4 GHz. With Mali400 Quad Core Graphic, Open GL |
| RAM | DDR3 1GB |
| Storage NAND Flash : 8GB | |
| System | Android 4.1 |
| Network | Wi-Fi: Built-in Wi-Fi Module. IEEE 802.11b/g/n. |
| 3G: External 3G by USB Dongle. | |
| Applications APK format applications | |
| Camera Front 0.3 MP | |
| Video RM, | RMVB, AVI, MOV, WMV, MP4, 3GP, MKV, MPEG, etc. |
| Music MP3, | WMA, WAV, APE, FLAC, AAC, OGG, etc |
| Pictures JPG, BMP, PNG ,GIF etc. | |
| E-Books | Support TXT、LRC、PDF、Html、Htm、EPUB |
| Connection Micro USB OTG port. | |
| Mini HDMI port | HD video output port. |
| Battery Built-in Lithium Battery: 3000mAh | |
\ Know your device
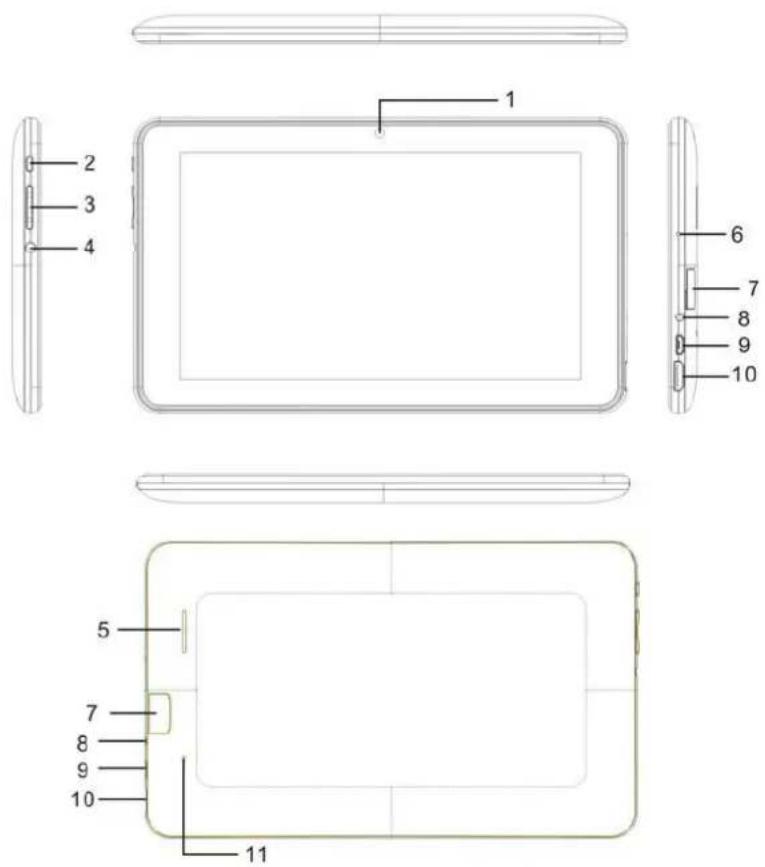
- Camera
- Power Button: press 3 seconds to power on/ power off, under working mode short press Power button to lock/ recall the screen
- V+: press to increase Volume.
- V-: press to the decrease Volume
- TF-Card slot: to connect with Micro SD card
- HDMI Jack: HD video output
- USB Jack: Micro-5pin connector, to connect with computer, to connect with OTG/ U disk
- DC Jack: to connect with 2.5mm DC-5V/2.5 A charger
- Earphone Jack: to connect with 3.5 mm earphone
- Reset: Press Reset to restart device
\ Announcements
- Keep the device away from moist and dust.
- Do not put the device in high-temperature environment, especially closed car in hot weather.
- Do not drop or strike the device.
- Do not shake the device violently, especially the LCD Screen part. Or, it will cause abnormal display on the screen.
- Choose proper volume when using the earphone which will be good for your ear.
- Charge the device when
- The power icon shows lowest power.
- The device is turns off automatically, and when you turn it on, it turns off automatically again.
- No response when operating the buttons.
Attention: Please use the charger offered by manufacturer to charge. Other chargers may cause damage to the device.
Input: 100-240V \~ 50/60 Hz
Output: 5V DC === 2000 m Ah
-
Do not disconnect the device from PC when downloading, uploading or formatting, or it will cause programming errors of the device.
-
Do not dismounting the device privately without professional guidance.
-
Do not use alcohol, thinner or benzene-chemical to clean the surface of the device.
-
Do not use the device in forbidden place, like airplane.
-
Always back-up your files in device's memory. The manufacturer is not responsible for the clear of files after damage or repair of the device.
-
The manufacturer reserves all rights of device's technology and design, and will have no obligation to inform the user if there are new versions or designs been developed.
-
The device is NOT water-proof; please keep it away from water.
-
The turn on time of this device is about 20 seconds; please don't operate the device when it is turned on in 20 seconds
\ Introduction
1. Packaging Details:
Each unit of Tablet PC has the following items: Tablet PC device*1, charger*1, USB cable*1, and user manual*1.
All items are packed in a gift box.
2. Instructions on Keys:
| Name | Description |
| POWER | Press this button shortly to enter sleeping/wake up mode, long press to switch ON/OFF |
| V+ | Press to increase Volume |
| V- | Press to the decrease Volume |
| Micro SD card Slot | For external Micro SD card, up to 32GB |
| Stereo Earpieces Jack | Stereo earpieces jack for earphone |
| DC Socket | Connect with 5V DC charger |
| USB Host Port (micro USB port) | Port for external USB Driver / 3G Dongle, Mouse, keyboard, etc(2.0) |
| Display | Display area |
| Mini HDMI Port | Mini HD video output port |
Long Press: Press the item for 1--2 seconds.
\ Quick Guides
- About Touch Panel: The touch screen is capacitive touch screen; you can use five fingers to touch the screen at the same time.
- Switching On/Off: Switch On and Unlock: When the device is OFF, press and hold "Power" key for 3 seconds to enter the Android start-up progress bar. It needs about 20 seconds to enter to the system desktop, when the LCD is under locked mode,
Press and Drag the icon to the Right side unlock point, then the LCD will be unlocked automatically. See the figures below,
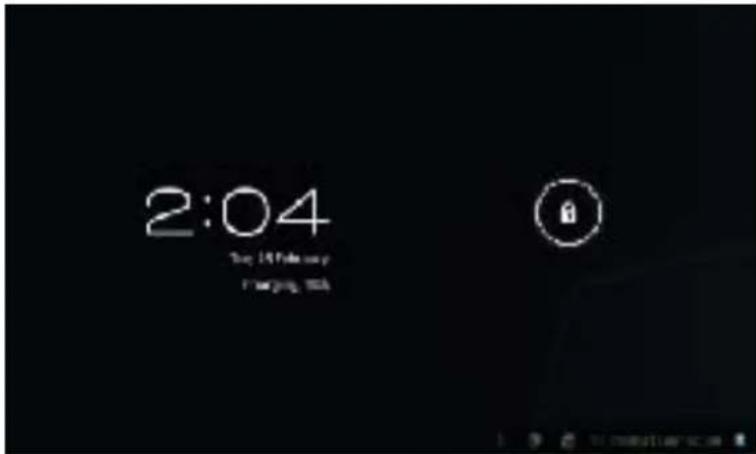
3. Power Saving Modes and Lock Screen.
- Press the "POWER" key shortly after starting up, system enter to power save and lock mode.
- Press the "POWER" key or tap the touch screen, system will return to bright in 1 second
- The primary operation of the device will not stop under the power save mode, only the LCD is disabled.
For example: playing music, movie, etc
- Switch OFF: When the device is OFF, press and hold the "POWER" key for 3 seconds, the screen will display the power OFF interface, choose the power OFF item to confirm, the system will shut automatically
Note: When the device's battery is low, it will alarm continuously until it shutdown automatically without charging. If the device can not start up please check if the battery is low, and try turning it on again after the battery is charged.
4. Battery management and charging.
- Make sure the battery is fully charged before use.
- Insert the micro port of the battery adaptor into DC slot of the device, and connect the other side to the power socket.
Then the desktop icon of the battery indicates it is in charging mode. Wait until the battery is fully-charged,
Don't disconnect the power when charging. Once the battery is fully charged, the Icon on the desktop will stop rolling.
Note: In order to keep the battery working in the best condition, do the following:
- Don't charge the power in high temperature.
- No need to drain the power for this Li- battery. You can charge the power even if there is still some power in the battery.
- In order to keep the battery in good condition, make sure to charge the device once every two weeks if you don't use this device for a long time.
5. Definition for the icons of the Functions
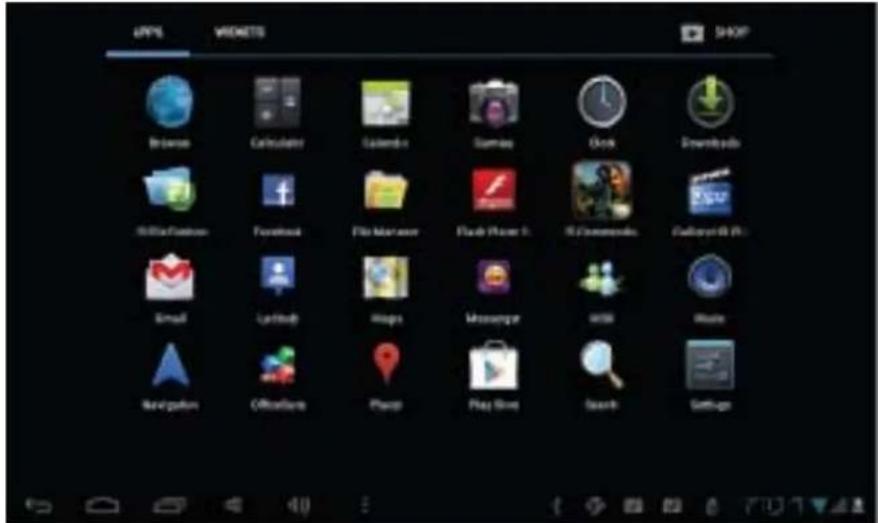
| Icon | Function | Icon | Function |
 | Back to Desktop |  | Note when the system finds new devices |
 | Show current power status |  | Set the alert time |
 | The current system time |  | Reduce the volume |
 | Back |  | Louder the volume |
 | Operation key |  | Mene for Function Block |
 | Google search |  | Adjust screen brightness |
 | System clock |  | WIFI on/off |
 | New mail |  | USB Connection |
| [TBGK] | Status Bar | ||
6. USB Host Function:
- USB- Host Definition: The Micro USB on the device can be used as USB Host.
- Read U-disk: Insert the USB into the host port, press the resource manager in the desktop, press USB enter into the port.
- External 3G USB Dongle. See the more details on page no.19).
7. Micro SD Card Storage:
There is a Micro SD card slot in this device, it support reading the files in Micro SD cards. Insert the Micro SD card into the card slot in right way, when take it out, just push the TF toward to the inside, then the slot will release the Micro SD card, Micro SD card will pop out automatically, take it then.
- Please insert the Micro SD card into the card slot of the device.
- Don't pull out the card when operating (reading, copying), or it may cause date error.
- Don't use the Micro SD card under high temperature condition.
- Keep the Micro SD card far from the liquid and erosive materials.
\ Network Access
The device support Wi-Fi network and external 3G network.

1. Network Access by Wi-Fi:
- Turn on Wi-Fi. The device will scan automatically for available Wi-Fi networks.
- Choose the Wi-Fi network that you want to connect to.
- Press Connect. Some network may need you input the password.
- On the Wi-Fi settings screen, press the Menu key, touch Advanced, you will get more settings for Wi-Fi.
2. Network Access by 3G:
- Turn OFF Wi-Fi if it is working.
- Access Mobile network setting, make sure Data enabled was chosen. Then go back to Wireless & Networks.
- Insert External 3G by USB host (micro USB / USB OTG Port).
Choose Mobile network, then wait for the 3G network connection, soon you can access network via 3G.
\ Storage File Copy
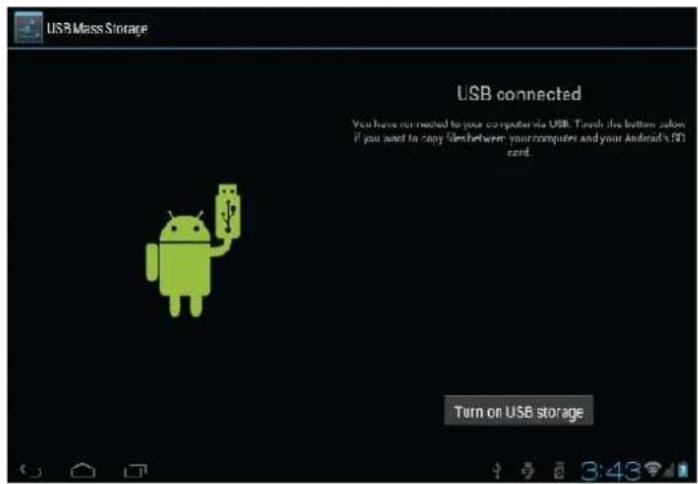
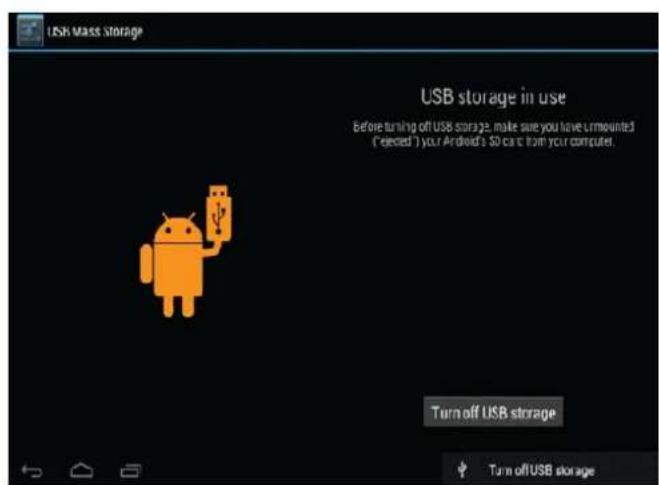
- Connect the device to computer by USB Cable, notification in the status bar will appear to indicate that the USB is connected.

- Choose USB Connected
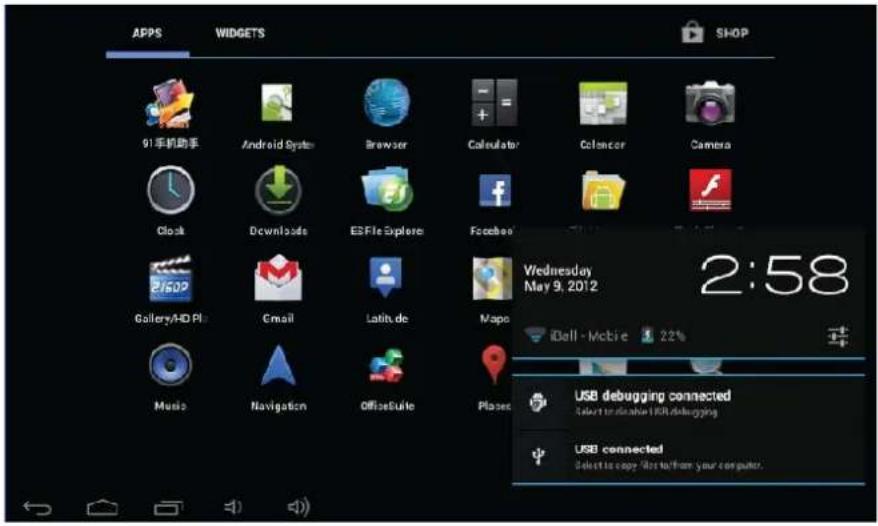
Choose USB Connected. Then, Turn on USB storage.

The left picture shows that device storage content could be viewed and modified from computer.
The right picture means that device storage content could NOT be viewed or modified from computer.
\ Main Functions Introduction
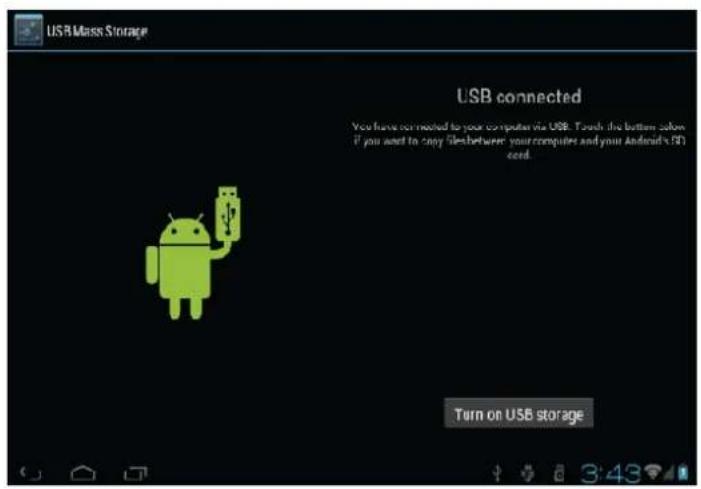
1. Audio Player
Go to the Music Player: In music player mode, double-click the favorite in the list to play music as shown in the following picture
Drag the playing progress bar

to adjust the playing process.
Instructions of the buttons in the Music Player
| Botton | Instruction | Button | Instruction |
 | Artist |  | Album |
 | Song |  | Playing Music List |
 | Randon Play |  | Loop playback |
 | Play the last sone |  | Play the next song |
 | Pause |  | Play |
 | Lyrics | ||
- When no music files stored in the playlist, the system will automatically load the music files from the card to the Music Player after turning it on the (the device supports audio file formats: mp3, wav, midi, wma). The playlist as shown in the above figure
- If there are two more songs in the Music playlist area, slide up/down the touch screen to scroll up/down
- Double-click the favorite in the list to play music.
• In the music playing interface, click

to enter the audio playing list.
- Drag the playback progress bar

to adjust audio playback progress.
2. Video Function
- Click the Video player icon to enter the video player interface, then open the video files,
- The device supports video file formats: MKV, RM, RMVB, MP4, MOV, AVI, WMV, 3GP, etc.
- When no video files stored in the video player playlist, the system will automatically load the video files from the card to the video player playlist after turning it on.
- Drag the playback progress bar

to adjust video playback progress.
3. Picture Function
- Click the Gallery/ HD Player to enter the viewing interface
- Add images (supports the format of picture: BMP, JPG, JPEG, PNG, GIF)
When there is no file in the photo list, the system will automatically load the image files from the card to the photo browsing list after opening the photo browser.
Open the corresponding folder, find the image file and add the picture you want.
- Click menu button, the photo can be set as wallpaper.
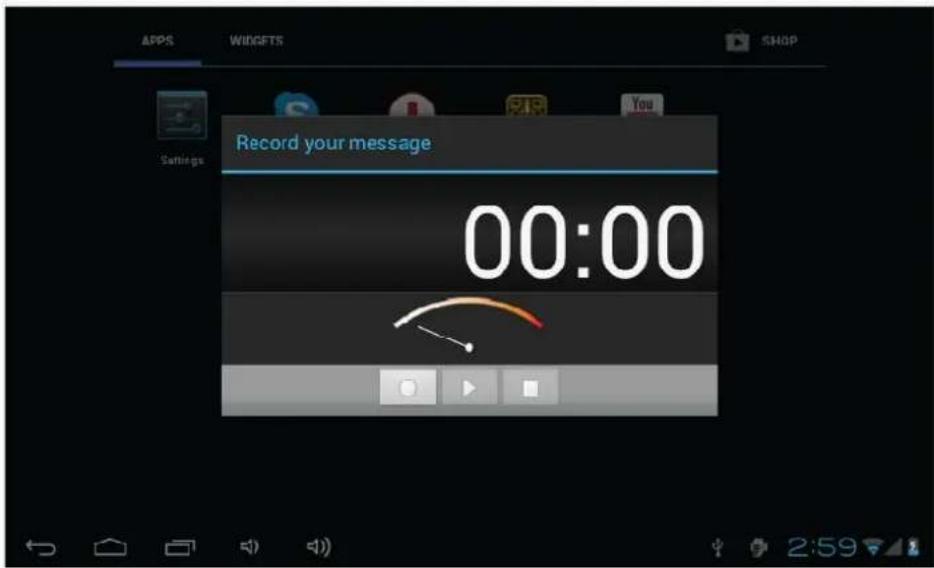
4. Record Function
Click the record icon

to enter the record interface, click record button

recording, click this button recording or give up, please

to stop recording, the system will remind you to use this manually.
Recording playing: please select audio player to play the recording, firstly select the record files from the explorer, then click it and playing, further details please refer to Audio Function.
5. ES File Manager
In file manager, you can check all files in the device, including files in built-in Memory and external card. Also there is a quick view for pictures and videos.
6. E-book Function
Support formats of E-Book: TXT, LRC, PDF, HTML, HTM, EPUB, etc.
7. Internet Browser
- Before you use internet browse function, please make sure your network is connected. See network access guidance in former part.
- Click IE Browser icon Browser to enter to the IE interface, click the address bar and input website and click Go to enter a corresponding

web page, you can view the corresponding website information.
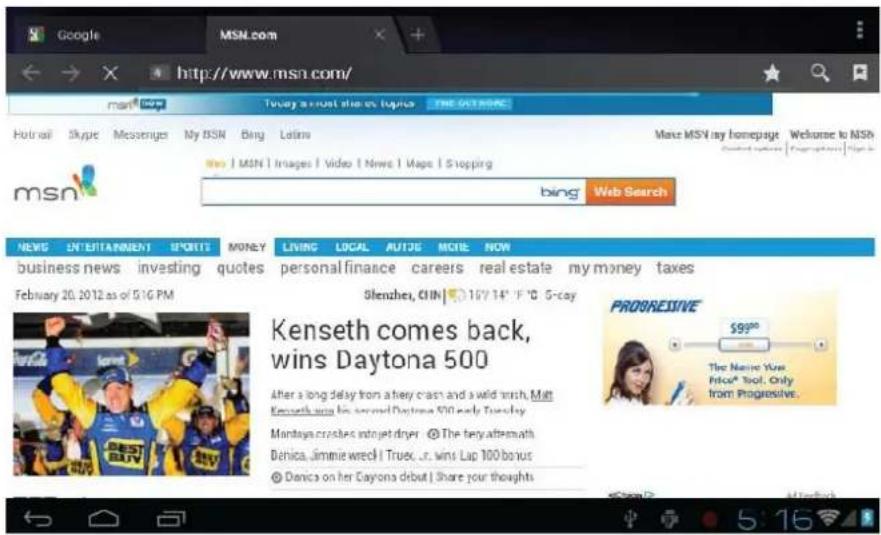
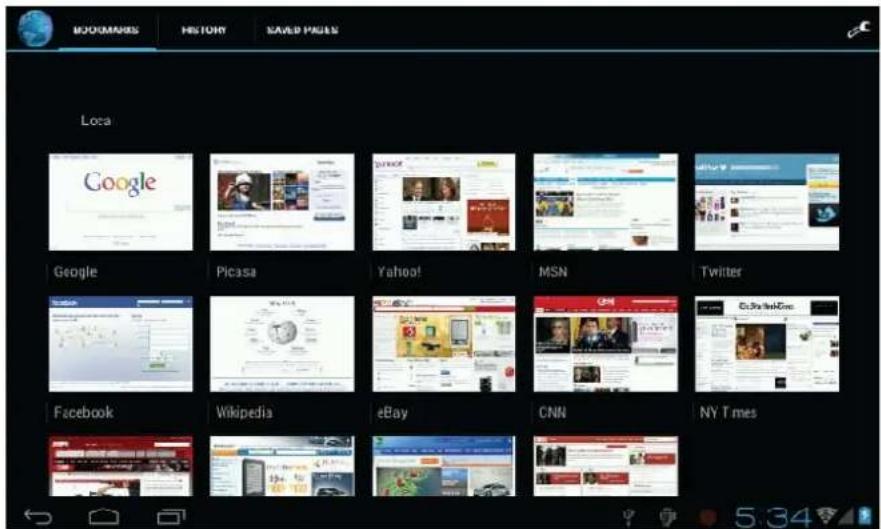
- Click icon to view bookmark and history record.
- Click menu icon to access settings.
- The device also supports other internet browsers, detail functions of those internet browsers refer to their own instructions
8. E-mail Function:
- Before you use email function, please make sure your network is connected. See network access guidance in former part.
- When using this function for the first time, you need to add an email account to the device. The device supports several accounts working together.
• Portal sites email accounts and enterprise email account adding methods are different.
Add portal sites email accounts. (Example: Gmail, MSN, Yahoo, etc.)
Take Google email account for an example here.
Email address: ----
Password: ********
- For portal sites email accounts, directly input your email address and password, then click next.
• After successful connection, input Account Name and Your Name. Account Name means the name of this account in the device,
Your Name means the displayed name of your email in receivers' account.
- Then you will access the account. Click email titles to read emails, long press email titles to access options.
- Click menu Key to access settings

Refresh: Checking new emails.
Compose: Write new emails.
Folders: Manage emails to different folders.
Accounts: View accounts in the device, add new accounts, delete accounts, set main account.
Accounts settings: More options for email account.
9. Calendar:
Click Calendar icon to enter calendar interface.
- In calendar mode, press and scroll up/down the screen to browse through Months; or to turn the pages.
- Auto adjusts Years when the month exceeds December or January.
- Enter interface, the number in the orange form is the intraday date, you can change the date in setting function;
details as the setting section.
Click

to return to main menu.
- Calculator: ClickCalculator icon to enter calculator interface.
11. Alarm Clock:
- Click Clock icon to enter time interface, then click the clock to access alarm interface, and you can add new alarms or edit
former alarms now. - Long press former alarms to choose turn alarm on/off, edit alarm, and delete alarm. Click alarms to edit alarm.
• You can edit alarm time, repeat mode, ringtone, and label.
- In alarm interface, click menu icon could be set.

ings. The following items
12. APK Installer:
- This device supports the third party's Application Package (APK format) based on Android OS. Many Application Package can be
downloaded from internet, or copied from other devices into the storage.
- If the Application Package is not downloaded from Google Android Market, you should operate the following steps before installation.
Please check Settings – Applications, make sure Unknown sources is chosen.
- Click the File Manager icon prompted to install

and Choose the file you want to install APK, press
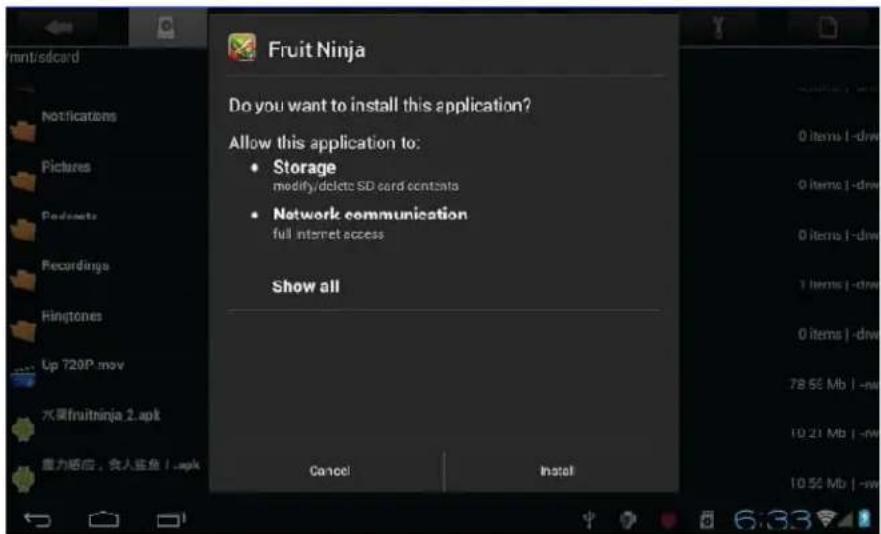
• Install: Click Install, enter into the APK installer interface.
- Internal Memory means built-in Flash memory, SD card means inserted T-Flash;
- After entering, select the APK format setting program in the right side, click the application to install, back to the main interface
when complete this operation, then it finished the installing, and there will be a relevant icon in application list.
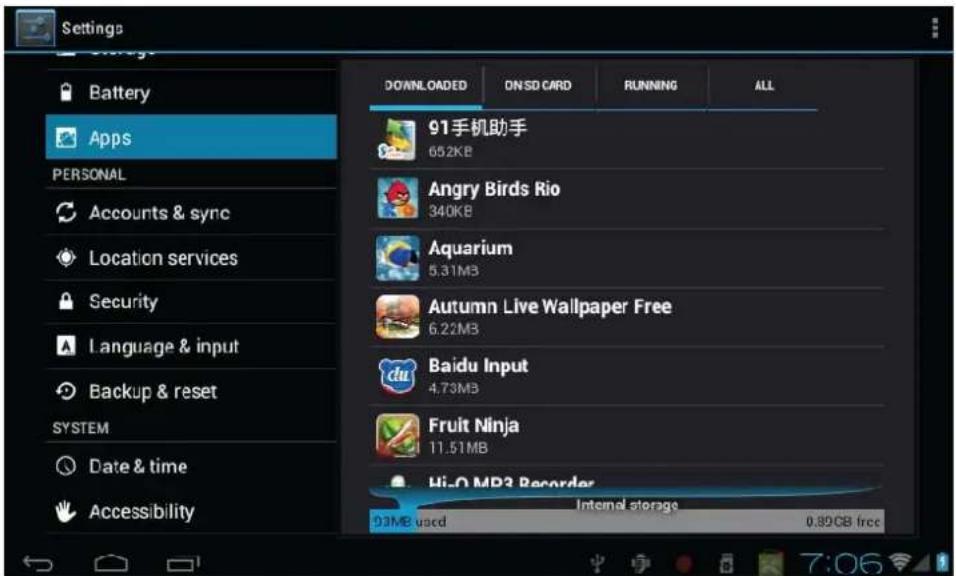
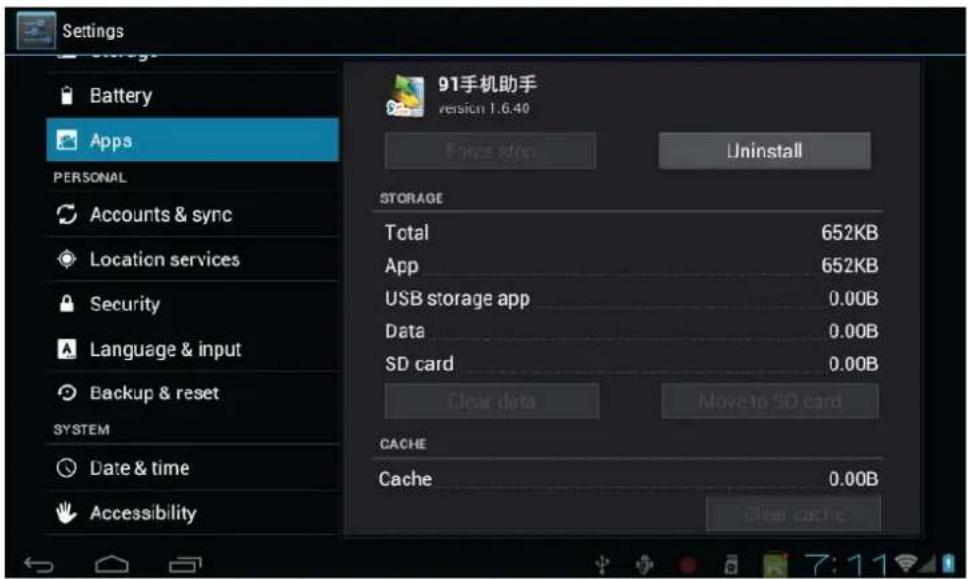
- Manage: Click settings and Choose APPS
- Click the APPS, Choose the file you want to cancel software
- Click the software, uninstall the software.
- Exit: Go back to the main interface.
Note: All installed applications will be shown in application list menu. Here applications include games, chatting TM, internet browser, media player, system tool, etc.
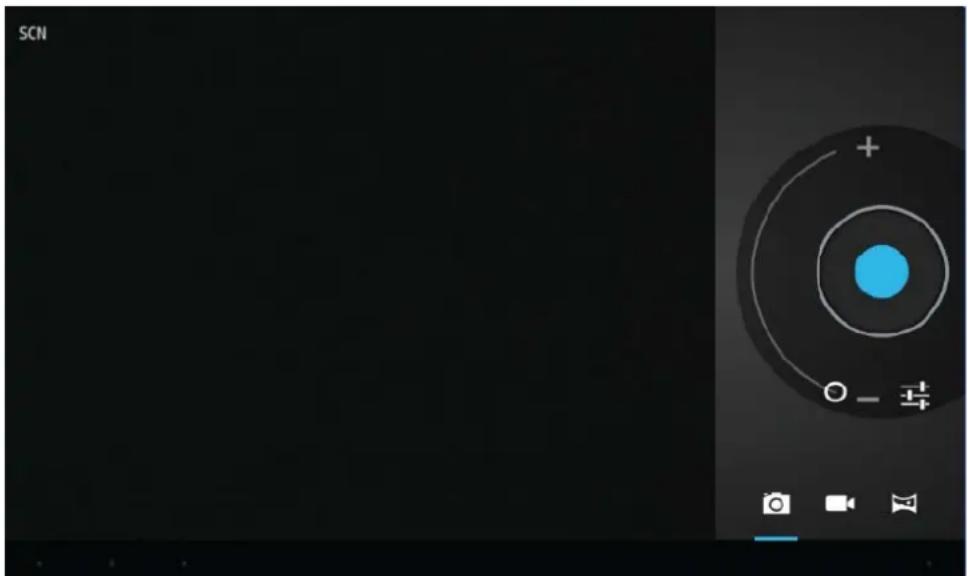
13. Camera And Photograph:
This machine is equipment with camera in the front, you can take photograph and record video clips.
natural_image
Digital camera control panel interface showing concentric rings and adjustment controls (no readable text or symbols)- Click on the applications tab to display all applications, then click "take photos" or "camera shooting" into the shooting model.
- Before filming, you can click on camera's work environment to have associate setting, like: white balance, photos size,
photo quality, point mode etc.

- Click on button to start or end shooting.
- The photographs or video can be previewed in the preview window.
- If you want play the video you recorded, turn on the video player and choose which video you want to play.
- If you want to see the photograph you taken, turn into the photo model, and choose which pictures you want to see.
Sharing with screen shot: You can now share what's on your screen. More easy by taking screen shots
(Hardware buttons volume down and power key let them snap a screen shot and store it locally.)
\ System Settings:

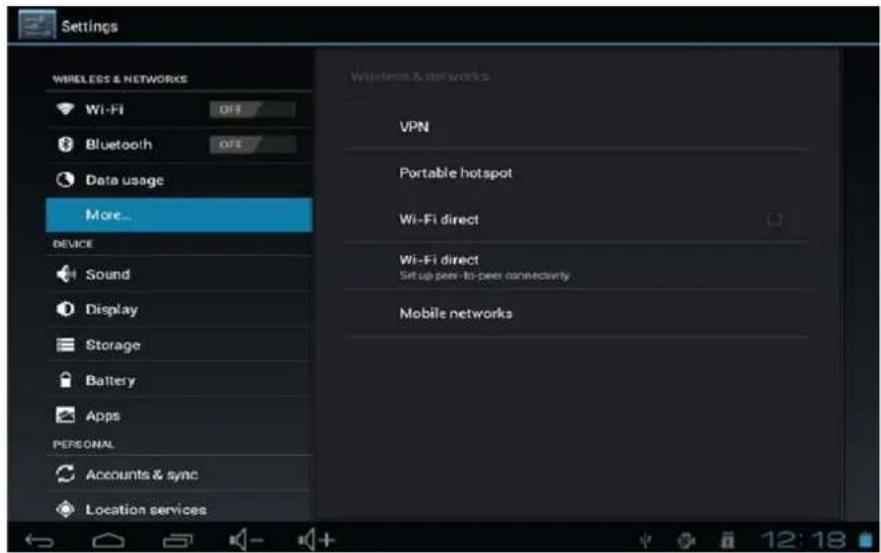
Click setting icon 📄 to enter system settings, then you can change wireless & networks, sound, display, location & security, Applications, accounts & sync, Privacy, Storage, language & keyboard, voice input & output, and date & time.
- Wi-Fi: WLAN on/off: Select this check box if you prefer to use WLAN for your data connection. WLAN settings: Open the WLAN settings screen; select it from the network list. Provide your username or password if required.
2) Data Usage: It provides a graphical representation of the data usage for a specified Data Usage cycle through Mobile Internet or Wi-Fi.
3) More VPN:
VPN stands for Virtual Private Mode. Using this feature, you can connect to your private network through a public network in a secured way. You can add a VPN connection, customize it as per your requirement and then save the settings. Once the network is created, select the network again to connect to it.
Portable hotspot:. Using hotspot, you can share your mobile network with other wifi enabled devices.
Mobile network
- Select data roaming capability.
- Select a wireless operator network - Scan for all available networks, or select a network automatically.
- Add or edit network Access Point Names (APNs) - Do not change this setting unless advised to do so by your wireless operator.
4) Sound Setting: You can adjust Volume, Screen locks sound, and touch sound.
5) Display Setting: You can adjust Brightness, Auto-rotate screen, Animation, Sleep mode, Wallpaper, Font size, Accelerometer coordinate system. Screen adaption.
6) Storage Setting: In this setting, you can check storage use and Mount & Erase TF cards.
Notice: Before you fetch out TF Card (if you have inserted TF card), please Unmount TF card first, in case that some applications will arise problems.
7) Battery: It gives you the current battery level, along with the distribution of battery consumption by different apps.
8) Applications Setting: You can manage applications here, and check storage & battery usage.
Notice: If you want to install applications which are not downloaded from Google Android Market, you should turn on Unknown sources in advance.
9) Accounts & Sync Setting: In this setting, you can manage accounts in the device.
10) Location service: In this setting, you can set up Google location service And Location & Google search; Location & Google search can help to improve search result and other services in Google
11) Security Setting: In this Setting, you can set up screen lock and device administrators, owner information, Credential storage setting.
12) Language & Input Setting.: In this setting, you can change the language of system, and choose keyboard inputs.
Notice: If you have installed an input and you want to use it, please remember to turn on it in this setting
(All inputs could be turned on here). Long Press the blank where you want to type, there will be popup to choose inputs.
13) Backup and restore: In this setting, you can back up data, and reset factory default.
14) Date & time Setting: In this setting, you can adjust date and time.
15) Accessibility: These are certain special features which help people with certain disabilities. Large text: The font size throughout the phone can be increased or decreased for better view ability for the user. Power button ends call: Calls can be ended with the power button on selecting this option. Touch & hold delay: It's the time taken to recognize a particular selection. Install web scripts: it installs scripts from Google that makes teir web content more accessible. Flip mute: On flipping the phone, your phone will go on mute.
16) Developer options:
- USB debugging: Select to connect your device to a PC by using a USB cable.
- Stay Awake: Screen will never sleep while charging.
- Allow mock locations: Allow mock locations and service information to be sent to a Location Manager service for testing.
17) About Tablet PC: Check device information.
\ FAQ
- How can I change languages if I mistakenly choose an unknown language?

- Find setting icon
in Menu Page to enter Settings.
- Then, choose icon setting.

to enter language & keyboard setting, the first option is language
- How can I change input when I am typing?
- Long Press the blank where you are typing, there will be popup to choose inputs.
- I already installed some applications, but I cannot find them now, why?
- By default, some applications are installed in external TF card, so if you fetched out the TF card from the device,
you will not see these applications.
-
The Slide cannot be turned on.
-
Check the battery and charge it if there is no power.
- Connect the Slide to AC Adapter.
-
Contact the seller if the Slide still cannot be turned on after charged.
-
There is no voice in the earphone.
-
Check if the device is in Mute mode.
- Check the volume setting in case it is 0.
-
Check the connection of earphone.
-
Why I cannot install applications?
- Please check Settings – Applications, make sure Unknown sources is chosen.
-
There is Error Codes on the screen.
-
System error, restart the device.
- The language you are browsing is not supported by built-in languages, please contact the original manufacturer to debug.
\ USB 3G Dongle Connectivity
Connect the right 3G DONGLE to Micro USB with bundled OTG
Go to Settings> Wireless & Networks > Mobile networks.
Select the Data enable & Data roaming
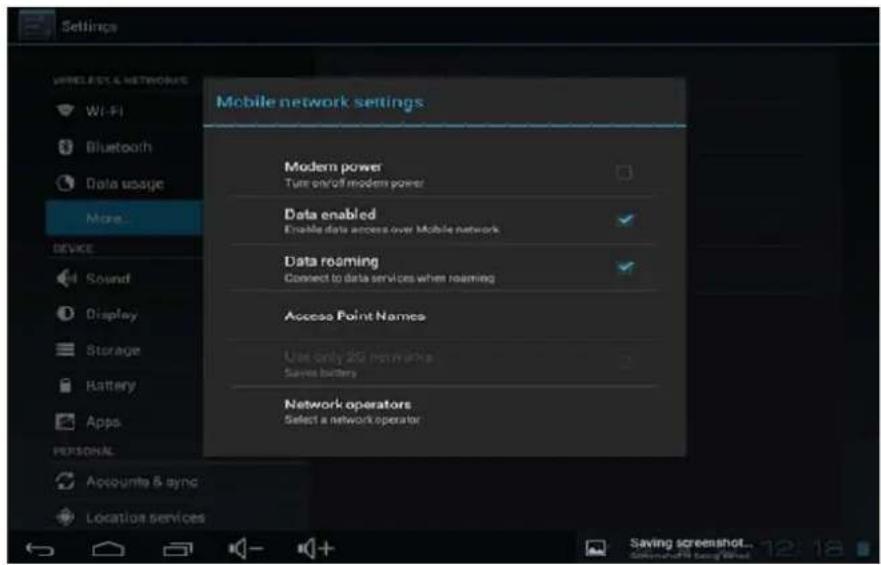
Select the below option "Access Point Names "Please click on this (marked) icon.
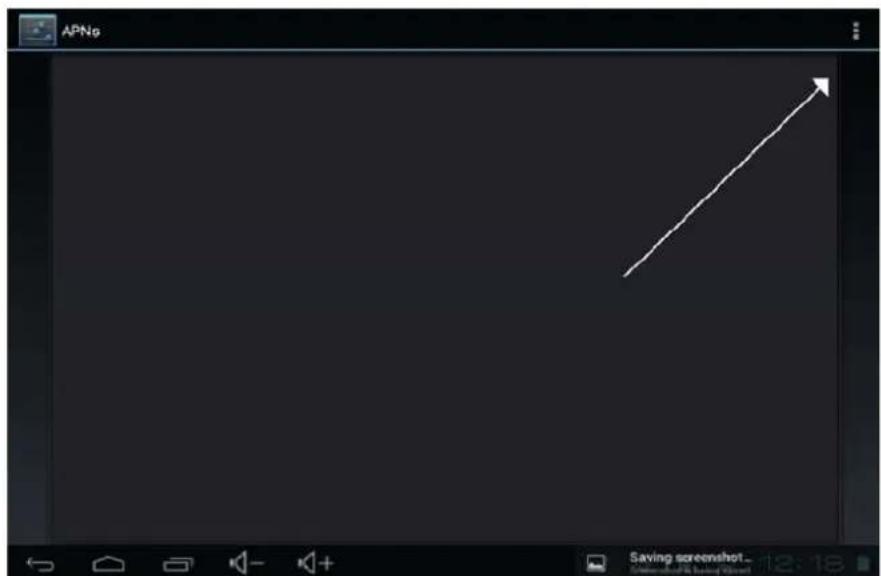
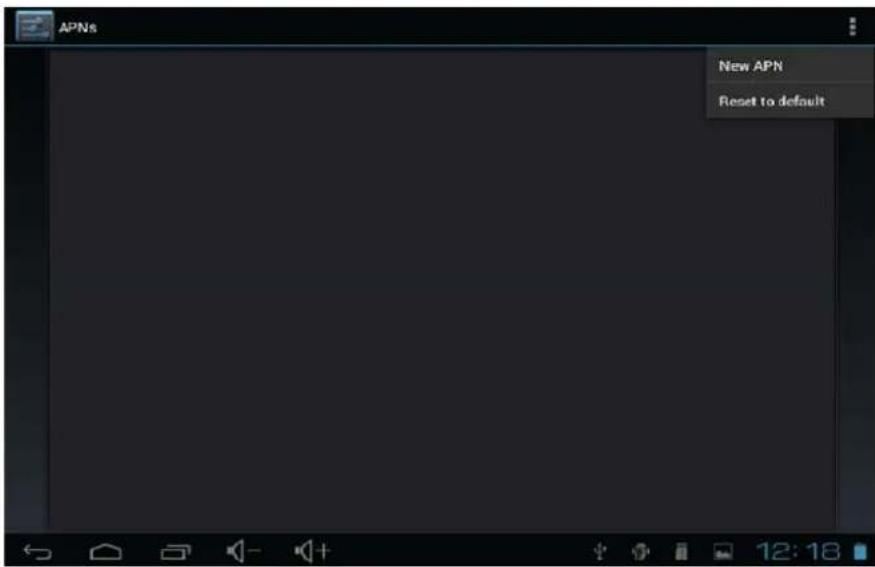
You will get the option of "New APN" click on it.
Type the Name of Service Provider in "Name" option.
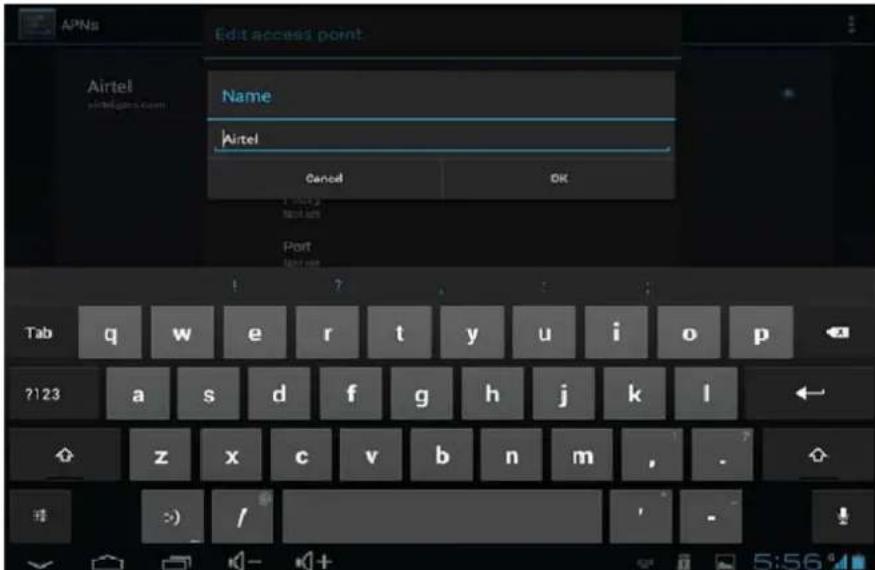
Type the APN of service provider in "APN" option. Confirm the APN from your Service Provider.
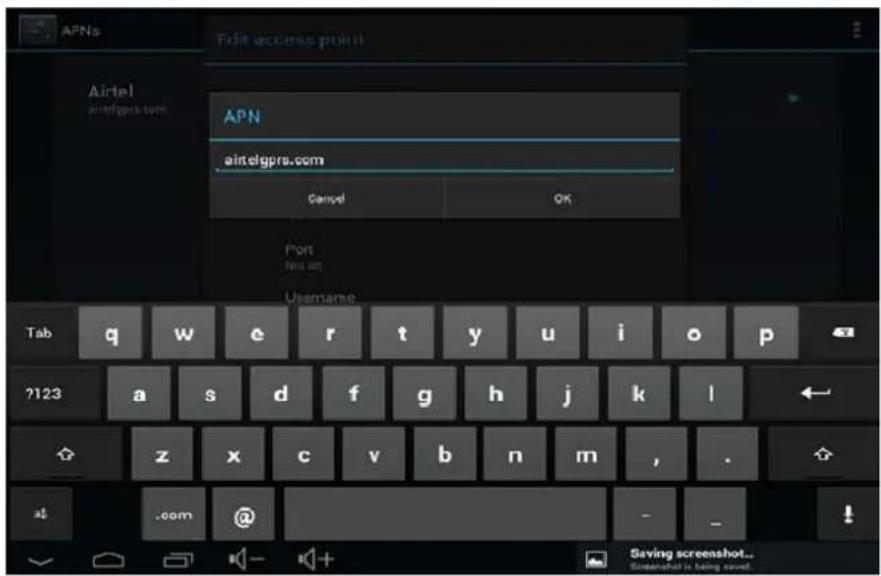
After Save the Name & APN select the by the right option
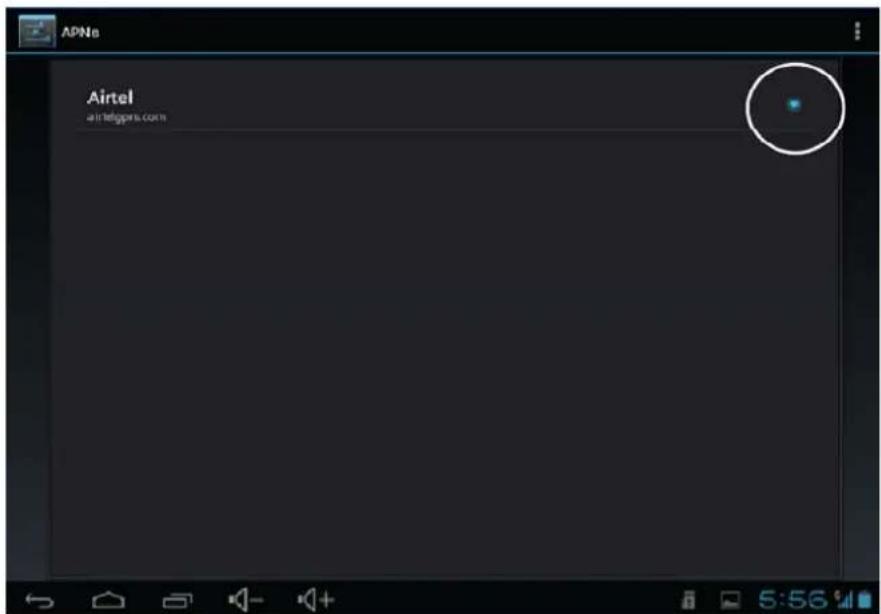
The right bottom corner you will able to see the strength of your network. Now you are able to access the Internet.
DECLARATION OF CONFORMITY
GLOBAL WOLDER GROUP S.L, Polígono Industrial de Barros nº29, 39408 Barros, Cantabria. España, certifies that this product, referenced as miTab SKY, complies with the provisions of the Directive 99/05/CE about Radio Equipment and Telecommunications Terminal (R&TTE), and the Directive 2004/108/CEE of Electromagnetic Compatibility standards in accordance to harmonized standards.
CE
armazenamento USB.
- Clicar no ícone

natural_image
Digital camera interface showing a circular dial with concentric rings and a blue center, no readable text or symbols on the dial itself.www.wolderelectronics.com